

Page 1
Digital Trail Camera
w/Night Vision
Lit# 93-0587/04-11
Instruction Manual
Manuel d'instructions
Manual de instrucciones
Bedienungsanleitung
Manuale di istruzioni
Manual de instruções
Model#: 119215/119215CM
Page 2

Page 3

3
Page Index
Introduction 5
Parts Identication 6
Battery and SD Card Installation 8
Camera Setup 9
Setting the Year, Date & Time 9
Setting Camera/Video Mode and Resolution 10
Setting the Delay Time 11
Checking the # of Stored Photo/Video Files 12
Formatting the SD Card 12
Camera Operation 13
Mount the Camera 13
Power on the Camera 13
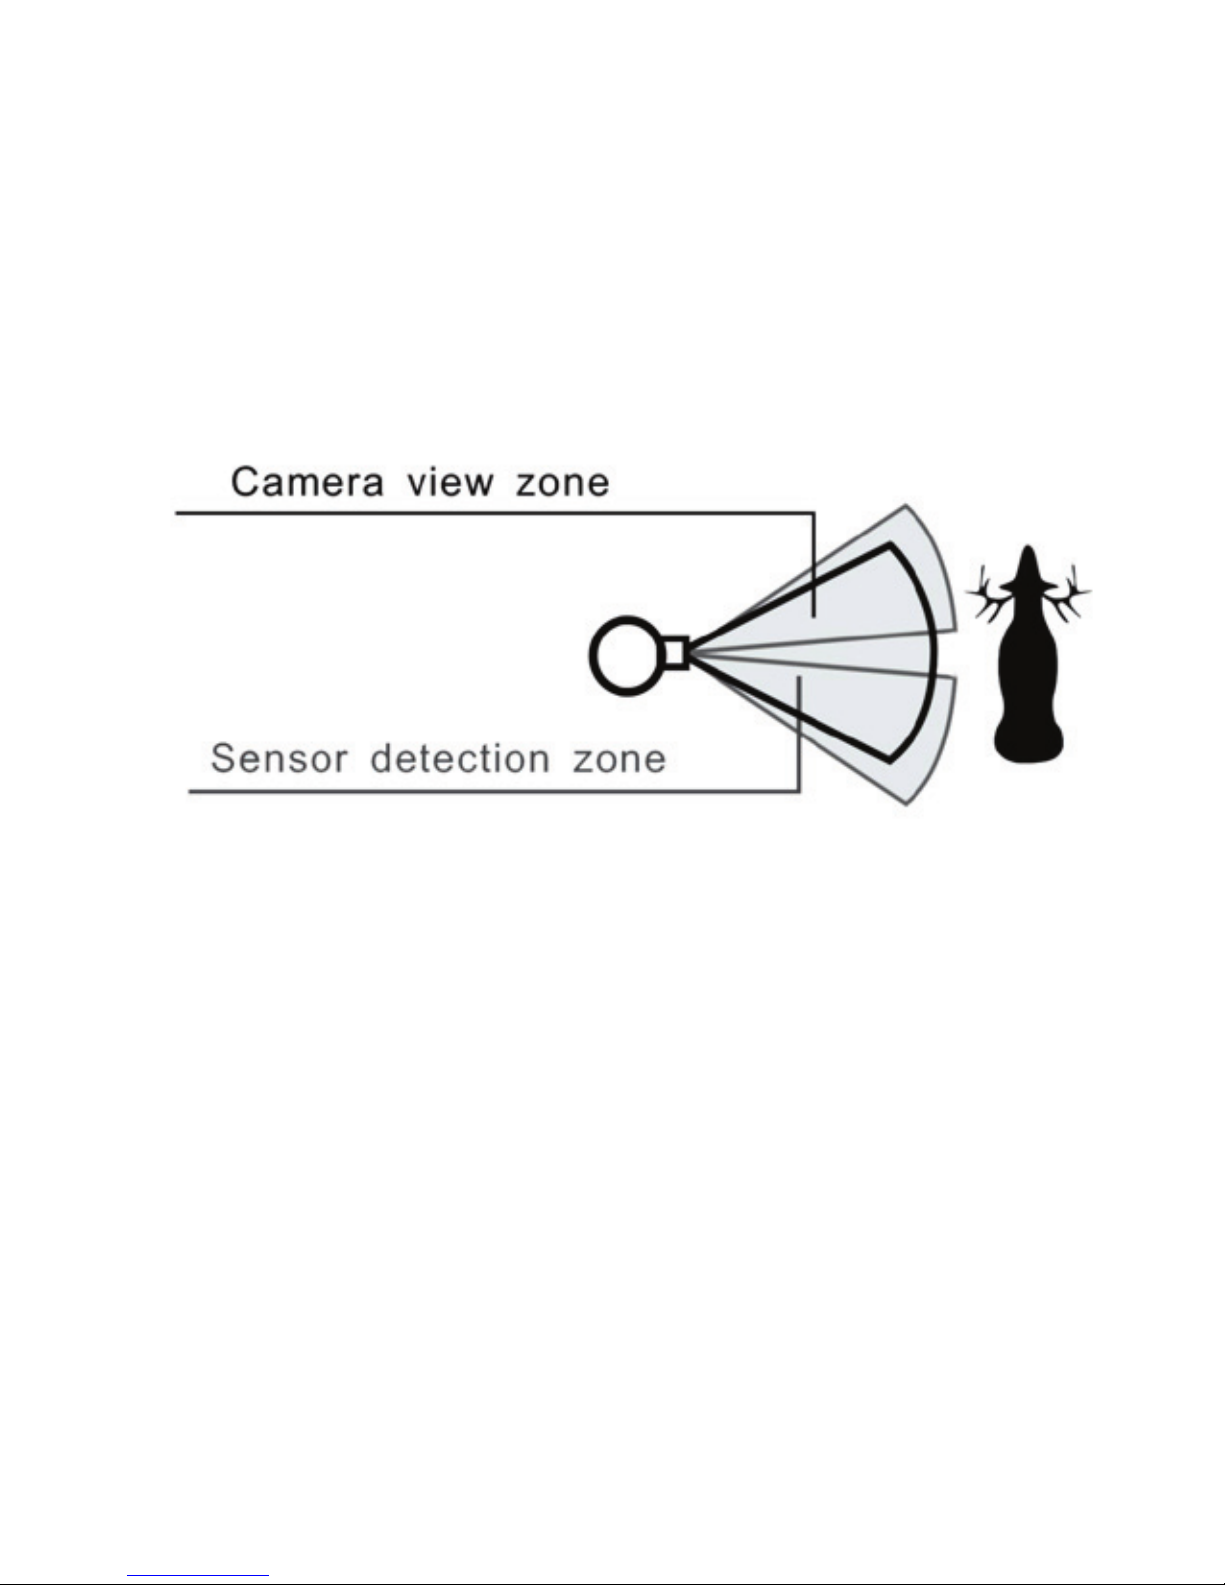
Test the Coverage Area 14
Secure the Camera 14
Viewing the Photos and Videos 15
Glossary 16
Specications 17
Troubleshooting/FAQ 18
English
Page 4

4
IMPORTANT NOTE
Congratulations on your purchase of one of the best trail cameras on the
market! Tasco is very proud of this little unit and we are sure you will be
pleased with it as well. We appreciate your business and want to earn
your trust. Please refer to the notes below and the instructions in this
manual to ensure that you are completely satised with this product.
If your Tasco Trail Cam does not seem to be functioning properly
or if you are having photo/video quality issues, please check the
Troubleshooting/FAQ section on pages 18-21.
Problems are often due to something simple that was overlooked, or
require only changing one setting to solve.
If your problem continues after trying the solutions in the
Troubleshooting/FAQ section, please call Tasco Customer Service at
(800) 423-3537. In Canada, call (800) 361-5702.
Tasco recommends using 4 Energizer® Lithium AA batteries in this
Trail Cam to obtain maximum battery life.
Tasco recommends using SanDisk® SD and SDHC Cards
(up to 16GB capacity) in this Trail Cam.
Page 5

5
INTRODUCTION
Congratulations on your purchase of the Tasco 119215 digital trail
camera. This trail camera is designed to record the activity of wildlife in
the outdoors with its still image and movie modes and weatherproof,
rugged construction. This trail cam model features a compact, portable
size and an extra long battery life.
Main Features:
• 2.1MP digital sensor
• Compact Size (120mm*94mm*46mm)
• Long Battery Life (Up to 6 months)
• Trigger Time=1.6 second
• Automatic IR Filter
• LCD Display
• 15 Night Vision LEDs
• Adjustable Photo Delay: 5~ 59 second ,1~ 10mins (default 10S)
• Multiple Shot Mode (3 images per trigger)
• 640*480 at 30 FPS Videos
• Supports up to 16 GB SD Card
• Date, Time & Moon Phase Imprint
• Auto Exposure
• Auto White Balance
• Power Supply: 4 AA Cell batteries
• Mounting Socket for Standard Tripods
• Weatherproof
Page 6
6
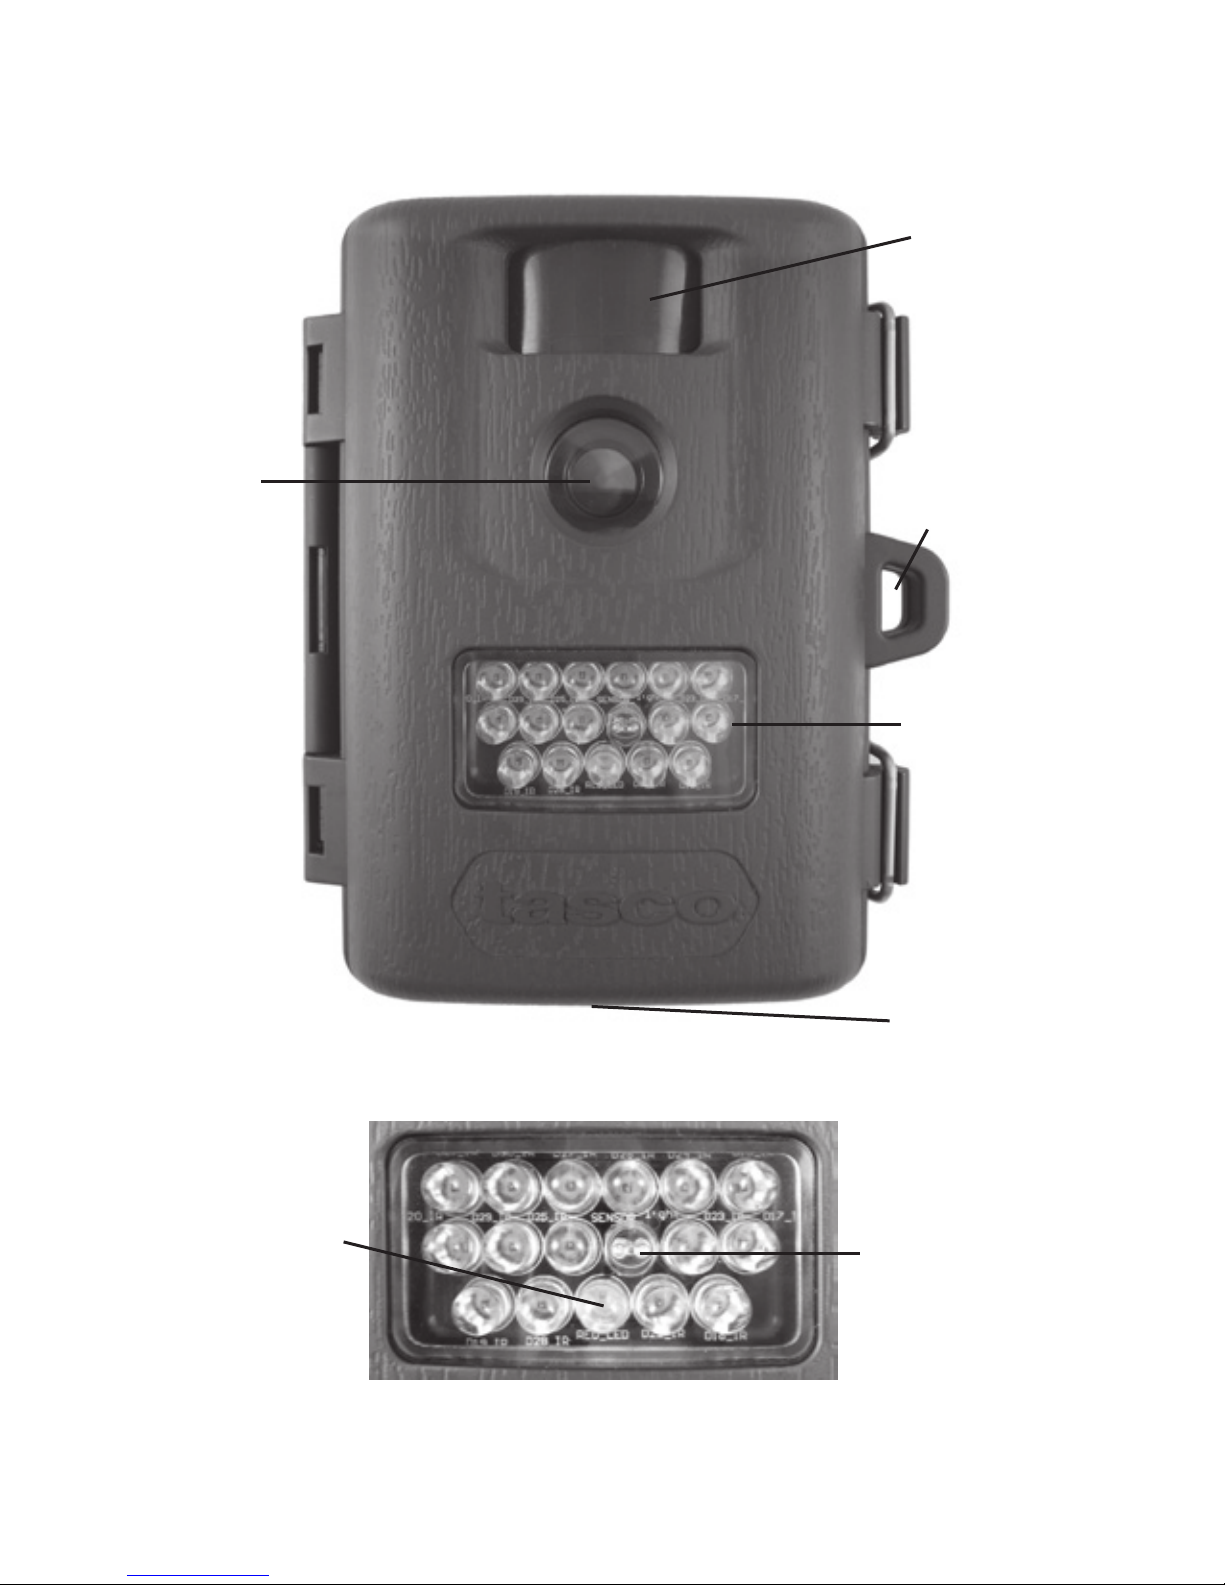
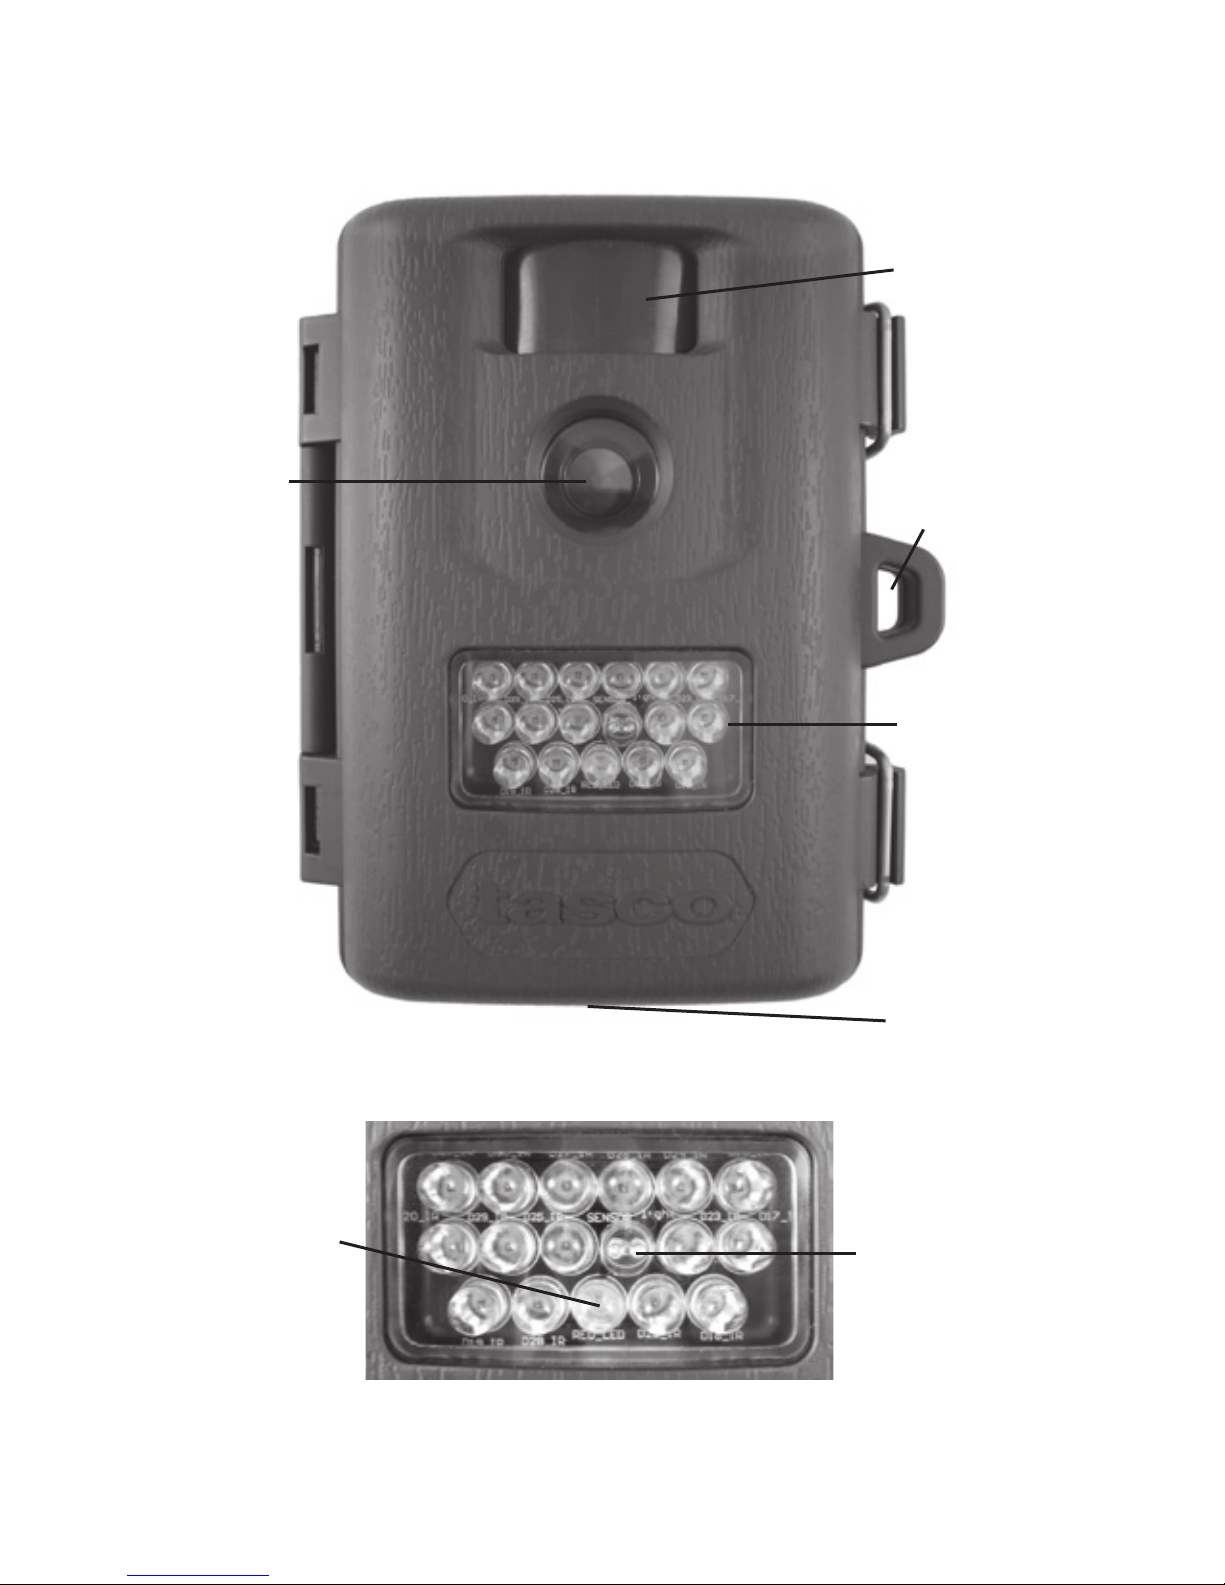
Parts and Controls Guide
Front of Camera
Camera
Lens
Infrared
LED Array
PIR Motion
Sensor
Tripod
Socket
Padlock
Hole
IR LED Array Detail
PIR
Indicator
(Setup
Mode
Only
Light
Sensor
Page 7
7
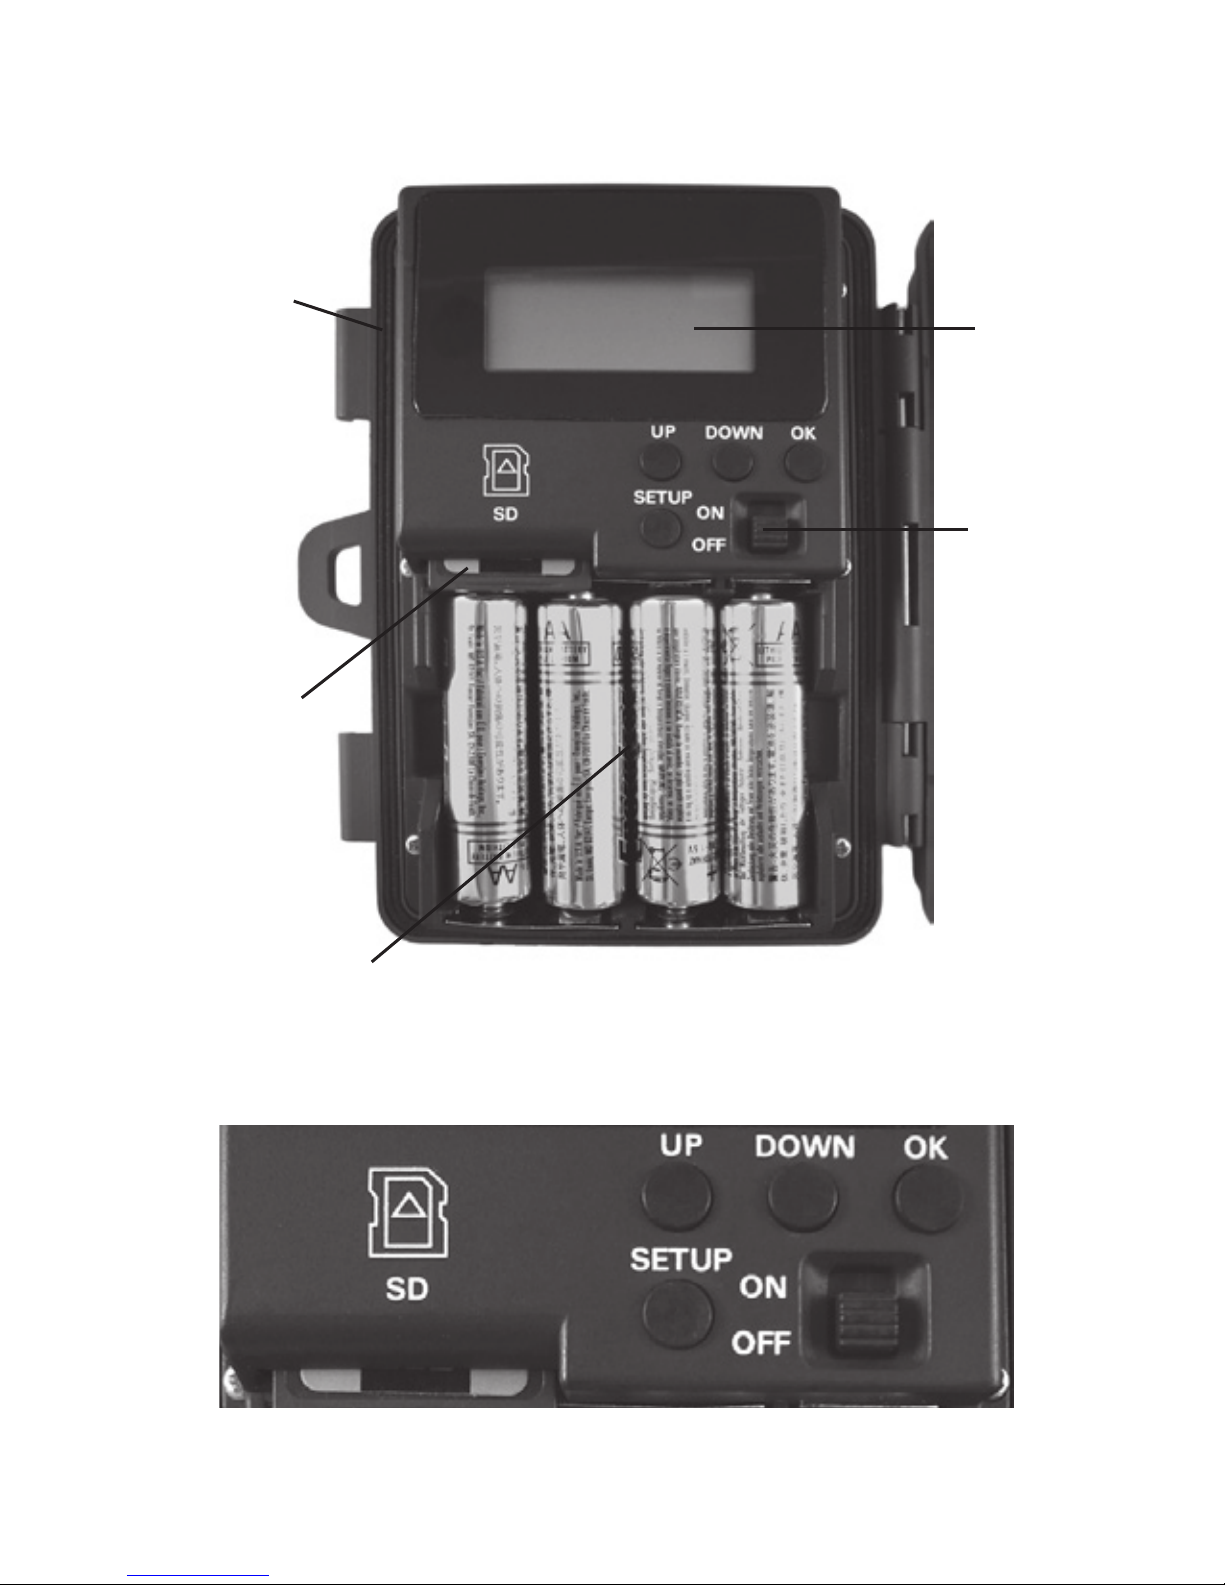
Control Panel Detail
Parts and Controls Guide
Control Panel
(Front Opened)
Power
Switch
USB Port
LCD
Display
SD Card
Slot
Battery
Compartment
Page 8

8
BATTERY and SD CARD INSTALLATION
The Tasco 119215 Digital Scouting Camera is designed to operate using
4 AA batteries. We recommend using Lithium (for longest life) or Alkaline
batteries.
NOTE: Always set the power switch to the OFF position when installing or
removing batteries.
Please make sure the batteries are inserted correctly, as indicated inside
the battery compartment. Incorrect voltage or polarity (+/-) will damage
the camera.
Memory
Your 119215 Digital Scouting Camera has a memory card slot, to accept
SD cards up to 16GB max. capacity (sold separately).
Inserting an SD card
Make sure camera is in the OFF position whenever adding or removing
memory.
Insert an SD card into the card slot completely and oriented correctly
as shown by the icon under the SETUP button (contacts facing up and
notched corner on the left).
To remove the SD memory card, depress the SD card and pull out the card
gently.
Using a new, blank SD card is recommended. If the SD card has been used
in another device, please make sure to format using the Format option
in the trail camera’s Setup menu before you set the camera to capture
photos/videos. New cards are ready to use straight from the package.
Page 9
9
CAMERA SETUP
The initial setup process for your trail camera is very easy. Turn on the unit
and then press the “SETUP” button. The display icons/indicators (shown
below) will blink in turn to indicate which type of setting you are making,
beginning with “DATE”. Press “UP” or “DOWN” to go to the next setup
item. Press the “OK” button to con rm a speci c menu setting when it is
blinking. After you have completed making the settings for all menu items
(or after going back in to change a setting for just one item), press “SETUP”
again to exit setup mode.
1. Setting the Date, Year and Time
Follow the steps below to set the Date, Year and Time so they will be
correct when they are imprinted on your photos:
Set Date and Year
• First, move the Power Switch to the “ON” position, and then press the
“SETUP” button.
• The “DATE” indicator (#1) will be blinking. Press “OK” to con rm you
want to set it.
• The rst two digits of the 4 digit display (#3) indicate the month
(MM) and the last two digits indicate the day (DD).
• Press “UP” or “DOWN” to select the month between 01-12, Press “OK”
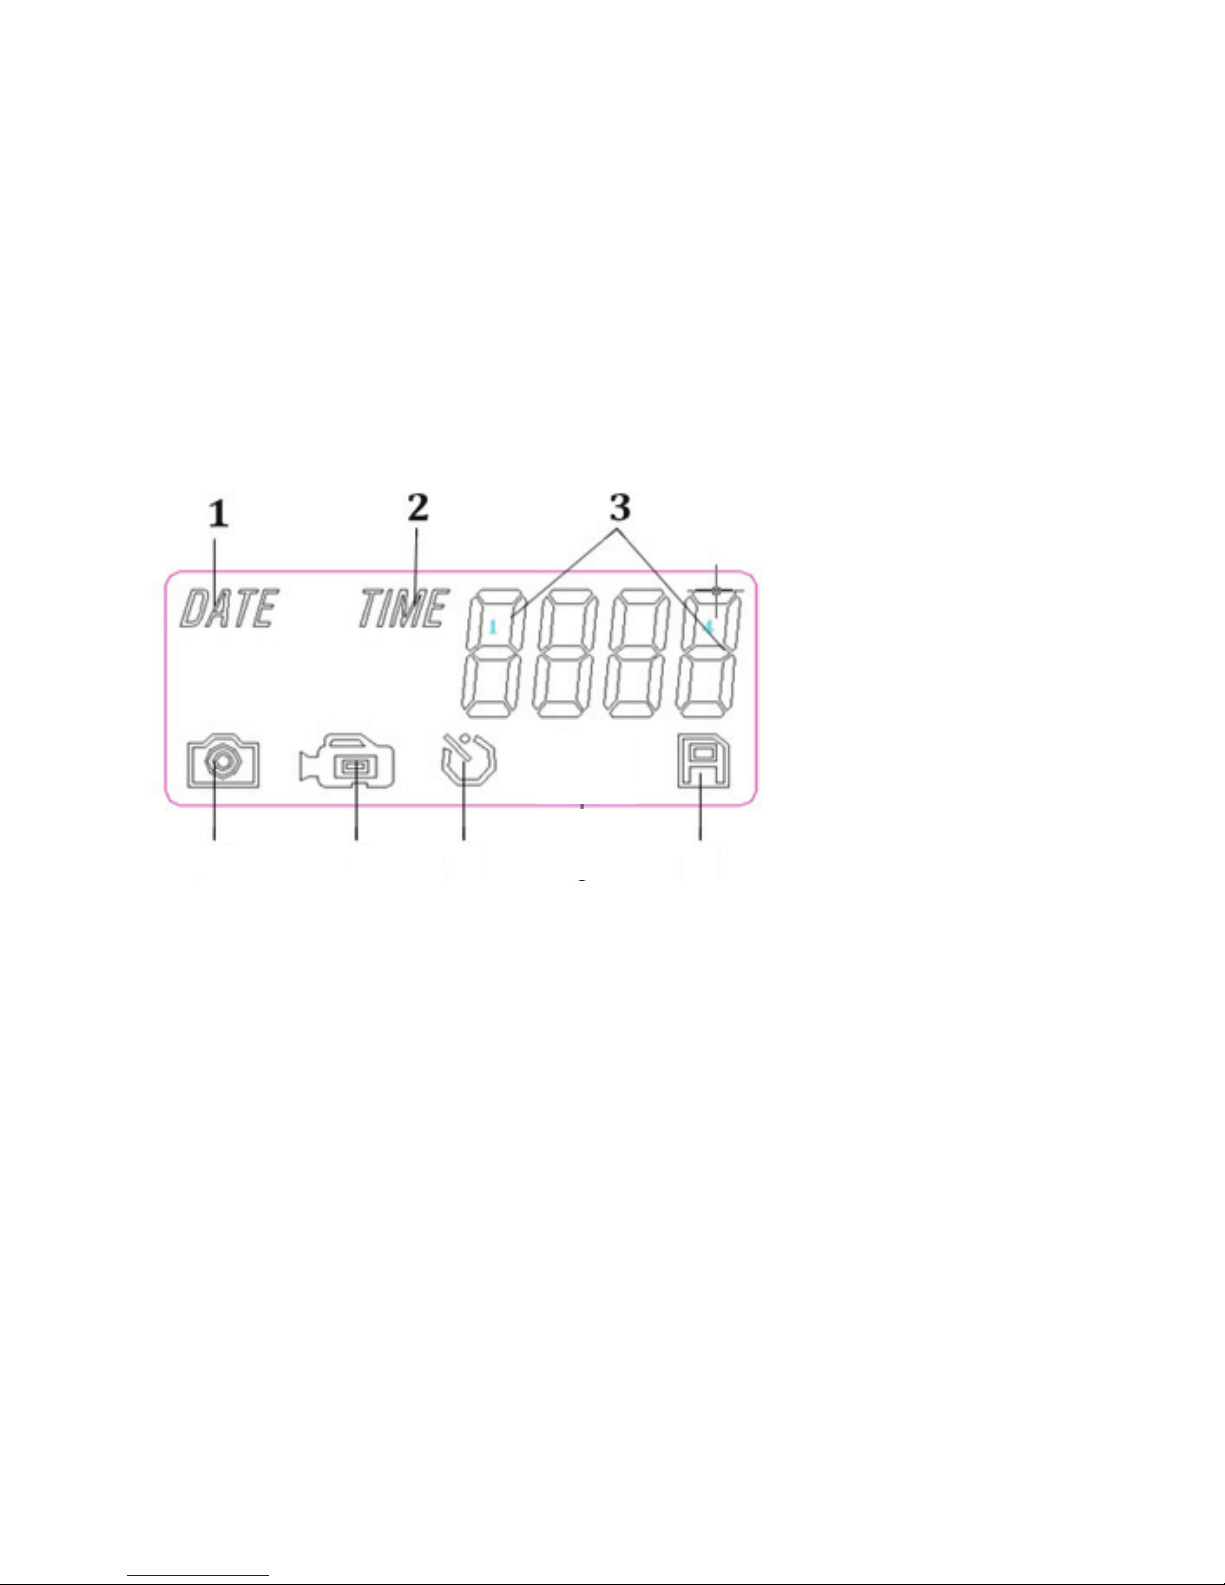
Setup Icons- Display Guide
1. Date
2. Time
3. 4 Digit Display
4. Still Photo Mode /
Resolution
5. Video Mode
6. Delay Time
7. SD Card
7
4
5 6
Page 10

10
to conrm the month setting you’ve made. Next, set the Date:
• Press “UP” or “DOWN” to select a date between 01-31, Press “OK” to
conrm. Next, set the Year:
• Press “UP” or “DOWN” to select a year between 10-30 (2010-2030),
Press “OK” to conrm.
Set Time
• The “TIME” indicator (#2) will blink next (after you conrm the DATE/
YEAR settings). Press “OK” to conrm you want to set it.
• The rst two digits of the 4 digit display indicate the hour (HH) and
the last two digits indicate minutes (MM).
• Press “UP” or “DOWN” to select an hour between 00-23 (00=midnight,
12=noon, 23=11PM), Press “OK” to conrm. Next, you are ready to set
the minutes.
• Press “UP” or “DOWN” to set the minutes between 00-59, Press “OK”
to conrm.
Note: The Date & Time setting will normally be retained for a few minutes
when the batteries are removed from the camera. However, you may need
to reset the Date & Time after replacing the batteries, if they have been
removed for a longer period of time.
2. Setting Camera/Video Mode and Resolution
This item allows you to select whether the camera takes still photos or
shoots video clips when the PIR is triggered (Photo or Video Mode). You
can also set the number of photos the camera takes for each PIR trigger
(for Photo Mode only). Available settings are 1P, 3P, or video mode.
• The “PHOTO/VIDEO” indicators (#4 & #5) are now both blinking
(alternating). Press “OK” to conrm you want to set the capture
mode.
• Press the “UP” or “DOWN” button to select the Photo or Video mode
icon (only the mode you select will be blinking).
CAMERA SETUP (continued)
Page 11

11
CAMERA SETUP (continued)
If you select the “Photo” mode icon (#4) then press “OK”:
• The LCD will blink the alternating indicators “1P” (single photo taken
per trigger event) and “3P” (sequence of 3 photos taken per trigger
event). Press “UP” or “DOWN” to select the setting you prefer, then
press “OK” to conrm.
• Next, the LCD will display “LoHI” which sets the resolution for the still
photos. “Lo” represents 2.1MP (the resolution of the sensor) and “HI”
represents is 5.0MP (via software interpolation-the photo quality will
be higher, but each le will use up more space on the SD card). Press
“UP” or “DOWN” to select the resolution you prefer and press “OK” to
conrm.
If you select the “Video” mode icon (#5) then press “OK”:
• The movie length is preset at 15 seconds and cannot be changed.
There are no additional settings or options for Video Mode.
After pressing “OK” (when you nish selecting the settings for one/three
photos and resolution if you chose “Photo” Mode), the “Delay Time” icon
(#6) will blink next.
3. Setting the Delay Time
The Delay Time menu item allows you to set the interval that the camera
will sleep before accepting a new PIR trigger, in minutes and seconds. This
setting ranges from 1 second to 10 minutes. The default delay time is 10
S.
• While the Delay Time icon (#6) is blinking, press “OK” to conrm you
want to set it.
• The LCD will display “0010”, with rst the two digits indicating
minutes and the last two digits indicating seconds.
• While the rst two digits are blinking, press “UP” or “DOWN” to change
the minutes value (Range from 00-60 min.). Press “OK” to conrm the
minutes setting.
Page 12

12
CAMERA SETUP (continued)
(Only) if you selected “00” for the minutes setting, the last two digits will
blink ,and you can set a delay time in seconds (this is not available if you
selected from “01” to “60” minutes).
• Press “UP” or “DOWN” to change the value (Range from 05-59
seconds), press “OK” to conrm.
Next (last item in the Setup menu), you will see the SD card icon (#7) blink.
You can now check the number of les on your SD card, and format it if
desired.
4. Checking the # of Stored Photo/Video Files
• While the SD Card icon (#7) is blinking, the total number of les stored
on the SD card will be seen on the 4 digit Display (#3). This allows you
to conrm if this is a new card or one you have used previously (and
may wish to format).
• Press OK-this will take you to the “Format Card” menu item next.
5. Formatting the SD Card
• With the SD Card icon (#7) blinking (after pressing OK at the end of
the previous Setup step), press “UP” or “DOWN” to select “FO” (Yes,
Format) or “NO” (Do Not Format) then press “OK” to conrm your
choice.
• Press “UP” or “DOWN” to select “Y” (Yes) or “N” (No), then press “OK” to
conrm. This step provides an extra level of safety, to help prevent
you from accidently formatting a card with les you wanted to keep.
If you select “FO” in the rst step, then select “Y” and press “OK”,
the camera will format the SD card-all les on the card will be
erased.
Exiting the Setup Menu
Once you have nished using the Setup menu, press “SETUP” to save all
your settings, and exit the Setup menu. You are now ready to take your
Trail Cam outside and begin using it to record wildlife activity.
Page 13

13
CAMERA OPERATION
Once your camera has been setup, you are ready to begin using it to
capture photos of wildlife activity in the area you choose to locate it. Just
follow these steps:
1. Mount the Camera
It is recommended that you mount the camera about 4 or 5 feet (1.2~1.5
meters) o the ground, with the camera pointed at a slight downward
angle. It’s best to avoid mounting the camera facing east or west as the
rising and setting of the sun could produce false triggers and overexposed
images. Clear branches and other debris away from the front of the camera
so as not to block the camera lens or PIR sensor.
To mount the camera in place, insert the strap through the strap slots on
the rear housing. Wrap the strap around the mounting surface. Secure the
strap and tighten the buckle in order to secure the camera.
Make sure that both door latches are securely locked in place, to ensure
proper weather resistance.
2. Power On the Camera
The camera will be in “sleep” status after it has been powered on. When
the PIR sensor is triggered, it will start to take photos immediately after the
delay time (as set) has passed.
3. Test the Coverage Area
One of the 119215 Trail Camera’s most useful features is the ability to test
the coverage area.
After mounting the camera, open the front housing and slide the “Power”
switch to the “ON” position. Press the SETUP button to enter the MENU
mode .
Adjust the PIR sensitivity dial to your preference based on conditions.
Page 14
14
The PIR indicator light below the lens will blink when you have entered
the coverage area.
Adjust the camera position as needed and repeat the test until the desired
coverage area is achieved.
Press the SETUP button again when you are nished using the test modethe camera will be “sleeping” and waiting for the PIR sensor to trigger the
rst photo or video capture.
4. Secure the Camera
A standard padlock may be used in the camera’s lock hole to secure it and
prevent theft.
CAMERA OPERATION (continued)
Page 15

15
VIEWING THE PHOTOS and VIDEOS
After your camera has been operating for awhile, you will of course want
to review the photos and/or videos it has been capturing. This can be done
by either of two methods, according to your preference or the availability
of accessory equipment:
Using an SD Card Reader
Push the SD card in slightly to release it then pull it out gently.
Put the SD card into any of the widely available SD card readers (either
a dedicated SD card reader or “multi-card reader” that features slots for
several dierent memory cards, including SD cards.
Follow the card reader supplier’s directions to view or download the photo
and/or video les on the SD card.
Connect the Camera to PC directly
Slide the “Power” switch to the “On” position, then press the “SETUP”
button.
Connect your camera to a PC with a USB cable (included, 5-pin mini
“B” to standard male type “A”). The PC will recognize the camera as an
external storage device, using the “USB Mass Storage” standard (no driver
installation necessary-not compatible with Windows 98 or earlier). The
PC will display a new disk symbol under “My Computer” or in Windows
Explorer, and you will see a dialog window on your desktop with several
options to view, move, or copy the photo and video les that are stored on
the SD card. The camera’s LCD will display “STO”, meaning the camera is in
mass storage mode.
USB cable
connectors
From Camera To PC
Page 16

16
PIR (Passive Infrared Sensor): Senses motion like a typical security motion
detector. Requires infrared energy (heat) in addition to motion to trigger
the sensor to help limit detection to live animals (rather than leaves, etc).
Camera Delay: Time elapsed between photos while events are sensed
and recorded. You should set this based on wildlife activity in the area.
Moon Phase: The activity level of some animals seems to be related to the
phases of the moon. The trail cam has a feature which imprints a moon
phase stamp on each photo for reference.
IR Flash: Also called IR LED Array. This is a “night vision” feature, which
emits a burst of infrared light, invisible to the human eye. Especially useful
for night photos when a visible ash may be undesirable.
Battery Life: Time that camera will function in the eld. Dependent on
ambient temperature, number of images taken and number of times the
IR ash res. When the battery voltage drops below 4.5v, the IR ash stops
ring. When battery voltage is below 3.5v, the camera stops working.
Burst: The number of pictures the camera takes per PIR trigger.
1P: Single image captured for each PIR trigger
3P: Three image sequence captured for each PIR trigger
FULL: When memory capacity is full, the LCD display indicates “FULL”
Mass Storage: Connect a USB cable to a computer, press the “SETUP”
button, and the computer can access the contents of the SD card. The
camera is automatically recognized as an “external drive”, without the
need to install special drivers. (Win 98 and older operating systems are not
supported. Mac OS9 and OSX are also compatible-the camera will appear
on your desktop as an external storage device or “disk”).
GLOSSARY
Page 17

17
Technical Specications
Model Number 119215
Image Sensor Type 1/2 Inch CMOS
Eective Resolution 2.1 Megapixels
Eective Focal Length 7.6 mm
Lens Aperture f/2.8
IR Filter Automatic IR Filter
Display Backlit LCD
PIR Sensor Yes
Trigger Speed 1.6 second
Number of IR LED 15 LEDs
Max Night Vision Lighting Distance 30 feet (10 meters)
Storage SD Card up to 16 GB Capacity
PIR Indicator Yes (Setup mode only)
Adjustable Delay Time Range 5~ 59 second, 1~ 10mins (default 10S)
Selectable Image Resolution 2.1MP, 5.0MP
Multiple Image Mode Yes-3 photos
Video Resolution
Movie: AVI 640 x 480 pixels @ 30 fps (15
seconds).
File Format (Image/Video) JPEG/AVI
Date Time Imprint Yes
Moon Phase Imprint Yes
Exposure Auto
White Balance Mode Auto
Power Supply
4 AA Cell batteries (alkaline, lithium or
NiMh)
Water Resistant Yes
Page 18

18
Battery life is shorter than expected
1. Battery life will vary with operating temperature and the number
of images taken over time. Typically, the Trail Cam will be able to
capture several thousand images before the batteries die.
2. Check to make sure you have used new alkaline or lithium
batteries. Tasco recommends using 4 Energizer® Lithium AA
batteries in this Trail Cam to obtain maximum battery life.
3. Make sure that the power switch was turned to the “On” position
and that the camera was not left in “Setup” mode while in the
eld.
4. Make sure that you are using a good quality name brand SD card
in your camera. Tasco recommends SanDisk® brand SD Cards up
to 16GB. Our experience indicates that poor quality SD cards can
sometimes reduce your Trail Cam battery life.
Camera stops taking images or won’t take images
1. Please make sure that the SD card is not full. If the card is full, the
camera will stop taking images.
2. Check the batteries to make sure that they are new alkaline or
lithium AA batteries. See note above about short battery life.
3. Make sure that the camera power switch is in the “On” position
and not in the “O” position or in “Setup” mode.
4. Make sure that you are using a good quality SD card in your
camera. Tasco recommends SanDisk® SD Cards up to 16GB.
5. If the SD card has its write protect switch in the lock position, the
camera will not take images.
6. If you have used an SD card in another device before inserting
it in your Trail Cam, you might want to try formatting the card
using the “Format” parameter in Setup mode (make sure you
have backed up any important les rst, as formatting will erase
all previous les). In some cases, other devices may change the
formatting of the SD card so that it will not work properly with
the Trail Cam.
Troubleshooting / FAQ
Page 19

19
Camera won’t power up
1. Make sure that you have installed all 4 batteries in the battery
compartment. Tasco recommends using 4 Energizer® Lithium
AA batteries in this Trail Cam.
2. Make sure that the batteries are installed correctly, observing
proper polarity. Always place the negative (at) end of each battery
in contact with the spring side of its slot inside the camera.
Still Photo and/or Video Quality Problems
1. Night photos or videos appear too dark
a. Try using a set of new batteries. The ash will stop operating
near the end of the battery life.
b. You will get the best results when the subject is within the ideal
ash range, no farther than 45’ (14m) from the camera. Subjects
may appear too dark at greater distances.
c. Please note that when the Capture Number parameter is set
higher than “1P”, or with very short Time Delay settings, some
images may appear darker than others due to the quick response
and rapid retriggering of the camera, allowing less time for the
ash to fully recharge before ring again.
2. Daytime photos or videos appear too dark
a. Make sure that the camera is not aimed at the sun or other light
sources during the day, as this may cause the auto exposure to
produce darker results.
3. Night photos or videos appear too bright
a. You will get the best results when the subject is within the ideal
ash range, no closer than 10’ (3m) from the camera. Subjects may
appear too light at closer distances.
4. Daytime photos or videos appear too bright
a. Make sure that the camera is not aimed at the sun or other light
sources during the day.
Troubleshooting / FAQ
Page 20

20
5. Photos with streaked subject
a. In some cases with low lighting conditions and fast moving
subjects, the 5MP (Hi) resolution setting may not perform as well
as the 2.1MP (Lo) setting.
b. If you have multiple images where fast moving subjects produce
streaks on the photo, try the 2.1MP (Lo Res) setting instead.
6. Red , green or blue color cast
a. Under certain lighting conditions, the sensor can become
confused resulting in poor color images.
b. If this is seen on a consistent basis, then the sensor may need
servicing. Please contact Tasco customer service.
7. Short video clips—not recording to the length set
a. Check to make sure that the SD card is not full.
b. Make sure that the camera has good batteries in it. Near the
end of the battery life, the camera may choose to record shorter
video clips to conserve power.
Photos Do Not Capture Subject of Interest
1. Try to set your camera up in an area where there is not a heat
source in the camera’s line of sight.
2. In some cases, setting the camera near water will make the camera
take images with no subject in them. Try aiming the camera over
ground.
3. Try to avoid setting the camera up on small trees that are prone to
being moved by strong winds.
4. Remove any limbs which are right in front of the camera lens.
PIR Sensor LED Flashes/Doesn’t Flash
1. When the camera is in the “Setup” mode, the PIR Indicator LED on
the front of the camera will ash when it senses motion. This is for
setup purposes only and will help the user aim the camera.
2. During use, the LED will not ash when the camera takes an
image. This is to help keep the camera hidden from game.
Troubleshooting / FAQ
Page 21

21
Camera won’t retain settings
1. Make sure that you have been saving the changes to any parameter
settings that you made while in Setup mode, by pressing “OK”
after changing the setting. If you don’t save your new setting after
changing it, the camera will continue to use the original default
setting for that parameter.
Troubleshooting / FAQ
Page 22

22
TWO-YEAR LIMITED WARRANTY
Your Tasco
®
product is warranted to be free of defects in materials and workmanship
for two years aer the date of purchase. In the event of a defect under this warranty,
we will, at our option, repair or replace the product, provided that you return the
product postage prepaid. is warranty does not cover damages caused by misuse,
improper handling, installation, or maintenance provided by someone other than a
Tasco Authorized Service Department.
Any return made under this warranty must be accompanied by the items listed below:
1)
A check/money order in the amount of $10.00 to cover the cost of postage and handling
2) Name and address for product return
3) An explanation of the defect
4) Proof of Date Purchased
5) Product should be well packed in a sturdy outside shipping carton, to prevent damage in transit,
with return postage prepaid to the address listed below:
IN U.S.A. Send To: IN CANADA Send To:
Tasco Tasco
Attn.: Repairs Attn.: Repairs
9200 Cody 25A East Pearce Street, Unit 1
Overland Park, Kansas 66214 Richmond Hill, Ontario L4B 2M9
For products purchased outside the United States or Canada please contact your local
dealer for applicable warranty information. In Europe you may also contact Tasco at:
Tasco Germany GmbH
European Service Centre
Mathias-Brüggen-Str. 80
D-50827 Köln
GERMANY
Tel: +49 221 995568-0
Fax: +49 221 995568-20
is warranty gives you specic legal rights.
You may have other rights which vary from country to country.
©2011 B.O.P..
Specications and designs are subject to change without
any notice or obligation on the part of the manufacturer.
Page 23

23
FCC Compliance Statement:
This equipment has been tested and found to comply with the limits for a
Class B digital device, pursuant to part 15 of the FCC Rules. These limits are
designed to provide reasonable protection against harmful interference
in a residential installation.
Operation is subject to the following two conditions: (1) This device
may not cause harmful interference, and (2) this device must accept any
interference received, including interference that may cause undesired
operation.
This equipment generates, uses and can radiate radio frequency energy
and, if not installed and used in accordance with the instructions, may
cause harmful interference to radio communications. However, there is
no guarantee that interference will not occur in a particular installation.
If this equipment does cause harmful interference to radio or television
reception, which can be determined by turning the equipment o and
on, the user is encouraged to try to correct the interference by one or
more of the following measures:
· Reorient or relocate the receiving antenna.
· Increase the separation between the equipment and receiver.
· Connect the equipment into an outlet on a circuit dierent from
that to which the receiver is connected.
· Consult the dealer or an experienced radio/TV technician for help.
The device does not contain any user-serviceable parts. Repairs should
only be made by an Authorized Tasco repair center. Unauthorized repairs
or modications could result in permanent damage to the equipment,
and will void your warranty and your authority to operate this device
under Part 15 regulations.
The shielded interface cable which is provided must be used with the
equipment in order to comply with the limits for a digital device pursuant
to Subpart B of Part 15 of FCC Rules.
Page 24

24
Disposal of Electric and Electronic Equipment
(Applicable in the EU and other European countries with separate collection systems)
This equipment contains electric and/or electronic parts and must therefore not
be disposed of as normal household waste. Instead, it should be disposed at the
respective collection points for recycling provided by the communities. For you, this
is free of charge.
If the equipment contains exchangeable (rechargeable) batteries, these too must be
removed before and, if necessary, in turn be disposed of according to the relevant
regulations (see also the respective comments in this unit’s instructions).
Further information about the subject is available at your community administration,
your local waste collection company, or in the store where you purchased this
equipment.
Page 25

25
Table des matières
Introduction 27
Identication des composants 28
Installation des piles et de la carte SD 30
Conguration de la caméra 31
Réglage de la date, de l’année et de l’heure 31
Réglage du mode Photo/Vidéo et de la résolution 32
Réglage du retardateur 33
Vérication du nombre de chiers
photo/vidéo stockés 34
Formatage de la carte SD 34
Fonctionnement de la caméra 35
Installation de la caméra 35
Mise en marche de la caméra 35
Test de la zone de couverture 36
Protection de la caméra 36
Visionnement des photos et des vidéos 37
Glossaire 38
Fiche technique 39
Dépannage/FAQ 40
Français
Page 26

26
REMARQUE IMPORTANTE
Félicitations ! Vous venez d’acquérir l’un des meilleurs appareils photo
de surveillance sur le marché ! Tasco est extrêmement er de ce petit
concentré de technologie et nous sommes certains qu’il vous satisfera
également. Nous vous sommes très reconnaissants de votre choix et
de votre conance. Veuillez consulter les informations ci-dessous et les
instructions de ce manuel pour garantir une utilisation optimale de ce
produit.
Si votre appareil photo de surveillance Tasco ne semble pas fonctionner
correctement, ou si les photos/vidéos présentent des problèmes de
qualité, reportez-vous à la section Dépannage/FAQ aux pages 40-43.
Les problèmes sont souvent dus à un détail qui n’a pas été remarqué et
un simple changement de réglage peut parfois les résoudre.
Si votre problème persiste après avoir essayé les solutions de la section
Dépannage/FAQ, veuillez contacter votre revendeur qui prendra
contact avec le service après vente Tasco.
Pour une autonomie maximale, Tasco recommande d’utiliser 4 piles AA
au lithium Energizer® avec la caméra de détection Trail Cam.
Tasco recommande également les cartes SD et SDHC SanDisk®
(capacité maximale de 16 Go).
Page 27

27
INTRODUCTION
Félicitations ! Vous venez d’acquérir une caméra numérique de détection
Tasco modèle 119215. Cette caméra, à la construction robuste et
résistante aux intempéries, est conçue pour photographier ou lmer les
activités d’animaux sauvages en extérieur. De taille compacte et facile à
transporter, elle possède également une très longue durée d’autonomie.
Caractéristiques principales :
• Capteur numérique de 2,1 mégapixels
• Taille compacte (120 mm x 94 mm x 46 mm)
• Longue durée d’autonomie (jusqu’à 6 mois)
• Vitesse de déclenchement : 1,6 seconde
• Filtre infrarouge automatique
• Écran LCD
• 15 LED de vision nocturne
• Intervalle photo réglable : 5-59 secondes, 1-10 minutes (réglage par
défaut : 10 secondes)
• Mode Rafale (3 photos par déclenchement)
• Résolution vidéo: 640 x 480 à 30 images par seconde
• Compatible avec les cartes SD d’une capacité maximale de 16 Go
• Impression de la date, de l’heure et des phases lunaires
• Exposition automatique
• Balance des blancs automatique
• Alimentation : 4 piles AA
• Pas de vis pour trépied standard
• Résistante aux intempéries
Page 28
28
Guide des diérents composants et commandes
Devant de l’appareil photo
Objectif
Flash
infrarouge à
DEL
Détecteur
infrarouge
passif
(IRP) de
mouvement
Point de
xation pour
trépied
Attache
pour
cadenas
Détail du ash infrarouge à LED
Indicateur
infrarouge
passif (IRP)
(Mode de
réglage
uniquement)
Détecteur
de lumière
Page 29

29
Détail du panneau de commande
Panneau de commande
(volet ouvert)
Interrupteur
d’alimentation
Port USB
Écran
LCD
Emplace-
ment pour
carte SD
Compartiment
des piles
Guide des diérents composants et commandes
Page 30

30
INSTALLATION DES PILES et DE LA CARTE SD
La caméra numérique de détection Tasco modèle 119215 est conçue
pour fonctionner avec 4 piles AA. Nous recommandons d’utiliser des piles
au lithium (pour une durée de vie plus longue) ou des piles alcalines.
REMARQUE: L’interrupteur d’alimentation doit toujours être en position
OFF lorsque vous insérez ou retirez les piles.
Assurez-vous que les piles sont correctement insérées, tel qu’indiqué
à l’intérieur du compartiment des piles. Une tension ou polarité (+/-)
incorrecte endommagera la caméra.
Mémoire
Votre caméra de détection modèle 119215 possède un emplacement
pour carte mémoire et est compatible avec les cartes SD d’une capacité
maximale de 16 Go (carte vendue séparément).
Insertion d’une carte SD
Assurez-vous que l’interrupteur d’alimentation est en position OFF
lorsque vous insérez ou retirez une carte mémoire.
Insérez une carte SD dans la fente dans le sens indiqué par l’icône se
trouvant sous le bouton SETUP (zone de contact orientée vers le haut et
coin biseauté à gauche).
Pour retirer la carte SD, enfoncez-la légèrement pour la libérer puis
dégagez-la doucement.
Il est recommandé d’utiliser une carte SD neuve et vierge. Si la carte SD
a été utilisée dans un autre appareil, assurez-vous de la formater à l’aide
de l’option Format dans le menu de conguration avant d’utiliser votre
caméra. Les cartes neuves peuvent être utilisées sans formatage.
Page 31

31
CONFIGURATION DE LA CAMÉRA
La con guration initiale de votre caméra est très facile. Allumez la caméra
puis appuyez sur le bouton SETUP. Les icônes/indicateurs (illustrés ci-dessous)
clignotent chacun à leur tour sur l’écran, en commençant par « DATE », pour
indiquer le réglage en cours. Appuyez sur les boutons UP ou DOWN pour
passer au réglage suivant. Appuyez sur le bouton OK pour valider un réglage
de menu spéci que lorsqu’il clignote. Une fois tous les paramètres con gurés
(ou après avoir modi é l’un des paramètres), appuyez de nouveau sur SETUP
pour quitter le mode de con guration.
1. Réglage de la date, de l’année et de l’heure
Suivez les étapes indiquées ci-dessous pour régler la date, l’année et l’heure
a n que lors de l’impression sur vos photos, ces données soit correctes:
Réglage de la date et de l’année
• Mettez tout d’abord l’interrupteur sur ON, puis appuyez sur le bouton
SETUP.
L’indicateur « DATE » (no 1) sclignote. Appuyez sur OK pour con rmer que vous
souhaitez procéder au réglage.
Les deux premiers chi res de l’a chage à 4 chi res (no 3) indiquent le mois
(MM) et les deux derniers indiquent le jour (JJ).
• Appuyez sur UP ou DOWN pour sélectionner un mois entre 01 et 12, puis
appuyez sur OK pour valider. Passez ensuite au réglage du jour:
• Appuyez sur UP ou DOWN pour sélectionner une date entre 01 et 31,
Icônes de con guration - Guide de l’a chage
1. Date
2. Heure
3. A chage à 4 chi res
4. Mode photo/résolution
5. Mode vidéo
6. Intervalle
7. Carte SD
7
4
5 6
Page 32

32
puis appuyez sur OK pour valider. Passez ensuite au réglage de l’année:
• Appuyez sur UP ou DOWN pour sélectionner une année entre 10 et 30
(2010-2030), puis appuyez sur OK pour valider.
Réglage de l’heure
Une fois la date et l’année réglées, l’indicateur « TIME » (nº 2) clignote. Appuyez
sur OK pour conrmer que vous souhaitez procéder au réglage.
• Les deux premiers chires de l’achage à 4 chires indiquent l’heure
(HH) et les deux derniers indiquent les minutes (MM).
• Appuyez sur UP ou DOWN pour sélectionner une heure entre 00 et 23
(00 = minuit, 12 = midi, 23 = 23h00), puis appuyez sur OK pour valider.
Passez ensuite au réglage des minutes.
• Appuyez sur UP ou DOWN pour régler les minutes entre 00 et 59, puis
appuyez sur OK pour valider.
Remarque : Le réglage de la date et de l’heure est généralement conservé
pendant quelques minutes lorsque les piles sont retirées de la caméra.
Cependant, un nouveau réglage de la date et de l’heure peut être nécessaire
après le changement des piles dans le cas où la caméra est restée sans piles
pendant trop longtemps.
2. Réglage du mode Photo/Vidéo et de la résolution
Ce réglage vous permet de choisir si la caméra prend des photos ou réalise
des vidéos lorsque le détecteur IRP est déclenché (mode Photo ou Vidéo).
Vous pouvez également choisir le nombre de photos prises lors de chaque
déclenchement du détecteur IRP (mode Photo uniquement). Trois réglages
sont possibles : 1P, 3P ou mode Vidéo.
• Les indicateurs « PHOTO/VIDÉO » (nº 4 et nº 5) clignotent à présent
en alternance. Appuyez sur OK pour conrmer que vous souhaitez
congurer le mode de capture.
• Appuyez sur UP ou DOWN pour sélectionner l’icône du mode Photo ou
Vidéo (seul le mode sélectionné clignotera).
Si vous sélectionnez l’icône du mode Photo (nº 4), appuyez ensuite sur OK :
• Les indicateurs « 1P » (une seule photo prise par déclenchement) et «
3P » (séquence de 3 photos prises par déclenchement) clignotent en
alternance sur l’écran LCD. Appuyez sur UP ou DOWN pour sélectionner
CONFIGURATION DE LA CAMÉRA (suite)
Page 33

33
CONFIGURATION DE LA CAMÉRA suite
le réglage de votre choix, puis appuyez sur OK pour valider.
• L’écran LCD ache ensuite l’indicateur « LoHI » qui permet le réglage de
la résolution des photos. « Lo » représente 2,1 mégapixels (résolution du
capteur) et « HI » représente 5,0 mégapixels (avec interpolation logicielle,
la qualité photo sera supérieure, mais chaque chier occupera davantage
d’espace sur la carte SD). Appuyez sur UP ou DOWN pour sélectionner la
résolution de votre choix, puis appuyez sur OK pour valider.
Si vous sélectionnez l’icône du mode Vidéo (nº 5), appuyez ensuite sur OK :
• La durée des vidéos est préréglée à 15 secondes et ne peut être
modiée. Il n’y a pas de réglages ou d’options supplémentaires pour le
mode Vidéo.
Après avoir appuyé sur OK (une fois les réglages pour une/trois photo(s) et la
résolution eectués si le mode Photo a été choisi), l’icône de l’intervalle (nº 6)
clignote.
3. Réglage de l’intervalle
Le menu de l’intervalle vous ore la possibilité de régler en minutes et
en secondes l’intervalle pendant lequel la caméra restera en veille avant
d’accepter un nouveau déclenchement du détecteur IRP. L’intervalle peut être
de 1 seconde à 10 minutes. Le réglage par défaut est de 10 secondes.
• Lorsque l’icône de l’intervalle clignote (nº 6) clignote, appuyez sur OK
pour conrmer que vous souhaitez passer au réglage.
• L’écran LCD ache « 0010 », les deux premiers chires indiquant les
minutes et les deux derniers, les secondes.
• Lorsque les deux premiers chires clignotent, appuyez sur UP ou DOWN
pour changer la valeur des minutes (entre 00 et 60). Appuyez sur OK
pour valider le réglage des minutes.
Les deux derniers chires ne clignoteront que si vous avez sélectionné « 00
» pour les minutes et vous pourrez alors régler la durée de l’intervalle en
secondes (le réglage de l’intervalle en secondes est impossible si vous avez
sélectionné une valeur entre 01 et 60 pour les minutes).
• Appuyez sur UP ou DOWN pour changer la valeur des secondes (entre 05
et 59), puis appuyez sur OK pour valider.
L’icône de la carte SD (nº 7), le dernier élément du menu de conguration,
clignote ensuite. Vous avez alors la possibilité de vérier le nombre de chiers
Page 34

34
CONFIGURATION DE LA CAMÉRA (suite)
stockés sur votre carte SD et de la formater, si vous le désirez.
4. Vérication du nombre de chiers photo/vidéo stockés
• Lorsque l’icône de la carte SD (nº 7) clignote, vous pouvez vérier le
nombre de chiers qu’elle contient sur l’achage à quatre chires (nº
3). Ceci vous permet de vérier si la carte insérée est neuve ou a déjà été
utilisée (et si c’est le cas vous devriez la formater).
• Appuyez sur OK pour passer au prochain élément, le formatage de la
carte SD.
5. Formatage de la carte SD
• Lorsque l’icône de la carte SD (nº 7) clignote (après avoir appuyé sur OK
au terme de l’étape de conguration précédente), appuyez sur UP ou
DOWN pour sélectionner « FO » (formater) ou « NO » (ne pas formater).
Appuyez ensuite sur OK pour valider votre choix.
• Appuyez sur UP ou DOWN pour sélectionner « Y » (Oui) ou « N » (Non),
puis appuyez sur OK pour valider. Cette étape vous ore une marge de
sécurité supplémentaire visant à éviter le formatage accidentel d’une
carte contenant des chiers que vous souhaiteriez conserver.
• Si vous sélectionnez « FO » à la première étape, puis « Y » et appuyez
sur OK, la caméra formatera la carte SD et tous les chiers sur la
carte seront eacés.
Quitter le menu de conguration
Une fois tous les réglages eectués, appuyez sur SETUP pour sauvegarder
vos paramètres et quitter le menu de conguration. Vous pouvez maintenant
commencer à utiliser votre caméra Trail Cam en extérieur et enregistrer les
activités d’animaux sauvages.
Page 35

35
FONCTIONNEMENT DE LA CAMÉRA
Une fois votre caméra réglée, vous pouvez commencer à l’utiliser pour
enregistrer les activités des animaux sauvages de l’endroit de votre choix.
Suivez les étapes suivantes pour installer la caméra:
1. Installation de la caméra
Il est recommandé d’installer la caméra à 1,2 ou 1,5 mètre du sol, en l’orientant
légèrement vers le bas. Il est préférable d’éviter d’orienter la caméra vers
l’est ou l’ouest car le lever et le coucher du soleil pourraient la déclencher et
produire des photos surexposées. Dégagez les branches et autres obstacles se
trouvant devant la caméra et pouvant obstruer l’objectif ou le détecteur IRP.
Pour installer la caméra, passez la sangle dans les fentes à l’arrière du boîtier.
Enroulez la sangle autour du support d’attache. Assurez-vous que la sangle est
stable et serrez la boucle an de maintenir la caméra en place.
Assurez-vous que les deux loquets du boitier sont solidement verrouillés an
de garantir une résistance aux intempéries.
2. Mise en marche de la caméra
La caméra est en mode veille à la mise en marche. Lorsque le détecteur IRP
se déclenche, la caméra commence à prendre des photos une fois la durée
choisie du retardateur écoulée.
3. Test de la zone de couverture
Une des caractéristiques les plus utiles de la caméra de détection modèle
119215 est la possibilité d’eectuer un test de la zone de couverture.
Après avoir installé la caméra, ouvrez le devant du boîtier et mettez
l’interrupteur d’alimentation sur ON. Appuyez sur le bouton SETUP pour
passer en mode MENU.
Réglez la sensibilité du détecteur IRP selon vos préférences et les conditions
ambiantes.
Page 36

36
Le voyant du détecteur IRP situé sous l’objectif clignote lorsque vous êtes dans
la zone de couverture.
Réglez la position de la caméra selon les besoins et faites des essais jusqu’à ce
que la zone voulue soit couverte.
Une fois les essais terminés, appuyez de nouveau sur le bouton SETUP. La
caméra passe alors en mode veille et attend le déclenchement du détecteur
IRP pour prendre la première photo ou vidéo.
4. Protection de la camera
An d’éviter le vol et verrouiller la caméra, il est possible de passer un cadenas
dans l’attache prévue à cet eet.
FONCTIONNEMENT DE LA CAMÉRA (suite)
VISIONNER LES PHOTOS et LES VIDÉOS
Au bout d’une certaine durée de fonctionnement, vous voudrez
naturellement visionner les photos et/ou les vidéos prises. Il existe pour
cela deux méthodes, selon vos préférences et le matériel disponible :
Angle de vision de la caméra
Angle de détecteur de mouvement
Page 37

37
Avec un lecteur de cartes SD
Enfoncez légèrement la carte SD pour la libérer, puis dégagez-la
doucement.
Insérez la carte SD dans un lecteur de cartes SD standard ou un lecteur
multicartes présentant des fentes pour diérents types de carte
mémoire, y compris pour les cartes SD.
Suivez les instructions du fabricant du lecteur de cartes pour visionner
ou télécharger les chiers photo et/ou vidéo stockés sur la carte SD.
En branchant directement la caméra à un ordinateur
Mettez l’interrupteur d’alimentation en position ON, puis appuyez sur le
bouton SETUP.
Branchez la caméra à un ordinateur à l’aide d’un câble USB (mini type B
à 5 broches/type A mâle standard, inclus). L’ordinateur reconnaît alors la
caméra comme dispositif de stockage de données externe à l’aide de la
norme USB Mass Storage (aucune installation de lecteur n’est nécessaire
; incompatible avec un système d’exploitation Windows 98 ou antérieur).
L’ordinateur ache une nouvelle icône de disque sur votre poste de
travail ou dans l’explorateur Windows, et une boîte de dialogue s’ache
sur votre bureau avec plusieurs options pour visionner, déplacer ou
copier les chiers photo et vidéo stockés sur la carte SD. L’écran LCD de
la caméra ache « STO », indiquant que la caméra est en mode mémoire
de masse.
Connecteurs USB
De la
caméra
Vers
l’ordinateur
Mini type B
à 5 broches
Type A
mâle
Page 38

38
Détecteur IRP: (détecteur infrarouge passif) Détecte le mouvement à la manière
d’un détecteur de mouvements de sécurité traditionnel. Nécessite de l’énergie
infrarouge (chaleur) en plus du mouvement pour limiter le déclenchement du
capteur à la détection des animaux (plutôt qu’à celle des feuilles, etc.).
Intervalle: Intervalle écoulé entre chaque photo pendant la détection et
l’enregistrement des événements. Il est recommandé de régler le retardateur en
fonction du niveau d’activité de l’endroit observé.
Phase lunaire : Le niveau d’activité de certains animaux semble inuencé par
les phases lunaires. La caméra ore la possibilité d’imprimer la phase lunaire sur
chaque photo à titre de référence.
Flash infrarouge: Aussi appelé groupe de LED IR. Il s’agit d’une fonction de «vision
nocturne»qui émet un rayonnement de lumière infrarouge invisible à l’œil humain.
Particulièrement pratique pour les photos de nuit, lorsqu’un ash visible peut être
indésirable.
Durée de vie des piles: Durée pendant laquelle la caméra fonctionne de manière
autonome. Elle dépend de la température ambiante, du nombre d’images prises et
du nombre de déclenchements du ash infrarouge. Lorsque la tension des piles est
inférieure à 4,5 V, le ash infrarouge cesse de se déclencher. Lorsque la tension des
piles est inférieure à 3,5 V, la caméra cesse de fonctionner.
Rafale : Nombre de photos que prend la caméra à chaque déclenchement du
détecteur IRP.
1P: Une seule photo prise par déclenchement.
3P: Une séquence de trois photos prises à chaque déclenchement.
FULL: Lorsque la capacité de mémoire a été entièrement utilisée, l’écran LCD ache
« FULL ».
Stockage de masse: Branchez un câble USB à un ordinateur et appuyez sur le
bouton SETUP an de permettre à l’ordinateur d’accéder au contenu de la carte SD.
L’ordinateur reconnaît automatiquement la caméra comme lecteur externe sans
qu’il soit nécessaire d’installer des pilotes supplémentaires. (Incompatible avec
un système d’exploitation Windows 98 ou antérieur. Compatible avec les systèmes
d’exploitation Mac OS9 and OSX ; la caméra apparaît sur votre bureau en tant que
dispositif de stockage de données externe ou disque).
GLOSSAIRE
Page 39

39
Fiche technique
Numéro de modèle 119215
Type de capteur photographique Type CMOS, ½ pouce
Résolution eective 2,1 mégapixels
Distance focale eective 7,6 mm
Ouverture de diaphragme f/2,8
Filtre infrarouge Filtre infrarouge automatique
Achage Écran LCD rétro-éclairé
Détecteur IRP Oui
Vitesse de déclenchement 1,6 seconde
Nombre de LED infrarouges 15 LED
Portée du ash infrarouge 10 mètres
Mémoire Carte SD d’une capacité maximale de 16 Go
Indicateur IRP Oui (mode de conguration uniquement)
Plage de réglage de l’intervalle
5-59 secondes, 1-10 minutes (réglage par
défaut : 10 secondes)
Choix de résolution d'image 2,1 mégapixels, 5,0 mégapixels
Mode Rafale Oui (3 photos)
Résolution vidéo
Vidéo : AVI 640 x 480 pixels à 30 images par
seconde(15 secondes).
Format de chier (photo/vidéo) JPEG/AVI
Horodatage Oui
Impression des phases lunaires Oui
Exposition Automatique
Mode de balance des blancs Automatique
Alimentation 4 piles AA (alcalines, au lithium ou NiMh)
Résistant aux intempéries Oui
Page 40

40
Dépannage/FAQ
La durée de vie des piles est plus courte que prévue.
1. La durée de vie des piles varie selon la température ambiante et
le nombre de photos prises. De manière générale, la caméra de
détection Trail Cam pourra prendre plusieurs milliers de photos
avant que les piles ne soient épuisées.
2. Vériez que vous utilisez des piles alcalines ou au lithium neuves.
Pour une autonomie maximale, Tasco recommande d’utiliser 4
piles AA au lithium Energizer® avec la caméra de détection Trail
Cam.
3. Assurez-vous que l’interrupteur d’alimentation est sur ON et que
la caméra n’est pas restée en mode de conguration durant son
utilisation.
4. Utilisez une marque de carte SD reconnue avec votre caméra. Tasco
recommande les cartes SD SanDisk® d’une capacité maximale de
16 Go. L’utilisation de cartes SD de mauvaise qualité peut parfois
réduire la durée de vie des piles de votre caméra Trail Cam.
La caméra arrête de prendre des photos ou n’en prend pas
1. Vériez que la carte SD n’est pas pleine. La caméra cesse de prendre
des photos lorsque la carte est pleine.
2. Vériez les piles pour vous assurer qu’il s’agit bien de piles AA
alcalines ou au lithium neuves. Reportez-vous au paragraphe
précédent concernant la durée de vie des piles.
3. Vériez que l’interrupteur d’alimentation est sur ON et non pas OFF
ou en mode de conguration.
4. Assurez-vous que vous utilisez une carte SD de bonne qualité avec
votre caméra. Tasco recommande les cartes SD SanDisk® d’une
capacité maximale de 16 Go.
5. Si le commutateur de protection contre l’écriture de la carte SD est
en position lock (verrouillé), la caméra ne prendra pas de photos.
6. Si vous avez utilisé la carte SD dans un autre appareil avant de
l’insérer dans votre caméra Trail Cam, tentez de la formater à l’aide
du paramètreFormat du mode de conguration (assurez-vous de
d’abord sauvegarder tous les chiers que vous souhaitez conserver,
car le formatage eacera tous les chiers existants). Dans certains
Page 41

41
cas, il arrive que d’autres appareils modient le formatage de la
carte SD de telle manière qu’elle ne fonctionnera pas correctement
avec la caméra Trail Cam.
La caméra ne s’allume pas.
1. Vériez que vous avez bien inséré les quatre piles dans le
compartiment des piles. Tasco recommande l’utilisation de quatre
piles AA au lithium Energizer® avec la caméra Trail Cam.
2. Vériez que les piles sont bien installées et que la polarité est
correcte. Placez toujours l’extrémité négative (plate) de chaque pile
en contact avec le ressort à l’intérieur du compartiment.
Problèmes de qualité des photos et/ou vidéos
1. Les photos ou vidéos prises de nuit sont trop sombres
a. Essayez un nouveau jeu de piles. Le ash cesse de fonctionner
lorsque les piles commencent à faiblir.
b. Vous obtiendrez de meilleurs résultats si le sujet est à portée idéale
du ash, soit à moins de 14 mètres de la caméra. Les sujets risquent
d’être trop sombres à des distances plus importantes.
c. Veuillez noter que lorsque le réglage du nombre de photos est
supérieur à une photo (1P), ou lorsque le retardateur est réglé sur
une durée très courte, certaines photos pourront être plus sombres
que d’autres en raison du temps de réponse plus court et du
redéclenchement rapide de la caméra, laissant moins de temps au
ash pour se recharger complètement avant de se déclencher de
nouveau.
2. Les photos ou vidéos prises en plein jour sont trop sombres
a. Assurez-vous que la caméra n’est pas orientée vers le soleil ou une
autre source lumineuse pendant la journée. Ceci pourrait inuencer
l’exposition automatique et produire des photos ou des vidéos plus
sombres.
3. Les photos ou vidéos prises de nuit sont trop claires
a. Vous obtiendrez de meilleurs résultats si le sujet est à portée idéale
du ash, soit à moins de 3 mètres de la caméra. Les sujets risquent
d’être trop clairs à des distances plus courtes.
Dépannage/FAQ
Page 42

42
4. Les photos ou les vidéos prises en plein jour sont trop claires
a. Assurez-vous que la caméra n’est pas orientée vers le soleil ou une
autre source lumineuse pendant la journée.
5. Les photos présentent des stries
a. Dans certains cas, avec une faible luminosité et des sujets
se déplaçant rapidement, il est possible que la résolution de 5
mégapixels ne produise pas d’aussi bons résultats que la résolution
de 2,1 mégapixels.
b. Si plusieurs photos de sujets se déplaçant rapidement présentent
des stries, essayez plutôt la résolution de 2,1 mégapixels.
6. Voile rouge, vert ou bleu
a. Certaines conditions de luminosité peuvent aecter les
performances du capteur et produire des photos aux couleurs
altérées.
b. Si ce problème se produit régulièrement, il peut être nécessaire de
faire réparer le capteur. Veuillez contacter le service clients de Tasco.
7. Séquences vidéo écourtées: la durée d’enregistrement ne correspond
pas à la durée réglée.
a. Vériez que la carte SD n’est pas pleine.
b. Vériez que les piles de la caméra ne sont pas épuisées. Lorsque
les piles commencent à faiblir, il peut arriver que la caméra enregistre
des séquences vidéo plus courtes pour préserver les piles.
Les photos prises ne contiennent pas le sujet ciblé
1. Essayez d’installer votre caméra dans un endroit où aucune source
de chaleur ne pénètre dans son angle de vue.
2. Dans certains cas, la présence d’eau à proximité peut entraîner la
prise de photos sans sujet. Essayez d’orienter la caméra vers le sol.
3. Evitez d’installer la caméra sur des arbres de petite taille susceptibles
d’être agités en cas de vents forts.
4. Dégagez toutes les branches se trouvant directement devant
l’objectif de la caméra.
Dépannage/FAQ
Page 43

43
La LED du détecteur IRP s’allume/ne s’allume pas.
1. Lorsque la caméra se trouve en mode de conguration, la LED
du détecteur IRP sur le devant de la caméra s’allume lorsqu’elle
détecte du mouvement. Cette fonction ne sert qu’au réglage et aide
l’utilisateur à orienter la caméra.
2. Pendant l’utilisation, la LED ne s’allume pas lorsque la caméra prend
une photo an que les animaux ne remarquent pas sa présence.
La caméra ne mémorise pas les réglages
1. Assurez-vous de sauvegarder toutes les modications de réglage
eectuées en mode de conguration en appuyant sur OK après avoir
eectué les modications. Si vous ne sauvegardez pas le nouveau
réglage après l’avoir modié, la caméra continuera d’utiliser le
réglage d’origine.
Dépannage/FAQ
Page 44

44
Les spécications et conceptions sont sujettes à modication
sans préavis ni obligation de la part du fabricant.
GARANTIE LIMITÉE DE DEUX ANS
Votre produit Tasco® est garanti contre toute défectuosité des matériaux et de la fabrication
pour une période de deux ans après la date d’achat. En cas de défectuosité aux termes
de la présente garantie, nous pourrons, à notre gré, réparer ou remplacer le produit sous
réserve que vous le retourniez port payé. La garantie ne couvre pas les dommages causés
par l’abus, l’utilisation irrégulière, l’installation ou la maintenance eectuée par quelqu’un
d’autre qu’un centre de service agréé par Tasco.
Tout retour eectué conformément à la présente garantie doit être accompagné des
éléments indiqués ci-après:
1) Chèque ou mandat au montant de 10,00$ pour couvrir les frais de poste et de
manutention.
2) Nom et adresse pour le retour du produit.
3) Des précisions sur la défectuosité.
4) La preuve de la date d’achat.
5) Le produit doit être soigneusement emballé dans un carton d’expédition externe
robuste pour prévenir les dommages en cours de transit, avec port de retour prépayé,
à l’adresse ci-après:
Aux États-Unis, expédier à: Au Canada, expédier à:
Tasco Tasco
Attn.: Repairs Attn.: Repairs
9200 Cody 25A East Pearce Street, Unit 1
Overland Park, Kansas 66214 Richmond Hill, Ontario L4B 2M9
Dans le cas d’un produit acheté à l’extérieur des Etats-Unis ou du Canada, veuillez
communiquer avec votre marchand local pour connaître la garantie s’appliquant. En
Europe, vous pouvez aussi communiquer avec Tasco à l’adresse suivante::
Tasco Germany GmbH
European Service Centre
Mathias-Brüggen-Str. 80
D-50827 Köln
GERMANY
Tel: +49 221 995568-0
Fax: +49 221 995568-20
La présente garantie cous confère des droits juridiques spéciques
et vous pouvez disposer d’autres droits qui dièrent d’un pays à l’autre.
©2011 B.O.P.
Page 45

45
Traitement des déchets d’équipements électriques et
électroniques
(En vigueur dans l’Union européenne et autres pays européens
ayant des systèmes de collecte des déchets séparés)
Cet équipement contient des composants électriques et/ou électroniques et par
conséquent ne doit pas être éliminé en n de vie avec les autres déchets ménagers.
Vous devez au contraire vous débarasser de ce produit an qu’il soit recyclé aux
points de collecte respectifs fournis par les communautés locales. Pour vous, ceci
est sans frais.
Si l’équipement contient des piles amovibles (rechargeables), celles-ci doivent
également être retirées de l’équipement et, si nécessaire, être éliminées à leur
tour conformément aux règlements en vigueur (voir également les commentaires
respectifs dans la notice d’utilisation de ce produit).
De plus amples renseignements à ce sujet sont disponibles auprès de votre mairie,
votre compagnie de ramassage d’ordures locale, ou dans le magasin où vous avez
acheté cet équipement.
Page 46

46
Índice de páginas
Introducción
Identicación de las piezas
Instalación de las baterías y la tarjeta SD
Conguración de la cámara
Ajuste de año, fecha y hora
Conguración del modo de cámara/vídeo y la
resolución
Ajuste del Tiempo de Retardo
Comprobación del número de archivos de foto/
vídeo almacenados
Formateo de la tarjeta SD
Funcionamiento de la cámara
Montaje de la cámara
Encendido de la cámara
Comprobación del área de cobertura
Fijación de la cámara
Observación de las fotos y los vídeos
Glosario
Especicaciones
Identicación de Problemas/Preguntas Frecuentes
Español
48
49
51
52
52
53
54
55
55
56
56
56
57
57
58
59
60
61
Page 47

47
NOTA IMPORTANTE
Felicidades por comprar una de las mejores cámaras de rastreo del
mercado. Tasco está muy orgullosa de esta pequeña unidad y estamos
seguros que usted también quedará complacido. Agradecemos su
compra y queremos ganarnos su conanza. Consulte las notas siguientes
y las instrucciones de este manual para asegurarse que queda plenamente
satisfecho con este producto.
Si su Tasco Trail Cam parece no funcionar correctamente o si tiene
problemas de calidad con los vídeos o fotos, consulte la sección
Identicación de Problemas/Preguntas Frecuentes de las páginas 61 a
63.
A menudo los problemas se deben a algo tan sencillo que no se tuvo en
cuenta o se solucionan simplemente cambiando un ajuste.
Si el problema continúa después de intentar las soluciones de la sección
Identicación de Problemas/Preguntas Frecuentes, llame al Servicio de
Atención al Cliente de Tasco al (800) 423-3537. En Canadá, llame al (800)
361-5702.
Tasco recomienda utilizar ocho baterías AA de litio Energizer® en esta
Trail Cam para conseguir la máxima duración de la batería.
Tasco recomienda usar tarjetas SanDisk® SD y SDHC
(hasta 16 GB de capacidad) en esta Trail Cam.
Page 48

48
INTRODUCCIÓN
Felicidades por comprar la cámara digital de rastreo Tasco 119215. Esta
cámara de rastreo se ha diseñado para grabar la actividad de la fauna
salvaje en exteriores, con sus modos de imagen estática o película y
su construcción robusta y resistente a la intemperie. Este modelo de
cámara de rastreo ofrece un tamaño compacto y portátil y una duración
extraordinaria de las baterías.
Características principales:
• Sensor digital de 2,1 MP
• Tamaño compacto (120*94*46 mm)
• Gran duración de las baterías (hasta seis meses)
• Tiempo de disparo = 1,6 s
• Filtro IR automático
• Pantalla LCD
• 15 LED de visión nocturna
• Retardo de foto ajustable: 5 a 59 s,1 a 10 min (predeterminado 10 s)
• Modo de disparo múltiple (tres imágenes por disparo)
• Vídeos de 640*480 a 30 FPS
• Admite tarjeta SD hasta 16 GB
• Impresión de fecha, hora y fase de la luna
• Exposición automática
• Balance de blancos automático
• Alimentación eléctrica: 4 baterías secas AA
• Junta de montaje para trípodes estándar
• Resistente a la intemperie
Page 49

49
Guía de Piezas y Controles
Objetivo
de la
cámara
Matriz
de LED
infrarrojos
Sensor de
movimiento
de tipo PIR
Junta para
el trípode
Oricio para
candado
Detalle de la matriz de LED infrarrojos
Indicador
de PIR (sólo
en modo de
conguración)
Sensor de
imagen
Page 50

50
Detalle del panel de control
Panel de control
(con el frontal retirado)
Interruptor
principal
Puerto
USB
Pantalla
LCD
Ranura
para
tarjetas
SD
Compartimiento
de las baterías
Guía de Piezas y Controles
Page 51

51
INSTALACIÓN DE LAS BATERÍAS y LA TARJETA SD
La cámara digital de localización Tasco 119215 se ha diseñado para
funcionar con cuatro baterías AA. Recomendamos utilizar baterías de litio
(para mayor duración) o alcalinas.
NOTA: Desconecte siempre el interruptor (posición OFF) al colocar o quitar
las baterías.
Compruebe que las baterías se han colocado correctamente, tal como
se indica en el interior del compartimiento de las mismas. Un voltaje o
polaridad (+/-) incorrectos dañarán la cámara.
Memoria
Su cámara digital de localización tiene una ranura para tarjeta de
memoria que admite tarjetas SD hasta una capacidad máxima de 16 GB
(no incluidas).
Insertar una tarjeta SD
Compruebe que la cámara esté apagada siempre que coloque o quite la
memoria.
Inserte una tarjeta SD en la ranura, a fondo y orientada correctamente
como indica el icono situado bajo el botón SETUP (contactos hacia arriba
y esquina muescada a la izquierda).
Para retirar la tarjeta de memoria SD presione la tarjeta SD y tire de ella
con suavidad.
Se recomienda utilizar una tarjeta SD nueva y en blanco. Si se ha utilizado
la tarjeta SD en otro dispositivo, recuerde formatearla con la opción
Formato del menú de Conguración de la cámara antes de ajustar la
cámara para tomar fotos o vídeos. Las tarjetas nuevas están listas para
usarse al sacarlas del paquete.
Page 52

52
CONFIGURACIÓN DE LA CÁMARA
El proceso de con guración inicial de su cámara de rastreo es muy
fácil. Encienda la unidad y pulse el botón “SETUP” (con guración). Los
iconos/indicadores de la pantalla (mostrados a continuación) destellarán
sucesivamente para indicar que ajuste está realizando, empezando por
“DATE” (fecha). Pulse “UP” o “DOWN” (arriba o abajo) para pasar al siguiente
elemento de con guración. Pulse el botón “OK” (aceptar) para con rmar
un ajuste de menú determinado cuando está destellando. Cuando haya
terminado de realizar los ajustes de todos los elementos de menú (o
después de volver al mismo para cambiar un ajuste de un solo elemento),
vuelva a pulsar “SETUP” para salir del modo de con guración.
1. Ajuste de fecha, año y hora
Siga los pasos siguientes para ajustar la fecha, el año y la hora de forma
que sean los correctos cuando se impriman en sus fotos:
Ajuste de fecha y año
• Primero ponga el interruptor de encendido en la posición “ON” y
pulse el botón “SETUP”.
• Destellará el indicador “DATE” (fecha) (n.º 1). Pulse “OK” para con rmar
que quiere ajustarla.
Iconos de con guración
– Guía de la pantalla
1. Fecha
2. Hora
3. Pantalla de cuatro
dígitos
4. Modo de
instantáneas /
Resolución
5. Modo de vídeo
6. Tiempo de Retardo
7. Tarjeta SD
7
4
5 6
Page 53

53
• Los dos primeros dígitos de la pantalla de cuatro dígitos (n.º 3)
indican el mes (MM) y los otros dos el día (DD).
• Pulse “UP” o “DOWN” para seleccionar el mes entre 01 y 12, y pulse
“OK” para conrmar el ajuste del mes. Después ajuste el día:
• Pulse “UP” o “DOWN” para seleccionar el día entre 01 y 31, y pulse
“OK” para conrmar. Después ajuste el año:
• Pulse “UP” o “DOWN” para seleccionar un año entre 10 y 30 (2010-
2030), y pulse “OK” para conrmar.
Ajuste de la hora
• A continuación (cuando haya conrmado los ajustes de fecha y año)
destellará el indicador “TIME” (hora) (n.º 2). Pulse “OK” para conrmar
que quiere ajustarla.
• Los dos primeros dígitos de la pantalla de cuatro dígitos indican la
hora (HH) y los otros dos los minutos (MM).
• Pulse “UP” o “DOWN” para seleccionar una hora 00 y 23 (00 =
medianoche, 12 = mediodía, 23 = 11 de la noche), y pulse “OK” para
conrmar. Después podrá ajustar los minutos.
• Pulse “UP” o “DOWN” para ajustar los minutos entre 00 y 59, y pulse
“OK” para conrmar.
Nota: Normalmente los ajustes de fecha y hora se conservarán durante
unos minutos cuando quite las baterías de la cámara. No obstante, si las
quita por un período prolongado, al volver a colocarlas tendrá que ajustar
de nuevo la fecha y la hora.
2. Conguración del modo de cámara/vídeo y la
resolución
Este elemento le permite seleccionar si la máquina tomará instantáneas
o clips de vídeo cuando se dispare el PIR (mofo Foto o Vídeo). También
puede jar el número de fotos que tomará la cámara por cada disparo del
PIR (sólo en modo Foto). Los ajustes disponibles son 1P (una foto), 3P o
modo de vídeo.
CONFIGURACIÓN DE LA CÁMARA (continuó)
Page 54

54
• Ahora destellan (alternativamente) los indicadores “PHOTO/VIDEO”
(foto/vídeo) (n.º 4 y n.º 5). Pulse “OK” para conrmar que quiere jar
el modo de captura.
• Pulse el botón “UP” o “DOWN” para seleccionar el icono del modo de
Foto o de Vídeo (sólo destellará el modo que seleccione).
Si selecciona el icono del modo “Foto” (n.º 4) pulse “OK”::
• En LCD destellarán alternativamente los indicadores “1P” (una
sola foto tomada por cada disparo) y “3P” (secuencia de tres fotos
tomadas por cada disparo). Pulse “UP” o “DOWN” para seleccionar el
ajuste que preera y pulse “OK” para conrmar.
• Después la LCD mostrará “LoHI” (BajaAlta) para jar la resolución de
las fotos instantáneas. “Lo” corresponde a 2,1 MP (la resolución del
sensor) y “HI” corresponde a 5,0 MP (por medio de una interpolación
por software la calidad de la foto será mejor, pero los archivos
ocuparán más espacio en la tarjeta SD). Pulse “UP” o “DOWN” para
seleccionar la resolución que preera y pulse “OK” para conrmar.
Si selecciona el icono del modo “Vídeo” (n.º 5) pulse “OK”:
• La duración de la película está ajustada a 15 segundos y no se puede
cambiar. No hay otros ajustes ni opciones para el modo de Vídeo.
Después de pulsar “OK” (al terminar de seleccionar los ajustes de una/tres
fotos y la resolución si selecciona el icono del modo “Foto”), el siguiente en
destellar es el icono “Delay Time” (tiempo de retardo) (n.º 6).
3. Ajuste del Tiempo de Retardo
El elemento de menú Tiempo de Retardo permite jar el tiempo que la
cámara estará inactiva antes de aceptar un nuevo disparo del PIR, en
minutos y segundos. El ajuste varía de 1 segundo hasta 10 minutos. El
tiempo predeterminado es de 10 s.
• Mientras destella el icono Tiempo de Retardo (n.º 6) pulse “OK” para
conrmar que desea ajustarlo.
• La LCD indicará “0010”, donde los dos primeros dígitos de la pantalla
indican los minutos y los otros dos los segundos.
CONFIGURACIÓN DE LA CÁMARA (continuó)
Page 55

55
• Mientras los dos primeros dígitos destellan, pulse “UP” o “DOWN”
para cambiar el valor de los minutos (entre 00 y 60 min). Pulse “OK”
para conrmar el ajuste de los minutos.
(Solamente) su ha seleccionado “00” para el ajuste de minutos,
destellarán los dos últimos dígitos y podrá jar el tiempo de retardo
en segundos (si ha seleccionado entre “01” y “60” minutos no estará
disponible).
• Pulse “UP” o “DOWN” para cambiar el valor (entre 05 y 59 segundos),
y pulse “OK” para conrmar.
A continuación (último elemento del menú de Conguración), verá
destellar el icono de la tarjeta SD (n.º 7). Ahora puede comprobar el
número de archivos que hay en la tarjeta SD y formatearla si lo desea.
4. Comprobación del número de archivos de foto/vídeo
almacenados
• Mientras destella el icono de la tarjeta SD (n.º 7), en la pantalla de
cuatro dígitos (n.º 3) se verá el número total de archivos guardados
en la tarjeta SD. Esto le permite conrmar si se trata de una tarjeta
nueva u otra que ya ha usado antes (y que quizás desea formatear).
• Pulse OK y a pasará al elemento de menú “Formatear tarjeta”.
5. Formateo de la tarjeta SD
• Con el icono de tarjeta SD (n.º 7) destellando (después de pulsar OK
al nal del paso de Conguración anterior), pulse “UP” o “DOWN”
para seleccionar “FO” (Sí, formatear) o “NO” (No formatear) y pulse
“OK” para conrmar su elección.
• Pulse “UP” o “DOWN” para seleccionar “S” (Sí) o “N” (No), y pulse
“OK” para conrmar. Este paso proporciona un nivel adicional de
seguridad, para ayudarle a evitar el formateo accidental de una
tarjeta con archivos que desee conservar. Si seleccionó “FO” en el
primer paso, seleccione “S” y pulse “OK”, la cámara formateará la
tarjeta SD -todos los archivos de la tarjeta se borrarán.
CONFIGURACIÓN DE LA CÁMARA (continuó)
Page 56

56
FUNCIONAMIENTO DE LA CÁMARA
Una vez congurada la cámara estará listo para empezar a usarla tomando
fotos de la fauna de la zona donde desee situarla. Basta seguir estos
pasos:
1. Monte la cámara
Recomendamos montar la cámara a entre 1,2 y 1,5 metros (4 a 5 pies) del
suelo, y orientada en un ángulo ligeramente descendente. Es preferible no
montar la cámara hacia el este ni el oeste, pues el sol naciente o poniente
podrían provocar falsos disparos e imágenes sobreexpuestas. Aparte las
ramas y otros restos de delante de la cámara para que no bloqueen su
objetivo ni el sensor PIR.
Para montar la cámara en su sitio, inserte la correa a través de las ranuras
para correa de la carcasa trasera. Enrolle la correa alrededor de la supercie
de montaje. Apriete la correa y apriete la hebilla para sujetar la cámara.
Compruebe que ambos cierres de la portezuela están bien cerrados para
garantizar una adecuada resistencia a la intemperie.
2. Encendido de la cámara
Después de encenderla la cámara estará en modo de reposo. Cuando se
dispare el sensor PIR empezará a tomar fotos inmediatamente en cuanto
haya pasado el tiempo de retardo (conforme a lo congurado).
Salir del menú de Conguración
Cuando haya terminado de usar el menú Conguración, pulse “SETUP”
para guardar todos los cambios y salir del menú Conguración. Ahora ya
está listo para llevar su Trail Cam al exterior y empezar a usarla para grabar
la actividad de la fauna.
Page 57

57
3. Comprobación del área de cobertura
Una de las características más útiles de al cámara de rastreo 119215 es la
posibilidad del comprobar el área de cobertura.
Después de montar la cámara, abra la carcasa delantera y ponga el
interruptor “Power” en la posición “ON”. Pulse el botón SETUP para pasar
a modo de MENÚ.
Ajuste el dial de sensibilidad del PIR según sus preferencias en función de
las condiciones.
El piloto indicador de PIR situado bajo el objetivo destellará cuando haya
introducido el área de cobertura.
Ajuste la posición de la cámara en función de las necesidades y repita la
comprobación hasta conseguir el área de cobertura deseada.
Vuelva a pulsar el botón SETUP cuando haya terminado de utilizar el modo
de comprobación: la cámara pasará a reposo esperando que el sensor PIR
dispare la primera captura de foto o vídeo.
4. Sujete la cámara
Puede utilizarse un candado estándar en el oricio de bloqueo de la
cámara para sujetarla y evitar robos.
FUNCIONAMIENTO DE LA CÁMARA (continuó)
Cámara
Sensor de movimiento
Page 58

58
OBSERVACIÓN DE LAS FOTOS y LOS VÍDEOS
Cuando su cámara haya funcionado un período, usted podrá revisar los
vídeos o fotos que haya tomado. Puede hacerlo mediante dos métodos,
según sus preferencias y la disponibilidad de equipos accesorios:
Utilización de un lector de tarjetas SD
Presione ligeramente la tarjeta SD para liberarla y después tire de ella
con suavidad. Coloque la tarjeta SD en cualquiera de los muchos lectores
de tarjetas SD disponibles en el mercado (tanto exclusivos de tarjetas
SD como multitarjeta, que disponen de varias ranuras para tarjetas de
memoria de distintos tipos, incluidas las tarjetas SD. Siga las instrucciones
del proveedor del lector de tarjetas para ver o descargar la foto o el vídeo
de la tarjeta SD.
Conecta directamente la cámara a un PC
Ponga el interruptor de encendido en la posición “ON” y pulse el botón
“SETUP”. Conecte su cámara a un PC con un Cable USB (suministrado, mini
“B” de cinco terminales a macho estándar de tipo “A”). El PC reconocerá la
cámara como dispositivo externo de almacenamiento que utiliza la norma
“Almacenamiento en masa USB” (no necesita instalar ningún controlador;
no es compatible con Windows 98 ni anteriores). El PC mostrará un
nuevo símbolo de disco en “Mi PC” o en el Explorador de Windows y en
el escritorio aparecerá una ventana de diálogo con varias opciones para
ver, mover o copiar los archivos de fotos y vídeos guardados en la tarjeta
SD. El LCD de la cámara mostrará “STO” para indicar que está en modo de
almacenamiento en masa.
Conectores del
cable USB
De la cámara Al PC
Macho
tipo A
Mini tipo B
(5 terminales)
Page 59

59
PIR (sensor de infrarrojos pasivo) Detecta el movimiento, igual que un detector
de movimiento de seguridad normal. Precisa energía infrarroja (calor) además de
movimiento para disparar el sensor, limitando así la detección a los animales vivos
(evitando hojas, etc.)
Retardo de la cámara: Tiempo transcurrido entre fotos mientras se detectan y
registran sucesos. Debe ajustarse en función de la actividad de la fauna de la zona.
Fase lunar: El nivel de actividad de algunos animales parece relacionado con las
fases de la luna. La cámara de rastreo tiene una función que imprime un sello con la
fase lunar en cada foto como referencia.
Flash IR: También llamado matriz de LED IR. Se trata de una función de “visión
nocturna” que emite un chorro de luz infrarroja, invisible para el ojo humano.
Resulta especialmente útil para fotos nocturnas en las que un ash visible resultaría
indeseable.
Duración de las baterías: Tiempo que funcionará la cámara en el campo. Depende
de la temperatura ambiente, el número de imágenes tomadas y el número de veces
que se dispare el ash IR. Cuando el voltaje de las baterías cae por debajo de 4,5 V el
ash IR deja de dispararse. Cuando el voltaje de las baterías está por debajo de 3,5 V
la cámara deja de funcionar.
Ráfaga: Número de imágenes que toma la cámara por cada disparo del PIR.
1P: Se captura una imagen por cada disparo del PIR
3P: Se toma una secuencia de tres imágenes por cada disparo del PIR
LLENA: Cuando la capacidad de la memoria está llena, la pantalla LCD indica
“LLENA”.
Almacenamiento en masa: Conecte un cable USB a un ordenador, pulse el botón
“SETUP” y el ordenador podrá acceder al contenido de la tarjeta SD. La cámara
se reconoce automáticamente como “unidad externa” sin necesidad de instalar
controladores especiales (No se admiten Win 98 ni sistemas operativos más antiguos.
Mac OS9 y OSX también son compatibles: la cámara aparecerá en su escritorio como
dispositivo de almacenamiento externo o “disco”).
GLOSARIO
Page 60

60
Especicaciones técnicas
Número de modelo 119215
Tipo de sensor de imagen CMOS de 1/2"
Resolución efectiva 2,1 megapíxeles
Distancia focal efectiva 7,6 mm
Diafragma del objetivo f/2.8
Filtro IR Filtro IR automático
Pantalla LCD retroiluminado
Sensor PIR Sí
Velocidad de disparo 1,6 s
Número de LED IR 15 LED
Distancia máxima de iluminación
de la visión nocturna
10 metros (30 pies)
Almacenamiento Tarjeta SD hasta 16 GB de capacidad
Indicador PIR Sí (sólo en modo Conguración)
Rango de tiempo de retardo ajustable 5 a 59 s,1 a 10 min (predeterminado
10 s)
Resolución de imagen seleccionable 2,1 MP, 5,0 MP
Modo de imagen múltiple Sí, tres fotos
Resolución de vídeo Película: AVI 640 x 480 píxeles a 30
fps (15 segundos).
Formato de archivo (imagen/vídeo) JPEG/AVI
Impresión de fecha y hora Sí
Impresión de fase lunar Sí
Exposición Automática
Modo de balance de blancos Automática
Alimentación eléctrica 4 baterías secas AA (alcalinas,
de litio o NiMh)
Resistente al agua Sí
Page 61

61
Las baterías duran menos de lo previsto
1. La duración de las baterías puede variar con la temperatura de
funcionamiento y el número de imágenes tomadas con el tiempo.
Habitualmente la Trail Cam podrá captar varios miles de imágenes
antes que las baterías se agoten.
2. Compruebe que ha utilizado baterías alcalinas o de litio nuevas.
Tasco recomienda utilizar ocho baterías AA de litio Energizer®
en esta Trail Cam para conseguir la máxima duración de la
batería.
3. Compruebe que se puso el interruptor de encendido en la posición
“On” y que la cámara no estaba en modo de “Conguración”
(Setup) una vez en el campo.
4. Compruebe que utiliza una tarjeta SD de una marca de buena
calidad en su cámara. Tasco recomienda utilizar tarjetas SD de
marca SanDisk® hasta 16 GB. Nuestra experiencia indica que las
tarjetas SD de baja calidad a veces pueden reducir la duración de
las baterías de la Trail Cam.
La cámara deja de tomar imágenes o no toma imágenes
1. Compruebe que la tarjeta SD no esté llena. Si la tarjeta está llena
la cámara deja de tomar imágenes.
2. Compruebe las baterías para asegurarse que son baterías AA
alcalinas o de litio nuevas.
3. Consulte la nota anterior sobre la duración reducida de las
baterías.
4. Compruebe que el interruptor de encendido de la cámara está en
la posición “On” y no en “O”, ni en modo “Conguración”.
5. Compruebe que está utilizando una tarjeta SD de buena calidad
en su cámara. Tasco recomienda utilizar tarjetas SD SanDisk®
hasta 16 GB.
6. Si la tarjeta SD tiene el interruptor de protección contra escritura
en la posición de bloqueo, la cámara no tomará imágenes.
7. Si tiene una tarjeta SD usada en otro dispositivo, antes de insertarla
en la Trail Cam, debería formatearla con el parámetro “Formato”
Identicación de Problemas/Preguntas Frecuentes
Page 62

62
del modo Conguración (compruebe que previamente ha hecho
una copia de seguridad de cualquier archivo importante, pues el
formateo borrará todos los archivos existentes). En algunos casos,
otros dispositivos pueden cambiar el formateo de la tarjeta SD de
forma que no funcionará correctamente con la Trail Cam.
La cámara no se enciende
1. Compruebe que ha colocado las cuatro baterías en el
compartimiento de las baterías. Tasco recomienda utilizar cuatro
baterías AA de litio Energizer® en esta Trail Cam.
2. Compruebe que las baterías se han colocado correctamente,
respetando la polaridad. Coloque siempre el extremo negativo
(plano) de la batería en contacto con el lado del muelle de su
cavidad en la cámara.
Problemas de calidad de las instantáneas o los vídeos
1. Los vídeos o fotos nocturnos son demasiado oscuros
a. Intente utilizar un juego de baterías nuevas. El ash dejará de
funcionar cuando la batería se acerque al nal de su vida.
b. Obtendrá los mejores resultados si el sujeto está dentro del
rango ideal del ash, no más lejos de 14 m (45’) de la cámara. A
distancias superiores los objetos pueden quedar demasiado
oscuros.
c. Observe que cuando el parámetro Número de Capturas es
superior a “1 P” o si los con ajustes retraso muy cortos, algunas
imágenes pueden aparecer más oscuras que otras debido a la
rápida respuesta y la rauda reactivación de la cámara, que deja
menos tiempo para que el ash se recargue plenamente antes de
volver a disparar.
2. Los vídeos o fotos diurnos son demasiado oscuros
a. Compruebe que no se ha orientado la cámara hacia el sol ni
otras fuentes de luz durante el día, pues ello podría provocar que
la exposición automática ofreciera resultados más oscuros.
3. Los vídeos o fotos nocturnos son demasiado brillantes
a. Obtendrá los mejores resultados si el sujeto está dentro del
Identicación de Problemas/Preguntas Frecuentes
Page 63

63
rango ideal del ash, no más cerca de 3 m (10’) de la cámara.
A distancias inferiores los objetos pueden quedar demasiado
claros.
4. Los vídeos o fotos diurnos son demasiado brillantes
a. Compruebe que no se ha orientado la cámara hacia el sol ni
otras fuentes de luz durante el día.
5. Fotos con el sujeto rayado
a. En algunos casos, en condiciones de baja iluminación u objetos
en movimiento rápido, la resolución de 5 MP puede no ir tan bien
como la de 2,1 MP.
b. S tiene muchas imágenes en las que los sujetos que se mueven
rápido provocan rayas en la foto, pruebe el ajuste a 2,1 MP.
6. Aspecto rojizo, verdoso o azulado
a. En determinadas condiciones de iluminación, el sensor puede
confundirse y ofrecer imágenes de color decientes.
b. Si pasa con frecuentemente, el sensor puede necesitar una
revisión. Póngase en contacto con el Servicio al Cliente de Tasco.
7. Videoclips cortos – no se graban hasta la duración jada
a. Compruebe que la tarjeta SD no esté llena.
b. Compruebe que la cámara lleva unas buenas baterías. Al
acercarse el nal de la duración de la batería la cámara puede
optar por grabar videoclips más cortos para conservar la energía.
Las fotos no captan el sujeto de interés
1. Intente ajustar su cámara en un área en la que no haya fuentes de
calor en la línea de visión de la cámara.
2. En algunos casos colocar la cámara cerca del agua puede provocar
que tome imágenes sin ningún sujeto en ellas. Intente apuntar la
cámara sobre el suelo.
3. Intente evitar colocar la cámara en árboles pequeños, que tienden
a moverse con viento fuerte.
4. Retire cualquier rama que esté justo delante del objetivo de la
cámara.
Identicación de Problemas/Preguntas Frecuentes
Page 64

64
El LED del sensor PIR dispara/no dispara el ash
1. Si la cámara está en modo “Conguración”, el LED indicador de
PIR de la parte delantera de la cámara destellará cuando detecte
movimiento. Esto solo tiene objeto en la conguración y ayuda al
usuario a orientar la cámara.
2. Durante el uso, el LED no destella cuando la cámara toma una
imagen. También ayuda a mantener la cámara oculta de las piezas
de caza
La cámara no conserva los ajustes
1. Compruebe que ha guardado los cambios de cualquier ajuste de
parámetro realizado en modo de ajuste pulsando “OK” después
de cambiar el ajuste. Si no guarda su nuevo ajuste después de
cambiarlo, la cámara seguirá usando el ajuste predeterminado
original de ese parámetro.
Identicación de Problemas/Preguntas Frecuentes
Page 65

65
Las especicaciones y diseños están sujetos a cambios
sin ningún aviso u obligación por parte del fabricante.
GARANTÍA LIMITADA de DOS AÑOS
Su producto Tasco® está garantizado contra defectos de materiales y fabricación durante dos
años después de la fecha de compra. En caso de defectos bajo esta garantía, nosotros, a nuestra
opción, repararemos o sustituiremos el producto siempre que lo devuelva con portes pagados.
Esta garantía no cubre defectos causados por el uso indebido, ni por un manejo, instalación
o mantenimiento realizados por alguien que no sea un departamento de servicio autorizado
de Tasco.
Cualquier envío que se haga bajo esta garantía deberá ir acompañado por lo siguiente:
1) Un cheque/giro postal por la cantidad de 10 dólares para cubrir los gastos postales y
de manejo
2) Nombre y dirección donde quiere que se le envíe el producto
3) Una explicación del defecto
4) Una prueba de la fecha de compra
5) El producto debe empaquetarse bien en una caja resistente para evitar que se dañe
durante el transporte, con los portes prepagados a la dirección ûn que se muestra a
continuación:
En EE.UU. enviar a: En CANADÁ enviar a:
Tasco Outdoor Products Tasco Outdoor Products
Attn.: Repairs Attn.: Repairs
9200 Cody 25A East Pearce Street, Unit 1
Overland Park, Kansas 66214 Richmond Hill, Ontario L4B 2M9
En el caso de productos comprados fuera de Estados Unidos o Canadá, póngase en contacto
con su distribuidor local para que le den la información pertinente sobre la garantía. En
Europa también puede ponerse en contacto con Tasco en:
Tasco Germany GmbH
European Service Centre
Mathias-Brüggen-Str. 80
D-50827 Köln
GERMANY
Tel: +49 221 995568-0
Fax: +49 221 995568-20
Esta garantía le ofrece derechos legales especícos.
Puede que tenga otros derechos que varían de un país a otro.
©2011 B.O.P.
Page 66

66
Eliminación de equipos eléctricos y electrónicos
(Aplicable en la UE y otros países europeos con sistemas de recogida separada)
Este equipo contiene elementos eléctricos o electrónicos y por tanto no debe
eliminarse con los residuos domésticos normales. En cambio, debe eliminarse en los
correspondientes puntos de recogida para reciclaje previstos por las comunidades.
Para usted resultará gratuito.
Si el equipo incorpora baterías intercambiables (recargables), estas también
deben retirarse antes y, si es necesario, eliminarlas de acuerdo con las regulaciones
correspondientes (consulte también los comentarios al efecto de las instrucciones
de estas unidades).
La administración de su comunidad, su empresa local de recogida o la tienda en la
que adquirió este equipo pueden proporcionarle información adicional sobre este
tema.
Page 67

67
Deutsch
Einleitung
Teilebeschreibung
Einlegen der Batterie und SD-Karte
Kamera-Setup
Jahr, Datum und Uhrzeit einstellen
Kamera-/Video-Modus und Auösung
einrichten
Verzögerungszeit einstellen
Anzahl der gespeicherten Foto-/Videodateien
prüfen
Formatieren der SD-Karte
Kamerafunktion
Montage der Kamera
Einschalten der Kamera
Testen des Abdeckungsbereichs
Kamera sichern
Fotos und Videos ansehen
Glossar
Technische Daten
Fehlerbehebung / häug gestellte Fragen
Seitenindex
69
70
72
73
73
74
75
76
76
77
77
77
78
78
79
80
81
82
Page 68

68
WICHTIGER HINWEIS
Wir gratulieren Ihnen zum Kauf einer der besten Wildkameras auf dem
Markt! Tasco ist auf die Entwicklung dieses Produktes sehr stolz, und wir
sind sicher, dass auch Sie mit Ihrer Wahl zufrieden sein werden. Wir freuen
uns über Ihren Kauf und danken Ihnen für das in uns gesetzte Vertrauen.
Bitte befolgen Sie die nachfolgenden Hinweise und Anweisungen in
dieser Bedienungsanleitung, damit Sie mit diesem Produkt voll und ganz
zufrieden sind.
Falls Ihre Tasco Wildkamera nicht ordnungsgemäß funktioniert oder
falls die Qualität der Fotos und Videos Anlass zu Beanstandung gibt,
lesen Sie bitte im Abschnitt Problembehebung und häug gestellte
Fragen auf den Seiten 82-85.
Häug gibt es eine ganz plausible Ursache für die aufgetretenen
Probleme, oder es müssen nur einige Einstellungen geändert werden.
Sollte das Problem nach dem Lesen des Abschnittes Problembehebung
und häug gestellte Fragen und Antworten weiterhin bestehen,
wenden Sie sich bitte an einen Tasco Fachhändler in Ihrer Umgebung.
Tasco empehlt die Verwendung von 4 Energizer® Lithium AA
Batterien in dieser Wildkamera für eine optimale Lebensdauer der
Batterien.
Tasco empehlt die Verwendung von SanDisk® SD- und SDHC-Karten
(bis zu 16GB Kapazität) in dieser Wildkamera.
Page 69

69
EINLEITUNG
Herzlichen Glückwunsch zum Kauf Ihrer digitalen Wildkamera Tasco
119215. Diese Wildkamera wurde zur Aufzeichnung von Wildbewegung
im Freien konstruiert. Sie verfügt über Standbild- und Film-Modi
und bietet eine wetterbeständige und robuste Konstruktion. Dieses
Wildkamera-Modell bietet eine kompakte Größe für unterwegs und eine
extra lange Batterie-Lebensdauer.
Hauptfunktionen:
• 2,1MP Digitalsensor
• Kompakte Größe (120mm x 94 mm x 46 mm)
• Lange Batterie-Lebensdauer (bis zu 6 Monate)
• Auslösezeit=1,6 Sekunden
• Automatischer IR-Filter
• LCD-Bildschirm
• 15 Nachtsicht-LEDs
• Anpassbare Fotoverzögerung: 5~ 59 Sekunden ,1~ 10 Min. (Standard
10S)
• Mehrfach-Aufnahmemodus (3 Bilder pro Auslöser)
• 640*480 bei 30 FPS Videos
• Unterstützt bis zu 16 GB SD-Karte
• Aufdruck von Datum, Zeit und Mondphase
• Automatische Belichtung
• Automatischer Weißabgleich
• Stromversorgung: 4 AA Akkus
• Montagesockel für Standardstative
• Wetterbeständig
Page 70

70
Anleitung für Teile und Bedienelemente
Kamera-
objektiv
Infrarot-LEDGruppe
PIR-Bewegungssensor
Stativönung
Bohrung für
Schloss
Detailansicht IR-LED-Gruppe
PIR-
Anzeige
(Nur im
Setup-
Modus)
Lichtsensor
Page 71

71
Detailansicht Bedienfeld
Anleitung für Teile und Bedienelemente
Bedienfeld
(Vorderseite geönet)
Einschaltknopf
USB-
Anschluss
LCDBildschirm
SD-Karten-
schlitz
Batteriefach
Page 72

72
EINLEGEN DER BATTERIE UND SD-KARTE
Die Tasco 119215 Digital Scouting Camera wird mit 4 AA Batterien
betrieben. Wir empfehlen Lithium (für längste Lebensdauer) oder Alkaline
Batterien.
Hinweis: Stellen Sie den Ein-/Ausschalter stets auf die „OFF“-Position
(AUS), wenn Sie die Batterien einlegen oder herausnehmen.
Achten Sie darauf, dass die Batterien korrekt eingelegt werden, wie im
Batteriefach angezeigt. Eine falsche Spannung oder Polarität (+/-) führen
zu einer Beschädigung der Kamera.
Speicher
Ihre 119215 Digital Scouting Camera hat einen Speicherkartenschlitz zur
Aufnahme von SD-Karten bis zu einer max. Kapazität von 16GB (separat
erhältlich).
Einlegen einer SD-Karte
Stellen Sie sicher, dass Ihre Kamera stets auf der „OFF“-Position steht,
wenn Sie eine Speicherkarte einschieben oder herausnehmen.
Schieben Sie die SD-Karte komplett und in der korrekten Ausrichtung, wie
durch das Symbol unter dem SETUP-Knopf angezeigt, in den Kartenschlitz
(Kontakte zeigen nach oben und die eingekerbte Ecke zeigt nach links).
Zum Herausnehmen der SD-Speicherkarte drücken Sie die SD-Karte
hinunter und ziehen die Karte vorsichtig heraus.
Wir empfehlen die Verwendung einer neuen, freien SD-Karte. Wenn die
SD-Karte in einem anderen Gerät verwendet wurde, stellen Sie bitte sicher,
dass diese mit der Formatierungsoption im Setup-Menü der Wildkamera
formatiert wird, bevor Sie die Kamera für Foto-/Videoaufnahmen
einrichten. Neue Karten sind direkt nach dem Auspacken einsatzbereit.
Page 73

73
KAMERA-SETUP
Die Ersteinrichtung Ihrer Wildkamera ist absolut einfach. Schalten Sie
das Gerät ein und drücken Sie die „SETUP“-Taste. Die Symbole/Anzeigen
des Displays (wie unten angezeigt) werden blinken und zeigen damit
an, welche Einstellung Sie vornehmen, wobei Sie mit „DATE“ (Datum)
beginnen. Drücken Sie „UP“ (Aufwärts) oder „DOWN“ (Abwärts), um zum
nächsten Einrichtungspunkt zu gelangen. Drücken Sie die „OK“-Taste,
um eine spezi sche Menüeinstellung zu bestätigen, wenn diese blinkt.
Nachdem Sie die Einstellungen für alle Menüpunkte abgeschlossen
haben (oder nachdem Sie erneut eine einzelne Einstellung vorgenommen
haben), drücken Sie erneut „SETUP“, um den Setup-Modus zu beenden.
1. Datum, Jahr und Uhrzeit einstellen
Befolgen Sie die nachfolgenden Schritte zum Einstellen von Datum, Jahr
und Uhrzeit, damit diese korrekt auf Ihren Fotos abgebildet werden:
Datum und Jahr einstellen
• Zunächst schieben Sie den Einschaltknopf auf die „ON“-Position und
drücken anschließend den „SETUP“-Knopf.
• Die „DATE“ (Datum) Anzeige (Nr.1) wird blinken. Drücken Sie „OK“,
um zu bestätigen, dass Sie das Datum einstellen möchten.
• Die ersten zwei Zi ern der 4-stelligen Anzeige (Nr.3) bezeichnen den
Monat (MM) und die letzten zwei Zi ern bezeichnen den Tag (TT).
Setup-Symbole – Erklärung des Displays
1. Datum
2. Uhrzeit
3. 4-Zi ern-Display
4. Standfoto-Modus /
Au ösung
5. Video-Modus
6. Verzögerungszeit
7. SD-Karte
7
4
5 6
Page 74

74
• Drücken Sie „UP“ oder „DOWN“ zum Wählen des Monats zwischen
01-12, drücken Sie „OK“ zum Bestätigen der von Ihnen eingegebenen
Monatsangabe. Anschließend stellen Sie das Datum ein:
• Drücken Sie „UP“ oder „DOWN“ zum Wählen eines Datums zwischen
01-31, drücken Sie „OK“ zum Bestätigen. Anschließend stellen Sie das
Jahr ein:
• Drücken Sie „UP“ oder „DOWN“ zum Wählen eines Jahres zwischen
10-30 (2010-2030), drücken Sie „OK“ zum Bestätigen.
Zeit einstellen
• Die „TIME“ Anzeige (Nr.2) wird als nächstes blinken (nachdem Sie die
DATE/YEAR (Datum/Jahr) Einstellungen bestätigt haben). Drücken
Sie „OK“, um zu bestätigen, dass Sie das Datum einstellen möchten.
• Die ersten zwei Ziern der 4-stelligen Anzeige bezeichnen die
Stunden (HH) und die letzten zwei Ziern bezeichnen die Minuten
(MM).
• Drücken Sie „UP“ oder „DOWN“ zum Wählen einer Stunde zwischen
00-23 (00=Mitternacht, 12=Mittag, 23=11PM), drücken Sie „OK“ zum
Bestätigen. Als nächsten können Sie die Minuten einstellen.
• Drücken Sie „UP“ oder „DOWN“ zum Wählen der Minuten zwischen
00-59, drücken Sie „OK“ zum Bestätigen.
Hinweis: Die Datum- und Zeiteinstellungen bleiben normalerweise für
einige Minuten erhalten, wenn die Batterien aus der Kamera genommen
werden. Wenn die Batterien jedoch für längere Zeit entnommen wurden,
müssen Sie beim Einlegen erneut Datum und Uhrzeit einstellen.
2. Kamera-/Video-Modus und Auösung einrichten
Unter dieser Einstellung können Sie festlegen, ob die Kamera Standfotos
schießt oder Videoclips aufnimmt, wenn der PIR ausgelöst wird (Fotooder Videomodus). Sie können weiterhin die Anzahl der Fotos festlegen,
welche die Kamera bei jedem PIR-Auslösen schießt (nur Fotomodus).
Verfügbare Einstellungen sind 1P, 3P oder Videomodus.
• Die „FOTO/VIDEO“ Anzeigen (Nr.4 & Nr.5) blinken jetzt (wechselnd).
Drücken Sie „OK“, um zu bestätigen, dass Sie den Aufnahmemodus
KAMERASETUP (Fortsetzung)
Page 75

75
KAMERASETUP (Fortsetzung)
einstellen möchten.
• Drücken Sie den „UP“ oder „Down“ Knopf zur Auswahl des Foto- oder
Videomodus-Symbols (nur der von Ihnen gewählte Modus wird
blinken).
Wenn Sie das „Foto“ Modus-Symbol wählen (Nr.4), drücken Sie „OK“:
• Das LCD wird die Anzeigen abwechselnd blinken lassen: „1P“ (ein
Foto pro Auslöser) und „3P“ (Folge von 3 Fotos pro Auslöser). Drücken
Sie „UP“ oder „DOWN“ zum Wählen der von Ihnen bevorzugten
Einstellung, dann drücken Sie „OK“ zum Bestätigen.
• Als nächstes wird das LCD „LoHI“ zur Einstellung der Auösung für
die Standfotos anzeigen. „Lo“ bezeichnet 2,1 MP (die Auösung des
Sensors) und „HI“ bezeichnet 5,0 MP (mittels Softwareerweiterungdie Fotoqualität wird höher sein, aber jede Datei belegt mehr Platz
auf der SD-Karte). Drücken Sie „UP“ oder „DOWN“ zum Wählen der
von Ihnen bevorzugten Auösung, dann drücken Sie „OK“ zum
Bestätigen.
Wenn Sie das „Video“ Modus-Symbol wählen (Nr.5), drücken Sie „OK“:
• Die Filmlänge ist auf 15 Sekunden voreingestellt und kann nicht
geändert werden. Es gibt keine weiteren Einstellungen oder
Optionen für den Videomodus.
Nachdem Sie auf „OK“ gedrückt haben (wenn Sie die Einstellung für ein/
drei Foto(s) und die Auösung für den „Foto“-Modus gewählt haben), wird
das Symbol „Verzögerungszeit“ (Nr.6) als Nächstes blinken.
3. Verzögerungszeit einstellen
Unter dem Menü „Verzögerungszeit“ können Sie die Länge der Ruhephase
der Kamera in Minuten und Sekunden einstellen, bevor ein neuer PIRAuslöser akzeptiert wird. Diese Zeiteinstellung reicht von 1 Sekunde bis
zu 10 Minuten. Die voreingestellte Verzögerungszeit beträgt 10 Sek.
• Drücken Sie bei blinkendem Symbol für die Verzögerungszeit (Nr.6)
auf „OK“, um zu bestätigen, dass Sie diese einstellen möchten.
• Das LCD wird „0010“ anzeigen, wobei die ersten zwei Ziern die
Minuten bezeichnen und die letzten zwei Ziern die Sekunden.
Page 76

76
KAMERASETUP (Fortsetzung)
• Während die ersten zwei Ziern blinken, drücken Sie auf „UP“ oder
„DOWN“, um den Minutenwert zu ändern (Bereich 00-60 Min.).
Drücken Sie auf „OK“, um die Minuteneingabe zu bestätigen.
(Nur) wenn Sie „00“ für die Minuteneinstellung gewählt haben, werden
die zwei letzten Ziern blinken und Sie können eine Verzögerungszeit
in Sekunden einstellen (dies ist nicht verfügbar, wenn Sie zwischen „01“
und „60“ Minuten gewählt haben).
• Drücken Sie „UP“ oder „DOWN“ zum Ändern des Wertes (Bereich von
05-59 Sekunden), drücken Sie „OK“ zum Bestätigen.
Anschließend (letzter Punkt im Setup-Menü) sehen Sie das SDKartensymbol (Nr.7) blinken. Hier können Sie bei Bedarf die Anzahl der
Dateien auf Ihrer SD-Karte und das Format prüfen.
4. Anzahl der gespeicherten Foto-/Videodateien prüfen
• Während das SD-Kartensymbol (Nr.7) blinkt, ist die Gesamtzahl der
gespeicherten Dateien auf der SD-Karte auf dem 4-stelligen Display
sichtbar (Nr.3). Damit können Sie sehen, ob es sich um eine neue
Karte handelt oder um eine, die Sie bereits zuvor genutzt haben
(und evtl. formatieren möchten).
• Drücken Sie auf OK – damit gelangen Sie als Nächstes zum
Menüpunkt „Format Card“ (Karte formatieren).
5. Formatieren der SD-Karte
• Während das SD-Kartensymbol (Nr.7) blinkt, (nach dem Drücken
auf OK am Ende des vorherigen Setup-Schrittes) drücken Sie „UP“
oder „DOWN“ zum Wählen von „FO“ (Ja, Format) oder „NO“ (Nicht
formatieren) und drücken dann „OK“ zum Bestätigen Ihrer Wahl.
• Drücken Sie „UP“ oder „DOWN“ zum Wählen von „Y“ (Ja) oder „N“
(Nein), dann drücken Sie „OK“ zum Bestätigen. Dieser Schritt bietet
zusätzliche Sicherheit und schützt vor einem versehentlichen
Formatieren einer Karte mit Dateien, die Sie behalten möchten.
Wenn Sie im ersten Schritt „FO“ wählen, und dann „Y“ und „OK“
drücken, wird die Kamera die SD-Karte formatieren – alle Dateien
auf der Karte werden gelöscht.
Page 77

77
KAMERAFUNKTION
Nachdem Ihre Kamera eingerichtet wurde, können Sie sie für
Fotoaufnahmen der Wildaktivitäten in dem von Ihnen gewählten Bereich
verwenden. Befolgen Sie einfach nachfolgende Schritte:
1. Montage der Kamera
Es wird empfohlen, die Kamera circa 4 oder 5 Fuß (1,2~1,5 Meter) überhalb
des Bodens zu montieren, wobei die Kamera einen leichten Abwärtswinkel
einnimmt. Wenn möglich, vermeidet man, dass die Kamera nach Osten
oder Westen ausgerichtet ist, da das Aufgehen und Untergehen der Sonne
falsche Auslöser und überbelichtete Bilder produzieren könnte. Räumen
Sie Zweige und andere Hindernisse vor der Kamera weg, damit diese die
Kameralinse oder den PIR-Sensor nicht blockieren.
Zum Befestigen der Kamera ziehen Sie die Riemen durch die dafür
vorgesehenen Schlitze hinten am Gehäuse. Wickeln Sie den Riemen um
die Befestigungsäche herum. Sichern Sie den Riemen und schließen Sie
die Schnalle, um die Kamera zu sichern.
Stellen Sie sicher, dass beide Türverriegelungen sicher verschlossen sind,
um eine entsprechende Wetterbeständigkeit zu gewährleisten.
2. Einschalten der Kamera
Die Kamera wechselt nach dem Einschalten in den Stromsparmodus.
Wenn der PIR-Sensor ausgelöst wird, wird sie direkt mit der Fotoaufnahme
beginnen, nachdem die Verzögerungszeit (wie eingestellt) verstrichen ist.
Verlassen des Setup-Menüs
Nachdem Sie das Setup-Menü abgeschlossen haben, drücken Sie „SETUP“
zum Speichern aller Einstellungen und verlassen Sie das Setup-Menü. Sie
können Ihre Wildkamera jetzt mitnehmen und mit der Aufnahme von
Wildaktivitäten in freier Natur beginnen.
Page 78

78
3. Testen des Abdeckungsbereichs
Eine der nützlichsten Funktion der 119215 Wildkamera ist die Möglichkeit,
den Abdeckungsbereich zu prüfen.
Önen Sie nach dem Montieren der Kamera das vordere Gehäuse und
schieben den Einschaltknopf auf die „ON“-Position. Drücken Sie den
SETUP-Knopf, um den MENU-Modus zu önen.
Stellen Sie die PIR-Empndlichkeitseinstellung entsprechend den
Bedingungen auf Ihre Präferenzen ein.
Die PIR-Anzeigenleuchte unter der Linse wird blinken, wenn Sie den im
Erfassungsbereich der Kamera den Bewegungssensor auslösen.
Richten Sie die Kameraposition bei Bedarf neu aus und wiederholen Sie
den Test, bis der gewünschte Abdeckungsbereich erzielt wurde.
Wenn Sie den Testmodus nicht mehr benötigen, drücken Sie erneut den
SETUP-Knopf. Die Kamera wechselt in den Stromsparmodus, bis der PIRSensor das erste Foto oder die erste Videoaufnahme auslöst..
4. Kamera sichern
Ein standardmäßiges Schloss kann durch die Schlossbohrung gesteckt
werden, um die Kamera zu sichern und vor Diebstahl zu schützen.
KAMERAFUNKTION (Fortsetzung)
Abdeckungsbereich der Kamera
Erfassungsbereich des Bewegungssensor
Page 79

79
FOTOS und VIDEOS ANSEHEN
Nachdem Ihre Kamera eine Weile gelaufen ist, möchten Sie natürlich die
aufgenommenen Fotos und/oder Videos ansehen. Hierzu stehen zwei
Methoden zu Auswahl, je nachdem, welche Sie bevorzugen und welches
Zubehör Sie zur Verfügung haben:
Verwendung eines SD-Kartenlesegeräts
Drücken Sie die SD-Karte leicht ein und ziehen diese vorsichtig heraus.
Stecken Sie die SD-Karte in ein SD-Kartenlesegerät (wahlweise ein
spezielles SD-Kartenlesegerät oder ein „Multi-Kartenlesegerät, das über
mehrere Schlitze für verschiedene Speicherkarten verfügt, darunter
auch für SD-Karten). Befolgen Sie die Herstelleranleitung des jeweiligen
Kartenlesers zum Ansehen oder Herunterladen der Fotos und/oder
Videodateien von der SD-Karte.
Direktanschluss der Kamera an einen PC
Schließen Sie Ihre Kamera mithilfe eines USB-Kabels an einen PC an (5Pin Mini „B“ zu Standardstecker „A“, im Lieferumfang enthalten). Der
PC wird die Kamera als externe Speichereinheit erkennen und den
„USB-Massenspeicher“ Standard verwenden (keine Treiberinstallation
erforderlich; nicht kompatibel mit Windows 98 oder älter). Das LCD
der Kamera wird „STO“ anzeigen, was bedeutet, dass die Kamera im
Massenspeicher-Modus ist.
USB-Kabelanschlüsse
Zur Kamera Zum PC
Steckertyp A
Page 80

80
PIR (Passiver Infrarot-Sensor): Erkennt Bewegungen wie ein üblicher
Sicherheitsbewegungsmelder. Benötigt neben der Bewegung Infrarot-Energie
(Wärme) zum Auslösen des Sensors, damit die Erkennung auf lebende Tiere
beschränkt bleibt (anstatt Blätter etc).
Kamera-Display: Verstrichene Zeit zwischen Fotos, während Ereignisse erkannt
und aufgezeichnet werden. Sie sollten dies entsprechend der Wildaktivität in der
Gegend einstellen.
Mondphase: Das Aktivitätsniveau einiger Tiere scheint mit den Mondphasen
verknüpft zu sein. Die Wildkamera verfügt über eine Funktion, welche zu
Referenzenzwecken einen Mondphasenstempel auf jedem Foto abbildet.
IR-Blitz: Auch als IR LED-Gruppe bezeichnet. Dies ist eine „Nachtsicht“-Funktion,
die gehäuftes Infrarotlicht emittiert, das für das menschliche Auge nicht sichtbar
ist. Dies ist insbesondere für Nachtfotos nützlich, wenn ein sichtbarer Blitz nicht
wünschenswert ist.
Lebensdauer der Batterie: Zeitdauer, in der die Kamera im Einsatz funktionieren
wird. Abhängig von der Umgebungstemperatur, der Anzahl der aufgenommenen
Bilder und der Anzahl der ausgelösten IR-Blitze. Wenn die Batteriespannung unter
4,5 V fällt, wird der IR-Blitz nicht mehr ausgelöst. Wenn die Batteriespannung unter
3,5 V liegt, stellt die Kamera die Funktion ein.
Häufung: Die Anzahl der Bilder, welche die Kamera durch PIR-Auslöser aufnimmt.
1P: Aufgenommenes Einzelbild pro PIR-Auslöser
3P: Aufgenommene Folge von drei Bildern pro PIR-Auslöser
VOLL: Wenn die Speicherkapazität erschöpft ist, zeigt das LCD-Display „VOLL“ an.
Massenspeicher: Schließen Sie ein USB-Kabel an einen Computer an, drücken
Sie auf den „SETUP“-Knopf und der Computer kann auf den Inhalt der SD-Karte
zugreifen. Die Kamera wird automatisch als „externes Laufwerk“ erkannt, ohne
dass hierzu spezielle Treiber installiert werden müssen (Win 98 und ältere
Betriebssysteme werden nicht unterstützt. Mac OS9 und OSX sind ebenfalls
kompatibel). Die Kamera wird auf Ihrem Desktop als externes Speichergerät oder
als „Disk“ angezeigt.
GLOSSAR
Page 81

81
Technische Spezikationen
Modellnummer 119215
Bildsensortyp 1/2 Zoll CMOS
Eektive Auösung 2,1 Megapixel
Eektive Brennweite 7,6 mm
Blende f/2,8
IR-Filter Automatischer IR-Filter
Anzeige Backlit LCD
PIR-Sensor Ja
Auslösergeschwindigkeit 1,6 Sekunden
Anzahl der IR-LEDs 15 LEDs
Max. Reichweit Nachtsichtblitz 10 Meter
Aufbewahrung
SD-Karte bis zu 16 GB
Speicherkapazität
PIR-Anzeige Ja (Nur im Setup-Modus)
Einstellbarer Verzögerungszeitbereich
5~ 59 Sekunden ,1~ 10 Min.
(Standard 10S
Wählbare Bildauösung 2,1MP, 5,0MP
Mehrfachbild-Modus Ja-3 Fotos
Videoauösung
Film: AVI 640 x 480 Pixel @ 30 fps
(15 Sekunden).
Dateiformat (Bild/Video) JPEG/AVI
Datum/Zeit-Aufdruck Ja
Mondphasen-Aufdruck Ja
Belichtung Auto
Weißabgleich-Modus Auto
Stromversorgung
4 AA Akkus (Alkaline, Lithium
oder NiMh)
Wasserbeständig
Ja
Page 82

82
Die Batterielaufzeit ist kürzer als angenommen
1. Die Laufzeit der Batterie hängt mit der Betriebstemperatur und
Anzahl der insgesamt gemachten Aufnahmen zusammen. In der
Regel genügt die Batterieleistung der Wildkamera für mehrere
tausend Aufnahmen.
2. Vergewissern Sie sich, ob Sie neue Alkali- oder Lithiumbatterien
eingelegt haben. Tasco empehlt die Verwendung von 4
Energizer® Lithium AA Batterien in dieser Wildkamera für eine
optimale Lebensdauer der Batterien.
3. Überprüfen Sie, ob der Einschaltknopf auf “ON” (Ein) gestellt, und
die Kamera im Freien nicht im “SETUP”-Modus auf war.
4. Sorgen Sie auch dafür, dass sie eine qualitativ hochwertige
SD-Karte eines Markenherstellers in der Kamera verwenden.
Tasco empehlt Karten bis zu 16 GB der Marke SanDisk®.
Unsere Erfahrung hat gezeigt, dass SD-Karten von niedriger
Qualität häug die Leistungsdauer der Batterien der Wildkamera
verringern.
Die Kamera macht auf einmal keine Bilder mehr oder lässt überhaupt
keine Aufnahmen mehr zu
1. Prüfen Sie, ob auf der SD-Karte noch Platz ist. Bei voller SD-Karte
sind keine Aufnahmen mehr möglich.
2. Vergewissern Sie sich, ob Sie neue Alkali- oder Lithiumbatterien
eingelegt haben.
3. Lesen Sie auch den Hinweis zum Thema “kurze Batterielaufzeit”.
4. Stellen Sie sicher, dass der Einschaltknopf auf der „On“-Position
und nicht auf der „O“-Position oder im „Setup“-Modus steht.
5. Sorgen Sie dafür, dass sie eine qualitativ hochwertige SD-Karte
in der Kamera verwenden. Tasco empehlt SanDisk® SD-Karten
bis zu 16GB.
6. Die Kamera macht keine Aufnahmen, wenn der Schreibschutz der
SD-Karte aktiviert ist.
7. Falls Sie Ihre SD-Karte vorher bereits in anderen Geräten
verwendet haben formatieren Sie die Karte mit dem Parameter
Fehlerbehebung / häug gestellte Fragen
Page 83

83
„Format“ im SETUP-Modus bevor Sie sie in Ihre Wildkamera
einlegen (vergewissern Sie sich, dass Sie davor wichtige
Dateien gespeichert haben, da eine Formatierung alle Dateien
unwiederbringlich löscht). Es kann vorkommen, dass andere
Geräte die Formatierung der SD-Karte verändert haben und sie
daher in der Wildkamera nicht ordnungsgemäß funktioniert.
Kamera lässt sich nicht einschalten
1. Stellen Sie sicher, dass Sie alle 4 Batterien in das Batteriefach
eingelegt haben. Tasco empehlt die Verwendung von 4
Energizer® Lithium AA Batterien in dieser Wildkamera.
2. Achten Sie darauf, dass die Batterien korrekt und richtig gepolt
eingelegt sind. Die Batterie muss immer mit dem negativen
(achen) Pol in Richtung der Feder in das Batteriefach der Kamera
eingelegt werden.
Schwierigkeiten mit der Qualität von Standfotos und/oder
Videoaufnahmen
1. In der Nacht aufgenommene Fotos oder Videos sind zu dunkel
a. Verwenden Sie einen Satz neuer Batterien. Bei geringer
Batterieleistung funktioniert der Blitz nicht mehr.
b. Das beste Ergebnis erzielen Sie, wenn sich das Objekt im
idealen Abstand zum Blitz bendet, was innerhalb von 14 Metern
sein sollte. Objekte erscheinen zu dunkel, wenn sie etwas weiter
entfernt sind.
c. Beachten Sie bitte, dass falls der Parameter „Anzahl der
Aufnahmen“ größer als „1 Foto“ ist oder die Zeitabstände nur sehr
kurz eingestellt sind, einige Bilder dunkler erscheinen können als
andere. Das liegt an der schnellen Reaktionszeit und daran, dass
der Kamera für ein erneutes Auslösen nur sehr wenig Zeit zur
Verfügung steht, wodurch sich auch der Blitz nicht vollständig
auaden kann.
Fehlerbehebung / häug gestellte Fragen
Page 84

84
2. Tagsüber aufgenommene Fotos oder Videos erscheinen zu dunkel
a. Stellen Sie sicher, dass die Kamera tagsüber nicht direkt auf
die Sonne oder andere Lichtquellen gerichtet ist, da die AutoBelichtung dadurch dunklere Ergebnisse liefert.
3. Nachts aufgenommene Fotos oder Videos erscheinen zu hell
b. Das beste Ergebnis erzielen Sie, wenn sich das Objekt im idealen
Abstand zum Blitz bendet, also nicht näher als 3m. Objekte
erscheinen zu hell, je näher sie sind.
4. Tagsüber aufgenommene Fotos oder Videos erscheinen zu hell
a. Sorgen Sie dafür, dass die Kamera tagsüber nicht direkt auf die
Sonne oder andere Lichtquellen ausgerichtet ist.
5. Die Objekte auf den Fotos erscheinen gestreift
a. Bei schlechten Lichtverhältnissen und bei sich schnell
bewegenden Objekten, kann eine Einstellung mit der Auösung
5 MP schlechtere Ergebnisse hervorbringen, als eine Einstellung
auf 2,1 MP.
b. Falls Schlieren auf mehreren Aufnahmen von sich schnell
bewegenden Objekten erscheinen, versuchen Sie die Einstellung
mit 2,1 MP.
6. Roter, grüner oder blauer Farbstich
a. Unter bestimmten Lichtverhältnissen kann der Sensor abgelenkt
werden, was zu minderwertigen Farbergebnissen führt.
b. Sollte dies aber regelmäßig auftreten, muss der Sensor eventuell
gewartet werden. Wenden Sie sich in diesem Fall bitte an Ihren
Tasco Fachhändler.
7. Kurze Videoaufnahmen—Gerät nimmt nicht in der gesamten
eingestellten Länge auf
a. Prüfen Sie, ob die Speicherkarte eventuell voll ist.
b. Stellen Sie sicher, dass die Batterien in der Kamera noch gut
sind. Wenn die Batterien schwächer werden, kann die Kamera
kürzere Videoclips aufnehmen, um Strom zu sparen.
Fehlerbehebung / häug gestellte Fragen
Page 85

85
Auf den Fotos ist nicht das gewünschte Objekt zu sehen
1. Platzieren Sie die Kamera möglichst nicht in der Nähe einer
Wärmequelle im Sichtfeld.
2. Wenn die Kamera in der Nähe zum Wasser aufgestellt wird, kann
es hin und wieder vorkommen, dass auch Aufnahmen ohne
Objekt gemacht werden. Die Kamera sollte daher immer auf
festen Untergrund ausgerichtet sein.
3. Die Kamera sollte nach Möglichkeit nicht an kleinen Bäumen
befestigt werden, die im Wind nachgeben.
4. Entfernen Sie alle Äste, die sich unmittelbar vor dem
Kameraobjektiv benden.
PIR-Sensor LED blinkt/blinkt nicht
1. Wenn die Kamera im „SETUP“-Modus ist, wird das LED der PIRAnzeige vorne an der Kamera blinken, wenn Bewegung erkannt
wurde. Dies ist nur für Einrichtungszwecke und unterstützt den
Benutzer bei der Ausrichtung der Kamera.
2. Während der Verwendung wird das LED nicht blinken, wenn die
Kamera ein Bild aufnimmt. Dies trägt dazu bei, dass die Kamera
möglichst unentdeckt bleibt.
Einstellungen werden von der Kamera nicht gespeichert
1. Vergewissern Sie sich, dass Sie alle im Setup-Modus durchgeführten
Änderungen der Parametereinstellungen durch Drücken der OK-Taste
gespeichert haben. Werden die Einstellungen nach der Änderung
nicht gespeichert, übernimmt die Kamera automatisch wieder die
für den jeweiligen Parameter festgelegten Werkseinstellungen.
Fehlerbehebung / häug gestellte Fragen
Page 86

86
Der Hersteller behält sich das Recht auf die Durchführung von
Änderungen von Spezikationen und Konstruktionsmerkmalen ohne
jegliche vorherige Ankündigung oder Verpichtung vor.
GEWÄHRLEISTUNGSFRIST ZWEI JAHRE
Auf das von Ihnen erworbene Produkt der Firma Tasco® gewähren wir zwei Jahre Garantie auf
Materialmängel und Verarbeitung, gültig ab dem Kaufdatum. Falls während dieser Garantiezeit
ein Mangel auftreten sollte, behalten wir uns die Entscheidung darüber vor, das Produkt zu
reparieren oder zu ersetzen, unter der Voraussetzung, dass der Kunde das Produkt porto- und
versandkostenfrei an uns zurückschickt. Diese Gewährleistung schließt keinerlei Schäden ein, die
durch Missbrauch, unsachgemäßen Umgang, Einbau oder durch fehlerhafte Wartung verursacht
wurden, und gilt ebenfalls nicht, wenn diese Tätigkeiten von anderen Personen als den durch die
Kundendienstabteilung der Firma Tasco hierfür autorisierten Personen durchgeführt wurden.
Jegliche Rücksendung, die in Bezug auf diese Gewährleistung erfolgt, muss folgende
Begleitpapiere enthalten:
1) Einen Scheck/Bargeld in Höhe von $10.00 für die Porto- und Handlingkosten
2) Name und Adresse für Rücksendung des Produkts
3) Eine genaue Erläuterung des Mangels
4) Beleg des Kaufdatums
5) Das Produkt ist in einem stabilen Versandkarton gut zu verpacken, um Beschädigungen
beim Transport zu vermeiden, die Portospesen für den Versand an nachstehend aufgeführte
Adresse sind im Voraus zu entrichten:
Versandadresse für die U.S.A: Versandadresse für Kanad:
Tasco Outdoor Products Tasco Outdoor Products
Attn.: Repairs Attn.: Repairs
9200 Cody 25A East Pearce Street, Unit 1
Overland Park, Kansas 66214 Richmond Hill, Ontario L4B 2M9
Was Produkte anbelangt, die nicht in den U.S.A. oder in Kanada gekauft wurden, erfragen Sie bitte
die gültigen Garantiebedingungen bei Ihrem örtlichen Händler. Innerhalb Europas kann die Firma
Tasco unter folgender Adresse kontaktiert werden:
Tasco Germany GmbH
European Service Centre
Mathias-Brüggen-Str. 80
D-50827 Köln
GERMANY
Tel: +49 221 995568-0
Fax: +49 221 995568-20
Diese Gewährleistung räumt Ihnen besondere juristische Rechte ein.
Für die jeweiligen Länder gelten möglicherweise länderspezische Rechte
©2011 B.O.P.
Page 87

87
Entsorgung von elektrischen und elektronischen Geräten
(Gültig in der EU und anderen europäischen Ländern mit getrennten Sammelsystemen)
Dieses Gerät enthält elektrische und/oder elektronische Bauteile und darf deshalb
nicht im normalen Hausmüll entsorgt werden. Stattdessen sollte es an den
entsprechenden Sammelstellen für Recycling der jeweiligen Gemeinden abgegeben
werden. Ihnen entstehen hierdurch keine Kosten.
Wenn die Ausrüstung austauschbare (wiederauadbare) Batterien enthält, müssen
diese zuvor auch herausgenommen werden und, falls nötig, entsprechend der
geltenden Vorschriften entsorgt werden (siehe auch die jeweiligen Anmerkungen in
der Anleitung dieses Geräts).
Weitere Informationen zu diesem Thema sind in Ihrer Gemeinde-/Stadtverwaltung,
Ihrem regionalen Abfallentsorgungsunternehmen oder in dem Geschäft, in dem Sie
das Gerät gekauft haben, erhältlich.
Page 88

88
Italiano
Indice pagine
Introduzione
Identicazione componenti
Installazione batteria e scheda SD
Impostazione fotocamera
Impostazione anno, data e ora
Impostazione modalità fotocamera/
videocamera e risoluzione
Impostazione tempo di delay
Verica del numero di le foto/video in memoria
Formattazione scheda SD
Funzionamento fotocamera
Montaggio fotocamera
Accensione fotocamera
Test dell’area di copertura
Protezione fotocamera
Visualizzazione di foto e video
Glossario
Speciche
Risoluzione problemi/FAQ
90
91
93
94
94
95
96
97
97
98
98
98
99
99
100
101
102
103
Page 89

89
NOTE IMPORTANTI
Congratulazioni per aver acquistato una delle migliori fotocamere da
esplorazione sul mercato! Tasco è particolarmente orgogliosa di questa
unità dalle dimensioni compatte ed è certa che sarà apprezzata anche
dagli utenti. Tasco apprezza le attività svolte dagli utenti, di cui desidera
guadagnare la ducia. Si prega di fare riferimento alle note sottostanti
e alle istruzioni contenute nel presente manuale per garantire l’uso
soddisfacente del prodotto.
Qualora la fotocamera da esplorazione Tasco non dovesse funzionare
correttamente o in caso di problemi di qualità di foto e di video, cfr. il
capitolo Risoluzione problemi/FAQ alle pagine 102-106.
Spesso i problemi dipendono da semplici dettagli che sono stati
trascurati oppure, in altri casi, è necessario modicare solamente una
impostazione.
Se il problema persiste dopo aver provato le soluzioni riportate nella
sezione Risoluzione problemi/FAQ, rivolgersi al servizio clienti Tasco al
numero (800) 423-3537. Dal Canada, chiamare il (800) 361-5702.
Per garantire la massima durata della batteria con la presente
fotocamera da esplorazione, Tasco raccomanda di usare 4 batterie
Energizer® al litio di tipo AA.
Tasco raccomanda di usare le schede SanDisk® SD e SDHC (capacità
no a 16GB) con la presente fotocamera da esplorazione.
Page 90

90
INTRODUZIONE
Congratulazioni per aver acquistato la fotocamera digitale da esplorazione
Tasco 119215. La presente fotocamera da esplorazione è progettata per
registrare le attività naturali all’aperto grazie alle modalità di realizzazione
di fotograe e video, nonché ad una costruzione robusta e impermeabile.
La presente fotocamera da esplorazione presenta dimensioni compatte
e portatili e garantisce tempi di durata della batteria particolarmente
lunghi.
Caratteristiche principali:
• Sensore digitale 2.1MP
• Dimensioni compatte (120mm*94mm*46mm)
• Durata prolungata della batteria (no a 6 mesi)
• Tempo di attivazione=1,6 secondi
• Filtro IR automatico
• Display LCD
• 15 LED per visione notturna
• Delay regolabile per foto: 5~59 secondi, 1~10 minuti (tempo di
default: 10 sec.)
• Modalità di scatto multiplo (3 immagini per attivazione)
• Video a 30 FPS da 640*480
• Supporta schede SD no a 16 GB
• Stampa della data, ora e fase lunare
• Esposizione automatica
• Bilanciamento bianco automatico
• Alimentazione: 4 batterie a celle tipo AA
• Presa di montaggio per treppiede standard
• Impermeabile
Page 91

91
Guida alle componenti e ai tasti di controllo
Obiettivo
della foto-
camera
Fascia di LED
infrarossi
Sensore di
movimento
PIR
Presa per
treppiede
Foro per
lucchetto
Dettaglio fascia di LED IR
Indicatore
PIR (solo in
modalità
Setup)
Sensore
luminoso
Page 92

92
Dettaglio pannello di controllo
Guida alle componenti e ai tasti di controllo
Pannello di controllo
(parte frontale aperta)
Interruttore
Porta USB
Display
LCD
Slot per
scheda SD
Vano batterie
Page 93

93
INSTALLAZIONE BATTERIA e SCHEDA SD
La fotocamera digitale da esplorazione Tasco 119215 è progettata per
funzionare con 4 batterie di tipo AA. Si raccomanda l’impiego di batterie
al litio (per garantire la durata massima) o alcaline.
NOTA: Impostare sempre l’interruttore su OFF prima dell’installazione o
rimozione delle batterie.
Vericare che le batterie vengano inserite correttamente, secondo quanto
indicato all’interno del vano batterie. L’eventuale voltaggio o polarità non
corretti (+/-) possono arrecare danni alla fotocamera.
Memoria
La fotocamera da esplorazione digitale 119215 dispone di una slot per
la memory card destinata all’inserimento di schede SD con capacità
massima di 16GB (in vendita separatamente).
Inserimento scheda SD
Vericare che la fotocamera si trovi su OFF prima di aggiungere o
rimuovere la memoria.
Inserire no in fondo la scheda SD nella slot per la scheda, rispettando
l’orientamento corretto come mostrato dall’icona sotto il tasto SETUP (i
contatti devono essere rivolti verso l’alto e l’angolo a V sulla sinistra).
Per rimuovere la memory card SD, esercitare la pressione sulla scheda SD
quindi rimuovere la scheda con delicatezza.
Si raccomanda l’impiego di una scheda SD nuova e pulita. Laddove la
scheda SD sia stata utilizzata all’interno di un altro dispositivo, eseguire
la formattazione utilizzando l’opzione Format nel menu Setup della
fotocamera da esplorazione prima di impostare la fotocamera per la
cattura di foto/video. Le schede nuove sono pronte per l’uso non appena
estratte dall’imballaggio.
Page 94

94
IMPOSTAZIONE FOTOCAMERA
La procedura iniziale di impostazione per la fotocamera da esplorazione
è molto semplice. Accendere l’unità quindi premere il tasto “SETUP” Le
icone/indicatori sul display (cfr. gura sotto) iniziano a lampeggiare una
alla volta, ad indicare la tipologia di impostazione in corso, iniziando
dalla data. Premere “SU” o “GIU” per passare alla voce di impostazione
successiva. Premere il tasto “OK” per confermare una impostazione
speci ca di menu quando essa lampeggia. Una volta completata la
procedura di impostazione per tutte le voci di menu (o dopo essere tornati
indietro per modi care una impostazione per una voce speci ca), premere
nuovamente “SETUP” per uscire dalla modalità di impostazione.
1. Impostazione data, anno e ora
Attenersi alla procedura sottostante per la regolazione di data, anno e ora
in modo che le informazioni risultino corrette in caso di stampa sulla foto:
Impostazione data e anno
• In primo luogo impostare l’interruttore su “ON”, quindi premere il
tasto “SETUP”.
• L’indicatore “DATE” (n.1) inizia a lampeggiare. Premere “OK” per
confermare l’impostazione.
• Le prime due cifre del display a 4 cifre (n.3) indicano il mese (MM)
mentre le ultime due cifre indicano il giorno (DD).
Icone di impostazione- Guida alle visualizzazioni
1. Data
2. Ora
3. Display a 4 cifre
4. Modalità/
risoluzione foto
5. Modalità video
6. Tempo delay
7. Scheda SD
7
4
5 6
Page 95

95
• Premere “SU” o “GIU” per selezionare il mese tra 01-12, quindi premere
“OK” per confermare l’impostazione del mese eettuata. Impostare
quindi la data:
• Premere “SU” o “GIU” per selezionare una data tra 01-31, quindi
premere “OK” per confermare. Impostare quindi l’anno:
• Premere “SU” o “GIU” per selezionare un anno tra 10-30 (2010-2030),
quindi premere “OK” per confermare.
Impostazione orario
• L’indicatore “TIME” (n.2) inizia quindi a lampeggiare (dopo aver
confermato le impostazioni di DATA/ANNO). Premere “OK” per
confermare l’impostazione.
• Le prime due cifre del display a 4 cifre indicano le ore (HH) mentre le
ultime due cifre indicano i minuti (MM).
• Premere “SU” o “GIU” per selezionare un’ora tra 00-23 (00=mezzanotte,
12=mezzogiorno, 23=11 di sera), quindi premere “OK” per confermare.
È quindi tutto pronto per l’impostazione dei minuti.
• Premere “SU” o “GIU” per impostare i minuti tra 00-59, quindi premere
“OK” per confermare.
Nota: L’impostazione di data e ora verrà normalmente conservata per
alcuni minuti dopo la rimozione delle batterie dalla fotocamera. Tuttavia
può essere necessario reimpostare la data e l’ora una volta sostituite
le batterie, laddove esse siano state rimosse per un periodo di tempo
prolungato.
2. Impostazione modalità fotocamera/video e risoluzione
La presente voce consente di scegliere tra la realizzazione di fotograe o di
videoclip una volta attivato il PIR (modalità foto o video). È altresì possibile
impostare il numero di foto che la fotocamera eettua per ciascuna
attivazione del PIR (solo per la modalità foto). Le impostazioni disponibili
sono 1 foto, 3 foto o modalità video.
• Entrambi gli indicatori “PHOTO/VIDEO” (n.4 e n.5) iniziano a
lampeggiare (in alternanza). Premere “OK” per confermare che si
desidera impostare la modalità di cattura.
IMPOSTAZIONE FOTOCAMERA (continua)
Page 96

96
IMPOSTAZIONE FOTOCAMERA (continua)
• Premere il tasto “SU” o “GIU” per selezionare l’icona della modalità
foto o video (solo la modalità selezionata inizia a lampeggiare).
Laddove si selezioni l’icona della modalità “Photo” (n.4) e si prema “OK:
• Gli indicatori sul LCD iniziano a lampeggiare alternando “1P” (foto
singola scattata per evento di attivazione) e “3P” (sequenza di 3
foto scattate per evento di attivazione). Premere “SU” o “GIU” per
selezionare le impostazioni desiderate, quindi premere “OK” per
confermare.
• Il LCD visualizza quindi “LoHI” per impostare la risoluzione delle
foto. “Lo” rappresenta 2.1MP (risoluzione del sensore) mentre “HI”
rappresenta 5.0MP (mediante interpolazione software la qualità
dell’immagine risulterà superiore, ma ciascun le occuperà maggiore
spazio sulla scheda SD). Premere “SU” o “GIU” per selezionare la
risoluzione desiderata, quindi premere “OK” per confermare.
Laddove si selezioni l’icona in modalità “Video” (n.5) e si prema “OK”:
• La lunghezza del lmato è preimpostata a 15 secondi e non può
essere modicata. Non sono disponibili impostazioni o opzioni
aggiuntive per la modalità video.
Una volta premuto “OK” (dopo aver terminato con la selezione delle
impostazioni relative a una/tre foto e la risoluzione, laddove si selezioni la
modalità “photo”), l’icona “Delay Time” (n.6) inizia a lampeggiare.
3. Impostazione tempo di delay
Il menu Delay Time consente di impostare l’intervallo di riposo della
fotocamera prima di eettuare una nuova attivazione del PIR, in minuti
e secondi. Tale impostazione varia da 1 secondo a 10 minuti. Il tempo di
delay di default è pari a 10 secondi.
• Mentre l’icona del tempo di delay (n.6) lampeggia, premere “OK” per
confermare l’impostazione desiderata.
• Sul LCD viene visualizzato “0010”, dove le prime due cifre indicano i
minuti e le ultime due cifre indicano i secondi.
• Mentre le prime due cifre lampeggiano, premere “SU” o “GIU” per
Page 97

97
IMPOSTAZIONE FOTOCAMERA (continua)
modicare il valore dei minuti (intervallo da 00-60 min.). Premere
“OK” per confermare le impostazioni dei minuti.
Solo nel caso in cui sia stato selezionato “00” per le impostazioni dei
minuti, le ultime due cifre iniziano a lampeggiare; è quindi possibile
impostare un tempo di delay in secondi (funzione non disponibile
quando i minuti selezionati partono da “01” no a “60”).
• Premere “SU” o “GIU” per modicare il valore (intervallo da 05-59
secondi), quindi premere “OK” per confermare.
Successivamente (ultima voce nel menu Setup), l’icona della scheda SD
(n.7) inizia a lampeggiare. A questo punto è possibile controllare il numero
di le sulla scheda SD e formattarla, qualora desiderato.
4. Verica del numero di le foto/video in memoria
• Mentre l’icona SD Card (n.7) lampeggia, sul display a 4 cifre viene
visualizzato il numero totale di le in memoria sulla scheda SD
(n.3). Tale funzione permette di confermare se si tratta di una nuova
scheda o se essa è stata usata in precedenza (e si desidera eettuarne
la formattazione).
• Premere OK; in questo modo si procede alla voce successiva del
menu “Format Card”.
5. Formattazione scheda SD
• Quando l’icona SD Card (n.7) lampeggia (dopo aver premuto OK
alla ne della precedente fase di Setup), premere “SU” o “GIU” per
selezionare “FO” (Sì, formatta) oppure “NO” (Non formattare), quindi
premere “OK” per confermare la selezione.
• Premere “SU” o “GIU” per selezionare “Y” (Sì) o “N” (No), quindi premere
“OK” per confermare. Tale fase garantisce un livello ulteriore di
sicurezza, volto a evitare la formattazione accidentale di una scheda
contenente le importanti da conservare. In caso di selezione di
“FO” durante la prima fase, selezionare “Y” quindi premere “OK”;
la fotocamera avvia la formattazione della scheda SD; tutti i le
sulla scheda verranno eliminati.
Page 98

98
FUNZIONAMENTO FOTOCAMERA
Una volta impostata la fotocamera, è possibile avviarne l’uso per scattare
foto delle attività della natura presso l’area prescelta per l’ubicazione.
Attenersi alla seguente procedura:
1. Montaggio fotocamera
Si raccomanda di montare la fotocamera a circa 1,2~1,5 metri dal suolo;
l’angolo della fotocamera deve essere puntato leggermente verso il
basso. Si sconsiglia di montare la fotocamera in direzione est o ovest in
quanto l’alba e il tramonto possono produrre false attivazioni e immagini
sovraesposte. Eliminare eventuali rami o altri elementi antistanti la
fotocamera, onde non bloccare l’obiettivo della fotocamera o il sensore
PIR.
Per montare la fotocamera in posizione, inserire la strappo nelle fessure
predisposte per la strappo sull’alloggiamento posteriore. Avvolgere la
strappo attorno alla supercie di montaggio. Fissare la strappo e stringere
la bbia per ssare la fotocamera.
Vericare che entrambi i fermi della porta siano correttamente bloccati in
posizione, al ne di garantire la corretta impermeabilità.
2. Accensione fotocamera
Una volta accesa, la fotocamera si trova in modalità di riposo. Con il sensore
PIR attivo, essa inizierà immediatamente a scattare le fotograe una volta
trascorso il tempo di delay (impostato).
Uscita dal menu Setup
Una volta terminato l’uso del menu Setup, premere “SETUP” per salvare
tutte le impostazioni, quindi uscire dal menu Setup. La fotocamera da
esplorazione è ora pronta per essere portata all’aperto ed utilizzata per
registrare le attività della natura.
Page 99

99
3. Test dell’area di copertura
Una delle funzioni più utili della fotocamera da esplorazione 119215 è la
capacità di eettuare la valutazione dell’area di copertura.
Una volta montata la fotocamera, aprire l’alloggiamento frontale e fare
scivolare l’interruttore “Power” in posizione “ON”. Premere il tasto SETUP
per accedere alla modalità MENU.
Regolare il misuratore di sensibilità PIR secondo le condizioni ambientali.
La luce dell’indicatore PIR sotto l’obiettivo inizia a lampeggiare una volta
eettuato l’accesso presso l’area di copertura.
Regolare la posizione della fotocamera come necessario, quindi ripetere il
test no a raggiungere l’area di copertura desiderata.
Al termine, premere nuovamente il tasto SETUP utilizzando la funzione di
test; la fotocamera sarà a riposo in attesa che il sensore PIR scatti la prima
foto o realizzi il primo video.
4. Protezione fotocamera
È possibile utilizzare un lucchetto standard per il foro del lucchetto della
fotocamera, in modo da ssarla ed evitare casi di furto.
FUNZIONAMENTO FOTOCAMERA (continua)
Fotocamera
Sensore di movimento
Page 100

100
VISUALIZZAZIONE FOTO e VIDEO
Una volta attivata la fotocamera per un certo periodo di tempo, si
desidererà sicuramente visionare le foto e/o i video realizzati. Tale
operazione può essere svolta in due modalità, a seconda delle preferenze
o della disponibilità dei dispositivi accessori:
Uso di un lettore della scheda SD
Esercitare una lieve spinta della scheda SD verso l’interno, quindi
rimuoverla con delicatezza.
Inserire la scheda SD in un qualsiasi lettore di schede SD (un lettore di
schede SD dedicato o un “lettore multi-schede” dotato di slot per diversi
tipi di memory card, tra cui le schede SD.
Attenersi alle istruzioni del fornitore del lettore della scheda per visualizzare
o scaricare i le foto e/o video sulla scheda SD.
Collegare direttamente la fotocamera al PC
Fare scivolare l’interruttore “Power” in posizione “On”, quindi premere il
tasto “SETUP”.
Collegare la fotocamera ad un PC mediante un cavo USB (fornito, tipo mini
“B” a 5 poli o tipo maschio standard “A”). Il PC riconosce la fotocamera come
dispositivo di archiviazione di massa esterno, utilizzando lo standard “USB
Mass Storage” (non è necessaria l’installazione del driver; non è compatibile
con Windows 98 o versioni precedenti). Il PC visualizza un simbolo
del disco nuovo all’interno delle “Risorse del computer” o su Windows
Explorer; compare quindi una nestra di dialogo sul desktop con una
serie di opzioni di visualizzazione, spostamento o copia dei le fotograci
o video memorizzati sulla scheda SD. Il
LCD della fotocamera visualizza “STO”,
ad indicare che la fotocamera si trova in
modalità di archiviazione di massa.
Connettori
cavo USB
Dalla fotocamera al PC
Maschio
tipo A
Mini tipo
B (5 poli)
 Loading...