

Page 1

»
9101411800
OWNER’S MANUAL
Page 2

2
Important Safety Instructions .............3
1. An introduction to the Porta02 .......4
1.1 Multitrack recording –
a brief introduction..................4
1.2 Some safety notes and
precautions..............................5
1.3 What you need to make
recordings................................8
1.4 Connecting the Porta02 ..........8
2. Parts of the Porta02 ........................9
3. Making your first recording...........13
3.1 Setting up ..............................13
3.2 Getting ready.........................13
3.3 Setting the level.....................14
3.4 Recording the first track .......15
3.5 Recording the next track ......16
3.6 Recording the stereo
backing ..................................17
3.7 Mixdown ................................18
4. Hints and advanced tips ...............20
4.1 Recording techniques...........20
4.2 Mixdown ................................21
5. Troubleshooting.............................22
6. Specifications ................................23
Table of Contents
This appliance has a serial number
located on the rear panel. Please record
the model number and serial number
and retain them for your records.
Model number
Serial number
WARNING: TO PREVENT FIRE OR
SHOCK HAZARD, DO NOT
EXPOSE THIS APPLIANCE TO
RAIN OR MOISTURE.
The exclamation point within an equilateral triangle is intended to alert the user to the
presence of important operating and maintenance (servicing) instructions in the literature accompanying the appliance.
The lightning flash with arrowhead symbol, within an equilateral triangle, is intended to alert
the user to the presence of uninsulated “dangerous voltage” within the product’s enclosure
that may be of sufficient magnitude to constitute a risk of electric shock to persons.
CAUTION: TO REDUCE THE RISK OF ELECTRIC SHOCK, DO NOT
REMOVE COVER (OR BACK). NO USER-SERVICEABLE PARTS
INSIDE. REFER SERVICING TO QUALIFIED SERVICE PERSONNEL.
Ü
ÿ
Ÿ
Page 3
3
Important Safety Instructions
CAUTION:
• Read all of these Instructions.
• Save these Instructions for later use.
• Follow all Warnings and Instructions marked on the
audio equipment.
1) Read Instructions — All the safety and operating
instructions should be read before the product is operated.
2) Retain Instructions — The safety and operating instructions should be retained for future reference.
3) Heed Warnings— All warnings on the product and in the
operating instructions should be adhered to.
4) Follow Instructions — All operating and use instructions should be followed.
5) Cleaning — Unplug this product from the wall outlet
before cleaning. Do not use liquid cleaners or aerosol cleaners.
Use a damp cloth for cleaning.
6) Attachments — Do not use attachments not recommended by the product manufacturer as they may cause hazards.
7) Water and Moisture — Do not use this product near
water _for example, near a bath tub, wash bowl, kitchen sink,
or laundry tub; in a wet basement; or near a swimming pool;
and the like.
8) Accessories — Do not place this product on an unstable
cart, stand, tripod, bracket, or table. The product may fall, causing serious injury to a child or adult, and serious damage to the
product. Use only with a cart, stand, tripod, bracket, or table
recommended by the manufacturer, or sold with the product.
Any mounting of the product should follow the manufacturer’s
instructions, and should use a mounting accessory recommended by the manufacturer.
9) Aproduct and cart combination should be moved with care.
Quick stops, excessive force, and uneven surfaces may cause
the product and cart combination to overturn.
15) Lightning — For added protection for this product during
a lightning storm, or when it is left unattended and unused for
long periods of time, unplug it from the wall outlet and disconnect the antenna or cable system. This will prevent damage to
the product due to lightning and power-line surges.
16) Power Lines — An outside antenna system should not be
located in the vicinity of overhead power lines or other electric
light or power circuits, or where it can fall into such power lines
or circuits. When installing an outside antenna system, extreme
care should be taken to keep from touching such power lines or
circuits as contact with them might be fatal.
17) Overloading — Do not overload wall outlets, extension
cords, or integral convenience receptacles as this can result in
risk of fire or electric shock.
18) Object and Liquid Entry — Never push objects of any
kind into this product through openings as they may touch dangerous voltage points or short-out parts that could result in a
fire or electric shock. Never spill liquid of any kind on the product.
19) Servicing — Do not attempt to service this product yourself as opening or removing covers may expose you to dangerous voltage or other hazards. Refer all servicing to qualified
service personnel.
20) Damage Requiring Service — Unplug this product
from the wall outlet and refer servicing to qualified service personnel under the following conditions:
a) when the power-supply cord or plug is damaged.
b) if liquid has been spilled, or objects have fallen into the
product.
c) if the product has been exposed to rain or water.
d) if the product does not operate normally by following the
operating instructions. Adjust only those controls that are covered by the operating instructions as an improper adjustment of
other controls may result in damage and will often require
extensive work by a qualified technician to restore the product
to its normal operation.
e) if the product has been dropped or damaged in any way.
f ) when the product exhibits a distinct change in performance
_
this indicates a need for service.
21) Replacement Parts — When replacement parts are
required, be sure the service technician has used replacement
parts specified by the manufacturer or have the same characteristics as the original part. Unauthorized substitutions may result
in fire, electric shock, or other hazards.
22) Safety Check — Upon completion of any service or
repairs to this product, ask the service technician to perform
safety checks to determine that the product is in proper operating condition.
23) Wall or Ceiling Mounting — The product should be
mounted to a wall or ceiling only as recommended by the manufacturer.
24) Heat — The product should be situated away from heat
sources such as radiators, heat registers, stoves, or other products (including amplifiers) that produce heat.
"Note to CATV system installer:
This reminder is provided to call the CATV system installer ’s
attention to Section 820-40 of the NEC which provides guidelines for proper grounding and, in particular, specifies that the
cable ground shall be connected to the grounding system of the
building, as close to the point of cable entry as practical.
10) Ventilation — Slots and openings in the cabinet are provided for ventilation and to ensure reliable operation of the
product and to protect it from overheating, and these openings
must not be blocked or covered. The openings should never be
blocked by placing the product on a bed, sofa, rug, or other similar surface. This product should not be placed in a built-in
installation such as a bookcase or rack unless proper ventilation
is provided or the manufacturer’s instructions have been
adhered to.
11) Power Sources— This product should be operated only
from the type of power source indicated on the marking label.
If you are not sure of the type of power supply to your home,
consult your product dealer or local power company. For products intended to operate from battery power, or other sources,
refer to the operating instructions.
12) Grounding or Polarization — This product may be
equipped with a polarized alternating-current line plug (a plug
having one blade wider than the other). This plug will fit into
the power outlet only one way. This is a safety feature. If you
are unable to insert the plug fully into the outlet, try reversing
the plug. If the plug should still fail to fit, contact your electrician to replace your obsolete outlet. Do not defeat the safety
purpose of the polarized plug.
13) Power-Cord Protection — Power-supply cords should
be routed so that they are not likely to be walked on or pinched
by items placed upon or against them, paying particular attention to cords at plugs, convenience receptacles, and the point
where they exit from the product.
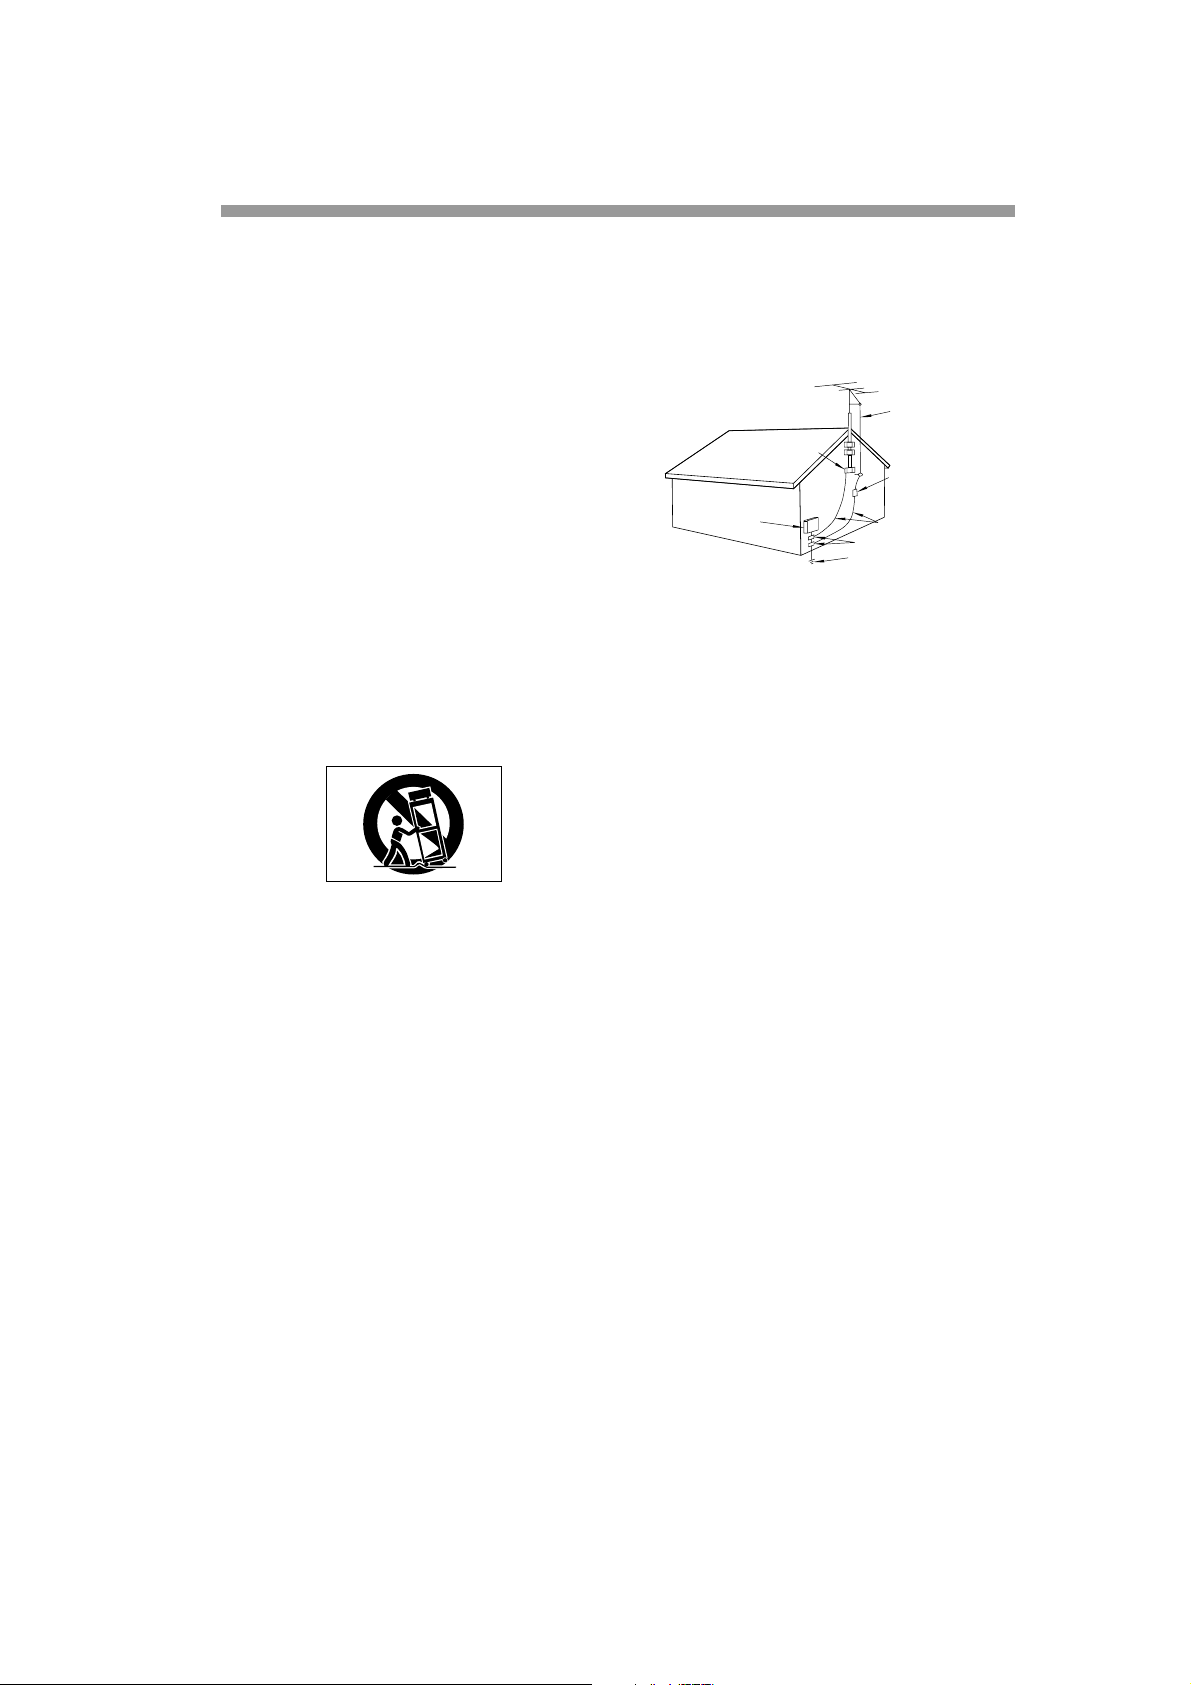
14) Outdoor Antenna Grounding — If an outside antenna
or cable system is connected to the product, be sure the antenna or cable system is grounded so as to provide some protection
against voltage surges and built-up static charges. Article 810 of
the National Electrical Code, ANSI/NFPA 70, provides information with regard to proper grounding of the mast and supporting structure, grounding of the lead-in wire to an antenna
discharge unit, size of grounding conductors, location of antenna-discharge unit, connection to grounding electrodes, and
requirements for the grounding electrode.
ANTENNA
LEAD IN
WIRE
ANTENNA
DISCHARGE UNIT
(NEC SECTION 810-20)
GROUNDING CONDUCTORS
(NEC SECTION 810-21)
GROUND CLAMPS
POWER SERVICE GROUNDING
ELECTRODE SYSTEM
(NEC ART 250. PART H)
NEC - NATIONAL ELECTRICAL CODE
ELECTRIC
SERVICE
EQUIPMENT
Example of Antenna Grounding as per
National Electrical Code, ANSI/NFPA 70
GROUND
CLAMP
Page 4

1 An introduction to the Porta02
1 – An introduction to the Porta02
The TASCAM Porta02 MiniStudio
allows you to produce recordings which
are not possible with an ordinary stereo
cassette recorder.
We suggest that you read at least this section 1 and also 3, “Making your first
1.1 Multitrack recording – a brief introduction
This section gives you a brief introduction to some of the terms and techniques
used in recording. If you are unfamiliar
with these terms, you may find it useful
1.1.1 Multitrack recorders
When you listen to a commercial recording (CD, cassette, etc.), it is quite probable that the different parts of the piece
will have been recorded at different
times.
This is done by “multitracking”–taking
the different sounds, feeding them
through a mixer’ s inputs (“channels”) and
recording them on a special tape recorder
which splits the tape into “stripes”, each
stripe being used for a different part of
the music.
These stripes are called “tracks”, and the
parts recorded on them may also be
called “tracks”. Since there are many
tracks on a tape, the term “multitrack” is
used to describe these tapes and recorders.
recording” before you start using the
Porta02. Spending a little time reading
now will save you a lot of time in the
future. You can read the rest of the manual at any time.
to read through this section so that you
understand the rest of the manual, which
uses the terms explained here.
The Porta02 allows you to record up to 4
tracks on inexpensive Type II (chrome)
cassettes using the same principle as
larger studios–taking inputs into a
mixer’s channels, feeding them into a
recorder which can record tracks independently of each other, and building up
the song by recording new tracks while
listening to what has been recorded
before (“monitoring”).
The advantage of working with multitrack recording is that the whole group of
musicians does not have to repeat the
whole piece if one person makes a mistake.
The illustration below shows you how
tracks are arranged on an ordinary stereo
cassette tape, as well as on the Porta02
4
Page 5

and on A/V cue-equipped cassette recorders.
1 An introduction to the Porta02
L
R
R
R
L
IEC (Philips) stereo cassette
4
3
2
1
TASCAM 4Tr 4Ch
(Porta02 format)
Notice that the stereo cassette arrangement allows you to use both sides of the
cassette, by playing the tape in the other
direction. The Porta02, however, uses the
whole width of the tape. Notice also that
1.1.2 Mixing down
Another advantage of multitrack recording is that when you come to make the
final version (on CD, cassette, etc.), you
can adjust the level (volume) of each
track, so that the piece sounds the way
you want.
As well as adjusting the track levels, you
can also adjust the position of each track
with regard to the left and right speakers.
This is called “panning”, and the controls
used to do this are called “panpots”. By
CUE
R
L
TASCAM 4Tr 3Ch
(A/V cue format)
one pair of L and R tracks on the stereo
cassette take up the same positions as
tracks 1 and 2 on the Porta02. This can be
important for your recording projects, as
we will see later on.
using the panpots, you can make the
tracks appear to come from the left or the
right speakers or anywhere in the middle.
The technique of converting a multitrack
recording to a stereo recording is called
“mixing down” to a “stereo master” or
“mastering” recorder. The Porta02
includes a mixdown section which allows
you to mix to a stereo cassette or MD
recorder.
1.2 Some safety notes and precautions
• Always use the PS-P2 power adaptor
supplied with the Porta02. If you use
any other adaptor, there is a risk of
damage, or even fire. Make sure that
the input voltage marked on the PS-P2
adaptor matches the power supply you
are using. If you are in any doubt, consult your TASCAM dealer .
• Turn of f your Porta02 and remove the
cassette when you are not using the
Porta02. If you will not be using it for
an extended period of time, unplug the
PS-P2 adaptor.
• When connecting or disconnecting the
Porta02 to or from any other equipment, make sure the power to the
Porta02 and all other equipment is
turned off. This will a void possible
damage to equipment.
• Do not keep your Porta02 in a very
hot place. Remember that in sunny
weather, the inside of a parked car
heats up very quickly. Avoid leaving
your Porta02 in such a place.
• Do not spill liquid onto your Porta02.
Avoid eating, drinking and smoking
near it (smoke particles are bad for
5
Page 6

1 An introduction to the Porta02
audio equipment). If any liquid or any
objects such as paperclips, guitar
picks, etc. fall inside the Porta02, do
not try to operate it. Return it to a
TASCAM service center for repair.
• If the case of the Porta02 becaomes
dirty , clean it only with a damp (not
wet) cloth, moistened with a little
1.2.1 Tape cassettes
Since the Porta02 uses the whole width of
a cassette tape, you can only play and use
one side of a cassette. You should try to
use either side A or side B for all cassettes, to avoid confusion when changing
tapes.
Only use Type II (chrome or CrO
settes with the Porta02. Find a reliable
brand and stick with it. The time you
spend creating your multitrack master is
worth much more than the small difference in price between cheap and highquality cassettes. High quality cassettes
will cause you fewer problems in the long
run.
) cas-
2
detergent. Do not use solvents or thinners, etc. to clean the Porta02, as these
will damage the surface.
• There are no parts inside the Porta02
that you can repair by yourself. Do not
open the Porta02 case or try to make
any repairs. Return it to a TASCAM
service center for repair.
To avoid having to wind and rewind a lot
of tape, use the shortest possible cassettes
for your projects. Remember that because
you are only using one side of the cassette, the marked length of the tape will
be halved (that is, a C60 tape will run for
30 minutes, a C40 for 20 minutes, etc.).
NOTE
Never use C120 cassettes with the Porta02. The
tape in these cassettes is thin, and may stretch
and break.
Always store cassettes in a safe place
(away from the magnetic fields produced
by speakers, television sets, computer
monitors, etc.).
1.2.2 Record-protecting cassettes
The record-protect tab on a cassette stops
you recording on that side when it is
removed. The Porta02 also recognizes
this protection, and will not allow you to
record on the side of a cassette where this
tab has been removed.
1.2.3 Playing back stereo cassettes
As mentioned earlier, the Porta02 can
play back cassettes recorded on a stereo
cassette recorder, using tracks 1 and 2.
Also, if tracks 1 and 2 have been recorded
on the Porta02, these cassettes can be
played back on a stereo cassette recorder.
However, if tracks 3 and 4 are used for
recording on the Porta02, these
6
cannot
However, we suggest that you remove
both
tabs when you want to protect a
Porta02 cassette. This will stop you putting in the cassette the wrong way round
and recording over old material
accidentally.
be played back on a stereo cassette
recorder.
Also, note that if a cassette has been
recorded with noise reduction, such as
Dolby, etc., it will sound strange when
played back on the Porta02. Any tapes
(tracks 1 and 2) recorded on the Porta02
should be played back without noise
reduction on a stereo recorder.
Page 7
1.2.4 Cleaning the heads
1 An introduction to the Porta02
You should clean the tape heads of the
Porta02 regularly to keep it working
properly. Dirt and tape oxide buildup on
the heads will force the tape away from
the tape head gaps that record and playback. Head cleaner will remove the dirt
and restore the sound quality.
In addition to affecting performance by
coating the heads, and keeping the tape
away from the recording and playback
gaps, dirt and oxide in the tape path will
also act in the same way as very fine
sandpaper, which will wear do wn internal
parts of the Porta02, and affect the
recording in this way as well.
All of these problems can be avoided if
you buy a head cleaning kit such as the
TEAC TZ-261 and keep it with your
Porta02 for regular use. The kit consists
of head cleaner, cleaner for the rubber
parts of the Porta02, and cotton-tipped
swabs. The cost of such a kit is less than
the cost of a couple of high-quality cassettes and will pay for itself in better per-
formance and longer life from your
Porta02.
WARNING
Only use head and rubber cleaning fluid and
cleaning swabs designed for use with tape
recorders. The use of any other cleaning materials may cause damage to the Porta02.
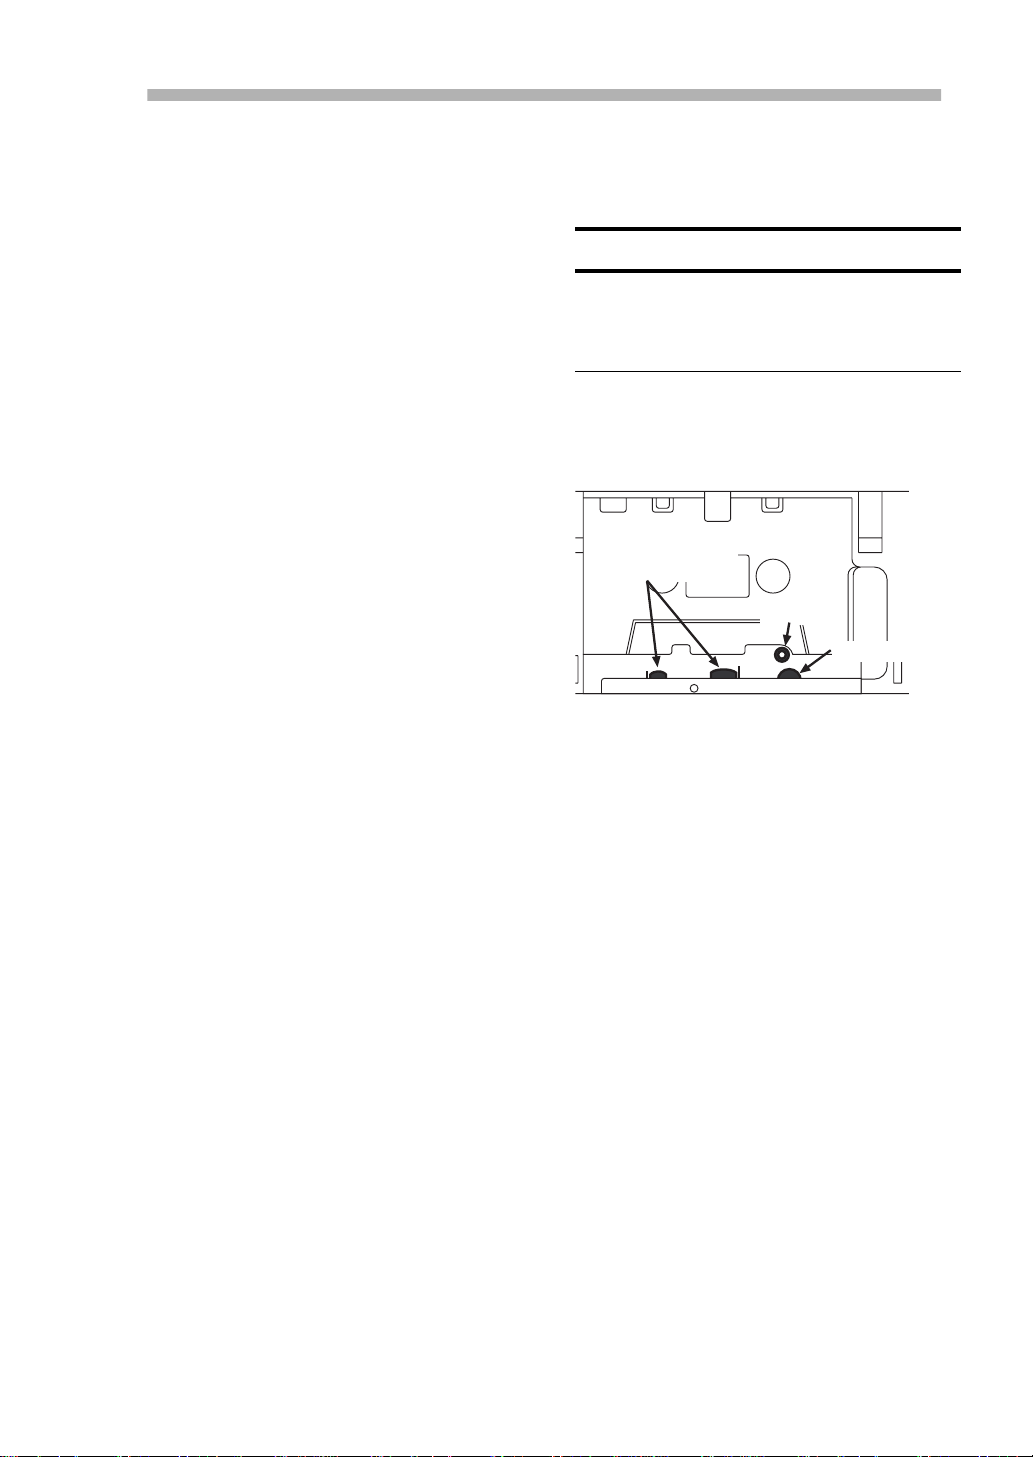
Clean the heads and metal parts of the
tape path before every session with the
Porta02 and also after every session.
Heads and tape
guides
Capstan
Pinch wheel
1) Open the tape cassette cover.
2) Carefully clean the heads and
metal parts as shown in the
illustration using a swab dipped in
the head cleaning fluid.
1.2.5 Cleaning the pinch roller
You should also clean the rubber pinch
roller at regular intervals (at least once
each day that you use the Porta02).
1) Open the tape cassette cover.
2) Press the
The pinch roller will engage with the
capstan shaft and start turning.
PLAY
key.
3) Dry off the heads with a dry swab.
3) Press a swab dipped in the rubber
cleaning fluid against the right side
of the pinch roller.
If you press the right side of the roller,
the swab will not get caught between the
roller and capstan.
4) Dry the capstan with a dry swab
and make sure that there is no
material on the pinch roller or
capstan before you insert a
cassette.
7
Page 8
1.3 What you need to make recordings
Apart from the Porta02 itself, you will
need:
• Some monitoring equipment (some
kind of amplifier and speaker system).
2 Parts of the Porta02
• Some kind of stereo mastering
recorder to produce the stereo recordings. This can be a cassette recorder
such as the TASCAM 102Mk II or an
MD recorder such as the TASCAM
MD301. A recorder which does not
have recording level controls is not
suitable for use as a master recorder.
• You will also need RCA (pin or
phono) cables to connect the Porta02
to other equipment.
1.4 Connecting the Porta02
1) Make sure all the equipment is
turned off.
2) Connect the
the Porta02 to the amplifier, using
a pair of terminals on the amplifier
such as
NOTE
AUX
LINE OUT
or
VIDEO
terminals of
.
• Headphones, if you intend doing any
work with microphones. These will
avoid acoustic feedback (“ho wlround”) when recording. Additionally,
headphones are sometimes useful
when panning tracks on mixdown, as
you can hear the precise position of
each track.
• Of course, you will also need some
kind of sound source to record (instrument or microphone, etc.).
You can listen to the Porta02 by selecting
the amplifier’s input source to be from the
terminals to which you connected the
Porta02 (
AUX
or
VIDEO
, etc.).
When you have mixed down and you
want to listen to the mixed tape, you
should select the mastering recorder as
the amplifier’s input source.
Do not use any terminals marked
intended for record decks. These are connected
to a special circuit inside the amplifier which
makes them unsuitable for anything except
record decks.
PHONO
3) Connect your mastering recorder
to a set of four
the amplifier (two for
for
PLAY
).
TAPE
terminals on
REC
and two
You may be using an integrated system in
which the mastering recorder and amplifier are built into one enclosure. In this
case, you do not need to follow step 3.
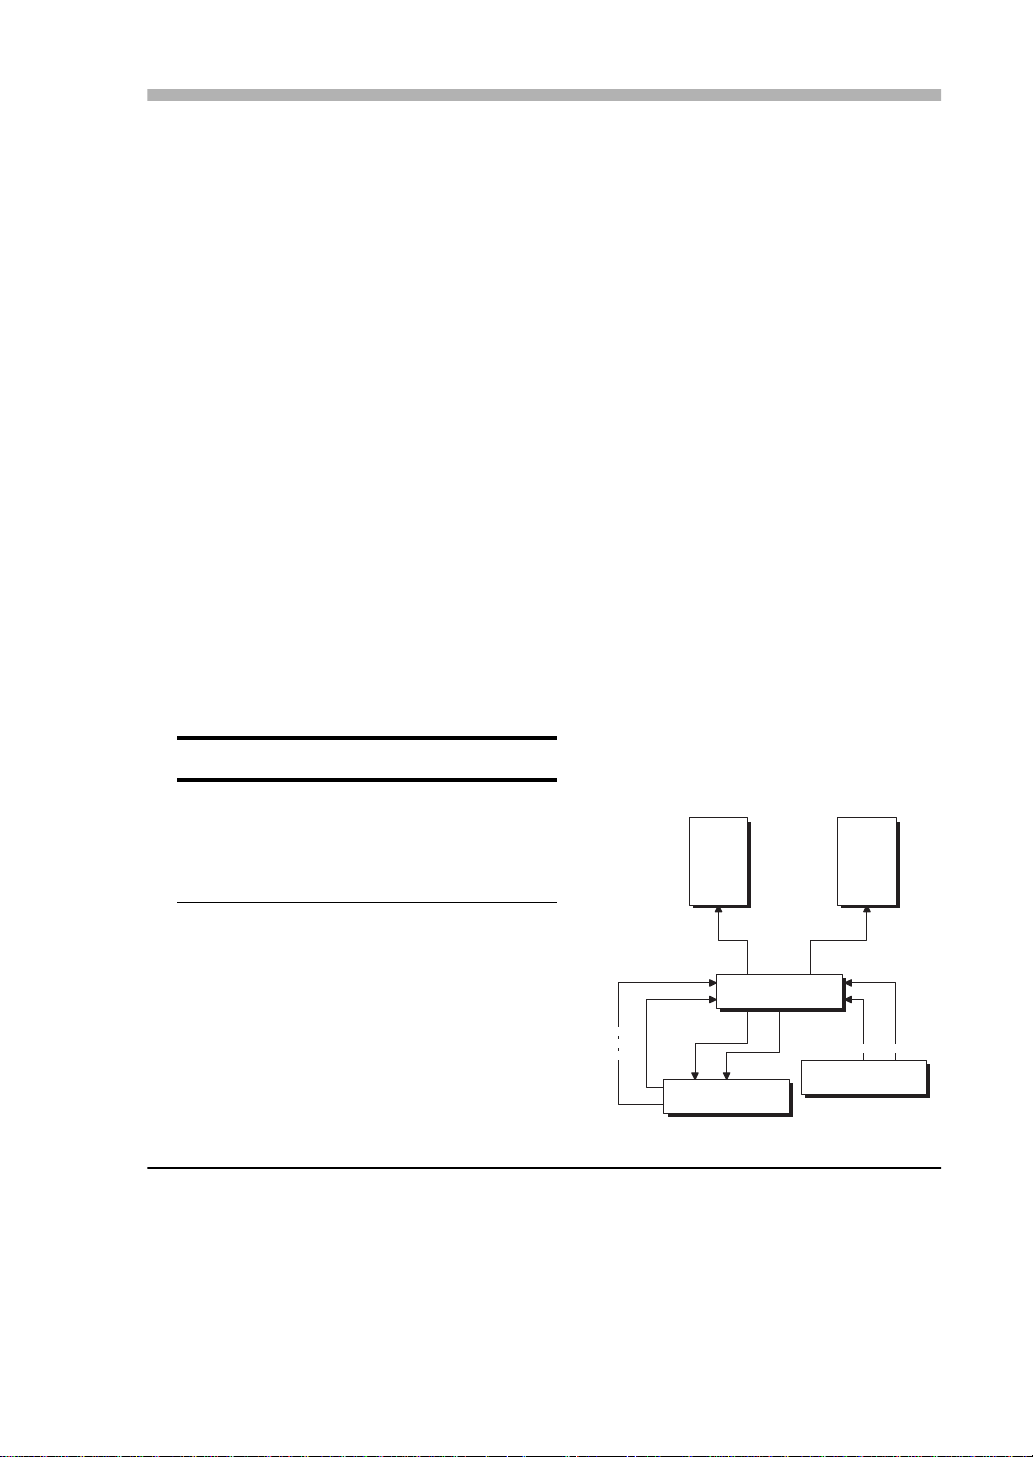
2 – Parts of the Porta02
This section gives an explanation of the
different parts of the Porta02, and what
or
PLAY OUT
to
TAPE IN
they do.
Left
speaker
TAPE OUT
to
REC IN
Mastering recorder
Amplifier
Right
speaker
To AUX IN
LINE OUT
Porta02
8
Page 9

Parts of the Porta02
Parts of the Porta02
9
Page 10

Parts of the Porta02
[1] POWER IN and switch
Use this jack to connect the PS-P2 AC
adaptor which comes with your Porta02.
When connecting the power, make sure
the power switch is off (slide it to the
right, as you look from the back).
WARNING
DO NOT use any adaptor with the Porta02
except the PS-P2 adaptor which comes with the
Porta02.
Slide the switch to the left (looking from
the back) to turn on the power to the
Porta02.
[2] MIC/LINE 2
Use this 1/4” phone jack to connect the
second channel audio source (instrument
or microphone) to the Porta02.
WARNING
The Porta02 is designed to record signals from
microphones, CD players, tape decks and musical instruments. It is not designed to record signals which come from the speaker outputs of
any amplifier or equipment. If you try to plug
such signals into the Porta02, you will almost
certainly damage both the Porta02 and the other
equipment.
[3] MIC/LINE 1 (MONO)
Use this 1/4” phone jack to connect the
first channel audio source (instrument or
microphone) to the Porta02.
If you connect an audio source to this
jack, but do not connect a source to the
MIC/LINE 2
LINE 1
it will be split between the first and second channels as if you had plugged the
same source into both jacks.
jack, the source at this
MIC/
jack acts as a mono source, that is,
[4] PHONES jack
This 1/4” jack allows you to connect a
pair of stereo headphones to the Porta02.
WARNING
Do not use headphones equipped with a mono
jack. This will cause damage to the Porta02’s
headphone amplifiers.
[5] LINE OUT
Use these RCA (pin or phono) jacks to
connect your Porta02 to the amplifier or
mastering recorder.
[6] PHONES LEVEL
This control adjusts the volume in headphones connected to the
PHONES
jack.
Turn clockwise to increase the volume.
There will be no output from the
PHONES
jack when the control is fully
counter-clockwise. It has no effect on the
level from the
LINE OUT
connectors.
[7] MONO switch
When this switch is pressed down (in), it
changes the stereo signal from the
PHONES
jack into a mono signal (the
same signal will be output from both the
left and right channels). Press it again to
return it to the “out” stereo position. It
does not affect the signal from the
OUT
connectors.
LINE
[8] TRIM (1 and 2)
Different pieces of equipment output signals at different levels. The
allow you to match the Porta02 to these
levels. A piece of equipment such as a
CD player or cassette deck will output
signals at a high (
) level, so the trim
LINE
control should be turned fully counterclockwise when such a device is being
recorded. A microphone on the other
hand, produces a lower signal level, and
so the
control should be turned fully
TRIM
TRIM
controls
10
Page 11

Parts of the Porta02
clockwise to
MIC
for any channel which
is recording a microphone.
Instruments such as electric guitars pro-
duce a signal which is between
levels and the
LINE
control should
TRIM
MIC
and
therefore be somewhere between fully
clockwise and fully counter-clockwise.
See 3.3, “Setting the level” for full details
of how to adjust the
controls for dif-
TRIM
ferent input sources.
[9] POWER indicator
This yellow light is lit when the Porta02
is connected to the power supply and
switched on.
[10] Tape counter and reset
button
The tape counter allows you to note different parts of the tape and locate to
them. Press the reset button to reset the
counter to “000” at any time (we suggest
that you only do this at the beginning of a
recording).
[11] OUTPUT LEVEL controls
These controls change the levels of the
four tape tracks in the
PHONES
outputs. When one of these controls is turned fully counter-clockwise,
the tape track corresponding to that control will not be heard in the
PHONES
outputs.
LINE OUT
LINE OUT
and
and
When the
PHONES MONO
switch is
pressed, these controls will have no effect
on the output from the
PHONES
jack.
[13] REC FUNCTION switches
(1 and 2)
These switches control where the signals
coming into the
MIC/LINE
jacks will be
recorded. For both switches 1 and 2, the
center position is marked as
SAFE
. When
a switch is in this position, no signal will
be recorded on tape. However, you can
still listen to the signals coming into the
MIC/LINE
jacks and view the levels on the
meters.
When set to a number (
1
or 3 for channel
1, or 2 or 4 for channel 2), the signals
input to the channel will be recorded on
the track whose number has been set on
the switch. This is called “assigning” or
“routing” channels to tracks.
[14] Channel meters (1 and 2)
Each channel has a set of four LED indicators which show the level of the signals
sent to the
Exactly what is metered depends on the
REC FUNCTION switch settings, but gen-
erally, they display the signals at the
LINE IN
nels are set to
off-tape signals, whose levels and pan
positions are set using the
LEVEL
LINE OUT L
and R jacks.
MIC/
jacks, and when the input chan-
SAFE, the meters show the
OUTPUT
and PAN controls.
[12] OUTPUT PAN controls
These controls change the position of the
four tape tracks in the stereo
PHONES
and
outputs. When one of these
controls is turned fully counter-clockwise, the sound of the corresponding tape
track will appear to come from the left,
and when turned fully clockwise, it will
appear to come from the right. When in
the center position, the output will appear
equally from both the left and right.
LINE OUT
The best level for any input signal is
when an averagely loud part of the signal
lights the red
0 indicator, and the +6 indi-
cator (also red) is only lit by the loudest
parts of the signal. See 3.3, “Setting the
level” for details of ho w this should be set
up.
[15] Channel faders (1 and 2)
These faders are used to adjust the level
of the signals coming into the
MIC/LINE
11
Page 12

Parts of the Porta02
IN jacks. They should be used together
with the TRIM controls (see 3.3, “Setting
the level”) to adjust the levels of the signals routed to the tape tracks.
[16] RECORD indicator
This red indicator lights when the
RECORD and PLAY keys are pressed, and
at least one of the
REC FUNCTION
switches is not in the SAFE position.
Pressing
REC FUNCTION switches are set to SAFE
RECORD and PLAY while both
has the same effect as pressing PLAY.
[17] Transport controls
These work in the same way as the controls on most cassette recorders. However, there are a few points you should
note:
• Pressing the
press down the
RECORD key will also
PLAY key.
• If the left record-protect tab of the cassette has been broken out, or if there is
no cassette loaded, the
RECORD key
cannot be pressed.
• It is not possible to go directly from
recording into playback mode.
• The
PAUSE key only pauses playback
and recording. It is not possible to
pause the tape in fast forward and
rewind modes.
• All keys lock down when pressed,
except for the
STOP ke y, and only
work when locked down.
[18] Cassette compartment
cover
The hinged cassette compartment cover
is opened by lifting the tab on the right
side.
There is no eject mechanism. You load
and unload cassettes by hand, using a finger or fingers in the space to the right of
the cassette.
12
Page 13

3 – Making your first recording
This section describes how to make a 4-track recording using the
Porta02. For this, we will assume that you are making a recording
of your voice on two tracks (1 and 2), using a microphone, and
recording a part of a stereo CD or cassette on the other two tracks (3
and 4). Make sure you know what you are going to say.
Start by making sure that you have all the equipment listed in 1.3,
“What you need to make recordings”.
3.1 Setting up
1) Make sure all equipment is turned off.
3 Making your first recording
2) Connect the
jacks of the amplifier.
3) Connect the mastering r ecorder
to the appropriate jacks of the amplifier. See 1.4,
“Connecting the Porta02” if you are not sure what you
should be doing here.
4) With the
microphone into the
into the
If the microphone has a switch, make sure this switch is off.
5) Plug the stereo headphones into the PHONES jack of the
Porta02.
6) Turn on the Porta02, the mastering recorder, and the
amplifier (in that order).
7) Set the amplifier’s input source to
jacks to which the Porta02 is connected).
3.2 Getting ready
LINE OUT jacks of the Porta02 to the AUX IN
REC IN and PLA Y OUT jacks
INPUT 1 fader at the 0 position, plug the
MIC/LINE 1 jack. Do not plug anything
MIC/LINE 2 jack.
AUX (or the name of the
1) Clean the heads and pinch roller (see 1.2.4, “Cleaning the
heads” and 1.2.5, “Cleaning the pinch roller”).
2) Insert a Type II (chrome) cassette.
The tape should be towards the front of the Porta02, and the full spool
should be on the left side. Put the non-tape part of the cassette in first,
and then push the tape (front) down into place
13
Page 14

3 Making your first recording
3) Play the tape for about 10 seconds and then stop the tape.
4) Press the counter reset button.
3.3 Setting the level
The aim of this section is to teach you to set the input level so that
the average signals coming from the microphone will light the
meter indicator, and the loudest will light the +6 indicator.
0
1) Make sure all
the headphones and set the
If you do not do turn down the speaker volume, you will probably get
feedback (“howlround”) when you start using the microphone.
OUTPUT LEVEL controls are set to 0. Put on
PHONES LEVEL to the 0 position.
2) Set both TRIM controls to the LINE position.
Although you will probably end up with this control at the MIC position, or close to it, for now, set it to LINE.
3) Take the INPUT 2 fader to the 0 mark. Bring the INPUT 1
fader up to between the
This is called the “nominal” position, and is the position where the
electronics controlled by the fader will not have to amplify the signal
too much (causing noise) or have too much signal going into them
(causing distortion).
7 and 8 marks.
4) Switch the microphone on if necessary. Speak into the
microphone at the volume you will be recording.
It is important than when you perform these level checks that you
speak, sing or play at the level at which you will actually be recording.
Most people, when they first start recording, tend to be a little louder
than when they are simply checking the levels.
14
5) While talking into the microphone, turn the INPUT 1 TRIM
control clockwise until the left
time, and the
If the 0 indicator hardly lights at all, you may be too far from the
microphone, or you are speaking too softly. If the microphone uses
batteries, you may need to replace them.
You can also bring the fader up from the 7-8 position to increase the
level, but you should do this only after the TRIM control has been
turned fully clockwise.
+6 indicator is lit on the loudest parts.
0 indicator is lit most of the
6) Adjust the PHONES LEVEL until you are comfortable with
what you hear in the headphones.
Page 15

3.4 Recording the first track
1) Set the REC FUNCTION switch of INPUT 1 to 1.
You are now ready to record on track 1. Make sure the REC FUNC-
switch of INPUT 2 is set to SAFE, so you don’t record on it by
TION
accident.
2) Press the RECORD key (which will also press the PLAY key)
and start recording the first spoken track.
If the level as shown by the meters now seems a little high, you can
“back off” on the fader a little.
3) When you have finished (try to keep speaking for at least a
minute), press the
4) Rewind the tape to the 000 mark.
3 Making your first recording
STOP key.
5) Start playing the tape, and adjust the
LEVEL and PAN
controls of track 1 so that you can hear clearly what you
have just recorded.
Note that meter 2 now shows the level of the tape replay on the right
LINE OUT, rather than what is being input to the tape.
NOTE
Y ou may notice a dif ference between the sound you hear when you replay the
tape and the sound you hear when you are recording. This is perfectly normal, and is due to the way that the Porta02 lets you hear previously-recorded
material.
6) Rewind and replay the tape again, listening carefully to
your recording.
7) Rewind and r e-r ecord the track as many times as you think
necessary .
Of course, this is only a test, so it doesn’t matter too much, but when
you’re making a real recording, it’s important to make the recording
as good as possible.
8) When you’re happy with the recording, set the REC
FUNCTION
If you replay now, both meters will now show off-tape monitoring
switch of INPUT 1 to SAFE.
15
Page 16

3 Making your first recording
3.5 Recording the next track
Since you plugged the microphone into MIC/LINE 1 / MONO, and
didn’t plug anything into
as if it was plugged into both channels.
1) Take fader 1 to the 0 mark.
2) Set the le vel for input channel 2 in the same way as y ou set it
for input channel 1 (see 3.3, “Setting the level”).
MIC/LINE 2, the microphone signal is split
3) Set
REC FUNCTION switch for INPUT 2 to 2.
You are now ready to record on track 2.
4) Rehearse your second spoken part by playing back the first
track (adjusting the level and pan if necessary) while
speaking the words for the second track.
5) Rewind and record when you are ready.
When you are recording, the meter of INPUT 2 will show the input
levels of input 2. Since the signal is now going to track 2, the meter
for input 1 will not show anything.
6) Rewind and playback when you have recorded. Adjust the
level and pan position of the two tracks with the
PAN controls for tracks 1 and 2.
Remember that the fader adjusts the level of what goes onto tape, not
the replay levels.
When you are playing back, the meter of INPUT 1 will show the lev el
of the signal from the left outputs, and the meter of INPUT 2 will
show the input signal level as long as the REC FUNCTION switch is
not SAFE.
LEVEL and
16
7) Rewind and repeat the recording of track 2 until you are
satisfied with it.
SAFE input channel 2, and take both faders down to 0. Set
the
TRIM controls of both inputs to LINE.
Page 17

3.6 Recording the stereo backing
Now that tracks 1 and 2 are filled with spoken words, we’ll put
some backing music behind them. We’ll assume that you’re using a
CD player here (of course, it may be an MD player or a cassette
player).
NOTE
This is a test recording and will not be used except as a test. However, if you
are making recordings for public performance or distribution which include
pre-recorded copyright material, you should be aware of the regulations concerning copyright in the area where you live. Unauthorized recording of copyright material may be illegal.
1) Make sur e the v olume on the amplifier is tur ned all the way
down (it should already be turned down).
2) Take off the headphones and unplug the microphone.
3 Making your first recording
3) Connect the left and right
LINE
inputs 1 and 2 of the Porta03.
4) Set the
You are now ready to start recording on tracks 3 and 4.
REC FUNCTION switches of INPUTs 1 and 2 to 3 and 4.
LINE OUT of the CD player to MIC/
5) Start playing the CD track y ou will be recording . Adjust the
faders so that the
+6 meter indicators light on the loudest
parts of the CD.
6) Slowly turn up the amplifier volume so that you are
listening at a comfortable level.
7) Make the CD r eady to play, and make sure that the Porta02
is rewound to the start of the recording.
8) Start recording, and start replaying the CD.
9) When you come to the end of the CD material, stop the CD
and Porta02, and rewind the Porta02 tape to the beginning
of the recording.
17
Page 18

3 Making your first recording
3.7 Mixdown
Make sure that your mastering recorder is connected to the monitoring system.
1) Set both
faders down to
This will stop any extra unwanted noise from the inputs appearing in
the final mix.
REC FUNCTION switches to SAFE, and move both
0.
2) Make sure the mastering recorder is ready to record, and
put it into record pause mode. Do not start recording yet.
If you are using a tape for mastering, make sure that you are not
recording over anything you want to keep. If you are using a ne w tape,
make sure that you have taken the tape past the leader portion. Make
the noise reduction, etc. settings on the mastering recorder, which will
give you the best sound quality.
3) Play back the recording on the Porta02 and adjust the
OUTPUT LEVEL and PAN controls on the Porta02.
The nominal position (the best position) for the LEVEL controls is
about the 2 to 3 o’clock position. This is the position you should
regard as normal.
It is usual to put the PAN controls for a stereo source such as a CD
fully right and fully left. You can place the tw o v oices anywhere in the
stereo picture.
18
Practice adjusting the levels of tracks 3 and 4 together to fade the
backing music in and out.
4) While adjusting the levels on the Porta02, watch the
recording levels on the mastering recorder. If they are too
high, take down the recording level on the mastering
recorder.
Remember that if you are recording on a digital recorder, such as an
MD recorder, if the signal levels are too high, the result will be
extremely unpleasant distortion. Analog recorders, such as cassette
decks, will also distort if the levels are too high, but the distortion is
much more pleasant (even so, you should try to av oid distortion in the
mixdown).
5) When you are happy with the mix rehearsal, rewind to the
start of the recording on the Porta02.
6) Start recording on the mastering machine, and start
playback on the Porta02.
Page 19

3 Making your first recording
7) Mix the tracks, fading the backing music on tracks 3 and 4
to taste.
8) At the end, stop both machines. Rewind the mastering
recorder.
9) Set the amplifier input source to the mastering recorder,
and replay your mix.
10) If you are not happy with the mix, you can do it again,
either recording over the old mix, or adding the new mix
after the old one.
Congratulations! You have now completed your first recording
project with the Porta02. Rewind the Porta02 tape to the start,
remove it, and clean the Porta02’s heads.
19
Page 20

4 Hints and advanced tips
4 – Hints and advanced tips
This section gives a few hints and tips
which may be useful to you when you
make recordings using the Porta02.
4.1 Recording techniques
Learning how to record is an art, not a
science. One of the best teachers is experience. However, there are a few things
mentioned here which may be useful to
4.1.1 Recording electric guitars
Much of the sound of an electric guitar
(and also bass) is due to the effects,
amplifier and speakers, as well as the guitar and style of playing. If you plug the
guitar straight into the Porta02, you will,
of course, be able to record it, but the
sound will probably not be what you are
used to.
Plugging effects units between the guitar
and the Porta02 will certainly help to produce a fuller sound. The sound which
will come closest to a live sound, though,
will be provided by the amplifier itself.
You can adopt one of two approaches:
either to put a microphone in front of the
guitar speaker and record this (at
level), or to connect the output of the pre.amplifier to the Porta02 and record at
LINE level.
MIC
you, and there are several good books on
the subject which can explain the theory
of recording and some of the techniques.
4.1.2 Recording with effects
Professional recordings often use effects
like digital reverberation on vocals, etc.
You can add some of these effects by
plugging the microphone into an effects
unit, and plugging the unit into the
Porta02. Note that the effects unit must
be able to accept microphone-level signals, and will output to the Porta02 at
LINE levels.
In addition, you will need to use the internal balance control in the unit to decide
how much of the “dry” (un-effected)
sound will be passed through to the
Porta02 for recording.
If you do not have access to a reverberation unit, you can try recording vocals in
a very “live” room (without much furniture).
WARNING
20
Do not connect the speaker output (or headphone output, if provided) of the amplifier to
the Porta02. This will almost certainly damage the Porta02, and may damage the amplifier. Only use outputs which are marked
LINE OUT , PRE OUT, DIRECT OUT
and so on. Avoid using any outputs marked
SPEAKER OUT , SP OUT , 4Ω, 8Ω, 16Ω
or the like.
Page 21

4.1.3 Metering
In general, you should not try to record at
too high a level, and the
+6 indicator
should not be lit more than half the time
(at the very most).
The meters display the input levels to the
channels at all times except when playing
back with the input channels in
SAFE
mode.
4.1.4 When you’re not recording
Try to get into the habit of always leaving
the
REC FUNCTION switches in the SAFE
position unless you are actually recording
or rehearsing a take. This will stop you
4.2 Mixdown
What sounds good is something that
depends on personal taste, but most professionals try to avoid mixes with too
much bass or high end (unless it’s for a
special effect). However, the most impor-
4 Hints and advanced tips
When playing back if one or both of the
input channels has set to
display the levels of the signal sent to the
left
LINE OUT (channel and meter 1) or
the right
LINE OUT (channel and meter
2). If a signal is also received at the
LINE
input jacks, this will be added to the
playback for metering.
recording by accident (remember that
pressing
SAFE is the same as pressing PLAY).
RECORD with both channels
tant pieces of equipment that you have
are your ears! Train yourself to use them
so that you can spot mistakes quickly,
and you know how to put them right, just
by listening. It’s a useful skill!
SAFE, they will
MIC/
4.2.1 Recording more than four tracks (i)
Although the Porta02 has only 4 tracks, it
is possible to produce a mix with more
than four sounds. Here’s one way, which
involves adding one or two more extra
inputs to the four recorded tape tracks.
These extra inputs will be panned either
fully left or right (or one track will be in
the center) and the mix proceeds as the
extra inputs are recorded. This method is
therefore useful for adding a pre-recorded
stereo backing to go behind the four
recorded tracks.
1) Record on all four tracks of the
Porta02.
2) Set both
3) Connect the source for the extra
4) Play back the tape, and use the
5) Use the faders to adjust the levels
4.2.2 Recording more than 4 tracks (ii)
For this method, there must be an ordinary stereo cassette recorder used as the
mastering recorder.
The four tracks of the Porta02 are mixed
in the usual way onto a stereo cassette.
This cassette is then removed from the
mastering recorder and replaces the 4-
REC FUNCTION switches to
SAFE.
inputs to the
adjust the
MIC/LINE jacks and
TRIM controls to match
the level.
OUTPUT LEVEL and PAN controls to
adjust the playback of the tape
tracks.
of the input signals against the tape
tracks.
21
Page 22

5 Troubleshooting
track tape in the Porta02. The left and
right stereo tracks of the mastering
recorder can be used as tracks 1 and 2 of
the Porta02, leaving tracks 3 and 4 ready
for recording.
There are a few points to remember:
• Although you can repeat this process
of mixing 4 tracks to 2 and then adding 2 more, as you repeat the mix process, noise and hiss will build up to a
point where the quality becomes unacceptable.
• The mastering recorder must have its
noise reduction turned off when mix-
5 – Troubleshooting
Tracing faults in a recording setup is
often a mixture of logical deduction and
patience. Very often, the problem is
caused by something simple; a cable
ing the Porta02 tracks to the mastering
machine, as the Porta02 does not use
noise reduction. Of course, on the
final stereo mix, you can use noise
reduction on the mastering machine.
• Once you have mixed the four tracks
to two, you cannot adjust their levels
or pan positions again on the new
tape. Think ahead to what tracks you
will record on the new tape, and mix
accordingly .
• When using this technique, always use
the same type of tape in the Porta02
and mastering machine. Differences in
tape type may affect the sound.
which hasn’t been plugged in properly, or
a faulty cable. If you discover a faulty
cable, replace it with a new one–it’s not
worth hanging onto bad cables!
The Porta02’ s POWER light does
not come on
The tape does not move when
PLAY is pressed
Some tracks have been recorded
on the tape, but nothing can be
heard when playing bac k
Nothing appears on the meter
indicators when a source is
played
Cannot press the RECORD key
The RECORD key is pressed, the
tape moves, but nothing is
recorded, or the level is very low
Is the PS-P2 adaptor plugged into the power supply?
Is the PS-P2 adaptor plugged into the Porta02?
Is the switch on the Porta02 set to ON?
Is the tape properly inserted in the Porta02?
Is the tape at the end of the tape?
If you’ve just put in a tape you recorded in another session, make
sure that it’s the right way round.
Make sure the
tape tracks (not at 0). Set the
SAFE and look at the meters.
Try monitoring through headphones and adjust the
LEVEL
the
LINE OUT connections.
Make sure the amplifier is set to the correct input source.
Is the source (microphone, guitar, etc.) switched on and volume
control turned up? If it uses batteries, does it need new batteries?
Is the
TRIM control of the channel set correctly?
Is the tape properly inserted in the Porta02?
Is the tape record-protected?
Is the REC FUNCTION set to SAFE?
Check the
Is the
TRIM level set correctly (a microphone feeding a channel set
to
LINE will sound very faint).
OUTPUT LEVEL controls are set to monitor the
REC FUNCTION switches to
PHONES
. If you can hear something through the headphones, check
OUTPUT LEVEL control for the track.
22
Page 23

The PAN controls don’t work
Recorded sound is distorted
when recording
Recorded sound distorts on
playback.
Tape sounds muffled on playback
Pitch changes (wow and flutter)
A stereo tape recorded on
another machine sounds really
strange!
6 Specifications
If you’re listening through headphones, is the Porta02’s MONO
switch pressed?
If you’re listening through speakers, is there a
the amplifier which has been pressed?
When monitoring while recording, the sound will often be a little
different to when it is played back. A large amount of distortion
may be caused by recording at too high a level (shown by the meter
indicator being lit all or most of the time). Adjust the TRIM
+6
level and/or back off on the faders.
If the meter
reduce the headphone level; you may be driving the headphones
too hard.
Either the sound was recorded at too high a level, or the summed
level of all four tracks is too high. Try reducing the level of all
tracks so that the meter
back (set
torted, it was recorded at too high a level.
The heads are dirty. Clean them (see 1.2.4, “Cleaning the heads”)
The capstan and pinch roller are dirty. Clean the capstan and pinch
roller (see 1.2.5, “Cleaning the pinch roller”).
You’re probably listening to tracks 1 and 2 forwards at the same
time as 3 and 4 backwards. Turn down the
trols of tracks 3 and 4.
If the sound is unnaturally “bright”, it’s quite likely that the tape
was recorded on the other machine using noise reduction.
+6 indicator is not constantly lit, you may want to
+6 indicator is not constantly lit on play-
REC FUNCTION to SAFE). If one track only is dis-
MONO switch on
OUTPUT LEVEL con-
6 – Specifications
Recommended tape type
Track format
Head configuration
Motor type
Tape speed
Wo w and flutter
Fast wind speed
Power requirements
Power consumption
Physical dimensions (w x h x d)
Weight (main unit)
MIC/LINE inputs (2 x 1/4" jacks)
Input level
Input impedance
Compact cassette tape, CrO2 (Type II, 70µs EQ), C-30 to
C-90
4 tracks, 4 channels
1 x 4-track record/replay head (Permaloy)
1 x 4-track erase head (ferrite)
1 x DC motor (capstan and reel motor)
1 7/8 in./sec (4.76 cm/sec)
0.18%
Approx 120 seconds (C-60 tape)
USA/CANADA: 120V AC, 60Hz
U.K./EUR OPE: 230V AC, 50Hz
AUSTRALIA: 240V AC, 50Hz
7W, via the supplied PS-P2 AC adaptor
305 x 64 x 205 (mm), 12.0 x 2.5 x 8.1 (in.), maximum
height (including controls) 80 (mm), 3.1(in)
1.5kg (3.3lb)
–50dBV, TRIM at maximum; –10dBV, TRIM at minimum
50k
Ω
23
Page 24
6 Specifications
LINE outputs (2 x RCA jacks)
Output level
Output impedance
Headphone output (1/4" stereo
jack)
Output level
Output impedance
Frequency response
Signal-to-noise ratio
Total Harmonic Distortion
Channel separation
Erasure
0 dBV is referenced to 1 volt
Changes in features or specifications may be made without notice or obligation.
–10dBV
10k
Ω
60mW + 60mW
30
Ω
50Hz – 12.5kHz ±3dB
43dB
Better than 3.0% (400Hz, –10dB)
Better than 40dB (at 1kHz)
65dB (at 1kHz)
305mm
205mm
80mm
64mm
TEAC CORPORATION 3-7-3, Nakacho, Musashino-shi, Tokyo 180, Japan Phone: (0422) 52-5082
TEAC AMERICA, INC. 7733 Telegraph Road, Montebello, California 90640 Phone: (213) 726-0303
TEAC CANADA LTD. 5939 Wallace Street, Mississauga, Ontario L4Z 1Z8, Canada Phone: 905-890-8008 Facsimile: 905-890-9888
TEAC MEXICO, S.A. De C.V Privada De Corina, No.18, Colonia Del Carmen Coyoacon, Mexico DF 04100 Phone: 5-658-1943
TEAC UK LIMITED 5 Marlin House, Marlins Meadow, The Croxley Centre, Watford, Herts. WD1 8YA, U.K. Phone: 01923-819699
TEAC DEUTSCHLAND GmbH Bahnstrasse 12, 65205 Wiesbaden-Erbenheim, Germany Phone: 0611-71580
TEAC FRANCE S. A. 17 Rue Alexis-de-Tocqueville, CE 005 92182 Antony Cedex, France Phone: (01) 42.37.01.02
TEAC BELGIUM NV/SA P.A. TEAC Nederland BV, Perkinsbaan 11a, 3439 ND Nieuwegein, Netherlands Phone: 0031-30-6048115
TEAC NEDERLAND BV Perkinsbaan 11a, 3439 ND Nieuwegein, Netherlands Phone: 030-6030229
TEAC AUSTRALIA PTY., LTD. 106 Bay Street, Port Melbourne, Victoria 3207, Australia Phone: (03) 9644-2442
A.C.N. 005 408 462
TEAC ITALIANA S.p.A. Via C. Cantù 5, 20092 Cinisello Balsamo, Milano, Italy Phone: 02-6601050
24
PRINTED IN TAIWAN 1097 M-1349A
 Loading...