


iXR
USB Audio/MIDI Interface
D01278500B
OWNER'S MANUAL
MODE D’EMPLOI
MANUAL DEL USUARIO
BEDIENUNGSANLEITUNG
MANUALE DI ISTRUZIONI
取扱説明書
ENGLISH
FRANÇAIS
ESPAÑOL
DEUTSCH
ITALIANO
日本語

• TASCAM is a trademark of TEAC CORPORATION,
registered in the U.S. and other countries.
• Microsoft, Windows and Windows Vista are
either registered trademarks or trademarks of
Microsoft Corporation in the United States and/
or other countries.
• Apple, Mac, Mac OS, OS X, iPad, iPhone, iPod
touch and Lightning are trademarks of Apple
Inc.
• IOS is a trademark or registered trademark of
Cisco in the U.S. and other countries and is used
under license.
• App Store is a service mark of Apple Inc.
• Cubase, Cubasis and VST are registered
trademarks of Steinberg Media Technologies
GmbH.
• ASIO is a trademark of Steinberg Media
Technologies GmbH.
• Blackfin® and the Blackfin logo are registered
trademarks of Analog Devices, Inc.
• Other company names, product names and
logos in this document are the trademarks
or registered trademarks of their respective
owners.
http://tascam.jp/
〒206-8530 東京都多摩市落合1-47
TEAC AMERICA, INC.
http://tascam.com/
Phone: +1-323-726-0303
1834 Gage Road, Montebello, California 90640
USA
TEAC MEXICO, S.A. de C.V.
http://teacmexico.net/
Phone: +52-55-5010-6000
Río Churubusco 364, Colonia Del Carmen, Delegación Coyoacán, CP 04100, México DF, México
TEAC UK LIMITED
http://tascam.eu/
Phone: +44-8451-302511
2 Huxley Road, Surrey Research Park, Guildford,
GU2 7RE, United Kingdom
TEAC EUROPE GmbH
http://tascam.eu/
Phone: +49-611-71580
Bahnstrasse 12, 65205 Wiesbaden-Erbenheim,
Germany
TASCAM iXR
2
TEAC SALES & TRADING(SHENZHEN) CO.,
LTD
http://tascam.cn/
Phone: +86-755-88311561~2
Room 817, Block A, Hailrun Complex, 6021 Shennan Blvd., Futian District, Shenzhen 518040, China
Owner's Manual
IMPORTANT SAFETY PRECAUTIONS
For U.S.A.
INFORMATION TO THE USER
This equipment has been tested and found to comply
with the limits for a Class B digital device, pursuant to
Part 15 of the FCC Rules. These limits are designed to
provide reasonable protection against harmful interference in a residential installation. This equipment
generates, uses, and can radiate radio frequency
energy and, if not installed and used in accordance
with the instruction manual, may cause harmful
interference to radio communications. However, there
is no guarantee that interference will not occur in a
particular installation. If this equipment does cause
harmful interference to radio or television reception,
which can be determined by turning the equipment
off and on, the user is encouraged to try to correct
the interference by one or more of the following
measures.
a) Reorient or relocate the receiving antenna.
b) Increase the separation between the equipment
and receiver.
c) Connect the equipment into an outlet on a circuit
different from that to which the receiver is connected.
d) Consult the dealer or an experienced radio/TV
technician for help.
CAUTION
Changes or modifications to this equipment not
expressly approved by TEAC CORPORATION for
compliance could void the user’s authority to operate
this equipment.
For Canada
THIS CLASS B DIGITAL APPARATUS COMPLIES WITH
CANADIAN ICES-003.
CET APPAREIL NUMERIQUE DE LA CLASSE B EST
CONFORME A LA NORME NMB-003 DU CANADA.
DECLARATION OF CONFORMITY
We, TEAC EUROPE GmbH. Bahnstrasse
12, 65205 Wiesbaden-Erbenheim,
Germany declare in own responsibility,
the TEAC product described in this
manual is in compliance with the corresponding
technical standards.
Declaration of Conformity
Responsible party: TEAC AMERICA, INC.
Address: 1834 Gage Road, Montebello,
California, U.S.A.
Telephone number: 1-323-726-0303
This device complies with Part 15 of the FCC Rules.
Operation is subject to the following two conditions:
(1) this device may not cause harmful interference,
and (2) this device must accept any interference
received, including interference that may cause
undesired operation.
IMPORTANT SAFETY INSTRUCTIONS
1 Read these instructions.
2 Keep these instructions.
3 Heed all warnings.
4 Follow all instructions.
5 Do not use this apparatus near water.
6 Clean only with dry cloth.
7 Do not block any ventilation openings. Install in
accordance with the manufacturer’s instructions.
8 Do not install near any heat sources such as
radiators, heat registers, stoves, or other apparatus
(including amplifiers) that produce heat.
9 Do not defeat the safety purpose of the polarized
or grounding-type plug. A polarized plug has two
blades with one wider than the other. A grounding
type plug has two blades and a third grounding
prong. The wide blade or the third prong are
provided for your safety. If the provided plug does
not fit into your outlet, consult an electrician for
replacement of the obsolete outlet.
10 Protect the power cord from being walked on or
pinched particularly at plugs, convenience receptacles, and the point where they exit from the
apparatus.
11 Only use attachments/accessories specified by the
manufacturer.
12 Use only with the cart, stand,
tripod, bracket, or table
specified by the manufacturer,
or sold with the apparatus.
When a cart is used, use
caution when moving the cart/apparatus combination to avoid injury from tip-over.
13 Unplug this apparatus during lightning storms or
when unused for long periods of time.
14 Refer all servicing to qualified service personnel.
Servicing is required when the apparatus has been
damaged in any way, such as power-supply cord or
plug is damaged, liquid has been spilled or objects
TASCAM iXR
3

have fallen into the apparatus, the apparatus has
been exposed to rain or moisture, does not operate
normally, or has been dropped.
• The apparatus draws nominal non-operating
power from the AC outlet with its POWER or
STANDBY/ON switch not in the ON position.
• The mains plug is used as the disconnect device,
the disconnect device shall remain readily
operable.
• Caution should be taken when using earphones
or headphones with the product because
excessive sound pressure (volume) from
earphones or headphones can cause hearing
loss.
• If you are experiencing problems with this
product, contact TEAC for a service referral. Do
not use the product until it has been repaired.
CAUTION
• Do not expose this apparatus to drips or
splashes.
• Do not place any objects filled with liquids, such
as vases, on the apparatus.
• Do not install this apparatus in a confined space
such as a book case or similar unit.
• The apparatus should be located close enough
to the AC outlet so that you can easily grasp the
power cord plug at any time.
• If the product uses batteries (including a battery
pack or installed batteries), they should not be
exposed to sunshine, fire or excessive heat.
• CAUTION for products that use replaceable
lithium batteries: there is danger of explosion
if a battery is replaced with an incorrect type
of battery. Replace only with the same or
equivalent type.
8
For European Customers
Disposal of electrical and electronic equipment
(a) All electrical and electronic equipment should be
disposed of separately from the municipal waste
stream via designated collection facilities appointed
by the government or the local authorities.
(b) By disposing of the electrical and electronic
equipment correctly, you will help save valuable
resources and prevent any potential negative
effects on human health and the environment.
(c) Improper disposal of waste equipment can have
serious effects on the environment and human
health as a result of the presence of hazardous
substances in electrical and electronic equipment.
(d) The crossed out wheeled dust bin
symbol indicates that electrical and
electronic equipment must be collected
and disposed of separately from
household waste.
(e) The return and collection systems are available to
the end users. For more detailed information about
disposal of old electrical and electronic equipment,
please contact your city office, waste disposal
service or the shop where you purchased the
equipment.
Contents
IMPORTANT SAFETY PRECAUTIONS ..............................3
IMPORTANT SAFETY INSTRUCTIONS .............................3
Introduction ............................................................................5
Note about the Reference Manual. ................................5
Included items .......................................................................5
Precautions for placement and use ...............................5
Beware of condensation ....................................................5
Cleaning the unit ..................................................................5
Names and functions of parts ..........................................6
Front ...................................................................................................... 6
Rear panel .......................................................................................... 7
Installing the dedicated software ..................................7
Installing the iOS Settings Panel ......................................... 7
Installing the Windows driver ............................................... 7
Installing the Mac Settings Panel........................................8
Uninstalling the dedicated software ............................9
Uninstalling the iOS Settings Panel ................................... 9
Uninstalling the Windows driver ........................................ 9
Uninstalling the Mac OS Settings Panel ......................... 9
Connecting the power ........................................................9
When using an iOS device ...................................................... 9
When using a computer (Windows/Mac) ..................10
Connection illustrations .................................................. 10
Using the USB ports when connecting iOS devices
Making settings on the Settings Panel screen ....... 10
Adjusting the input sound ............................................. 11
Troubleshooting ................................................................. 12
Specifications ...................................................................... 13
Audio resolution ..........................................................................13
Analog audio input ratings ...................................................13
Analog audio output ratings .............................................. 14
Control input/output ratings ............................................. 14
Audio performance .................................................................. 14
Operation requirements ................................................. 14
iOS devices ..................................................................................... 14
Windows .......................................................................................... 14
Mac OS ...............................................................................................15
Supported audio/MIDI drivers ............................................15
General................................................................................... 15
Dimensional drawings ..................................................... 16
. 10
TASCAM iXR
4

Introduction
Thank you for your purchase of the iXR USB Audio/
MIDI Interface.
Before using this unit, read this manual carefully so
that you will be able to use it correctly and enjoy
working with it for many years. After you have
finished reading this manual, please keep it in a safe
place for future reference.
You can also download this Owner's Manual from the
TEAC Global Site (http://teac-global.com/).
Should the contents of the memory of a connected
device (including hard disks and optical discs) in
the same system as this unit be lost, our company
will bear no responsibility for repair, including for
compensation.
Before connecting this unit to a computer, you
must download and install dedicated software
on the computer.
This product has a Blackfin® 16/32-bit embedded
processor made by Analog Devices, Inc. This
processor controls digital signal processing.
Inclusion of this Blackfin® processor in the product
increases its performance and reduces its power
consumption.
Note about the Reference Manual.
This Owner's Manual explains the main functions of
this unit. Please see the Reference Manual for information about all the unit's functions.
You can download the Reference Manual from the
TEAC Global Site (http://teac-global.com/).
Included items
remove the restrictions of the demo version,
allowing you to use it as a full version of
Cubasis LE.
Precautions for placement and use
• The operating temperature range of this unit is
5–35 °C.
• Do not install this unit in the following types
of locations. Doing so could make the sound
quality worse or cause malfunction.
Places with significant vibrations
Near windows or other places exposed to
direct sunlight
Near heaters or other extremely hot places
Extremely cold places
Places with bad ventilation or high humidity
Very dusty locations
• To enable good heat dissipation, do not place
anything on top of the unit.
• Do not place this unit on top of a power
amplifier or other device that generates heat.
Beware of condensation
Condensation could occur if the unit is moved from
a cold place to a warm place, it is used immediately
after a cold room has been heated or it is otherwise
exposed to a sudden temperature change.
Should this happen, leave the unit for one or two
hours before turning the unit on and using it.
Cleaning the unit
Use a dry soft cloth to wipe the unit clean. Do not
wipe with chemical cleaning cloths, thinner, alcohol
or other chemical agents. Doing so could damage the
surface or cause discoloration.
This product includes the following items.
Keep the packing materials for transportation in the
future.
Please contact TASCAM Customer Support (see back
cover) if any of these items are missing or have been
damaged during transportation.
• Main unit ................................................................... × 1
• USB cable .................................................................. × 1
• Steinberg Cubase LE installation guide .........× 1
• Owner’s Manual (this document) including
warranty .................................................................... × 1
• Included software (provided by download)
Steinberg Cubase LE
Steinberg Cubasis LE*
* A demo version of Cubasis LE can be
downloaded for free from the App Store.
Connecting the iOS device to this unit will
TASCAM iXR
5
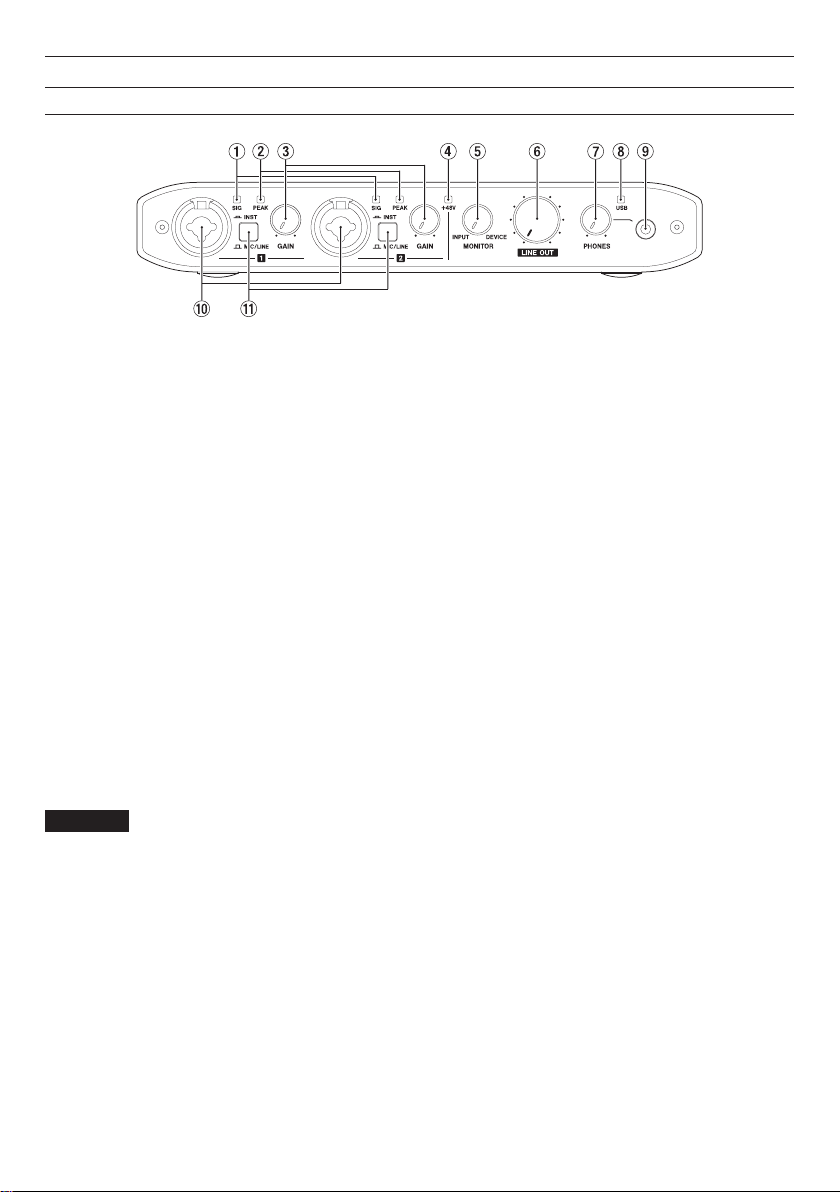
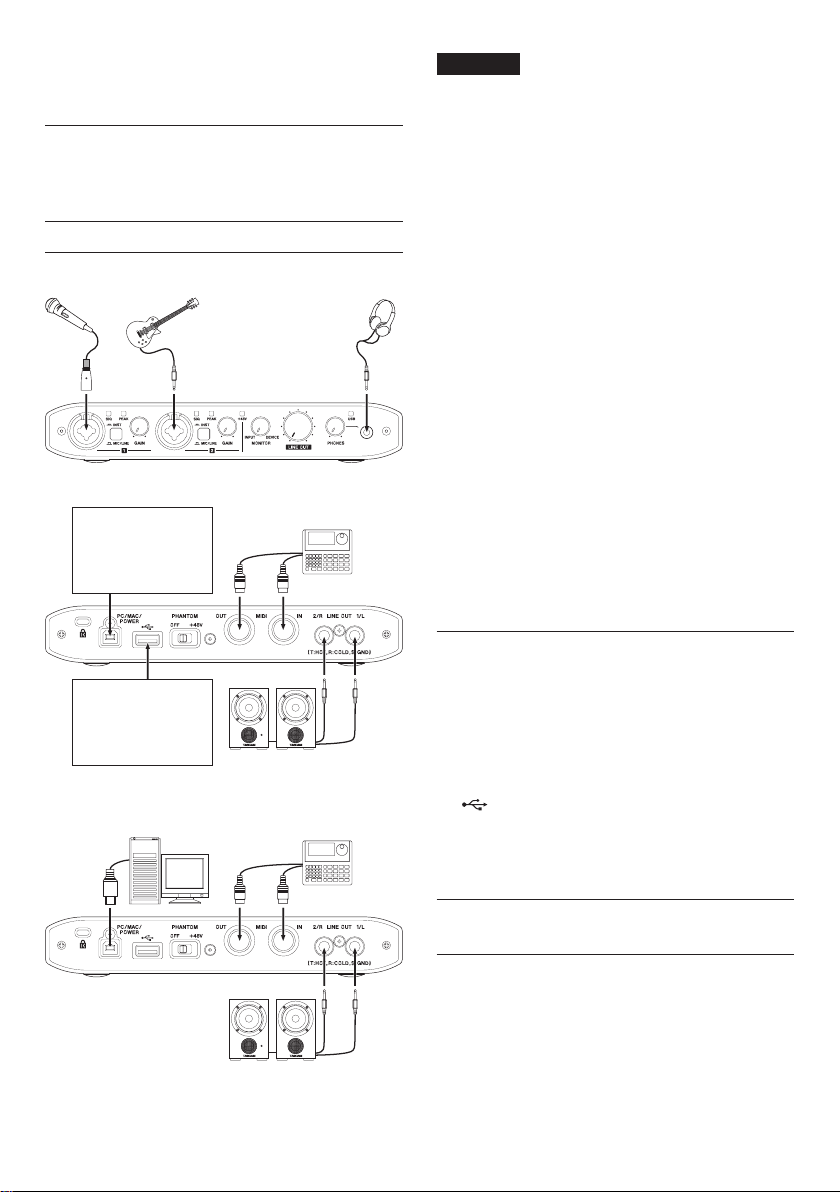
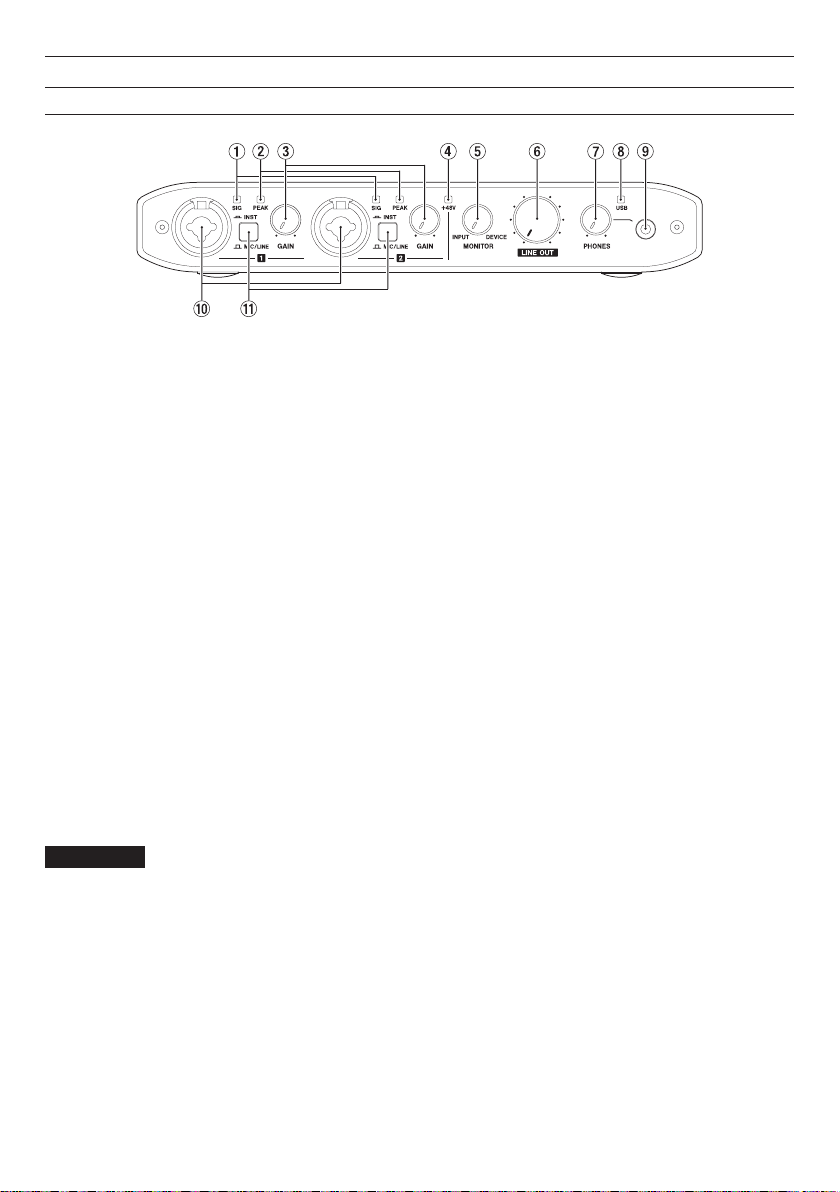
Names and functions of parts
Front
1 SIG indicators
The SIG indicators light green when a signal of
at least −32 dBFS is input through the IN 1/IN
2 jacks.
2 PEAK indicators
The PEAK indicators light red when a signal that
is about to distort (−1 dBFS or higher) is input
through the IN 1/IN 2 jacks.
3 GAIN knobs
Use to adjust the input levels of the IN 1/IN 2
jacks.
4 +48V indicator
This indicator lights when the PHANTOM switch
is set to +48V.
5 MONITOR knob
Use to adjust the balance between the signals
input through the unit's input jacks and the
output of the device connected by USB.
6 LINE OUT knob
Use to adjust the output level of the LINE OUT
1/L-2/R jacks.
7 PHONES knob
Use to adjust the PHONES jack output level.
CAUTION
Before connecting headphones, use the PHONES
knob to minimize the volume. Failure to do so
could result in a sudden loud noise that could
harm hearing, for example.
8 USB indicator
This lights when the USB connection is active.
This blinks when the USB connection is inactive.
It is unlit when the unit is off.
9 PHONES jack
Connect stereo headphones to this stereo mini
(3.5mm) jack.
The same signal is output from the LINE OUT 1/L
and 2/R jacks.
Use an adapter to connect headphones with a
standard (6.3mm) plug.
0 IN 1/IN 2 connectors
These are combo XLR/TRS input jacks.
Use the MIC/LINE INST switches on the front of
the unit to enable balanced line (MIC/LINE) or
unbalanced (INST) input for the TRS jacks.
q MIC/LINE INST switches
Set according to the IN 1/IN 2 jack input
sources.
Set to MIC/LINE when connecting electronic
instruments, audio devices, mics and similar
equipment. Set to INST when connecting an
electric guitar, electric bass or other equipment
with high output impedance.
TASCAM iXR
6
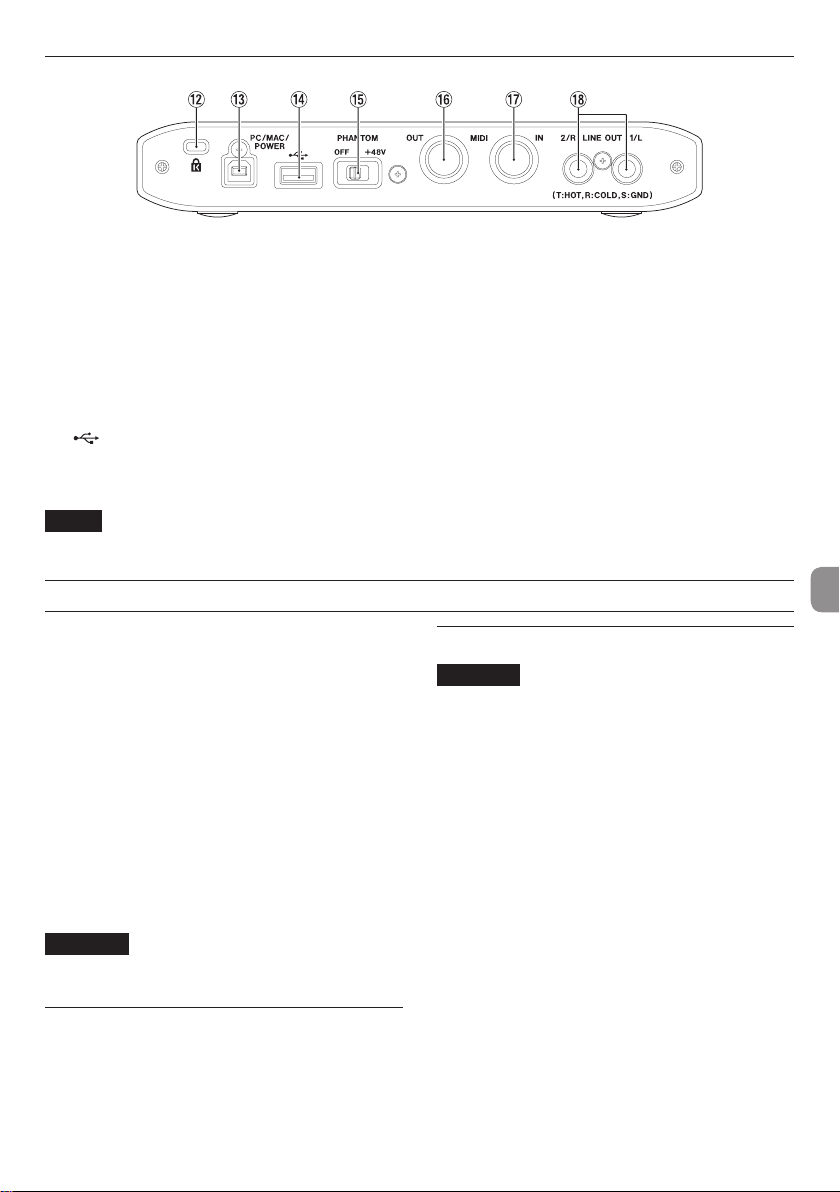
Rear panel
w Kensington Security Slot
e PC/MAC/POWER port (USB B-type)
When using this unit with an iOS device, use the
included USB cable to connect the USB power
adapter included with the iOS device. Doing this
allows this port to function as a power supply
connector.
When using this unit with a computer, use
the included USB cable to connect it to the
computer.
r port (USB-A type)
To connect this unit with an iOS device, use
the Lightning-USB cable included with the iOS
device.
NOTE
This port will not provide power to the iOS
device, nor will it draw power from the device.
Installing the dedicated software
To use this unit with a computer, dedicated software
must be installed on the computer.
With some exceptions, the latest software for the
operating system you are using can be downloaded
from the TEAC Global Site (http://teac-global.com/).
• To use this unit with an iOS device, install the
Settings Panel app. The standard iOS driver
will be used. The Settings Panel app can be
downloaded for free from the App Store.
• To use this unit with a Windows computer,
install the driver. When you install the driver, the
Settings Panel application will be installed at the
same time.
• To use this unit with a Mac, install the Settings
Panel application. The standard OS driver will
be used.
CAUTION
Before starting to install software, quit other
applications.
Installing the iOS Settings Panel
Find the TASCAM iXR Settings Panel app on the App
Store and download it.
Downloading it will install it automatically.
t PHANTOM switch
Use this switch to provide +48V phantom power
to the IN 1/IN 2 jacks.
y MIDI OUT connector
This 5-pin DIN is a standard MIDI output jack.
It outputs MIDI signals.
u MIDI IN connector
This 5-pin DIN is a standard MIDI input jack.
Use it to input MIDI signals.
i LINE OUT 1/L and 2/R jacks
These standard TRS jacks are analog line outputs.
Use the Settings Panel to set the signals output
from the LINE OUT 1/L and 2/R jacks.
(Tip: HOT, Ring: COLD, Sleeve: GND)
Installing the Windows driver
CAUTION
• Complete installation of the driver on the
computer before connecting the unit to it with
the USB cable.
• If you already connected the unit to the
computer using the USB cable before installing
the driver and the Found New Hardware Wizard
launched, close the message and disconnect the
USB cable.
8
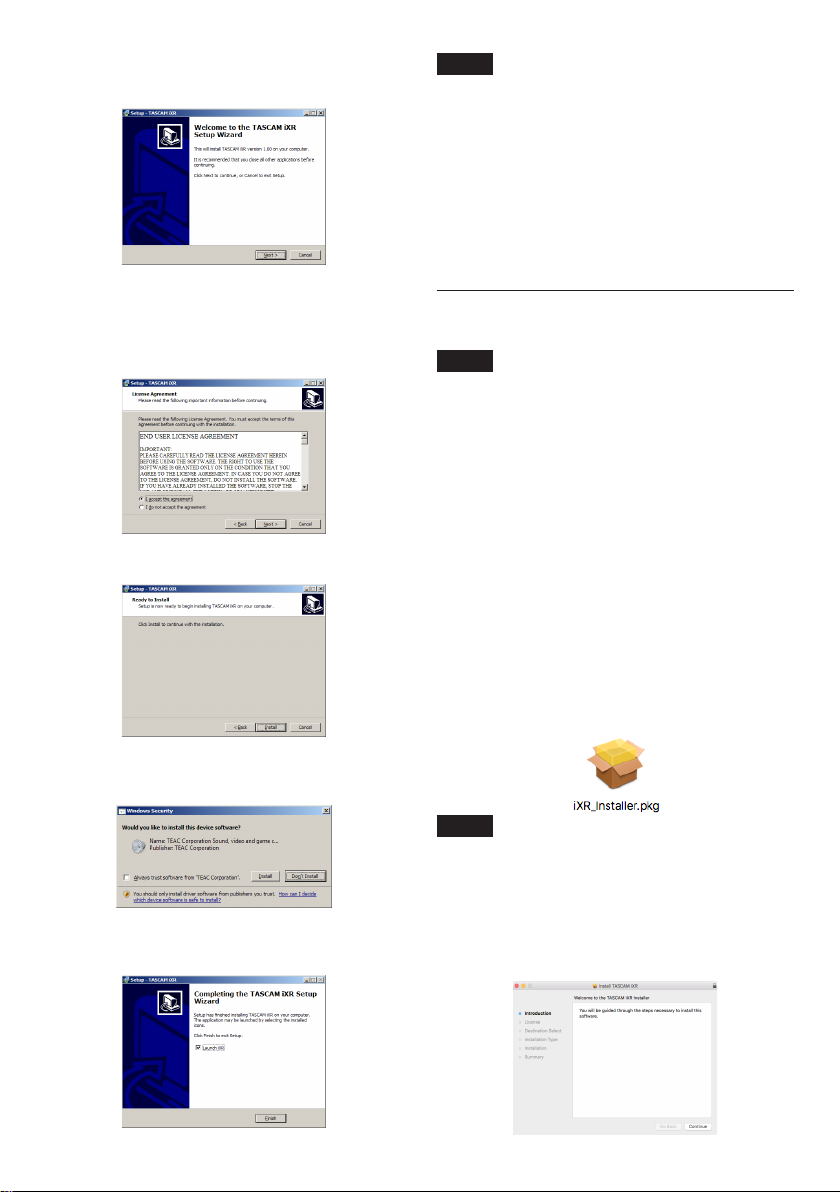
Windows driver installation procedures
1. Download the latest Windows driver for the
operating system you are using from the TEAC
Global Site (http://teac-global.com/) and save it
on the computer to be used with the unit.
2. Open the saved Windows driver (zip file) on, for
example, the computer desktop.
3. Double-click the “iXR_Installer_XXX.exe” (XXX
is the version number), file in the folder that
appears after uncompression to automatically
launch the installation software.
4. When a “Security Warning” or “User Account
Control” screens appear, click the “Yes” button.
TASCAM iXR
7

5. When the Setup Wizard screen appears, click the
“Next” button.
6. Read the contents of the License Agreement, and
select “I accept the agreement” if you agree to the
terms. Then, click the “Next” button.
7. Next, click the “Install” button to start installation.
NOTE
After installing the driver, the device driver will
be installed the first time the unit is connected
by USB.
At this time, Windows will automatically search
Windows Update, and it may take some time to
recognize the unit connection.
If the unit is still not recognized after some
time, open the software installation screen
from the message area at the bottom right of
the computer display, and click "Skip Obtaining
Drivers From Windows Update" to cancel the
search.
Installing the Mac Settings Panel
NOTE
• Install the Settings Panel on the computer before
connecting the unit to it with the USB cable.
• Depending on the Gatekeeper setting, a warning
message might appear during installation. For
information about Gatekeeper, see “Note about
Gatekeeper” in “3–Installation” of the Reference
Manual.
8
Settings Panel installation procedures
1. Download the software for the operating system
you are using from the TEAC Global Site (http://
teac-global.com/) and save it on the computer to
be used with the unit.
2. Double-click “iXR_Installer_XXX.dmg” (XXX is the
version number), which is the saved disk image
file for the Mac Settings Panel, and double-click
“iXR_Installer.pkg” inside the folder that opens.
8. A Windows security screen will appear twice.
Click the “Install” button to proceed with installation.
9. The following screen appears when installation
has completed.
Click the “Finish” button.
TASCAM iXR
8
NOTE
Depending on the computer’s settings, the
downloaded zip file might not have opened
automatically. In this case, open the zip file first
and then double-click the disk image file.
3. When the installer starts, click the “Continue”
button.
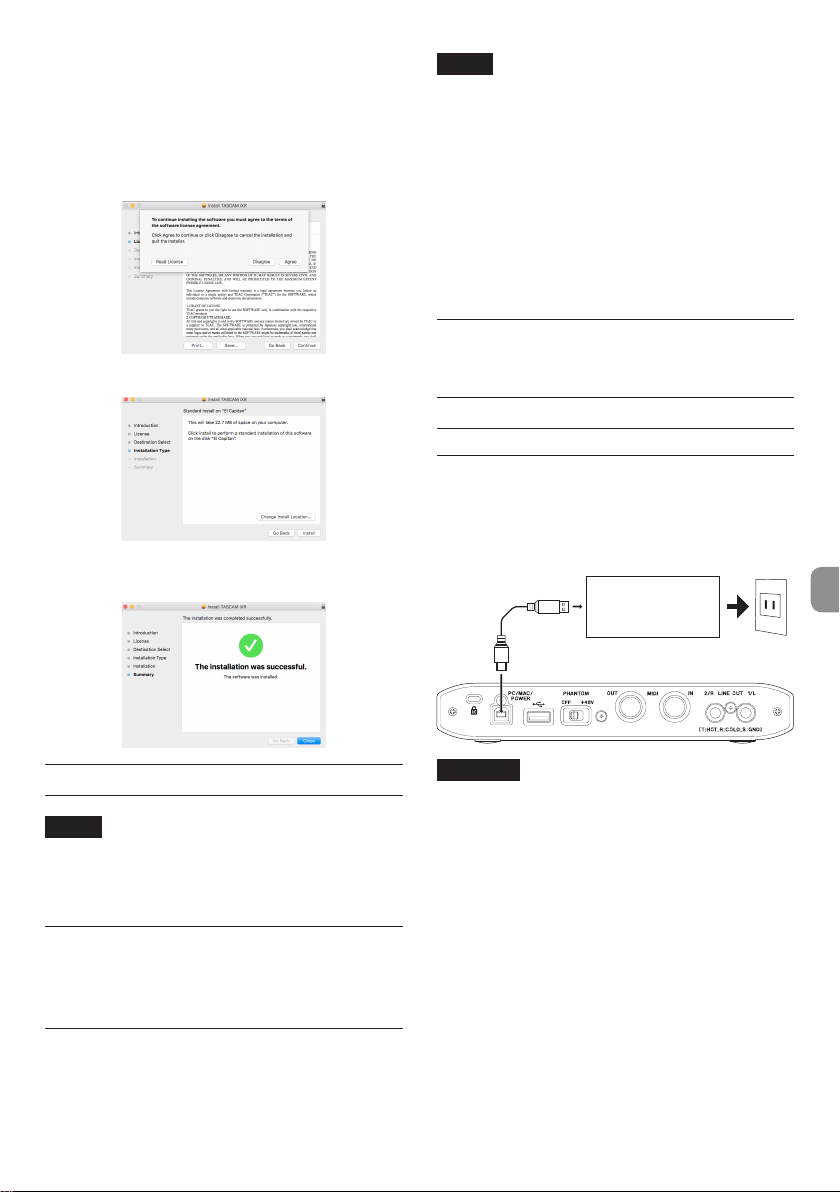
4. On the software license agreement screen, click
the “Continue” button to open the software
license agreement confirmation screen.
Click the “Read License” button and check the
contents of the Software License Agreement.
If you agree to the contents of the license, click
“Ag re e”.
5. Next, click the “Install” button to start installation.
6. The following screen appears when installation
has completed. Click the “Close” button.
NOTE
• In Windows 10, right-click the Start button and
click Control Panel when it appears.
• In Windows 8.1, right-click the button at the
bottom left of the Start screen and click Control
Panel on the Apps screen.
2. If “View by:” is set to “Category”, click “Uninstall a
program” under the “Program” item.
If “View by:” is set to “Large icons” or “Small icons”,
click “Programs and Features”.
3. Double-click “TASCAM iXR” in the list.
4. Then, follow the instructions that appear on the
screen.
Uninstalling the Mac OS Settings Panel
Delete “iXR_Settings Panel” from the Application
folder to complete uninstallation.
Connecting the power
When using an iOS device
Connect the USB power adapter included with the
iPad or iPhone to the USB cable included with this
unit, and connect the cable to the PC/MAC/POWER
port.
USB power adapter
included with iPad/
iPhone
Uninstalling the dedicated software
NOTE
Normally, there is no need to uninstall the
dedicated software. Follow these procedures if a
problem occurs or you no longer intend to use the
unit with the computer.
Uninstalling the iOS Settings Panel
Press and hold the “iXR Settings” icon to show the
× mark and enable app deletion. Tap the × mark to
delete the app.
Uninstalling the Windows driver
Uninstalling from the Programs and Features Control
Panel.
1. From the Start menu, open the Control Panel and
launch Programs and Features.
USB cable included with iXR
CAUTION
• A USB power adapter is not included with an
iPod touch. To use an iPod touch with this unit,
purchase a genuine Apple USB power adapter
(capable of supplying 5V and at least 700mA
current).
• Operation with other USB power adapters is
possible, but we strongly recommend using the
genuine Apple USB power adapter included with
the iPad/iPhone.
When using another USB power adapter, be
sure that the power supply device meets the
following specifications.
• Supplied voltage: 5 V
• Supplied current: 700 mA or more
Using a power supply device when the specifications are other than the above could
cause malfunction, overheating, fire or other
problems. If anything abnormal occurs, stop use
TASCAM iXR
9
and contact the retailer where you purchased
the unit or a TASCAM service center to request
repair.
When using a computer (Windows/Mac)
When this unit is connected to a computer, it will
operate using USB bus power, so connecting a
separate power supply device is not necessary.
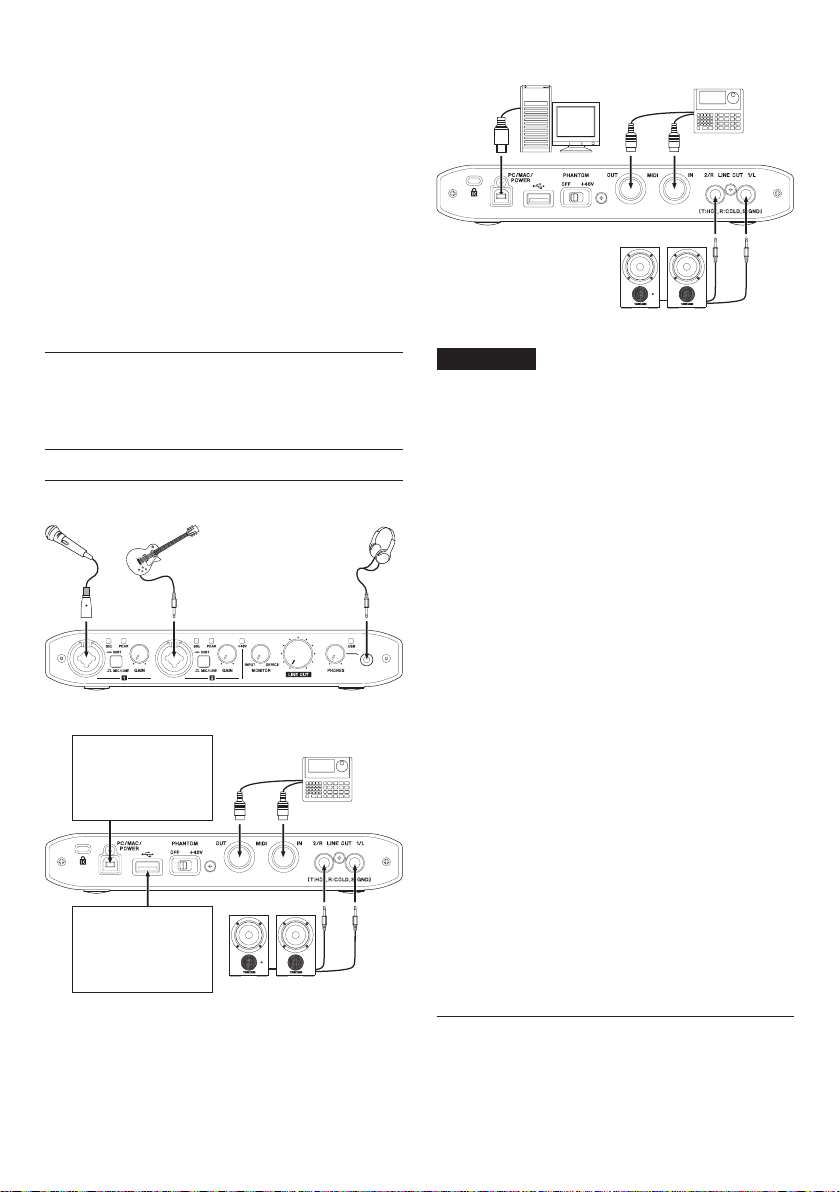
Connection illustrations
Vocal mic
Guitar
Connection example (front)
USB power adapter
included with iPad/
iPhone (using USB
cable included with
iXR)
Headphones
Drum machine
CAUTION
• Before making connections, turn this unit and
all connected devices (excluding computers/iOS
devices) to be connected off (standby).
• The PHANTOM switch affects both input
channels simultaneously. Do not turn phantom
power on when connecting a mic that does not
require phantom power.
• Turning phantom power on when a dynamic mic
or other mic that does not require it is connected
could damage this unit and connected
equipment.
• Do not connect or disconnect mics while
phantom power is on. Doing so could cause
a loud noise and might damage this unit and
connected equipment.
• Set the LINE OUT and PHONES knobs to their
minimum values before turning phantom
power on/off. Depending on the connected
mics, sudden loud noises from monitoring
equipment could occur, and this could damage
the equipment or harm hearing.
• When using condenser mics that require
phantom power and dynamic mics together, be
sure to use balanced dynamic mics. Unbalanced
dynamic mics cannot be used when phantom
power is enabled.
• Supplying phantom power to some ribbon mics
will break them. If you are unsure, do not supply
phantom power to a ribbon mic.
iOS device (using
Lightning-USB cable
included with iOS
device)
Connection example with an iOS device (rear)
Computer
Powered monitor speakers
with balanced connections
Connection example with a computer (rear)
TASCAM iXR
10
Powered monitor speakers
with balanced connections
Drum machine
Using the USB ports when connecting iOS devices
Connect the USB power adapter included with the
iPad or iPhone to the USB cable included with this
unit, and connect the cable to the PC/MAC/POWER
port.
To connect an iOS device, use the Lightning-USB
cable included with the iOS device to connect it to
the port.
A USB power adapter is not included with an iPod
touch. To use an iPod touch with this unit, purchase
a genuine Apple USB power adapter (capable of
supplying 5V and at least 700mA current).
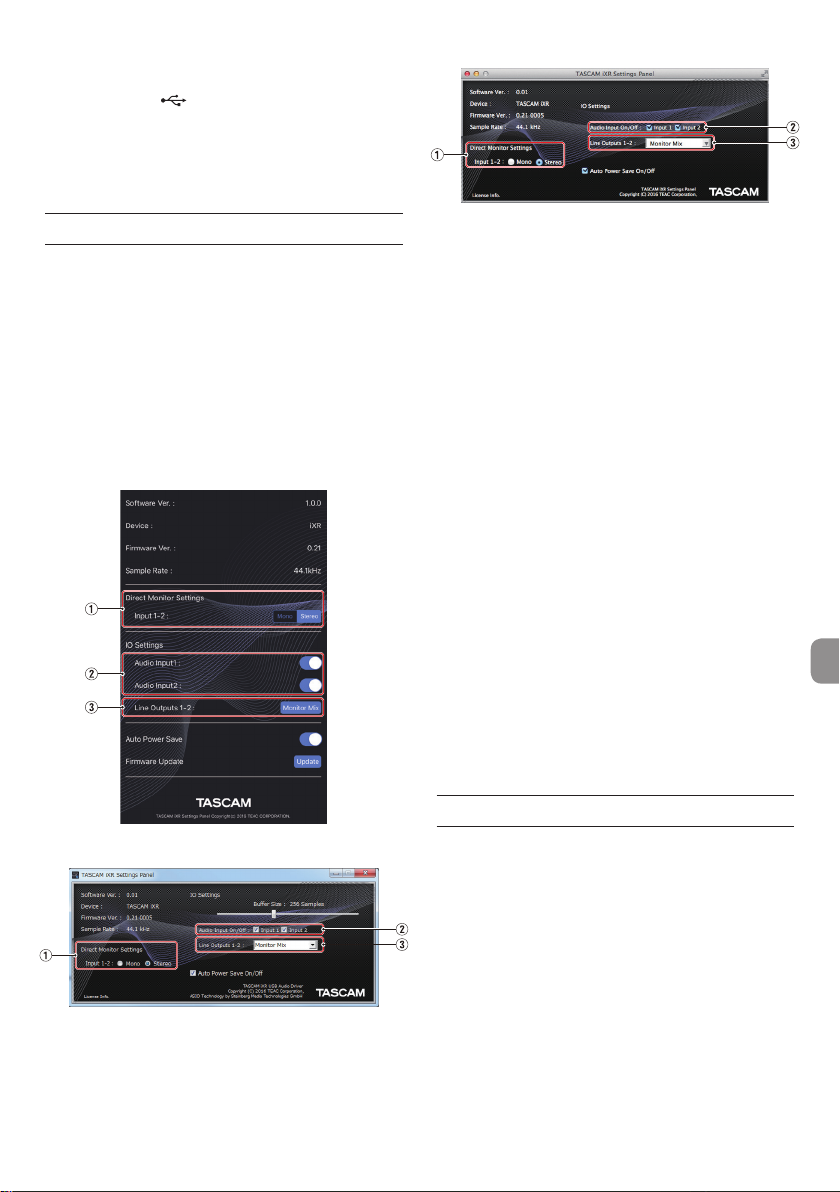
Making settings on the Settings Panel screen
8
iOS device
Tap the “iXR Settings” icon on the Home Screen.
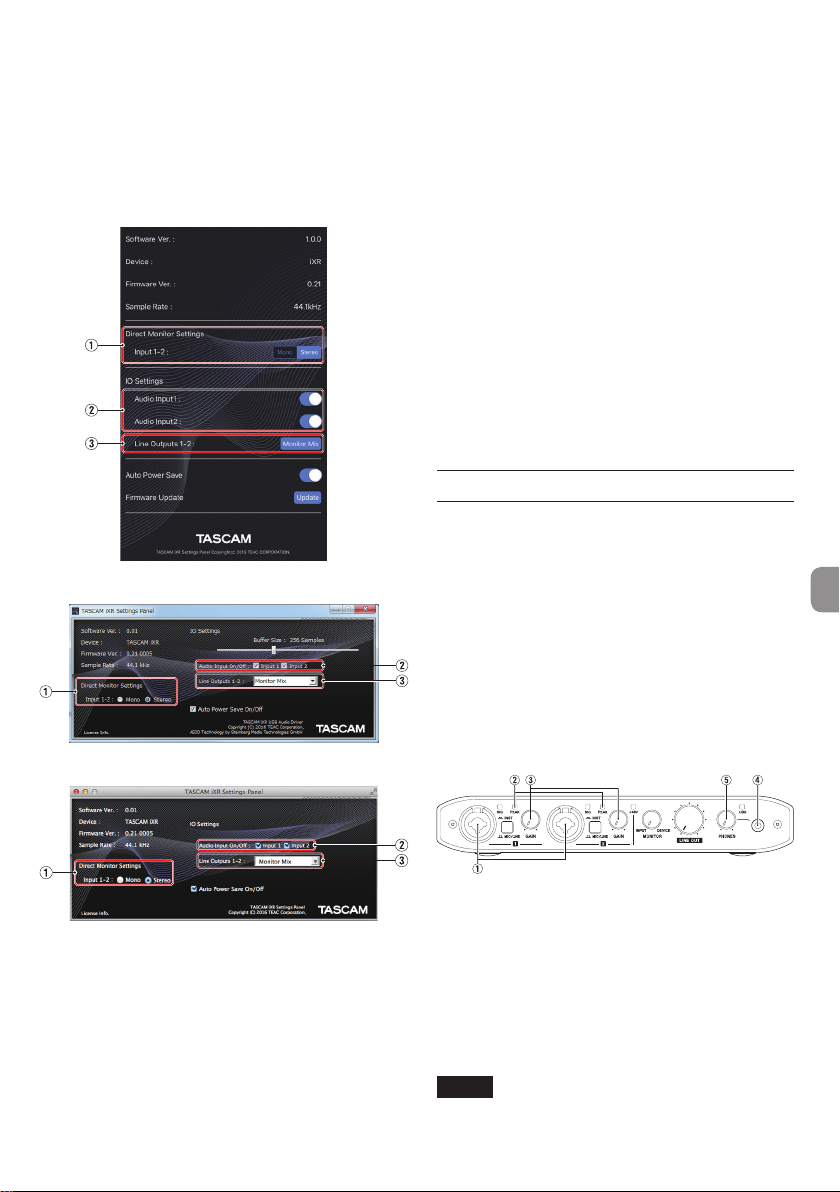
8
Windows
From “All Apps” (All Programs), select “iXR Settings
Panel” under TASCAM.
8
Mac
Select “iXR Settings Panel” from Applications and
launch it to open the Settings Panel on the computer
display.
iOS Settings Panel
Windows Settings Panel
3 Line Outputs 1-2
Select the signals to be output from the LINE
OUT 1/L-2/R and PHONES jacks.
Options
Monitor Mix
The signals input from all the input ports
and the signals sent by USB from the device
connected by USB (computer or iOS device)
are mixed by this unit and output.
xxxx Out 1-2 (Used with an iOS device)
Only the playback signals sent from the iOS
device connected by USB are output. The
connected iOS device name appears in place
of “xxxx”.
Computer Out 1-2 (Used with a computer)
Only the playback signals sent from the
computer connected by USB are output.
For details about settings other than the above, see
“Settings Panel overview” in “6 – Using the Settings
Panel” of the Reference Manual.
Adjusting the input sound
Analog audio signals input into this device from mics,
guitars, keyboards and other audio equipment can be
converted into digital signals and transmitted to the
computer/iOS device by USB.
You can use the features of this unit to adjust the
digital signals that are sent to the computer/iOS
device.
In addition, by connecting speakers (through an
amplifier) or headphones to this unit, you can
monitor audio signals that are input to this unit and
output from the computer/iOS device.
Use the various controls on the front of the unit as
necessary while listening to the input sound.
Mac Settings Panel
1 Direct Monitor Settings Input 1-2
Set the monitoring signal for the IN 1/IN 2 jacks
to Mono or Stereo.
2 Audio Input On/Off
Turn input on/off for each channel separately.
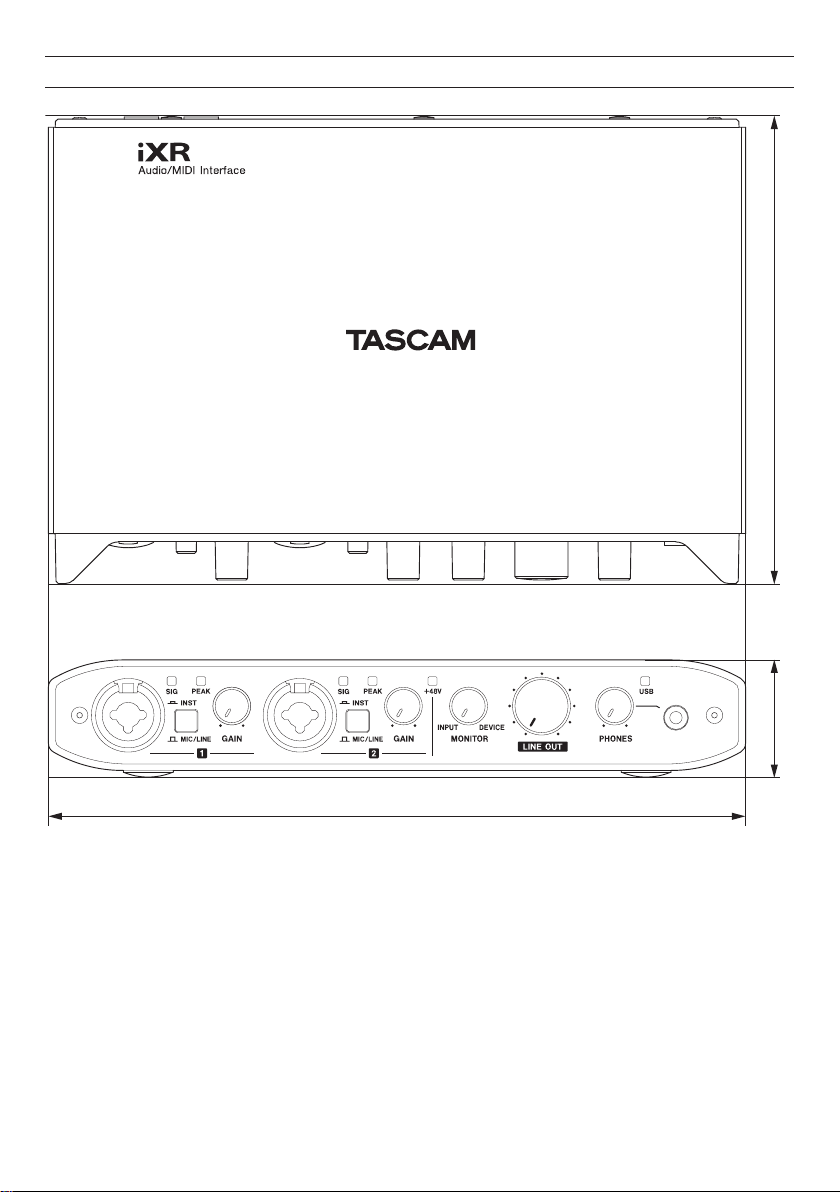
Example of operation using this unit
Use the GAIN knobs (3) to adjust the analog input
levels of the IN 1/IN 2 jacks (1) so that the PEAK
indicators (2) above and to the right of the knobs do
not light.
To listen to the monitoring signal using headphones,
connect the headphones to the PHONES jack (4)
and adjust the PHONES knob (5).
NOTE
If you cannot hear the input sound through the
headphones or the LINE OUT 1/L-2/R jacks,
TASCAM iXR
11

check the settings of the MONITOR knob on the
front of the unit and the Line Outputs item on
the Settings Panel screen.
Troubleshooting
Please read this chapter if you are unable to use the
unit properly even after setting it up following the
procedures in this manual.
If you are still unable to resolve your problems please
contact TASCAM customer support with the following
information about the operating environment and
details about the trouble.
Operating environment
• Computer/iOS device manufacturer
• Model
• CPU
• Memory (RAM)
• Operating system
• Applications used
• Antivirus software
• Wireless LAN use
See the end of this document for contact information.
8
The dedicated software cannot be
installed
1. Check the operating system
The operating system you are using might not
be supported by the software that you are
trying to install.
Check the operating systems supported by
the software that you are trying to install.
2. Stop software that is running in the background
Antivirus software and other software
running in the background can interfere with
installation. Quit software running in the
background and try installing again.
8
The unit will not turn on.
• When using an iOS device, a power supply
device must be connected to the PC/MAC/
POWER port. Carefully read “Connecting the
power” on page 9 of this operation manual
and connect a suitable power supply device.
• When using this unit with a computer, the
computer must support USB bus power. Check
the computer specifications.
8
The unit is connected, but the computer/
iOS device does not recognize it.
1. Install the dedicated software
i If you have not done so, install the dedicated
software. See “Installing the dedicated software”
on page 7 for details.
2. Change the USB port (if using a computer)
i This unit will not work with USB 1.1. Use a USB
2.0 or USB 3.0 port.
i Do not use a USB hub. Always connect the unit
directly to a USB port on the computer.
i If the above steps do not resolve the problem,
connect the unit to a different USB port on the
computer.
3. Check the connection cable (when using an iOS
device)
i When connecting this unit to an iOS device,
always use the Lightning-USB cable included
with the iOS device. Operation is not guaranteed
with cables other than Apple genuine cables.
8
There is no sound even when audio is
playing back on the computer.
Confirm that the unit's MONITOR knob is not turned
all the way to the left (toward INPUT). If that is the
case, turn the MONITOR knob to the right of center.
In addition, confirm the following while the unit
is connected to the computer. Moreover, if you
make the following settings, sound will be output
through this unit, but no sound will be output by the
computer’s speakers or headphone jack.
Windows
See the “Windows 10/Windows 8.1” or
“Windows 7” instructions in the “Windows
Media Player” section of “8 – Application guide”
in the Reference Manual, and make settings as
necessary for the OS.
OS X
1. Quit all applications and open “System
Preferences…” from the Apple menu.
2. Open “Sound”.
3. On the Output tab, select “iXR”.
After completing the setting, restart the computer
and check the sound of playback.
Depending on the application that you are using, you
might need to make additional device settings.
In particular, DAW applications operate using audio
engines with settings that are different from the OS
settings, so confirm the DAW driver settings first after
installing the dedicated software for this unit.
Please see the manuals for the applications that you
are using for detailed setting procedures.
8
Sound breaks up or there is noise.
The processing load on the computer causes sound
to break up and noise to occur.
Here are some methods to reduce the load on the
computer.
1. A wireless LAN and software running in the
background, including antivirus software,
regularly put processing loads on the computer,
12
TASCAM iXR

which can cause sound to break up and other
noise.
Stop wireless LAN transmission, antivirus
software and other software running in the
background when using this unit.
2. Set the buffer size (latency) in the audio application that you are using or in this unit's Settings
Panel to a larger value. (Windows only)
NOTE
Consult the maker of the audio application that
you are using for methods to reduce its load on
your computer.
3. Change the settings of your computer so that
they are optimal for audio processing.
Using Windows
1 Open the Control Panel using the appropriate
method of the OS you are using (Windows 10/
Windows 8.1/Windows 7).
i In Windows 10, from the Start button at the
bottom left click “Control Panel” to open the
Control Panel. Then, click the System icon.
i In Windows 8.1, right-click the ordinary Start
screen (Metro user interface screen) and then
click “All apps”. Then, right-click “Computer”
and selec t “Properties”.
i In Windows 7, from the Start button at the
bottom left right-click “Computer” and select
“Properties”.
2 Click “Advanced system settings”.
3 Click “Settings” in the “Performance” section of
the “Advanced” tab of the “System Properties”
window.
4 In the “Visual Effects” tab of the “Performance
Options” window, select “Adjust for best
performance”.
Using OS X
1 Open “System Preferences…” from the Apple
menu, and select “Energy Saver”.
2 Set “Computer sleep” to “Never”.
3 Set “Display sleep” to “Never”.
NOTE
Depending on the Mac OS version and Mac
computer model, these settings might not be
available.
8
Cubase LE/Cubasis LE support
Our company does not provide support for Cubase LE
or Cubasis LE.
Please refer to the corresponding help menu or
operation manual for instructions about using the
product.
Specifications
Audio resolution
8
Sampling frequencies
44.1, 48, 88.2, 96 kHz
8
Quantization bit depth
16/24-bit
Analog audio input ratings
8
Mic inputs (balanced, IN 1/IN 2)
Connector: XLR-3-31 equivalent
3: COLD)
Input impedance: 2.2 kΩ
Nominal input level (gain knob at MAX): −65 dBu
(0.0004 Vrms)
Nominal input level (gain knob at MIN): −8 dBu
(0.3090 Vrms)
Maximum input level: +8 dBu (1.9467 Vrms)
Gain range: 57 dB
8
Instrument inputs (unbalanced, IN 1/IN
2)
(MIC/LINE INST switch set to INST)
Connector: 6.3mm (1/4") standard TS jack (Tip:
HOT, Sleeve: GND)
Input impedance: 1 MΩ or more
Nominal input level (gain knob at MAX): −63 dBV
(0.0007 Vrms)
Nominal input level (gain knob at MIN): −6 dBV
(0.5015 Vrms)
Maximum input level: +10 dBV (3.162 Vrms)
Gain range: 57 dB
8
Line inputs (balanced, IN 1/IN 2)
(MIC/LINE INST switch set to MIC/LINE)
Connector: 6.3mm (1/4") standard TRS jack (Tip:
HOT, Ring: COLD, Sleeve: GND)
Input impedance: 10 kΩ
Nominal input level (gain knob at MAX): −53 dBu
(0.0017 Vrms)
Nominal input level (gain knob at MIN): +4 dBu
(1.228 Vrms)
Maximum input level: +20 dBu (7.75 Vrms)
Gain range: 57 dB
(1: GND, 2: HOT,
TASCAM iXR
13

Analog audio output ratings
8
Line outputs (balanced, LINE OUT 1/L–2/R)
Connector: 6.3mm (1/4") standard TRS jack (Tip:
HOT, Ring: COLD, Sleeve: GND)
Output impedance: 110 Ω
Rated output level: +4 dBu (1.273 Vrms)
Maximum output level: +20 dBu (7.75 Vrms)
8
Headphone output (PHONES)
Connector: 3.5mm (1/8”) stereo mini jack
Maximum output: 18 mW + 18 mW or higher
(THD+N 1% or less, into 32Ω load)
8
Distortion
0.0025% or less (MIC/LINE input to LINE OUT,
1kHz sine wave, at nominal input level and
maximum output level, JEITA)
8
Crosstalk
95 dB or more (MIC/LINE input to LINE OUT, 1
kHz, JEITA)
Operation requirements
Check the TEAC Global Site (http://teac-global.com/)
for the latest information about supported operating
systems.
Control input/output ratings
8
MIDI IN connector
Connector: 5-pin DIN
Format: standard MIDI
8
MIDI OUT connector
Connector: 5-pin DIN
Format: standard MIDI
8
Windows/Mac/Power port
Connector: 4-pin USB B-type
Transfer rate: USB 2.0 High Speed (480 Mbps)
8
port
Connector: USB A-type
Transfer rate: USB 2.0 High Speed (480 Mbps)
Audio performance
8
Mic amp EIN (equivalent input noise)
−125 dBu or less (150Ω termination, gain knob
at MAX)
8
Frequency response
IN 1/IN 2 to LINE OUT (BALANCED), headphone
(PHONES) output
At 44.1/48 kHz
20 Hz: +0 dB/−0.4 dB (JEITA)
20 kHz: +0 dB/−0.1 dB (JEITA)
20 kHz: +0 dB/−0.5 dB (HP output, JEITA)
At 88.2/96 kHz
20 Hz: +0 dB/−0.4 dB (JEITA)
40 kHz: +0 dB/−0.25 dB (JEITA)
40 kHz: +0 dB/−2.0 dB (HP output, JEITA)
8
S/N ratio
101 dB or higher (MIC/LINE input to LINE OUT,
gain knob at MIN, JEITA)
iOS devices
Apple iOS devices with a Lightning connector and
running iOS 8, 9 or later
Windows
8
Supported operating systems
Windows 10 32-bit
Windows 10 64-bit
Windows 8.1 32-bit
Windows 8.1 64-bit
Windows 7 32-bit SP1 or later
Windows 7 64-bit SP1 or later
(Windows Vista and Windows XP are not
supported)
8
Computer hardware requirements
Windows-compatible computer with a USB 2.0
port
8
CPU/processor speed
2 GHz or faster dual core processor (x86)
8
Memory
2 GB or more
CAUTION
Operation of this unit was confirmed using
standard computers that meet the above
requirements. This does not guarantee
operation with all computers that meet the
above requirements. Even computers that meet
the same system requirements might have
processing capabilities that differ according to
their settings and other operating conditions
14
TASCAM iXR

Mac OS
8
Supported operating systems
OS X El Capitan (10.11 or later)
OS X Yosemite (10.10 or later)
OS X Mavericks (10.9.1 or later)
OS X Mountain Lion (10.8.4 or later)
8
Computer hardware requirements
Mac with a USB 2.0 port
8
CPU/processor speed
2 GHz or faster dual core processor
8
Memory
2 GB or more
Supported audio/MIDI drivers
iOS: Core Audio for iPhone
Windows: ASIO 2.0, WDM, MIDI
Mac: Core Audio, Core MIDI
General
8
Power
Used with a computer
USB bus power
Used with an iOS device
USB power adapter (that supplies 5 V and at least
700 mA current)
Mobile battery (that supplies 5 V and at least 700
mA current)
TASCAM BP-6AA external battery pack
1
We strongly recommend using the USB power
adapter included with the iPad/iPhone. A USB
power adapter is not included with an iPod
touch. To use an iPod touch with this unit,
purchase a genuine Apple USB power adapter
(capable of supplying 5V and at least 700mA
current).
8
Power consumption
2.5 W
8
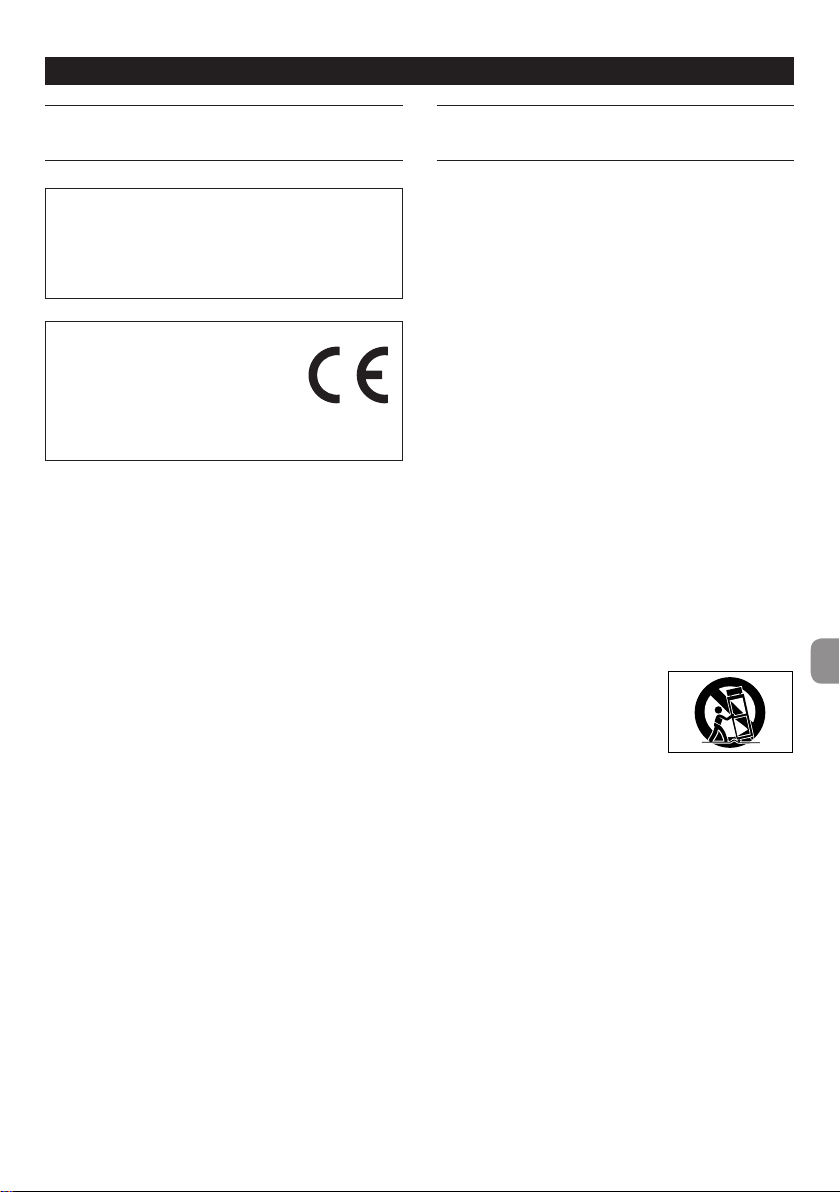
External dimensions
210 × 35.3 × 140.7 mm (width × height × depth,
excluding protrusions)
8
Weight
660 g
8
Operating temperature range
5–35 °C (41–95º F)
8
Bundled DAW software (download
editions)
Steinberg Cubase LE
Steinberg Cubasis LE
2
A demo version of Cubasis LE can be
downloaded for free from the App Store.
Connecting the iOS device to this unit will
remove the restrictions of the demo version,
allowing you to use it as a full version of
Cubasis LE.
1
2
TASCAM iXR
15
Dimensional drawings
210 mm
35.3 mm 140.7 mm
• Illustrations in this manual might differ in part from the actual product.
• Specifications and external appearance might be changed without notification to improve the product.
TASCAM iXR
16
Mode d'emploi
PRÉCAUTIONS DE SÉCURITÉ IMPORTANTES
Pour le Canada
THIS CLASS B DIGITAL APPARATUS COMPLIES WITH
CANADIAN ICES-003.
CET APPAREIL NUMÉRIQUE DE LA CLASSE B EST
CONFORME À LA NORME NMB-003 DU CANADA.
DÉCLARATION DE CONFORMITÉ
Nous, TEAC EUROPE GmbH. Bahnstrasse
12, 65205 Wiesbaden-Erbenheim,
Allemagne, déclarons sous notre
propre responsabilité que le produit
TEAC décrit dans ce mode d'emploi est conforme aux
normes techniques lui correspondant.
INSTRUCTIONS DE SÉCURITÉ IMPORTANTES
1 Lisez ces instructions.
2 Conservez ces instructions.
3 Tenez compte de tous les avertissements.
4 Suivez toutes les instructions.
5 N'utilisez pas cet appareil avec de l'eau à proximité.
6 Ne nettoyez l'appareil qu'avec un chiffon sec.
7 Ne bloquez aucune ouverture de ventilation.
Installez-le conformément aux instructions du
fabricant.
8 Ne l'installez pas près de sources de chaleur telles
que des radiateurs, bouches de chauffage, poêles
ou autres appareils (y compris des amplificateurs)
dégageant de la chaleur.
9 Ne neutralisez pas la fonction de sécurité de la fiche
polarisée ou de terre. Une fiche polarisée a deux
broches, l'une plus large que l'autre. Une fiche de
terre a deux broches identiques et une troisième
broche pour la mise à la terre. La broche plus large ou
la troisième broche servent à votre sécurité. Si la fiche
fournie n'entre pas dans votre prise, consultez un
électricien pour le remplacement de la prise obsolète.
10 Évitez de marcher sur le cordon d'alimentation et
de le pincer, en particulier au niveau des fiches, des
prises secteur, et du point de sortie de l'appareil.
11 N'utilisez que des fixations/accessoires spécifiés par
le fabricant.
12 Utilisez-le uniquement avec
des chariots, socles, trépieds,
supports ou tables spécifiés
par le fabricant ou vendus
avec l'appareil. Si un chariot
est utilisé, faites attention à ne pas être blessé par
un renversement lors du déplacement de
l'ensemble chariot/appareil.
13 Débranchez cet appareil en cas d'orage ou de non
utilisation prolongée.
14 Confiez toute réparation à des techniciens
de maintenance qualifiés. Une réparation est
nécessaire si l'appareil a été endommagé d'une
quelconque façon, par exemple si le cordon ou la
fiche d'alimentation est endommagé, si du liquide
a été renversé sur l'appareil ou si des objets sont
tombés dedans, si l'appareil a été exposé à la pluie
ou à l'humidité, s'il ne fonctionne pas normalement,
ou s'il est tombé.
• L’appareil tire un courant nominal de veille de la
prise secteur quand son interrupteur POWER ou
STANDBY/ON n’est pas en position ON.
• La fiche secteur est utilisée comme dispositif
de déconnexion et doit donc toujours rester
disponible.
TASCAM iXR
17

• Des précautions doivent être prises en cas
d'utilisation d'écouteurs ou d'un casque avec le
produit car une pression sonore excessive (volume
trop fort) dans les écouteurs ou dans le casque
peut causer une perte auditive.
• Si vous rencontrez des problèmes avec ce produit,
contactez TEAC pour une assistance technique.
N'utilisez pas le produit tant qu'il n'a pas été
réparé.
ATTENTION
• N'exposez pas cet appareil aux gouttes ni aux
éclaboussures.
• Ne placez pas d'objet rempli de liquide sur
l'appareil, comme par exemple un vase.
• N’installez pas cet appareil dans un espace
confiné comme une bibliothèque ou un meuble
similaire.
• L’appareil doit être placé suffisamment près de
la prise de courant pour que vous puissiez à tout
moment attraper facilement la fiche du cordon
d'alimentation.
• Si le produit utilise des piles/batteries (y compris
un pack de batteries ou des batteries fixes), elles
ne doivent pas être exposées au soleil, au feu ou
à une chaleur excessive.
• PRÉCAUTION pour les produits qui utilisent des
batteries remplaçables au lithium: remplacer
une batterie par un modèle incorrect entraîne un
risque d'explosion. Remplacez-les uniquement
par un type identique ou équivalent.
8
Pour les consommateurs européens
Mise au rebut des équipements électriques et
électroniques
(a) Tous les équipements électriques et électroniques
doivent être traités séparément de la collecte
municipale d'ordures ménagères dans des points
de collecte désignés par le gouvernement ou les
autorités locales.
(b) En vous débarrassant correctement des
équipements électriques et électroniques, vous
contribuerez à la sauvegarde de précieuses
ressources et à la prévention de potentiels effets
négatifs sur la santé humaine et l'environnement.
(c) Le traitement incorrect des déchets d'équipements
électriques et électroniques peut avoir des effets
graves sur l'environnement et la santé humaine en
raison de la présence de substances dangereuses
dans les équipements.
(d) Le symbole de poubelle sur roues barrée
d'une croix indique que les équipements
électriques et électroniques doivent être
collectés et traités séparément des
déchets ménagers.
(e) Des systèmes de retour et de collecte sont
disponibles pour l'utilisateur final. Pour des
informations plus détaillées sur la mise au rebut des
vieux équipements électriques et électroniques,
veuillez contacter votre mairie, le service d'ordures
ménagères ou le magasin dans lequel vous avez
acheté l'équipement.
Sommaire
PRÉCAUTIONS DE SÉCURITÉ IMPORTANTES ............. 17
INSTRUCTIONS DE SÉCURITÉ IMPORTANTES............17
Introduction ......................................................................... 19
Note à propos du manuel de référence .....................19
Éléments fournis .................................................................19
Précautions concernant l'emplacement et l'emploi .
Attention à la condensation ...........................................19
Nettoyage de l'unité ..........................................................19
Nomenclature et fonctions des parties ...................... 20
Avant .................................................................................................. 20
Face arrière .....................................................................................21
Installation du logiciel dédié .......................................... 21
Installation du panneau de réglages
(Settings Panel) pour appareil iOS ...................................21
Installation du pilote Windows ..........................................21
Installation du panneau de réglages
(Settings Panel) pour Mac ..................................................... 22
Désinstallation du logiciel dédié .................................. 23
Désinstallation du panneau de réglages
(Settings Panel) pour iOS .......................................................23
Désinstallation du pilote Windows .................................23
Désinstallation du panneau de réglages
(Settings Panel) pour Mac OS ............................................. 23
Connexion de l'alimentation ..........................................23
Avec un appareil iOS ................................................................23
Avec un ordinateur (Windows/Mac) .............................. 24
Schémas de connexion .................................................... 24
Emploi des ports USB pour connecter des
appareils iOS .................................................................................. 24
Réglages en écran Settings Panel ................................25
Réglage du son entrant .................................................... 25
Guide de dépannage ........................................................ 26
Caractéristiques techniques ........................................... 27
Résolution audio ......................................................................... 27
Données d'entrée audio analogique ............................. 28
Données de sortie audio analogique ............................ 28
Données d'entrée/sortie de commande .....................28
Performances audio ..................................................................28
Configurations requises ...................................................29
Appareils iOS ................................................................................. 29
Windows .......................................................................................... 29
Mac OS X ..........................................................................................29
Pilotes audio/MIDI pris en charge ....................................29
Caractéristiques générales .............................................. 29
Dessins avec cotes .............................................................30
19
18
TASCAM iXR

Introduction
Merci d'avoir choisi l'interface audio/MIDI USB 2.0 iXR.
Avant d'utiliser cette unité, lisez attentivement ce
mode d'emploi pour pouvoir l'utiliser correctement
et en profiter durant de nombreuses années. Une fois
la lecture de ce mode d'emploi terminée, veillez à le
conserver en lieu sûr pour référence ultérieure.
Vous pouvez aussi télécharger ce mode d'emploi depuis
le site mondial de TEAC (http://teac-global.com/).
En cas de perte de contenu de la mémoire d'un
périphérique connecté (y compris des disques
durs et disques optiques) dans le même système
que cette unité, notre société n'endossera aucune
responsabilité de réparation ou d'indemnisation.
Avant de brancher cette unité à un ordinateur, un
logiciel dédié doit être téléchargé et installé sur
l'ordinateur.
Ce produit est équipé d'un processeur Blackfin®
16/32bits d'Analog Devices, Inc. Ce processeur
contrôle le traitement numérique du signal.
L'incorporation de ce processeur Blackfin® améliore
les performances et réduit la consommation
d'énergie.
Note à propos du manuel de référence
Ce mode d'emploi explique les principales fonctions
de cette unité. Veuillez consulter le manuel de
référence pour des informations sur toutes les
fonctions de l'unité.
Vous pouvez télécharger le manuel de référence depuis
le site mondial de TEAC (http://teac-global.com/).
Éléments fournis
Ce produit est livré avec les éléments suivants.
Conservez les matériaux d'emballage pour de futurs
transports.
Si un élément quelconque est manquant ou a été
endommagé durant le transport, veuillez contacter le
service clientèle TASCAM (voir au dos de couverture).
• Unité principale ...................................................... × 1
• Câble USB .................................................................. × 1
• Guide d'installation de Cubase LE de
Steinberg ...................................................................× 1
• Mode d'emploi (ce document) incluant la
garantie ......................................................................× 1
• Logiciels inclus (fournis par téléchargement)
Cubase LE de Steinberg
Cubasis LE* de Steinberg
* Une version de démonstration de Cubasis LE
peut être téléchargée gratuitement depuis
l'App Store. Connecter l'appareil iOS à cette
unité lèvera les restrictions de la version de
démonstration, vous permettant de l'utiliser
comme une version complète de Cubasis LE.
Précautions concernant l'emplacement et l'emploi
• La plage de température de fonctionnement de
cette unité se situe entre 5ºC et 35ºC.
• Ne placez pas cette unité dans les types
d'emplacement suivants. Cela pourrait dégrader
la qualité sonore ou causer des mauvais
fonctionnements.
Lieux sujets à des vibrations importantes
Près de fenêtres ou en exposition directe au
soleil
Près de chauffages ou dans des lieux
extrêmement chauds
Lieux extrêmement froids
Lieux mal ventilés ou très humides
Lieux très poussiéreux
• Pour permettre une bonne dispersion
thermique, ne placez rien sur le dessus de
l'unité.
• Ne placez pas cette unité sur un amplificateur
de puissance ou un autre appareil générant de
la chaleur.
Attention à la condensation
De la condensation peut se produire si l'unité est
déplacée d'un endroit froid à un endroit chaud, est
utilisée dans une pièce qui vient d'être chauffée ou
soumise à des changements brutaux de température.
Si c'est le cas, laissez l’unité une ou deux heures
à température ambiante avant de l'allumer et de
l'utiliser.
Nettoyage de l'unité
Essuyez l'unité avec un chiffon sec et doux pour
la nettoyer. Ne l'essuyez pas avec des lingettes de
nettoyage contenant des produits chimiques, du
diluant, de l'alcool ou d'autres agents chimiques.
Cela pourrait endommager la surface ou causer une
décoloration.
TASCAM iXR
19
Nomenclature et fonctions des parties
Avant
1 Voyants de signal (SIG)
Les voyants SIG s'allument en vert quand un
signal d'au moins -32dBFS entre dans les prises
IN 1/IN 2.
2 Voyants de crête (PEAK)
Les voyants PEAK s'allument en rouge quand
un signal sur le point d'atteindre le niveau de
distorsion (-1dBFS ou plus) entre dans les prises
IN 1/IN 2.
3 Boutons GAIN
Utilisez-les pour régler les niveaux d'entrée par
les prises IN 1/IN 2.
4 Voyant +48V
Le voyant s'allume quand le commutateur
PHANTOM est réglé sur +48V.
5 Bouton MONITOR
Sert à régler la balance entre les signaux reçus
par les prises d'entrée de l'unité et ceux sortant
de l'appareil connecté par USB.
6 Bouton LINE OUT
Utilisez-le pour régler le niveau de sortie par les
prises LINE OUT 1/L-2/R.
7 Bouton PHONES
Sert à régler le niveau de sortie par la prise
PHONES (casque).
ATTENTION
Avant de brancher un casque, baissez le bouton
PHONES pour réduire le volume au minimum.
Ne pas le faire pourrait entraîner la production
d'un bruit fort et soudain risquant par exemple
d'endommager votre audition.
8 Voyant USB
Il s'allume quand la connexion USB est active.
Il clignote quand la connexion USB est inactive.
Il est éteint quand l'unité est elle-même éteinte.
9 Prise PHONES
Branchez un casque ou des écouteurs stéréo à
cette prise mini-jack stéréo (3,5mm).
Le même signal sort des prises LINE OUT 1/L et
2/R.
Utilisez un adaptateur pour brancher un casque à
fiche jack (6,35mm) standard.
0 Prises IN 1/IN 2
Ce sont des prises d'entrée mixtes XLR/jack
6,35mm 3points (TRS).
Utilisez les sélecteurs MIC/LINE INST de la face
avant de l'unité afin d'activer l'entrée ligne
symétrique (MIC/LINE) ou asymétrique (INST)
pour les prises jack 3points (TRS).
q Sélecteurs MIC/LINE INST
Réglez-les en fonction des sources d'entrée des
prises IN 1/IN 2.
Choisissez MIC/LINE pour la connexion
d'instruments électroniques, d'appareils audio,
de micros et équipements similaires. Choisissez
INST pour la connexion d'une guitare électrique,
d'une basse électrique ou d'un autre équipement
à haute impédance de sortie.
20
TASCAM iXR

Face arrière
w Fixation de sécurité Kensington
e Port PC/MAC/POWER (USB type B)
Pour utiliser cette unité avec un appareil iOS,
utilisez le câble USB fourni afin de connecter
l'adaptateur secteur USB livré avec l'appareil iOS.
Cela permet à ce port de fonctionner comme
connecteur d'alimentation.
Lors de l'utilisation de cette unité avec un
ordinateur, utilisez le câble USB fourni pour la
connexion à l'ordinateur.
r Port (USB type A)
Pour connecter cette unité à un appareil iOS,
utilisez le câble Lightning-USB fourni avec
l'appareil iOS.
NOTE
Ce port ne fournit pas d'alimentation à l'appareil
iOS et n'en tire pas non plus de l'appareil.
Installation du logiciel dédié
Pour utiliser cette unité avec un ordinateur, un
logiciel dédié doit être installé sur l'ordinateur.
À quelques exceptions près, le dernier logiciel pour
le système d'exploitation utilisé peut être téléchargé
depuis le site mondial TEAC (http://teac-global.com/).
• Pour utiliser cette unité avec un appareil iOS,
installez l'app Settings Panel (panneau de
réglages). Le pilote standard iOS sera utilisé.
L'app Settings Panel peut être téléchargée
gratuitement depuis l'App Store.
• Pour employer cette unité avec un ordinateur
sous Windows, installez le pilote. Quand vous
installez le pilote, le panneau de réglages
(Settings Panel) est installé en même temps.
• Pour utiliser cette unité avec un Mac, installez le
panneau de réglages (Settings Panel). Le pilote
standard du système d'exploitation sera utilisé.
ATTENTION
Avant de lancer le logiciel d'installation, fermez
les autres applications.
Installation du panneau de réglages (Settings Panel) pour appareil iOS
Trouver l'app TASCAM iXR Settings Panel sur l'App
Store et téléchargez-la.
La télécharger l'installera automatiquement.
t Commutateur PHANTOM
Utilisez-le pour fournir une alimentation fantôme
+48V aux prises IN 1/IN 2.
y Connecteur MIDI OUT
Cette prise DIN 5 broches est une prise de sortie
MIDI standard. Elle produit les signaux MIDI.
u Connecteur MIDI IN
Cette prise DIN 5 broches est une prise d'entrée
MIDI standard. Utilisez-la pour recevoir les
signaux MIDI.
i Prises LINE OUT 1/L et 2/R
Ces prises jack 6,35mm 3 points (TRS) sont des
sorties ligne analogiques
Utilisez le panneau de réglages pour choisir les
signaux produits par les prises LINE OUT 1/L et
2/R (pointe : point chaud, bague : point froid,
manchon : masse).
Installation du pilote Windows
ATTENTION
• Terminez l'installation du pilote sur l'ordinateur
avant de lui brancher l'unité avec le câble USB.
• Si vous avez branché l'unité à l'ordinateur avec
le câble USB avant d'avoir installé le pilote et que
l'Assistant Ajout de nouveau matériel détecté a
été lancé, fermez le message et débranchez le
câble USB.
8
Procédure d'installation du pilote Windows
1. Téléchargez depuis le site mondial TEAC (http://
teac-global.com/) le pilote Windows le plus
récent pour le système d'exploitation que vous
utilisez et sauvegardez-le sur l'ordinateur devant
être employé avec l'unité.
2. Ouvrez le pilote Windows (fichier zip) sauvegardé,
par exemple sur le bureau de l'ordinateur.
3. Double-cliquez sur le fichier «iXR_Installer_XXX.
exe» (XXX est le numéro de version) dans le
dossier qui apparaît après décompression pour
automatiquement lancer le logiciel d'installation.
4. Quand un écran «Avertissement de sécurité»
ou «Contrôle de compte d'utilisateur» apparaît,
cliquez sur le bouton «Oui».
TASCAM iXR
21
5. Quand l'écran de l'Assistant d'installation
apparaît, cliquez sur le bouton «Next» (Suivant).
6. Lisez le contenu du contrat de licence (License
Agreement) puis sélectionnez «I accept the
agreement» («J'accepte les termes du contrat de
licence») si vous en acceptez les termes.
Puis cliquez sur le bouton «Next» (Suivant).
7. Ensuite, cliquez sur le bouton «Install» (Installer)
pour lancer l'installation.
8. Un écran de sécurité Windows apparaîtra deux
fois. Cliquez sur le bouton « Install » (Installer)
pour poursuivre l'installation.
NOTE
Après l'installation logicielle, le pilote du
périphérique est installé la première fois que
l'unité est connectée par USB. Windows lance
alors automatiquement une recherche Windows
Update, et il peut falloir un certain temps pour que
la connexion de l'unité soit détectée. Si ce n'est
toujours pas le cas après un certain temps, ouvrez
l'écran d'installation du logiciel depuis la zone de
message en bas à droite de l'écran de l'ordinateur
et cliquez sur «Ignorer la recherche de pilote dans
Windows Update» pour annuler la recherche.
Installation du panneau de réglages (Settings Panel) pour Mac
NOTE
• Installez le logiciel Settings Panel sur l'ordinateur
avant de lui brancher l'unité avec le câble USB.
• Selon le réglage du Gatekeeper, un message
peut apparaître en cours d'installation. Pour des
informations sur le Gatekeeper, voir «Note à
propos du Gatekeeper» dans «3 – Installation»
du manuel de référence.
8
Procédure d'installation du panneau de
réglages (Settings Panel)
1. Téléchargez sur le site mondial TEAC
(http://teac-global.com/) le logiciel le plus
récent pour le système d'exploitation utilisé et
enregistrez-le sur l'ordinateur employé avec l'unité.
2. Double-cliquez sur «iXR_Installer_XXX.dmg»
(XXX est le numéro de version)» qui est le
fichier image disque sauvegardé pour le logiciel
Settings Panel pour Mac, et double-cliquez sur
«iXR_Installer.pkg» dans le dossier qui s'ouvre.
9. L'écran suivant apparaît quand l'installation
est terminée. Cliquez sur le bouton «Finish»
(Terminer).
TASCAM iXR
22
NOTE
Selon le paramétrage de l'ordinateur, le
fichier zip téléchargé peut ne pas s'être ouvert
automatiquement. Dans ce cas, ouvrez d'abord
le fichier zip, puis double-cliquez sur le fichier
image disque.
3. Lorsque le programme d'installation démarre,
cliquez sur le bouton «Continue» (Continuer).
4. Dans la fenêtre de contrat de licence du logiciel,
cliquez sur le bouton « Continue » (Continuer)
pour ouvrir l'écran de confirmation du contrat de
licence de logiciel.
Cliquez sur le bouton «Read License» (Lire la
licence) et prenez connaissance du contrat de
licence du logiciel. Si vous êtes d'accord avec
le contenu de la licence, cliquez sur «Agree»
(Accepter).
5. Puis cliquez sur le bouton «Install» (Installer).
6. L'écran suivant apparaît quand l'installation est
terminée. Cliquez sur le bouton «Close» (Fermer).
Désinstallation du pilote Windows
Désinstallation depuis le Panneau de configuration
Programmes et fonctionnalités.
1. Depuis le menu Démarrer, ouvrez le Panneau
de configuration et lancez Programmes et
Fonctionnalités.
NOTE
• Sous Windows 10, cliquez avec le bouton droit
sur le bouton Démarrer et cliquez sur le Panneau
de configuration quand il s'affiche.
• Sous Windows 8.1, cliquez avec le bouton
droit sur le bouton en bas à gauche de l'écran
de démarrage et cliquez sur Panneau de
configuration dans l'écran des applications.
2. Si «Afficher par:» est réglé sur «Catégorie »,
cliquez sur «Désinstaller un programme» sous la
rubrique «Programme».
Si «Afficher par:» est réglé sur «Grandes icônes»
ou «Petites icônes», cliquez sur «Programmes et
fonctionnalités».
3. Double-cliquez sur «TASCAM iXR» dans la liste.
4. Ensuite, suivez les instructions qui apparaissent
à l'écran.
Désinstallation du panneau de réglages (Settings Panel) pour Mac OS
Supprimez «iXR_Settings Panel» du dossier
Applications pour terminer la désinstallation.
Connexion de l'alimentation
Désinstallation du logiciel dédié
NOTE
Normalement, il n'est pas nécessaire de
désinstaller le logiciel dédié. Suivez ces procédures
si un problème se produit ou si vous n'avez plus
l'intention d'utiliser l'unité avec l'ordinateur.
Désinstallation du panneau de réglages (Settings Panel) pour iOS
Pressez et maintenez l'icône «iXR Settings »
pour faire s'afficher le symbole × et permettre la
suppression de l'app. Touchez le symbole × pour
supprimer l'app.
Avec un appareil iOS
Connectez l'adaptateur secteur USB fourni avec l'iPad
ou l'iPhone au moyen du câble USB livré avec cette
unité et connectez le câble au port PC/MAC/POWER.
Adaptateur secteur
USB fourni avec
l'iPad/iPhone
Câble USB fourni avec l'iXR
ATTENTION
• Il n'y a pas d'adaptateur secteur USB fourni avec
l'iPod touch. Pour utiliser un iPod touch avec
cette unité, achetez un authentique adaptateur
secteur USB Apple (capable de fournir un
courant de 5 V et d'au moins 700 mA).
• Le fonctionnement avec d'autres adaptateurs
secteur USB est possible, mais nous vous
TASCAM iXR
23
recommandons fortement d'utiliser l'adaptateur
secteur USB Apple fourni d'origine avec l'iPad/
iPhone.
Si vous utilisez un autre adaptateur secteur USB,
il doit avoir les caractéristiques suivantes.
• Tension fournie: 5V
• Courant fourni: 700mA ou plus
Utiliser une alimentation aux caractéristiques
autres que celles ci-dessus peut entraîner un
dysfonctionnement, une surchauffe, un incendie
ou d'autres problèmes. Si quoi que ce soit
d'anormal se produit, cessez toute utilisation
et contactez le revendeur chez qui vous avez
acheté l'unité ou un service après-vente TASCAM
pour demander une réparation.
Avec un ordinateur (Windows/Mac)
Normalement, quand cette unité est branchée à un
ordinateur, elle est alimentée par le bus USB, rendant
inutile une alimentation électrique séparée.
Schémas de connexion
Micro chant
Guitare
Exemple de connexion (face avant)
Adaptateur secteur
USB fourni avec
l'iPad/iPhone (en
utilisant le câble USB
livré avec l'iXR)
Appareil iOS (en
utilisant le câble
Lightning-USB fourni
avec l'appareil iOS)
Boîte à rythmes
Enceintes amplifiées avec
connexions symétriques
Exemple de connexion avec un appareil iOS
(face arrière)
Casque
Ordinateur
Enceintes amplifiées avec
connexions symétriques
Boîte à rythmes
Exemple de connexion avec un ordinateur
(face arrière)
ATTENTION
• Avant de faire les connexions, éteignez (mise
en veille ou Standby) cette unité et tous les
appareils à connecter (exceptés les ordinateurs/
appareils iOS).
• Le commutateur PHANTOM affecte les deux
canaux d'entrée simultanément. N'activez pas
l'alimentation fantôme si vous branchez un
micro qui ne la nécessite pas.
• Activer l'alimentation fantôme quand vous avez
connecté un micro dynamique ou autre micro ne
la nécessitant pas peut endommager cette unité
et l'équipement connecté.
• Ne branchez/débranchez pas de micro quand
l'alimentation fantôme est en service. Cela
pourrait causer un grand bruit et endommager
cette unité et l'équipement connecté.
• Réglez les boutons LINE OUT et PHONES
au minimum avant d'activer/désactiver
l'alimentation fantôme. En fonction des micros
connectés, des bruits forts et soudains peuvent
être produits par l'équipement d'écoute et
cela peut causer des dommages auditifs ou à
l'équipement.
• Si vous utilisez en même temps des micros
électrostatiques nécessitant une alimentation
fantôme et des micros dynamiques, veillez à
utiliser des micros dynamiques symétriques.
Il n'est pas possible d'utiliser des micros
dynamiques asymétriques si l'alimentation
fantôme est activée.
• Fournir une alimentation fantôme à certains
microphones à ruban les détruira. En cas de
doute, ne fournissez pas d'alimentation fantôme
à un micro à ruban.
Emploi des ports USB pour connecter des appareils iOS
Connectez l'adaptateur secteur USB fourni avec l'iPad
ou l'iPhone au câble USB livré avec cette unité et
branchez le câble dans le port PC/MAC/POWER.
24
TASCAM iXR
Pour connecter un appareil iOS, utilisez le câble
Lightning-USB fourni avec l'appareil iOS afin de le
brancher au port .
Il n'y a pas d'adaptateur secteur USB fourni avec l'iPod
touch. Pour utiliser un iPod touch avec cette unité,
achetez un authentique adaptateur secteur USB
Apple (capable de fournir un courant de 5 V et d'au
moins 700 mA).
Réglages en écran Settings Panel
8
Appareil iOS
Touchez l'icône «iXR Settings» en écran d'accueil.
8
Windows
Dans «Tous les programmes», sélectionnez «iXR
Settings Panel» sous TASCAM.
8
Mac
Sélectionnez «iXR Settings» dans Applications et
lancez-le pour ouvrir le panneau de réglages sur
l'écran de l'ordinateur.
Écran Settings Panel sur Mac
1 Réglages d'écoute directe des entrées 1-2
Réglez le signal d'écoute pour les prises IN 1/IN
2 sur Mono ou Stereo.
2 Entrées audio On/Off
Activez/désactivez séparément l'entrée pour
chaque canal.
3 Line Outputs 1-2
Sélectionnez les signaux produits par les prises
LINE OUT 1/L-2/R et PHONES.
Options
MONITOR
Les signaux reçus par tous les ports d'entrée
et ceux reçus de l'appareil connecté en USB
(ordinateur ou appareil iOS) sont mixés par
cette unité avant d'être reproduits.
xxxx Out 1-2 (utilisation avec un appareil iOS)
Seuls sont produits les signaux lus sur
l'appareil iOS connecté par USB. Le nom de
l'appareil iOS connecté apparaît à la place de
«xxxx».
Computer Out 1-2 (utilisation avec un ordinateur)
Seuls sont produits les signaux lus sur
l'ordinateur connecté par USB.
Écran Settings Panel sur appareil iOS
Écran Settings Panel dans Windows
Pour des détails sur les autres réglages, voir
«Présentation du panneau de réglages (Settings
Panel)» dans «6 – Emploi du panneau de réglages
(Settings Panel)» du manuel de référence.
Réglage du son entrant
Les signaux audio analogiques entrant dans cette
unité en provenance de micros, guitares, claviers et
autres équipements audio peuvent être convertis
en signaux numériques et transmis à l'ordinateur/
appareil iOS par USB.
Vous pouvez utiliser les fonctions de cette unité pour
rectifier les signaux numériques qui sont envoyés à
l'ordinateur/appareil iOS.
De plus, en branchant des enceintes (au travers
d'un amplificateur) ou un casque à cette unité, vous
pouvez écouter les signaux audio entrant dans cette
unité et ceux produits par l'ordinateur/appareil iOS.
Utilisez les diverses commandes de la face avant de
l'unité en fonction des besoins pendant l'écoute du
son entrant.
TASCAM iXR
25

Exemple de fonctionnement avec cette unité
Utilisez les boutons GAIN (3) pour régler les niveaux
d'entrée analogique des prises IN 1/IN 2 (1) de
façon à ce que les voyants PEAK (2) situés au-dessus
et à gauche des boutons ne s'allument pas.
Pour écouter le signal de contrôle au casque,
branchez le casque à la prise PHONES (4) et réglez le
bouton PHONES (5).
NOTE
Si vous ne pouvez pas entendre le son entrant,
que ce soit au casque ou par les prises LINE OUT
1/L-2/R, vérifiez le réglage du bouton MONITOR
en face avant de l'unité et celui du paramètre
Line Outputs (sorties ligne) dans l'écran Settings
Panel (panneau de réglages).
Guide de dépannage
Veuillez lire ce chapitre si vous n'arrivez pas à utiliser
correctement l'unité même après l'avoir configurée
conformément aux procédures indiquées dans ce
mode d'emploi.
Si vous ne pouvez toujours pas résoudre vos
problèmes, veuillez contacter le service après-vente
TASCAM avec les informations suivantes concernant
l'environnement de fonctionnement et des détails
décrivant le problème.
Environnement de fonctionnement
• Fabricant de l'ordinateur/appareil iOS
• Modèle
• Processeur
• Mémoire vive (RAM)
• Système d'exploitation
• Applications utilisées
• Logiciel antivirus
• Emploi d'un réseau local (LAN) sans fil
Voir la fin de ce document pour des coordonnées de
contact.
8
Le logiciel dédié ne peut pas être installé.
1. Vérifiez le système d'exploitation.
Le système d'exploitation utilisé peut ne pas
être pris en charge par le logiciel que vous
essayez d'installer.
Vérifiez les systèmes d'exploitation pris
en charge par le logiciel que vous essayez
d'installer.
TASCAM iXR
26
2. Arrêtez tout logiciel fonctionnant en tâche de
fond.
Les logiciels antivirus et autres logiciels qui
s'exécutent en tâche de fond peuvent interférer
avec l'installation. Quittez les logiciels qui
s'exécutent en tâche de fond et recommencez
l'installation.
8
L'unité ne s'allume pas.
• Lorsque vous utilisez un appareil iOS, un
dispositif d'alimentation doit être connecté
au port PC/MAC/POWER. Lisez attentivement
«Connexion de l'alimentation» en page
23 dans ce mode d'emploi et connectez un
dispositif d'alimentation adapté.
• Si vous utilisez cette unité avec un ordinateur,
l'ordinateur doit fournir l'alimentation par son
bus USB. Vérifier les caractéristiques techniques
de l'ordinateur.
8
L'unité est connectée mais l'ordinateur/
appareil iOS ne la reconnaît pas.
1. Installez le logiciel dédié.
i Si vous ne l'avez pas encore fait, installez le
logiciel dédié. Voir «Installation du logiciel
dédié» en page 21 pour des détails.
2. Changez de port USB (si vous utilisez un
ordinateur).
i Cette unité ne fonctionnera pas avec un port
USB 1.1. Utilisez un port USB 2.0 ou USB 3.0.
i N'utilisez pas de concentrateur (hub) USB.
Connectez toujours l'unité directement à un
port USB de l'ordinateur.
i Si les indications ci-dessus ne résolvent pas le
problème, connectez l'unité à un autre port USB
de l'ordinateur.
3. Vérifiez le câble de connexion (si vous utilisez un
appareil iOS).
i Pour la connexion de cette unité à un appareil
iOS, employez toujours le câble Lightning-USB
fourni avec l'appareil iOS. Le fonctionnement
n'est pas garanti avec d'autres câbles que les
câbles d'origine Apple.
8
Il n'y a pas de son même quand l'audio est
lu sur l'ordinateur.
Vérifiez que le bouton MONITOR de l'unité n'est pas à
fond à gauche (vers INPUT). Si c'est le cas, tournez le
bouton MONITOR à droite par rapport au centre.
Veuillez vérifier les points suivants pendant que l'unité
est connectée à l'ordinateur. En outre, si vous faites
les réglages suivants, du son sera produit au travers
de cette unité, mais aucun son ne sera produit par les
enceintes de l'ordinateur ni par sa prise casque.
Windows
Voir les instructions pour «Windows 10/Windows
8.1» ou «Windows 7» dans la section «Lecteur

Windows Media» du chapitre «8 – Guide
d'application» dans le manuel de référence, et
faites les réglages nécessaires pour le système
d'exploitation.
OS X
1. Fermez toutes les applications et ouvrez
«Préférences Système» dans le menu
Pomme.
2. Ouvrez «Son».
3. Dans l'onglet Sortie, sélectionnez «iXR».
Après avoir terminé le réglage, faites redémarrer
l'ordinateur et vérifiez le son reproduit.
Selon l'application que vous utilisez, vous pouvez
avoir à faire des réglages supplémentaires pour
l'interface.
En particulier, les applications STAN fonctionnent
à l'aide de moteurs audio dont les réglages sont
différents de ceux du système d'exploitation, aussi
vérifiez d'abord les réglages de pilote de STAN après
avoir installé le logiciel dédié de cette unité.
Veuillez consulter les modes d'emploi des applications
que vous utilisez pour des procédures de réglage
détaillées.
8
Le son se coupe ou il y a du bruit.
La charge de traitement de l'ordinateur peut entraîner
des interruptions du son et la production de bruits.
Voici quelques méthodes pour réduire la charge de
travail de l'ordinateur.
1. Un réseau local (LAN) sans fil et un logiciel
fonctionnant en tâche de fond, y compris un
logiciel antivirus, sollicitent régulièrement le
processeur de l'ordinateur, ce qui peut causer des
interruptions de son et autres bruits.
Arrêtez la transmission par réseau local sans
fil, le logiciel antivirus et tout autre logiciel
fonctionnant en tâche de fond lorsque vous
utilisez cette unité.
2. Réglez une plus grande taille de mémoire tampon
(latence) dans l'application audio que vous utilisez
ou dans le panneau de mixage de cette unité
(Windows uniquement).
NOTE
Consultez le fabricant de l'application audio
que vous utilisez pour obtenir des méthodes
permettant de réduire la charge demandée à
l'ordinateur par l'application.
3. Changez les réglages de votre ordinateur pour
qu'ils soient optimisés en vue du traitement audio.
Avec Windows
1 Ouvrez le panneau de configuration à l'aide
de la méthode appropriée pour le système
d'exploitation que vous utilisez (Windows 10/
Windows 8.1/Windows 7).
i Sous Windows 10, à partir du bouton
Démarrer dans le coin inférieur gauche,
cliquez sur «Panneau de configuration»
pour ouvrir le panneau de configuration.
Puis, cliquez sur l'icône Système.
i Sous Windows 8.1, cliquez avec le
bouton droit de la souris sur l'écran de
démarrage ordinaire (écran de l'interface
utilisateur Metro) puis cliquez sur «Toutes
les applications». Ensuite, cliquez avec
le bouton droit sur «Ordinateur» et
sélectionnez «Propriétés».
i Sous Windows 7, cliquez sur le bouton
Démarrer en bas à gauche puis cliquez
avec le bouton droit sur «Ordinateur» et
sélectionnez «Propriétés».
2 Cliquez sur «Paramètres système avancés».
3 Cliquez sur «Paramètres» dans la section
«Performances» de l'onglet «Paramètres
système avancés» de la fenêtre «Propriétés
système».
4 Dans l'onglet «Effets visuels» de la fenêtre
«Options de performances», sélectionnez
l'option «Ajuster afin d'obtenir les meilleures
performances».
Avec OS X
1 Ouvrez «Préférences Système...» dans le
menu Pomme et sélectionnez «Économiseur
d'énergie».
2 Réglez «Ordinateur en veille après» sur
«Jamais».
3 Réglez «Écran en veille après» sur «Jamais».
NOTE
Selon la version de Mac OS et le modèle
d'ordinateur Mac, ces réglages peuvent ne pas
être disponibles.
8
Assistance pour Cubase LE/Cubasis LE
Notre société n'assure pas l'assistance pour Cubase LE
et Cubasis LE.
Veuillez vous reporter au menu d'aide ou au mode
d'emploi correspondant pour des instructions sur
l'utilisation du produit.
Caractéristiques techniques
Résolution audio
8
Fréquences d'échantillonnage
44,1, 48, 88,2, 96kHz
8
Résolution de quantification en bits
16/24 bits
TASCAM iXR
27

Données d'entrée audio analogique
8
Entrées micro (symétriques, IN 1/IN 2)
Connecteur: équivalent XLR-3-31
(1: masse, 2: point chaud, 3: point froid)
Impédance d’entrée: 2,2kΩ
Niveau d'entrée nominal
(bouton de gain sur MAX) : -65dBu (0,0004Vrms)
Niveau d'entrée nominal
(bouton de gain sur MIN) : -8dBu (0,3090Vrms)
Niveau d'entrée maximal: +8dBu (1,9467Vrms)
Plage de gain: 57dB
8
Entrées instrument (asymétriques, IN 1/
IN 2)
(sélecteur MIC/LINE INST réglé sur INST)
Connecteur: jack 6,35mm 2 points (TS) standard
(pointe: point chaud, manchon: masse)
Impédance d’entrée: 1MΩ ou plus
Niveau d'entrée nominal
(bouton de gain sur MAX): -63dBV (0,0007Vrms)
Niveau d'entrée nominal
(bouton de gain sur MIN): -6dBV (0,5015Vrms)
Niveau d'entrée maximal: +10dBV (3,162Vrms)
Plage de gain: 57dB
8
Entrées ligne (symétriques, IN 1/IN 2)
(sélecteur MIC/LINE INST réglé sur MIC/LINE)
Connecteur: jack 6,35mm 3 points (TRS)
standard (pointe: point chaud, bague: point
froid, manchon: masse)
Impédance d’entrée: 10kΩ
Niveau d'entrée nominal
(bouton de gain sur MAX) : -53dBu (0,0017Vrms)
Niveau d'entrée nominal
(bouton de gain sur MIN) : +4dBu (1,228Vrms)
Niveau d'entrée maximal: +20dBu (7,75Vrms)
Plage de gain: 57dB
Données de sortie audio analogique
8
Sorties ligne
(symétriques, LINE OUT 1/L–2/R)
Connecteur: jack 6,35mm 3 points (TRS)
standard (pointe: point chaud, bague: point
froid, manchon: masse)
Impédance de sortie: 110Ω
Niveau de sortie nominal: +4dBu (1,273Vrms)
Niveau de sortie maximal:+20dBu (7,75Vrms)
8
Sortie casque (PHONES)
Connecteur: mini-jack 3,5mm stéréo
Sortie maximale: 18 mW + 18 mW ou plus
(DHT+B de 1% ou moins sous charge de 32Ω)
Données d'entrée/sortie de commande
8
Connecteur MIDI IN
Connecteur: DIN 5 broches
Format: MIDI standard
8
Connecteur MIDI OUT
Connecteur: DIN 5 broches
Format: MIDI standard
8
Port Windows/Mac/Power
Connecteur: USB 4 broches type B
Débit de transfert: USB 2.0 haute vitesse
(480Mbit/s)
8
Port
Connecteur: USB, type A
Débit de transfert: USB 2.0 haute vitesse
(480Mbit/s)
Performances audio
8
Bruit rapporté à l'entrée d'ampli micro
(EIN)
-125dBu ou moins (terminaison de 150Ω,
bouton de gain sur MAX)
8
Réponse en fréquence
IN 1/IN 2 vers sorties LINE OUT (symétrique),
casque (PHONES)
À 44,1/48 kHz
20Hz: +0dB/-0,4dB (JEITA)
20 kHz: +0dB/-0,1dB (JEITA)
20 kHz: +0dB/-0,5dB (sortie casque, JEITA)
À 88,2/96 kHz
20Hz: +0dB/-0,4dB (JEITA)
40 kHz: +0dB/-0,25dB (JEITA)
40 kHz: +0dB/-2,0dB (sortie casque, JEITA)
8
Rapport signal/bruit
101 dB ou plus (entrée MIC/LINE vers LINE OUT,
bouton de gain sur MIN, JEITA)
8
Distorsion
0,0025% ou moins
(entrée MIC/LINE vers LINE OUT, onde
sinusoïdale à 1kHz au niveau d'entrée nominal et
au niveau de sortie maximal, JEITA)
8
Diaphonie
95 dB ou plus
(entrée MIC/LINE vers LINE OUT, 1kHz, JEITA)
28
TASCAM iXR
 Loading...