

Tascam iU2 Owner`s Manual [fr]

iU2
Audio/MIDI Interface
for iPhone/iPad/
iPod touch
This device has a serial number located located in
the dock connector cable compartment. Please
record it and retain it for your records.
Serial number: ____________________________
OWNER’S MANUAL
D01166020A

2 TASCAM iU2
IMPORTANT SAFETY PRECAUTIONS
Do not expose this apparatus to drips or splashes.•
Do not place any objects filled with liquids, such as vases, •
on the apparatus.
Caution should be taken when using earphones or •
headphones with the product because excessive sound
pressure (volume) from earphones or headphones can
cause hearing loss.
Declaration of Conformity
Model Number: iU2
Trade Name: TASCAM
Responsible party: TEAC AMERICA, INC.
Address: 7733 Telegraph Road, Montebello,
California, U.S. A.
Telephone number: 1-323-726-0303
This device complies with Part 15 of the FCC Rules.
Operation is subject to the following two conditions:
(1) this device may not cause harmful interference, and
(2) this device must accept any interference recieved,
including interference that may cause undesired operation.
THIS CLASS B DIGITAL APPARATUS COMPLIES WITH
CANADIAN ICES-003.
CET APPAREIL NUMÉRIQUE DE LA CLASSE B EST CONFORME
À LA NORME NMB-003 DU CANADA.
FOR U.S.A.
TO THE USER
This equipment has been tested and found to comply
with the limits for a Class B digital device, pursuant to Part
15 of the FCC Rules. These limits are designed to provide
reasonable protection against harmful interference in
a residential installation. This equipment generates,
uses, and can radiate radio frequency energy and, if not
installed and used in accordance with the instruc tion
manual, may cause harmful interference to radio
communications. However, there is no guarantee that
interference will not occur in a particular installation. If
this equipment does cause harmful interference to radio
or television reception, which can be determined by
turning the equipment off and on, the user is encouraged
to try to correct the interference by one or more of the
following measures.
a) Re orient or relocate t he receiving antenna .
b) Increase the separation bet ween the equipment and
receiver.
c) Connect the equipment into an outlet on a circuit
different from that to which the receiver is connected.
d) Consult the dealer or an experienced radio/TV
technician for help.
CAUTION
Changes or modifications to this equipment not expressly
approved by TEAC CORPORATION for compliance could
void the user's authorit y to operate this equipment.
TASCAM iU2 3
IMPORTANT SAFETY PRECAUTIONS
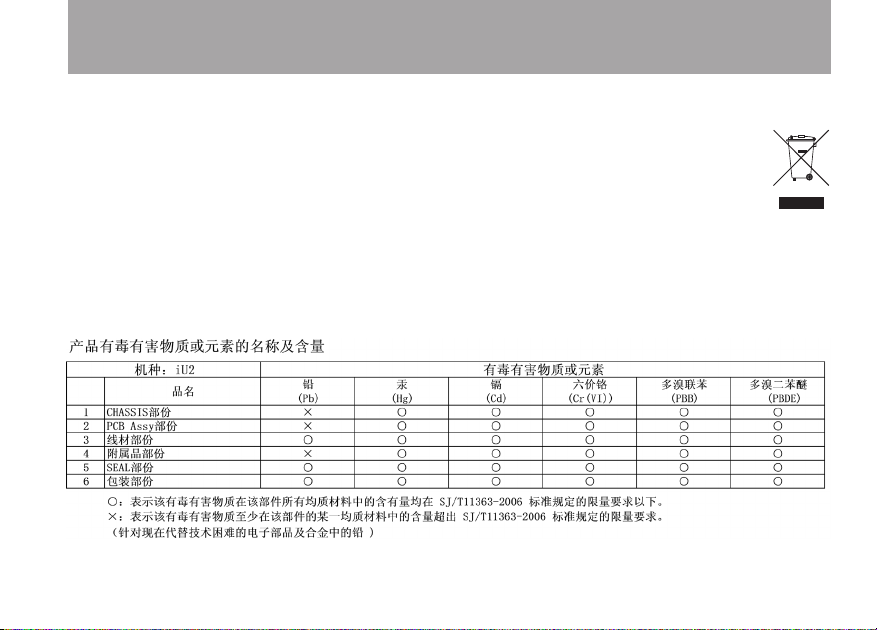
For European Customers 8
Disposal of electrical and electronic equipment
(a) All electrical and electronic equipment should be disposed
of separately from the municipal waste stream via collection
facilities designated by the government or local authorities.
(b) By disposing of electrical and electronic equipment
correctly, you will help save valuable resources and prevent
any potential negative eects on human health and the
environment.
(c) Improper disposal of waste electrical and electronic
equipment can have serious eects on the environment and
human health because of the presence of hazardous
substances in the equipment.
(d) The Waste Electrical and Electronic Equipment
(WEEE) symbol, which shows a wheeled bin that
has been crossed out, indicates that electrical
and electronic equipment must be collected
and disposed of separately from household
waste.
(e) Return and collection systems are available to end users.
For more detailed information about the disposal of old
electrical and electronic equipment, please contact your
city oce, waste disposal service or the shop where you
purchased the equipment.

4 TASCAM iU2
Table of Contents
1 – Introduction ...............................................5
Overview ............................................................................................5
Features .............................................................................................. 5
Items included with the product .............................................. 6
Conventions used in this manual ............................................. 6
Trademarks ........................................................................................ 7
Precautions for placement .......................................................... 7
Beware of condensation .............................................................. 7
Cleaning the unit ............................................................................ 7
Product Registration ..................................................................... 7
2 – Names and Functions of Parts ..................8
Top panel ........................................................................................... 8
Front panel ........................................................................................ 9
Rear panel .......................................................................................... 9
Left side panel ................................................................................10
Bottom panel .................................................................................. 10
3 – Connections .............................................12
Connecting with an iOS device ............................................... 12
Connecting with a computer ...................................................12
Connecting microphones .........................................................13
Connecting a guitar .....................................................................13
Connecting keyboards, drum machines and music
players ...............................................................................................14
Connecting monitor speakers .................................................14
Connecting headphones ........................................................... 14
Connecting MIDI devices........................................................... 15
4 – Application Guide ...................................16
Windows 7/Windows Vista .......................................................16
Windows XP ....................................................................................20
Mac OS X ........................................................................................... 21
Audio application set tings ........................................................23
5 – MIDI Implementation Chart ...................24
6 – Troubleshooting ...................................... 26
7 – Specifications ..........................................28
Analog input and output ratings ...........................................28
Digital output ratings ..................................................................29
Control input/output ratings ...................................................29
Audio per formance ......................................................................29
System requirements ..................................................................30
General ..............................................................................................30
Dimensional drawings ................................................................31

TASCAM iU2 5
1 – Introduction
Thank you very much for purchasing the TASCAM iU2 Audio/
MIDI Interface for iPhone/iPad/iPod touch.
Please read this manual thoroughly before using the unit so
that you understand correct operating procedures and can use
its functions fully. We hope that you enjoy using this unit for
many years.
Please keep this manual so that you can read it at any time. A
digital copy of this manual can also be downloaded from our
website (http://tascam.com/)
Overview
In addition to being able to use this unit as a USB audio/MIDI
interface with a computer, you can also connect it to an iOS
device and easily set up a compact digital recording system.
(The iPhone 4S, iPhone 4, iPad 2, iPad and iPod touch (4th
generation) are currently supported.)
Moreover, you can use the iU2 to record music cassette tapes
and other analog audio sources to a computer for transfer to
audio CDs or to an iOS device directly where they can be saved
as audio les.
Features
USB audio interface with 2 inputs and 4 outputs•
Supports 44.1/48 kHz, 16-bit recording•
High-quality sound transfer using the dock connector for •
digital connection
Balanced mic/line input jacks (standard TRS) support •
phantom power
Phantom power supplied by USB bus power •
High-quality mic preamps •
Guitar input (standard TS jack)•
Headphones output (standard TRS jack) •
Headphones and line outputs are independent and have •
separate volume controls
Direct monitoring function can be used for input •
monitoring without latency
S/PDIF digital output jack•
MIDI input and output can be used with a connected iOS •
device or computer
Power can be supplied from a computer or from an iOS •
device using the dock connector
Works with the standard audio driver for iPhone 4/iPad 2/•
iPad/iPod touch (4th generation) on Windows XP, Windows
Vista, Windows 7 and Mac OS X
Connects using WDM on Windows and Core Audio/Core •
MIDI on Macintosh
Records on iOS devices using an iOS application from •
TASCAM or another existing iOS application
Firmware updates possible using iOS•
iOS device can be recharged via the Mini USB port•

6 TASCAM iU2
1 – Introduction
About use with an iOS device or computer
If you have any questions about the basic operation of your
iOS device or computer when reading the explanations in this
manual, please refer to its operation manual.
Items included with the product
This product contains the following items.
Take care when opening the package not to damage the items.
Keep the package materials for transportation in the future.
Please contact the retailer where you purchased this unit if
any of these items are missing or have been damaged during
transportation.
Main unit• ................................................................................................. 1
USB cable• ................................................................................................ 1
MIDI-3.5mm (1/8”) stereo mini-jack adapter cable• .................2
XLR (female)-6.3mm (1/4”) standard TRS jack •
adapter cable ........................................................................................2
Warranty • ................................................................................................. 1
Owner’s Manual (this document)• ..................................................1
Conventions used in this manual
The following conventions are used in this manual.
In this manual, we refer to the devices for which connection •
with this unit is supported (iPhone 4S/iPhone 4/iPad 2/iPad/
iPod touch (4th generation)) as “iOS devices.”
When we refer to a button or connector or control on the •
iU2, the typeface looks like this: GUITAR IN.
When we show messages, for example, that appear on the •
screen, we show them like this: OK.
Additional information is introduced in the styles below •
when needed:
TIP
We give hints and tips on using the iU2 when you see this icon.
NOTE
A note provides additional explanations for special situations.
CAUTION
A caution shows that you may lose data (recordings) if you do
not follow the instructions.

TASCAM iU2 7
1 – Introduction
Trademarks
TASCAM is a trademark of TEAC Corporation, registered in •
the U.S. and other countries.
Microsoft, Windows, Windows Vista, Windows 7, and •
Windows Media are either registered trademarks or
trademarks of Microsoft Corporation in the United States
and/or other countries.
Apple, Macintosh, Mac, Mac OS X, iPad, iPhone, iPod, iPod •
touch and iTunes are trademarks of Apple Inc.
“Made for iPod,” “Made for iPhone,” and “Made for iPad” mean •
that an electronic accessory has been designed to connect
specically to iPod, iPhone, or iPad, respectively, and has
been certied by the developer to meet Apple performance
standards. Apple is not responsible for the operation of
this device or its compliance with safety and regulatory
standards. Please note that the use of this accessory with
iPod, iPhone, or iPad may aect wireless performance.
Other company names, product names and logos in this •
document are the trademarks or registered trademarks of
their respective owners.
Precautions for placement
The environmental temperature operation range of this unit •
is 5–35° C (41–95° F).
Do not place anything on top of unit because it generates •
much heat.
Do not put this unit on top of a power amplifier or other •
equipment that generates heat.
This unit comes with a protective sheet attached to its top •
panel. Remove this sheet before using the unit.
Beware of condensation
If the unit is moved from a cold to a warm place, or used
after a sudden temperature change, there is a danger of
condensation; vapor in the air could condense on the internal
mechanism, making correct operation impossible. To prevent
this, or if this occurs, let the unit sit for one or two hours at the
new room temperature before using.
Cleaning the unit
Use a dry soft cloth to wipe the unit clean. Do not clean the
unit with a chemically treated cloth or substances such as
benzene, thinner and alcohol because they might cause
damage to the surface of the unit.
Product Registration
See the end of this manual for details about user registration.
8 TASCAM iU2
2 – Names and Functions of Parts
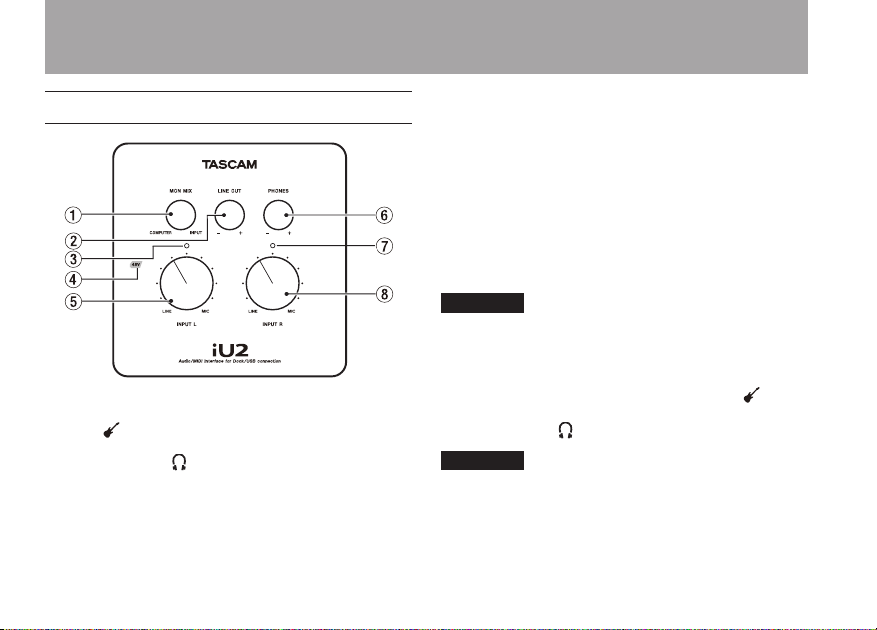
Top panel
1 MON MIX knob
Signals input through the unit’s jacks (from the INPUT L
jack or jack and the INPUT R jack) and by USB from the
computer are mixed together and output from the LINE
OUT L/R jacks and jack. Use this knob to adjust the
balance between these signals. Turn the knob all the way
to the left (COMPUTER) to output only the signal input by
USB from the computer output or all the way to the right
(INPUT) to output only the signals input through the unit’s
jacks.
2 LINE OUT knob
Use this to adjust the level output from the LINE OUT L/R
jacks.
3 Overload indicator (L)
This lights red just before the signal input through the left
input channel (L) reaches a level that distorts. This indicator
only works with analog input. It lights red when the
maximum level exceeds –2 dB.
4 Phantom power indicator (48V)
When the bottom panel PHANTOM switch is ON, the 48V
indicator lights red.
NOTE
If the INPUT L or INPUT R switch is set to LINE or GUITAR,
phantom power will not be supplied to that input even when
this indicator is lit (PHANTOM switch set to ON).
5 INPUT L knob
Use to adjust the input level from the INPUT L or jack.
6 PHONES knob
Use to adjust the jack output level.
CAUTION
Before connecting headphones, minimize the volume with the
PHONES knob. Failure to do so could result in sudden loud
noises that might damage your hearing or cause other harm.

TASCAM iU2 9
2 – Names and Functions of Parts
7 Overload indicator (R)
This lights red just before the signal input through the
right input channel (R) reaches a level that distorts. This
indicator only works with analog input. It lights red when
the maximum level exceeds –2 dB.
8 INPUT R knob
Use to adjust the input level from the INPUT R jack.
Front panel
9 jack
Connect guitars, basses and other high impedance
instruments here.
This jack functions when the INPUT L switch on the bottom
panel is set to GUITAR.
(6.3mm (1/4”) standard TS jack; tip: HOT, sleeve: GND)
0 INPUT L jack
Connect electronic instruments, audio devices, mics and
other line-level equipment to this balanced line input jack.
Set the INPUT L switch on the bottom panel to MIC or LINE
according to the connected device.
(6.3mm (1/4”) standard TRS jack; tip: HOT, ring: COLD, sleeve:
GND)
q INPUT R jack
Connect electronic instruments, audio devices, mics and
other line-level equipment to this balanced line input jack.
Set the INPUT R switch on the bottom panel to MIC or LINE
according to the connected device.
(6.3mm (1/4”) standard TRS jack; tip: HOT, ring: COLD, sleeve:
GND)
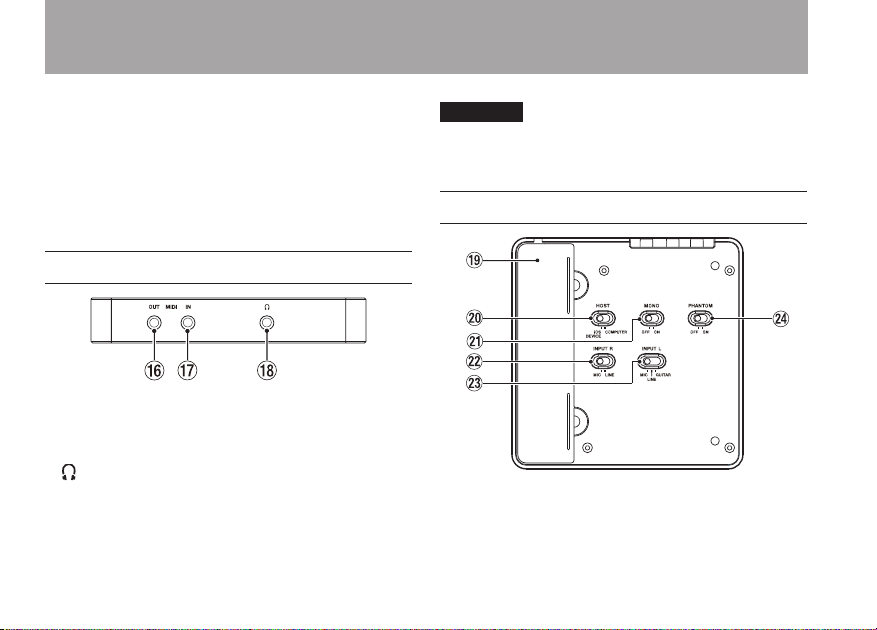
Rear panel
w Dock connector cable port
Pass the dock connector cable through here.
e Mini USB port
Use a USB cable to connect the unit with a computer
(supports USB 2.0).
If the unit is connected to a USB recharger using the USB
cable, the iOS device connected to the dock connector
cable can be recharged.
10 TASCAM iU2
2 – Names and Functions of Parts
In order to recharge an iOS device, you must connect the
device to the dock connector cable before connecting the
USB cable.
r DIGITAL OUT (coaxial) jack
This RCA pin jack is a coaxial digital output compliant with
IEC60958-3 (S/PDIF) standards.
t LINE OUT L/R unbalanced jacks
These RCA pin jacks are analog line outputs (L/R).
Left side panel
y MIDI OUT jack
This sends MIDI output.
u MIDI IN jack
This receives MIDI input.
i (3.5mm stereo headphones) jack
Use this jack to connect stereo headphones. Use an adapter
to connect headphones with a standard (1/4”) jack.
CAUTION
Before connecting headphones, minimize the volume with the
PHONES knob. Failure to do so could result in sudden loud
noises that might damage your hearing or cause other harm.
Bottom panel
o Dock connector cable storage
This holds the dock connector cable used to connect iOS
devices.
 Loading...