

Page 1
IF-E100
ETHERNET CONTROL CARD
D01337520A
Reference Manual
Page 2

Contents
Features
Features .................................................................................... 2
Models compatible for installation ........................................ 2
CD-400U/CD-400UDAB ..................................................................... 2
Updating the firmware ............................................................ 2
Installation procedure overview ............................................ 2
Conventions used in this manual ........................................... 2
Trademarks ..............................................................................2
Using the TEAC Global Site ..................................................... 3
Product registration ................................................................ 3
About TASCAM customer support service ............................. 3
Names and functions of parts ................................................ 3
Rear panel ...................................................................................................3
Installing the Ethernet card .................................................... 3
Connecting to Ethernet ........................................................... 3
Network function settings ...................................................... 4
Enabling Ethernet (Serial Mode setting) ......................................... 4
Network function settings .................................................................... 4
Password setting .................................................................................4
IP mode setting ....................................................................................4
IP address setting (IP Address) .......................................................4
Setting the subnet mask (Subnet Mask) ..................................... 5
Setting the default gateway (Gateway) ......................................5
Setting the DNS address (DNS Address) .....................................5
Remote control ........................................................................ 6
Required settings for Telnet connection .....................................6
Connecting to this unit by Telnet ..................................................6
Specifications ........................................................................... 6
Input and output .....................................................................................6
Ethernet connectors...........................................................................6
Other ............................................................................................................ 6
Dimensions ............................................................................................6
Weight .....................................................................................................6
Dimensional drawings ...........................................................................6
Software Licensing .................................................................. 7
Apache License ....................................................................................7
APPENDIX: How to apply the Apache License to your work 8
0 Enables external control of a CD-400U/CD−400U DAB using
Telnet through an Ethernet connection
0 Supports 100BASE-T
Models compatible for installation
Before installing this card, check the TEAC Global Site (http:// teac-global.com/) for the latest information about the models in
which it can be installed.
CD-400U/CD-400UDAB
Use firmware Ver 1.10 or later for these models.
Updating the firmware
The firmware of this card can be updated to add functions to it.
Check the TEAC Global Site (http://teac-global.com/) for details
about the latest firmware and update procedures.
Installation procedure overview
0 Always disconnect the CD-400U/CD−400U DAB AC cord be-
fore installing or removing this card.
0 Securely tighten the attachment screws on the right and the
left of the card before use.
Conventions used in this manual
In this manual, we use the following conventions:
0 When we refer to buttons, connectors and other parts of this
unit, we use a bold font like this: ENTER button.
0 When we show characters that appear on the display, the
typeface looks like this: Serial Mode.
0 As necessary, additional information is provided under TIP,
NOTE and CAUTION headings.
TIP
These are tips about how to use the unit.
TASCAM IF-E100
2
NOTE
These provide additional explanations and describe special
cases.
ATTENTION
Failure to follow these instructions could result in damage to
equipment or lost data, for example.
V
CAUTION
Failure to follow these instructions could result in injury.
Trademarks
0 TASCAM is a registered trademark of TEAC Corporation.
0 Other company names, product names and logos in this doc-
ument are the trademarks or registered trademarks of their
respective owners.
Page 3

Using the TEAC Global Site
You can download updates for this unit from the TEAC Global
Site:
http://teac-global.com/
In the TASCAM Downloads section, select the desired language
to open the Downloads website page for that language.
Product registration
Customers in the USA, please visit the following TASCAM website
to register your TASCAM product online.
http://tascam.com/
About TASCAM customer support service
TASCAM products are supported and warrantied only in their
country/region of purchase.
To receive support after purchase, on the TASCAM Distributors list
page of the TEAC Global Site (http:// teac-global.com/), search
for the local company or representative for the region where you
purchased the product and contact that organization.
When making inquiries, the address (URL) of the shop or web
shop where it was purchased and the purchase date are required.
Moreover, the warranty card and proof of purchase might also
be necessary.
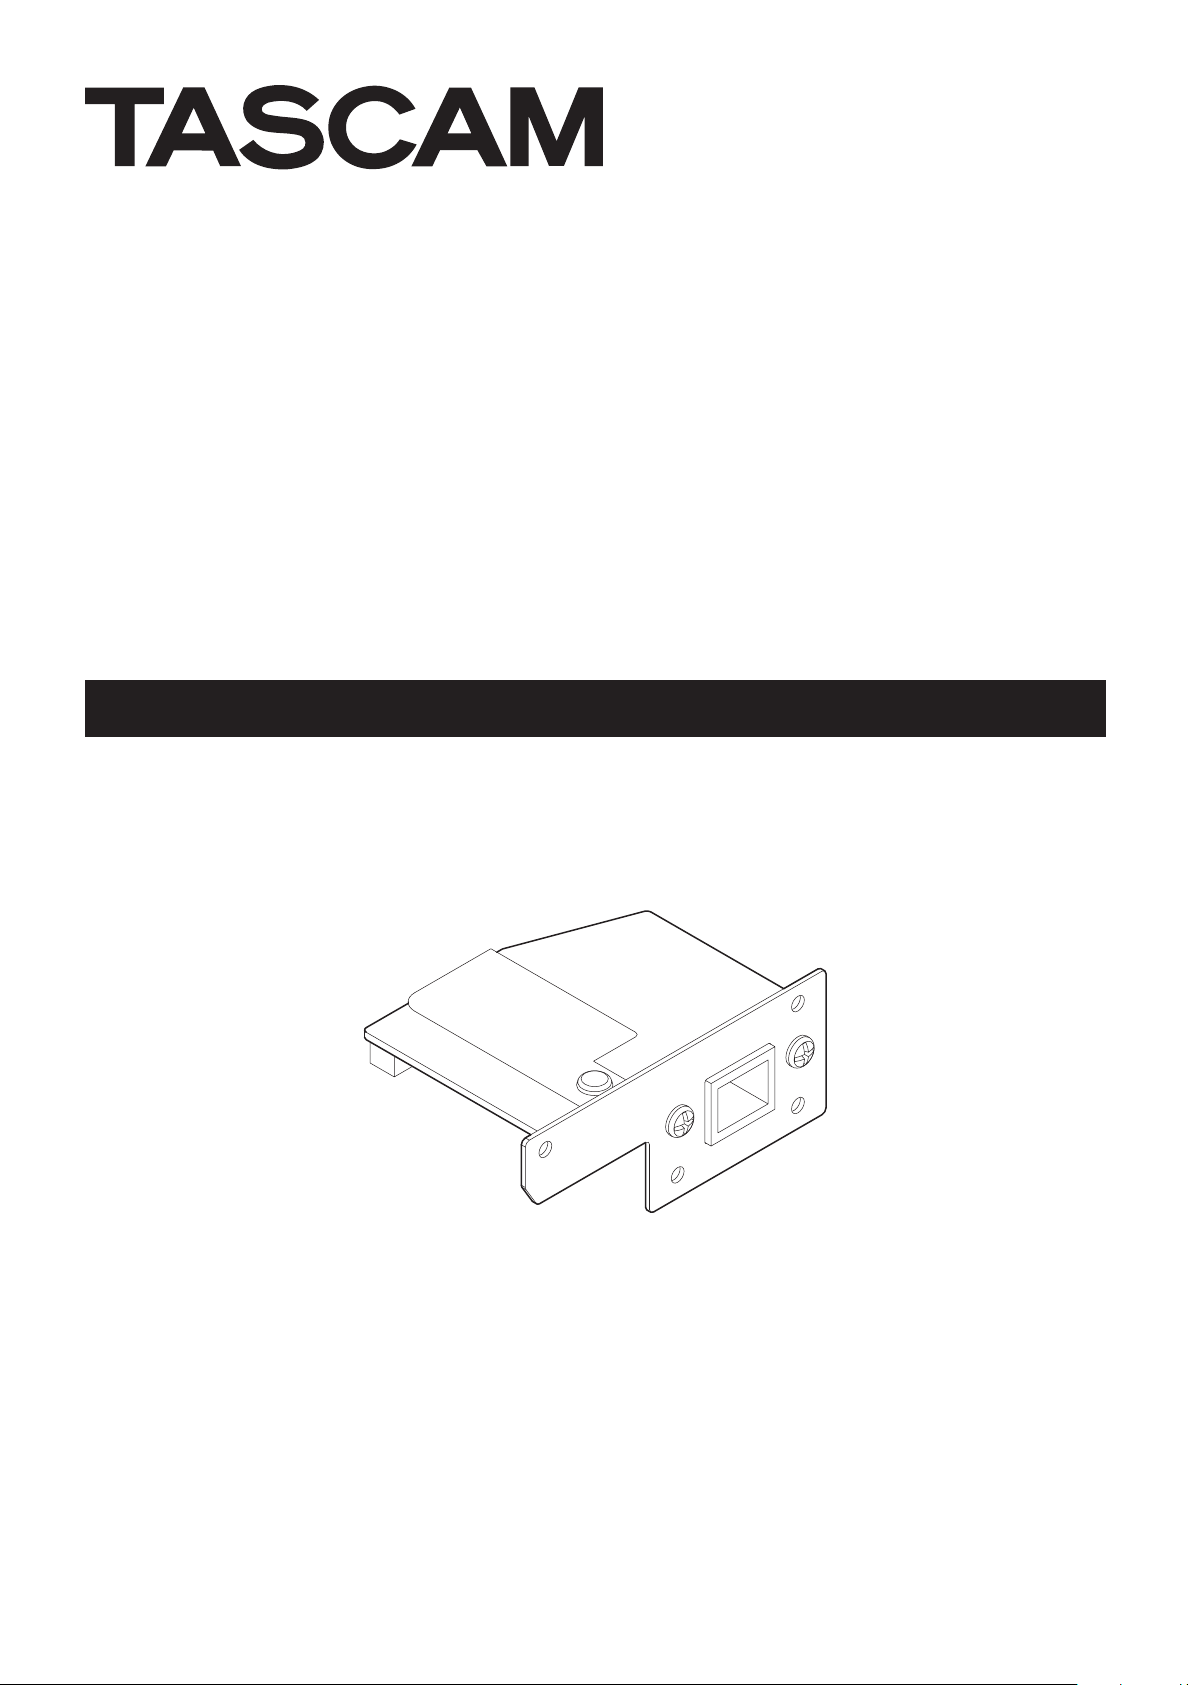
Names and functions of parts
This card has a RJ-45 connector that supports 100Mbps Ethernet.
Use a LAN cable to connect this connector to other devices that
support Ethernet or an Ethernet network.
Rear panel
Installing the Ethernet card
ATTENTION
Before installing or removing the Ethernet card, disconnect
the power cord from the outlet or the unit.
1. Remove the 4 screws (a) from the placeholder card installed
in the CD-400U/CD−400U DAB.
ATTENTION
Do not remove any screws other than those indicated.
2. Gently pull the placeholder card away from and out of the
unit.
3. The CD-400U/CD−400U DAB and the placeholder card are
connected. Turn the placeholder card over and pull out the
connector.
4. Completely insert the connector that was removed from the
placeholder card into the connector receptacle on the Ethernet card. (If something seems wrong when inserting the
connector, check the connector orientation.)
5. Insert the Ethernet card in the CD-400U/CD−400U DAB, and
use the 4 screws a to secure it to the unit.
Be careful not to over-tighten the screws.
After installation, confirm that the screws are not loose or
sticking out.
1 RJ-45 connector
This is an Ethernet port.
Use this to connect to a network and control the unit exter-
nally.
2 100Mbps link status indicator
Orange indicates that a 100Mbps Ethernet link has been established.
3 Link status/activity indicator
Green indicates that a link is established between the devices.
Blinking indicates that signals are being transmitted between
the devices.
NOTE
Confirm that the CD-400U/CD−400U DAB is using the latest
system firmware.
Connecting to Ethernet
Connect a LAN cable to the RJ−45 connector on this card and
select an Ethernet network.
TASCAM IF-E100
3
Page 4

Network function settings
Enabling Ethernet (Serial Mode setting)
The unit can be connected to a network using its Ethernet connector, allowing external control of the unit. Telnet is the protocol
that can be used.
To control the unit by Ethernet, Serial Mode must be switched
from RS-232C to Ethernet.
1. Select Serial Mode on the Menu screen to open the Serial
mode screen. (See “Menu operation procedures” in “2 –
Names and Functions of Parts” in the CD-400U/CD−400U
DAB Owner’s Manual.)
Serial Mode
< RS-232C >
2. Set the Serial Mode.
Options: RS-232C (default), Ethernet
Set to Ethernet to use the IF-E100 to control a CD-400U.
3. Confirm the setting and return to the Menu Screen.
NOTE
i
The Serial Mode setting must be reset to “RS-232C” to control
the CD-400U/CD−400U DAB externally using an RS-232C connection.
i
The Serial Mode setting is retained even when the unit is
turned off.
i
Press the BACK [PAIRING] button to return to the Network
Set. screen without changing the setting.
4. Press the main unit MULTI JOG dial or remote control ENTER
button to confirm the setting and return to the Menu screen.
NOTE
i
The Password setting is retained even when the unit is turned
off.
i
Press the CLEAR button to delete characters. All the numbers
to the right of the cursor (editing point) will be deleted.
i
Press the BACK [PAIRING] button to return to the Network
Set. screen without changing the setting.
IP mode setting
Set the IP address setting mode.
When set to Static, the IP Address, Subnet Mask, Gateway and
DNS Address items are set manually.
When set to Auto (DHCP), the IP Address, Subnet Mask, Gate-
way and DNS Address items are set automatically.
Use this setting if there is a DHCP server on the network.
1. Select Network Set. on the Menu screen to open the Net-
work Set. screen. (See “Menu operation procedures” in “2
– Names and Functions of Parts” in the CD-400U/CD−400U
DAB Owner’s Manual.)
Network Set.
< Password >
2. Select IP Mode on the Network Set. screen to open the IP
Mode screen.
IP Mode
< Auto(DHCP) >
Network function settings
The unit can be connected to a network using its Ethernet connector, allowing external control of the unit.
Telnet is the protocol that can be used.
Use Network Set. on the Menu screen to set the network func-
tion.
Password setting
Set the password (default: 400).
Input up to 10 characters, using only numbers.
1. Select Network Set. on the Menu screen to open the Net-
work Set. screen. (See “Menu operation procedures” in “2
– Names and Functions of Parts” in the CD-400U/CD−400U
DAB Owner’s Manual.)
Network Set.
< Password >
2. Select Password on the Network Set. screen to open the
Password screen.
Password
[400 ]
3. Use the number buttons on the main unit or the remote control to input the password.
The blinking character shows the cursor (editing point)
where a number can be input.
Turn the MULTI JOG dial or press the .// [l/;] remote control buttons to move the cursor.
3. Set the IP Mode.
Options: Auto (DHCP) (default), Static
4. Confirm the setting and return to the Menu Screen.
NOTE
i
The IP Mode setting is retained even when the unit is turned
off.
i
Press the BACK [PAIRING] button to return to the Network
Set. screen without changing the setting.
IP address setting (IP Address)
Set the IP address (default: 192.168.000.040).
1. Select Network Set. on the Menu screen to open the Net-
work Set. screen. (See “Menu operation procedures” in “2
– Names and Functions of Parts” in the CD-400U/CD−400U
DAB Owner’s Manual.)
Network Set.
< Password >
2. Select IP Address on the Network Set. screen to open the
IP Address screen.
IP Address
192.168.000.040
3. Use the number buttons on the main unit or the remote control to input the IP address.
The blinking character shows the cursor (editing point)
where a number can be input.
Turn the MULTI JOG dial or press the .// [l/;] re-
mote control buttons to move the cursor.
TASCAM IF-E100
4
Page 5

4. Press the main unit MULTI JOG dial or remote control ENTER
button to confirm the setting and return to the Menu screen.
NOTE
i
This cannot be set when the IP address setting mode (IP Mode)
is set to Auto (DHCP).
i
The IP address setting is retained even when the unit is turned
off.
i
To enter a single-digit number, input “00x” and to enter a
two-digit number, input “0xy”.
(For example, input “001” to enter “1”. “192.168.0.1” is entered
as “192.168.000.001”. )
i
Press the BACK [PAIRING] button to return to the Network
Set. screen without changing the setting.
Setting the subnet mask (Subnet Mask)
Set the subnet mask (default: 255.255.255.000).
1. Select Network Set. on the Menu screen to open the Network
Set. screen. (See “Menu operation procedures” in “2 – Names
and Functions of Parts” in the CD-400U/CD−400U DAB Owner’s Manual.)
Network Set.
< Password >
2. Select Subnet Mask on the Network Set. screen to open the
Subnet Mask screen.
Subnet Mask
255.255.255.000
3. Use the number buttons on the main unit or the remote control to input the subnet mask.
The blinking character shows the cursor (editing point) where
a number can be input.
Turn the MULTI JOG dial or press the .// [l/;] remote
control buttons to move the cursor.
4. Press the main unit MULTI JOG dial or remote control ENTER
button to confirm the setting and return to the Menu screen.
NOTE
i
This cannot be set when the IP address setting mode (IP Mode)
is set to Auto (DHCP).
i
The subnet mask setting is retained even when the unit is
turned off.
i
Press the BACK [PAIRING] button to return to the Network
Set. screen without changing the setting.
Setting the default gateway (Gateway)
Set the default gateway (default: 192.168.000.001).
1. Select Network Set. on the Menu screen to open the Net-
work Set. screen. (See “Menu operation procedures” in “2 –
Names and Functions of Parts” in the CD-400U/CD−400U DAB
Owner’s Manual.)
3. Use the number buttons on the main unit or the remote control to input the default gateway.
The blinking character shows the cursor (editing point) where
a number can be input.
Turn the MULTI JOG dial or press the .// [l/;] remote
control buttons to move the cursor.
4. Press the main unit MULTI JOG dial or remote control ENTER
button to confirm the setting and return to the Menu screen.
NOTE
i
This cannot be set when the IP address setting mode (IP Mode)
is set to Auto (DHCP).
i
The default gateway setting is retained even when the unit is
turned off.
i
Press the BACK [PAIRING] button to return to the Network
Set. screen without changing the setting.
Setting the DNS address (DNS Address)
Set the DNS address (default: 192.168.000.001).
1. Select Network Set. on the Menu screen to open the Network
Set. screen. (See “Menu operation procedures” in “2 – Names
and Functions of Parts” in the CD-400U/CD−400U DAB Owner’s Manual.)
Network Set.
< Password >
2. Select DNS Address on the Network Set. screen to open the
DNS Address screen.
DNS Address
192.168.000.001
3. Use the number buttons on the main unit or the remote control to input the DNS address.
The blinking character shows the cursor (editing point) where
a number can be input.
Turn the MULTI JOG dial or press the .// [l/;] remote
control buttons to move the cursor.
4. Press the main unit MULTI JOG dial or remote control ENTER
button to confirm the setting and return to the Menu screen.
NOTE
i
This cannot be set when the IP address setting mode (IP Mode)
is set to Auto (DHCP).
i
The DNS address setting is retained even when the unit is
turned off.
i
Press the BACK [PAIRING] button to return to the Network
Set. screen without changing the setting.
Network Set.
< Password >
2. Select Gateway on the Network Set. screen to open the
Gateway screen.
Gateway
192.168.000.001
TASCAM IF-E100
5
Page 6

Remote control
Remote control of this unit by Ethernet using Telnet through port
23 is possible.
Required settings for Telnet connection
The following settings are necessary to connect to this unit by
Telnet.
IP address: The IP address of the unit is shown in the IP Ad-
dress screen. (See “IP address setting (IP Address)”
on page 4.)
Port number: 23
Password: 400 (default) This can be changed on the Password
screen. (See “Password setting” on page 4.)
Connecting to this unit by Telnet
1. After connecting to this unit by Telnet with the above IP ad-
dress and port number, press the computer Enter key.
2. “Enter Password” will appear on the Telnet console. Input
the above password and press the Enter key.
3. When login succeeds, “Login Successful” will appear on the
Telnet console.
NOTE
i
Multiple connections are not possible. If a Telnet connection
has already been made, additional connections will not be
possible.
i
If an item of Network Set Is changed when there is a Telnet
connection, the connection will be interrupted.
i
You can download the Telnet command protocol for CD-400U/
CD-400UDAB from the TEAC Global Site (http://teac-global.
com/).
Specifications
Input and output
Ethernet connector
Connector: RJ-45
Transmission protocol: Telnet
Port number: 23
Password: numbers only 10-digit maximum (default: 400)
Ethernet standard: 100BASE-TX
Cables: category 5e or faster.
Other
Dimensions
75.0 × 31.0 × 54.8 mm
(width × height × depth, including protrusions)
Weight
37 g
Dimensional drawings
52.6mm
75.0mm
2.2mm
31.0mm
0 Illustrations in this manual might differ in part from the actual
product.
0 Specifications and external appearance might be changed
without notification to improve the product.
TASCAM IF-E100
6
Page 7

Software Licensing
Apache License
Version 2.0, January 2004
http://www.apache.org/licenses/
TERMS AND CONDITIONS FOR USE, REPRODUCTION, AND DISTRIBUTION
1. Definitions.
“License” shall mean the terms and conditions for use, reproduction, and distribution as defined by Sections 1 through 9 of this
document.
“Licensor” shall mean the copyright owner or entity authorized
by the copyright owner that is granting the License.
“Legal Entity” shall mean the union of the acting entity and all
other entities that control, are controlled by, or are under common control with that entity. For the purposes of this definition,
“control” means (i) the power, direct or indirect, to cause the direction or management of such entity, whether by contract or
otherwise, or (ii) ownership of fifty percent (50%) or more of the
outstanding shares, or (iii) beneficial ownership of such entity.
“You” (or “Your”) shall mean an individual or Legal Entity exercising permissions granted by this License.
“Source” form shall mean the preferred form for making modifications, including but not limited to software source code, documentation source, and configuration files.
“Object” form shall mean any form resulting from mechanical
transformation or translation of a Source form, including but not
limited to compiled object code, generated documentation, and
conversions to other media types.
“Work” shall mean the work of authorship, whether in Source or
Object form, made available under the License, as indicated by a
copyright notice that is included in or attached to the work (an
example is provided in the Appendix below).
“Derivative Works” shall mean any work, whether in Source or
Object form, that is based on (or derived from) the Work and for
which the editorial revisions, annotations, elaborations, or other
modifications represent, as a whole, an original work of authorship. For the purposes of this License, Derivative Works shall not
include works that remain separable from, or merely link (or bind
by name) to the interfaces of, the Work and Derivative Works
thereof.
2. Grant of Copyright License. Subject to the terms and conditions of this License, each Contributor hereby grants to You a perpetual, worldwide, non-exclusive, no-charge, royalty-free, irrevocable copyright license to reproduce, prepare Derivative Works
of, publicly display, publicly perform, sublicense, and distribute
the Work and such Derivative Works in Source or Object form.
3. Grant of Patent License. Subject to the terms and conditions
of this License, each Contributor hereby grants to You a perpetual, worldwide, non-exclusive, no-charge, royalty-free, irrevocable (except as stated in this section) patent license to make, have
made, use, offer to sell, sell, import, and otherwise transfer the
Work, where such license applies only to those patent claims
licensable by such Contributor that are necessarily infringed by
their Contribution(s) alone or by combination of their Contribution(s) with the Work to which such Contribution(s) was submitted. If You institute patent litigation against any entity (including
a cross-claim or counterclaim in a lawsuit) alleging that the Work
or a Contribution incorporated within the Work constitutes direct
or contributory patent infringement, then any patent licenses
granted to You under this License for that Work shall terminate as
of the date such litigation is filed.
4. Redistribution. You may reproduce and distribute copies of
the Work or Derivative Works thereof in any medium, with or
without modifications, and in Source or Object form, provided
that You meet the following conditions:
a. You must give any other recipients of the Work or Derivative
Works a copy of this License; and
b. You must cause any modified files to carry prominent notic-
es stating that You changed the files; and
c. You must retain, in the Source form of any Derivative Works
that You distribute, all copyright, patent, trademark, and
attribution notices from the Source form of the Work, excluding those notices that do not pertain to any part of the
Derivative Works; and
d. If the Work includes a “NOTICE” text file as part of its distribu-
tion, then any Derivative Works that You distribute must include a readable copy of the attribution notices contained
within such NOTICE file, excluding those notices that do not
pertain to any part of the Derivative Works, in at least one of
the following places: within a NOTICE text file distributed as
part of the Derivative Works; within the Source form or documentation, if provided along with the Derivative Works; or,
within a display generated by the Derivative Works, if and
wherever such third-party notices normally appear. The
contents of the NOTICE file are for informational purposes
only and do not modify the License. You may add Your own
attribution notices within Derivative Works that You distribute, alongside or as an addendum to the NOTICE text from
the Work, provided that such additional attribution notices
cannot be construed as modifying the License.
“Contribution” shall mean any work of authorship, including the
original version of the Work and any modifications or additions
to that Work or Derivative Works thereof, that is intentionally
submitted to Licensor for inclusion in the Work by the copyright
owner or by an individual or Legal Entity authorized to submit on
behalf of the copyright owner. For the purposes of this definition,
“submitted” means any form of electronic, verbal, or written communication sent to the Licensor or its representatives, including
but not limited to communication on electronic mailing lists,
source code control systems, and issue tracking systems that are
managed by, or on behalf of, the Licensor for the purpose of discussing and improving the Work, but excluding communication
that is conspicuously marked or otherwise designated in writing
by the copyright owner as “Not a Contribution.”
“Contributor” shall mean Licensor and any individual or Legal
Entity on behalf of whom a Contribution has been received by
Licensor and subsequently incorporated within the Work.
You may add Your own copyright statement to Your modifications and may provide additional or different license
terms and conditions for use, reproduction, or distribution
of Your modifications, or for any such Derivative Works as
a whole, provided Your use, reproduction, and distribution
of the Work otherwise complies with the conditions stated
in this License.
5. Submission of Contributions. Unless You explicitly state otherwise, any Contribution intentionally submitted for inclusion
in the Work by You to the Licensor shall be under the terms and
conditions of this License, without any additional terms or conditions. Notwithstanding the above, nothing herein shall supersede or modify the terms of any separate license agreement you
may have executed with Licensor regarding such Contributions.
TASCAM IF-E100
7
Page 8

6. Trademarks. This License does not grant permission to use the
trade names, trademarks, service marks, or product names of the
Licensor, except as required for reasonable and customary use in
describing the origin of the Work and reproducing the content of
the NOTICE file.
7. Disclaimer of Warranty. Unless required by applicable law or
agreed to in writing, Licensor provides the Work (and each Contributor provides its Contributions) on an “AS IS” BASIS, WITHOUT
WARRANTIES OR CONDITIONS OF ANY KIND, either express or
implied, including, without limitation, any warranties or conditions of TITLE, NON-INFRINGEMENT, MERCHANTABILITY, or FITNESS FOR A PARTICULAR PURPOSE. You are solely responsible for
determining the appropriateness of using or redistributing the
Work and assume any risks associated with Your exercise of permissions under this License.
8. Limitation of Liability. In no event and under no legal theo-
ry, whether in tort (including negligence), contract, or otherwise,
unless required by applicable law (such as deliberate and grossly
negligent acts) or agreed to in writing, shall any Contributor be
liable to You for damages, including any direct, indirect, special,
incidental, or consequential damages of any character arising as
a result of this License or out of the use or inability to use the
Work (including but not limited to damages for loss of goodwill,
work stoppage, computer failure or malfunction, or any and all
other commercial damages or losses), even if such Contributor
has been advised of the possibility of such damages.
9. Accepting Warranty or Additional Liability. While redistrib-
uting the Work or Derivative Works thereof, You may choose to
offer, and charge a fee for, acceptance of support, warranty, indemnity, or other liability obligations and/or rights consistent
with this License. However, in accepting such obligations, You
may act only on Your own behalf and on Your sole responsibility,
not on behalf of any other Contributor, and only if You agree to
indemnify, defend, and hold each Contributor harmless for any
liability incurred by, or claims asserted against, such Contributor
by reason of your accepting any such warranty or additional liability.
END OF TERMS AND CONDITIONS
APPENDIX: How to apply the Apache License to your work
To apply the Apache License to your work, attach the following
boilerplate notice, with the fields enclosed by brackets “[]” replaced with your own identifying information. (Don’t include the
brackets!) The text should be enclosed in the appropriate comment syntax for the file format. We also recommend that a file or
class name and description of purpose be included on the same
“printed page” as the copyright notice for easier identification
within third-party archives.
Copyright [yyyy] [name of copyright owner]
Licensed under the Apache License, Version 2.0 (the “License”);
you may not use this file except in compliance with the License.
You may obtain a copy of the License at
http://www.apache.org/licenses/LICENSE-2.0
Unless required by applicable law or agreed to in writing, software distributed under the License is distributed on an “AS IS” BASIS, WITHOUT WARRANTIES OR CONDITIONS OF ANY KIND, either
express or implied.
See the License for the specific language governing permissions
and limitations under the License.
TASCAM IF-E100
8
Page 9

TASCAM IF-E100
9
Page 10

TEAC CORPORATION
Phone: +81-42-356-9143
1-47 Ochiai, Tama-shi, Tokyo 206-8530 Japan
https://tascam.jp/jp/
TEAC AMERICA, INC. http://tascam.com/
Phone: +1-323-726-0303
1834 Gage Road, Montebello, California 90640 USA
TEAC UK Ltd. http://tascam.eu/
Phone: + 44 -1923-797205
Meridien House, 69-71 Clarendon Road, Watford, Herts, WD17 1DS, United Kingdom
TEAC EUROPE GmbH http://tascam.eu/
Phone: +49-611-71580
Bahnstrasse 12, 65205 Wiesbaden-Erbenheim, Germany
TEAC SALES & TRADING(SHENZHEN) CO., LTD http://tascam.cn/
Phone: +86-755-88311561~2
Room 817, Block A, Hailrun Complex, 6021 Shennan Blvd., Futian District, Shenzhen 518040, China
0718.MA-2566A
 Loading...