

Page 1

LUXURY VINYL TILE AND PLANKS
© 2017 Tarkett
Page 1 of 3
ID_20170522_EN_TRANSCEND_SURESET
Transcend SureSet
™
Installation Instructions
INTRODUCTION
These instructions are written as a guide to be used by professional installers when installing Tarkett products. These instructions, combined with our
adhesives and flooring products, create a system. Utilizing this system will ease the installation process and provide the customer with a completed
product that will perform to its intended purpose. Always visit www.tarkettna.com for the most current installation and maintenance instructions.
Technical videos and tip sheets are also available. Contact Tarkett Technical Services at (800)-899-8916 ext. 9297 with any questions.
HANDLING AND STORAGE
1. All Tarkett products must be stored in an indoor, climate controlled
space and be protected from the elements. Temperature must be
maintained between 65F (18.3C) and 85F (29.4C) with a relative
humidity between 40% and 60%.
2. All cartons must be stored on a dry, flat, level surface. Cartons must
be carefully stacked squarely on top of one another and never be
stored on edge. Take caution not to over stack the cartons and never
double stack pallets. Always protect carton corners from damage by
tow-motors and other traffic.
3. Tarkett flooring and adhesives must be site conditioned at room
temperature for 48 hours prior to, during, and after installation.
Room temperature must be maintained between 65F (18.3C) and
85F (29.4C) and the ambient relative humidity must be between
40% and 60%. We strongly recommend the permanent HVAC system
be fully operating. NOTE: If a system other than the permanent
HVAC source is utilized, it must provide proper control of both
temperature and humidity to recommended or specific levels for the
appropriate time duration as stated above.
4. Once the installation is completed, the service temperature of the
space must never fall below 55F (12.8C).
5. In areas that are exposed to intense or direct sunlight, the product
must be protected during the conditioning, installation, and adhesive
curing periods, by covering the light source.
6. Tarkett products are not recommended for exterior use. Exposure to
excessive UV rays can result in fading, degradation, and/or color
variation.
7. The highest quality of materials and workmanship is employed in the
manufacture of Tarkett Flooring and careful inspection is made
before shipment. A quality installation is the responsibility of the
installer. It is the installer's responsibility to verify the accuracy of the
order and to ensure the materials are checked for damage, defects,
and satisfactory color match. An authorized Tarkett distributor or
Tarkett representative must be notified of any defects before
installation proceeds. Tarkett will not pay for labor or material
costs claimed on installed materials with visual defects.
8. Tarkett cannot accept responsibility for any loss or damage that may
result due to processing or working conditions and/or workmanship
outside our control.
9. Users are advised to confirm the suitability of this product by their
own tests.
GENERAL SUBFLOOR PREPARATION
1. All subfloors must be permanently dry, clean, smooth, and
structurally sound. The surface must be free of all dust, loose
particles, solvents, paint, grease, oil, wax, alkali, sealing/curing
compounds, old adhesive, and any other foreign material, which
could affect the installation and adhesive bond to the substrate.
Permanent and non-permanent markers, pens, crayons, paint, or
similar marking tools used to mark the substrate or the back of the
resilient flooring material will cause migratory staining. Subfloor
contamination or markings that bleed through the flooring material
causing discoloration or staining are excluded from the Tarkett
Limited Warranty. All substrate contaminants must be mechanically
removed prior to the installation of the flooring material. NOTE: Do
not use liquid solvents or adhesive removers.
Caution: Do not use oil based sweeping compounds.
Fill all depressions, cracks, and other surface irregularities with a
good quality Portland cement based underlayment patching
compound appropriate for this purpose.
Tarkett does not recommend installing over existing resilient
floors. All existing flooring and adhesives must be mechanically
removed prior to installing the new flooring material – Do not use
chemical adhesive removers or solvents. Refer to the Resilient
Floor Covering Institute (RFCI),
Removal of Existing Resilient Flooring
Caution: Some resilient flooring products and adhesives contain
"asbestos fibers" and special handling of this material is required.
2. Concrete subfloors must be constructed as recommended by the
American Concrete Institute’s ACI 302.2 Guide for Concrete Slabs
that Receive Moisture-Sensitive Flooring Materials and prepared in
Recommended Work Practices for
for best work practices.
accordance with ASTM F 710 Standard Practice for Preparing
Concrete Floors to Receive Resilient Flooring.
Do not install Tarkett flooring over expansion joints, control joints,
or other moving joints in the substrate. These joints must be
respected and should not be filled with products that are not intended
for that purpose. Contact an expansion joint cover manufacturer to
meet specific flooring conditions.
All concrete subfloors must be tested for moisture and pH
(alkalinity):
Moisture testing must be conducted in accordance with ASTM F 2170
Standard Test Method for Determining Relative Humidity in Concrete
Floor Slabs Using
Method for Measuring Moisture Vapor Emission Rate of Concrete
Subfloor Using Anhydrous Calcium Chloride. Following ASTM F 2659
Preliminary Evaluation of Comparative Moisture Condition of
Concrete, Gypsum Cement and Other Floor Slabs and Screeds Using
a Non-destructive Electronic Moisture Meter can provide qualitative
information prior to performing ASTM F 2170 or ASTM F 1869.
Acceptable moisture limits can be found in the adhesive section
below, on the adhesive label, and in the adhesive specifications
online. Test results must not exceed the limits of the adhesive.
If the tests results exceed the limitations, the installation must not
proceed until the problem has been corrected. Tarkett does not
recommend or warrant any particular product or procedure for the
remediation of high moisture in concrete substrates. There are
several companies that manufacture products suitable for moisture
remediation. We suggest you refer to the current ASTM F 710
Standard Practice for Preparing Concrete Floors to Receive Resilient
in situ
Probes or ASTM F 1869 Standard Test
Page 2

© 2017 Tarkett
Page 2 of 3
ID_20170522_EN_TRANSCEND_SURESET
Flooring and ASTM F 3010 Standard Practice for Two Component
Resin Based Membrane-Forming Moisture Mitigation Systems for Use
Under Resilient Flooring Systems.
A pH test for alkalinity must be conducted. Acceptable pH range of
the adhesive can be found in the adhesive section below, on the
adhesive label, and in the adhesive specifications online. Results
must not exceed the limits of the adhesive. If the test results are not
within the acceptable range, the installation must not proceed until
the problem has been corrected.
3. Wood subfloors must have a minimum 18" (47 cm) of cross-
ventilated space between the bottom of the joist and ground.
Exposed earth crawl spaces must be sealed with a polyethylene
moisture barrier.
Subfloors must meet local and national building codes. Trade
associations, such as the APA -The Engineered Wood Association,
offer structural guidelines for meeting various code requirements.
Refer to ASTM F 1482 Standard Practice for Installation and
Preparation of Panel Type Underlayments to receive Resilient
Flooring, for additional information.
Single Floor Wood Construction and Tongue and Groove
subfloors must be covered with 1/4" (6.4 mm) or 1/2" (13 mm) APA
approved underlayment plywood. Use 1/4" (6.4 mm) thick
underlayment panels for boards with a face width of 3" (76 mm) or
less. For boards wider than 3" (76 mm) face width use 1/2" (13 mm)
underlayment panels.
INSTALLATION
1. Adhesive Application: For application in areas subject to heavy point
loads, rolling loads, topical moisture, or temperature extremes, see
adhesive chart below and follow adhesive label instructions for proper
use.
2. Installation Procedure:
a. During the installation of plank material, install product out of
multiple cartons from matching batch numbers.
b. Square the area and establish reference points on the substrate.
c. Remove the release paper and use established reference points
and install the flooring material. WARNING: Once removed,
release paper may be slippery. Please keep work area
clean and free of release paper.
d. Install planks in the same direction, in a random pattern, and
offset plank end joints by 12" (15.2 cm).
e. Tiles may be installed in the same direction, ‘Ashlar’ or ‘quarter
turned’ to create patterns.
f. Roll floor in both directions with a 100 pound three-section roller.
Use a small hand roller in areas that cannot be reached with a
large roller.
g. For adhesive installations:
i. Apply the adhesive to the substrate and allow proper open time.
Open and working times are dependent on the ambient
temperature, humidity, substrate porosity and
temperature, and air movement. It is the installer’s
responsibility to modify the open and working time for
jobsite conditions.
ii. Planks and Tiles should be lightly butted together when placing
the flooring into the adhesive.
iii. Do not force Planks or Tiles together creating a ledge condition
at the seams and corners. Sliding tiles will result in forcing the
adhesive out between the seams.
iv. When using 975 Two-Part Urethane Adhesive the installer
MUST work off the flooring.
v. Remove release paper prior to laying into wet adhesive.
vi. Periodically, lift the corner of an installed tile or plank to ensure
proper transfer of adhesive.
vii. Inspect the floor surface, especially seams, and remove any
adhesive on the surface.
Countersink nail heads and fill depressions, joints, cracks, gouges,
and chipped edges with a good quality Portland cement based
patching compound designed for this purpose.
Do not install over OSB (Oriented Strand Board), particle
board, chipboard, lauan or composite type underlayments.
4. Terrazzo and Ceramic floor surface must be thoroughly sanded to
remove all glaze and waxes. Remove or replace all loose tiles and
clean the grout lines. Use a good quality Portland cement based
leveling compound to fill all grout lines and other depressions.
5. Steel floor surface must be mechanically abraded to assist with the
adhesive bond. The floor must be cleaned to remove all dirt, rust and
other contaminants that could affect the adhesive or the bond of the
flooring material to the substrate. Surface must be primed with a rust
inhibitor. It is important to follow the non-porous installation
instructions when installing over metal.
6. Concrete floors equipped with a radiant heating system: Turn
the heat down to 65F (18.3C) for at least 48 hours before
installation. Heat may be gradually returned to operating
temperature 48 hours after installation. Surface temperature must
not exceed 85F (29.4).
7. An adhesive bond test must be performed using the actual flooring
materials and adhesive to be installed. The test areas must be a
minimum of 36" x 36" and remain in place for at least 72 hours and
then evaluated for bond strength to the concrete.
3. Post Installation Floor Protection:
We recommend that the installation of new flooring material not be
performed until all the other trades have completed their work.
Proper precautions must be taken during and after the installation
process to avoid damage to the newly installed flooring.
Flooring must be swept or vacuumed to remove loose dirt and
grit prior to the application of proper floor protection. (Do not
trap dirt and grit under floor protection.)
Apply floor protection suitable for construction foot traffic such
as: undyed heavy Kraft paper, Ram Board, 1/8” Masonite
panels, or similar product designed for resilient floor
protection.
Areas that will receive heavy traffic, rolling loads, pallet jacks,
and furniture or appliance placement must be protected with
¼” thick Masonite or similar wood panels. Must wait 72
hours with adhesive installations.
The floor must be swept or vacuumed prior to the placement
of the floor protection panels. (Lightly damp mop if necessary)
Note: Do not use plastic or other non-porous materials
to protect the newly installed flooring that could
prevent the adhesive from drying properly.
a. Immediately after adhesive installations:
All traffic must be restricted for a minimum of 24 hours after
installation.
All heavy traffic, rolling loads, pallet jacks, and furniture or
appliance placement must be restricted for a minimum of 72
hours after installation.
Page 3
© 2017 Tarkett
Page 3 of 3
ID_20171130_EN_TRANSCEND_SURESET
Technical Services Department
30000 Aurora Road, Solon, Ohio 44139
(800) 899-8916 ext 9297
Fax (440) 632-5643
email: [email protected]
www.tarkettna.com
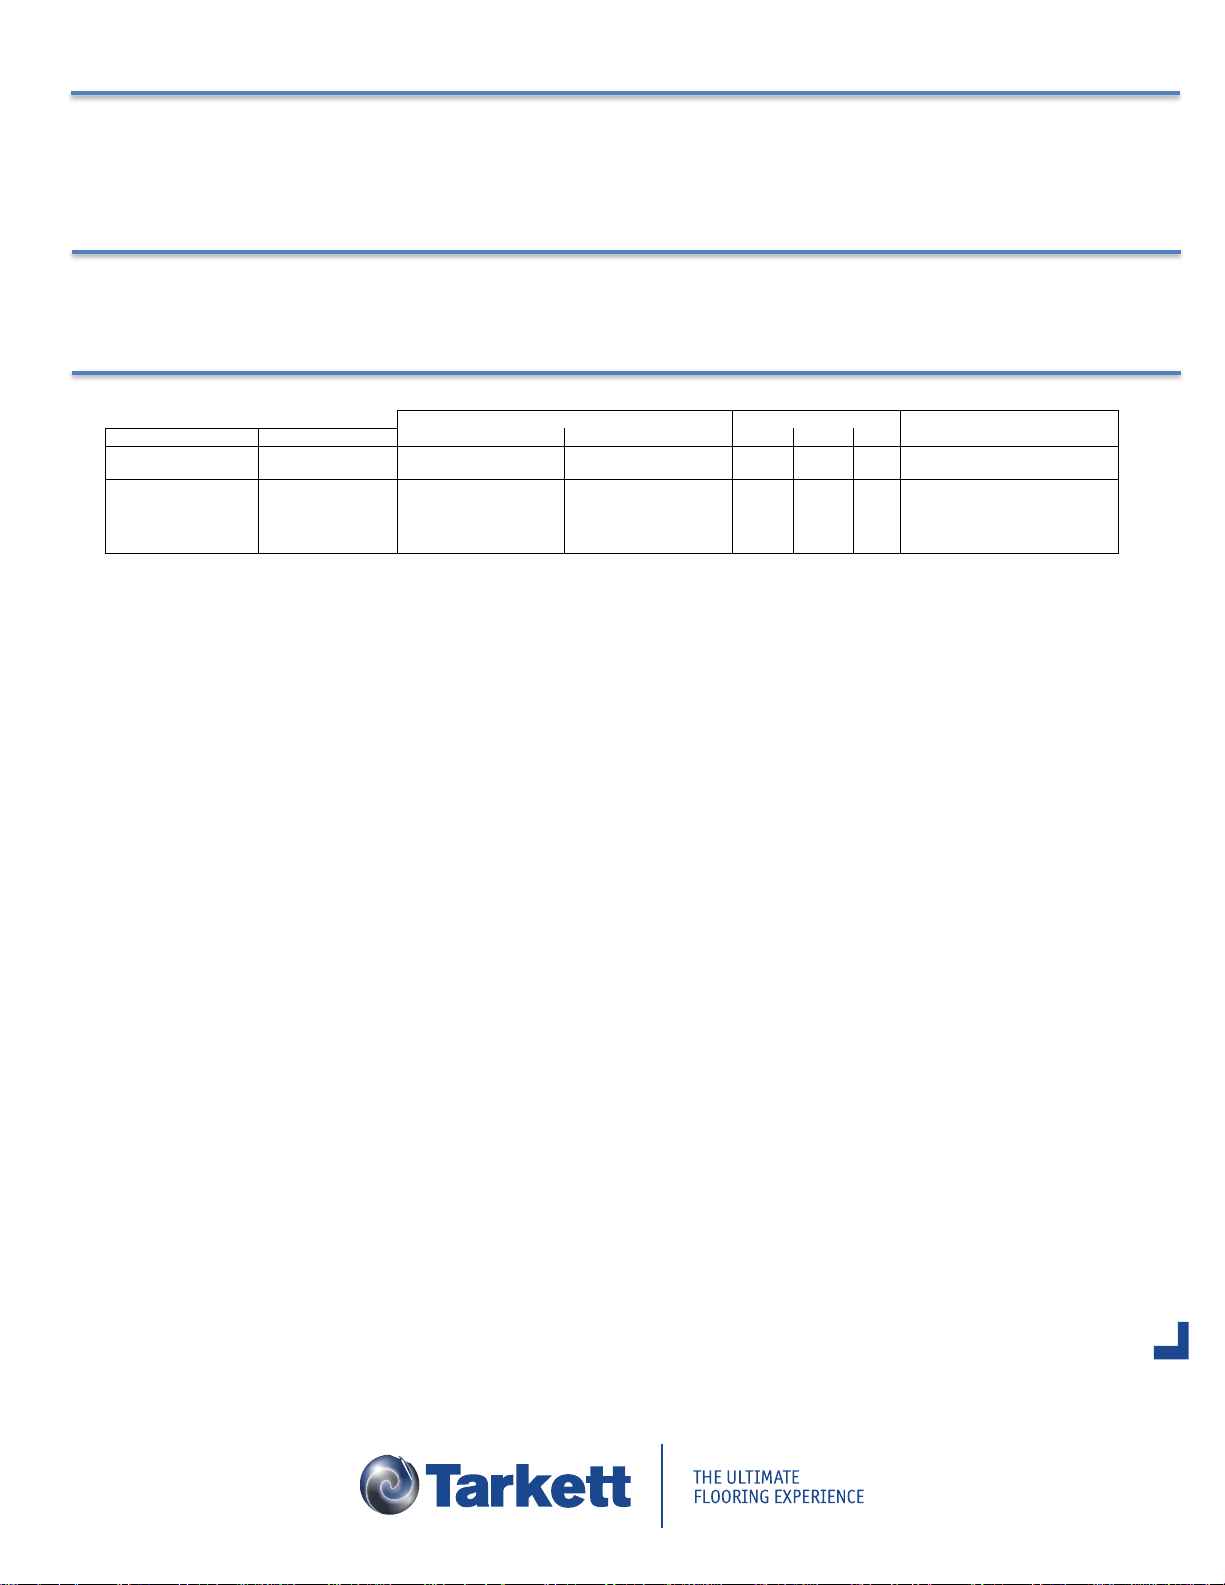
Application and Coverage
Moisture / pH Limits
Notes
Products
Adhesive
Porous
Non-Porous
RH%
CaCl2
pH
SureSet
Pre-applied
N/A
N/A
95%
9 lbs.
10
SureSet
975 Two-Part
Urethane Adhesive
1/32 x 1/16 x 1/32 U
225 – 250 sq. ft.
per gallon
1/32 x 1/16 x 1/32 U
225 – 250 sq. ft.
per gallon
85%
7 lbs.
9
For application in areas
subject to heavy point loads,
rolling loads, topical moisture,
or temperature extremes.
ADHESIVE CLEAN UP
Excess adhesive should be removed during the installation process.
975 Two-Part Urethane Adhesive
Before the adhesive sets, remove excess adhesive from flooring and
clean tools with denatured alcohol applied to a clean white cloth.
(Follow manufacturer's precautions when using denatured alcohol.)
MAINTENANCE
1. Wait 72 hours after installation before
performing initial cleaning with
adhesive installations.
ADHESIVE SELECTION CHART
2. A regular maintenance program must
be started after the initial cleaning.
Do not allow adhesive to dry on the flooring surface.
Removing dried adhesive may cause irreparable damage to the
flooring surface.
3. Refer to Tarkett’s Maintenance
Instructions for complete details.
 Loading...