

Page 1

Wireless Laser Mouse
Making Your Mobile Life Easier.
Features and specifications are subject to change without notice.
© 2005 Targus Group International, Inc. and Targus Inc.
BRUSSELS HANNOVER BARCELONA TOKYO MILAN AMSTERDAM SINGAPORE LONDON PARIS NEW YORK LOS ANGELES TORONTO HONG KONG SYDNEY
Visit our Web site at: www.targus.com
AMW14US/400-0283-001A
®
USER’S GUIDE
Making Your Mobile Life Easier.
®
Page 2

TARGUS WIRELESS LASER
MOUSE
Introduction
Congratulations on your purchase of the Targus Wireless
Laser Mouse for the desktop. This ergonomically-designed
mouse offers the latest in laser tracking technology as well
as the most up-to-date wireless features. It allows for
improved tracking accuracy on most types of surfaces, even
some mirror and glass. With 6 channels and 256 IDs per
channel, the mouse's digital signal processor offers a new
level of accuracy and precision in wireless data
transmission. Productivity is enhanced by a practical 8button design that includes such short cuts as Internet back
and forward, applications switch and scroll up and down
functions.
Note: While the mouse is functioning, no laser light is
visible to the naked eye. Be careful not to look
directly into the emitter hole while the mouse is
active.
Package Contents
• Wireless Laser Mouse
• USB Receiver
• USB Charge Cable
•USB Extension Seat
• 2 x AA Rechargeable Batteries
•User Guide
2
Page 3

Targus Wireless Laser Mouse
System Requirements
Hardware
• USB interface
Operating System
•Windows® 2000/XP
For Desktop PCs
For instances where the PC is positioned under a desk or
other places that might impede wireless connectivity, use of
the extension seat is recommended.
1 Connect the extension seat to an available USB port on
your PC.
2 Plug the USB wireless receiver into the port labeled
'receiver' located at the top of the seat.
3 Connect the USB end of the charge cable to the USB
port labeled 'charger' on the extension seat.
For Notebook PCs
1 Connect the extension seat to an available USB port on
your PC.
2 Plug the USB wireless receiver into the port labeled
'receiver' located at the top of the seat.
3 Connect the charge cable's USB end to the USB port
labeled 'charger' on the extension seat.
3
Page 4
Targus Wireless Laser Mouse
Alternatively, if more than one USB port is available you may
opt not to use the extension seat by plugging the receiver
and charging cable directly into the notebook PC's open
USB ports.
Installing the Batteries
1 Remove the battery cover from the bottom of the mouse
by pressing the tab located on the bottom and lifting it
off.
Battery cover
tab
Bottom of mouse
2 2 AA NiMH rechargeable batteries are included. Insert
the supplied batteries, making sure that the positive (+)
and negative (-) ends of each battery match the polarity
indicators inside the battery housing.
WARNINGS: Use ONLY heavy-duty NiMH
recharegeable batteries. Never use alkaline batteries.
Avoid mixing new and used batteries.
3 Slide the battery cover back into position until it “clicks”
firmly into place.
4
Page 5

Targus Wireless Laser Mouse
Charging the Mouse
For best results, you should charge the mouse at least eight
hours before using it.
1 Connect the supplied charge cable to the charge port
on the supplied extension seat and plug the extension
seat cable to the USB port on your computer.
2 Connect the other end of the charge cable to the
mouse.
3 Alternatively, you can connect the charge cable's USB
connector directly into an available USB port on your
computer.
NOTE: To continuously charge the mouse via the USB
charge cable, your computer must be on and awake.
For best results, turn off your computer’s power
management feature while charging the mouse.
Synchronization
Make sure that your computer is turned on and has
detected the USB receiver before you synchronize.
1 Press and release the connect button on the receiver.
Connect
button
5
Page 6

Targus Wireless Laser Mouse
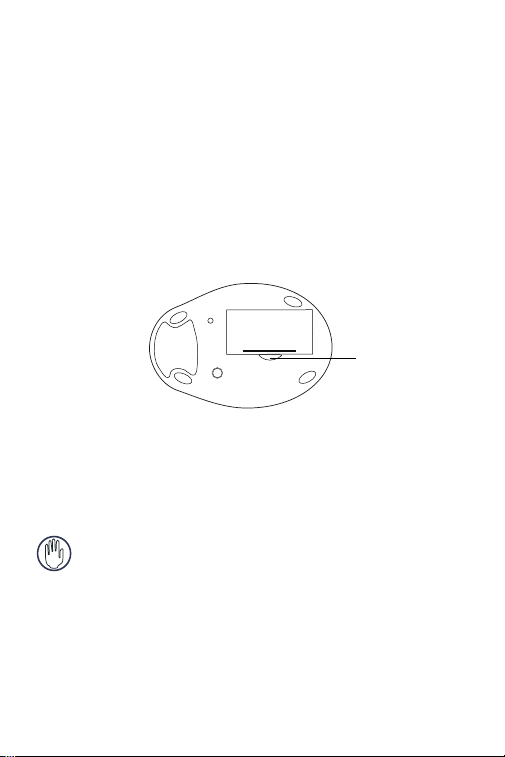
2 Press and release the connect button located on the
bottom of the mouse.
Connect
button
Laser
emitter
The receiver’s status light flashes while it scans the
identification codes. When synchronized the status light
stops flashing. This process must be completed within a
few seconds or the steps will need to be repeated.
After successfully synchronizing, you are ready to use the
mouse.
NOTE: Removing the batteries will require you to
synchronize the mouse with the receiver again.
6
Page 7

Targus Wireless Laser Mouse
Using the Mouse
8
7
3
2
4
1
1: Left Mouse Button 5: Application Switch
2: Right Mouse Button 6: Internet Page Backward
3: Middle Button/Scrolling Wheel 7: Scroll Up
4: Internet Page Forward 8: Scroll Down
NOTES: The 4th through 8th buttons require Windows
2000 or XP to function.
6
5
Due to the improved tracking speed of the laser
engine, users may find the cursor movement is
faster than a conventional optical mouse. Cursor
settings can be changed from the Control Panel
in Windows.
7
Page 8

Targus Wireless Laser Mouse
Safety Measures
• Although this mouse is a Class 1 Laser Product and safe
for operation, avoid pointing the laser into the eyes or
looking directly into the laser emitter.
• Keep the mouse away from young children.
• Any attempt to disassemble, adjust or repair the mouse
may result in exposure to laser light or other safety
hazards.
Sleep Mode
The mouse's sleep mode feature activates after 8 minutes
of non-operation. To wake the mouse, click the left, right or
scroll mouse button.
Troubleshooting
What do I do if the mouse does not work?
• Make sure that the polarity of the batteries is correct. The
positive (+) and negative (-) ends of each battery must
match the positive (+) and negative (-) connections in the
battery housing.
• Make sure that the batteries are fully charged. Check your
computer’s suspend mode settings, as the mouse will not
charge while the computer is in suspend mode.
• Check that the receiver's USB connector is firmly
attached to the USB port on your computer or the
8
Page 9

Targus Wireless Laser Mouse
extension seat, or that the extensions seat's cable is
connected to your PC.
• Make sure you have established a wireless link between
the mouse and its receiver. See “Synchronization” on
page 5.
I do not see the laser light when the mouse is active.
• Unlike traditional optical mice, the light is not visible when
the laser mouse is active.
• To make sure the mouse is on and functioning properly,
move the mouse back and forth and check to see if the
cursor responds.
My mouse does not work on a mirror or glass surface.
• Though rated for most of these kinds of surfaces,
occasionally there will be one such surface that will cause
the mouse to work improperly or not at all.
• If you are using the mouse on a reflective or mirrored
surface, move it to another surface.
What do I do if the response time of the mouse is
slow or the mouse intermittently stops working?
• "Increase the distance between the mouse's receiver and
the rest of your computer equipment. Use the USB
extension seat if necessary.
• "Increase the distance between the mouse's receiver and
the base units of other wireless devices.
• "Turn off any wireless devices and their base units that
are near the mouse's receiver.
9
Page 10

Targus Wireless Laser Mouse
• Metals, such as iron, aluminum or copper may slow down
the mouse's response time or cause the mouse to fail
temporarily.
• If you are using the mouse on a metal surface, move it and
the receiver to a non-metal surface.
Technical Support
For technical questions, please visit:
US
Internet: www.targus.com/support.asp
Australia
Internet: www.targus.com.au
Email: infoaust@targus.com
Telephone: 1800-641-645
New Zealand
Telephone: 0800-633-222
Product Registration
Targus recommends that you register your Targus accessory shortly
after purchasing it. To register your Targus accessory, go to:
http://www.targus.com/registration.asp
You will need to provide your full name, email address, phone
number, and company information (if applicable) .
10
Page 11

Targus Wireless Laser Mouse
Warranty
Targus warrants this product to be free from defects in materials and
workmanship for one year. If your Targus accessory is found to be
defective within that time, we will promptly repair or replace it. This
warranty does not cover accidental damage, wear and tear, or
consequential or incidental loss. Under no conditions is Targus liable
for loss of, or damage to a computer; nor loss of, or damage to,
programs, records, or data; nor any consequential or incidental
damages, even if Targus has been informed of their possibility. This
warranty does not affect your statutory rights.
Regulatory Compliance
This device complies with Part 15 of the FCC Rules. Operation is
subject to the following two conditions: (1) This device may not
cause harmful interference, and (2) This device must accept any
interference received, including interference that may cause
undesired operation.
FCC Statement
Tested to Comply
This equipment has been tested and found to comply with the limits
of a Class B digital device, pursuant to Part 15 of the FCC Rules.
These limits are designed to provide reasonable protection against
harmful interference in a residential installation. This equipment
generates, uses, and can radiate radio frequency energy and if not
installed and used in accordance with the instructions, may cause
harmful interference to radio communications. However, there is no
guarantee that interference will not occur in a particular installation.
If this equipment does cause harmful interference to radio or
television reception, which can be determined by turning the
equipment off and on, the user is encouraged to try to correct the
interference by one or more of the following measures:
• Reorient or relocate the receiving antenna;
• Increase the separation between the equipment and receiver;
11
Page 12

Targus Wireless Laser Mouse
• Move the computer away from the receiver;
• Connect the equipment into an outlet on a circuit different from
that to which the receiver is connected.
Intel and Pentium are registered tradem arks of Intel Corporation. Windows i s a registered
trademark of Microsoft C orporation. All other tradema rks are the property of thei r respective
owners. © 2005, Targus Group International, Inc. and Targus, Inc., Anaheim, CA 92806 USA.
12
 Loading...