

Page 1
Visit our Website a t www.targus.com
Features and specifi cations are subject to change
without notice.
©2006 Targus Group Inter national, Inc. and Targus, Inc.
AMB01US / 410-00 07-001A
USER GUIDE
wireless
bluetooth
notebook
mouse
Page 2

Table of Contents
Introduction ...........................................3
Installing the Software...........................4
Using the Bluetooth Mouse...................5
Initial Configuration ...............................7
Accessing the Bluetooth Configuration
Panel.....................................................7
Pairing Devices ...................................10
Basic Operations.................................13
To Pair with another device.................15
Start or Stop Bluetooth........................16
Mouse Power Management ................16
Operating Hints ...................................16
Specifications .....................................17
Troubleshooting ..................................18
Technical Support ...............................19
Product Registration............................20
Warranty..............................................20
2
Page 3

TARGUS WIRELESS
BLUETOOTH
NOTEBOOK MOUSE
Introduction
Congratulations on your purchase of the Targus
Bluetooth Mouse. The Bluetooth software included offers
service to other Bluetooth devices from your computer,
such as: PIM Synchronization, PIM Item Transfers, File
Transfers, Network Access, Dial-up Networking and
Bluetooth Serial Port.
This user guide describes how to connect the mouse
adapter to your computer, install default software drivers
and set up the radio link.
In addition to this user guide this package contains:
• Targus Wireless Bluetooth Notebook Mouse
• Bluetooth USB Adapter
• USB Extension cable
• CD-ROM
• 2 AAA batteries
• Carrying Pouch
3
Page 4

Targus Wireless Bluetooth Notebook Mouse
System Requirements
Hardware
• PC with a Pentium® processor or equivalent
•USB interface
Operating System
• Windows® 2000 or XP
Installing the Software
CAUTION: DO NOT PLUG IN THE USB ADAPTER
UNTIL
1 Insert the software CD-ROM into your computer’s
CD-ROM drive.
The
If setup does not begin automatically, click Start, Run,
then enter D:\Setup.exe (where D: is the path of your
disc drive) and then click OK.
2 Click Next.
3The
4 Click
PROMPTED BY THE SOFTWARE.
InstallShield Wizard
License Agreement
I accept the terms in the License Agreement
screen appears.
screen appears.
.
5 Click Next.
Follow the on-screen instructions.
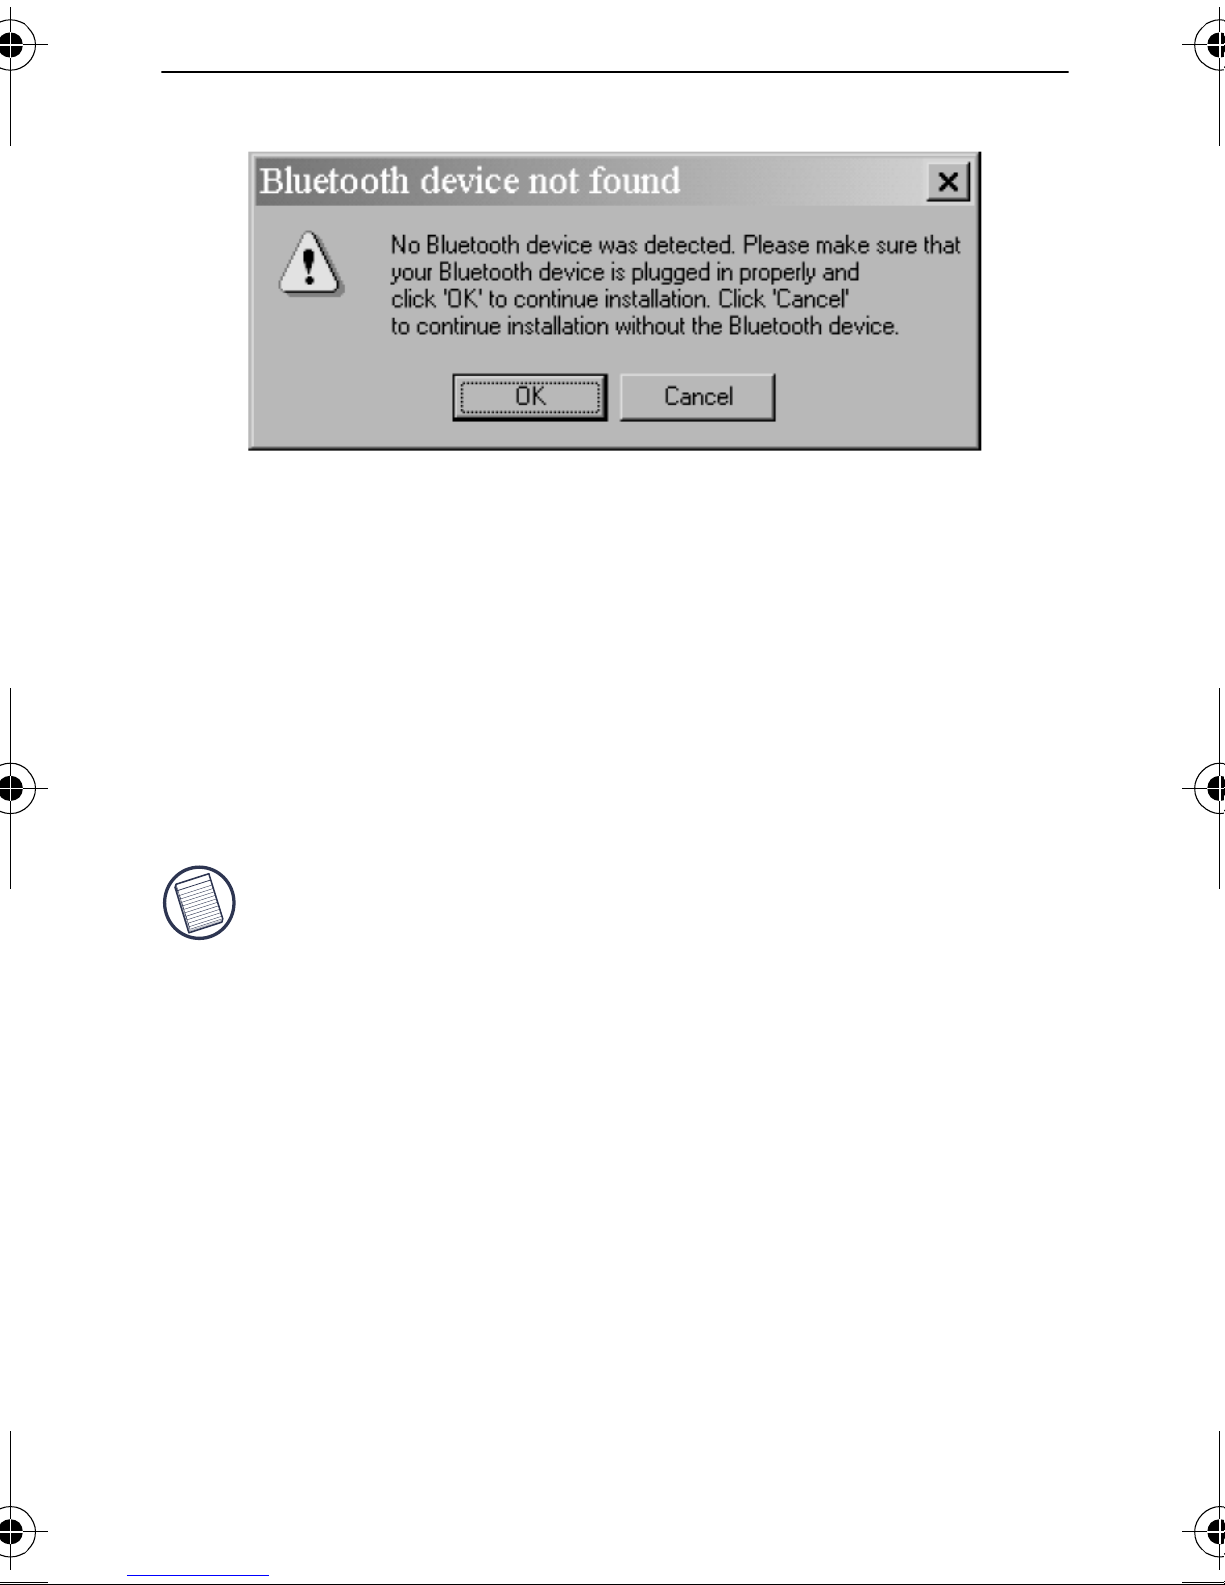
The following screen will appear to prompt you to plug in
the USB adapter:
4
Page 5
Targus Wireless Bluetooth Notebook Mouse
6 Plug the USB adapter into an available USB slot on
your computer.
7 Click OK.
The new hardware will be found and the installation
will finish.
8 You will be prompted to Restart your computer to
complete the installation.
NOTE: F
LOCATED
OR A COMPLETE USER GUIDE, PLEASE REFER TO THE MANUAL
ON THE CD-ROM INCLUDED IN THIS PACKAGE.
Using the Bluetooth Mouse
Installing the Batteries
1 Remove the battery cover from the top of the mouse
by pressing the release latch at the bottom of the
mouse.
5
Page 6

Targus Wireless Bluetooth Notebook Mouse
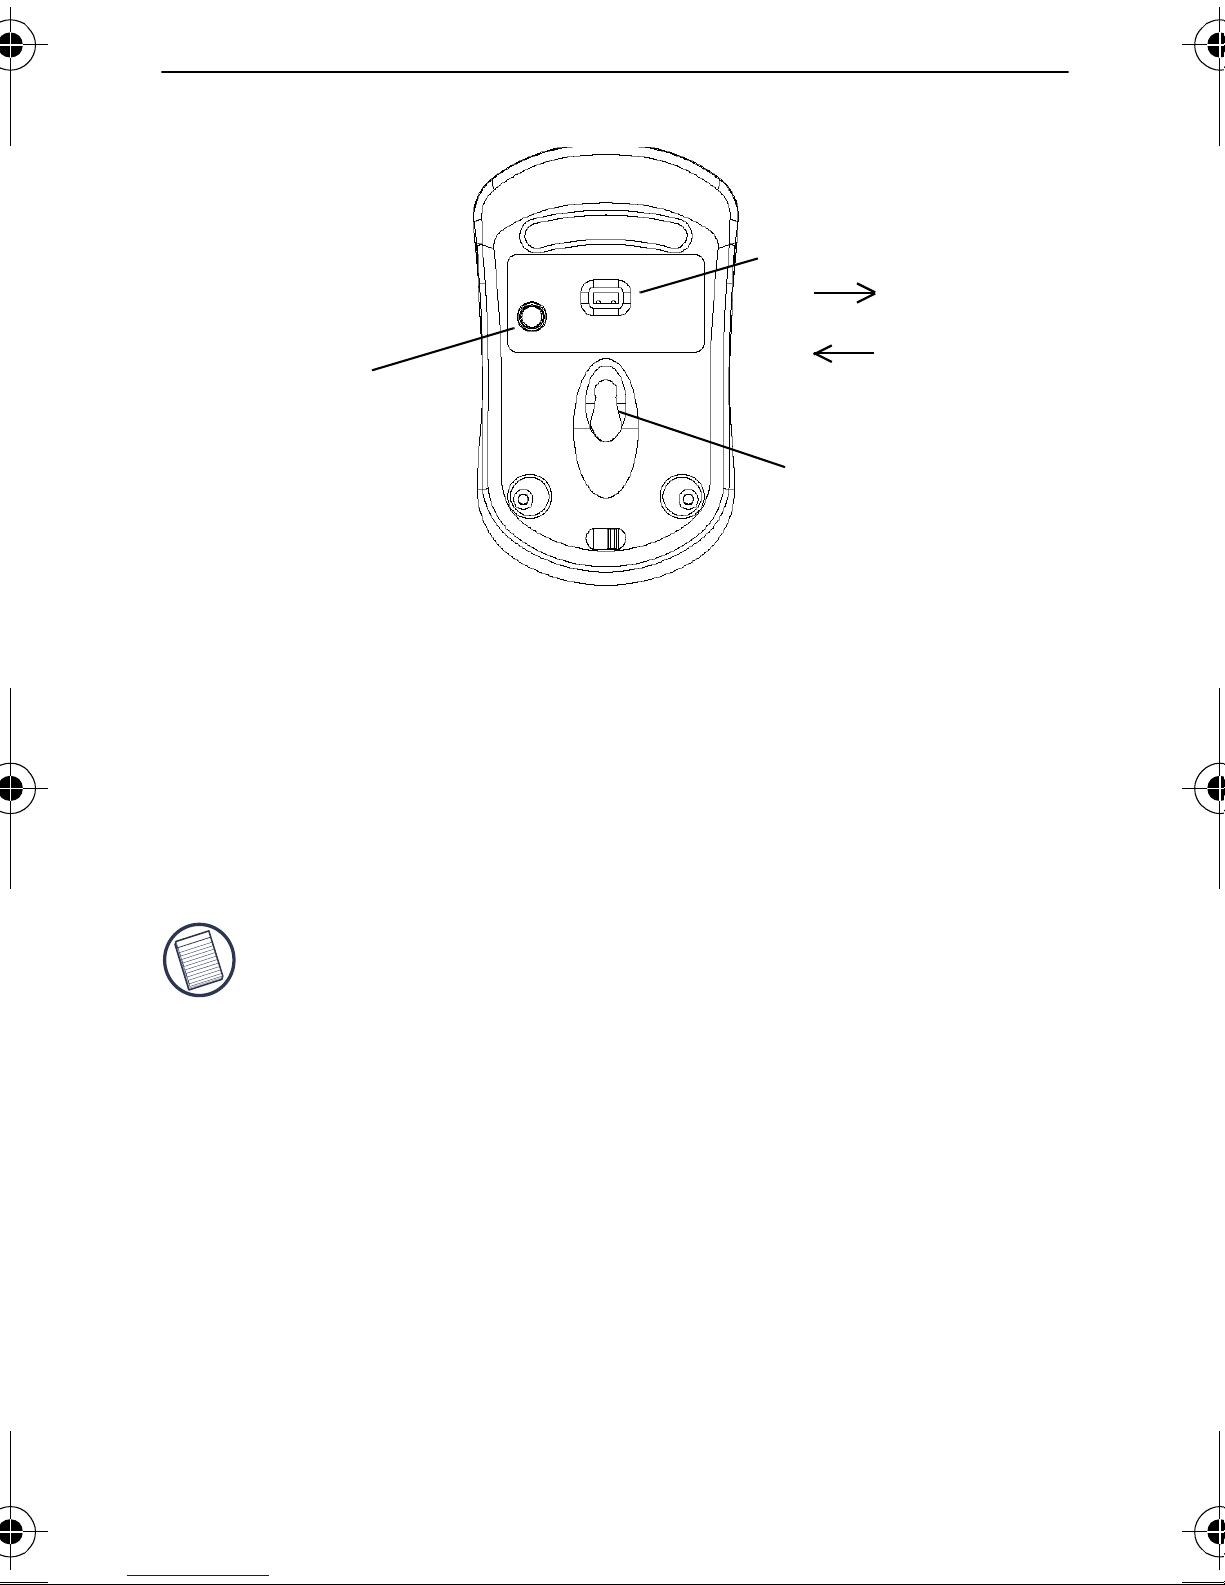
On/Off switch
Battery cover
Release latch
Top of Mouse Bottom of mouse
2 Insert the supplied batteries, making sure that the
positive (+) and negative (-) ends of each battery
match the polarity indicators inside the battery
housing.
WARNINGS: W
OTHER
HEAVY-DUTY NIMH BATTERIES. NEVER USE AN ALKALINE WITH A
HEN REPLACING THE BATTERIES, YOU MAY USE ALKALINE OR
NIMH BATTERY IN A DEVICE.
A
VOID MIXING NEW AND USED BATTERIES IN A DEVICE.
3 Snap the battery cover back into position.
4 Turn on the mouse by sliding the on/off switch on the
bottom of the mouse to the “on” position.
6
Page 7
Targus Wireless Bluetooth Notebook Mouse
On/Off switch
On
Pairing
button
Initial Configuration
Before you can begin using Bluetooth on your computer
and with other Bluetooth devices, you must perform
some initial setup.
Optical sensor
Off
NOTE: F
CONFIGURING
THE CD-ROM INCLUDED IN THIS PACKAGE.
ON
OR A COMPLETE USER GUIDE WITH DETAILED INSTRUCTIONS ON
BLUETOOTH DEVICES, PLEASE REFER TO THE MANUAL LOCATED
Accessing the Bluetooth
Configuration Panel
The Bluetooth Configuration Panel provides access to
settings for Bluetooth services, client applications,
hardware, security, discovery, accessibility, default paths,
event notification and other Bluetooth related items.
Open the configuration panel one of two ways:
7
Page 8

Targus Wireless Bluetooth Notebook Mouse
• From the Windows Control Panel, select Bluetooth
Configuration; or
• In the Windows System Tray, right-click the Bluetooth
icon, and select Advanced Configuration from the
shortcut menu.
The following screen will appear:
The Configuration Wizard will take you through the initial
setup of your computer and configure a basic Bluetooth
environment.
You can select the locations you want the Bluetooth icon
to appear.
8
Page 9

Targus Wireless Bluetooth Notebook Mouse
Next you will need to select a name for your computer
and indicate what type it is:
9
Page 10

Targus Wireless Bluetooth Notebook Mouse
To configure the Bluetooth services that your computer
will offer to other Bluetooth devices, click Next.
Follow on-screen instructions to complete your settings.
NOTE: F
CONFIGURING
ON
THE CD-ROM INCLUDED IN THIS PACKAGE.
OR A COMPLETE USER GUIDE WITH DETAILED INSTRUCTIONS ON
BLUETOOTH DEVICES, PLEASE REFER TO THE MANUAL LOCATED
Pairing Devices
Pairing allows you to avoid entering access information
each time a connection is attempted. Paired devices
share a unique link key, which they exchange each time
they connect.
10
Page 11

Targus Wireless Bluetooth Notebook Mouse
After the software is installed, you must pair the USB
adapter with the bluetooth mouse BEFORE you can use
the mouse. To do this:
Pairing button
Optical sensor
Mouse Bottom USB Adapter
1 While the USB adapter is connected to your computer,
press and hold the pairing button located on the
bottom of the USB adapter until the following screen
appears:
11
Page 12

Targus Wireless Bluetooth Notebook Mouse
2 While the Wizard searches for the mouse, press and
hold the pairing button on the bottom of the mouse
until it is identified. The optical sensor will illuminate
red and the following dialog box will appear:
12
Page 13

Use the Bluetooth mouse to click the “Click here”
button to confirm the connection.
You are now ready to use the mouse.
NOTES: P
AIRED DEVICES ARE ALWAYS DISPLAYED IN MY BLUETOOTH
PLACES, EVEN IF THE REMOTE DEVICE IS OUT OF RANGE OR NOT POWERED UP.
OR A COMPLETE USER GUIDE, PLEASE REFER TO THE MANUAL LOCATED ON
F
THE
CD-ROM INCLUDED IN THIS PACKAGE.
Basic Operations
Bluetooth tray
The Bluetooth tray resides in the Windows system tray,
which is normally located in the lower-right corner of the
screen. The Bluetooth tray provides fast access to most
Bluetooth operations.
From the Bluetooth tray you can:
• Access My Bluetooth Places:
› Double-click the Bluetooth icon, or right-click the
Bluetooth icon and then select Explore My Bluetooth
Places.
• Access the Bluetooth Setup Wizard to help you:
› Configure how this computer accesses a service on
another Bluetooth device.
› Locate remote Bluetooth devices.
› Configure the way that this computer provides ser-
vices to remote Bluetooth devices .
› Set the name and type of this Bluetooth device, e.g.,
“John's PC” and “Desktop.”
Page 14

Targus Wireless Bluetooth Notebook Mouse
• Access the Bluetooth Configuration Panel:
› Right-click the Bluetooth icon, and then select
Advanced Configuration.
• Access the Quick Connect option:
› Right-click the Bluetooth icon, select Quick Connect,
and then select the type of service to which you wish
to connect.
• Start/Stop Bluetooth on this computer.
NOTE: F
CONFIGURING
THE
CD-ROM.
OR A COMPLETE USER GUIDE WITH DETAILED INSTRUCTIONS ON
BLUETOOTH DEVICES, PLEASE REFER TO THE GUIDE LOCATED ON
Bluetooth Connection Status
The Bluetooth Connection Status dialog box displays
information about the state of a connection and provides
a means to disconnect an active connection.
To display the Connection Status dialog box: in My
Bluetooth Places, from the Folders pane, select a device,
and then, in the right pane of My Bluetooth Places, right-
14
Page 15

Targus Wireless Bluetooth Notebook Mouse
click a service name and select Status from the shortcut
menu.
Sample Connection Status dialog box
To Pair with another device
In the Folders pane of My Bluetooth Places, right-click a
device, select Pair Device from the shortcut menu, and
then follow the on-screen instructions.
Remove Pairing
In the Folders pane of My Bluetooth Places, right-click a
paired device and select Unpair Device from the shortcut
menu.
15
Page 16

Targus Wireless Bluetooth Notebook Mouse
Start or Stop Bluetooth
To start Bluetooth
In the Windows system tray, right-click the Bluetooth icon
and select Start the Bluetooth Device. The Bluetooth icon
is blue in color with a white insert when the Bluetooth
software is running.
To stop Bluetooth
In the Windows system tray, right-click the Bluetooth icon
and select Stop the Bluetooth Device. The Bluetooth icon
is blue in color with a red insert when Bluetooth is
stopped.
Mouse Power Management
To power the mouse on and off, slide the on/off switch at
the bottom of the mouse to the desired position.
When power is on, the mouse goes into "sleep mode"
after 20 minutes of inactivity. To activate the mouse, click
any button.
To save battery power, turn off the mouse while traveling
or while not in use.
Operating Hints
For optimal performance and RF reception:
• Avoid using the mouse on a metal surface. Metals,
such as iron, aluminum or copper, shield the radio
frequency transmission and may slow down the
16
Page 17

Targus Wireless Bluetooth Notebook Mouse
mouse’s response time or cause the mouse to fail
temporarily.
• The mouse will enter a suspend mode at the same time
your computer does. To activate the mouse, press any
key on your keyboard.
• If your computer has a metal case that contains
aluminum or magnesium, use the mouse to the side.
The display panel may interfere with the radio
frequency signal if you use the mouse directly in front
of the computer.
• Never use the mouse on a glass or mirrored surface as
these surfaces will cause the mouse to fail temporarily.
• To maximize battery life, use the mouse on a white, or
light colored surface. Dark surfaces cause the mouse’s
light emitter diode (LED) light to glow brighter, which
causes the battery to discharge more rapidly.
Specifications
Bluetooth Specification 1.1 and 1.2 compliant
Resolution 800 DPI
Working range Up to 33 feet (10 m)
RF transmit power 0 dBm
Operating Voltage 32mA
Batteries 2 AAA Alkaline
Operating Current 5 V
Standby Current 6~22mA
Sleep Mode Current 0.04mA
17
Page 18

Targus Wireless Bluetooth Notebook Mouse
Dimensions 0.74 x 1.87 x 0.37 inches
Weight 1.83 ounces (52 g)
Troub les ho oting
The mouse is not working.
• Make sure that the polarity of the batteries is correct.
The positive (+) and negative (-) ends of each battery
must match the positive (+) and negative (-)
connections in the battery housing.
(18.9 x 47.5 x 9.30 mm)
• Check that the USB adapter is firmly attached to the
USB port on your computer.
• Verify that the device drivers are installed:
1 Click Start/Settings/Control Panel/System/Hardware/
Device Manager.
2 Check under 'Bluetooth Devices' that a 'Targus
Bluetooth Mini Mouse' is installed.
I cannot connect to a paired device.
• Paired devices are always displayed in My Bluetooth
Places, even if the remote device is out of range or not
powered up.
• Verify that the remote member of the pair is within radio
range, and powered up, and then attempt the
connection again.
18
Page 19

Targus Wireless Bluetooth Notebook Mouse
I cannot discover services on an un-paired
remote device.
• The remote device may not be powered up or may be
out of range.
• Verify that the remote device is powered up.
• Verify that the remote device is in Connectable mode
(Bluetooth Configuration Panel > Accessibility tab).
• Perform a Search for Devices to verify that the device
is within range.
NOTE: F
MANUAL
OR A COMPLETE USER GUIDE, PLEASE REFER TO THE WIDCOMM
LOCATED ON THE CD-ROM INCLUDED IN THIS PACKAGE.
Technical Support
For technical questions, please visit:
US
Internet: http://www.targus.com/support
Australia
Internet: www.targus.com.au
Email: infoaust@targus.com
Telephone: 1800-641-645
New Zealand
Telephone: 0800-633-222
19
Page 20

Targus Wireless Bluetooth Notebook Mouse
Product Registration
Targus recommends that you register your Targus accessory
shortly after purchasing it. To register your Targus accessory, go
to: http://www.targus.com/registration.asp
You will need to provide your full name, email address, phone
number, and company information (if applicable).
Warranty
Targus warrants this product to be free from defects in materials
and workmanship for one year. If your Targus accessory is found
to be defective within that time, we will promptly repair or replace
it. This warranty does not cover accidental damage, wear and
tear, or consequential or incidental loss. Under no conditions is
Targus liable for loss of, or damage to a computer; nor loss of, or
damage to, programs, records, or data; nor any consequential or
incidental damages, even if Targus has been informed of their
possibility. This warranty does not affect your statutory rights.
Product Registration at: http://www.targus.com/registration.asp
Regulatory Compliance
This device complies with Part 15 of the FCC Rules. Operation is
subject to the following two conditions: (1) This device may not
cause harmful interference, and (2) This device must accept any
interference received, including interference that may cause
undesired operation.
FCC Statement
Te s t ed to Com ply
This equipment has been tested and found to comply with the
limits of a Class B digital device, pursuant to Part 15 of the FCC
Rules. These limits are designed to provide reasonable protection
against harmful interference in a residential installation. This
equipment generates, uses, and can radiate radio frequency
energy and if not installed and used in accordance with the
20
Page 21

Targus Wireless Bluetooth Notebook Mouse
instructions, may cause harmful interference to radio
communications. However, there is no guarantee that
interference will not occur in a particular installation.
If this equipment does cause harmful interference to radio or
television reception, which can be determined by turning the
equipment off and on, the user is encouraged to try to correct the
interference by one or more of the following measures:
• Reorient or relocate the receiving antenna;
• Increase the separation between the equipment and receiver;
• Connect the equipment into an outlet on a circuit different from
that to which the receiver is connected;
• Consult the dealer or experienced radio/TV technician for help.
WIDCOMM and the WIDCOMM logo are trademarks of WIDCOMM, Inc. Bluetooth and
the Bluetooth logos are trademarks owned by Bluetooth SIG, Inc., U.S.A. and licensed
to WIDCOMM, Inc. Microsoft, Windows, Outlook are registered trademarks of Microsoft
Corporation. All other trademarks are the property of their respective owners.© 2006,
Targus Group International, Inc. and Targus, Inc., Anaheim, CA 92806 USA.
21
 Loading...