

Page 1

BRUSSELS HANNOVER BARCELONA TOKYO MILANO AMSTERDAM SINGAPORE LONDON PARIS NEW YORK LOS ANGELES TORONTO HONG KONG SYDNEY
Tar gu s USB
Calculator/Keypad
USER’S GUIDE
Making Your Mobile Life Easier.
Making Your Mobile Life Easier.
Visit our Web site at: www.targus.com
Features and specifications are subject to change without notice. © 2002 Targus Corp.
400-0076-001B
Page 2

Targus USB Calculator/Keypad
Introduction
Congratulations on your purchase of the Targus USB Calculator/
Keypad. This versatile accessory connects to your computer’s
Universal Serial Bus (USB) port and uses a two-way power
system, incorporating both power from your computer and one
A3, LR41 or V3GA “button” battery. It enables you to:
• Perform standard calculator operations
• Send calculation results to the cursor location in the active
program on your computer (calculator mode only)
• Enter numbers and control cursor movement as you would from
a standard keypad
In addition to this user’s guide, this package contains the Targus
USB Calculator/Keypad.
System Requirements
To use the keypad, your computer must meet the following
hardware requirements and run one of the operating systems listed
below.
Hardware Operating System
•PC with an Intel® Pentium®
processor or equivalent and a hard
disk drive
• 32 MB RAM or higher, depending
on the operating system
• Windows
• Windows
®
98/Me
®
2000/XP
• USB version 1.1 interface
2
Page 3
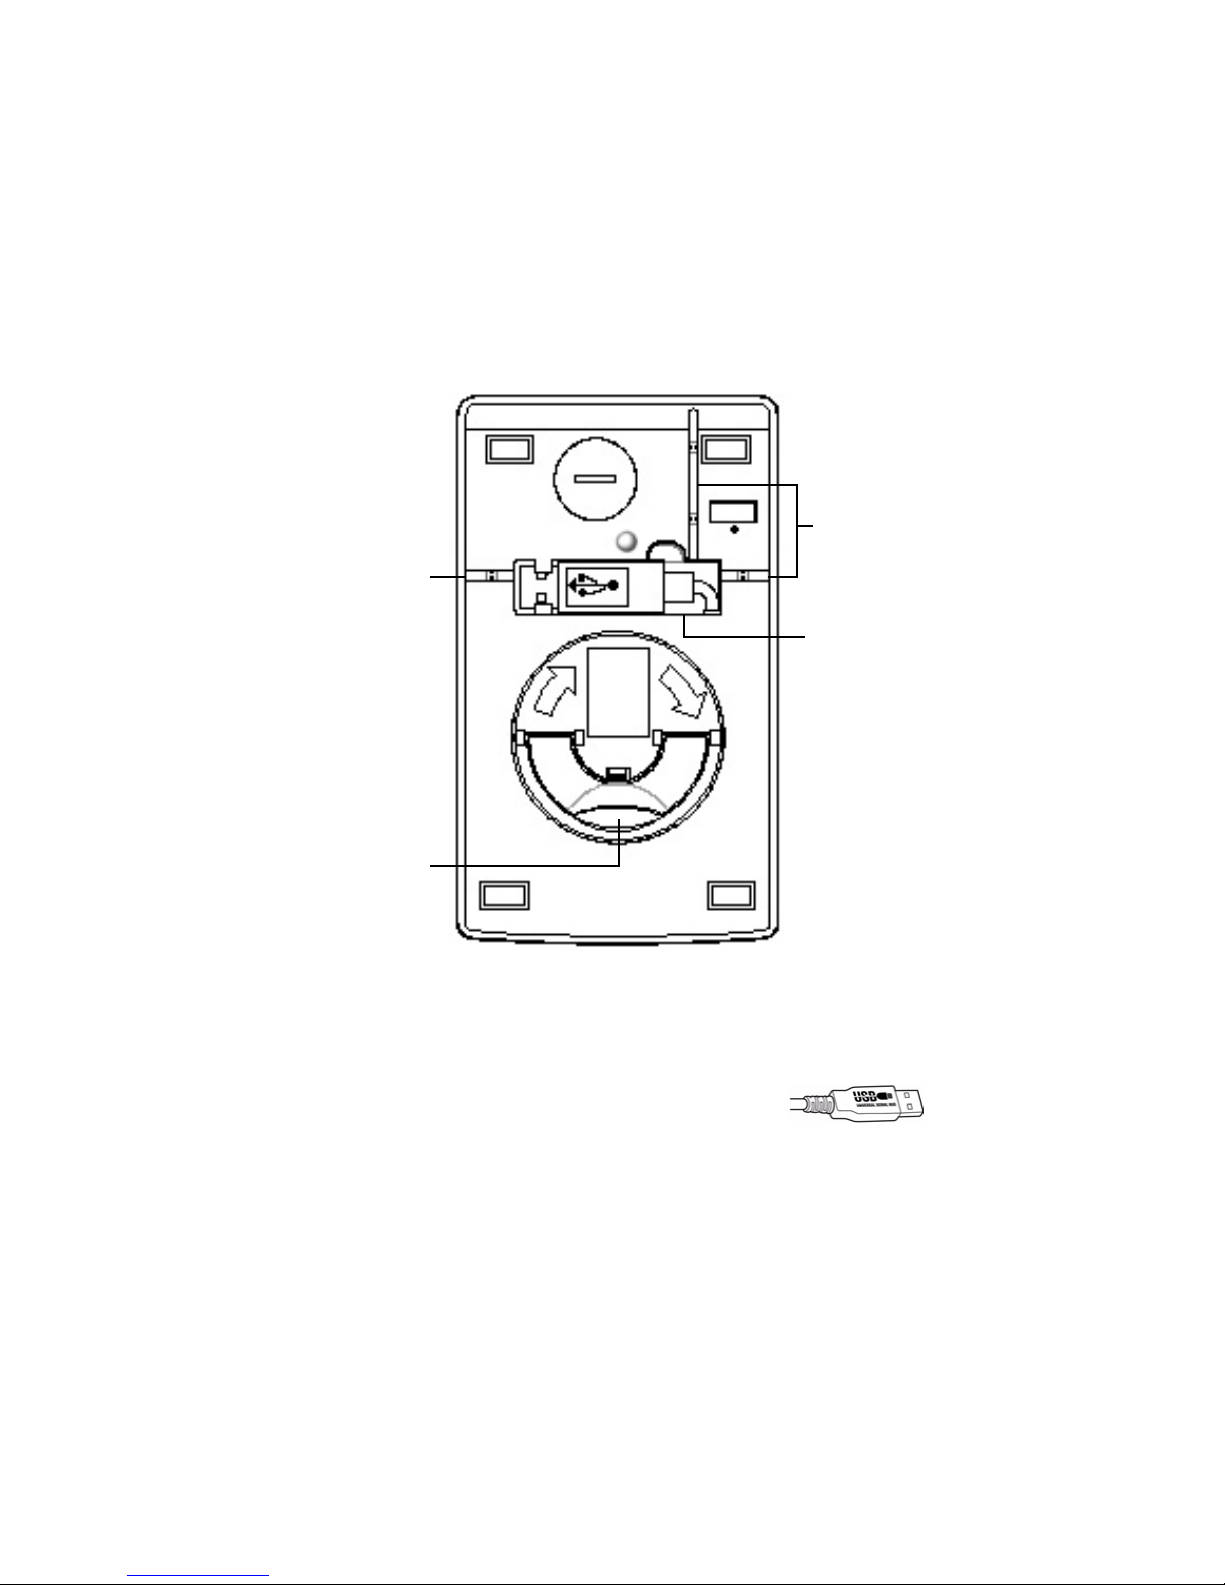
Connecting the Calculator Keypad
to Your Computer
1 Turn off your computer (if it’s turned on).
2 Remove the USB connector from its recess in the back of the
keypad and guide the cable through one of the three cable
grooves. Use the groove that is closest to your computer.
RESET
Cable
groove
Wheel
grip
USB Calculator/Keypad - back view
3 Extend the cable to the desired length.
Cable
grooves
USB connector
recess
4 Plug the standard USB end of the cable ( ) into an
available USB port on your computer.
You are now ready to turn on your computer and install the keypad
driver.
3
Page 4

Retracting the Cable
To store or transport the keypad or to use it as a calculator
independent of your computer, you can stow the cable and USB
connector in the back of the unit. To do this:
1 Unplug the USB connector from your computer’s USB port
(if connected).
2 On the back of the keypad, lift the wheel grip up.
3 Slowly turn the wheel in the direction of the arrows until the
cable is completely retracted.
4 Fit the USB connector back into its recess and press the wheel
grip down until it “clicks” into place.
Installing the Default Driver
After connecting the keypad to your computer, you are ready to
install the default driver supplied with the operating system. To do
this, follow the procedure listed below for your operating system.
Windows® 98/Me Operating Systems
1 Turn on your computer.
The Add New Hardware Wizard appears.
If it does not, the operating system has installed the default
driver automatically. No other steps are necessary.
2Click Next.
The locate driver screen appears.
3 Select “Search for the best driver for your device.
(Recommended),” and then click Next.
The wizard searches for the appropriate device driver.
4Click Next.
5Click Finish to complete the driver installation.
You are now ready to begin using your keypad.
4
Page 5

Windows® 2000/XP Operating Systems
1 Turn on your computer.
The Found New Hardware Wizard appears.
If it does not, the operating system has installed the default
driver automatically. No other steps are necessary.
2Click Next.
The wizard searches for the appropriate device driver.
3Click Next.
4Click Finish to complete the driver installation
You are now ready to begin using your keypad.
Using the USB Calculator/Keypad
Turning the Keypad Off and On
To turn on the keypad, press the CE/AC key, located directly
above the number seven key. The keypad starts in calculator mode
and displays “0.”
The keypad automatically turns itself off after three minutes and
50 seconds of non-operation. There is no “off” key.
Switching Between Calculator and Keypad Mode
This Targus accessory operates as a calculator or as a keypad.
When the device is in calculator mode, the LED indicator light,
located next to the NRC key, does not glow. When the device is in
keypad mode, the LED glows green. To switch between the two
modes, press the MODE key.
NOTE: The NumLock key on your computer will not affect the
NumLock status of the keypad.
5
Page 6

LED
M+
M–
MRC
TAB
MU
GT
+/–
%
MODE
SEND
Num
Lock
CE/AC
7
Home
456
/
8
*
9
↑
PgUp
←
123
End
0
Ins
↓
PgDn
.
Del
–
+
→
Enter
=
USB Calculator/Keypad - front view
Sending Calculation Results from the Calculator
to Your Computer
When the device is in calculator mode, you can send calculation
results to the cursor location in the active program on your
computer. To do this, after calculating your equation, press the
SEND key.
NOTE: The Send feature automatically sends all calculation
results as positive factors. To send a calculation result as a
negative factor, you must set the Send feature to negative
mode.
Sending Calculations with Negative Results to Your Computer
To set the Send feature to negative mode and send calculations
with negative results from the calculator to your computer:
1 Calculate your equation and press the MODE key so that the
LED glows green.
2 Enter the minus (-) symbol.
6
Page 7

3Press the SEND key.
The negative result now appears in the active program on
your computer.
USB Calculator/Keypad Keys
Function Keys
The following tables list the keypad’s keys and their functions.
Key Function
M+ Adds the displayed number into memory.
M- Subtracts the displayed number from memory.
MRC Pressing once transfers the memory contents onto the
display. Pressing a second time clears memory.
TAB Specifies the number of decimal places for rounding.
MU
(Mark Up)
Calculates price and percentage values based on
known factors.
Example 1: Calculate the selling price, where the
original cost is $100 and the margin on the sale price
is 20%.
Key Sequence: 100[/]20[MU]
Result: The selling price is $125
Example 2: Calculate the mark up percentage, where
the original cost is $100, the margin on the sale price
is 20% and the selling price is $125.
Key Sequence: 100[/]20[MU][MU]
Result: The mark up amout is $25
GT Displays the grand total memory.
% Performs percentages, mark up, mark down, ratio,
and rate of change calculations.
Extracts the square root of the displayed positive
number.
7
Page 8

Key Function
+/- Switches the displayed value between positive (+)
and negative (-).
Calculator mode – deletes the far right digit by
shifting the display value to the right.
Keypad mode – back space.
MODE Switches between calculator and keypad modes.
SEND Sends calculation results to your computer.
Keypad Keys
Key Function
NumLock
CE/AC
NOTE: The following keys work in conjunction with the
NumLock key.
7
Home
8
↑
9
PgUp
4
←
Power on
Calculator mode – Pressing once clears the entry.
Pressing a second time clears the operating register.
Keypad mode – NumLock.
NumLock on – enters “7” on the display.
NumLock off – emulates the Home key.
NumLock on – enters “8” on the display.
NumLock off – moves the cursor up one line of text.
NumLock on – enters “9” on the display.
NumLock off – emulates the Page Up key.
NumLock on – enters “4” on the display.
NumLock off – moves one character to the left of the
cursor position.
5 NumLock on – enters “5” on the display.
6
→
NumLock on – enters “6” on the display.
NumLock off – moves one character to the right of
the cursor position.
1
End
NumLock on – enters “1” on the display.
NumLock off – emulates the End key.
8
Page 9

Key Function
2
↓
NumLock on – enters “2” on the display.
NumLock off – moves the cursor down one line of
text.
3
PgDn
0
Ins
•
Del
NumLock on – enters “3” on the display.
NumLock off – emulates the Page Down key.
NumLock on – enters “0” on the display.
NumLock off – emulates the Insert key.
NumLock on – inserts a decimal point.
NumLock off – deletes a number.
USB Calculator/Keypad Display Screen
The keypad’s screen shows letters, numbers and other symbols
that display calculation results or the status or current function of
the keypad. The following tables list the keypad’s display
messages and what they mean.
Message Description
-MINUS Negative value
MEMORY Independent memory
ERROR Error
‘ 3-digit separator (apostrophe)
GT Grand total
Display Screen - Rounding Selector
Message Description
F Floating decimal point system, which displays the
value without rounding.
9
Page 10

Display Screen - Decimal Place Selector
Message Description
0, 2, 4 Number of decimal places for the 5/4 setting of the
Rounding Selector.
A The “Add Mode” automatically adds a decimal
point and two decimal places to all values, even if
you don’t input a decimal point. This mode is very
useful when performing calculations in dollars or
other currencies that require two decimal places. If
you press the DEL key while entering a value or
you are performing an operation other than
addition and subtraction, the calculator does not
add decimal spaces.
Replacing the Battery
NOTES: Battery life is normally two and a half years. However,
the factory installed battery discharges during shipment and
storage and may need replacing less than two and a half years
after you purchase the keypad.
If the battery is completely discharged, the keypad will work
from your computer’s power supply when connected to an
available USB port on your computer.
If the display becomes dim or difficult to read or if the display
remains blank after you press the CE/AC key, you may need to
replace the battery.
10
Page 11

To replace the battery:
1 Use a round object, such as coin, to open the battery cover on
the back of the unit.
Battery
cover
RESET
USB Calculator/Keypad - back view
2 Remove the old battery, insert a new one and close the battery
cover using the same round object.
Things to Remember
• Avoid using or storing the keypad in extreme temperatures. The
environmental specifications while operating are 32° to 104°
Fahrenheit (0° to 40° Celsius)
• If you use the keypad in a low temperature environment, the
display response may slow down or fail temporarily. For best
results, allow the keypad to reach room temperature before
using it.
• Avoid using or storing the keypad in dusty or humid
surroundings.
11
Page 12

• Never use pointed objects, such as a pen or pencil tip, to press
the keys on the keypad.
• To clean the keypad, use a soft cloth dampened with a dilute
solution of a mild detergent and water.
• Never expose the keypad to a direct flame, sunlight or other heat
source.
• Any attempt to disassemble, adjust or repair the keypad may
cause damage to the device and possibly void the warranty.
Specifications
Model
PAUK001 Version 3.0
Number of Digits
12
Memory
Independent and Grand Total Memory
Rounding
Selectable (floating-point, cut off, round off and Add Mode)
Number of Decimal Places
Selectable (0, 2, 4)
Power Consumption
160 MA
Power Supply Voltage
1.5 v (calculator mode, running on battery power only)
Battery Quantity/Type
One/A3, LR41 or V3GA “button” battery
12
Page 13

Battery Life
2 ½ years (approximately) based on use for one hour per day
Operating Temperature
32° to 104° Fahrenheit (0° to 40° Celsius)
Dimensions
1.17 x 3.88 x 6.34 inches (H x W x D)
(29.8 x 98.5 x 161 mm)
Weight
6.35 ounces (180g)
Technical Support
In the unlikely event that you encounter a problem with your
Targus accessory, please contact our technical support team at:
Email: techsupport@targus.com
Internet: http://www.targus.com/support.asp
Our knowledgeable staff is also available to answer your questions
through one of the following telephone numbers.
US
Monday through Friday, 8:00 a.m. (08:00) to 8:00 p.m. (20:00)
Eastern time: 800-283-6325
Canada
Monday through Friday, 9:00 a.m. (09:00) to 5:00 p.m. (17:00)
Eastern time: 888-827-4877
13
Page 14

Europe
Belgium +32 0 02-717-2451
Denmark +45 0 35-25-8751
France +33 0 1-64-53-9151
Germany +49 0 21-16-579-1151
Italy +39 0 24-827-1151
Netherlands +31 0 53-484-9470
Spain +34 0 91-745-6221
Sweden +46 0 8-751-4058
Switzerland +41 0 1-212-0007
United Kingdom +44 0 20-7744-0330
Eastern Europe & others +31 0 53-484-9479
Product Registration
For more efficient customer service and to activate the product’s warranty,
Targus recommends that you register your Targus accessory shortly after
purchasing it.
To register your Targus accessory, go to:
http://www.targus.com/registration.asp
You will need to provide your full name, email address, phone number, and
company information (if applicable).
Warranty
Targus warrants this product to be free from defects in materials and
workmanship for one year. If your Targus accessory is found to be defective
within that time, we will promptly repair or replace it. This warranty does
not cover accidental damage, wear and tear, or consequential or incidental
loss. Under no conditions is Targus liable for loss of, or damage to a
computer; nor loss of, or damage to, programs, records, or data; nor any
consequential or incidental damages, even if Targus has been informed of
their possibility. This warranty does not affect your statutory rights.
Warranty Registration at:
http://www.targus.com/registration.asp
14
Page 15

Regulatory Compliance
This device complies with Part 15 of the FCC Rules. Operation is subject to
the following two conditions: (1) This device may not cause harmful
interference, and (2) This device must accept any interference received,
including interference that may cause undesired operation.
FCC Statement
Tested to Comply
This equipment has been tested and found to comply with the limits of a
Class B digital device, pursuant to Part 15 of the FCC Rules. These limits
are designed to provide reasonable protection against harmful interference
in a residential installation. This equipment generates, uses, and can radiate
radio frequency energy and if not installed and used in accordance with the
instructions, may cause harmful interference to radio communications.
However, there is no guarantee that interference will not occur in a
particular installation.
If this equipment does cause harmful interference to radio or television
reception, which can be determined by turning the equipment off and on, the
user is encouraged to try to correct the interference by one or more of the
following measures:
• Reorient or relocate the receiving antenna
• Increase the separation between the equipment and receiver
• Move the computer away from the receiver
• Connect the equipment into an outlet on a circuit different from that to
which the receiver is connected.
Intel and Pentium are registered trademarks of Intel Corporation. Windows is a registered
trademark of Microsoft Corporation. All other trademarks are the property of their respective
owners.
15
 Loading...