

Page 1

USB 2.0
Laptop Docking
Station
with Video
USER GUIDE
Page 2

Table of Contents
English
USB 2.0 Laptop Docking Station With Video .............................2
Deutsch
USB 2.0 Laptop Dockstation mit Video ...................................21
Español
Docking Station USB 2.0 con Vídeo para portátiles ...............40
Français
Station d’accueil USB 2.0 avec vidéo pour ordinateur portable ..
..................................................................................................59
Italiano
Docking Station USB 2.0 per Notebook con Video .................78
Nederlands
USB 2.0 Koppelstation voor de Laptop met videotoepassingen ..
..................................................................................................97
Português
Base de Ligação USB 2.0 com Vídeo para PC Portátil ........116
1
Page 3

TARGUS USB 2.0
LAPTOP DOCKING
STATION WITH VIDEO
Introduction
Congratulations on your purchase of the Targus USB 2.0
Laptop Docking Station with Video. This portable
expansion module allows you to connect through a single
USB connection up to 4 USB devices, monitor, network
(Ethernet/LAN) connection, speakers and microphone.
The docking station also offers two, Targus Power Ports
providing twice the USB spec for high power devices,
and USB ports that are widely spaced for larger adapters.
Targus Always On provides power to the USB ports even
when the notebook is shut-down, disconnected from
the docking station or in hibernate/stand-by mode. This
allows USB devices that charge via the USB port to keep
charging under any circumstance as long as the AC
adapter is plugged in.
The Docking Station provides the
following ports:
• DVI Single Link (supports up to 2048 x 1152 at 32 bit color)
• Two 3.5 mm Audio: (1) stereo out (1) microphone in
• RJ-45 Ethernet 10/100
• Two USB 2.0 (White)
• Two USB Power Ports (Black) - providing current up to 1
Ampere
2
Page 4

Targus USB 2.0 Laptop Docking Station with Video
Package Contents
In addition to this user guide, the package contains:
• Targus USB 2.0 Laptop Docking Station with Video
• High-speed USB 2.0 upstream cable
• Driver software CD (mini CD)
• AC power adapter (required)
System Requirements
Hardware
• PC with an Intel® Pentium® processor or equivalent
• CD-ROM drive (support mini CD)
• USB version 2.0 port
• AC power source (AC adapter required)
Operating System
• Windows Vista® with Service Pack 1 (32-bit or 64-bit)
• Windows® XP with Service Pack 3
NOTE: WHEN CONNECTED TO A USB VERSION 1.1 PORT ON YOUR COMPUTER, THE
DOCKING STATION’S PERFORMANCE LEVEL WILL BE LESS THAN OPTIMAL AND THE
VIDEO PORT WILL NOT FUNCTION PROPERLY. FOR BEST RESULTS, CONNECT IT TO A
USB VERSION 2.0 PORT.
3
Page 5

Targus USB 2.0 Laptop Docking Station with Video
Installing the Device and Drivers
To use the Targus Docking Station, you must first install the driver
onto your computer. Then, connect the docking station to your
computer and Windows plug-and-play will install the hardware
drivers for each port.
WARNING: YOU MUST INSTALL THE DOCKING STATION SOFTWARE
BEFORE CONNECTING IT TO YOUR COMPUTER. OTHERWISE, THE
DOCKING STATION WILL NOT WORK PROPERLY.
Installing the Docking Station Driver
Installing the docking station driver enables your operating system
to recognize the docking station and its ports once it’s connected.
1 Turn on your computer.
2 Insert the driver software CD into your computer’s CD-ROM
drive.
If setup does not begin automatically, click Start, Run, and
enter D:\Setup.exe (where D: is the path of your CD-ROM
drive) and then click OK.
3 Follow any on-screen instructions to complete the installation.
4 Click Finish and restart your computer when prompted.
4
Page 6

Targus USB 2.0 Laptop Docking Station with Video
Connecting the Docking Station to Your
Computer
After installing the docking station software, you are ready to con-
nect the docking station to your computer. To do this:
1 Connect the supplied AC power adapter to the AC power jack
on the docking station.
2 Connect one end of the USB cable to the docking station and
the other end into an available USB 2.0 port on your computer.
WARNING: THE DOCKING STATION WILL NOT FUNCTION PROPERLY
WITHOUT THE AC ADAPTER PLUGGED INTO AN AC OUTLET.
DO NOT CONNECT ANY DEVICES TO THE DOCKING STATION UNTIL
THE INSTALLATION IS COMPLETED.
5
Page 7

Targus USB 2.0 Laptop Docking Station with Video
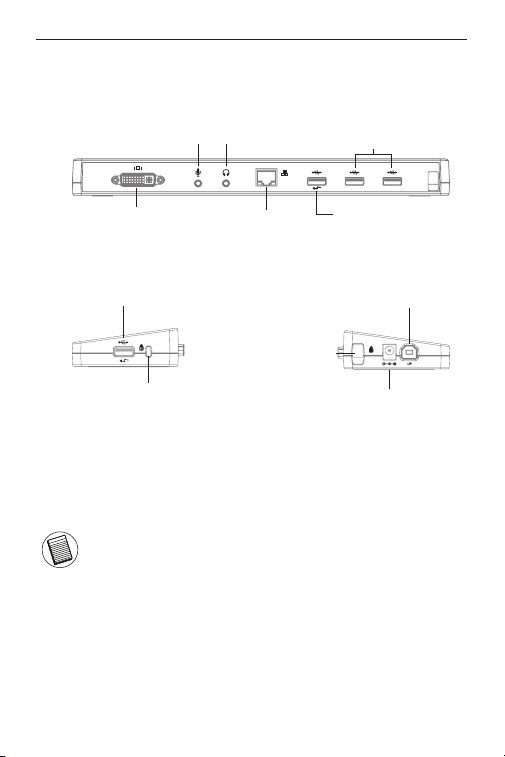
Docking Station Ports
Audio In (MIC)
DVI
High Power USB
Ports (BLACK)
Standard lock slot
Audio Out (SPK)
Network
Cable
Back View
Lock loop
USB Ports
(White)
High Power USB
Ports (BLACK)
USB to PC
Connection
D C 5 V
AC adapter
Right side Left side
• Green Tx light illuminates when connected to a network and the
yellow Rx light flashes when data is transmitting to or from the
network.
NOTE: THE DOCKING STATION SUPPORTS HOT SWAPPING OF THE NETWORK CABLE.
6
Page 8

Targus USB 2.0 Laptop Docking Station with Video
Connecting New Devices
To avoid possible damage when connecting a new device, do not
force the cable connector into the port on the docking station. If the
cable connector does not attach smoothly, turn the connector over
and try attaching it again.
Connecting to a Local Area Network
To connect an ethernet cable with RJ-45 connect, attach the cable
connector to the ethernet/network port on the docking station. Additional procedures to connect to an actual network depend on the
type of network you are using. Contact your network administrator
for detailed instructions.
Connecting a USB Device
To connect a USB device, plug it into a USB port on the docking station and follow the additional instructions provided with the
device. All four USB ports meet USB hi-speed requirements by
providing 480Mbps through-put and 500mA of power.
However, the two black USB ports have two unique features. See
“Targus Always On” more details.
The white USB ports are high-speed ports that provide standard
500mA of power. The black USB power ports are high-speed ports
that provide up to 1Amp.
Connecting and Configuring an Audio Device
1. Plug your headphones or speakers into the green 3.5mm
Audio Out port on the docking station.
2. To connect a microphone, plug it into the mono Audio In port.
3. The sound and mic should come out automatically when you
plug the docking station. Make sure that both speaker and
micphone volume is not set to MUTE.
4. To manually enable your headphones or speakers in case
automatic transfer is not possible
7
Page 9

Targus USB 2.0 Laptop Docking Station with Video
For Windows XP
Go to the Control Panel and choose Sound and Audio.
Select the Audio tab. Under Sound Playback, change Pre-
ferred Device to USB Multimedia Audio Device from the
drop down list.
• Click Apply, then click OK.
For Windows Vista
Go to the Control Panel and select Sound. Under the Play-
back tab, check that USB Audio Device is set as the default.
If it is, click OK. If it isn’t, select it, click Set Default, then
click OK.
NOTE: AUDIO DEVICES WILL NOT WORK SIMULTANEOUSLY ON THE PORT STATION AND
THE HOST COMPUTER
CAUTION: ALL AUDIO OR MULTIMEDIA APPLICATIONS MUST BE TERMINATED BEFORE
SWITCHING BETWEEN THE PORT STATION AUDIO OUTPUT AND THE HOST COMPUTER
AUDIO OUTPUT.
Connecting to a Monitor or LCD
Any monitor or LCD connected to the video port of the docking
station will be limited to a maximum resolution of 2048 x 1152 at
32 bit color
NOTE: THE MAXIMUM RESOLUTION OF 2048 x 1152 IS ONLY SUPPORTED IF THE
MONITOR OR LCD IS PLUGGED INTO THE DOCKING STATION BEFORE CONNECTING THE
DOCKING STATION TO THE NOTEBOOK. IF THE MONITOR OR LCD IS PLUGGED INTO THE
DOCKING STATION AFTER THE DOCKING STATION IS CONNECTED TO THE NOTEBOOK,
THE RESOLUTION IS SET TO 1024 X 768.
8
Page 10

Targus USB 2.0 Laptop Docking Station with Video
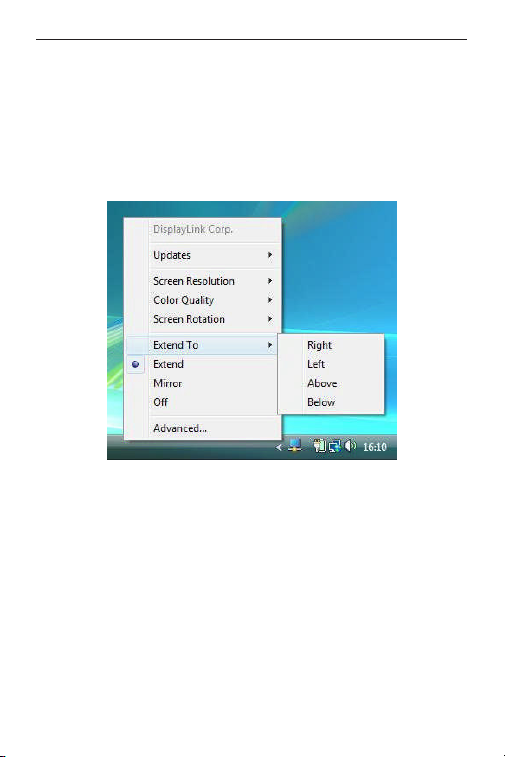
Controlling the Display using Docking
Station’s Video Menu Options
Video menu options can be accessed by right-clicking on the Docking Station icon in the system tray or through the Windows Display
Properties.
9
Page 11
Targus USB 2.0 Laptop Docking Station with Video
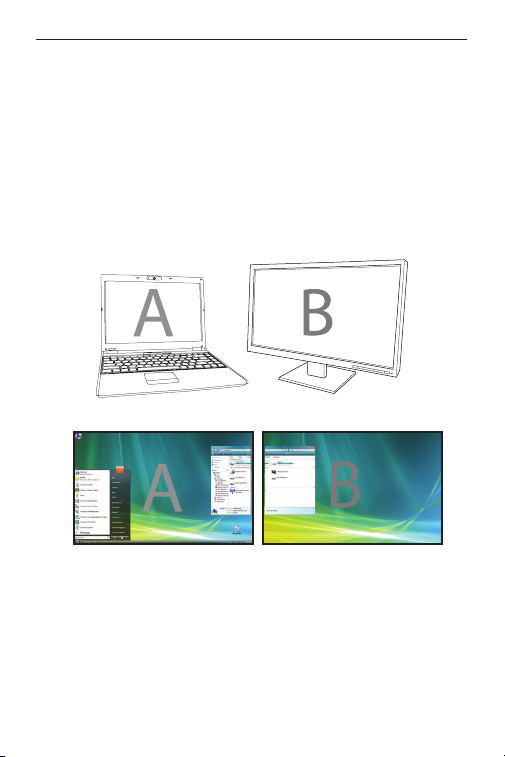
Extend: You are using your notebook screen as your primary display and your monitor or LCD is a secondary screen.
To set the display into this mode, select ‘Extend’ in the Docking
Station Icon application menu. The device will now be extending in the direction it was the last time the display was in this
mode. For more control, navigating to the ‘Extend To’ submenu
and selecting one of the options will not only put the device
into extend mode, but will also place it to the Left/Right/Above/
Below the main (primary) monitor.
Extend Mode
10
Page 12

Targus USB 2.0 Laptop Docking Station with Video
Mirror: You are using your notebook screen as your primary display and your monitor or LCD replicates your notebook screen.
To set the display into this mode, simply select ‘mirror’ from the
docking station icon application menu. The resolution, colour
depth and refresh rate of the primary screen are replicated on
the monitor connected to the docking station graphics adapter.
NOTE: IF THE MONITOR CONNECTED TO THE DOCKING STATION SUPPORTS A LOWER
RESOLUTION THAN THE PRIMARY PICTURE FITS ON THE EXTERNAL SCREEN. WHERE
THE MONITOR CONNECTED TO THE DOCKING STATION IS OF A LARGER SIZE THAN THE
PRIMARY SCREEN THE IMAGE WILL BE LETTER-BOXED TO KEEP THE ASPECT RATIO
CORRECT.
Mirror
11
Page 13

Targus USB 2.0 Laptop Docking Station with Video
Off: You are using your notebook screen as your primary display
and your monitor or LCD is turned off.
Off
12
Page 14
Targus USB 2.0 Laptop Docking Station with Video
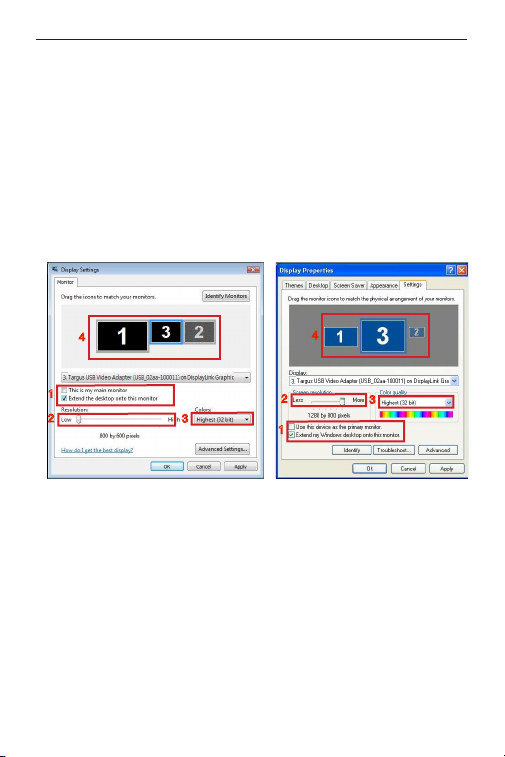
Controlling the Display using Windows
Display Properties
Docking Station’s video setting can also be configured from the
Windows Display Properties dialog box. To do this on Windows Vis-
ta, right click on the desktop, click on “Personalize” and then select
the ‘Display Settings’ link. The corresponding feature is available in
Windows XP by right clicking on the desktop, selecting ‘Properties’
and then navigating to the ‘Settings’ tab.
4
1
2
3
Windows Vista
4
2
1
3
Windows XP
Figure 1
Extend Mode: To set the display into this mode, check the box
marked ‘Extend my Windows desktop onto this monitor’ (1 in Figure 1). Arrange screen resolution and colour quality using the ap-
propriate controls (2 and 3), and arrange its position with respect
to the other monitors on the extended desktop in using the drag
area (4).
13
Page 15
Targus USB 2.0 Laptop Docking Station with Video
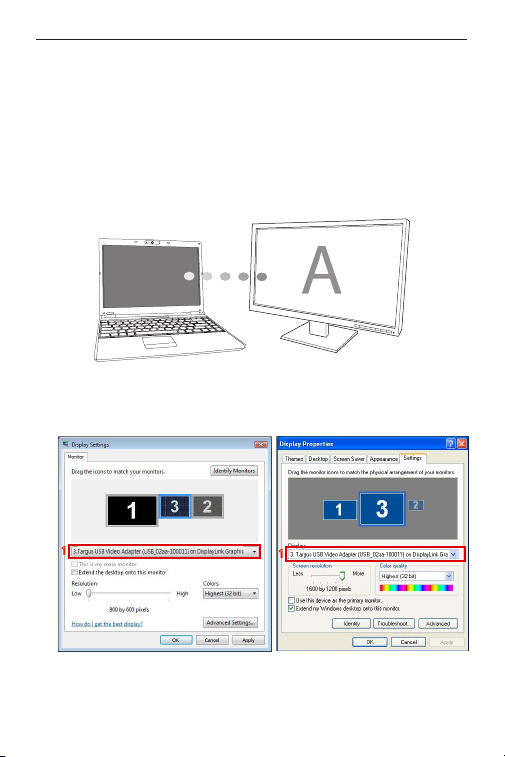
Mirror Mode: To set the display into mirror mode, simply uncheck
the box marked ‘Extend the desktop onto this monitor’ (1 in Figure
1 on previous page.).
Setting the Primary Display: To make the monitor attached to
the Docking Station as the primary display, follow the instructions
below:
1. In Display Properties window, using the drop down list, select the
monitor that is attached to the Docking Station.
1
Windows Vista
1
Windows XP
14
Page 16

Targus USB 2.0 Laptop Docking Station with Video
2. After selecting the corresponding monitor, check the box next to
“extend the desktop onto this monitor” (for Vista) or “extend my
Windows desktop onto this monitor” (for XP).
2
2
Windows Vista
Windows XP
3. Then, check the box next to “This is my main monitor” (for Vista)
“ Use this device as the primary monitor” (for XP).
3
3
Windows Vista
Windows XP
4. Click “Apply”.
15
Page 17
Targus USB 2.0 Laptop Docking Station with Video
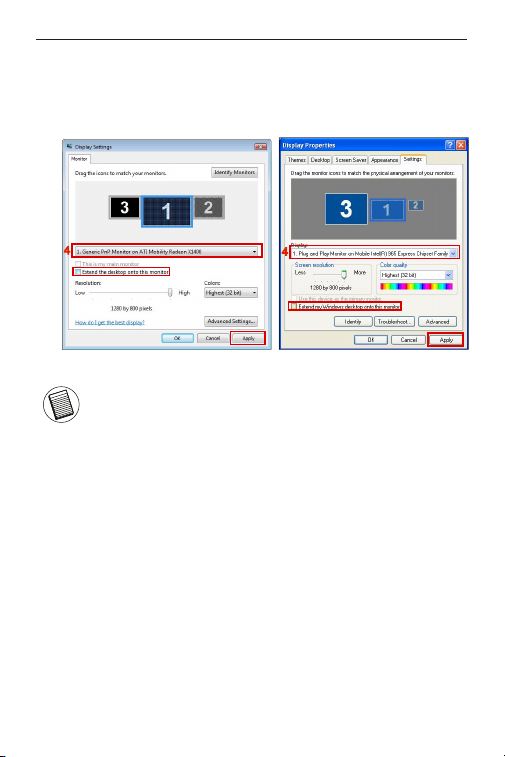
5. Select the Laptop monitor using the drop down list and uncheck
the box “extend the desktop onto this monitor” (for Vista) or “ Extend my Windows desktop onto this monitor” (for XP) and click
“Apply”
4
Windows Vista
NOTE: IT IS POSSIBLE TO WORK MORE CONVENIENTLY WITH A LAPTOP BY SETTING ITS
ACTION ON LID CLOSED TO ‘DO NOTHING’ AND SETTING THE DOCKING TO PRIMARY
MODE. THE LAPTOP LID CAN THEN BE CLOSED AND THE LAPTOP USED WITH THE EXTERNAL KEYBOARD AND MOUSE.
4
Windows XP
The monitor attached to the Docking Station stays primary if the PC
enters hibernate or suspend mode or is rebooted. If the Docking
Station is detached, the laptop’s display becomes primary again.
Upon reconnection, the monitor attached to the Docking Station
will return to primary mode.
16
Page 18

Targus USB 2.0 Laptop Docking Station with Video
Automatic Updates
Automatic Updates is a product maintenance feature from DisplayLink. The automatic update mechanism ensures that the Docking
Station’s graphics Adapter has the most up-to-date drivers and
software, providing the user with increased performance and stability.
Disconnecting the Docking Station
If the Docking Station is powered off or the USB cable is removed
from the computer, the display blanks. All windows and icons will
shift to the primary screen.
On reconnection or powering up of the Docking Station, the display
returns to the same mode as it was before disconnection. However,
windows and icons that were previously on the screen will not be
moved back.
Targus Always On
Targus Always On enables the black USB ports to continue providing power even when the laptop is powered down or disconnected from the docking station. This allows you to charge the batteries
of any USB rechargeable accessory you may have connected.
Using USB Devices That Require More
Power
Some devices, which use large amounts of power, such as printers
and optical drives, should be plugged into the USB Power Ports.
These ports will provide up to 1000mA of power - double the power
on standard USB ports.
17
Page 19

Targus USB 2.0 Laptop Docking Station with Video
Supported Resolution
Resolution Refresh Rates available at 32 bit
640 x 480 60 67 72 75 85
720 x 480 50 60
768 x 576 50 60
800 x 600 56 60 72 75 85
832 x 624 75
800 x 480 60
848 x 480 60
1024 x 600 60
1024 x 768 60 70 72 85
1152 x 864 75
1152 x 870 75
1280 x 720 50 60
1280 x 800 60 75 85
1280 x 960 60
1280 x 1024 60 75
1360 x 768 60
1366 x 768 60 75 85
1400 x 1050 60
1440 x 900 60
1600 x 1200 60
1680 x 1050 60
1920 x 1080 50 60
1920 x 1200 60
2048 x 1152 60
Actual support resolutions area depend on the support of connected monitor.
18
Page 20

Targus USB 2.0 Laptop Docking Station with Video
Troubleshooting
Device Not Working
• Make sure that the device is fully inserted into the correct port on
the docking station.
• Plug the device into a different port on the docking station. If it
still doesn’t work, test the device by connecting it directly to your
computer.
• Verify that you ran the Setup or Install program for the device.
• Make sure that the device appears in Device Manager. For more
information refer to “Verifying Devices are Installed”
• Disconnect all devices from the docking station and reconnect
them, one at a time. Check that each device works before plugging in the next one.
• Each USB port is equipped with over-current protection. Should a
USB device draw more current than the USB port can supply, the
port will shut down. To re-enable the port, unplug the device and
go to Device Manager or to the message in the system tray and
choose the Reset option. You can then plug the device back into
the USB port. If a shut down reoccurs, check the power requirements of the device.
Product Limitations
Some devices may halt temporarily when a high data transfer is
occurring. For example, your mouse may respond slowly while a
graphic print job is printing or while you are experiencing heavy
network traffic. We recommend the following guidelines:
• Do not transfer data to or from multiple high-speed devices, such
as a digital camera or scanner, at the same time.
• If speed degradation does occur, close other programs that use a
USB device to improve device performance.
19
Page 21

Targus USB 2.0 Laptop Docking Station with Video
Verifying Devices are Installed
You can view the devices installed on the docking station from
the Device Manager window in System Properties. Right-click My
Computer, Properties, then click the Hardware tab, and then the
Device Manager button.
From the Device Manager window, expand the following:
• Display Adapters:
- Displaylink Graphic Adapter (XP only)
- Displaylink Mirror Adapter (XP only)
• Network Adapters:
- High speed USB Ethernet Adapter
• Sound, Video and Game Controllers:
- USB Audio Device
• USB Display Adapters
- Targus USB Video Adapter
• Monitor
- Targus USB Video Adapter
FAQ - DisplayLink
DisplayLink provides this support website to help answer questions. This may answer any questions you may have.
http://www.displaylink.com/support/index.php
20
Page 22

TARGUS USB 2.0
LAPTOP DOCKSTATION
MIT VIDEO
Einführung
Vielen Dank, dass Sie sich für die Targus USB 2.0
Dockstation mit Video entschieden haben. Dieses
tragbare Erweiterungsmodul erlaubt Ihnen, bis zu 4
USB-Geräte, Monitor, Netzwerkanschluss (Ethernet/
LAN), Lautsprecher und Mikrofon über einen einzigen
USB-Anschluss anzuschließen. Die Dockstation bietet
Ihnen auch zwei Targus Power Ports, die doppelte
USB-Leistung liefern, und USB Ports mit breiteren
Zwischenräumen für größere Adapter. Targus Always On
beliefert die USB Ports sogar dann mit Energie, wenn das
Notebook ausgeschaltet, von der Dockstation getrennt
oder im Ruhe-/Standbymodus ist. Das ermöglicht es
USB-Geräten, die über den USB Port laden, unter allen
Umständen weiter zu laden, solange der Wechselstrom-
Adapter eingesteckt ist.
Die Dockstation ist mit folgenden
Ports ausgestattet:
• DVI Single Link (unterstützt bis zu 2048 x 1152 bei 32 bit
color)
• Zwei 3.5 mm Audio: (1) Stereoausgang (1) Microfoneingang
• RJ-45 Ethernet 10/100
• Zwei USB 2.0 (Weiß)
• Zwei USB Stom- Ports (Schwarz) - liefern Spannung bis zu
1Ampere
21
Page 23

Targus USB 2.0 Laptop Docking Station with Video
Packungsinhalt
Zusätzlich zu dieser Bedienungsanleitung enthält die Verpackung:
• Targus USB 2.0 Laptop Dockstation mit Video
• Hochgeschwindigkeits- USB 2.0 Upstream-Kabel
• Treibersoftware CD (mini CD)
• Wechselstromadapter (benötigt)
Systemanforderungen
Hardware
• PC mit Intel® Pentium® Prozessor oder gleichwertig
• CD-ROM Laufwerk (mini CD unterstützend)
• USB Port Version 2.0
• Wechselstromquelle (Wechselstromadapter nötig)
Betriebssystem
• Windows Vista® with Service Pack 1 (32-bit or 64-bit)
• Windows® XP with Service Pack 3
HINWEIS: IST DIE DOCKSTATION AN EINEN USB-ANSCHLUSS VERSION 1.1 AN IHREM
COMPUTER ANGESCHLOSSEN, IST IHR LEISTUNGSVERMÖGEN NICHT OPTIMAL UND
DER VIDEOPORT FUNKTIONIERT NICHT ORDNUNGSGEMÄSS. SCHLIESSEN SIE, UM
BESTE ERGEBNISSE ZU ERZIELEN, DIE DOCKSTATION AN EINEN USB PORT VERSION
2.0 AN.
22
Page 24

Targus USB 2.0 Laptop Docking Station with Video
Gerät und Treiber installieren
Um die Targus Dockstation nutzen zu können, müssen Sie zuerst
den Treiber auf Ihrem Computer installieren. Schließen Sie die
Dockstation an Ihren Computer an, und Windows Plug-and-Play
wird die Hardwaretreiber für jeden Port installieren.
WARNUNG: SIE MÜSSEN DIE SOFTWARE FÜR DIE DOCKSTATION INSTALLIEREN, BEVOR SIE SIE AN DEN COMPUTER ANSCHLIESSEN. ANDERNFALLS ARBEITET DIE DOCKSTATION NICHT ORDNUNGSGEMÄSS.
Treiber für Dockstation installieren
Die Installation der Dockstation-Treiber ermöglicht es Ihrem
Betriebssystem, die Dockstation und ihre Ports zu erkennen, wenn
sie angeschlossen ist.
1 Schalten Sie Ihren Computer ein.
2 Legen Sie die CD mit der Treibersoftware in das CD-ROM-
Laufwerk Ihres Computers ein.
Sollte die Einrichtung nicht automatisch beginnen, klicken Sie
Start, Ausführen und und rufen Sie D:\Setup.exe auf (wenn D:
der Pfad Ihres CD-ROM-Laufwerks ist), und klicken Sie dann
OK.
3 Folgen Sie den Anweisungen auf dem Bildschirm, um die
Installation fertig zu stellen.
4 Klicken Sie Fertigstellen und starten Sie den Computer neu,
wenn Sie dazu aufgefordert werden.
23
Page 25

Targus USB 2.0 Laptop Docking Station with Video
Anschluss der Dockstation an den
Computer
Nach der Installation der Dockstation-Software können Sie die
Dockstation an den Computer anschliessen. Um das zu tun:
1 Schließen Sie den mitgelieferten Wechselstromadapter an die
Wechselstrombuchse der Dockstation an.
2 Verbinden Sie das eine Ende des USB-Kabels mit der Docksta-
tion, und das andere Ende mit einem freien USB Port an Ihrem
Computer.
WARNUNG: DIE DOCKSTATION WIRD NICHT ORDNUNGSGEMÄSS
ARBEITEN, WENN DER WECHSELSTROMADAPTER NICHT IN EINE
WECHSELSTROMSTECKDOSE EINGESTECKT IST.
SCHLIESSEN SIE KEINE GERÄTE AN DIE DOCKSTATION AN, BEVOR
DIE INSTALLATION FERTIGGESTELLT IST.
24
Page 26
Targus USB 2.0 Laptop Docking Station with Video
Ports der Dockstation
Audioausgang
Audioeingang
(MIC)
(LAUTSPRECHER)
USB Ports
(Weiß)
DVI
Netzwerkkabel
Hochleistungs-USB
Ports (SCHWARZ)
Hochleistungs-USB
Ports (SCHWARZ)
Rückansicht
Anschluss USB
zu PC
D C 5 V
Schloss-Öse
Standard Steckplaz
für ein Schloss
Wechselstromadapter
Rechte Seite Linke Seite
• Das grüne Tx-Licht leuchtet, wenn Anschluss an ein Netzwerk
besteht, und das gelbe Rx-Licht blinkt, wenn Daten vom oder
zum Netzwerk übertragen werden.
HINWEIS: DIE DOCKSTATION UNTERSTÜTZ HOT SWAPPING DES NETZWERKKABELS.
25
Page 27

Targus USB 2.0 Laptop Docking Station with Video
Anschluss neuer Geräte
Zwingen Sie, um mögliche Beschädigungen beim Anschluss eines
neuen Gerätes zu vermeiden, den Kabelstecker nicht mit Gewalt in den
Port der Dockstation. Lässt sich der Kabelstecker nicht problemlos ein-
stecken, drehen Sie ihn um und versuchen Sie es erneut.
Anschluss an ein Lokales Netztwerk
(Local Area Network)
Um ein Ethernetkabel mit RJ-45-Stecker anzuschließen, stecken Sie
den Kabelstecker in den Ethernet/Netzwerkport der Dockstation ein. Die
weiteren Schritte zur Verbindung mit einem realen Netzwerk hängen
davon ab, welche Art von Netzwerk Sie verwenden. Wenden Sie sich an
Ihren Netzwerk-Administrator, um detaillierte Informationen zu erhalten.
Anschluss eines USB Gerätes
Um ein USB Gerät anzuschliessen, stecken Sie dieses in einen USB
Port der Dockstation ein und folgen Sie den weiteren Anweisungen
für das jeweilige Gerät. Alle vier USB Ports erfüllen die USB- Hochgeschwindigkeitsanforderungen durch Lieferung von 480Mbps
Die beiden schwarzen USB Ports allerdings haben zwei einzigartige
Eigenschaften. Sehen Sie unter “Targus Always On” nach, um mehr
zu erfahren.
Die weißen USB Ports sind Hochgeschwindigkeitsports, die die Standardleistung von 500mA liefern. Die schwarzen USB Power Ports sind
Hochgeschwindigkeitsports, die bis zu 1Ampere liefern.
Anschluss und Konfiguration eines Audiogerätes
1. Stecken Sie Kopfhörer oder Lautsprecher in den grünen
3.5mm Audioausgang-Port der Dockstation ein.
2. Ein Mikrofon können Sie über den Port Mono-Audioeingang
anschließen.
3. Die Ausgabe von Ton und Mikrofon sollte automatisch erfolgen, wenn Sie die Dockstation einstecken. Vergewissern
Sie sich, dass die Lautstärke für Lautsprecher und Mikrofon
nicht auf STUMM steht.
4. Manuelle Aktivierung von Kopfhörern oder Lautsprechern
für den Fall, dass automatische Übertragung nicht möglich
ist
26
Page 28

Targus USB 2.0 Laptop Docking Station with Video
Bei Windows XP
Gehen Sie zu Systemsteuerung und wählen Sie Sounds und
Audiogeräte. Wählen Sie den Reiter Audio. Ändern Sie unter
Soundwiedergabe das Standardgerät von der Aufklappliste
zu USB Multimedia-Audiogerät.
• Klicken Sie Anwenden, dann OK.
Bei Windows Vista
Gehen Sie zu Systemsteuerung und wählen Sie Sound.
Prüfen Sie unter dem Reiter Wiedergabe, ob das USB Audiogerät voreingestellt ist. Wenn ja, klicken Sie OK. Wenn nicht,
klicken Sie “Als Standard einrichten” und dann OK.
HINWEIS: AUDIOGERÄTE ARBEITEN NICHT GLEICHZEIZIG MIT DER PORTSTATION UND
DEM HAUPTRECHNER.
VORSICHT: ALLE AUDIO- ODER MULTIMEDIAANWENDUNGEN MÜSSEN BEENDET
WERDEN, BEVOR ZWISCHEN AUDIOAUSGABE DER PORTSTATION UND AUDIOAUSGABE
DES HAUPTRECHNERS UMGESCHALTET WIRD:
Anschluss an einen Monitor oder LCD
Jeder Monitor oder LCD, der an den Videoport der Dockstation
angeschlossen wird, ist auf eine maximale Auflösung von 2048 x
1152 bei 32 bit color begrenzt.
HINWEIS: DIE MAXIMALE AUFLÖSUNG VON 2048 x 1152 WIRD NUR DANN UNTERSTÜTZT, WENN DER MONITOR ODER LCD IN DIE DOCKSTATION EINGESTECKT WIRD, BEVOR
DIESE AN EIN NOTEBOOK ANGESCHLOSSEN WIRD. WIRD DER MONITOR ODER LCD IN
DIE DOCKSTATION EINGESTECKT, NACHDEM DIESE AN DAS NOTEBOOK ANGESCHLOSSEN WURDE, IST DIE AUFLÖSUNG AUF 1024 X 768 EINGESTELLT.
27
Page 29
Targus USB 2.0 Laptop Docking Station with Video
Kontrolle des Displays über die VideoMenüoptionen der Dockstation
Sie können die Video-Menüoptionen über Rechtsklick auf das
Symbol Dockstation im Systemordner oder über Windows Displayeigenschaften aufrufen.
28
Page 30

Targus USB 2.0 Laptop Docking Station with Video
Erweitert: Sie verwenden Ihren Notebookbildschirm als Primärdisplay, und Ihr Monitor oder LCD ist ein sekundärer Bildschirm.
Wählen Sie, um die Anzeige auf diesen Modus einzustellen,
“Erweitert” im Anwendungsmenü des Dockstationssymbols.
Das Gerät wird jetzt in die Richtung, in die es das letzte Mal,
als sich die Anzeige in diesem Modus befand, erweitert. Für
weitere Optionen navigieren Sie zum “Erweitern Auf”- Submenü. Die Wahl einer der Optionen dort führt das Gerät nicht
nur in den Erweiterungsmodus, sondern platziert es auch
Links/Rechts/Über/Unter dem Haupt-(Primär-) Monitor.
Erweiterungsmodus
29
Page 31

Targus USB 2.0 Laptop Docking Station with Video
Spiegel: Sie verwenden Ihren Notebookbildschirm als Primärdisplay und Ihr Monitor oder LCD reproduzieren den Notebookbild-
schirm.
Wählen Sie, um die Anzeige auf diesen Modus einzustellen,
einfach “Spiegel” im Anwendungsmenü des Dockstationssymbols. Auflösung, Farbtiefe Bildwiederholrate des Primärbildschirms werden auf dem Monitor, der an den Grafikadapter
der Dockstation angecshlos ist, reproduziert.
HINWEIS: WENN DER AN DIE DOCKSTATION ANGESCHLOSSENE MONITOR EINE NIEDRIGERE AUFLÖSUNG ALS DER PRIMÄRBILDSCHIRM UNTERSTÜTZT, WIRD DIE GRÖSSE
DES BILDES SO GEÄNDERT, DASS ES AUF DEN EXTERNEN BILDSCHIRM PASST. WENN
DER AN DIE DOCKSTATION ANGESCHLOSSENE MONITOR GRÖSSER ALS DER PRIMÄRBILDSCHIRM IST, WIRD DAS BILD ALS LETTERBOX-BILD ANGEZEIGT, UM DAS RICHTIGE
BILDSEITENVERHÄLTNIS ZU BEWAHREN.
Spiegel
30
Page 32

Targus USB 2.0 Laptop Docking Station with Video
Aus: Sie verwenden Ihren Notebookbildschirm als Primärbildschirm und Monitor oder LCD ist abgeschaltet.
Aus
31
Page 33

Targus USB 2.0 Laptop Docking Station with Video
Kontrolle des Displays über Windows
Displayeigenschaften
Die Videoeinstellung der Dockstation kann auch über die Dialog-
felder der Windows Grafikeigenschaften gesteuert werden. Bei
Windows Vista müssen Sie auf dem Desktop rechtsklicken, “An-
passen” klicken und wählen Sie “Grafikoptionen”. Die entsprechende Möglic hkeit haben Sie bei Windows XP, indem Sie auf dem
Desktop rechtsklicken, “Grafikeigenschaften” wählen und dann
zum Reiter “Displayeinstellungen” navigieren.
4
1
2
3
Windows Vista
4
2
1
3
Windows XP
Abbildung 1
Erweiterungsmodus: Um das Display auf diesen Modus
einzustellen, markieren Sie die Box “Windows Desktop auf diesen
Monitor erweitern” (1 in Abbildung 1). Passen Sie Auflösung und
Farbqualität mit den entsprechenden Kontrollen an (2 und 3) und
arrangieren Sie seine Position unter Berücksichtigung der anderen
Monitore in der Drag-Zone unter “Erweiterter Desktop” (4).
32
Page 34

Targus USB 2.0 Laptop Docking Station with Video
Spiegelmodus: Um das Display auf Spiegelmodus einzustellen,
entfernen Sie einfach die Markierung der Box “Desktop auf diesen
Monitor erweitern” (1 in Abbildung 1 auf der vorigen Seite).
Einrichtung des Primärdisplays: Folgen Sie den Anweisungen
unten, um den an die Dockstation angeschlossenen Monitor als
Primärdisplay einzurichten:
1. Wählen Sie den an die Dockstationen angeschlossenen Monitor
in der Aufklappliste im Fenster Grafikeigenschaften.
1
Windows Vista
1
Windows XP
33
Page 35

Targus USB 2.0 Laptop Docking Station with Video
2. Markieren Sie, nachdem Sie den entsprechenden Monitor
gewählt haben, die Box neben “Desktop auf diesen Monitor erweitern” (bei Vista) oder “Windows Desktop auf diesen Monitor
erweitern” (bei XP).
2
2
Windows Vista
Windows XP
3. Markieren Sie dann die Box neben “Mein Hauptmonitor” (bei
Vista), “Primärgerät” (bei XP)
3
3
Windows Vista
Windows XP
4. Klicken Sie “Anwenden”.
34
Page 36

Targus USB 2.0 Laptop Docking Station with Video
5. Wählen Sie den Laptopmonitor in der Aufklappliste und entfern-
en Sie die Markierung der Box “Desktop auf diesen Monitor erweitern” (bei Vista) oder “Windows Desktop auf diesen Monitor
erweitern” (bei XP) und klicken Sie “Anwenden”.
4
Windows Vista
HINWEIS: SIE KÖNNEN NOCH BEQUEMER MIT EINEM LAPTOP ARBEITEN, WENN SIE
SEINE AKTION BEIM SCHLIESSEN DES DECKELS AUF “NICHTS TUN” UND DIE DOCKSTATION AUF PRIMÄRMODUS STELLEN. DANN KÖNNEN SIE DEN LAPTOPDECKEL SCHLIESSEN UND DEN LAPTOP MIT EXTERNER TASTAUR UND MAUS VERWENDEN.
4
Windows XP
Der an die Dockstation angeschlossene Monitor bleibt der Primärmonitor, wenn er in den Ruhe- oder Schlafmodus übergeht oder
neu gestartet wird. Wird die Dockstation entfernt, wird das Display
des Laptop wieder zum Primärmonitor.
Bei Wiederanschluss wird der an die Dockstation angeschlossene
Monitor in den Primärmodus zurückkehren.
35
Page 37

Targus USB 2.0 Laptop Docking Station with Video
Automatische Updates
Automatische Updates sind eine Produktwartungsfunktion von
Display-Link. Der Automatische Updates-Mechanismus stellt sicher, dass der Grafikadapter der Dockstation über die modern-
sten Treiber und Software verfügt und dem Nutzer sich stetig ver-
bessernde Leistung und Stabilität bietet.
Abtrennung der Dockstation
Wird die Dockstation abgeschaltet oder das USB-Kabel vom Com-
puter getrennt, wird das Display gelöscht. Alle Fenster und Symbole werden auf den Primärbildschirm verschoben. Bei Wiederan-
schluss oder Einschalten der Dockstation geht die Anzeige in den
Modus, den sie vor der Abtrennung inne hatte, zurück. Allerdings
werden die vorher dort befindlichlichen Fenster und Symbole nicht
zurück verschoben.
Targus Always On
Targus Always On versetzt die schwarzen USB Ports in die
Lage, sogar dann weiter Energie zu liefern, wenn der Laptop ab-
geschaltet oder von der Dockstation getrennt ist. Das ermöglicht
Ihnen, die Batterien jedes aufladbaren Zubehörs, das Sie ang-
eschlossen haben, zu laden.
Verwendung von USB-Geräten, die mehr
Energie benötigen
Einige Geräte, die einen hohen Energiebedarf haben, wie Drucker und optische Laufwerke, sollten in die USB Power Ports eingesteckt werden. Diese Ports liefern bis zu 1000mA Energie - die
doppelte Energiemenge die gewöhnliche USB Ports liefern.
36
Page 38

Targus USB 2.0 Laptop Docking Station with Video
Unterstützte Auösung
Auflösung Bildwiederholungsrate bei 32 bit
640 x 480 60 67 72 75 85
720 x 480 50 60
768 x 576 50 60
800 x 600 56 60 72 75 85
832 x 624 75
800 x 480 60
848 x 480 60
1024 x 600 60
1024 x 768 60 70 72 85
1152 x 864 75
1152 x 870 75
1280 x 720 50 60
1280 x 800 60 75 85
1280 x 960 60
1280 x 1024 60 75
1360 x 768 60
1366 x 768 60 75 85
1400 x 1050 60
1440 x 900 60
1600 x 1200 60
1680 x 1050 60
1920 x 1080 50 60
1920 x 1200 60
2048 x 1152 60
Reale unterstützte Auflösungen sind von der Unterstützung des angeschlossenen Monitors abhängig.
37
Page 39

Targus USB 2.0 Laptop Docking Station with Video
Problemlösung
Das Gerät arbeitet nicht
• Stellen Sie sicher, dass das Gerät vollständig in den korrekten
Port der Dockstation eingesteckt ist.
• Stecken Sie das Gerät in einen anderen Port der Dockstation ein.
Wenn es immer noch nicht arbeitet, testen Sie das Gerät, indem
Sie es direkt an den
• Vergewissern Sie sich, dass Sie das Einrichtungs- oder Instal-
lationsprogramm für das Gerät durchgeführt haben.
• Stellen Sie sicher, dass das Gerät im Gerätemanager gelistet
ist. Weitere Informationen finden Sie unter “Sichern, dass Geräte
installiert sind”
• Trennen Sie alle Geräte von der Dockstation und verbinden Sie
sie dann wieder, jeweils eins zur Zeit. Prüfen Sie, dass jedes
Gerät arbeitet, bevor Sie das nächste anschließen.
• Jeder USB Port ist mit Überstromschutz ausgerüstet. Sollte ein
USB-Gerät mehr Strom ziehen, als der USB Port liefern kann,
schaltet sich der Port ab. Um den Port zu reaktivieren, müs-
sen Sie das Gerät trennen und den Gerätemanager oder die
Botschaft im Systemordner aufrufen und die Option Zurücksetzen wählen. Sie können dann das Gerät wieder in den USB Port
einstecken. Tritt wieder eine Abschaltung auf, überprüfen Sie die
Energieanforderungen des Gerätes.
Produktlimitierungen
Einige Geräte könnten zeitweilig stocken, wenn hoher Datentransfer auftritt. Zum Beispiel könnte Ihre Maus langsam ansprechen,
während ein grafischer Druckauftrag gedruckt wird oder wenn
reger Betrieb im Netzwerk herrscht. Wir empfehlen die folgenden
Rich
• Übertragen Sie keine Daten von oder zu mehreren Hochge-
schwindigkeitsgeräten, wie Digitalkameras oder Scanner, zur
gleichen Zeit.
• Wenn eine Verlangsamung auftritt, schließen Sie andere Pro-
gramme, die ein USB-Gerät verwenden, um die Leistung des
Gerätes
38
Page 40

Targus USB 2.0 Laptop Docking Station with Video
Sichern, dass Geräte installiert sind
Sie können die an der Dockstation installierten Geräte im Fenster Gerätemanager unter Systemeigenschaften einsehen. Re-
chtsklicken Sie Systemsteuerung, Eigenschaften, klicken Sie dann
den Reiter Hardware und dann den Button Gerätemanager.
Klappen Sie Flogendes im Fenster Gerätemanager auf:
• Displayadapter:
- Displaylink Grafikadapter (nur XP)
- Displaylink Spiegeladapter (nur XP)
• Netzwerkadapter:
- Hochgeschwindigkeits- USB Ethernet Adapter
• Sound, Video und Spielkontrollen:
- USB Audiogerät
• USB Displayadapter
- Displaylink USB zu DVI Adapter
• Monitor
- Displaylink USB zu DVI Adapter
FAQ - DisplayLink
DisplayLink stellt diese Support-Website zur Verfügung, um Ihnen
zu helfen, Ihre Fragen zu beantworten. Die website sollte alle Ihre
eventuellen Fragen beantworten.
http://www.displaylink.com/support/index.php
39
Page 41

TARGUS
DOCKING STATION USB 2.0
CON VÍDEO PARA
PORTÁTILES
Introducción
Enhorabuena por su compra de la Docking Station USB
2.0 con Vídeo para Portátiles de Targus. Este módulo
portátil de expansión le permite conectarse a través de una
simple conexión USB a hasta 4 dispositivos USB, monitor,
conexión a red (Ethernet/LAN), altavoces y micrófono.
La docking station, también ofrece dos Puertos de
Alimentación Targus, facilitando el doble de alimentación
USB para dispositivos de gran potencia, y con suficiente
separación entre los puertos USB para los adaptadores
de mayor tamaño. Targus Always On (Siempre Encendido),
suministra potencia a los puertos USB incluso cuando el
portátil está apagado, desconectado de la docking station
o en modo de hibernación/espera. Esto permite a los
dispositivos USB que cargan a través del puerto USB,
seguir cargando bajo cualquier circunstancia siempre y
cuando el adaptador de corriente CA esté enchufado a una
toma de corriente.
La Docking Station dispone de los
siguientes puertos:
• Conector DVI Simple (compatible con hasta 2048 x 1152 a 32
bits de color)
• Dos puertos Audio de 3.5 mm: (1) salida estéreo (1) entrada
de micrófono
• RJ-45 Ethernet 10/100
• Dos USB 2.0 (Blanco)
• Dos puertos USB de Alimentación (Negro) - suministran
40
Page 42

Targus USB 2.0 Laptop Docking Station with Video
Contenido de la Caja
Junto con esta guía de usuario, la caja contiene:
• Docking Station USB 2.0 con Vídeo para Portátiles de Targus
• Cable de alta velocidad USB 2.0
• CD con los drivers del software (mini CD)
• Adaptador de corriente CA (necesario)
Requisitos del Sistema
Hardware
• PC con un procesador Intel® Pentium® o equivalente
• Unidad CD-ROM (compatible con mini CD)
• Puerto USB versión 2.0
• Alimentación por Corriente Alterna (requiere adaptador de CA)
Sistema Operativo
• Windows Vista® con e l Paquete de Servicio 1 (32-bit o 64-bit)
• Windows® XP con el paquete de Servicio 3
NOTA: CUANDO SE CONECTE A UN PUERTO USB VERSIÓN 1.1 DE SU ORDENADOR, EL
NIVEL DE RENDIMIENTO DE LA DOCKING STATION SERÁ MENOR QUE EL ÓPTIMO Y EL
PUERTO PARA VÍDEO NO FUNCIONARÁ CORRECTAMENTE. PARA UN MEJOR RESULTADO, CONÉCTELO A UN PUERTO USB VERSIÓN 2.0
41
Page 43

Targus USB 2.0 Laptop Docking Station with Video
Instalar el Dispositivo y los Drivers
Para utilizar la Docking Station de Targus, deberá instalar primero
el driver en su ordenador. Luego conecte la docking station a
su ordenador y Windows plug-and-play instalará los drivers del
hardware para cada puerto.
ADVERTENCIA: DEBE INSTALAR EL SOFTWARE DE LA DOCKING STATION ANTES DE CONECTARLA A SU ORDENADOR, DE LO CONTRARIO
EL DISPOSITIVO NO FUNCIONARÁ CORRECTAMENTE.
Instalar el Driver de la Docking
Station
Instalar el driver de la Docking station permite que su sistema
operativo reconozca la docking station y sus puertos una vez sea
conectada.
1 Encienda su ordenador.
2 Inserte el CD de software del driver en la unidad CD-ROM
de su ordenador.
Si la configuración no se inicia automáticamente, haga clic en
Inicio, Ejecutar y entre en D:\Setup.exe (cuando la unidad D:
sea la unidad de su CD-ROM) y haga clic en OK.
3 Siga cualquier instrucción en pantalla para completar la
instalación.
4 Haga clic en Finalizar y reinicie su ordenador cuando se lo
indique.
42
Page 44

Targus USB 2.0 Laptop Docking Station with Video
Conectar la Docking Station a su
Ordenador
Después de instalar el software de la Docking Station, estará listo
para conectarla a su ordenador. Para efectuar esta operación:
1 Enchufe el adaptador de corriente alterna suministrado al
conector de CA de la docking station.
2 Conecte un extremo del cable USB a la docking station y el
otro extremo a un puerto USB 2.0 libre de su ordenador.
ADVERTENCIA: LA DOCKING STATION NO FUNCIONARÁ CORRECTAMENTE SI EL ADAPTADOR DE CORRIENTE NO ESTÁ ENCHUFADO A
UNA TOMA DE CORRIENTE CA.
NO ENCHUFE NINGÚN DISPOSITIVO A LA DOCKING STATION HASTA
QUE LA INSTALACIÓN HAYA FINALIZADO.
43
Page 45

Targus USB 2.0 Laptop Docking Station with Video
Puertos de la docking station
Entrada de
Audio (MIC)
DVI
Puertos USB de
Gran Potencia
(BLACK/Negros)
Salida de Audio
(SPK/Altavoz)
Cable de
Red
Lateral derecho
Bucle de
Puertos USB
(Blancos)
Puertos USB de
Gran Potencia
(BLACK/Negros)
Conexión
USB a PC
D C 5 V
cierre
Ranura estándar de
bloqueo
Adaptador de
Corriente Alterna
Vista Trasera Lateral izquierdo
• La luz Tx verde se ilumina cuando está conectado a la red y la
luz Rx verde parpadea cuando se está transmitiendo datos a, o
desde la red.
NOTA: LA DOCKING STATION PERMITE EL CAMBIO EN CALIENTE DEL CABLE DE RED.
44
Page 46

Targus USB 2.0 Laptop Docking Station with Video
Conectar Dispositivos Nuevos
Para evitar posibles daños cuando conecta un dispositivo nuevo,
no fuerce el conector del cable en el puerto de la docking station.
Si el conector del cable no encajase bien, déle la vuelta al conector
y pruebe a encajarlo otra vez.
Conectarse a una Red de Área Local
Para conectar un cable de red ethernet con conector RJ-45, introduzca el conector del cable al puerto de red ethernet/network de
la docking station. Los procedimientos adicionales para conectar a
una red dependerán del tipo de red que esté utilizando. Contacte
con su administrador de red para instrucciones detalladas.
Conectar un Dispositivo USB
Para conectar un dispositivo USB, enchúfelo en el puerto de acoplamiento y siga las instrucciones adicionales suministradas con
el dispositivo. Los cuatro puertos USB cumplen con los requisitos
de alta velocidad para USB ofreciendo 480 Mbps de tasa de trans-
ferencia y 500mA de potencia
No obstante, los dos puertos USB negros tienen dos característi-
cas únicas. Vea la sección Targus Always On (Siempre Encendido)
para mas detalles.
Los puertos USB blancos son puertos de gran velocidad que suministran 500mA de potencia. Los puertos USB negros de potencia
son puertos de gran velocidad que suministran hasta 1Amp.
Conectar y Configurar un Dispositivo Audio
1. Enchufe los auriculares o altavoces en el puerto Salida de
Audio verde de 3.5mm de la docking station.
2. Para conectar un micrófono, enchúfelo en el puerto monoaural de Entrada de Audio.
3. El sonido y micrófono saldrá automáticamente cuando enchufe la docking station. Asegúrese de que el volumen del
altavoz y del micrófono no esté SILENCIADO.
4. Para activar manualmente sus auriculares o altavoces, en
caso de que la transferencia automática no sea posible.
45
Page 47

Targus USB 2.0 Laptop Docking Station with Video
Para Windows XP
Vaya al Panel de Control y seleccione Sonido y Audio. Se-
leccione la lengüeta Audio. Bajo Reproducción de Sonido,
cambie el Dispositivo Preferido a “USB Multimedia Audio
Device”( Dispositivo Audio USB Multimedia) desde el menú
desplegadle.
• haga clic en Solicitud, luego haga clic en ACEPTAR.
Para Windows Vista
Vaya al Panel de Control y seleccione Sonido. Bajo la pestaña de reproducción, compruebe que el Dispositivo de Audio USB está configurado como predeterminado. Si lo está,
haga clic en Aceptar. De lo contrario, selecciónelo, haga clic
en Predeterminar y, a continuación, haga clic en Aceptar.
NOTA: LOS DISPOSITIVOS DE AUDIO NO FUNCIONARÁN SIMULTÁNEAMENTE EN LOS
PUERTOS DE LA DOCKING STATION Y EN EL ORDENADOR.
PRECAUCIÓN: TODAS LAS APLICACIONES DE AUDIO O MULTIMEDIA DEBEN CERRARSE
ANTES DEL CAMBIO ENTRE LOS PUERTOS DE SALIDA DE AUDIO DE LA DOCKING STATION Y LA SALIDA DE AUDIO DEL ORDENADOR HUÉSPED.
Conectarse a una pantalla o monitor LCD
Cualquier monitor o pantalla LCD conectada al puerto de vídeo de
la docking station se limitará a una resolución máxima de 2048 x
1152 para valores de color de 32 bits.
NOTA: LA MÁXIMA RESOLUCIÓN DE 2048 x 1152 SOLO PUEDE SER COMPATIBLE SI EL
MONITOR O PANTALLA LCD SE CONECTA A LA DOCKING STATION ANTES DE CONECTAR
DICHA ESTACIÓN AL PORTÁTIL.. SI EL MONITOR O PANTALLA LCD SE CONECTAN A
LA DOCKING STATION DESPUÉS DE CONECTAR LA ESTACIÓN BASE AL PORTÁTIL, LA
RESOLUCIÓN SE ESTABLECERÁ EN 1024 X 768.
46
Page 48

Targus USB 2.0 Laptop Docking Station with Video
Control de la Pantalla usando el menú de
opciones de video de la docking station
Para acceder al menú de opciones de vídeo se puede acceder
haciendo clic con el botón derecho sobre el icono de la docking
station en la bandeja del sistema o a través de la Propiedades de
Pantalla de Windows.
47
Page 49

Targus USB 2.0 Laptop Docking Station with Video
Extend (Ampliación): Usted está utilizando su ordenador portátil
como pantalla principal y la pantalla o monitor LCD como pantalla
secundaria.
Para configurar la pantalla en este modo, seleccione
“Extend”en el Icono del menú de aplicaciones de la docking
station. El dispositivo se extenderá en la dirección que la pan-
talla se configuró en este modo por última vez. Para un mayor
control, puede navegar al submenú “Extend To” (Extender a) y
seleccionando una de las opciones no solo pondrá el dispositi-
vos en modo extendido, sino que también podrá posicionar a la
Izquierda/Derecha/Arriba/Abajo el monitor principal.
Modo Extendido
48
Page 50

Targus USB 2.0 Laptop Docking Station with Video
Espejo: Está utilizando la pantalla de su portátil como su pantalla principal y su pantalla o monitor LCD replica la pantalla de
su portátil.
Para configurar la pantalla en este modo, basta con seleccio-
nar “mirror (espejo)” desde el icono del menú de aplicaciones
de la docking station . La resolución, profundidad de color y la
tasa de refresco de la pantalla principal se replican en el monitor conectado al adaptador de gráficos de la docking station.
NOTA: SI EL MONITOR CONECTADO A LA DOCKING STATION PERMITE UNA RESOLUCIÓN MENOR QUE LA PANTALLA PRIMARIA, LA IMAGEN SERÁ REAJUSTADA PARA
AMOLDARSE A LA PANTALLA EXTERNA. AQUÍ EL MONITOR CONECTADO A LA DOCKING
STATION ES DE MAYOR TAMAÑO QUE LA PANTALLA PRINCIPAL, POR LO QUE LA IMAGEN
SERÁ ENTONCES ACOTADA PARA MANTENER EL RATIO DE IMAGEN CORRECTO.
Espejo
49
Page 51

Targus USB 2.0 Laptop Docking Station with Video
Apagado: Esta utilizando la pantalla de su ordenador como dispositivo principal y su monitor LCD se encuentra apagado.
Apagado
50
Page 52

Targus USB 2.0 Laptop Docking Station with Video
Administrar la pantalla utilizando
Windows Display
La configuración de la docking station también puede ser administrada desde el cuadro de diálogo de las Propiedades de Pantalla
de Windows. Para hacer esto en Windows Vista, haga clic en el
botón derecho sobre el escritorio, haga clic en “Personalizar” y
luego seleccione el vinculo “Configuración de Pantalla”. La función
correspondiente está disponible en Windows XP haciendo clic en
el botón derecho en el escritorio, seleccionando “Propiedades” y, a
continuación, navegar a la pestaña ‘Configuración’.
4
1
2
3
Windows Vista
4
2
1
3
Windows XP
Figure 1
Modo extendido: Para configurar la pantalla en este modo, veri-
fique la casilla marcada Extender el escritorio en este monitor (1
en la Figura 1 en la pagina anterior). Seleccione la resolución de
pantalla y calidad de color usando los controles apropiados (2 y 3),
y configure su posición respectivamente, a los otros monitores en
el escritorio extendido ampliado en el uso de la zona arrastre (4).
51
Page 53

Targus USB 2.0 Laptop Docking Station with Video
Modo espejo: Para configurar la pantalla en el modo espejo, sim-
plemente quite la verificación de la casilla marcada. “Extender el
escritorio a este monitor” (1 en figura 1 de la pagina previa).
Seleccionando la Pantalla principal: Para seleccionar el monitor
conectado a la docking station como pantalla principal, siga las
siguientes instrucciones:
1. En la ventana de Propiedades de Pantalla, usando la lista
despegable, seleccione el monitor conectado la docking station.
1
Windows Vista
1
Windows XP
52
Page 54

Targus USB 2.0 Laptop Docking Station with Video
2. Después de seleccionar le correspondiente monitor, marque la
siguiente casilla junto a “extender el escritorio a este monitor”
(para Vista) o “extender mi Escritorio de Windows a este moni-
tor” (para XP).
2
2
Windows Vista
Windows XP
3. Seguidamente marque la casilla junto a “Este es mi moni-
tor principal” (para Vista)” Use este dispositivo como monitor
principal”(para XP).
3
3
Windows Vista
Windows XP
4. Pulse el botón “Aplicar”.
53
Page 55

Targus USB 2.0 Laptop Docking Station with Video
5. Seleccione el monitor del portátil usando la lista desple-
gadle y deseleccione la casilla “extender el escritorio a este
monitor”(para Vista) o “ Extender mi Escritorio de Windows a
este monitor” (para XP) y pulse el botón “Aplicar”
4
Windows Vista
NOTA: ES POSIBLE TRABAJAR DE FORMA MAS CÓMODA CON UN PORTÁTIL CON
LA TAPA CERRADA “NO HAGA NADA” Y PONGA LA DOCKING STATION COMO MODO
PRINCIPAL. LA TAPA DEL PORTÁTIL PUEDE ENTONCES CERRARSE Y EL PORTÁTIL SER
USADO CON UN RATÓN Y TECLADO EXTERNOS.
4
Windows XP
El monitor conectado a la docking station se establece como
primario si el PC entra en modo de hibernación, suspenso o se
reinicia. Si la docking station se desenchufa, la pantalla del portátil
pasa a ser primaria.
Al volver a conectar, el monitor enchufado a la docking station
volverá a aparecer en modo primario.
54
Page 56

Targus USB 2.0 Laptop Docking Station with Video
Actualizaciones Automáticas
Las actualizaciones automáticas son una característica de mantenimiento de producto de Display-Link. El mecanismo de actu-
alización automática asegura que el adaptador de gráficos de la
docking station tiene los drivers y software mas recientes, proporcionando al usuario un mayor rendimiento y estabilidad.
Desconectando la docking station.
Si la docking station se apaga o el cable USB se desconecta del
ordenador, la pantalla se queda en blanco. Todas las ventanas e
iconos cambiaran a la pantalla primaria. Al reconectar o al volver
a encender la docking station, la pantalla vuelve al mismo modo
que se encontraba antes de la desconexión. Sin embargo, las ventanas y los iconos que anteriormente en la pantalla no volverán a
la posición original.
Targus siempre encendido
Targus Always On permite a los puertos USB negros continu-
ar suministrando corriente eléctrica aun cuando el portátil esta
apagado o desconectado de la docking station. Esto le permite
cargar las baterías de cualquier accesorio USB que tenga conectado.
Utilizar dispositivo USB que requieran
mas potencia
Algunos dispositivos, que utilizan grandes cantidades de potencia,
como impresoras o dispositivos ópticos, deben ser conectados a
los puertos USB de Alimentación. Estos puertos proveen de hasta
1000mA de corriente - el doble de la corriente de un USB.
55
Page 57

Targus USB 2.0 Laptop Docking Station with Video
Resolución Soportada
Resolución Tasas de refresco a 32 bit
640 x 480 60 67 72 75 85
720 x 480 50 60
768 x 576 50 60
800 x 600 56 60 72 75 85
832 x 624 75
800 x 480 60
848 x 480 60
1024 x 600 60
1024 x 768 60 70 72 85
1152 x 864 75
1152 x 870 75
1280 x 720 50 60
1280 x 800 60 75 85
1280 x 960 60
1280 x 1024 60 75
1360 x 768 60
1366 x 768 60 75 85
1400 x 1050 60
1440 x 900 60
1600 x 1200 60
1680 x 1050 60
1920 x 1080 50 60
1920 x 1200 60
2048 x 1152 60
El área de resoluciones compatible depende del monitor conectado.
56
Page 58

Targus USB 2.0 Laptop Docking Station with Video
Solución de problemas
Dispositivo no funciona
• Asegúrese de que el dispositivo esté totalmente insertado en el
puerto correcto de la Docking Station.
• Conecte el dispositivo a un puerto diferente en la docking station.
Si todavía no funciona, pruebe a conectar el dispositivo directamente al ordenador.
• Compruebe que ejecuta la instalación del programa para el dis-
positivo.
• Asegúrese que el dispositivo aparece en el administrador de dis-
positivos. Para mas información diríjase a “Verificar Dispositivos
Instalados”.
• Desconecte todos los dispositivos de la estación de la docking
station y vuelva a conectarlos de un en uno. Compruebe que
cada dispositivo funciona antes de conectar el siguiente.
• Cada puerto USB esta equipado con una protección en caso de
sobrecarga de corriente. Si un dispositivo USB requiere mas corriente de la que el puerto USB puede proveer, el puerto se des-
activará. Para reactivar el puerto, desconecte el dispositivo y vaya
a Administrador de dispositivos o a el mensaje de sistema en la
bandeja de sistema y escoja la opción Reiniciar. Puede enchufar
el dispositivo de vuelta al puerto USB. Si se vuelve a desactivar el
puerto, compruebe los requisitos de alimentación del dispositivo.
Limitaciones del producto
Algunos dispositivos pueden detenerse temporalmente cuando
se produce una elevada transferencia de datos. Por ejemplo, el
ratón puede responder muy despacio, mientras que se imprime
una tarea gráfica, o mientras está experimenta un tráfico elevado
en la red. Recomendamos las siguientes directrices:
• No transferir los datos hacia o desde múltiples dispositivos de
alta velocidad, como una cámara digital o escáner, al mismo
tiempo.
• Si la velocidad de degradación se produce, cierre otros program-
as que usen un dispositivo USB para mejorar el funcionamiento
del dispositivo.
57
Page 59

Targus USB 2.0 Laptop Docking Station with Video
Vericando que los dispositivos se
encuentran instalados
Puede ver los dispositivos instalados en la docking station desde la ventana del Administrador de dispositivos en Propiedades
del sistema. Haga clic con el botón derecho del ratón en Mi PC,
Propiedades, a continuación, haga clic en la pestaña Hardware
y, a seguidamente en el botón de Administrador de dispositivos.
Desde la ventana del Administrador de dispositivos, expanda los
siguientes dispositivos:
• Adaptadores de pantalla:
- Adaptador gráfico Displaylink (XP solamente)
- Adaptador Espejo Displaylink (XP solamente)
• Adaptadores de red:
- Alta velocidad Adaptador Ethernet USB
• Dispositivo de sonido, vídeo y juegos:
- Dispositivo USB de Audio
• Adaptadores USB de Pantalla
- USB Targus a Adaptadores DVI
• Monitor
- USB Targus a Adaptadores DVI
Preguntas frecuentes - DisplayLink
DisplayLink ofrece este sitio Web de asistencia para ayudar a
resolver sus dudas. Esta sitio Web puede responder a cualquier
pregunta que usted pueda tener.
http://www.displaylink.com/support/index.php
58
Page 60

STATION D’ACCUEIL USB 2.0
TARGUS AVEC VIDÉO POUR
ORDINATEUR PORTABLE
Introduction
Nous vous remercions d’avoir acheté cette station
d’accueil USB 2.0 TARGUS avec vidéo pour ordinateur
portable. Ce module d’extension vous permet, via une
simple connexion USB, de connecter votre ordinateur
portable à 4 périphériques USB, un écran, un réseau
(Ethernet/LAN), des haut-parleurs et un microphone.
Deux des ports USB sont des ports d’alimentation
destinés aux périphériques requérant davantage
de puissance que la normale. Les ports USB sont
suffisamment distants les uns des autres pour
s’accommoder de connecteurs plus larges. L’alimentation
électrique fournie sur les ports USB est assurée même
lorsque l’ordinateur portable est éteint, déconnecté de
la base d’accueil ou en état de veille. Vous pouvez ainsi
charger vos périphériques USB quand vous le voulez, du
moment que la station reste connectée au secteur CA.
Votre station d’accueil vous propose
les connexions suivantes :
• une liaison DVI (pour une résolution maximale de 2048 x 1152
en mode couleur 32 bits)
• deux connecteurs audio 3,5 mm : (1) sortie stéréo (1) entrée
microphone
• RJ-45 Ethernet 10/100
• Deux ports USB 2.0 (blanc)
• Deux ports d’alimentation USB (Noir)
59
Page 61

Targus USB 2.0 Laptop Docking Station with Video
Contenu de la boîte
En plus de ce guide d’utilisateur, vous trouverez avec votre achat :
• Une station d’accueil USB 2.0 TARGUS avec vidéo pour
ordinateur portable
• Un câble montant USB 2.0 à grande vitesse
• Un mini CD pour les éléments logiciels
• Un adaptateu
Conguration système requise
Matériel
• Un ordinateur équipé d’un processeur Intel® Pentium® ou
équivalent
• Un lecteur de CD-ROM (acceptant également les mini CD)
• Un port USB version 2.0 disponible
• Une prise secteur (adaptateur électrique CA obligatoire)
Système d’exploitation
• Windows Vista avec Service Pack 1 (32 bits ou 64 bits)
• Windows® XP avec Service Pack 3
REMARQUE : VOTRE STATION D’ACCUEIL FONCTIONNE ÉGALEMENT SUR UN PORT USB
VERSION 1.1, MAIS AVEC DES PERFORMANCES MOINDRES ET SANS LA CONNEXION AU
PORT VIDÉO. POUR OBTENIR DES PERFORMANCES OPTIMALES, CONNECTEZ LA STATION À UN PORT USB VERSION 2.0.
60
Page 62

Targus USB 2.0 Laptop Docking Station with Video
Installation de la station et de son
pilote
Avant d’utiliser votre station d’accueil Targus, vous devez installer
son pilote sur l’ordinateur puis connecter la station à l’ordinateur.
Windows détectera la station et installera le pilote pour chaque
port.
AVERTISSEMENT : VOUS DEVEZ INSTALLER LE PILOTE DE LA STATION
D’ACCUEIL AVANT DE CONNECTER LA STATION À L’ORDINATEUR. SINON, LA STATION RISQUE DE NE PAS FONCTIONNER CORRECTEMENT.
Installation du pilote de la station
d’accueil
Ce pilote est nécessaire au système d’exploitation pour détecter
la station d’accueil lorsque vous la connectez à l’ordinateur et
installer les pilotes de chacun des ports.
1. Allumez votre ordinateur.
2. Insérez le mini-CD fourni dans le lecteur de CD-ROM de
l’ordinateur.
Si le programme d’installation du CD ne démarre pas
automatiquement, cliquez sur Démarrer, Exécuter, tapez D:\
Setup.exe (si D: désigne le lecteur de CD-ROM) et cliquez sur
OK.
3. Conformez-vous aux instructions affichées à l’écran.
4. Cliquez sur Finish (Terminer) et redémarrez votre ordinateur
après l’affichage du message de redémarrage.
61
Page 63

Targus USB 2.0 Laptop Docking Station with Video
Connexion de la station d’accueil à
l’ordinateur
Si vous avez suivi toutes nos instructions, vous pouvez mainten-
ant connecter la station à l’ordinateur. Pour cela :
1. Branchez l’extrémité appropriée de l’adaptateur CA sur l’entrée
correspondante de la station.
2. Branchez une extrémité du câble USB sur la station et
l’autre extrémité dans l’un des ports USB 2.0 disponibles de
l’ordinateur.
AVERTISSEMENT : LA STATION D’ACCUEIL NE FONCTIONNE PAS SI
L’ADAPTATEUR CA N’EST PAS BRANCHÉ SUR UNE PRISE SECTEUR.
NE BRANCHEZ AUCUN APPAREIL SUR LA STATION AVANT D’AVOIR
COMPLÈTEMENT TERMINÉ D’INSTALLER CETTE DERNIÈRE.
62
Page 64

Targus USB 2.0 Laptop Docking Station with Video
Ports de la station d’accueil
Entrée audio
(MIC)
DVI
Ports d’alimentation
USB (noir)
Sortie audio
(haut-parleur)
Câble
réseau
Vue arrière
Boucle de
Ports USB
(blanc)
Ports d’alimentation
USB (noir)
Connexion USB vers
un ordinateur
D C 5 V
fixation
Encoche de blocage
Adaptateur CA
standard
Côté droit Côté gauche
• Le témoin lumineux vert Tx s’allume lorsque la base est connec-
tée à un réseau et le témoin lumineux jaune Rx clignote pendant
l’échange de données entre la base et le réseau.
REMARQUE : LA STATION D’ACCUEIL PERMET DE CONNECTER/DÉCONNECTER “À
CHAUD” LE CÂBLE RÉSEAU.
63
Page 65

Targus USB 2.0 Laptop Docking Station with Video
Connexion de périphériques à la base
Ne forcez jamais le connecteur du périphérique dans le port de la
station. Vous risquez d’endommager le port et/ou le connecteur. Si
un branchement s’avère difficile, sortez le connecteur du port et
rebranchez-le. L’opération doit s’effectuer très facilement.
Connexion de la base à un réseau LAN
(Local Area Network)
Pour relier la station à un réseau Éthernet, branchez le connecteur
RJ-45 du câble sur le port Éthernet/réseau de la station. Conformez-vous ensuite aux instructions spécifiques au type du réseau
auquel vous voulez vous connecter. N’hésitez pas à consulter votre
administrateur réseau si vous ne connaissez pas ces instructions.
Connexion d’un périphérique de stockage USB
Pour brancher un périphérique USB sur la station, introduisez son
connecteur sur l’un des ports USB de la station et conformez-vous
aux instructions spécifiques à ce périphérique. Les quatre ports
USB disponibles travaillent à grande vitesse (débit de 480 Mbps)
et peuvent fournir un courant d’alimentation de 500 mA.
Les deux ports USB noirs offrent certaines caractéristiques spéciales. Reportez-vous à la section “Fonction “Alimentation continue”
de Targus” pour plus de détails.
Les deux ports USB blancs sont des ports à grande vitesse
fournissant un courant d’alimentation standard de 500 mA. Les
deux ports USB noirs sont des ports à grande vitesse capables de
fournir un courant d’alimentation de 1 A.
Connexion et configuration d’un périphérique audio
1. Branchez vos écouteurs ou vos haut-parleurs sur le port de
sortie 3,5 mm de la station.
2. Pour brancher un microphone, utilisez l’entrée audio de la
station.
3. La connexion son ou microphone est automatiquement activée à la mise en marche de la station. Vérifiez que le son
n’est pas désactivé (MUTE) pour cette connexion.
4. Pour activer manuellement les écouteurs ou les haut-par-
leurs, le cas échéant :
64
Page 66

Targus USB 2.0 Laptop Docking Station with Video
Sous Windows XP
Ouvrez le Panneau de Configuration et cliquez sur Son et
Audio. Ouvrez l’onglet Audio. Dans la rubrique Lecture audio,
choisissez USB Multimedia Audio Device (Périphérique au-
dio multimédia USB) dans la liste Unité par défaut.
• Cliquez sur Appliquer puis sur OK.
Pour Windows Vista
Ouvrez le Panneau de Configuration et cliquez sur Son.
Ouvrez l’onglet Lecture et vérifiez que USB Audio Device
(Périphérique audio USB) est le périphérique de lecture par
défaut. Si c’est le cas, cliquez simplement sur OK. Sinon,
sélectionnez cette entrée dans la liste, cliquez sur le bouton
Par défaut puis sur OK.
REMARQUE : LES PÉRIPHÉRIQUES AUDIO NE PEUVENT PAS FONCTIONNER À LA FOIS
SUR LE PORT DE LA STATION ET L’ORDINATEUR HÔTE.
ATTENTION : FERMEZ TOUTES VOS APPLICATIONS AUDIO ET MULTIMÉDIA AVANT
DE BASCULER ENTRE LA SORTIE AUDIO DE LA STATION ET LA SORTIE AUDIO DE
L’ORDINATEUR.
Connexion d’un moniteur ou d’un écran LCD
Tout moniteur et écran LCD que vous connectez est limité à une
résolution de 2048 x 1152, en mode couleur 32 bits.
REMARQUE : POUR TRAVAILLER À LA RÉSOLUTION MAXIMALE AUTORISÉE DE 2048 X
1152, CONNECTEZ LE MONITEUR OU L’ÉCRAN LCD SUR LA BASE D’ACCUEIL AVANT
DE CONNECTER LA BASE À VOTRE ORDINATEUR PORTABLE. SI VOUS CONNECTEZ LE
MONITEUR OU L’ÉCRAN LCD SUR LA BASE D’ACCUEIL APRÈS AVOIR CONNECTÉ LA
BASE À VOTRE ORDINATEUR PORTABLE, LA RÉSOLUTION MAXIMALE EST RAMENÉE À
1024 X 768.
65
Page 67

Targus USB 2.0 Laptop Docking Station with Video
Contrôle de l’afchage depuis le menu
Video (Vidéo) de la station d’accueil
Pour accéder au menu Video (Vidéo), cliquez avec le bouton droit
de la souris sur l’icône de la station d’accueil, dans la barre de
tâches de Windows, ou affichez la fenêtre Propriétés d’affichage
de Windows.
66
Page 68

Targus USB 2.0 Laptop Docking Station with Video
Extend (Extension) : Vous voulez utiliser l’écran de l’ordinateur
comme écran principal et le moniteur ou l’écran LCD comme écran
secondaire.
Pour activer cette configuration, sélectionnez ‘Extend’ (Extension) dans le menu de la station d’accueil. Le moniteur
ou l’écran LCD étend l’affichage de l’écran principal, dans la
même direction que celle que vous aviez choisie la dernière
fois que vous avez travaillé en mode extension. Pour modifier
la direction d’extension par rapport à l’écran principal, choisissez l’option ‘Extend To’ (Étendre à) puis l’une des directions
proposées : Left/Right/Above/ Below (Gauche/Droit/Au dessus/En-dessous. Le mode extension est activé dans la direction choisie.
Mode extension
67
Page 69

Targus USB 2.0 Laptop Docking Station with Video
Option Mirror (Miroir) : Vous voulez afficher le contenu exact de
l’écran de l’ordinateur sur le moniteur ou l’écran LCD.
Pour activer cette configuration, sélectionnez ‘Mirror’ (Miroir)
dans le menu de la station d’accueil. La résolution, la profondeur de la couleur et la vitesse de rafraîchissement de l’écran
primaire sont appliquées à l’écran branché sur la station
d’accueil.
SI L’ÉCRAN CONNECTÉ À LA STATION NE PEUT PAS TRAVAILLER AVEC UNE RÉSOLUTION AUSSI GRANDE QUE CELLE DE L’ÉCRAN PRINCIPAL, LA TAILLE DE L’IMAGE EST
AUTOMATIQUEMENT ADAPTÉE À SA RÉSOLUTION. SI L’ÉCRAN CONNECTÉ À LA STATION
EST PLUS GRAND QUE L’ÉCRAN PRINCIPAL, L’IMAGE EST AFFICHÉE EN MODE LETTERBOX POUR NE PAS ÊTRE DÉFORMÉE.
miroir
68
Page 70

Targus USB 2.0 Laptop Docking Station with Video
OFF (Arrêt) : Vous voulez utiliser uniquement l’écran de
l’ordinateur et éteindre le moniteur ou l’écran LCD.
arret
69
Page 71

Targus USB 2.0 Laptop Docking Station with Video
Contrôle de l’afchage depuis la fenêtre
Propriétés d’afchage de Windows
Vous pouvez configurer le mode vidéo de la station d’accueil
depuis la fenêtre Propriétés d’affichage de Windows. Depuis Windows Vista, cliquez avec le bouton droit de la souris sur le Bureau,
cliquez sur l’option “Personnaliser” et sélectionnez le raccourci
‘Paramètres d’affichage’. Depuis Windows XP, cliquez avec le bouton droit de la souris sur le Bureau, cliquez sur l’option “Propriétés”
et ouvrez l’onglet ‘Paramètres’.
4
1
2
3
Windows Vista
4
2
1
3
Windows XP
Figure 1
Mode extension : pour travailler en mode extension d’écran, co-
chez l’option “Étendre le Bureau à ce moniteur” (1 dans la Figure
1). Sélectionnez la résolution et la qualité de la couleur (2 et 3),
puis la position de prolongement par rapport à l’écran principal (4).
70
Page 72

Targus USB 2.0 Laptop Docking Station with Video
Mode miroir : Pour travailler en mode miroir, cliquez sur la case de
sélection de l’option “Étendre le Bureau à ce moniteur” (1 dans la
Figure 1 de la page précédente)
Sélection de l’écran principal : Pour utiliser l’écran branché sur
la station d’accueil comme écran principal pour l’ordinateur, procé-
dez comme suit :
1. Dans la fenêtre Paramètres d’affichage, sélectionnez l’écran
branché sur la station dans la liste déroulante.
1
Windows Vista
1
Windows XP
71
Page 73

Targus USB 2.0 Laptop Docking Station with Video
2. Cliquez sur la case de sélection “Étendre le Bureau à ce moniteur“ (pour Vista et XP).
2
2
Windows Vista
Windows XP
3. Cliquez sur la case de sélection “Il s’agit de mon moniteur principal (pour Vista et XP).
3
3
Windows Vista
Windows XP
4. Cliquez sur “Appliquer”.
72
Page 74

Targus USB 2.0 Laptop Docking Station with Video
5. Sélectionnez l’écran de l’ordinateur portable dans la liste déroulante et enlevez la sélection de l’option “Étendre le Bureau à ce
moniteur” (pour Vista et XP) et cliquez sur “Appliquer”.
4
Windows Vista
REMARQUE : POUR TRAVAILLER PLUS AISÉMENT, CONFIGUREZ LA CONDITION ÉCRAN
FERMÉ DE L’ORDINATEUR PORTABLE SUR “DO NOTHING” (NE RIEN FAIRE) ET SÉLECTIONNEZ L’ÉCRAN DE LA STATION COMME ÉCRAN PRINCIPAL. VOUS POUVEZ MAINTENANT FERMER L’ÉCRAN DE L’ORDINATEUR PORTABLE ET TRAVAILLER AVEC UN ÉCRAN,
UN CLAVIER ET UNE SOURIS EXTERNES.
4
Windows XP
L’écran connecté à la station d’accueil devient l’écran principal
lorsque l’ordinateur passe en mode veille ou déconnecté, ou redémarre. Si vous déconnectez ou éteignez la station, l’écran de
l’ordinateur portable redevient l’écran principal.
À la reconnexion ou à la remise sous tension de la station, l’écran
qui lui est connecté redevient l’écran principal.
73
Page 75

Targus USB 2.0 Laptop Docking Station with Video
Mises à jour automatiques
DisplayLink a équipé sa station d’accueil d’une fonction de mise
à jour automatique afin que sa carte graphique travaille toujours
avec les dernières versions de son pilote et de son logiciel, fournissant à l’utilisateur le meilleur de ses performances et davantage
de stabilité.
Déconnexion de la station d’accueil
Lorsque vous éteignez la station d’accueil ou débranchez son
câble USB de l’ordinateur, l’écran secondaire devient blanc. Toutes
les fenêtres et toutes les icônes repassent sur l’écran principal.
À la reconnexion ou à la remise sous tension de la station, la
dernière configuration d’affichage est réactivée mais aucune des
fenêtres et des icônes alors affichées ne réapparaissent.
Fonction “Alimentation continue” de
Targus
La fonction “Alimentation continue” de Targus permet de con-
tinuer d’alimenter vos périphériques (via les ports USB noirs)
même lorsque l’ordinateur portable est éteint ou déconnecté de la
station d’accueil. Il vous permet ainsi de continuer à charger vos
périphériques USB rechargeables.
Alimentation des périphériques USB
requérant davantage de puissance
Certains périphériques (par exemple les imprimantes et équipements optiques) requièrent davantage de puissance que les ports
USB standards ne peuvent en fournir. Pour ces périphériques,
votre base Targus offre deux ports USB de 1000 mA, soit le double
de la puissance fournie par un port USB standard.
74
Page 76

Targus USB 2.0 Laptop Docking Station with Video
Résolutions possibles
Résolution Vitesses de rafraîchissement à 32 bits
640 x 480 60 67 72 75 85
720 x 480 50 60
768 x 576 50 60
800 x 600 56 60 72 75 85
832 x 624 75
800 x 480 60
848 x 480 60
1024 x 600 60
1024 x 768 60 70 72 85
1152 x 864 75
1152 x 870 75
1280 x 720 50 60
1280 x 800 60 75 85
1280 x 960 60
1280 x 1024 60 75
1360 x 768 60
1366 x 768 60 75 85
1400 x 1050 60
1440 x 900 60
1600 x 1200 60
1680 x 1050 60
1920 x 1080 50 60
1920 x 1200 60
2048 x 1152 60
Les résolutions effectivement prises en charge dépendent de l’écran connecté.
75
Page 77

Targus USB 2.0 Laptop Docking Station with Video
Guide de dépannage
Un périphérique ne fonctionne pas
• Vérifiez que le périphérique est correctement branché sur la sta-
tion d’accueil.
• Essayez de brancher le périphérique sur un autre port de la sta-
tion. Si le périphérique ne fonctionne toujours pas, essayez de le
connecter directement sur l’ordinateur.
• Vérifiez que vous avez correctement configuré et/ou installé le
périphérique.
• Vérifiez que le périphérique apparaît dans le Gestionnaire de
périphériques. Pour plus d’information, reportez-vous à la section
“Affichage des périphériques installés”
• Débranchez tous les périphériques de la station d’accueil puis
rebranchez-les un par un. Vérifiez que chaque périphérique fonc-
tionne correctement avant d’en rebrancher un autre.
• Chaque port USB est protégé contre les surtensions. Cette
protection disjoncte le port dès lors qu’un périphérique USB
demande plus de courant que le port ne peut en fournir. Pour
réenclencher le port, débranchez le périphérique, ouvrez le Gestionnaire de périphériques ou le message affiché dans la barre
système et choisissez l’option Reset (Réinitialiser). Vous pouvez
maintenant rebrancher le périphérique sur le port USB de la sta-
tion. Si le port disjoncte à nouveau, vérifiez les spécifications
électriques du périphérique.
Limitations du produit
Certains périphériques ne fonctionnent pas normalement pen-
dant un transfert de données à grande vitesse. Par exemple,
l’impression de graphiques ou un trafic réseau important suffit
pour allonger les temps de réponse de la souris. Nous vous recommandons.
• de ne pas transférer en même temps des données vers ou
depuis un périphérique travaillant à grande vitesse, par exemple
un appareil-photo numérique ou un numériseur (scanner).
• de fermer tous les programmes travaillant sur un périphérique
USB afin d’am:
76
Page 78

Targus USB 2.0 Laptop Docking Station with Video
Afchage des périphériques installés
Vous affichez la liste des périphériques installés sur la station
d’accueil depuis la fenêtre Gestionnaire de périphériques. Cliquez
avec le bouton droit de la souris sur Poste de travail, Propriétés.
Ouvrez l’onglet Matériel et cliquez sur le bouton Gest
Depuis la fenêtre Gestionnaire de périphériques, développez les
entrées suivantes :
• Cartes graphiques :
- Displaylink Graphic Adapter (XP uniquement)
- Displaylink Mirror Adapter (XP uniquement) (carte
• Cartes réseau :
- High speed USB Ethernet Adapter (Carte Eternet
• Contrôleurs son, vidéo et jeu :
-Périphérique audio USB
• Cartes graphiques USB
- Targus USB Video Adapter (Cartes Targus USB
• Écran
- Targus USB Video Adapter (Cartes Targus USB
(carte graphique Displaylink)
miroir Displaylink)
USB à grande vitesse)
vers DVI)
vers DVI)
Foire aux questions - DisplayLink
DisplayLink a ouvert un site Web d’assistance pour ses clients. Si
vous avez des questions, n’hésitez pas à nous les poser.
http://www.displaylink.com/support/index.php
77
Page 79

DOCKING STATION
USB 2.0 PER NOTEBOOK
CON VIDEO
Introduzione
Congratulazioni per aver acquistato la Docking Station
Targus USB 2.0 con video. Questo modulo portatile
d’espansione permette di collegare, grazie a un
singolo collegamento USB, fino a 4 apparecchi USB,
monitor, rete (Ethernet/LAN) casse e microfono. La
docking station offre anche due Targus Power Port che
forniscono due volte le caratteristiche per apparecchi
USB ad alta potenza oltre a porte USB più distanziate
per adattatori più larghi. La caratteristica Targus Always
On fornisce potenza alle porte USB anche quando il
computer è spento, distaccato dalla docking station o
in modalità di ibernazione/standby. Questo consente
agli apparecchi che si ricaricano tramite la porta USB di
ricaricarsi in qualsiasi circostanza purché il trasformatore
sia collegato.
La Docking Station fornisce le
seguenti porte:
• DVI Single Link (compatibile fino a 2048 x 1152 colore a 32
bit)
• Due Audio 3,5 mm: (1) stereo out (1) microfono in
• RJ-45 Ethernet 10/100
• Due USB 2.0 (bianche)
• Due Porte USB Power (nere) - che forniscono alimentazione
fino a 1Ampere
78
Page 80

Targus USB 2.0 Laptop Docking Station with Video
Contenuto imballo
Oltre a questa guida per l’utente l’imballo contiene:
• Docking Station Targus USB 2.0 per Notebook con video
• Cavo Upstream Alta velocità USB 2.0
• CD di Software del Driver (mini CD)
• Trasformatore di alimentazione (necessario)
Requisiti necessari al sistema
Hardware
• PC con processore Intel® Pentium® o equivalente
• Drive per CD-ROM (compatibile con mini CD)
• USB versione porta 2.0
• Fonte di alimentazione (necessario trasformatore)
Sistema operativo
• Windows Vista® con Service Pack 1 (32-bit o 64-bit)
• Windows® XP con Service Pack 3
NOTA: SE CI SI COLLEGA A UNA PORTA USB VERSIONE 1.1 SUL COMPUTER, IL LIVELLO
DI PRESTAZIONE DELLA DOCKING STATION SARÀ INFERIORE E LA PORTA VIDEO NON
FUNZIONERÀ CORRETTAMENTE. PER I MIGLIORI RISULTATI COLLEGARSI A UNA PORTA
USB VERSIONE 2.0.
79
Page 81

Targus USB 2.0 Laptop Docking Station with Video
Installare l’apparecchio e i driver.
Per usare la Docking Station Targus prima occorre installare il
driver sul computer poi collegare la docking station al computer e
Windows plug-and-play installerà i driver per ogni porta.
ATTENZIONE: OCCORRE INSTALLARE IL SOFTWARE DELLA DOCKING
STATION PRIMA DI COLLEGARLA AL COMPUTER ALTRIMENTI NON
FUNZIONERÀ CORRETTAMENTE.
Installare il driver della Docking
Station
Installare il driver della docking station permette al sistema
operativo di riconoscere la docking station e le sue porte una volta
che viene collegata.
1 Accendere il computer.
2 Inserire il CD di software del driver nel CD-ROM drive del
computer.
Se l’installazione non si avvia automaticamente fare click su
Avvio, Esegui, e inserire D:\Setup.exe (dove D: è il drive del
CD-ROM) e poi fare clic su OK.
3 Seguire le istruzioni sullo schermo per completare
l’installazione.
4 Fare clic su Fine e riavviare il computer quando richiesto.
80
Page 82

Targus USB 2.0 Laptop Docking Station with Video
Collegare la Docking Station al computer
Dopo aver installato il software della docking station siete pronti a
collegare la docking station al computer. Per farlo:
1 Collegare il trasformatore in dotazione alla presa di corrente
della docking station.
2 Collegare un’estremità del cavo USB alla docking station e
l’altra estremità in una porta USB 2.0 disponibile del computer.
ATTENZIONE: LA DOCKING STATION NON FUNZIONERÀ CORRETTAMENTE SE IL TRASFORMATORE NON È INSERITO IN UNA PRESA DI
CORRENTE. NON COLLEGARE NESSUN APPARECCHIO ALLA DOCKING STATION PRIMA DI AVER COMPLETATO L’INSTALLAZIONE.
81
Page 83

Targus USB 2.0 Laptop Docking Station with Video
Porte della Docking Station
Audio in (Mic)
DVI
Porte High
Power USB
(NERE)
Fessura di sicurezza
standard
Audio out
(CASSE)
Cavo di
rete
Visione posteriore
Circuito ad
aggancio
Porte USB
(Bianche)
Porte High
Power USB
(NERE)
Collegamento
USB per PC
D C 5 V
Trasformatore
Lato destro Lato sinistro
• La luce Tx verde si accende se collegata a una rete e la luce Rx
gialla lampeggia mentre il computer riceve o trasmette dati
NOTA: LA DOCKING STATION È COMPATIBILE CON HOT SWAP DEL CAVO DI RETE
82
Page 84

Targus USB 2.0 Laptop Docking Station with Video
Collegare nuovi apparecchi
Per evitare danni quando si collega un nuovo apparecchio non
forzare il connettore del cavo nella porta o nella docking station. Se
il connettore del cavo non si collega con facilità, girarlo e provare
di nuovo a collegarlo.
Collegarsi a un LAN
Per collegare un cavo Ethernet con connettore RJ-45, collegare
il connettore alla porta ethernet/di rete della docking station.
Eventuali altre procedure di connessione a una rete dipendono dal
tipo di rete utilizzata. Contattare l’amministratore di rete per istruzioni dettagliate.
Collegare un apparecchio USB
Per collegare un apparecchio USB collegarlo alla porta USB della
docking station e seguire le istruzioni fornite con l’apparecchio.
Tutte le quattro porte USB corrispondono agli standard di alta velocità con 480 Mbps troughput e 500mA di potenza.
Tuttavia le due porte USB nere hanno due caratteristiche uniche.
Vedere “Targus Always on” per ulteriori particolari.
Le porte USB bianche sono porte ad alta velocità che forniscono
una potenza standard di 500mA. Le Power Port USB nere sono
porte ad alta velocità che forniscono fino a 1Amp.
Collegare e configurare un apparecchio audio.
1. Collegare le cuffie o le casse nella porta Audio verde da 3.5
mm sulla docking station.
2. Per collegare un microfono, inserirlo nella porta Audio in
mono.
3. Il suono e il microfono si collegano automaticamente quando
ci si collega alla docking station. Assicurarsi che il volume di
entrambi non sia impostato su MUTO.
4. Per attivare manualmente le cuffie o le casse in caso non sia
possibile il trasferimento automatico.
83
Page 85

Targus USB 2.0 Laptop Docking Station with Video
Per Windows XP
Andare a Pannello di Controllo e scegliere Suono e Audio.
Selezionare l’opzione audio. Alla voce Riproduzione del
suono cambiare la periferica preferita con Apparecchio Mul-
timediale Audio USB dalla lista a tendina.
• Fare clic su Applica e poi su OK.
Per Windows Vista
Andare a Pannello di Controllo e scegliere Suono. Alla voce
Riproduzione verificare che la periferica Audio USB sia impostata come predefinita. In questo caso fare clic su OK. Al-
trimenti selezionarla e fare clic su impostare come predefin-
ita poi fare clic su OK.
NOTA: GLI APPARECCHI AUDIO NON FUNZIONERANNO CONTEMPORANEAMENTE
SULLA STAZIONE E SUL COMPUTER OSPITANTE
ATTENZIONE: TUTTE LE APPLICAZIONI AUDIO O MULTIMEDIALI VANNO FERMATE
PRIMA DI SPOSTARSI TRA L’USCITA AUDIO DELLA DOCKING STATION E L’USCITA AUDIO
DEL COMPUTER.
Collegarsi a un Monitor o a un LCD.
Qualsiasi monitor o LCD collegato alla porta video della docking
station avrà una risoluzione massima di 2048 x 1152 colore a 32
bit.
NOTA: LA RISOLUZIONE MASSIMA DI 2048 X 1152 È COMPATIBILE SOLO SE IL MONITOR
O L’LCD È COLLEGATO ALLA DOCKING STATION PRIMA CHE QUESTA VENGA COLLEGATA AL NOTEBOOK. SE IL MONITOR O L’LCD SONO COLLEGATI ALLA DOCKING STATION
DOPO CHE QUESTA È STATA COLLEGATA AL COMPUTER LA RISOLUZIONE È IMPOSTATA
SU 1024 X 768.
84
Page 86

Targus USB 2.0 Laptop Docking Station with Video
Controllare il display usando le opzioni
video del menù della Docking Station
Si può accedere alle opzioni Video del menù facendo clic col tasto
destro sull’icona della docking station nella finestra del sistema o
attraverso la visualizzazione delle Proprietà di Windows.
85
Page 87

Targus USB 2.0 Laptop Docking Station with Video
Extend (Espandere): Si usa lo schermo del notebook come visualizzatore principale e il monitor o l’LCD come schermo secondario.
Per impostare lo schermo in questa modalità, selezionare
“Extend” sull’icona del menù applicativo della docking sta-
tion. L’apparecchio si espanderà nella direzione in cui si tro-
vava l’ultima volta che il display era in questa modalità. Per un
controllo maggiore navigare sul sottomenù “Espandere su” e
selezionare una delle opzioni. In questo modo l’apparecchio
non verrà solo messo in modalità d’espansione ma si potrà anche scegliere la direzione Sinistra/destra/Sopra/sotto il monitor
principale (primary).
Modalità d’espansione
86
Page 88

Targus USB 2.0 Laptop Docking Station with Video
A specchio: Si usa lo schermo del computer come visualizzatore
principale e il monitor o LCD copia esattamente lo schermo del
computer.
Per impostare il display in questa modalità selezionare semplicemente “mirror (specchio) dall’icona del menù applicativo
della docking station. La risoluzione, profondità di colore e velocità di ripristino dello schermo principale sono esattamente
copiate sul monitor collegato all’adattatore grafico della docking station.
NOTA: SE IL MONITOR COLLEGATO ALLA DOCKING STATION È COMPATIBILE CON UNA
RISOLUZIONE INFERIORE A QUELLA DELL’IMMAGINE PRINCIPALE L’IMMAGINE VERRÀ
RIDIMENSIONATA PER ADATTARSI ALLO SCHERMO ESTERNO. SE IL MONITOR COLLEGATO ALLA DOCKING STATION HA DIMENSIONI SUPERIORI ALLO SCHERMO PRINCIPALE
L’IMMAGINE SARÀ IN FORMATO LETTER-BOX PER MANTENERE LE PROPORZIONI CORRETTE.
specchio
87
Page 89

Targus USB 2.0 Laptop Docking Station with Video
Off: Si usa lo schermo del notebook come display principale e il
monitor o LCD è spento.
Off
88
Page 90

Targus USB 2.0 Laptop Docking Station with Video
Controllare il Display tramite le Proprietà
di visualizzazione di Windows
Si possono configurare le impostazioni video della docking station
tramite la finestra di dialogo delle Proprietà di visualizzazione di
Windows. Per farlo con Windows Vista, fare clic col tasto destro del
mouse sul desktop, fare clic su “Personalizza” e poi selezionare
“Impostazioni schermo”. La caratteristica corrispondente è dis-
ponibile in Windows XP facendo clic col tasto destro sul desktop,
selezionare “Proprietà” e poi navigare sull’opzione “Impostazioni”.
4
1
2
3
Windows Vista
4
2
1
3
Windows XP
Figura 1
Modalità d’espansione: Per impostare il display in questa mo-
dalità, controllare il riquadro contrassegnato con “Espandere il
desktop di windows su questo monitor” (1 in figura 1). Organizzare
la risoluzione dello schermo e la qualità del colore selezionando i
comandi appropriati (2 e 3) e organizzare la posizione in relazione
agli altri monitor sul desktop espanso usando l’area di trascinamento (4)
89
Page 91

Targus USB 2.0 Laptop Docking Station with Video
Modalità a specchio: Per impostare il display in questa modalità
togliere la spunta dal riquadro contrassegnato “Espandere il desktop su questo monitor” (1 in figura 1 della pagina precedente)
Impostare il display principale: Per impostare il display collegato
alla docking station come display principale, seguire le istruzioni
che seguono:
1. nella finestra delle Proprietà del display, usare la lista a tendina,
selezionare il monitor collegato alla Docking Station.
1
Windows Vista
1
Windows XP
90
Page 92

Targus USB 2.0 Laptop Docking Station with Video
2. Dopo aver selezionato il monitor corrispondente, spuntare il ri-
quadro vicino a “espandere il desktop su questo monitor” (per
Vista) o “Espandere il mio desktop di Windows su questo monitor” (per XP).
2
2
Windows Vista
Windows XP
3. Poi spuntare il riquadro vicino a “Questo è il mio monitor princi-
pale” (per Vista) “Usare questa periferica come monitor principale” (per XP).
3
3
Windows Vista
Windows XP
4. fare clic su “Applica”
91
Page 93

Targus USB 2.0 Laptop Docking Station with Video
5. Selezionare il monitor del computer usando la lista a tendina e
togliere la spunta da “espandere il desktop su questo monitor”
(per Vista) o “Espandere il desktop di Windows su questo monitor” (per XP) e fare clic su “Applica”
4
Windows Vista
NOTA: È POSSIBILE LAVORARE PIÙ COMODAMENTE CON IL NOTEBOOK IMPOSTANDONE LE AZIONI SUL COPERCHIO CHIUSO SU “NON FARE NIENTE” E IMPOSTANDO LA
DOCKING STATION SULLA MODALITÀ PRINCIPALE. A QUESTO PUNTO SI PUÒ CHIUDERE
IL COMPUTER E USARLO CON TASTIERA E MOUSE ESTERNI.
4
Windows XP
Il monitor collegato alla Docking station rimane il principale se il
PC va in ibernazione o in sospensione e se viene riavviato. Se
la docking Station viene staccata, il display del computer diventa
nuovamente il principale.
Dopo che viene ricollegata, il monitor della Docking station tornerà
in modalità principale.
92
Page 94

Targus USB 2.0 Laptop Docking Station with Video
Aggiornamenti automatici
Gli aggiornamenti automatici sono una caratteristica di manutenzione del prodotto da Display-Link, Il meccanismo di aggiornamento
automatico assicura che l’adattatore grafico della Docking Station sia dotato dei driver e del software più aggiornati, fornendo
all’utente migliori prestazioni e stabilità.
Disconnettere la Docking Station
Se la Docking Station è spenta o se il cavo USB viene staccato dal
computer, dal display scompaiono le immagini. Tutte le finestre e le
icone torneranno sullo schermo principale. Quando ci si ricollega
e si rialimenta la Docking Station il display torna nella stessa modalità in cui si Trovava prima della disconnessione. Tuttavia, le finestre e le icone che si trovavano precedentemente sullo schermo
non ricompariranno.
Targus Always On
Targus Always On permette alle porte USB nere di continuare a
fornire alimentazione anche quando il computer è spento o staccato dalla docking station. Questo vi permette di ricaricare le bat-
terie di qualsiasi accessorio USB ricaricabile che avete collegato.
Usare apparecchi USB che richiedono
maggiore alimentazione
Alcuni apparecchi, che usano molta energia, come stampanti e
driver ottici, vanno collegati alle Power Port USB. Queste porte
forniscono un’energia pari a 1000mA - il doppio delle porte USB
standard.
93
Page 95

Targus USB 2.0 Laptop Docking Station with Video
Risoluzione compatibile
Risoluzione Velocità di ripristino disponibile a 32 bit
640 x 480 60 67 72 75 85
720 x 480 50 60
768 x 576 50 60
800 x 600 56 60 72 75 85
832 x 624 75
800 x 480 60
848 x 480 60
1024 x 600 60
1024 x 768 60 70 72 85
1152 x 864 75
1152 x 870 75
1280 x 720 50 60
1280 x 800 60 75 85
1280 x 960 60
1280 x 1024 60 75
1360 x 768 60
1366 x 768 60 75 85
1400 x 1050 60
1440 x 900 60
1600 x 1200 60
1680 x 1050 60
1920 x 1080 50 60
1920 x 1200 60
2048 x 1152 60
L’area di risoluzione veramente disponibile dipende da quella compatibile con il monitor collegato.
94
Page 96

Targus USB 2.0 Laptop Docking Station with Video
Risoluzione dei problemi
L’apparecchio non funziona
• Assicurarsi che l’apparecchio sia collegato correttamente alla
porta corretta della docking station.
• Collegare l’apparecchio a una porta differente sulla docking sta-
tion. Se ancora non funziona, controllare che l’apparecchio funzioni collegandolo direttamente al computer.
• Verificare di avere eseguito il programma di Impostazione o In-
stallazione dell’apparecchio.
• Assicurarsi che l’apparecchio compaia in Gestione Periferiche.
Per ulteriori informazioni fare riferimento a “Verificare che le per-
iferiche siano installate”.
• Staccare tutte le periferiche dalla docking station e ricollegarle,
una alla volta. Controllare che tutte le periferiche funzionino prima
di inserire la successiva.
• Ogni porta USB è dotata di protezione da sovraccarico. Se un
apparecchio USB utilizza più corrente di quella che la porta
USB gli può fornire, la porta si chiude. Per riattivare la porta,
staccare l’apparecchio e andare su Gestione Periferiche o sul
messaggio nella finestra del sistema e scegliere l’opzione Re-
imposta. Adesso si può ricollegare l’apparecchio alla porta USB.
Se si richiude nuovamente, controllare il fabbisogno energetico
dell’apparecchio.
Limiti del prodotto
Alcuni apparecchi possono bloccarsi temporaneamente durante il
trasferimento dei dati. Ad esempio il mouse può rispondere lentamente mentre si sta stampando un lavoro pesante e in presenza
di intenso traffico di rete. Si raccomandano le seguenti linee guida:
• Non trasferire contemporaneamente dati da apparecchi ad alta
velocità, come da una fotocamera digitale o da uno scanner.
• Se si verifica una diminuzione della velocità, chiudere altri
programmi che usano un apparecchio USB per migliorare le
prestazioni dell’apparecchio.
95
Page 97

Targus USB 2.0 Laptop Docking Station with Video
Vericare che gli apparecchi siano
installati
Si possono vedere gli apparecchi installati sulla docking station
dalla finestra di Gestione Periferiche nelle proprietà del Sistema.
Fare clic col tasto destro su Computer, Proprietà, poi fare clic su
Hardware e poi sul tasto Gestione Periferiche.
Dalla finestra Gestione Periferiche, espandere quanto segue
• Adattatori display:
- Displaylink Graphic Adapter (solo XP)
- Displaylink Mirror Adapter (solo XP)
• Adattatori di rete:
- Adattatore High speed USB Ethernet
• Controllori Audio, video e Giochi:
- Apparecchi Audio USB
• Adattatori Display USB
- Targus USB ad adattatori DVI
• Monitor
- Targus USB ad adattatori DVI
FAQ - DisplayLink
Displaylink fornisce supporto su web in risposta alle domande. Può
essere utile per rispondere a eventuali vostre domande.
http://www.displaylink.com/support/index.php
96
Page 98

TARGUS USB 2.0 DOCKING
STATION (KOPPELSTATION)
VOOR DE LAPTOP MET
VIDEOTOEPASSINGEN
Introductie
Hartelijk dank voor de aanschaf van de Targus USB 2.0 Laptop
Docking Station With Video (Targus USB 2.0 Docking Station
(Koppelstation) voor de Laptop met videotoepassingen).
Met deze draagbare uitbreidingsmodule kunt u door middel
van 1 USB verbinding liefst 4 USB apparaten, een monitor,
een netwerkverbinding (Ethernet/LAN), luidsprekers, en een
microfoon aansluiten. Het docking station (koppelstation) biedt
ook twee Targus Power Ports (‘Stroomuitgangen’) die twee keer
zoveel stroom leveren als normale USB uitgangen, speciaal
voor apparaten die hoog stroomverbruik hebben, en ook USB
uitgangen die breed ontworpen zijn voor grotere adapters.
Targus Always On (Targus Altijd Aan) levert stroom aan de
USB uitgangen, zelfs wanneer de laptop uitgeschakeld is,
losgekoppeld is van het docking station (koppelstation) of in
slaapmodus is. Hierdoor kunnen USB apparaten, die via de USB
uitgang opladen, onder elke omstandigheid opladen zolang de
AC wisselstroomadapter in het apparaat zit.
Het Docking Station (Koppelstation)
biedt de volgende uitgangen:
• DVI Single Link (ondersteunt tot 2048 x 1152 met 32 bits
kleurkwaliteit)
• Twee 3.5 mm Audiouitgangen: (1) stereo-uitgang (1)
microfoon-ingang
• RJ-45 Ethernet 10/100
• Twee USB 2.0 uitgangen (Wit)
• Twee USB ‘Power Ports’ (Stroomuitgangen) (Zwart) - die tot
1Ampere stroom leveren
97
Page 99

Targus USB 2.0 Laptop Docking Station with Video
Inhoud verpakking
Behalve deze handleiding bevat de verpakking ook:
• Targus USB 2.0 Laptop Docking Station with Video (Targus
USB 2.0 Docking Station (Koppelstation) voor de laptop met
videotoepassingen.
• USB 2.0 hoge snelheidskabel voor uploaden
• cd met driver software (mini cd)
• AC wisselstroomadapter (vereist)
Systeemvereisten
Hardware
• PC met een Intel® Pentium® processor of gelijkwaardig product
• CD-ROM drive (die mini cd kan draaien)
• USB versie 2.0 uitgang
• Netvoeding (AC Wisselstroomadapter vereist)
Besturingssysteem
• Windows Vista® met Service Pack 1 (32-bits of 64-bits)
• Windows® XP met Service Pack 3
OPMERKING: WANNEER HET DOCKING STATION (KOPPELSTATION) OP EEN 1.1 USB
UITGANG OP UW COMPUTER IS AANGESLOTEN, ZAL ZIJN PRESTATIENIVEAU NIET OPTIMAAL ZIJN EN ZAL DE VIDEOUITGANG NIET CORRECT FUNCTIONEREN. SLUIT HET, VOOR
DE BESTE PRESTATIES, AAN OP EEN 2.0 USB UITGANG.
98
Page 100

Targus USB 2.0 Laptop Docking Station with Video
Het apparaat en de drivers installeren
U moet, om het Targus Docking Station (Koppelstation) te
gebruiken, eerst de driver op uw computer installeren. Sluit het
koppelstation vervolgens aan op uw computer; Windows ‘plugand-play’ (insteken en spelen) zal de hardware- drivers voor elke
uitgang installeren.
WAARSCHUWING: U MOET DE SOFTWARE VOOR HET DOCKING STATION (KOPPELSTATION) INSTALLEREN VOORDAT U HET OP DE COMPUTER AANSLUIT. ANDERS ZAL HET DOCKING STATION (KOPPELSTATION) NIET CORRECT WERKEN.
De driver van het docking station
(koppelstation) installeren
Als gevolg van de installatie van de driver voor het docking
station (koppelstation) zal het besturingssysteem het docking
station (koppelstation) en zijn uitgangen herkennen zodra het
aangesloten is.
1. Zet uw computer aan.
2 Plaats de cd met de driver software in de CD-ROM drive van
uw computer.
Klik, als setup niet automatisch opstart, op Start, Uitvoeren en
voer in: D:\Setup.exe (waar D: het pad van uw CD-ROM drive
is). Klik daarna op OK.
3 Volg de instructies die op het scherm verschijnen om de
installatie te voltooien.
4 Klik op Finish (Voltooien) en herstart uw computer wanneer
u dit gevraagd wordt.
99
 Loading...