

Page 1

Universal Laptop
Docking Station
USER GUIDE
Page 2

Table of ConTenTs
GB - English
Targus Universal Laptop Docking Station ............................ 3
DE - Deutsch
Targus Universelle Laptop-Dockingstation ........................ 21
ES - Español
Targus Docking Station Universal Para Portátil ................. 39
FR - Français
Targus Station D’accueil Universelle Pour Ordinateur Portable
............................................................................................ 57
IT - Italiano
Targus Universal Laptop Docking Station .......................... 75
NL - Nederlands
Targus Universeel Docking Station Voor Laptops .............. 93
PT - Português
Targus Universal Laptop Docking Station ........................ 111
2
Page 3

TARGUS
UNIVERSAL LAPTOP
DOCKING STATION
Introduction
Congratulations on your purchase of the Targus Universal
Laptop Docking Station. This portable expansion module
allows you to connect through a single USB connection up
to 4 USB devices, a network (Ethernet/LAN) connection,
speakers and microphone, PS/2 mouse and keyboard,
and a serial and parallel device. Also, the lock slot and
universal lock support provided helps you secure your
docking station to your desktop.
The docking station also features Targus Always On
technology, Targus USB Power Port providing twice the
USB specification for higher power requirement devices,
and USB ports that are widely spaced to acommodate
larger adapters. Targus Always On provides power
to the USB ports even when the laptop is shut-down,
disconnected from the docking station or in hibernate/
stand-by mode. This allows USB devices that charge via
the USB port to keep charging under any circumstance.
3
Page 4

Targus Universal Laptop Docking Station
Features
Heat dissipation by natural
convection:
Place the back edge of your laptop on the rubber pads of
the Docking Station. Most laptops dissipate heat through
the bottom and the more air that’s allowed to flow under
the bottom, the better chance that heat will dissipate by
natural convection.
Comfort
The raised platform also provides a more comfortable
position for the hands.
The docking station provides the
following ports:
• Two PS/2 ports
• IEEE 1284 DB25 Connector parallel (USB emulated)
• Two 3.5 mm Audio: (1) stereo out and (1) microphone
in
• RS232 serial (USB emulated)
• One S/PDIF Digital Audio Output (not supported in
Windows 2000)
• RJ-45 Ethernet 10/100
• Four USB 2.0 Ports:
- Two High-Speed USB 2.0 ports
- Two High-Speed USB 2.0 Always-On ports with extra
power
4
Page 5

Targus Universal Laptop Docking Station
Package Contents
In addition to this user guide, the package contains:
• Targus Universal Laptop Docking Station
• High-speed USB 2.0 upstream cable
• Driver software CD
• AC power adapter
System Requirements
Hardware
• PC with an Intel
• CD-ROM drive
• USB version 2.0 port
• AC power source (AC adapter required)
NOTE: WhEN cONNEcTEd TO a USB vErSiON 1.1 pOrT ON
yOUr cOmpUTEr, ThE dOckiNg STaTiON’S pErfOrmaNcE
lEvEl Will BE lESS ThaN OpTimal. fOr BEST rESUlTS,
cONNEcT iT TO a USB vErSiON 2.0 pOrT.
Operating System
• Windows® 2000 Service Pack 4 or
• Windows® XP Service Pack 3 or
• Windows Vista® Service Pack 1
®
Pentium® processor or equivalent
5
Page 6

Targus Universal Laptop Docking Station
Installing the Device
and Drivers
To use the Targus docking station, you must first install
the driver onto your computer.
WarNiNg: yOU mUST iNSTall ThE SOfTWarE BEfOrE
cONNEcTiNg ThE dOckiNg STaTiON TO yOUr cOmpUTEr.
OThErWiSE, ThE dOckiNg STaTiON Will NOT WOrk prOpErly.
After installing your software, connect the docking station
to your computer and Windows plug-and-play will install
the hardware drivers for each port.
Installing the Docking Station
Driver
Installing the docking station driver enables your
operating system to recognize it and its ports once it’s
connected.
1 Turn on your computer.
2 Insert the driver software CD into your computer’s
CD-ROM drive.
If setup does not begin automatically, click Start, Run,
and enter D:\ACP45_setup.exe (where D: is the path of
your CD-ROM drive) and then click OK.
6
Page 7

Targus Universal Laptop Docking Station
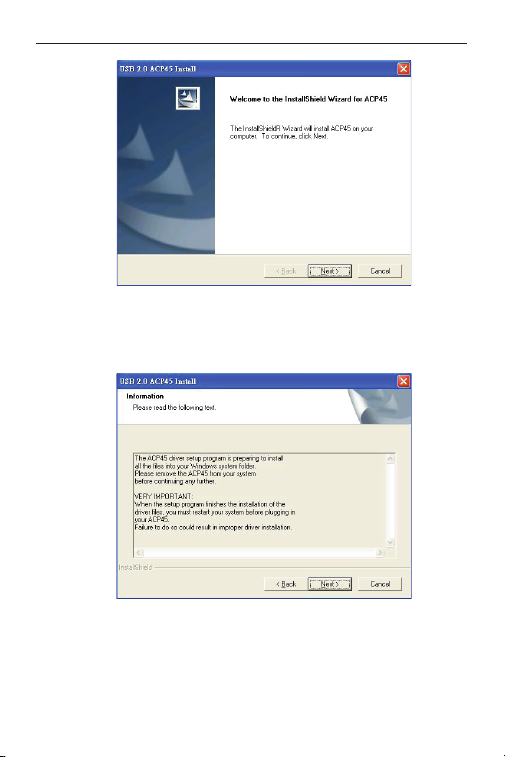
3 The Installation Wizard window of the docking station
will pop up. Click Next to proceed.
4 The
Information window will pop up. Click Next to
proceed. In order to install the driver files properly,
you must restart your system before plugging in
the docking station.
7
Page 8
Targus Universal Laptop Docking Station
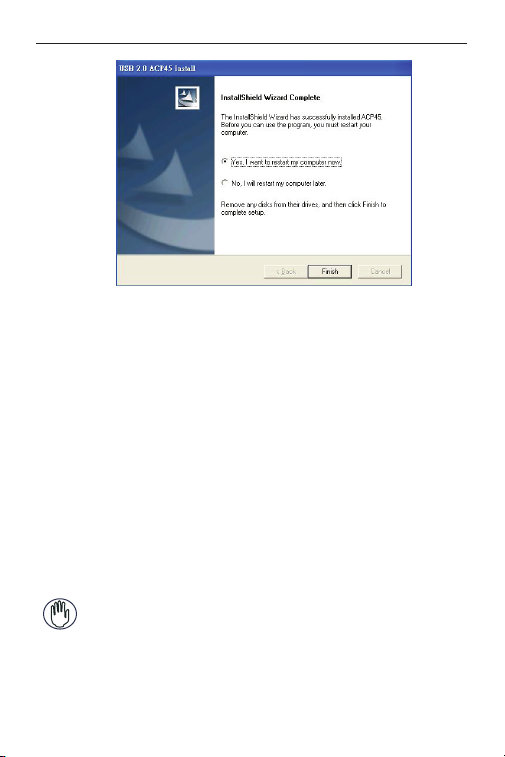
5 Choose Yes, I want to restart my computer now.
Click Finish and restart your computer when
prompted.
Connecting the Docking
Station to Your Computer
After installing the docking station software, you are
ready to connect the docking station to your computer. To
do this:
1 Connect the supplied AC power adapter to the AC
power jack on the docking station.
2 Connect one end of the USB cable to the docking
station and the other end into an available USB 2.0
port on your computer.
WarNiNg: ThE dOckiNg STaTiON Will NOT fUNcTiON
prOpErly WiThOUT ThE ac adapTEr plUggEd iNTO aN ac
OUTlET.
dO NOT cONNEcT aNy dEvicES TO ThE dOckiNg STaTiON
UNTil ThE iNSTallaTiON iS cOmplETEd.
8
Page 9

Targus Universal Laptop Docking Station
Installing the Default Device
Drivers
Once you connect the docking station to your computer,
the default drivers begin installing for each of the ports
automatically.
NOTE: plEaSE ENSUrE yOU havE ThE laTEST SErvicE packS
iNSTallEd.
Some hardware devices may prompt you to install the
drivers.
To install the drivers:
1 Select Install the software automatically
(Recommended) and click Next.
The Found New Hardware Wizard program begins
installing the hardware drivers.
The Completing the Found New Hardware Wizard
screen appears.
2 Click Finish and repeat as needed for each device.
3 Restart your computer.
LED Status Indicator Lights
Once all device drivers are installed, the USB LED status
indicator lights on the back of the docking station glow
when you connect devices to the docking station.
• Green Tx light illuminates when connected to a
network and the yellow Rx light flashes when data is
transmitting to or from the network.
NOTE: ThE dOckiNg STaTiON SUppOrTS hOT SWappiNg Of
ThE NETWOrk caBlE.
9
Page 10
Targus Universal Laptop Docking Station
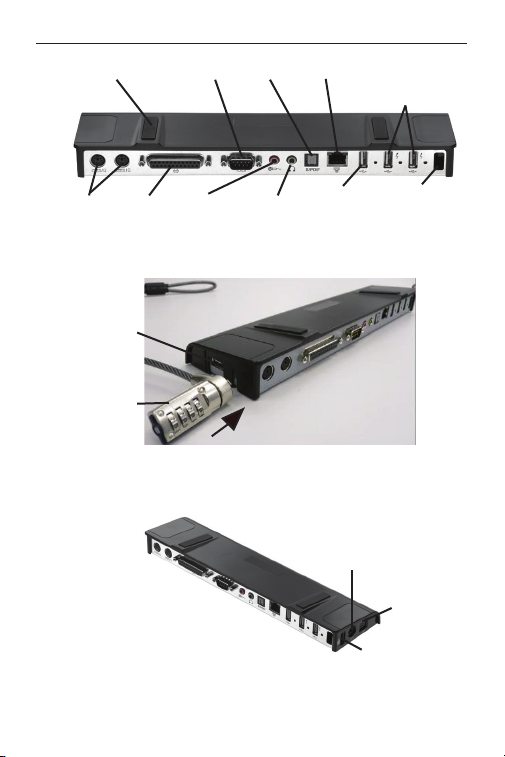
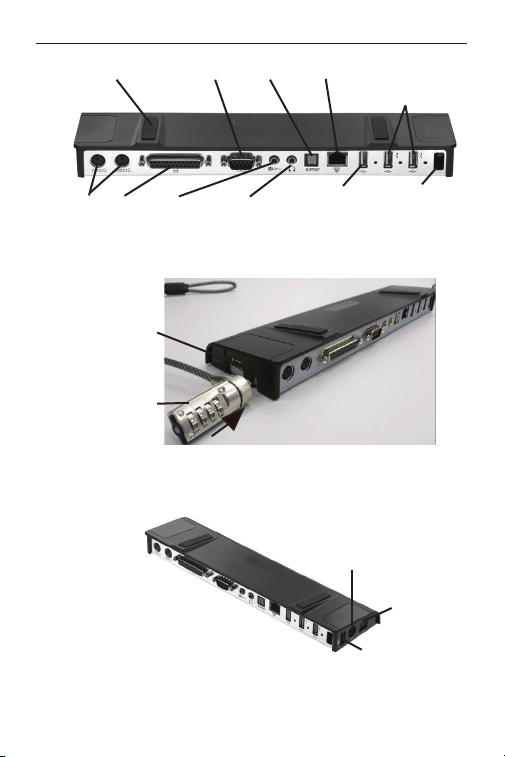
Laptop Support Pad
PS/2 Parallel Audio In Audio Out
Serial S/PDIF Network High-Speed USB
Docking station ports
“Easy Access”
High-Speed
USB 2.0 Port
Targus
DEFCON CL,
PA410E (not
included)
Docking station left-side view
Docking station right-side view
10
High-Speed
USB 2.0 Port
AC Adapter
2.0 Always-On
with Extra Power
Cable
Lock Slot
USB to PC
Connection
Cable
Lock Slot
Page 11

Targus Universal Laptop Docking Station
Connecting New
Devices
To avoid possible damage when connecting a new
device, do not force the cable connector into the port on
the docking station. If the cable connector does not attach
smoothly, turn the connector over and try attaching it
again.
Connecting a Serial Mouse /
Keyboard
To connect a serial mouse or keyboard, attach the cable
connector to the serial port on the docking station.
Connecting a PS/2 Mouse /
Keyboard
To connect a PS/2 mouse or keyboard, attach the cable
connector to the PS/2 port on the docking station.
Connecting and Conguring a
Serial Modem
To connect a serial modem:
1 Attach the cable connector to the serial port on the
docking station.
2 Install the modem software driver according to the
instructions that come with the device.
3 When prompted to select the port, choose the Serial
USB (COMx), where x is the COM port number
assigned by your operating system.
11
Page 12

Targus Universal Laptop Docking Station
Connecting a Parallel Printer
To connect a parallel printer:
1 Attach the cable connector to the parallel port on the
docking station.
2 Go to Start button of your Window OS, and click on
Printers and Faxes. Add your printer driver by
following the instructions of the
Add Printer Wizard.
Connecting a PDA
1 Attach the cable connector to the serial port on the
docking station.
2 Verify that the COM port setting, in either your
HotSync
on the docking station.
To verify the COM port setting on the docking station,
refer to “Verifying Devices are Installed”.
To verify the COM port setting on your PDA, refer to
the documentation that came with it.
®
or ActiveSync® software, matches the setting
Connecting to a Local Area
Network
To connect an Ethernet cable with an RJ-45 connector,
attach the cable connector to the Ethernet/network port
on the docking station. Additional procedures to connect
to an actual network depend on the type of network you
are using. Contact your network administrator for detailed
instructions.
12
Page 13

Targus Universal Laptop Docking Station
Connecting a USB Device
To connect a USB device, plug it into a USB port on the
docking station and follow the additional instructions
provided with the device.
All four USB ports meet USB High-speed requirements
by providing 480Mbps and 500mA of power. However, the
two USB ports on the right side denoted by this symbol
have two unique features - Always On and High Power.
See “Targus Always On” and “Using USB Devices That
Require More Power” for more details.
The other USB ports (one on the side and the other on
the back next to the Ethernet port) are ports that provide
the standard 500 mA of power.
Connecting and Conguring an
Audio Device
1 Plug your headphones or speakers into the green
3.5mm
2 To connect a microphone, plug it into the mono Audio
In port.
3 To enable your headphones or speakers, you must
first choose USB PnP Sound Device in the Properties
Settings.
For Windows 2000, click Start, Settings, Control Panel,
and then open the Sounds and Multimedia folder.
Select the Audio tab. Under Sound Playback, change
Preferred Device to USB PnP Sound Device from the
drop down list.
Click Apply, then click OK.
Audio Out port on the docking station.
13
Page 14

Targus Universal Laptop Docking Station
For Windows XP, go to the Control Panel and choose
Sound and Audio. Select the Audio tab. Under Sound
Playback, change Preferred Device to USB PnP Sound
Device from the drop down list.
Click Apply, then click OK.
For Windows Vista, go to the Control Panel and choose
Hardware and Sound. Select Sound. Under the
Playback tab, select Digital Output of the USB PnP
Sound Device.
Click Set Default.
4 Make sure the volume is not set to MUTE.
NOTE: aUdiO dEvicES Will NOT WOrk SimUlTaNEOUSly ON
ThE pOrT STaTiON aNd ThE hOST cOmpUTEr.
caUTiON: all aUdiO Or mUlTimEdia applicaTiONS mUST BE
TErmiNaTEd BEfOrE SWiTchiNg BETWEEN ThE pOrT STaTiON
aUdiO OUTpUT aNd ThE hOST cOmpUTEr aUdiO OUTpUT.
14
Page 15
Targus Universal Laptop Docking Station
Installing and Conguring a
S/PDIF (Sony/ Philips Digital
Interface) Device
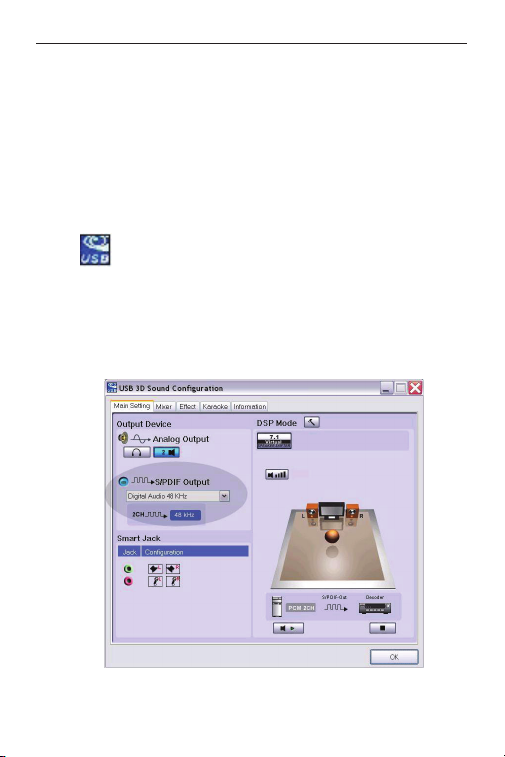
1 In order to enable S/PDIF, you have to turn it on.
This can be done by opening the USB 3D Sound
Configuration applet located in your system tray (click
on the USB icon to open up the Configuration Screen).
2 Click on the button next to the S/PDIF Output text to
enable S/PDIF.
3 Set the Audio Output from the Tray.
15
Page 16
Targus Universal Laptop Docking Station
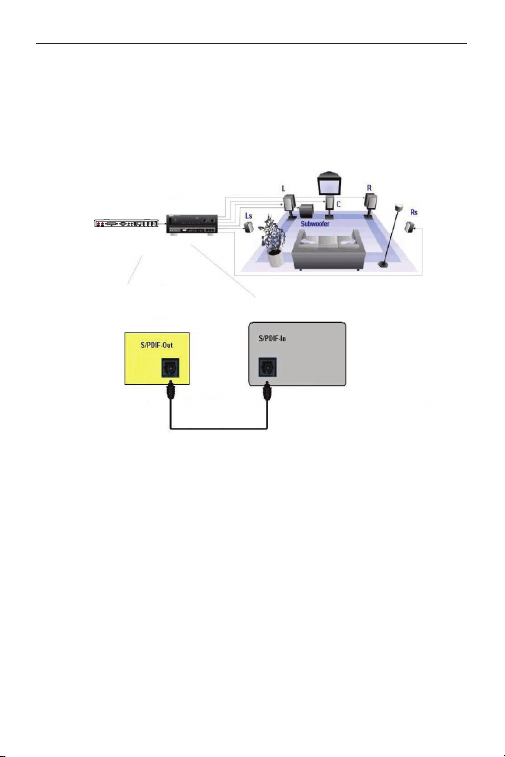
Universal Docking Station
Universal Docking Station
Digital Decoder
A/V Receiver
Optical Cable (Not included)
Home Theatre
ZOOM IN
4 Plug your optical cable (not included) into the
S/PDIF-Out port of docking station on one end, and
the S/PDIF-In port of Digital Decoder or Speaker on
the other end.
5 Connect your Digital Decoder or Speaker to the Home
Theater System.
Global Suspend Mode
When your computer is in suspend mode, the docking
station also enters suspend mode to avoid power
consumption. When your computer wakes up, the docking
station wakes up automatically.
16
Page 17

Targus Universal Laptop Docking Station
Targus Always On
The two USB ports that provide up to 1 Amp of power
will continue providing power even when the laptop is
powered down or disconnected from the docking station.
This allows you to charge any USB device you connect to
these ports without powering your laptop.
Using USB Devices
That Require More
Power
Some devices, which use large amounts of power, such
as printers and optical drives, should be plugged into the
High Power USB Ports. These ports will provide up to
1000 mA of power - double the power of a standard USB
ports.
Product Limitations
Some devices may halt temporarily when a high data
transfer is occurring. For example, your mouse may
respond slowly while a graphic print job is printing or
while you are experiencing heavy network traffic.
We recommend the following guidelines:
• Do not transfer data to or from multiple high-speed
devices, such as a digital camera or scanner, at the
same time.
• If speed degradation does occur, close other programs
that use a USB device to improve device performance.
17
Page 18

Targus Universal Laptop Docking Station
Troubleshooting
Device Not Working
• Make sure that the device is fully inserted into the
correct port on the docking station.
• Plug the device into a different port on the docking
station. If it still doesn’t work, test the device by
connecting it directly to your computer.
• Verify that you ran the Setup or Install program for the
device.
• Make sure that the device appears in Device Manager.
For more information refer to “Verifying Devices are
Installed”.
• Disconnect all devices from the docking station and
reconnect them, one at a time. Check that each device
works before plugging in the next one.
• Each USB port is equipped with over-current
protection. Should a USB device draw more current
than the USB port can supply, the port will shut down.
To re-enable the port, unplug the device and go to
Device Manager or to the message in the system
tray and choose the
plug the device back into the USB port. If a shut down
reoccurs, check the power requirements of the device.
Reset option. You can then
18
Page 19

Targus Universal Laptop Docking Station
Verifying Devices are Installed
You can view the devices installed on the docking station
from the Device Manager window in System Properties.
Right-click My Computer, Properties, then click the
Hardware tab, and then the Device Manager button.
From the Device Manager window, expand the following:
• Human Interface Devices - displays keyboards and
pointing devices: mice, trackballs, and joysticks
• Keyboards — displays PS/2 keyboards
• Mice and Other Pointing Devices — displays PS/2
mouse
• Network Adapters — displays ASIX AX88772A USB
2.0 fast Ethernet Adapter
• Ports (COM & LPT) — Prolific USB-to-Serial Comm
Port (COM X)
ound, Video and Game Controllers — displays
• S
USB PnP Sound Device
• U
niversal Serial Bus controllers — displays the other
devices installed for the docking station and generic
hub
19
Page 20

Targus Universal Laptop Docking Station
Verifying a Serial Modem
Connection
When attaching a modem to the serial (RS232) port,
verify that the port assigned to your modem is Serial USB
(COMx), where x is the number of the COM port.
If the operating system does not detect automatically that
your modem is assigned to Serial USB (COMx), run the
Hardware Wizard again and choose Select from the list
instead of Autodetect. Then, select use Prolific Device
from Page as the COM port.
Error Message on Your PDA
If the error message “Connection Not Established”
appears on your PDA, check that the COM port setting in
either your HotSync or ActiveSync software matches the
setting on the docking station. See “Verifying Devices are
Installed” to verify the COM port setting on the docking
station.
Some older versions of the Palm® Desktop software are
not compatible with the USB to Serial conversion. Please
contact your PDA vendor for software updates.
Palm and HotSync are registered trademarks of Palm, Inc. Microsoft, Windows, Windows
Vista and ActiveSync are either registered trademarks or trademarks of Microsoft Corporation
in the United States and/or other countries. All trademarks and registered trademarks are
the properties of their respective owners. All rights reserved. Features and specifications are
subject to change without notice. © 2008, Targus Group International, Inc. and Targus Group
(UK) Ltd.
20
Page 21

TARGUS
UNIVERSELLE
NOTEBOOK-
DOCKINGSTATION
Einführung
Herzlichen Glückwunsch zum Kauf der universellen
Notebook-Dockingstation von Targus. Mit Hilfe dieses
tragbaren Erweiterungsmoduls können Sie über einen
einzelnen USB-Anschluss bis zu vier USB-Geräte,
Lautsprecher und Mikrofon, PS/2-Maus und -Tastatur, ein
serielles und ein paralleles Gerät anschließen sowie eine
Netzwerkverbindung (Ethernet/LAN) herstellen. Ein
Kabel- und ein Universalschloss bieten zudem die
Möglichkeit, die Dockingstation an einem Schreibtisch zu
sichern.
Ferner verfügt die Dockingstation über die TargusAlways-On-Technologie, einen Targus USB-Power-Port
mit doppelter USB-Spezifikation für Geräte mit höherem
Versorgungsbedarf, und USB-Ports, die genügend Platz
für den Anschluss größerer Adapter bieten. Die Targus
Always-On-Technologie versorgt die USB-Ports auch
dann, wenn das Notebook ausgeschaltet ist, von der
Dockingstation abgetrennt ist oder sich im Ruhezustand /
Standby-Modus befindet. So können USB-Geräte. die
über den USB-Port versorgt werden, in jeder Situation
aufgeladen werden.
21
Page 22

Targus Universelle Notebook-Dockingstation
Merkmale
Wärmeableitung durch natürliche
Konvektion:
Stellen Sie die Hinterkante Ihres Laptops auf die
Gummipuffer der Dockingstation. Bei den meisten
Laptops wird die Wärme über die Unterseite abgeleitet.
Je mehr Luft daher an die Unterseite gelangen kann,
desto besser kann die Wärme durch natürliche
Konvektion abgeleitet werden.
Komfort
Die angehobene Plattform ermöglicht eine bequemere
Handhaltung und sorgt für eine bessere Kühlung.
Die Dockingstation verfügt über
folgende Anschlüsse:
• zwei PS/2-Ports
• ein paralleler IEEE 1284 DB25-Anschluss (USB
nachgebildet)
• zwei 3,5-mm-Audioanschlüsse: ein Stereoausgang und
ein Mikrofoneingang
• ein serieller RS232-Anschluss (USB nachgebildet)
• ein digitaler S/PDIF-Audioausgang (wird nicht von
Windows 2000 unterstützt)
• ein RJ45 Ethernet 10/100-Anschluss
• Vier USB 2.0 Ports:
- Zwei Hochgeschwindigkeits- USB 2.0 Ports
- Zwei Always-On Hochgeschwindigkeits- USB 2.0
Ports mit extra Kraft
22
Page 23

Targus Universelle Notebook-Dockingstation
Lieferumfang
Zusätzlich zu diesem Benutzerhandbuch umfasst der
Lieferumfang:
• Targus Universal-Dockingstation
• High-Speed USB 2.0 Upstream-Kabel
• Treibersoftware-CD
• Netzstromadapter
Systemvoraussetzungen
Hardware
• PC mit einem Intel® Pentium® oder entsprechenden
Prozessor
• CD-ROM-Laufwerk
• USB 2.0-Port
• Netzstromquelle (Netzadapter erforderlich)
HINWEIS: BEIM ANSCHLUSS AN EINEN USB 1.1-PORT IHRES
COMPUTERS ERREICHT DIE DOCKINGSTATION NICHT DIE
OPTIMALE LEISTUNG. FÜR OPTIMALE RESULTATE SCHLIESSEN
SIE SIE AN EINEN USB 2.0-PORT AN.
Betriebssystem
• Windows® 2000 Service Pack 4 oder
• Windows® XP Service Pack 3 oder
• Windows Vista® Service Pack 1
23
Page 24

Targus Universelle Notebook-Dockingstation
Gerät und Treiber
installieren
Bevor die Targus Dockingstation verwendet werden
kann, muß zuerst der Treiber auf dem Computer
installiert werden.
ACHTUNG: DIE SOFTWARE FÜR DIE DOCKINGSTATION MUSS
INSTALLIERT WERDEN, BEVOR SIE AN DEN COMPUTER
ANGESCHLOSSEN WIRD. ANDERNFALLS FUNKTIONIERT DIE
DOCKINGSTATION NICHT RICHTIG.
Die Dockingstation an Ihren Computer anschliessen,
damit Windows Plug-and-Play die Hardwaretreiber für
jeden Anschluss installieren kann.
Den Treiber für die
Dockingstation installieren
Wenn der Treiber für die Dockingstation installiert ist,
kann das Betriebssystem die Dockingstation und ihre
Anschlüsse nach deren Anschluss erkennen.
1 Schalten Sie den Computer ein.
2 Stecken Sie die Treibersoftware CD in das CD-ROM
Laufwerk Ihres Computers.
Falls die Einrichtung der Software nicht automatisch
beginnt, klicken Sie Start, Run, geben
D:\ACP45_setup.exe ein (wobei D: der Pfad des CDROM Laufwerks ist) und klicken dann auf OK.
24
Page 25
Targus Universelle Notebook-Dockingstation
3 Das Fenster mit dem Installationsassistenten für die
Dockingstation erscheint. Klicken Sie auf Next
(Weiter), um fortzufahren.
Informationsfenster erscheint. Klicken Sie auf
4 Das
Next, um fortzufahren. Damit die Treiberdateien
korrekt installiert werden, müssen Sie Ihr System
neu starten, bevor Sie die Dockingstation
anschließen.
25
Page 26

Targus Universelle Notebook-Dockingstation
5 Wählen Sie Yes (Ja), um den Computer jetzt neu zu
starten. Klicken Sie auf Finish (Fertig stellen), und
starten Sie Ihren Computer, wenn die Aufforderung
erfolgt.
Schließen Sie die
Dockingstation an Ihren
Computer an
Nach dem Installieren der Dockingstation-Software
können Sie die Dockingstation an Ihren Computer
anschließen. Dazu tun Sie Folgendes:
1 Schließen Sie den mitgelieferten Netzstromadapter
an der Netzbuchse der Dockingstation an.
2 Schließen Sie ein Ende des USB-Kabels an der
Dockingstation und das andere Ende an einem freien
USB 2.0-Port Ihres Computers an.
WARNUNG: DIE DOCKINGSTATION FUNKTIONIERT NUR
EINWANDFREI, WENN DER NETZSTROMADAPTER AN EINER
STECKDOSE ANGESCHLOSSEN IST. SCHLIESSEN SIE ANDERE
GERÄTE ERST AN DER DOCKINGSTATION AN, WENN DIE
INSTALLATION ABGESCHLOSSEN IST.
26
Page 27

Targus Universelle Notebook-Dockingstation
Installieren der
standardmäßigen
Gerätetreiber
Nachdem Sie die Dockingstation an Ihren Computer
angeschlossen haben, werden automatisch die
standardmäßigen Treiber für jeden der Ports installiert.
HINWEIS: ACHTEN SIE BITTE DARAUF, DIE NEUESTEN
SERVICEPACKS ZU INSTALLIEREN.
Manche Geräte fordern dazu auf, die Treiber zu
installieren.
So installieren Sie die Treiber:
1 Wählen Sie Software automatisch installieren
(empfohlen), und klicken Sie dann auf Weiter.
Der Assistent für neue Hardware beginnt nun damit,
die Gerätetreiber zu installieren.
Anschließend erscheint der Abschlussbildschirm des
Hardwareassistenten.
2 Klicken Sie auf Fertig stellen, und wiederholen Sie
die Schritte für jedes Gerät.
3 Starten Sie Ihren Computer neu.
LED-Statusanzeigen
Nachdem alle Gerätetreiber installiert sind, leuchten die
USB-Status-LEDs auf der Rückseite der Dockingstation
auf, wenn Geräte angeschlossen werden.
• Die grüne Tx-LED leuchtet beim Anschluss an ein
Netzwerk, und die gelbe Rx-LED blinkt, wenn Daten
zum oder vom Netzwerk übertragen werden.
HINWEIS: DIE DOCKINGSTATION UNTERSTÜTZT EIN “HOT
SWAPPING” DES NETZWERKKABELS.
27
Page 28
Targus Universelle Notebook-Dockingstation
Laptopauflage
PS/2 Parallel Audioeingang Audioausgang
Seriell S/PDIF Netzwerk Always-On
Ports an der Dockingstation
„Leichter Zugang“
HochgeschwindigkeitsUSB 2.0 Port
Targus
DEFCON CL,
PA410U
(nicht
enthalten)
Linke Seite der Dockingstation
HochgeschwindigkeitsUSB 2.0 mit extra Kraft
HochgeschwindigkeitsUSB 2.0 Port
Netzstromadapter
Kabelsicherung
USB-zu-PC
Anschluss
Rechte Seite der Dockingstation
28
Kabelsicherung
Page 29

Targus Universelle Notebook-Dockingstation
Anschließen neuer
Geräte
Um mögliche Schäden zu vermeiden, dürfen die Kabel
neuer Geräte nicht mit Gewalt an der Dockingstation
angeschlossen werden. Sollte sich ein Kabel nicht
problemlos anschließen lassen, drehen Sie den Stecker
um, und probieren es erneut.
Anschließen einer seriellen
Maus/Tastatur
Um eine serielle Maus oder Tastatur anzuschließen,
schließen Sie den Stecker am seriellen Port der
Dockingstation an.
Anschließen einer PS/2-Maus/
Tastatur
Um eine PS/2-Maus oder Tastatur anzuschließen,
schließen Sie den Kabelstecker am PS/2-Port der
Dockingstation an.
Anschließen und Kongurieren
eines seriellen Modems
So schließen Sie ein serielles Modem an:
1 Schließen Sie den Stecker am seriellen Port der
Dockingstation an.
2 Installieren Sie die Modemsoftwaretreiber gemäß den
Anweisungen, die Sie zusammen mit dem Gerät
erhalten haben.
3 Wählen Sie bei entsprechender Aufforderung den
seriellen USB-Port (COMx), wobei x die von Ihrem
Betriebssystem zugewiesene COM-Port-Nummer ist.
29
Page 30

Targus Universelle Notebook-Dockingstation
Anschließen eines parallelen
Druckers
So schließen Sie einen parallelen Drucker an:
1 Schließen Sie den Stecker am parallelen Port der
Dockingstation an.
2 Drücken Sie Start-Taste Ihres Windows Betriebssystems und klicken Sie auf Drucker und
Faxgeräte. Fügen Sie mit Hilfe des
Druckerassistenten Ihren Druckertreiber hinzu.
Anschließen eines PDA
1 Schließen Sie den Stecker am seriellen Port der
Dockingstation an.
2 Überprüfen Sie, ob die COM-Port-Einstellung
(entweder in der HotSync
Software) mit den Einstellungen an der
Dockingstation übereinstimmt.
Hinweise hierzu finden Sie unter “Überprüfen
angeschlossener Geräte”.
Um die COM-Port-Einstellungen Ihres PDA zu
überprüfen, informieren Sie sich bitte anhand der
zugehörigen Dokumentation.
®
- oder ActiveSync®-
Anschließen an ein lokales
Netzwerk
Um ein Ethernet-Kabel mit einem RJ45-Stecker
anzuschließen, verbinden Sie das Kabel mit dem
Ethernet/Netzwerk-Port der Dockingstation. Zusätzliche
Maßnahmen bei einem bestimmten Netzwerk sind von
der Art des jeweiligen Netzwerks abhängig. Für
ausführliche Hinweise wenden Sie sich bitte an Ihren
Netzwerkadministrator.
30
Page 31

Targus Universelle Notebook-Dockingstation
Anschließen eines USBGerätse
Um ein USB-Gerät anzuschließen, verbinden Sie es mit
einem USB-Port der Dockingstation und befolgen die mit
dem Gerät gelieferten zusätzlichen Hinweise.
Alle vier USB-Ports erfüllen die USB High-SpeedAnforderungen für 480 Mbit/s und 500 mA Leistung.
Allerdings verfügen die zwei USB Ports auf der rechten
Seite, gekennzeichnet durch dieses Symbol , über
zwei einzigartige Eigenschaften – Always-On und Hohe
Leistung. Siehe hierzu “Targus Always-OnTechnologie” und “USB-Geräte mit höherem
Leistungsbedarf”.
Die übrigen USB Ports (seitlich und rückseitig, neben
dem Ethernet Port) sind Ports, die die Standardenergie
von 500 mA liefern.
Anschließen und Kongurieren
eines Audiogeräts
1 Schließen Sie Ihre Kopfhörer oder Lautsprecher am
grünen 3,5-mm
2 Ein Mikrofon schließen Sie am Mono-Audioeingang
an.
3 Um Ihre Kopfhörer oder Lautsprecher benutzen zu
können, müssen Sie zunächst in den
Eigenschafteneinstellungen USB PnP Sound
Device wählen.
Audioausgang der Dockingstation an.
31
Page 32

Targus Universelle Notebook-Dockingstation
Bei Windows 2000 klicken Sie dazu auf Start,
Einstellungen, Systemsteuerung, und öffnen dann den
Ordner Sounds und Multimedia. Wählen Sie die
Registerkarte Audio. Ändern Sie unter
Audiowiedergabe die Option Bevorzugtes Gerät
anhand der Auswahlliste zu USB PnP Sound Device.
Klicken Sie auf Übernehmen und dann auf OK.
Bei Windows XP gehen Sie in die Systemsteuerung
und wählen Sound und Audiogeräte. Wählen Sie die
Registerkarte Audio. Ändern Sie unter
Audiowiedergabe die Option Bevorzugtes Gerät
anhand der Auswahlliste zu USB PnP Sound Device.
Klicken Sie auf Übernehmen und dann auf OK.
Gehen Sie, bei Windows Vista, zur Systemsteuerung
und wählen Sie Hardware und Sound. Wählen Sie
Sound. Wählen Sie, unter dem Tab Wiedergabe,
Digitale Ausgabe des USB PnP Soundgerätes.
Klicken Sie Standardeinstellung festlegen.
4 Achten Sie darauf, dass unter Lautstärke nicht Ton
aus markiert ist.
HINWEIS: AUDIOGERÄTE FUNKTIONIEREN NICHT GLEICHZEITIG
AN DER PORTSTATION UND DEM HOST-COMPUTER.
VORSICHT: ALLE AUDIO- ODER MULTIMEDIAANWENDUNGEN
MÜSSEN BEENDET WORDEN SEIN, BEVOR ZWISCHEN DEM
AUDIOAUSGANG DER PORTSTATION UND DEM DES
HOSTCOMPUTERS UMGESCHALTET WERDEN KANN.
32
Page 33

Targus Universelle Notebook-Dockingstation
Installieren und Kongurieren
eines S/PDIF (Sony/ Philips
Digital Interface)-Geräts
1 Um die S/PDIF-Funktion zu aktivieren, müssen Sie
sie einschalten. Dies kann erfolgen, indem man das
USB 3D-Soundkonfigurierungsprogramm im Infofeld
öffnet (klicken Sie auf das USB-Symbol, um den
Konfigurationsbildschirm aufzurufen).
2 Klicken Sie auf die Schaltfläche neben “S/PDIF
Output”, um die S/PDIF-Funktion zu aktivieren.
3 Richten Sie die Audioausgabe über das Infofeld ein.
33
Page 34

Targus Universelle Notebook-Dockingstation
Universal Docking Station
Universal Docking Station
Digital Decoder
A/V Receiver
Optical Cable (Not included)
Home Theatre
ZOOM IN
4 Schließen Sie das optische Kabel (nicht enthalten) mit
einem Ende am S/PDIF-Ausgang der Dockingstation
und dem anderen Ende am S/PDIF-Eingang des
digitalen Decoders oder Lautsprechers an.
5 Schließen Sie den digitalen Decoder oder
Lautsprecher am Home-Theater-System an.
Allgemeiner
Ruhezustandsmodus
Wenn sich Ihr Computer im Ruhezustand befindet,
wechselt auch die Dockingstation in den Ruhezustand,
um Energie zu sparen. Sobald Ihr Computer reaktiviert
wird, geschieht dies automatisch auch mit der
Dockingstation.
34
Page 35

Targus Universelle Notebook-Dockingstation
Targus Always-OnTechnologie
Die beiden USB-Ports mit bis zu 1 A Leistung versorgen
auch dann noch mit Strom, wenn der Laptop
ausgeschaltet oder von der Dockingstation abgetrennt
ist. Dies ermöglicht Ihnen, jedes USB Gerät, das Sie an
diese Ports anschließen, zu laden, ohne Ihr Notebook
einzuschalten.
USB-Geräte mit höherem
Leistungsbedarf
Manche Geräte mit einer hohen Leistungsaufnahme, wie
beispielsweise Drucker und optische Geräte, sollten an
den USB-Power-Ports angeschlossen werden. Diese
Ports liefern eine Leistung bis zu 1000 mA und damit
doppelt so viel wie standardmäßige USB-Ports.
Produktbeschränkungen
Manche Geräte stoppen vorübergehend, wenn große
Datenmengen übertragen werden. Beispielsweise kann
Ihre Maus nur langsam reagieren, während ein
Grafikdruckjob ausgeführt wird oder starker Verkehr im
Netzwerk vorherrscht. Wir empfehlen folgende
Richtlinien:
• Übertragen Sie nicht Daten gleichzeitig zu oder von
mehreren Hochgeschwindigkeitsgeräten wie einer
Digitalkamera oder einem Scanner.
• Sollte es zu Geschwindigkeitseinbußen kommen,
schließen Sie andere Programme, die ein USB-Gerät
benutzen, um die Geräteleistung zu verbessern.
35
Page 36

Targus Universelle Notebook-Dockingstation
Störungsbeseitigung
Das Gerät funktioniert nicht
• Kontrollieren Sie, ob das Gerät vollständig am richtigen
Port der Dockingstation angeschlossen ist.
• Schließen Die das Gerät an einen anderem Port der
Dockingstation an. Sollte es immer noch nicht
funktionieren, überprüfen Sie das Gerät, indem Sie es
direkt an Ihren Computer anschließen.
• Achten Sie darauf, das Setup- oder
Installationsprogramm für das betreffende Gerät
auszuführen.
• Kontrollieren Sie, ob das Gerät im Geräte-Manager
erscheint. Weitergehende Informationen finden Sie
unter “Überprüfen angeschlossener Geräte”.
• Trennen Sie alle Geräte von der Dockingstation ab und
schließen Sie sie einzeln nacheinander wieder an.
Überprüfen Sie, ob jedes Gerät funktioniert, bevor Sie
das nächste anschließen.
• Jeder USB-Port verfügt über einen Überstromschutz.
Sollte ein USB-Gerät mehr Strom ziehen, als der USB
Port bereitstellen kann, wird der Port abgeschaltet. Um
den Port wieder reaktivieren, trennen Sie das Gerät ab
und wechseln zum Geräte-Manager oder zur
entsprechenden Meldung im Infobereich und wählen
die Option zum Zurücksetzen. Anschließend können
Sie das Gerät wieder am USB-Port anschließen. Sollte
es erneut zu einer Abschaltung kommen, überprüfen
Sie den Leistungsbedarf des Geräts.
36
Page 37

Targus Universelle Notebook-Dockingstation
Überprüfen angeschlossener
Geräte
Die an der Dockingstation angeschlossenen Geräte
werden im Fenster des Geräte-Managers in den
Systemeigenschaften angezeigt.
Klicken Sie mit der rechten Maustaste auf Arbeitsplatz,
Eigenschaften, wählen Sie die Registerkarte Hardware,
und klicken Sie dann auf Geräte-Manager.
Im Fenster des Geräte-Managers können Sie folgende
Elemente erweitern:
• Eingabegeräte - zeigt Tastaturen und Zeigegeräte:
Mäuse, Trackballs und Joysticks
• Tastaturen - zeigt PS/2-Tastaturen
• Mäuse und andere Zeigegeräte - zeigt PS/2-Mäuse
• Netzwerkadapter - zeigt den ASIX AX88772A USB 2.0
Fast Ethernet-Adapter
• Anschlüsse (COM und LPT) - Prolific USB-to-Serial
Comm Port (COM X)
• Audio-, Video- und Gamecontrollers - zeigt das
USB PnP Sound-Gerät
• USB-Controller – zeigt weitere an der Dockingstation
angeschlossene Geräte und den generischen Hub
37
Page 38

Targus Universelle Notebook-Dockingstation
Überprüfen eines seriellen
Modems Anschluss
Beim Anschließen eines Modems am seriellen (RS232)
Port müssen Sie überprüfen, ob der Ihrem Modem
zugeordnete Port ein serieller USB-Port (COMx) ist,
wobei x die Nummer des COM-Ports ist. Falls das
Betriebssystem nicht automatisch erkennt, dass Ihr
Modem dem seriellen USB-Port (COMx) zugeordnet ist,
führen Sie den Hardwareassistenten erneut aus und
wählen anstatt Aus einer Liste wählen die Option
Automatische Erkennung. Wählen Sie anschließend
das Prolific-Gerät als COM-Port.
Fehlermeldung beim PDA
Sollte auf Ihrem PDA die Fehlermeldung “Connection Not
Established” (Keine Verbindung hergestellt) erscheinen,
überprüfen Sie, ob die COM-Port-Einstellung entweder in
der HotSync- oder der ActiveSync-Software mit der
Einstellung an der Dockingstation übereinstimmt. Siehe
auch “Überprüfen angeschlossener Geräte”, um zu
überprüfen, ob die COM-Port-Einstellung mit der
Einstellung an der Dockingstation übereinstimmt.
Einige ältere Versionen der Palm® Desktop-Software
sind nicht mit der USB-zu-Seriell-Konvertierung
kompatibel. Wenden Sie sich bitte an Ihren PDA-Händler
zwecks einer softwareaktualiserung.
Palm und HotSync sind eingetragene Marken der Palm, Inc. Microsoft, Windows, Windows
Vista und ActiveSync sind eingetragene Marken der Microsoft Corporation in den USA
und/oder in anderen Ländern. Alle eingetragenen Marken sind das Eigentum des jeweiligen
Eigentümers. Alle Rechte vorbehalten. Die Funktionsmerkmale und Spezifikationen können
ohne vorherige Mitteilung geändert werden. © 2008, Targus Group International, Inc. und
Targus Group (GB) Ltd.
38
Page 39

TARGUS DOCKING
STATION UNIVERSAL
PARA PORTÁTIL
Introducción
Enhorabuena por adquirir la Docking Station universal
para portátil de Targus. Este módulo de expansión
portátil le permite conectar a través de una sola conexión
hasta 4 dispositivos USB, una conexión de red (Ethernet/
LAN), altavoces y un micrófono, un ratón y un teclado
PS/2, un dispositivo serie y uno paralelo. Además, la
ranura para cierre de seguridad y el cierre universal que
se incluyen le ayudan a conectar la docking station a su
ordenador de sobremesa de forma segura.
La docking station cuenta además con tecnología de
alimentación permanente Always On de Targus, un puerto
de alimentación USB Targus que proporciona el
doble de la especificación USB para dispositivos que
requieren una alimentación superior, y puertos USB
ampliamente separados para admitir adaptadores de
mayor tamaño. Always On de Targus proporciona
corriente a los puertos USB incluso cuando el portátil
está apagado, desconectado de la docking station o en
modo de hibernación o espera. Esto permite a los
dispositivos USB que se estén cargando a través
del puerto USB seguir recibiendo alimentación bajo
cualquier circunstancia.
39
Page 40

Targus Docking Station Universal Para Portátil
Características
Disipación del calor por convección
natural:
Sitúe el borde trasero del portátil sobre las almohadillas
de goma de la Docking Station. La mayoría de los
portátiles disipan el calor a través de su parte inferior, y
cuanto más aire se deja pasar por ésta, más
posibilidades hay de disipar el calor mediante convección
natural.
Confort
La plataforma elevada ofrece una posición más cómoda
para las manos, y aumenta el flujo de aire para una
mejor refrigeración.
La Docking Station cuenta con los
siguientes puertos:
• Dos puertos PS/2
• Conexión en paralelo IEEE 1284 DB25 (USB emulado)
• Dos conectores de audio de 3,5 mm: (1) salida
estéreo y (1) entrada de micrófono
• Puerto serie RS232 (USB emulado)
• Una salida de audio digital S/PDIF (no soportado en
Windows 2000)
• Puerto RJ-45 Ethernet 10/100
• Cuatro puertos USB 2.0:
- Dos puertos USB 2.0 de alta velocidad
- Dos puertos USB 2.0 de alta velocidad siempre
activados con energía extra
40
Page 41

Targus Docking Station Universal Para Portátil
Contenido del paquete
Además de esta guía del usuario, el paquete contiene:
• Docking Station universal de Targus
• Cable de datos USB 2.0 de alta velocidad
• CD de controladores
• Adaptador de corriente CA
Requisitos del sistema
Hardware
• PC con procesador Intel® Pentium® o equivalente
• Unidad de CD-ROM
• Puerto USB versión 2.0
• Fuente de alimentación de CA (requiere un adaptador
de CA)
NOTA: AL CONECTAR LA DOCKING STATION A UN PUERTO USB
VERSIÓN 1.1 DE SU ORDENADOR, EL NIVEL DE RENDIMIENTO DE
ÉSTA NO SERÁ EL ÓPTIMO. PARA OBTENER LOS MEJORES
RESULTADOS, CONÉCTELA A UN PUERTO USB VERSIÓN 2.0.
Sistema operativo
• Windows® 2000 Service Pack 4 o
• Windows® XP Service Pack 3 o
• Windows Vista® Service Pack 1
41
Page 42

Targus Docking Station Universal Para Portátil
Instalación del
dispositivo y los
controladores
Para usar la Docking Station de Targus debe instalar
primero el controlador en el ordenador.
ADVERTENCIA: DEBE INSTALAR EL SOFTWARE DE LA DOCKING
STATION ANTES DE CONECTARLA AL ORDENADOR. DE LO
CONTRARIO, ÉSTA NO FUNCIONARÁ CORRECTAMENTE.
Después de instalar el software, conecte la docking
station al ordenador y la función Plug-and-Play de
Windows instalará los controladores de hardware para
cada puerto.
Instalación del controlador de
la Docking Station
Al instalar el controlador de la docking station, el sistema
operativo puede reconocer ésta y sus puertos una vez
conectada.
1 Encienda el ordenador.
2 Inserte el CD de controladores en la unidad de
CDROM del ordenador.
Si la instalación no se inicia automáticamente, haga clic
en Inicio, Ejecutar y teclee D:\ACP45_setup.exe
(donde D: es la ruta de su unidad de CD-ROM) y haga
clic en OK.
42
Page 43

Targus Docking Station Universal Para Portátil
3 Se abrirá la ventana emergente del asistente de
instalación de la docking station. Haga clic en Next
para continuar.
4 Se abrirá la ventana emergente de información. Haga
clic en
Next para continuar. Para instalar los archivos
del controlador correctamente, debe reiniciar el
sistema antes de conectar la Docking Station.
43
Page 44

Targus Docking Station Universal Para Portátil
5 Elija Sí, deseo reiniciar el equipo ahora. Haga clic
en Finalizar y reinicie el ordenador cuando se le pida.
Conectar la Docking Station al
ordenador
Después de instalar el software de la docking station,
estará preparado para conectarla al ordenador. Para
hacer esto:
1 Conecte el adaptador de corriente CA incluido al
conector de CA de la docking station.
2 Conecte un extremo del cable USB a la docking
station y el otro a un puerto USB 2.0 que esté
disponible en el ordenador.
ADVERTENCIAS: LA DOCKING STATION NO FUNCIONARÁ
CORRECTAMENTESI NO SE CONECTA EL ADAPTADOR DE CA A
UNA TOMA DE CORRIENTE. NO CONECTE NINGÚN DISPOSITIVO A
LA DOCKING STATION HASTA TERMINAR LA INSTALACIÓN.
44
Page 45

Targus Docking Station Universal Para Portátil
Instalación de los
controladores de dispositivo
predeterminados
Una vez conectada la docking station al ordenador,
comenzarán a instalarse los controladores
predeterminados para cada puerto de forma automática.
NOTA: ASEGÚRESE DE TENER INSTALADOS LOS SERVICE PACKS
MÁS RECIENTES.
Es posible que algunos dispositivos de hardware le
soliciten que instale los controladores.
Para instalar los controladores:
1 Seleccione Instalar el software automáticamente
(recomendado) y haga clic en Siguiente.
El Asistente para hardware nuevo encontrado
comenzará a instalar los controladores de hardware.
Aparece la pantalla Finalización del Asistente para
hardware nuevo encontrado.
2 Haga clic en Finalizar y repita el proceso según sea
necesario para cada dispositivo.
3 Reinicie el ordenador.
Indicadores luminosos LED de
estado
Una vez instalados los controladores de dispositivo, los
indicadores luminosos LED USB de estado se iluminan
en la parte trasera de la docking station al conectar
dispositivos a ésta.
• El indicador luminoso Tx verde se enciende al
conectar a una red, y el indicador luminoso Rx amarillo
parpadea cuando se transmiten datos desde la red o
hacia ésta.
45
Page 46

Targus Docking Station Universal Para Portátil
NOTA: LA DOCKING STATION PERMITE LA CONEXIÓN Y
DESCONEXIÓN DEL CABLE DE RED SIN APAGAR.
Soporte del portátil
Serie S/PDIF Red
USB 2.0 de alta
velocidad siempre
activado con
energía extra
PS/2 Paralelo
Entrada
de audio
Salida de
audio
Puerto USB 2.0
de alta velocidad
Puertos de la docking station
Puerto USB
2.0 de alta
velocidad de
“fácil acceso”
Targus
DEFCON CL,
PA410E (no
incluido)
Vista de lado izquierdo de la docking station
Vista de lado derecho de la docking station
46
Ranura Cierre
Seguridad cable
Adaptador CA
USB-a-PC
Conexión
Ranura Cierre
Seguridad cable
Page 47

Targus Docking Station Universal Para Portátil
Conexión de
dispositivos nuevos
Para evitar posibles daños al conectar un dispositivo
nuevo, no fuerce el conector del cable al puerto de la
docking station. Si el conector del cable no se fija con
suavidad, gire el conector e intente fijarlo de nuevo.
Conexión de un ratón / teclado
serie
Para conectar un ratón o teclado serie, fije el conector
del cable al puerto serie de la docking station.
Conexión de un ratón / teclado
PS/2
Para conectar un ratón o teclado PS/2, fije el conector
del cable al puerto PS/2 de la docking station.
Conexión y conguración de
un módem de serie
Para conectar un módem de serie:
1 Fije el conector de cable al puerto serie de la docking
station.
2 Instale el controlador del módem siguiendo las
instrucciones adjuntas con el dispositivo.
3 Cuando se le solicite que seleccione el puerto, elija el
puerto serie USB (COMx), donde x sería el número
de puerto COM asignado por el sistema operativo.
47
Page 48

Targus Docking Station Universal Para Portátil
Conexión de una impresora en
paralelo
Para conectar una impresora en paralelo:
1 Fije el conector de cable al puerto paralelo de la
docking station.
2 Haga clic en el botón Inicio de Windows y seleccione
Impresoras y faxes. Añada el controlador de su
impresora siguiendo las instrucciones del
para agregar impresoras.
Asistente
Conexión de un PDA
1 Fije el conector de cable al puerto serie de la docking
station.
2 Compruebe que la configuración de puerto COM, ya
sea en el software HotSync
con la de la docking station.
Para comprobar la configuración de puerto COM de la
docking station, consulte la sección “Verificar que los
dispositivos están instalados”.
Para comprobar la configuración de puerto COM del
PDA, consulte la documentación que lo acompañaba.
®
o ActiveSync®, coincide
Conexión a una red de área
local
Para conectar un cable Ethernet con un conector RJ-45,
fije el conector de cable al puerto Ethernet/red de la
docking station. Los procedimientos adicionales para
conectar a la red dependen del tipo de red que utilice.
Póngase en contacto con el administrador de la red para
obtener instrucciones más detalladas.
48
Page 49

Targus Docking Station Universal Para Portátil
Conexión de un dispositivo
USB
Para conectar a un dispositivo USB, conéctelo a un
puerto USB de la docking station y siga las instrucciones
adicionales que se proporcionan con el dispositivo.
Los cuatro puertos USB cumplen los requisitos de alta
velocidad, ya que proporcionan 480 Mbps y 500 mA de
alimentación. Sin embargo, los dos puertos USB situados
al lado derecho marcados con este símbolo tienen dos
características únicas - Siempre Activado y Alta Energía.
Consulte la sección “Always On de Targus” para ver más
información, y “Uso de dispositivos USB que
requieren más alimentación”.
Los otros puertos USB (uno en el lateral y el otro en la
parte posterior próxima al puerto Ethernet) son puertos
que proporcionan la corriente estándar de 500 mA.
Conexión y conguración de
un dispositivo de audio
1 Conecte los auriculares o altavoces a la salida
Out de 3,5 mm de la docking station.
2 Para conectar un micrófono, use el puerto mono
Audio In.
3 Para habilitar los auriculares o altavoces, primero
debe seleccionar Dispositivo de Sonido USB PnP
en Propiedades.
Audio
49
Page 50

Targus Docking Station Universal Para Portátil
En Windows 2000, haga clic en Inicio, Opciones,
Panel de control y, a continuación, abra la carpeta
Sonidos y multimedia. Seleccione la ficha Audio. En
Reproducción de sonido, cambie la opción Dispositivo
predeterminado a Dispositivo de Sonido USB PnP
en la lista desplegable.
Haga clic en Aplicar y después en Aceptar.
En Windows XP, vaya al Panel de control y escoja
Dispositivos de sonido y audio. Seleccione la ficha
Audio. En Reproducción de sonido, cambie la opción
Dispositivo predeterminado a Dispositivo de Sonido
USB PnP en la lista desplegable.
Haga clic en Aplicar y después en Aceptar.
Para Windows Vista, vaya al Panel de Control y
seleccione Hardware y Sonido. Seleccione Sonido.
Bajo la pestaña Reproducir, seleccione Salida Digital
del Dispositivo de Sonido USB PnP.
Hacer clic en Configurar Valor Predeterminado.
4 Asegúrese de que el volumen no esté en SILENCIO.
NOTA: LOS DISPOSITIVOS DE AUDIO NO FUNCIONARÁN
SIMULTANEAMENTE EN LA ESTACIÓN DE PUERTOS Y EL
ORDENADOR HOST.
PRECAUCIÓN: TODAS LAS APLICACIONES DE AUDIO O
MULTIMEDIA SE DEBEN CERRAR ANTES DE CONMUTAR ENTRE
LA SALIDA DE AUDIO DE LA ESTACIÓN DE PUERTOS Y LA SALIDA
DE AUDIO DEL ORDENADOR HOST.
50
Page 51

Targus Docking Station Universal Para Portátil
Instalación y conguración de
un dispositivo S/PDIF (Interfaz
Digital Sony/ Philips)
1 Para poder habilitar el S/PIDF debe encenderlo. Para
ello, abra la subaplicación de configuración de sonido
USB 3D situada en su bandeja de sistema (haga clic
en el icono USB para abrir la ventana de
configuración).
2 Haga clic en el botón situado junto al texto de salida
S/PIDF para habilitar éste.
3 Elija la salida de audio de la bandeja.
51
Page 52

Targus Docking Station Universal Para Portátil
Universal Docking Station
Universal Docking Station
Digital Decoder
A/V Receiver
Optical Cable (Not included)
Home Theatre
ZOOM IN
4 Conecte el cable óptico (no incluido) en el puerto de
salida S/PDIF-Out de la Docking Station a un extremo
y el puerto de entrada S/PDIF-In del decodificador
digital o el altavoz al otro extremo.
5 Conecte el decodificador digital o altavoz al sistema
home theater.
Modo de suspensión
global
Cuando el ordenador está en modo de suspensión, la
docking station también entra en modo de suspensión
para evitar el consumo de electricidad. Cuando el
ordenador se reactiva, la docking station se reactiva
también automáticamente.
52
Page 53

Targus Docking Station Universal Para Portátil
Always On de Targus
Los dos puertos USB que proporcionan hasta 1 Amp de
alimentación seguirán proporcionando corriente incluso
cuando el portátil esté apagado o desconectado de la
docking station. Esto le permite cargar cualquier
dispositivo USB que conecte a estos puertos sin
encender su ordenador portátil.
Uso de dispositivos
USB que requieren más
alimentación
Algunos dispositivos que utilizan grandes cantidades de
energía, como las impresoras y unidades ópticas, se
deben conectar a los puertos de alimentación USB.
Estos puertos proporcionan hasta 1000 mA de
alimentación: el doble de corriente que los puertos USB
normales.
Limitaciones del
producto
Algunos dispositivos pueden dejar de funcionar
temporalmente cuando se transfiere un gran volumen de
datos. Por ejemplo, es posible que el ratón responda
despacio mientras se está realizando una tarea de
impresión de gráficos, o cuando el tráfico de red es
intenso. Recomendamos seguir estas directrices:
• No transfiera datos desde ni hacia varios dispositivos
de alta velocidad, como una cámara digital o un
escáner al mismo tiempo.
53
Page 54

Targus Docking Station Universal Para Portátil
• Si se produce una reducción de la velocidad, cierre
otros programas que utilicen un dispositivo USB para
mejorar el rendimiento de los dispositivos.
Solución de problemas
El dispositivo no funciona
• Asegúrese de que el dispositivo está completamente
insertado en el puerto correcto de la docking station.
• Conecte el dispositivo a un puerto distinto de la
docking station. Si sigue sin funcionar, pruébelo
conectándolo directamente al ordenador.
• Compruebe que ha ejecutado el programa de
configuración o instalación del dispositivo.
• Asegúrese de que el dispositivo aparece en el
Administrador de dispositivos. Para obtener más
información, consulte la sección “Verificar que los
dispositivos están instalados”.
• Desconecte todos los dispositivos de la docking station
y vuelva a conectarlos uno a uno. Compruebe que
cada uno de ellos funciona antes de conectar el
siguiente.
• Cada puerto USB está equipado con una protección
contra sobretensión. En caso de que un dispositivo
USB requiera más corriente de la que puede
proporcionar el puerto USB, éste se apagará. Para
volver a habilitar el puerto, desconecte el dispositivo y
vaya al Administrador de dispositivos o al mensaje de
la bandeja de sistema y elija la opción Reiniciar. A
continuación puede volver a conectar el dispositivo al
puerto USB. Si se vuelve a apagar, compruebe los
requisitos de alimentación del dispositivo.
54
Page 55

Targus Docking Station Universal Para Portátil
Vericar que los dispositivos
están instalados
Puede ver los dispositivos instalados en la docking
station en la ventana Administrador de dispositivos en
Propiedades del sistema.
Haga clic con el botón derecho en Mi PC, Propiedades,
haga clic en la ficha Hardware y, a continuación, en el
botón Administrador de dispositivos.
En la ventana Administrador de dispositivos, expanda lo
siguiente:
• Dispositivos de interfaz humana: muestra los teclados
y dispositivos señaladores: ratones, trackballs y
joysticks
• Teclados: muestra los teclados PS/2
• Ratones y otros dispositivos señaladores: muestra el
ratón PS/2
• Adaptadores de red: muestra el adaptador ASIX
AX88772A USB 2.0 fast Ethernet
• Puertos (COM & LPT): puerto de comunicaciones
USB-a-serie (COM X)
• Dispositivos de sonido, vídeo y juegos: muestra el
dispositivo de sonido USB PnP
• Controladores de bus serie universal: muestra los
demás dispositivos instalados para la docking station y
hub genérico
55
Page 56

Targus Docking Station Universal Para Portátil
Vericación de un módem
serie Conexión
Al conectar un módem al puerto serie (RS232),
compruebe que el puerto asignado a dicho módem es el
puerto serie USB (COMx), donde x sería el número del
puerto COM.
Si el sistema operativo no detecta automáticamente
que su módem está asignado al puerto serie USB
(COMx), ejecute el asistente para hardware de nuevo
y elija Seleccionar en la lista en lugar de detectar
automáticamente. A continuación, seleccione usar el
dispositivo USB-a-serie de la página como puerto
COM.
Mensaje de error en el PDA
Si aparece el mensaje de error “Conexión no
establecida” en su PDA, compruebe que la configuración
de puerto COM en el software HotSync o ActiveSync
coincide con la configuración de la docking station.
Consulte la sección “Verificar que los dispositivos están
instalados” para verificar la configuración de puerto COM
de la docking station.
Algunas versiones anteriores del software Palm
Desktop no son compatibles con la conversión USB a
serie. Póngase en contacto con su distribuidor de PDA
para obtener actualizaciones de software.
®
Palm y HotSync son marcas registradas o marcas comerciales de Palm, Inc. Microsoft,
Windows, Windows Vista y ActiveSync son marcas registradas o marcas comerciales
de Microsoft Corporation en los Estados Unidos y/o en otros países. Todas las marcas
comerciales y marcas registradas son propiedad de sus titulares respectivos. Todos los
derechos reservados. Características y especificaciones sujetas a cambios sin previo aviso.
© 2008, Targus Group International, Inc. y Targus Group (UK) Ltd.
56
Page 57

TARGUS STATION
D’ACCUEIL
UNIVERSELLE
POUR ORDINATEUR
PORTABLE
Introduction
Félicitations pour votre acquisition de la station d’accueil
Targus universelle pour ordinateur portable. Ce module
d’expansion portable permet, via une seule connexion
USB, de brancher jusqu’à 4 périphériques USB, une
connexion réseau (Ethernet/LAN), des haut-parleurs et
un microphone, un clavier et une souris PS/2, un
périphérique série et un périphérique parallèle. De plus,
l’emplacement de verrouillage et le verrou universel
permettent de fixer la station d’accueil à un bureau.
La station d’accueil bénéficie également de la
technologie Targus Always On, d’un port d’alimentation
USB Targus fournissant deux fois la spécification USB
pour les périphériques nécessitant une alimentation plus
importante et des ports USB largement espacés pour
permettre le branchement d’adaptateurs plus grands.
Targus Always On alimente les ports USB même lorsque
le portable est arrêté, déconnecté de la station d’accueil
ou en mode veille ou veille prolongée. Ceci permet aux
périphériques USB se chargeant via le port USB de
rester chargés en toutes circonstances.
57
Page 58

Targus Station D’accueil Universelle Pour Ordinateur Portable
Caractéristiques
Dissipation de la chaleur par
convection naturelle:
Placez l’arrière de votre ordinateur portable sur les patins
en caoutchouc de la station d’accueil. La plupart des
ordinateurs portables évacuent la chaleur par le dessous
et plus la quantité d’air circulant à cet endroit est
importante, plus il y a de chances pour que la chaleur se
dissipe par convection naturelle.
Confort
La plateforme surélevée fournit une position plus
confortable pour les mains et augmente la circulation de
l’air pour un meilleur refroidissement.
La station d’accueil offre les ports
suivants:
• Deux ports PS/2
• Un connecteur parallèle IEEE 1284 DB25 (USB émulé)
• Deux connecteurs audio 3,5 mm : (1) sortie stéréo et
(1) entrée micro
• Un port série RS232 (USB émulé)
• Une sortie audio numérique S/PDIF (non compatible
avec Windows 2000)
• Un port RJ-45 Ethernet 10/100
• Quatre ports USB 2.0:
- Deux ports USB 2.0 dotés d’une grande vitesse
- Deux ports USB 2.0 dotés d’une grande vitesse
toujours active et d’une puissance supérieure
58
Page 59

Targus Station D’accueil Universelle Pour Ordinateur Portable
Contenu de la boîte
Outre ce Manuel de l’utilisateur, la boîte contient :
• Une station d’accueil Targus universelle
• Un câble de transfert haut-débit USB 2.0
• Un CD-ROM comportant le logiciel de pilote
• Un adaptateur d’alimentation CA
Conguration Requise
Matériel
• PC avec processeur Intel® Pentium® ou équivalent
• Lecteur de CD-ROM
• Port USB version 2.0
• Une source d’alimentation CA (adaptateur CA requis)
REMARQUE: SI LA STATION D’ACCUEIL EST CONNECTÉE À UN
PORT USB 1.1 SUR VOTRE ORDINATEUR, SON NIVEAU DE
PERFORMANCES NE SERA PAS OPTIMAL. POUR DE MEILLEURS
RÉSULTATS, CONNECTEZ-LA À UN PORT USB 2.0.
Système d’exploitation
• Windows® 2000 Service Pack 4 ou
• Windows® XP Service Pack 3 ou
• Windows Vista® Service Pack 1
59
Page 60

Targus Station D’accueil Universelle Pour Ordinateur Portable
Installation du
périphérique et des
pilotes
Pour pouvoir utiliser la station d’accueil Targus, vous
devez installer au préalable le pilote sur votre ordinateur.
ATTENTION: VOUS DEVEZ INSTALLER LE LOGICIEL DE LA STATION
D’ACCUEIL AVANT DE LA CONNECTER À VOTRE ORDINATEUR.
SINON, ELLE NE FONCTIONNERA PAS CORRECTEMENT.
Une fois le logiciel installé, connectez la station d’accueil
à votre ordinateur et le service Plug-and-Play de
Windows installera les pilotes matériels pour chaque
port.
Installation du pilote de la
station d’accueil
L’installation du pilote de la station d’accueil permet à
votre système d’exploitation de la reconnaître, ainsi que
ses ports, une fois qu’elle est connectée.
1 Mettez votre ordinateur sous tension.
2 Insérez le CD-ROM du logiciel du pilote dans le
lecteur de votre ordinateur.
Si l’installation ne démarre pas automatiquement, cliquez
sur Démarrer, Exécuter et tapez D:\ACP45_setup.exe
(où D: est le chemin d’accès à votre lecteur de CD-ROM),
puis cliquez sur OK.
60
Page 61

Targus Station D’accueil Universelle Pour Ordinateur Portable
3 La fenêtre de l’Assistant d’installation de la station
d’accueil s’ouvre. Cliquez sur Next (Suivant) pour
continuer.
4 La fenêtre Information s’affiche. Cliquez sur
Next
(Suivant) pour continuer. Pour installer
correctement les fichiers du pilote, vous devez
redémarrer votre système avant de brancher la
station d’accueil.
61
Page 62

Targus Station D’accueil Universelle Pour Ordinateur Portable
5 Sélectionnez l’option Yes, I want to restart my
computer now (Oui, je veux redémarrer mon
ordinateur maintenant). Cliquez sur Finish (Terminer)
et redémarrez votre ordinateur à l’invite du système.
Branchement de la station
d’accueil sur votre ordinateur
Une fois le logiciel de la station d’accueil installé, vous
être prêt à brancher la station d’accueil sur l’ordinateur.
Pour ce faire, procédez comme suit:
1 Branchez l’adaptateur d’alimentation CA fourni dans
la prise d’alimentation CA sur la station d’accueil.
2 Branchez une extrémité du câble USB sur la station
d’accueil et l’autre sur un port USB 2.0 disponible de
votre ordinateur.
ATTENTION: LA STATION D’ACCUEIL NE FONCTIONNERA PAS
CORRECTEMENT. SI L’ADAPTATEUR CA N’EST PAS BRANCHÉ
DANS UNE PRISE CA.
NE RELIEZ AUCUN PÉRIPHÉRIQUE À LA STATION D’ACCUEIL TANT
QUE. L’INSTALLATION N’EST PAS TERMINÉE.
62
Page 63

Targus Station D’accueil Universelle Pour Ordinateur Portable
Installation des pilotes de
périphériques par défaut
Une fois la station d’accueil branchée sur votre
ordinateur, l’installation des pilotes par défaut démarre
automatiquement pour chacun des ports.
REMARQUE: ASSUREZ-VOUS QUE VOUS DISPOSEZ DES SERVICE
PACKS LES PLUS RÉCENTS.
Certains périphériques matériels peuvent vous inviter à
installer les pilotes.
Pour ce faire, procédez comme suit:
1 Sélectionnez Installer le logiciel automatiquement
(recommandé) et cliquez sur Suivant.
Le programme Assistant Matériel détecté démarre
l’installation des pilotes matériels.
L’écran Fin de l’Assistant Ajout de nouveau matériel
détecté apparaît.
2 Cliquez sur Terminer et répétez l’opération pour
chaque périphérique.
3 Redémarrez votre ordinateur.
Indicateurs d’état
Une fois tous les pilotes de périphériques installés, les
lampes des indicateurs d’état USB situés à l’arrière de la
station d’accueil s’allument lorsque vous branchez les
périphériques à la station d’accueil.
• Le témoin vert Tx s’éclaire lors du branchement à un
réseau et le témoin jaune Rx clignote lorsque des
données sont transmises sur le réseau.
REMARQUE: LA STATION D’ACCUEIL PREND EN CHARGE
L’ÉCHANGE À CHAUD DU CÂBLE RÉSEAU.
63
Page 64

Targus Station D’accueil Universelle Pour Ordinateur Portable
Patin de support
du portable
Série S/PDIF Réseau
Deux ports USB 2.0
toujours activés et
dotés d’une puissance
supérieure
Parallèle
PS/2
Port USB
2.0 doté
d’une grande
vitesse “facile
d’accès”
Antivol Targus
DEFCON CL,
PA410E (non
inclus)
Entrée
audio
Sortie
audio
Port USB 2.0
doté d’une
grande vitesse
Emplacement
de verrouillage
du câblee
Ports de la station d’accueil
Station d’accueil Vue latérale gauche
Adaptateur CA
Emplacement
de verrouillage
du câblee
Station d’accueil Vue latérale droite
64
USB-à-PC
Connexion
Page 65

Targus Station D’accueil Universelle Pour Ordinateur Portable
Connexion de nouveaux
périphériques
Afin d’éviter toute détérioration éventuelle lors de la
connexion d’un nouveau périphérique, ne forcez pas en
enfonçant le connecteur du câble dans le port de la
station d’accueil. Si le connecteur du câble ne se met pas
en place aisément, retournez-le et essayez à nouveau.
Branchement d’une souris/d’un
clavier série
Pour connecter une souris ou un clavier série, branchez
le connecteur du câble sur un port série de la station
d’accueil.
Branchement d’une souris/d’un
clavier PS/2
Pour connecter une souris ou un clavier PS/2, branchez
le connecteur du câble sur un port PS/2 de la station
d’accueil.
Branchement et conguration
d’un modem série
Pour brancher un modem série, procédez comme suit:
1 Branchez le connecteur du câble sur le port série de
la station d’accueil.
2 Installez le pilote logiciel du modem conformément
aux instructions fournies avec le périphérique.
3 À l’invite de sélection du port, choisissez Serial USB
(COMx), où x est le numéro du port COM affecté à
votre système d’exploitation.
65
Page 66

Targus Station D’accueil Universelle Pour Ordinateur Portable
Branchement d’une
imprimante parallèle
Pour brancher une imprimante parallèle, procédez
comme suit:
1 Branchez le connecteur du câble sur le port parallèle
de la station d’accueil.
2 Dans le menu Démarrer Window, sélectionnez
Paramètres > Imprimantes et télécopieurs. Ajoutez le
pilote de votre imprimante en suivant les instructions
de l’Assistant Ajout d’imprimante.
Branchement d’un assistant
numérique personnel
1 Branchez le connecteur du câble sur le port série de
la station d’accueil.
2 Vérifiez que la définition du port COM, dans votre
logiciel HotSync
sur la station d’accueil.
Pour vérifier la définition du port COM sur la station
d’accueil, reportez-vous à la section “Vérification de
l’installation des périphériques”.
Pour vérifier la définition du port COM sur votre
assistant numérique personnel, reportez-vous à la
documentation fournie avec celui-ci.
®
ou ActiveSync®, correspond à celle
Branchement à un réseau local
Pour brancher un câble Ethernet doté d’un connecteur
RJ-45, enfoncez le connecteur du câble dans le port
Ethernet/réseau de la station d’accueil. Les procédures
de branchement à un réseau diffèrent selon le type de
réseau que vous utilisez. Pour plus de détails, prenez
contact avec votre administrateur réseau.
66
Page 67

Targus Station D’accueil Universelle Pour Ordinateur Portable
Branchement d’un
périphérique USB
Pour connecter un périphérique USB, branchez-le sur un
port USB de la station d’accueil et suivez les instructions
supplémentaires fournies avec le périphérique.
Les quatre ports USB répondent aux exigences du
hautdébit USB en fournissant un débit de 480 Mbps et
une alimentation de 500 mA. Cependant, les deux ports
USB situés sur le côté droit marqué de ce symbole ont
deux caractéristiques uniques – Toujours activés et
de grande puissance. Pour plus de détails, reportezvous aux sections “Targus Always On” et “Utilisation
de périphériques USB nécessitant une alimentation
supérieure”.
Les autres ports USB (un sur le côté et l’autre à l’arrière
près du port Ethernet) sont des ports fournissant la
puissance standard de 500 mA.
Connexion et conguration
d’un périphérique audio
1 Branchez votre casque ou vos haut-parleurs sur le
port vert 3,5 mm
2 Pour connecter un microphone, branchez-le sur le
port mono Entrée audio.
3 Pour activer le casque ou les haut-parleurs, vous
devez d’abord sélectionnez USB PnP Sound Device
dans les paramètres des propriétés.
Sortie audio de la station d’accueil.
67
Page 68

Targus Station D’accueil Universelle Pour Ordinateur Portable
Sous Windows 2000, cliquez sur Démarrer, Paramètres,
Panneau de configuration, puis ouvrez le dossier
Sons et multimédia. Sélectionnez l’onglet Audio. Sous
Lecture des sons, remplacez le périphérique par
défaut par USB PnP Sound Device en le sélectionnant
dans la liste déroulante.
Cliquez sur Appliquer, puis sur OK.
Sous Windows XP, passez dans le Panneau de
configuration et sélectionnez Sons et périphériques
audio. Sélectionnez l’onglet Audio. Sous Lecture audio,
remplacez l’unité par défaut par USB PnP Sound
Device en le sélectionnant dans la liste déroulante.
Cliquez sur Appliquer, puis sur OK.
Pour Windows Vista, accédez au Panneau de contrôle
et sélectionnez Matériel et Sons. Sélectionnez
Sons. Dans l’onglet de Lecture, sélectionnez Sortie
numérique dans Appareil sonore USB PnP.
Cliquez sur Réglages par défaut.
4 Assurez-vous que la case Muet du volume n’est pas
cochée.
REMARQUE : LES PÉRIPHÉRIQUES AUDIO NE FONCTIONNENT
PAS SIMULTANÉMENT SUR LA STATION DE PORTS ET
L’ORDINATEUR HÔTE.
AVERTISSEMENT : TOUTES LES APPLICATIONS AUDIO OU
MULTIMÉDIA DOIVENT ÊTRE ARRÊTÉES AVANT DE BASCULER
ENTRE LA SORTIE AUDIO DE LA STATION DE PORTS ET LA SORTIE
AUDIO DE L’ORDINATEUR HÔTE.
68
Page 69

Targus Station D’accueil Universelle Pour Ordinateur Portable
Installation et conguration
d’un périphérique S/PDIF
(Sony/ Philips Digital Interface)
1 Pour utiliser S/PDIF, vous devez l’activer. Pour ce
faire, ouvrez l’applet Configuration Son USB 3D situé
dans la barre d’état système (cliquez sur l’icône USB
pour ouvrir l’écran de configuration).
2 Cliquez sur le bouton en regard de S/PDIF Output
pour activer S/PDIF.
3 Définissez la Sortie Audio à partir de la barre d’état.
69
Page 70

Targus Station D’accueil Universelle Pour Ordinateur Portable
Universal Docking Station
Universal Docking Station
Digital Decoder
A/V Receiver
Optical Cable (Not included)
Home Theatre
ZOOM IN
4 Branchez une extrémité de votre câble optique (non
inclus) sur le port Sortie S/PDIF de la station d’accueil
et l’autre extrémité sur le port Entrée S/PDIF du
décodeur numérique ou du haut-parleur.
5 Branchez le décodeur numérique ou le haut-parleur
au système Home Théâtre.
Mode Veille général
Lorsque votre ordinateur est en mode veille, la station
d’accueil entre également dans ce mode afin de réduire
la consommation. Lorsque l’ordinateur s’éveille, la station
d’accueil repasse automatiquement en mode actif.
70
Page 71

Targus Station D’accueil Universelle Pour Ordinateur Portable
Targus Always On
Les deux ports USB fournissant une alimentation de 1
Amp continuent leur alimentation même si l’ordinateur
portable est mis hors tension ou débranché de la station
d’accueil. Cela vous permet de charger n’importe quel
périphérique USB que vous connectez sur ces ports sans
activer votre ordinateur portable.
Utilisation de
périphériques USB
nécessitant une
alimentation supérieure
Certains périphériques, nécessitant une alimentation
plus importante, comme les imprimantes et les
périphériques optiques, doivent être branchés sur les
ports d’alimentation USB. Ces ports fournissent une
puissance pouvant atteindre 1000 mA, soit le double de
la puissance d’un port USB standard.
Limites du produit
Certains périphériques peuvent s’interrompre
temporairement lors d’un transfert important de données.
Par exemple, il se peut que la souris répondre plus
lentement pendant l’impression d’un graphique ou si le
trafic réseau est élevé. Observez les recommandations
suivantes:
71
Page 72

Targus Station D’accueil Universelle Pour Ordinateur Portable
• N’effectuez pas transfert de données de ou vers
plusieurs périphériques à haut débit, tels qu’un
appareil photo numérique ou un scanneur, en même
temps.
• Si une dégradation de la vitesse survient, fermez
d’autres programmes qui utilisent un périphérique USB
afin d’améliorer les performances de ce périphérique.
Dépannage
Le périphérique ne fonctionne pas
• Vérifiez que le connecteur du périphérique est
correctement enfoncé dans le port approprié de la
station d’accueil.
• Branchez le périphérique sur un autre port de la
station d’accueil. S’il ne fonctionne toujours pas, testez
le périphérique en le branchant directement sur votre
ordinateur.
• Vérifiez que vous avez exécuté le programme de
configuration ou d’installation du périphérique.
• Assurez-vous que le périphérique apparaît dans le
Gestionnaire de périphériques. Pour plus
d’informations, reportez-vous à la section “Vérification
de l’installation des périphériques”.
• Débranchez tous les périphériques de la station
d’accueil et rebranchez-les en procédant l’un après
l’autre. Vérifiez que chaque périphérique fonctionne
avant de brancher le suivant.
• Chaque port USB est équipé d’une protection contre
sur les surtensions. Si un périphérique USB tire plus
de courant que le port USB ne peut fournir, le port
s’éteint. Pour le réactiver, débranchez le périphérique
et consultez le Gestionnaire de périphériques ou le
72
Page 73

Targus Station D’accueil Universelle Pour Ordinateur Portable
message dans la barre d’état système et choisissez
l’option
périphérique sur le port USB. Si un arrêt se produit,
vérifiez les conditions d’alimentation requises pour le
périphérique.
Réinitialiser. Vous pouvez alors rebrancher le
Vérication de l’installation
des périphériques
Vous pouvez afficher les périphériques installés sur la
station d’accueil dans la fenêtre Gestionnaire de
périphériques des Propriétés système.
Avec le bouton droit de la souris, cliquez sur Poste de
travail, Propriétés, puis cliquez sur l’onglet Matériel,
puis sur le bouton Gestionnaire de périphériques.
Dans la fenêtre Gestionnaire de périphériques,
développez les éléments suivants:
• Périphériques d’interface utilisateur : affiche les
claviers et les périphériques de pointage, souris,
trackballs et manettes de jeu
• Claviers : affiche les claviers PS/2
• Souris et autres périphériques de pointage : affiche la
souris PS/2
• Cartes réseau : affiche ASIX AX88772A USB 2.0 Fast
Ethernet Adapter
• Ports (COM et LPT) : Prolific USB-to-Serial Comm Port
(COM X)
• Contrôleurs son, vidéo et jeu : affiche un périphérique
audio USB PnP
• Contrôleurs de bus USB : affiche les autres
périphériques installés pour la station d’accueil et le
concentrateur générique
73
Page 74

Targus Station D’accueil Universelle Pour Ordinateur Portable
Vérication du branchement
d’un modem série
Lors du branchement d’un modem sur le port série
(RS232), vérifiez que le port affecté à votre modem est
Serial USB (COMx), où x est le numéro du port COM. Si
le système d’exploitation ne détecte pas
automatiquement que votre modem est affecté au port
Serial USB (COMx), exécutez à nouveau l’Assistant
Matériel et choisissez Sélectionner dans la liste au lieu
de Détection automatique. Ensuite, sélectionnez
l’utilisation de Prolific Device from Page comme port
COM.
Message d’erreur sur votre
assistant numérique personnel
Si le message d’erreur « Connexion non établie »
s’affiche sur votre assistant numérique personnel,
vérifiez que la définition du port COM dans votre logiciel
HotSync ou ActiveSync correspond à celle de la station
d’accueil. Pour vérifier la définition du port COM sur la
station d’accueil, reportez-vous à la section “Vérification
de l’installation des périphériques”.
Certaines versions anciennes du logiciel Palm® Desktop
ne sont pas compatibles avec la conversion USB en
Série. Prenez contact avec le fournisseur de votre
assistant numérique personnel pour obtenir les mises à
jour du logiciel.
Palm et HotSync sont des marques déposées ou commerciales de Palm, Inc. Microsoft,
Windows, Windows Vista et ActiveSync sont des marques déposées ou commerciales
de Microsoft Corporation aux États-Unis et/ou dans d’autres pays. Toutes les marques
commerciales et déposées sont les propriétés de leurs détenteurs respectifs. Tous droits
réservés. Les caractéristiques et spécifications peuvent être modifiées sans préavis. © 2008,
Targus Group International, Inc. et Targus Group (RU) Ltd.
74
Page 75

TARGUS
UNIVERSAL LAPTOP
DOCKING STATION
Introduzione
Congratulazioni per l’acquisto della Targus Universal
Notebook Docking Station. Questo modulo di espansione
portatile consente di collegare attraverso una singola
connessione USB fino a 4 periferiche USB, una
connessione di rete (Ethernet/LAN), diffusori e microfono,
tastiera e mouse PS/2, una periferica seriale e una
parallela. Inoltre, il supporto universale per lucchetti e
l’asola di sicurezza sono molto utili per fissare la docking
station alla scrivania.
La docking station implementa la tecnologia Targus
Always On, porte alimentate USB Targus che
raddoppiano le specifiche USB in termini di corrente
erogata, per le periferiche USB che richiedono maggiore
potenza; le porte USB sono ampiamente distanziate tra
loro per poter utilizzare anche gli adattatori più larghi.
Targus Always On alimenta le porte USB anche quando il
notebook è spento, disconnesso dalla docking station o
in modalità sospensione / stand-by. In questo modo sarà
possibile ricaricare le periferiche USB tramite porta USB
in qualsiasi situazione.
75
Page 76

Targus Universal Laptop Docking Station
Caratteristiche
Dissipazione del calore tramite
convezione naturale:
Posizionate il bordo posteriore del laptop sopra i supporti
in gomma della Docking Station. La maggior parte del
laptop dissipa il calore attraverso il pannello inferiore;
quindi favorendo il passaggio dell’aria sul fondo del
laptop, si migliora la dissipazione del calore.
Comfort
La piattaforma rialzata consente una posizione delle
mani più confortevole, e una maggiore circolazione
dell’aria per migliorare la dissipazione del calore.
La Docking Station include le seguenti
porte:
• Due porte PS/2
• Connettore parallelo DB25 IEEE 1284 (USB emulato)
• Due audio da 3,5 mm: (1) uscita stereo e (1) ingresso
microfono
• RS232 seriale (USB emulato)
• Un’uscita audio digitale S/PDIF (non compatibile con
Windows 2000)
• RJ-45 Ethernet 10/100
• Quattro porte USB 2.0 :
- Due porte ad alta velocità USB 2.0
- Due porte ad alta velocità USB 2.0 sempre attive con
potenza extra
76
Page 77

Targus Universal Laptop Docking Station
Contenuto della
confezione
Oltre a questa guida utente, la confezione include:
• Targus Universal Docking Station
• Cavo USB 2.0 upstream High-speed
• CD driver
• Alimentatore CA
Requisiti di sistema
Hardware
• PC con processore Intel® Pentium® o equivalente
• Unità CD-ROM
• Porta USB versione 2.0
• Alimentazione CA (alimentatore CA richiesto)
NOTA: QUANDO E’ CONNESSA AD UNA PORTA USB VERSIONE 1.1
DEL COMPUTER, LE PRESTAZIONI DELLA DOCKING STATION
RISULTERANNO INFERIORI ALLE SPECIFICHE. PER OTTENERE I
MIGLIORI RISULTATI, COLLEGATELA AD UNA PORTA USB
VERSIONE 2.0.
Sistema operativo
• Windows® 2000 Service Pack 4 o
• Windows® XP Service Pack 3 o
• Windows Vista® Service Pack 1
77
Page 78

Targus Universal Laptop Docking Station
Installare accessorio e
driver
Per utilizzare la Targus Docking Station, è necessario
installarne il driver nel computer.
AVVERTENZA: PER GARANTIRNE IL CORRETTO FUNZIONAMENTO,
IL SOFTWARE DEVE ESSERE INSTALLATO PRIMA DI COLLEGARE
LA DOCKING STATION AL COMPUTER.
Dopo aver installato il software, collegate la docking
station al computer; la funzione plug-and-play di
Windows installerà i driver hardware per le varie porte.
Installare il driver della docking
station
L’installazione del driver della docking station consente al
sistema operativo di riconoscere la periferica e le relative
porte quando viene collegata al computer.
1 Accendete il computer.
2 Inserite il CD dei driver nell’unità CD-ROM del
computer.
Se l’installazione non si avvia automaticamente, fate clic
su Start, Esegui e digitate D:\ACP45_setup.exe (dove
D: è il percorso all’unità CD-ROM), poi fate clic su OK.
78
Page 79

Targus Universal Laptop Docking Station
3 Comparirà la finestra dell’Installazione guidata della
docking station. Fate clic su Avanti per continuare.
4 Compare la finestra informativa. Fate clic su
Avanti
per continuare. Per installare i driver correttamente,
è necessario riavviare il sistema prima di
collegarvi la Docking Station.
79
Page 80

Targus Universal Laptop Docking Station
5 Riavviate il computer selezionando “Yes, I want to
restart my computer now”. Fate clic su Fine e
riavviate il computer quando richiesto.
Collegare la Docking Station al
computer
Dopo aver installato il software della docking station, è
tutto pronto per collegarla al computer. Procedete in
questo modo:
1 Collegate l’alimentatore CA in dotazione al jack di
alimentazione CA della docking station.
2 Collegate un’estremità del cavo USB alla docking
station e l’altra estremità in una porta USB 2.0 libera
del computer.
AVVERTENZE: LA DOCKING STATION NON PUÒ FUNZIONARE
CORRETTAMENTE SE L’ALIMENTATORE CA NON VIENE
COLLEGATO AD UNA PRESA ELETTRICA.
NON COLLEGATE ALCUNA PERIFERICA ALLA DOCKING STATION
FINCHE’ L’INSTALLAZIONE NON E’ STATA COMPLETATA
CORRETTAMENTE.
80
Page 81

Targus Universal Laptop Docking Station
Installare i driver predeniti
Dopo aver collegato la docking station al computer, i
driver predefiniti per ciascuna porta vengono installati
automaticamente.
NOTA: ACCERTATEVI CHE SIA INSTALLATO IL SERVICE PACK PIÙ
RECENTE.
Alcune periferiche hardware potrebbero richiede
l’installazione di driver.
Per installare i driver:
1 Selezionate Installa il software automaticamente
(Raccomandato) e fate clic su Avanti.
L’Installazione guidata nuovo hardware inizierà ad
installare i driver hardware.
Comparirà la finestra che conferma il completamento
dell’installazione del nuovo hardware.
2 Fate clic su Fine e, se necessario, ripetete questa
procedura per ciascuna periferica.
3 Riavviate il computer.
LED di stato
Al termine dell’installazione di tutti i driver, i LED di stato
sul retro della docking station si accenderanno non
appena collegherete le periferiche alla docking station.
• La spia Tx verde si illumina quando collegate la rete e
la spia Rx gialla lampeggia quando vengono trasmessi
dati da o verso la rete.
NOTA: LA DOCKING STATION SUPPORTA LA FUNZIONE DI HOT
SWAP DEL CAVO DI RETE.
81
Page 82

Supporto per laptop
Targus Universal Laptop Docking Station
Seriale S/PDIF Rete
USB 2.0 ad alta
velocità sempre
attivo con potenza
extra
PS/2 Parallela
Ingresso
audio
Uscita
audio
Porte della Docking Station
Porta USB
2.0 ad alta
velocità
“Accesso
facile”
Targus
DEFCON CL,
PA410E (non
fornito)
Vista laterale sinistra della Docking Station
Vista laterale destra della Docking Station
82
Porta USB 2.0
ad alta velocità
Alimentatore CA
Slot
sicurezza
Slot
sicurezza
Connessione
USB - PC
Page 83

Targus Universal Laptop Docking Station
Collegare nuove
periferiche
Per evitare possibili danni durante la connessione di una
nuova periferica, non inserite forzatamente il connettore
del cavo di connessione nella porta della docking station.
Se il connettore non si collega senza sforzo, provate a
collegarlo capovolgendolo.
Collegare mouse / tastiera
seriali
Per collegare un mouse o una tastiera seriale, inserite il
connettore del cavo nella porta seriale della docking
station.
Collegare un mouse / tastiera
PS/2
Per collegare un mouse o una tastiera PS/2, inserite il
connettore del cavo nella porta PS/2 della docking
station.
Collegare e congurare un
modem seriale
Per collegare un modem seriale:
1 Collegate il connettore del cavo alla porta seriale della
docking station.
2 Installate il driver del modem secondo le istruzioni
fornite con il dispositivo.
3 Quando viene richiesta la selezione della porta,
specificate USB seriale (COMx), dove x è il numero
della porta COM assegnato dal sistema operativo.
83
Page 84

Targus Universal Laptop Docking Station
Collegare una stampante
parallela
Per collegare una stampante parallela:
1 Collegate il connettore del cavo alla porta parallela
della docking station.
2 Fate clic su Start del desktop di Windows e
selezionate
stampante seguendo le istruzioni
guidata stampanti.
Stampanti e fax. Aggiungete il driver della
dell’Installazione
Collegare un PDA
1 Collegate il connettore del cavo alla porta seriale della
docking station.
2 Verificate che le impostazioni della porta COM, nel
software HotSync
alle impostazioni della docking station.
Per verificare le impostazioni della porta COM sulla
docking station, fate riferimento a “Controllare le
periferiche installate”.
Per verificare le impostazioni della porta COM su
PDA, consultate la documentazione a corredo di
questo prodotto.
®
o ActiveSync®, corrispondano
Collegare la rete locale
Per collegare un cavo Ethernet con connettore RJ-45,
inserite il connettore del cavo nella porta rete/Ethernet
della docking station. A seconda del tipo di rete utilizzato
potrebbero essere necessarie ulteriori procedure di
connessione. Per maggiori istruzioni, contattate
l’amministratore di rete.
84
Page 85

Targus Universal Laptop Docking Station
Collegare una periferica USB
Per collegare una periferica USB, inserite il suo
connettore in una porta USB della docking station e
seguite le istruzioni aggiuntive fornite con la periferica.
Tutte e quattro le porte USB soddisfano i requisiti USB
High-speed erogando 480Mbps e 500mA di corrente.
Tuttavia le due porte USB sul lato destro caratterizzate
da questo simbolo hanno due caratteristiche unicheSempre attive e ad alta potenza. Per maggiori dettagli
consultate “Targus Always On”, e “Usare periferiche USB
che richiedono più potenza”.
Le altre porte USB (una laterale e l’altra posteriore vicino
alla porta Ethernet) sono porte che forniscono una
portenza di 500mA standard.
Collegare e congurare una
periferica audio
1 Collegate le cuffie o i diffusori alla porta uscita audio
da 3,5 mm verde della docking station.
2 Per collegare un microfono, inserite il relativo spinotto
nella porta di ingresso audio.
3 Per abilitare le cuffie o i diffusori, è necessario
selezionare nella finestra delle proprietà la periferica
audio USB PnP.
In Windows 2000, fate clic su Start, Impostazioni,
Pannello di controllo ed aprite la cartella Suoni e
multimedia. Selezionate la scheda Audio. Sotto
Riproduzione suoni, selezionate dalla lista Periferica
preferenziale USB PnP Sound Device.
Fate clic su Applica, poi su OK.
85
Page 86

Targus Universal Laptop Docking Station
In Windows XP, aprite il Pannello di controllo e
selezionate Suoni e periferiche audio. Selezionate la
scheda Audio. Sotto Riproduzione suoni, selezionate
dalla lista Periferica predefinita USB PnP Sound
Device.
Fate clic su Applica, poi su OK.
Per Windows Vista andare su Pannello di controllo
e scegliere Hardware e suoni. Selezionare Audio.
In Riproduzione scegliere l’Uscita Digitale
dell’apparecchio audio USB PnP.
Fare clic su Imposta Default.
4 Controllate che il volume non sia impostato su
Disattiva.
NOTA: NON E’ POSSIBILE UTILIZZARE CONTEMPORANEAMENTE
LA PERIFERICA AUDIO SULLA PORTA DELLA DOCKING STATION E
SUL COMPUTER HOST.
CAUTELA: TUTTE LE APPLICAZIONI AUDIO O MULTIMEDIALI
DEVONO ESSERE CHIUSE PRIMA DI PASSARE DALL’USCITA
AUDIO DELLA DOCKING STATION ALL’USCITA AUDIO DEL
COMPUTER.
86
Page 87

Targus Universal Laptop Docking Station
Installare e congurare una
periferica S/PDIF (Sony/ Philips
Digital Interface)
1 Per abilitare S/PDIF, è necessario attivarlo. Questa
operazione viene svolta nell’applet di configurazione
dell’audio 3D USB disponibile nell’Area di notifica del
sistema (fate clic sull’icona USB per accedere allo
schermo di configurazione).
2 Fate clic sul pulsante a lato dell’uscita S/PDIF per
abilitare S/PDIF.
3 Impostate l’uscita audio dall’Area di notifica.
87
Page 88

Targus Universal Laptop Docking Station
Universal Docking Station
Universal Docking Station
Digital Decoder
A/V Receiver
Optical Cable (Not included)
Home Theatre
ZOOM IN
4 Collegate il cavo ottico (non fornito) tra la porta di
uscita S/PDIF-Out della Docking Station e la porta di
ingresso S/PDIF-In del decoder digitale o dei diffusori.
5 Collegate il decoder digitale o i diffusori al sistema
Home Theater.
Modalità Suspend
globale
Quando il computer è in stato Suspend, anche la docking
station attiva la modalità suspend, per risparmiare
energia. Quando il computer si riattiva, la docking station
si riattiva automaticamente.
88
Page 89

Targus Universal Laptop Docking Station
Targus Always On
Le due porte USB che erogano fino a 1Amp continuano
ad alimentare le periferiche anche quando il laptop è
spento o disconnesso dalla docking station. Questo vi
permette di caricare ogni strumento USB che si collega a
queste porte senza dover accendere il computer.
Usare periferiche USB
che richiedono più
potenza
Alcune periferiche con assorbimento di corrente elevato,
quali le stampanti e le unità ottiche, vanno collegate alle
porte USB alimentate. Queste porte erogano fino a
1000mA - il doppio rispetto ad una porta USB standard.
Limitazioni
Alcune periferiche potrebbero bloccarsi
temporaneamente in caso di trasferimento dati
sostenuto. Ad esempio, il mouse potrebbe rispondere
con una certa lentezza durante la stampa di contenuti
grafici o in presenza di elevato traffico di rete.
Raccomandiamo di seguire questi suggerimenti:
• Non trasferite dati verso e da più periferiche ad alta
velocità contemporaneamente, quali camere digitali o
scanner.
• In caso di degrado della velocità, chiudete gli altri
programmi che utilizzano la periferica USB, per
aumentarne le prestazioni.
89
Page 90

Targus Universal Laptop Docking Station
Risoluzione di problemi
Periferica non funzionante
• Controllate che sia correttamente inserita nella porta
adeguata della docking station.
• Collegate la periferica ad un’altra porta della docking
station. Se continua a non funzionare, controllate la
periferica collegandola direttamente al computer.
• Verificate di aver eseguito il programma di installazione
della periferica.
• Controllate se la periferica è presente nella Gestione
periferiche. Per maggiori informazioni, consultate
“Controllare le periferiche installate”.
• Scollegate le periferiche dalla docking station e
ricollegatele, una alla volta. Controllate che ogni
periferica funzioni correttamente prima di ricollegarne
un’altra.
• Ciascuna porta USB è equipaggiata con una
protezione contro sovracorrenti. Se una periferica USB
assorbe più corrente di quanta non sia in grado di
erogare la porta USB, la porta verrà disattivata.Per
riabilitare la porta, scollegate la periferica e selezionate
l’opzione di Reset nella Gestione periferiche o
nell’icona dell’Area di notifica. A questo punto è
possibile ricollegare la periferica alla porta USB. Se
viene nuovamente arrestata, controllate i requisiti di
alimentazione della periferica.
90
Page 91

Targus Universal Laptop Docking Station
Controllare le periferiche
installate
Nella finestra Gestione periferiche di Windows è
possibile controllare la lista delle periferiche collegate alla
docking station.
Fate un clic destro sulle Risorse del computer,
Proprietà, poi aprite la scheda Hardware e selezionate il
pulsante Gestione periferiche.
Nella finestra Gestione periferiche, espandete:
• Human Interface Devices - visualizza tastiere e
periferiche di puntamento: mouse, trackball e joystick
• Tastiere– visualizza le tastiere PS/2
• Mouse e altre periferiche di puntamento- visualizza il
mouse PS/2
• Schede di rete– visualizza l’adattatore ASIX
AX88772A USB 2.0 fast Ethernet
• Porte (COM & LPT) – Porta di comunicazione Prolific
USB-to-Serial Comm Port (COM X)
• Controller audio, video e giochi – visualizza la
periferica audio USB PnP
• Controller USB (Universal Serial Bus) – visualizza le
altre periferiche installate per la docking station e gli
hub
91
Page 92

Targus Universal Laptop Docking Station
Vericare un modem seriale
Connessione
Se collegate un modem alla porta seriale (RS232),
verificate che la porta assegnata al modem sia USB
seriale (COMx), dove x è il numero della porta COM. Se il
sistema operativo non rileva automaticamente
l’assegnazione del modem alla porta USB seriale
(COMx), rieseguite l’Installazione hardware e
selezionate Seleziona dalla lista al posto di Rilevazione
automatica. Poi selezionate Prolific Device from Page
come porta COM.
Messaggio di errore sul PDA
Se sul PDA compare il messaggio di errore
“Connessione non stabilita”, verificate che le
impostazioni della porta COM, nel software HotSync o
ActiveSync, corrispondano alle impostazioni della
docking station. Per verificare le impostazioni della porta
COM sulla docking station, fate riferimento a “Controllare
le periferiche installate”.
Alcune versioni obsolete del software Palm® Desktop
non sono compatibili con la conversione USB - Seriale.
Contattate il produttore del PDA per ottenere un
aggiornamento del software.
Palm e HotSync sono marchi registrati o marchi di fabbrica di Palm, Inc. Microsoft, Windows,
Windows Vista e ActiveSync sono marchi registrati o marchi di fabbrica di Microsoft
Corporation negli Stati Uniti e/o in altri Paesi. Tutti i marchi di fabbrica e i marchi registrati
sono di proprietà dei rispettivi depositar i. Tutti i diritti riservati. Caratteristiche e specifiche
soggette a modifiche senza preavviso. © 2008, Targus Group International, Inc. e Targus
Group (RU) Ltd.
92
Page 93

TARGUS
UNIVERSEEL
DOCKING STATION
VOOR
NOTEBOOKS
Inleiding
Veel plezier met het Targus Universeel Docking Station
voor notebooks. Op deze draagbare uitbreidingsmodule
kunt u via één USB-connector vier USB-apparaten, een
netwerk (Ethernet/LAN), luidsprekers en een microfoon,
een PS/2-muis en -toetsenbord, en een serieel en een
parallel apparaat aansluiten. Daarnaast kunt u het
docking station met het beveiligingsslot aan uw
bureaublad bevestigen.
Het docking station heeft bovendien de Targus Always
On-technologie, de Targus USB Power Port met dubbele
USB-specificatie voor apparaten die meer stroom
verbruiken, en USB-poorten die meer ruimte bieden aan
grotere adapters. Targus Always On geeft ook voeding
aan de USB-poorten als het notebook is uitgeschakeld,
van het docking station is losgekoppeld, en wanneer dit
in de slaap- of ruststand staat. Daardoor kunnen
USBapparaten die via de USB-poort worden opgeladen,
onafgebroken worden gevoed.
93
Page 94

Targus Universeel Docking Station Voor Notebooks
Mogelijkheden
Warmteafvoer door natuurlijke
warmte-uitwisseling:
Plaats de onderzijde van uw laptop op de rubberen
steunen van het docking station. De meeste laptops
voeren warmte af via de onderzijde en hoe meer lucht
eronder kan circuleren, hoe groter de kans dat de warmte
door natuurlijke uitwisseling wordt afgevoerd.
Comfort
Het verhoogde platform biedt een gezondere positie voor
uw handen en meer luchtcirculatie voor een betere
koeling.
Het docking station heeft de volgende
poorten:
• Twee PS/2-poorten
• Parallelle connector IEEE 1284 DB25
(USB geëmuleerd)
• Twee 3,5 mm audioaansluitingen: 1 stereo-uitgang en
1 microfooningang
• Seriële aansluiting RS232 (USB geëmuleerd)
• Een S/PDIF digitale audio-uitgang (niet ondersteund
door Windows 2000)
• RJ45 Ethernet 10/100
• Vier USB 2.0 Poorten:
- Twee Hoge Snelheid USB 2.0 poorten
- Twee Hoge Snelheid USB 2.0 Always-On poorten
met extra vermogen
94
Page 95

Targus Universeel Docking Station Voor Notebooks
Inhoud verpakking
Naast deze handleiding bevat de verpakking de volgende
onderdelen:
• Targus Universeel Docking Station
• High-speed USB 2.0 upstreamkabel
• CD met stuurprogramma’s
• Adapter voor netvoeding
Systeemvereisten
Hardware
• PC met Intel® Pentium®-processor of gelijkwaardig
• CD-ROM-station
• USB-poort versie 2.0
• Netvoeding (voedingsadapter vereist)
OPMERKING: ALS HET DOCKING STATION IS AANGESLOTEN OP
EEN USB-POORT VERSIE 1.1, ZULLEN DE PRESTATIES VAN HET
STATION NIET OPTIMAAL ZIJN. VOOR HOGERE PRESTATIES MOET
HET OP EEN USB-POORT VERSIE 2.0 WORDEN AANGESLOTEN.
Besturingssysteem
• Windows® 2000 Service Pack 4 of
• Windows® XP Service Pack 3 of
• Windows Vista® Service Pack 1
95
Page 96

Targus Universeel Docking Station Voor Notebooks
Apparaat en
stuurprogramma’s
installeren
Om het Targus Docking Station te kunnen gebruiken,
moet u eerst het stuurprogramma op uw computer
installeren.
WAARSCHUWING: U MOET DE SOFTWARE VAN HET DOCKING
STATION INSTALLEREN VOORDAT U DIT OP UW COMPUTER
AANSLUIT. ANDERS ZAL HET STATION NIET CORRECT
FUNCTIONEREN.
Na installatie van de software sluit u het docking station
aan op uw computer. Windows plug-and-play installeert
daarna de stuurprogramma’s voor de hardware voor elke
poort.
Stuurprogramma voor docking
station installeren
Als het stuurprogramma voor het docking station
geïnstalleerd is, kan het besturingssysteem het station
en zijn poorten herkennen nadat deze zijn aangesloten.
1 Schakel de computer in.
2 Plaats de CD met het stuurprogramma in het CDROM station van uw computer.
Als Setup niet automatisch start, klik dan op Start,
Uitvoeren, typ D:\ACP45_setup.exe (als D: de
aanduiding is van uw CD-ROM-station) en klik op OK.
96
Page 97

Targus Universeel Docking Station Voor Notebooks
3 Het venster van de installatiewizard van het docking
station verschijnt. Klik op Volgende om door te gaan.
4 Het informatievenster verschijnt. Klik op
Volgende om
door te gaan. Om het stuurprogramma correct te
installeren moet u het systeem opnieuw starten
voordat u het docking station aansluit.
97
Page 98

Targus Universeel Docking Station Voor Notebooks
5 Kies Ja, ik wil mijn computer nu opnieuw
opstarten. Klik op Voltooien en start uw computer
opnieuw als dat gevraagd wordt.
Docking station op computer
aansluiten
Na installatie van de software voor het docking station
kunt u het station als volgt op de computer aansluiten:
1 Sluit de meegeleverde voedingsadapter aan op de
voedingsaansluiting van het docking station.
2 Sluit één einde van de USB-kabel aan op het docking
station en het andere einde op een vrije USB 2.0 poort van uw computer.
WAARSCHUWINGEN: HET DOCKING STATION FUNCTIONEERT
NIET GOED ALS DE VOEDINGSADAPTER NIET OP HET LICHTNET
IS AANGESLOTEN.
SLUIT APPARATEN PAS OP HET DOCKING STATION AAN ALS DE
INSTALLATIE VOLTOOID IS.
98
Page 99

Targus Universeel Docking Station Voor Notebooks
Standaard stuurprogramma’s
installeren
Als u het docking station op uw computer hebt
aangesloten, worden de standaard stuurprogramma’s
voor elke poort automatisch geïnstalleerd.
OPMERKING: ZORG DAT U DE NIEUWSTE SERVICE PACKS HEBT
GEÏNSTALLEERD.
Voor sommige apparatuur kan u gevraagd worden de
stuurprogramma’s te installeren.
Dit doet u als volgt:
1 Selecteer Software automatisch installeren
(aanbevolen) en klik op Volgende.
De wizard Nieuwe hardware gevonden begint de
stuurprogramma’s te installeren.
Het scherm van de wizard Nieuwe hardware
gevonden voltooien verschijnt.
2 Klik op Voltooien en herhaal dit als dat nodig is voor
elk apparaat.
3 Start de computer opnieuw.
Statuslampjes
Als alle stuurprogramma’s geïnstalleerd zijn, lichten de
statuslampjes bij de USB-poorten aan de achterzijde van
het docking station op wanneer u apparaten aansluit.
• Een groene Tx-LED brandt als er verbinding is met een
netwerk en een gele Rx-LED brandt wanneer data met
het netwerk worden uitgewisseld.
OPMERKING: HET DOCKING STATION ONDERSTEUNT HOT
SWAPPING (VERWISSELEN TIJDENS BEDRIJF) VAN DE
NETWERKKABEL.
99
Page 100

Targus Universeel Docking Station Voor Notebooks
Laptop Steunkussen
PS/2 Parallel
“Easy
Access” Hoge
Snelheid USB
2.0 Poort.
Targus
DEFCON CL,
PA410E (niet
meegeleverd)
Serieel S/PDIF Netwerk Hoge Snelheid USB
Audio-
Audiouitgang
Hoge Snelheid
USB 2.0 Poort
ingang
2.0 Always-On poort
met extra vermogen
Poorten Docking Station
Linkerzijde Docking Station
Netadapter
USB naar PC
Aansluiting
Kabelslot
Kabelslot
Rechterzijde Docking Station
100
 Loading...