

Page 1
410-1681-006F / AMP13AP
Model: AMP13-A
3 YEARS LIMITED WARRANTY: We pride ourselves
on the quality of our products. For complete warranty
details and a list of our worldwide oces, please visit
www.targus.com. Features and specications are subject
to change without notice. All trademarks and registered
trademarks are the property of their respective owners.
©2015 Targus Group International, Inc. Manufacturer/
Importer: Targus Asia Pacic Ltd., Unit 1202-07, 12/F,
Miramar Tower, 132 Nathan Road, Tsim Sha Tsui,
Kowloon, Hong Kong
User Guide
Petunjuk Pengguna
32900/SDPPI/2014
3047
Page 2

Targus Laser Presentation Remote
1
folding line
2 staples here (saddle stitching)
Introduction
Thank you for your purchase of the Targus Laser Presentation Remote. This
combination remote with laser pointer, controls both Microsoft PowerPoint
®
and
Apple Keynote
®
. This cordless remote also oers true plug and play capability
with no need for software drivers, while long-range 2.4 GHz technology allows
for eective presentations up to 50 feet (15 m).
System Requirements
Hardware
• USB port
Operating System
• Microsoft Windows
®
2000
• Microsoft Windows
®
XP
• Microsoft Windows Vista
®
• Microsoft Windows® 7
• Microsoft Windows
®
8
• Mac OS
®
X v10.4 to v10.8.4
Contents
• Targus Laser Presentation Remote
• Mini USB Receiver
• 1 x AAA Battery
• User Guide
Page 3
Targus Laser Presentation Remote Targus Laser Presentation Remote
2 3
folding line
2 staples here (saddle stitching)
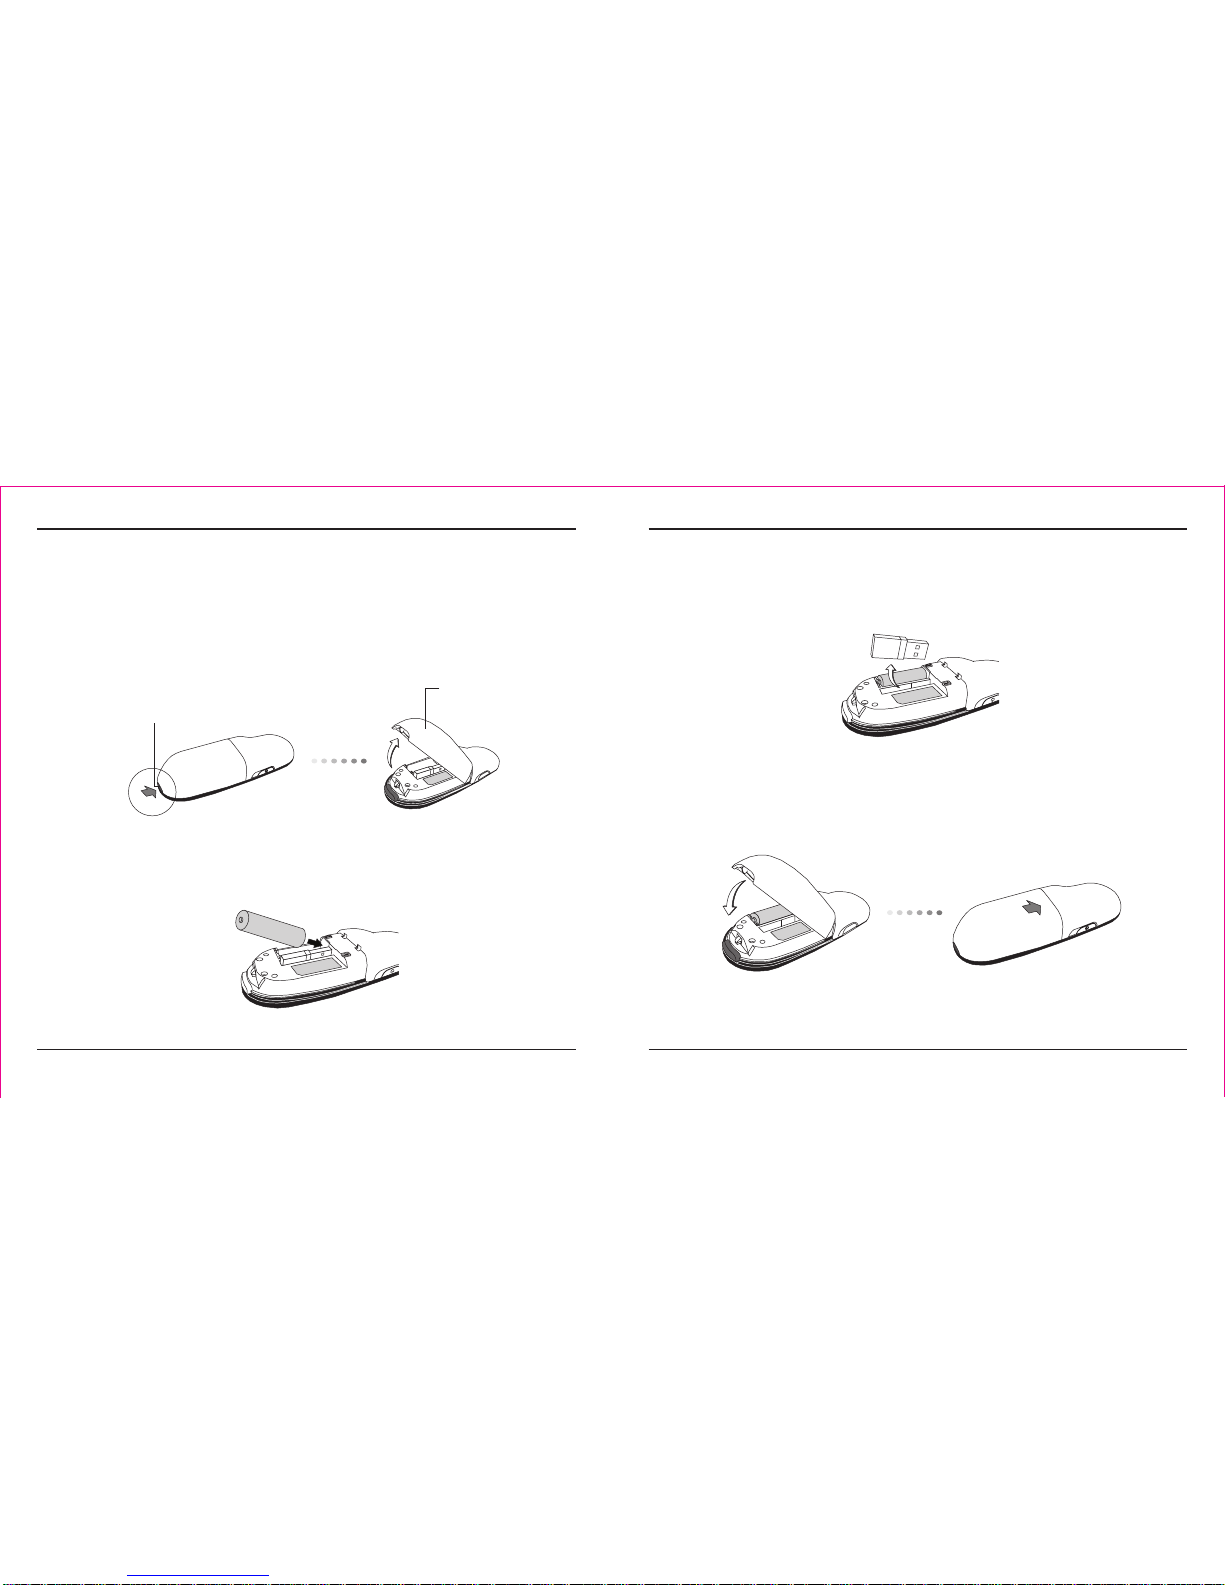
Setting Up Your Remote
Installing the Batteries
Press the battery cover release button to open the battery cover and carefully
lift the cover as shown.
Battery
cover
Insert the supplied batteries, making sure the positive (+) and negative (-) ends
of the batteries match the polarity indicators inside the battery compartment.
Battery cover
release button
Remove the mini USB receiver stored inside the center compartment.
Slide the battery cover back into position until it “clicks” rmly into place.
Page 4
Targus Laser Presentation Remote Targus Laser Presentation Remote
4 5
folding line
2 staples here (saddle stitching)
Using Your Remote
PC PowerPoint
®
Mac KeyNote
®
Mac PowerPoint
®
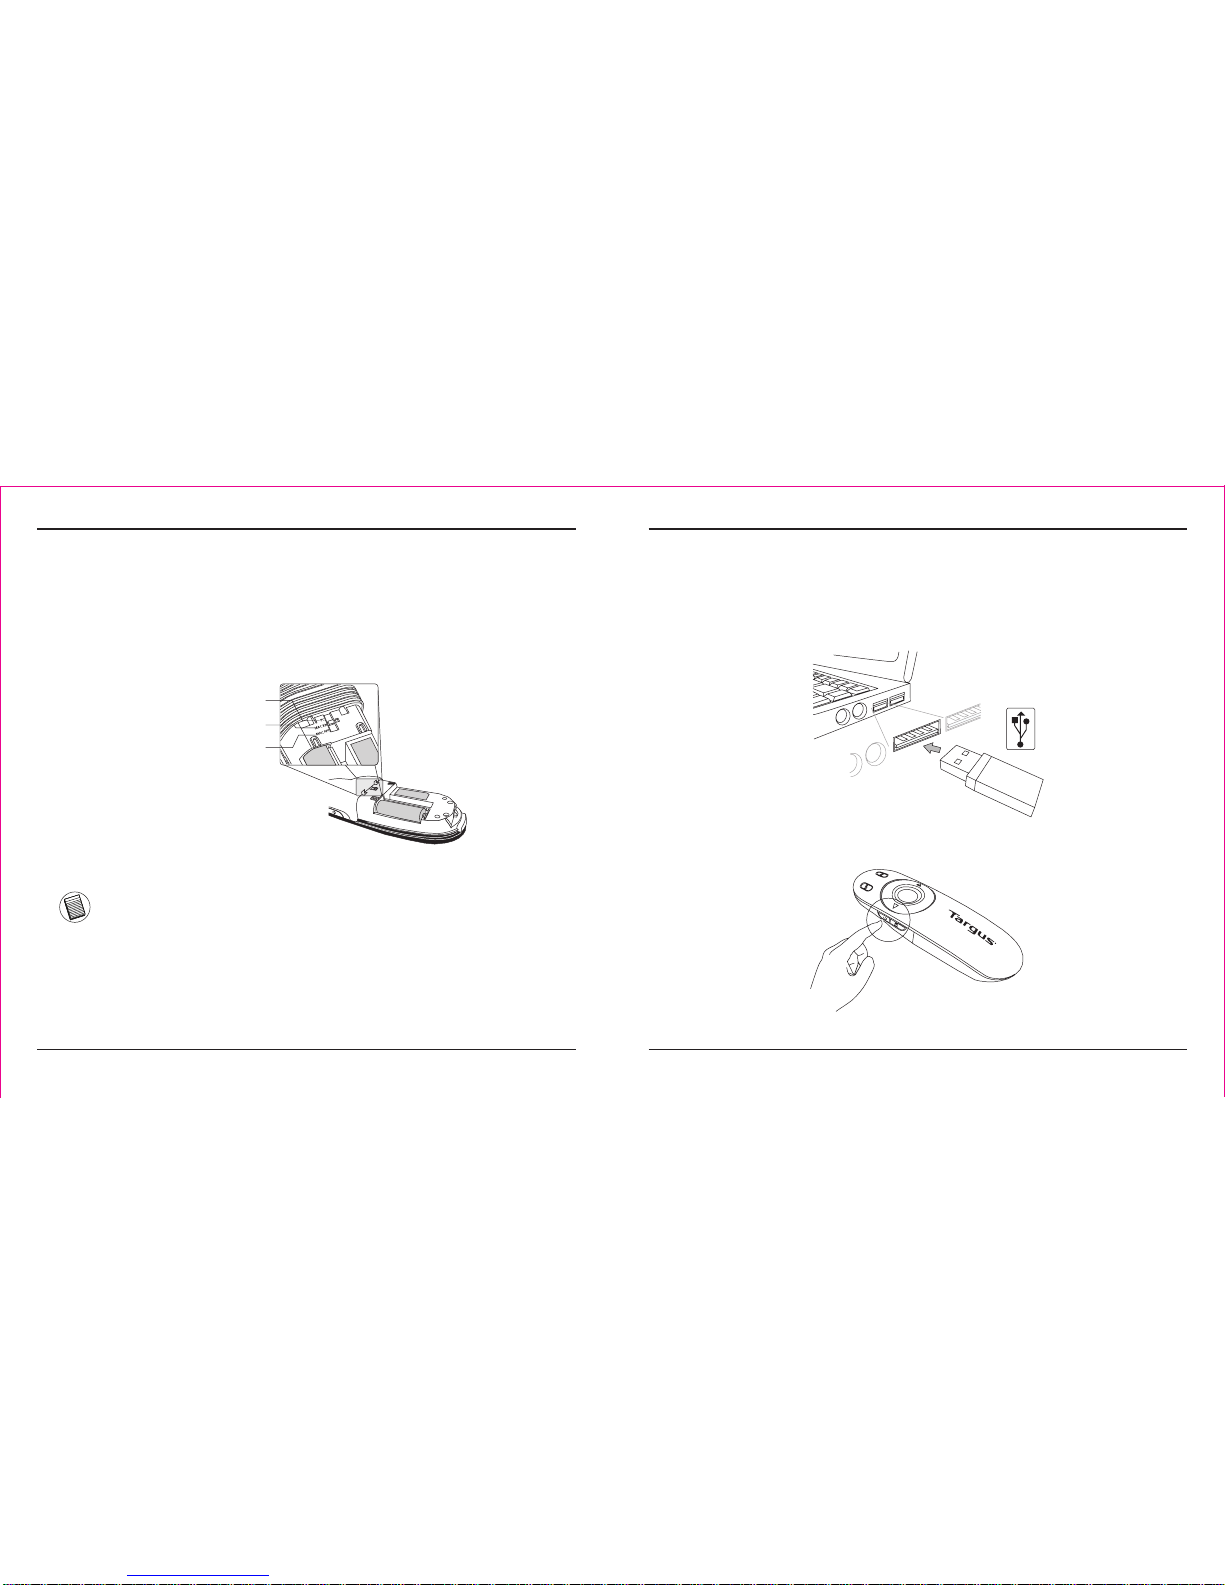
Before using the remote, please select your computer type and preferred
presentation software. Locate the switch inside the battery compartment as
shown.
NOTE: SELECT “PC POWERPOINT” IF YOU USE A COMPUTER MADE BY:
HP/COMPAQ, DELL, TOSHIBA, GATEWAY, PANASONIC, FUJITSU, SONY,
IBM/LENOVO, ACER, ASUS, ETC.
This remote is a plug and play device. It will automatically operate when the
USB receiver is connected to the computer. Plug the mini USB receiver into any
available USB port on your computer.
Turn on the remote by pressing and holding the On/O power button for 3 seconds.
Page 5

Targus Laser Presentation Remote Targus Laser Presentation Remote
6 7
folding line
2 staples here (saddle stitching)
Keys and Functions
1 Power button
Press and hold for 3 seconds to turn on the remote.
LED ring will turn green.
Press and hold for 3 seconds to turn o the remote.
LED ring will shut o.
2 Blank screen button The screen will become blank/dark.
3 Slide show
Start - Press once to begin.
Stop - Press and hold for 2 seconds to stop the slide
show.
4
Page Forward/
Next slide
Press once to go to next slide.
5
Page Backward/
Previous slide
Press once to go back one slide.
6 Laser pointer Laser light is emitted from the opening.
7 LED light ring Power and KeyLock
TM
indicator.
8 KeyLock button
Press once to enable KeyLock function.
- Disables all keys except the laser, page forward/
next slide and page backward/ previous slide
buttons.
- LED ring will become RED.
Press once to disable the KeyLock function.
- LED ring will return to GREEN.
9 Laser pointer button Press and hold to activate the laser pointer.
1
2
3
4
5
6
7
8
9
Page 6

Targus Laser Presentation Remote Targus Laser Presentation Remote
8 9
folding line
2 staples here (saddle stitching)
Safety Measures
• To avoid possible eye damage, never point the remote’s laser at people,
especially their faces, or look directly into the remote’s laser beam.
• Avoid pointing the remote’s laser beam at a mirror or other highly-reective
surface.
• Keep the remote away from young children.
• Never view the remote’s laser beam using telescopic devices, such as a
microscope or binoculars.
• Any attempt to disassemble, adjust or repair the remote may result in
exposure to laser light or other safety hazards.
Troubleshooting
What do I do if the response time of the remote is slow or it intermittently stops
working?
• Make sure that the remote is within 50 feet (15 m) of the mini USB receiver
and computer.
• Increase the distance between the remote’s receiver and the base units of
other wireless devices.
• Turn o any wireless devices and their base units that are near the remote’s
receiver.
• Replace the battery.
Pengenalan
Terima kasih atas pembelian Presentasi Remote dengan Laser Targus.
Kombinasi remote, dengan penunjuk laser dan pengontrol kursor, bekerja
bersama dengan Microsoft PowerPoint® dan Apple Keynote®. Remote nirkabel
juga menawarkan kapabilitas siap pakai yang sebenarnya dengan tidak
membutuhkan perangkat lunak Driver, sementara teknologi 2.4 GHz berjarak
jauh membuat presentasi efektif sampai dengan 50 kaki (15 m).
Permintaan Sistem
Hardware
• port USB
Sistem Pengoperasian
• Microsoft Windows
®
2000
• Microsoft Windows
®
XP
• Microsoft Windows Vista
®
• Microsoft Windows® 7
• Microsoft Windows
®
8
• Mac OS
®
X v10.4 untuk v10.8.4
Daftar Isi
• Presentasi Remote dengan Laser Targus.
• Penerima USB Mini
• 1 x Baterai AAA
• Petunjuk penggunaan
Page 7

Targus Laser Presentation Remote Targus Laser Presentation Remote
10 11
folding line
2 staples here (saddle stitching)
Mengatur Remote Anda
Menginstalasi Baterai
Tekan dan geser untuk memindahkan penutup baterai untuk instalasi baterai
Tekan penutup
baterai
Tombol pembuka
penutup baterai
Masukkan dua baterai ukuran AA, pastikan bahwa ujung positif (+) dan negatif
(-) dari setiap baterai sesuai dengan indikator kutub di dalam kompartemen
baterai.
Pindahkan penerima USB mini di dalam kompartemen pusat.
Ganti penutup baterai, sesuaikan secara perlahan dengan penutup sampai
berbunyi klik di tempantnya.
Page 8

Targus Laser Presentation Remote Targus Laser Presentation Remote
12 13
folding line
2 staples here (saddle stitching)
Gunakan remote Anda
PC PowerPoint
®
Mac KeyNote
®
Mac PowerPoint
®
Sebelum menggunakan remote, silakan pilih jenis komputer Anda dan
software presentasi yang disukai. Lokasikan kenop di dalam kompartemen
baterai sebagaimana telah ditunjukkan.
CATATAN: PILIH “POWERPOINT PC” BILA ANDA MENGGUNAKAN KOMPUTER YANG DIBUAT OLEH : HP/COMPAQ, DELL, TOSHIBA, GATEWAY,
PANASONIC, FUJITSU, SONY, IBM/LENOVO, ACER, ASUS, DLL.
Remote ini merupakan perangkat siap pakai. Ia akan secara otomatis beroperasi
ketika penerima USB dihubungkan ke komputer. Pasang penerima USB mini
kepada USB yang tersedia di komputer Anda.
Hidupkan remote dengan menekan sementara waktu tombol On/O selama 3 detik
Page 9

Targus Laser Presentation Remote Targus Laser Presentation Remote
14 15
folding line
2 staples here (saddle stitching)
Kunci dan fungsinya
1 Power tombol
Geser tombol ke atas untuk menghidupkan power
Geser tombol ke bawah untuk menghidupkan power
2 Layar gelap tombol Layar akan menjadi putih/hitam
3 Slide show
Start - Tekan sekali untuk menjadi
Stop - Dengan mematikan tombol selama 2 detik
4 Halaman sebelumnya Tekan sekali untuk ke slide selanjutnya
5 Halaman sesudahnya Tekan sekali untuk ke satu slide sebelumnya
6 Penunjuk laser Cahaya laser dipancarkan dari pembukaan
7 LED rin Power dan KeyLock
TM
indikator.
8 KeyLock Tombol
Tekan sekali mengaktifkan KeyLock fungsi.
- Menonaktifkan semua tombol kecuali halaman, laser
maju / slide berikutnya dan halaman belakang / tombol
slide sebelumnya.
- LED rin akan menjadi merah
Tekan sekali untuk mengaktifkan KeyLock fungsi.
- LED rin akan menjadi hijah
9 Tombol laser
Tekan dan tahan untuk mengaktivasi penunjuk laser
hijau
1
2
3
4
5
6
7
8
9
Page 10

Targus Laser Presentation Remote Targus Laser Presentation Remote
16 17
folding line
2 staples here (saddle stitching)
Pengukuran keamanan
• Untuk menghindari kerusakan pada mata, jangan pernah mengarahkan laser remote
pada orang, terutama pada bagian wajah, atau melihat secara langsung pada lampu
sorot laser.
• Hindari mengarahkan sorotan laser remote pada kaca atau permukaan yang
memantulkan cahaya.
• Jauhkan remote dari anak-anak kecil.
• Jangan pernah melihat sorotan laser remote dengan menggunakan perangkat
teleskop, seperti mikroskop atau binokuler.
• Setiap tindakan untuk membongkar, menyesuaikan atau memperbaiki remote
mungkin dapat menyebabkan perubahan pada cahaya laser atau bahaya pada
perangkat keamanan lainnya.
Penyelesaian masalah
Apa yang saya lakukan bila waktu respons remote melambat atau tiba-tiba
berhenti bekerja?
• Pastikan remote berada dalam 100 kaki (30 m) dari penerima USB mini dan
komputer.
• Menaikkan jarak antara penerima remote dan unit dasar dari perangkat
nirkabel lainnya.
• Mematikan perangkat nirkabel dan unit dasar yang berada di dekat penerima
remote.
• Menggantikan baterai.
Technical Support
For technical questions, please contact us via the following options:
Email
Telephone
techsupport@targus.com
Internet
http://www.targus.com/support.asp
Targus Asia Pacic – Hong Kong
Monday through Friday, 9:00 a.m. (09:00) to 5:30 p.m. (17:30): (+852) 2526-2620
Targus Asia Pacic – South Asia
Monday through Friday, 9:00 a.m. (09:00) to 6:00 p.m. (18:00): (+65) 6383-1330
Targus Australia
Monday through Friday, 9:00 a.m. (09:00) to 5:00 p.m. (17:00): (+61) 2-9807-1222
Targus Japan
Monday through Friday, 10:00 a.m. (10:00) to 5:00 p.m. (17:00): (+81) 3-3254-7070
Targus Korea
Monday through Friday, 9:00 a.m. (09:00) to 6:00 p.m. (18:00): (+82) 2-3272-0288
Targus Taiwan
Monday through Friday, 9:00 a.m. (09:00) to 5:30 p.m. (17:30): (+886) 2-2723-1836
Targus Thailand
Monday through Friday, 9:00 a.m. (09:00) to 6:00 p.m. (18:00): (+66) 0-2634-4201
Page 11

Targus Laser Presentation Remote Targus Laser Presentation Remote
18 19
folding line
2 staples here (saddle stitching)
Warranty
Targus warrants this product to be free from defects in materials and workmanship
for three years. If your Targus accessory is found to be defective within that time,
we will promptly repair or replace it upon proof of purchase. This warranty does
not cover accidental damage, wear and tear, or consequential or incidental loss.
Under no conditions is Targus liable for loss of, or damage to, a computer or
other device(s); nor loss of, or damage to, programs, records, or data; nor any
consequential or incidental damages, even if Targus has been informed of their
possibility. This warranty does not aect your statutory rights.
Regulatory Compliance
This device complies with Part 15 of the FCC Rules. Operation is subject to the
following two conditions: (1) This device may not cause harmful interference, and
(2) This device must accept any interference received, including interference that
may cause undesired operation.
FCC Statement
Tested to Comply
This equipment has been tested and found to comply with the limits of a Class B
digital device, pursuant to Part 15 of the FCC Rules. These limits are designed to
provide reasonable protection against harmful interference in a residential installation.
This equipment generates, uses, and can radiate radio frequency energy and if not
installed and used in accordance with the instructions, may cause harmful interference
to radio communications. However, there is no guarantee that interference will not
©2015 Manufactured or imported by Targus Asia Pacic Ltd., Unit 1202-07, 12/F, Miramar Tower, 132 Nathan Road,
Tsim Sha Tsui, Kowloon, HK. All rights reserved. Targus is either a registered trademark or trademark of Targus
Group International, Inc. in the United States and/or other countries. Features and specications are subject to change
without notice. Mac, the Mac logo and Mac OS, are trademarks of Apple Inc., registered in the U.S. and other countries.
Windows and Windows Vista are either registered trademarks or trademarks of Microsoft Corporation in the United
States and/or other countries. All trademarks and registered trademarks are the property of their respective owners.
occur in a particular installation. If this equipment does cause harmful interference to
radio or television reception, which can be determined by turning the equipment o
and on, the user is encouraged to try to correct the interference by one or more of
the following measures:
• Reorient or relocate the receiving antenna;
• Increase the separation between the equipment and receiver;
• Connect the equipment into an outlet on a circuit dierent from that to which the
receiver is connected;
• Consult the dealer or an experienced radio/TV technician for help.
Changes or modications not authorized by the party responsible for compliance
could void the user’s authority to operate this product.
Declaration of Conformity
Hereby, Targus, declares that this device is in compliance with the essential
requirements and other relevant provisions of Directive 1999/5/EC.
This symbol on the product or in the instructions means that your electrical and electronic
equipment should be disposed at the end its life separately from your household waste. There
are separate collection system for recycling in the EU.
For more information, please contact the local authority or your retailer where you purchased
the product.
Page 12

Targus Laser Presentation Remote Targus Laser Presentation Remote
20 21
folding line
2 staples here (saddle stitching)
AVOID EXPOSURE — HAZARDOUS ELECTROMAGNETIC RADIATION EMITTED FROM
THIS APERTURE.
LASER RADIATION. DO NOT STARE INTO THE BEAM OR VIEW DIRECTLY WITH
OPTICAL INSTRUMENTS. CLASS 2 LASER PRODUCT.
NEVER POINT A LASER BEAM INTO A PERSON’S EYES OR VIEW A LASER BEAM
DIRECTLY, AS PROLONGED EXPOSURE CAN BE HAZARDOUS TO THE EYES.
MOMENTARY EXPOSURE FROM A LASER POINTER, SUCH AS AN INADVERTENT
SWEEP OF THE LIGHT ACROSS A PERSON’S EYES, MAY CAUSE TEMPORARY FLASH
BLINDNESS SIMILAR TO THE EFFECT OF A CAMERA FLASH BULB. ALTHOUGH THIS
CONDITION IS TEMPORARY, IT CAN BECOME MORE DANGEROUS IF THE EXPOSED
PERSON IS ENGAGED IN A VISION-CRITICAL ACTIVITY SUCH AS DRIVING.
CAUTION: ANY CHANGES OR MODIFICATIONS NOT EXPRESSLY APPROVED BY THE
PARTY RESPONSIBLE FOR COMPLIANCE COULD VOID THE USER’S AUTHORITY TO
OPERATE THE EQUIPMENT.
THIS DEVICE AND ITS ANTENNA(S) MUST NOT BE CO-LOCATED OR OPERATING
IN CONJUNCTION WITH ANY OTHER ANTENNA OR TRANSMITTER. YOUR DEVICE
CONTAINS A LOW POWER TRANSMITTER. WHEN DEVICE IS TRANSMITTED IT
SENDS OUT RADIO FREQUENCY (RF) SIGNAL. NOTE: THE MANUFACTURER IS NOT
RESPONSIBLE FOR ANY RADIO OR TV INTERFERENCE CAUSED BY UNAUTHORIZED
MODIFICATIONS TO THIS EQUIPMENT. SUCH MODIFICATIONS COULD VOID THE
USER’S AUTHORITY TO OPERATE THE EQUIPMENT.
Microsoft, Windows, 及 Windows Vista为已注册商标或在美国/其他国家的微软公司的商标。所有的商标及注册商标都归商标持有者所有。
版权所有。
部件名稱
Part Name
有毒有害物质或元素
Hazardous Substances or Elements
鉛
(Pb)汞(Hg)鎘(Cd)
六價鉻
(Cr(VI))
多溴聯苯
(PBB)
多溴二苯醚
(PBDE)
PCB板 O O O O O O
元器件 X O O O O O
结构件 O O O O O O
塑胶件 O O O O O O
其他辅料 O O O O O O
O: 表示該有毒有害物質在該部件所有均質材料中的含量均在SJ/T 11363-2006標準規定的
限量要求以下。
X: 表示該有毒有害物質至少在該部件的某一均質材料中的含量超出SJ/T 11363-2006標準
規定的限量要求
技术说明: 表格中X是含量符合欧盟ROHS标准的豁免物料。
10
 Loading...