

Page 1

Targus Digital Camera
Handheld Computers
for Handspring™
Page 2

Targus Digital Camera
Congratulations on your purchase of the Targus
Handcam Digital Camera. The camera driver
software self-loads the first time you insert the
Handcam into the expansion slot on your
Handspring
immediately capture images and video clips from
your handheld computer. The camera’s pivoting
lens allows you to aim the camera while viewing
the display and the adjustable focus permits
clear, sharp close-up and scenic images.
With the supplied Universal Serial Bus (USB)
Handcam socket adapter and camera driver
software, you can also use the Handcam with
your notebook or desktop computer.
From any computer, the Handcam enables you
to:
• Capture still images and video clips
• View images in full-screen (640 x 480) or a
Palm size (160 x 120)
™
Visor™, allowing you to
2
• Immediately play back video clips
• Name, categorize and add notes to images,
edit and/or print your still images
• Email images or video clips
Page 3

Targus Digital Camera 3
• Transfer images and video clips between
computers using the supplied USB Handcam
socket adapter or beam technology
NOTE: To transfer images or video clips, the receiving
computer must have the camera driver already installed.
In addition to this user’s guide, this package
contains:
• Targus Handcam Digital Camera
• USB Handcam socket adapter
• CD-ROM containing the camera driver and
other bundled software
System Requirements
To install the camera driver software, your
desktop or notebook computer must meet the
following hardware requirements and run one of
the operating systems listed below.
Hardware
• Pentium II PC or higher, with a hard disk drive
and 160 MB free space
• 64 MB RAM or higher, depending on the oper-
ating system
• CD-ROM drive
Operating System
• Windows® 98/Me/2000
Page 4
Targus Digital Camera 4
I
Using the Targus Handcam Digital Camera with Your Handheld Computer
Connecting the Camera
To connect the Targus Handcam Digital Camera
to your Visor handheld computer, slide the
camera into the computer’s expansion slot until it
is firmly in place.
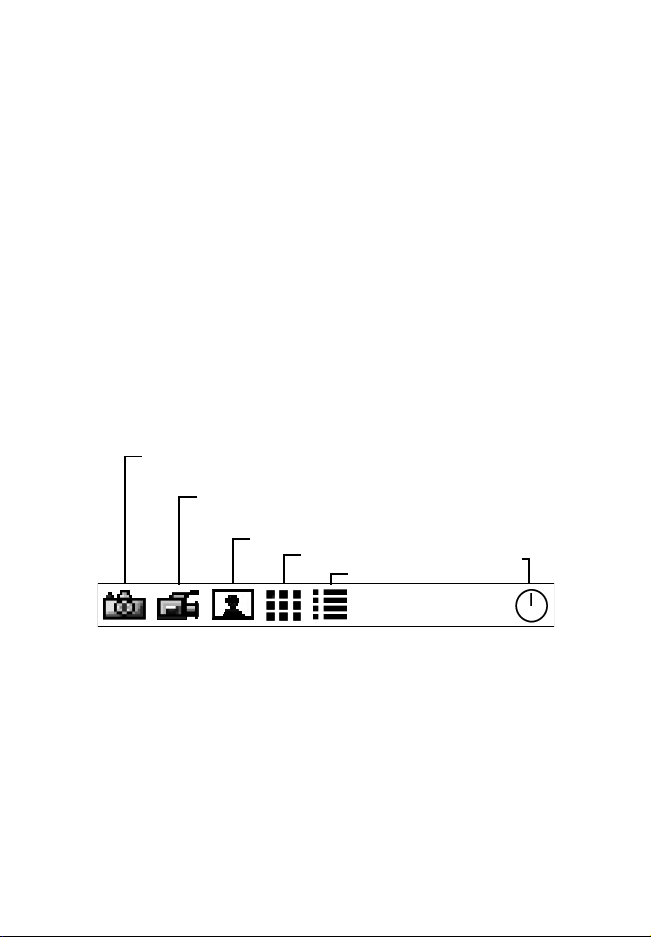
Identifying Function Icons
Use the following icons to control the camera
application.
mage
Capture
Video
Capture
View
Thumbnail
Details
Self-timer
Main Menu Icons
Image Capture — tapping this icon enables you
to capture still images.
Video Capture — tapping this icon enables you
to record video clips.
View — tapping this icon displays full-screen
images and video clips.
Page 5

Targus Digital Camera 5
Thumbnail — tapping this icon displays several
small-size images and video clips at a time.
Details — tapping this icon displays a list of
images and video files and their properties.
Self-timer — tapping this icon activates the timer
countdown, which allows you to capture “hands
free” images.
Setting up the Camera
1 Tap the Image Capture icon or the Video
Capture icon to view live video on your
computer’s screen.
2 Adjust the camera’s position and focus as
necessary.
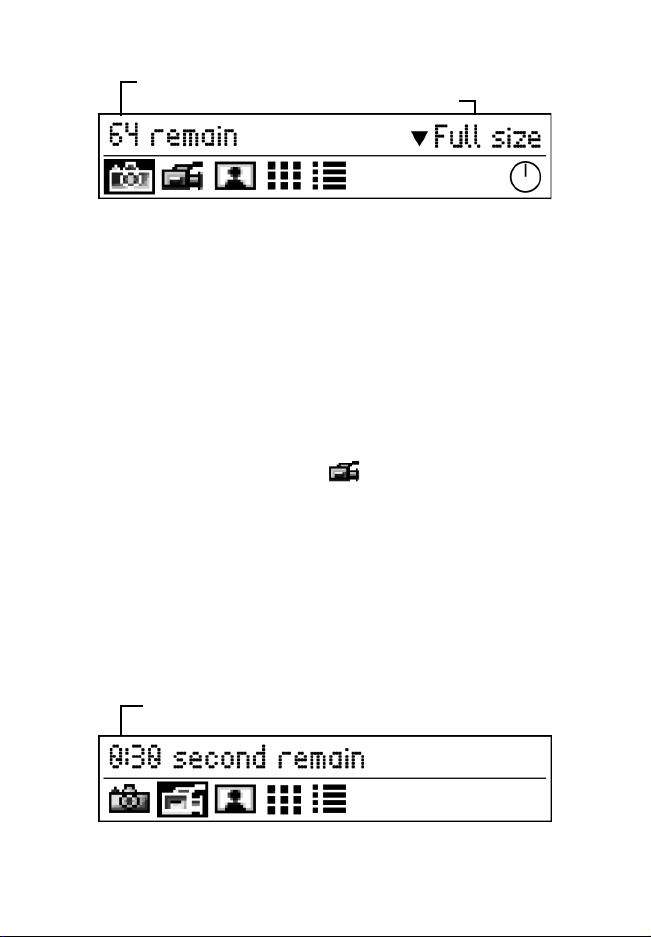
Capturing Images
1 To activate the image capture feature, tap
the Image Capture icon, if you have not
already done so.
2 Use the memory indicator, located above the
menu icons, to gauge the current maximum
image size based on the amount of memory
available. Allow 130 KB for a Full size
image, 38 KB for Palm size.
NOTE: Before capturing an image, you can specify the
image size by tapping the size indicator/changer. Full size =
640 x 480 pixels (full VGA). Palm size = 160 x 120 pixels.
Page 6
Targus Digital Camera 6
M
Memory
indicator
Image Capture Menu options
Size
indicator/changer
3 When you are ready to capture an image,
press the
Up button on your handheld
computer.
To save the image, see “Saving Images and
Video Clips” on page 7.
Recording Video Clips
1 To activate the video recording feature, tap
the Video Capture icon if you have not
already done so.
2 To start recording, press the
Up button on
your handheld computer.
The video length indicator, located above the
menu icons, shows how many seconds of video
you can record, based on the amount of
memory available.
emory
indicator
Video Capture Menu options
Page 7
Targus Digital Camera 7
3 When you are ready to stop recording video,
press the
on-screen button.
To save the video clip, see the next section.
Up button again or, tap the Stop
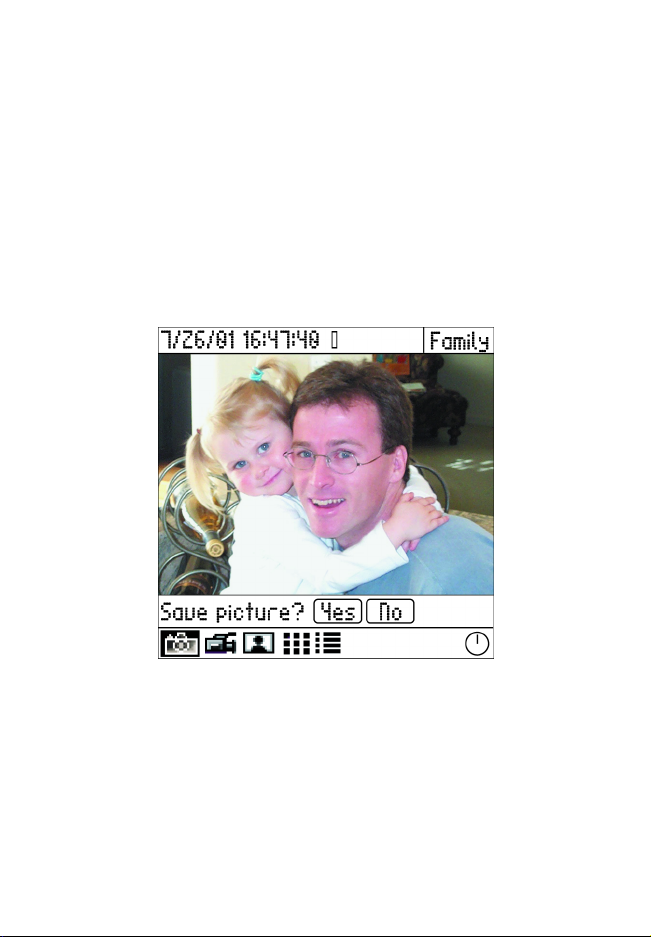
Saving Images and Video Clips
When you capture an image or stop recording
video, the “Save picture? Yes/No” prompt
appears below the image.
Saving an image
1 Choose the category in which you want to
save the file by tapping the
located in the upper-right corner of the
screen, and selecting a new category from
the list.
Category box,
Page 8

Targus Digital Camera 8
2 Tap Yes to save, or No to delete, the captured
image and return to live video.
NOTE: When capturing images and video, you can use
your handheld computer’s Up button for Yes and Down
button for No responses.
The file is automatically named with the current
date and time.
3 To give the file a descriptive title, tap on the
file name, located in the upper-left corner,
and enter the new name.
Now you are ready to view or transfer images
and video clips. See “Viewing Images and Video
Clips” below, or “Using the Targus Handcam
Digital Camera with Your Notebook or Desktop
Computer” on page 14.
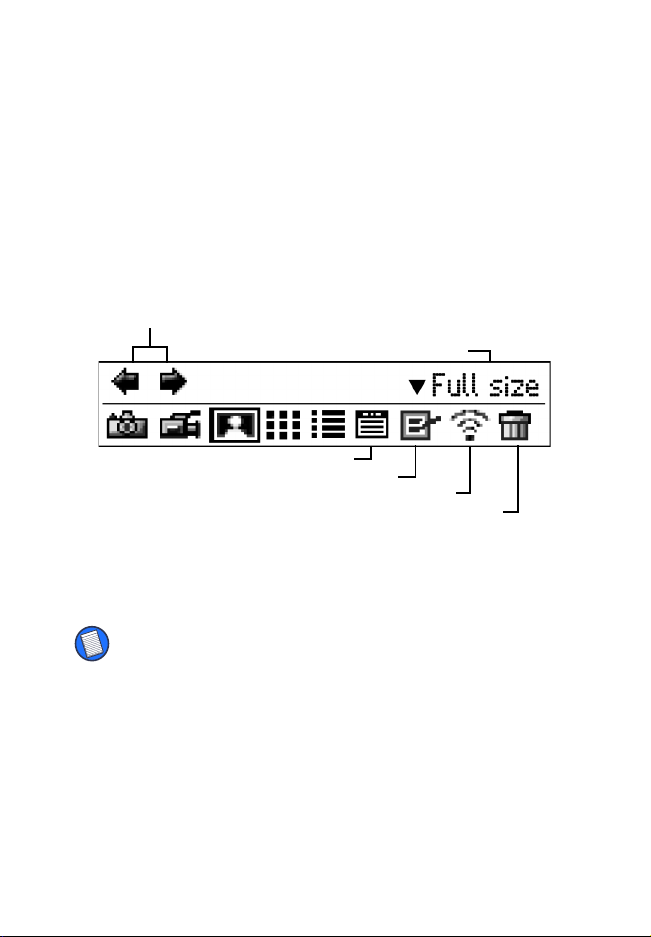
Viewing Images and Video Clips
To view saved images and video clips, tap the
View icon. The most recent image or video
appears. Tap the scroll arrows, using your stylus,
to view other images or videos.
Page 9
Targus Digital Camera 9
The View Menu has additional icons that allow
you to do the following with images and video
clips:
• View information
• Add notes
• Transfer the file using beam technology
• Delete the file
Scroll
Information
View Menu options - image
Size
indicator/changer
Notes
Beam
Delete
Tap the icon to activate the feature you want to
use.
NOTE: When viewing images and video, you can use your
handheld computer’s Up and Down buttons to scroll
between files.
Video Playback Features
During video playback, additional icons appear
that enable you to control the video clip. For
Page 10
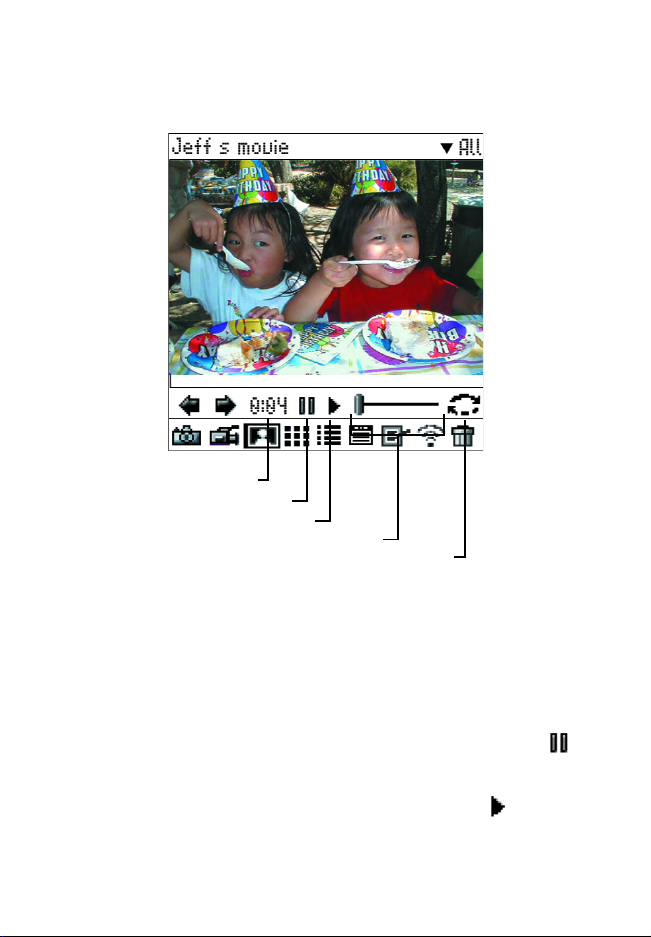
Targus Digital Camera 10
example, to edit the name of a video, tap on the
title and enter a new name.
Time
counter
Pause
Play
Progress
bar
View Menu options - video
Looping
on/off
During video playback you can also:
• View the length of the video clip via the time
counter.
• Pause video playback by tapping the Pause
icon.
• Resume playback by tapping the Play icon.
Page 11
Targus Digital Camera 11
• Skip forward or backward during playback by
dragging the Progress bar with your stylus.
• Activate continuous playback by tapping the
Loop icon. To turn off this feature, tap the
Loop icon again.
Use the scroll arrows, or the Up and Down
buttons on your handheld computer, to view
other videos.
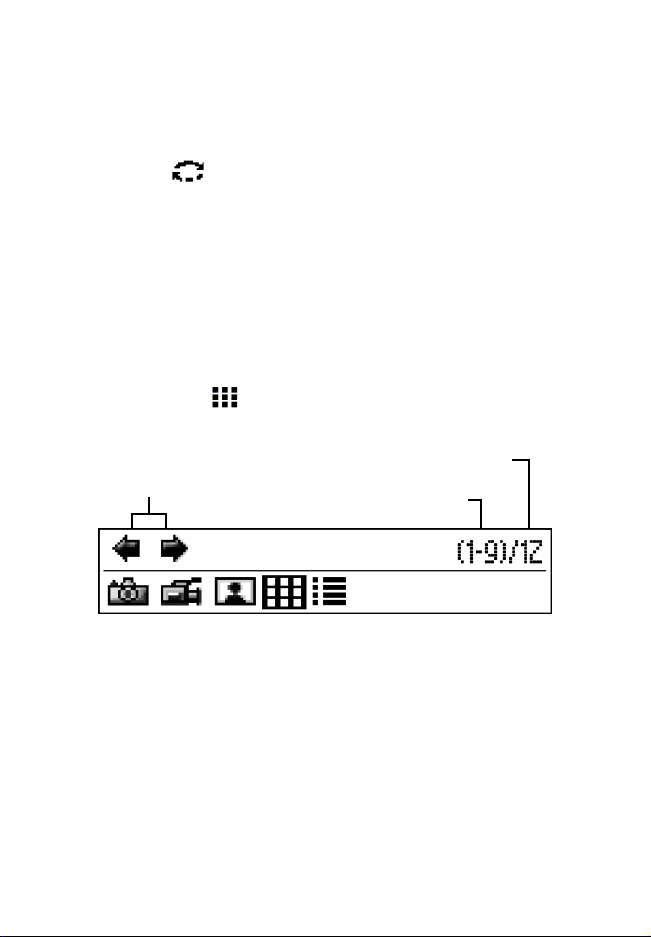
Thumbnail Viewing
To view several images at the same time, tap the
Thumbnail icon. Tapping an individual
thumbnail opens the file for full-screen viewing.
Video
Scroll
count
Image
count
Thumbnail Menu options
To view files from a different category, tap the
drop-down arrow, located in the upper-right
corner, and select a category from the list. Use
the scroll arrows, or the Up and Down buttons on
your handheld computer, to scroll between
thumbnail groups.
Page 12
Targus Digital Camera 12
The image and video count indicate how many
images and video clips are present in the current
category. Thumbnails with sprocket hole borders
indicate that the file is a video clip.
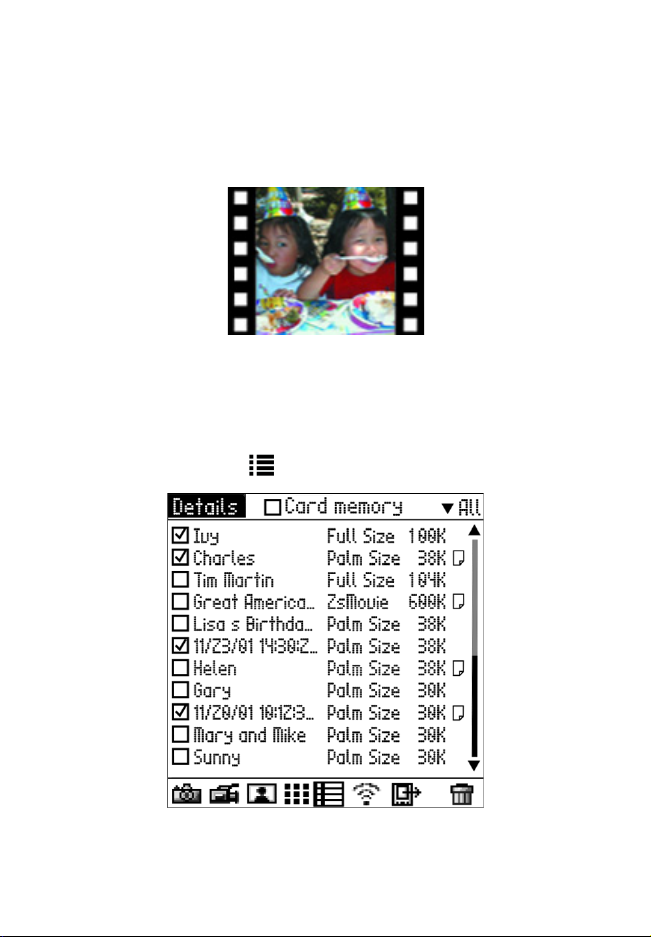
Video thumbnail
Viewing Image and Video Details
To view a list of saved images and video clips,
tap the Details icon.
Details screen
Page 13

Targus Digital Camera 13
The Details list displays the file name, image size
(Full or Palm), file size in memory and note
attachments.
From the Details list you can:
• Open an individual file for viewing by tapping on
the file name.
• View note attachments by tapping the Attached
Note icon.
• Beam files to other handheld computers by
tapping the box next to each required file so
that a check mark appears and then tapping the
Beam icon.
NOTES: Keep the infrared ports aligned while beaming files
to ensure complete file transfer.
You can only beam files to another handheld computer that
already has the camera driver installed. To install the
camera driver, insert the Targus Handcam Digital Camera
into the other computer’s expansion slot.
Color images that are beamed to a black and white
handheld computer are converted to black and white for
quality viewing. These color images will reappear in color,
with a slight loss of color quality, when transferred to your
notebook or desktop computer.
• Copy files from your handheld computer to the
Handcam, which frees memory resources on
your computer, by tapping the box next to each
desired file so that a check mark appears and
then tapping the Copy icon. Once the files
Page 14

Targus Digital Camera 14
are copied, you can delete them from your
handheld computer.
• Delete files by tapping the box next to each
obsolete file so that a check mark appears and
then tapping the Delete icon.
Copy Delete
Beam
Detail Menu options
Using the Targus Handcam Digital Camera with Your Notebook or Desktop Computer
To use the Targus Handcam Digital Camera with
your notebook or desktop computer, you must
first install the camera driver software. Once the
driver is installed, you can connect the Handcam
to your computer with the supplied USB
Handcam socket adapter and begin using it as
you would with your handheld computer.
Installing the Camera Driver
1 Turn on your computer (if it is not already
on).
Page 15

Targus Digital Camera 15
2 Insert the camera software CD-ROM into
your computer’s CD-ROM drive.
3 If Setup does not begin automatically, click
Start, then Run, and enter D:\setup.exe (where
D: is the path of your CD-ROM drive) and
then click
OK.
The Camera Install screen appears.
4 Click
Install.
The following screen appears.
Install Selected Software screen
5 To install the digital camera driver only, click
the box next to each additional software item
listed so that the check mark disappears.
6 Click
OK.
Page 16

Targus Digital Camera 16
NOTE: If you choose to install the additional software,
follow the on-screen procedures for each program.
The InstallShield Wizard for Targus Camera
screen appears.
7 Click
8 Click
9 Click
An eye drop icon now appears on the desktop
and you are ready to transfer files to your
computer.
Next.
The License Agreement screen appears.
Yes to accept the agreement or No to
cancel installation.
The InstallShield Wizard Complete screen
appears.
Finish and restart your computer to
complete installation.
Connecting the Camera to Your Notebook or Desktop Computer
NOTE: You must install the camera driver software before
connecting the Handcam to your notebook or desktop
computer.
1 Turn on your computer (if it is not already
on).
2 Plug the standard end of the USB Handcam
socket adapter into an available USB port on
your computer.
Page 17

Targus Digital Camera 17
3 Slide the camera into the Handcam socket
adapter’s slot until the camera is firmly in
place.
Inserting the Handcam into the Handcam socket adapter
Attaching the Camera Clip
Use the supplied camera clip to steady the
Handcam and improve image and video quality.
To attach the clip to the Handcam, slide the
tracks on the top of the clip into the grooves on
the bottom of the camera until the camera is
centered on top of the clip. To attach the clip to a
steady object, such as the top your notebook’s
screen, pull back the spring lever, place the clip’s
overhang over the object (so that the object is
Page 18

Targus Digital Camera 18
between the overhang and the lever) and release
the spring lever.
Overhang
Grooves
Spring
lever
Attaching the Handcam to the camera clip
Page 19

Targus Digital Camera 19
Using the Camera Desktop Application
To open the camera desktop application, doubleclick the Targus Camera icon on your
desktop.
Camera desktop application, initial screen
Page 20

Targus Digital Camera 20
Once the desktop application is active, live feed
appears on the screen and, from the main menu
bar, you can select the following options:
Capture an image Flip images horizontally
Record video mail
Record video clip
Save recorded video
to the album
Access camera settings
Open and close the
album
You can also open additional installed software,
such as ArcSoft PhotoImpression, by clicking the
drop-down arrow next to Applications, located at
the upper-left of the screen.
With additional software like ArcSoft
PhotoImpression, you can edit images and
create items, such as greeting cards and
calendars, with your saved images.
Capturing and Saving Images
To capture an image, adjust the camera’s
position and focus as needed, then click the
Capture Image icon from the main menu. The
image is automatically saved with a sequential
name (for example cap_001) in the current
album. For instant viewing, the album opens
every time you capture an image. To rename the
Page 21

Targus Digital Camera 21
image, right-click the image’s thumbnail in the
album, select
Rename and then enter a new title.
Recording, Viewing, Saving and Sending Video Clips
To record video mail, click the Video Mail icon, or
to record a regular video clip, click the
from the main menu. When you are ready to stop
recording, click the
Stop icon. A menu bar
appears.
Video icon
Playback
Video Mail menu bar
NOTE: If you are recording a regular video clip, the Video
menu bar appears with the Playback icon only.
Send Mail
To playback the recording, click the Playback
icon. The playback options menu bar appears.
Play
Playback options menu bar
Pause
Stop
To save a video clip to the current album, click
the
Save icon, located above the video screen on
the main menu bar. When the Save as window
appears, enter the name of the video and click
Save. To rename the image, open the album,
Page 22

Targus Digital Camera 22
right-click the video’s thumbnail, select Rename
and then enter a new title.
To send the video recording as an email
attachment, click the
Send Mail icon. Your default
mail agent opens with the video clip attached as
an AVI file to a new message. Send as you would
a regular message. You can also send images
and videos from the album application. See
“Accessing Images and Video Clips in the
Album” on page 25.
Flipping Images Horizontally
To flip an image horizontally and change the
angle, click the
menu. This reverses the photo from left to right.
Click the
Flip Image icon again to flip the image
back to its original angle. You can also flip and
rotate images from the album application. See
“Accessing Images and Video Clips in the
Album” on page 25.
Flip Image icon from the main
Original image and image flipped horizontally
Page 23

Targus Digital Camera 23
Changing the Camera Settings
In the desktop application you can change the
camera settings to best suite your needs. To
access the setting options, click the
Settings
icon from the main menu.
From the Capture tab you can:
• Specify the maximum size allowed for video
clips
• Set a delay before capturing an image
• Adjust the audio recording volume
• Select the image format
Camera
Capture settings
Page 24

Targus Digital Camera 24
From the Video tab you can adjust the camera’s
composition or reapply the default settings.
Video settings
From the Mail agent tab you can select which
mail agent opens when sending images or video
clips as an attachment.
Mail Agent settings
When you are done changing the settings, click
OK to save or Cancel to exit the settings option
without saving your changes.
From any option tab, you can adjust the Video
Quality settings by clicking the
Advanced button.
Page 25

Targus Digital Camera 25
Accessing Images and Video Clips in the Album
To view saved images and video clips, click the
Album icon from the main menu. Thumbnails of
the most recent images or video clips appear.
Current album
To view files from a different album, tap the drop-
down arrow
select an album from the list.
From the album menu, you can:
• Open the full-size file in a default viewer
, located in the upper-left corner, and
• Send the image or video via email attachment
• Print an image
• Save a video to an album
• Delete files
• View file details that list the file name, file and
image size and the date and time stamp
Page 26

Targus Digital Camera 26
• Rotate an image counter-clockwise (90
degrees)
• Rotate an image clockwise (90 degrees)
• Flip an image horizontally
• Adjust image color
To use the menu options, select a thumbnail,
then click the desired icon.
Transferring Files From Your Handheld Computer to Your Notebook or Desktop Computer
Transferred files are saved in a folder labeled
“Targus Handcam,” which is created during the
first file transfer. The images retain the same
titles as found on your handheld computer. You
can then edit, print or email the files provided you
install the appropriate applications from the
camera software CD-ROM.
To transfer files saved on your handheld
computer:
1 Connect the synchronization cradle to your
notebook or desktop computer.
2 Place your handheld computer in the cradle
and then press the HotSync
®
button.
Page 27

Targus Digital Camera 27
NOTES: During file transfer, images and video clips are
automatically converted to JPEG and AVI files respectively.
You can only view the AVI files on another computer that
already has either the camera desktop application or the
video decoder, which is supplied on the CD-ROM,
installed.
If you send your AVI files via email, for your convenience,
you can also send the video decoder application as an
email attachment.
Troubleshooting
To capture sharper images:
• Hold your handheld computer as still as
possible while capturing image or video clips.
• Use the Targus Handcam Digital Camera in
adequate lighting.
• Adjust the screen contrast and brightness level
correctly on your handheld computer.
To conserve memory on your handheld computer:
• Capture Palm size images, which are
approximately 38KB, instead of Full size
images, which are approximately 130KB.
• Make sure your video clips are short in length
as they consume more memory than still
images.
• Transfer images and video clips to your
notebook or desktop computer frequently.
Page 28

Targus Digital Camera 28
If the Targus Handcam Digital Camera doesn’t
work:
• Check that the Targus Handcam Digital
Camera is fully inserted in the expansion slot.
• Verify that your handheld computer is working
properly.
• Make sure that your computer’s battery is fully
charged.
• Check that your handheld computer is not in
sleep mode. If your handheld computer goes
into sleep mode, the Handcam will pause. To
reactivate the Handcam, wake up your
handheld computer by tapping the screen, then
tap on the Image Capture icon or the Video
Capture icon to return to live video.
Specifications
On Board Memory
2 MB
Resolutions
Palm size: 160 x 120 pixels
Full size: 640 x 480 pixels (full VGA, JPEG
format)
Video Capture
8 fps
Page 29

Targus Digital Camera 29
Capacity
The following table lists, on average, the number
of Full or Palm size images or the total length of
video clips you can store in a color or black and
white handheld computer with 6 MB of free
memory.
Color Black and White
50 + Full size images, or 50 + Full size images, or
150 + Palm size images, or 660 + Palm size images, or
20 + seconds of video clips 85 + seconds of video clips
Technical Support
In the unlikely event that you encounter a
problem with your Targus accessory, please
contact our technical support team at:
Email: techsupport@targus.com
Internet: http://www.targus.com/support
Our knowledgeable staff is also available to
answer your questions through one of the
following telephone numbers.
North America
Monday through Friday, 8:00 a.m. (08:00) to 8:00
p.m. (20:00) Eastern time:
US & Canada 800-283-6325
Page 30

Targus Digital Camera 30
Europe
Belgium +32 0 02-717-2451
Denmark +45 0 35-25-8751
France +33 0 1-64-53-9151
Germany +49 0 21-16-579-1151
Italy +39 0 24-827-1151
Netherlands +31 0 53-484-9470
Spain +34 0 91-745-6221
Sweden +46 0 8-571-4058
Switzerland +41 0 1-212-0007
United Kingdom +44 0 20-7744-0330
Eastern Europe & others +31 0 53-484-9479
Product Registration
For more efficient customer service and to activate the
product’s warranty, Targus recommends that you register
your Targus accessory shortly after purchasing it.
To register your Targus accessory, go to:
http://www.targus.com/registration.asp
You will need to provide your full name, email address,
phone number, and company information (if applicable).
Warranty
Targus warrants this product to be free from defects in
materials and workmanship for one year. If your Targus
accessory is found to be defective within that time, we will
promptly repair or replace it. This warranty does not cover
accidental damage, wear and tear, or consequential or
incidental loss. Under no conditions is Targus liable for loss
of, or damage to, a computer; nor loss of, or damage to,
Page 31

Targus Digital Camera 31
programs, records, or data; nor any consequential or
incidental damages, even if Targus has been informed of
their possibility. This warranty does not affect your statutory
rights.
Warranty Registration at:
http://www.targus.com/registration.asp
Regulatory Compliance
This device complies with Part 15 of the FCC Rules.
Operation is subject to the following two conditions: (1) This
device may not cause harmful interference, and (2) This
device must accept any interference received, including
interference that may cause undesired operation.
FCC Statement
Tested to Comply
This equipment has been tested and found to comply with
the limits of a Class B digital device, pursuant to Part 15 of
the FCC Rules. These limits are designed to provide
reasonable protection against harmful interference in a
residential installation. This equipment generates, uses, and
can radiate radio frequency energy and if not installed and
used in accordance with the instructions, may cause
harmful interference to radio communications. However,
there is no guarantee that interference will not occur in a
particular installation.
If this equipment does cause harmful interference to radio or
television reception, which can be determined by turning the
equipment off and on, the user is encouraged to try to
Page 32

Targus Digital Camera 32
correct the interference by one or more of the following
measures:
• Reorient or relocate the receiving antenna
• Increase the separation between the equipment and
receiver
• Move the computer away from the receiver
• Connect the equipment into an outlet on a circuit different
from that to which the receiver is connected.
Handspring and Visor are trademarks of Handspring, Inc. Windows and Windows 98/Me/2000
are registered trademarks of Microsoft Corporation. HotSync is a registered trademark of
Palm, Inc. All other trademarks are the property of their respective owners.
Page 33

400-0136-001A
 Loading...