

Page 1
Visit our Website at www.targus.com
Features and spe cifications subject to ch ange without notice.
©2006 Targus Group Inter national, Inc. and Targus, Inc.
ASP04EUX / 410-0 258-003A
USER GUIDE
DEFCON®
Mouse and keypad
Lock
Page 2

3
Table of Contents
Introduction............................................................. 6
Threading the Cables............................................. 6
Using a Notebook Cable Lock with the Mouse and Key-
board Lock.............................................................. 7
Product Registration............................................... 10
Warranty................................................................. 10
Einführung.............................................................. 11
Die Kabel durchfädeln............................................ 11
Gebrauch des Notebook-Kabelschlosses mit dem
Maus- und Tastaturschloss .................................... 12
Produktregistrierung............................................... 15
Garantie.................................................................. 15
Introducción............................................................ 16
Cómo pasar los cables........................................... 16
Cómo usar el Candado para cables de la ordenador
portátil con el Candado para el ratón y el teclado.. 17
Soporte técnico ...................................................... 19
Registro del producto ............................................. 20
Garantía ................................................................. 20
English
Deutsch
Español
Page 3

4
Introduction............................................................. 21
Enroulage des câbles............................................. 21
Utilisation du câble anti-vol de l'ordinateur avec l'anti-
vol de la souris et du clavier................................... 22
Enregistrement du produit...................................... 25
Garantie.................................................................. 25
Introduzione............................................................ 26
Sistemazione dei cavi............................................. 26
Uso del cavo con lucchetto per notebook con il lucchet-
to per mouse e tastiera........................................... 27
Supporto tecnico .................................................... 29
Registrazione del prodotto ..................................... 30
Garanzia................................................................. 30
Inleiding.................................................................. 31
De kabels geleiden................................................. 31
Gebruik van het laptopkabelslot met het muis- en toet-
senbordslot............................................................. 32
Technische ondersteuning ..................................... 34
Productregistratie ................................................... 35
Garantie.................................................................. 35
Français
Italiano
Nederlands
Page 4

5
Table of Contents
Introdução .............................................................. 36
Ligação dos Cabos................................................. 36
Utilizando o Cadeado de Cabo do Computador Portátil
com o Cadeado de Rato e Teclado........................ 37
Assistência Técnica................................................ 39
Registo de Produto................................................. 40
Garantia.................................................................. 40
Português
Page 5
6
DEFCON
®
MOUSE
AND KEYBOARD
LOCK
Introduction
Thank you for purchasing the Targus DEFCON Mouse &
Keyboard Lock. By using the same notebook computer
lock you use for your system, such as the DEFCON CL
Cable- Notebook Computer Cable Lock or DEFCON KL Notebook Computer Key Lock, you can simply and
effectively keep your laptop, keyboard, mouse, and other
select accessories safe from theft. The revolutionary
slide action of the lock allows you to tether all your loose
cables to keep your PC and accessories together and
safe.
Threading the Cables
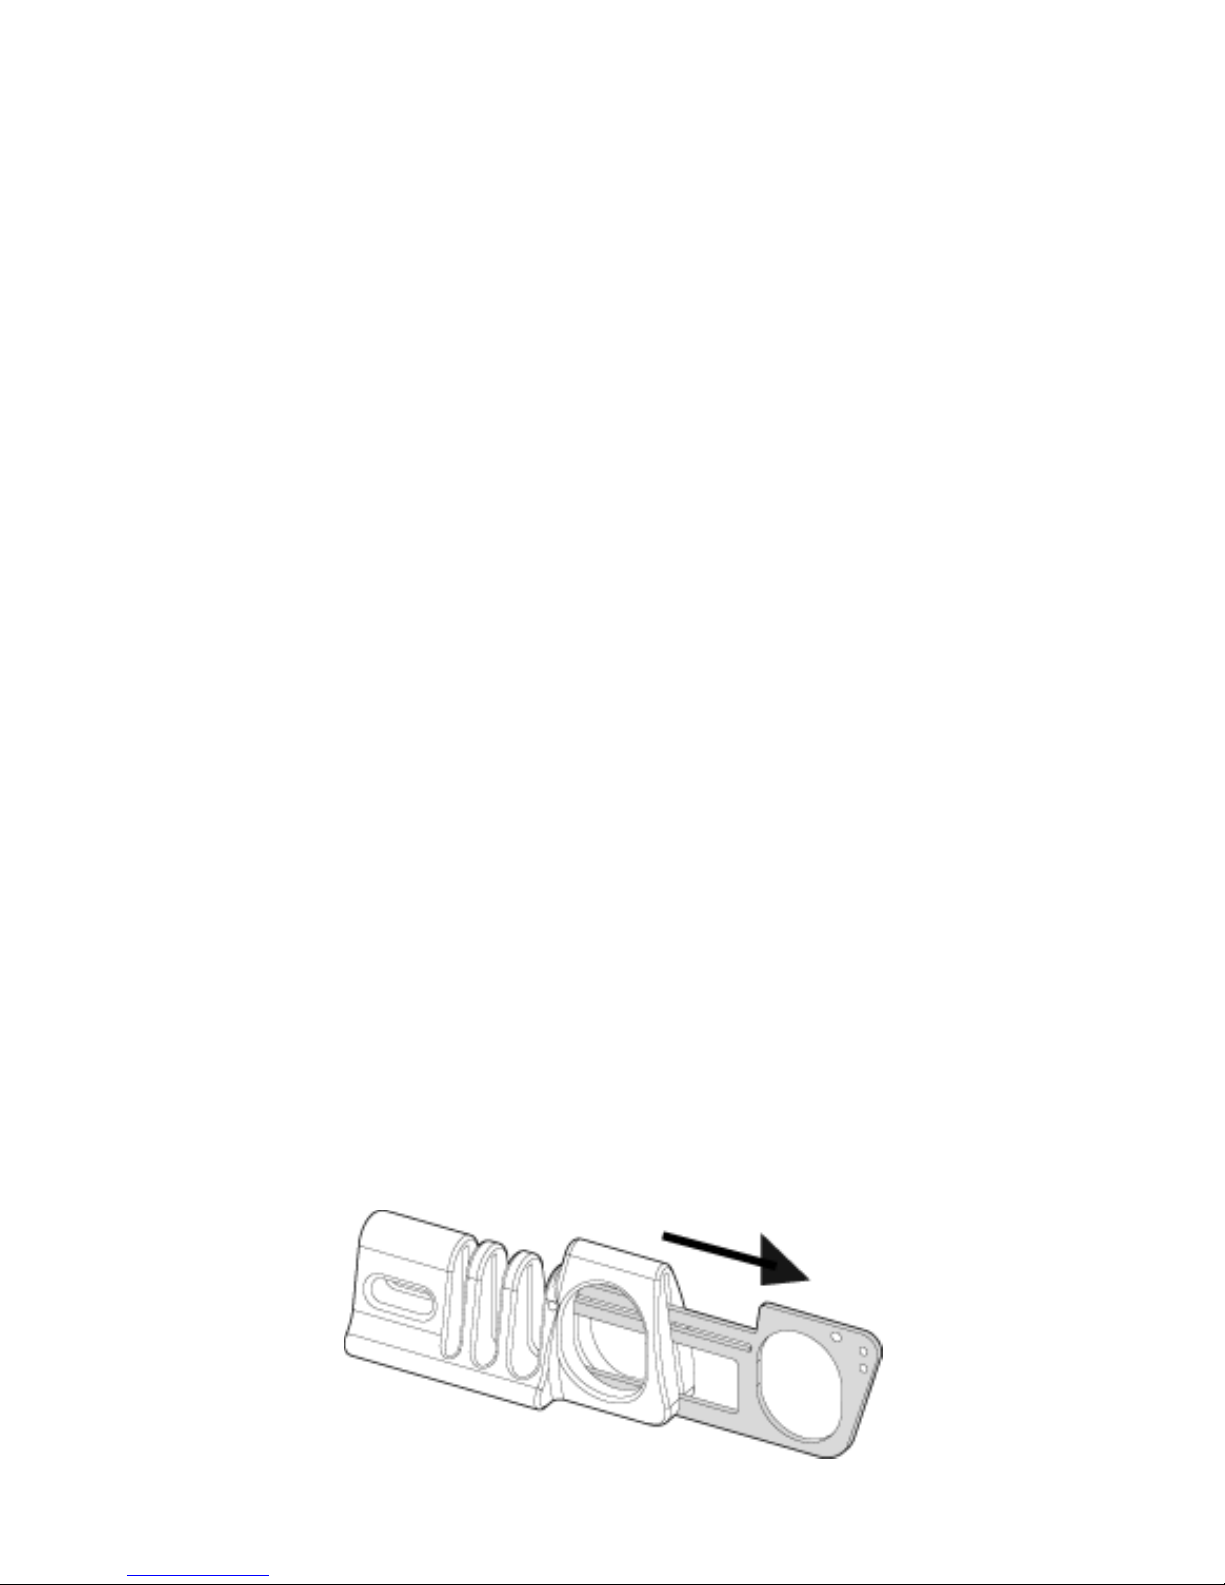
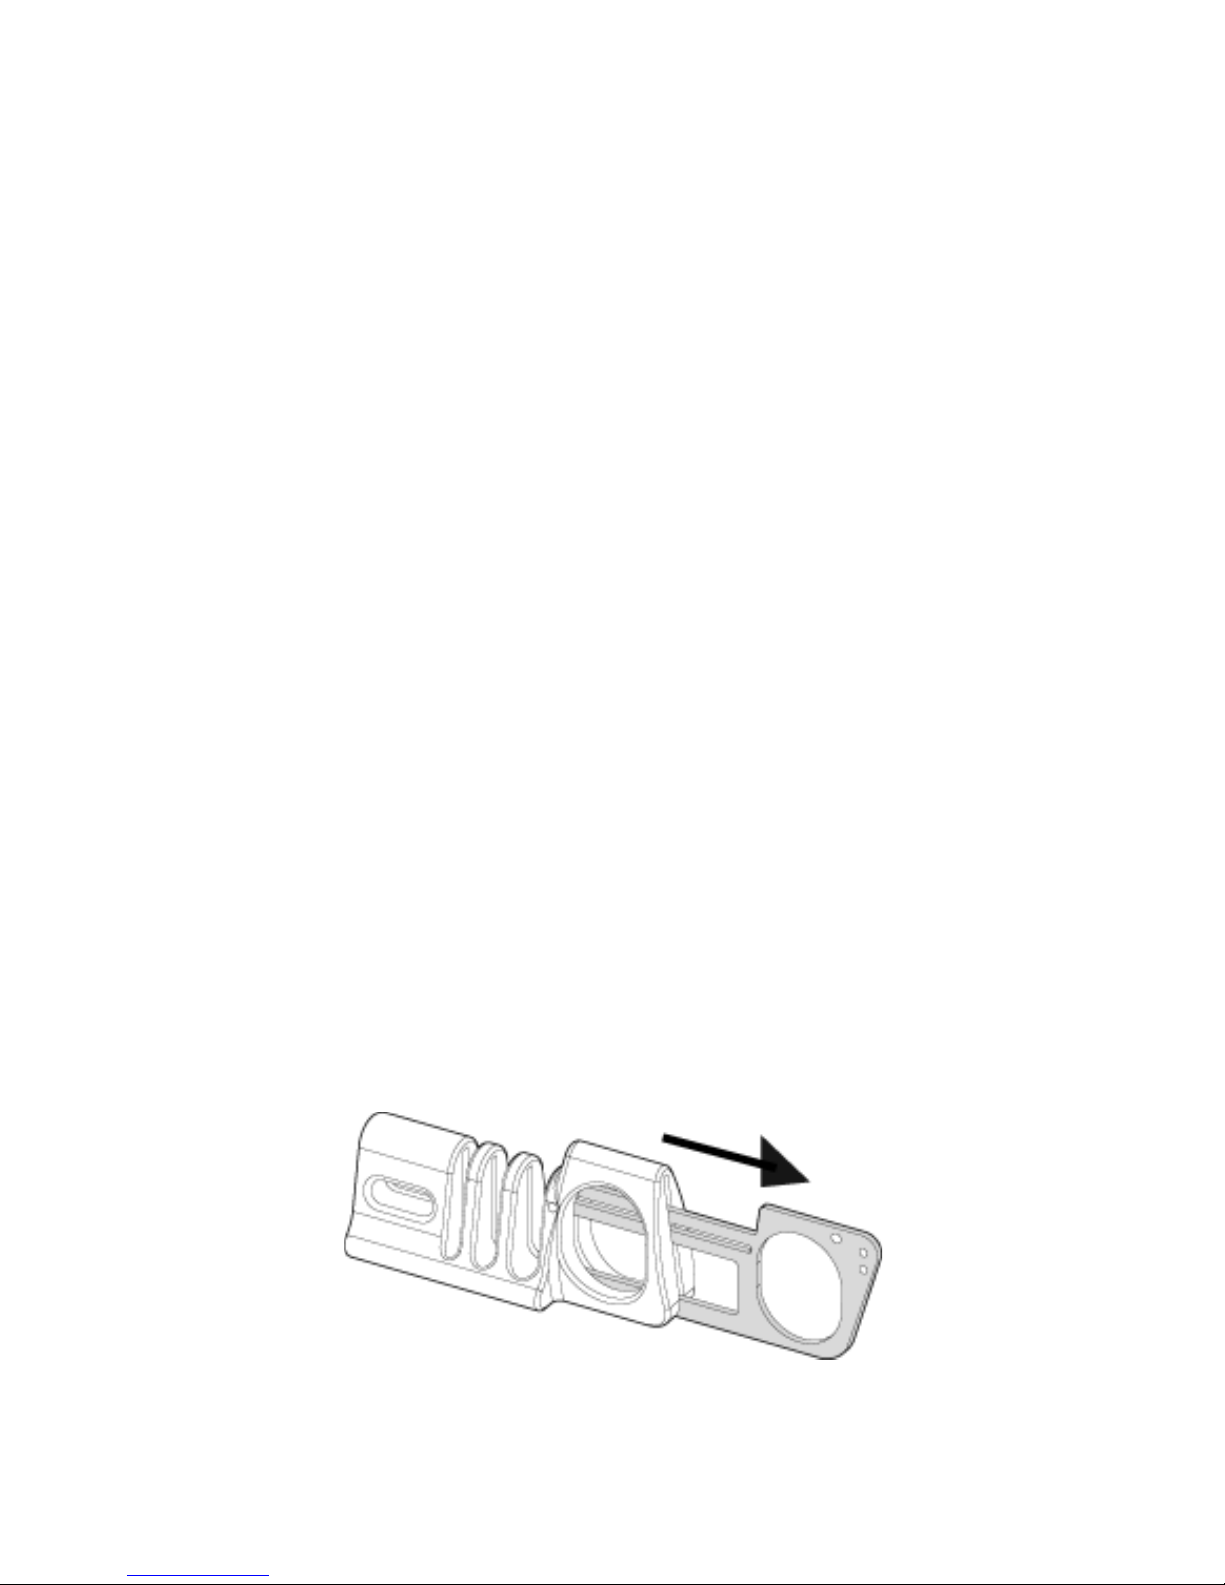
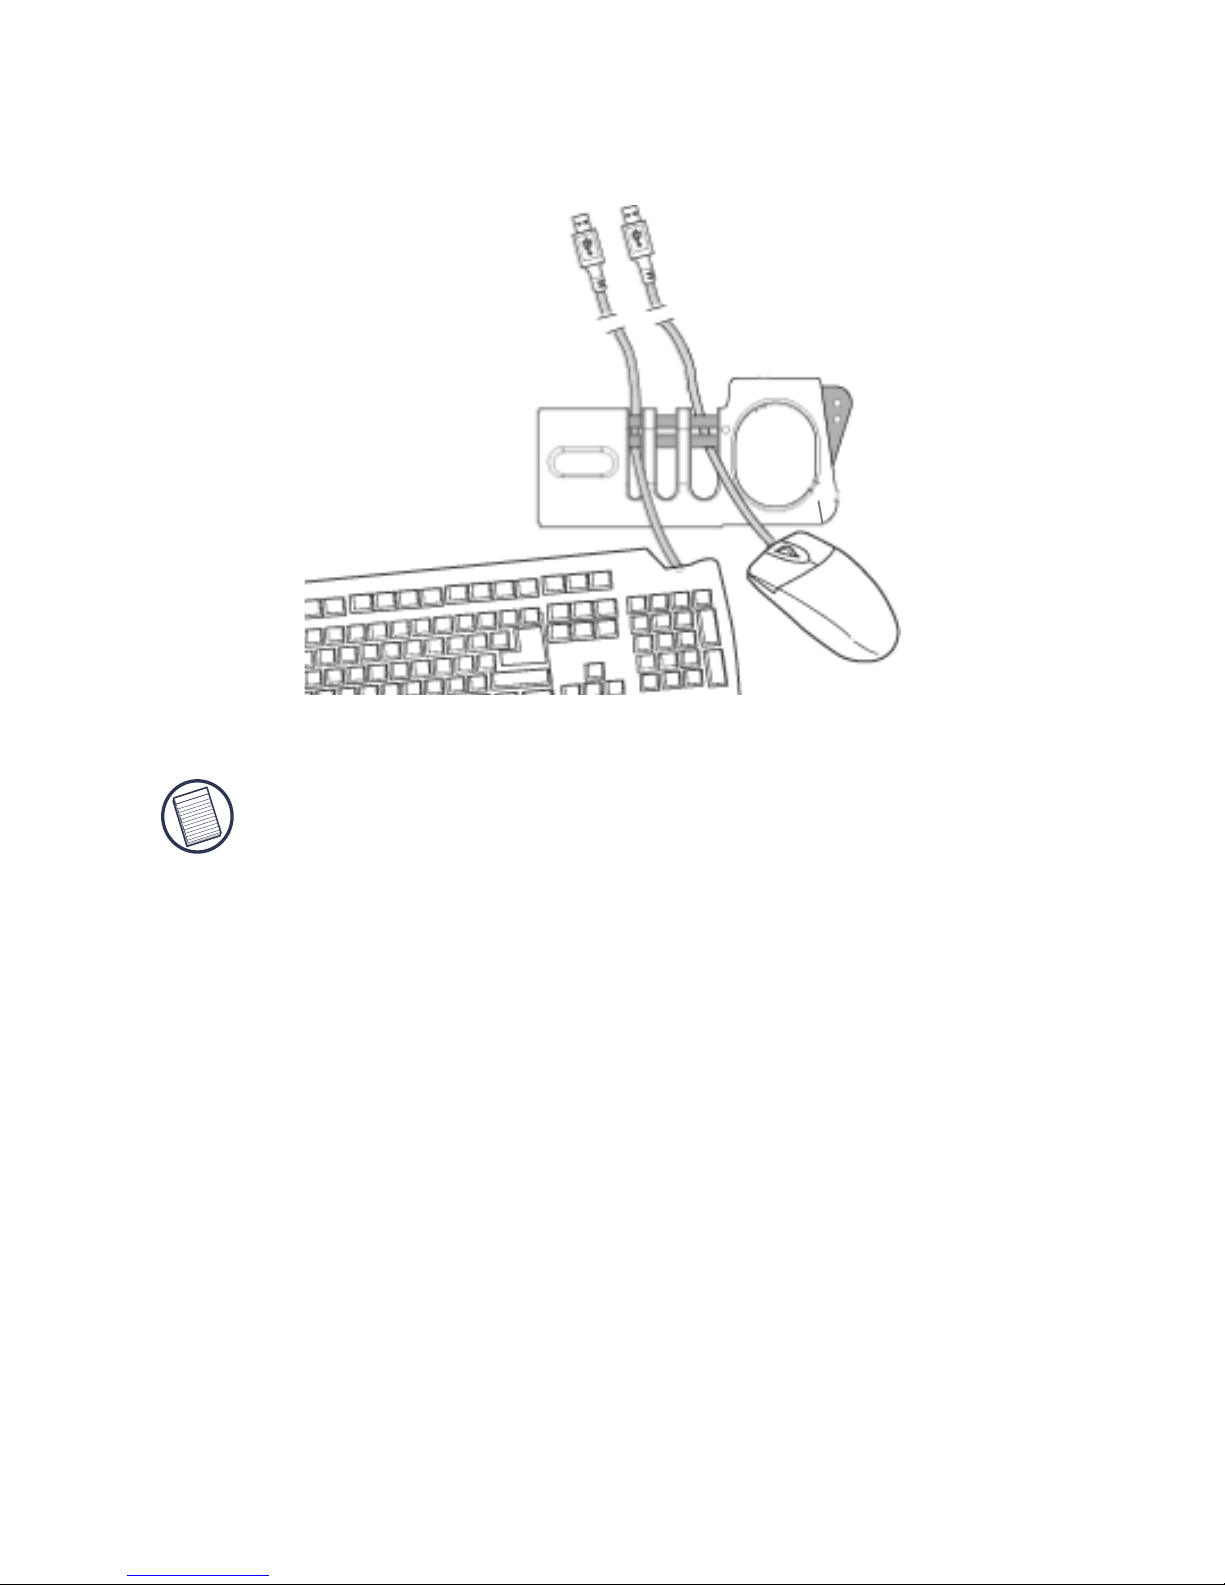
1 Pull the sliding mechanism all the way out.
Page 6
7
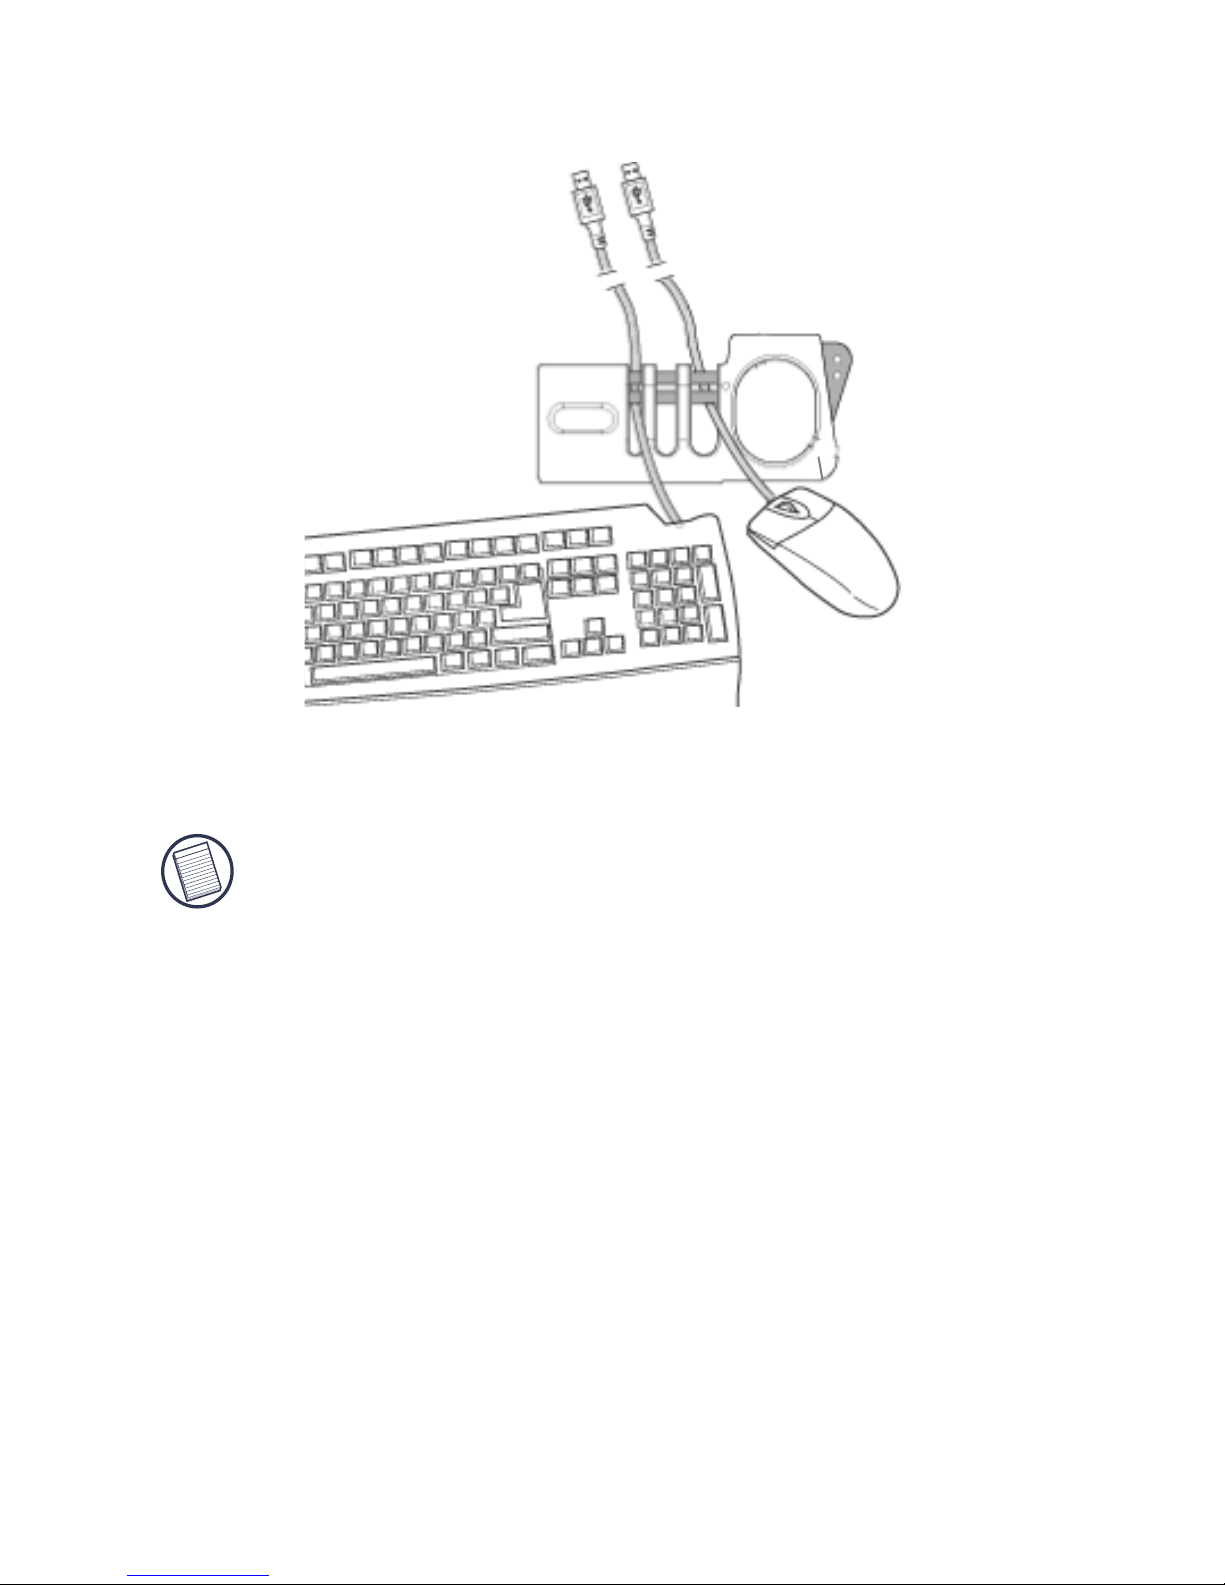
2 Carefully place your mouse, keyboard, monitor or
other select accessory cables into the slots as shown.
3 Slide the mechanism back to close it.
NOTE: The width of the lock slots vary to accommodate
different size cables. Ensure that your cable does not slip
through.
Using a Notebook Cable
Lock with the Mouse and
Keyboard Lock
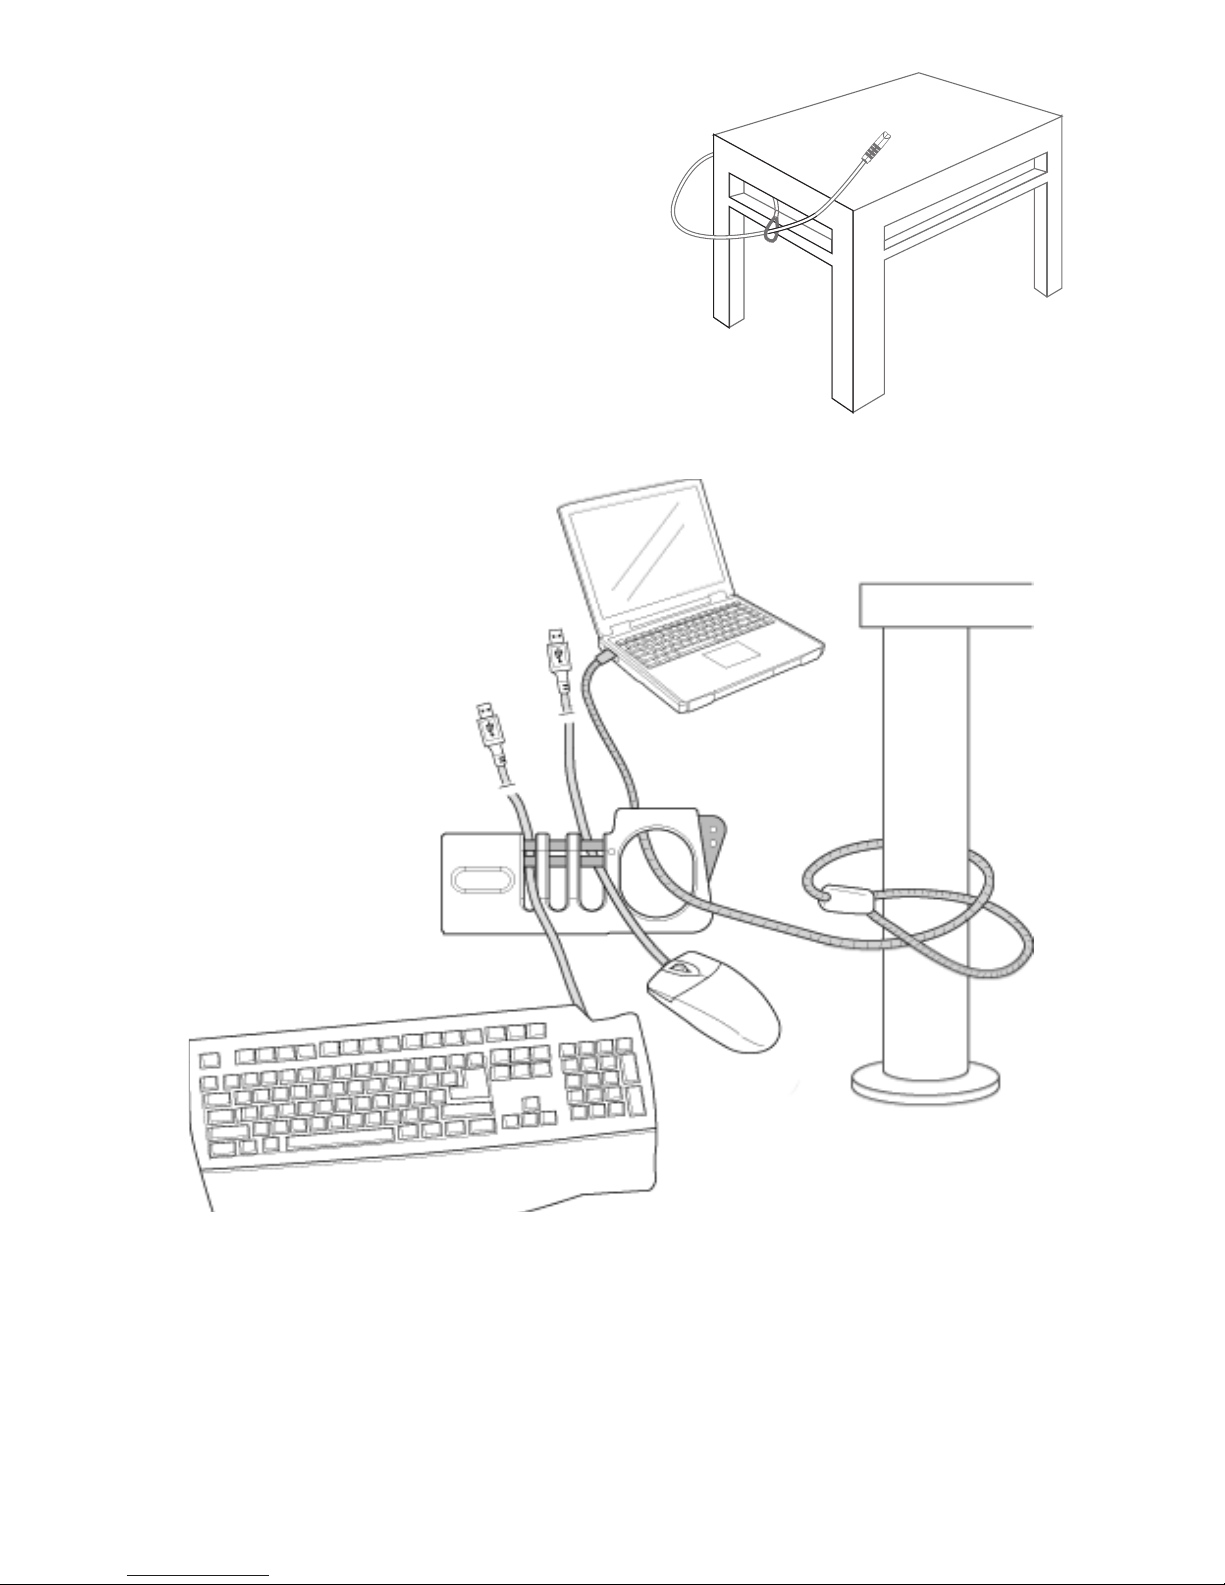
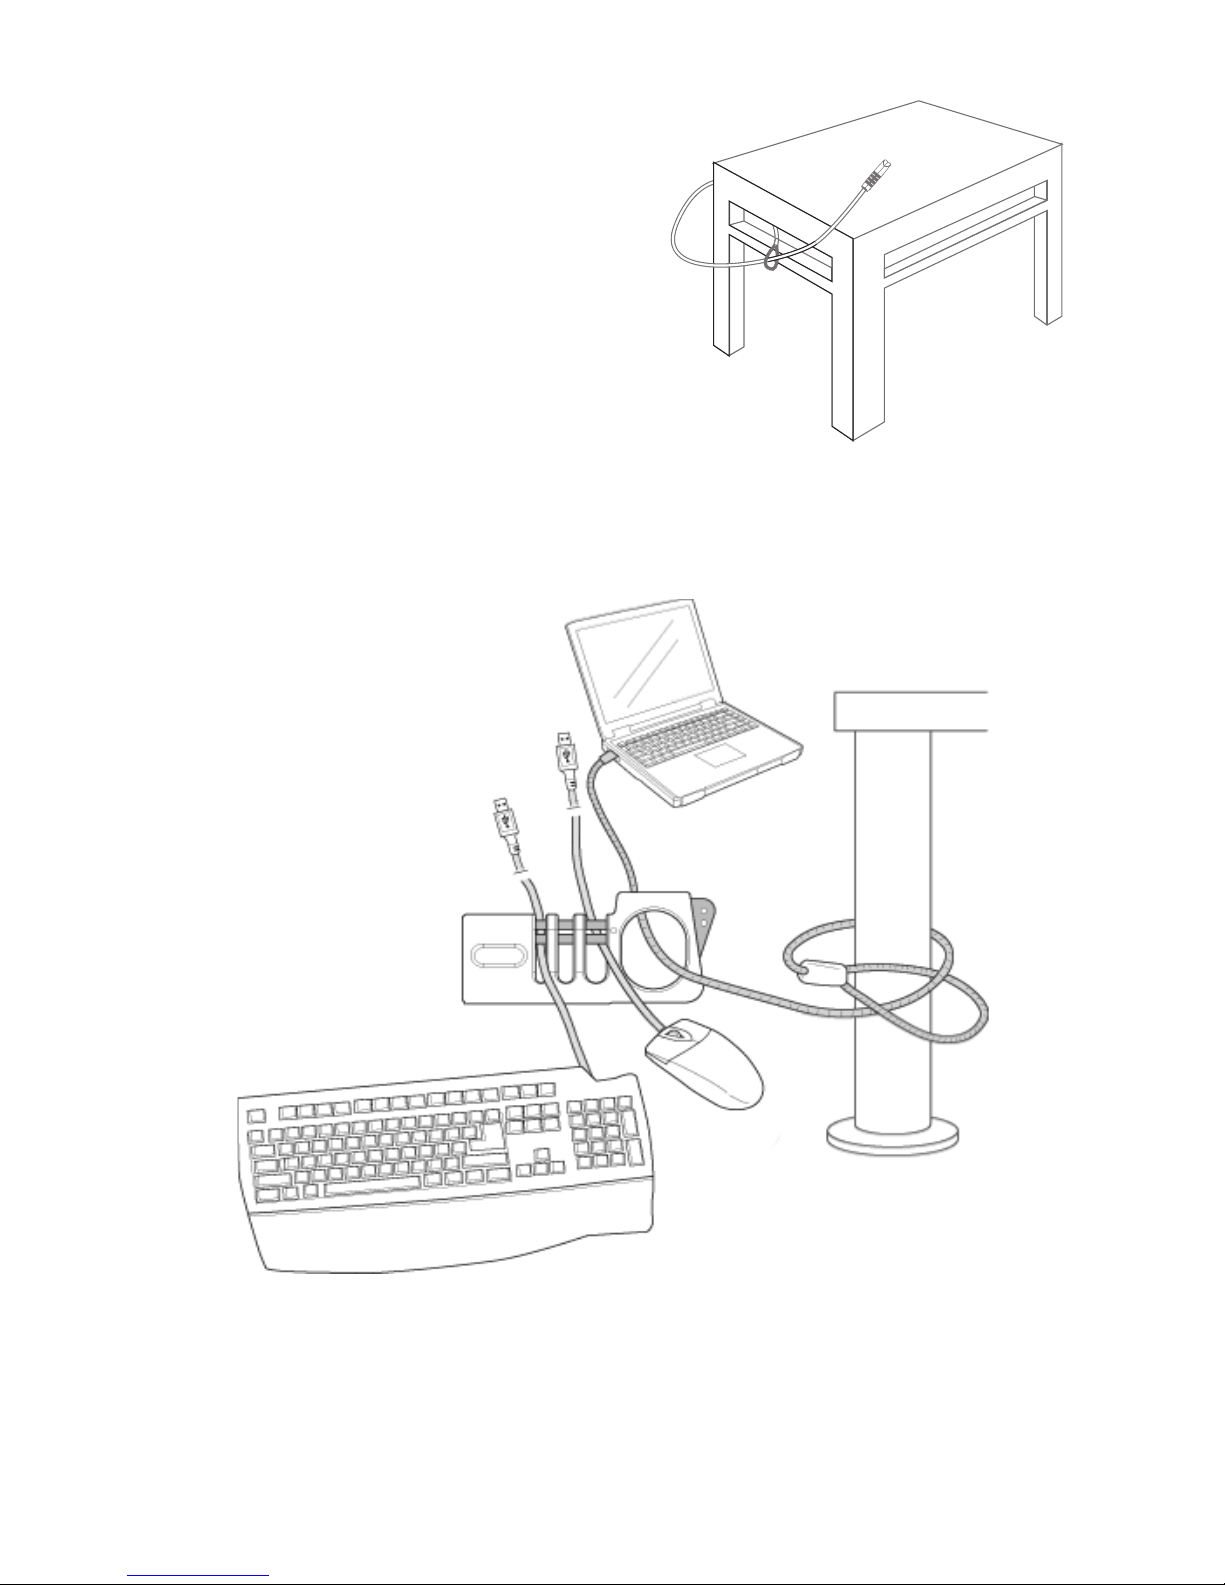
Select an object in the room to which you will secure your
notebook computer with the DEFCON cable lock.
Choose something stationary and difficult to move, such
as a table or desk.
Page 7
8
1 Wrap the looped end of
the cable around the
selected secure object
and feed the locking
head through the loop.
2 Feed the locking head
through the mouse and
keyboard lock opening.
3 Attach the locking head to any notebook, monitor or
desktop computer equipped with a lock slot.
Page 8

9
Technical Support
For technical questions, please visit:
Internet: http://www.targus.com/support.asp
Email: English techuk@targus.com
French techfr@targus.com
German techde@targus.com
Spanish teches@targus.com
Italian techit@targus.com
Dutch technl@targus.com
Our knowledgeable staff is also available to answer your
questions through one of the following telephone
numbers.
Belgium +32 0 02-717-2451
Denmark +45 0 35-25-8751
Finland +35 8 922948016
France +33 0 1-64-53-9151
Germany +49 0 21-16-579-1151
Italy +39 (02) 4827-1151
Netherlands +31 0 2-0504-0671
Norway +47 2 2577729
Portugual +35 1 21-415-4123
Spain +34 0 91-745-6221
Sweden +46 0 8-751-4058
Switzerland +41 0 1-212-0007
United Kingdom +44 0 20-7744-0330
Eastern Europe & others +31 0 20-5040671
Page 9

10
Product Registration
Targus recommends that you register your Targus accessory
shortly after purchasing it. To register your Targus accessory, go
to:
http://www.targus.com/registration.asp
You will need to provide your full name, email address, phone
number, and company information (if applicable).
Warranty
Targus warrants this product to be free from defects in materials
and workmanship for two years. If your Targus accessory is found
to be defective within that time, we will promptly repair or replace
it. This warranty does not cover accidental damage, wear and
tear, or consequential or incidental loss. Under no conditions is
Targus liable for loss of, or damage to a computer; nor loss of, or
damage to, programs, records, or data; nor any consequential or
incidental damages, even if Targus has been informed of their
possibility. This warranty does not affect your statutory rights.
Windows is a registered trademark of Microsoft Corporation. All other trademarks
are the property of their respective owners. Features and specifications subject to
change without notice. © 2006, Targus Group International, Inc. and Targus, Inc.,
Anaheim, CA 92806 USA.
Page 10
11
DEFCON
®
MAUS- UND
TASTATURSCHLOSS
Einführung
Wir danken Ihnen für den Kauf des DEFCON Maus- und
Tastaturschlosses von Targus. Durch den Gebrauch
desselben Notebookschlosses, das Sie auch für Ihr
System verwenden, wie das DEFCON CL - NotebookKabelschloss oder das DEFCON KL - NotebookSchlüsselschloss, können Sie Ihren Laptop, Ihre Tastatur,
Ihre Maus oder andere Zubehörteile vor Diebstahl
sichern. Mit dem revolutionären Schiebeschloss können
Sie alle losen Kabel anbinden, um Ihren PC und Ihr
Computerzubehör zusammenzuhalten und zu sichern.
Die Kabel durchfädeln
1 Ziehen Sie den Schiebemechanismus ganz heraus.
Page 11
12
2 Platzieren Sie vorsichtig die Kabel von Maus, Tastatur,
Bildschirm oder anderem Zubehör wie abgebildet in
die Schlitze.
3 Den Mechanismus zurückschieben und verschließen.
ACHTUNG: Die am Schloss befindlichen Löcher durch die, die
Kabel gezogen werden, um die Produkte zu sichern, können
Sie dem Kabel speziell anpassen. Bitte stellen Sie sicher, dass
die zu sichernden Kabel nicht durch den Schlitz des Schlosses
gezogen werden können.
Gebrauch des NotebookKabelschlosses mit dem
Maus- und Tastaturschloss
Wählen Sie einen Gegenstand aus, an den Sie Ihr
Notebook mit dem DEFCON-Kabelschloss anschließen
möchten. Suchen Sie etwas aus, das stationär und
schwer zu bewegen ist, wie z.B. einen Tisch oder
Schreibtisch.
Page 12
13
1 Schlingen Sie das
Schlaufenende des
Kabels um den
ausgewählten sicheren
Gegenstand und führen
Sie den Sicherungskopf
durch die Schlaufe.
2 Den Sicherungskopf
durch die Öffnung des
Maus- und
Tastaturschlosses führen.
3 Befestigen Sie den Sicherungskopf an einem
beliebigen Notebook, Bildschirm oder Desktop-PC,
der mit einem Steckplatz für ein solches Schloss
ausgestattet ist.
Page 13

14
Technische Unterstützung
Wenn Sie technische Fragen haben, besuchen Sie bitte:
Internet: http://www.targus.com/support.asp
E-Mail: Englischtechuk@targus.com
Französisch techfr@targus.com
Deutsch techde@targus.com
Spanisch teches@targus.com
Italienisch techit@targus.com
Holländisch technl@targus.com
Unser Expertenteam steht Ihnen auch telefonisch zur
Beantwortung Ihrer Fragen zur Verfügung.
Belgien +32-(0) 02-717-2451
Dänemark +45-35-25-8751
Finnland +35 8 922948016
Frankreich +33-(0) 1-64-53-9151
Deutschland +49-(0) 211-657 911 51
Italien +39 (02) 4827-1151
Niederlande +31-(0) 2-0504-0671
Norwegen +47 2 2577729
Portugual +35 1 21-415-4123
Spanien +34-(0) 91-745-6221
Schweden +46-(0) 8-751-4058
Schweiz +41-(0) 1-212-0007
Großbritannien +44-(0) 20-7744-0330
Osteuropa & sonstige Länder +31 (0) 20-5040671
Page 14

15
Produktregistrierung
Targus empfiehlt die Registrierung des Targus-Zubehörs sofort
nach dem Kauf. Die Registrierung von Targus-Zubehör erfolgt
unter:
http://www.targus.com/registration.asp
Geben Sie bitte Ihren vollständigen Namen, Ihre E-Mail-Adresse,
Telefonnummer und Firmeninformationen an (falls zutreffend).
Garantie
Targus garantiert zwei (2) Jahre lang, dass Zubehör von Targus
frei von Fehlern im Material und in der Verarbeitung ist. Erweist
sich Ihr Targus-Zubehör während dieser Zeit als fehlerhaft, wird
es umgehend repariert oder ersetzt. Diese Garantie deckt weder
zufällige oder mittelbare Schäden, noch Abnutzung oder
Verschleiß ab. Unter keinen Umständen haftet Targus für Verlust
oder Schäden an Computern bzw. für Verlust oder Schäden an
Programmen, Aufzeichnungen oder Daten. Targus haftet auch
nicht für mittelbare oder zufällige Schäden, selbst wenn Targus
über deren Möglichkeit informiert wurde. Diese Garantie hat
keinen Einfluss auf Ihre gesetzlichen Rechte.
Windows ist ein eingetragenes Warenzeichen der Microsoft Corporation. Alle
anderen Warenzeichen sind das Eigentum ihrer jeweiligen Besitzer. Änderungen
an Funktionen und Spezifikationen sind vorbehalten. © 2006, Targus Group
International, Inc. und Targus, Inc., Anaheim, CA 92806 USA.
Page 15

16
CANDADO
DEFCON
®
PARA RATÓN
Y TECLADO
Introducción
Muchas gracias por su compra del Candado DEFCON
para ratón y teclado, de Targus. Al usar el mismo
candado para ordenador portátil que usa para su
sistema, tal como el candado DEFCON CL para
ordenador portátil o el candado con llave DEFCON KL
para ordenador portátil, puede proteger en forma sencilla
y eficaz su ordenador portátil, su teclado, su ratón y otros
accesorios particulares contra el robo. Un novedoso
sistema le permite anclar todos sus cables sueltos
deslizándolos por unos orificios destinados a este fin,
manteniéndolos todos juntos y asegurar tanto su
ordenador personal como sus accesorios.
Cómo pasar los cables
1 Extraiga por completo todo el mecanismo deslizante.
Page 16

17
2 Coloque con cuidado en las ranuras todos los cables
del ratón, el teclado, el monitor o cualquier otro
accesorio seleccionado, como se ilustra.
3 Deslice el mecanismo de vuelta a su sitio para
cerrarlo.
NOTA: El diámetro de los orificios por los que se pasan los
cables se puede variar en función del tamaño del cable que
quiera introducir. Asegúrese de ajustarlo lo suficiente como
para que el cable no se escape.
Cómo usar el Candado para
cables de la ordenador
portátil con el Candado
para el ratón y el teclado
Elija un objeto de la habitación al que fijará su ordenador
portátil con el candado de cables DEFCON. Elija algo fijo
y difícil de mover, como una mesa o un escritorio.
Page 17

18
1 Enrosque el extremo con
bucle del cable alrededor
del objeto elegido y haga
pasar la punta de cierre
por el bucle.
2 Haga pasar la punta de
cierre por la abertura del
cerrojo para el ratón y el
teclado.
3 Fije la punta de cierre a cualquier ordenador portátil,
monitor u ordenador de sobremesa equipado con
una ranura de seguridad.
Page 18

19
Soporte técnico
Si tiene preguntas técnicas, por favor visite:
Internet: http://www.targus.com/support
Correo electrónico: Ingléstechuk@targus.com
Francés techfr@targus.com
Alemán techde@targus.com
Español teches@targus.com
Italiano techit@targus.com
Holandés technl@targus.com
Nuestro personal experto también puede contestarle sus
preguntas a través de uno de los siguientes números
telefónicos.
Bélgica +32 0 02-717-2451
Dinamarca +45 0 35-25-8751
Finlandia +35 8 922948016
Francia +33 0 1-64-53-9151
Alemania +49-(0) 211- 657-911-51
Italia +39 (02) 4827-1151
Noruega +47 2 2577729
Países Bajos +31 0 2-0504-0671
Portugual +35 1 21-415-4123
España +34 91-745-6221
Suecia +46 0 8-751-4058
Suiza +41 0 1-212-0007
El Reino Unido +44 0 20-7744-0330
Europa Oriental y otros +31 0 20-5040671
Page 19

20
Registro del producto
Targus recomienda registrar su accesorio marca Targus
inmediatamente después de comprarlo. Para registrar su
accesorio Targus, vaya a: http://www.targus.com/registration.asp
Será necesario que proporcione su nombre completo, dirección
de correo electrónico, número de teléfono y la información de su
empresa (si corresponde).
Garantía
Targus garantiza que este producto no tendrá defectos en los
materiales ni la mano de obra durante dos años. Si dentro de ese
lapso se determina que el accesorio Targus está defectuoso, lo
repararemos o reemplazaremos sin demora. Esta garantía no
cubre daños accidentales, el uso y desgaste natural ni las
pérdidas resultantes o incidentales. Targus no es responsable,
bajo circunstancia alguna, por pérdidas o daños al ordenador ni
por pérdida de programas, registros o datos ni daños a los
mismos, así como tampoco por daños resultantes o incidentales
algunos, incluso si a Targus se le informó de la posibilidad que
existieran. La presente garantía no afecta los derechos que la ley
le otorga.
Windows es una marca comercial registrada de Microsoft Corporation. Todas las
demás marcas comerciales pertenecen a sus respectivos propietarios. Las
características y las especificaciones pueden cambiar sin previo aviso. © 2006,
Targus Group International, Inc. y Targus, Inc., Anaheim, CA 92806 EE. UU.
Page 20

21
CÂBLE ANTI-VOL POUR
SOURIS ET CLAVIER
DEFCON
®
Introduction
Merci d'avoir acheté le câble anti-vol pour souris et
clavier DEFCON de Targus. En utilisant le même anti-vol
pour ordinateur portable que celui que vous utilisez pour
votre système, comme le câble anti-vol pour ordinateur
portable DEFCON CL, ou l'anti-vol à clé pour ordinateur
portable DEFCON KL, vous pouvez simplement et
efficacement protéger votre portable, votre clavier, votre
souris et tous les accessoires contre le vol. Le
mécanisme à glissière révolutionnaire de l'anti-vol vous
permet de relier tous vos câbles et vous permet ainsi de
garder ensemble votre PC et tout vos accessoires pour
plus de sécurité.
Enroulage des câbles
1 Tirez le mécanisme à glissière sur toute la longueur.
Page 21

22
2 Placez soigneusement le câble de votre souris, de
votre clavier, de votre moniteur ou de tout autre
accessoire dans les encoches tel qu'indiqué sur le
schéma.
3 Ramenez le mécanisme pour le refermer.
NOTE: La largeur de l’orifice du verrou varie pour s’adapter
aux différentes tailles des câbles. Assurez-vous que votre
câble ne glisse pas.
Utilisation du câble anti-vol
de l'ordinateur avec l'antivol de la souris et du clavier
Sélectionnez un objet dans la pièce où se trouve votre
ordinateur portable auquel vous pourrez attacher celui-ci
à l'aide du câble anti-vol DEFCON. Choisissez quelque
chose qui reste en place et de difficile à bouger, comme
une table ou un bureau.
Page 22

23
1 Enroulez la boucle située
à l'extrémité du câble
autour de l'objet choisi, et
passez la tête de blocage
dans la boucle.
2 Passez la tête de
blocage dans les
ouvertures de l'anti-vol
de la souris et du câble.
3 Attachez la tête de blocage à l'ordinateur, au moniteur
ou au PC équipé de l'encoche de blocage.
Page 23

24
Soutien technique
Pour les questions techniques, connectez-vous sur :
Internet : http://www.targus.com/support
Adresse e.mail : Anglaistechuk@targus.com
Français techfr@targus.com
Allemand techde@targus.com
Espagnol teches@targus.com
Italien techit@targus.com
Hollandais technl@targus.com
Nos techniciens sont également disponibles aux
numéros de téléphone ci-dessous pour répondre à vos
questions.
Allemagne +49 0 21-16-579-1151
Belgique +32 0 02-717-2451
Danemark +45 0 35-25-8751
Espagne +34 0 91-745-6221
Finlande +35 8 922948016
France +33 0 1-64-53-9151
Italie +39 (02) 4827-1151
Hollandes +31 02-0504-0671
Norvège +47 2 257772
Le Portugual +35 1 21-415-4123
Royaume-Uni +44 0 20-7744-0330
Suède +46 0 8-751-4058
Suisse +41 0 1-212-0007
Europe de l'Est et autres pays+31 0 20-05040671
Page 24

25
Enregistrement du produit
Targus vous conseille vivement d'enregistrer votre produit Targus
dans les plus brefs délais après son achat. Pour enregistrer votre
accessoire Targus, allez sur :
http://www.targus.com/registration.asp
Vous aurez à fournir votre nom complet, votre adresse e.mail et
des renseignements sur votre entreprise (le cas échéant).
Garantie
Targus garantit ce produit contre tout défaut de matériel ou de
fabrication pour une durée de deux ans. Si votre accessoire
Targus s'avère défectueux durant cette garantie, nous veillerons à
le remplacer ou à le réparer au plus vite. Cette garantie ne couvre
pas les dommages résultant d'accidents, de l'usure normale ou
de pertes consécutives ou accessoires. En aucun cas, Targus ne
pourra être tenu responsable de la perte matérielle ou de
l'endommagement d'un ordinateur, ni de la perte de programmes,
d'enregistrements ou de données ou de leur endommagement, ni
de tous autres dommages conséquentiels ou accidentels, même
si Targus a été préalablement informé de cette possibilité. Cette
garantie n'a aucun effet sur vos droits statutaires.
Windows est une marque de commerce déposée de Microsoft Corporation.
Toutes les autres marques de commerce appartiennent à leurs propriétaires
respectifs. Les caractéristiques et les spécifications sont sujettes à des
changements sans préavis. © Targus Group International et Targus, Inc. Anaheim
(CA) 92806 USA., 2006.
Page 25

26
LUCCHETTO
DEFCON
®
PER MOUSE E
TASTIERA
Introduzione
Vi ringraziamo per aver acquistato il lucchetto DEFCON
Targus per mouse e tastiera. Usando lo stesso sistema di
protezione per il vs. notebook, come il DEFCON CL cavo con lucchetto a combinazione o il DEFCON KL lucchetto con chiave per notebook, potete proteggere
dai furti in maniera semplice ed efficace il laptop, la
tastiera, il mouse, e gli altri accessori selezionati. La
rivoluzionaria azione a scorrimento del lucchetto
permette di legare tutti i cavi in modo da tenere al sicuro
nello stesso tempo il PC e gli accessori.
Sistemazione dei cavi
1 Tirare il meccanismo di scorrimento all'infuori.
Page 26

27
2 Collocare con attenzione i cavi del mouse, della
tastiera, del monitor o degli altri accessori selezionati
negli slots come illustrato.
3 Richiudere il meccanismo facendolo scorrere
all'indietro.
NOTA:L’ampiezza della fessura di bloccaggio varia per
accomodare cavi di diversa misura. Assicuratevi che il vostro
cavo non si sfili via.
Uso del cavo con lucchetto
per notebook con il
lucchetto per mouse e
tastiera
Selezionare un oggetto situato nella stanza al quale
assicurare il notebook con il cavo con lucchetto
Page 27

28
DEFCON. Scegliere un oggetto fisso e difficile da portare
via, tipo un tavolo o una scrivania.
1 Avvolgere il capo ad
occhiello del cavo attorno
all'oggetto prescelto e far
passare il lucchetto
attraverso l'occhiello.
2 Far passare il lucchetto
attraverso l'apertura del
lucchetto del mouse e
della tastiera.
Page 28

29
3 Attaccare il lucchetto a qualsiasi notebook, monitor o
computer muniti di uno slot per lucchetto.
Supporto tecnico
In caso di quesiti tecnici, visitare:
Internet: http://www.targus.com/support.asp
Email: Inglese techuk@targus.com
Francese techfr@targus.com
Tedesco techde@targus.com
Spagnolo teches@targus.com
Italiano techit@targus.com
Olandese technl@targus.com
Il nostro staff di tecnici esperti è anche disponibile per
rispondere telefonicamente alle vostre domande. Potete
quindi chiamare uno dei numeri seguenti.
Belgio +32-(0) 02-717-2451
Danimarca +45-35-25-8751
Finlandia +35 8 922948016
Francia +33-(0) 1-64-53-9151
Germania +49-(0) 211-657-911-51
Italia +39 (02) 4827-1151
Norvegia +47 2 2577729
Paesi Bassi +31-(0) 2-0504-0671
Il Portogalio +35 1 21-415-4123
Spagna +34-(0) 91-745-6221
Svezia +46-(0) 8-751-4058
Page 29

30
Svizzera +41-(0) 1-212-0007
Regno Unito +44-(0) 20-7744-0330
Europa dell'est e altri Paesi +31-(0) 20-05040671
Registrazione del
prodotto
La Targus vi raccomanda che registriate il vostro prodotto Targus
poco dopo averlo acquistato. Per registrare il vostro prodotto
Targus, visitate: http://www.targus.com/registration.asp
Dovrete fornire il vostro nome e cognome, l'indirizzo e-mail, il
numero di telefono, e le informazioni della ditta (se applicabili).
Garanzia
Targus garantisce per la durata di due anni che questo prodotto è
privo di difetti di materiale e di manodopera. Se l'accessorio
Targus dovesse rivelarsi difettoso durante questo periodo, verrà
riparato o sostituito. Questa garanzia non copre i danni
accidentali, la normale usura e perdita consequenziale o
accidentale. In nessuna circostanza la Targus sarà responsabile
per perdita di dati o danni a computer e/o programmi, dati
memorizzati o qualsiasi altro danno consequenziale o
accidentale, anche nel caso Targus sia stata informata di questa
possibilità. Questa garanzia non influisce sui diritti statutari
dell'utente.
Windows e' un marchio di fabbrica registrato della Microsoft Corporation. Tutti gli
altri marchi di fabbrica sono di proprieta' dei rispettivi proprietari. Le caratteristiche
e le specifiche sono soggette a cambiamenti senza preavviso. © 2006, Targus
Group International, Inc. e Targus, Inc., Anaheim, CA 92806 USA.
Page 30

31
DEFCON
®
MUIS- EN
TOETSENBORDSLOT
Inleiding
Bedankt dat u het Targus DEFCON muis- en
toetsenbordslot hebt gekocht. Met hetzelfde laptopslot
dat u voor uw systeem gebruikt, zoals het DEFCON CL laptopkabelslot of de DEFCON KL - laptopsleutel kunt u
uw laptop, toetsenbord, muis en bepaalde andere
accessoires eenvoudig, doeltreffend en veilig tegen
diefstal beschermen. Dankzij het revolutionaire
schuifmechanisme van het slot kunt u alle losse kabels
vastmaken en uw pc en accessoires tezamen en veilig
bewaren.
De kabels geleiden
1 Trek het schuifmechanisme helemaal uit.
Page 31

32
2 Plaats uw muis, toetsenbord, monitor of bepaalde
andere accessoirekabels zorgvuldig in de sleuven,
zoals wordt getoond.
3 Schuif het mechanisme terug om het te sluiten.
OPMERKING: het slot is verstelbaar zodat er verschillende
kabels op passen. Wees erop alert dat uw kabel er niet door
heen slipt
Gebruik van het
laptopkabelslot met het
muis- en toetsenbordslot
Kies een voorwerp in de kamer waaraan u uw laptop met
het DEFCON kabelslot wilt vastmaken. Kies iets dat
stabiel en moeilijk te verplaatsen is, zoals een tafel of
bureau.
Page 32

33
1 Wikkel het uiteinde met
de lus van de kabel rond
het gekozen, veilige
voorwerp en geleid de
sluitkop door de lus.
2 Geleid de sluitkop door
de opening van het slot
van de muis en het
toetsenbord.
3 Maak de sluitkop vast aan een laptop, monitor of pc
die met een sleufslot is uitgerust.
Page 33

34
Technische ondersteuning
Met technische vragen kunt u terecht op:
Internet: http://www.targus.com/support
Email: Engelstechuk@targus.com
Frans techfr@targus.com
Duits techde@targus.com
Spaans teches@targus.com
Italiaans techit@targus.com
Hollands technl@targus.com
Ook kunnen wij uw vragen tevens telefonisch
beantwoorden.
België +32 0 02-717-2451
Denemarken +45 0 35-25-8751
Frankrijk +33 0 1-64-53-9151
Duitsland +49 0 21-16-579-1151
Finland +35 8 922948016
Italië +39 (02) 4827-1151
Nederland +31 0 2-0504-0671
Noorwegen +47 2 2577729
Portugual +35 1 21-415-4123
Spanje +34 0 91-745-6221
Zweden +46 0 8-751-4058
Zwitserland +41 0 1-212-0007
Groot-Brittannië +44 0 20-7744-0330
Oost-Europa en overige landen+31 0 20-5040671
Page 34

35
Productregistratie
Targus raadt aan dat u uw Targus-product zo snel mogelijk na de
aankoop registreert. U kunt uw Targus-product registreren op:
http://www.targus.com/registration.asp
U zult uw volledige naam, e-mailadres, telefoonnummer en
bedrijfsinformatie (indien van toepassing) moeten opgeven.
Garantie
Targus biedt de garantie dat dit product gedurende twee jaar vrij
is van tekortkomingen in materiaal en vakmanschap. Als uw
Targus-product binnen die periode defect raakt, zullen wij het
onmiddellijk herstellen of vervangen. Deze garantie is niet van
toepassing op schade door ongelukken, slijtage of bijkomende of
incidentele schade. Targus is onder geen beding aansprakelijk
voor verlies of beschadiging van een computer, verlies of
beschadiging van programma's, records of gegevens, of
bijkomende of gevolgschade, zelfs als Targus is gewezen op die
mogelijkheid. Deze garantie is niet van invloed op uw wettelijke
rechten.
Windows is een gedeponeerd handelsmerk van Microsoft Corporation. Alle
overige handelsmerken zijn eigendom van hun respectieve eigenaars. Functies
en specificaties kunnen zonder kennisgeving worden gewijzigd. © 2006, Targus
Group International, Inc. en Targus, Inc., Anaheim, CA 92806 USA.
Page 35

36
CADEADO
DEFCON
®
PARA RATO E
TECLADO
Introdução
Agradecemos a sua compra do Cadeado para Rato e
Teclado DEFCON da Targus. Utilizando o mesmo
cadeado para computador portátil que usa actualmente
para o seu sistema, tal como o Cadeado de Cabo de
Computador portáil - DEFCON CL ou o Cadeado com
chave para Computador portátil - DEFCON KL, você
pode, de forma simples e eficaz, manter os seus
computador portátil, teclado, rato, e outros acessórios
seleccionados, seguros contra roubo. A acção deslizante
revolucionária do cadeado permite-lhe ligar todos os
seus cabos soltos para manter o seu PC e os acessórios
juntos e em segurança.
Ligação dos Cabos
1 Puxe o mecanismo deslizante todo para fora.
Page 36

37
2 Com cuidado, coloque os seus rato, teclado, monitor
ou os cabos de outros acessórios seleccionados, nas
ranhuras, como se mostra.
3 Deslize o mecanismo para dentro, para o fechar.
NOTA: A largura da abertura da fechadura varia de modo a
acomodar cabos de tamanho diferente. Assegure que seu
cabo não deslize.
Utilizando o Cadeado de
Cabo do Computador
Portátil com o Cadeado de
Rato e Teclado
Seleccione um objecto no quarto ao qual irá prender o
seu computador portátil com o cadeado de cabo
Page 37

38
DEFCON. Escolha uma coisa estacionária e difícil de
mover, tal como uma mesa ou secretária.
1 Enrole a extremidade em
laço do cabo à volta do
objecto seguro
seleccionado, e passe a
cabeça de fecho através
do laço.
2 Passe a cabeça de fecho
através da abertura do
cadeado do rato e do
teclado.
Page 38

39
3 Prenda a cabeça de fecho a qualquer computador
portátil, monitor ou computador de secretária,
equipado com uma ranhura de fecho.
Assistência Técnica
Para questões de ordem técnica, é favor visitar:
Internet: http://www.targus.com/support.asp
Email: Inglêstechuk@targus.com
Francês techfr@targus.com
Alemão techde@targus.com
Espanhol teches@targus.com
Italiano techit@targus.com
Holandês technl@targus.com
O nosso pessoal especializado está também disponível
para responder às suas questões através de um dos
seguintes números de telefone.
Bélgica +32 0 02-717-2451
Dinamarca +45 0 35-25-8751
França +33 0 1-64-53-9151
Finland +35 8 922948016
Alemanha +49 (0) 211-657-911-51
Itália +39 (02) 4827-1151
Holanda +31 0 2-0504-0671
Portugual +35 1 21-415-4123
Espanha +34 0 91-745-6221
Noruega +47 2 2577729
Page 39

40
Suécia +46 0 8-751-4058
Suíça +41 0 1-212-0007
Reino Unido +44 0 20-7744-0330
Europa do Leste e outros +31 0 20-5040671
Registo de Produto
A Targus recomenda que registe o seu acessório Targus logo
após o ter comprado. Para registar o seu acessório Targus, vá a:
http://www.targus.com/registration.asp
Necessitará de fornecer o seu nome completo, endereço de
email, número de telefone e informação sobre a companhia (se
aplicável).
Garantia
A Targus garante que este produto está isento de defeitos de
material e fabrico pelo período de dois anos. Se o seu acessório
Targus for considerado com defeito durante esse período de
tempo, procederemos de imediato à sua reparação ou
substituição. Esta garantia não cobre danos acidentais, desgaste
ou perdas consequênciais ou acidentais. Em nenhuma
circunstância será a Targus responsável por perda de, ou danos
para, um computador, nem perda de, ou danos para, programas,
registos ou dados, nem por quaisquer danos consequênciais ou
acidentais, mesmo que a Targus tenha sido informada sobre tal
possibilidade. Esta garantia não afecta os seus direitos
estatutários.
Windows é uma marca comercial registada de Microsoft Corporation. Todas as
outras marcas comerciais são propriedade dos seus respectivos donos. As
características e especificações estão sujeitas a mudança sem aviso prévio. ©
2006, Targus Group International, Inc. e Targus, Inc., Anaheim, CA 92806 USA.
 Loading...