

Page 1
BRUSSELS HANNOVER BARCELONA TOKYO MILANO AMSTERDAM SINGAPORE LONDON PARIS NEW YORK LOS ANGELES TORONTO HONG KONG SYDNEY
Targus Click N Type
for Toshiba Pocket PC
USER’S GUIDE
Making Your Mobile Life Easier.
Making Your Mobile Life Easier.
Visit our Web site at: www.targus.com
Features and specifications are subject to change without notice. © 2002 Targus Corp.
400-0097-001A
Page 2

Targus Click N Type
Congratulations on your purchase of the Targus Click N Type.
The Click N Type is a convenient and ultra-portable keyboard
and mouse for your PDA.
With the Click N Type you can:
• Enter text directly into your PDA.
• Use the 8-way navigation button to simulate mouse movement.
• Take a keyboard and mouse with you whenever you travel with
your PDA.
In addition to this user’s guide, this package contains the Targus
Click N Type and the driver software CD-ROM.
Installing the Driver
To install the driver software for the Click N Type, you need:
• A desktop or notebook computer with the Windows® 95/98/
Me/2000/XP or Windows NT® 4.0 operating system
• Microsoft® ActiveSync® 3.1 or higher on your computer (for
copying files to your PDA). For the most current version of
Microsoft ActiveSync, go to: http://www.microsoft.com/mobile
• At least 30K bytes of free memory on your PDA.
2
Page 3
1 Connect your PDA to your computer, if it’s not already
connected, and synchronize to back up your files.
2 Disable any previously installed keyboard software on your
PDA.
3 Insert the driver software CD-ROM into your computer’s
CD-ROM drive.
4 If setup doesn’t begin automatically, click Start, Run, then
enter D:\Setup.exe (where D: is the path of your CD-ROM
drive) and then click OK.
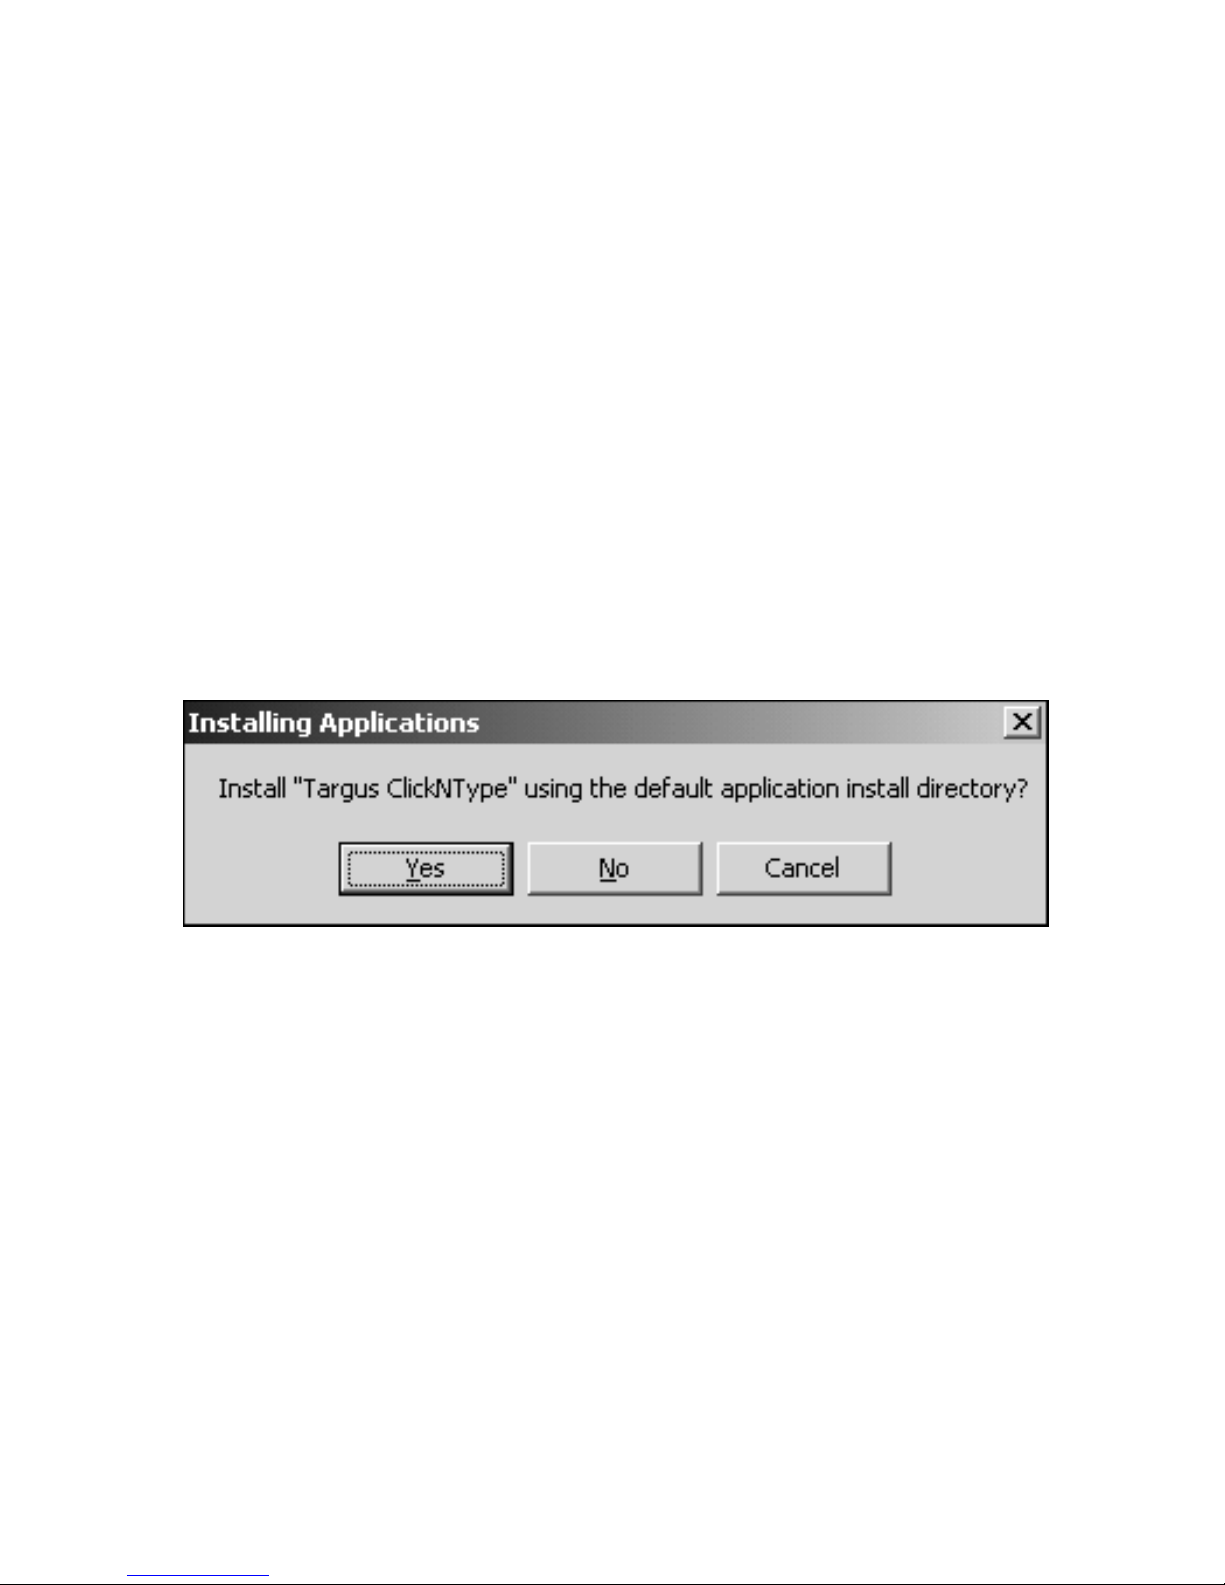
The Installing Applications screen appears.
Sample Installing Applications screen
5 Click Yes.
6 Follow the on-screen instructions to complete installation.
When installation is complete, the Click N Type icon appears
in the Start Menu on your PDA. You can now connect the
Click N Type to your PDA.
3
Page 4
Connecting the Click N Type to
You r P D A
Once you have installed the driver, you can connect the Click N
Type to your PDA. To do this:
1 Turn off your PDA (if it’s turned on).
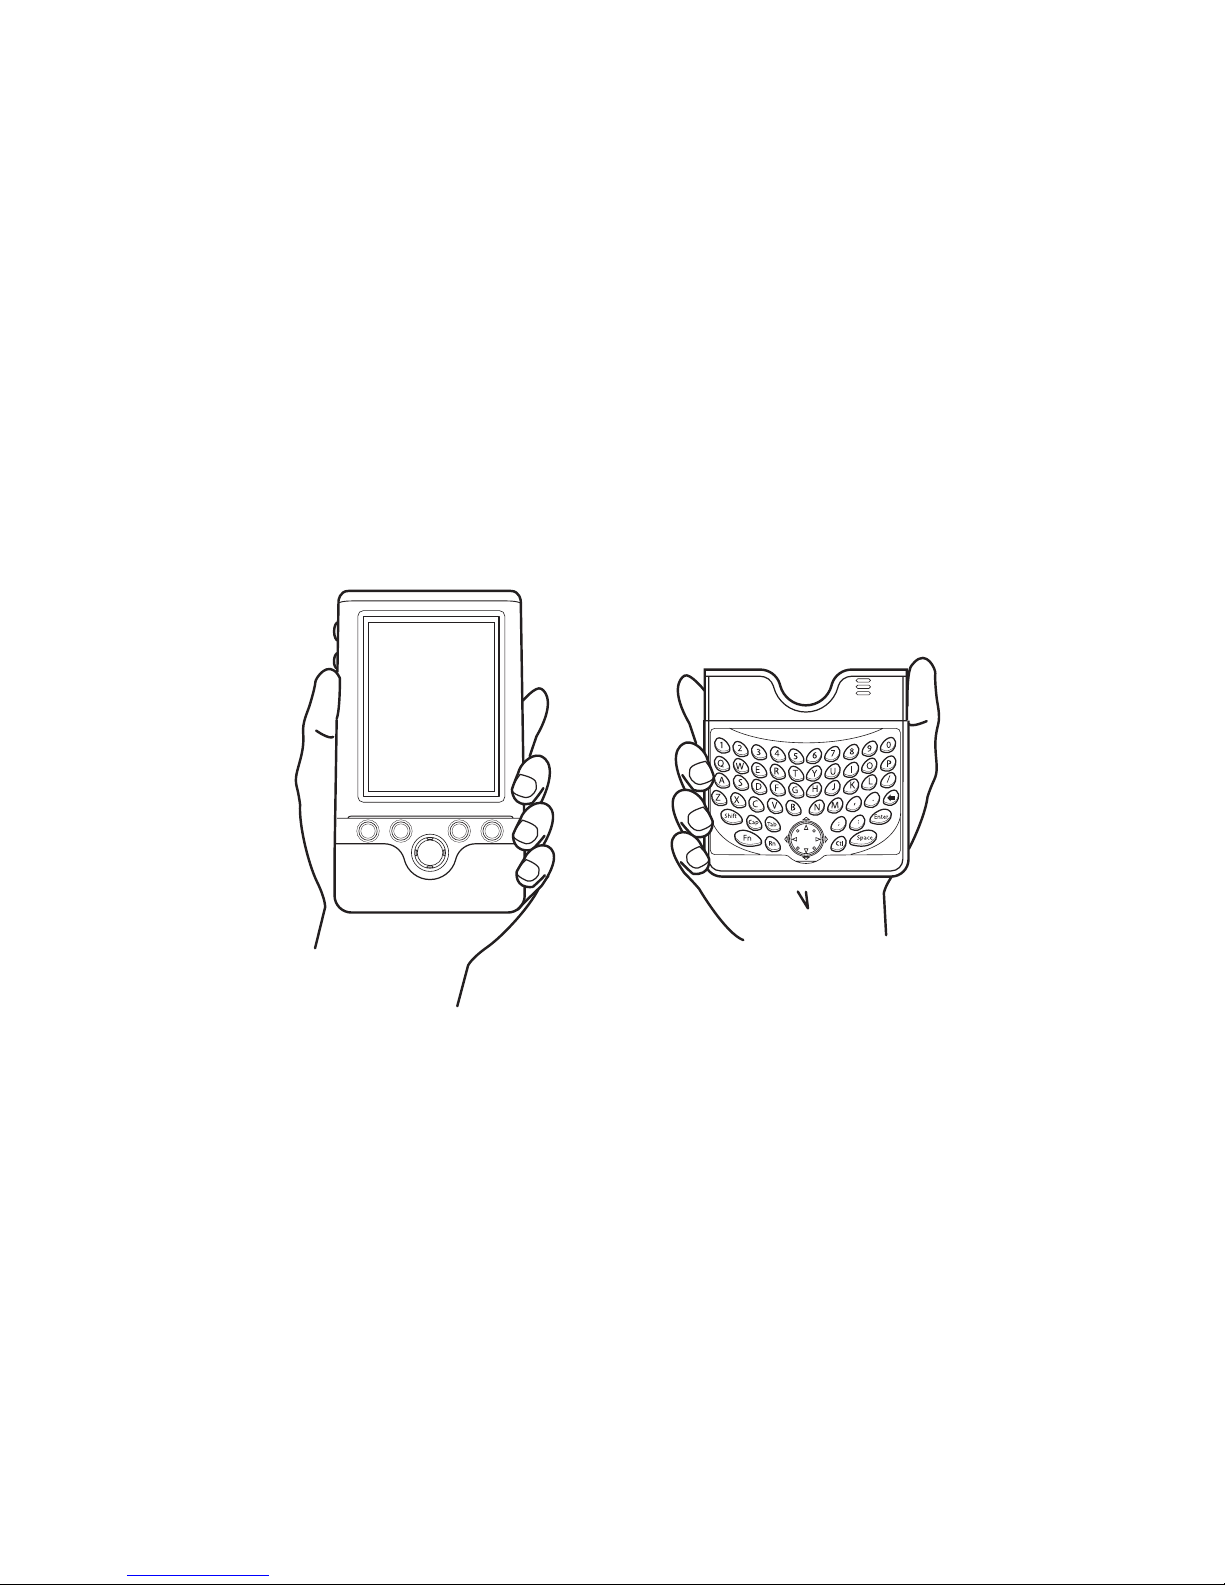
2 Hold your PDA in one hand and the Click N Type in your
other hand.
Holding your PDA and the Click N Type
4
Page 5
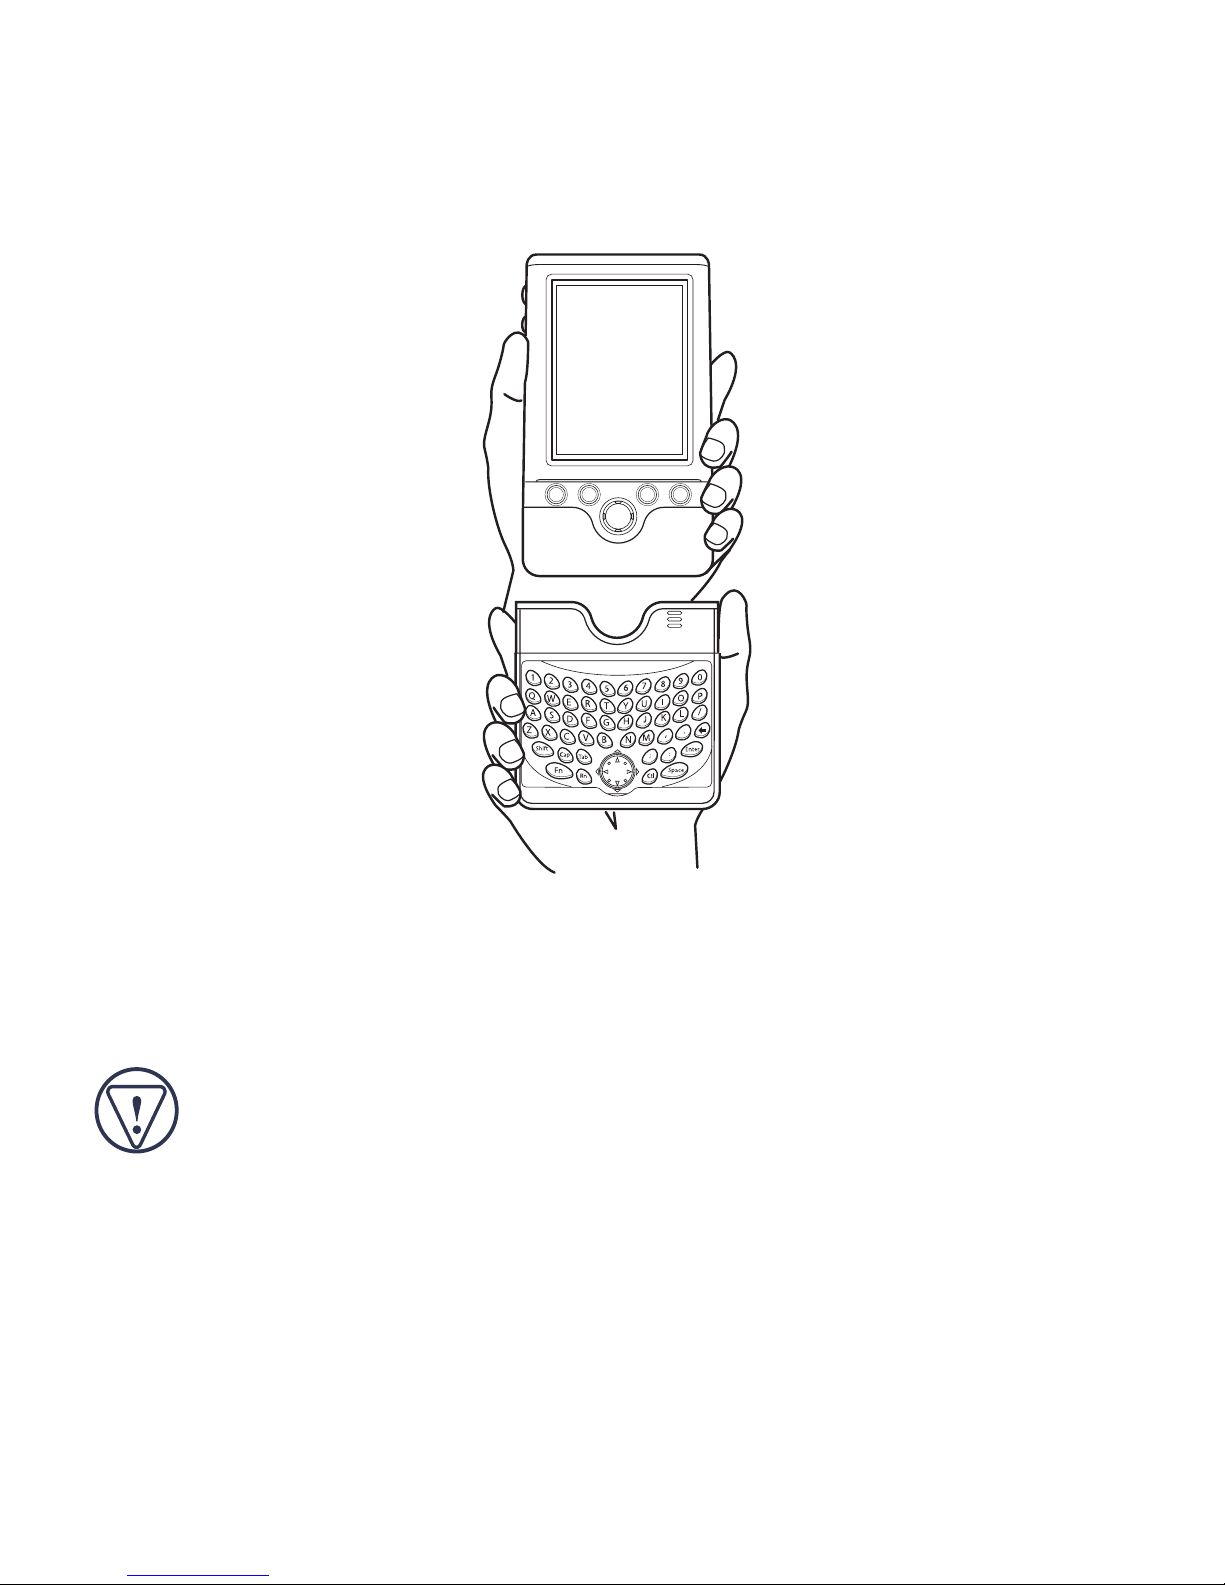
3 Align your PDA with the keyboard connector, located at the
top of the Click N Type.
Aligning your PDA with the keyboard connector
4 Gently slide your PDA into the keyboard connector until you
hear a “click.”
CAUTION: Always use the keyboard connector as a guide
when connecting and disconnecting your PDA to avoid
possible damage to your device or the Click N Type.
5
Page 6

Disconnecting the Click N Type
To disconnect the Click N Type from your PDA:
1 Turn off your PDA (if it’s turned on).
2 Press the eject buttons, located on either side of the
keyboard, and gently pull your PDA away from the Click N
Type, sliding it out of the keyboard connector.
Using the Click N Type
NOTE: The Click N Type does not require batteries. Instead, it
runs off of a small amount of power, which it draws directly
from your PDA.
Enabling the Click N Type
After installing the driver and connecting the Click N Type to
your PDA, you can enable the keyboard through the main
application screen.
To enable the Click N Type, tap Start, then Click N Type.
6
Page 7

The main application screen appears and you are now ready to
customize and use the Click N Type.
Sample main application screen
7
Page 8

Customizing the Click N Type Options
Once you enable the Click N Type, you can view and customize
its options through the Options menu on the main application
screen.
To customize the Click N Type options:
1Tap Start, Click N Type, then Options.
The Options menu appears.
Sample main application screen, Options menu
2 Select the option you want to view or customize.
8
Page 9

NOTE: To access the About and Help options, tap Help instead
of Options on the main application screen.
The available options are:
• About Shows the software version and copyright
• Help Lists the online Help topics
• Keyboard Specifies the keyboard repeat rate settings
• Mouse Specifies the mouse speed settings
About
The About screen allows you to view the software version and
copyright information. To access the About screen, from the
Click N Type application, select Help, then About.
Help
The Help screen displays the online help topics. To access the
Help screen, from the Click N Type application, select Help, then
Help again.
Find the topic you want to learn more about and select the link to
view more information.
9
Page 10

(Keyboard) Buttons
The Buttons screen allows you to regulate the keystroke repeat
function. To access the Buttons screen, select the Up/Down
Control tab.
• Delay before first repeat: allows you to set the length of time
before a letter, number or other character begins to repeat when
you press and hold a key. The settings range is short to long.
Sample Buttons screen
10
Page 11

• Repeat rate: allows you to set the speed at which a letter,
number or other character repeats when you press and hold a
key. The settings range is slow to fast.
NOTE: The Program Buttons tab allows you to configure the
PDA buttons only.
Mouse
The Mouse screen in the Click N Type application allows you to
regulate the rate at which the mouse (8-way navigation button)
moves the cursor across the screen.
Sample Mouse screen
11
Page 12

• Mouse Speed Slow: allows you to set the speed at which the
cursor normally moves. The settings range is 1 (slow) to 5
(fast).
• Mouse Speed Fast: allows you to set the higher speed at
which the cursor moves, after the speed delay, when you press
and hold down the mouse button. The settings range is 1 (slow)
to 5 (fast), but the corresponding speeds are faster than for
Mouse Speed Slow.
• Mouse Speed Delay: allows you to set the length of time
before the cursor changes from slow speed to fast speed when
you press and hold down the mouse button. The settings range
is 1 (short) to 10 (long).
Using the Keyboard Mouse
With the Click N Type’s 8-way navigation button, you can
control the cursor’s movement and tap items on your PDA’s
screen — all “stylus-free.”
Click N Type 8-way navigation button
12
Page 13

Press the arrows on the navigation button to move the cursor
across the PDA’s screen. To “tap” an on-screen option, press the
checkmark key on the Click N Type. To “tap and hold” an
on-screen option, press and hold the checkmark key on the
Click N Type.
NOTE: The mouse turns itself off after one second of
non-operation or when you press any key on the Click N Type.
Typing Keyboard Shortcuts
The following table details the key sequences you can use to
access options and additional characters, and to issue commands
to your PDA from the Click N Type.
To use these key sequences, hold down the Ctrl, Fn, or Shift key
(as indicated) and then tap the second key listed in the table for
the desired result.
To access the characters that are imprinted in red, press
Fn + <key>.
Keyboard Combinations
Key Sequence Result
1 Shift + any key Enters uppercase character
2 Caps Toggles between all upper or lowercase
characters
3 Fn + any key Activates the red symbol above a key
4 Shift + → Highlights character to right of cursor
13
Page 14

Key Sequence Result
5 Shift + ← Highlights character to left of cursor
6 Fn + Mouse Emulates the left/right and up/down arrows on
a keyboard
7 Mouse Moves the cursor in the same manor as a
regular mouse
8 Ctrl + X Cuts selected text
9 Ctrl + C Copies selected text
10 Ctrl + V Pastes cut or copied text
11 Ctrl + A Selects all text
12 Ctrl + Z Undoes last command
13 Ctrl + Backspace Deletes word to left of cursor
14 Ctrl + Q Close program
15 Ctrl + N Opens a new document, if supported
Troubleshooting
What should I do when I type on the keyboard and nothing
happens?
• Check that your PDA is charged.
• Make sure that your PDA is firmly connected to the Click N
Type.
• Verify that the keyboard driver is installed on your PDA.
14
Page 15

• Remove the keyboard driver and then reinstall it. To do this:
1Tap Start, Settings and select the System tab.
2Tap Remove Programs and select Targus Click N Type.
3Tap Remove, then Yes.
4 Install the driver software, following the instructions in
“Installing the Driver” on page 2.
Does the Targus Click N Type require batteries?
No — the keyboard uses only a small amount of power, which it
draws directly from your PDA. Alternately, you can charge your
PDA while using the Click N Type by connecting the AC adapter
that came with your PDA to the AC adapter port, located at the
bottom of the keyboard.
What should I do if my PDA screen goes blank while I’m
typing?
To keep your PDA screen from turning off during use, turn off
the backlight option. To do this:
1 From the Settings Menu, select Power.
2Tap Adjust backlight settings.
3Select Turn off backlight so that the check mark disappears.
15
Page 16

Technical Support
In the unlikely event that you encounter a problem with your
Targus accessory, please contact our technical support team at:
Email: techsupport@targus.com
Internet: http://www.targus.com/support.asp
Our knowledgeable staff is also available to answer your
questions through one of the following telephone numbers.
US
Monday through Friday, 8:00 a.m. (08:00) to 8:00 p.m. (20:00)
Eastern time: 800-283-6325
Canada
Monday through Friday, 9:00 a.m. (09:00) to 5:00 p.m. (17:00)
Eastern time: 888-827-4877
16
Page 17

Europe
Belgium +32 0 02-717-2451
Denmark +45 0 35-25-8751
France +33 0 1-64-53-9151
Germany +49 0 21-16-579-1151
Italy +39 0 24-827-1151
Netherlands +31 0 53-484-9470
Spain +34 0 91-745-6221
Sweden +46 0 8-751-4058
Switzerland +41 0 1-212-0007
United Kingdom +44 0 20-7744-0330
Eastern Europe & others +31 0 53-484-9479
Product Registration
For more efficient customer service and to activate the product’s
warranty, Targus recommends that you register your Targus accessory
shortly after purchasing it.
To register your Targus accessory, go to:
http://www.targus.com/registration.asp
You will need to provide your full name, email address, phone number,
and company information (if applicable).
17
Page 18

Warranty
Targus warrants this product to be free from defects in materials and
workmanship for one year. If your Targus Targus Click N Type is found
to be defective within that time, we will promptly repair or replace it.
This warranty does not cover accidental damage, wear and tear, or
consequential or incidental loss. Under no conditions is Targus liable for
loss of, or damage to, a computer; nor loss of, or damage to, programs,
records, or data; nor any consequential or incidental damages, even if
Targus has been informed of their possibility. This warranty does not
affect your statutory rights.
Warranty Registration at:
http://www.targus.com/registration.asp
Regulatory Compliance
This device complies with Part 15 of the FCC Rules. Operation is
subject to the following two conditions: (1) This device may not cause
harmful interference, and (2) This device must accept any interference
received, including interference that may cause undesired operation.
FCC Statement
Tested to Comply
This equipment has been tested and found to comply with the limits of a
Class B digital device, pursuant to Part 15 of the FCC Rules. These
limits are designed to provide reasonable protection against harmful
interference in a residential installation. This equipment generates, uses,
and can radiate radio frequency energy and if not installed and used in
accordance with the instructions, may cause harmful interference to
radio communications. However, there is no guarantee that interference
will not occur in a particular installation.
18
Page 19

If this equipment does cause harmful interference to radio or television
reception, which can be determined by turning the equipment off and
on, the user is encouraged to try to correct the interference by one or
more of the following measures:
• Reorient or relocate the receiving antenna
• Increase the separation between the equipment and receiver
• Move the computer away from the receiver
• Connect the equipment into an outlet on a circuit different from that
to which the receiver is connected.
Microsoft, Windows and ActiveSync are registered trademarks of Microsoft Corporation. All
other trademarks are the property of their respective owners.
19
 Loading...