

Page 1
Targus Charge-Sync Cable
Page 2

Targus Charge-Sync Cable
Features
The Targus Charge-Sync Cable supports one
touch synchronization between your Palm
PDA (Personal Digital Assistant) and your
desktop or notebook computer and includes a
charger function.
™
V
1
The operating systems supported are Windows
98, Windows
Edition.
In addition to this user’s guide, this package
contains:
• Targus Charge-Sync Cable
• Sync-Cable software
®
2000, and Windows® Millennium
Installing the Targus
Software
Follow these instructions to install the Sync-
®
Cable software on your desktop or notebook
computer.
NOTE: You must install and configure the Palm Desktop
software on your computer before connecting the Targus
Charge-Sync Cable.
Page 3
Targus Charge-Sync Cable 2
WARNING: Do not connect the Targus Charge-Sync Cable
until instructed to do so.
1 Insert the Sync-Cable software CD into your
computer’s CD-ROM drive.
Setup begins automatically.
2 If Setup does not begin automatically, click
Start, then Run, and type D:\setup\setup.exe
(where
D: is the path of your CD-ROM drive).
The Welcome to the Install Shield Wizard for
Targus Charge-Sync Cable window appears.
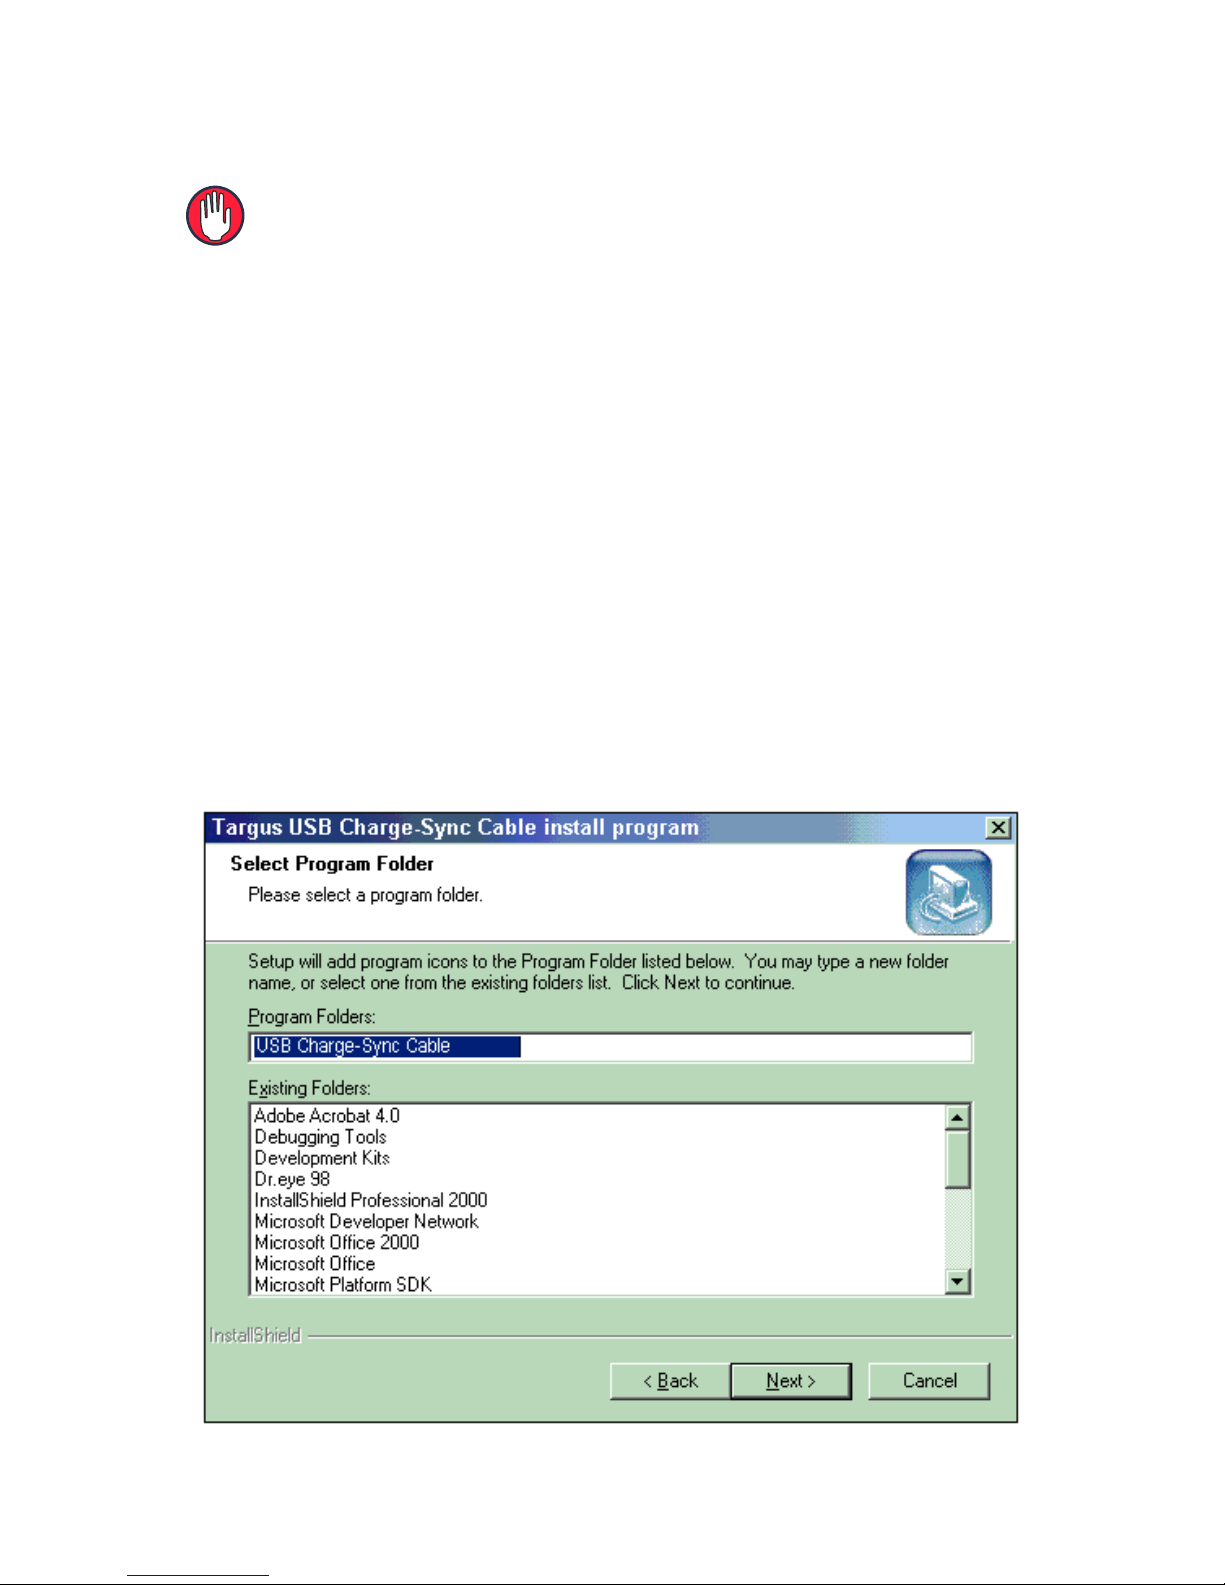
3 Click
Next.
The Select Program Folder window appears.
Select Program Folder window
Page 4
Targus Charge-Sync Cable 3
4 Click Next to install the software.
The application files are then copied to your
computer.
5 Click
Finish.
The message “Please insert the Targus
Charge-Sync Cable” appears.
6 Insert the cable into your computer’s USB
port.
Windows now builds a driver database and
installs the driver.
7 Click
Yes when driver installation is
complete.
8 Click
NOTE: You must reboot your computer before you can use
the cable.
OK and reboot your computer.
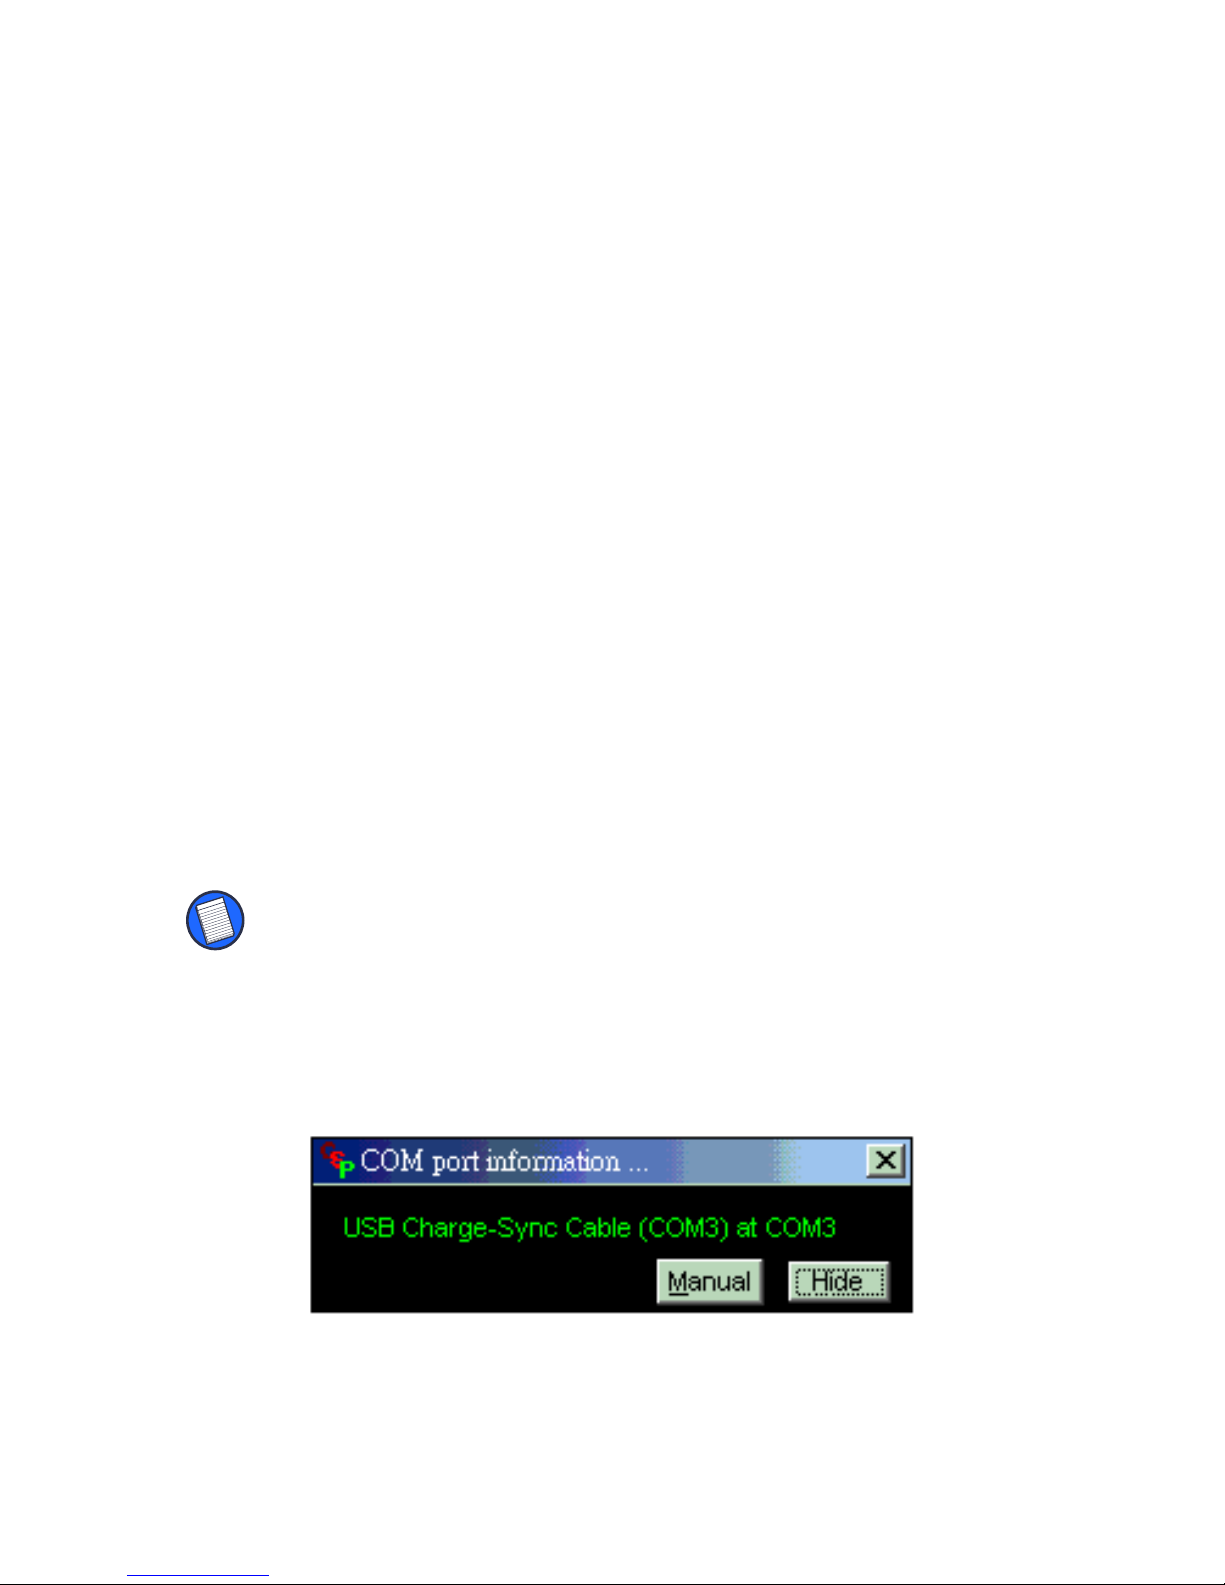
When your computer completes rebooting, the
COM port information box appears in the lowerright corner of the screen.
No conflict COM port information window
Page 5

Targus Charge-Sync Cable 4
If there is no conflict with the COM port setting,
the message “USB Charge-Sync Cable (COMx)
at COMx” (where x is the number of the COM
port) appears in green.
NOTE: If the message “No Cable” appears, refer to the
“Troubleshooting” section on page 11.
If there is a conflict with the COM port setting, the
message “USB Charge-Sync Cable (COMx) at
COMx” (where x is the number of the COM port)
appears in red.
To fix the COM port setting conflict, record the
COM port number shown in the message box
and refer to “Changing the COM Port Setting” on
page 5.
Installation is now complete and you can use the
Targus Charge-Sync Cable to synchronize your
data or charge your Palm V.
NOTE: You must match the Targus Charge-Sync Cable
COM port with the Palm Desktop HotSync Manager COM
port settings before you can synchronize your data.
Matching COM Port Settings for Palm
Desktop HotSync
This section explains how to match the Targus
Charge-Sync Cable COM port with the Palm
Desktop HotSync
®
Manager COM port settings.
Page 6

Targus Charge-Sync Cable 5
1 To access HotSync Manager, right-click the
HotSync icon in the lower-right corner of
the screen or click
Desktop
, and HotSync Manager.
Start, then Programs, Palm
2 To match the COM port settings, click
HotSync, then Setup, Local, and Serial Port.
Select the COM port that matches the COM
port number you recorded during
installation.
3 Click
OK to save your changes and close
HotSync Setup.
NOTE: Palm Desktop HotSync Manager supports COM1 to
COM4 only. If your desktop or notebook computer uses
more than 4 COM ports, release COM1, 2,3 or 4 for the
Targus Charge-Sync Cable to use.
After setting the COM port, you can synchronize
your data or charge your Palm V.
Changing the COM Port Setting
After installing the Sync-Cable software, your
computer automatically assigns a COM port to
the cable. If there is a conflict (the COM port is
already in use) or if the COM port is not set to
COM1, 2, 3 or 4, you must change the COM port
Page 7

Targus Charge-Sync Cable 6
setting either manually or by using the Auto
feature.
NOTE: Use the Auto feature if you are unfamiliar with
changing COM port settings.
Using the Auto Feature
The Auto feature enables your computer to
automatically select an available COM port for
the Targus Charge-Sync Cable.
To use it, click the
information window or press
Auto button in the COM port
Alt+A on the
keyboard. No further action is required.
Setting the COM Port Manually
1 Click the Manual button on the COM port
information window or press
keyboard.
Conflicting COM port information window
Alt+M on your
Page 8

Targus Charge-Sync Cable 7
The COM port setting utility window appears.
COM port setting utility window
Current COM port information is listed under
“Please select a device to change COM port...”.
If an asterisk (*) appears next to a device, you
can change the COM port of that device to any
available COM port listed under “Change COM
port to...”.
NOTE: Do not select a COM port that is labeled N/A.
2 In the device list, click the button next to
Targus Charge-Sync Cable.
Page 9

Targus Charge-Sync Cable 8
NOTE: The Targus Charge-Sync Cable COM port must
match the Palm Desktop HotSync COM port setting.
HotSync only works with COM1 to COM4, so set the cable
COM port to COM1, 2, 3 or 4.
3 Click Set, then Refresh.
The message “Are you sure to change port”
appears.
4 Click
Yes, then Exit.
Your computer will automatically reboot and
update the Targus Charge-Sync Cable’s COM
port setting.
Synchronizing your data
After completing software installation and
configuring the Palm Desktop HotSync Manager,
you can now synchronize your data. To do this:
1 Connect the Targus Charge-Sync Cable to a
USB port on your computer.
2 Connect the cable to your Palm V.
3 Press the
Synchronization between your computer and
Palm V begins.
SYNC button on the cable.
Page 10

Targus Charge-Sync Cable 9
Using the Charge Feature
NOTE: Your computer must be powered on for the charge
feature to work.
1 Connect the Targus Charge-Sync Cable to a
USB port on your computer.
2 Connect the cable to your Palm V.
When the PWR light glows, the charge feature is
operating.
Specifications
The Targus Charge-Sync Cable converts a USB
1.1 interface to a serial interface. The cable
enables computers equipped with a USB
interface to connect to legacy RS232
peripherals, popular PDAs (Personal Digital
Assistants) or handheld PCs.
The cable also provides one button
synchronization using the HotSync function for
Palm OS
function.
Physical Characteristics
®
handhelds and supports a charger
Dimension: 579 x 28 x 11 mm
Includes USB cable with type A connector to
host computer
22.8 x 1.125 x .4375 inches
Page 11

Targus Charge-Sync Cable 10
Certification
EMC/EMI: FCC Part 15, Class B
CE (CISPR22 Class B)
VCCI Class 2
Environment
Operating
Temperature: 0°C to 50°C (32°F to 122°F)
Humidity: 10 to 90%
Storage
Temperature: -20°C to 65°C (-4°F to 149°F)
Humidity: 10 to 90%
Power Consumption
Average: 30mA (at 5V)
Maximum: 50mA (at 5V)
LED Indication
PWR: Power is on
TXD: Transmitting Data
RXD: Receiving Data
PWR
light
TXD
light
RXD
light
SYNC
button
Page 12

Targus Charge-Sync Cable 11
Operating Systems Supported
Windows 98
Windows 2000
Windows Millennium Edition
Troubleshooting
This section describes common problems found
during installation, configuration, and regular
usage of the Targus Charge-Sync Cable.
Frequently Asked Questions
Why can’t I synchronize my computer and Palm V
when I hot plug the Targus Charge-Sync Cable?
Hot plugging the cable causes the Palm Desktop
HotSync ports to loose the proper configuration.
To reconfigure the synchronization ports:
1 Click the
tem tray.
2 Click
3 Press the
Local USB setting.
HotSync Manager icon in the sys-
SYNC button on the cable.
Page 13

Targus Charge-Sync Cable 12
During installation there is no response on my
computer screen after inserting the cable — what
should I do?
• Make sure the USB cable end (with the
USB logo) is plugged into the USB port
of your computer.
• Check that the cable is securely connected to
the USB port. If not, remove the cable and
reconnect it.
• Check that the cable is securely connected to
the Palm V. If not, remove the cable and
reconnect it.
• Make sure you are running the correct
operating system: Windows 98, Windows 2000,
or Windows Millennium Edition.
• Check that the USB controller is activated on
your computer. To do this, double-click
My Computer, Control Panel, System, Device
Manager
, then Universal Serial Bus Controller
and locate the USB Root Hub. If the USB Root
Hub is not present, refer to your computer user
manual or contact your network administrator
or computer dealer for help installing the USB
controller.
Page 14

Targus Charge-Sync Cable 13
What should I do when the message “driver not
found” or “unable to locate driver” or “unknown
device” appears while installing the cable?
If one of these messages appears, click Cancel
and remove the cable from your computer. To
complete driver installation, insert the Targus
Software CD into the CD-ROM drive and follow
the on-screen instructions. Connect the cable
and reboot your computer when prompted.
How do I remove the Targus Software?
Use the Uninstall utility and then reboot your
computer. To run the Uninstall utility:
1 Click
Panel
2 Double-click
3 Select
Start, select Settings, then click Control
.
Add/Remove Programs.
Targus Sync-Charge Cable, then click
Remove.
The Uninstallation window appears.
4 Click
OK.
Follow the on-screen instructions to complete
the uninstallation process.
To use the Targus Charge-Sync Cable again, you
must reinstall the software. Refer to “Installing
the Targus Software” on page 1.
Page 15

Targus Charge-Sync Cable 14
What happens if I connect the Targus ChargeSync Cable before installing the software?
A USB composite device will appear in Device
Manager and must be removed or the Targus
Charge-Sync Cable will not work.
NOTE: Make sure the Targus Charge-Sync Cable is plugged
into your computer’s USB port before removing the USB
Device.
To remove the USB Device for Windows 98/Me:
1 Right-click
and
Device Manager.
My Computer, then click Properties,
On the left side of the USB Device there will be
a yellow circle with an exclamation point.
2 Right-click
USB Device, then click Uninstall
and follow the on-screen instructions.
Uninstalling the USB composite device
3 Remove the cable and click OK.
4 Reboot your computer, insert the Targus
Software CD into the CD-ROM drive and
Page 16

Targus Charge-Sync Cable 15
follow the on-screen instructions. Connect
the cable when prompted.
To remove the USB Device for Windows 2000:
1 Right-click
My Computer, then click Properties,
Hardware, then Device Manager.
On the left side of the USB composite device
there will be a yellow circle with an exclamation
point.
2 Right-click
USB Device, then click Uninstall
and follow the on-screen instructions.
3 Close Device Manager and remove the
cable.
4 Reboot your computer, insert the Targus
Software CD into the CD-ROM drive and
follow the on-screen instructions. Connect
the cable when prompted.
5 When installation is complete, you must
reboot your computer again before the cable
will work.
What should I do when the message “No Cable”
appears?
The cable drivers may not be installed correctly.
• If the cable is connected to the USB port on
your computer, remove the cable, uninstall the
USB Device from Device Manager and
Page 17

Targus Charge-Sync Cable 16
reconnect the cable. For information on
uninstalling the USB Device, refer to “What
happens if I connect the Targus Charge-Sync
Cable before installing the software?” on
page 14.
• If the cable is connected to a USB hub, remove
the cable and connect it directly to the USB port
on your computer.
Warranty
Targus warrants this product to be free from defects in
materials and workmanship for one year. If your Targus
Charge-Sync Cable is found to be defective within that time,
we will promptly repair or replace it. This warranty does not
cover accidental damage, wear and tear, or consequential
or incidental loss. Under no conditions is Targus liable for
loss or damage to a computer; nor loss of, or damage to,
programs, records, or data; nor any consequential or
incidental damages, even if Targus has been informed of
their possibility. This warranty does not affect your statutory
rights.
Warranty Registration at:
http://www.targus.com/product_registration.asp
Technical Support
In the unlikely event that you encounter a problem with your
Targus accessory, please contact our technical support
team at:
Email: techsupport@targus.com
Internet: http://www.targus.com/tech_support.asp
Page 18

Targus Charge-Sync Cable 17
Our knowledgeable staff is also available to answer your
questions through one of the following telephone numbers.
North America
Monday through Friday, 8:00 a.m. (08:00) to 6:00 p.m.
(18:00) Eastern time:
US & Canada: 800-283-6325
Europe
Belgium +32 0 02-717-2451
Denmark +45 0 35-25-8751
France +33 0 1-64-53-9151
Germany +49 0 21-16-579-1151
Italy +39 0 24-827-1151
Netherlands +31 0 53-484-9470
Spain +34 0 91-745-6221
Sweden +46 0 8-571-4058
Switzerland +41 0 1-212-0007
United Kingdom +44 0 20-7744-0330
Eastern Europe & others +31 0 53-484-9479
Regulatory Compliance
This device complies with Part 15 of the FCC Rules.
Operation is subject to the following two conditions: (1) This
device may not cause harmful interference, and (2) This
device must accept any interference received, including
interference that may cause undesired operation.
Page 19

Targus Charge-Sync Cable 18
FCC Statement
Tested to Comply
This equipment has been tested and found to comply with
the limits of a Class B digital device, pursuant to Part 15 of
the FCC Rules. These limits are designed to provide
reasonable protection against harmful interference in a
residential installation. This equipment generates, uses, and
can radiate radio frequency energy and if not installed and
used in accordance with the instructions, may cause
harmful interference to radio communications. However,
there is no guarantee that interference will not occur in a
particular installation.
If this equipment does cause harmful interference to radio or
television reception, which can be determined by turning the
equipment off and on, the user is encouraged to try to
correct the interference by one or more of the following
measures:
• Reorient or relocate the receiving antenna
• Increase the separation between the equipment and
receiver
• Move the computer away from the receiver
• Connect the equipment into an outlet on a circuit different
from that to which the receiver is connected.
Palm V is a trademark and Palm OS and HotSync are registered trademarks of Palm, Inc. Windows 98,
Windows 2000, and Windows Millennium Edition are registered trademarks of Microsoft Corporation. All
other trademarks are the property of their respective owners.
Page 20

400-0036-001A
 Loading...