

Targus AMW51A User Manual
410-1689-206B / AMW51AP
N2953
3 YEARS LIMITED WARRANTY: We pride ourselves on
the quality of our products. For complete warranty details
and a list of our worldwide ofces, please visit www.
targus.com. Features and specications are subject
to change without notice. Microsoft, Windows and
Windows Vista are registered trademarks or trademarks
of Microsoft Corporation in the United States and/or other
countries. Mac is a trademark of Apple Inc., registered
in the U.S. and other countries. Logitech is a registered
trademark of Logitech International in the United States
and other countries. All trademarks and registered
trademarks are the property of their respective owners.
©2010 Targus Group International, Inc.
User Guide
用戶指南 / 用户指南 / Petunjuk Pengguna / 説明書

Targus Wireless Comfort Laser Mouse
2
Targus Wireless Comfort Laser Mouse
3
Introduction
Thank you for your purchase of the Targus Wireless Comfort Laser Mouse.
The accompanying micro USB receiver is small enough to leave plugged
into your computer or simply store it inside the mouse when travelling.
This is a plug and play device so no additional software is required. The
advance scroll wheel feature program can be downloaded from the Targus
website.
System Requirements
Hardware
• USB port
Operating System
• Microsoft Windows® 2000
• Microsoft Windows® XP
• Microsoft Windows Vista
®
• Microsoft Windows® 7
• Mac OS® X 10.4 or later
Contents
• Targus Wireless Comfort Laser Mouse
• 2 x AA Batteries
• Micro USB Receiver
• User Guide
Table of Contents
English ........................................................................................ 3
繁體中文 ................................................................................. 13
中文简体字 ........................................................................... 24
Bahasa Indonesia ........................................................... 35
日本語 .......................................................................................... 45

Targus Wireless Comfort Laser Mouse
4
Targus Wireless Comfort Laser Mouse
5
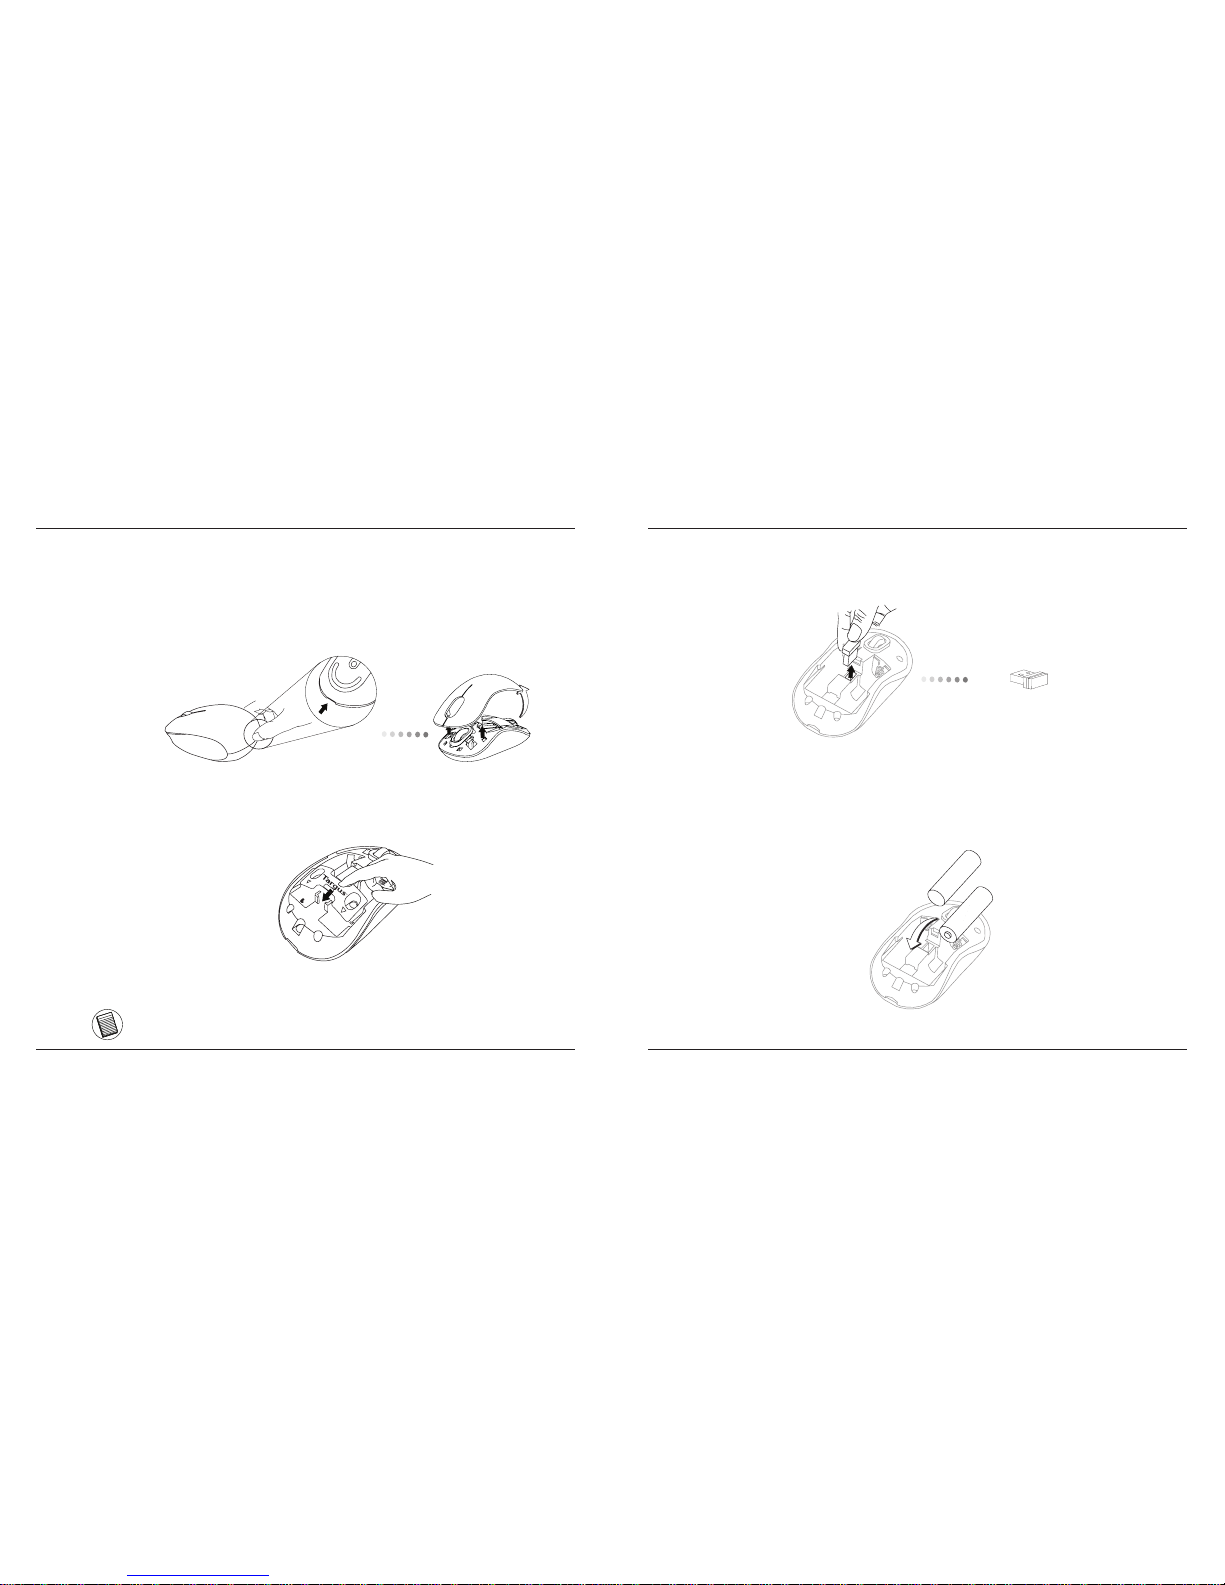
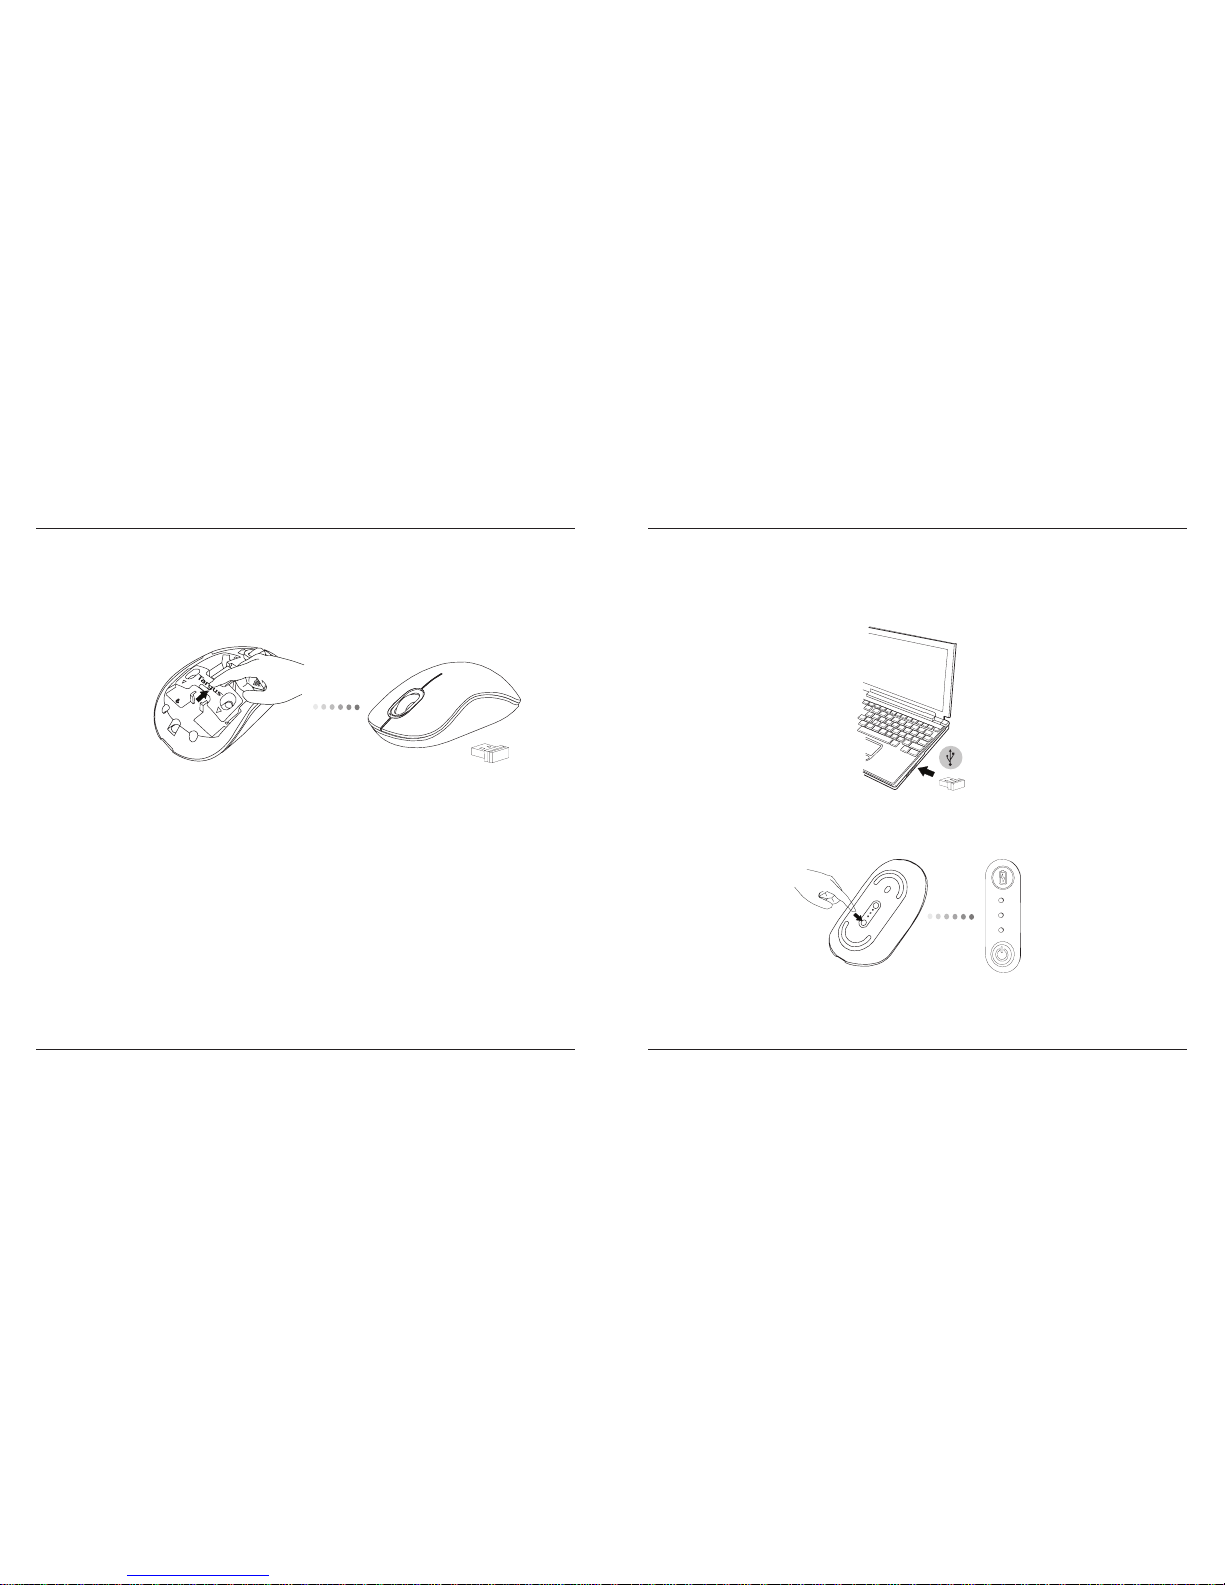
3. Remove the micro USB receiver stored inside the center compartment .
Micro USB
receiver
4. Insert the two AA batteries, making sure that the positive (+) and
negative (-) ends of each battery match the polarity indicators inside
the battery compartment.
1. Remove the battery cover from the top of the mouse by using the notch
on the back. Carefully lift the cover up as shown in the diagram.
Installing the Batteries
2. Remove the battery safety clip by squeezing the center of the clip and
sliding it back, towards the rear of the mouse. Lift up and rotate the
clip out of the way.
NOTE: THE BATTERY SAFETY CLIP WILL NEED TO BE IN THE SECURE, LOCKED POSITION
BEFORE THE BATTERY COVER CAN BE PUT BACK IN PLACE.
Targus Wireless Comfort Laser Mouse
6
Targus Wireless Comfort Laser Mouse
7
5. Replace the battery safety clip by sliding it forward until it clicks into
place and then replace the battery cover.
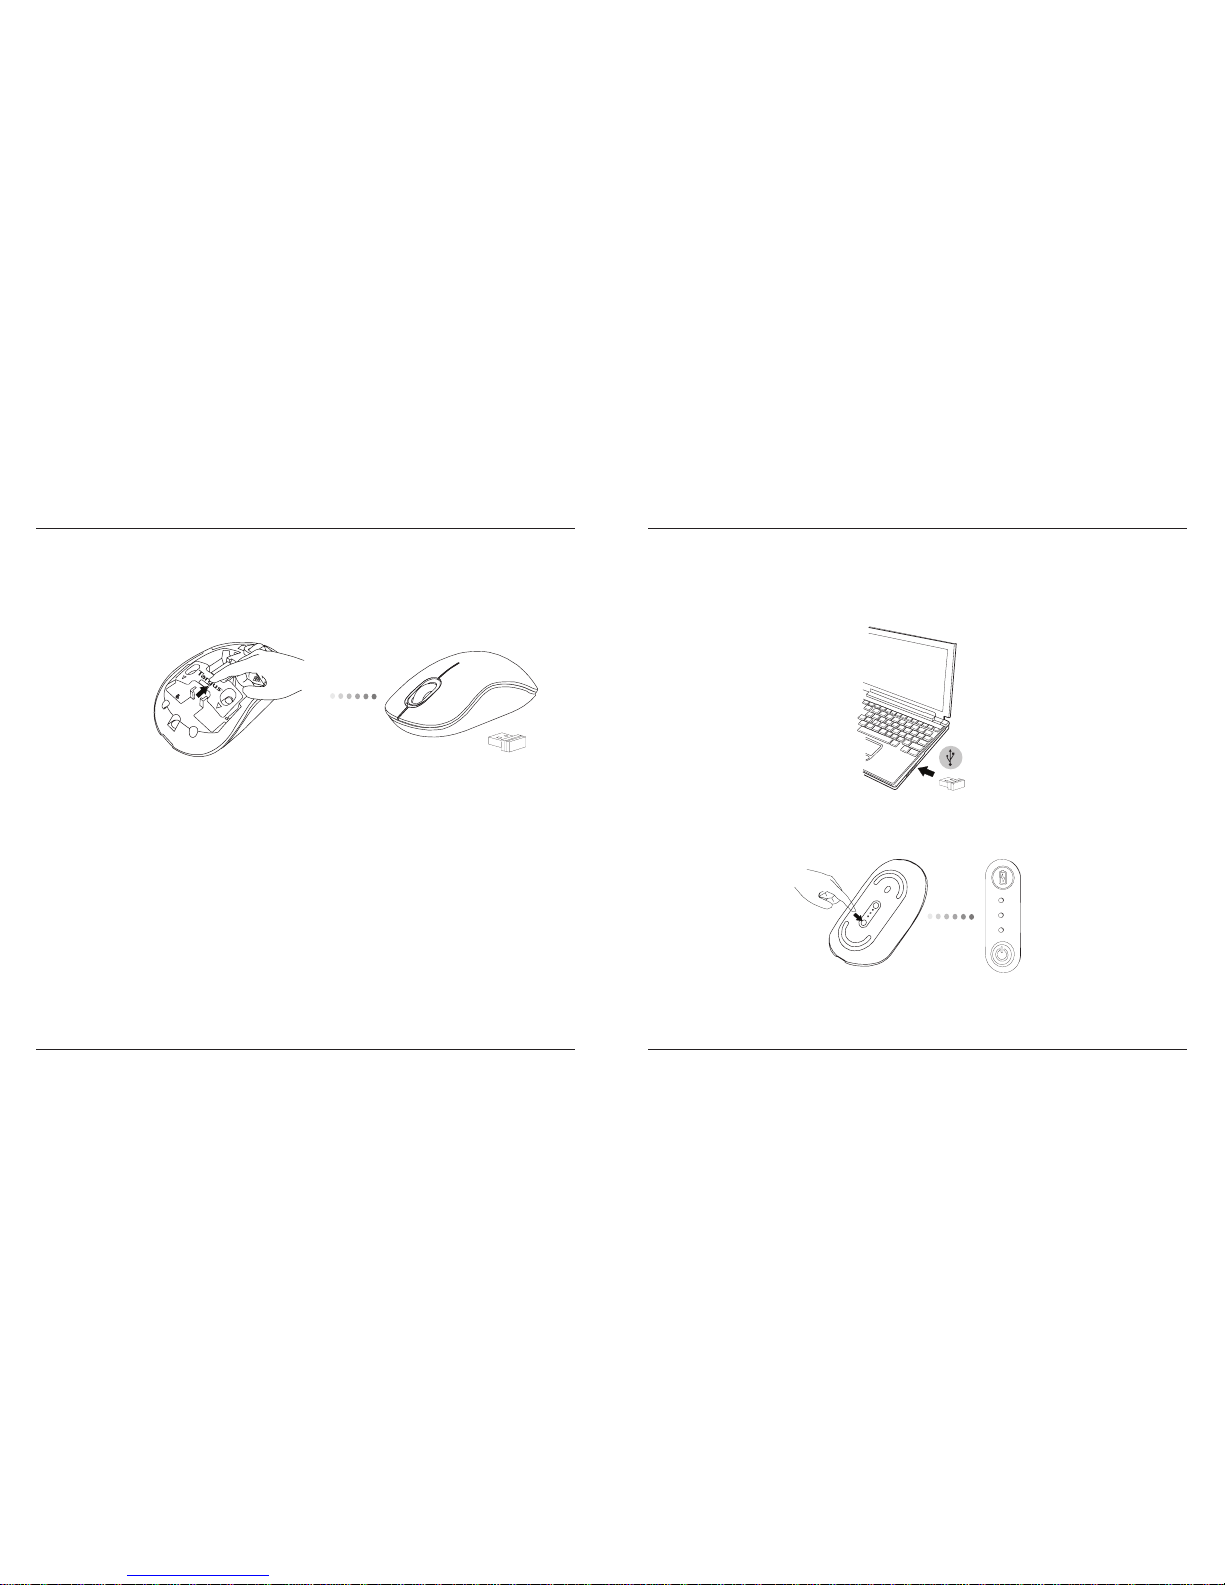
(B) Turn on the mouse pressing the power button, located on the bottom
of the mouse, for 3 seconds and then release.
This mouse is a plug and play device. It will automatically operate when
the USB receiver is connected to the computer.
(A) Plug the USB receiver into an available USB port on your computer.
Establishing the Connection
Power button
Targus Wireless Comfort Laser Mouse
8
Targus Wireless Comfort Laser Mouse
9
Power On:
Press and hold the power button for 3 seconds and then release.
The battery life indicator will briey light up showing the current power
level of the batteries.
Power Off:
Press and hold the power button for 3 seconds and then release.
The battery life indicator will briey light up and then fade out.
Battery Check:
After the mouse is turned on, quickly press and release the power button.
The battery life indicator will light up showing the current power level of
the batteries.
Power Saving mode:
After an extended period of time, if the mouse is not used, it will automatically enter power saving mode to conserve power and increase battery
life. Click on any mouse button to resume the normal operation. The
mouse may take a few seconds to reconnect with your computer.
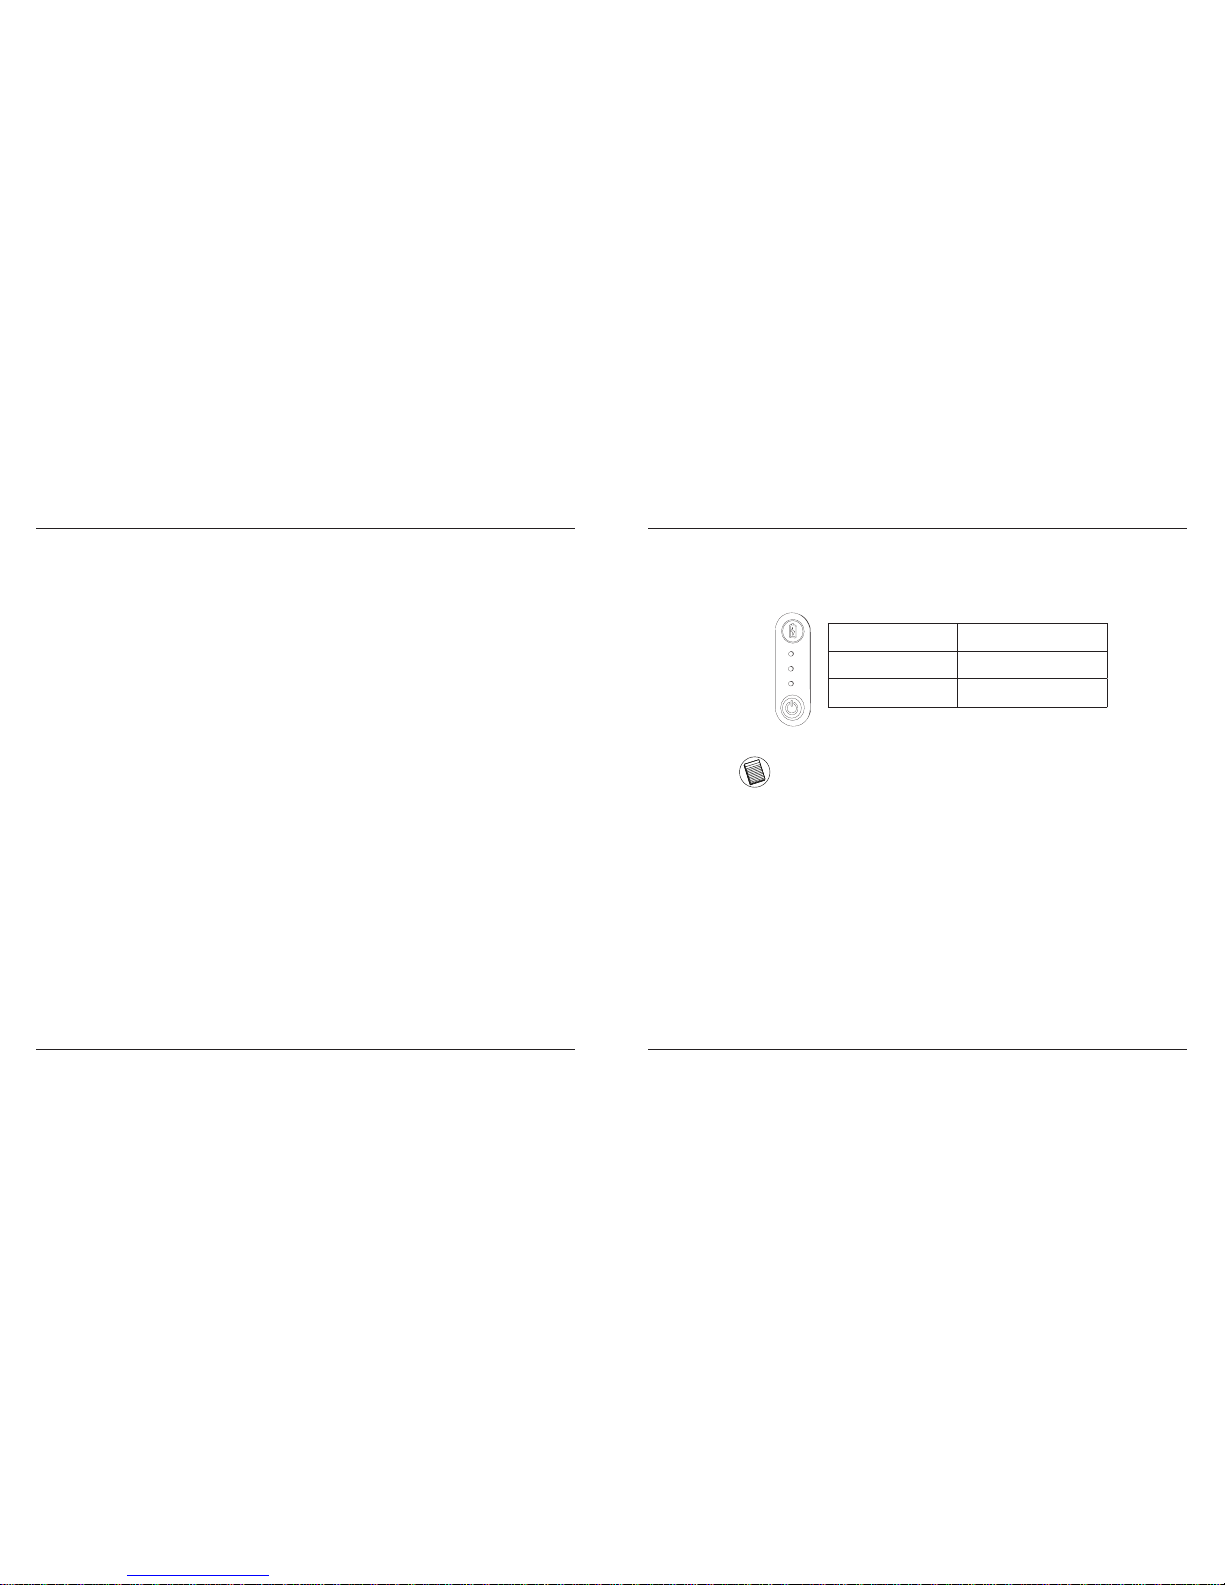
Battery Life Indicator
NOTE: WHEN THE FIRST LIGHT IS BLINKING, PLEASE REPLACE THE BATTERIES
3 LEDs lit Full power
2 LEDs lit Half power
1 LED lit Low power
Power Management
• To extend the life of your battery, turn off the mouse while travelling or
when you’re not using it.

Targus Wireless Comfort Laser Mouse
10
Targus Wireless Comfort Laser Mouse
11
Programming Your Mouse
(Windows Only)
Once installation is complete, open the driver software and select the
desired setting for the scroll-wheel button. Close the driver software
application and you’re ready to go. Activate your selected feature by
pressing down on the scroll wheel.
To access the advanced scroll wheel features you will need to download
and install the software driver. This can be downloaded from the following
location:
Visit www.targus.com to download and install the driver.
Regulatory Compliance
This device complies with Part 15 of the FCC Rules. Operation is subject to the
following two conditions: (1) This device may not cause harmful interference, and (2)
This device must accept any interference received, including interference that may
cause undesired operation.
FCC Statement
Tested to Comply
This equipment has been tested and found to comply with the limits of a Class B
digital device, pursuant to Part 15 of the FCC Rules. These limits are designed to
provide reasonable protection against harmful interference in a residential installation.
This equipment generates, uses, and can radiate radio frequency energy and if not
installed and used in accordance with the instructions, may cause harmful interference
to radio communications. However, there is no guarantee that interference will not
occur in a particular installation. If this equipment does cause harmful interference to
radio or television reception, which can be determined by turning the equipment off
and on, the user is encouraged to try to correct the interference by one or more of
the following measures:
• Reorient or relocate the receiving antenna;
• Increase the separation between the equipment and receiver;
• Connect the equipment into an outlet on a circuit different from that to which the
receiver is connected;
• Consult the dealer or an experienced radio/TV technician for help.
Changes or modications not authorized by the party responsible for compliance
could void the user’s authority to operate this product.
Declaration of Conformity
Hereby, Targus, declares that this device is in compliance with the essential
requirements and other relevant provisions of Directive 1999/5/EC.

Targus Wireless Comfort Laser Mouse
12
Targus Wireless Comfort Laser Mouse
13
LASER RADIATION. DO NOT STARE INTO THE BEAM OR VIEW DIRECTLY WITH
OPTICAL INSTRUMENTS. CLASS I LASER PRODUCT.
NEVER POINT A LASER BEAM INTO A PERSON’S EYES OR VIEW A LASER BEAM
DIRECTLY, AS PROLONGED EXPOSURE CAN BE HAZARDOUS TO THE EYES.
MOMENTARY EXPOSURE FROM A LASER POINTER, SUCH AS AN INADVERTENT
SWEEP OF THE LIGHT ACROSS A PERSON’S EYES, MAY CAUSE TEMPORARY
FLASH BLINDNESS SIMILAR TO THE EFFECT OF A CAMERA FLASH BULB.
ALTHOUGH THIS CONDITION IS TEMPORARY, IT CAN BECOME MORE
DANGEROUS IF THE EXPOSED PERSON IS ENGAGED IN A VISION-CRITICAL
ACTIVITY SUCH AS DRIVING.
CAUTION
Microsoft, Windows, and Windows Vista are either registered trademarks or trademarks of Microsoft Corporation in the
United States and/or other countries. All trademarks and registered trademarks are the properties of their respective owners.
All rights reserved.
介紹
感謝您購買Targus極微鐳射鼠。具備超小型USB接收器,安裝在電腦後,
無須取出,接收器亦可收納於滑鼠背面。本滑鼠為隨插即用,無須安裝驅
動程式,如須使用進階滾輪功能,請至Targus網站下載驅動程式
系統要求
硬件
• USB介面
作業系統
•Microsoft Windows® 2000
•Microsoft Windows® XP
•Microsoft Windows Vista
®
•Microsoft Windows® 7
•Mac OS® X 10.4或更高版本
內容物
• Targus極微鐳射鼠
• 2 X AA電池
• 超小型USB接收器
• 說明書
Targus Wireless Comfort Laser Mouse
14
Targus Wireless Comfort Laser Mouse
15
1.用手按住滑鼠背面的凹處,從滑鼠的頂部將電池蓋取下。如圖所示,小
心地將電池蓋掀開。
安裝電池
2.用手擠壓固定扣中心,並將它向後朝滑鼠的背面滑動,將電池固定扣取
下。將安全扣向上抬高並旋轉取下。
注意:在將電池蓋裝回之前,需將電池固定扣放置在一個安全的位置。
3.將存放在收納槽中間的超小型USB接收器取下。
超小型USB接收器
4.安裝兩顆AA電池,確保每枚電池的正(+)負(-)極和電池槽中所標示的正
負極保持一致。
Targus Wireless Comfort Laser Mouse
16
Targus Wireless Comfort Laser Mouse
17
5.將電池固定扣向前滑動,直到它卡入到正確的位置,然後將電池蓋上裝
回原處。
(B)按住滑鼠底部的電源按鈕3秒鐘,然後鬆開,即可啟動滑鼠。
這是一款隨插即用的滑鼠。當USB接收器安裝到電腦上後,即可開始使
用。
(A)將USB接收器從滑鼠的底部取下。
連接
電源按鈕
 Loading...