

Targus AMW47AP User Manual
1 YEAR LIMITED WARRANTY: We pride ourselves on
the quality of our products. For complete warranty details
and a list of our worldwide ofces, please visit www.
targus.com. Features and specications are subject to
change without notice. All trademarks and registered
trademarks are the property of their respective owners.
All rights reserved. ©2010 Manufactured or imported by
Targus Group International, Inc. (for U.S. sales: 1211
North Miller Street, Anaheim, CA 92806 USA) whose
Australian sales representative is Targus Australia Pty.
Ltd., 117-119 Bowden Street, Meadowbank, NSW 2114
Australia
N2953
410-1630-206B / AMW47AP
User Guide
WIRELESS
STOW-N-GO
TM
LAPTOP MOUSE

Targus Wireless Stow-N-Go
TM
Laptop Mouse
2
Targus Wireless Stow-N-Go
TM
Laptop Mouse
3
Table of Contents
Wireless Stow-N-GoTM Laptop Mouse ...........................................................3
Stow-N-GoTM 無線筆電滑鼠 .......................................................................9
无线Stow-N-GoTM笔记本鼠标 ..................................................................15
무선 Stow-N-GoTM 노트북용 마우스 ....................................................20
เมาส์สำาหรับเครื่องแลปท็อป Stow-N-GoTM แบบไร้สายิ .................................26
ワイヤレスStown-N-GoTM(収納可能な)ラップトップマウス .........................32
Introduction
Congratulations on your purchase of the Targus Wireless Stow-NGoTM Laptop Mouse. The Stow-N-GoTM receiver clips onto the mouse
for ease of use while traveling or on the go. This is a plug and play
device so no additional software is required.
System Requirements
Hardware
• USB port
Operating System
• Windows® 2000
• Windows® XP
• Windows Vista
®
• Mac OS® X v10.4 or later
Targus Wireless Stow-N-Go
TM
Laptop Mouse
4
Targus Wireless Stow-N-Go
TM
Laptop Mouse
5
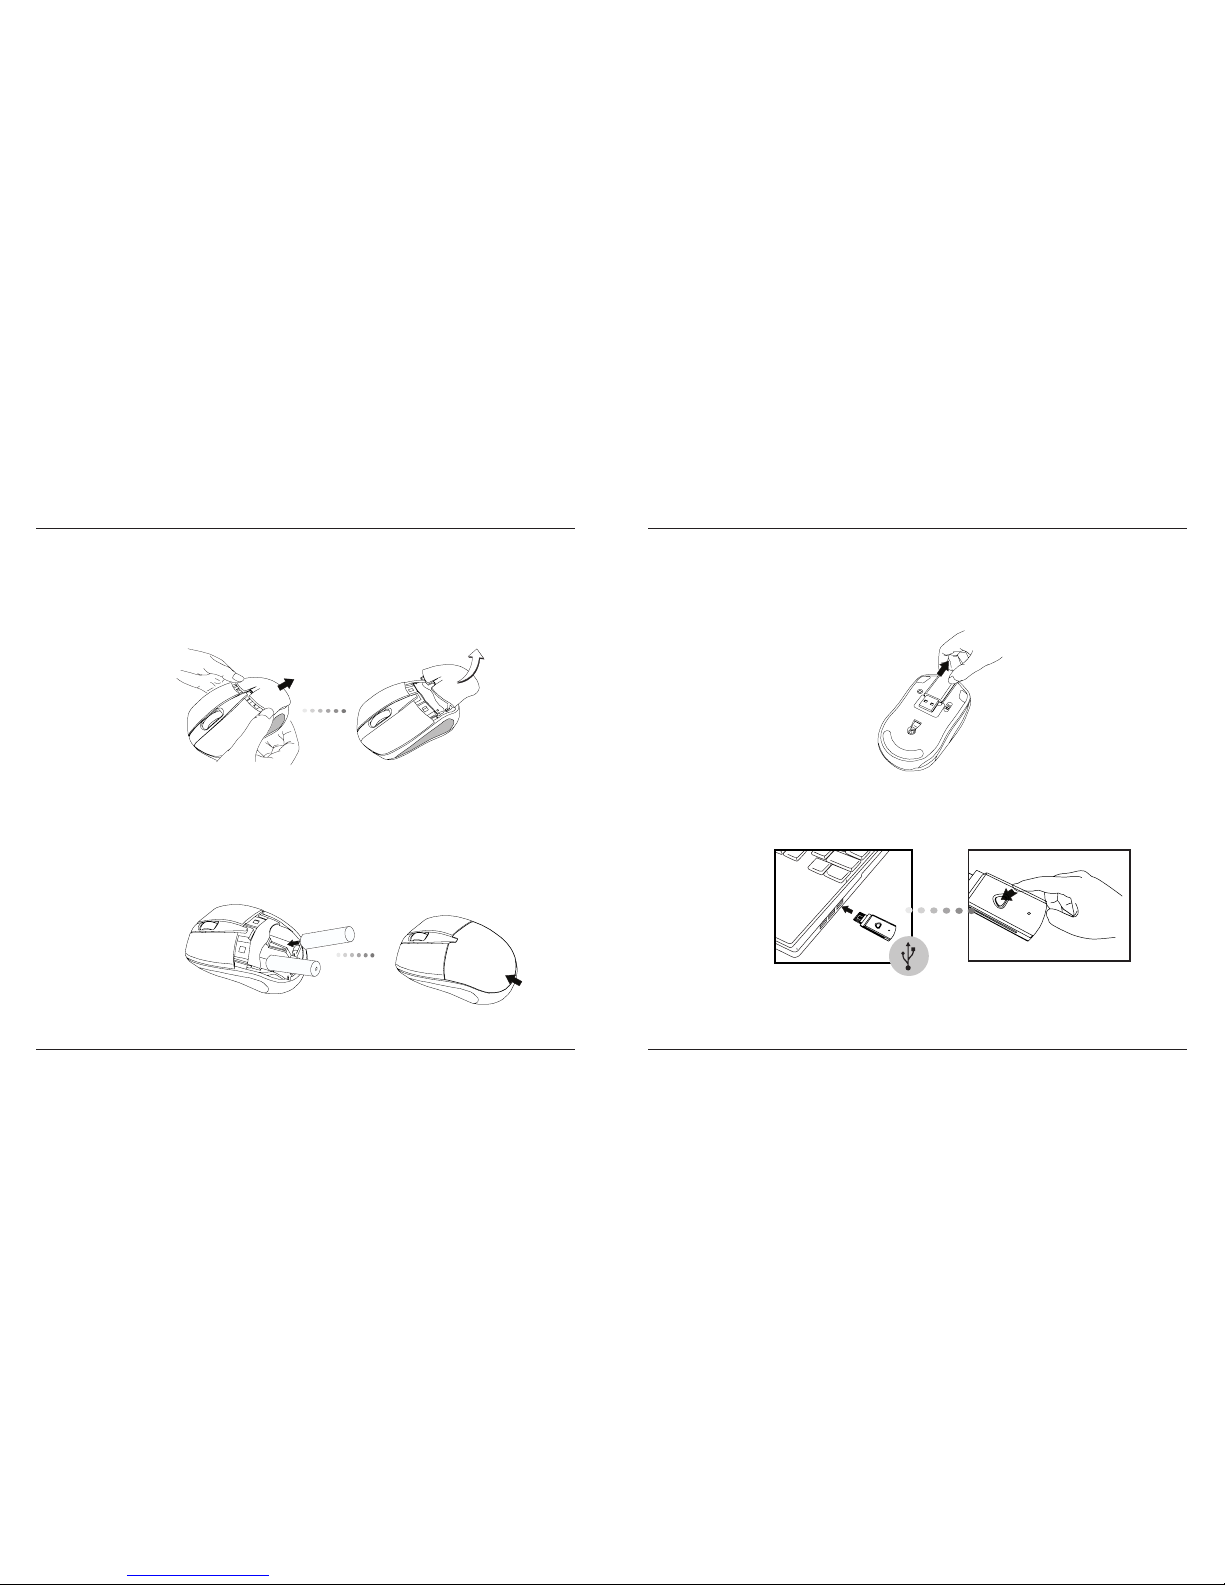
1. Remove the battery cover from the back of the mouse by sliding off the cover
of the mouse. Hold the mouse in your hands and with the back of the mouse
away from you. Press down on the corners of the battery cover and slide
towards the back of the mouse. Lift the cover off from the back of the mouse.
2. Insert two AA-size batteries, making sure that the positive (+) and negative
(-) ends of each battery match the polarity indicators inside the battery
compartment. To replace the battery cover, place the cover on top of the
mouse and slide forward until it clicks into place.
(B) Plug the USB receiver into an available USB port on your computer.
(C) Press and release the setup key on the receiver.
Establishing the Connection
(A) Remove the USB receiver from the bottom of the mouse.
Targus Wireless Stow-N-Go
TM
Laptop Mouse
6
Targus Wireless Stow-N-Go
TM
Laptop Mouse
7
RF 2.402GHz-2.482GHz
Battery Type Alkaline battery AA
Effective RF
Communication Range
10 meters max
RF output power 1.6 mW max
Transmitter
Receiver
RF 2.402GHz-2.482GHz
Interface USB 1.1
Power USB Bus Powered 5V DC
Product Specication
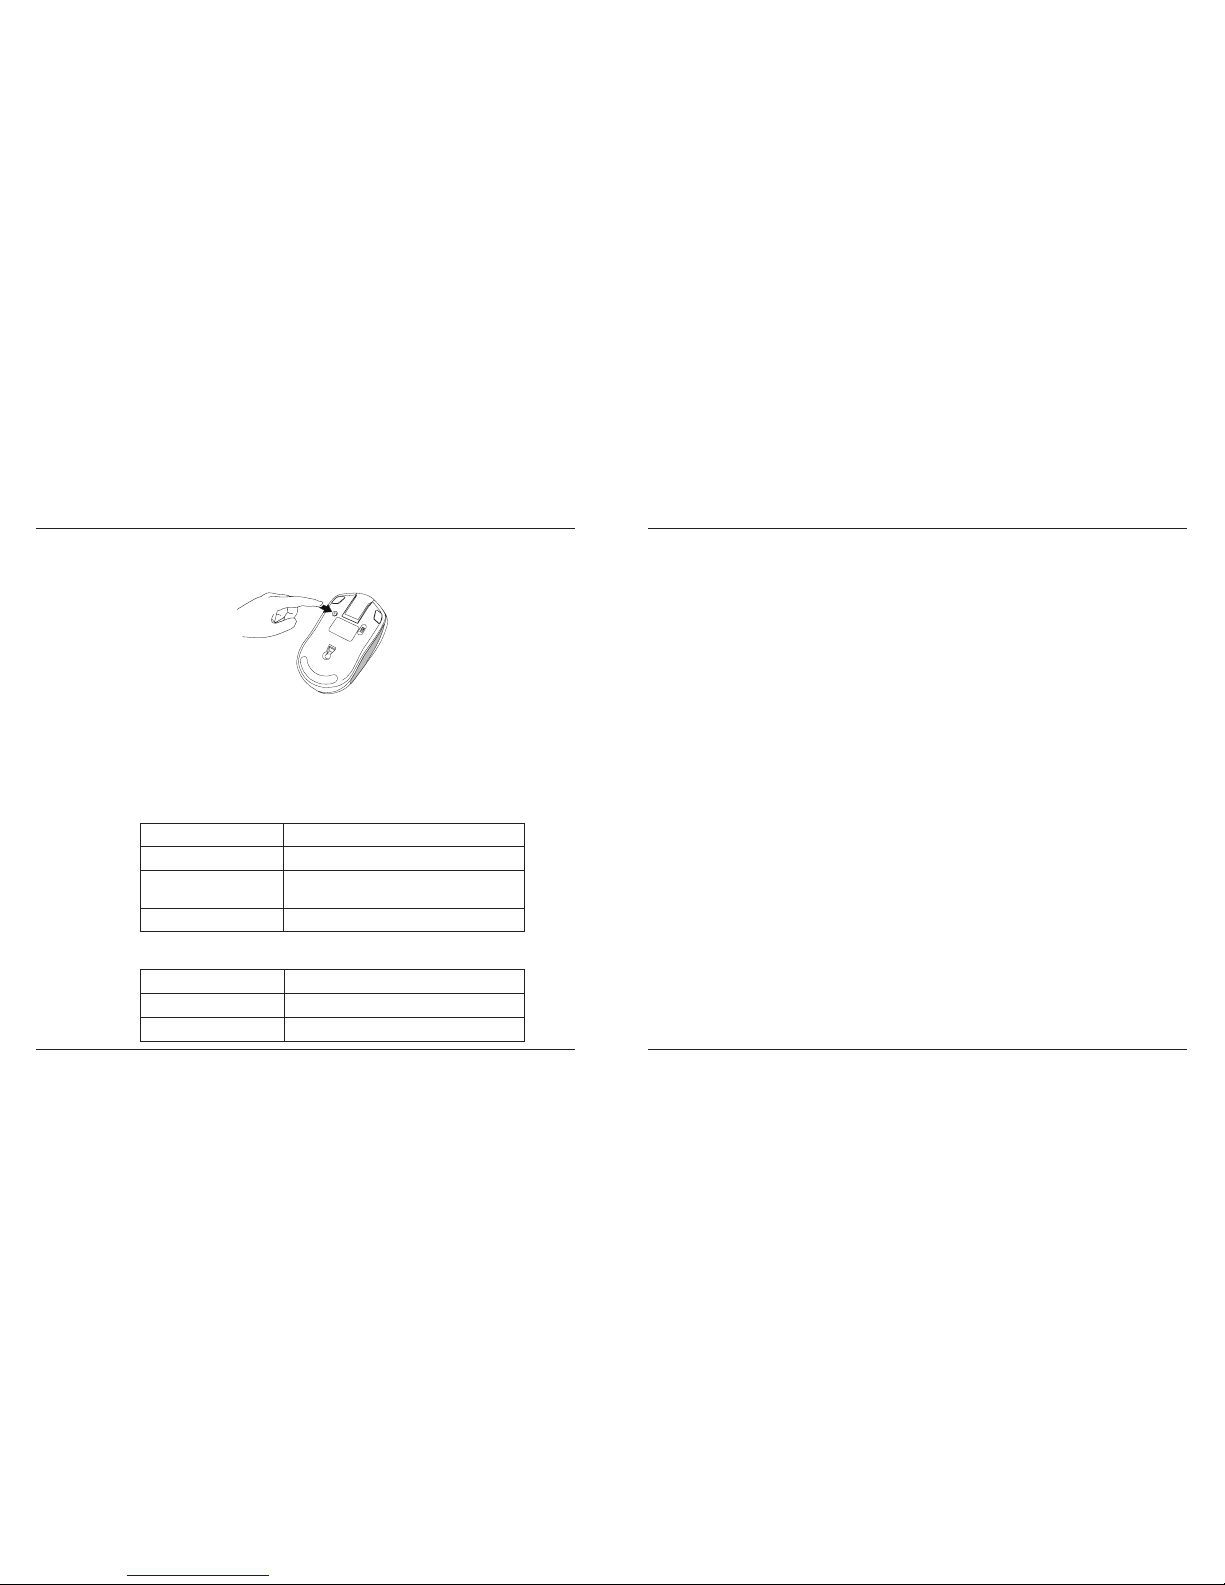
(D) Press the setup key on the bottom of the mouse.
This device has 256 identication codes that allow the mouse and its receiver
to operate without interference from other radio frequency devices. If you
experience interference during use, repeat steps C and D to change the connection channel.
Regulatory Compliance
This device complies with Part 15 of the FCC Rules. Operation is subject to the
following two conditions: (1) This device may not cause harmful interference,
and (2) This device must accept any interference received, including interference that may cause undesired operation.
FCC Statement
Tested to Comply
This equipment has been tested and found to comply with the limits of a Class B
digital device, pursuant to Part 15 of the FCC Rules. These limits are designed
to provide reasonable protection against harmful interference in a residential
installation. This equipment generates, uses, and can radiate radio frequency
energy and if not installed and used in accordance with the instructions, may
cause harmful interference to radio communications. However, there is no
guarantee that interference will not occur in a particular installation. If this
equipment does cause harmful interference to radio or television reception,
which can be determined by turning the equipment off and on, the user is encouraged to try to correct the interference by one or more of the following measures:
• Reorient or relocate the receiving antenna;
• Increase the separation between the equipment and receiver;
• Connect the equipment into an outlet on a circuit different from that to which
the receiver is connected;
• Consult the dealer or an experienced radio/TV technician for help.
Changes or modications not authorized by the party responsible
for compliance could void the user’s authority to operate this
product.

Targus Wireless Stow-N-Go
TM
Laptop Mouse
8
Targus Wireless Stow-N-Go
TM
Laptop Mouse
9
Declaration of Conformity
Hereby, Targus Group International, declares that this device is in compliance
with the essential requirements and other relevant
provisions of Directive 1999/5/EC.
Microsoft, Windows, and Windows Vista are either registered trademarks or trademarks of Microsoft Corporation in the United States and/or other countries. All trademarks and registered
trademarks are the properties of their respective owners. All rights reserved.
簡介
多謝你購買Stow-N-GoTM 無線筆電滑鼠。巧易收接收器夾在滑鼠
上,方便於旅途中或移動中使用。 本産品是隨插即用,無須安裝任
何驅動程式 。
系統需求
硬體
• USB界面
操作系統
• Microsoft Windows® 2000
• Microsoft Windows® XP
• Microsoft Windows Vista
®
• Mac OS® X v10.4 或更高版本
Targus Wireless Stow-N-Go
TM
Laptop Mouse
10
Targus Wireless Stow-N-Go
TM
Laptop Mouse
11
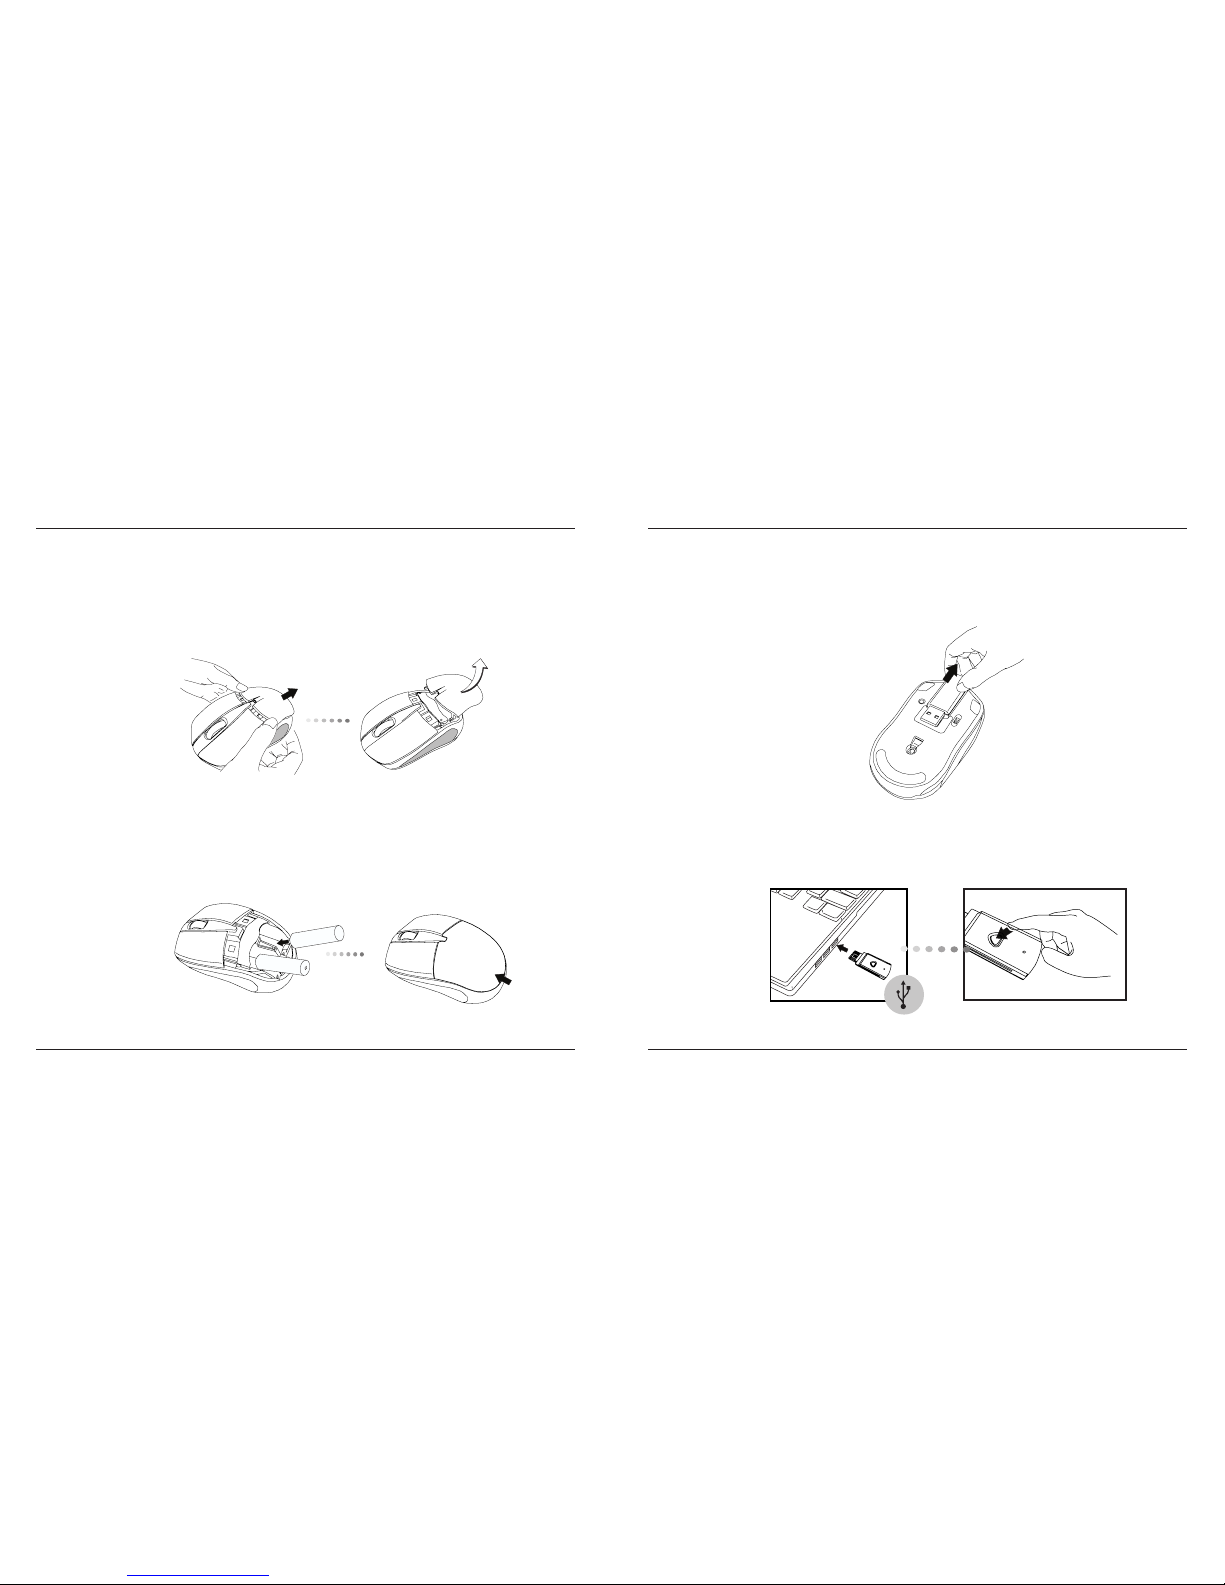
安裝電池
1. 從滑鼠背部滑下電池蓋。用手握住滑鼠,滑鼠背部向外。按下電池蓋角並
向滑鼠背部滑動。從滑鼠背部拿起電池蓋。
2. 插入兩粒AA電池,確保各電池正極(+)和負極(-)兩端與電池盒中的指示相
符。要更換電池蓋時,將電池蓋置於滑鼠頂部並向前滑動,直到發出“
卡"聲後到位。
建立連接
(A) 從滑鼠底部拆下USB接收器。
(B) 將USB接收器插入你電腦上閒置的USB介面上。
(C) 按下並鬆開接收器上的啟動鍵。
 Loading...