

Page 1

©2015 Manufactured or imported by Targus Europe
Ltd., Feltham, Middlesex, TW14 8HA, UK. All rights
reserved. Targus is either a registered trademark or
trademark of Targus Group International, Inc. in the
United States and/or other countries. Features and
specifications are subject to change without notice.
All trademarks and registered trademarks are the
property of their respective owners.
410-2537-003C / AMW060EU
WIRELESS
OPTICAL MOUSE
N2953
User Guide
Page 2
Targus Wireless Optical Mouse Targus Wireless Optical Mouse
Table of Contents
CONNEC
T
O
F
F
ON
CONNEC
T
O
F
F
ON
C
O
N
N
E
C
T
O
F
F
ON
C
O
N
N
E
C
T
O
F
F
ON
C
O
N
N
E
C
T
O
F
F
ON
GB – English
Targus Wireless Optical Mouse .........................................................2
DE – Deutsch
Schnurlose, optische Maus von Targus .............................................5
ES – Español
Ratón de óptico inalámbrico Targus ..................................................7
FR – Français
Souris optique sans l de Targus .....................................................10
IT – Italiano
Mouse Wireless ottico Targus .........................................................12
NL – Nederlands
Targus draadloze optische muis ......................................................15
PT – Português
Rato Óptico sem Fios Targus ..........................................................17
TR – Türkçe
Targus Kablosuz Optik Fare ............................................................20
GB - Introduction
Thank you for your purchase of the Targus Wireless Optical
Mouse. The accompanying micro USB receiver is small
enough to leave plugged into your computer or simply store
it inside the mouse when travelling. This is a plug and play
device so no additional software is required.
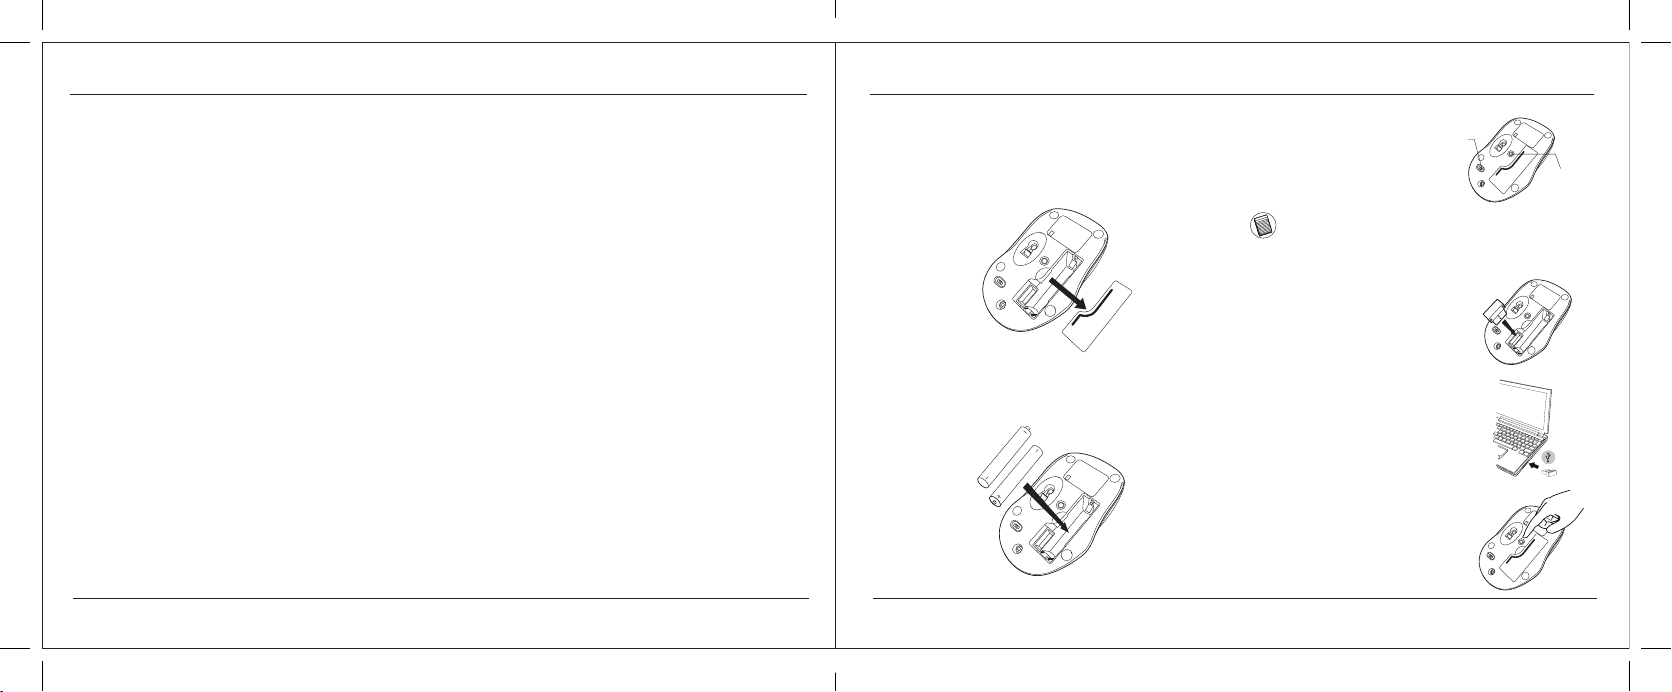
Installing the Batteries
1. Remove the battery cover from the top of the mouse by
using the notch on the back. Carefully lift the cover up as
shown in the diagram.
Contents
• Targus Wireless Optical Mouse
• 2 x AAA Energizer® MAX® Batteries
• Micro USB Receiver
• User Guide
System Requirements
Hardware
• USB port
Operating System
• Microsoft Windows® 2000
• Microsoft Windows® XP
• Microsoft Windows Vista
• Microsoft Windows® 7
• Microsoft Windows® 8
• Mac OS® X 10.4 or later
®
2. Insert the two AAA batteries, making sure that the positive
(+) and negative (-) ends of each battery match the polarity
indicators inside the battery compartment.
2 3
AAA
AAA
3. Replace the battery cover.
NOTE: THE FRONT OF THE LID SHOULD BE INSERTED FIRST BEFORE
SNAPPING THE BACK OF THE LID DOWN.
ON/OFF
switch
Connect
Button
Establishing the Connection
(A) Remove the micro USB
receiver stored inside the
center compartment .
(B) Plug the USB receiver into an
available USB port on your
computer.
(C) Press the Connect Button
on the bottom of the mouse.
You are now ready to use the
mouse.
Page 3
Targus Wireless Optical Mouse Targus Wireless Optical Mouse
Power On:
CONNEC
T
O
F
F
ON
CONNEC
T
O
F
F
ON
Slide the power switch to the ON position.
Power Off:
Slide the power switch to the OFF position.
Power Saving mode:
After an extended period of time, if the mouse is not used, it will
automatically enter power saving mode to conserve power and
increase battery life. Click on any mouse button or simply move
the mouse to resume the normal operation. The mouse may
take a few seconds to reconnect with your computer.
Battery Life Indicator
• The low power light will start flashing when less than 5% of
the battery power remains. Replace the batteries as soon
as possible
BatteryLife
Indicator
Power Management
• To extend the life of your battery, turn off the mouse while
travelling or when you’re not using it.
DE – Einführung
Vielen Dank, dass Sie sich für die Schnurlose, optischeMaus
von Targus entschieden haben. Der mitgelieferte Micro
USB-Receiver ist so klein, dass Sie ihn auf Reisen in
Ihrem Computer eingesteckt lassen oder ihn in der Maus
verstauen können. Das Gerät ist sofort betriebsbereit, es
ist keine zusätzliche Software erforderlich.
Inhalt
• Schnurlose, optische Maus von Targus
• Micro USB-Receiver
• Bedienungsanleitung
Systemanforderungen
Hardware
• USB-Schnittstelle
Betriebssystem
• Microsoft Windows® 2000
• Microsoft Windows® XP
• Microsoft Windows Vista
• Microsoft Windows® 7
• Microsoft Windows® 8
• Mac OS® X 10.4 oder später
4 5
®
Einsetzen der Batterien
1. Entfernen Sie die Batterieabdeckung von der Oberseite
der Maus, indem Sie die Aussparung an der Rückseite
benutzen. Heben Sie, wie im Diagramm dargestellt, den
Deckel vorsichtig an.
2. Legen Sie die AAA-Batterien ein. Stellen Sie sicher,
dass die positiven (+) und negativen (-) Enden mit den
Polaritätsanzeigen im Inneren des Batteriefachs
AAA
AAA
Page 4

Targus Wireless Optical Mouse Targus Wireless Optical Mouse
3. Fügen Sie die Batterieabdeckung
C
O
N
N
E
C
T
O
F
F
ON
C
O
N
N
E
C
T
O
F
F
ON
C
O
N
N
E
C
T
O
F
F
ON
wieder ein.
HINWEIS: DIE VORDERSEITE DES LID SOLLTE EINGESTECKT WERDEN, BEVOR
DIE RÜCKSEITE DES LID HERUNTERGEKLAPPT WIRD.
ON/OFF
switch
Verbindung herstellen
(A) Nehmen Sie den Micro-USB-
Receiver heraus.
(B) Stecken Sie den USB-Receiver
in einen freien USB Port an Ihrem
Computer.
(C) Drücken Sie die Connect-Taste
an der Unterseite der Maus. Sie
sind nun bereit, um die Maus zu
benutzen.
Einschalten:
Schieben Sie den Stromschalter auf die AN-Position.
Ausschalten:
Connect
Button
Schieben Sie den Stromschalter auf die AUS-Position.
Energiesparmodus:
Wenn die Maus über einen gewissen Zeitraum nicht benutzt
wurde, schaltet sie automatisch in den Stromsparmodus,
um Energie zu sparen und die Lebendauer der Batterie zu
verlängern. Klicken Sie auf eine beliebige Maustaste oder
bewegen Sie einfach die Maus, um in den normalen Betrieb
zurück zu kehren. Die Maus benötigt u.U. einige Sekunden, um
die Verbindung mit Ihrem Computer wieder herzustellen.
Batterieindikator
• Die Anzeige für eine schwache Batterie beginnt zu blinken,
sobald weniger als 5% der Batteriekapazität verbleibt.
Tauschen Sie die Batterien so schnell wie möglich aus.
Batterieindikator
Energieverwaltung
• Schalten Sie die Maus auf Reisen oder bei Nichtverwendung
ab, um die Lebensdauer der Batterien zu verlängern.
6 7
ES – Introducción
Le agradecemos la adquisición del Ratón de óptico
inalámbrico Targus. El micro receptor USB incluido es
suficientemente pequeño para poder dejarlo conectado
al ordenador o también puede guardarlo dentro del ratón
durante los viajes. Este es un dispositivo plug-n-play que
no requiere software adicional.
Contenido
• Ratón de óptico inalámbrico Targus
• 2 pilas AAA
• Micro receptor USB
• Manual de instrucciones
Requisitos del Sistema
Hardware
• Interfaz USB
Sistema Operativo
• Microsoft Windows® 2000
• Microsoft Windows® XP
• Microsoft Windows Vista
• Microsoft Windows® 7
• Microsoft Windows® 8
• Mac OS® X 10.4 o versión más reciente
®
Page 5

Targus Wireless Optical Mouse Targus Wireless Optical Mouse
Instalación de las Pilas
CONNEC
T
O
F
F
ON
CONNEC
T
O
F
F
ON
C
O
N
N
E
C
T
O
F
F
ON
C
O
N
N
E
C
T
O
F
F
ON
C
O
N
N
E
C
T
O
F
F
ON
1. Retire la tapa de las pilas de la parte superior del ratón
utilizando la muesca posterior. Levante la tapa con
precaución tal y como indica el diagrama.
2. Instale la pila AAA, respetando la señal positiva (+) y
negativa (−) de polaridad del interior del compartimento.
AAA
AAA
3. Vuelva a colocar la tapa de la pila.
ON/OFF
switch
NOTA: SE DEBE INTRODUCIR LA PARTE ANTERIOR DE LA TAPA ANTES DE
CERRAR A PRESIÓN LA PARTE POSTERIOR DE DICHA TAPA.
Establecer la Conexión
(A) Extraiga el micro receptor USB.
(B) Conecte el receptor USB en cualquier
puerto USB libre del ordenador.
Connect
Button
Encender:
Sitúe el interruptor en la posición ON.
Apagar:
Sitúe el interruptor en la posición OFF.
Modo de Ahorro de Energía:
Después de un amplio periodo de tiempo sin usar el ratón,
éste entrará automáticamente en modo de ahorro para
conservar la energía y aumentar la vida de la batería. Haga
clic en cualquier botón del ratón o simplemente mueva el
ratón para reanudar el funcionamiento normal. El ratón puede
tardar unos segundos en volverse a conectar a su ordenador.
Indicador de pila
• La luz de corriente baja comenzará a parpadear cuando
quede menos de un 5% de energía en la batería.
Sustituya las pilas lo antes posible.
Indicador de pila
(C) Pulse el botón Conectar en la parte
inferior del ratón. Ahora está listo
para utilizar el ratón.
Gestión de la Alimentación
• Para prolongar la duración de las pilas, apague el ratón
cuando viaje o no lo utilice.
8 9
Page 6

Targus Wireless Optical Mouse Targus Wireless Optical Mouse
FR – Introduction
CONNEC
T
O
F
F
ON
CONNEC
T
O
F
F
ON
C
O
N
N
E
C
T
O
F
F
ON
C
O
N
N
E
C
T
O
F
F
ON
C
O
N
N
E
C
T
O
F
F
ON
Nous vous remercions d’avoir acheté cette Souris
optique sans fil de Targus. Son récepteur micro USB est
suffisamment petit pour rester constamment branché
sur l’ordinateur ou pour être rangé dans la souris et
ainsi ne pas le perdre lorsque vous vous déplacez. Cette
souris est de type Plug & Play et ne requiert donc aucun
pilote spécifique.
Contenu de la boîte
• Souris optique sans fil de Targus
• 2 x piles AAA
• Récepteur micro USB
• Manuel d’utilisateur
Configuration système requise
Matériel
• Interface USB
Système d’exploitation
• Microsoft Windows® 2000
• Microsoft Windows® XP
• Microsoft Windows Vista
• Microsoft Windows® 7
• Microsoft Windows® 8
• Mac OS® X 10.4 ou supérieure
®
Installation des piles
1. Retirez le couvercle du compartiment de piles sur le dessus
de la souris, à l’aide de l’encoche prévue à l’arrière. Soulevez
délicatement le couvercle, comme indiqué sur la figure.
3. Replacez le couvercle du
compartiment de la pile.
REMARQUE: INSÉREZ EN PREMIER LA PARTIE AVANT DU COUVERCLE,
PUIS ENCLENCHEZ LA PARTIE ARRIÈRE EN POSITION.
ON/OFF
switch
Connect
Button
Établissement de la connexion
2. Insérez la pile de type AAA, en respectant le sens des
polarités positive (+) et négative (-) indiquées à l’intérieur du
compartiment de la pile.
AAA
AAA
10 11
(A) Débranchez le mini récepteur USB.
(B) Connectez le récepteur USB sur l’un
des ports USB disponibles de votre
ordinateur.
(C) Appuyez sur le bouton Connect
sur le fond de la souris. Vous êtes
maintenant prêt à utiliser la souris.
Mise en route :
Faites glisser l’interrupteur en position ON (MARCHE).
Mise hors tension :
Faisant glisser l’interrupteur en position OFF (ARRÊT).
Mode économie d’énergie :
La souris se place automatiquement en mode économie
d’énergie lorsque vous ne l’utilisez pas pendant un certain
temps, afin de ne pas gaspiller l’énergie des piles. Cliquez sur
l’un quelconque des boutons de la souris ou simplement déplacez la souris pour la réactiver. La reconnexion à l’ordinateur
peut prendre quelques secondes.
Indicateur de puissance des piles
• Si les piles sont trop déchargées (il reste moins de 5%
de la puissance disponible), le témoin de marche vous le
signale en clignotant toutes les 3 secondes. Remplacez
alors les piles le plus vite possible.
Indicateur de
puissance des piles
Économie d’énergie
• Éteignez votre souris lorsque vous vous déplacez ou ne
l’utilisez pas piles dureront ainsi plus longtemps.
Page 7

Targus Wireless Optical Mouse Targus Wireless Optical Mouse
CONNEC
T
O
F
F
ON
CONNEC
T
O
F
F
ON
C
O
N
N
E
C
T
O
F
F
ON
C
O
N
N
E
C
T
O
F
F
ON
C
O
N
N
E
C
T
O
F
F
ON
IT – Introduzione
Grazie per aver acquistato il Mouse Wireless ottico Targus. Il
ricevitore micro USB che lo accompagna è sufficientemente piccolo
da poterlo lasciare collegato al computer o da riporlo semplicemente
dentro il mouse quando si viaggia. È un apparecchio plug and play
quindi non occorre software aggiuntivo.
Installare le batterie
1. Rimuovere il coperchio dalla parte superiore del
mouse usando l’incavo sul retro. Sollevare il coperchio
con cura come mostrato nel diagramma.
Contenuto
• Mouse Wireless ottico Targus
• 2 x batterie AAA
• Micro ricevitore USB
• Guida per l’utente
2. Inserire le batterie AAA, assicurandosi che le estremità
Requisiti necessari al sistema
Hardware
• Interfaccia USB
Sistema operativo
• Microsoft Windows® 2000
• Microsoft Windows® XP
• Microsoft Windows Vista
• Microsoft Windows® 7
• Microsoft Windows® 8
• Mac OS® X 10.4 o successivo
®
positiva (+) e negativa (-) combacino con gli indicatori
di polarità nel vano batterie.
12 13
AAA
AAA
3. Rimettere il coperchio
sul vano batterie.
NOTA: PRIMA DI FAR SCATTARE IN POSIZIONE LA PARTE POSTERIORE DEL
COPERCHIO INSERIRE LA PARTE ANTERIORE.
ON/OFF
switch
Stabilire il collegamento
(A) Estrarre il ricevitore micro USB.
(B) Inserire il ricevitore USB in una porta
USB disponibile del computer.
(C) Premere il pulsante Connect sulla
parte inferiore del mouse. Ora
siete pronti per utilizzare il mouse.
Connect
Button
Page 8

Targus Wireless Optical Mouse Targus Wireless Optical Mouse
Accensione:
CONNEC
T
O
F
F
ON
CONNEC
T
O
F
F
ON
Fare scorrere l’interruttore di alimentazione sulla posizione ON.
Spegnimento:
Fare scorrere l’interruttore di alimentazione sulla posizione OFF.
Modalità di risparmio energetico:
Se non si usa il mouse per un cer to tempo entrerà automaticamente in modalità di risparmio energetico per
conservare energia e allungar e la vita della ba tteria. Fare
clic su un tasto qualsiasi del mouse o spostarlo ne riavvia le funzioni. Può occorrere qualche secondo perché il
mouse si ricolleghi al computer.
Indicatore della batteria
• Quando rimane meno del 5% di carica alla batteria la
luce dell’alimentazione inizia a lampeggiare a intervalli.
Sostituire le batterie appena possibile.
Indicatore della batteria
Gestione della carica
• Per prolungare la vita delle batterie spegnere il mouse
durante il trasporto o quando non lo si usa.
NL – Introductie
Hartelijk dank voor de aanschaf van de Targus draadloze
optische muis. De bijgeleverde micro USB ontvanger
is klein genoeg om tijdens uw reizen op uw computer
aangesloten te blijven maar het kan ook eenvoudig
worden opgeborgen in de muis. Dit is een “plug-n-play”
(“insteken en spelen”) apparaat en u heeft daarom geen
extra software nodig.
1. Verwijder het batterijdeksel van de bovenkant van de muis door de
Inhoud
De batterijen installeren
• Targus draadloze optische muis
• 2 x AAA batterijen
• Micro USB ontvanger
• Gebruikershandleiding
2. Plaats de AAA batterij, ervoor zorgend dat de positieve (+)
Systeemvereisten
Hardware
• USB communicatie
Besturingssysteem
• Microsoft Windows® 2000
• Microsoft Windows® XP
• Microsoft Windows Vista
• Microsoft Windows® 7
• Microsoft Windows® 8
• Mac OS® X 10.4 of recenter
14 15
®
gleuf aan de achterkant te gebruiken. Til het deksel voorzichtig op
zoals aangegeven in het figuur.
en negatieve (-) einden van de batterij overeenkomen met de
polariteitsindicatoren binnenin het batterijcompartiment.
AAA
AAA
Page 9

Targus Wireless Optical Mouse Targus Wireless Optical Mouse
3. Plaats het batterijdeksel
C
O
N
N
E
C
T
O
F
F
ON
C
O
N
N
E
C
T
O
F
F
ON
C
O
N
N
E
C
T
O
F
F
ON
weer terug.
OPMERKING: DE VOORZIJDE VAN HET DEKSEL MOET INGEBRACHT
WORDEN VOORDAT U DE ACHTERKANT ERVAN KUNT NEERKLAPPEN.
ON/OFF
switch
Connect
Button
De verbinding tot stand brengen
(A) Neem de mini USB ontvanger uit de
verpakking.
(B) Steek de USB ontvanger in een
beschikbare USB uitgang op uw
computer.
(C) Druk op de knop Connect aan de
onderkant van de muis. U bent nu
klaar om de muis te gebruiken.
Inschakelen:
Schuif de stroomknop naar de ON (AAN) positie.
Uitschakelen:
Schuif de stroomknop naar de OFF (UIT) positie.
Modus energiebesparing:
Wanneer de muis een bepaalde tijd niet wordt gebruikt, gaat zij
automatisch over in de stroombesparingsmodus om stroom te
besparen en de levensduur van de batterij te verlengen. Klik op
eender welke muistoets om de normale werking te hervatten. Het
kan enkele seconden duren voordat de muis opnieuw verbinding
krijgt met uw computer.
Batterij-indicator
• Het controlelampje zwa kke batterijen knippert om wanneer
minder dan 5% batterijstroom restereert. Vervang dan de
batterij zo gauw mogelijk.
Batterij-indicator
Energiemanagement
• Schakel, om de levensduur van uw batterij te verlengen, de
muis uit tijdens reizen of wanneer u het niet gebruikt.
16 17
PT – Introdução
Obrigado por ter comprado o Rato Óptico sem Fios Targus.
O micro receptor USB que o acompanha é suficientemente
pequeno para o deixar ligado no seu computador ou
simplesmente guardá-lo dentro do rato quando viajar. Este
é um dispositivo “plug-n-play “(ligar e usar) e não precisa
de software adicional.
Índice
• Rato Óptico sem Fios Targus
• 2 baterias AAA
• Micro receptor USB
• Guia do Utilizador
Requisitos do sistema
Hardware
• Interface USB
Sistema operativo
• Microsoft Windows® 2000
• Microsoft Windows® XP
• Microsoft Windows Vista
• Microsoft Windows® 7
• Microsoft Windows® 8
• Mac OS® X 10.4 ou posterior
®
Page 10

Targus Wireless Optical Mouse Targus Wireless Optical Mouse
Instalação das pilhas
C
O
N
N
E
C
T
O
F
F
ON
C
O
N
N
E
C
T
O
F
F
ON
C
O
N
N
E
C
T
O
F
F
ON
CONNEC
T
O
F
F
ON
CONNEC
T
O
F
F
ON
1. Retire a tampa das pilhas da parte superior do
rato, utilizando o encaixe na parte de trás. Levante
cuidadosamente a tampa, como se indica no diagrama.
2. Introduza a pilha AAA, certificando-se de que o pólo
positivo (+) e o pólo negativo (-) em cada uma das
extremidades da pilha coincidem com os indicadores
de polaridade no interior do respectivo compartimento.
AAA
AAA
3. Recoloque a tampa do
compartimento da pilha.
NOTA: A PARTE DA FRENTE DA TAMPA DEVE SER INSERIDA EM PRIMEIRO
LUGAR, ANTES DE PRESSIONAR FECHAR A PARTE DE TRÁS DA TAMPA.
ON/OFF
switch
Fazer a ligação
(A) Retire o receptor Micro USB.
(B) Ligue o receptor USB na porta USB
disponível do sue computador.
Ligado: (ON)
Desloque o interruptor de corrente para a posição ON (Ligar).
Desligado: (OFF)
Connect
Button
Desloque o interruptor de corrente para a posição OFF (Desligar).
Modo de poupança de energia:
Se o rato não for utilizado durante um período de tempo
alargado, entra automaticamente no modo de poupança de
energia, conservando energia e aumentando a vida útil da pilha.
Clique em qualquer botão ou desloque simplesmente o rato
para retomar o modo de funcionamento normal. O rato pode
demorar alguns segundos a restabelecer a ligação com o seu
computador.
Indicador da pilha
• A luz indicadora de pouca carga da pilha começa a piscar
a quando a energia restante da pilha for inferior a 5%.
Substitua a pilha o mais breve possível.
Indicador da pilha
(C) Pressione o botão Conectar na parte
inferior do mouse. Agora você está
pronto para usar o rato.
Gestão de energia
• Para prolongar a vida da sua bateria, desligue o rato
quando viajar ou não estiver a usar.
18 19
Page 11

Targus Wireless Optical Mouse Targus Wireless Optical Mouse
TR – Giriş
CONNEC
T
O
F
F
ON
CONNEC
T
O
F
F
ON
C
O
N
N
E
C
T
O
F
F
ON
C
O
N
N
E
C
T
O
F
F
ON
C
O
N
N
E
C
T
O
F
F
ON
Targus Kablosuz Optik Fare’yi satın aldığınız için tebrikler.
Birlikte verilen mikro USB alıcı bilgisayarınızda takılı
bırakmak veya seyahat sırasında farenin içinde saklamak için
yeterince küçüktür. Bu bir tak ve kullan cihazdır, bu nedenle
ek yazılıma gerek yoktur. İleri teknoloji kaydırma tekerleği
programı Targus’un web sitesinden yüklenebilir.
İçindekiler
• Targus Kablosuz Optik Fare
• 2 x AAA pil
• Mikro USB alıcı
• Kullanım Kılavuzu
Sistem Gereksinimleri
Donanım
• USB arayüzü
İşletim Sistemi
• Microsoft Windows® 2000
• Microsoft Windows® XP
• Microsoft Windows Vista
• Microsoft Windows® 7
• Microsoft Windows® 8
• Mac OS® X 10.4 veya üstü
®
3. Pil kapağını takın.
Pilleri Yerleştirme
1. Arkadaki çıkıntıyı kullanarak farenin üstündeki pil kapağını
çıkarın. Çizimde gösterildiği gibi kapağı dikkatle yukarı kaldırın.
2. Pozitif (+) ve negatif (-) kutupların pil bölmesindeki kutup
göstergeleriyle eşleştiğinden emin olarak AAA pili yerleştirin.
AAA
AAA
NOT: KAPAĞIN ARKASINA BASTIRILMADAN ÖNCE ÖN TARAFI
TAKILMALIDIR.
Bağlantı Kurma
(A) Mikro USB alıcıyı çıkarın.
(B) USB alıcısını bilgisayardaki
kullanılabilir bir USB
bağlantısına takın.
(C) Farenin altındaki Connect
Butonuna basın. Artık fare
kullanmaya hazırsınız.
ON/OFF
switch
Connect
Button
20 21
Güç Açık:
Güç düğmesini ON (Açık) konumuna kaydırın
Güç Kapalı:
Güç düğmesini OFF (Kapalı) konumuna kaydırın
Güç Tasarrufu modu:
Fare bir süre kullanılmazsa, güç tasarrufu yapmak ve pil ömrünü
artırmak için otomatik olarak güç tasarrufu moduna girecektir.
Normal çalışmasına geri dönmesi için herhangi bir düğmeye
basın veya sadece fareyi hareket ettirin. Farenin bilgisayarınızla
yeniden bağlantı kurması birkaç saniye sürecektir.
Pil Göstergesi
• Pil gücü %5’ten az kaldığında düşük pil ışığı her saniyede bir
yanmaya başlayacaktır. Mümkün olduğunca kısa sürede pilleri
değiştirin.
Pil Göstergesi
Güç Yönetimi
• Pilinizin ömrünü uzatmak için seyahat sırasında veya
kullanmadığınızda fareyi kapatın.
Page 12

Targus Wireless Optical Mouse Targus Wireless Optical Mouse
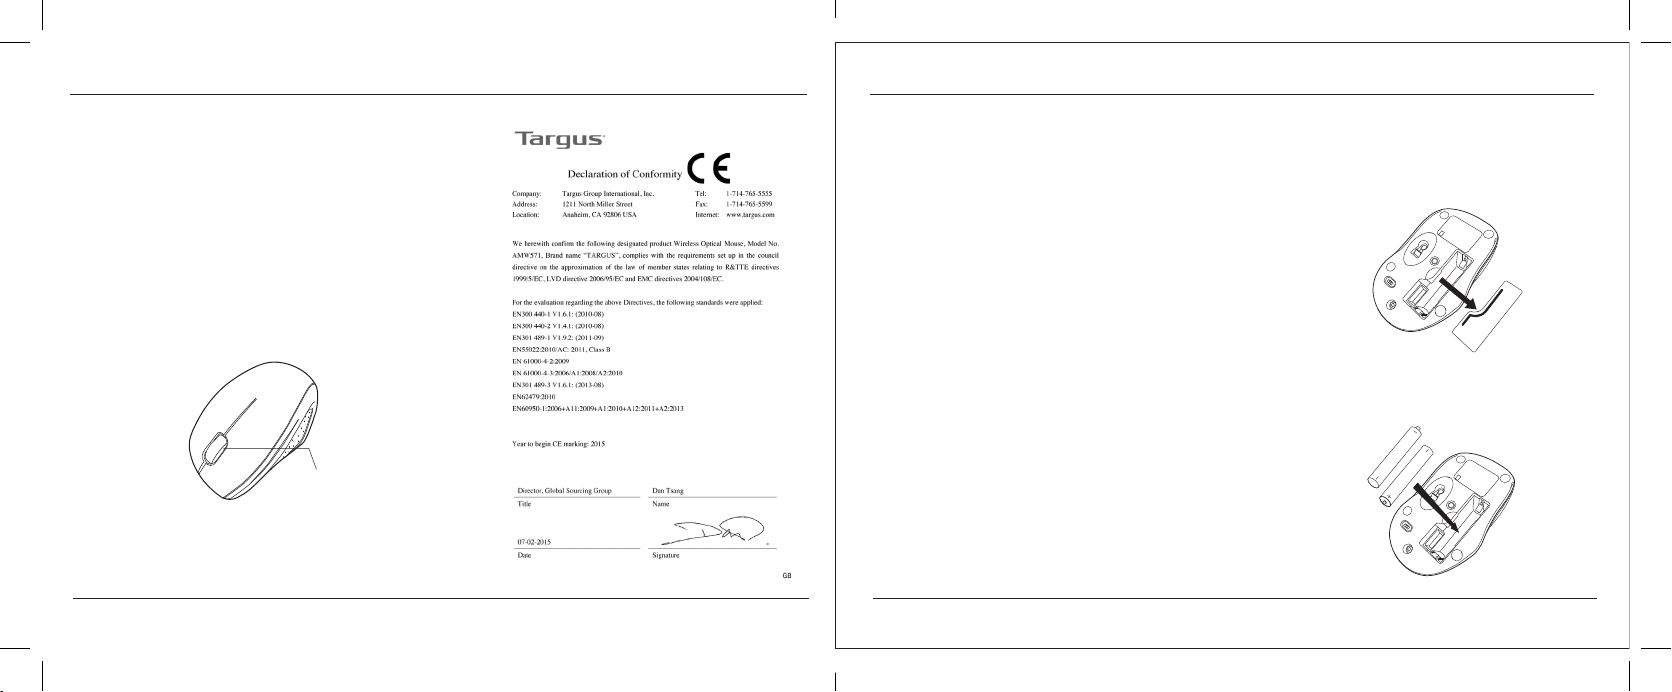
Statement of Compliance with EU Directives
Tested to Comply
Hereby, Targus Group International, inc. declares that this product is in compliance
with the essential requirements and other relevant provision of Directives. This
product is designed to be used in conjunction with a computer /laptop /tablet. This
product complies with all relevant standards from the list below:
EMC directives 2004/108/EC
EN300 440-1 V1.6.1: (2010-08)
EN300 440-2 V1.4.1: (2010-08)
EN301 489-1 V1.9.2: (2011-09)
EN55022:2010/AC: 2011, Class B
EN 61000-4-2:2009
EN 61000-4-3:2006/A1:2008/A2:2010
EN301 489-3 V1.6.1: (2013-08)
EN62479:2010
EN60950-1:2006+A11:2009+A1:2010+A12:2011+A2:2013
The technical documentation as required by the Conformity Assessment
procedure is kept at the follow address:
Company: Targus Europe Ltd
Address: Feltham, Middlesex, TW14 8HA
Country: United Kingdom
Telephone number: 44 208 831 2000
Fax number: 44 208 831 2004
Internet: http://www.targus.com
The product placed on the market, including cables and spare parts for its
repair, its reuse, updating of its functionalities or upgrading of its capacity,
does not contain the substances:
Lead (0,1 %); Mercury (0,1 %); Cadmium (0,01 %); Hexavalent chromium
(0,1 %); Polybrominated biphenyls (PBB) (0,1 %); Polybrominated diphenyl
ethers (PBDE) (0,1 %).
22 23
Warranty –
http://www.targus.com/uk/warranty
Targus warrants this product to be free from defects in
materials and workmanship for two years. If your Targus
accessory is found to be defective within that time, we
will promptly repair or replace it. This warranty does not
cover accidental damage, wear and tear, or consequential
or incidental loss. Under no conditions is Targus liable for
loss of, or damage to a computer; nor loss of, or damage
to, programs, records, or data; nor any consequential or
incidental damages, even if Targus has been informed of their
possibility. This warranty does not affect your statutory rights.
Power Management
All electronic products sold by Targus should be used in an
energy efcient way, for example battery operated devices
should be, where possible, switched off when not in use,
and AC adapter products should be unplugged to ensure
unnecessary power is not consumed.
Recycling Instruction
Disposal of Old Electrical & Electronic Equipment (Applicable
in the European Union and other European countries with
separate collection systems). This symbol on the product or on
its packaging indicates that this product shall not be treated
as household waste. Instead it shall be handed over to the
applicable collection point for the recycling of electrical and
electronic equipment. By ensuring this product is disposed of
correctly, you will help prevent potential negative consequences
for the environment and human health, which could otherwise
be caused by inappropriate waste handling of this product. The
recycling of materials will help to conserve natural resources. For
more detailed information about recycling of this product, please
contact your local Civic Ofce, your household waste disposal
service or the shop where you purchased the product.
 Loading...