

Targus AMW05CA User Manual

USER GUIDE
Rechargeable
Wireless
Notebook Mouse
MANUEL DE
L'UTILISATEUR
Souris sans fil
pour Ordinateur
Portable

TABLE OF CONTENTS
English - - - - - - - - - - - - - - - 3
Français - - - - - - - - - - - - - - 15
2

TARGUS
RECHARGEABLE
WIRELESS
NOTEBOOK MOUSE
Introduction
Congratulations on your purchase of the Targus
Rechargeable Wireless Notebook Mouse. This
ergonomically designed mouse uses a radio frequency
(RF) link that enables you to use the mouse anywhere
within 1 m of its receiver. No line-of-sight between the
mouse and its receiver is required.
In addition to this user’s guide this package contains:
System Requirements
Hardware
• PC
• USB interface
Operating System
• Windows® 2000/Me/XP
Mouse
USB receiver
2 AAA rechargeable
batteries
USB extension cable
USB charge cable
Carrying pouch
• Windows Vista
TM
3

Targus Rechargeable Wireless Notebook Mouse
NOTE: THE THIRD BUTTON AND THE SCROLLING WHEEL ONLY WORK WITH THE
OPERATING
SYSTEMS LISTED ABOVE. IF YOU USE THE MOUSE WITH A
DIFFERENT OPERATING SYSTEM, IT WILL LOSE ITS ENHANCED FEATURES AND
FUNCTION
AS A STANDARD, TWO-BUTTON MOUSE.
Connecting the Mouse
Receiver
To connect the mouse receiver:
1 Plug the USB receiver into an available USB port on
your computer.
2 Your computer’s operating system identifies the
receiver and begins installing the default driver.
Follow any on-screen procedures to complete the
default driver installation.
Using the Mouse
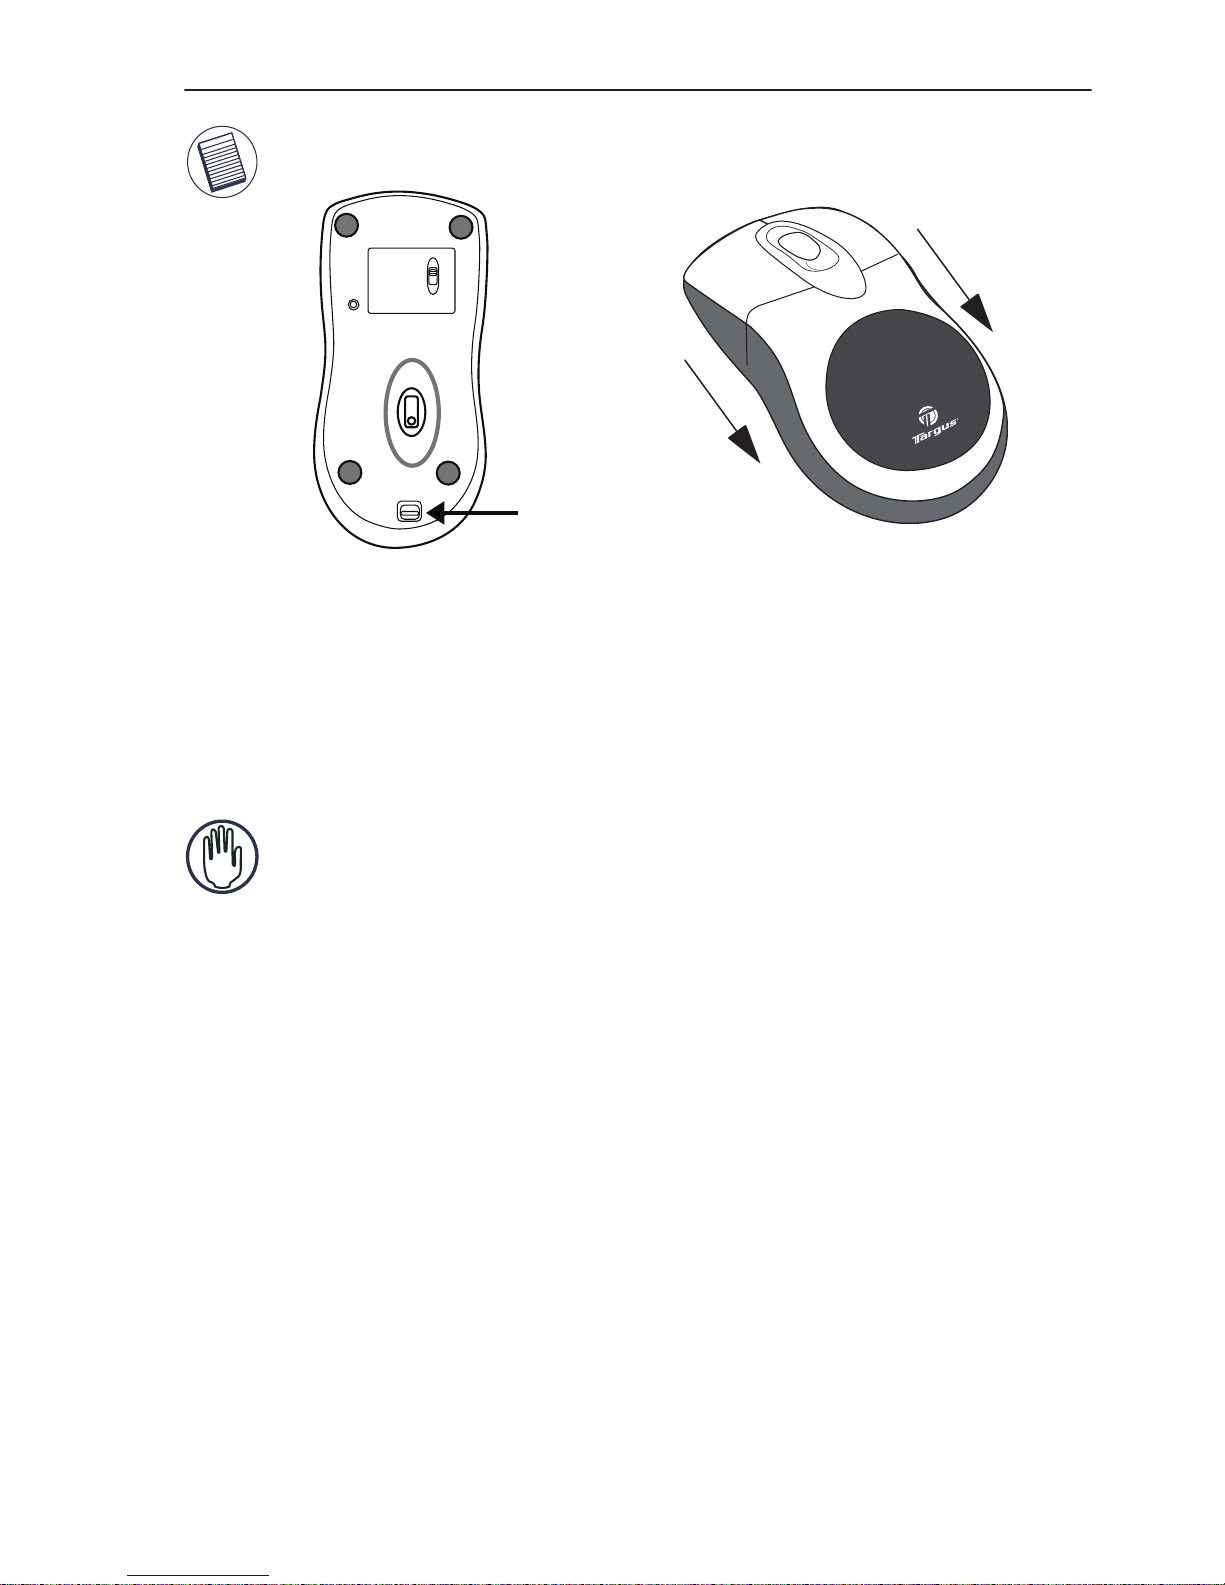
Installing the Batteries
1 If the mouse is on, slide the on/off switch on the
bottom of the mouse to the “off” position.
2 Remove the battery cover from the top of the mouse
by pressing the battery cover hinge located on the
bottom of the mouse and sliding it off.
4
Targus Rechargeable Wireless Notebook Mouse
NOTE: THE BATTERY COVER IS ALSO THE TOP COVER OF THE MOUSE.
3 Insert the supplied batteries, making sure that the
positive (+) and negative (-) ends of each battery
match the polarity indicators inside the battery
housing.
WARNING: WHEN REPLACING THE BATTERIES, USE ONLY HEAVY-DUTY NIMH
BATTERIES. RECHARGING ALKALINE BATTERIES MAY DAMAGE THE MOUSE.
AVOID MIXING NEW AND USED BATTERIES IN A DEVICE.
4 Slide the battery cover back into position until it
“clicks” firmly into place.
5 Turn on the mouse by sliding the on/off switch on the
bottom of the mouse to the “on” position.
The optical sensor, located on the bottom of the
mouse, illuminates.
OPEN
ID
on
off
Battery cover
release button
5
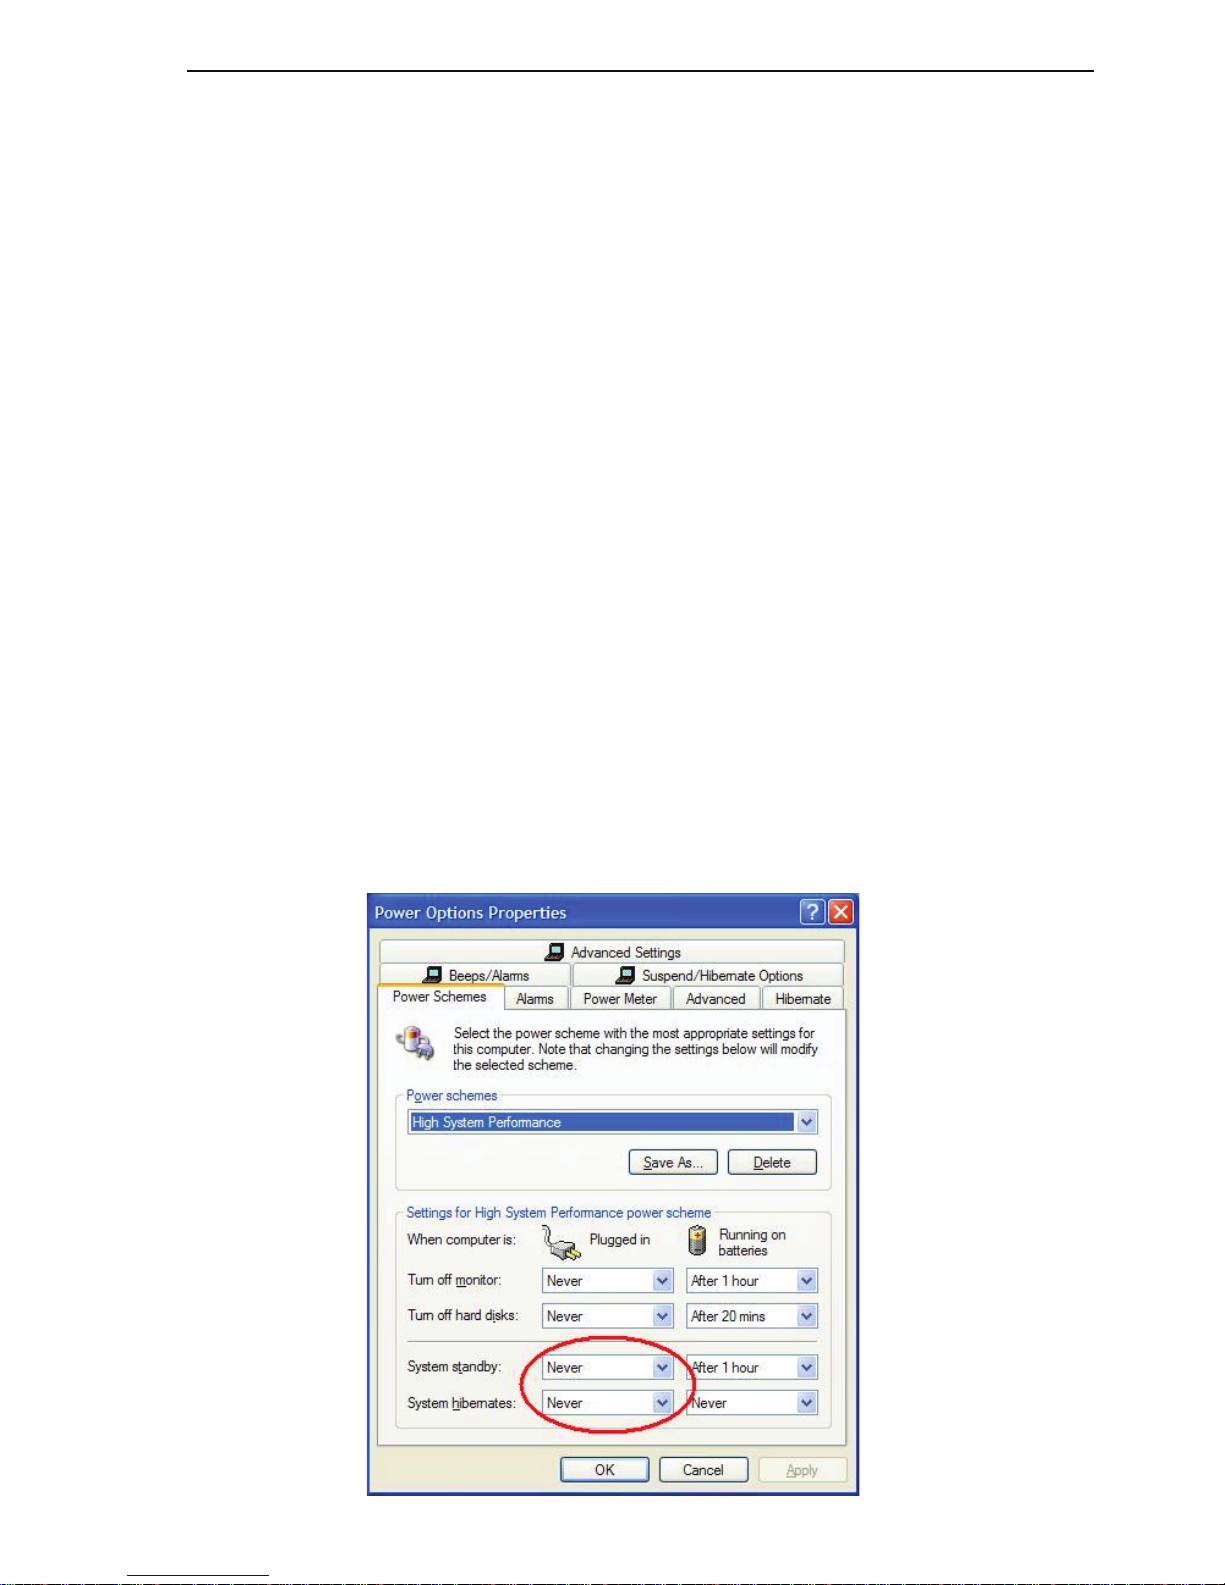
Operating Notes for Wireless Mice with
Recharging Feature via USB Cable
1. Charge the mouse for at least 8 hours before using it. And please
make sure only rechargeable batteries (the ones that come with your
product) are used.
2. Your computer needs to stay powered on for the mouse to charge.
Follow these steps to prevent your computer from going in to
Standby or Hibernate:
a) Click “Start”
b) Click “Control Panel”
c) Click “Performance and Maintenance” (Skip in Classic View)
d) Click “Power Options”
e) Make sure “System Standby:” and “System Hibernates:” under “Plugged
in” are set to “Never”
3. If you use your notebook computer’s LCD monitor, please do not
close the lid. (Please ignore this step if you use an external monitor
with your notebook lid closed.)
4. If your mouse does not respond after a period of inactivity, please
wake it up by pressing one of the buttons on the mouse or moving
the mouse around.
Targus wireless keypad and mouse combo
6

Targus Rechargeable Wireless Notebook Mouse
Charging the Batteries
For best results, you should charge the mouse at least 8
hours before using it. You can do this via the supplied
USB charge cable. To do this:
1 Connect the cable’s USB connector into an available
USB port on your computer
2 Connect the other end to the mouse.
NOTE: T
O CONTINUOUSLY CHARGE THE MOUSE VIA THE USB CHARGE CABLE,
YOUR COMPUTER MUST BE ON AND AWAKE. FOR BEST RESULTS, TURN OFF
YOUR
COMPUTER’S POWER MANAGEMENT FEATURE WHILE CHARGING THE
MOUSE.
Establishing a Communications Link
The mouse has 256 identification codes that allow the
mouse and its receiver to operate without interference
from other radio frequency devices.
After your computer detects the USB receiver and the
driver is installed, you must establish a communications
link between the mouse and its receiver BEFORE you
can use the mouse. To establish this link, you need to set
the identification code so that the mouse works properly.
To do this, follow the instructions below:
Make sure that your computer is turned on and has
detected the USB receiver before you establish a
communications link.
7
Targus Rechargeable Wireless Notebook Mouse
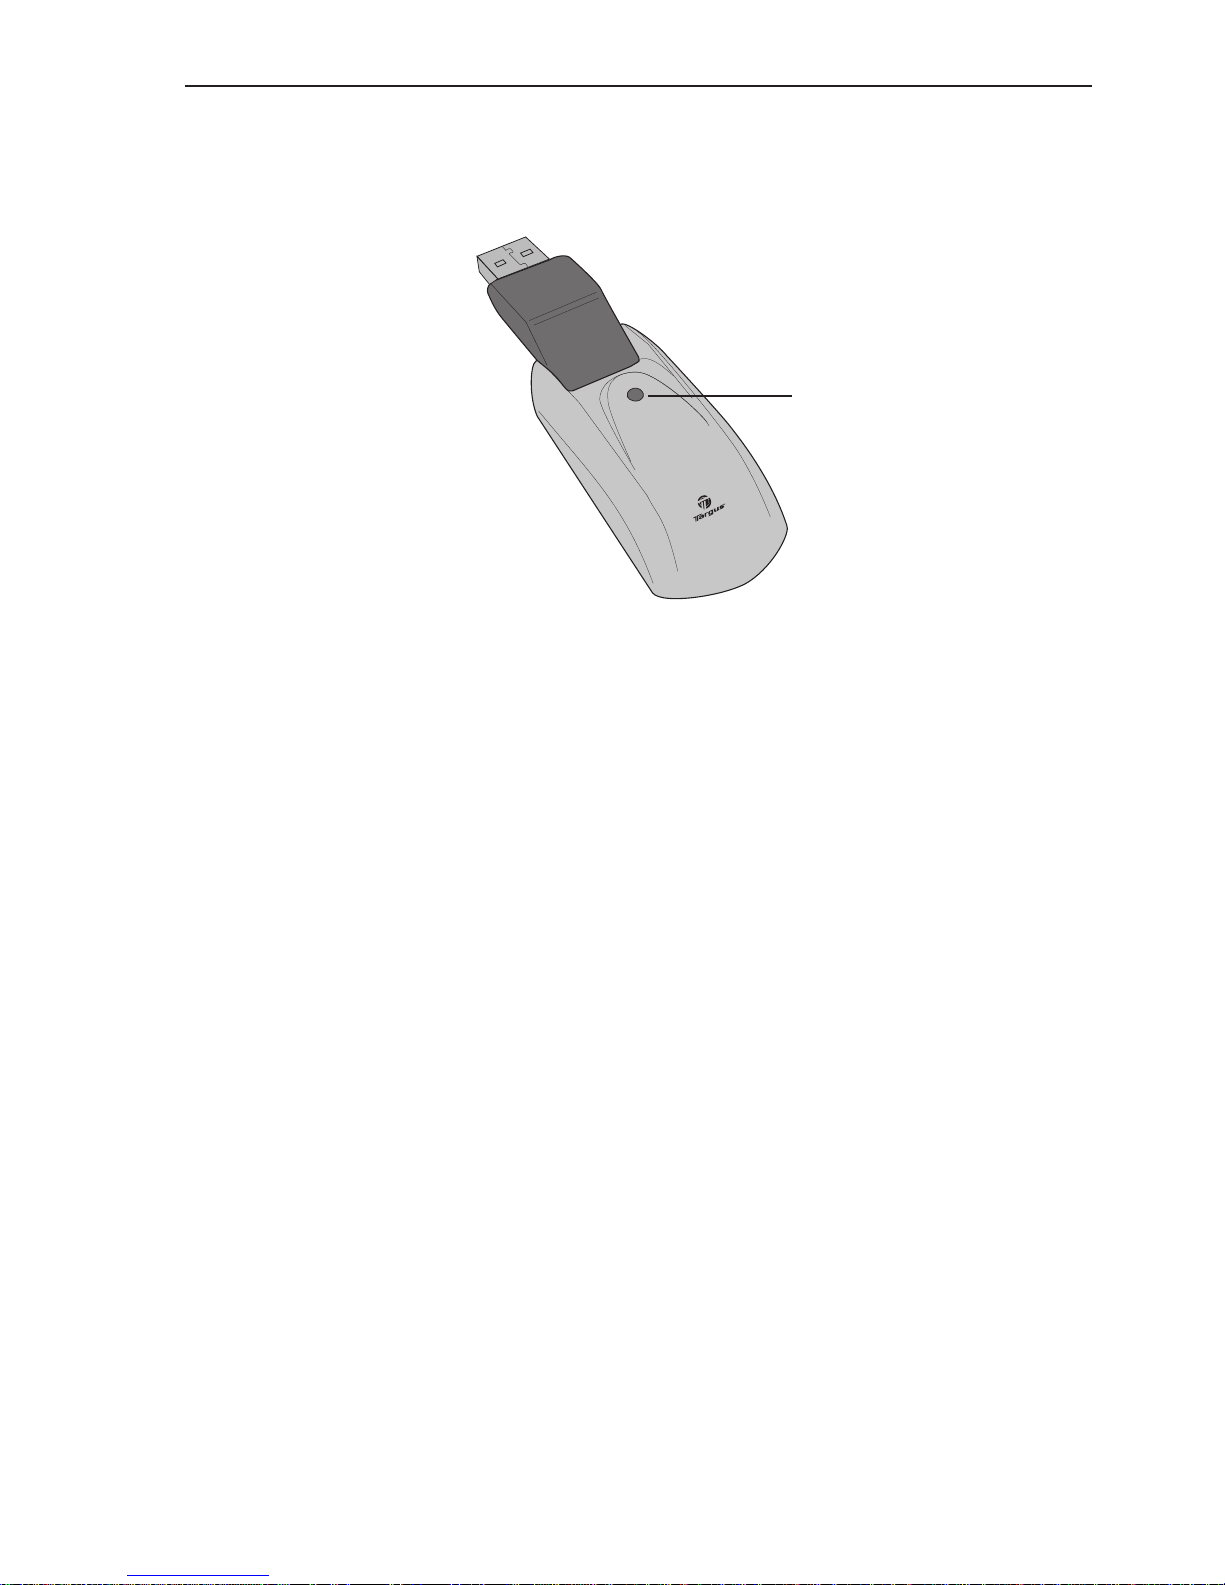
1 Press and release the link button located on the bottom
of the receiver.
Receiver
The receiver’s status light blinks when the receiver is
activated.
2 Press and release the link button, located on the
bottom of the mouse.
You are now ready to use the mouse.
Mouse Power Management
To power the mouse on and off, slide the on/off switch at
the bottom of the mouse to the desired position.
When power is on, the mouse goes into "sleep mode"
after 8 minutes of no use. To activate the mouse, move
the mouse or press any key.
To save battery power, turn off the mouse while traveling.
Status light
8

Targus Rechargeable Wireless Notebook Mouse
Operating Hints
For optimal performance and RF reception:
• Place the receiver at least 20cm away from all
electrical devices, such as your monitor, speakers or
external storage devices.
• If necessary, use the supplied extension cable to keep
the receiver away from the computer. Plug the receiver
into the extension cable, and the extension cable to the
computer.
• Avoid using the mouse on a metal surface. Metals,
such as iron, aluminum or copper, shield the radio
frequency transmission and may slow down the
mouse’s response time or cause the mouse to fail
temporarily.
• The mouse will enter a suspend mode at the same time
your computer does. To activate the mouse, simply
move the mouse.
• If your computer has a metal case that contains
aluminum or magnesium, use the mouse to the side.
The display panel may interfere with the radio
frequency signal if you use the mouse directly in front
of the computer.
• Never use the mouse on a glass or mirrored surface as
these surfaces will cause the mouse to fail temporarily.
• To maximize battery life, use the mouse on a white, or
light colored surface. Dark surfaces cause the mouse’s
light emitter diode (LED) light to glow brighter, which
causes the battery to discharge more rapidly.
9
 Loading...