

Page 1
Food Vacuum Sealer
User Manual
Model No.: TARFSM16
220 - 240Va.c. 50Hz 150W
Rev 1
Note: The specifications and/or components of this appliance are subject to change without prior notice
Page 2

Page 2 of 20
Page 3

Page 3 of 20
1 Before First Use ...................................................................4
2 Important Safeguards .........................................................4
3 Functions and Features ......................................................7
3.1 Food Preparation Tips for Air-tight Vacuum Sealing ............... 7
3.2 Preparation Hints for Meat and Fish ....................................... 7
3.3 Preparation Hints for Cheeses ................................................ 7
3.4 Preparation Guidelines for Vegetables .................................... 7
3.5 More on Vegetables ................................................................ 8
3.6 Preparation Hints for Powdery Foods ..................................... 8
3.7 Preparation Hints for Liquids ................................................... 8
4 Features ...............................................................................8
5 Components ........................................................................9
6 Operating Instructions ...................................................... 11
6.1 How to make Custom Sized Bags ......................................... 11
6.2 Vacuum Sealing ................................................................... 12
6.3 Hints For Best Vacuuming Performance ............................... 13
6.4 To Open a Sealed Bag ......................................................... 13
6.5 Resealing ............................................................................. 13
7 Preparing Food for the Freezer ........................................ 13
8 General Rules For Food Safety ........................................ 14
9 Food Storage Safety Information ..................................... 15
10 Cleaning and Maintenance ............................................. 17
10.1 Vacuum Sealer ................................................................ 17
10.2 Preservation Bags ............................................................ 17
11 When the Appliance is Not in Use ................................. 18
12 Troubleshooting .............................................................. 18
13 Warranty Against Defect ................................................ 20
READ AND SAVE THESE INSTRUCTIONS FOR
FUTURE REFERENCE
Page 4

Page 4 of 20
1 Before First Use
Read and follow all the instructions in this “Instruction Manual” even if you feel you
are familiar with the product, and find a place to keep it handy for future reference.
Your attention is drawn particularly to the sections concerning “IMPORTANT
SAFEGUARDS”, “FOR YOUR SAFETY”, and the “SERVICE” statements.
For your convenience, record the complete model number (located on the product
identification plate) and the date you purchased the product, together with your
purchase receipt and attach to the warranty and service information. Retain in the
event that warranty service is required.
2 Important Safeguards
When using any electrically powered product, basic safety precautions should always
be followed, including the following:
PLEASE READ ALL INSTRUCTIONS CAREFULLY BEFORE USING THE
PRODUCT.
WARNING - to reduce the risk of fire, electrical shock or injury to persons or property:
• Always operate the product from a power source of the same voltage, frequency
and rating as indicated on the product identification plate.
• This appliance is not intended for use by persons (including children) with
reduced physical, sensory or mental capabilities, or lack of experience and
knowledge, unless they have been given supervision or instruction concerning
use of the appliance by a person responsible for their safety.
• Children should be supervised to ensure that they do not play with the
appliance.
• Do not operate any product with a damaged cord or plug, or after the product
malfunctions, or is dropped or appears damaged in any way.
• Any type of servicing, apart from ordinary cleaning, must be carried out by an
authorised service centre or qualified dealer. There are no user serviceable
parts in this appliance
• Avoid using on metal surfaces e.g. sink.
• Do not place or use this appliance on or near a hot gas flame, electric element
or on a heated oven. Do not place on top of any other appliance
Page 5

Page 5 of 20
• To reduce the risk of electric shock, do not immerse or expose the product or
flexible cord to rain, moisture or any liquid other than those necessary for
correct operation of the product.
• For indoor use only.
• This product should not be used in the immediate vicinity of water, such as
bathtub, washbowls, swimming pool etc. where the likelihood of immersion or
splashing could occur.
• Switch off and unplug from outlet when not in use, before assembling or
disassembling parts and before cleaning. Remove plug by grasping the plug
body - do not pull on the cord.
• Do not misuse the power cord. Never pull the appliance by the cord.
• Do not use the appliance for other than its intended use.
• Do not let the cord hang over the edge of a table or bench or touch any hot
surfaces.
• The use of attachments or accessories not recommended or sold by the product
distributor may cause personal or property hazards or injuries.
• This product is intended for normal domestic/household use only.
• If sealing more than 20 bags continuously, wait at least 30 - 40 minutes for the
appliance to cool down before resuming use.
• This appliance is not intended to be operated by means of an external timer or
separate remote-control system.
• Do not reach for an appliance that has fallen into water. Switch ‘OFF’ at the
power point and unplug immediately.
• Unplug this appliance before cleaning, storing or when not in use.
• Check the appliance and the cable regularly for damage. If there is damage of
any kind, the appliance should not be used.
• If the supply cord is damaged, it must be replaced by the manufacturer or its
service agent or a similarly qualified person in order to avoid a hazard.
• Do Not Open appliance. There are no user serviceable parts inside.
• When storing the appliance, coil the cord loosely around the cord storage hooks
on the underneath of the unit to avoid unnecessary strain on the cord.
Page 6

Page 6 of 20
• Never leave the product unattended when in use.
• Keep the upper lid of the appliance unlocked when not in use.
• The appliance must only be used as intended in accordance with the enclosed
operating instructions.
• Do not allow babies or children to play with plastic bags. They are not a toy.
• Keep Plastic Bags out of reach of babies and children
• Take care to avoid a burns injury when sealing as the heating strip may be hot.
• If this appliance is used by a third party, please supply the instruction manual
with it.
• No liability can be accepted for any damage caused by non-compliance with
these instructions or any other improper use or mishandling of appliance.
• This product has not been designed for any uses other than those specified in
this manual
READ AND SAVE THESE INSTRUCTIONS FOR
FUTURE REFERENCE
Page 7

Page 7 of 20
3 Functions and Features
IMPORTANT: Vacuum packaging is NOT a substitute for refrigeration or freezing.
Any perishable foods that require refrigeration must still be refrigerated or frozen after
vacuum packaging.
For best result in extending the life of foods, it is important to vacuum package foods
that are fresh. Once food has begun to deteriorate, vacuum packaging may only slow
the deterioration process. Vacuum sealing cannot prevent the growth of mould. Other
disease causing microorganisms can still grow in low oxygen environments and may
require further measures to be eliminated.
3.1 Food Preparation Tips for Air-tight Vacuum Sealing
Cooking, Thawing and Reheating – Simmering in a vacuum bag helps food retain
its flavour and it helps with the clean up as well. No dirty saucepans... When
reheating foods in the microwave using your vacuum bags, always puncture open
the bag to allow hot air to escape. You can also reheat foods in the vacuum bags
by placing them in water at a low simmer below 170°F (75°C).
IMPORTANT : Always thaw foods in either a refrigerator or microwave – do not
thaw perishable foods at room temperature.
3.2 Preparation Hints for Meat and Fish
Try pre-freezing meats and fish for 1-2 hours before vacuum packaging. This helps
retain the juice and shape, and provides for a better seal.
If you can’t, place a folded paper towel between the food and top of the bag, but
below seal area. Leave paper towel in bag to absorb excess moisture and juices
during vacuum packaging process.
3.3 Preparation Hints for Cheeses
Vacuum package cheese after each use. If you make your bag just a little longer
than needed, you can re-seal the bag after each use.
IMPORTANT : Due to the risk of anaerobic bacteria, soft cheeses should never be
vacuum packaged.
3.4 Preparation Guidelines for Vegetables
Blanching is a process that should be done before vacuum packaging vegetables.
This process stops the enzyme action that could lead to loss of flavour, colour and
texture. To blanch vegetables, place them in Simmering water or in a microwave
until they are cooked, but still crisp. Blanching times can range from 1 to 2 minutes
for leafy greens and peas ; 3 to 4 minutes for snap peas, sliced zucchini or broccoli
; give your carrots about 5 minutes ; and 7 to 11 minutes for corn on the cob. After
blanching, immerse vegetables in cold water to stop the cooking process.
Page 8

Page 8 of 20
NOTE : All vegetables (including broccoli, Brussels sprouts, cabbage, cauliflower,
kale, turnips) naturally emit gases, during storage. Therefore, after blanching, it’s
best if they’re stored in the freezer.
3.5 More on Vegetables
Vegetables are a great candidate for portion control ; when storing vegetables, try
pre-freezing them for 1 to 2 hours, then separate them into meal portions within
your vacuum bags. After they have been vacuum packaged, return them to the
freezer.
IMPORTANT : Due to the risk of anaerobic bacteria, fresh mushrooms, onions &
garlic should never be vacuum packaged.
3.6 Preparation Hints for Powdery Foods
When vacuum packaging powdery items like flour, it’s best to use their original
packaging inside of the vacuum bags. The fine powder could get sucked into the
machine and cause enough damage to shorten the life of the sealer.
3.7 Preparation Hints for Liquids
Before you vacuum package liquid such as soup stock, pre-freeze in a casserole
dish, loaf pan or ice cube tray until solid. Remove frozen liquid from pan and
vacuum package in the vacuum bags. You can then stack in the freezer. When
you’re ready to use, just cut corner of bag and place in either a microwave dish or
drop into water at a low simmer, below 170°F (75°C)
IMPORTANT: If sealing more than 20 bags continuously, wait at least 25 minutes
for the appliance to cool down before resuming use.
4 Features
Sleek design
Wide sealing line (up to 3mm) prevents air leakage and keeps high
vacuum degree for a longer time.
“Seal Only” function is available.
Sealing width : MAX 30cm
Page 9
Page 9 of 20
5 Components
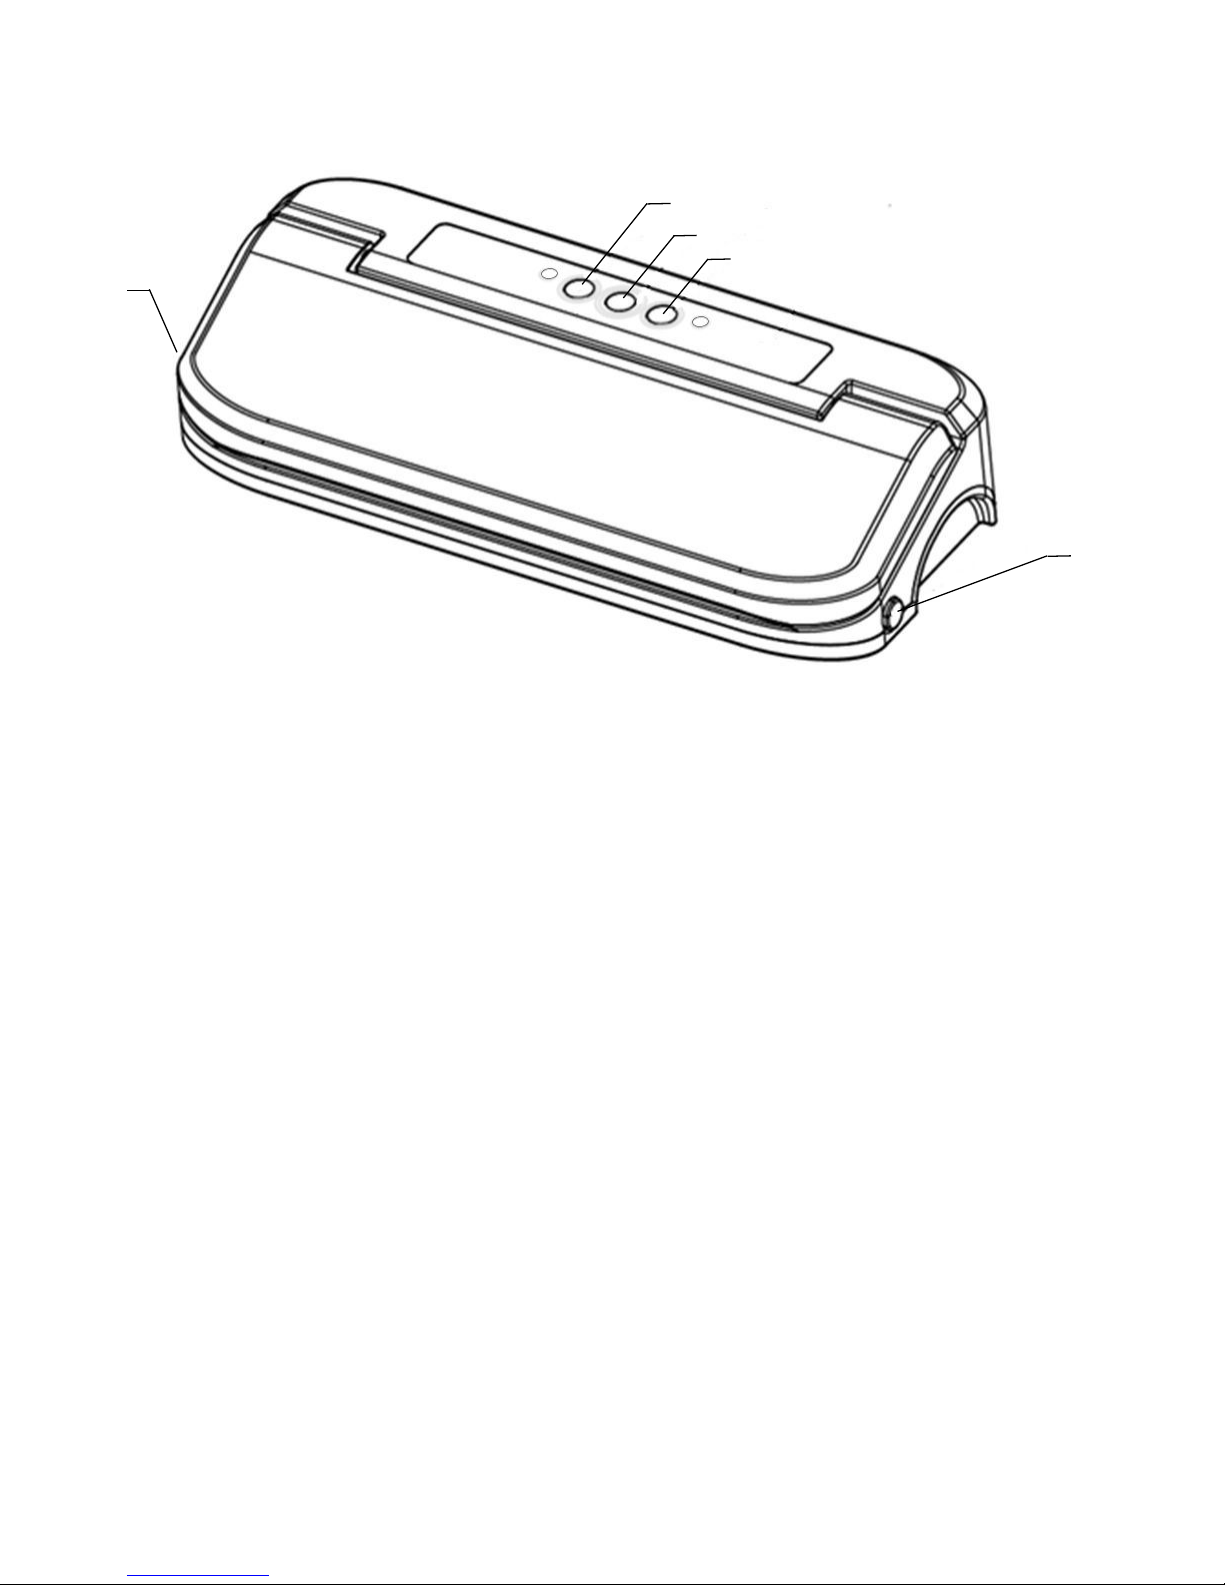
“A” Vacuum & Seal Button.
Press to vacuum package and seal food airtight. Appliance shuts off automatically.
“B” Cancel Button.
Immediately halts the current function.
“C” Seal Only Button.
This button has three uses:
Press to create a seal when making bags from a roll.
Press to immediately stop the vacuum process and begin sealing the
bag preventing delicate foods from being crushed.
Press to create a seal on Mylar bags (such as a potato chip bag) to
keep food sealed airtight.
“D” Release Button (one on the left and one on the right).
Press to open lid after sealing process is completed.
A C B D D
Page 10
Page 10 of 20
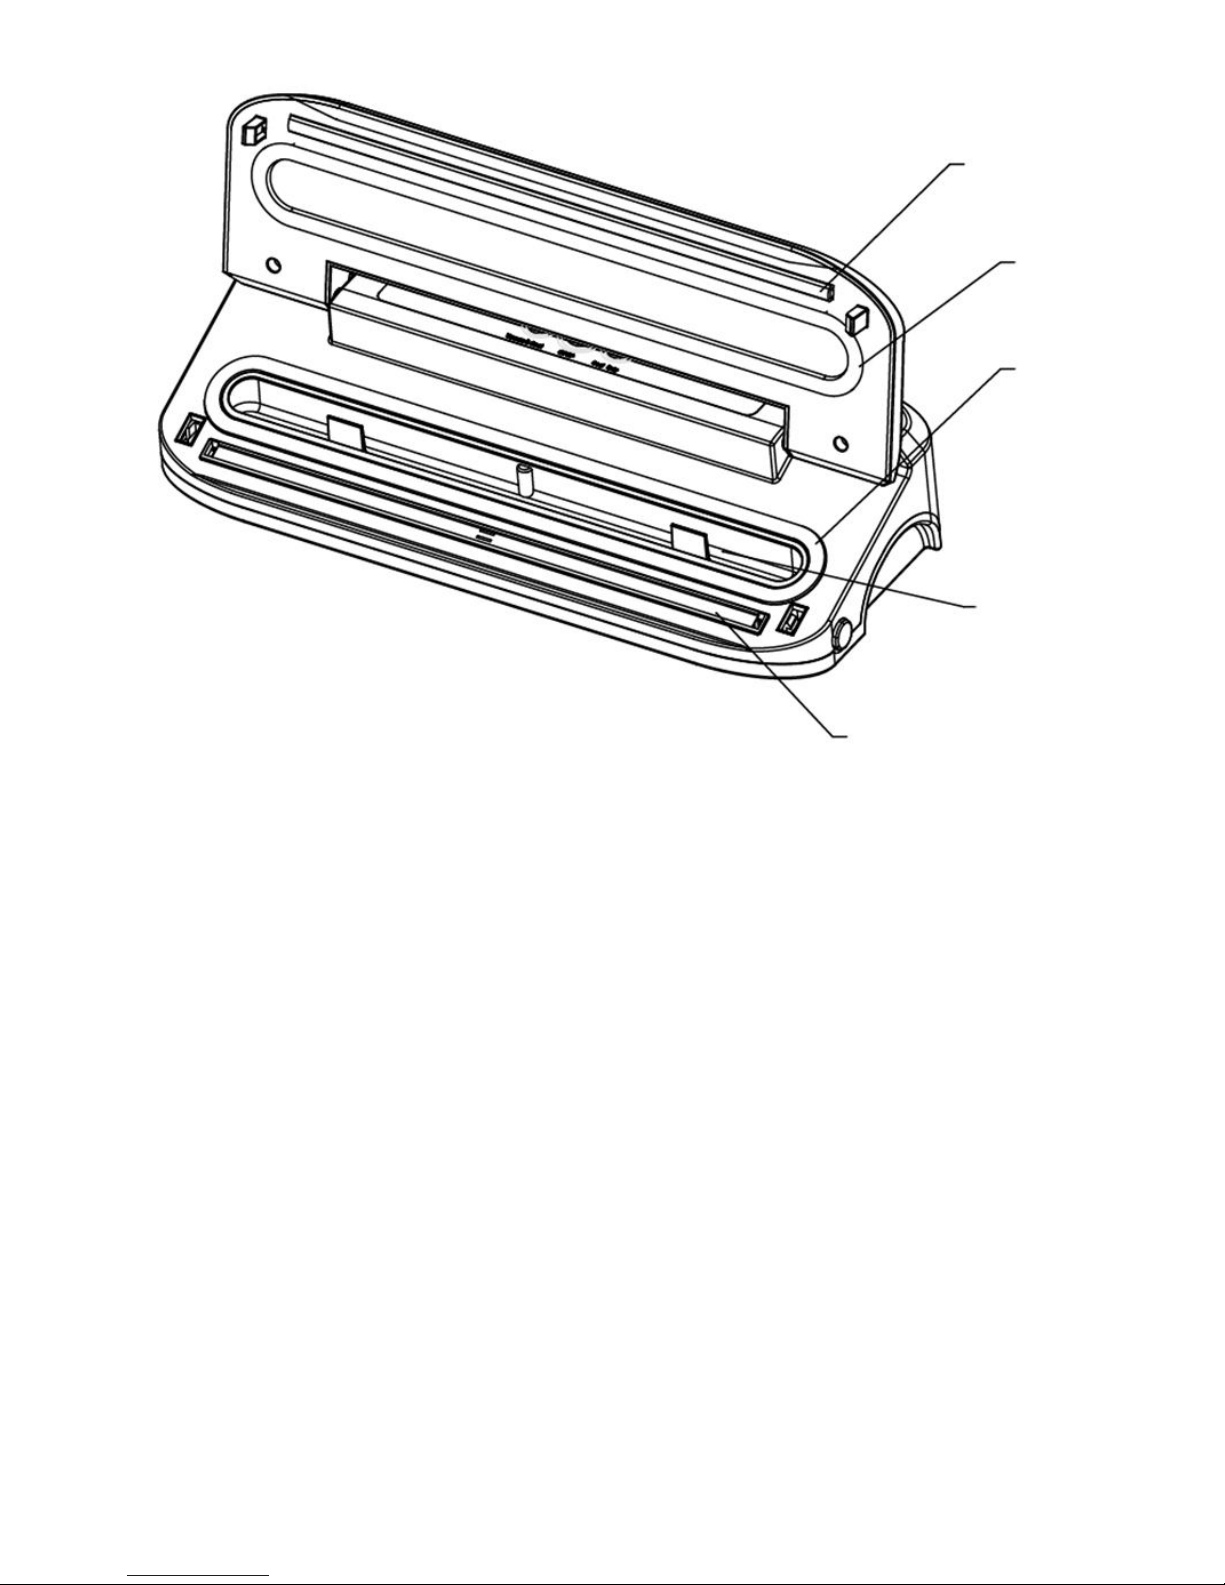
“E” Rubber Sealing Strip
“F” Sealing Gaskets (Top and Bottom)
“G” Vacuum Chamber / Drip Tray
“H” Sealing Heated Strip
E F F
G
H
Page 11
Page 11 of 20
6 Operating Instructions
6.1 How to make Custom Sized Bags
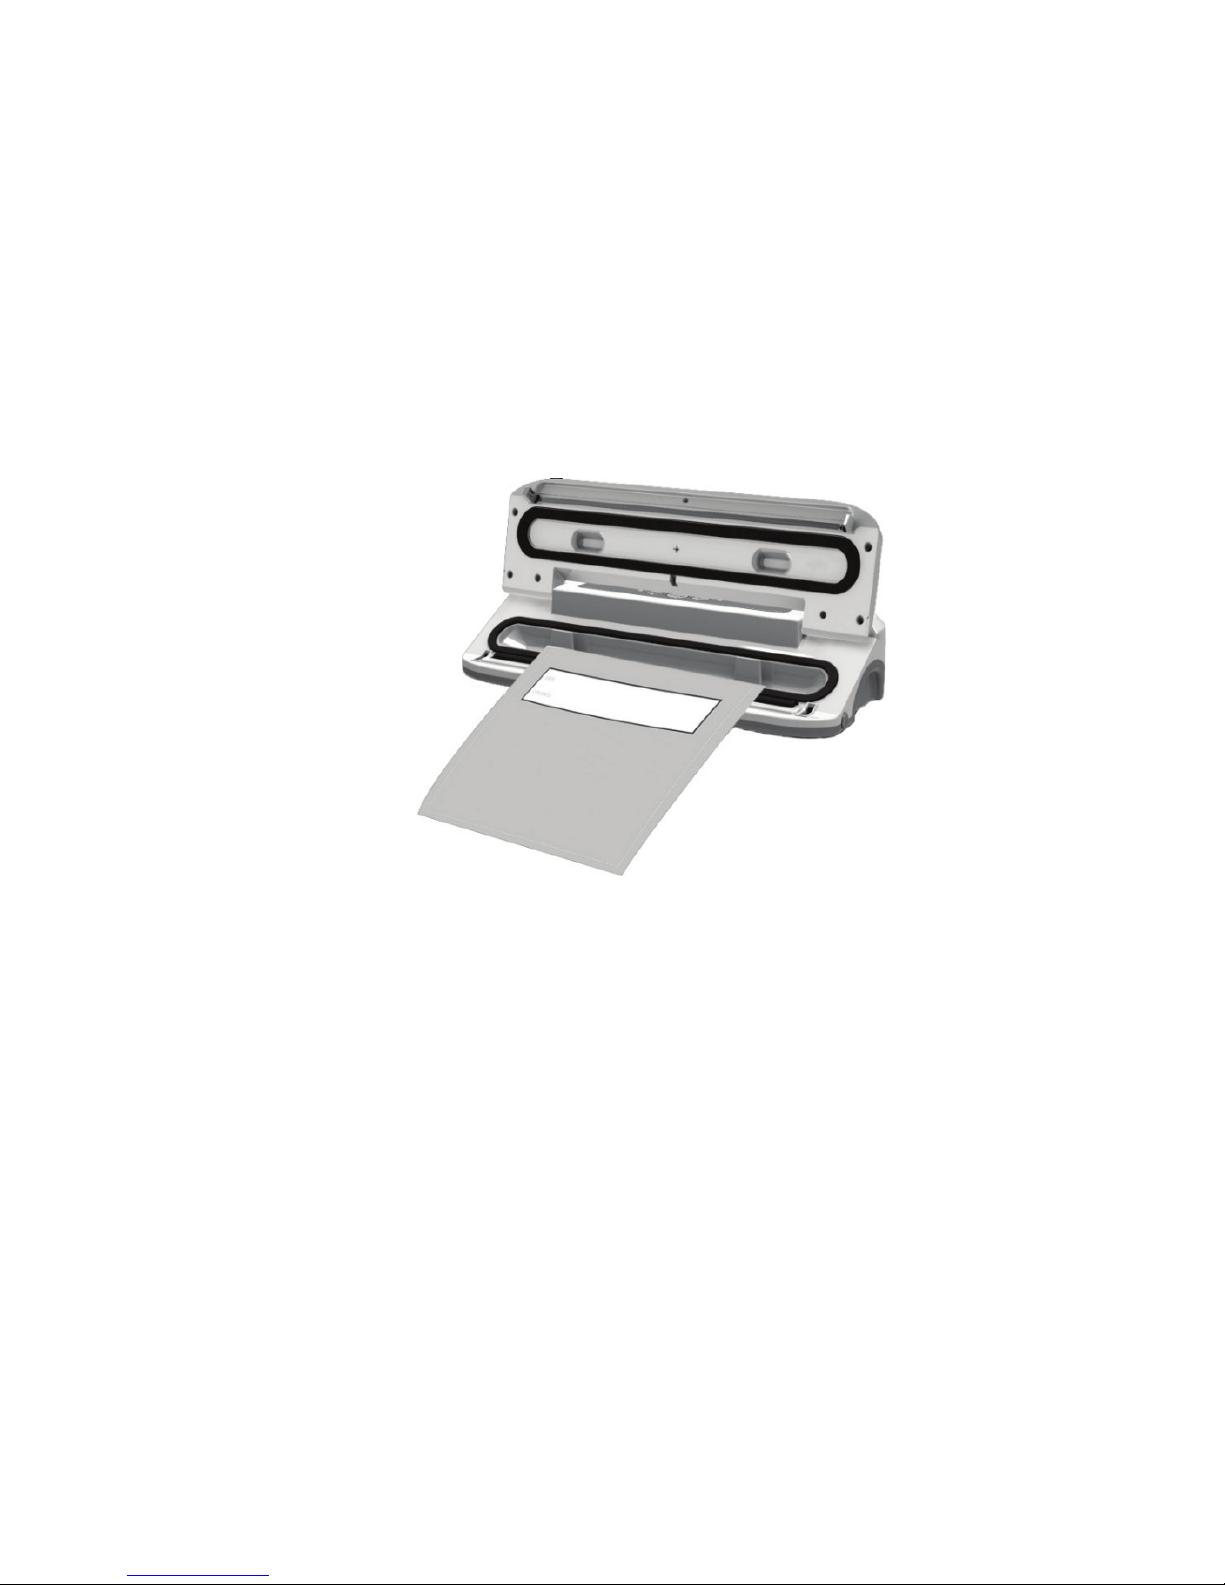
• Pull enough bag material to hold the item to be vacuum packaged, plus 5cm
more.
• With a pair of scissors or sharp knife, cut the desired bag length from the bag
roll. Make sure to cut in a straight line.
• Plug in to power point and switch on.
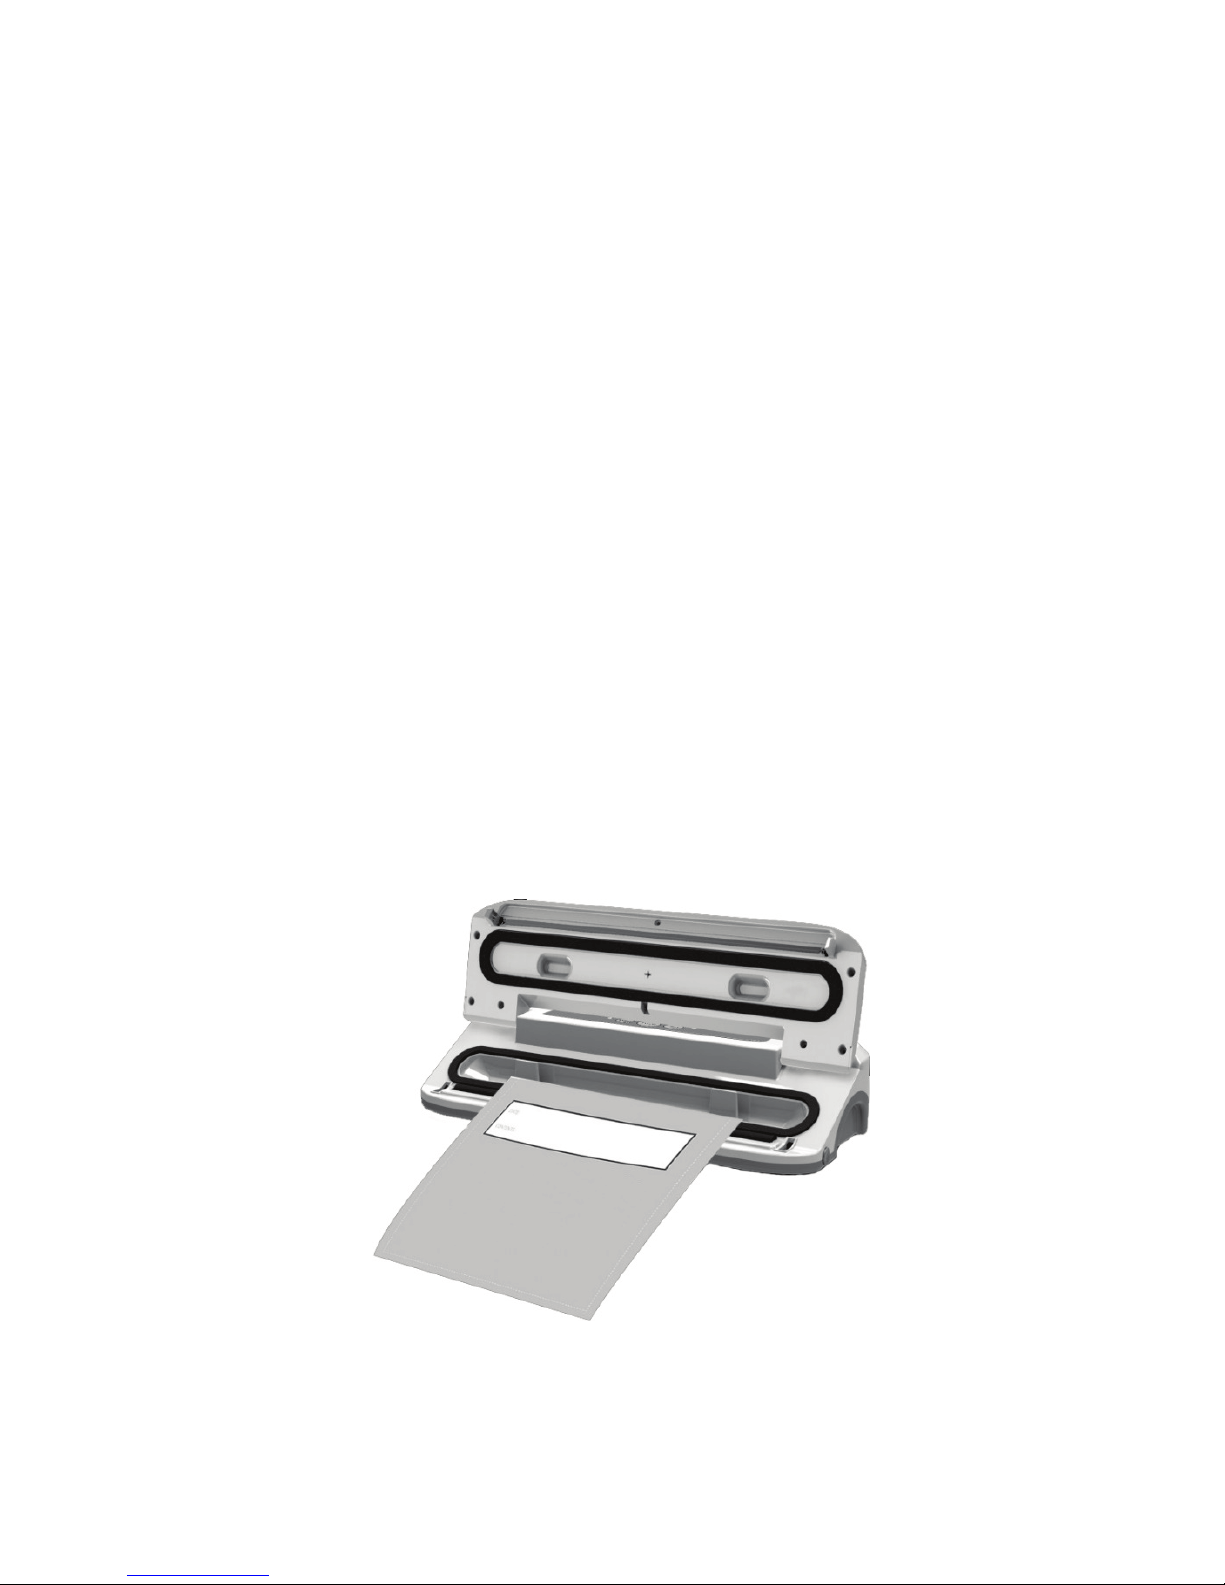
• Open lid. Place one end of the cut bag onto the sealing strip, don’t worry if you
accidently place any material onto the gasket area.
• Close the lid firmly by pressing down firmly on both sides, check to make sure
that the lid has latched closed. If the lid cannot be lifted, then you have
successfully locked the lid in place.
NOTE: The sealing strip will NOT work properly unless you lock the lid. Ensure
that the lid has been locked on both sides for proper sealing.
• Now that the lid has been locked, press the “Seal Only” button to create a
custom sized bag. The Red indicator light illuminates during the seal process.
• Once completed the Red indicator light will turn off; press the release buttons
on both sides of the machine, it is now safe to take out the newly created bag.
Warning: Take care to avoid a burns injury when sealing as the Sealing Heated
Strip may be hot.
• The custom sized bag is now ready for vacuum sealing.
CAUTION: Make sure you give the appliance time to cool down. Wait at least
20 seconds between seals. Under very heavy usage, appliance will shut off
automatically to prevent overheating. If it does, wait 30 - 40 minutes to allow
appliance to cool off.
Page 12
Page 12 of 20
6.2 Vacuum Sealing
• Plug in to power point and switch on.
• Place the item(s) to be vacuum sealed into the pre-cut or custom sized bag.
Leave at least 5cm between the contents and the top of the bag to allow for bag
contraction.
• Open the lid and place the open end of the bag down into the Vacuum channel
ensuring the bag is flat and wrinkle free.
• Close the lid firmly by pressing down firmly on both sides, check to make sure
that the lid has latched closed. If the lid cannot be lifted, then you have
successfully locked the lid in place.
NOTE: The sealing strip will NOT work properly unless you lock the lid. Ensure
that the lid has been locked on both sides for proper sealing.
• Now that the lid has been locked, press the “Vacuum & Seal” button. Unit will
start to pump out the air and the Green indicator light will illuminate.
• When enough air has been withdrawn, the Green indicator light will turn off, the
Red indicator light will illuminate and the sealing process will begin.
• Once completed and the Red indicator light has turned off, press the release
buttons on both sides of the machine, to release the sealed bag.
Warning: Take care to avoid a burns injury when sealing as the Sealing Heated
Strip may be hot.
CAUTION: Make sure you give the appliance time to cool down. Wait at least
20 seconds between seals. Under very heavy usage, appliance will shut off
automatically to prevent overheating. If it does, wait 30 - 40 minutes to allow
appliance to cool off.
Page 13

Page 13 of 20
NOTE: If for some unknown reason the unit does not reach the required vacuum
pressure, please check if the bag has a leak, or the bag has not been placed
properly on the appliance, then re-try.
6.3 Hints For Best Vacuuming Performance
Do not put too much food stuff inside the bag. Leave enough empty space in the
open end of the bag so that the bag can be placed on the vacuuming plate more
positively and easily.
Do not wet the open end of the bag. A wet bag may be difficult to melt and seal
tightly.
Clean and straighten the open end of the bag before sealing the bag. Make sure
there is nothing is left on the open area of the bag and no wrinkles or creased lines
as this may cause difficulty sealing.
Do not leave excess air inside the bag. Press the bag to expel as much air as
possible from the bag before vacuuming sealing it. Too much air inside the bag
increases the vacuum pump load and may cause the pump motor to overwork and
thus not removing all the air.
Do not vacuum pack objects with sharp points like fish bones and hard shells.
Sharp points may penetrate and tear the bag.
6.4 To Open a Sealed Bag
Cut the bag straight across with scissors or a sharp knife, just below the seal line.
6.5 Resealing
You can reseal many foods in their original store packages (i.e. frozen peas, etc.).
To do so, follow the steps of “Vacuum Sealing” previously in this manual.
Note: Not all original food bags are re-sealable. Test and see which are and which
are not suitable for future reference.
7 Preparing Food for the Freezer
In properly stored conditions, the vacuum sealer helps you to maintain the food’s
freshness. Try to start with the freshest food possible.
To freeze the foods which need to hold its shape or which are fragile, vacuum seal
in a vacuum bag and return to freezer.
Food such as meats, berries and breads can be frozen without fear of freezer burn
for up to 24 hours.
Page 14

Page 14 of 20
For vacuum sealing liquid-based foods, such as soups, casseroles or stews, first
freeze the liquid in a dish (no bigger than the vacuum bag), then place the frozen
liquid into the vacuum bag and vacuum seal, label and place in your freezer.
To vacuum seal foods not frozen, allow an additional 50mm bag length expansion
while freezing.
Place meat or fish on a paper towel, and vacuum seal with the paper towel in the
bag, this way it will help to absorb moisture from the foods.
Before storing the foods such as tortillas, crepes or hamburger patties, use wax or
parchment paper between them when stacking. This will be easier to remove some
of the food, then reseal the rest and immediately replace in the freezer.
Blanch vegetables by cooking briefly in boiling water or in a microwave oven, let them
cool down, then vacuum seal in convenient portions.
8 General Rules For Food Safety
From scientific study and common sense, we can learn the following food safety
rules, and it will lead you to improved safety and optimal food storage.
• If perishable foods have been heated, defrosted or un-refrigerated, consume
them immediately.
• To re-vacuum foods after the vacuum bag has been opened, follow the
instructions on “Vacuum Sealing” and then refrigerate or freeze as desired.
• The safest way to defrost your food is to place the frozen food in the refrigerator
and leave until fully thawed out. Never defrost foods in hot water or via external
heat sources. You may use a microwave oven with a defrost function.
• It will be harmful if you consume the foods which have been left out at room
temperature for more than a few hours, especially if they have been prepared
with a thick sauce, in a vacuum package, or in some other low-oxygen
environment.
• To cool down food temperature quickly, please spread vacuum packages
evenly throughout the refrigerator or freezer.
We advise the following when packaging large volumes of meat, fish, or any food
products
• Before vacuum sealing, it’s necessary to clean your hands, and all utensils and
surfaces to be used for cutting and vacuum sealing foods.
Page 15

Page 15 of 20
• Refrigerate or freeze the perishable foods immediately, if you have vacuum-
sealed them, and do not leave them sitting at room temperature.
• The shelf life of dry foods such as nuts, coconut or cereals will be extended in
vacuum-sealed package, while stored in a cool, dark place. Oxygen and warm
temperature will cause the fat in high-fat content foods to rancidity.
• Before vacuum sealing some fruit and vegetables, such as apples, bananas,
potatoes and root vegetables, peeling them will extend their shelf lives.
• Some vegetables such as fresh broccoli, cauliflower and cabbage when
refrigerated, will emit gases, so it’s suggested to blanch and freeze these foods
before vacuum sealing.
9 Food Storage Safety Information
This Vacuum Preservation System will change the way you purchase and store
foods.
Once you are accustomed to vacuum packing, it will become an indispensable part
of your food preparation.
Follow the certain procedures to ensure food quality and safety, when using this
appliance to vacuum seal foods.
Chemical reactions in the food to air, temperature, moisture, and enzyme action,
growth of microorganisms or contamination from insects will cause food spoilage.
The main element to cause food to lose nutritive value, texture, flavour, and overall
quality is oxygen in the air.
Most microorganisms’ growth relies on air, for it will carry moisture into and out of
foods unless they are protected with moisture-proof packing.
Frozen foods being exposed to freezer air will result in freezer burn.
The vacuum seal packing removes up to 90% of the air from the package. It’s
approximately 21% oxygen in the air, so 90% air removal leaves a 2% to 3% residual
oxygen level in vacuum-sealed foods. When the oxygen level is at or below 5%, most
microorganisms are inhibited from growth.
In general, there are three microorganism categories: mould, yeast and bacteria, they
are present everywhere, but only under certain conditions they can cause problems.
In moisture, Sugar and a moderate temperature circumstance, yeast can grow with
or without air.
Page 16

Page 16 of 20
Refrigeration will slow the growth of yeast and freezing stops it completely.
Bacteria can grow with or without air.
One of the extremely dangerous type of bacteria is clostridium botulinum, and they
can grow under the right conditions without air: in the temperature range of 4˚ to 46˚
C.
Conditions for growth are foods lacking acid, low oxygen environment and
temperatures greater than 4˚C for extended time.
Frozen, dried, high in acid, salt or sugar foods can be resistant to botulinum.
Non-acid foods which include meats, seafood, lye-cured olives, poultry, fish, eggs
and mushrooms; low-acid foods which are mostly vegetables; medium-acid foods
include overripe tomatoes, onions, chilli peppers, figs and cucumbers are easy be
infected by botulinum.
It should be refrigerated for short term and frozen for long-term storage, for the foods
most susceptible to botulinum, and consumed immediately after heating.
Some dried foods, such as flour and cereals may contain insect larvae, if you do not
vacuum-seal, larvae may hatch during storage and contaminate the foods. To
prevent weevils and other insects from hatching, store these foods in vacuum sealed
packages.
Avoid spoilage: foods should be stored at low temperatures, for few of the
microorganisms can grow without air.
If Temperatures in the refrigerator are greater than 4˚C (especially for extended
periods of time), it will support the growth of harmful microorganisms, so you should
keep the temperature at 4˚C or below.
When the temperature in the freezer is -17˚C or lower, it’s suitable for store foods,
although freezing does not kill microorganisms, it retards their growth.
The vacuum-sealed storage temperature will affect dried foods: for their shelf life is
extended 3-4 times for every 10˚C drop in temperature.
Both the “General Rules for Food Safety” and “Food Storage Safety Information”
were the latest food safety recommendations at the time of writing this manual.
If you are unsure to whether these notes are still current, please contact your local
health authority for updates.
Page 17
Page 17 of 20
10 Cleaning and Maintenance
Before any maintenance or cleaning work is carried out, switch off and
DISCONNECT the appliance from the ELECTRICITY supply.
Allow the unit to cool if just finished using.
10.1 Vacuum Sealer
• Always unplug the unit before cleaning.
• Do not immerse in water or any other liquid.
• Do not use detergents, abrasive powders, highly perfumed cleaning
products, wax polishes or products containing alcohol, etc. as these may
damage the unit..
• Wipe the outer surfaces with a slightly moistened (not wet) and dry off.
• To clean the inside of the unit, wipe away any food or liquid with a paper
towel.
• Dry thoroughly before using again.
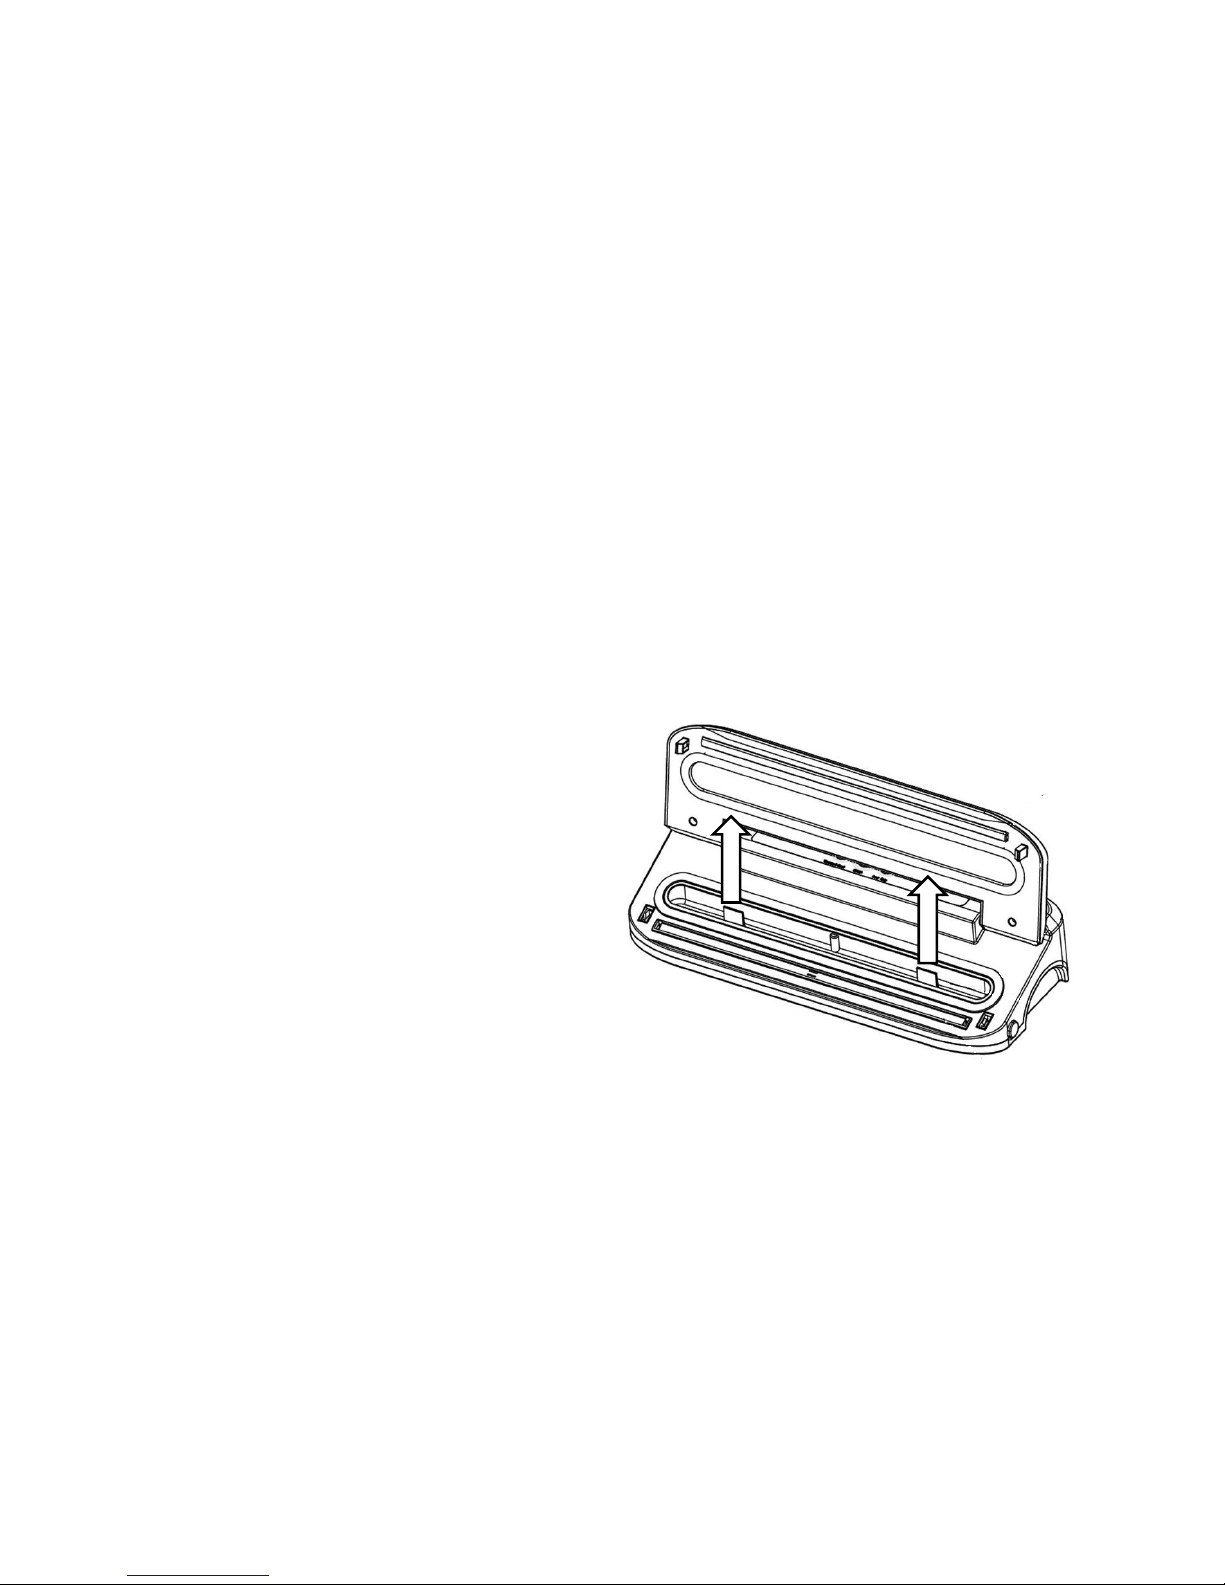
• There is a removal drip tray in
the lower section of the unit.
This can be removed for ease
of cleaning. Grasp the two
tabs and pull up and out as
shown.
• Do not place in a dishwasher.
Only clean with mild
dishwashing detergent and
warm water.
• Rinse off and dry thoroughly and refit before using the vacuum sealer.
10.2 Preservation Bags
• Some bags can be washed and reused.
• Wash the bag inside and outside in warm water with a mild dishwashing
detergent, then rinse the bag well and allow to dry thoroughly before
reusing.
Note: Bags used to store raw meats, fish, or greasy foods Must Not be reused for
Health Reasons. Discard bags properly.
Page 18

Page 18 of 20
11 When the Appliance is Not in Use
When the appliance is not in use or is not going to be used for a long period,
disconnect from the electricity supply and store in a dry safe place.
There is a cord storage on the underneath of the vacuum sealer. Do not pull the
cord tight but instead, loosely wrap around the hooks.
Keep the upper lid of the appliance unlocked when not in use.
12 Troubleshooting
Nothing happens when I press the ’’Vacuum & Seal’’ button:
• Make sure the power cord is correctly plugged into the electrical outlet.
• Make sure the power cord is not damaged in any way.
• Make sure the electrical outlet is operative by plugging in another appliance. If
it’s not, please check the circuit breakers or fuses in your home.
• Make sure the bag is positioned correctly down in the vacuum chamber.
• Press down on both sides of the lid and make sure it is locked in place.
• Wait 25 minutes to allow appliance to cool off, and then try using again.
Air is not vacuumed from the bag:
• Check that there are no gaps, folds, wrinkles or holes in the pre-sealed bags.
• Check for loose, worn or cracked Upper and Lower sealing gaskets.
• Foods with high liquid contents may prevent the bag from sealing properly. Cut
bag open and wipe top inside of bag and reseal.
• Check to see if bag is properly inserted into the vacuum chamber.
• Make sure you’ve placed the bag in the proper place. When making a bag from
a roll, make sure end of cut piece is on the sealing strip.
Bag melts:
• The sealing strip may have been too hot during the sealing process. Allow the
unit to cool for 20 seconds between uses. If the bag continues to melt, allow
unit to cool with the lid in the upright position for 30 - 40 minutes before using.
Air has seeped back into the vacuumed bag:
• Check the seal of the bag. There may be a hole or wrinkle that is allowing air to
re-enter the bag. Carefully cut the bag open and re-seal it, or use an entirely
new bag.
• Make sure there is no moisture or liquid from the food present within the bag
seal. You may need to cut open the bag and re-seal it, or use an entirely new
bag. Partially freeze foods with excess liquids, prior to vacuum sealing.
• Make sure there are no food items with sharp edges that may have punctured
Page 19

Page 19 of 20
• the bag. If you find a puncture hole, seal the item in an entirely new bag.
• Make sure no liquids were drawn to the sealing strip area.
• Check for loose, worn or cracked Upper and Lower sealing gaskets.
• Moisture of foods with high liquid content will prevent the bag from sealing
properly. Cut bag open and wipe top inside of bag and reseal.
Bag will not seal:
• Check that there aren’t any gaps, folds, wrinkles or holes in pre-sealed edges.
• Moisture of foods with high liquid content will prevent the bag from sealing
properly. Cut bag open and wipe top inside of bag and reseal.
• Make sure you’ve placed the bag in the proper place. When making a bag from
a roll, make sure end of cut piece is on the sealing strip.
• Make sure you’ve given the appliance time to cool down. Wait 20 seconds
between seals
Page 20

Page 20 of 20
13 Warranty Against Defect
WHAT’S COVERED?
1.1. H.E. Group Pty Ltd (“us” “we” or “our”) warrants
this good for a full replacement or refund for a
period of twelve months from the date of
purchase.
1.2.
This warranty covers materials and
workmanship defects only
WHAT IS NOT COVERED?
2.1 This good is for household use only and if used
in any way other than as detailed in the
instruction manual will void this warranty.
2.2 This warranty does not apply to defects arising
from abuse, alteration, unauthorised or
unreasonable use of the good, nor does it cover
general deterioration due to usage
2.3 This warranty does not apply to accessories due
to general deterioration or acts beyond human
control.
WHAT WE WILL DO
3.1. We will replace the good or provide a refund to
the value of the purchase price, if a defect is
discovered in the good during the warranty
period of twelve months subject to verification of
defect or malfunction and the date and proof of
purchase and purchase price.
WARRANTY COSTS
4.1 Once we have received the goods and you have
complied with the warranty, our costs associated
with the warranty claim will be borne by us.
4.2 No responsibility will be taken for goods lost,
mislaid or damaged whilst in transit.
GENERAL
5.1 The benefits of this warranty are additional to
any other rights and remedies you may have
under law.
5.2 Our goods come with guarantees that cannot be
excluded under the Australian Consumer Law
(Schedule 2 of the Competition and Consumer
Act 2010 (Cth)). You are entitled to a
replacement or refund for a major failure and
compensation for any other reasonably
foreseeable loss or damage. You are also
entitled to have the goods repaired or replaced if
the goods fail to be of acceptable quality and the
failure does not amount to a major failure. If you
require further information on the Australian
Consumer Law, please visit the Australian
Consumer Law website at
http://www.consumerlaw.gov.au.
5.3 Notwithstanding 5.1, except as provided for in
this warranty, all express and implied warranties
and conditions under statute or general law as to
the merchantability, descr
iption, quality,
suitability or fitness of the goods for any purpose,
or as to design, assembly, installation, materials
or workmanship or otherwise are (where
permitted under law) expressly excluded.
5.4 To the extent permitted by law, our total liability
for loss or damage of every kind related to the
good in any way whatsoever is limited to the
amount paid to the retailer by you for the good
or the value of the good.
5.5 These terms and conditions supersede and
exclude all prior and other discussions,
representations (contractual or otherwise) and
arrangements relating to the supply of the
goods or any part of the goods. This includes
representations not made by us relating to the
performance of the goods or any part of the
goods or the results that ought to be expected
from using the good.
CUSTOMER CARE
6.1 To claim under this warranty, you must first
contact our friendly customer service team on
free call 1800 079 124 or via email
[email protected] and explain the basis of
your claim. Our customer service team will then
provide you with directions on how to make your
claim under this warranty.
6.2 This warranty is valid with the presentation of the
original proof of purchase receipt or tax invoice
originating from the store of purchase for the
product showing the retailer’s name, date of
purchase and amount paid, by you, for the good.
Address:
Phone No:
Email:
Website
HE Group Pty Ltd, 17 Claremont Avenue, Malvern VIC 3144 Australia
1800 079 124 (free call) or (03) 9500 0979 New Zealand: (09) 8870 447
[email protected]
www.hegroup.com.au
Nov 2015
Edition
 Loading...