

Page 1
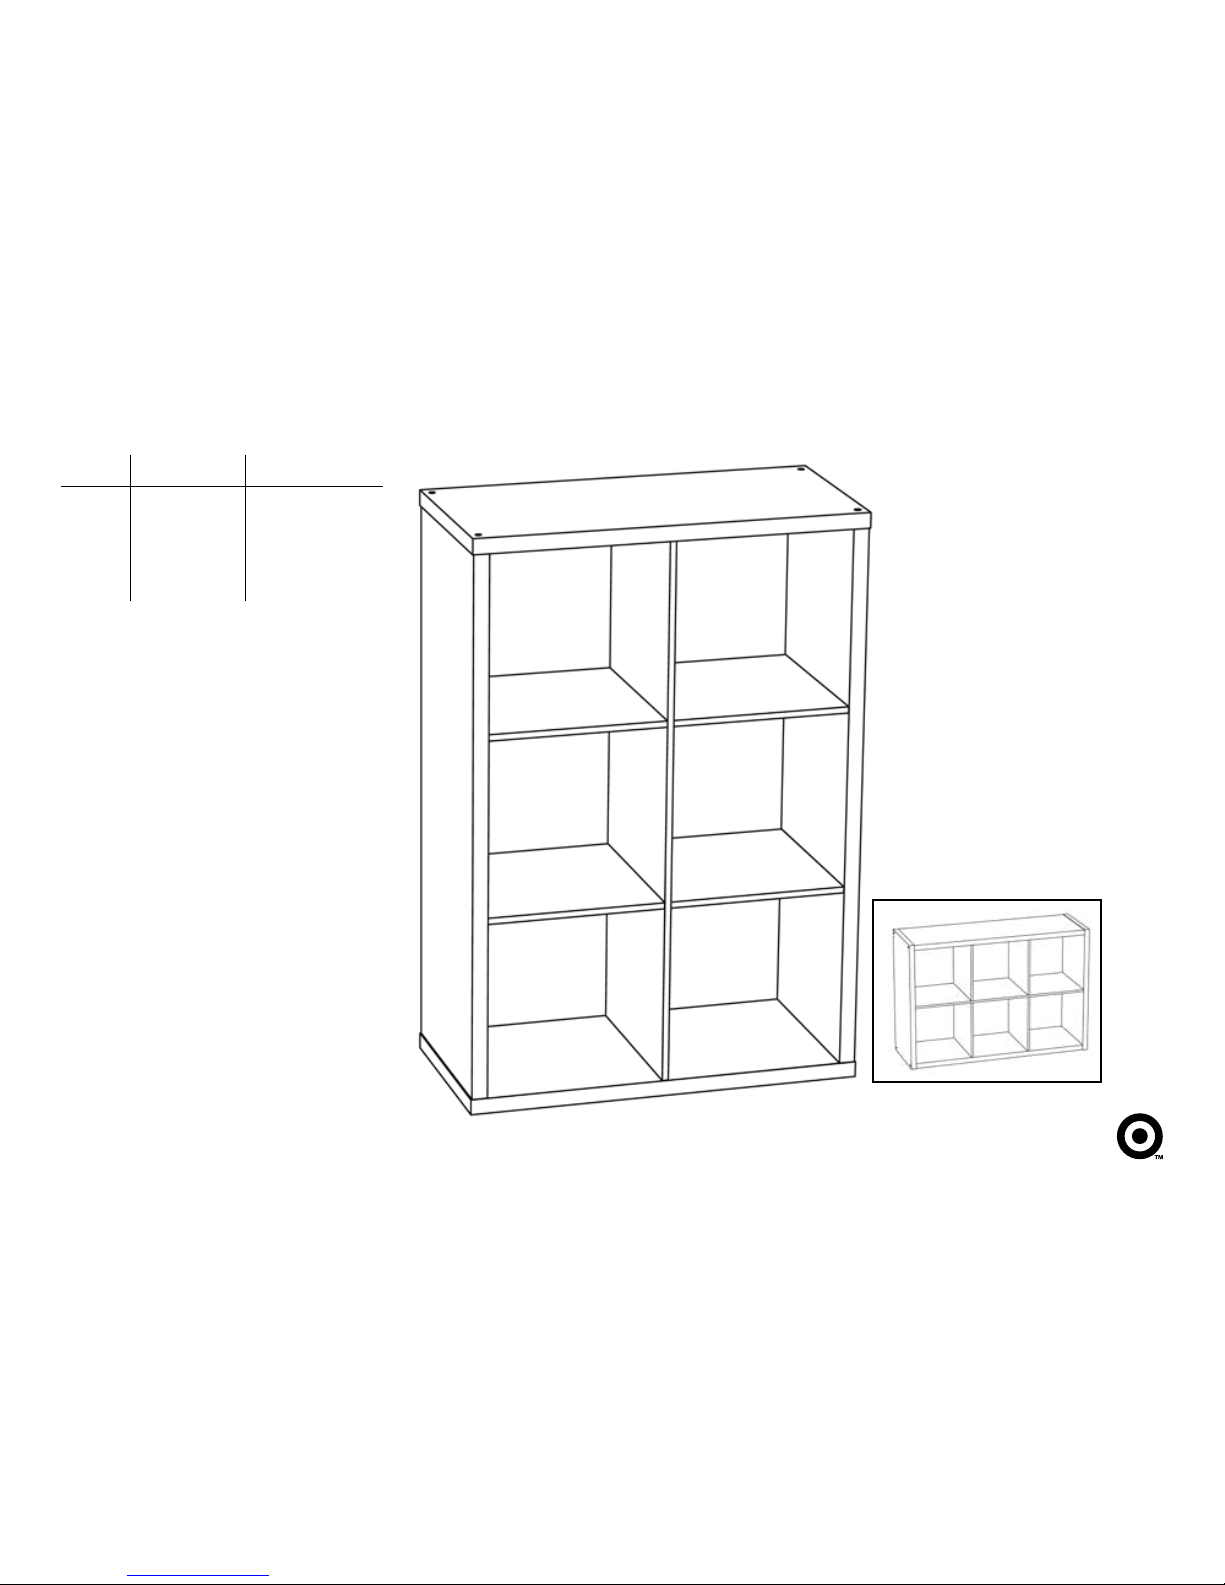
>> assembly instructions
6-Cube Organizer
style dpci nish
4273 002-11-0501 Avington
4279 002-11-0746 White
4290 002-11-0789 Weathered Gray
4301 002-11-1221 Natural
Page 2
2
supplied
Congratulations on your latest Target purchase.
Now what? Don’t start sweating over this box of parts. This will be easy. We did the hard work for you.
All you need to do is follow our simple instructions and you’ll be on your way to transforming your room
in no time. Good luck—though we’re condent you won’t need it.
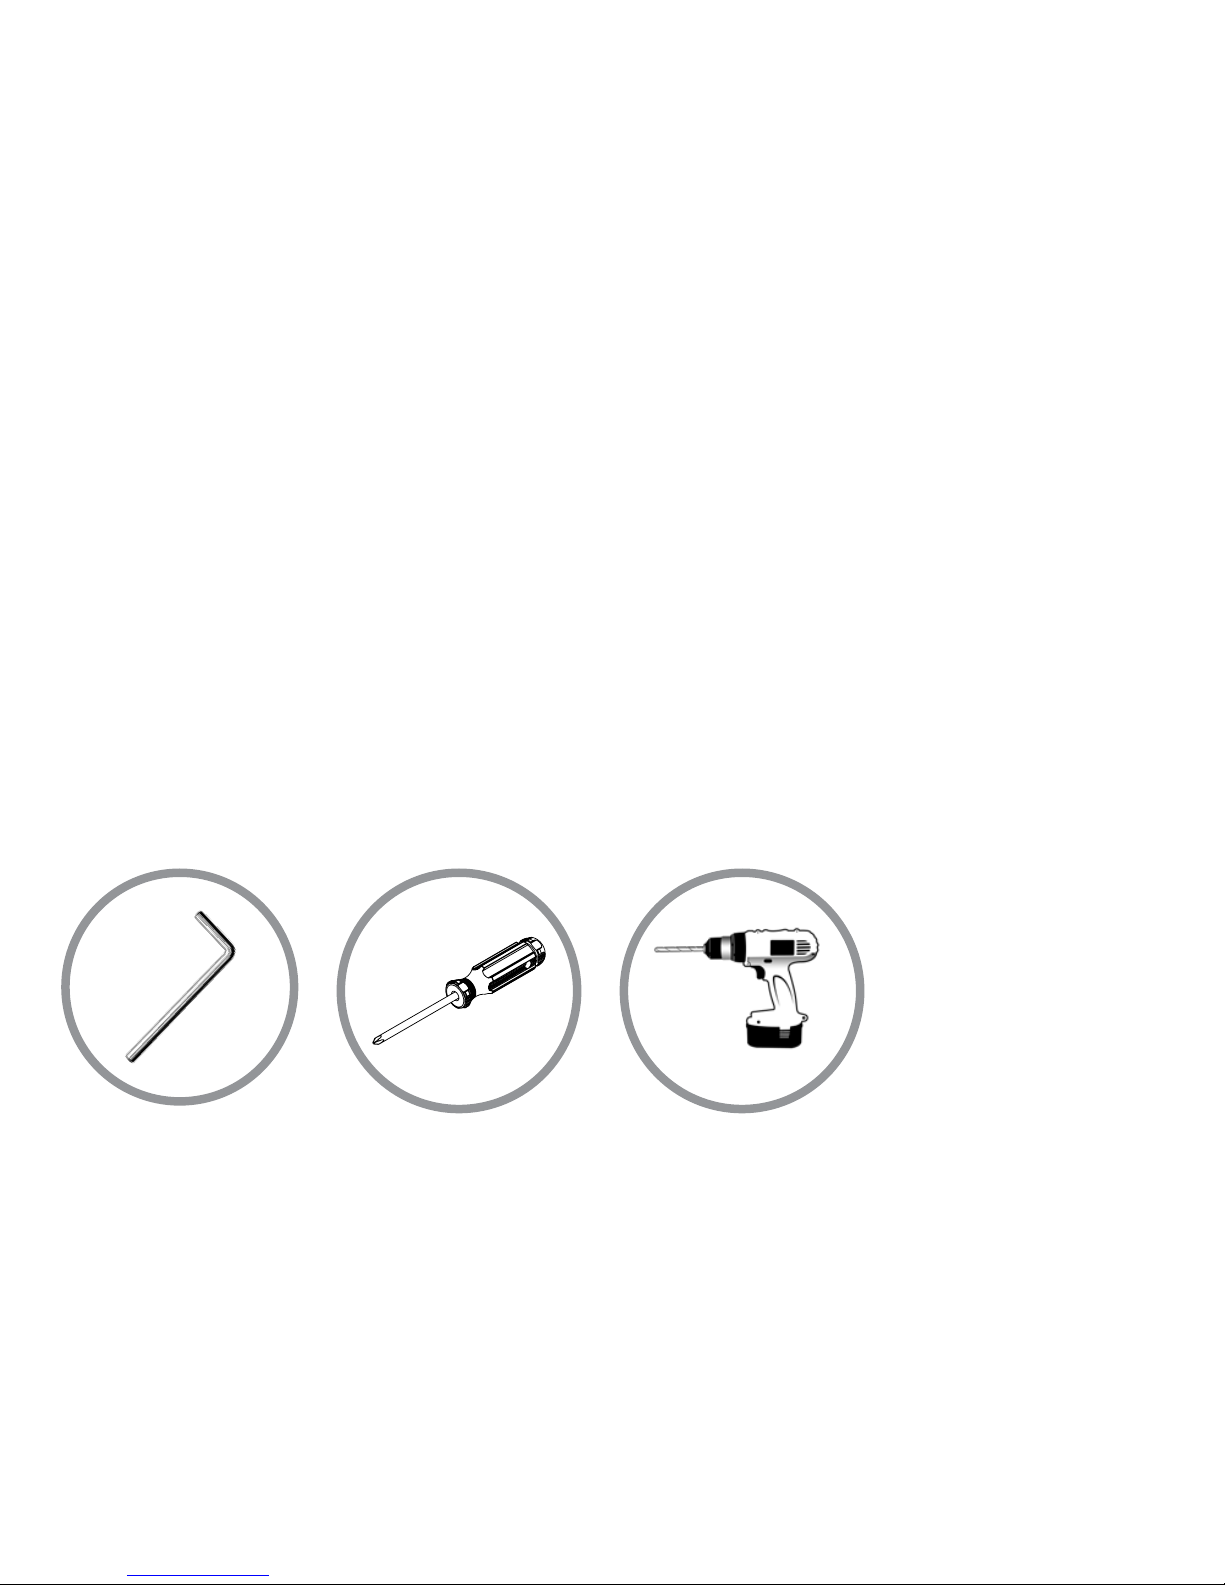
tools needed
before you begin
1. Check for damaged or missing parts. Call 1-800-874-0008 to order missing supplies.
2. Use the carton as a working surface to prevent product damage during assembly.
3. Gather all tools prior to assembly.
Page 3

3QUESTIONS? Just call 1-800-874-0008 for parts and service. For faster service, have the style number and DPCI number ready when calling.
introduction 2
hardware 4
parts list 5
safety precautions 6
installing L-bracket 7
assembly 8-12
additional accessories 13
weight capacity/care instructions 14
table of contents
Page 4
4
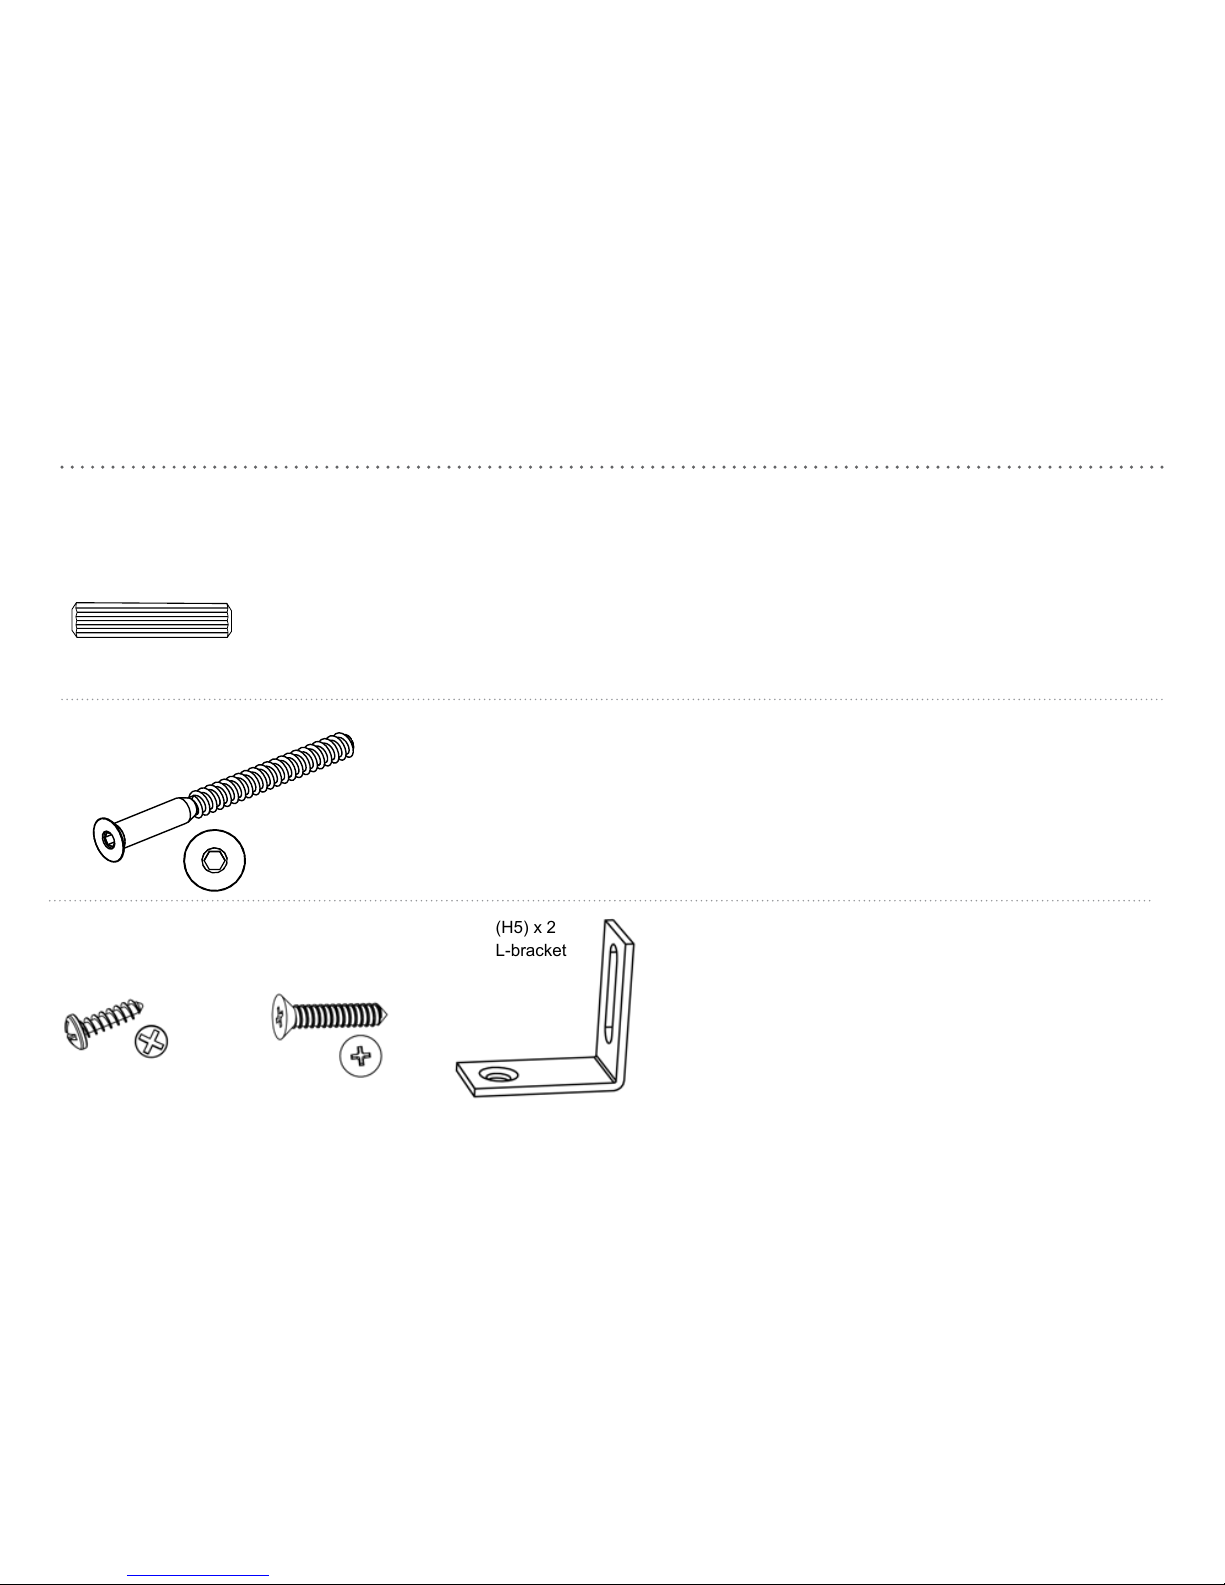
hardware
(H1) x 16
pre-glued dowel
(H2) x 8
hex screw
(H3) x 2
L-bracket screw
#10 x 1/2”
(H4) x 2
wall screw
#10 x 1-1/2”
(H5) x 2
L-bracket
Page 5
5
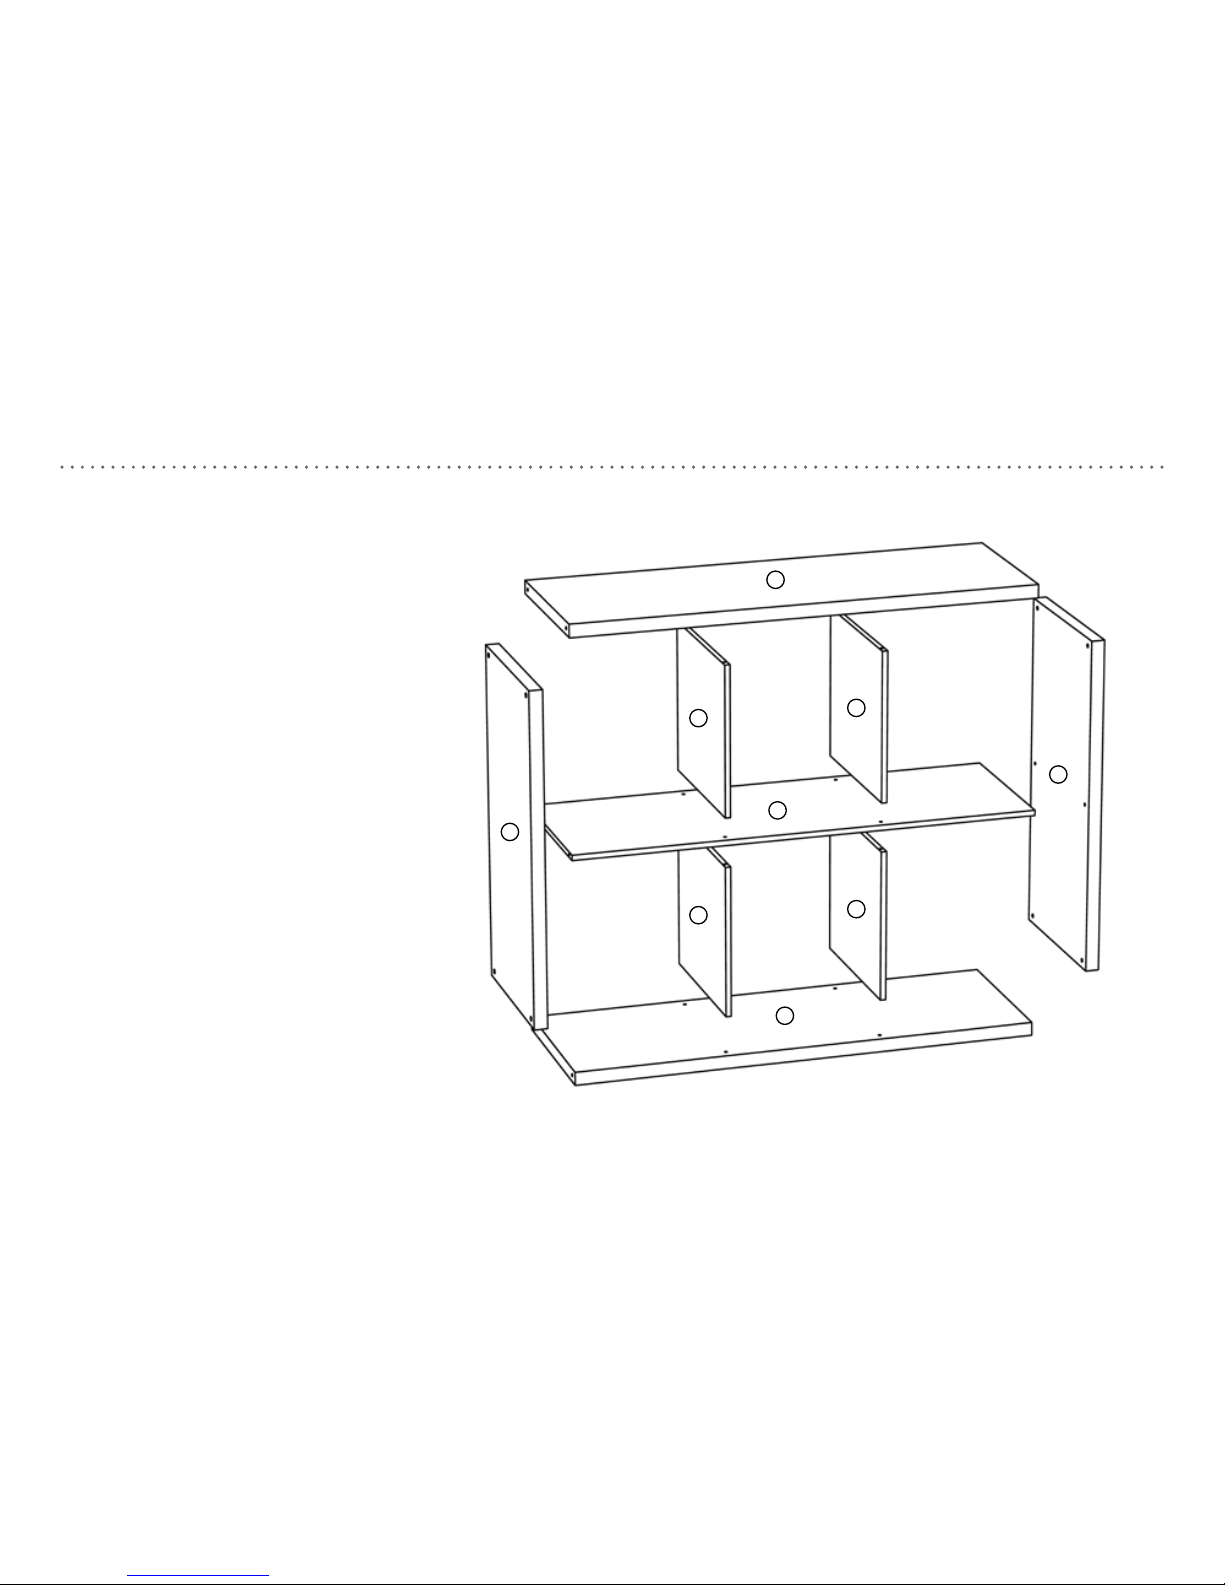
ITEM DESCRIPTION QUANTITY
A side panel 2
B top/bottom panel 2
C divider 4
D xed shelf 1
C
C
C
C
D
A
A
B
B
Page 6

6
safety precautions
warning
• This unit contains small parts which could be a choking hazard for small children. Children should be under adult supervision at all times or
serious injury could occur.
• Always unload unit prior to moving the unit. The weight of personal belongings can cause the unit to become unstable and either tip or collapse.
Serious bodily injury and/or damage to personal belongings may occur.
• Do not overload unit. If any shelf, top, or bottom of unit bows or bends, it is overloaded. The shelf, top, or bottom could collapse and cause
serious bodily injury and/or damage to personal belongings.
• Do not climb or step on the unit. This is not a bench. The unit may become unstable and either tip or collapse. Serious bodily injury and/or
damage to personal belongings may occur.
• Do not use this unit as a television stand. Serious bodily injury and/or damage to personal belongings may occur.
• Do not mount or attach anything to the sides, rear or front of the unit as this can create a force which can cause the unit to tip. Serious bodily
injury and/or damage to personal belongings may occur.
• Do not stack units. Stacking of units can cause an unsafe tip-over hazard which may cause serious bodily injury and/or damage to personal
belongings.
• Do not hang this unit on the wall. The product structure is not designed for wall hanging. Serious bodily injury, damage to personal belongings,
and/or damage to the wall may occur.
• All units must be secured individually to wall stud using hardware provided. If wall stud is not accessible, consult your local hardware store for
appropriate mounting hardware. Failure to do so may create an unsafe tipping hazard that could lead to serious bodily injury and/or damage to
personal belongings.
• Follow proper safety procedures if using power tools and ladders.
• We recommend you protect your work surface during assembly to prevent scratching or damage to table tops, wood oors, etc.
• We recommend you hand-tighten screws. Use care not to overtighten if using power tools.
Page 7
7
installing L-bracket
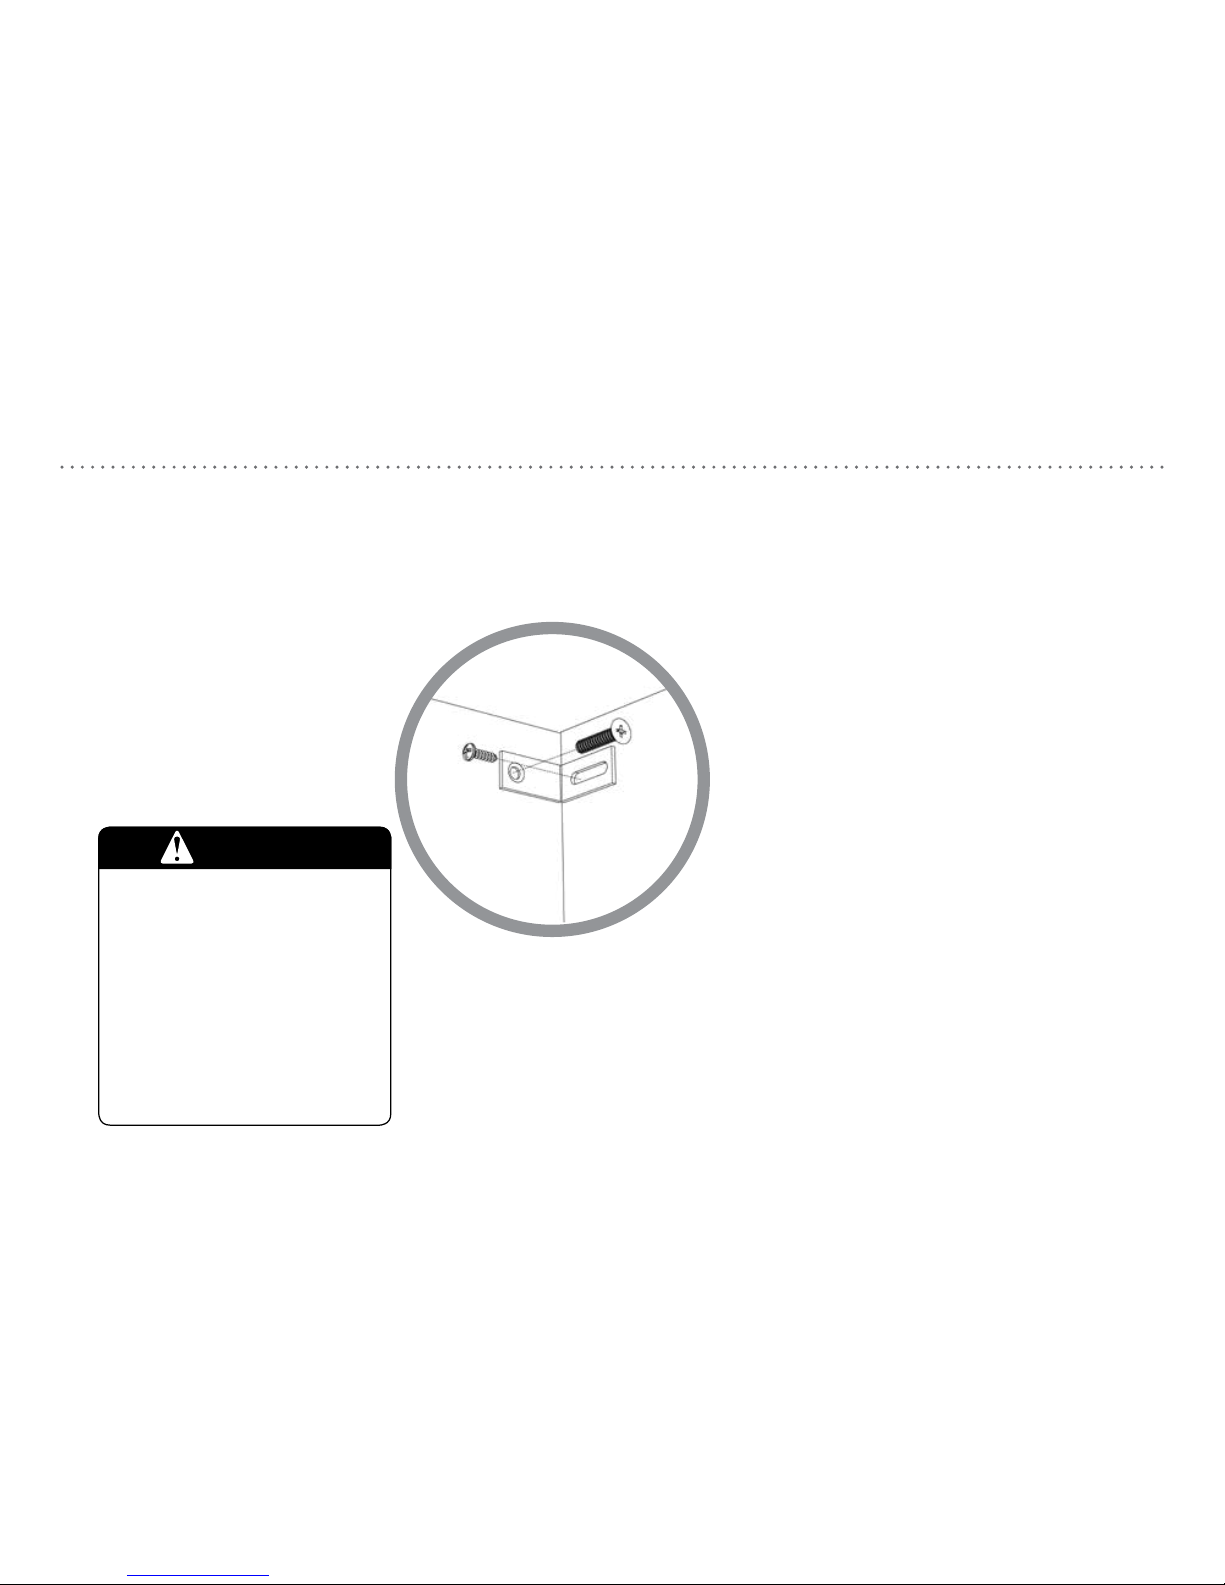
There are several "key points" to Lbracket installation. Please
review the drawings and
comments at right as well as
the assembly steps provided.
All units must be fastened to the wall.
Always mount L-bracket to a wallstud.
The L-bracket is intended to be
installed on panel A.
Install the screw hole end of L-bracket against
at least one wall stud; horizontal adjustable end
against unit. L-bracket must be mounted no more
than 1 1/2 inches from edge of panel.
panel A
panel B
Secure L-bracket on the inside of panel A. See step 5
for detailed installation instructions.
wall
stud
Serious or fatal crushing injuries can occur
from furniture tip-over. To help prevent
tip-over:
- Install tip-over restraint provided.
- Unless specifically designed to accommodate,
do not set TVs or other heavy objects on top of
this product.
- Never allow children to climb or hang on
drawers, doors, or shelves.
- Place heavy items on lower shelves and as far
back as possible.
Use of tip-over restraints may only reduce,
but not eliminate, the risk of tip-over.
This is a permanent label. Do not attempt to remove.
WARNING
Page 8
8
step 1.
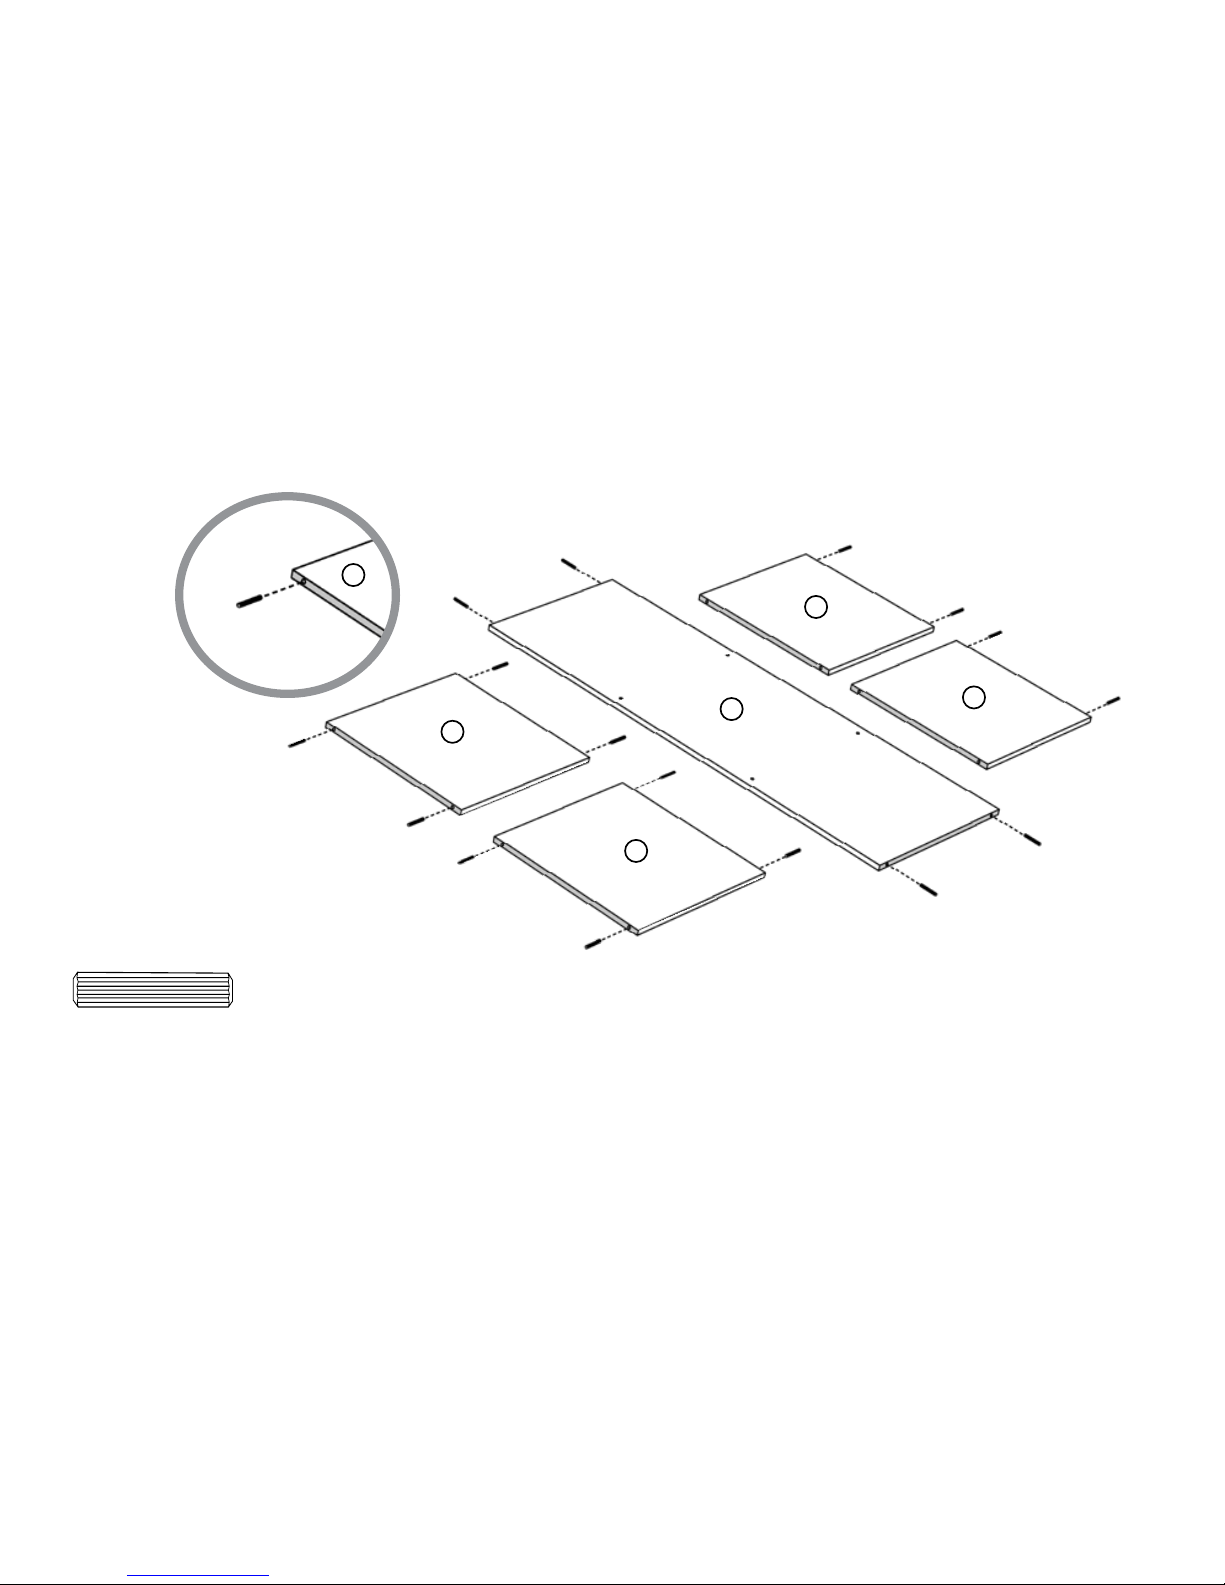
1. Arrange xed shelf (D) and dividers (C) as shown.
2. Quickly dip pre-glued dowels into a cup of water, making sure entire dowel gets wet.
3. Immediately push dowels into holes on unnished edges of each panel. Two dividers will only have two dowels on one side.
(H1)
D
C
C
C
C
C
(H1) x 16
pre-glued dowel
16x
Page 9
9
D
D
C
C
C
C
C
step 2.
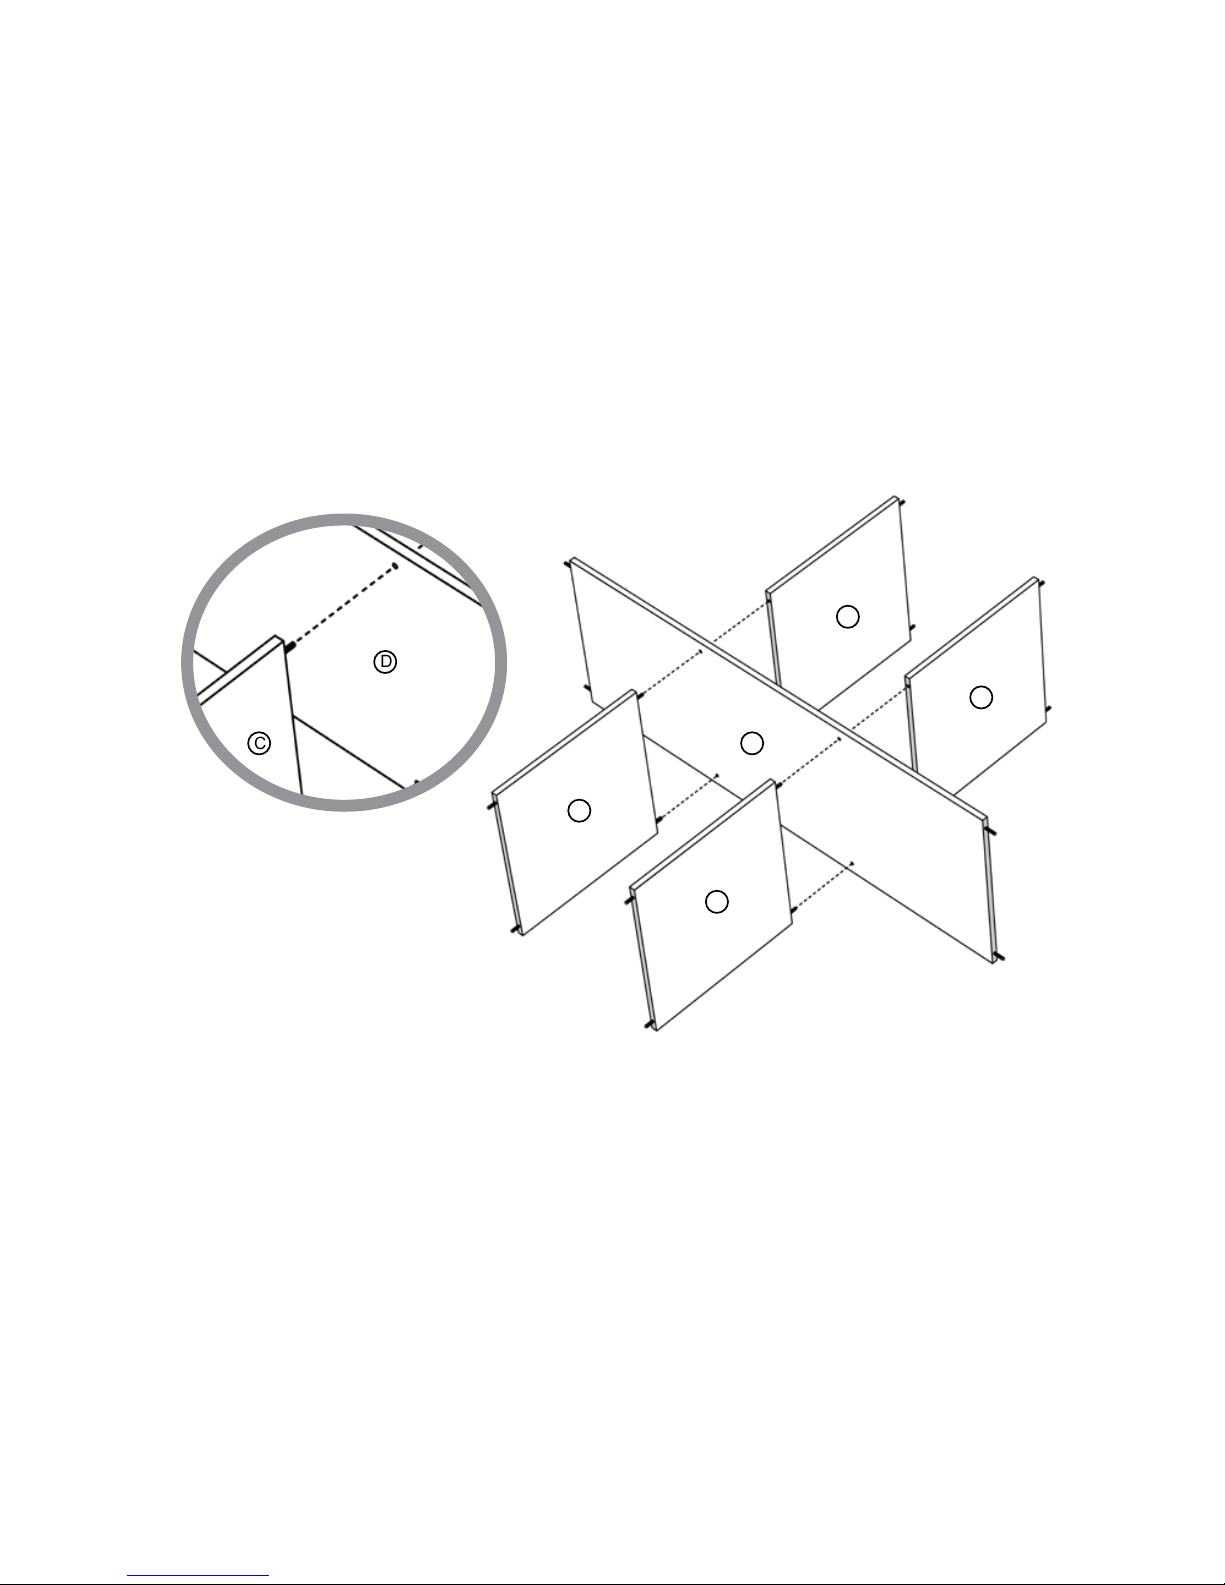
1. Align dowels on dividers (C) with center holes on xed shelf (D) as shown.
2. Push dividers into place. Dowels in dividers (C) should interlock with dividers (C) on other side of xed shelf (D).
Page 10
10
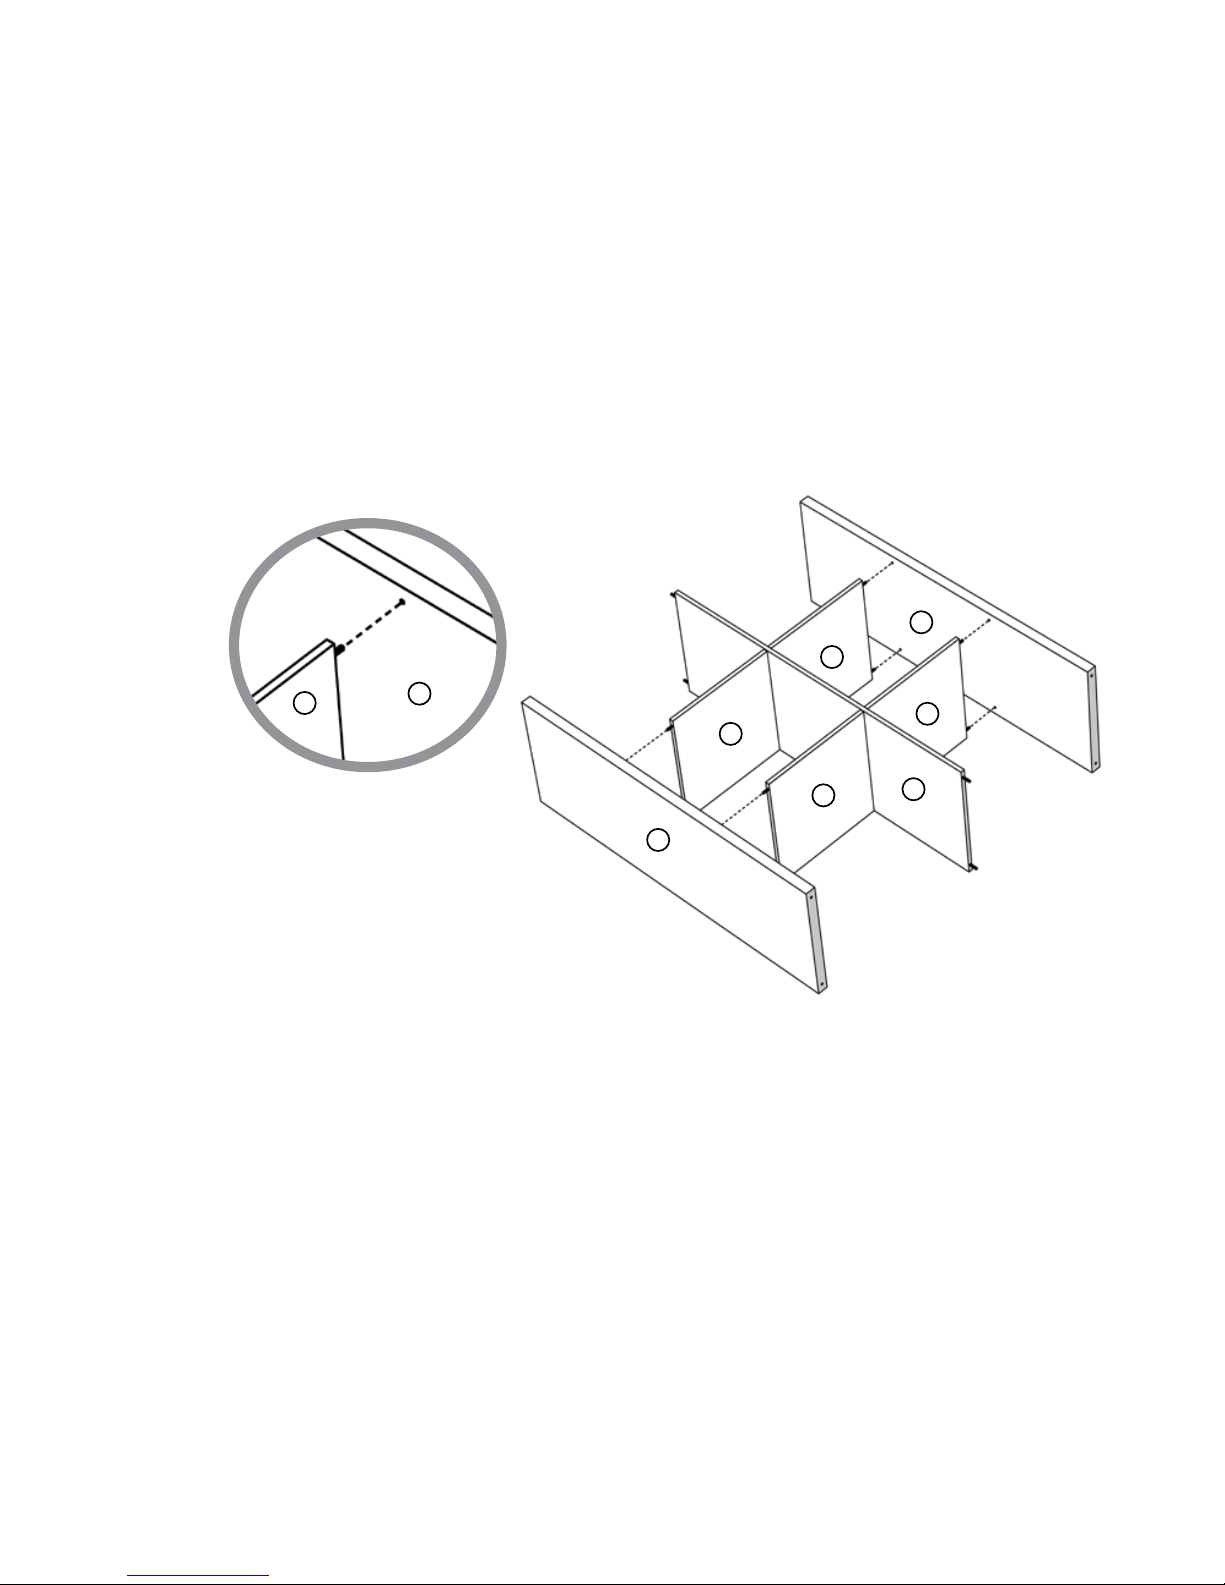
1. Align dowels on dividers (C) with center holes on both top/bottom panels (B).
2. Push top/bottom panels into place.
step 3.
C
C
C
C
C
D
B
B
B
Page 11
11
step 4.
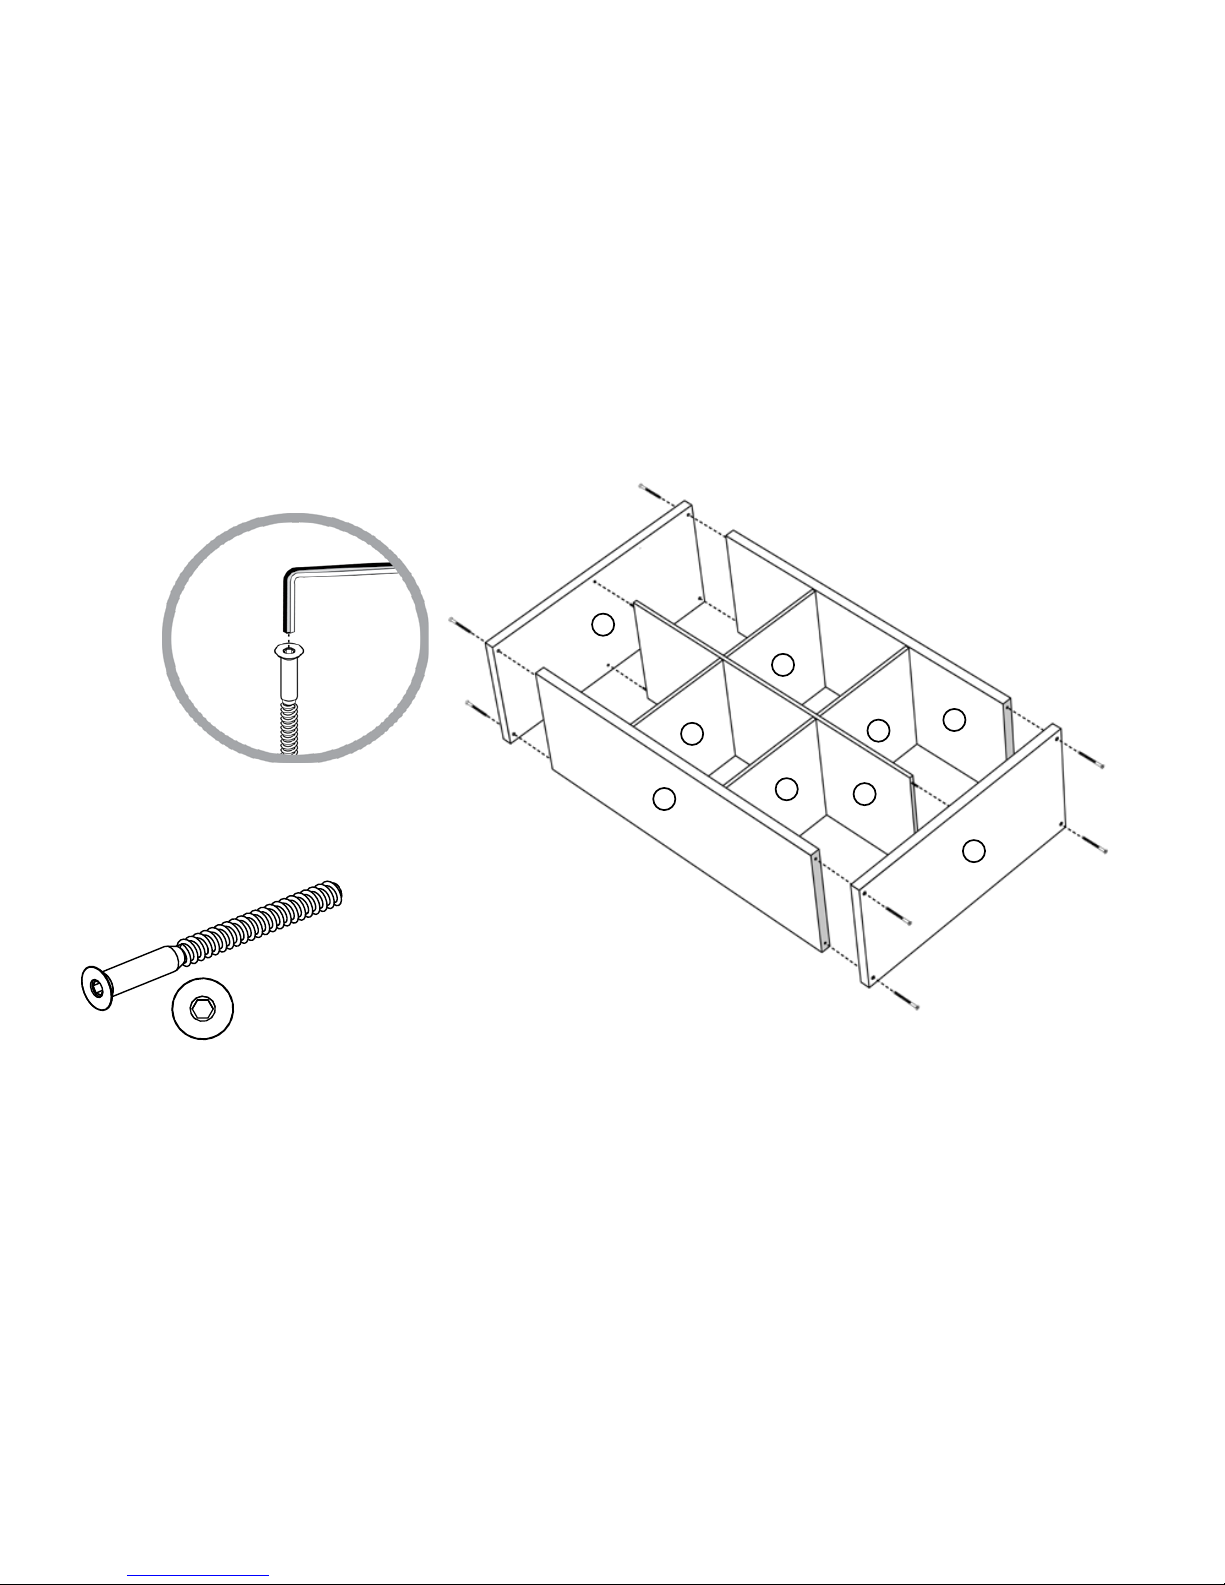
1. Align screw holes in top and bottom panel (B) with screw holes in both side panels (A).
2. Secure top and bottom panels (B) to both side panels (A) using four hex screws for each panel. Tighten screws using supplied hex wrench.
C
C
C
C
B
B
D
A
A
(H2) x 8
hex screw
(H2)
(H2)
(H2)
(H2)
(H2)
(H2)
(H2)
8x
(H2)
Page 12
12
step 5.
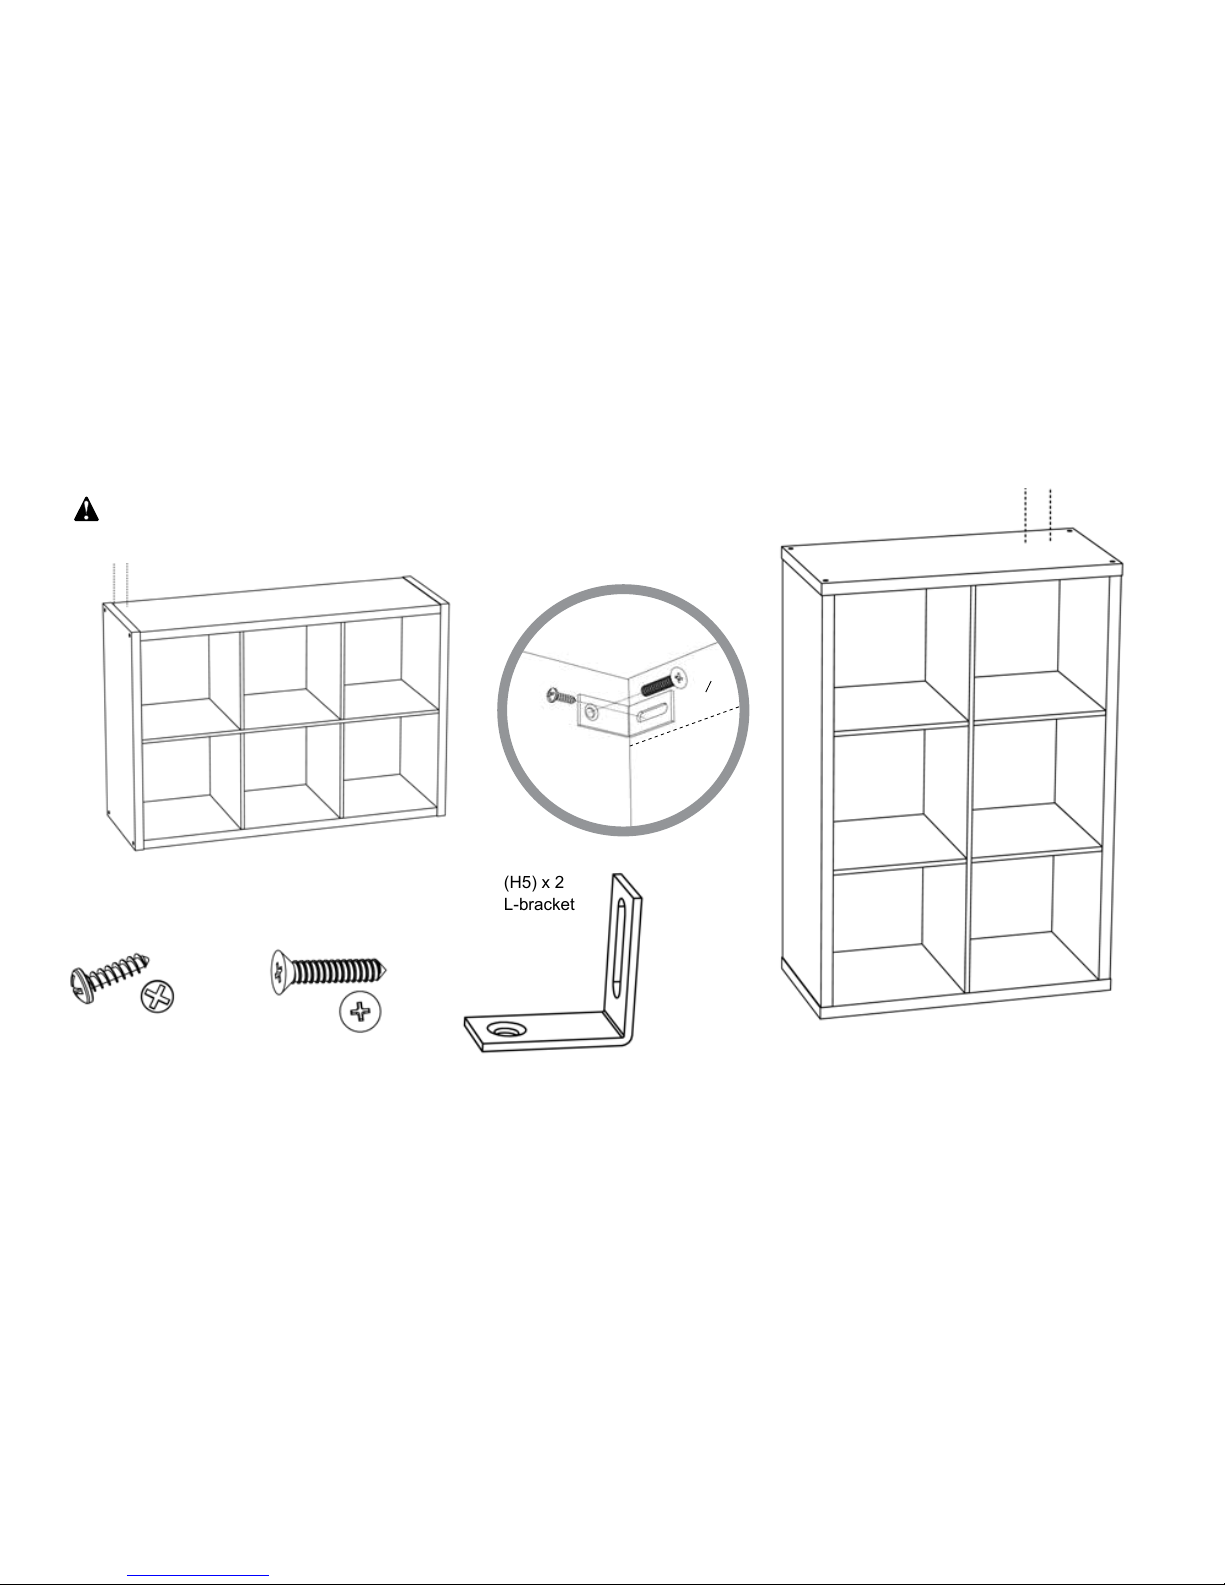
1. Align side of unit with wall stud.
2. Place small hole end of L-bracket against wall/wall stud. Use 1-1/2” screw to secure L-bracket to wall.
3. Use 1/2” screw to secure L-bracket to panel B. L-bracket must be mounted no more than 1 1/2 inches from edge of panel.
warning
All units MUST be fastened to the wall.
panel B
panel A
(H4)
1 in.
MAX
(H3)
wall stud
(H5) x 2
L-bracket
(H3) x 2
L-bracket screw
#10 x 1/2”
(H4) x 2
wall screw
#10 x 1-1/2”
L-bracket must be mounted no
more than 1 1/2 inches from edge
of panel.
1
2
Page 13
13
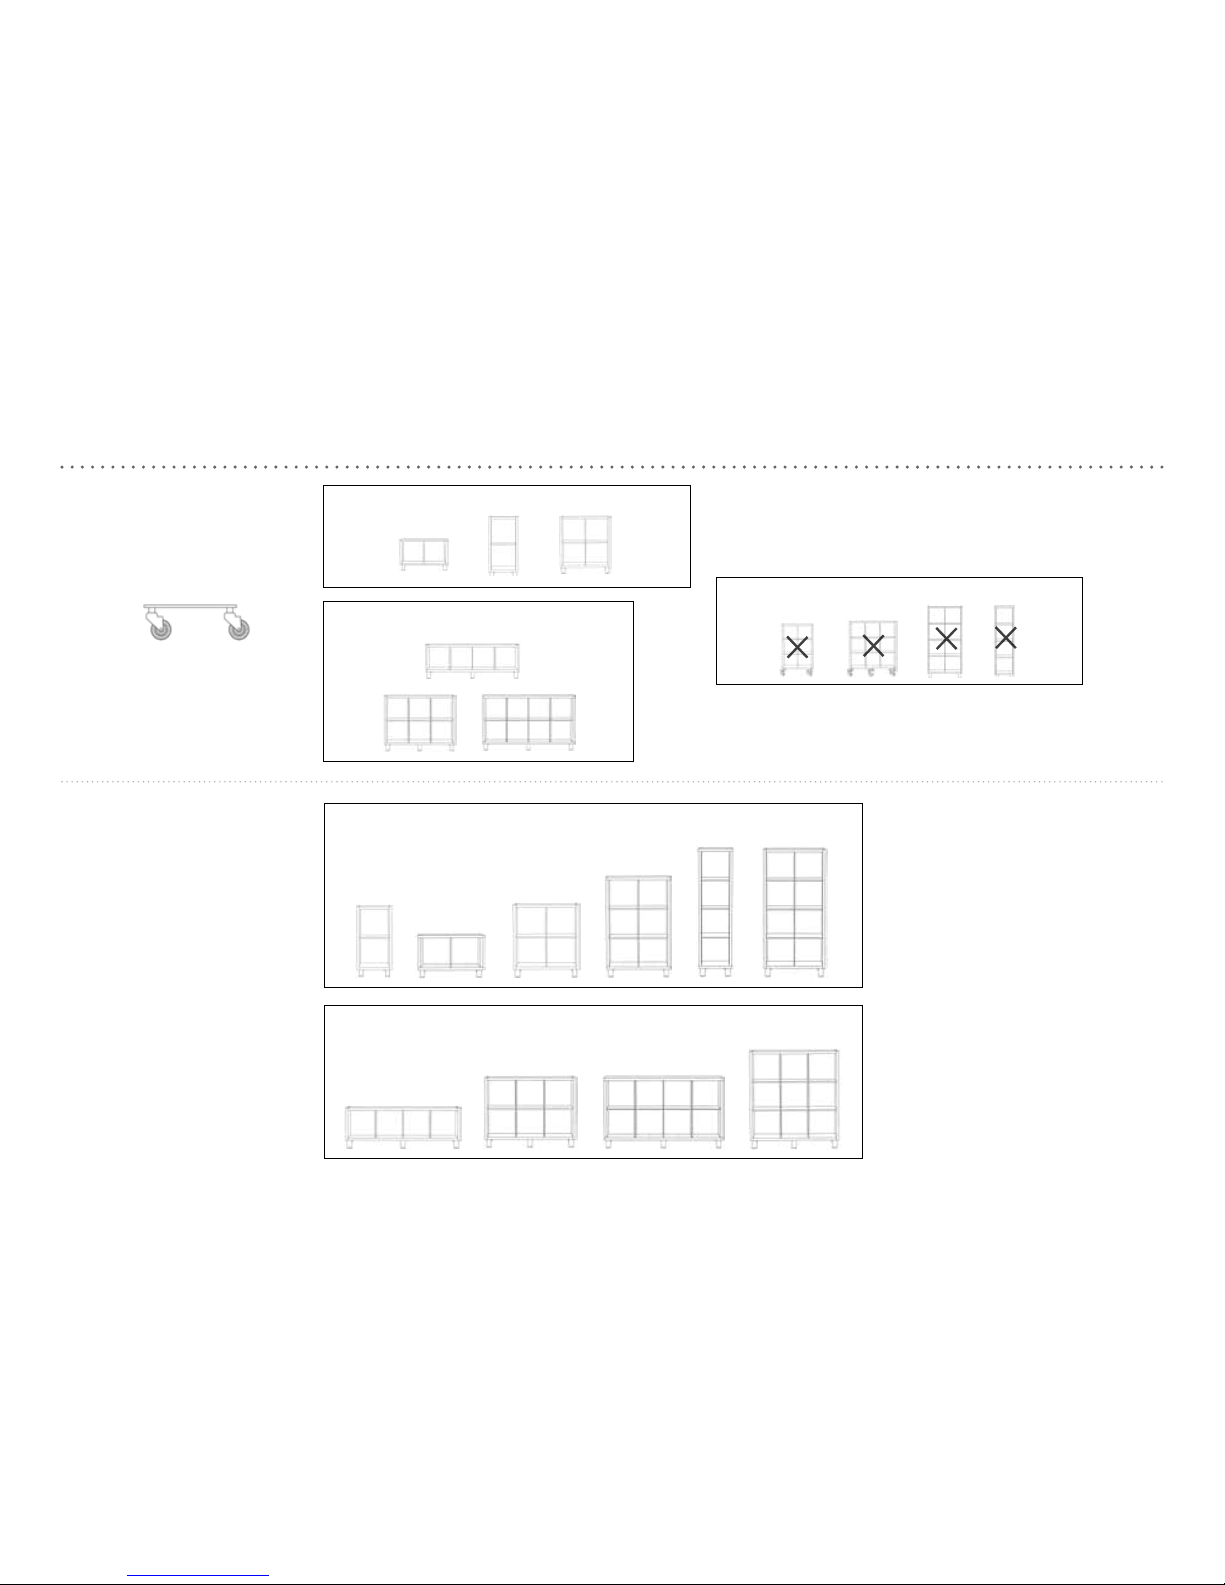
additional accessories - purchased separately
CASTERS
FEET
USE 2 SETS WITH ORIENTATIONS SHOWN BELOW
USE 3 SETS WITH ORIENTATIONS SHOWN BELOW
USE 2 SETS WITH ORIENTATIONS SHOWN BELOW
USE 3 SETS WITH ORIENTATIONS SHOWN BELOW
DO NOT USE WITH ORIENTATIONS SHOWN BELOW
Page 14
14
weight capacity/care instructions
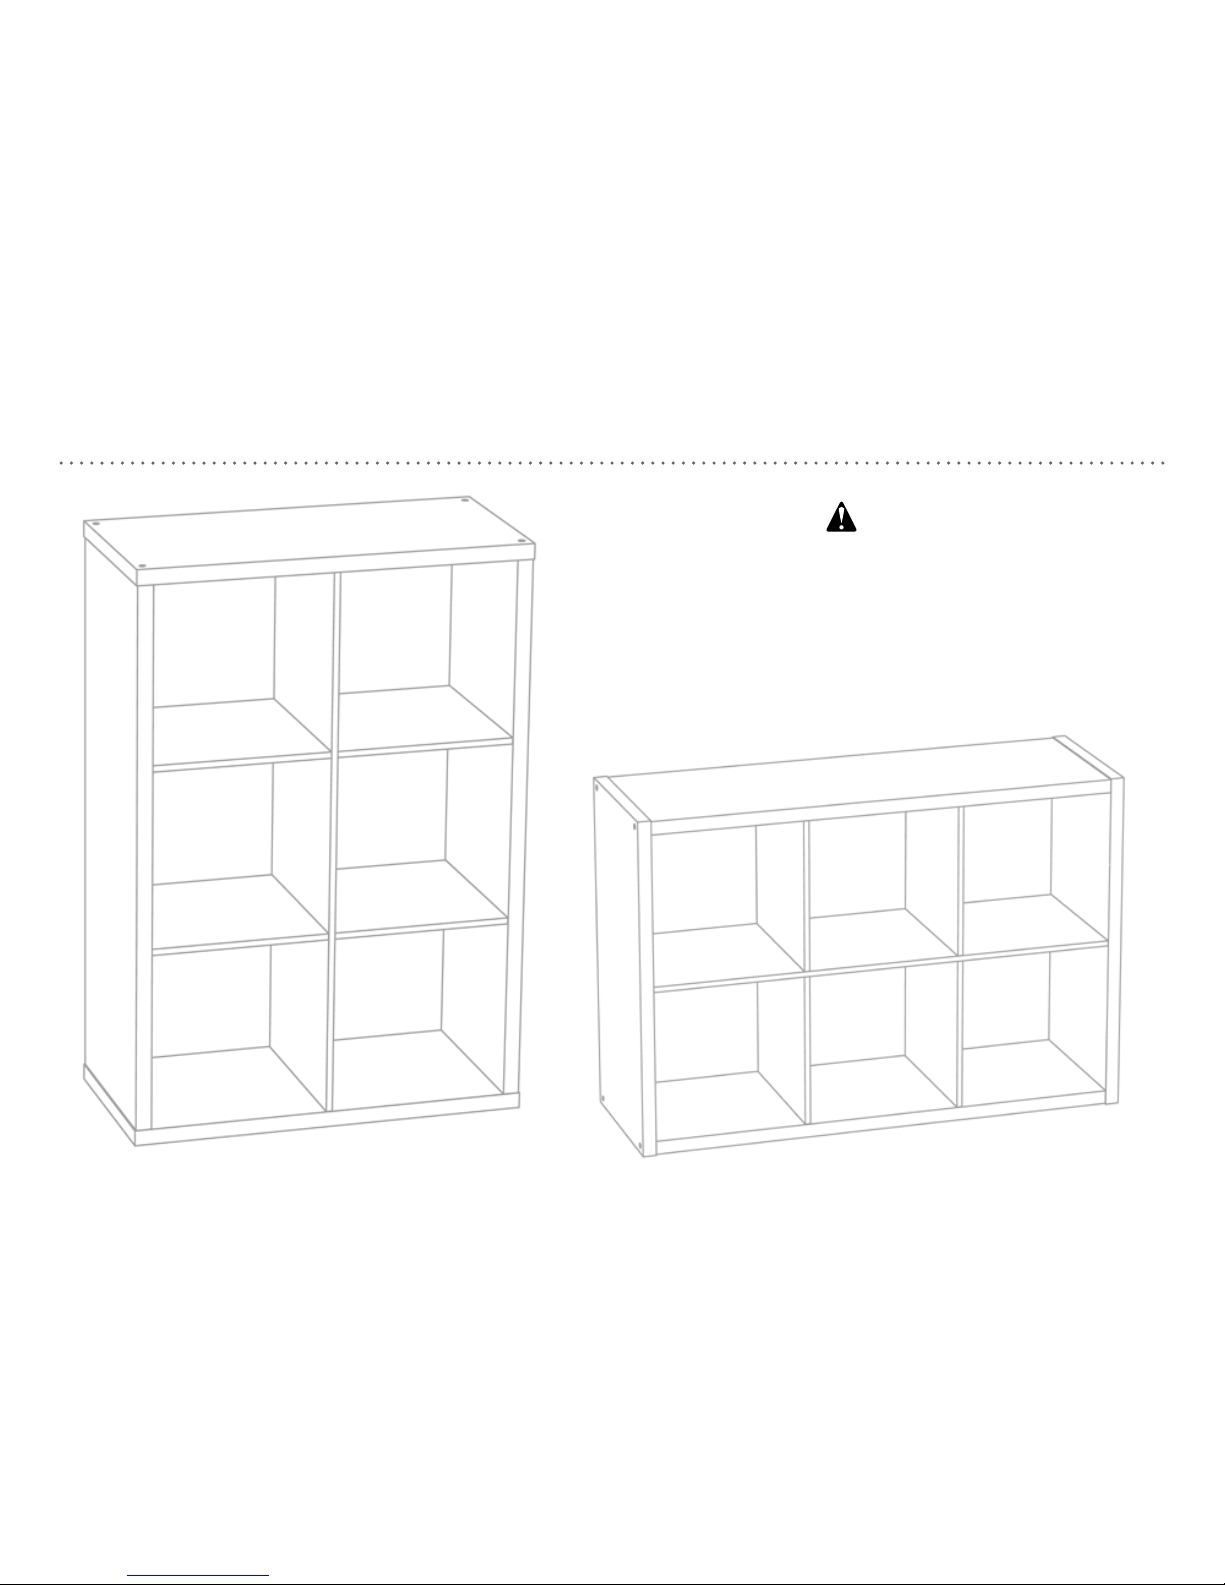
This unit has been designed for the weight
shown. Exceeding this recommended weight
could result in excessive "sagging" of the top
or shelves. Extreme overloading can cause
failure of the unit and possible injury.
Care Instructions:
Dust with a clean, lint-free dry cloth.
warning
30 lbs.
55 lbs.
30 lbs.
30 lbs.
30 lbs.
30 lbs.
30 lbs.
80 lbs.
30 lbs.
30 lbs.
30 lbs.
30 lbs.
30 lbs.
30 lbs.
Page 15

15
Page 16

© 2018 Target. The Bullseye Design is a trademark of Target Brands, Inc. All rights reserved.
 Loading...