

Page 1

Operating instructions
DVD Recorder
DR-5200x
En
Before first use, read the operating instructions carefully and keep them for future reference.
Page 2

Contents
1
2
3
4
Getting Started
Important Safeguards ................................................. 3
Important Notes ........................................................... 4
Important Safety Instructions ..................................... 5
Precautions ......................................................................... 5
About This Manual .......................................... ...................6
How to Proceed in This Manual .............................................. 6
Importtant Instructions ............................................................ 7
General Information ..................................................... 8
Features ........ ................................................................................ 8
DVD region code ............................................................................. 8
Disc can be playbacked .................................................................. 8
Disc can be recorded ...................................................................... 8
Glossary of disc terms ..................................................................... 8
Supplied Accessories ...................................................................... 8
Inserting batteries into the remote control ................................... 8
Function Overview ....................................................... 9
Front panel ...............................................................................9
Back panel ...............................................................................9
Remote control ................................................................................ 10
Basic Connection.........................................................11
Connect your DVD recorder to TV set ........................................... 11
Connect your DVD recorder to Audio devices .............................. 12
Connect your DVD recorder to VCR or a similar recording
equipment.. ..................................................................................... 13
Pro Logic Setting ............................................................................ 23
Speaker Test ............................................................................ 24
Recording Functions
2-1 Before Recording .................................................. 25
2-2 Recording............................................................... 25
Recording TV Programs ................................................................. 25
Timer Recording ............................................................................. 26
Set the record program(s) first ........................................................ 26
Setting Record Time .............................................................. 26
Setting Frequency ................................................................... 26
Setting VPS/PDC ............................................................... 27
Setting Input Source ............................................................... 27
Setting Channel ...................................................................... 27
Setting Quality ........................................................................ 27
Setting Title ............................................................................. 28
Edit My Recording List ................................................................... 28
Press STANDBY/ON to turn the power off .................................... 28
Video Plus ............................................................................... 29
Recording from an External Source ............................................. 29
One Touch Recording .................................................................... 29
2-3 Editing .......................................................................... 30
Play Title...... .................................................................................. 30
Title Delete...............................................................................30
Title Rename .................................................................................. 30
Initial Setting
1-1 Initial Setting .......................................................... 15
Select Language ............................................................................ 15
Select Country ................................................................................. 15
Setting Clock ................................................................................... 15
Setting Auto Scan ........................................................................... 15
1-2 Channel Setup ....................................................... 16
Auto S-can Setting ......................................................................... 16
Channel List Setting ....................................................................... 16
Fine Tune Setting .......................................................................... 17
1-3 Record/Disc Setup................................................. 17
Record Quality Setting ............................................................ 17
Auto Chapter Setting ............................................................... 18
Erase/Format Disc Setting........................................................ 18
Protect Disc Setting ................................................................. 18
Rename Disc Setting ............................................................... 19
Finalize Disc Setting................................................................. 19
1-4 Video Setup............................................................ 20
OSD Language Setting .................................................................. 20
TV Type Setting ....................................................................... 20
TV Display Setting .......................................................................... 20
Video Output Setting ..................................................................... 21
Angle Mark Setting ......................................................................... 21
Progressive Scan Setting ..........................................................21
1-5 System Setup ........................................................ 22
Clock Setting ................................................................................... 22
Rating Setting ................................................................................. 22
Choose Rating ................................................................................. 23
Set Password ................................................................................... 23
Factory Defaults Setting ................................................................. 23
DivX(R) Registration ................................................................. 23
Down Mix Setting ..................................................................... 23
Playback Features
Preparations ........................................................................... 31
Start or Pause Playback ......................................................... 31
Stopping Playback .................................................................. 31
Fast Playback ......................................................................... 31
Skip Playback ......................................................................... 31
Slow Motion Playback............................................................. 31
Step Playback......................................................................... 31
Repeat Playback..................................................................... 31
A-B Repeat Playback.............................................................. 32
Using DVD Title menu ............................................................. 32
Using Disc Menu..................................................................... 32
Return .................................................................................... 32
Go to ...................................................................................... 32
Display the playback information ............................................ 32
Subtitle.................................................................................... 33
Audio.......... ............................................................................ 33
Zooming.....................................................................................33
Angle.......... ............................................................................ 33
Programmed playback ............................................................ 33
KODAK Picture CD Playback .................................................. 33
JPEG CD Playback .................................................................. 34
KODAK Picture CD / JPEG Picture Playback ........................... 34
MP3 CD Playback.................................................................... 34
DivX / Nero Digital Playback ......................................................35
For Your Reference
4-1 Troubleshooting Guide .......................................... 36
4-2 Disc Handling and Maintenance ...........................37
4-3 Definition of Terms ................................................ 38
4-4 Specifications .............................................................. 39
2
Page 3

Important Safeguards
For your own safety read following instructions carefully before attempting to connect this recorder to the mains.
Mains Supply: 230V ~ 50Hz - AC only
This unit is designed to operate on a 230V~50Hz supply only. Connecting it to other power sources may damage it. Ensure that
the supply corresponds to the information on the rating label at the rear of the recorder.
This component system may be fitted with a non-rewireable plug. If it is necessary to change the fuse in a non-rewireable plug
the fuse cover must be refitted. If the fuse cover becomes lost or damaged, the plug must not be used until a replacement,
available from the manufacturer, is obtained. It is important that the colour of the replacement fuse cover corresponds with the
colour marking on the base of the plug.
If the plug needs to be changed because it is not suitable for your socket, or becomes damaged, it should be cut off and an
appropriate plug fitted following the wiring instructions below. The plug must then be disposed of safely, as insertion into a 13A
socket is likely to cause an electrical hazard.
IMPORTANT
This symbol means that this unit is double insulated. An earth connection is not required.
DANGER
LASER SAFETY
CAUTION : USE OF CONTROLS OR ADJUSTMENTS OR PERFORMANCE OF PROCEDURES OTHER
THAN SPECIFIED HEREIN MAY RESULT IN HAZARDOUS RADIATION EXPOSURE.
INVISIBLE LASER RADIATION WHEN OPEN AND INTERLOCK FAILED OR DEFEATED. AVOID DIRECT EXPOSURE TO BEAM
This unit employs a laser. Only a qualified service person should remove the cover or attempt to service
CAUTION
To prevent electric shock, disconnect from the mains before removing cover.No user
serviceable parts inside. Refer servicing to qualified service personnel.
To achieve the utmost in enjoyment and performance, please read this manually carefully before attempting to operate the unit in
order to became familiar with its features, and assure you years of faithful, trouble free performance and listening pleasure.
Important Notes
n Keep instructions the safety and operating instructions should be retained for future reference.
n Avoid installing the unit in locations described below:
Exposed to direct sunlight or close to heat radiating appliances such as electric heaters.
On top of other stereo equipment that radiate too much heat.
Places lacking ventilation or dusty places.
Places subject to constant vibration.
Humid or moist places.
n Make sure not to obstruct the ventilation opening.
n Operate turning controls and switches as instructed in the manual.
n Before turning on the power for the first time, make certain the power cord is properly installed.
n Store your DVDs in a cool area to avoid damage from heat.
For safety reasons, do not remove any covers or attempt to gain access to the inside of the product.
Refer any servicing to qualified personal.
Do not attempt to remove any screws, or open the casing of the unit; there are no user serviceable parts inside, refer all servicing
to qualified service personal. ( Continued to next page )
3
Page 4

Important Notes
Hearing is very important to you and to us so please take care when operating this equipment. It is strongly recommended that
you follow the listed guidelines in order to prevent possible damage or loss of hearing.
ESTABLISH A SAFE SOUND LEVEL
n Over time your hearing will adapt to continuous loud sounds and will give the impression that the volume has in fact been
reduced. What seems normal to you may in fact that be harmful. To guard against this BEFORE YOUR HEARING ADAPTS
set the volume at a low level.
n Slowly increase the level until you can hear comfortably and clearly and without distortion.
n Damage to your hearing is accumulative and is irreversible..
n Any ringing or discomfort in the ears indicates that the volume is maybe too loud.
n Use of any controls, adjustments or procedure other than those specified here in may result in hazardous
Radiation Exposure.
Once your have established a comfortable listening level, DO NOT INCREASE THE SOUND LEVEL FURTHER.
Important Safeguards ( continued )
CAUTION : TO REDUCE THE RISK OF ELECTRIC SHOCK DO NOT REMOVE COVER(OR BACK), NO USER SERVICEABLE
PARTS INSIDE, REFER SERVICING TO QUALIFIED SERVICE PERSONAL.
DANGEROUS VOLTAGE
Conductor dangerous voltage, that may be of sufficient magnitude to constitute a risk of electric shock to
persons is present within this product's enclosure.
ATTENTION
The owner's manual contains important operating and maintenance instructions, for your safety, it is neces sary to refer to the manual.
WARNING :TO PREVENT FIRE OR SHOCK HAZARD, DO NOT EXPOSE THIS APPLIANCE TO DRIPPING OR SPLASHING.
Note:
This unit will become warm when used for a long period of time. This is normal and does not indicate a problem with the unit.
4
Page 5
Important Safety Instructions
Since it is usual for DVD movies to be released at different
times in different regions of the world, all players have region
codes and disc can have an optional region code. If you load
a disc of a different region code to your player, you will see the
region code notice on the screen. The disc will not play, and
should be unloaded.
(Possible region codes:)
There are 6 regions (also called “locals ”).
Each DVD player and disc will be played in one region ONLY.
1: Canada, U.S., U.S. Territories
2: Japan, Europe, South Africa, Middle East (including Egypt)
3: Southeast Asia, East Asia (including Hong Kong)
4: Australia, New Zealand, Pacific Islands, Central America,
Mexico, South America, Caribbean
5: Former Soviet Union, Indian Subcontinent, Africa (also
North Korea, Mongolia)
6: China
Never make or change connections with the power
switched on.
WARNING: To reduce the risk of fire or electric shock, do not
expose this apparatus to rain or moisture. The apparatus
shall not be exposed to dripping or splashing and that no
objects filled with liquids, such as vases, shall be placed on
the apparatus.
This product incorporates copyright protection technology that
is protected by method claims of certain U.S. patents and
other intellectual property rights owned by Macrovision
Corporation and other rights owners. Use of this copyright
protection technology must be authorized by Macrovision
Corporation, and is intended for home and other limited
viewing uses only unless otherwise authorized by
Macrovision Corporation. Reverse engineering or disassembly is prohibited.
CAUTION VISIBLE AND INVISBLE LASER RADIATION WHEN
OPEN AVOID EXPOSURE TO BEAM (WARNINGLO CATION: INSIDE ON LASER COVER SHIELD)
Precautions
Please read these precautions before operating this unit.
n Power cord protection
To avoid any malfunctions of the unit, and to protect against
electric shock, fire or personal injury, please observe the following.
n Hold the plug firmly when connecting or disconnecting the
AC power cord.
n Keep the AC power cord away from heating appliances.
n Never put any heavy object on the AC power cord.
n Do not attempt to repair or reconstruct the AC power cord
in any way.
n Placement
Avoid placing the unit in areas of:
n direct sunlight or heating radiators, or closed automobiles
n high temperature (over 35 C) or high humidity (over 90%)
n much dust as the internal parts may be seriously dam-
aged.
n Non-use periods
When the unit is not being used, turn it off. When left unused
for a long period of time, the unit should be unplugged from
the household AC outlet.
n No fingers or other objects inside
n Touching internal parts of this unit is dangerous, and may
cause serious damage to the unit. Do not attempt to disas-
semble the unit.
n Do not put any foreign object on the disc tray.
n Keep away from water/magnet
n Keep the unit away from flower vases, tubs, sinks, etc. If
liquids are spilled into the unit, serious damage could occur.
n Never bring a magnet or magnetized object near the unit.
n Stacking
n Place the unit in a horizontal position, and do not place
anything heavy on it.
n Condensation
Moisture may form on the lens in the following conditions:
n immediately after a heater has been turned on
n in a steamy or very humid room
n when the unit is suddenly moved from a cold environment
to a warm one If moisture forms inside this unit, it may not
operate properly. In this case, turn on the power and wait
about one hour for the moisture to evaporate.
n If there is noise interference on the TV while a broadcast is
being received
Depending on the reception condition of the TV, interference
may appear on the TV monitor while you watch a TV broadcast and the unit is left on. This is not a malfunction of the unit
or the TV. To watch a TV broadcast, turn off the unit.
5
Page 6

About This Manual
Thank you for purchasing this DVD Recorder. We sincerely hope you can enjoy the pleasure of recording and playing back
pictures through this quality unit with only certain simple operations to follow. Through this DVD Recorder, you can watch DVDs,
play audio CDs, or watch TV shows through external devices. What is more, you can record programs to DVD+/-R or DVD+/-RW
discs.
This DVD Recorder supports the following Media Formats:
--Playable disc format
n DVD, DVD+/-R, DVD+/-RW, VCD, SVCD, CD-DA, Mixed CD-DA, Audio CD, JPEG file disc and Kodak Picture,
MP3, DivX and Nero Digital disc.
--Recordable disc format
n DVD+/-RW (Application Programme)
n DVD+/-R
NOTE:
Some discs may encounter problems during playback possibly due to mal production or external damage. If the discs are selfburn, self-copy or are non-original, we can not guarantee that they will be playable.
How to Proceed in This Manual
Using the DVD recorder and its features may be confusing at first. Please follow the order below to help you get through the
important stages of getting set up so you can start using your DVD recorder as soon as possible.
1 Check the contents of the package.
Refer to the section of “General Information ”in the manual that was included with this unit. You should have the items listed in
the section.
2 Get acquainted with the recorder.
Refer to the sections of “Function Overview ”in the manual. It will let you get familiar with the parts and buttons on the main unit
and remote control as you proceed throughout the manual.
3 Make the necessary connections.
Refer to the section of “Basic Connection ”in the manual. It will guide you how to make the connections with external audio and
video device.
4 Set the necessary settings from the initial setup menu.
Before you operate the DVD recorder, refer to the section of initial Settings in the manual. It will provide on-screen menus with
different options to let you select the proper settings corresponding to the system.
5 Record a disc.
You can record your favourite shows from local cable TV, or music and picture from an external audio and video device on both
DVD+/-R and DVD+/-RW media. Refer to section of Chapter 2-2 Recording in the manual.
6 Play back a disc.
After making all the connections and menu setups, you can start to play DVD, DVD+R, DVD+RW, DVD-R, DVD-RW, JEPG photo
CD, Video CD or CD, MP3, DivX and Nero Digital discs with the recorder. Refer to section of Chapter 3 Playback Features in this
manual.
7 Benefit all the available features.
You can obtain all the benefits from advance features given by this recorder. Refer to section of Chapter 3 Playback Features in
the manual.
6
Page 7

Important Instructions
NEC SECTION 810-
GROUNDING CONDUC-
(NEC SECTION 810-20)
POWER SERVICE GROUNDING
1 Read these instructions.
2 Keep these instructions.
3 Heed all warning.
4 Follow all instructions.
5 Do not use this apparatus near water.
6 Clean only with dry cloth.
7 Do not block any ventilation openings. Install in accor-
dance with the manufacturer’s instructions.
8 Do not install near any heat sources such as radiators,
heat registers, stoves, or other apparatus (including
amplifiers) that produce heat.
9 Do not defeat the safety purpose of the polarized or
grounding-type plug. A polarized plug has two blades with
one wider than the other. A grounding type plug has two
blades and a third grounding prong. The wide blade or the
third prong are provided for your safety. If the provided plug
does not fit into your outlet, consult an electrician for
replacement of the obsolete outlet.
10 Protect the power cord from being walked on or pinched,
particullarly at plugs, convenience receptacles, and the
point where they exit from the apparatus.
11 Only use attachments/accessories specified by the
manufacturer.
12 Use only with the cart, stand, tripod,
bracket, or table specified by the manufac
turer or sold with the apparatus.When a cart
is used, use caution when moving the cart/
apparatus combination to avoid injury from
tip-over.
13 Unplug this apparatus during lightning storms or when
unused for long periods of time.
14 Refer all serving to qualified service personnel.
Servicing is required when the apparatus has been
damaged in any way, such as power-supply cord or plug
is damaged, liquid has been spilled or objects have fallen
into the apparatus, the apparatus has been exposed to
rain or moisture, does not operate normally, or has been
dropped.
15 Battery usage CAUTION - To prevent battery leakage
which may result in bodily injury, property damage, or
damage to the unit:
17 This appliance shall not be exposed to dripping or
splashing water and that no object filled with liquid such
as vases shall be placed on the apparatus.
18 Power Lines - An outdoor antenna should be located
away from power lines.
19 Outdoor Antenna Grounding - If an outside antenna is
connected to the product, be sure that the antenna system
is grounded so as to provide some protection against
voltage surges and built up static charges.
Section 810 of the National Electrical Code, ANSI/NFPA 70
provides information with respect proper grounding of the
mast and supporting structure, grounding of the lead-in
wire to an antenna discharge unit, size of grounding
conductors, location of antenna-discharge unit, connection to grounding electrodes, and requirements for the
grounding electrode.
GROUND
ELECTRICSERVICE
EQUIPMENT
GROUND CLAMPS
CLAMPS
GROUND
CLAMPS
ELECTORDE SYSTEM
(NEC ART.250,PART H)
ANTENNA
LEAD IN
WIDE
ANTENNA
DISCHARGE UNIT
(
20)
TORS
20 The wall outlet must be easily accessible.
21 To completely disconnect the device from the electrical
power, unplug the power cord.
22 Do not use any extension cords.
• Install all bateries correctly, + and - as marked on the unit.
• Do not mix batteries (old and new or carbon and alkaline,
etc.).
• Remove batteries when the unit is not used for a long
time.
16 To reduce the risk of fire or electric shock, Do not
expose this apparatus to rain or moisture
7
Page 8

General Information
Features
n Built-in Dolby Digital decorder, supporting Dolby Pro Logic,
Virtual Surround
n 5.1 Channel audio out
n TV tuner receiver
n Support DVD+/-RW, DVD+/-R, DivX, Nero Digital, SVCD,VCD1.1,
VCD2.0,CDR, CDRW discs
n DVD navigation and SVCD,VCD2.0 PBC controlling functions
n VFD front panel display and OSD menu display
n Full function remote control
n Scart loop through
n Chapter (DVD)
Sections of a picture or a music piece that are smaller than titles.
A title is composed of several chapters. Each chapter is assigned
a chapter number enabling you to locate the chapter you want.
Depending on the disc, no chapters may be recorded.
n Track (Video or audio CD)
Sections of a picture or a music piece on a VIDEO or a CD. Each
track is assigned a track number enabling you to locate the track
you want.
DVD region code
DVD recorders and discs are designed with region numbers which
dictate the region (printed on the rear panel). If the region number
does not match the region number in your DVD recorder, you will not
be able to play the disc. If you try to play the DVD, the message “
WRONG REGION NUMBER” will appear on OSD.
This unit is set to Region 2
Discs that can be played
n DVDs
Disc are general recorded with multi-titles.
Titles may be subdivided into chapters.
n Video CD (version 2.0, 1.1,) / SVCD
Disc are general divided into tracks.
n Audio CDs / Kodak picture CD
Disc are divided into tracks.
Notes:
n You cannot play HDCD,SACD,DVD-RAM,WMV, DVD-Audio,MP3
ID3 Tag and DVD-RW(Video Mode)discs.
n You cannot play illegally produced discs.
n You cannot play scratched discs.
n You cannot play disc that are dusty, soiled or marked with finger-
prints.
Supplied Accessories
Check that you have the following items:
n Aerial cable
n Remote control
n AA batteries
n Owner’s manual
n Scart Cable
n RCA Cable
n 1 x DVD+RW Disc
Inserting Batteries into the Remote Control
You can control the system using the supplied remote. Insert two
batteries by matching the + and - on the batteries. When using the
remote, point it at the remote sensor on the front panel of this system.
DISC can be recorded
n DVD+/-R (Digital Versatile Disc + recordable)
n DVD+/-RW (Digital Versatile Disc + rewritable)
Glossary of disc terms
n Title (DVD)
The longest sections of a picture or a music piece on a DVD; a
movie, ect., for a picture piece on a video software; or an album,
etc., for a music piece on and audio software. Each title is assigned a title number enabling you to locate the title you want.
8
Notes:
n Do not leave the remote in an extermely hot or humid place.
n Do not use a new battery with an old one.
n Do not drop any foreign object into the remote casing. particularly
when replacing the batteries.
n Do not expose the remote sensor to direct sunlight or lighting
apparatuses. Doing so many cause a malfunction.
n If you will not use the remote for an extended period of time,
remove the batteries to avoid possible damage from battery leakage and corrosion.
n Dispose worn-out batteries not with your domestic waste. Please
contact your local government for disposal practices in your area.
Page 9
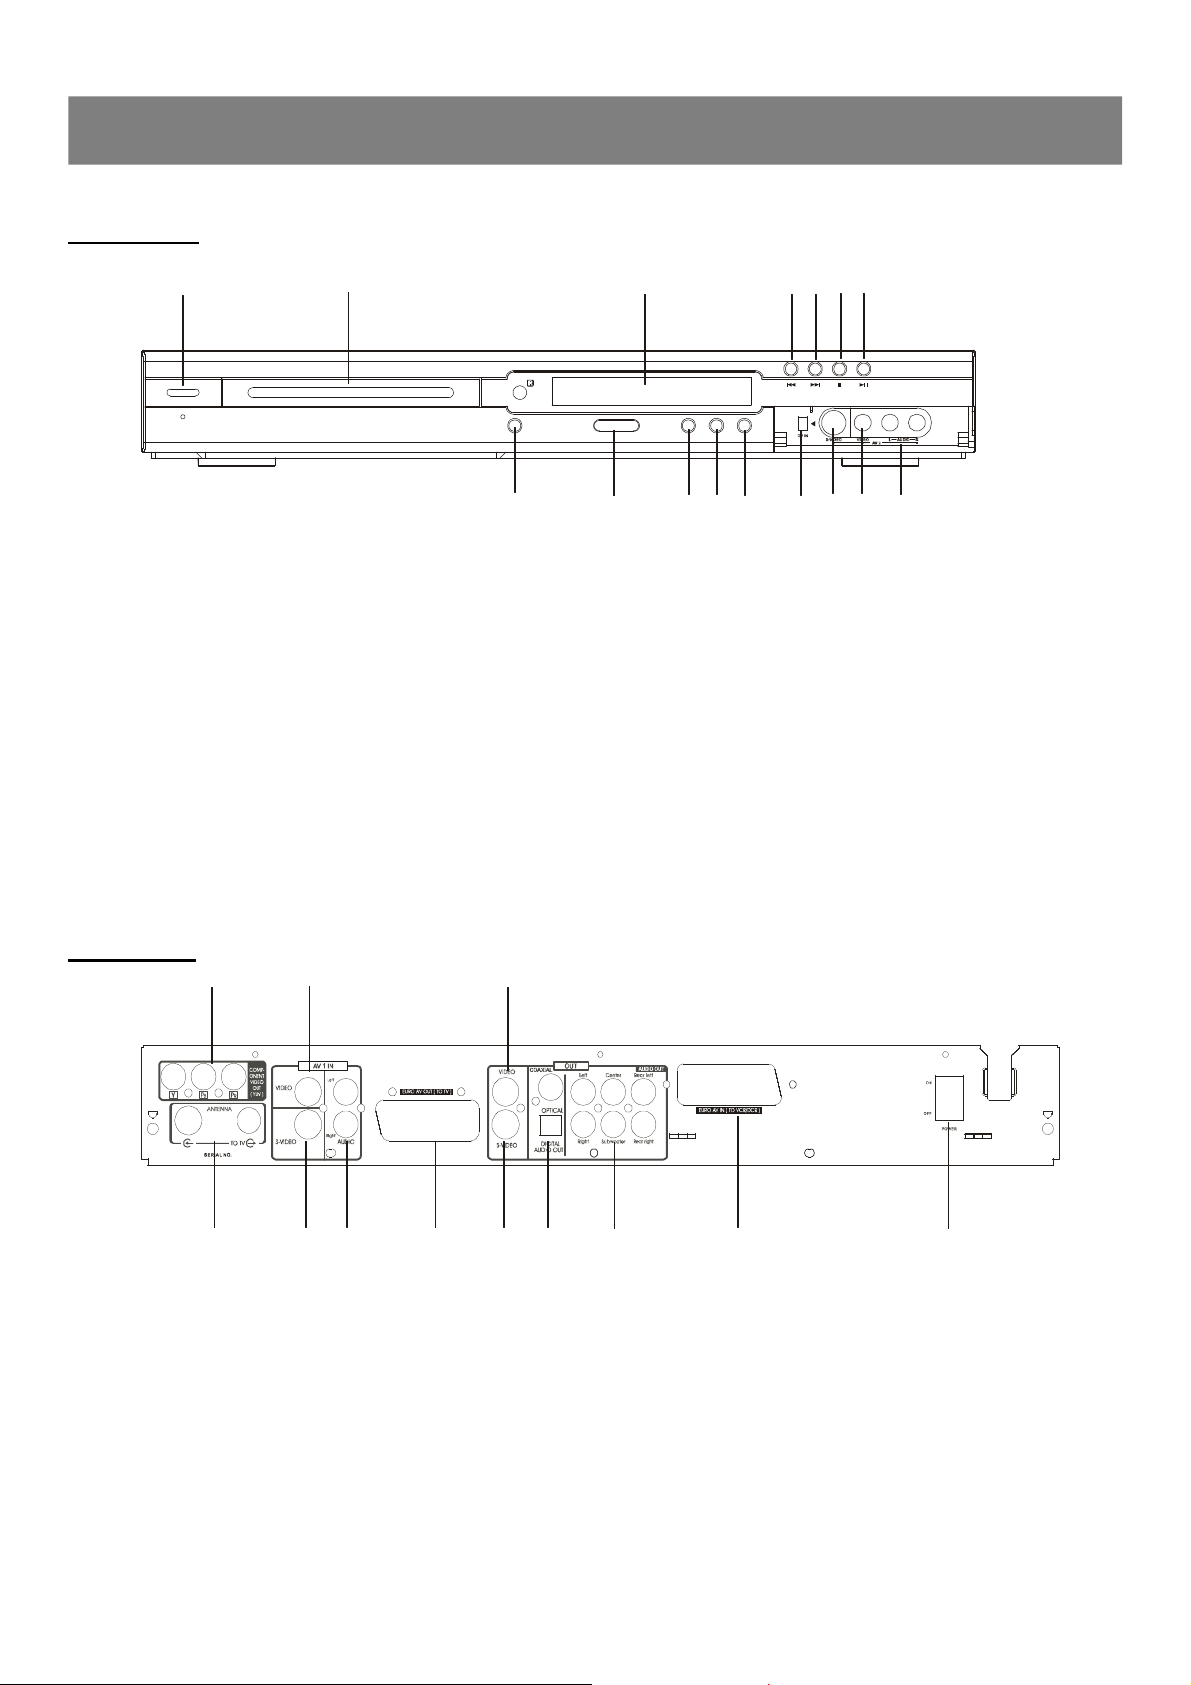
Front panel
12356
7
8
9
4
101112
13
14
15
16
1
2
3
5
6
91011412
Function Overview
1- STANDBY/ON
To switch the unit to standby and power on mode
2- DVD Door(Disc Tray)
3- FL
Fluorescent Display
4- PREV
Press to select the previous track or chapter
5- NEXT
Press to select the next track or chapter
6- STOP
Press to stop playback except for timer recording
7- PLAY/PAUSE
Press to play or pause the playback
8- OPEN/CLOSE
Press to open/close disc tray
Back panel
9- RECORD
Press to record
10- CHANNEL (-)
Press to select previous TV channel
11- CHANNEL (+)
Press to select the next TV channel
12- REC MODE
Select the record mode
13- DV IN
Connect the audio/video(game console, camcorder, etc.)
14- S-VIDEO IN
S-video input jack
15- VIDEO IN
Video input jack
16- AUDIO IN(L,R)
Audio input jack( left and right channel)
1- ANTENNA
Connect TV aerial and RF loop through cable here
2- S-VIDEO (IN)
S-video input jack
3- AUDIO IN (LEFT and RIGHT)
Audio input jacks
4- SCART OUT (TO TV)
Scart output jack
5- S-VIDEO (OUT)
S-video output jack
6- DIGITAL AUDIO OUT
Coaxial and Optical audio output
7 8
7- AUDIO OUT
Connect the amplifier audio input jacks
8- SCART IN (Connect a Freeview or Sky box here)
Scart input jack
9- Power Switch
Switch the set is power on or off
10- COMPONENT VIDEO OUT
Component video output jacks
11- VIDEO IN
Video input jack
12- VIDEO OUT
Video output jack
9
Page 10

141516171819202122232425262728293031333435363738394032
Function Overview
Remote control
1
2
3
4
5
6
7
8
9
10
11
12
13
7. Timer/V+ : press to start timer recording or enter video plus.
8. Directional arrow buttons : select the item you want.
9. Disc Menu : press to select the root menu and PBC ON/OFF.
10. Record : press to start record.
11. Play/Pause : press to start or pause playback.
12. Prev. : skip to previous chapter or track.
13. Next : skip to next chapter or track.
14. Slow : select the forward/backward slow speed playback.
15. Step : press to view playback frame by frame.
16. Number Keys : used in DVD menu and CD track selection.
17. Go to: go to the desired starting title, chapter, track or time.
18. Auido : changes the audio channels of a VCD or CD if availabl , or
selects stereo, left or right audio channel of a VCD disc.
19. Subtitle : access various subtitle language in DVD.
20. PR +/- : press to select upper/lower TV program channel.
21. Angle : access various camera angles on DVD.
22. Zoom : press to enlarge the picture.
1. Standby : switches the unit between standby and on.
2. Clear : press to clear what you select or input.
3. Channel: press to enter channel setup menu.
4. Record/Disc: press to enter Record/Disc setup menu.
5. Display: press to show the playing information about the disc.
6. Rec Quality: press to select the record quality before
recording.
23. Mute : press to shut off the sound or to restore the sound.
24. Return : return back to the menu (VCD only).
25. Program : program the tracks in your own order (only VCD and
CD)
26. A-B : repeat a certain segment betweeen A and B.
27. 1/ALL : allow you to repeat a title,a chapter, a song or all songs on
the disc(usally used on music discs).
28. Edit : press to edit what you record.
29. Title : displays the title menu if available (DVD only)
30. Fast Backward : press to do fast backward search.
31. Fast Forward : press to do fast forward search.
32. Stop : stops by momentarily or fully.
33. Source : press to select your desired source.
34. Enter : press to enter a command or confirm a selection.
35. TV<-->DVDR : press to transfer between TV and DVD mode.
36. Disc Info : press to show some informations of recorded disc.
37. Video : press to enter Video setup menu.
38. System : press to enter System setup menu.
39. Help : press to enter Help Information menu.
40. Open/Close: open or close the disc tray.
10
Page 11
Basic Connection
IMPORTANT !
n Before connecting the AC power to the wall outlet, ensure
that all other connections have been made.
n Never make or change any connections with the power
swithced on.
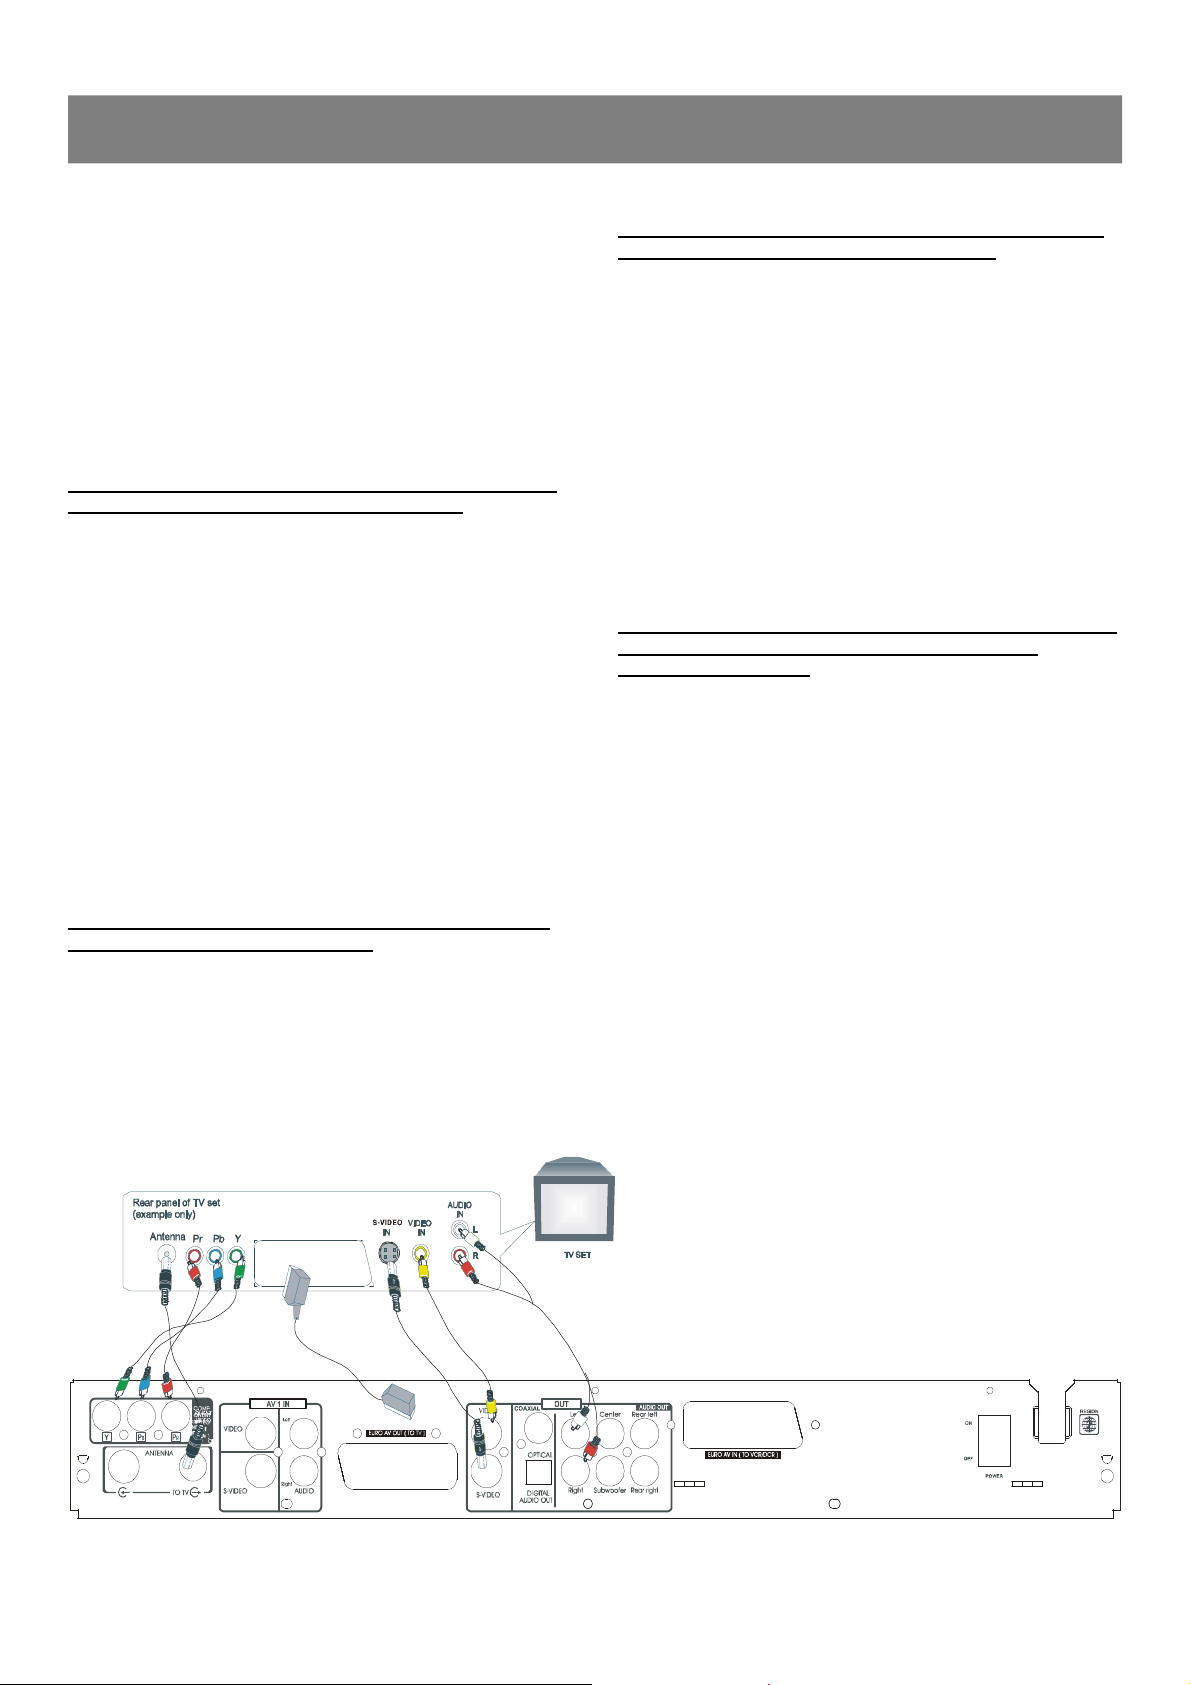
Connect your DVD recorder to TV set★
If your TV set have the VIDEO OUT socket , connect your
TV with a Video cable . (Configuration A+D+E )
1. Insert ANTENNA cable into ANTENNA socket at the back of the
DVD recorder.
2. Insert one end of the supplied aerial cable to the ANTENNA OUT at
the back of the DVD recorder and the other end into the aerial
input socket at the back of the TV set.
3. Plug one end of the supplied Video cable into the yellow Video
(CVBS) output socket at the back of the DVD recorder and the
other end into the Video in or AV in socket on the TV set .
4. Insert one end of the supplied Audio cable into the Red/White
socket OUT L AUDIO R at the back of the DVD recorder and the
other end into the Audio input (usually red/white )socket on the TV
set.
If your TV set have the SCART socket , connect your TV
with a Scart cable .(Configuration F)
1. Insert ANTENNA cable into ANTENNA socket at the back of the
DVD recorder.
2. Insert one end of the supplied aerial cable to the TV socket at
the back of the DVD recorder and the other end into the aerial
input socket at the back of the TV set.
3. Plug scart cable into the corresponding scart socket at the back of
the TV set and the scart socket (SCART OUT)
If your TV set have the S-Video socket , connect your TV
with a S-Video cable .(Configuration B+D+E)
1. Insert ANTENNA cable into ANTENNA socket at the back of the
DVD recorder.
2. Insert one end of the supplied aerial cable to the ANTENNA OUT at
the back of the DVD recorder and the other end into the aerial
input socket at the back of the TV set.
3. Plug one end of a S-Video cable into the S-Video 1 output socket
at the back of the DVD recorder and the other end into the S Video input socket on the TV set .
4. Insert one end of the supplied Audio cable into the Red/White
socket OUT L AUDIO R at the back of the DVD recorder and the
other end into the Audio input (usually red/white )socket on the TV
set.
If your TV set have the COMPONENT VIDEO OUT socket,
connect your TV with Component video cables .
(Configuration C+D+E)
1. Insert ANTENNA cable into ANTENNA socket at the back of the
DVD recorder.
2. Insert one end of the supplied aerial cable to the ANTENNA OUT at
the back of the DVD recorder and the other end into the aerial
input socket at the back of the TV set.
3. Plug one end of the Video cable into the Green /Blue/ Red
Component Video output socket at the back of the DVD recorder
and the other end into the Video in or AV in socket on the TV set .
4. Insert one end of the supplied Audio cable into the Red/White
socket OUT L AUDIO R at the back of the DVD recorder and the
other end into the Audio input (usually red/white )socket on the TV
set.
E
C
F
B
A
D
11
Page 12
Basic Connection(continued)
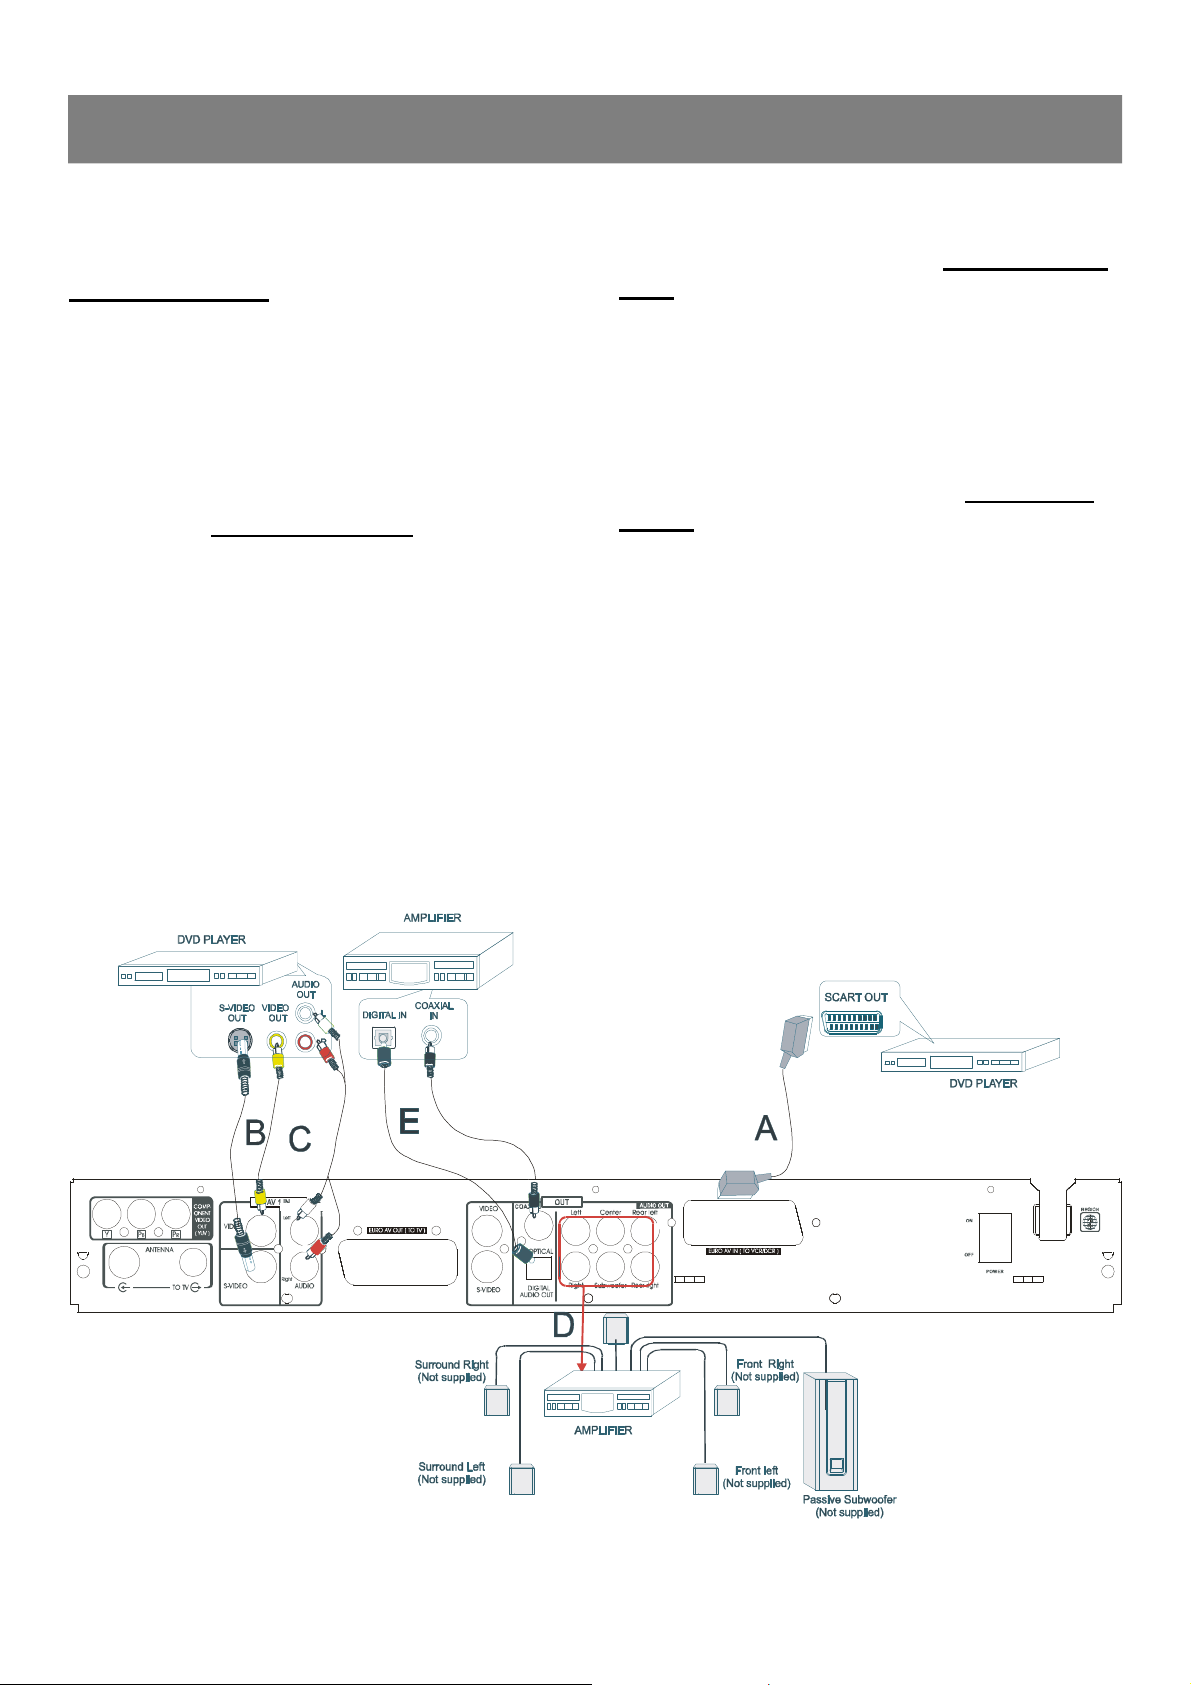
Connect your DVD recorder to addi-★
tional devices, using second Scart socket
(Configuration A )
You can connect additional devises such as decorders,DVD
player,etc. to the Scart In, then you can see the picture from the
additional device on your TV set. At same time, you can recorder
the program from the additional device.
Connect your DVD recorder to an Amp-★
lifier with 5.1 channels and surrounding
audio input. (Configuration D )
The analogue audio sockets AUDIO OUT are located at the back of
the DVD recorder.
These can be used connect the following:
1) a receiver with Dolby Surround Prologic
2) a recerver with two - channel analogue stereo
Connect your DVD recorder to additional★
devices, using Video socket (Configuration
B/C )
You can connect additioanl devises such as decorders,
camcorders,etc. to the S-video /Video and Audio in ,then you can see
the picture from the additional device on your TV set. At same time,
you can recorder the program from the additional device.
Connect your DVD recorder the digital★
audio socket to Audio devices (Configura-
tion E)
At the back of the DVD decorder there are digital output socket Digital
DVD recorder.
These can be used connect the following:
1)an A/V receiver or A/V amplifier with digital muti-channel sound
decorder
2) a recerver with two channel digital stereo
12
Page 13

C
D
A
B
Basic Connection(continued)
Connect your DVD recorder to VCR or★
a similar recording equipment
You can use this unit as the source player or as the recording
deck.
Connection for recording from other equipment
You can connect additional devises such as decorders, camcorders,
etc. to the S-video /Video/component and Audio in , then you can see
the picture from the additional device on your TV set. At the same
time , you can record the program from the additional device .
1. Connect to the AV IN by a video cable.(configuration A+D)
2. Connect to the AV IN by a s-video cable.(configuration B+D)
3. Connect with component video cable.(configuration C+D)
4. Connect to a camcorder etc. by a video/s-video/DV IN.
To copy camcorder recordings, you can use the front sockets .These
scokets are located behind the flap on the left hand side .
n Best picture Qulity( Configuration A)
If you have a DV or digital 8 camcorder , connect the DV IN of the
DVD recorder to the appropriate DV output on the Camcorder.
n Very good picture Quility (Configuration B+D)
If you have H18 or S-VHS (c) camcorder , connect the S-Video 2
of the DVD recorder to the S-VHS output on the camcorder.
you must aslo connect the audio input L AUDIO R on the
DVDrecorder to Audio output on the camcorder.
n Good picture Quility(Configuration C+D)
If your camcorder only have a single Video output
(compositeVideo , CVBS) , connect the Video(AV 2) of the DVD
recorder to the Video output on the camcorder.
you must aslo connect the audio input L AUDIO R on the
DVDrecorder to Audio output on the camcorder.
C
A
B D
13
Page 14

Basic Connection(continued)
Connection for recording from other equipment
Connect a VCR or similar recording equipment to the OUT jacks.
1. Connect to Video IN by a video cable.(configuration A+D)
2. Connect to S-video IN by a s-video cable.(configuration B+D)
3. Connect with component video cable.(configuration C+D)
C
B
A
D
14
Page 15

1-1 Initial Setting
Turn on your TV then turn on the recorder. The TV should
show the EASY SETUP guide. If this does not show then
press the AV button on your TV until the Picture shown below
is seen.
Select Language
1. “Easy Setup ”screen appears on the TV screen, press Enter
to confirm,“Language ”is highlighted.
Setting Auto Scan
1. Select “Auto Scan ”.
2. Press Enter, auto memory channel scanning screen appears
and starts to memorize all the channels available in your area.
2. Press5/6 repeatedly to select language then press Enter to
confirm,“Country ”is highlighted.
Select Country
1. Select “Country ”, and press5/6 repeatedly to select country.
2. Press Enter to confirm,“Set Clock ”is highlighted.
Setting Clock
1. Select “Set Clock ”and press Enter.
2. Press3/4/5/6 repeatedly (or number buttons) to set the
date and time.
3. Press4to select “Done”, and then press Enter ,
“Auto Scan ”is highlighted and begin to auto scan channels.
Note: If you don't want it, press Enter to cancel.
3. Please wait and “Finished ”is highlighted when the scanning is
finished.
4. Press Enter to finish the initial setup and enter monitor mode.
15
Page 16

1-2 Channel Setup
(Channel ---> Auto Scan, Channel List & Fine Tune)
1. Press Channel , “Channel ”screen appears on the TV screen.
2. Press Enter or4, “Auto Scan ”is highlighted.
3. Press 5/6 repeatedly to select the item.
Auto Scan
Auto Scan is a tuner search and allows a channel to be confirmed.
During initial setup, this DVD Recorder will select available TV
channels. Yet, if more channels become available in your area, you
may need to repeat the Auto Scan to update the available channels.
Note: The recorder will auto enter into TV mode after auto
scanning all channels.
Channel List Setting
1. Select “Channel List ”.
2. Press Enter or4, “Channel List” screen appears.
Notes:
n While doing Auto Scan, it will erase and replace all previously
stored channels.
n Before doing Auto Scan, make sure your TV connections has
been made properly.
n For Details on how to make TV connection to your DVD Re-
corder, please refer to the Basic Connection.
1. Select “Auto Scan ”.
2. Press Enter or4, a message screen appears.
“Yes ”is highlighted.
Note: If you want to cancel it, press4to select “No”, and
then press Enter.
3. Press 5/6 to select the channel you want to edit, and then
press Enter,the edit menu appears on TV screen.“CH Swap” is
highlighted.
3. Press Enter, auto memory channel scanning screen appears
and starts to memorize all the channels available in your area.
16
Page 17

1-3 Record/Disc Setup
Channel Setup ( continued )
4. Select “CH Swap ”and press Enter, then press 3/4/5/6
to select your desired position and press Enter to confim.The
previous channel will be moved to the new position.
Note: If you want to receive or not receive the channel,
press 5/6 to select “Erase CH ” and then press
Enter, “Enabled ”or “Disabled ”appears.
5. Select “Exit ”and press3 to return to “ Channel ”screen.
Fine Tune Setting
1. Select “Fine Tune ”.
2. Press Enter or4, the fine tune screen appears.
The Record/Disc Setting OSD will vary when a disc is not inserted, a
DVD+/-R,or a DVD+/-RW disc.
(Rec/Disc ---> Record Quality, Auto Chapter, Erase/Format
Disc, Protect Disc, Rename Disc & Finalize Disc)
1. Press Record/Disc , “Rec/Disc ”screen appears on the TV
screen.
2. Press Enter or4, “Record Quality ”is highlighted.
3. Press 5/6 repeatedly to select the item.
3. Use 3/4 to move the cursor and fine tune the selected
channel to get a more wonderful vision.
4. Press6 to to select “Done ”and press Enter to confirm.
Note :
If it is not necessary, select “Cancel” and then press Enter.
Record Quality Setting
1. Select “Record Quality ”.
2. Press Enter or 4 to select the sub menu, then press 5/6 to
select the desired quality.
Recording Quality Record time (minutes)
HQ (High Quality): 60
SP (Standard mode) : 120
LP (Long Play): 180
EP (Extended Play): 240
EP+ (Extended Play Plus): 360
EP+ +(Extended Play Plus): 480
Notes :
n The record times are an estimate and actual times may differ.
n EP+ + is not available for DVD-R/RW.
17
Page 18

1-3 Record/Disc Setup (continued)
n The record time may differ depending on the recording conditi ons.
- Recording a program with poor reception, or a program or v ideo source of low picture quality
- Recording on a disc that has already been edited
- Recording only a still picture or just sound
3. Press Enter, “√ ” appears, the Recording Quality is set.
4. Press 3to return to “Record Quality ”.
Auto Chapter Setting
When recording starts, the title is slit into chapters automatically.
You can choose the time of each chapter by this step.
1. Select “Auto Chapter ”.
2. Press Enter to select the sub menu, then press 5/6 to
select the item you want.
3. Press Enter, “√ ” appears.
4. Press 3to return to“Auto Chapter ”.
Erase / Format Disc Setting (DVD+/-RW)
You can erase all titles on the disc , but the disc name and format
will remain the same.
1. Select “Erase/Format Disc ”then press Enter , a message
appears.
2. Press3 to to select “Yes ”.
Note : If it is not necessary, select “No” and then press Enter.
3. Press Enter to start to erase, then please wait until erasing
is finished.
Protect Disc Setting (DVD+/-RW )
You can protect a disc from accidental erasure or editing.
1. Select “Protect Disc ”then press Enter , a message appears.
2. Press3 to to select “Yes ”.
Note : If it is not necessary, select “No” and then press Enter.
3. Press Enter , A message appears.
18
n “Menu ” screen returns.
n “Protect Disc ”is change to “Unprotect Disc ”.
4. To exit, press Record/Disc.
Page 19

1-3 Record/Disc Setup (continued)
Rename Disc Setting (DVD+/-RW & DVD+/-R)
You can enter up to 10 characters for a disc name.
1. Select “Rename Disc ”, then press Enter,“New Disc Name”
screen appears.
2. Press 3/4/5/6to select the letter or number , then press
Enter , the character appears in the box.
3. Repeat steps2 to make the new title name (up to 10 characters).
Note: If it is not necessary, select “Cancel ” and press Enter.
If you make a mistake, select “Delete ” or “Clear ”, and
press Enter.
n Delete : Every time Enter is pressed, the last character of the
title name is deleted.
n Clear : Enter is pressed, the title name is cleared at once.
Finalize Disc Setting (DVD+/-R)
After you finalize the disc, you can play the disc on other DVD
players. It can be used as DVD-Video disc. But it is not guaranteed.
CAUTION :
After you finalize a DVD+/-R disc, you cannot edit or record on
the disc. Finish all the editing before you start to finalize the disc.
1. Select “Finalize Disc ”then press Enter, a message appears.
2. Press3 to to select “Yes ”.
Note : If it is not necessary, select “No” and then press Enter.
3. Press Enter to start to finalize, then please wait until finalizing
is finished. “Menu ” screen returns.
4. Press6to select “Done ”, then press Enter , wait until
“Rename disc. Please wait.... ”disappears on the TV screen.
“Menu ”screen returns.
Notes :
n This unit may not be able to finalize the disc if it was recorded
on other DVD recorders or PCs.
n You do not need to finalize the disc again once the disc has
been finalized with this unit.
n Depending on the condition of the disc, recording, or the unit,
discs may not be played even if the discs are finalized.
19
Page 20

1-4 Video Setup
(Video ---> OSD Menu,TV Type, TV Display, Video Output &
Angle Mark, Progressive Scan)
1. Press Video , “Video ”screen appears on the TV screen.
2. Press Enter or 4, “TV Type ”is highlighted.
3. Press 5/6 repeatedly to select the item.
OSD Language setting
1. Select “OSD Menu ”.
2. Press Enter or4to select the sub menu, then press 5/6 to
select the appropriate setting for your TV screen size.
★ 4:3 (Pan Scan)
Select when a conventional TV set is connected.
When the wide screen disc is played back, it displays pictures
cropped to fill to your TV screen. The left and right edges are cut
off.
★ 4:3 (Letter Box)
Select when a conventional TV set is connected.
When the wide screen disc is played back, the black bands
appear at the top and bottom of screen.
★ 16:9 (Wide TV)
Select when a wide screen TV set is connected.
Played in FULL size. ( Setting the wide screen TV to FULL mode
is also necessary.)
Notes:
n The screen size may differ depending on the DVD video
discs.
n If you select Wide TV to get rid of the black bands on
screen when wide screen disc is played back, picture may
be slightly distorted.
n In some discs, even if Normal/PS is selected, the black
bands may remain on the screen.
2. Press Enter or4to select the sub menu, then press 5/6 to
select your favorite language.
TV Type Setting
The kind of TV set (4:3 or 16:9) connected to this DVD Recorder can
be selected.
1. Select “TV Type ”.
3. Press Enter, “√ ” appears, the TV type is set.
4. Press 3to return to “TV Type ”.
TV Display Setting
1. Select “TV Display ”
2. Press Enter or4to select the sub menu, then press 5/6 to
select the appropriate setting for your TV screen size.
★ AUTO
Select this if the connected TV set is compatible with both
NTSC and PAL . The output format will be consistent with the
video signal of the disc.
20
Page 21

1-4 Video Setup (continued)
★ NTSC
Select this if the connected TV set is NTSC system.
It will change the video signal of a PAL video disc and
output to NTSC system.
★ PAL
Select this if the connected TV set is PAL system.
It will change the video signal of an NTSC disc and
output to PAL format.
3. Press Enter, “√ ” appears, the TV display is set.
4. Press 3to return to “TV Display ”.
Video Output Setting
1. Select “Video Output ”.
2. Press Enter or4to select the sub menu, then press 5/6 to
select “Scart RGB ”, “S-Video ”or “YPbPr ”.
★ Scart RGB
Select “Scart RGB ”when you have connected the Scart Out
of this recorder to TV via Scart cable. This will provide a better
viewing result.
★ S-Video
Select S-Video when you have connected S-Video Out jacks of
this recorder to S-Video In jacks of your TV .
Select S-Video Only if your TV does not provide Progressive
nor component jacks.
3. Press Enter,“√ ” appears.
4. Press 3to return to “Angle Mark ”.
Progressive Scan Setting
Connect your TV set and the recorder with a YPbPr cable if your
TV set has YPbPr input jacks before you start this setting.
1. Set the TV Video Output to YPbPr.
2. Select “Progressive Scan ”.
3. Press Enter or 4 to select “ON ”.
★ YPbPr
Select YPbPr when you have connected YPbPr Out jacks of
this recorder to YPbPr In jacks of your TV .
3. Press Enter, “√ ” appears.
4. Press 3to return to “Video Output ”.
5. To exit, press Video.
Angle Mark Setting
1. Select“Angle Mark ”.
2. Press Enter or4to select the sub menu, then press 5/6 to
select “ON ”or “OFF ”.
4. Select “OK ”to confirm, then the machine will automatically
return to the “Progressive Scan ” screen.
21
Page 22

1-5 System Setup
(System ---> Set Clock, Rating, Factory Defaults, DivX (R)
Registration, Down Mix, Pro Logic & Speaker Test)
1. Press System , “System ”screen appears on the TV screen.
2. Press Enter or4, “Set Clock ”is highlighted.
3. Press 5/6 repeatedly to select the item.
Clock Setting
1. Select “Set Clock ”.
2. Press Enter or4 to select “Manual ” and press Enter again,
“Set Clock Setup ”screen appears.
2. Press Enter or 4to enter sub menu.
3. Use number buttons to enter the password and press Enter.
Parental Control
MPAA (Motion Picture Association of America) Guideline is a ratin g system that provides advanced cautionary information to pare nt about the content of movie programs.
The parental lock level is equivalent to the following MPAA Rating
System.
1 G (General audiences)
3 PG (Parental guidance suggested)
4 PG-13 (Parents strongly cautioned)
6 PG-R (Restricted)
7 NC-17 (No one 17 and under admitted)
8 Adult
No Parental
Some DVD-Video discs contain a restriction level which enables
parents to prevent playback of discs by children. This unit is eq uipped with a password designed to prevent children changing
the level.
You cannot play DVD-Video discs rated higher than the level you
selected unless you cancel the parental lock function.
For example, when you select “5 ”level, the unit will not play di scs with ratings of “6 ” ,“7 ”,“8 ”.
3. Press3/4/5/6 repeatedly (or number buttons) to set the
date and time.
4. Press4to select “Done”or “Cancel ”, and then press Enter ,
“Manual ”returns.
Rating Setting
A built-in viewer rating setting enables you to lock the videos that
you do not want children to view. For example, if you set it to PG13 then the recorder will not play the videos rated PG-R, NC-17 or
Adult unless the correct pass word is entered.
Notes :
n “Password ”is set to “3308 ” before shipping from the factory.
n You may need extra instructions during the setting. If a message
appears, please follow the instructions displayed on the TV
screen.
1. Select “Rating ”.
Note:
DVD video discs may or may not respond to the parental lock se ttings. Make sure this function works with your DVD video discs.
Note : If you use this unit for first time, enter [3], [3], [0] and [8].
Because the initial password is set to “3308 ” before
shipping from the factory.
4. Press 6 repeatedly to select “OK ”.
5. Press Enter , the Parental screen appears. then press 3/4/
5/6 to select “Choose Rating ”or “Set Password ”.
22
Page 23

1-5 System Setup (continued)
Choose Rating
1. Select “Choose Rating ”.
2. Press Enter or4to select the sub menu, then press 5/6 to
select the parental lock level.
3. Press Enter, “√ ” appears.
Note : After inserting a parental disc and loading, you should be
requested to enter the password again to double confirm
your playback.
3. Press 3to return to “Factory Defaults ”.
Note : After selecting “Confirm ”, this DVD Recorder will reset
every setup item in the setup menu. When factory default is
done, the machine will automatically reboot and EASY
SETUP will appear on TV screen.
DivX(R) Registration
Set Password
1. Select “Set Password ”.
2. Press Enter or4, “New Password ”screen appears in right
column.
3. Use number buttons to set new password your desired (maximum
4 numbers) and press Enter , the Confirm column is highlighted.
then enter the same password as above.
4. Press Enter to select “OK ”, then press Enter to confirm and
“Set Password ”returns, the new password is set.
5. Press3 to return to “Rating ”.
Factory Defaults Setting
1. Select “DivX(R) Registration ” to show your registration code.
2. Press ENTER to return “Divx(R) Registration” screen.
Down Mix Setting
1. Select “Down Mix ”.
You may re-set the previous settings in System to the default
setting.
1. Select “Factory Defaults ”.
2. Press Enter or 4to enter sub menu.
Note : If you want to select factory defaults, select “Confirm ”,
If you want to keep current setting, select “CANCEL ”.
23
Page 24

1-5 System Setup (continued)
2. Press ENTER or4to select the sub menu, then press 5/6 to
select the desired item.
3. Press ENTER, “√ ” appears, the disc down mix is set.
4. Press 3to return to “Down Mix ”.
Pro Logic Setting
1. Select “Pro Logic ”.
Speaker Test
1. Select “Speaker Test ”.
2. Press Enter or4to enter.
2. Press ENTER or4to select the sub menu, then press 5/
6 to select “ON ”or “OFF”or “Auto ”.
3. Press ENTER, “√ ” appears.
4. Press 3to return to“Pro Logic ”.
3. Press 3to return to “Version ”.
4. Press System to exit.
24
Page 25

2-2 Recording
2-1 Before Recording
Preparations
n Turn on the TV and select the video input source. Refer to your
TV’s owner manual.
n Check that the disc has enough available space for recording.
n Do not touch the disc tray while it is moving.
n Never place anything except a disc on the disc tray. Foreign
objects can damage the unit.
n Do not apply excessive force to the disc tray.
n Only one disc must be placed on the disc tray at a time.
n Only blank oneself recorder DVD can be used.
When operation buttons are pressed, that operation is displayed on
the TV screen. The display turns off after several seconds.
1. Press Standby to turn the unit on.
n “Targa ”logo appears on the TV screen.
n “POWER ON ” ---> “LOADING ” ---> “NO DISC ” appears
on the FL display.
2. Press Open/Close to open the disc tray.
n “OPEN ” appears on the TV screen.
Note : To open or close the disc tray, be sure to press Open/
Close. Do not press the disc tray with your hand.
3. Place a DVD+/-RW or DVD+/-R disc ( label facing up ) to be
recorded on the disc tray.
Recording TV Programs
Before pressing TV , select the Record Quality ( “HQ ”, “SP
”,“LP”, “EP”, “EP+”or “EP++”)first by setting “Rec/Disc
Setup ”or by pressing Rec Quality on the remote control and set
Auto Scan.
1. Press TV<->DVDR to receive the TV program, “MONITOR ”
appears briefly on the TV screen ( indicating the DVD recorder is
searching the input signal which you want to record.)
2. To select the channel, do one of the following :
n Press PR + or - .
n Press the number button(s) and then press Enter .
Examples:
To select Channel 6: Press [0] and [6].
To select Channel 12: Press [1] and [2].
The channel number appears on the FL display
3. Press RECORD on the unit to start recording.
n “RECORDING ”appears briefly on the TV screen.
n Elapsed recording time appears on the TV screen.
n The REC indicator lights.
Recording continues until you stop the recording or the disc is
full.
Note :
Press DISPLAY repeatedly until the elapsed recording
time disappears on the TV screen, if necessary.
4. To stop recording
n Press n during recording.
n Please wait until “PLEASE WAIT... ”disappears on the TV
screen.
Note :
It takes a while to complete closing the disc. You may not watch
TV program while closing.
4. Press Open/Close again to close the disc tray.
Please wait until “CLOSE ” ---> “DISC LOADING ” --->“STOP”
disappears on the TV screen.
n If a blank disc is used for first time, “BUSH ” logo screen
remains.
n If the disc is recorded once before, a title menu screen may
appear.
n “DVD RW ”( or “DVD ”) and “ SP ”( or “HQ ”,“LP ”,
“EP ”,“EP+ ”or “EP++ ”) appear on the FL display.
n Blank DVD+RW may take a while longer before “STOP ”
disappears on the TV screen.
5. Press Rec Quality to select the Record Quality ( “HQ ”, “SP”,
“LP”, “EP ”,“EP+ ”or “EP++ ”).
A title menu screen appears on the TV screen.
n The TV program is recorded on the disc.
n The additional recording information is also stored on the disc.
Then the recording is completed.
Notes :
n You cannot change the channel or record quality during recor ding.
n The record time is estimate and actual time may differ.
n Recording makes on open space on the disc. Data will not be
overwritten.
n You cannot record a program with copy-protection.
To watch another TV while recording☆
Press TV<->DVDR or Source repeatedly to select TV source on
the screen.
n “TV ” appears on the FL display.
n Use your original TV remote control to select the channel on your
TV.
Note :
If you do not want to watch TV while recording, you can turn off
the TV. If using a cable box, make sure to leave it on.
25
Page 26

2-2 Recording (continued)
Timer Recording
The program timer switches the unit on and off to record a TV program at a preset time.
Use programmed recording to automatically start and stop recording
at a later date. The DVD recorder will switch to the right program
number and begin recording at the correct time.
1. Set the record program(s) first.
1. Insert a DVD+/-RW or DVD+/-R disc ( label facing up ) to be
recorded on the disc tray.
2. Press Timer/V+, “My Record List ”screen appears.
3. Press 5/6 ( or the number buttons on the remote control ) to
set the start and end times and press 3/4to move the cursor.
4. Press 4to select “DONE ”, then press Enter, the record time
is set. The “Record Show ”screen returns.
Setting Frequency
1. Select “Frequency ”.
2. Press Enter, the Record Show screen appears.
3. Press 5/6 to selec the “Once ” or “Repeat ”.
4. If select “Once ”, Press Enter or4 to select “Continue ”
then press Enter , the calendar screen appears.
3. Press Enter ,“Record Show ”screen appears on the TV
screen.
4. Press 5/6 to select the item ( Record Time, Frequency,
VPS/PDC, Input Source, Channel, Quality & Title)
Setting Record Time
1. Select “Record Time ”.
2. Press Enter , the start and end time screen appears.
5. Press 5/6 ( or the number buttons on the remote control ) to
set the record date and press3/4to move the cursor.
6. If select “Repeat ”, Press Enter , then the week screen
appears.
26
7. Press 4to select “DONE ”, then press Enter , the record date
is set. The “Record Show ”screen returns.
Page 27

2-2 Recording (continued)
Timer Recording ( continued )
Setting VPS/PDC
1. Select “VPS/PDC ”.
2. Press Enter , the VPS/PDC screen appears.
3. Press 5/6 to select “ON ”, “OFF ”, then press Enter ,
your selection is confirmed. The “Record Show ”screen
returns.
Setting Input Source
1. Select “Input Source ”.
2. Press Enter , the Input Source screen appears.
3. Press 5/6 to select “Channel ”, “Scart VID ” “Scart
RGB”, “AV1 ”,“AV2 ”, “S-Video1 ”, “S-Video2 ”.
4. Press Enter or 4to select “DONE ”, then press Enter , the
recording input source is selected. The “Record Show ”screen
returns.
Setting Channel
1. Select “Channel ”.
2. Press Enter , the Channel screen appears.
3. Press 5/6 to select your desired channel.
4. Press Enter or 4to select “DONE ”, then press Enter , the
recording channel is selected. The “Record Show”screen
returns.
Setting Quality
1. Select “Quality ”.
2. Press Enter , the Quality screen appears.
3. Press 5/6 to select “HQ(1hr) ”, “SP(2hr) ”,“LP(3hr)”,
“EP(4hr)”, “EP+(6hr)”or “EP++(8hr)”.
4. Press Enter or 4to select “DONE ”, then press Enter , rec ording quality is set. The “Record Show”screen returns.
27
Page 28

2-2 Recording (continued)
Setting Title
1. Select “Title ”.
2. Press Enter , title screen appears.
3. Press Enter again, new title screen appears
4. Press 3/4/5/6 to select the letter or number, then press
Enter.
5. Repeat step 4 to make a title name (up to 10 characters).
Note : If you make a mistake, select “Delete ” or “Clear ”,
and press Enter.
n Delete : Every time Enter is pressed, the last character of the
title name is deleted.
n Clear : Enter is pressed, the title name is cleared at once.
Timer Recording ( continued )
If the list is correct:☆
n Press Timer/V+ to exit.
If you want to edit it:☆
n Press 5/6 to select the item you want to edit.
n Press 3/4 to select “Edit ”.
n Press Enter, “Edit My Record List ” screen appears.
If you want to delete it.☆
n Press 5/6 to select the item you want to delete.
n Press 3/4 to select “Del ”.
n Press Enter, a message appears on the screen.
6. Press 6to select “DONE ”, then press Enter , title screen re-
turns. The new title name appears.
7. Press 4to select “DONE ”, then press Enter , The
“Record Show”screen returns.
After all the item setting are completed , press
6to select “Done ” and then press Enter key.
( If you want to cancel it, select “Cancel ” and
then press Enter key.)
2. Edit My Recording List
(1) Press Timer/V+, “My Record List ”screen appears
n Select “Confirm ”to delete the item. If you do not want,
select “Cancel ”.
3. Press STANDBY to turn the power off.
Recording standby mode is set.
n The present time appears on the FL display.
n When the timer ON time arrives, the power turns on automati cally and recording starts.
n When the timer OFF time arrives, the power turns off automa tically and it is set to the standby mode.
Notes :
n If there is not enough space on the disc, as much of the prog ram as possible will be recorded on the disc.
n Be sure to check and/or change the disc after every timer re cording has been completed.
28
Page 29

2-2 Recording (continued)
Video Plus
All the information needed by the DVD recorder for programing is
contained in the video plus numbers. This 9-digit video plus number is
found in most TV listing magazines. Pls follow the steps below:
1. Press Timer/V+ , press3to select “Show View ”, press
enter to display “VCR Plus Record ”screen appears.
2. Use the number buttons on remote control to enter the video
plus number and then press 3, the decoded information
appears. You can press 3/4/5/6 to change the informa tion. ( “ Frequency”, “ Channel ”, “Quality ”,“ Title ”)
Notes:
n This number is up to 9 digits long and can be found next to the
start time of the TV programme in your TV listing magazines.
Recording from an External Source
Preparations:
n Please connect this DVD Recorder to your TV, and connect
outer equipment to this DVD Recorder. (For details please
refer to the Basic Connection.)
n Remember to use an open and recordable DVD+RW or DVD+R
disc.
1. Load a recordable DVD+RW or DVD+R onto the disc tray.
2. Press Source repeatedly to select “ VIDEO1 IN ”, or
“ VIDEO2 IN ”for the equipment you have connected.
n “ VIDEO1 ”or “VIDEO2 ”appears on the FL display.
3. Start playback on the other equipment.
4. Press Rec at the point you want to start recording.
n Recording starts.
5. To pause recording
Press /ll during recording and press it again to restart record ing.
6. To stop recording
n Press n during recording.
n Please wait until “PLEASE WAIT... ”disappears on the TV
screen.
Note :
It takes a while to complete closing the disc. You may not watch
TV program while closing.
CAUTION:
Almost all videos and DVD softwares on sale have a copyprote ction. You cannot record them using this unit.
One Touch Recording ( OTR )
3. Press6 to select “Done ”to confirm.
4. To exit , press Timer/V+.
5. Load a DVD (unprotected)ready for recording. The current disc
is checked.
6. Press STANDBY/ON to switch off. The programmed recording
will only function properly when the DVD recorder has been
switched using the STANDBY/ON button.
Use this function to make a one touch recording which means that
the recording quality is not needed to set for record.During the
recording you can repeatedly press the Rec button on your remote
control or on the front panel to have a duration of recording from 5
mitutes to 480 minutes.The longest duration time is 480 minutes.
Each time pressing Rec button, the relative information will show on
TV screen, such as “RECORDING TO 005 MINUTES ”,you can refer
to them. When you press Rec button and “OTR OFF ”appears on
TV screen, your recording returns to normal recording mode.
Notes :
n The record times are an estimate and actual times may differ.
n The record time may differ depending on the recording conditi ons.
n This function depend on the disc memory and the record
quality.
29
Page 30

2-3 Editing
Edit function can ONLY work on DVD+/-RW or DVD+/-R discs. Once
you insert a DVD+/-RW or DVD+/-R disc, a title menu appears on the
screen. All the video clips you have recorded will be shown on this
menu as different titles.
n Name of the recording. If the TV station does not transmit a name,
only the channel number and time will be stored as the name.
n Length of the recording.
n Recording quality.
n Date of the recording.
1. Insert a recorded DVD+/-RW or DVD+/-R on the disc tray. Press
Play/Pause after the disc is loading. The Index Picture screen
appears on the TV screen.
2. Press3 to to select “Yes ”.
Note : If it is not necessary, select “No” and then press Enter.
3. Press Enter , then please wait until “PLEASE WAIT...”
disappears on the TV screen.
n The title menu (with “DELETED ”) screen returns.
Title Rename ( DVD+/-RW & DVD+/-R )
2. Press 3/4 to highlight the title which you want to edit.
3. Press Edit, the edit screen appears.
4. Press 5/6 to select the item.
Play Title ( DVD+/-RW & DVD+/-R )
Select “PLAY TITLE ”, then press Enter , the selected title starts
playback.
Title Delete ( DVD+/-RW )
1. Select “TITLE RENAME ”, then press Enter , “Rename”
screen appears.
2. Press 3/4/5/6to select the letter or number , then press
Enter , the character appears in the box.
3. Repeat step 2 to make the new title name (up to 10 characters).
Note :If it is not necessary, select “Cancel ” and press Enter.
If you make a mistake, select “Delete ” or “Clear ”, and
press Enter.
n Delete : Every time Enter is pressed, the last character of the
title name is deleted.
n Clear : Enter is pressed, the title name is cleared at once.
4. Press6to select “Done ”, then press Enter , wait until
“PLEASE WAIT...”disappears on the TV screen.
n The title menu (with “RENAME ”) screen returns.
1. Select “TITLE DELETE ”, then press Enter , a message
appears.
30
5. To exit , press Edit.
Page 31

3 Playback Features
Preparations
1. When you complete all the connections, plug the AC power cord
of the player.
2. Press Standby to switch on the main power.
3. Press Source to select the input source.
4. Press Open/Close to open the disc tray, insert a disc into the tray,
then press it again to close the disc tray.
5. Press Mute to shut off the sound. To restore the volume , press it
again.
6. Press Help to view the help informations.
Start or Pause Playback
n Press /ll to start palyback.
n To pause playback, press /ll again.
Note : Some discs will start playing automatically, and others will
display the menu on the TV screen. use the 3/4/5/6
to select the track, or press the number keys (0 ~ 9) to go
to the desired track/chapter.
Stopping Playback
For DVD discs
n Press n once during playback.
1. “ PRESS PLAY TO CONTINUE ”appears briefly on the TV screen.
2. When you press Play/Pause, playback starts automatically
from the point where you stopped. “PLAY ” appears briefly on
the TV screen.
Note : Some discs may not resume playback.
n Press n twice during playback.
1. “ MONITOR ”appears briefly on the TV screen and enter into
monitor mode.
2. When you press Play/Pause, “PRESS PLAY TO CONTINUE ”
appears briefly on the TV screen,press Play/Pause again,playback
starts from the point where you stopped.
fast forword : FF2X, FF 4X, FF 6X, FF 8X(4 steps).
fast reverse : FR 2X, FR 4X, FR 6X, FR 8X(4 steps).
n For VCD / CD discs
fast forword : FF 2X, FF 4X, FF 8X, FF 16X(4 steps).
fast reverse : FR 2X, FR 4X, FR 8X, FR 16X(4 steps).
2. Press /ll to return to normal playback.
Skip Playback
During playback press l / l repeatedly to skip to previous
or next track/chapter.
Slow Motion Playback
1. During playback press Slow l repeatedly to select the forward
(or reverse) slow speed playback.
The playback speed changes as follows :
n For DVD discs
SF2X → SF4X→ SF8X → SR2X → SR4X → SR8X → PLAY →
SF2X→…
n For VCD discs
SF1X → SF2X→ SF3X → STEP BWD → SF1X → SF2X → ...
2. Press Play/Pause /ll to return to normal playback.
Step Playback ( Frame by Frame Advance Playback )
n Only for DVD / VCD
1. During playback, press Step repeatedly to view playback frame
by frame. Each time the button is pressed, the picture advances
one frame.
2. Press /ll to return to normal playback.
Repeat Playback
For DVD+/-RW / DVD+/-R discs
n Press n once during playback.
1. “ PRESS PLAY TO CONTINUE ”appears briefly on the TV screen.
2. When you press Play/Pause, playback starts automatically
from the point where you stopped. “PLAY ” appears briefly on
the TV screen.
n Press n twice during playback, “STOP ”appears briefly on the TV
screen and then TITLE menu return.
n Press n third time during playback, the recorder enter into monitor
mode.
For VCD / CD discs
n Press n once during playback. The unit stops completely.
Fast Playback
1. Press or to do fast reverse or fast forward search. Each
time the button is pressed, the playback speed changes as follows:
n For DVD discs
Press 1/ALL during playback (or programmed playback) of the title
(or track ) you want to repeat. Each time the button is pressed , the
repeat mode will be changed as follows :
n For DVD discs
CHAPTER REPEAT ON:
Repeat of the chapter being played
TITLE REPEAT ON:
Repeat of the title being played
REPEAT OFF
Normal playback mode
n For VCD / CD discs
REP-ONE:
Repeat of the track being played
REP-ALL:
Repeat all tracks
REPEAT OFF:
Normal playback mode
Note : The function for VCD discs only available for PBC OFF mode.
31
Page 32

3 Playback Features (continued)
A-B Repeat Playback
This function can play a specific section in a chapter/track repeatedly.
1. Press A - B at the statring portion you want.
2. Press A - B again at the end portion you want. The specific section
will now repeat continuously.
3. Press A - B the third time to return to normal playback.
Notes :
n The A and B can be set only within the same chapter/track.
n After performing repeat play, be sure to press the Stop button .
Otherwise, the disc will play continuously.
Using DVD Title menu
Some DVD discs may contain two or more titles. If the disc has a
title menu recorded on it, you can start playback from the selected
movie title.
1. Press Title , The title menu screen will appear (if the disc contains it).
2. Press 3/4/5/6 (or the number buttons ) to select the desired
title.
3. Press Enter to playback the selected title.
Using Disc Menu
n For VCD discs
1. The system will set the PBC function to ON automatically and sho wing PBC menu.
2. Press Disc Menu to switch PBC OFF( If the disc is playing, the
playback will stop), using numeric key (0~9) to select the track
you want to playback.
n For DVD disc
Press Disc Menu to turn “ROOT MENU ” will appear on OSD.
3. Use numeric key (0~9) to input the specific title, chapter or elapsed
playing time at which you want to begin playback.
4. Press Enter.
n For VCD / CD discs ( only in PBC OFF mode )
1. Press Go to.
2. Use numeric key (0~9) to input the specific elapsed playing time at
which you want to begin playback.
eg : GO TO __:__
Display the playback information
You can check information about the disc, such as the total number
of the titles or chapters or tracks or time, using the Display function.
The information you want appears on the TV screen or/and on the
front panel display.
When playing back a DVD disc
1. Press Display repeatedly to show the relative information on TV
screen. ( The display will disappear after a few seconds. )
TITLE 02 / 05 CHAPTER 001 / 006
00 : 34 : 56
↓
TITLE REMAIN
00 : 34 : 56
↓
CHAPTER ELAPSED
00 : 01 : 23
↓
CHAPTER REMAIN
00 : 03 : 21
Note : When the PBC is set to ON , you can not use the numeric
buttons to select track directly.
Return ( Go back to the menu screen )
Press Return when playing a VCD disc with PBC .“BACK TO MAIN
PAGE ”is shown on the TV screen, and then the menu appears.
Go to ( Title, Chapter, Track or Time search )
This function allows you to start playing at any title,chapter,track or time
on the disc.
Note : This function is only available in the same track.
n For DVD discs (DVD+/-RW & DVD+/-R do not support Time search
function)
1. Press Go to.
2. Press 3/4 to select TITLE or CHAPTER search or press Go to
again to enter time search.
eg : TITLE 01 / 28 CHAPTER 015 / 035
TITLE 01 / 02 TIME __ : __ : __
2. Press Display again, the information display is off.
Note : Depending on the DVD, the title number or chapter number or
time may not appear or you may not be able to change the
display.The DISPLAY function for VCD discs only available
for PBC OFF mode.
When playing back a VCD or CD
1. Press Display repeatedly to show the relative information on TV
screen. ( The display will disappear after a few seconds. )
SINGLE ELAPSED---->SINGLE REMAIN ---> OFF
(only in PBC ON mode)
SINGLE ELAPSED ---> SINGLE REMAIN ---> TOTAL ELAPSED
---> TOTAL REMAIN ---> OFF
(only in PBC OFF mode)
2. Press Display again, the information display is off.
Subtitle ( Selecting Subtitle Language )
32
Page 33

3 Playback Features (continued)
This operation works only with discs on which multiple subtitle
languages are recorded.
1. Press Subtitle repeatedly during playback to select the different
subtitle language.
2. If the subtitle language is not necessary, press Subtitle to select
“SUBTITLE OFF ”.
Notes :
n In some cases, the subtitle language is not changed to the selec ted one.
n When a disc supporting closed caption is played, the subtitle and
the closed caption may overlap each other on the TV screen . In
this case, turn the subtitle off.
n When the desired language is not selected even if the button is
pressed, the language is not available on the disc.
n When the power is turned on or the disc is replaced , select the
subtitle language again.
Audio (Selecting Audio Soundtrack Language )
This operation works only with discs on which multiple audio
soundtrack languages are recorded.
Press Audio repeatedly during playback to select the desired audio
language appears on the TV screen.
Notes :
n When the desired language is not selected even if the button is
pressed, the language is not available on the disc.
n When the power is turned on or the disc is replaced, select the
language again.
n If the language is not recorded on the disc, only the available
language on the disc will be heard.
Zooming
This function allows you to enlarge the picture on the TV screen
and to pan through the enlarged image.
1. Press Zoom repeatedly to select a zoom factor as below:
ZOOM x 1.5
↓
ZOOM x 2
↓
ZOOM x 3
↓
ZOOM OFF
2. To pan through the enlarged image, press 3/4/5/6 buttons
to move the zoomed picture left, right, up or down.
Angle ( Viewing from a Desired Camera Angle )
n Some DVD-Video discs may contain scenes which have been
shot simultaneously from a number of different camera angles.
n The jacket or case of discs that are recorded with angles will
be marked.
n For these discs, the same scenes can viewed from each of the
different angles.
Press the Angle button to change the scenes from one angle to other
angle(s).
For example: 1/4, 2/4, 3/4, 4/4.
Programmed Playback
You can play the contents of the disc in the order you want by programming the order of the tracks to be played. Up to 99 tracks can be stored.
This function is only available in VCD( only in PBC OFF mode )/CD mode.
1. Press n to stop playback.
2. Press Program to enter program mode.
n “PROGRAM P00:00 ”appears on the TV screen.
n “PROG ”icon appears on the FL display.
3. Use the number buttons (0 ~ 9) to input the track number in the
order you want. and then press Enter to confirm.
n “PROGRAM PXX:YY ”appears on the TV screen.
n The Track No. “YY ” is set to the No. “XX ” program.
Note : If you make a mistake, press Clear to eliminate the numb er you have input.
4. Repeat step 3 as above to select other tracks.
5. Press /ll to start programmed playback.
n When all programmed selections have been played, the unit
stops automatically.
n The programmed contents are retained in memory. If press /ll
again, programmed playback starts again.
6. To stop programmed playback, press n .
7. To cancel programmed playback, press n and then press
Program.
KODAK Picture CD Playback
With KODAK Picture CD, it’s easy to turn film into pictures you can
email from your PC and view on this unit.
1. Press Open/Close to open the disc tray.
2. Load the disc with the label facing up on the disc tray.
3. Press Open/Close again to close the disc tray.
n If you press /ll during the slide show, the slide show stops
temporarily. “Pause ” appears. Press /ll again to resume the
slide show.
n If the picture appears upside down, sideways, etc. Press 3/
4/5/6 as follows:
4: Rotate it 90 degrees clockwise.
3: Rotate it 90 degrees counterclockwise.
5: Change it to the vertically reversed image picture.
6: Change it to the mirror reversed image picture.
n If you press l / l during the slide show, it skips to the
previous picture or next picture.
n To stop the slide show, press n. The thumbnail pictures appear.
33
Page 34

3 Playback Features (continued)
n After the last picture has been displayed, the thumbnail pictures
appear on the TV screen.
To start the slide show from the thumbnail pictures
1. Press 3/4/5/6 to move the cursor to the desired picture.
n To go to the previous or next thumbnail pictures, press l / l
2. Press Enter ( or /ll ( Play ) ) to start the slide show from the
selected picture.
JPEG CD Playback
You can also view digital images from JPEG files on disc created
by your computer.
1. Load the disc with the label facing up on the disc tray.
2. Press 5/6 to select the folder or file, and press Enter or
press number buttons to select the file.
The slide show starts
n If you press /ll during the slide show, the slide show stops
temporarily. “Pause ” appears. Press /ll again to resume the
slide show.
n If the picture appears upside down, sideways, etc. Press 3/4/
5/6 as follows:
4: Rotate it 90 degrees clockwise.
3: Rotate it 90 degrees counterclockwise.
5: Change it to the vertically reversed image picture.
6: Change it to the mirror reversed image picture.
n If you press l / l during the slide show, it skips to the
previous picture or next picture.
n To stop the slide show, press n. The thumbnail pictures appear.
KODAK Picture CD / JPEG Picture Zoom
MP3 CD Playback
1. Load the disc with the label facing up on the disc tray.
n File list screen appears.
2. Press 5/6 to select the folder or file, and press Enter or
press number buttons to select the file.
n If the folder is selected, the file menu of the selected folder
appears.
n If the file is selected, the selected file playback starts.
(“Play ”appears briefly on the TV screen).
3. Repeat step 2 to select the file in the folder, if necessary.
Stopping Playback
n Press n during playback.
n “Stop ”appears briefly on the TV screen.
Pause
n Press /ll during playback.
n “Pause ”appears briefly on the TV screen and “ll ”appears
on the FL display.
n Press /ll again to return to normal playback.
1. Press /ll at the desired picture.
2. Press Zoom. “ZOOM ON ” appears briefly on the TV screen.
3. Press / to select the desired picture size.
4. To return to the original size, press Zoom again.
“ZOOM OFF ”appears briefly on the TV screen.
34
File Skip
n Press l / l repeatedly during playback to skip to
previous or next file.
Repeat Playback
n Press 1/ALL in the stop mode.
n Each time the button is pressed, the repeat mode will be changed
as follows.
Rep-one --> Folder Repeat --> Disc Repeat -->Repeat off
--> Rep-one -->...
To Display the Elapsed Playing Time
n Press Display in the playback mode.
n Each time the button is pressed, various playing time appears.
“Chapter Elapsed ” and elapsed playing time
“Chapter Remain ” and remaining playing time
“OFF ”
Page 35

DivX / Nero Digital Playback
3 Playback Features (continued)
1. Load the disc with the label facing up on the disc tray.
n File list screen appears.
Stopping Playback
n Press n during playback.
n “Stop ”appears briefly on the TV screen.
Pause
n Press /ll during playback.
n “Pause ”appears briefly on the TV screen and “ll ”appears
on the FL display.
n Press /ll again to return to normal playback.
File Skip
n Press l / l repeatedly during playback to skip to
previous or next file.
Repeat Playback
n Press 1/ALL in the stop mode.
n Each time the button is pressed, the repeat mode will be changed
as follows.
Rep-one --> Folder Repeat --> Disc Repeat -->Repeat off
--> Rep-one -->...
To Display the Elapsed Playing Time
n Press Display in the playback mode.
n Each time the button is pressed, various playing time appears.
2. Press 5/6 to select the folder or file, and press Enter or
press number buttons to select the file.
n If the folder is selected, the file menu of the selected folder
appears.
n If the file is selected, the selected file playback starts.
(“Play ”appears briefly on the TV screen).
3. Repeat step 2 to select the file in the folder, if necessary.
Note :
n Other playbacks are the same as DVDs.
35
Page 36

4-1 Troubleshooting Guide
If you experience any of the following difficulties while using the
system, use this troubleshooting guide to help you remedy the
problem. While any problem persist, consult your nearest service
center.
No power.
n Is the power cord firmly plugged into the power outlet?
n Is the power swicth of back panel turned to ON?
n One of the safety mechanisms may be operating. In this event,
unplug the player from the power outlet briefly and then plug it in
again.
No picture.
n Check that the system is connected securely.
n The video connecting cord is damaged. Replace it with a new
one.
n Make sure you connect the system to the video input connector
on the TV.
n Make sure you turn on the TV.
n Make sure you select the video input on the TV so that you can
view the pictures from this system.
Noise(interference) appears in the picture.
n Clean the disc.
n If video from this system has to go through your VCR to get to
your TV, the copy-protection applied to some DVD programs
could affect picture quality. If you still experience problems after
checking your connections, please try connecting your DVD
system directly to your TV S-Video input, if your TV is equipped
with this input.
n The system is in pause mode or in slow-motion play mode, or
fast forward or fast reverse is performed. Press PLAY/PAUSE
to return to normal play mode.
n Check the speaker settings.
The left and right sounds are unbalanced or
reversed.
n Check that the speakers and components are connected
correctly and securely.
Severe hum or noise is heard.
n Check that the speakers and components are connected
securely.
n Check that the connecting cords are away from a transformer or
motor, and at least 3 meters away from a TV or fluorescent light.
n Move your TV away from the audio components.
n The plugs and jacks are dirty. Wipe them with a cloth slightly
moistened with alcohol.
n Clean the disc.
The surround effect is difficult to hear when
you are playing a Dolby Digital sound track.
n Check the speaker connections.
n Depending on the DVD disc, the output signal may at times be
monaural or stereo even if the sound track is recorded in Dolby
Digital format.
The aspect ratio of the screen cannot be changed even though you set "TV DISPLAY" in
the SETUP menu when you play a wide picture.
n The aspect rate is fixed on your DVD disc.
n If you connect the system with the S-Video cable, connect dire-
ctly to the TV. Otherwise, you may not change the aspect rate.
n Depending on the TV, you may not be able to change the aspect
ratio.
There is no sound or only a very low-level
sound is heard.
n Check that the speakers and components are connected
securely.
n Make sure that you have selected the correct source on the
system.
n Press MUTE button on the remote control if the red STANDBY
LED on the front panel is turn on.
n The protective device on the system has been activated
because of a short circuit. Turn off the system, eliminate the
short-circuit problem and turn on the power again.
n The audio connecting cord is damaged. Replace it with a new
one.
The sound comes from the center speaker
only.
n Depending on the disc at times the sound may come from the
center speaker only. This is normal.
No sound is heard from the center speaker.
n Adjust the center speaker volume.
No sound or only a very low-level sound is
heard from the rear speakers.
n Adjust the rear speaker volume.
The remote does not function.
n Remove any obstacles between the remote control and the
system.
n Move the remote control closer to the system.
n Point the remote control at the remote sensor on the front panel.
n Replace all the batteries in the remote control with new ones if
they are weak.
n Check that the batteries are loaded correctly.
36
Page 37

4-2 Disc Handling and Maintenance
Disc
Disc tray
X
(B)
X
o
(C)
(A)
Handling Precautions
n Hold the disc by the edges so the surface will not be soiled with fi ngerprints. (A)
Fingerprints, dirt and scratches can cause skipping and distortion.
n Do not write on the label side with a ball-point pen or other writing utensils.
n Do not use record cleaning sprays, benzine, thinner, static electricity prevention liquids
or any other solvent.
n Be careful not to drop or bend the disc.
n Do not install more than 1 disc on the disc tray.
n Do not try to close the disc tray when the disc is not installed properly. (B)
n Be sure to store the disc in its exclusive case when not in use.
If the surface is soiled (C)
Wipe gently with a soft, damp (water only) cloth.
When wiping discs, always move the cloth from the center hole toward the outer edge.
(If you wipe the discs using a circular motion, circular scratches are likely to occur, which
will cause noise.)
If the disc is brought from a cold to a warm environment, moisture may form on the disc
Wipe this moisture off with a soft, dry, lint-free cloth before using the disc.
Improper disc storage
You can damage discs if you store them in the following places:
n Areas exposed to direct sunlight
n Humid or dusty areas
n Areas directly exposed to a heat outlet or heating appliance
Playable disc format
n DVD, DVD+RW, DVD+R, DVD-RW, DVD-R, VCD, SVCD, CD-DA, Mixed CD-DA,
Audio CD,JPEG file disc, Kodak Picture, MP3, DivX and Nero Digital Disc.
Recordable disc format
n DVD+/-RW (Application Programme)
n DVD+/-R
Maintenance
n Be sure to turn the unit off and disconnect the AC power cord before maintaining the
unit.
n Wipe this unit with a dry soft cloth.
If the surfaces are extremely dirty, wipe clean with a cloth which has been dipped in a
weak soap-and-water solution and wrung out thoroughly, and then wipe again with a
dry cloth.
n Never use alcohol, benzine, thinner, cleaning fl uid or other chemicals. And do not use
compressed air to remove dust.
37
Page 38

4-3 Definition of Terms
Angle
Recorded onto some DVD discs are scenes which have been simultaneously shot from a number of different angles (the same scene is shot
from the front, from the left side, from the right side, etc.). With such discs, the ANGLE button can be used to view the scene from different
angles.
Chapter Number
These numbers are recorded on DVD discs. A title is subdivided into many sections, each of which is numbered, and specificparts of video
presentations can be searched quickly using these numbers.
DVD
These refer to a high-density optical disc on which high-quality pictures and sound have been recorded by means of digital signals. Incorporating a new video compression technology (MPEG II) and high-density recording technology, DVD enables aesthetically pleasing full-motion
video to be recorded over long periods of time (for instance, a whole movie can be recorded).
DVD has a structure consisting of two 0.6 mm thin discs which are adhered to each other. Since the thinner the disc, the higher the density at
which the information can be recorded, a DVD disc has a greater capacity than a single 1.2 mm thick disc. Since the two thin discs are
adhered to each other, there is the potential to achieve double-sided play sometime in the future for even longer duration play.
DVD+/-R
This means DVD+Recordable. These Discs can be recorded and finalized only once.
DVD+/-RW
This means DVD+ReWritable. These Discs can be recorded on repeatedly.
Subtitles
These are the printed lines appearing at the bottom of the screen which translate or transcribe the dialogue. They are recorded on DVD discs.
Time Digit
This indicates the play time which has elapsed from the start of a disc or a title. It can be used to find a specific scene quickly. (It may not
work with some discs.)
Title Number
These numbers are recorded on DVD discs. When a disc contains two or more movies, these movies are numbered as title 1, title 2, etc.
Track Number
These numbers are assigned to the tracks which are recorded on audio CDs. They enable specific tracks to be located quickly.
Your product is designed and manufactured with high quality materials and components,which can be recycled and reused.
When this crossed-out wheeled bin symbol is attached to a product it means the product is covered by the European
Directive 2002/96/EC
Please inform yourself about the local separate collection system for electrical and electronic products.
Please act according to your local rules and do not dispose of your old products with your nomal household waste. The correct disposal of
your old product with help prevent potential negative consequences for the environment and human health.
38
Page 39

4-4 Specifications
Note: Specifications subject to change without prior notice
Playable discs
DVD+/-RW
DVD+/-R
DVD-VIDEO
VIDEO CD
Audio CD (CD-DA)
MP3 CD
DivX/MPEG4
Nero Digital
Kodak Picture CD
Recordable discs
DVD+/-RW
DVD+/-R
Video recording format
DVD+/-RW Video Format
Audio recording format
MPEG Audio
Recording time (DVD+/-RW, Version 1.2)
HQ: Approx. 60 minutes
SP (Standard mode): Approx. 120 minutes
LP: Approx. 180 minutes
EP: Approx. 240 minutes
EP+: Approx. 360 minutes
EP++: Approx. 480 minutes
Timer
1 year/15-event programmable
Outputs
COMPONENT VIDEO OUT :
Y: 1.0 Vp-p (75 .)
PB: 0.7 Vp-p (75 .)
PR: 0.7 Vp-p (75 .)
VIDEO: 1.0 Vp-p (75 .)
S-VIDEO:
Y: 1.0 Vp-p (75 .)
C: 0.286 Vp-p (75 .)
DIGITAL AUDIO:
Optical & Coaxial
AUDIO (L/R):
2 V rms
Inputs
AV1 IN :
VIDEO: 1.0 Vp-p (75 .)
S-VIDEO:
Y: 1.0 Vp-p (75 .)
C: 0.286 Vp-p (75 .)
AUDIO (L/R): 2 V rms
AV2 IN :
VIDEO: 1.0 Vp-p (75 .)
S-VIDEO:
Y: 1.0 Vp-p (75 .)
C: 0.286 Vp-p (75 .)
AUDIO (L/R): 2 V rms
Power requirements
TV system
PAL standard system
Tuner channel range
VHF: 2-13
UHF: 14-69
CATV: 1-125
RF converter
Built-in VHF converter
Time indication
24-hour system
230V- 50 Hz
Power consumption
28 Watts
Standby By Pass
Receive and then export signal in standby mode
39
Page 40

Targa GmbH
Lange Wende 41
D-59494 Soest
www.targa-online.com
 Loading...