


English ............................................................................................................... 2
Dank ................................................................................................................ 47
Deutsch ............................................................................................................ 91
V 1.3

CR 1.0 A1
Contents
Contents ..................................................................................................................................................... 2
Trademarks ................................................................................................................................................ 5
Introduction ................................................................................................................................................ 5
Intended use .............................................................................................................................................. 5
Package Contents ..................................................................................................................................... 6
Technical specifications ............................................................................................................................ 7
Safety instructions...................................................................................................................................... 8
Explanation of symbols ........................................................................................................................ 8
Copyright ................................................................................................................................................ 11
Overview ................................................................................................................................................ 12
Controls and displays ........................................................................................................................ 13
Buttons ................................................................................................................................................ 13
LED indicators .................................................................................................................................... 14
Before you start ...................................................................................................................................... 15
Inserting/removing the memory card............................................................................................... 15
Car mount .......................................................................................................................................... 15
Charging the battery ......................................................................................................................... 16
Charging the battery with a USB cable ........................................................................................... 17
Charging with the car charger ......................................................................................................... 17
Getting started ........................................................................................................................................ 18
Turning on the Dashboard Camera ................................................................................................. 18
Turning off the Dashboard Camera ................................................................................................. 18
2 - English

CR 1.0 A1
Setting the menu language ............................................................................................................... 18
Setting the date / time ...................................................................................................................... 19
Turning on and selecting the operating mode ..................................................................................... 19
Dashboard Camera is not being charged....................................................................................... 19
Dashboard Camera is connected to a PC with a USB cable ........................................................ 20
Dashboard Camera is connected with the car charger ................................................................. 20
Recording videos ................................................................................................................................... 20
Video light .......................................................................................................................................... 22
Exposure compensation .................................................................................................................... 22
Protecting videos from being overwritten during loop recording .................................................. 23
Taking photos ......................................................................................................................................... 23
Exposure compensation .................................................................................................................... 25
Playback ................................................................................................................................................. 25
Video playback functions .................................................................................................................. 25
Photo playback functions .................................................................................................................. 27
Menus ..................................................................................................................................................... 29
Main menu ......................................................................................................................................... 29
The recording menus ......................................................................................................................... 32
The playback menus .......................................................................................................................... 37
Connectors and sockets ........................................................................................................................ 39
Viewing recordings on a television .................................................................................................. 39
Transferring recordings to a computer ............................................................................................. 39
Connecting the Dashboard Camera to a Computer ...................................................................... 40
English - 3

CR 1.0 A1
Using a card reader .......................................................................................................................... 40
Encoding videos for iOS ................................................................................................................... 40
Replacing the car charger fuse ............................................................................................................. 41
Troubleshooting ...................................................................................................................................... 42
After use .................................................................................................................................................. 43
Storage when not using the product for a longer time ................................................................... 43
Repairs ................................................................................................................................................ 43
Cleaning ............................................................................................................................................. 43
Conformity notes .................................................................................................................................... 43
Environmental regulations and disposal information .......................................................................... 44
Warranty and Service Information ....................................................................................................... 44
4 - English

CR 1.0 A1
Trademarks
HDMI, the HDMI logo and High-Definition Multimedia Interface are trademarks or registered
trademarks of HDMI Licensing, LLC in the USA and other countries.
Microsoft Windows is a registered trademark of Microsoft Corporation, USA.
SD and SDHC are registered trademarks.
USB is a registered trademark.
Apple is a registered trademark of Apple, Inc.
IOS is a trademark or registered trademark in the US and other countries of Cisco Systems.
Other names and products may be the trademarks or registered trademarks of their respective
owners.
Introduction
Thank you for purchasing this CR 1.0 A1 Dashboard Camera, hereinafter referred to as the
Dashboard Camera. The Dashboard Camera is the ideal vehicle companion. Not only can it
record your trips but thanks to the G-sensor, it can also capture details in the event of a crash.
Intended use
The Dashboard Camera is a Consumer Electronics device and is designed exclusively for
recording video and photos. Any use other than that mentioned above does not correspond to the
intended use. The device may only be used for private purposes, not for industrial or commercial
ones.
This device fulfils all relevant standards and directives relating to the European Conformity
Declaration. If any changes are made to the device other than those endorsed by the
manufacturer, compliance with these standards and directives can no longer be guaranteed. Only
use accessories recommended by the manufacturer.
Observe the regulations and laws in the country of use.
English - 5

CR 1.0 A1
Package Contents
Remove all devices and accessories from the packaging. Remove the packaging material and
screen protector and check whether all the parts are complete and undamaged. If you find
anything missing or damaged, please contact the manufacturer.
Keep the packaging material away from children and dispose of appropriately.
CR 1.0 A1 Car mount USB cable
Car charger User manual
6 - English
(lineart illustration)

CR 1.0 A1
Technical specifications
Dashboard Camera
Display 960 x 240 pixels, 2.7 inch (6.9 cm) TFT LCD
Video resolution 1920x1080, 25 fps
1440x1080, 30 fps
1280x720*, 30fps
Image resolution 12M 4032x3024
10M 3648x2736
8M 3264x2448
5M 2592x1944
Aspect ratio JPG
Zoom 4x digital zoom
Light 4 white LEDs
Interfaces HDMI output
USB port for PC
Operating modes Video Recording, Motion Detection, Photo, Playback, PC Camera
Storage media MicroSD card, 2 to 32 GB, class 6 minimum
Functions Loop recording (3, 5, 10 minutes, Off)
Motion Detection
G-sensor
Built-in battery Rechargeable Li-Ion battery, 3.7 V / 330 mAh
Charging function via USB interface
Typical run time (video recording) with fully charged battery: 45
minutes
Charging time approx. 1.5 hours (when powered off) and approx. 2
hours (when powered on)
Operating
environment
Storage environment -10 to 55 ºC, max. 85% relative humidity
Dimensions 85.5 x 62 x 32 mm (W x H x D)
Weight 70 g
* native Dashboard Camera resolution. All other resolutions are interpolated.
0 to 35 ºC, max. 85% relative humidity
640x480, 30 fps
848x480, 30 fps
320x240, 30 fps
3M 2048x1536
2MHD 1920x1080
1.3M 1280x960
VGA 640x480*
English - 7

CR 1.
0
g
h
f
l
t
e
c
t
f
m
a
e
e
e
t e
o
c
r
l
e
m
n
T
o
W
G
t
h
d
W
G
m
3
e
e
l
to
d
e
o
o
u
a
d
v
e
AR
n
op
d
f
w
n
a
o
p
i
t
m
a
r
a
f
c
A1
Car c
arger
Manu
acturer
Mode
name
Input
Outpu
Fuse
r cable length
Charg
hnical specificati
The te
Safe
y instruction
Before
you use this devi
you are familia
even i
safe p
ace for future ref
the sa
e time. The User
Expl
nation of sy
In this
user manual, war
th
device is not exp
th
device is not exp
th
Dashboard Ca
0°
C to 35°C only
DANGER!
situation. Ign
ARNIN
required for
Caution!
lead to legal
This symbol
ARNIN
Targa GmbH
Car Charger CR
12 to 24 V ,
5 V , 600 mA
T2A L, 250 V
200 cm
ns and design ca
s
e for the first tim
with handling el
rence. If you sel
Manual is part of
bols
ings are used as
his icon and the
ring it can lead
!
This symbol an
he safe operation
T
is symbol and th
actions when ign
enotes further inf
! Always make s
osed to direct he
osed to direct sun
era may be use
1.0 A1
50 mA
n be changed wit
, please read the
ectronic devices.
the device or gi
the product.
follows.
word “DANGER
severe injury or
the word “W
of the product a
word “Caution”
red.
rmation on the t
re that
t sources (e.g. ra
light or bright arti
within the allo
hout prior notice.
following notes a
Keep these oper
e it away, pass
” alert you to a
ven death.
NING” denote
for the safety of
denote importan
ic.
iators)
icial light
ed operating te
nd heed all warni
ting instructions
n the user manu
otentially dange
mportant inform
its users.
information that
perature range
ngs,
in a
l at
ous
ion
an
rom
8 - En
lish

CR 1.0 A1
contact with water sprays or drops and corrosive liquids is avoided and the device is never
operated near water; in particular the device may never be immersed in liquids (do not place
any objects containing liquids, such as vases or drinks, on or near the device)
the device is never placed near magnetic fields (e.g. speakers)
no naked flames (e.g. burning candles) are placed on or near the device
no foreign bodies can penetrate the device
the device is not exposed to any extreme temperature fluctuations as this can cause moisture
through condensation and cause short-circuits. If the device has been exposed to strong
temperature variations, wait for it to reach the ambient temperature before switching it on
(about 2 hours).
the device should not be subjected to excessive shocks and vibrations
the device and its accessories are not damaged in order to avoid any further risks. Therefore
you must inspect the device and its accessories regularly for any damage. If you find any
component damaged, it must not be used. Never open the Dashboard Camera housing and
have all repairs performed by qualified technical stuff only.
Failure to heed the warnings above may result in damage to the device or injury.
DANGER! Children and persons with disabilities
Electrical devices are not suitable for children. Also persons with reduced physical, sensory or
mental capabilities should only use electrical devices within the limits of their abilities. Do not allow
children or persons with disabilities to use electrical devices unsupervised, unless they are
instructed accordingly and supervised by a competent person responsible for their safety. Children
should always be supervised to ensure that they do not play with the product. Small parts can
represent choking hazards.
DANGER! Risk of suffocation!
Keep small parts and packaging material away from children. Packaging material is no toy.
Danger of suffocation!
English - 9

CR 1.0 A1
Warning! Recordings (Photo/Video) of persons and the right to one's
own image
Please note that when recording any persons, whether portraits or groups of persons, every person
has the right to her/his own image/recording. Recording underage people is subject to the
consent of the parents. In order to avoid any legal measures, make sure to respect the legislation
of the country of use.
Furthermore, in some jurisdictions it may not be allowed to film or photograph any people
(including car drivers and passengers as well as pedestrians, etc.) without telling them first that you
are doing so. Please make sure to respect the privacy legislation of the country of use.
DANGER! Using on the road
Please note that using the camera on the road, whether driving a car, riding a bicycle or as a
pedestrian may distract you from the traffic resulting in severe accidents. This may harm your health
and/or result in legal actions. Also, using the Dashboard Camera may incur legal action in some
countries. Please make sure to respect the legislation of the country of use.
DANGER! Installation / Use in the Car
Road safety first! In the event of an accident there is an increased risk of injury from flying objects.
Always secure the Dashboard Camera so that the vehicle can be operated safely at all times and
so that the driver's visibility is not impaired. Always position all cables in your vehicle so that they
do not impede operation of your vehicle. When positioning the cables, take care to ensure that the
cables do not limit your field of vision. Under no circumstances must the Dashboard Camera, or
parts thereof (interface or power cables), be installed within the airbag deployment area. This
constitutes a risk of accident and injury.
DANGER! Battery
Do not throw the Dashboard Camera into a fire. Otherwise there is risk of explosion.
The built-in rechargeable battery cannot be removed for disposal.
10 - English

CR 1.0 A1
DANGER! Risk of Explosion
Improper use could cause explosions or leaks.
DANGER! Screen
Do not apply any pressure to the screen and keep sharp objects away from the display. A broken
display represents a risk of injury. Wear gloves when collecting the broken parts and contact the
manufacturer if necessary. Collect the broken parts in a suitable container. In the case of scratches
or other damage to the screen, take extreme care to ensure that no fluid escapes from the screen.
If fluid does escape, proceed as follows:
If the fluid comes into contact with the skin, wipe off with a clean cloth and rinse with plenty of
water. Contact a doctor if necessary.
If the fluid comes into contact with the eyes, rinse them under running water for at least 15
minutes and contact a doctor immediately.
If the fluid is swallowed, first rinse the mouth out with water and then drink plenty of water.
Contact a doctor immediately!
WARNING! Cables
Unplug all cables by holding the plugs and never pull on the cables themselves. Never place
pieces of furniture or other heavy objects on the cables and take care that they do not become
damaged, especially at the plugs and sockets. Never tie knots in a cable and do not tie them to
other cables. All cables must be laid so that nobody can trip over them or be obstructed by them.
Copyright
All the contents of this user manual are protected by copyright and provided to the reader for
information only. Copying data and information without the prior explicit written consent of the
author is strictly forbidden. This also applies to any commercial use of the contents and information.
All texts and diagrams are up-to-date at the time of printing.
English - 11

CR 1.
0
n
r
d
d
n
r
l
o
h
4
R
6
7
9
r
a
T
o
m
o
F
o
v
A1
Ove
view
An ad
itional illustratio
on the
inner page of th
whilst
reading the diffe
s at any time.
contro
of the items and
e fold-out cover
ent chapters of t
controls and thei
f this user manu
is user manual.
eft side
L
. Reset switch
1
. microSD card sl
2
rotective cover)
p
. HDMI output
3
. Protective cover
ight side
5
. USB/charging c
F
ront
. Lens
. Speaker
8
. 4 white LEDs
corresponding n
l. You can keep
his allows you t
t (labelled as "T-
onnector
umbers can be f
this page folded
refer to the rele
lash" on the
und
out
ant
op
T
. Thread for car
12 - E
glish
ount

Cont
r
o
t
a
u
B
e
e
h1m
B
n
p
.
u
o
o
e
a
d
1
v
n
e
w
a
d
0
-
e
n
ols and displ
Butt
ns
But
on F
EV b
utton (10)
Men
u button
(11)
ys
unction
Press this button
the exposure va
button (12).
Press this butto
displayed to o
operating mode
ack
1
0. EV button: adj
1. Menu button:
1
ttings
s
1
2. OK button
1
3. Display
1
4. On/Off button
1
5. Protect button:
cording
r
1
6. Return button:
7. – button: decr
1
e menu
t
8. + button: incre
enu
1
9. Charge LED (o
2
0. Recording LED
ottom
2
1. Microphone
with video recor
lue using the + (
with recording
en the settings
sts the exposure
pens the operati
to protect the curr
pens the main m
ases zoom / do
ses zoom / up n
range)
(blue)
ing paused or in
8) and – (17) b
or playback pau
menu associate
CR 1.
alue
g mode-specific
ent video
nu
n navigation in
vigation in the
Photo mode to s
uttons and the O
sed and no men
with the curre
A1
t
u
t
English
13

CR 1.0 A1
OK button (12)
Press this button in Video mode to start or stop recording.
Press this button in Photo mode to take a picture.
Press this button while the menu is shown to select a menu item.
On/Off button
(14)
Press and hold this button for at least 3 seconds to switch the
Dashboard Camera on or off.
Press this button during video recording to switch off the display. Video
recording will continue. Press the button again to switch the display on
again.
Press this button in Photo mode to switch off the display. Press the
button again to switch the display on again.
Protect button
(15)
Return button
(16)
– (17) and +
(18) buttons
Press this button during video recording to protect the current video
and prevent it from being overwritten during loop recording.
Press this button to display the main menu for operating mode
selection.
Press these buttons during video recording or photo capture to zoom
in or out on the scene.
Press these buttons with the Menu displayed to navigate between the
various Menu options (up/down).
Press these buttons with a value in the Menu selected to increase or
decrease the value.
LED indicators
LED Description
Charge LED (19)
Recording LED
(20)
Orange: charging battery
Blue: device is being initialised (after switching on)
Blue flashing: video recording in progress
Blue flashing: Self-timer enabled in photo capture mode
14 - English

CR 1.0 A1
Before you start
Inserting/removing the memory card
You will need a microSD memory card (not included) to save your photos and
videos. If a memory card is inserted, all the content recorded is saved onto it. If
no memory card is inserted, recording will not be possible. In this case the message
"PLEASE INSERT SD CARD" will appear. Confirm by pressing the OK button (12).
Proceed as follows to insert a memory card:
WARNING!
memory card.
Power the Dashboard Camera off before you insert or remove a
Only use Speed Class 6 or faster memory cards.
If you have not inserted a microSD memory card the message "PLEASE INSERT SD
CARD" will appear when the device is switched on.
1. Open the protective cover (4) on the left--hand side of the Dashboard Camera.
2. Insert the memory card with the contacts facing towards the front of the device (towards the
display (13)) into the microSD card slot (2) until it clicks in place.
3. Close the protective cover (4) on the left--hand side of the Dashboard Camera.
To remove the memory card, gently press on the inserted card. The memory card will protrude a
little so that you can get hold of it and remove it.
Car mount
The car mount allows the Dashboard Camera to be
mounted on the windscreen of your vehicle.
1. Connect the Dashboard Camera to the car mount. To
do this, screw the thread for the car mount (9) on to the
car mount's threaded pin (22). You can use the knurled
nut (23) to fix the Dashboard Camera in place.
2. Then press the suction pad (24) of the car mount
against the windscreen and secure by pressing down the lever (26).
English - 15

CR 1.0 A1
As the thread for the car mount (9) is located at
the top of the Dashboard Camera, you should
install the car mount such that the Dashboard
Camera "hangs" off it (see adjacent image).
Otherwise the controls (10 to 20) will be upside
down.
DANGER!
the operating area of the vehicle’s airbag and install the car mount so that the driver’s
Do not install the car mount (with or without the Dashboard Camera) within
view is not obstructed.
3. Loosen the knurled screw (27) to line up the Dashboard Camera in the desired position with
the help of the ball joint. Re-tighten the knurled screw (27).
4. To remove the car mount from the windscreen, flip the lever (26) up again and then pull on
the release tab (25) on the suction pad.
Charging the battery
The Dashboard Camera battery can be charged via the USB port on a computer or with the car
charger supplied.
In addition to the options below, you can also connect the Dashboard Camera to an
external USB power adapter (not supplied) and charge the Dashboard Camera that
way. You can purchase a suitable 5V USB power adapter with at least 1A output
current from any electronics retail outlet.
WARNING!
easily accessible wall outlet so that it can be disconnected quickly in case of an
When using an external power adapter, it must be connected to an
emergency.
16 - English

CR 1.0 A1
Charging the battery with a USB cable
1. Use the USB cable to connect the Dashboard Camera to a USB port on your computer. Insert
the small plug (30) of the supplied USB cable into the Dashboard Camera's USB/charge port
(5) and the large plug (31) into a USB port on your computer.
The Dashboard Camera will now turn on.
Some computers do not supply USB power while they are turned off. If the Dashboard
Camera does not charge, make sure your computer is switched on.
2. You will be asked to select the desired operating mode (Mass Storage or PC Camera). On
first use we recommend you switch the device off initially, leave the battery to charge for a
few hours and then define basic settings such as language, date and time etc. before
performing further steps. To power the Dashboard Camera on, press and hold the On/Off
button (14) for approx. 3 seconds.
The charge LED (19) lights up orange while charging. Once charging is complete, the charge LED
(19) goes out.
Charging with the car charger
WARNING!
surges, connect the car charger after you have started your car engine.
In order to protect your Dashboard Camera from any sudden voltage
You can connect the car charger to a 12V or 24V cigarette lighter.
1. Plug the mini-USB connector (29) of the car charger into the USB/charge port (5) on the
Dashboard Camera.
2. Then connect the car charger to a suitable cigarette lighter in your car.
The Dashboard Camera will then switch on and loop recording will begin.
If the cigarette lighter in your vehicle can be turned on with the ignition key, this will ensure that
recording begins each time you start your vehicle's engine and thus all journeys will be recorded
automatically.
The charge LED (19) lights up orange while charging. Once charging is complete, the charge LED
(19) goes out.
If the charge LED (19) does not light up, you may need to replace the car charger fuse. For more
on this, see "Replacing the car charger fuse" on page 41.
WARNING!
supplies power all the time, the car battery discharges if you leave the Dashboard
If your car's cigarette lighter does not switch off with the ignition key but
English - 17

CR 1.0 A1
Camera turned on. Therefore, to avoid discharging the battery to a level where the
engine cannot be started anymore, we recommend you to disconnect the car charger
from the cigarette lighter of your car when leaving the car.
Getting started
Please charge the battery before first use of the device.
Turning on the Dashboard Camera
Press and hold the On/Off button (14) for at least 3 seconds to turn on the Dashboard
Camera.
Or, if you have connected the Dashboard Camera to your car's cigarette lighter using the car
charger and this can be turned on and off with the ignition key, switch the ignition on to turn
on the Dashboard Camera. In this case, loop recording will start automatically.
Turning off the Dashboard Camera
Press and hold the On/Off button (14) for at least three seconds to turn off the Dashboard
Camera.
Or, if you have connected the Dashboard Camera to your car's cigarette lighter using the car
charger and this can be turned on and off with the ignition key, switch the ignition off to turn
off the Dashboard Camera. The message "Shutting down..." will flash for approx. 30 seconds
and the Dashboard Camera will turn off automatically.
Setting the menu language
The procedure described below only works when the Dashboard Camera is NOT
connected to the computer with the USB cable. If necessary, first disconnect the USB
cable from the USB/charge port (5) on the Dashboard Camera.
1. Power the device on by pressing and holding the On/Off button (14) for approx. 3 seconds.
2. Press the – (17) or + (18) button several times until the "Setup" Menu is displayed.
3. Press the OK button (12) to open the "Setup" menu.
4. Press the – (17) or + (18) button several times until the "Language" option is selected.
5. Press the OK button (12) to open the "Language" option.
18 - English

CR 1.0 A1
6. Press the – (17) or + (18) button several times to highlight the desired language and press
OK (12) to confirm.
7. When finished, press the Return button (16) to show the main menu.
Setting the date / time
The procedure described below only works when the Dashboard Camera is NOT
connected to the computer with the USB cable. If necessary, first disconnect the USB
cable from the USB/charge port (5) on the Dashboard Camera.
1. Power the device on by pressing and holding the On/Off button (14) for approx. 3 seconds.
2. Press the – (17) or + (18) button several times until the "Setup" Menu is displayed.
3. Press the OK button (12) to open the "Setup" menu.
4. Press the – (17) or + (18) button several times until the "Date/Time" option is selected and
press OK (12) to confirm.
5. Press the – (17) or + (18) button several times to set the value currently selected and press the
OK button (12) to apply it.
The cursor skips to the next field where you can set the corresponding value. Repeat this
procedure to set all values accordingly.
6. When finished, press the Menu button (11) to return to the Setup menu or press the Return
button (16) to open the main menu.
Turning on and selecting the operating mode
Once you have switched the device on (hold down the On/Off button (14) for approx. 3
seconds), there are three scenarios depending on whether and how the Dashboard Camera
battery is charged.
Dashboard Camera is not being charged
If the Dashboard Camera is not plugged in (USB or car charger) the "Loop recording" option from
the main menu will appear after switching the device on.
Select the "Loop recording" option in the main menu by pressing the OK button (12) to record
video in loop recording mode. See also "Loop recording" on page 29. Video recording will
now start immediately.
Alternatively, using the – (17) and + (18) buttons, select a different operating mode and
confirm by pressing the OK button (12).
English - 19

CR 1.0 A1
Dashboard Camera is connected to a PC with a USB cable
If there is a USB cable connection from the PC to the Dashboard Camera, a selection menu
appears after switching the device on for the "Mass Storage" and "PC Camera" options.
When connected to a computer by cable, the Dashboard Camera can not be used as
a video camera or digital (photo) camera, only as a mass storage device or webcam.
Using the – (17) and + (18) buttons, select the desired option and confirm by pressing the OK
button (12). See also "Connecting the Dashboard Camera to a Computer" on page 40.
Dashboard Camera is connected with the car charger
If the Dashboard Camera is connected to the car charger and that in turn is connected to the live
cigarette lighter in your vehicle, loop recording will start straight away after the device is switched
on.
Recording videos
Once you have switched the device on and selected a video recording mode where applicable as
described in the previous step, the Dashboard Camera can be used to record videos with or
without the car mount while travelling.
1. If you are using the Dashboard Camera without the car mount, aim the Dashboard Camera at
the desired subject with the help of the display (13).
2. Press the OK button (12) to start recording. The recording LED (20) will flash blue while
recording.
3. If necessary, select a larger or smaller section of the image (zoom) using the + (18) and
– (17) buttons. Press the + (18) button to bring the subject closer or the – button (17) to make
the subject appear further away.
4. Press the OK button (12) to stop recording. The recording LED (20) will no longer flash.
The video will be saved automatically under a unique name.
During recording, different icons may appear on the display (13) informing you about the current
settings.
20 - English

i
x
0
(
c
p
c
m
m
v
e
n
t
t
4
e
W
i
s
CR 1.
0
-
8
d
A1
A
B
320x240
C
D
E
F
G
H
●
00:02:32
QVGA
Video mode ind
Resolution in pi
848x480, 128
Recording icon
This icon indicat
overwritten.
Recording time
Resolution: the
and 1080FHD
Audio icon: indi
( ) or withou
Memory type:
: an SD me
it.
: no SD me
cator
els: the possible
x720, 1440x10
flashes red while
es that the current
ounter
ossible values ar
ates whether or
t ( ) sound.
ory card is inser
ory card is inser
alues are 320x2
80, 1920x1080
recording)
recording is prot
QVGA, VGA,
ot the video is be
ed and recording
ed.
0, 640x480,
cted and will not
VGA, 720P, 10
ing recorded with
are being store
English
be
0P
on
21

CR 1.0 A1
I
J x4.0 Zoom indicator
K 10:32:00 Current time
L 12/12/2014 Current date
Battery level
: battery fully charged
: battery 2/3 full
: battery 1/3 full
: battery almost empty
Video light
In dark environments you can enable the 4 built-in white LEDs (8).
1. During the video recording, press the OK button (12) to stop recording and then the Menu
button (11) to bring up the menu for the current mode.
2. Using the – (17) and + (18) buttons, select the "LED Light" option and confirm by pressing the
OK button (12).
3. Using the – (17) and + (18) buttons, select the "On" option and confirm by pressing the OK
button (12) to turn on the video light.
Alternatively, press the "Off" option and confirm by pressing the OK button (12) to switch off
the video light.
Once you have enabled the function, the video light will come on automatically when there is
insufficient light. It will remain off in bright conditions to save the battery.
Exposure compensation
You can define an exposure compensation value for video recordings.
1. With video recording or photo capture paused, press the EV button (10) to bring up the
exposure compensation menu.
2. Using the + (18) and – (17) buttons, select the desired option and confirm by pressing the OK
button (12). While making your selection the preview image on the display (13) will change in
real time so that you can quickly see which exposure value is currently most suitable.
You may choose an exposure value between – 2 and + 2 in 1/3 exposure value increments.
If the picture is too bright, select a negative value for exposure compensation.
If the picture is too dark, select a positive value for exposure compensation.
22 - English

CR 1.0 A1
Protecting videos from being overwritten during loop recording
For the "Loop recording" mode, you can define a length of 3, 5 or 10 minutes for the video in the
menu. After that recording time, a new video file is automatically created. As you record videos,
the optional microSD memory card fills up. Once the storage space has been used up, the oldest
video in the current recording is automatically overwritten. This ensures that recording is always
possible, even when the storage space has actually all been used up.
It may be however that you wish to keep a particular scene and prevent it from being overwritten.
To do this, proceed as follows:
During video recording, press the Protect current video button (15).
Note that after the preset time of 3, 5 or 10 minutes, a new video will be recorded
which will be treated as loop recording again (in other words open to being
overwritten after the defined period of time).
If you set the loop recording to "Off", videos can be recorded until the inserted microSD memory
card is full. On the one hand, this guarantees that no existing recordings are overwritten, but on the
other hand no new videos can be recorded.
Taking photos
Once you have switched the device on, as described in the "Turning on and selecting the
operating mode" section on page 19, and selected photo capture mode, you can take photos with
or without the car mount during your journey.
1. If you are using the Dashboard Camera without the car mount, aim the Dashboard Camera at
the desired subject with the help of the display (13).
2. If necessary, select a larger or smaller section of the image (zoom) using the + (18) and
– (17) buttons. Press the + (18) button to bring the subject closer or the – button (17) to make
the subject appear further away.
3. Press the OK button (12) to take the photo.
The image will be saved automatically under a unique name.
During recording, different icons may appear on the display (13) informing you about the current
settings.
English - 23

CR 1.
0
n
t
o
b
p
m
m
/
/
m
e
e
e
M
D
A1
A
B
C
D
02699
E
F
G
H
I
24 - E
12M
x4.0
glish
Photo mode indi
Self-timer indica
Continuous sho
Remaining num
Resolution: The
1.3M and VGA
Quality indicato
Memory type:
: an SD me
it.
: no SD me
Battery level
: battery ful
: battery 2
: battery 1
: battery al
Zoom indicator
cator
or
ting indicator
er of pictures
ossible values ar
r
ory card is insert
ory card is insert
ly charged
3 full
3 full
ost empty
12M, 10M, 8
d and recordings
d.
, 5M, 3M, 2MH
are being stored , on

CR 1.0 A1
Exposure compensation
You can define an exposure compensation value for photo capture.
1. With "Photo" mode selected, press the EV button (10) to bring up the exposure compensation
menu.
2. Using the + (18) and – (17) buttons, select the desired option and confirm by pressing the
OK button (12). While making your selection the preview image on the display (13) will
change in real time so that you can quickly see which exposure value is currently most
suitable.
You may choose an exposure value between – 2 and + 2 in 1/3 exposure value increments.
If the picture is too bright, select a negative value for exposure compensation.
If the picture is too dark, select a positive value for exposure compensation.
Playback
You can play back your recorded videos and photos on the screen to check if the results are
satisfactory. The recordings can also be played back on an HDMI-ready television (see also
"Viewing recordings on a television" on page 39).
To be able to play back the videos and photos, you must select the "Playback" option in the main
menu:
1. Power the Dashboard Camera on by pressing and holding the On/Off button (14) for approx.
3 seconds.
2. Press the + (18) or – (17) button several times until the "Playback" Menu is displayed.
3. Press the OK button (12) to enable Playback mode.
The last recorded file (video or photo) will now appear.
4. Press the + (18) or – (17) button several times until the recording you wish to play is selected.
If the selected recording is a video, the icon will appear at the top left of the screen. If the
selected recording is a photo, the icon will appear at the top left of the screen.
5. For video files, press the OK button (12) to start playback.
Video playback functions
The following functions are available while playing videos (a toolbar is shown at the bottom of the
screen with a guide to the available functions):
Pause: Press the OK button (12) to temporarily pause playback. Press the OK button (12) again
to continue playback.
English - 25

CR 1.0 A1
Fast forward/rewind: During playback, press the – button (17) multiple times to rewind the
video. Rewind speed will be increased as follows each time the button is pressed: -2x, -4x, -8x. To
return to normal playback speed, press the + button (18) as many times as necessary.
During playback, press the + button (18) multiple times to fast forward the video. Playback speed
will be increased as follows each time the button is pressed: 2x, 4x, 8x. To return to normal
playback speed, press the – button (17) as many times as necessary.
In playback mode you will see further information on the display:
AB C
-
+
D
E
F
G
H
Symbol Description
A
B
C
D
E
F
128-0014
00:00:08
14/12/20
09:21
Video playback
Protected video. This video will not be overwritten during loop recording.
First 3 numbers of the storage folder – sequential number of the recording
Current playback time
Recording date
Time of the recording
26 - English

CR 1.0 A1
G
H
When video playback is paused, the following functions are available and can be shown via the
Menu button (11) and selected using the – (17) and + (18) buttons.
Delete
Protect
Slide Show
Battery level
: battery fully charged
: battery 2/3 full
: battery 1/3 full
: battery almost empty
Help bar for playback controls
This option allows you to delete the video currently being displayed or all saved
videos. See also "Delete" on page 37.
Here you can protect one or more videos to prevent accidental deletion or
unprotect them. See also "Protect" on page 38.
This function allows you to play all captured photos in sequence like a
slideshow. To do so, select the desired display time for each image (2, 5 or 8
seconds) in this menu. See also "Slide Show" on page 38.
Photo playback functions
During photo playback, the following functions are available and can be shown for a displayed
image via the Menu button (11) and selected using the + (18) and – (17) buttons.
Delete
Protect
Slide Show
During photo playback you will see further information on the display:
This option allows you to delete the currently displayed image or all saved
images. See also "Delete" on page 37.
Here you can protect one or more photos to prevent accidental deletion or
unprotect them. See also "Protect" on page 38.
This function allows you to play all captured photos in sequence like a
slideshow. To do so, select the desired display time for each image (2, 5 or 8
seconds) in this menu. See also "Slide Show" on page 38.
English - 27

CR 1.0 A1
AB C
Symbol Description
A
B
129-0018
C
3648x2736 Resolution
D
14/12/20 Recording date
E
09:25 Time of the recording
F
G
Photo playback
Protected image. This photo can not be deleted.
First 3 numbers of the storage folder – sequential number of the recording
Battery level
: battery fully charged
: battery 2/3 full
: battery 1/3 full
: battery almost empty
D
E
F
G
28 - English

CR 1.0 A1
Menus
The Dashboard Camera has various menus that provide various settings for the different modes.
There is also a setup menu allowing you to set the preferences for your Dashboard Camera.
Main menu
In the main menu you can access the desired recording function, playback function and the Setup
menu for your Dashboard Camera. There is also a flashlight function available here so that the
Dashboard Camera can be used as a light in the dark.
1. Power the Dashboard Camera on by pressing and holding the On/Off button (14) for approx.
3 seconds.
2. If the Dashboard Camera is connected to the car charger, press the OK button (12) to stop
recording and then the Return button (16) to show the main menu. Otherwise, continue with
step 3.
3. Press the + (18) or – (17) button several times to select the desired function.
4. Press the OK button (12) to enable the selected function.
The available functions are described in the sections below.
Loop recording
Loop recording is a function in which video clips of a certain length (e.g. 5 minutes) are recorded.
After that recording time, a new video file is automatically created. As you record videos, the
optional microSD memory card fills up. Once the storage space has been used up, the oldest
video in the current recording is automatically overwritten. This ensures that recording is always
possible, even when the storage space has actually all been used up.
In this mode, you should ensure that any recordings you wish to keep are either protected (see
"Protecting videos from being overwritten during loop recording" on page 23) or transferred to a
different storage medium (e.g. your PC, see "Transferring recordings to a computer" on page 39).
1. Power the Dashboard Camera on by pressing and holding the On/Off button (14) for approx.
3 seconds.
2. If the Dashboard Camera is connected using the car charger, press the Return button (16) to
display the main menu. Otherwise, continue with step 3.
3. Press the + (18) or – (17) button several times to select the "Loop recording" function.
4. Press the OK button (12) to enable loop recording.
English - 29

CR 1.0 A1
Photo
In this mode your Dashboard Camera acts like a conventional digital camera that you can take
photos with. Further information can be found in the "Photo capture menu" section on page 35 and
the "Taking photos" section on page 23.
1. Power the Dashboard Camera on by pressing and holding the On/Off button (14) for approx.
3 seconds.
2. If the Dashboard Camera is connected using the car charger, press the Return button (16) to
display the main menu. Otherwise, continue with step 3.
3. Press the + (18) or – (17) button several times to select the "Photo" function.
4. Press the OK button (12) to enable the camera function.
Motion Detection
Motion detection is a memory-saving alternative of having videos recorded automatically. This can
be useful, e.g. when you have parked your vehicle but still want any parking cars to be filmed in
case they dent your number plate with their tow bar while reversing.
nnnn
Videos recorded via motion detection will be saved in folders named "
4-digit number.
1. Power the Dashboard Camera on by pressing and holding the On/Off button (14) for approx.
3 seconds.
2. If the Dashboard Camera is connected using the car charger, press the Return button (16) to
display the main menu. Otherwise, continue with step 3.
3. Press the + (18) or – (17) button several times to select the "Motion Detection" function.
4. Press the OK button (12) to enable motion detection.
Playback
You can play back your recorded videos and photos on the screen to check if the results are
satisfactory.
EVEN" where
nnnn
is a
You can also play back the recorded videos on a computer or a television. See also
"Transferring recordings to a computer" on page 39 and "Viewing recordings on a
television" on page 39.
1. Power the Dashboard Camera on by pressing and holding the On/Off button (14) for approx. 3
seconds.
2. If the Dashboard Camera is connected using the car charger, press the Return button (16) to
display the main menu. Otherwise, continue with step 3.
30 - English

CR 1.0 A1
3. Press the + (18) or – (17) button several times to select the "Playback" function.
4. Press the OK button (12) to enable the playback function.
Further information can be found in the "Playback" section on page 25 and in "The playback
menus" section on page 37.
FlashLight
Thanks to your Dashboard Camera's 4 white LEDs (8), the device can also be used as a flashlight.
How to switch the 4 white LEDs (8) on or off:
1. Power the Dashboard Camera on by pressing and holding the On/Off button (14) for approx.
3 seconds.
2. If the Dashboard Camera is connected using the car charger, press the Return button (16) to
display the main menu. Otherwise, continue with step 3.
3. Press the + (18) or – (17) button several times to select the "FlashLight" function.
4. Press the OK button (12), select the desired option by pressing the – button (17) and then
press the OK button (12) to confirm:
Off: Turns the flashlight function off.
Always Bright: Turns the flashlight function on.
One Second Flash: Turns the flashlight function on. The 4 white LEDs (8) then flash once a
second. This mode saves the battery.
If you have enabled the "Auto Power Off" option in the "Setup" menu, the flashlight will
also power off after the set time.
Setup
The setup menu contains basic settings for your Dashboard Camera. These include date and time,
idle time before automatic shutdown (power-saving function), key press confirmation sound, onscreen menu language, image rotation, formatting function for the inserted SD memory card,
factory settings restore and firmware version information.
Setting Description
Date/Time
Auto Power Off
Set the date and time (see also "Setting the date/time" on page 19).
You can set the device to power off automatically after a certain time
to save power. If no buttons are pressed during the preset time, the
device powers off automatically. The Dashboard Camera can then be
switched on again using the On/Off button (14).
English - 31

CR 1.0 A1
You can choose between the power-off times of 1 minute, 3 minutes or
disable the automatic power-off function.
Beep Sound
Language
Frequency
Image rotation
Format
Here you can set whether or not the device makes a sound every time
you press a button. This option also enables or disables the power-on
sound at the same time.
Select the desired display menu language (see also "Setting the menu
language" on page 18).
Select the mains frequency to avoid any interference from fluorescent
lighting. A mains frequency of 50 Hz is used across Europe; in
America the mains uses a frequency of 60 Hz.
This function allows you to rotate the image by 180°.
This function lets you delete all contents from your memory card
(optional accessory) and renew the file saving structure on your card
(formatting).
Warning! All saved videos and pictures will be erased and cannot be
restored. This also applies to protected files. Make sure that all
recordings you want to keep have been backed up to a different
Default Setting
Version
storage medium.
All device parameters will be reset to their factory-default values.
This does not erase any data from your memory card.
This function displays your Dashboard Camera's current firmware
version. You might need this information when contacting customer
services for example.
The recording menus
Video recording menu
The video recording menu allows you to set the different video recording parameters. How to open
the video recording menu:
1. Power the device on by pressing and holding the On/Off button (14) for approx. 3 seconds.
2. By default, the "Loop recording" option appears. Press the OK button (12) to select it or, if the
Dashboard Camera is connected to the car charger, wait a few seconds for the "Loop
recording" mode to be enabled automatically.
3. Press the OK button (12) to stop video recording.
4. Press the Menu button (11) to display the Video Recording menu.
32 - English

CR 1.0 A1
5. Use the – (17) and + (18) buttons to adjust the desired settings (see below) and press OK (12).
6. Press the Menu button (11) again to hide the menu.
The following sections contain a description of the different parameters available in the video
recording menu.
Resolution
The resolution determines the size of the recording in pixels. As a general rule: the higher the
resolution, the more storage space is required.
Your Dashboard Camera supports recording in modern wide-screen format. However, not all of
the resolutions available offer a 16:9 aspect ratio. With the 1140x1080P, QVGA and VGA
settings, the aspect ratio is 4:3.
The following settings are available:
Resolution Description
QVGA 320x240 Low quality (recommended for Internet applications)
VGA 640x480 VGA screen quality
WVGA 848x480 Normal quality
1280x720P Average quality
1440x1080P High quality
1920x1080P Very high quality
Loop recording
The loop recording time can be defined here. After the preset time a new video file will be created.
Loop recording Description
Off Disables loop recording (i.e. recording stops when the memory card is
full and no older files are overwritten). A new video file is automatically
created after 10 minutes. To stop the recording, you must press the OK
button (12) – recording will not stop automatically after a certain time.
3 mins. A maximum of 3 minutes will only ever be recorded per video. After that
a new video file is created automatically.
5 mins. A maximum of 5 minutes will only ever be recorded per video. After that
a new video file is created automatically.
10 mins. A maximum of 10 minutes will only ever be recorded per video. After
that a new video file is created automatically.
English - 33

CR 1.
0
n
n
D
e
d
a
a
e
r
i
v
i
v
i
v
i
e
v
v
r
r
w
w
s
n
th
W
he
d
n
t
o
a
e
m
a
e
n
g
a
o
ts
e
e
l
ie
y
g
s
"
d
sc
u
p
c
h
t
c
/
d
s
q
e
s
y
o
r
d
d
d
c
a
ag
r
s
o
c
"
r
di
T
A1
sor
G-se
Your
ashboard Came
detect
d, the Dashboa
name
"
autom
tically. In other
You c
n define the sen
an av
rage sensitivity a
d Audio
Reco
Use th
s option to define
The a
ailable options ar
Date
Stamp
s option to define
Use th
The a
ailable options ar
Auto
display off
s option to define
Use th
presse
for a certain am
ailable options ar
The a
LED L
ght
Enabl
the LED light t
impro
es the quality of
The a
ailable options ar
nnnn
EVEN"
Make sure
mode so that
henever t
is represente
If this optio
seconds. To
a features a G-s
d Camera auto
here
nnnn
is
ords, it will not b
itivity of the G-se
d "High" for a hi
e Dashboard C
a video of any p
G-sensor detec
by the icon
whether or not th
e "On" or "Off".
whether or not th
e "On" or "Off".
whether the disp
ount of time.
e "On" or "Off".
is enabled, the
urn it back on, br
obtain properl
ny night recordin
e "On" or "Off".
nsor which react
atically saves th
4-digit number
overwritten.
sor here. Select
her sensitivity. Or
mera is switche
tential accident
an impact, the c
on top of the dis
video will be re
date and time s
ay should be swi
display will swit
fly press the On
exposed recor
s.
to vibrations or
current video
. This video se
Low" for a low s
select “Off” to di
on and alread
ene can be rec
rrent video recor
lay (13).
orded with soun
ould be recorde
ched off automati
h off automatic
Off button (14)
ings even in da
impacts. If a cra
equence to a f
uence is prote
nsitivity, "Middle
able the G-senso
in "Loop recor
ded.
ing is protected.
or not.
with the video.
cally if no buttons
lly after approx.
gain.
rk environments.
h is
lder
ted
for
.
ng"
his
are
30
This
34 - E
glish

CR 1.0 A1
When LED light is enabled, the light will switch on automatically when required (when the ambient
light is insufficient).
Photo capture menu
The photo capture menu allows you to set the different still image recording parameters. How to
open the photo capture menu:
1. Power the device on by pressing and holding the On/Off button (14) for approx. 3 seconds.
2. By default, the "Loop recording" option appears. Press the + (18) or – (17) button several
times, select the "Photo" menu option and press OK (12) to open it.
3. Press the Menu button (11) to open the still image recording menu.
4. Use the – (17) and + (18) buttons to adjust the desired settings (see below) and press OK (12).
5. Press the Menu button (11) again to hide the menu.
The following sections contain a description of the different parameters available in the still image
capture menu.
Capture Mode
This allows you to define whether you wish to capture images with the Dashboard Camera
normally or using the self-timer. The delay times of 2 seconds, 5 seconds or 10 seconds are
available for the self-timer.
When the self-timer is enabled, the , or icon will be shown at the top of the display
(13) depending on the delay time selected
Resolution
The resolution determines the size of the recording in pixels. As a general rule: the higher the
resolution, the more storage space is required. The following settings are available:
Resolution Description
12M 4032x3024 Very high quality
10M 3648x2736 High quality
8M 3264x2448 Very good quality
5M 2592x1944 Good quality
3M 2048x1536 Average quality
2MHD 1920x1080 PC widescreen quality
1.3M 1280x960 Low quality
VGA 640x480 VGA screen quality
English - 35

CR 1.0 A1
Sequence
When this function is enabled ("On" option), you can press the OK button (12) while capturing
images to take 5 consecutive photos. Alternatively, select "Off" to only ever take a single image.
Quality
The Quality setting determines the compression ratio of the captured image when saved onto the
memory card. The higher the compression, the more pictures can be stored.
You can capture images using the quality presets Economy, Normal and High. Select the
appropriate option. The selected setting will be shown on the right of the display (13) as follows
during capture:
Quality Description
Fine
Normal
Economy
Quick Review
Quick Review allows you to check that capture was successful immediately after capturing a still
image. When you enable the function the captured image will be shown on the display (13) for 2
or 5 seconds depending on the set value. Alternatively, select "Off" to return to the live view
immediately after capture.
Date Stamp
This function allows you to mark each image with the current date. The following settings are
available:
Setting Description
Off Images will not be given a date stamp.
Date Images will be marked with the current date.
Date/Time Images will be marked with the current date and time.
36 - English

CR 1.0 A1
The playback menus
The following sections contain a description of the different parameters available in the playback
menu. In addition to display options, it also contains functions to protect and delete your videos
and still images.
1. Power the Dashboard Camera on by pressing and holding the On/Off button (14) for approx.
3 seconds.
2. Press the + (18) or – (17) button several times until the "Playback" Menu is displayed.
3. Press the OK button (12) to enable playback mode.
The last recorded file (video or photo) will now appear.
4. Press the + (18) or – (17) button several times until the recording you wish to play is selected.
If the selected recording is a video, the icon will appear at the top left of the screen. If the
selected recording is a photo, the icon will appear at the top left of the screen.
5. Press the Menu button (11) to show the playback menu.
6. Press the + (18) or – (17) button several times to select the desired function and press the OK
button (12) to execute it or display the available options.
The available options are described in the sections below.
The options in the playback menu are virtually identical for both videos and still images.
To open the menu for videos, playback must be stopped (do not start video playback).
Delete
This option allows you to delete the currently displayed video or image or all saved videos and
images.
1. Perform steps 1 to 5 under "The playback menus" (see page 37).
2. Press the + (18) or – (17) button several times to select the "Delete" function and press the OK
button (12) to display the available options.
Delete Current: Use this option to delete the currently selected video or still image. After
selecting this option, confirm with the OK button (12). A safety prompt appears. Select the
"OK" option and confirm the deletion by pressing the OK button (12).
Delete All: Use this option to delete all saved videos and still images at once. After selecting
this option, confirm with the OK button (12). A safety prompt appears. Select the "OK" option
and confirm the deletion by pressing the OK button (12).
Protected recordings can not be deleted with this function. See also the "Protect" section
below.
English - 37

CR 1.0 A1
Protect
Here you can protect one or more videos and still images to prevent accidental deletion or
unprotect them.
By default, all new still images are protected.
1. Perform steps 1 to 5 under "The playback menus" (see page 37).
2. Press the + (18) or – (17) button several times to select the "Protect" function and press the OK
button (12) to display the available options.
Lock Current: Use this option to protect the currently selected video or still image. Confirm
by pressing the OK button (12).
Unlock Current: Use this option to unprotect the currently selected video or still image.
Confirm by pressing the OK button (12).
Lock All: Use this option to protect all captured videos and still images. Confirm by pressing
the OK button (12).
Unlock All: Use this option to unprotect all captured videos and still images. Confirm by
pressing the OK button (12).
Slide Show
This function allows you to play all captured still images in sequence, and in a loop, like a
slideshow. This is particularly useful for being able to view all of your still images as a presentation
when you have connected the Dashboard Camera to a television (see the section below).
1. Perform steps 1 to 5 under "The playback menus" (see page 37).
2. Press the + (18) or – (17) button several times to select the "Slide Show" function and press the
OK button (12) to display the available options.
3. Press the + (18) or – (17) button several times to select the desired display time for the
individual images (2, 5 or 8 seconds). Confirm by pressing the OK button (12).
The slide show will now start.
4. Press the OK button (12) to stop the slide show.
38 - English

CR 1.0 A1
Connectors and sockets
Viewing recordings on a television
Any recordings that you can view on the Dashboard Camera display can also be played on a
normal television. The television set needs to have an appropriate HDMI input.
A HDMI cable with a mini-HDMI connector (not supplied) will also be required. The HDMI cable
provides digital images and sound and therefore optimum quality. The HDMI output (3) can be
found under the protective cover (4).
While the Dashboard Camera is connected to the TV via the HDMI cable, video
recording and still image capture are not available. It is only possible to play alreadyrecorded content.
Simply operate the device as usual. For instance, enable Slide Show to have all images displayed
automatically (see also "Slide Show" on page 38).
Connecting the HDMI cable
1. Please make sure that the Dashboard Camera is powered off.
2. Open the protective cover (4) and insert the small end of the optional HDMI cable into the
HDMI output (3) on the Dashboard Camera (see also "Overview" on page 12).
3. Plug the larger connector of the HDMI cable into the HDMI receptacle of your TV set.
4. Select the HDMI signal source corresponding to the above input connectors on your TV set. If
necessary, read the User Manual of your TV set for more information on how to do this.
5. Switch on the Dashboard Camera using the On/Off button (14). The device display remains
off while the picture will be shown on the TV screen.
Further information can be found in the "Playback" section on page 25 and in "The playback
menus" section on page 37.
Transferring recordings to a computer
There are two ways of copying recordings from the Dashboard Camera to a computer.
by connecting the device to a computer via the USB cable
by inserting the SD memory card into a card reader.
English - 39

CR 1.0 A1
Connecting the Dashboard Camera to a Computer
1. Use the USB cable supplied to connect the Dashboard Camera to a USB port on your
computer. To do so, insert the small plug of the supplied USB cable into the USB/charge port
(5) of your Dashboard Camera and the large plug into a USB port on your computer.
2. The Dashboard Camera will then turn on automatically and you will be asked to select either
"Mass Storage" or "PC Camera" mode.
3. Press the + (18) or – (17) button several times to select the "Mass Storage" function and press
the OK button (12).
The computer will now set up a removable disk that can be used to access your recordings.
When connecting to the PC via the USB cable, the content of the SD memory card will
be read-only. This means you will not be able to delete, rename or write to any files on
the Dashboard Camera from the PC. It is only possible to play previously recorded
content.
Using a card reader
If your computer has a card reader which is compatible with microSD or SD memory cards, you
can read the contents of the memory card directly. To do so, remove the memory card from the
Dashboard Camera while it is switched off.
1. Insert the microSD card directly into the microSD card reader or into the SD card adapter.
2. If you are using the SD card adapter, insert it into the SD card reader on your computer
(normally labelled SD/MMC).
3. The PC will add the memory card contents under the drive letter representing the card reader in
My Computer.
4. Open My Computer on your PC and double-click on the drive representing the card reader.
5. All recorded files can be found in various folders on this disk drive.
6. Now you can copy the recorded files from the memory card into a folder of your choice on the
computer’s hard disk.
Encoding videos for iOS
1. Copy the desired video file to your Apple computer. To do this, proceed as described in the
previous sections.
2. Open the video file context menu and select "Encode Selected Video Files".
3. In the menu that appears, click "Continue".
A new video file appears on the desktop.
40 - English
CR 1.0 A1
4. Next drag this video file into the "Movies" category of iTunes.
Now the video file is available in the Library under "Home Videos" and can be synchronised
from here with an iOS device.
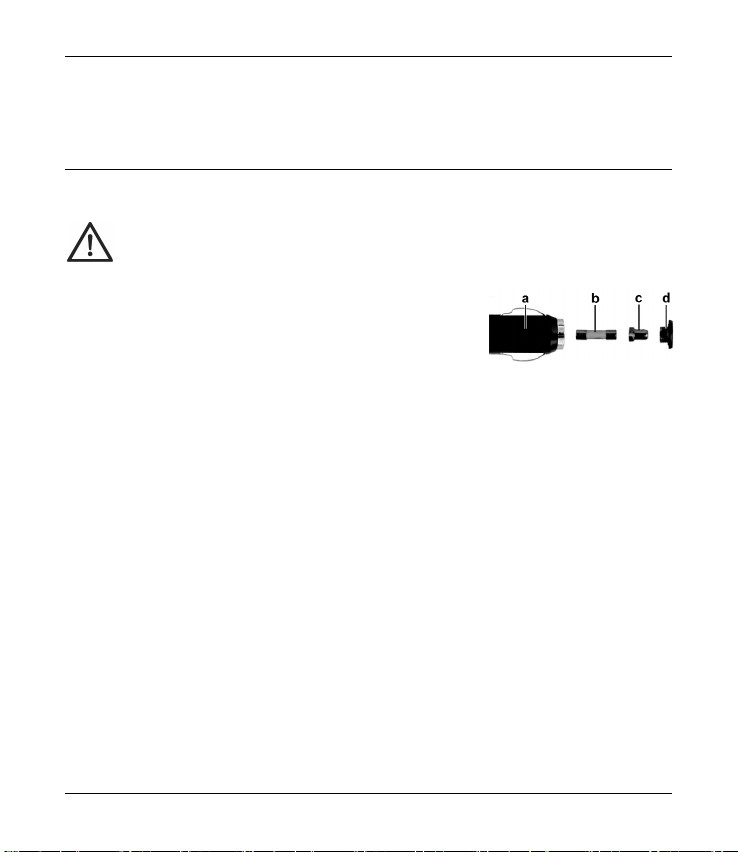
Replacing the car charger fuse
When the 12/24 V car charger is connected but the LED indicator of the 12/24 V car charger
(28) does not light up, the fuse might be defective.
WARNING! If you need to replace the fuse make sure to use a fuse of the same type
(T2A L, 250 V).
To replace the fuse, proceed as follows:
1. Rotate the screw cap (d) counter-clockwise and remove it
from the cigarette lighter plug housing (a). If necessary, use
pliers.
2. Replace the fuse (b) with a new T2A L, 250 V type fuse.
You can purchase a suitable fuse from any electronics retail
outlet.
3. First insert the fuse (b) into the cigarette lighter plug housing (a).
4. Insert the metal contact (c) into the screw cap (d).
5. Next, insert the screw cap (d) with the inserted metal contact (c) over the fuse (b) and then
screw the cap (d) clockwise onto the cigarette lighter plug housing (a).
English - 41

CR 1.0 A1
Troubleshooting
You can solve most common problems yourself using the table below. If the problem persists after
checking the suggested solutions, please contact our Service Hotline (see page 44). Do not
attempt to repair the product yourself. Do not open the housing of the Dashboard Camera or of
the car charger as they contain no serviceable parts.
Error Solution
Unable to power the Dashboard
Camera on.
The Dashboard Camera suddenly
powers off.
The Dashboard Camera fails to
respond and cannot be switched
off.
The recordings show stains or
shadows.
The "SD CLASS6" message is
displayed.
The battery is empty. Recharge the battery.
The battery is empty. Recharge the battery.
Auto Power Off is enabled. Check the setting (see page
31).
Press the Reset switch (1). To do so, open the protective
cover (4) and slide the Reset switch (1) to the opposite
location using a pointed object. Wait for a few seconds
and then slide the Reset switch (1) back to the original
position. The Dashboard Camera should then work as
normal again.
Clean the Dashboard Camera lens with a soft, dry, lintfree cloth. Do not use any detergents or chemicals.
The inserted microSD memory card must support at least
Speed Class 6. If necessary, insert a faster microSD
memory card.
42 - English

Afte
r
a
i
g
g
h
a
a
r
t
t
n
m
o
e
0
y
D
h
e
a
o
o
d
t
s
u
d
m
d
r
i
e
m
b
o
w
/
g
e
d
e
s
,
d
e
d
y
a
e
n
t
e
r
t
0
-
s
l
m
y
f
.
a
U
use
Stor
ge when not
If you
won't be using th
ng environmental
follow
Stora
e temperature: -1
Stora
e relative humidit
Please
remember that th
e Dashboard Ca
store t
If you
do not use your
y (at least once a
anyw
Rep
irs
Repai
s are required w
when
liquids or objects
he product has b
when
device
immediately and
checked out by
have i
Clea
ing
Use
a soft, lint-free cl
not use any clea
Do
per
anent damage t
Conf
rmity notes
using the pro
Dashboard Ca
conditions:
to 55 °C
: Max. 85 %
ese values may b
mera in a dry an
ashboard Came
month).
en the device or
have entered th
en dropped. If s
disconnect all ca
n expert. All repa
th for cleaning.
ners, detergents
the product.
This
evice complies
Direc
ive 2004/108
corre
ponding Declara
Man
al.
uct for a lon
era for a longer
e exceeded insid
dust-free room at
a for an extende
ts housing has b
product, when t
oke, unusual noi
les. If this occurs
irs must be carrie
r solvents, as th
ith the basic an
EC and the
tion of Conformit
er time
time, store it at
a car. Therefore
home.
period, recharg
en damaged in a
e product does
es or smells are
do not continue
out by qualified
se may enter th
other relevant
RoHs Directive
can be found a
CR 1.
place that meet
it is recommende
the battery regu
ny way, for exa
not work normall
oticed, power of
to use the device
service personnel
housing and c
equirements of E
2011/65/EU.
t the end of this
A1
the
d to
arly
ple,
or
the
and
use
MC
The
ser
English
43

CR 1.
0
n
r
s
n
r
e
t
h
e
e
e
e
t
g
e
/
a
s
c
e
n
n
e
r
m
P
o
p
u
a
d
o
e
m
b
e
c
a
a
h
r
v
r
e
e
t
a
t
m
o
c
o
e
g
i
,
m
e
m
s
r
b
o
r
o
s
r
b
s
o
n
a
a
c
d
h
o
u
n
a
g
e
w
d
a
A1
Envi
onmental re
Dispo
e of all packagi
taken
to paper recycli
ed in the packag
contai
The b
uilt-in recharg
War
anty and Se
vice is sold with
This d
receip
in a safe place
read t
e enclosed docu
pleas
call our hotline.
for all
enquiries. If it is n
further servicing
initiate
repaired or repl
will b
comm
nces if the prod
batteri
s and lamps are
atutory rights tow
Your s
ulations an
Devic
s marked with
2012
19/EU. All ele
separ
tely from househ
Avoid
hazards to the
ing of the device
dispo
conta
t your local gov
the d
vice.
g in an environ
g centres or pu
ing should be tak
able battery
vice Inform
three years warr
as proof of purc
entation. Should
lease have the a
t possible to sol
rocedures depen
aced free of cha
ct is repaired or
not covered by th
ards the seller ar
disposal inf
this symbol ar
ctrical and elec
ld waste at offici
environment and
properly. For fur
rnment, disposal
entally friendly
lic collection p
n to your public
annot be rem
tion
nty from the dat
ase. Before usin
any problems ar
ticle number and
e the problem on
ding on the fault.
ge as we deem
replaced. Consu
e warranty.
not affected or r
rmation
subject to the
ronic devices
l disposal centre
dangers to you
her information a
bodies or the sh
anner. Cardboa
ints for recycling
ollection points f
ved for dispo
of purchase. Ple
your product fo
se which cannot
if available, the
the phone, our h
Within the warra
appropriate. No
ables such as b
stricted by this w
European Dire
ust be dispose
.
r personal healt
bout proper disp
p where you bo
d packaging ca
. Any film or pl
r disposal.
al.
ase keep the ori
the first time, pl
e solved in this
erial number to h
tline support staff
ty period the pro
new warranty pe
tteries, recharge
rranty.
tive
of
by
sal,
ght
be
stic
inal
ase
ay,
and
will
uct
riod
ble
44 - E
glish

CR 1.0 A1
Service
E-Mail: service.GB@targa-online.com
E-Mail: service.IE@targa-online.com
E-Mail: service.MT@targa-online.com
E-Mail: service.CY@targa-online.com
TARGA GmbH
IAN: 106751
Manufacturer
Coesterweg 45
59494 SOEST
GERMANY
Phone: 0207 – 36 50 744
Phone: 01 – 242 15 83
Phone: 800 – 62 175
Phone: 800 – 92 496
English - 45

CR 1.0 A1
46 - English

CR 1.0 A1
Indhold
Indhold .................................................................................................................................................... 47
Varemærker ............................................................................................................................................ 50
Indledning ............................................................................................................................................... 50
Tilsigtet anvendelse ................................................................................................................................ 50
Pakkens indhold ..................................................................................................................................... 51
Tekniske specifikationer ......................................................................................................................... 52
Sikkerhedsanvisninger ........................................................................................................................... 53
Symbolforklaring ............................................................................................................................... 53
Copyright ................................................................................................................................................ 56
Oversigt .................................................................................................................................................. 57
Betjeningselementer og displays ...................................................................................................... 58
Knapper ............................................................................................................................................. 58
LED-indikatorer ................................................................................................................................... 59
Før du går i gang ................................................................................................................................... 60
Isætning/udtagning af hukommelseskort......................................................................................... 60
Bilholder ............................................................................................................................................. 60
Opladning af batteriet ...................................................................................................................... 61
Opladning af batteriet med et USB-kabel ....................................................................................... 61
Opladning med bilopladeren ........................................................................................................... 62
Kom godt i gang .................................................................................................................................... 63
Tænd for Dashcam’et ........................................................................................................................ 63
Sluk for Dashcam’et ........................................................................................................................... 63
Dansk - 47

CR 1.0 A1
Indstilling af menusproget ................................................................................................................. 63
Indstilling af dato og klokkeslæt ....................................................................................................... 63
Opstart og valg af driftstilstand ............................................................................................................ 64
Dashcam’et oplades ikke .................................................................................................................. 64
Dashcam er tilsluttet en pc med et USB-kabel ................................................................................. 64
Dashcam’et er tilsluttet via bilopladeren .......................................................................................... 65
Optagelse af videoer............................................................................................................................. 65
Videolys .............................................................................................................................................. 67
Kompensering for eksponering......................................................................................................... 67
Sådan beskytter du dine videoer mod at blive overskrevet under loop-optagelse ...................... 68
Fotografering .......................................................................................................................................... 68
Kompensering for eksponering......................................................................................................... 70
Afspilning ................................................................................................................................................ 70
Videoafspilningsfunktioner ................................................................................................................ 70
Stillbilledafspilningsfunktioner ........................................................................................................... 72
Menuer ................................................................................................................................................... 74
Hovedmenu ........................................................................................................................................ 74
Optagemenuerne .............................................................................................................................. 77
Afspilningsmenuerne ......................................................................................................................... 82
Stikforbindelser ....................................................................................................................................... 84
Visning af optagelser på et fjernsyn ................................................................................................. 84
Overførsel af optagelser til en computer ......................................................................................... 85
Tilslutning af Dashcam’et til en computer......................................................................................... 85
48 - Dansk

CR 1.0 A1
Sådan bruges en kortlæser ............................................................................................................... 85
Kodning af videoer til iOS ................................................................................................................ 86
Udskiftning af bilopladningssikring ....................................................................................................... 86
Fejlfinding ............................................................................................................................................... 87
Efter brug ................................................................................................................................................ 87
Opbevaring når produktet ikke anvendes i længere tid ................................................................ 87
Reparation .......................................................................................................................................... 88
Rengøring ........................................................................................................................................... 88
Bemærkninger om overensstemmelse .................................................................................................. 88
Miljøregler og oplysninger om bortskaffelse ....................................................................................... 88
Garanti- og serviceoplysninger ............................................................................................................. 89
Dansk - 49

CR 1.0 A1
Varemærker
HDMI, HDMI-logoet og High-Definition Multimedia Interface er varemærker eller registrerede
varemærker tilhørende HDMI Licensing, LLC i USA og andre lande.
Microsoft Windows er et registreret varemærke tilhørende Microsoft Corporation i USA.
SD og SDHC er registrerede varemærker.
USB er et registreret varemærke.
Apple er et registreret varemærke tilhørende Apple, Inc.
IOS er et varemærke eller et registreret varemærke i USA og andre lande tilhørende Cisco
Systems.
Andre navne og produkter kan være varemærker eller registrerede varemærker tilhørende deres
respektive ejere.
Indledning
Tak, fordi du købte dette CR 1.0 A1, der herefter benævnes Dashcam’et. Dashcam’et er den
ideelle rejseledsager i bilen. Ikke alene optager det dine ture, men takket være G-sensoren kan
den også optage detaljer i tilfælde af et sammenstød.
Tilsigtet anvendelse
Dit Dashcam er en forbrugerteknisk enhed, og det er kun designet til optagelse af film og billeder.
Enhver anden brug end nævnt ovenfor er i strid med den tilsigtede brug. Enheden må kun
anvendes til privat brug, ikke til industriel eller kommerciel brug.
Dette apparat overholder alle relevante standarder og direktiver vedrørende CEoverensstemmelse. Hvis der foretages ændringer på udstyret, der ikke er godkendt af producenten,
er der ikke længere garanti for overensstemmelse med disse standarder og direktiver. Brug kun
tilbehør, som er anbefalet af producenten.
Overhold regler og love i det land, hvor udstyret anvendes.
50 - Dansk

CR 1.0 A1
Pakkens indhold
Fjern alle dele og tilbehør fra pakken. Fjern emballagen og skærmbeskyttelsen, og kontroller, at
alle delene er hele og ubeskadigede. Hvis der mangler noget, eller noget er beskadiget, skal du
kontakte producenten.
Lad ikke børn komme i nærheden af emballagen, og smid den ud med det samme.
CR 1.0 A1 Bilholder USB-kabel
Biloplader Brugervejledning (lineart-
illustration)
Dansk - 51

CR 1.0 A1
Tekniske specifikationer
Dashcam
Display 960 x 240 pixel, 2,7 tommer (6,9 cm) TFT LCD
Videoopløsning 1920x1080, 25 fps
Billedopløsning 12M 4032 x 3024
Formatforhold JPG
Zoom 4x digital zoom
Lys 4 hvide LED-pærer
Brugerflader HDMI-udgang
Betjeningstilstande Videooptagelse, bevægelsessporing, stillbillede, afspilning, pc-kamera
Lagermedier MicroSD-kort, 2 til 32 GB, minimum klasse 6
Funktioner Loop-optagelse (3, 5, 10 minutter, Fra)
Indbygget batteri genopladeligt Li-Ion-batteri, 3,7 V / 330 mAh
Betjeningsforhold 0 til 35 ºC, maks. 85 % relativ luftfugtighed
Opbevaringsmiljø -10 til 55 ºC, maks. 85 % relativ luftfugtighed
Dimensioner 85,5 x 62 x 32 mm (B x H x D)
Vægt 70 g
* ægte Dashcamopløsning. Alle andre opløsninger er interpoleret.
640x480, 30 fps
1440x1080, 30 fps
1280x720*, 30fps
10M 3648 x 2736
8M 3264 x 2448
5M 2592 x 1944
USB-port til pc
Bevægelsessporing
G-sensor
Opladerfunktion via USB-brugerflade
Typisk funktionstid (videooptagelse) med fuldt opladet batteri: 45
minutter
Opladningstid ca. 1,5 timer (når enheden er slukket) og ca. 2 timer
(når enheden er tændt)
848x480, 30 fps
320x240, 30 fps
3M 2048 x 1536
2MHD 1920 x 1080
1,3M 1280 x 960
VGA 640 x 480*
52 - Dansk

Bilop
l
c
l
t
g
e
d
v
n
b
s
h
h
n
n
n
a
f
es
af
D
e
t
t
A
g
e
e
d
d
e
o
o
e
re
m
y
a
æ
e
r
d
"
di
e
A
h
e
d
e
i
B
l
d
g
y
0
-
ø
a
e
H
f
ader
Produ
ent
Mode
navn
Input
Outpu
Sikrin
Oplad
erkabelslængde
De tek
niske specifikatio
Sikk
rhedsanvis
Før du
tager denne enh
varsler, også se
alle a
Opbe
ar denne betjeni
eller g
iver den væk, sk
del af produktet.
ikke e
Sym
olforklaring
Advar
ler anvendes på
en
eden ikke udsæt
en
eden ikke udsæt
Dette
FARE!
den ignorer
ADVARSEL
sikker brug
Forsigtig!
til retsforfølg
Dette symbol
ADVARSEL
Targa GmbH
CR 1.0 A1
12 til 24 V ,
5 V 600 m
T2A L, 250 V
200 cm
er og designet ka
inger
ed i brug første
lvom du i forvej
gsvejledning på
l du samtidig vi
ølgende måde i
symbol og ordet
, kan det medfør
!
Dette symbol
produktet og for
ette symbol og
lse, hvis de ignor
angiver yderlige
! Sørg altid for at
es for direkte var
es for direkte soll
350 mA
n ændres uden v
ang, bedes du l
n er fortrolig m
t sikkert sted til f
eregive denne b
enne brugervejle
FARE" advarer
alvorlige kvæst
g teksten "ADV
brugerens sikker
rdet "Forsigtig" b
res.
oplysninger om
ekilder (f.eks. ra
s eller stærkt, kun
rsel.
se nedenstående
d at håndtere el
emtidig brug. Hv
rugervejledning.
ning.
g om en potentie
ser eller dødsfal
RSEL" angiver vi
ed.
tyder vigtige opl
emnet.
iatorer)
tigt lys
CR 1.
anvisninger og f
ektroniske appar
s du sælger enh
rugervejledninge
lt farlig situation.
.
tige oplysninger
sninger, der kan
A1
lge
ter.
den
er
vis
for
øre
Dansk
53

CR 1.0 A1
Dashcam’et kun må anvendes inden for det tilladte driftstemperaturområde fra 0 °C til
35 °C
kontakt med opsprøjt, dryppende vand og nedbrydende væsker undgås, og at enheden aldrig
betjenes nær vand; enheden må slet ikke nedsænkes i væske (placér ikke objekter
indeholdende væske, såsom vaser eller drikkevarer, på eller i nærheden af enheden)
enheden aldrig anbringes i nærheden af magnetfelter (f.eks. højttalere)
der ikke placeres åben ild (f.eks. brændende stearinlys) på eller i nærheden af enheden
der ikke kan trænge fremmedlegemer ind i enheden
enheden ikke udsættes for store temperaturudsvingninger, da dette kan give fugtdannelse på
grund af kondens og forårsage kortslutning. Hvis enheden har været udsat for kraftige
temperatursvingninger, skal du vente på, at den når omgivelsestemperaturen, før du tænder for
den (ca. 2 timer).
enheden ikke udsættes for kraftige stødpåvirkninger eller vibrationer
at apparatet og dets tilbehør ikke bliver beskadiget for at undgå yderligere risici. Du skal
derfor regelmæssigt efterse apparatet og dets tilbehør for eventuelle skader. Hvis du opdager
at en eller flere komponenter er beskadiget, må du ikke bruge kameraet. Du må aldrig åbne
kamerahuset og du skal sørge for, at alle reparationer udelukkende foretages af kvalificeret
teknisk personale.
Hvis advarslerne ovenfor ikke overholdes, kan det resultere i skade på enheden eller
personskader.
FARE! Børn og handicappede personer
Elektriske apparater er ikke egnede til børn. Personer med nedsat fysisk, sansemæssig eller psykisk
kapacitet bør også kun anvende elektriske apparater under passende omstændigheder. Undlad,
at børn eller personer med handicap anvender elektriske enheder uden opsyn, medmindre de har
modtaget passende anvisninger og er under opsyn af en kompetent person, som er ansvarlig for
deres sikkerhed. Børn skal altid være under opsyn for at sikre, at de ikke leger med produktet.
Smådele kan udgøre en kvælningsrisiko.
FARE! Risiko for kvælning!
Lad ikke børn komme i nærheden af smådele og emballagen. Emballagen er ikke legetøj. Risiko
for kvælning!
54 - Dansk

CR 1.0 A1
Advarsel! Optagelser (foto/video) af personer og ophavsret til
optagelser af sig selv
Bemærk, at når du laver optagelser af personer, uanset om de er af grupper eller personer, har
den enkelte person ophavsretten til billedet/optagelsen af sig selv. Optagelse af mindreårige
personer kræver forældrenes tilladelse. Sørg for at overholde lovgivningen i landet, hvor enheden
anvendes, for at undgå retsforfølgelse.
I visse retskredse er det endvidere måske ikke tilladt, at filme eller fotografere personer (herunder
føreren af bilen og passagererne samt fodgængere osv.) Sørg for at overholde lovgivningen
vedrørende privatliv i landet, hvor enheden anvendes.
FARE! Brug på farten
Bemærk, at brug af kameraet på farten, uanset om du kører bil, cykel eller er fodgænger, kan
fjerne din opmærksomhed fra trafikken og medføre alvorlige ulykker. Dette kan medføre skader på
helbredet og/eller medføre retsforfølgelse. Endvidere kan brugen af forrudekameraet medføre
retsforfølgelse i visse lande. Sørg for at overholde lovgivningen i landet, hvor enheden anvendes.
FARE! Installation / brug i bilen
Trafiksikkerheden er vigtigst! I tilfælde af en ulykke er der øget risiko for, at man bliver beskadiget
af genstande, der bliver kastet rundt i bilen. Sørg altid for at fastgøre Dashcam’et på en måde, så
køretøjet altid kan betjenes sikkert og så det ikke blokerer for førerens udsyn. Placer altid alle
ledninger i bilen, så de ikke begrænser køretøjets drift. Når ledningerne placeres, skal du sørge
for, at ingen ledninger begrænser førerens synsfelter. Dashcam’et, eller dele af dette (brugerflade
og tilslutningsledninger), må under ingen omstændigheder installeres der, hvor airbaggen sidder.
Dette udgør en risiko for uheld og skader.
FARE! Batteri
Kast ikke Dashcam’et i ilden. Der er fare for eksplosion.
Det indbyggede, genopladelige batteri kan ikke tages ud ved bortskaffelse.
Dansk - 55

CR 1.0 A1
FARE! Eksplosionsfare
Ukorrekt brug kan forårsage eksplosioner eller lækage.
FARE! Skærm
Udsæt ikke skærmen for tryk og hold skarpe genstande på afstand af skærmen. En ødelagt skærm
udgør risiko for skader. Bær handsker, når du indsamler ødelagte dele og kontakt om nødvendigt
producenten. Bortskaf de ødelagte dele i en passende beholder. I tilfælde af ridser eller andre
skader på skærmen skal du være meget omhyggelig med at sikre, at der ikke trænger væske ud af
skærmen.
Hvis der trænger væske ud, skal du gøre følgende:
Hvis du får væsken på huden, skal det tørres af med en ren klud og du skal skylle efter med
rigeligt vand. Kontakt om nødvendigt lægen.
Hvis du får væske i øjet, skal du skylle øjet med rindende vand i mindst 15 minutter og
øjeblikkeligt kontakte en læge.
Hvis væsken sluges, skal munden skylles med vand og du skal derefter drikke rigeligt med
vand. Kontakt en læge øjeblikkeligt!
ADVARSEL! Ledninger
Kobl alle ledninger fra elnettet ved at trække i stikket, og aldrig i selve ledningen. Placér aldrig
møbler eller andre tunge genstande oven på ledningerne, og sørg for, at de ikke bliver beskadiget,
særligt ved stikkene. Der må aldrig bindes knuder på ledninger, og de må aldrig bindes sammen
med andre ledninger. Placér alle ledninger, så ingen kan snuble over dem, og så de ikke er i vejen
for nogen.
Copyright
Alt indholdet i denne betjeningsvejledning er beskyttet af ophavsret og er kun beregnet til
information for brugeren. Kopiering af data og oplysninger uden forudgående, udtrykkelig, skriftlig
godkendelse fra ophavsretsindehaveren, er strengt forbudt. Dette gælder også for enhver
kommerciel anvendelse af indholdet og oplysningerne. Al tekst og alle diagrammer var
opdaterede på trykketidspunktet.
56 - Dansk

CR 1.0 A1
Oversigt
En yderligere illustration af delene og betjeningsknapperne samt de tilhørende numre kan findes
på udfoldningsarket på indersiden af forsiden af denne brugervejledning. Denne side kan forblive
udfoldet, mens du læser de forskellige kapitler i denne brugervejledning. Det vil give dig mulighed
for at se de relevante betjeningselementer til enhver tid.
Venstre side
1. Nulstillingsknap
2. Plads til microSD-kort (mærket som "T-Flash" på
beskyttelsesdækslet)
3. HDMI-udgang
4. Beskyttelsesdæksel
Højre side
5. USB-/opladerstik
Front
6. Objektiv
7. Højttaler
8. 4 hvide LED-pærer
Dansk - 57

CR 1.
0
a
n
pKna
n
u
T
9
T
2
N
2
k
8
d
d
e
b
a
å
e
o
D
e
s
n
e
n
æ
f
d
e
o
g
n
a
g
n
A1
Betje
ingselemente
Kna
per
p F
EV-k
ap (10)
Men
u-knap (11)
r og displays
unktion
Tryk på denne
fototilstand for
knapperne + (1
Tryk på denne k
afbrudt, og der i
der er tilknyttet
op
. Gevind til bilhol
ilbage
1
0. EV-knap: juster
1. Menu-knap: å
1
2. OK-knap
1
3. Display
1
4. Tænd-/slukkna
1
5. Beskyttelseskn
1
ideooptagelse
v
6. Tilbage-knap:
1
7. --knap: mindsk
1
8. +-knap: øger z
1
9. Oplader-LED (
1
0. Optagelses-LE
ederst
1. Mikrofon
nap, mens optag
at indstille ek
) og – (17) og k
nap, mens optag
kke er nogen me
en aktuelle driftsti
er
r eksponeringsv
ner de driftsspeci
p
p: til at beskytte
bner hovedmenu
r zoom / naviger
oom / navigerer
range)
(blå)
lsen er midlertidi
poneringsværdie
appen OK (12).
lsen eller afspilni
u vist for at åbne
lstand.
rdien
fikke indstillinger
en aktuelle
en
er ned i menuen
p i menuen
t afbrudt eller er
n ved hjælp
gen er midlertidi
indstillingsmenue
i
f
t
,
58 - D
nsk

OK-knap (12)
Tryk på denne knap i videotilstand for at starte eller standse
optagelsen.
Tryk på denne knap i fototilstand for at tage et billede.
Tryk på knappen, mens menuen vises, for at vælge et menupunkt.
Tænd-/slukknap
(14)
Tryk på knappen og hold den inde i mindst 3 sekunder for at tænde
eller slukke Dashcam’et.
Tryk på denne knap under videooptagelse for at slukke for skærmen.
Videooptagelsen vil fortsætte. Tryk på knappen igen for at tænde
skærmen igen.
Tryk på denne knap i fototilstand for at slukke skærmen. Tryk på
knappen igen for at tænde skærmen igen.
Beskyttelsesknap
(15)
Tilbage-knap
(16)
Knapperne –
(17) og + (18)
Tryk på denne knap under videooptagelse for at beskytte den aktuelle
video og undgå at den overskrives ved loop-optagelse.
Tryk på denne knap for at vise hovedmenuen for driftstilstandsvalget.
Tryk på disse knapper under videooptagelse eller fotografering for at
zoome ind eller ud på motivet.
Tryk på disse knapper mens menuen er vist for at navigere mellem de
forskellige menumuligheder (op/ned).
Tryk på disse knapper mens en værdi er valgt i menuen for at øge
eller mindske værdien.
LED-indikatorer
LED Beskrivelse
Oplader-LED
(19)
Optagelses-LED
(20)
Orange: Oplader batteri
Blå: enhed starter op (når den er blevet tændt)
Blinker blåt: videooptagelse i gang
Blinker blåt: Selvudløser aktiveret i fotograferingstilstanden
CR 1.0 A1
Dansk - 59

CR 1.0 A1
Før du går i gang
Isætning/udtagning af hukommelseskort
Du skal bruge et microSD-hukommelseskort (medfølger ikke) til at gemme dine
videoer og fotos. Når et hukommelseskort er indsat, gemmes alt optaget
indhold på det. Hvis der ikke isættes et hukommelseskort, er det ikke muligt at
optage. I dette tilfælde vil meddelelsen "INDSÆT SD-KORT" blive vist. Bekræft ved at trykke på
OK-knappen (12).
Fortsæt på følgende måde for at isætte et hukommelseskort:
ADVARSEL!
Sluk for Dashcam’et før isætning eller udtagelse af et hukommelseskort.
Brug kun hukommelseskort med hastighedsklasse 6 eller hurtigere.
Hvis du ikke har isat et microSD-hukommelseskort, vil meddelelsen "INDSÆT SD-KORT"
blive vist, når enheden tændes.
1. Åbn beskyttelsesdækslet (4) på venstre side af Dashcam’et.
2. Isæt hukommelseskortet i microSD-kortporten (2) med terminalerne mod forsiden af apparatet
(mod skærmen (13)), indtil det klikker på plads.
3. Luk beskyttelsesdækslet (4) på venstre side af Dashcam’et.
Hvis du vil fjerne hukommelseskortet, skal du trykke forsigtigt på det isatte kort. Hukommelseskortet
stikker lidt frem, så du kan få fat i det og tage det ud.
Bilholder
Bilholderen gør det muligt at montere Dashcam’et på bilens
forrude.
1. Tilslut Dashcam’et til bilholderen. Dette gør du ved at
skrue gevindet til bilholderen (9) på bilholderen
gevindstift (22). Du kan bruge den riflede møtrik (23) til
at fastgøre Dashcam’et på dets plads.
2. Tryk derefter sugekoppen (24) på bilholderen mod
forruden og fastgør ved at trykke grebet (26) nedad.
60 - Dansk

CR 1.0 A1
Da gevindet til bilholderen (9) er placeret
øverst på Dashcam’et, skal du montere
bilholderen på en sådan måde, at Dashcam’et
"hænger" på holderen (se billede). Ellers vil
styreknapperne (10 til 20) vende på hovedet.
Bilholderen må ikke monteres (med eller uden Dashcam’et) inden for
FARE!
funktionsområdet for køretøjets airbag, og bilholderen skal monteres, så den ikke
hindrer førerens udsyn.
3. Løsn den riflede skrue (27) for at justere Dashcam’et i den ønskede position med hjælp fra
kugleleddet. Spænd den riflede skrue (27) igen.
4. Når du vil fjerne bilholderen fra forruden, skal du skubbe grebet (26) op igen og derefter
trække i udløsningsstiften (25) på sugekoppen.
Opladning af batteriet
Dashcam’ets batteri kan oplades via USB-porten på en computer eller med den medfølgende
biloplader.
Udover de nedenstående muligheder kan du også tilslutte Dashcam’et til en ekstern
USB-strømforsyning (medfølger ikke) og oplade Dashcam’et på den måde. Du kan
købe en passende 5 V USB-strømforsyning med en udgangsspænding på mindst 1A i
enhver elektronikforretning.
ADVARSEL!
tilgængelig stikkontakt, så den kan afbrydes hurtigt i en nødsituation.
Når du bruger en ekstern strømforsyning, skal den være sluttet til en let
Opladning af batteriet med et USB-kabel
1. Brug USB-kablet til at slutte Dashcam’et til en ledig USB-indgang på en computer. Sæt det lille
stik (30) på det medfølgende USB-kabel ind i Dashcam’ets USB-/opladningsport (5) og det
store stik (31) i en USB-port på computeren.
Dansk - 61

CR 1.0 A1
Nu vil Dashcam’et tænde.
Visse computere har ingen USB-strømforsyning, når de er slukkede. Hvis Dashcam’et
ikke lades op, skal du kontrollere, at computeren er tændt.
2. Du vil blive bedt om at vælge den ønskede driftstilstand (masselager eller pc-kamera). Ved
første brug anbefaler vi, at du starter med at slukke enheden, lader batteriet lade op i et par
timer og derefter definerer basisindstillinger som eksempelvis dato og tidspunkt osv., inden du
gør andet. For at tænde for Dashcam’et, skal du trykke på og holde tænd-/slukknappen (14)
inde i omkring 3 sekunder.
Oplader-LED-lyset (19) lyser orange under opladning. Når opladning er gennemført, slukker
oplader-LED-lyset (19).
Opladning med bilopladeren
ADVARSEL!
bilopladerkablet tilsluttes, efter bilmotoren er startet.
For at beskytte dit Dashcam mod pludselige spændingsstigninger skal
Du kan tilslutte bilopladeren til en 12 V- eller 24 V-cigarettænder.
1. Tilslut mini-USB-stikket (29) fra bilopladeren til USB-/opladningsporten (5) på Dashcam’et.
2. Slut derefter bilopladeren til et egnet cigarettænderstik i bilen.
Dashcam’et vil derefter tænde og loop-optagelse vil begynde.
Hvis cigarettænderen i din bil kan tændes med tændingsnøglen, vil dette sikre, at optagelsen
begynder, hver gang du starter bilens motor og dermed vil alle dine rejseruter blive optaget
automatisk.
Oplader-LED-lyset (19) lyser orange under opladning. Når opladning er gennemført, slukker
oplader-LED-lyset (19).
Hvis oplader-LED-lyset (19) ikke lyser, er det muligt, du skal udskifte bilopladningssikringen. Du kan
læse mere om dette i afsnittet "Udskiftning af bilopladningssikring" på side 86.
ADVARSEL!
strømførende hele tiden, vil bilens batteri blive afladet, hvis du lader Dashcam’et være
Hvis cigarettænderen i din bil ikke slukker med tændingsnøglen, men er
tændt. For at undgå afladning af batteriet til et niveau hvor bilen ikke længere kan
startes, anbefaler vi derfor, at du frakobler bilopladeren fra cigarettænderen i bilen,
når du forlader bilen.
62 - Dansk

CR 1.0 A1
Kom godt i gang
Tænd for Dashcam’et
Tryk på og hold Dashcam’ets tænd-/slukknap (14) nede i mindst 3 sekunder for at tænde det.
Eller tænd bilen for at starte Dashcam’et. Dette er en mulighed, hvis du har tilsluttet
Dashcam’et til din bils cigarettænder ved hjælp af bilopladeren, og denne kan
aktiveres/deaktiveres med tændingsnøglen. I dette tilfælde starter loop-optagelse automatisk.
Sluk for Dashcam’et
Tryk på og hold Dashcam’ets tænd-/slukknap (14) nede i mindst 3 sekunder for at slukke det.
Eller sluk bilen for at slukke Dashcam’et. Dette er en mulighed, hvis du har tilsluttet Dashcam’et
til din bils cigarettænder ved hjælp af bilopladeren, og denne kan aktiveres/deaktiveres med
tændingsnøglen. Meddelelsen "Kameraet lukkes" vil blinke i ca. 30 sekunder og Dashcam’et
vil automatisk slukke.
Indstilling af menusproget
Proceduren der er beskrevet nedenfor fungerer kun, når Dashcam’et IKKE er tilsluttet en
computer med et USB-kabel. Hvis det er nødvendigt, skal du først frakoble USB-kablet
fra USB-/opladningsporten (5) på Dashcam’et.
1. Tænd for enheden ved at trykke på og holde tænd-/slukknappen (14) inde i omkring 3
sekund.
2. Tryk på knapperne – (17) eller + (18) flere gange indtil menuen "Setup" vises.
3. Tryk på knappen OK (12) for at åbne menuen "Setup".
4. Tryk på knapperne – (17) eller + (18) flere gange indtil muligheden "Language" er valgt.
5. Tryk på knappen OK (12) for at åbne muligheden "Language".
6. Tryk på knapperne – (17) eller + (18) flere gange for at fremhæve det valgte sprog og tryk
på OK (12) for at bekræfte.
7. Når du er færdig, skal du trykke på knappen Tilbage (16) for at vise hovedmenuen.
Indstilling af dato og klokkeslæt
Proceduren der er beskrevet nedenfor fungerer kun, når Dashcam’et IKKE er tilsluttet en
computer med et USB-kabel. Hvis det er nødvendigt, skal du først frakoble USB-kablet
fra USB-/opladningsporten (5) på Dashcam’et.
Dansk - 63

CR 1.0 A1
1. Tænd for enheden ved at trykke på og holde tænd-/slukknappen (14) inde i omkring 3
sekund.
2. Tryk på knapperne – (17) eller + (18) flere gange indtil menuen "Opsætning" vises.
3. Tryk på knappen OK (12) for at åbne menuen "Opsætning".
4. Tryk på knapperne – (17) eller + (18) flere gange indtil muligheden "Dato/tid" er valgt, og
tryk på OK (12) for at bekræfte.
5. Tryk på knapperne – (17) eller + (18) flere gange for at indstille den værdi, der aktuelt er
valgt, og tryk på OK-knappen (12) for at anvende den.
Markøren skifter til det næste felt, hvor du kan indstille den tilsvarende værdi. Gentag denne
procedure for at indstille alle værdierne.
6. Når du er færdig, skal du trykke på knappen Menu (11) for at vende tilbage til
opsætningsmenuen, eller trykke på knappen Tilbage (16) for at åbne hovedmenuen.
Opstart og valg af driftstilstand
Når du har tændt for enheden (hold Tænd-/slukknappen (14) nede i ca. 3 sekunder), er der tre
muligheder afhængigt af, vejret og hvordan Dashcam’et oplades.
Dashcam’et oplades ikke
Hvis Dashcam’et ikke er tilsluttet (via USB eller bilopladeren) vil muligheden "Loop-optagelse" i
hovedmenuen blive vist, når enheden er tændt.
Vælg muligheden "Loop-optagelse" i hovedmenuen ved at trykke på knappen OK (12) for at
optage video i en loop-optagelsestilstand. Se endvidere "Loop-optagelse" på side 74.
Videooptagelsen vil nu begynde med det samme.
Du kan også bruge knapperne – (17) og + (18) til at vælge en anden driftstilstand og
bekræfte dit valg, ved at trykke på OK-knappen (12).
Dashcam er tilsluttet en pc med et USB-kabel
Hvis der er foretaget en USB-tilslutning mellem en pc og dit Dashcam, vil der blive vist en
udvalgsmenu, når enheden tændes for mulighederne "Masselager" og "PC-kamera".
Når Dashcam’et er tilsluttet en computer via et USB-kabel, kan enheden ikke anvendes
som et videokamera eller et digitalkamera, kun som masselagerenhed eller webcam.
Ved hjælp af knapperne – (17) og + (18) kan du vælge den ønskede mulighed og bekræfte dit
valg ved at trykke på knappen OK (12). Se også afsnittet "Tilslutning af Dashcam’et til en
computer" på side85.
64 - Dansk

CR 1.0 A1
Dashcam’et er tilsluttet via bilopladeren
Hvis Dashcam’et er tilsluttet via bilopladeren og den er tilsluttet en strømførende cigarettænder i
din bil, vil loop-optagelse begynde, så snart enheden tændes.
Optagelse af videoer
Når du har tændt enheden og valgt en videooptagelsestilstand, når det er relevant som beskrevet i
de forrige trin, kan Dashcam’et anvendes til at optage videoer med eller uden bilholderen, mens
du kører.
1. Hvis du anvender Dashcam’et uden bilholderen, skal du rette Dashcam’et mod den ønskede
genstand ved hjælp af skærmen (13).
2. Tryk på knappen OK (12) for at begynde optagelse. Optagelses-LED-lyset (20) vil blinke blåt,
mens der optages.
3. Hvis det er nødvendigt, kan du vælge en større eller mindre del af billedet (zoom) ved hjælp
af knapperne + (18) og – (17). Tryk på knappen + (18) for at bringe genstanden tættere
eller knappen - (17) for at bringe genstanden længere væk.
4. Tryk på knappen OK (12) for at stoppe optagelse. Optagelses-LED-lyset (20) vil ikke længere
blinke.
Videoen lagres automatisk under et unikt navn.
Under optagelsen kan der fremkomme forskellige ikoner på skærmen (13), der oplyser dig om de
aktuelle indstillinger.
Dansk - 65

CR 1.
0
a
e
e
0
v
p
m
e
p
e
d
d
o
e
Q
v
e
m
s
V
0
A1
A
B
320x240
C
D
E
F
G
H
I
66 - D
●
00:02:32
QVGA
nsk
Indikator for vid
Opløsning i pix
848x480, 128
Optagelsesikon
Dette ikon angi
blive overskreve
Timetæller for o
Opløsning: De
og 1080FHD
Lydikon: indiker
() lyd.
Hukommelsesty
: der er isat
dette.
: der er ikk
Batteriniveau
: batteri ful
ooptagelse
l: De mulige vær
x720, 1440x10
(blinker rødt ved
er, at den aktuell
t.
tagelse
ulige værdier er
r om videoen bli
e:
et SD-hukommels
isat et SD-hukom
t opladet
ier er 320x240,
80, 1920x1080
ptagelse)
optagelse er be
VGA, VGA, W
er optaget med (
skort, og alle opt
elseskort.
640x480,
kyttet og ikke vil
GA, 720P, 108
) eller uden
agelser lagres på
P

CR 1.0 A1
: batteri 2/3 opladet
: batteri 1/3 opladet
: batteri næsten tomt
J x4.0 Zoom-indikator
K 10:32:00 Klokkeslæt
L 12/12/2014 Aktuel dato
Videolys
I mørke omgivelser kan du aktivere de integrerede 4 hvide LED-pærer (8).
1. Under videooptagelse kan du trykke på knappen OK (12) for at stoppe optagelsen og derefter
trykke på Menu-knappen (11) for at vise menuen for den aktuelle tilstand.
2. Ved hjælp af knapperne – (17) og + (18) kan du vælge muligheden "LED-lampe" og
bekræfte dit valg ved at trykke på knappen OK (12).
3. Ved hjælp af knapperne – (17) og + (18) kan du vælge muligheden "Til" og bekræfte dit valg
ved at trykke på knappen OK (12) for at tænde videolyset.
Du kan også trykke på "Fra" og bekræfte valget ved at trykke på knappen OK (12) for at
slukke for videolyset.
Når du har aktiveret funktionen, vil videolyset automatisk lyse, når der ikke er tilstrækkeligt lys. Det
vil forblive slukket i lyse omgivelser for at spare på batteriet.
Kompensering for eksponering
Du kan definere en eksponeringskompensationsværdi for videooptagelser.
1. Når videooptagelse eller fotografering er midlertidigt afbrudt, skal du trykke på EV-knappen
(10) for at frembringe eksponeringskompensationsmenuen.
2. Ved hjælp af knapperne + (18) og – (17) kan du vælge den ønskede mulighed og bekræfte
dit valg ved at trykke på knappen OK (12). Mens du foretager dit valg, vil
forhåndsvisningsbilledet på skærmen (13) ændre sig i realtid, så du hurtigt kan se, hvilken
eksponeringsværdi der i øjeblikket er den mest passende.
Du kan vælge en eksponeringsværdi mellem – 2 og + 2 i 1/3 eksponeringsværdiintervaller.
Hvis billedet er for lyst, kan du indstille en negativ værdi for eksponeringskompensationen.
Hvis billedet er for mørkt, kan du indstille en positiv værdi for eksponeringskompensationen.
Dansk - 67

CR 1.0 A1
Sådan beskytter du dine videoer mod at blive overskrevet under loopoptagelse
For tilstanden "Loop-optagelse" kan du definere en længde for videoen på 3, 5 eller 10 minutter i
menuen. Efter den optagelsestid oprettes der automatisk en ny videofil. Når du optager videoer,
bliver det valgte microSD-kort fyldt op. Når der ikke er mere ledig lagringsplads, vil den ældste
video i den aktuelle optagelse automatisk blive overskrevet. Dette sikrer, at det altid er muligt at
optage, også selvom lagringspladsen faktisk er blevet brugt op.
Det kan imidlertid være, at du gerne vil beholde en bestemt sceene og forhindre, at den
overskrives. Dette gøres på følgende måde:
Under videooptagelsen skal du trykke på knappen Beskyt aktuel video (15).
Bemærk at efter den indstillede tid på 3, 5 eller 10 minutter vil en ny video blive
optaget, der vil blive behandlet som en loop-optagelse igen (med andre ord vil den
være åben for overskrivning, når den indstillede tid er gået).
Hvis du indstiller loop-optagelse til "Fra", kan der optages videoer, indtil det indsatte microSD-kort
er fyldt op. Det garanterer på den ene side, at ingen eksisterende optagelser overskrives, men til
gengæld kan der ikke optages nye videoer.
Fotografering
Når du har tændt enheden som beskrevet i afsnittet "Opstart og valg af driftstilstand" på side 64
og har valgt fotograferingstilstanden, kan du tage billeder med eller uden bilholderen i løbet af din
køretur.
1. Hvis du anvender Dashcam’et uden bilholderen, skal du rette Dashcam’et mod den ønskede
genstand ved hjælp af skærmen (13).
2. Hvis det er nødvendigt, kan du vælge en større eller mindre del af billedet (zoom) ved hjælp
af knapperne + (18) og – (17). Tryk på knappen + (18) for at bringe genstanden tættere
eller knappen - (17) for at bringe genstanden længere væk.
3. Tryk på knappen OK (12) for at tage billedet.
Billedet lagres automatisk under et unikt navn.
Under optagelsen kan der fremkomme forskellige ikoner på skærmen (13), der oplyser dig om de
aktuelle indstillinger.
68 - Dansk

o
p
s
m
p
e
d
3
3
æ
1
e
m
5
a
CR 1.
0
-
A1
A
B
C
D
02699
E
F
G
H
I
12M
x4.0
Indikator for fot
Selvudløserlam
Indikator for fort
Resterende anta
Opløsning: De
1,3M og VGA
Kvalitetsindikato
Hukommelsesty
: der er isat
dette.
: der er ikke
Batteriniveau
: batteri ful
: batteri 2/
: batteri 1/
: batteri n
Zoom-indikator
graferingstilstand
e
at fotografering
l billeder
ulige værdier er
r
e:
t SD-hukommels
isat et SD-hukom
t opladet
opladet
opladet
sten tomt
2M, 10M, 8M,
skort, og alle opt
elseskort.
M, 3M, 2MHD,
gelser lagres på
Dansk
69

CR 1.0 A1
Kompensering for eksponering
Du kan definere en eksponeringskompensationsværdi for fotografering.
1. Når fotograferingstilstanden er valgt, skal du trykke på EV-knappen (10) for at frembringe
eksponeringskompensationsmenuen.
2. Ved hjælp af knapperne + (18) og – (17) kan du vælge den ønskede mulighed og bekræfte
dit valg ved at trykke på knappen OK (12). Mens du foretager dit valg, vil
forhåndsvisningsbilledet på skærmen (13) ændre sig i realtid, så du hurtigt kan se, hvilken
eksponeringsværdi der i øjeblikket er den mest passende.
Du kan vælge en eksponeringsværdi mellem – 2 og + 2 i 1/3 eksponeringsværdiintervaller.
Hvis billedet er for lyst, kan du indstille en negativ værdi for eksponeringskompensationen.
Hvis billedet er for mørkt, kan du indstille en positiv værdi for eksponeringskompensationen.
Afspilning
Du kan afspille dine optagede videoer og stillbilleder på skærmen, så du kan kontrollere, om
resultatet er i orden. Optagelserne kan også afspilles på et HDMI-tv (se også "Visning af
optagelser på et fjernsyn" på side 84).
For at kunne afspille videoer og vise stillbilleder, skal du vælge muligheden "Afspilning" i
hovedmenuen:
1. Tænd for Dashcam’et ved at trykke på og holde tænd-/slukknappen (14) inde i omkring 3
sekund.
2. Tryk på knapperne + (18) eller – (17) flere gange indtil menuen "Afspilning" vises.
3. Tryk på knappen OK (12) for at aktivere Afspilningestilstand.
Nu vises den sidst optagede fil (video eller stillbillede).
4. Tryk på knapperne + (18) eller – (17) flere gange indtil den optagelse du ønsker at afspille, er
valgt.
Hvis den valgte optagelse er en video, vil ikonet blive vist øverst til venstre på skærmen.
Hvis den valgte optagelse er et stillbillede, vil ikonet blive vist øverst til venstre på
skærmen.
5. For videofiler skal du trykke på knappen OK (12) for at begynde afspilning.
Videoafspilningsfunktioner
De følgende funktioner er tilgængelige, mens du afspiller videoer (der vises en værktøjslinke i
bunden af skærmen med en vejledning i de tilgængelige funktioner):
70 - Dansk

CR 1.0 A1
Pause: Tryk på knappen OK (12) for midlertidigt at stoppe afspilningen. Tryk på OK-knappen
igen (12), hvis afspilning skal fortsætte.
Spol frem/tilbage: Under afspilning kan du trykke på knappen - (17) flere gange for at spole
videoen tilbage. Spolehastigheden vil blive øget hver gang, knappen aktiveres: -2x, -4x, -8x. For at
vende tilbage til normal afspilningshastighed skal du trykke på knappen + (18) det antal gange,
det er nødvendigt.
Under afspilning kan du trykke på knappen + (18) flere gange for at spole videoen frem.
Afspilningshastigheden vil øges eller reduceres i takt med, at knappen aktiveres: 2x, 4x, 8x. For at
vende tilbage til normal afspilningshastighed skal du trykke på knappen - (17) det antal gange,
det er nødvendigt.
I afspilningstilstand vil du se yderligere oplysninger på skærmen:
AB C
-
+
D
E
F
G
H
Symbol Beskrivelse
A
B
C
D
128-0014
00:00:08
Videoafspilning
Beskyttet video. Denne video vil ikke blive overskrevet under loop-afspilning.
De første 3 numre i lagringsmappen - fortløbende numre for optagelsen
Aktuel afspilningstid
Dansk - 71

CR 1.0 A1
E
F
G
14/12/20
09:21
Optagedato
Tidspunkt for optagelse
Batteriniveau
: batteri fuldt opladet
: batteri 2/3 opladet
: batteri 1/3 opladet
: batteri næsten tomt
H
Hjælpelinje til afspilningsfunktioner
Når en videoafspilning er midlertidigt standset, er de følgende funktioner tilgængelige og de kan
blive vist via menuknappen (11) og valgt med knapperne - (17) og + (18).
Slet
Denne mulighed gør det muligt for dig at slette den video, der aktuel bliver vist
eller alle gemte videoer. Se også "Slet" på side 83.
Beskyt
Her kan du beskytte en eller flere videoer for at forhindre, at du ved et uheld
sletter eller ikke beskytter dem. Se også "Beskyt" på side 83.
Diasshow
Denne funktion giver dig mulighed for at afspille alle billeder i rækkefølge som
et diasshow. For at gøre dette, skal du vælge den valgte afspilningstid for hvert
billede (2, 5 eller 8 sekunder) i denne menu. Se også "Diasshow" på side 84.
Stillbilledafspilningsfunktioner
Under stillbilledafspilning er de følgende funktioner tilgængelige, og de kan blive vist for et vist
billede via menuknappen (11) og valgt med knapperne - (17) og + (18).
Slet
Denne mulighed gør det muligt for dig at slette det aktuelt viste billede eller alle
gemte billeder. Se også "Slet" på side 83.
Beskyt
Her kan du beskytte et eller flere stillbilleder for at forhindre, at du ved et uheld
sletter eller ikke beskytter dem. Se også "Beskyt" på side 83.
Diasshow
Denne funktion giver dig mulighed for at afspille alle billeder i rækkefølge som
et diasshow. For at gøre dette, skal du vælge den valgte afspilningstid for hvert
billede (2, 5 eller 8 sekunder) i denne menu. Se også "Diasshow" på side 84.
Under stillbilledafspilning kan du se yderligere oplysninger på skærmen:
72 - Dansk

AB C
Symbol Beskrivelse
A
B
129-0018
C
3648x2736 Opløsning
D
14/12/20 Optagedato
E
09:25 Tidspunkt for optagelse
F
G
Stillbilledafspilning
Beskyttet billede. Dette stillbillede kan ikke slettes.
De første 3 numre i lagringsmappen - fortløbende numre for optagelsen
Batteriniveau
: batteri fuldt opladet
: batteri 2/3 opladet
: batteri 1/3 opladet
: batteri næsten tomt
: batteri er fladt
D
E
F
G
CR 1.0 A1
Dansk - 73

CR 1.0 A1
Menuer
Dashcam’et har forskellige menuer, der sørger for forskellige indstillinger for de forskellige
tilstande. Der findes også en opsætningsmenu, der giver dig mulighed for at indstille dine
præferencer for Dashcam’et.
Hovedmenu
I hovedmenuen kan du få adgang til den ønskede optagefunktion, afspilningsfunktion og til
opsætningsmenuen for dit Dashcam. Der er endvidere en lommelygte funktion tilgængelig her, så
du kan bruge Dashcam’et som en lygte i mørket.
1. Tænd for Dashcam’et ved at trykke på og holde tænd-/slukknappen (14) inde i omkring 3
sekund.
2. Hvis Dashcam’et er tilsluttet bilopladeren, skal du trykke på knappen OK (12) for at stoppe
optagelsen og derefter på tilbage-knappen (16) for at vise hovedmenuen. Ellers kan du gå
videre til trin 3.
3. Tryk på knapperne + (18) eller - (17) flere gange for at vælge den ønskede funktion.
4. Tryk på OK (12) for at aktivere den valgte funktion.
De tilgængelige funktioner er beskrevet i afsnittet nedenfor.
Loop-optagelse
Loop-optagelse er en funktion, hvori der optages videoklip af en bestemt længde (eksempelvis 5
minutter). Efter den optagelsestid oprettes der automatisk en ny videofil. Når du optager videoer,
bliver det valgte microSD-kort fyldt op. Når der ikke er mere ledig lagringsplads, vil den ældste
video i den aktuelle optagelse automatisk blive overskrevet. Dette sikrer, at det altid er muligt at
optage, også selvom lagringspladsen faktisk er blevet brugt op.
I denne tilstand skal du sikre, at alle de optagelser du ønsker at beholde, enten er beskyttede (se
afsnittet "Sådan beskytter du dine videoer mod at blive overskrevet under loop-optagelse" på side
68) eller overført til et andet lagringsmedie (eksempelvis din pc, se "Overførsel af optagelser til en
computer" på side 85).
1. Tænd for Dashcam’et ved at trykke på og holde tænd-/slukknappen (14) inde i omkring 3
sekund.
2. Hvis Dashcam’et er tilsluttet ved hjælp af bilopladeren, skal du trykke på knappen Tilbage (16)
for at vise hovedmenuen. Ellers kan du gå videre til trin 3.
3. Tryk på knapperne + (18) eller - (17) flere gange for at vælge "Loop-optagelse".
4. Tryk på OK (12) for at aktivere loop-optagelse.
74 - Dansk

CR 1.0 A1
Stillbillede
I denne tilstand agerer dit Dashcam som et almindeligt digitalkamera, som du kan tage billeder
med. Yderligere oplysninger findes i afsnittet "Fotograferingsmenu" på side 80 samt i afsnittet
"Fotografering" på side 68.
1. Tænd for Dashcam’et ved at trykke på og holde tænd-/slukknappen (14) inde i omkring 3
sekund.
2. Hvis Dashcam’et er tilsluttet ved hjælp af bilopladeren, skal du trykke på knappen Tilbage (16)
for at vise hovedmenuen. Ellers kan du gå videre til trin 3.
3. Tryk på knapperne + (18) eller - (17) flere gange for at vælge funktionen "Stillbillede".
4. Tryk på OK (12) for at aktivere kamerafunktionen.
Bevægelsessporing
Bevægelsessporing er et alternativ, der sparer på hukommelsen ved at optage videoer automatisk.
Dette kan være nyttigt, når du eksempelvis har parkeret bilen, men gerne vil filme de parkere biler i
tilfælde af, at de buler din nummerplade med deres trækkrog, når de bakker.
nnnn
Videoer der optages via bevægelsessporing, bliver gemt i mapper, der hedder "
nnnn
er et firecifret nummer.
1. Tænd for Dashcam’et ved at trykke på og holde tænd-/slukknappen (14) inde i omkring 3
sekund.
2. Hvis Dashcam’et er tilsluttet ved hjælp af bilopladeren, skal du trykke på knappen Tilbage (16)
for at vise hovedmenuen. Ellers kan du gå videre til trin 3.
3. Tryk på knapperne + (18) eller - (17) flere gange for at vælge funktionen
"Bevægelsessporing".
4. Tryk på OK (12) for at aktivere bevægelsessporing.
Afspilning
Du kan afspille dine optagede videoer og stillbilleder på skærmen, så du kan kontrollere, om
resultatet er i orden.
EVEN", hvor
Du kan også afspille de optagede videoer på en computer eller et tv. Se også
"Overførsel af optagelser til en computer" på side 85 og "Visning af optagelser på et
fjernsyn" på side 84.
1. Tænd for Dashcam’et ved at trykke på og holde tænd-/slukknappen (14) inde i omkring 3
sekund.
Dansk - 75

CR 1.0 A1
2. Hvis Dashcam’et er tilsluttet ved hjælp af bilopladeren, skal du trykke på knappen Tilbage (16)
for at vise hovedmenuen. Ellers kan du gå videre til trin 3.
3. Tryk på knapperne + (18) eller - (17) flere gange for at vælge funktionen "Afspilning".
4. Tryk på OK (12) for at aktivere afspilningsfunktionen.
Yderligere oplysninger findes i afsnittet "Afspilning" på side 70 samt i afsnittet "Afspilningsmenuer"
på side 82.
Lommelygte
Takket være dit Dashcams 4 hvide LED-lamper (8) kan enheden også anvendes som lommelygte.
Sådan tænder og slukker du de 4 hvide LED-lamper (8):
1. Tænd for Dashcam’et ved at trykke på og holde tænd-/slukknappen (14) inde i omkring 3
sekund.
2. Hvis Dashcam’et er tilsluttet ved hjælp af bilopladeren, skal du trykke på knappen Tilbage (16)
for at vise hovedmenuen. Ellers kan du gå videre til trin 3.
3. Tryk på knapperne + (18) eller - (17) flere gange for at vælge funktionen "Lommelygte".
4. Tryk på knappen OK (12), vælg den ønskede mulighed ved at trykke på knappen - (17) og
tryk derefter på knappen OK (12) for at bekræfte:
Sluk: Slukker lygtefunktionen.
Altid lyst: Tænder lygtefunktionen.
Etsekunds-lommelygte: Tænder lygtefunktionen. De 4 hvide LED-lamper (8) vil derefter
blinke en gang i sekundet. Denne tilstand sparer på batteriet.
Hvis du har aktiveret muligheden "Autosluk" i menuen "Opsætning", vil lommelygten
også slukke efter den indstillede tid.
Opsætning
Opsætningsmenuen indeholder de grundlæggende indstillinger for Dashcam’et. Disse inkluderer
dato og tidspunkt, dvaletid inden automatisk nedlukning (strømbesparende funktion),
bekræftelseslyd for tastetryk, sprog for menu på skærmen, billedrotation, formateringsfunktion for
det isatte SD-hukommelseskort, fabriksindstillinger samt gendannelses- og
firmwareversionsoplysninger.
Indstilling Beskrivelse
Dato/tid
Indstil dato og klokkeslæt (se også "Indstilling af dato og klokkeslæt"
på side 63).
76 - Dansk

Autosluk
Biplyd
Sprog
Frekvens
Billedrotation
Format
Standardindstilling
Version
CR 1.0 A1
Du kan sætte kameraet til at slukke automatisk efter en vis tid, så du
kan spare på batteriet. Hvis der ikke trykkes på nogen knapper i
løbet af det forudindstillede tidsrum, slukker enheden automatisk.
Dashcam’et kan derefter tændes igen ved hjælp af Tænd/slukknappen (14).
Du kan vælge imellem sluktider fra 1 minut til 3 minutter, eller du kan
slå autoslukfunktionen fra.
Her kan du indstille, om enheden skal lave en lyd hver gang, du
trykker på en knap. Denne valgmulighed aktiverer eller deaktiverer
også lyden ved opstart.
Vælg det ønskede skærmmenusprog (se også "Indstilling af
menusproget" på side 63).
Vælg netstrømsfrekvens for at undgå forstyrrelser forårsaget af
fluorescerende lys. I Europa bruges en netstrømsfrekvens på 50 Hz,
og i Amerika bruges en netstrømsfrekvens på 60 Hz.
I denne menu kan du rotere billedet 180°.
Denne funktion giver dig mulighed for at slette alt indhold på dit
hukommelseskort (ekstratilbehør) og forny fillagringsstrukturen på dit
kort (formatering).
Advarsel! Alle gemte videoer og billeder slettes og kan ikke
gendannes. Det gælder også beskyttede filer. Sørg for, at alle de
optagelser, du vil beholde, er sikkerhedskopieret på et andet
lagringsmedie.
Alle apparatparametre gendannes til fabriksindstillingerne.
Dette slette ikke nogen data fra dit hukommelseskort.
Denne funktion viser dit Dashcams aktuelle firmwareversion. Disse
oplysninger kan være nyttige, når du eksempelvis skal kontakte
kundeservice.
Optagemenuerne
Videooptagelsesmenu
Videooptagelsesmenuen giver dig mulighed for at indstille de forskellige videooptagelsesmenuer.
Sådan åbnes videooptagelsesmenuen:
Dansk - 77

CR 1.0 A1
1. Tænd for enheden ved at trykke på og holde tænd-/slukknappen (14) inde i omkring 3
sekund.
2. Som standard vises muligheden "Loop-optagelse". Tryk på knappen OK (12) for at vælge den,
eller vent et par sekunder på at "Loop-optagelsen" aktiveres automatisk, hvis Dashcam’et er
tilsluttet bilopladeren.
3. Tryk på OK-knappen (12) for at stoppe videooptagelsen.
4. Tryk på menuknappen (11) for at få vist videooptagelsesmenuen.
5. Ved hjælp af knapperne – (17) og + (18) kan du justere de ønskede indstillinger (se nedenfor)
og trykke på knappen OK (12).
6. Tryk på menuknappen (11) for at skjule menuen.
De følgende afsnit indeholder en beskrivelse af de forskellige tilgængelige parametre i
videooptagelsemenuen.
Opløsning
Opløsningen definerer størrelsen på optagelsen i pixel. Som tommelfingerregel: Jo højere
opløsning, desto mere lagringsplads er nødvendig.
Dit Dashcam understøtter optagelse i moderne bredskærmformat. Men ikke alle tilgængelige
opløsninger tilbyder 16:9-formatet. Med indstillingerne 1140x1080P, QVGA og VGA er formatet
4:3.
Der findes de følgende indstillinger:
Opløsning Beskrivelse
QVGA 320 x 240 Lav kvalitet (anbefales til internet-applikationer)
VGA 640 x 480 VGA-skærmkvalitet
WVGA 848 x 480 Normal kvalitet
1280 x 720P Middel kvalitet
1440 x 1080P Høj kvalitet
1920 x 1080P Meget høj kvalitet
Loop-optagelse
Loop-optagelsestiden kan defineres her. Efter den indstillede periode vil en ny videofil blive dannet.
Loop-optagelse Beskrivelse
Fra Deaktiverer loop-optagelse (det vil sige at optagelsen stopper, når
hukommelseskortet er fyldt og ingen gamle filer bliver overskrevet). Der
oprettes automatisk en ny videofil efter 10 minutter. Du skal trykke på
78 - Dansk

3 mi
n
n
m
n
a
e
n
m
e
g
d
s
d
d
d
r
r
m
o
k
s
d
e
v
l
e
e
t
e
2
o
o
o
e
c
v
æ
l
n
o
d
F
a
F
m
p
d
k
e
k
e
k
e
r
a
n
f
d
e
a
ø
e
æ
m
e
p
p
r
v
h
"
o
k
n
,
0
-
p
e
e
t
s
a
r
e
å
u
p
.
5 mi
.
10
in.
sor
G-se
Dit D
shcam er udsty
samm
nstød spores ge
hedde
r "
med andre ord i
Den vi
definere G-sen
Du ka
genne
snitlig følsomhe
sensor
n.
Opta
lyd
Brug
enne mulighed til
De tilg
ængelige muligh
tempel
Dato
Brug
enne mulighed til
De tilg
ængelige muligh
isplay fra
Auto
Brug
enne mulighed
aktive
es i en bestemt p
nnnn
EVEN", hv
Sørg for, at
kan optage
Når som
ideooptage
OK-knappen (1
automatisk efter
Der vil altid kun
oprettes der aut
Der vil altid kun
oprettes der aut
Der vil altid kun
oprettes der aut
et med en G-s
mer Dashcam’et
r
nnnn
er et fire
ke blive overskre
orens følsomhed
og "Høj" for en
Dashcam’et er t
n video af en mu
helst G-sensore
se. Dette vises i f
at definere om vi
der er "Til" eller "
at definere om d
der er "Til" eller "
il at definere o
riode.
) for at stoppe o
en bestemt perio
blive optaget ma
matisk en ny vid
blive optaget ma
matisk en ny vid
blive optaget ma
matisk en ny vid
nsor, der reage
automatisk den
ifret nummer. De
et.
her. Vælg "Lav"
højere følsomhe
e.
simalt 3 minutter
ofil.
simalt 5 minutter
ofil.
simalt 10 minutte
ofil.
er på vibratione
ne videosekvens
or en lav følsom
. Eller vælg "Fra
ndt og allerede
ig ulykke.
sporer et s
mmenstød, bes
rm af -ikonet
eoen skal optag
ra".
toen og klokkesl
ra".
skærmen auto
s med lyd eller ej.
ttet skal optages
atisk skal slukke
tagelsen - optag
ktuelle videosek
r i tilstanden "L
verst på skærme
CR 1.
lsen vil ikke stop
per video. Dereft
per video. Dereft
r per video. Deref
r eller stød. Hvi
ens i en mappe,
beskyttes autom
hed, "Mellem" fo
for at deaktiver
op-optagelse", s
yttes den akt
(13).
på videoen.
hvis ingen kna
A1
e
r
r
er
et
der
tisk.
en
G-
du
elle
per
Dansk
79

CR 1.0 A1
De tilgængelige muligheder er "Til" eller "Fra".
Hvis denne mulighed er aktiveret, vil skærmen automatisk slukke efter ca. 30 sekunder.
For at tænde den igen skal du kort trykke på Tænd-/slukknappen (14) igen.
LED-lampe
Tænd LED-lampen for at opnå tilstrækkelig belyste optagelser, selv i mørke omgivelser. Dette
forbedrer kvaliteten på alle natoptagelser.
De tilgængelige muligheder er "Til" eller "Fra".
Når LED-lampen er aktiveret, tænder lyset automatisk, når det er nødvendigt (når der ikke er
tilstrækkeligt omkringværende lys).
Fotograferingsmenuen
Fotograferingsmenuen giver dig mulighed for at indstille de forskellige fotograferingsparametre.
Sådan åbnes fotograferingsmenuen:
1. Tænd for enheden ved at trykke på og holde tænd-/slukknappen (14) inde i omkring 3
sekund.
2. Som standard vises muligheden "Loop-optagelse". Tryk på knapperne + (18) eller – (17) flere
gange, vælg "Stillbillede"-menuen, og tryk på OK (12) for at åbne den.
3. Tryk på menuknappen (11) for at få vist fotograferingsmenuen.
4. Ved hjælp af knapperne – (17) og + (18) kan du justere de ønskede indstillinger (se nedenfor)
og trykke på knappen OK (12).
5. Tryk på menuknappen (11) for at skjule menuen.
De følgende afsnit indeholder en beskrivelse af de forskellige tilgængelige parametre i
fotograferingsmenuen.
Fotograferingstilstand
Denne gør det muligt for dig at definere, om du ønsker at fotografere med Dashcam’et på
almindelig vis eller ved hjælp af selvudløseren. Selvudløseren har forsinkelsestider på 2 sekunder,
5 sekunder eller 10 sekunder.
Når selvudløseren er aktiveret, vises ikonet , eller øverst på skærmen (13) afhængigt
af hvilken forsinkelsestid, der er valgt.
80 - Dansk

CR 1.0 A1
Opløsning
Opløsningen definerer størrelsen på optagelsen i pixel. Som tommelfingerregel: Jo højere
opløsning, desto mere lagringsplads er nødvendig. Der findes de følgende indstillinger:
Opløsning Beskrivelse
12M 4032 x 3024 Meget høj kvalitet
10M 3648 x 2736 Høj kvalitet
8M 3264 x 2448 Meget god kvalitet
5M 2592 x 1944 God kvalitet
3M 2048 x 1536 Middel kvalitet
2MHD 1920 x 1080 Kvalitet i pc-bredformat
1,3M 1280 x 960 Lav kvalitet
VGA 640 x 480 VGA-skærmkvalitet
Sekvens
Når denne funktion er aktiveret (muligheden "Til"), kan du trykke på knappen OK (12), mens du
fotograferer, for at tage 5 efterfølgende stillbilleder. Du kan også vælge "Fra" for altid kun at tage
et enkelt billede.
Kvalitet
Indstillingen for kvalitet bestemmer billedets komprimeringsforhold, når det gemmes på
hukommelseskortet. Jo højere komprimeringsgrad, des flere billeder kan der lagres.
Du kan tage billeder med kvalitetspræindstillingerne Økonomi, Normal og Fin. Vælg den relevante
mulighed. Den valgte indstilling vil blive vist i højre side af skærmen (13) på følgende måde under
fotografering:
Kvalitet Beskrivelse
Fin
Normal
Økonomi
Hurtig gennemse
"Hurtig gennemse" lader dig øjeblikkelig kontrollere, at fotograferingen gik godt, når du har taget
et stillbillede. Når du aktiverer funktionen, vil det fotograferede billede blive vist på skærmen (13) i
Dansk - 81

CR 1.0 A1
2 eller 5 sekunder, afhængigt af den indstillede værdi. Du kan også vælge "Fra" for at vende
tilbage til live-visningen med det samme efter fotografering.
Datostempel
Denne gør det muligt at markere hvert billede med den aktuelle dato. Der findes de følgende
indstillinger:
Indstilling Beskrivelse
Fra Billeder vil ikke få påført datostempel.
Dato Billeder vil blive markeret med den aktuelle dato.
Dato/tid Billeder vil blive markeret med den aktuelle dato og klokkeslæt.
Afspilningsmenuerne
De følgende afsnit indeholder en beskrivelse af de forskellige tilgængelige parametre i
afspilningsmenuen. Udover visningsmulighederne indeholder den også funktioner til at beskytte og
slette dine videoer og stillbilleder.
1. Tænd for Dashcam’et ved at trykke på og holde tænd-/slukknappen (14) inde i omkring 3
sekund.
2. Tryk på knapperne + (18) eller – (17) flere gange indtil menuen "Afspilning" vises.
3. Tryk på OK (12) for at aktivere afspilningstilstanden.
Den sidst optagede fil (video eller stillbillede) vises nu.
4. Tryk på knapperne + (18) eller – (17) flere gange indtil den optagelse du ønsker at afspille, er
valgt.
Hvis den valgte optagelse er en video, vil ikonet blive vist øverst til venstre på skærmen.
Hvis den valgte optagelse er et stillbillede, vil ikonet blive vist øverst til venstre på
skærmen.
5. Tryk på Menu-knappen (11) for at få vist afspilningsmenuen.
6. Tryk på knappen + (18) eller - (17) flere gange for at vælge den ønskede funktion, og tryk på
knappen OK (12) for at udføre handlingen eller vise de tilgængelige muligheder.
De tilgængelige muligheder er beskrevet i afsnittet nedenfor.
Mulighederne i afspilningsmenuen er så godt som identiske for både videoer og
stillbilleder. For at åbne menuen for videoer skal afspilningen stoppes (start ikke
videoafspilning).
82 - Dansk

CR 1.0 A1
Slet
Denne mulighed gør det muligt for dig at slette den aktuelt viste video eller billede eller alle gemte
billeder.
1. Udfør trin 1 til 5 under "Afspilningsmenuerne" (se side 82).
2. Tryk på knappen + (18) eller - (17) flere gange for at vælge funktionen "Slet", og tryk på
knappen OK (12) for at vise de tilgængelige muligheder.
Slet aktuel: Brug denne mulighed til at slette den aktuelt valgte video eller det valgte
stillbillede. Når du har valgt denne mulighed, skal du bekræfte med tryk på OK-knappen (12).
En sikkerhedsbesked vises. Vælg "OK" og bekræft sletningen ved at trykke på knappen OK
(12).
Slet alt: Brug denne valgmulighed til at slette alle gemte videoer og stillbilleder på en gang.
Når du har valgt denne mulighed, skal du bekræfte med tryk på OK-knappen (12). En
sikkerhedsbesked vises. Vælg "OK" og bekræft sletningen ved at trykke på knappen OK (12).
Beskyttede optagelser kan ikke slettes med denne funktion. Se også afsnittet "Beskyt"
nedenfor.
Beskyt
Her kan du beskytte en eller flere videoer og stillbilleder for at forhindre, at du ved et uheld sletter
eller ikke beskytter dem.
1. Udfør trin 1 til 5 under "Afspilningsmenuerne" (se side 82).
2. Tryk på knappen + (18) eller - (17) flere gange for at vælge funktionen "Beskyt", og tryk på
knappen OK (12) for at vise de tilgængelige muligheder.
Lås aktuel: Brug denne mulighed til at beskytte den aktuelt valgte video eller det valgte
stillbillede. Bekræft ved at trykke på OK-knappen (12).
Lås aktuel op: Brug denne mulighed til at fjerne beskyttelsen fra den aktuelt valgte video
eller det valgte stillbillede. Bekræft ved at trykke på OK-knappen (12).
Lås alle:Brug denne valgmulighed til at beskytte alle gemte videoer og stillbilleder på en
gang. Bekræft ved at trykke på OK-knappen (12).
Lås alle op:Brug denne valgmulighed til at fjerne beskyttelsen fra alle gemte videoer og
stillbilleder på en gang. Bekræft ved at trykke på OK-knappen (12).
Som standard er alle stillbilleder beskyttede.
Dansk - 83

CR 1.0 A1
Diasshow
Denne funktion giver dig mulighed for at afspille alle stillbilleder i rækkefølge og i loop som et
diasshow. Dette er især nyttigt, når du skal se alle dine stillbilleder som en præsentation, når du har
tilsluttet Dashcam’et til et tv (se afsnittet nedenfor).
1. Udfør trin 1 til 5 under "Afspilningsmenuerne" (se side 82).
2. Tryk på knappen + (18) eller - (17) flere gange for at vælge funktionen "Diasshow", og tryk på
knappen OK (12) for at vise de tilgængelige muligheder.
3. Tryk på knappen + (18) eller - (17) flere gange for at vælge den ønskede afspilningstid for de
individuelle billeder (2, 5 eller 8 sekunder). Bekræft ved at trykke på OK-knappen (12).
Herefter vil diasshowet starte.
4. Tryk på OK-knappen (12) for at stoppe diasshowet.
Stikforbindelser
Visning af optagelser på et fjernsyn
Alle optagelser som du kan vise på Dashcam’ets skærm, kan også afspilles på et almindeligt tv.
Tv'et skal have en relevant HDMI-indgang.
Et HDMI-kabel med et mini-HDMI-stik (medfølger ikke) skal også bruges. HDMI-kablet skaber
digitale billeder og lyd og dermed optimal kvalitet. HDMI-udgangen (3) kan findes under
beskyttelsesdækslet (4).
Når Dashcam’et er tilsluttet til dit tv via et HDMI-kabel, er videooptagelse og
fotografering ikke muligt. Det er kun muligt at afspille tidligere optaget indhold.
Brug blot apparatet som normalt. Du kan eksempelvis aktivere et diasshow for at alle billeder vises
automatisk (se også afsnittet "Diasshow" på side 84).
Tilslutning af HDMI-kablet
1. Du skal sikre dig, at Dashcam’et er slukket.
2. Åbn beskyttelsesdækslet (4) og isæt den lille ende af et HDMI-kabel i HDMI-udgangen (3) på
Dashcam’et (se endvidere "Oversigt" på side 57).
3. Sæt det store stik på HDMI-kablet ind i HDMI-indgangen på dit tv.
4. Vælg HDMI som signalkilde på dit tv. Læs eventuelt i Brugervejledningen til dit tv, hvis du
ønsker flere oplysninger om dette emne.
5. Tænd for Dashcam’et ved hjælp af tænd-/slukknappen (14). Skærmen på apparatet forbliver
slukket, mens billedet vises på tv-skærmen.
84 - Dansk

CR 1.0 A1
Yderligere oplysninger findes i afsnittet "Afspilning" på side 70 samt i afsnittet "Afspilningsmenuer"
på side 82.
Overførsel af optagelser til en computer
Der er to metoder til at kopiere optagelser fra Dashcam’et til en computer.
Ved at tilslutte kameraet til en computer med et USB-kabel
Ved at indsætte hukommelseskortet i en kortlæser.
Tilslutning af Dashcam’et til en computer
1. Brug det medfølgende USB-kabel til at tilslutte Dashcam’et til en ledig USB-indgang på en
computer. Sæt det lille stik på det medfølgende USB-kabel i USB-/opladningsporten (5) på dit
videokamera Dashcam og det store stik i en USB-port på computeren.
2. Dashcam’et vil derefter automatisk tænde, og du vil blive bedt om at vælge "Masselager" eller
"PC-kamera".
3. Tryk på knappen + (18) eller - (17) flere gange for at vælge funktionen "Masselager", og tryk
på knappen OK (12).
Computeren vil nu opsætte en flytbar disk, der kan anvendes til at få adgang til dine optagelser.
Når du tilslutter pc'en via USB-kablet, vil indholdet på SD-hukommelseskortet være
skrivebeskyttet. Dette betyder, at du ikke kan slette, omdøbe eller skrive i nogen filer på
Dashcam’et fra din pc. Det er kun muligt at afspille tidligere optaget indhold.
Sådan bruges en kortlæser
Hvis din computer har en kortlæser, der er kompatibel med microSD- eller SD-hukommelseskort,
kan du indlæse indholdet på hukommelseskortet direkte. For at gøre dette skal du fjerne
hukommelseskortet fra Dashcam’et, mens det er slukket.
1. Sæt microSD-kortet direkte i microSD-kortlæseren eller ind i SD-kortadapteren.
2. Hvis du bruger SD-kortadapteren, skal du sætte den ind i SD-kortlæseren på din computer
(normalt mærket SD/MMC).
3. Computeren lægger indholdet fra hukommelseskortet under kortlæserens drevbogstav i Denne
computer.
4. Åbn Denne computer på din computer, og dobbeltklik på det drev, som repræsenterer
kortlæseren.
5. Alle gemte filer findes i forskellige mapper på dette diskdrev.
Dansk - 85

CR 1.0 A1
6. Du kan nu kopiere de gemte filer fra hukommelseskortet til en mappe, du selv vælger på
computerens harddisk.
Kodning af videoer til iOS
1. Kopiér den ønskede videofil til din Apple-computer. Det gør du, ved at følge anvisningerne i de
tidligere afsnit.
2. Åbn videofilindholdets menu og vælg "Kodning af de valgte videofiler".
3. I den viste menu skal du klikke på "Fortsæt".
Der vises en ny videofil på skrivebordet.
4. Derefter trækker du denne videofil til kategorien "Film" i iTunes.
Nu er videoen tilgængelig i biblioteket under "Hjemmevideoer" og kan synkroniseres herfra
med en iOS-enhed.
Udskiftning af bilopladningssikring
Når den 12/24 V biloplader er tilsluttet, men LED-indikatoren på din 12/24 V biloplader (28)
ikke lyser, skyldes det måske, at sikringen er sprunget.
ADVARSEL! Hvis du skal udskifte sikringen, skal du sikre dig, at du bruger den
samme type (T2A L, 250 V).
Sådan skiftes sikringen:
1. Drej skruelåget (d) mod uret og fjern det fra
cigarettænderstikket (a). Hvis det er nødvendigt, kan du
bruge en tang.
2. Udskift sikringen (b) med en ny af typen T2A L, 250 V. Du
kan købe en passende sikring i enhver elektronikforretning.
3. Du skal først sætte sikringen (b) i cigarettænderstikket (a).
4. Derefter isættes metalkontakten (c) i skruelåget (d).
5. Til sidst isættes skruelåget (d) med den isatte metalkontakt (c) over sikringen (b), og skruelåget
(d) drejes med uret på cigarettænderstillet (a).
86 - Dansk

CR 1.0 A1
Fejlfinding
Du kan løse de mest almindelige problemer selv ved hjælp af tabellen nedenfor. Hvis problemet
varer ved, efter de anbefalede løsninger er forsøgt, skal du kontakte vores service-hotline (se side
88). Forsøg ikke at reparere produktet selv. Åbn ikke selv Dashcam’ets hus eller bilopladeren, da
de indeholder vedligeholdelsesfrie dele.
Fejl Løsning
Kan ikke tænde Dashcam’et. Batteriet er tomt. Genoplad batteriet.
Dashcam’et slukker pludseligt. Batteriet er tomt. Genoplad batteriet.
Automatisk nedlukning er aktiveret. Kontrollér indstillingen
(se side 76).
Dashcam’et reagerer ikke og kan
ikke slukkes.
Tryk på nulstillingskontakten (1). Du skal åbne
beskyttelsesdækslet (4) og skubbe nulstillingskontakten
(1) til den modsatte side med en spids genstand. Vent et
par sekunder og skub derefter nulstillingskontakten (1)
tilbage til den oprindelige position. Dashcam’et bør
derefter virker normalt igen.
Der er pletter eller skygger på
optagelserne.
Rengør Dashcam’ets linse med en blød, tør og fnugfri
klud. Undlad at bruge rengøringsmidler eller kemikalier.
Meddelelsen "SD CLASS6" vises. Det isatte microSD-hukommelseskort skal understøtte en
hastighed på mindst hastighedsklasse 6. Hvis det er
nødvendigt, skal du isætte et hurtigere microSD-
hukommelseskort.
Efter brug
Opbevaring når produktet ikke anvendes i længere tid
Hvis du ikke skal bruge dit Dashcam i længere tid, skal det opbevares på et sted, der
imødekommer de følgende miljømæssige forhold:
Opbevaringstemperatur: -10 til 55 °C
Relativ luftfugtighed ved opbevaring: Maks. 85 %
Husk på, at disse værdier kan overstiges inde i en bil. Det anbefales derfor, at du opbevarer dit
Dashcam på et tørt, støvfrit sted i hjemmet.
Dansk - 87

CR 1.
0
a
s
t
a
e
e
ø
g
æ
ø
a
i
n
n
D
n
t
m
a
s
o
k
s
g
m
r
/
s
m
k
n
a
p
d
s
e
r
a
r
.
f
d
/
æ
m
d
p
d
ø
.
f
a
n
k
e
p
e
e
e
s
u
f
d
e
r
p
e
s
r
/
n
a
g
i
b
r
c
æ
M
e
n
e
r
n
r
r
e
A1
Hvis d
ikke bruger dit
t en gang om må
(minds
Repa
ration
Der er
behov for repara
empel der er ko
for ek
korrek
, eller hvis appar
appar
tet straks slukke
enhed
n og få den k
servic
personale.
Reng
ring
Bru
en blød, fnugfri
Der
må ikke anvende
ind i
indkapslingen o
Bem
Milj
regler og op
Bortsk
f al emballage
offentl
ge afleveringsste
på de
lokale genbrugs
Det i
dbyggede, g
rkninger o
Dette
direkt
overe
Appa
2012
fra hu
Skån
korre
forret
bortsk
ashcam i længe
eden).
ioner, hvis appar
met væske eller f
tet er blevet tabt
, og alle kabler
ntrolleret af en
lud til rengøring.
rensemiddel, ren
forårsage perma
overensste
apparat overhol
ivet 2004/108
nsstemmelseserkl
lysninger o
ater mærket me
19/EU. Alle ele
holdningsaffald
iljøet, og undgå
t vis. Kontakt
ing, hvor du k
affelse.
å miljørigtig vis.
er til genvinding
tation til bortskaf
nopladelige b
e tid, skal du ge
tet eller huset er
emmedlegemer i
Hvis der bemær
rakobles. Hvis d
ekspert. Alle re
gøringsmiddel ell
nent skade på ap
mmelse
er de grundlægg
EF og RoHs-dir
ring kan findes i
bortskaffel
dette symbol
ktriske og elektro
å officielle genbr
farer for dit eget
e lokale myndi
bte apparatet,
Papemballage ka
Film og plastik,
else.
tteri kan ikk
oplade batteriet
levet beskadiget
apparatet, hvis a
es røg, mærkelig
tte sker, skal du
arationer skal u
r opløsningsmidd
aratet.
nde samt andre
ktivet 2011/65
slutningen af den
e
er underlagt det
niske enheder sk
gspladser.
helbred ved at b
gheder, genbru
or nærmere opl
n afleveres i pap
er findes i emba
tages ud ved
egelmæssigt allig
på nogen måde,
paratet ikke fung
lyde eller lugte,
toppe med at b
dføres af kvalifi
el, da det kan tr
relevante krav i E
EU. Den tilhør
e brugervejledni
europæiske dir
l bortskaffes sæ
ortskaffe enhede
sstationer eller
ysninger om ko
ircontaineren elle
llagen, skal aflev
bortskaffelse.
vel
hvis
erer
skal
uge
eret
nge
C-
nde
g.
ktiv
skilt
på
den
rekt
på
res
88 - D
nsk

CR 1.0 A1
Garanti- og serviceoplysninger
Der er 3 års garanti på dette apparat fra købsdatoen. Opbevar venligst den originale kassebon
som bevis for købet. Læs venligst den vedlagte dokumentation, før du tager dit produkt i brug. Hvis
der skulle opstå et problem, der ikke kan afhjælpes på denne måde, bedes du kontakte vores
hotline. Sørg venligst for at have artikelnummeret eller, i givet fald, serienummeret, parat, når du
kontakter os. I tilfælde af, at problemet ikke kan afhjælpes via telefonen, foranlediger vi yderligere
service via vores hotline, afhængigt af årsagen til fejlen. Inden for garantiperioden vil produktet,
efter vores skøn, enten blive repareret eller udskiftet i tilfælde af materiale- eller fabrikationsfejl. Der
påbegyndes ikke en ny garantiperiode ved reparation eller udskiftning af produktet.
Forbrugsmateriale, som batterier, akkumulatorer og lyskilder er ikke omfattet af garantien.
Dine juridiske rettigheder over for sælgeren begrænses ikke af denne garanti og vil være uberørte
heraf.
Service
E-mail: service.DK@targa-online.com
TARGA GmbH
IAN: 106751
Producent
Coesterweg 45
59494 SOEST
GERMANY
Telefon: 38 – 322 953
Dansk - 89

CR 1.0 A1
90 - Dansk

CR 1.0 A1
Inhalt
Inhalt ....................................................................................................................................................... 91
Warenzeichen ........................................................................................................................................ 94
Einleitung ................................................................................................................................................ 94
Bestimmungsgemäße Verwendung ...................................................................................................... 94
Lieferumfang ........................................................................................................................................... 95
Technische Daten ................................................................................................................................... 96
Sicherheitshinweise ................................................................................................................................ 97
Erläuterung der Symbole .................................................................................................................. 97
Urheberrecht......................................................................................................................................... 101
Übersicht ............................................................................................................................................... 101
Bedienelemente und Anzeigen ....................................................................................................... 103
Tasten ............................................................................................................................................... 103
LED-Anzeigen ................................................................................................................................... 104
Vor der Inbetriebnahme ...................................................................................................................... 104
Speicherkarte einlegen/entnehmen ............................................................................................... 104
Kfz-Halterung ................................................................................................................................... 105
Akku aufladen .................................................................................................................................. 106
Akku über USB-Kabel aufladen ...................................................................................................... 106
Akku über Kfz-Ladegerät aufladen ................................................................................................ 106
Inbetriebnahme .................................................................................................................................... 107
Dashcam einschalten ....................................................................................................................... 107
Dashcam ausschalten ...................................................................................................................... 107
Deutsch - 91

CR 1.0 A1
Menüsprache einstellen .................................................................................................................. 108
Datum / Uhrzeit stellen ................................................................................................................... 108
Einschalten und Betriebsmodus auswählen ....................................................................................... 109
Dashcam wird nicht aufgeladen..................................................................................................... 109
Dashcam ist über USB-Kabel an PC angeschlossen ..................................................................... 109
Dashcam ist mit Kfz-Ladegerät verbunden .................................................................................... 109
Videos aufnehmen ............................................................................................................................... 110
Videoleuchte .................................................................................................................................... 111
Belichtungskorrektur ........................................................................................................................ 112
Video bei Endlosaufnahme vor Überschreiben schützen ............................................................. 112
Fotos aufnehmen .................................................................................................................................. 113
Belichtungskorrektur ........................................................................................................................ 114
Wiedergabe ......................................................................................................................................... 115
Funktionen zum Abspielen von Videos .......................................................................................... 115
Funktionen zum Abspielen von Fotos ............................................................................................. 117
Menüs ................................................................................................................................................... 119
Das Hauptmenü ............................................................................................................................... 119
Die Aufnahmemenüs ....................................................................................................................... 123
Die Wiedergabemenüs ................................................................................................................... 128
Anschlüsse ............................................................................................................................................ 130
Aufnahmen über ein Fernsehgerät ansehen .................................................................................. 130
Aufnahmen auf einen Computer überspielen ................................................................................ 131
Dashcam mit einem Computer verbinden ...................................................................................... 131
92 - Deutsch

CR 1.0 A1
Kartenleser verwenden ................................................................................................................... 131
Videos für iOS-Geräte transcodieren ............................................................................................. 132
Sicherung des Kfz-Ladegeräts auswechseln ...................................................................................... 132
Fehlerbehebung ................................................................................................................................... 133
Nach dem Gebrauch .......................................................................................................................... 134
Lagerung bei längerer Nichtbenutzung ......................................................................................... 134
Reparaturen ..................................................................................................................................... 134
Reinigung ......................................................................................................................................... 134
Konformitätsvermerke .......................................................................................................................... 134
Umwelthinweise und Entsorgungsangaben ....................................................................................... 135
Hinweise zu Garantie und Serviceabwicklung .................................................................................. 136
Deutsch - 93

CR 1.0 A1
Warenzeichen
HDMI, das HDMI Logo und High-Definition Multimedia Interface sind Warenzeichen oder
eingetragene Warenzeichen der HDMI Licensing, LLC in den U.S.A. und anderen Ländern.
Microsoft Windows ist ein eingetragenes Warenzeichen von Microsoft Corporation, U.S.A.
SD und SDHC sind eingetragene Warenzeichen.
USB ist ein eingetragenes Warenzeichen.
Apple ist ein eingetragenes Warenzeichen von Apple, Inc.
IOS ist ein Warenzeichen oder eingetragenes Warenzeichen in den USA und in anderen Ländern
von Cisco Systems.
Weitere Namen und Produkte können die Warenzeichen bzw. eingetragene Warenzeichen der
jeweiligen Eigentümer sein.
Einleitung
Vielen Dank für den Kauf der Dashcam CR 1.0 A1, nachfolgend als Dashcam bezeichnet. Die
Dashcam ist die ideale Begleiterin im Fahrzeug. Sie können nicht nur Ihre Fahrten aufzeichnen,
sondern dank des Unfallsensors auch im Falle eines Aufpralls die Details festhalten.
Bestimmungsgemäße Verwendung
Die Dashcam ist ein Gerät der Unterhaltungselektronik und dient ausschließlich der Aufnahme von
Videos und Fotos. Jede andere Verwendung ist nicht bestimmungsgemäß. Das Gerät darf nur zu
privaten und nicht zu industriellen und kommerziellen Zwecken verwendet werden.
Dieses Gerät erfüllt alle, im Zusammenhang mit der europäischen Konformitätserklärung,
relevanten Normen und Richtlinien. Bei einer nicht mit dem Hersteller abgestimmten Änderung des
Gerätes ist die Einhaltung dieser Normen und Richtlinien nicht mehr gewährleistet. Benutzen Sie
nur das vom Hersteller angegebene Zubehör.
Bitte beachten Sie die Landesvorschriften bzw. Gesetze des Einsatzlandes.
94 - Deutsch

CR 1.0 A1
Lieferumfang
Nehmen Sie alle vorhandenen Geräte und Zubehörteile aus der Verpackung. Entfernen Sie alle
Verpackungsmaterialien und die Displayschutzfolie und überprüfen Sie, ob alle Komponenten
vollständig und unbeschädigt sind. Im Falle einer unvollständigen oder beschädigten Lieferung
wenden Sie sich an den Hersteller.
Halten Sie das Verpackungsmaterial von Kindern fern und entsorgen Sie es umweltgerecht.
CR 1.0 A1 Kfz-Halterung USB-Kabel
Kfz-Ladegerät Bedienungsanleitung
(Symbolbild)
Deutsch - 95

CR 1.0 A1
Technische Daten
Dashcam
Display 960 x 240 Pixel, 2,7 Zoll (6,9 cm) TFT-LCD
Videoauflösung 1920x1080, 25fps
Fotoauflösung 12M 4032x3024
Bildformat JPG
Zoom 4-fach-Digitalzoom
Beleuchtung 4 weiße LED
Schnittstellen HDMI-Ausgang
Betriebsarten Videoaufnahme, Bewegungserkennung, Fotoaufnahme, Wiedergabe,
Speichermedium microSD-Karte, 2 bis 32 GB, mindestens Class 6
Funktionen Endlosaufnahme (3, 5, 10 Minuten, Aus)
Eingebauter Akku Li-Ionen-Akku, 3,7 V, 330 mAh
Betriebsumgebung 0 bis 35 °C, rel. Luftfeuchtigkeit max. 85 %
Lagerungsumgebung -10 bis 55 °C, rel. Luftfeuchtigkeit max. 85 %
Abmessungen 85,5 x 62 x 32 mm (B x H x T)
Gewicht 70 g
* native Auflösung der Dashcam. Die anderen genannten Auflösungen sind interpoliert.
640x480, 30fps
1440x1080, 30fps
1280x720*, 30fps
10M 3648x2736
8M 3264x2448
5M 2592x1944
USB-Anschluss für PC
PC-Kamera
Bewegungserkennung
Unfallsensor
Ladefunktion über USB-Schnittstelle
Typische Laufzeit (Videoaufnahme) bei vollgeladenem Akku: 45
Minuten
Ladezeit ca. 1,5 Std. (Gerät ausgeschaltet) bzw. 2 Std. (Gerät
eingeschaltet)
848x480, 30fps
320x240, 30fps
3M 2048x1536
2MHD 1920x1080
1,3M 1280x960
VGA 640x480*
96 - Deutsch

Kfz-L
a
l
n
u
a
u
e
e
e
u
d
n
u
h
c
i
W
i
k
s
y
n
D
g
S
zu
W
G
d
D
e
bo
W
G
m
e
g
it
n
n
l,
i
u
w
n
e
e
ä
n
G
in
n
ei
n
G
g
e
e
n
i
h
k
s
e
c
e
0
-
u
ä
W
e
ng
h
h
n
degerät
Herste
ller
Mode
lbezeichnung
Einga
g
Ausga
ng
ng
Sicher
Länge
des
bels
Ladek
ngen der technis
Änder
Sich
rheitshinwe
Vor d
r ersten Verwend
und b
achten Sie alle
vertra
t ist. Bewahren S
Sie
as Gerät ver
Bedie
ungsanleitung au
Erlä
terung der S
Warn
inweise werden i
kei
ne direkten Wär
GEFAHR!
efährliche
oder sogar
ARNUN
Hinweise für
Achtung!
Hinweise, di
Dieses Sym
ARNUN
Targa GmbH
CR 1.0 A1
12 bis 24 V ,
5 V , 600 mA
T2A L, 250 V
200 cm
hen Daten sowie
se
ung des Gerätes
arnhinweise, sel
e diese Bedienun
aufen oder w
. Sie ist Bestandt
mbole
dieser Bedienun
ieses Symbol, m
ituation, die, we
m Tod führen ka
!
Dieses Symbo
den sicheren Betr
ieses Symbol,
bei Nichtbeacht
l kennzeichnet
! Achten Sie dar
equellen (z.B. He
350 mA
des Designs kön
lesen Sie sich di
bst wenn Ihnen d
gsanleitung sorgf
eitergeben, hän
il des Produktes.
sanleitung folge
dem Hinweis „
n Sie nicht verh
n.
mit dem Hinweis
eb des Gerätes u
mit dem Hinw
ng rechtliche Ko
eitere informative
auf, dass
izungen) auf das
en ohne Ankündi
folgenden Anw
r Umgang mit el
ltig als zukünftig
igen Sie unb
dermaßen verwe
EFAHR“, kennze
dert wird, zu sc
„WARNUNG“,
d zum Schutz de
s „Achtung“, k
sequenzen mit si
Hinweise zum Th
erät wirken
CR 1.
ung erfolgen.
isungen genau d
ektronischen Ger
Referenz auf.
edingt auch d
ndet.
chnet eine droh
weren Verletzu
ennzeichnet wic
Anwenders.
nnzeichnet wic
h bringen könne
ma.
A1
rch
ten
enn
iese
de
en
ige
ige
.
Deutsch
97

CR 1.0 A1
kein direktes Sonnenlicht oder starkes Kunstlicht auf das Gerät trifft
die Dashcam nur im zulässigen Betriebstemperaturbereich von 0°C bis 35°C betrieben
werden darf
der Kontakt mit Spritz- und Tropfwasser und aggressiven Flüssigkeiten vermieden wird und das
Gerät nicht in der Nähe von Wasser betrieben wird, insbesondere darf das Gerät niemals
untergetaucht werden (stellen Sie keine mit Flüssigkeiten gefüllten Gegenstände, z.B. Vasen
oder Getränke auf oder neben das Gerät)
das Gerät nicht in unmittelbarer Nähe von Magnetfeldern (z.B. Lautsprechern) steht
keine offenen Brandquellen (z.B. brennende Kerzen) auf oder neben dem Gerät stehen
keine Fremdkörper eindringen
das Gerät keinen starken Temperaturschwankungen ausgesetzt wird, da sonst Luftfeuchtigkeit
kondensieren und zu elektrischen Kurzschlüssen führen kann. Wurde das Gerät jedoch starken
Temperaturschwankungen ausgesetzt, warten Sie (ca. 2 Stunden) mit der Inbetriebnahme, bis
das Gerät die Umgebungstemperatur angenommen hat
das Gerät keinen übermäßigen Erschütterungen und Vibrationen ausgesetzt wird
das Gerät und das Zubehör nicht beschädigt wird, um Gefährdungen zu vermeiden.
Überprüfen Sie aus diesem Grund das Gerät und das Zubehör regelmäßig auf
Beschädigungen. Sollten Sie Beschädigungen feststellen, dürfen Sie die entsprechenden
Komponenten nicht weiter verwenden. Öffnen Sie niemals das Gehäuse der Dashcam und
lassen Sie Reparaturen nur von qualifiziertem Fachpersonal durchführen.
Bei Nichtbeachtung der zuvor genannten Hinweise, besteht Gefahr für Ihre Gesundheit oder das
Gerät könnte beschädigt werden.
GEFAHR! Kinder und Personen mit Einschränkungen
Elektrische Geräte gehören nicht in Kinderhände. Auch Personen mit geistigen, sensorischen oder
motorischen Einschränkungen sollten elektrische Geräte nur im Rahmen ihrer Möglichkeiten
verwenden. Lassen Sie Kinder und Personen mit Einschränkungen niemals unbeaufsichtigt
elektrische Geräte benutzen. Es sei denn, sie wurden entsprechend eingewiesen oder werden
durch eine für Ihre Sicherheit zuständige Person beaufsichtigt. Kinder sollten grundsätzlich
beaufsichtigt werden, damit sichergestellt werden kann, dass sie mit diesem Gerät nicht spielen.
Kleinteile können bei Verschlucken lebensgefährlich sein.
98 - Deutsch
 Loading...