

Page 1
t
APMAN
®
OPERATING INSTRUCTIONS TX2
PROGRAMMABLE TIMER
Specifications
Display: 0.56” height 3 digit Red.
Time ranges: 9.99 / 99.9 / 999 sec,
9:59 min:sec, 99.9 / 999 min, 9.99 /
99.9 / 999 Hrs.
Counting
Direction: Up / Down.
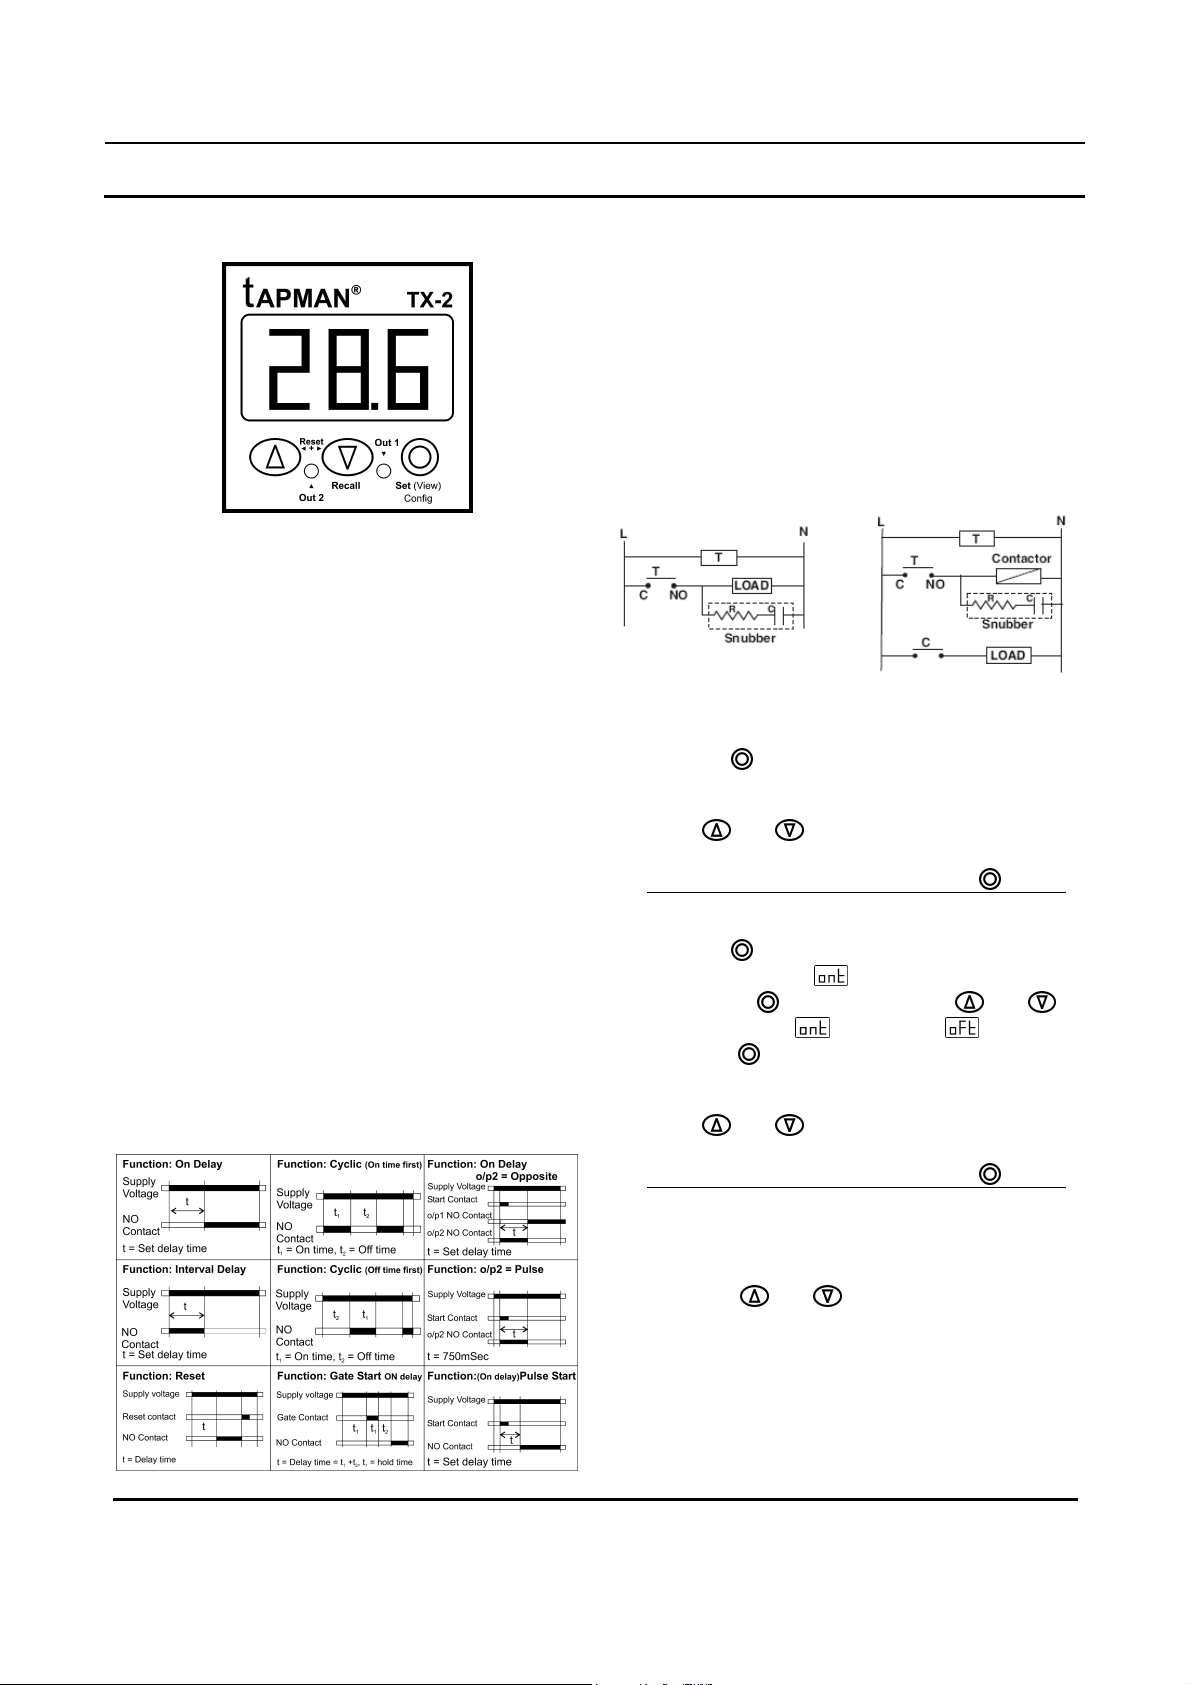
Modes: a) ON delay b) Interval c) Cyclic On
first d) Cyclic OFF first.
Time setting: By front keypad.
Outputs: 2 C/O.
Relay rating: 7A @ 240VAC.
Inputs: a) START b) RESET
Reset: a) Front panel. b) Rear terminal. c) On
power interruption.
Reset Time: Less than 100ms.
Accuracy: ±0.05% or 50msec which ever is
greater.
Supply: 220VAC ±10% @ 50 / 60 Hz.
Mounting: Panel mounting.
Housing: ABS.
Operating
Temperature: 0˚C to 50˚C.
Humidity: 95% R.H. Non condensing.
OPERATING MODES
Precautions during use
High voltage spikes (noise) present in the industrial
environment can cause malfunctioning of the
instrument like erratic display, latch up, data loss or
permanent damage to the instrument.
To reduce the chances of malfunction
a) Use of MOV across supply of timers and snubber
circuits across loads are recommended.
b) Use separate shielded wires for inputs.
SET VALUE PROGRAMMING
1. On-delay / Interval mode
a. Keep the
b. The display shows the Set value and starts to
flash (on and off).
c. Using
value.
d. While the display is still flashing press
2. Cyclic On-first/ Cyclic Off first mode.
a. Keep the
b. The display shows
c. Keeping the
buttons to select
d. Leave the
e. Now the display shows the corresponding set
value.
f. Using
value.
g. While the display is still flashing press
RESETTING THE TIMER
1. By front panel:
Press the
seconds.
2. Remote reset:
TX2 can be reset from a remote push button by
shorting the RST and COM terminals.
button pressed for 3 seconds.
and buttons change to desired
button.
button pressed for 3 seconds.
and starts flashing.
button pressed use and
(On time) or (Off time).
button.
and buttons change to desired
button.
and buttons together for 3
Specifications subject to change as development is a continuous process. TX2_Manual Ver: 1.0
www.microsmartindia.com
Page 2
SETVALUE RECALL
While TX2 is running/ waiting for inputs, set value/
values can be recalled (viewed) without disturbing the
timing process.
Briefly press the
1. If the configured mode is
will show the set value for one second.
2.
If the configured mode is or the display will
show
its set value.
button on the TX2 timer.
or the display
and its set value followed by and
CONFIGURATION RECALL
While TX2 is running/ waiting for inputs pressing the
button for 3 seconds causes to display to show
the configuration setting of parameters 1 to 6 one
after the other.
CONFIGURATION
TX2 is a multifunctional timer. To make it function in
the desired way it has to be configured.
Configuration can be done through the front panel
buttons.
To enter into the configuration mode.
1. Remove power to the instrument.
2. Keep the
3. Apply power.
4. Leave the button when the display shows
5. Navigate the configuration parameters using
and buttons.
To change parameter value
6. Press the
7. The display shows the value of that parameter.
8. Using
desired value.
9. Using
10. Similarly other parameters can be changed.
To save the changes and exit the configuration
mode
11. Navigate using
parameter) when the display shows
12. Press the
13.
The TIMER is now updated with the new
configuration and is ready to be used.
and buttons change to the
button exit that parameter.
button pressed
.
button to enter that parameter.
and buttons (to the
.
button.
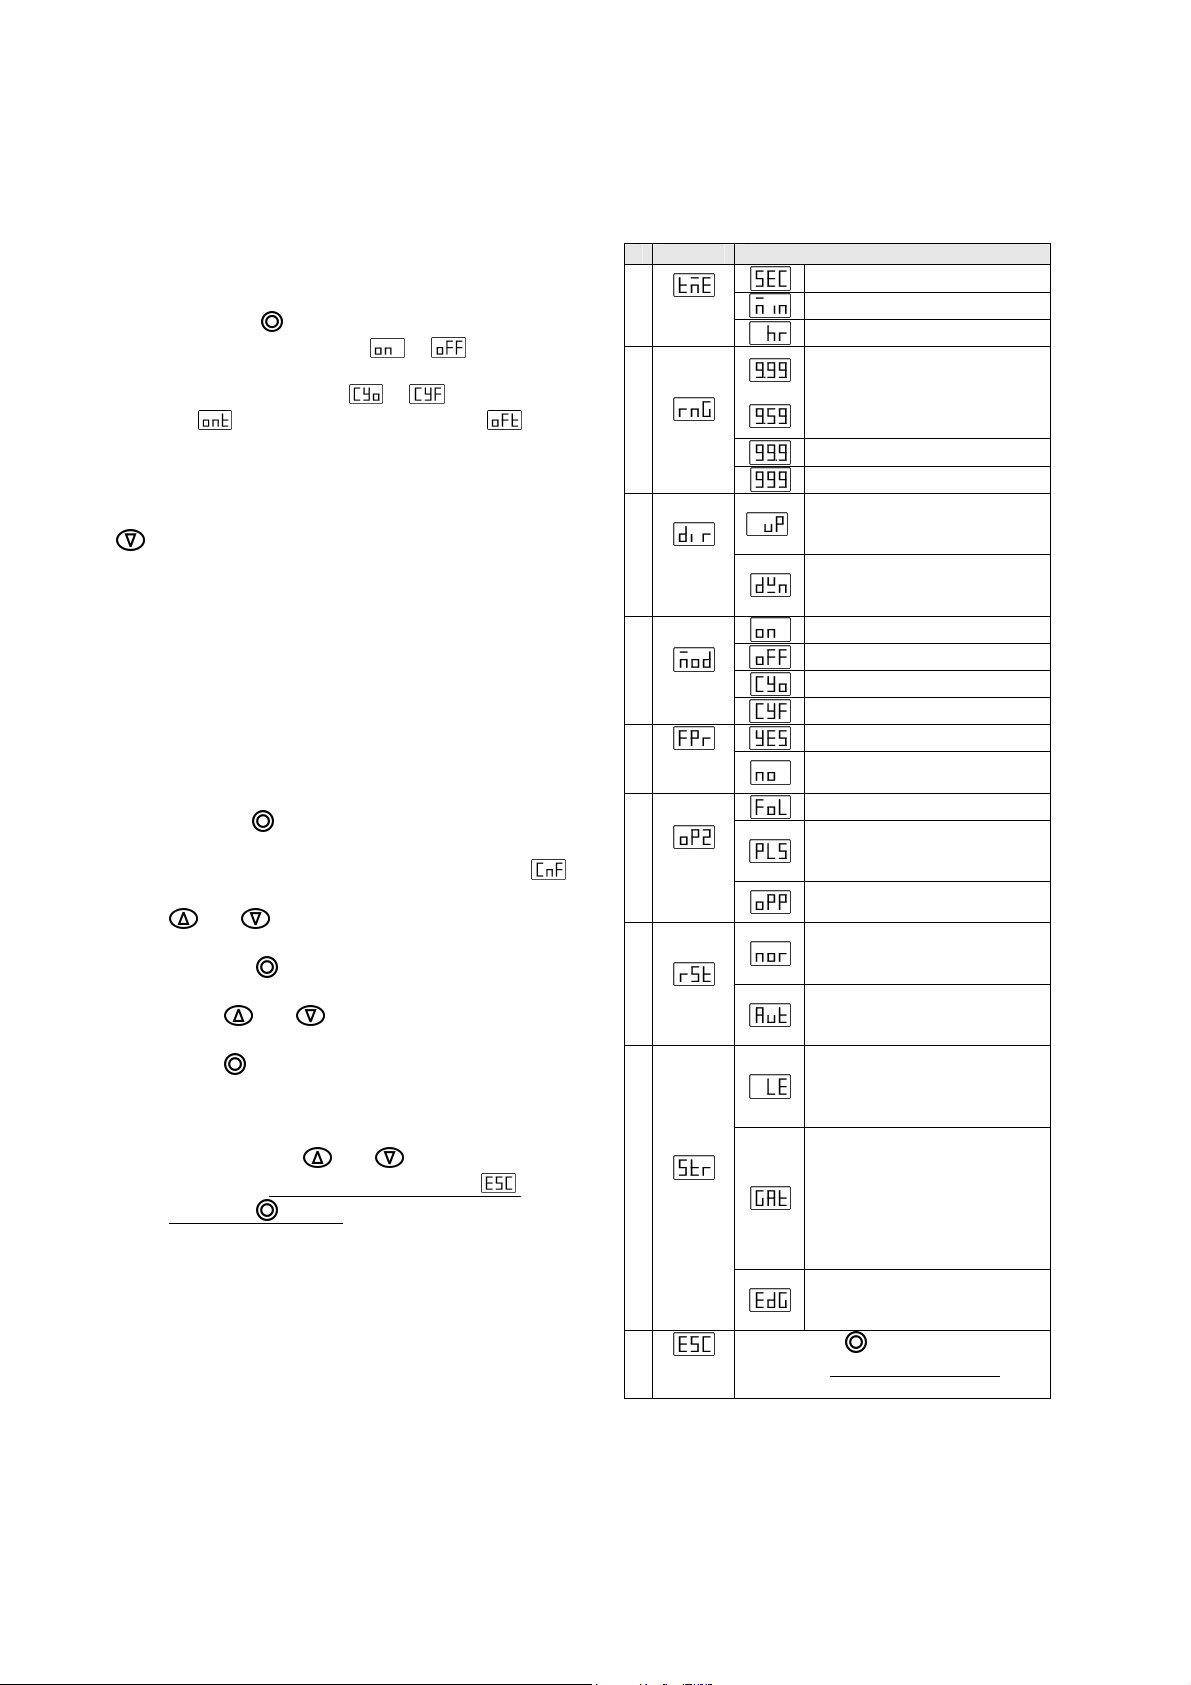
Configuration Parameters
# Name. Setting range for parameter
Seconds
1
2
3
4
5
6
7
8
Time
Units
Range
Directio
n
Mode
Front
Reset
Output
2
Reset
Start
type
Exit
Config
Minutes
Hours
9.99 When Time units is set
to seconds
9.59 When Time units is set
to Minutes or Hours.
99.9
999
UP: Once the timer starts
the display increases from 0
to Set value.
DOWN: Once the timer
starts the display decreases
from Set value to 0.
On delay
Interval
Cyclic with ON time first.
Cyclic with OFF time first.
Reset by front panel Enable.
Reset by front panel
Disable.
Output 2 follows Output 1.
Output 2 pulses on for
750ms when START input is
given.
Output 2 is opposite off
Output 1.
Normal: To start a new
cycle a RESET input has to
be given.
Auto: A new cycle can be
started without first giving a
RESET signal.
Level: The START input can
be closed permanently and
the timer will always read it
as start input present.
Gate: When
the relay state does not
change but the time
counting stops. On make
of START contact time
counting starts from the last
time count.
Edge: Timing starts on
application of START input
(Open to Close).
On pressing
parameter configuration is saved
timer goes into normal operation.
button
START
at this
is open
and
 Loading...