


EasyClean®, EasyClean® High Capacity &
EasyClean® Extra High Capacity Box
1380 Beverage Drive, Suite W
Stone Mountain, GA 30083
1-800-426-6256 | 678-892-2323
Models: 20TTX, 25TTX, 30TTX, 22TT, 27TT, 32TT,
EZ07H, EZ10H, EZ12H, EHC07, EHC10, EHC12
Operation and Maintenance Guide
Better – Faster – Every time
Updated 01 2014
BETTER
FASTER
EVERY TIME
www.tapetech.com
© 2014 TapeTech Tool Co. All Rights Reserved
EasyClean®, EasyClean® High Capacity &
EasyClean® Extra High Capacity Box
1380 Beverage Drive, Suite W
Stone Mountain, GA 30083
1-800-426-6256 | 678-892-2323
Models: 20TTX, 25TTX, 30TTX, 22TT, 27TT, 32TT, EZ07H, EZ10H, EZ12H, EHC07, EHC10, EHC12
Operation and Maintenance Guide
Better – Faster – Every time
Updated 01 2014
www.tapetech.com
© 2014 TapeTech Tool Co. All Rights Reserved

EasyClean®, EasyClean® High Capacity &
EasyClean® Extra High Capacity Box
1380 Beverage Drive, Suite W
Stone Mountain, GA 30083
1-800-426-6256 | 678-892-2323
Operation and Maintenance Guide
Better – Faster – Every time
Models: 20TTX, 25TTX, 30TTX, 22TT, 27TT, 32TT, EZ07H, EZ10H, EZ12H, EHC07, EHC10, EHC12
Operation
The EasyClean® finishing box , EasyClean® High Capacity and EasyClean®
Extra High Capacity Finishing boxes apply joint compound over taped joints.
They come in three widths, generally used for finishing as follows:
(175 mm): applies bed coat
7”
(250 mm): applies finish coat
10”
(300 mm): applies skim coat
12”
These tools require little effort to operate and are designed to produce uniform results every time. The
difference in the two boxes are their capacity and cleaning; the EasyClean® High Capacity Box and
Extra High Capacity Box holds more joint compound and is even easier to clean because the back
opens even more than the standard EasyClean™ boxes.
The boxes are controlled by a specially designed handle. These handles come in multiple lengths from
34” to 72” as well as an XTender™ Handle that adjusts between 41” and 63“. The handle is attached to
the box by sliding the box onto the handle and tightening the two wing nuts.
Load the box through the opening behind the blade using the box adapter with the slot adapter
inserted.
To apply compound, draw the box steadily along the joint while applying pressure with the handle.
This dispenses compound through the opening at a steady rate. The tool is always run with the wheels
leading and the blade trailing. The handle should lead the box, except at the end of joints.
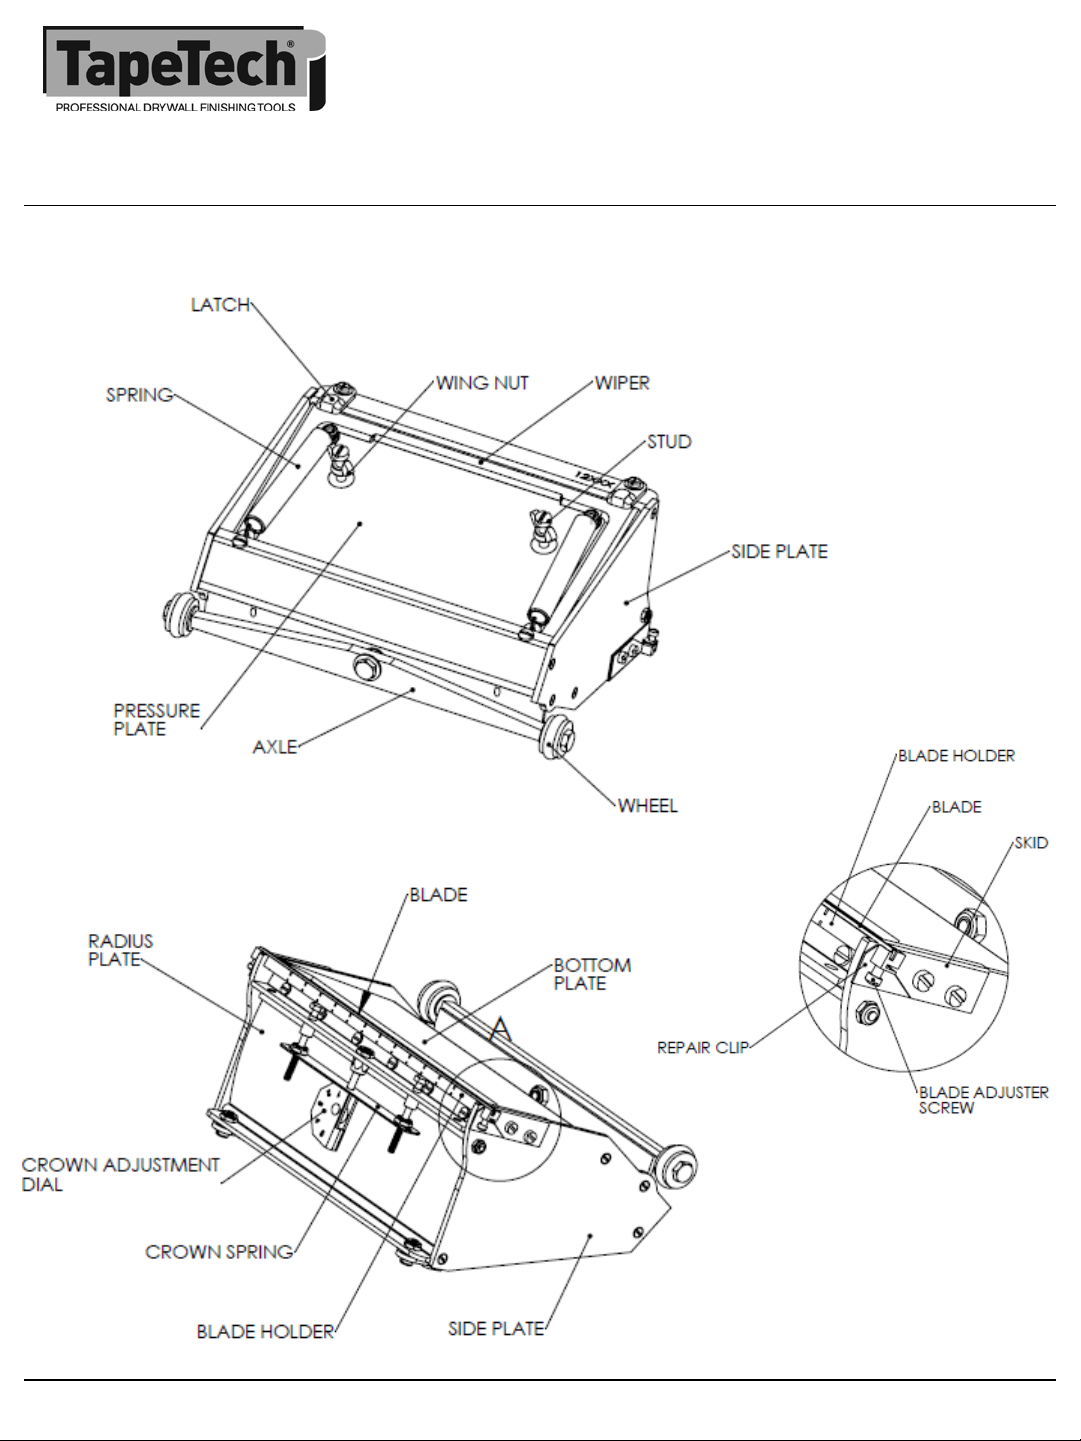
The adjustable metal blade trowels the compound with the precise crown needed. This is set using the
crown adjustment wheel. This dial controls the amount of crown left by the box with #1 being the
most and #5 the least.
Before starting to run any joint, lock the box handle at a slight angle by squeezing the handle grip with
one hand. Your other hand should grip the handle near the box.
Place the box at the end of the joint and apply pressure with the handle to start the compound
flowing. Release the hand grip to unlock the handle and allow it to find its own natural position. Draw
the tool along the joint, leading with the handle and applying pressure to distribute the joint
compound onto the wallboard surface.
Near the middle of the joint, lock the handle and by gradually decreasing pressure, remove the box
from the wallboard surface with a sweeping motion.
Reverse hand positions and begin again at the other end of the joint. Again draw the box along until
you reach the previous stopping point. Lock the handle and remove the box from the surface with a
sweeping motion. This procedure is followed for all ceiling joints and horizontal wall joints.
Updated 01 2014
www.tapetech.com
© 2014 TapeTech Tool Co. All Rights Reserved

EasyClean®, EasyClean® High Capacity &
EasyClean® Extra High Capacity Box
1380 Beverage Drive, Suite W
Stone Mountain, GA 30083
1-800-426-6256 | 678-892-2323
Operation and Maintenance Guide
Better – Faster – Every time
Operation (continued)
To cover vertical wall joints, lock the handle and begin covering the joint from the bottom up to a
height of about 30” (.75 m), sweep off and begin again at the top of the joint.
Draw down the joint until you reach the previous stopping point. Then lock the handle and sweep off
the surface, neatly joining the two finished sections.
For door or window openings, always work from the corner, moving toward the opening. Just before
the wheels reach the opening, lock the handle and lift the wheels to keep them from dropping into the
opening, then sweep away from the wall.
Before starting the finish coat, lightly sand the dried topping coat to remove any small crumbs. Fill the
10” or 12” (250-300 mm) box and set the dial to #3 for a medium crown. Apply a finish coat to all
joints. For butt joints, apply a coat on either side of the center of the joint. After the two side by side
coats have dried, finish them with a 10” or 12” (250-300mm) skim coat over the center of the joint.
Reset the crown dial to #5 for a tight crown then cover the joints on the ceilings and walls.
Maintenance
To open the boxes for cleaning, simply turn the two latches on the back and pull open. Clean
thoroughly with a brush and water (or a water hose) to remove all joint compound from the tool.
Then, after the tool is clean, lightly oil with Ames® Bazooka® Oil or any light machine oil.
Box Blade Replacement
1. To remove the used blade, place the tip of a screwdriver against one end of the blade and tap the
screwdriver with the palm of your hand.
2. If the blade does not pop out, tighten the screw at one end of the brass blade holder, forcing the
end of the blade out. Back the screw up and again tap the end of the blade.
3. Use one end of the used blade to clean any dried compound from the blade holder slot.
4. Remove both right and left skids, but leave the repair clips in place.
5. Slightly bend the new blade approximately 2 inches from both ends. This will help secure the blade
while the tool is in use.
6. Start at one end, pressing the blade all the way into the blade holder, working to the other end.
Install new skids. The “dog ear” on the skids should press against the back side of the new
blade and be flush with the blade holder (about the thickness of a thumbnail lower than the blade
edge).
Common Wear Parts
7” (175mm) Stainless Steel Blade: 200001
10” (250mm) Stainless Steel Blade: 250001
12” (300mm) Stainless Steel Blade: 300001
Skid Cover (Right): 209006
Skid Cover (Left): 209039
Updated 01 2014
www.tapetech.com
© 2014 TapeTech Tool Co. All Rights Reserved
 Loading...