


User Manual

2
Please Read Before Proceeding
THE BATTERY IS NOT CHARGED WHEN YOU TAKE IT OUT OF THE BOX.
DO NOT REMOVE THE BATTERY PACK WHEN THE DEVICE IS CHARGING.
YOUR WARRANTY IS INVALIDATED IF YOU OPEN OR TAMPER WITH THE DEVICE’S OUTER
CASING.
PRIVACY RESTRICTIONS
Some countries require full disclosure of recorded telephone conversations, and stipulate that you must
inform the person with whom you are speaking that the conversation is being recorded. Always obey the
relevant laws and regulations of your country when using the recording feature of your PDA Phone.
INTELLECTUAL PROPERTY RIGHT INFORMATION
Copyright © 2007 High Tech Computer Corp. All Rights Reserved.
,
Important Health Information and Safety Precautions
When using this product, the safety precautions below must be taken to avoid possible legal liabilities and
damages. Additional safety information can be found in the Appendix at the end of the user manual.
Retain and follow all product safety and operating instructions. Observe all warnings in the operating
instructions on the product.
To reduce the risk of bodily injury, electric shock, fire, and damage to the equipment, observe the following
precautions.
ELECTRICAL SAFETY
This product is intended for use when supplied with power from the designated battery or power supply unit.
Other usage may be dangerous and will invalidate any approval given to this product.
SAFETY PRECAUTIONS FOR PROPER GROUNDING INSTALLATION
CAUTION: Connecting to an improperly grounded equipment can result in an electric shock to your device.
This product is equipped with a USB cable for connecting the product to a desktop or notebook computer.
Be sure your computer is properly grounded (earthed) before connecting the product to the computer.
The power supply cord of a desktop or notebook computer has an equipment-grounding conductor and
a grounding plug. The plug must be plugged into an appropriate outlet which is properly installed and
grounded in accordance with all local codes and ordinances.
3
SAFETY PRECAUTIONS FOR POWER SUPPLY UNIT
• Use the correct external power source
A product should be operated only from the type of power source indicated on the electrical ratings
label. If you are not sure of the type of power source required, consult your authorized service provider
or local power company. For a product that operates from battery power or other sources, refer to the
operating instructions that are included with the product.
• Handle battery packs carefully
This product contains a Li-ion Polymer battery. There is a risk of fire and burns if the battery pack is
handled improperly. Do not attempt to open or service the battery pack. Do not disassemble, crush,
puncture, short external contacts or circuits, dispose of in fire or water, or expose a battery pack to
temperatures higher than 60˚C (140˚F).
WARNING: Danger of explosion if battery is incorrectly replaced. To reduce risk of fire or burns, do not
disassemble, crush, puncture, short external contacts, expose to temperature above 60˚C (140˚F), or dispose
of in fire or water. Replace only with specified batteries. Recycle or dispose of used batteries according to the
local regulations or reference guide supplied with your product.
SAFETY PRECAUTIONS FOR DIRECT SUNLIGHT
Keep this product away from excessive moisture and extreme temperatures. Do not leave the product or
its battery inside a vehicle or in places where the temperature may exceed 60°C (140°F), such as on a car
dashboard, window sill, or behind a glass that is exposed to direct sunlight or strong ultraviolet light for
extended periods of time. This may damage the product, overheat the battery, or pose a risk to the vehicle.

4
PREVENTION OF HEARING LOSS
CAUTION: Permanent hearing loss may occur if earphones or headphones are used at high volume for
prolonged periods of time.
Turn down the volume before using headphones or other audio devices. An excessive sound volume level
could cause damage to your hearing.
SAFETY IN AIRCRAFT
Due to the possible interference caused by this product to an aircraft’s navigation system and its
communications network, using this device’s phone function on board an airplane is against the law in
most countries. If you want to use this device when on board an aircraft, remember to turn off the phone by
switching to Flight Mode.
ENVIRONMENT RESTRICTIONS
Do not use this product in gas stations, fuel depots, chemical plants or where blasting operations are in
progress, or in potentially explosive atmospheres such as fuelling areas, fuel storehouses, below deck
on boats, chemical plants, fuel or chemical transfer or storage facilities, and areas where the air contains
chemicals or particles, such as grain, dust, or metal powders. Please be aware that sparks in such areas could
cause an explosion or fire resulting in bodily injury or even death.
EXPLOSIVE ATMOSPHERES
When in any area with a potentially explosive atmosphere or where flammable materials exist, the product
should be turned off and the user should obey all signs and instructions. Sparks in such areas could cause
an explosion or fire resulting in bodily injury or even death. Users are advised not to use the equipment at
refueling points such as service or gas stations, and are reminded of the need to observe restrictions on the
use of radio equipment in fuel depots, chemical plants, or where blasting operations are in progress. Areas
with a potentially explosive atmosphere are often, but not always, clearly marked. These include fueling
areas, below deck on boats, fuel or chemical transfer or storage facilities, and areas where the air contains
chemicals or particles, such as grain, dust, or metal powders.
ROAD SAFETY
Vehicle drivers in motion are not permitted to use telephony services with handheld devices, except in the
case of emergency. In some countries, using hands-free devices as an alternative is allowed.
SAFETY PRECAUTIONS FOR RF EXPOSURE
• Avoid using your device near metal structures (for example, the steel frame of a building).
• Avoid using your device near strong electromagnetic sources, such as microwave ovens, sound
speakers, TV and radio.
• Use only original manufacturer-approved accessories, or accessories that do not contain any metal.
• Use of non-original manufacturer-approved accessories may violate your local RF exposure guidelines
and should be avoided.
INTERFERENCE WITH MEDICAL EQUIPMENT FUNCTIONS
This product may cause medical equipment to malfunction. The use of this device is forbidden in most
hospitals and medical clinics.
If you use any other personal medical device, consult the manufacturer of your device to determine if it
is adequately shielded from external RF energy. Your physician may be able to assist you in obtaining this
information.
Turn the phone OFF in health care facilities when any regulations posted in these areas instruct you to do so.
Hospitals or health care facilities may be using equipment that could be sensitive to external RF energy.

HEARING AIDS
Some digital wireless phones may interfere with some hearing aids. In the event of such interference, you may
want to consult your service provider, or call the customer service line to discuss alternatives.
NONIONIZING RADIATION
This product should be operated in the suggested normal condition only to ensure the radiative performance
and safety of the interference. As with other mobile radio transmitting equipment, users are advised that for
satisfactory operation of the equipment and for the safety of personnel, it is recommended that no part of the
human body be allowed to come too close to the antenna during operation of the equipment.
GENERAL PRECAUTIONS
• Heed service markings
Except as explained elsewhere in the Operating or Service documentation, do not service any product
yourself. Service needed on components inside the device should be done by an authorized service
technician or provider.
• Damage requiring service
Unplug the product from the electrical outlet and refer servicing to an authorized service technician or
provider under the following conditions:
• Liquid has been spilled or an object has fallen into the product.
• The product has been exposed to rain or water.
• The product has been dropped or damaged.
• There are noticeable signs of overheating.
• The product does not operate normally when you follow the operating instructions.
5
• Avoid hot areas
The product should be placed away from heat sources such as radiators, heat registers, stoves, or other
products (including, but limited to, amplifiers) that produce heat.
• Avoid wet areas
Never use the product in a wet location.
• Avoid using your device after a dramatic change in temperature
When you move your device between environments with very different temperature and/or humidity
ranges, condensation may form on or within the device. To avoid damaging the device, allow sufficient
time for the moisture to evaporate before using the device.
NOTE: When taking the device from low-temperature conditions into a warmer environment or from high-
temperature conditions into a cooler environment, allow the device to acclimate to room temperature
before turning on the power.
• Avoid pushing objects into product
Never push objects of any kind into cabinet slots or other openings in the product. Slots and openings
are provided for ventilation. These openings must not be blocked or covered.
• Mounting Accessories
Do not use the product on an unstable table, cart, stand, tripod, or bracket. Any mounting of the
product should follow the manufacturer’s instructions, and should use a mounting accessory
recommended by the manufacturer.
• Avoid unstable mounting
Do not place the product with an unstable base.
• Use product with approved equipment
This product should be used only with personal computers and options identified as suitable for use
with your equipment.
• Cleaning
Unplug the product from the wall outlet before cleaning. Do not use liquid cleaners or aerosol cleaners.
Use a damp cloth for cleaning, but NEVER use water to clean the LCD screen.

6
Contents
Chapter 1 Getting Started 9
1.1 Getting to Know Your Device and Its Accessories ................................... 10
1.2 Battery Information ................................................................................... 13
1.3 Starting Up ................................................................................................. 14
1.4 The Today Screen ....................................................................................... 15
1.5 Status Icons ................................................................................................ 15
1.6 The Start menu ........................................................................................... 17
1.7 Programs .................................................................................................... 17
1.8 Device Settings .......................................................................................... 19
Chapter 2 Entering and Searching Information 21
2.1 Using the Hardware Keyboard ................................................................. 22
2.2 Entering Information ................................................................................. 23
2.3 Using On-screen Keyboard ....................................................................... 23
2.4 Using Letter Recognizer ............................................................................ 24
2.5 Using Block Recognizer ............................................................................. 24
2.6 Using Transcriber ....................................................................................... 24
2.7 Using Symbol Pad ...................................................................................... 25
2.8 Using Notes to Draw, Write, and Record Voice Notes .............................. 26
2.9 Searching Information .............................................................................. 26
Chapter 3 Using Phone Features 27
3.1 Using the Phone ......................................................................................... 28
3.2 Making a Call .............................................................................................. 29
3.3 Receiving a Call .......................................................................................... 30
3.4 Smart Dialing ............................................................................................. 31
3.5 In-call Options ............................................................................................ 33
3.6 Additional Dialing Information ................................................................ 34
Chapter 4 Setting Up Your Device 35
4.1 Basic Settings ............................................................................................. 36
4.2 Personalizing Your Device ......................................................................... 37
4.3 Customizing Phone Settings and Services .............................................. 38
4.4 Protecting Your Device .............................................................................. 40
4.5 Other Settings ............................................................................................ 40

Chapter 5 Synchronizing Information With Your Computer 43
5.1 About Synchronization ............................................................................. 44
5.2 Setting Up Windows Mobile Device Center for Windows Vista .............. 44
5.3 Setting Up ActiveSync for Windows XP .................................................... 46
5.4 Synchronizing With Your Computer ......................................................... 47
5.5 Synchronizing via Infrared and Bluetooth .............................................. 48
5.6 Synchronizing Music and Video ............................................................... 49
Chapter 6 Organizing Contacts, Appointments, Tasks,
and Other Information 51
6.1 Contacts ...................................................................................................... 52
6.2 Calendar ..................................................................................................... 54
6.3 Tasks ........................................................................................................... 56
6.4 Notes ........................................................................................................... 57
7
Chapter 7 Exchanging Messages 59
7.1 Messaging .................................................................................................. 60
7.2 Text Messages ............................................................................................ 60
7.3 Multimedia Message Service (MMS) ........................................................ 61
7.4 Setting Up E-mail Accounts ....................................................................... 65
7.5 Using E-mail ............................................................................................... 67
Chapter 8 Working With Company E-mail and
Meeting Appointments 71
8.1 Synchronizing Your Device with the Exchange Server ........................... 72
8.2 Working With Company E-mail ................................................................. 73
8.3 Managing Meeting Requests .................................................................... 76
8.4 Finding Contacts in the Company Directory ........................................... 77
8.5 E-mail Security ........................................................................................... 78
Chapter 9 Working With Documents and Files 81
9.1 Microsoft® Office Word Mobile ................................................................. 82
9.2 Microsoft® Office Excel® Mobile ................................................................ 82
9.3 Microsoft® Office PowerPoint Mobile ...................................................... 83
9.4 Adobe Reader LE ........................................................................................ 83
9.5 Copying and Managing Files .................................................................... 85
9.6 ZIP ............................................................................................................... 86
9.7 Axcess Shop ................................................................................................ 87

8
Chapter 10 Getting Connected 89
10.1 Comm Manager .......................................................................................... 90
10.2 Connecting to the Internet ........................................................................ 91
10.3 Internet Explorer Mobile ........................................................................... 94
10.4 Bluetooth .................................................................................................... 96
10.5 Using Your Device as a Modem (Internet Sharing) ................................ 100
Chapter 11 Experiencing Multimedia 103
11.1 Using Camera ........................................................................................... 104
11.2 Using Pictures & Videos ........................................................................... 112
11.3 Using Windows Media Player .................................................................. 114
11.4 Using Sharpcast Photos ........................................................................... 118
Chapter 12 Managing Your Device 121
12.1 Adding and Removing Programs ............................................................ 122
12.2 Managing Memory .................................................................................. 122
12.3 Checking System Information ................................................................. 123
12.4 Resetting Your PDA Phone ...................................................................... 123
12.5 Battery Saving Tips .................................................................................. 125
Chapter 13 Using Other Applications 127
13.1 Voice Speed Dial ....................................................................................... 128
13.2 Windows Live ............................................................................................ 129
Appendix 135
A.1 Specifications ........................................................................................... 136
A.2 Regulatory Notices .................................................................................. 138
A.3 Additional Safety Information ................................................................ 143

Chapter 1
Getting Started
1.1 Getting to Know Your Device
and Its Accessories
1.2 Battery Information
1.3 Starting Up
1.4 The Today Screen
1.5 Status Icons
1.6 The Start menu
1.7 Programs
1.8 Device Settings

10 Getting Started
1.1 Getting to Know Your Device and Its Accessories
Getting Started 11
14
15
16
17
18 19
2120
24
25
26
22
23
28 29
27
31
30
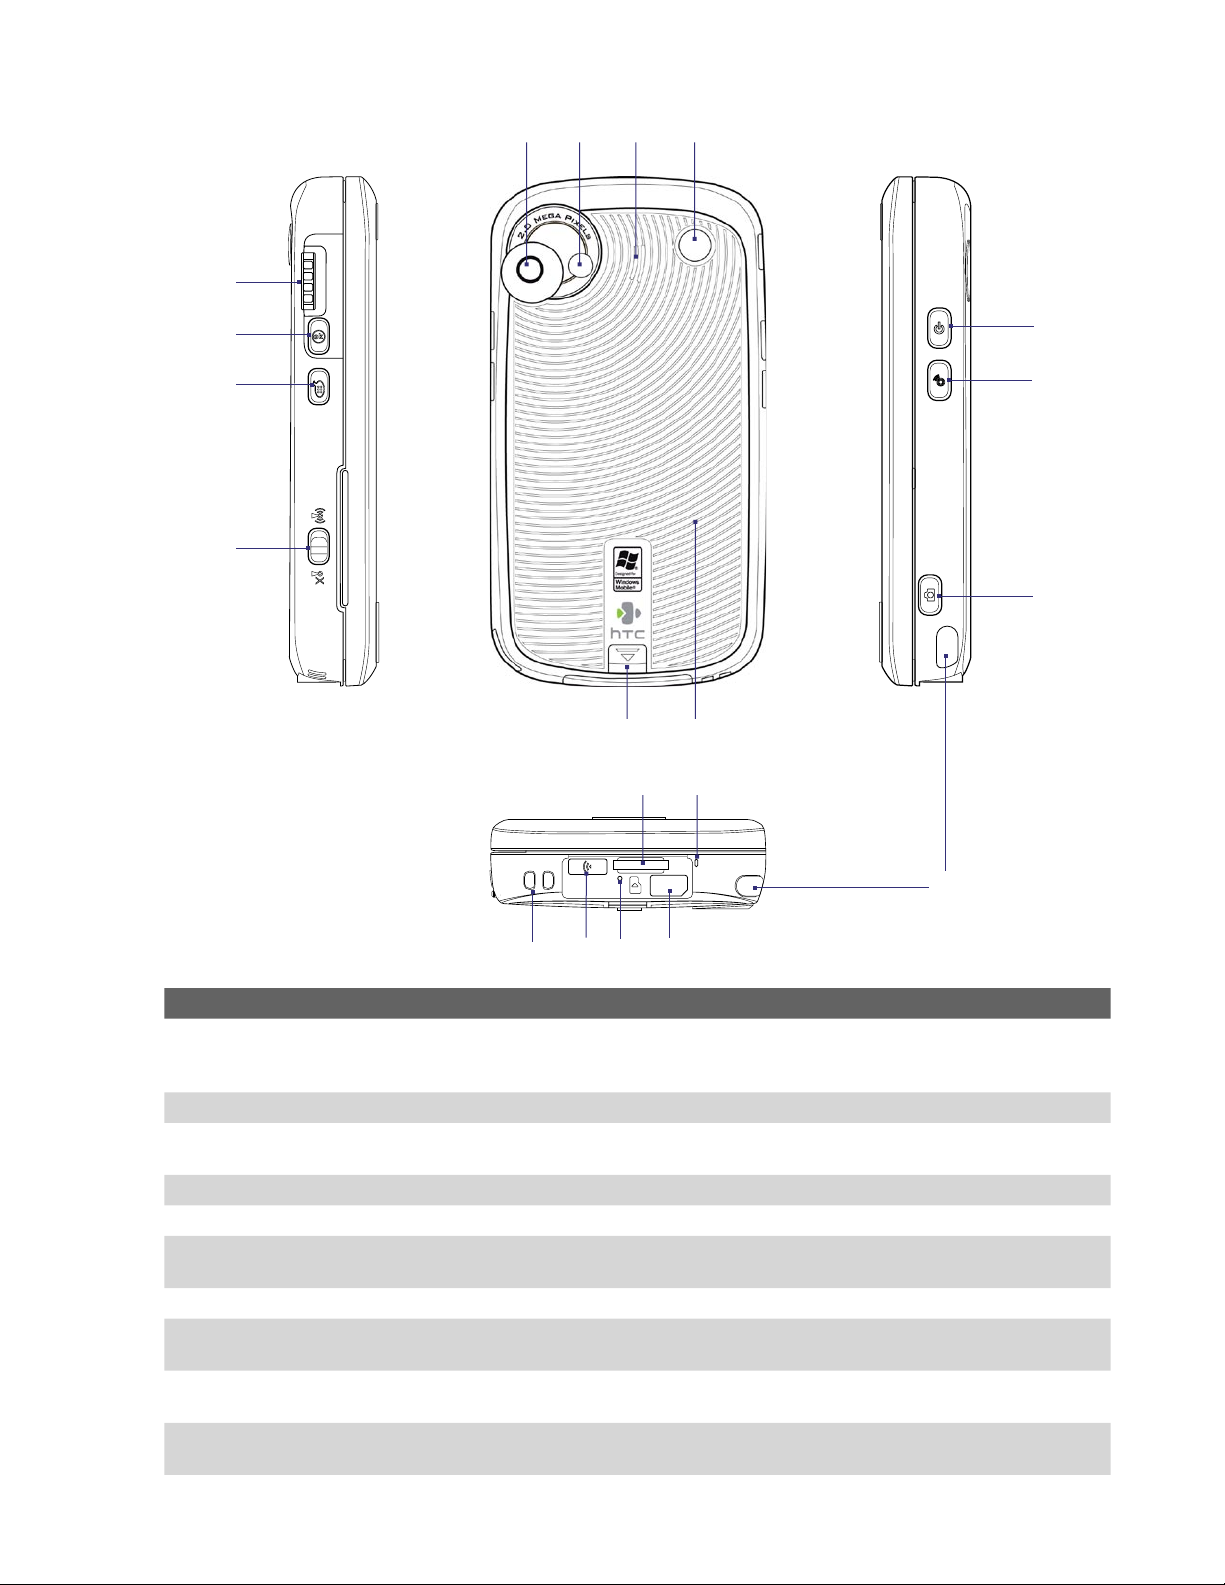
No. Item Function
14 Jog Wheel While on the Today screen or using applications, scroll up or down to navigate through menus
or program instructions; press the wheel to carry out a selection. During a call or while playing
music, scroll up or down to adjust the sound volume.
15 OK Button Press to confirm your data entries, or to exit the program in use.
16 VOICE COMMAND
Button
17 WLAN Switch Slide up to turn Wi-Fi on, down to turn Wi-Fi off.
18 Camera Use the camera to take still photos and record video clips.
19 Flash Light When turned on, it illuminates your subject and allows you to capture clear photos or video in
20 Speaker Used when speaker mode has been enabled, and to listen to media.
21 Car Antenna
Connector
22 Battery Cover
Latch
23 Battery Cover After pressing down the cover latch, remove the battery cover to access the battery
Press to start Voice Speed Dial; press and hold to record a voice note.
dark-lit environments.
Connect your device to the car antenna(if available) while in a car to have better reception
quality.
Press downward to release the battery cover.
compartment.
32
33
12 Getting Started
No. Item Function
24 POWER Button • Press and hold to turn on the device.
25 COMM MANAGER
Button
26 CAMERA Button Press to launch the Camera; press again to take a photo or video clip, depending on the specified
27 Stylus Use the stylus to write, draw, or select items on the touch screen.
28 microSD Card Slot Insert a microSD memory card for storing data.
29 Microphone Speak into the microphone during a phone call or voice recording.
30 Strap Holder Attach a strap for carrying your device.
31 Infrared Port Exchange files or data with other infrared enabled devices wirelessly.
32 RESET Button With the stylus, press the RESET button to soft-reset your device.
33 Sync Connector/
Earphone Jack
• Press to turn off the display temporarily. This switches your device to Sleep mode. You can still
receive calls and messages when your device is in Sleep mode.
• Press and hold (for about 5 seconds) to turn off the power completely. All functions including
the phone will be unavailable for use.
Press to open the Comm Manager. Comm Manager lets you easily turn on/off your device’s
connections (such as Bluetooth, Wi-Fi, enable ‘Flight Mode’ and cellular data connection), ringer,
phone, etc.
capture mode.
Connect the supplied AC charger to charge the battery or the USB cable to synchronize data with
the PC. You can also plug in the provided splitter cable to allow the AC charger and your stereo
headset to be connected to the device at the same time.
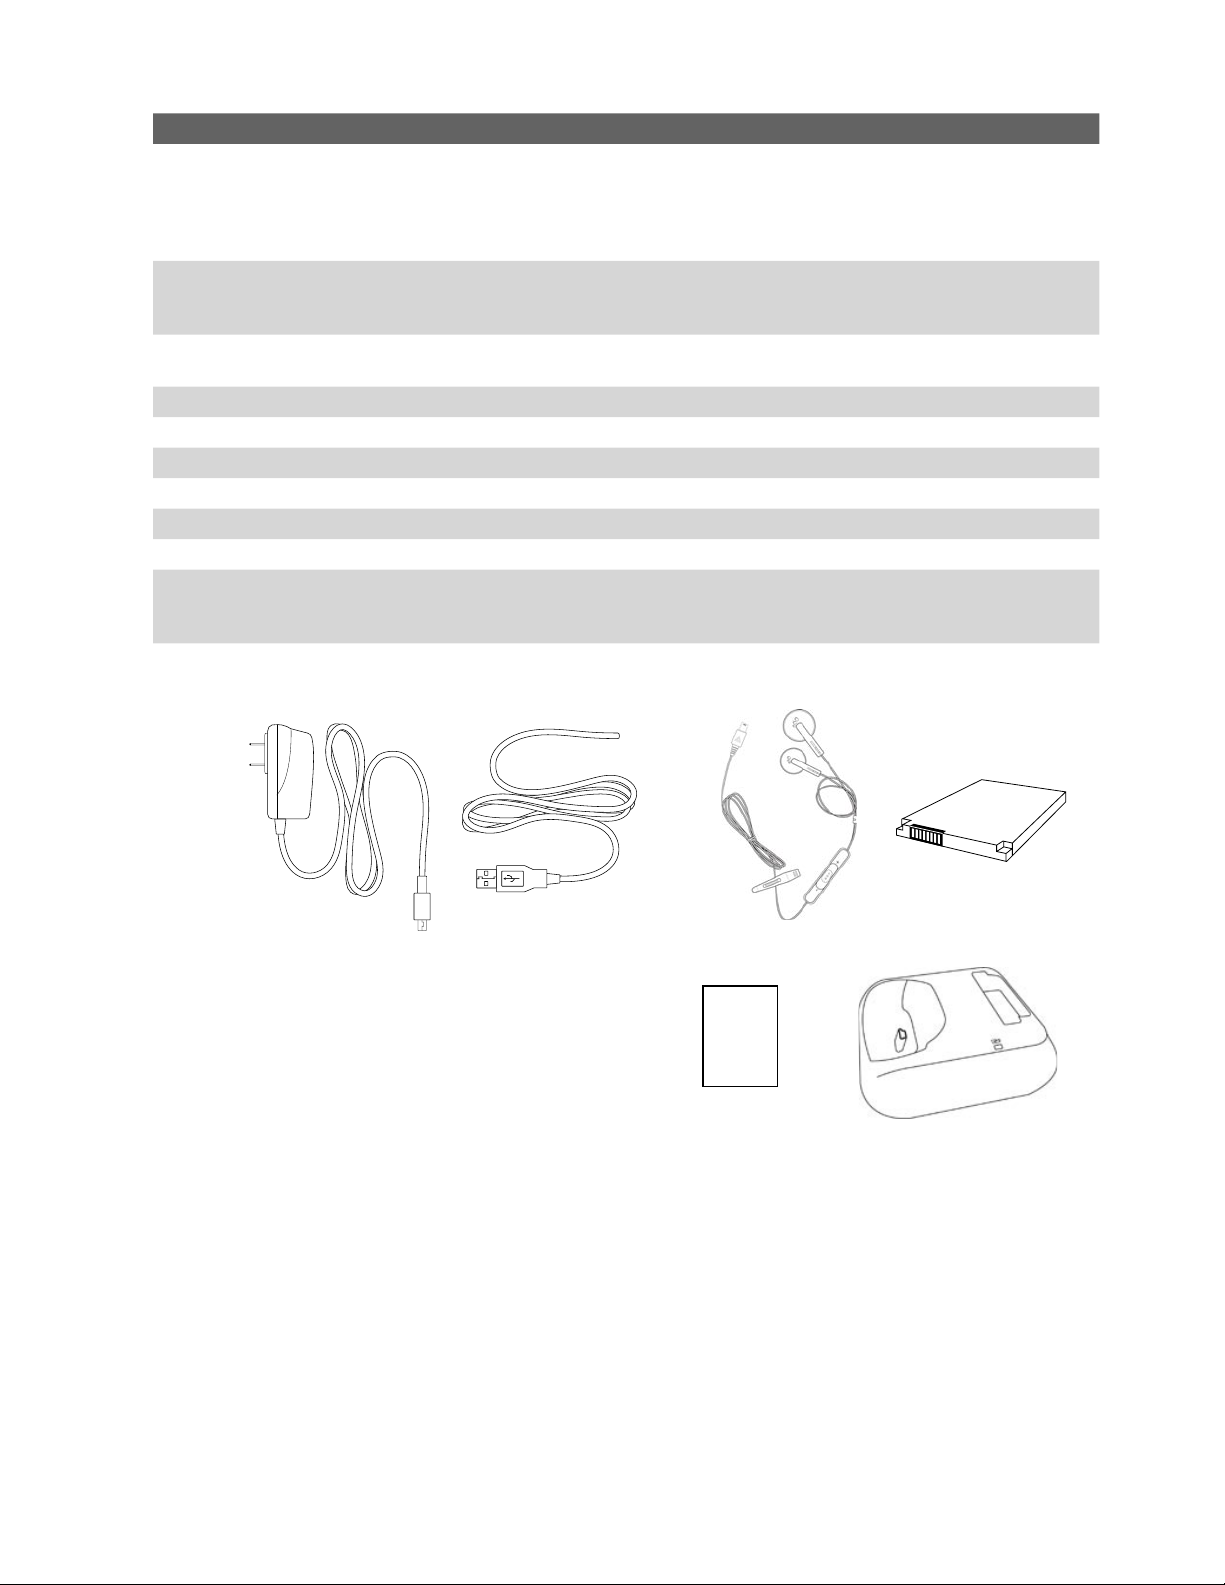
Accessories
1
5 6
2
3
1.2 Battery Information
Always turn off your device before installing or replacing the battery. Follow the instructions in the Quick Start
Guide to install the battery.
Your device contains a rechargeable Li-ion polymer battery. This device is designed to use only manufacturerspecified original batteries and accessories. Battery performance depends on many factors, including your
wireless service provider’s network configuration, signal strength, the temperature of the environment in
which you operate your device, the features and/or settings you select and use, items attached to connecting
ports, and your voice, data, and other program usage patterns.
Warning! To reduce risk of fire or burns:
• Do not attempt to open, disassemble, or service the battery pack.
• Do not crush, puncture, short external contacts, or dispose of in fire or water.
• Do not expose to temperatures above 60oC (140oF).
• Replace only with the battery pack designated for this product.
• Recycle or dispose of used battery as stipulated by local regulation.
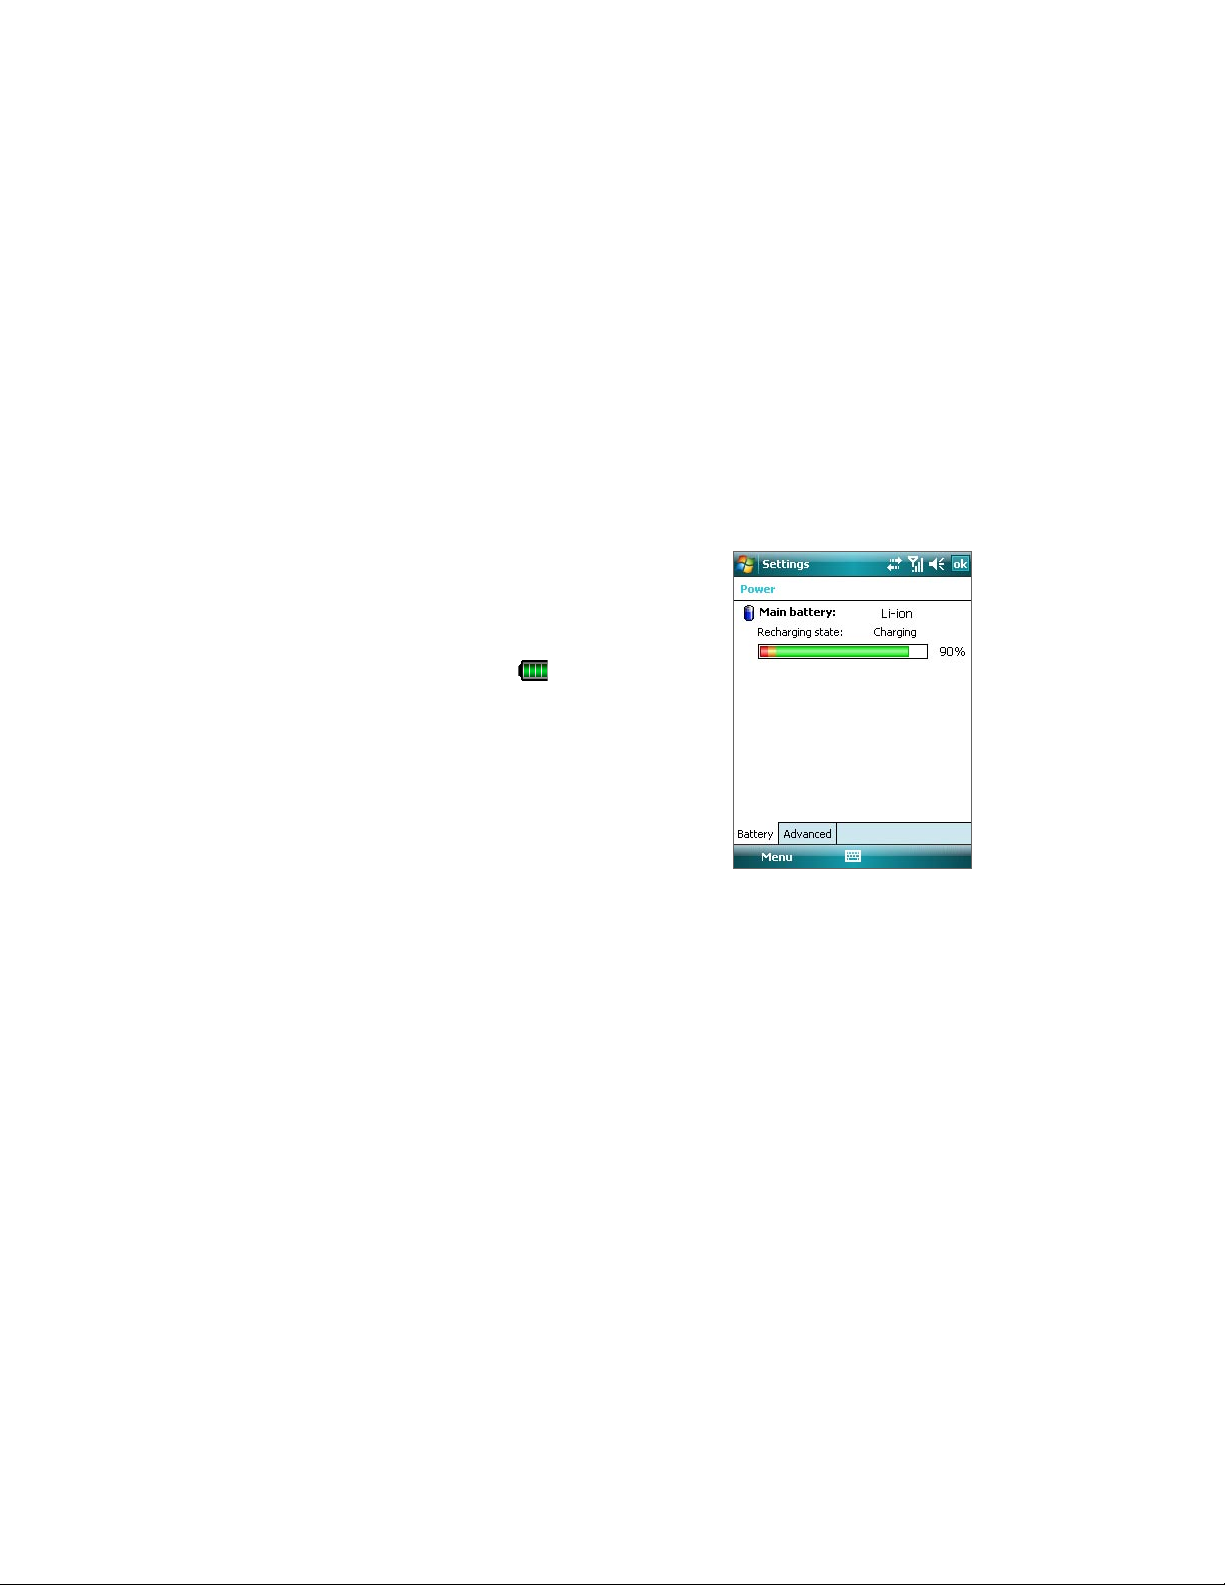
To check the battery power
1. Power on your device.
2. Do one of the following:
Getting Started 13
• Tap the battery level icon ( ) on the Today
screen.
• Alternatively, tap Start > Settings > Systems
tab > Power.
Battery power information
Charge the battery
New batteries are shipped partially charged. Before you start using your device, it is recommended that you
install and charge the battery. Some batteries perform best after several full charge/discharge cycles. You can
charge the battery in two ways:
•
Charging your device’s battery by using the AC charger.
• Connecting your device to a PC via the provided USB Sync cable.
• Connect the USB cradle to an electrical outlet or your PC, and use the cradle to charge the battery.
Warning! • Do not remove the battery from the device while you are charging it using the AC or car charger.
• As a safety precaution, the battery stops charging when it overheats.
Low battery
When the low-battery warning appears, do the following:
• Immediately save your current data.
• Synchronize with your PC or connect the AC charger to charge the battery.
• Turn off your device.

14 Getting Started
1.3 Starting Up
Turn your device on and off
To turn on your device, press and hold the POWER button ( ). When you turn on your device for the first
time, a Quick Start Wizard will guide you through the screen calibration process and the setup of regional
settings, date and time, and password. For more information about touch screen calibration, see “Calibrate the
device”. For information about setting a device password, see “Protecting Your Device” in Chapter 4.
To turn off your device, press and hold the POWER button ( ) for a few seconds. A message will then be
displayed, prompting you whether or not to turn off the device completely.
Switching your device to Sleep mode
Quickly pressing the POWER button ( ) turns off the display temporarily and switches your device to Sleep
mode. Sleep mode suspends your device to a low power state while the display is off in order to save battery
power.
Your device also automatically reverts to Sleep mode when you leave the device idle after a certain amount of
time.
To specify the timeout period before your device goes into Sleep mode
1. Tap Start > Settings > System tab > Power > Advanced tab.
2. Under On battery power, make sure the Turn off device if not used for check box is selected.
3. Select the battery timeout period, then tap OK.
You will still be able to receive messages and calls when your device is in Sleep mode. Your device wakes up
automatically when you press POWER ( ) again or when there are new incoming calls/messages.
Calibrate the device
Calibrating the touch screen involves tapping the center of a cross with the stylus as the cross moves around
the screen. This process ensures that when you tap the screen with your stylus, the tapped item is activated.
If your device does not accurately respond to screen taps, follow these steps to re-calibrate it:
1. Tap Start > Settings > System tab > Screen.
2. On the General tab, tap Align Screen, then follow the on-screen instructions to complete the
calibration.
Manage screen settings
The device’s display has the following orientation modes: Portrait, Landscape (right-handed), and
Landscape (left-handed). Portrait mode allows you to get a better view or a better operation of certain
programs, while Landscape mode may be optimal for viewing lengthy files.
• To change the orientation, tap Start > Settings > System tab > Screen, and select the orientation you
want.
• To smooth the edges of screen fonts for many programs, on the ClearType tab, select the Enable
ClearType check box.
• To increase the readability or to see more content on the screen, on the Text Size tab, adjust the text
size by moving the slider.
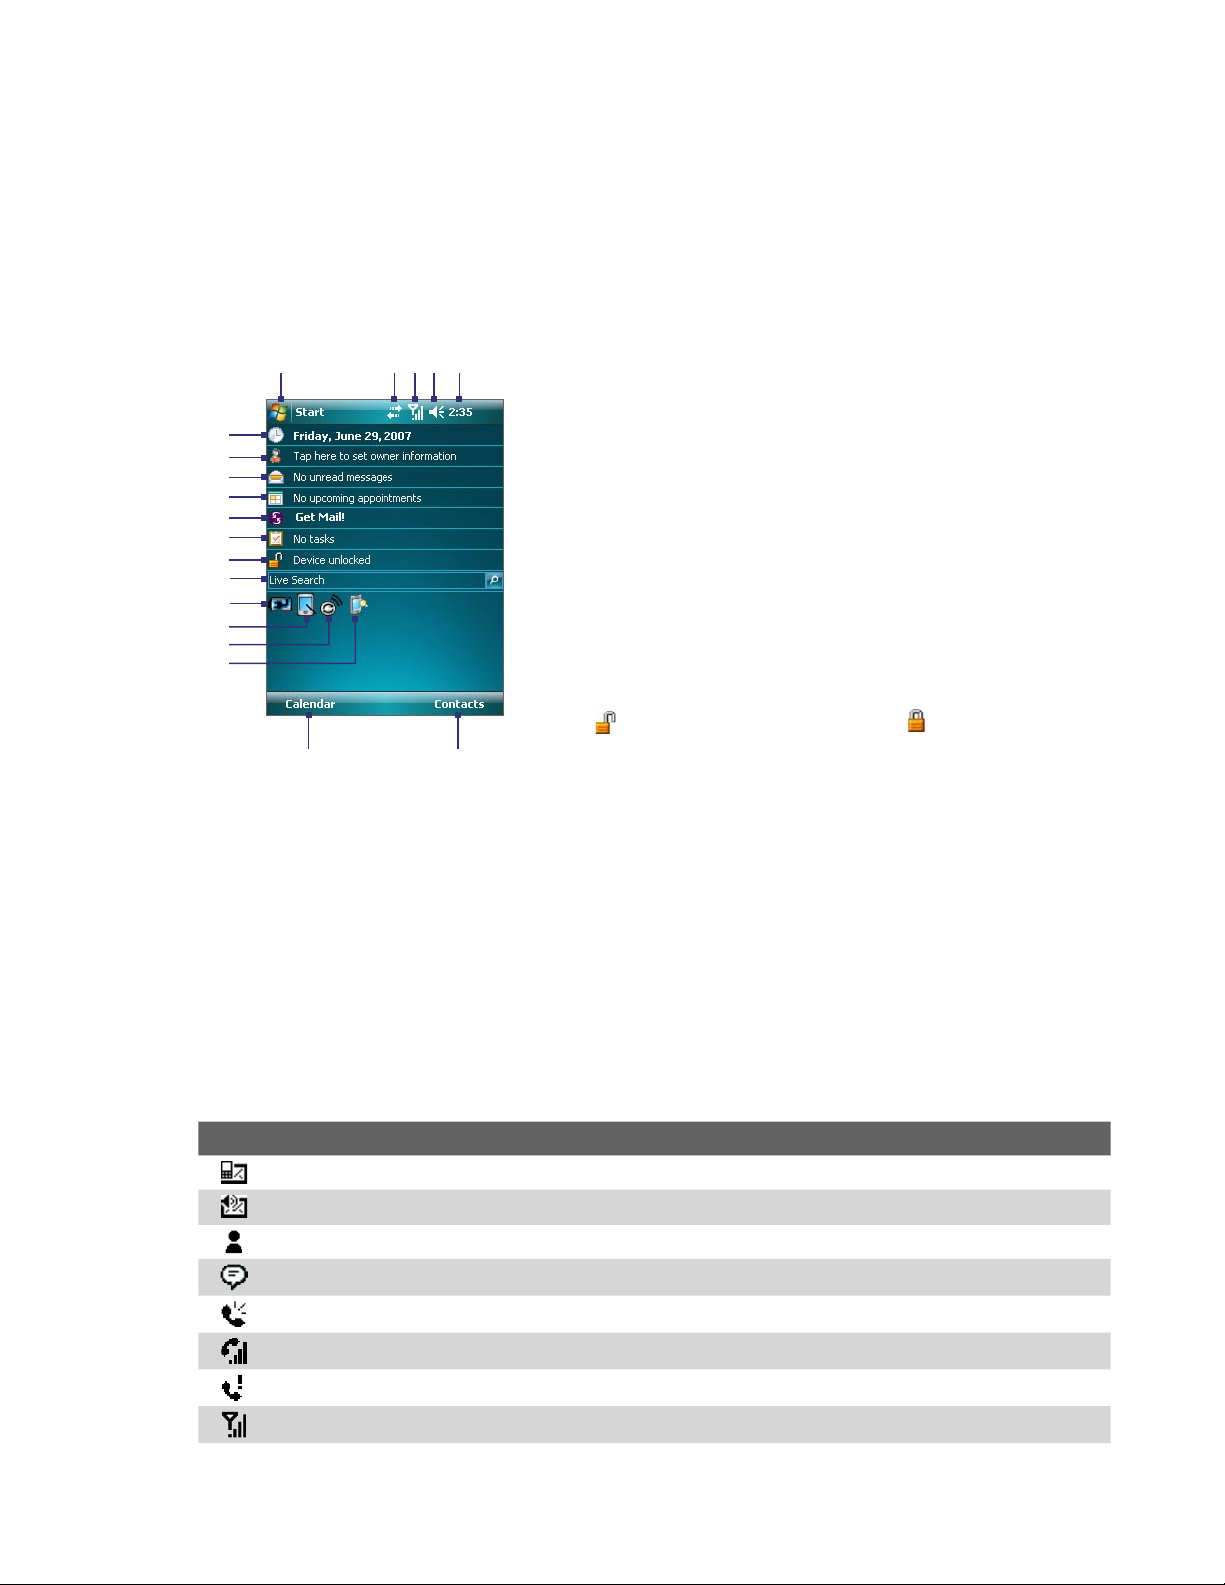
1.4 The Today Screen
The Today screen displays important information, such as upcoming appointments, number of new messages,
and your tasks. You can tap an item on the Today screen to open the associated program.
• To access the Today screen, tap Start > Today.
• To customize the Today screen display, including the background image, tap Start > Settings >
Personal tab > Today.
Getting Started 15
6
7
8
9
10
11
12
13
14
15
16
17
1
2 3 4 5
18 19
1 Tap to open the Start menu.
2 Tap to view connectivity status.
3 Indicates the radio signal strength. Tap to configure the phone
settings.
4 Tap to adjust device/ringer volume.
5 Displays the current time. Tap to check the current date and
upcoming appointments. Tap and hold to change the clock mode to
Analog or Digital.
6 Displays the current date. Tap to set up date, time, alarm, and more.
7 Tap to set owner information.
8 Indicates the incoming messages. Tap to open Messaging.
9 Reminds you of the appointment(s). Tap to open Calendar.
10 Allows you to send/receive e-mails, update your calendar and view
the company contacts in real time form your device.
11 Displays the task(s) that you need to do. Tap to open Tasks.
12
Tap
to lock the device. The icon changes to
Tap Unlock twice on the Today screen to unlock again.
12 Displays the task(s) that you need to do. Tap to open Tasks.
13 Live Search allows you to quickly and efficiently search the Web
through Internet Explorer.
14 Indicates the battery status. Tap to open the Power Settings screen.
15 Tap to toggle the screen between portrait and landscape orientation.
16 Tap to open Comm Manager.
17 Tap to open the Backlight Settings screen.
18 Tap to open Calendar or view Notification.
19 Tap to open Contacts.
.
1.5 Status Icons
The following are some of the status icons that you may see on the device.
Icon Description
New e-mail or text messages
New voice mail
New MSN message
There are more notifications. Tap the icon to view all.
Speakerphone on
Voice call in progress
Missed call
Maximum signal strength
16 Getting Started
Icon Description
No signal
Phone is turned off
No phone service
Searching for phone service
1xRTT available
EVDO available
Data connection is active and transmitting data
Data connection is active but idle
Roaming
Connection is active
Connection is not active
Synchronization in progress
Synchronization error
ActiveSync notification
Wi-Fi function enabled, but device not yet connected to a wireless network
Wireless network(s) detected
Connecting to wireless network (arrows moving);
Connected to wireless network
Synchronizing via Wi-Fi
Vibration mode
Sound on
Sound off
Alarm
Device is locked
Device is unlocked
Battery is fully charged
Battery power is very low
Battery charging
Portrait mode
Landscape mode
Bluetooth stereo headset detected
Serial USB connection active
Note The USB to PC ( ) icon appears on the Today Screen when your device is connected to your computer and you
enable a serial USB connection between them. For more information about USB to PC, see “Device Settings” later in
this chapter.
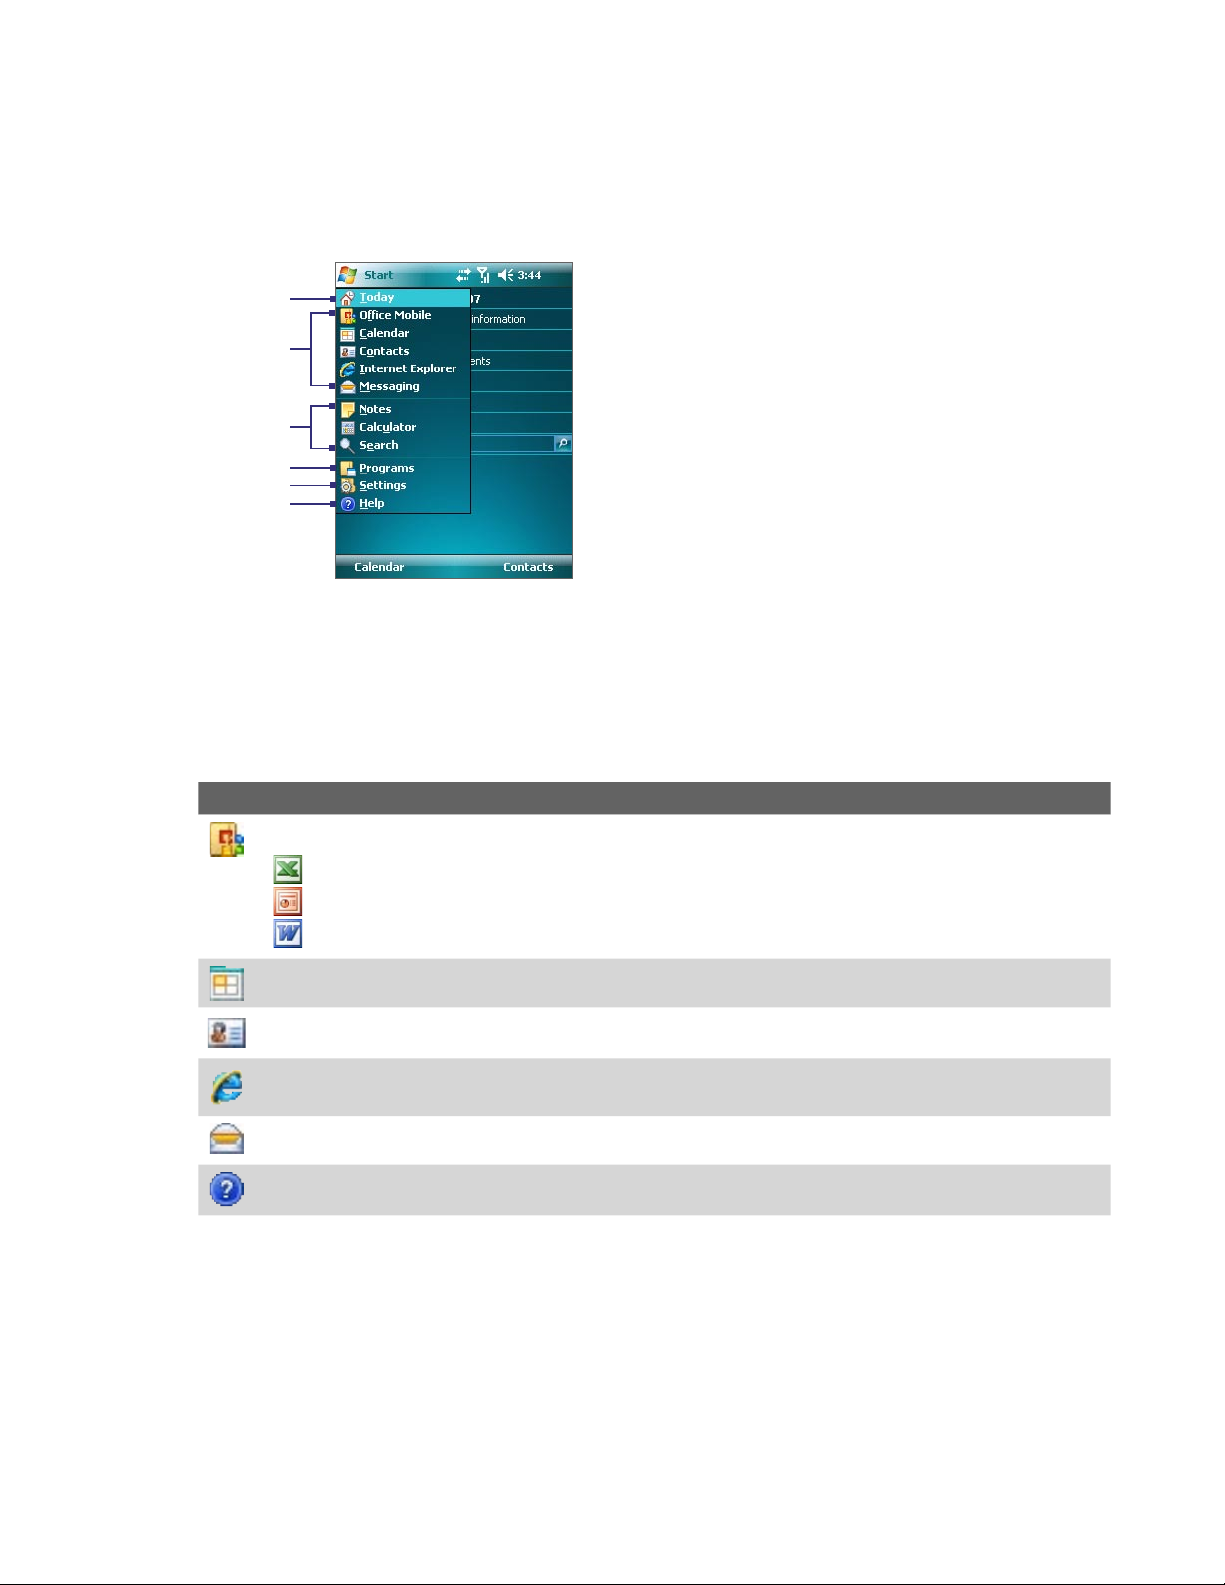
1.6 The Start menu
The Start menu, located at the top left corner of the Today screen, displays a list of programs. You can start a
program by scrolling through the programs list and then pressing ENTER, or by tapping a program with the
stylus.
1
2
3
4
5
6
1 Tap to switch to the Today screen.
2 Tap to start a program. The items displayed in
the Start menu can be customized by tapping
Start > Settings > Personal
3 Tap to start a recently-used program.
4 Tap to view and select more programs that are
installed on your device.
5 Tap to change device settings.
6 Tap to see a Help topic for the current screen.
tab > Menus.
Getting Started 17
1.7 Programs
The following are some of the programs that are already installed on your device.
Programs in the Start menu
Icon Description
Office Mobile Use the complete suite of Microsoft® Office applications for your mobile device.
Excel Mobile Create new workbooks or view and edit Microsoft® Excel® workbooks.
PowerPoint Mobile View Microsoft® PowerPoint® slides and presentations.
Word Mobile Create, view, and edit Microsoft® Word documents.
Calendar Keep track of your appointments and create meeting requests.
Contacts Keep track of your friends and colleagues.
Internet Explorer Mobile Browse Web and WAP sites as well as download new programs and files from the
Internet.
Messaging Send and receive e-mail, MMS, and text messages.
Help See Help topics for the current screen or program.
18 Getting Started
Programs screen
Icon Description
Games Play two pre-installed games: Bubble Breaker and Solitaire.
ActiveSync Synchronize information between your device and a PC or the Exchange Server.
Adobe Reader LE View PDF (Portable Document Format) files on your device.
Axcess Shop Let you view, sort, organize and download software applications, games, and entertainment on
your device.
Calculator Perform basic arithmetic and calculations, such as addition, subtraction, multiplication, and
division.
Camera Snap photos or shoot video clips with accompanying audio.
File Explorer Organize and manage files on your device.
Get Mail! Allow you to send/receive e-mails, update your calendar and view the company contacts in real time
form your device.
Internet Sharing Connect your notebook computer to the Internet using your device’s data connection.
Messenger This is the next generation of MSN Messenger Mobile. You can sign in using your Hotmail or
Windows Live Mail address, add emoticons when sending instant messages, transfer files, and more.
Notes Create handwritten or typed notes, drawings, and recordings.
Phone Make and receive calls, switch between calls, and set up conference calling.
Pictures & Videos View, organize, and sort picture and video files on your device or a storage card. Captured
photos are stored in the My Pictures folder, and video clips are saved in the My Videos folder of your device.
Search Search contacts, data, and other information on your device.
Sharpcast Photos Allow you to synchronize photos on your PC, mobile device, and the Web so they are always
up-to-date and accessible from anywhere.
Tasks Keep track of your tasks.
Text Messages Retry Resend SMS messages that failed delivery.
Voice Speed Dial Record voice tags so that you can dial a phone number or launch programs simply by
speaking a word.
Voice Speed Dial Switch Enable or disable Voice Speed Dial to be launched when the VOICE COMMAND
button is pressed.
Windows Live Mobile Use this mobile version of Windows LiveTM to find information on the web. It also lets
you sign into your Windows Live account so that you can access your Live Mail messages and send/receive
instant messages in Live Messenger.
Windows Media Player Mobile Play back audio and video files.
ZIP Enable you to save memory and free up storage space on your device by compressing files in the
conventional ZIP format.

1.8 Device Settings
You can adjust the device settings to suit the way you work. To see all available settings, tap Start > Settings,
then tap the Personal, System, and Connections tabs located at the bottom of the screen.
Personal tab
Icon Description
Buttons Assign a program or function to a hardware button.
Input Set options for each of the input methods.
Lock Set a password for your device.
Menus Set what programs will appear in the Start menu.
Owner Information Enter your personal information on your device.
Phone Customize phone settings such as ring tone, optional phone services, and more.
Getting Started 19
SlidingSound Select a slide-in and slide-out sound for the hardware keyboard.
Sounds & Notifications Enable sounds for events, notifications, and more, and allows you to set the type of
notification for different events.
Today Customize the appearance and the information to be displayed on the Today screen.
Voice Speed Dial Create voice tags for voice dialing contacts and SIM contacts as well as for launching
programs.
System tab
Icon Description
About This is where you can see basic information such as the Windows Mobile® version and type of processor
used on your device. You can also specify a name for your device.
Backlight Set the backlight timeout and brightness.
Certificates See information about certificates that are installed on your device.
Clear Storage Tap this icon only when you need to remove all your data and files from the memory and reset
your device to factory default settings.
Clock & Alarms Set the device clock to the date and time of your locale or to a visiting time zone when you’re
traveling. Alarms can also be set at specified days and times of a week.
Customer Feedback Send feedback to the Customer Experience Improvement Program of Microsoft.
Device Information See information about the firmware version, hardware, identity, and the duration of calls
made on your device.
Encryption Allow files on your storage card to be encrypted. Encrypted files will be readable only on your
device.

20 Getting Started
Icon Description
Error Reporting Enable or disable the device’s error reporting function. When this function is enabled and a
program error occurs, technical data about the state of the program and your computer will be logged in a text
file and delivered to Microsoft’s technical support if you choose to send it.
External GPS Set the appropriate GPS communication ports, if required. You may need to do this when there
are programs on your device that access GPS data or you have connected a GPS receiver to your device. See
Help for details.
Key Lock Lock the buttons on your device except for the POWER button when the device is in Sleep mode. This
ensures you will not switch the device on by accident and consume unnecessary power.
Memory Check the device memory allocation status and memory card information. You can also stop currently
running programs.
Power Check the remaining battery power. You can also set the timeout for turning off the display (switching
device to Sleep mode) to conserve battery power.
Regional Settings Set the regional configuration to use, including the format for displaying numbers,
currency, date, and time on your device.
Remove Programs Remove programs that you installed on your device.
Screen Change the screen orientation, re-calibrate the screen, and change the screen text size.
Windows Update Link to Microsoft’s web site and update Windows Mobile® on your device with the latest
security patches or fixes.
Connections tab
Icon Description
Beam Set your device to receive incoming Bluetooth beams.
Bluetooth Turn Bluetooth on, set your device to visible mode, and scan for other Bluetooth devices.
Comm Manager Manage your device’s connections (
phone on or off, switch to ringer/vibration mode, and enable or disable the Direct Push function.
Connections Set up one or more types of modem connections for your device, such as phone dial-up,
Bluetooth, and more, so that your device can connect to the Internet or a private local network.
USB to PC Set the USB connection between your device and PC, and helps with problems connecting
ActiveSync.
Wi-Fi Scan for available wireless networks.
Wireless LAN See information about the active wireless network, and allows you to customize Wi-Fi settings.
including Bluetooth and cellular data connection
), turn the

Chapter 2
Entering and Searching
Information
2.1 Using the Hardware Keyboard
2.2 Entering Information
2.3 Using On-screen Keyboard
2.4 Using Letter Recognizer
2.5 Using Block Recognizer
2.6 Using Transcriber
2.7 Using Symbol Pad
2.8 Using Notes to Draw, Write,
and Record Voice Notes
2.9 Searching Information
22 Entering and Searching Information
2.1 Using the Hardware Keyboard
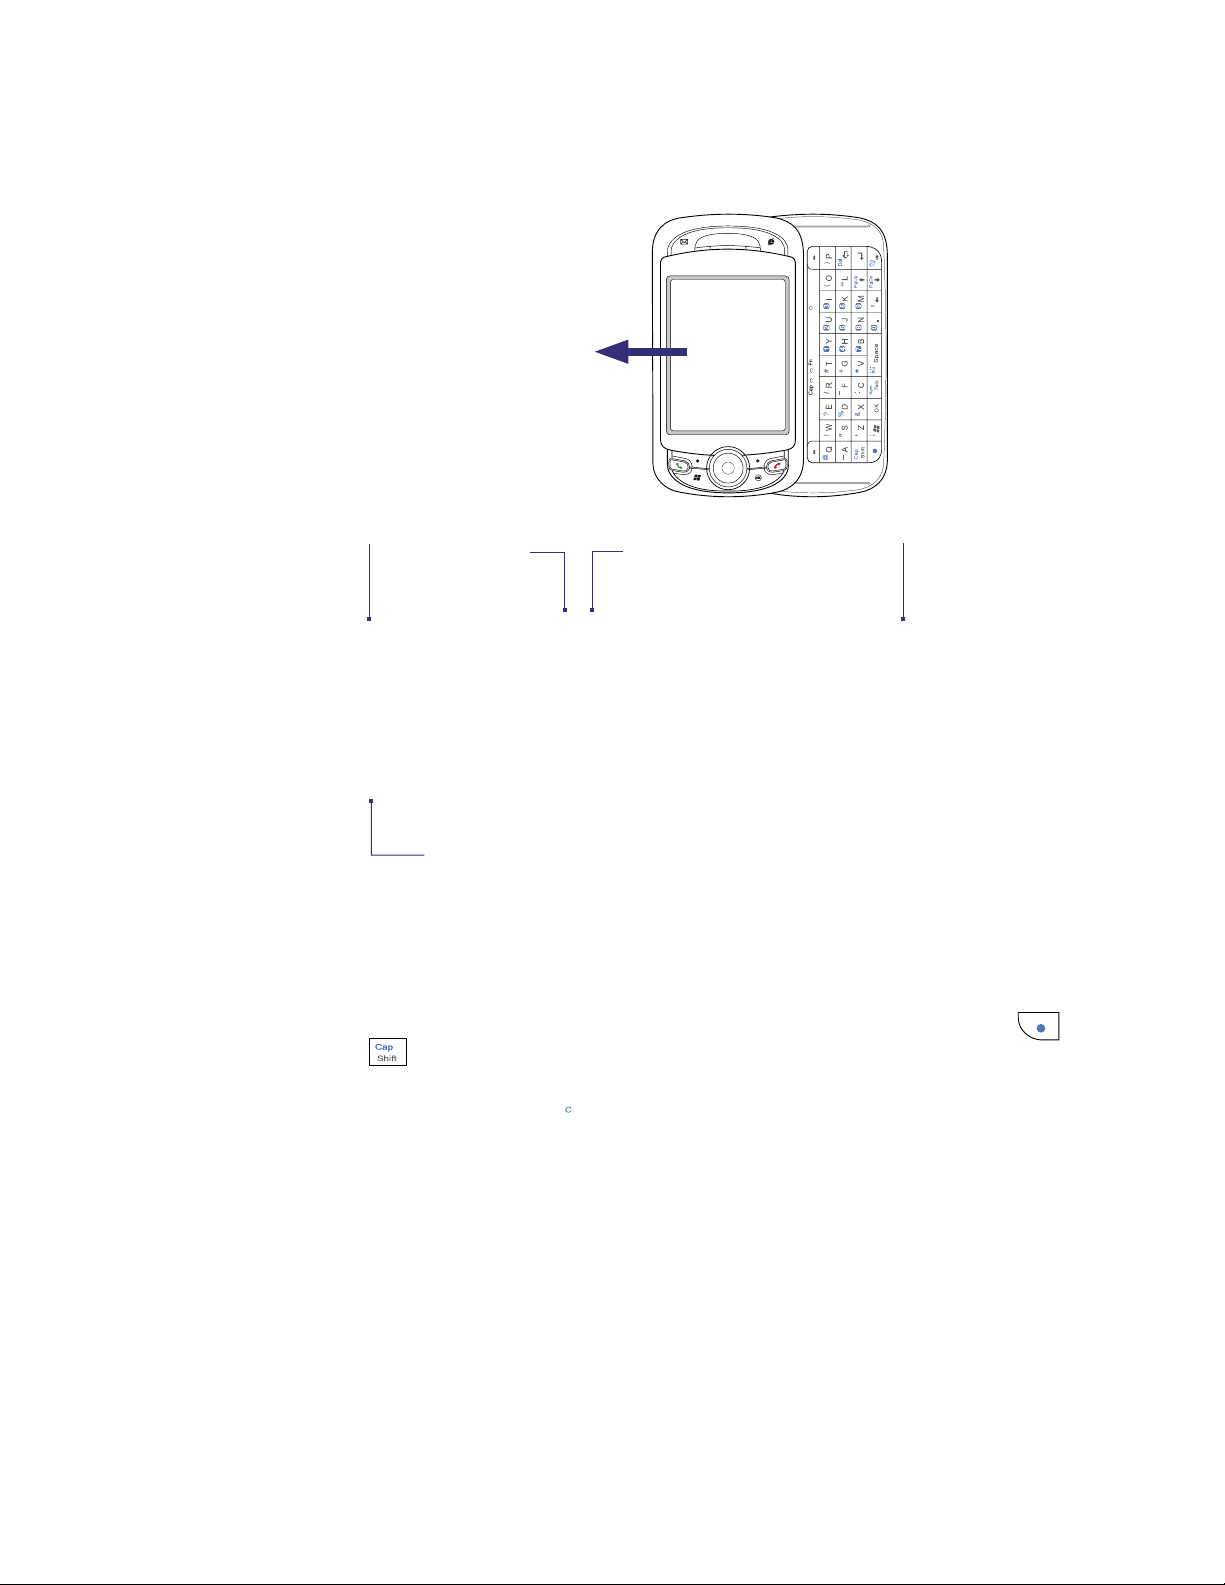
Your device provides you with a QWERTY keyboard, which is similar to a standard keyboard on your PC.
Slide the screen panel
to the left to reveal the
keyboard.
Left SOFT KEY
Shift Key /
Caps Lock
LED
Function Key
Function Key
LED
Right SOFT KEY
When you slide open the hardware keyboard, the screen automatically changes to landscape view. The screen
changes back to portrait view when you close the hardware keyboard.
You can do the following with the QWERTY keyboard:
•
To type lowercase letters, press the keys using your thumbs or fingers.
• To turn on Caps Lock mode so that you can type all uppercase letters, press the Function Key ( )
first, then press . The Shift Key/Caps Lock LED lights up to indicate that Caps Lock mode is enabled.
To turn off Caps Lock mode, press these buttons again.
•
To type a single uppercase letter, press
2.2 Entering Information
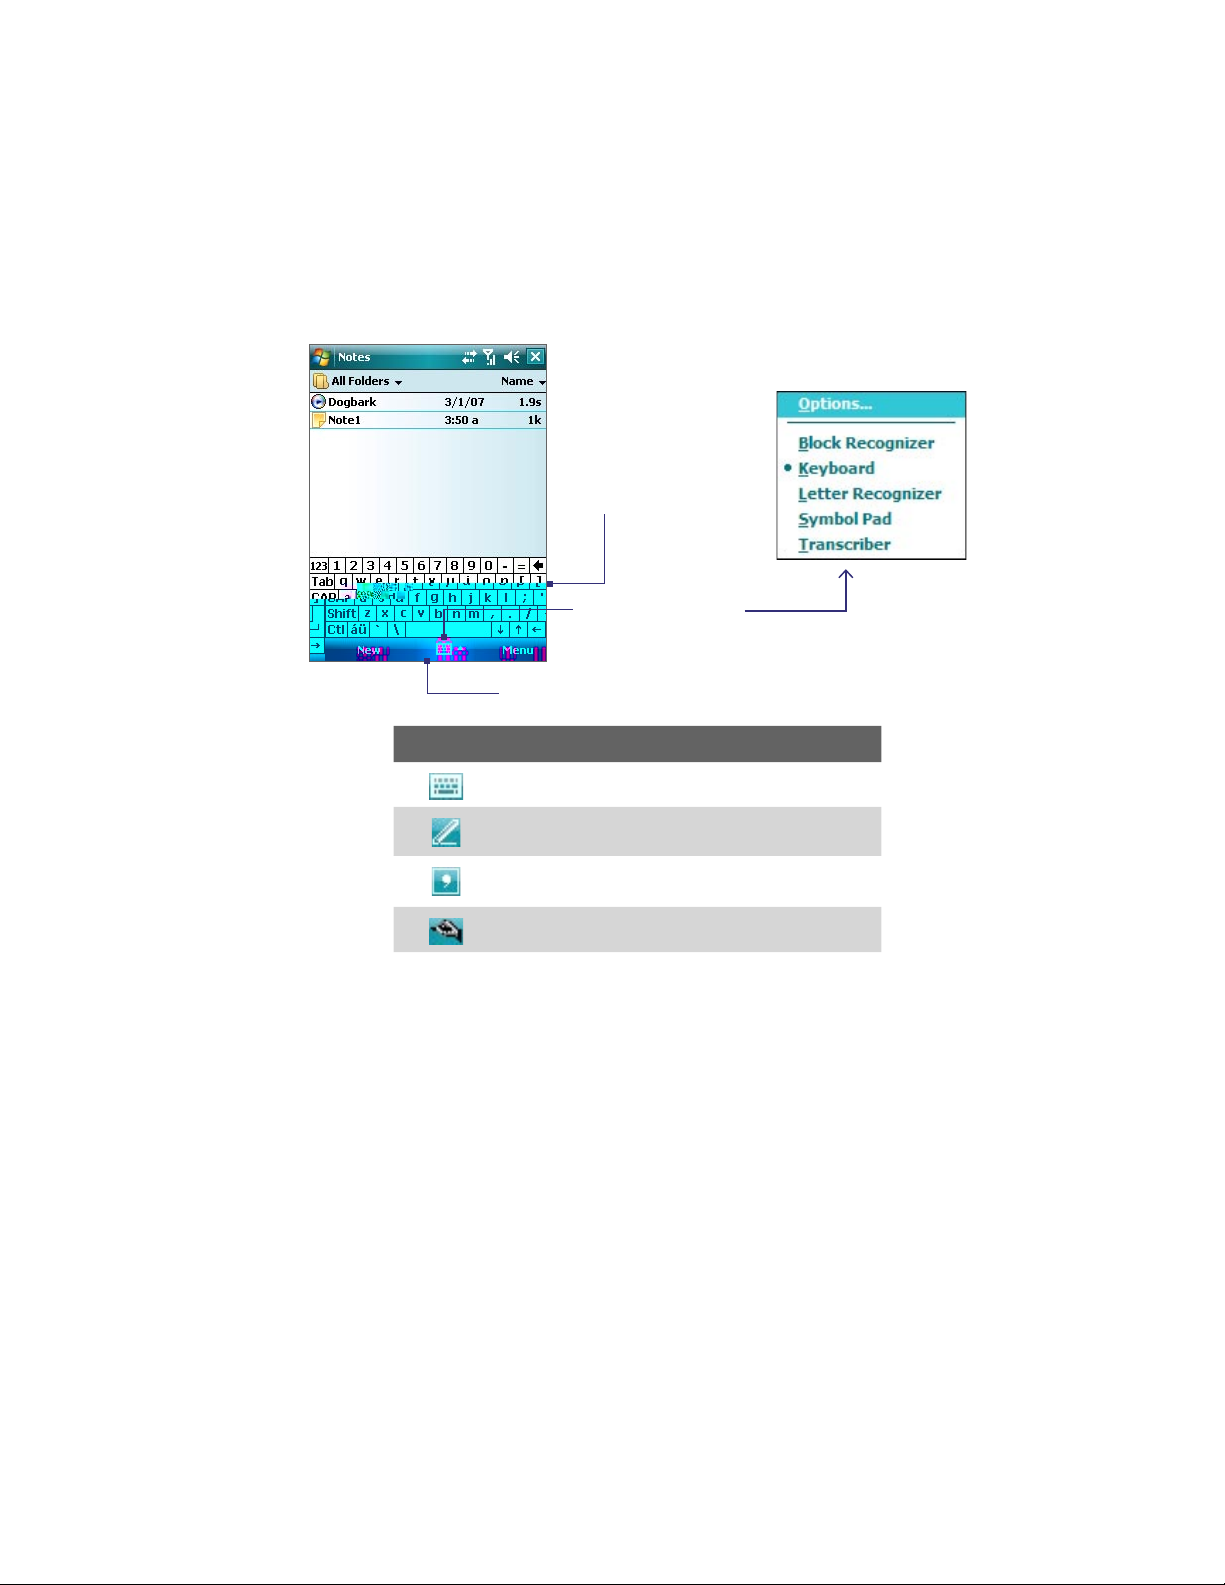
When you start a program or select a field that requires text or numbers, the Input Panel icon becomes
available on the menu bar.
Tap the Input Selector arrow (that appears next to the Input Panel icon) to open a menu where you
can select a text input method and customize input options. After selecting a text input method, the
corresponding Input Panel is then displayed and you can use it to enter text. To toggle between showing and
hiding the Input Panel, simply tap the Input Panel icon.
Entering and Searching Information 23
Input Panel
(Keyboard)
Input Selector arrow
Input Panel icon
Icon Input method
On-screen Keyboard
Letter Recognizer or Block Recognizer
Symbol Pad
Transcriber
Note Some text input methods may not be available in certain language versions of the device.
2.3 Using On-screen Keyboard
The on-screen Keyboard is available when text entry is possible. You can enter text by tapping keys on the
keyboard that are displayed on the screen.
To enter text using the on-screen Keyboard
1. In a program, tap the Input Selector arrow, and tap Keyboard.
2. Enter text by tapping keys on the on-screen Keyboard.
To increase or decrease the size of the keyboard keys
1. Tap the Input Selector arrow, then tap Options.
2. In the Input method list, select Keyboard.
3. Select Large keys or Small keys.

24 Entering and Searching Information
2.4 Using Letter Recognizer
With Letter Recognizer, you can write individual letters, numbers, and punctuation, which are then
converted into typed text.
To use Letter Recognizer
1. From a program, tap the Input Selector arrow, and tap Letter Recognizer.
2. Write characters, numbers, and symbols in the designated writing area.
• Enter capital letters by writing in the ABC (left) area of the box.
• Enter lower case letters by writing in the abc (middle) area of the box.
• Enter numbers by writing in the 123 (right) area of the box.
• Enter punctuation and symbols by tapping in either area of the box and then writing the desired
character.
Note Letter Recognizer is available when text entry is possible.
Tip For help with writing characters, tap the question mark near the writing area.
2.5 Using Block Recognizer
With Block Recognizer, you use a single stroke to write letters, numbers, symbols, and punctuation, which
are then converted into typed text.
To use Block Recognizer
1. From a program, tap the Input Selector arrow, and tap Block Recognizer.
2. Write characters, numbers, and symbols in the designated writing area.
• Enter letters by writing in the abc (left) area of the box.
• Enter numbers by writing in the 123 (right) area of the box.
• Enter symbols and punctuation by tapping in either area of the box and then writing the desired
character.
Note Block Recognizer is available when text entry is possible.
Tip For help with writing characters with Block Recognizer, tap the question mark near the writing area.
2.6 Using Transcriber
Transcriber is a handwriting recognition program that allows you to write in cursive, print, or a combination
of both. Transcriber works transparently in the background of programs, recognizing words with its
integrated dictionary. When Transcriber is turned on, it interprets stylus movement anywhere on the screen as
handwriting input. For more information about using Transcriber, see Help on your device.
To start Transcriber
1. Start a program that accepts user input, such as Word Mobile.
2. Tap the Input Selector arrow, and tap Transcriber. The Transcriber introductory screen appears.


26 Entering and Searching Information
3. To browse through the pages of symbols, tap / on the Symbol Pad screen.
4. Tap a symbol to select it and close the Symbol Pad. The selected symbol will then be inserted in your
document.
2.8 Using Notes to Draw, Write, and Record Voice Notes
Using Notes, you can draw directly on the screen, or write on the screen and save notes in your own
handwriting. You can also create a stand-alone recording (voice note) or you can add a recording to a note.
For more information on what you can do with Notes, see “Notes” in Chapter 6.
2.9 Searching Information
You can search for files and other items stored in My Documents folder or on an installed storage card of your
device. You can search by file name or by words located in the item. For example, you can search in e-mail
messages, notes, appointments, contacts, and tasks, as well as in online Help.
To search for a file or an item
1. Tap Start > Programs > Search.
2. In the Search for field, you can:
• Enter the file name, word, or other information you want to search for.
• Tap the down arrow icon ( ), and from the list, select one item that you have looked for before.
3. In the Type field, you can tap the down arrow icon ( ) and select a data type from the list to help
narrow your search.
4. Tap Search. The system then starts searching the matched files in the My Documents folder and
subfolders.
5. In the Results list, tap the item you want to open.
Note The storage card symbol ( or ) is displayed next to the names of files saved on a storage card.

Chapter 3
Using Phone Features
3.1 Using the Phone
3.2 Making a Call
3.3 Receiving a Call
3.4 Smart Dialing
3.5 In-call Options
3.6 Additional Dialing Information
28 Using Phone Features
3.1 Using the Phone
Like a standard mobile phone, you can use your device to make, receive, and keep track of calls and send text
messages. You can also dial directly from Contacts.
The Phone screen
From the Phone screen, you can access Call History, Speed Dial, and Phone settings. To open the Phone
screen, do one of the following:
• Press the TALK button ( ).
• Directly dial the phone number by pressing numeric keys on the hardware keyboard.
• Tap Start > Phone.
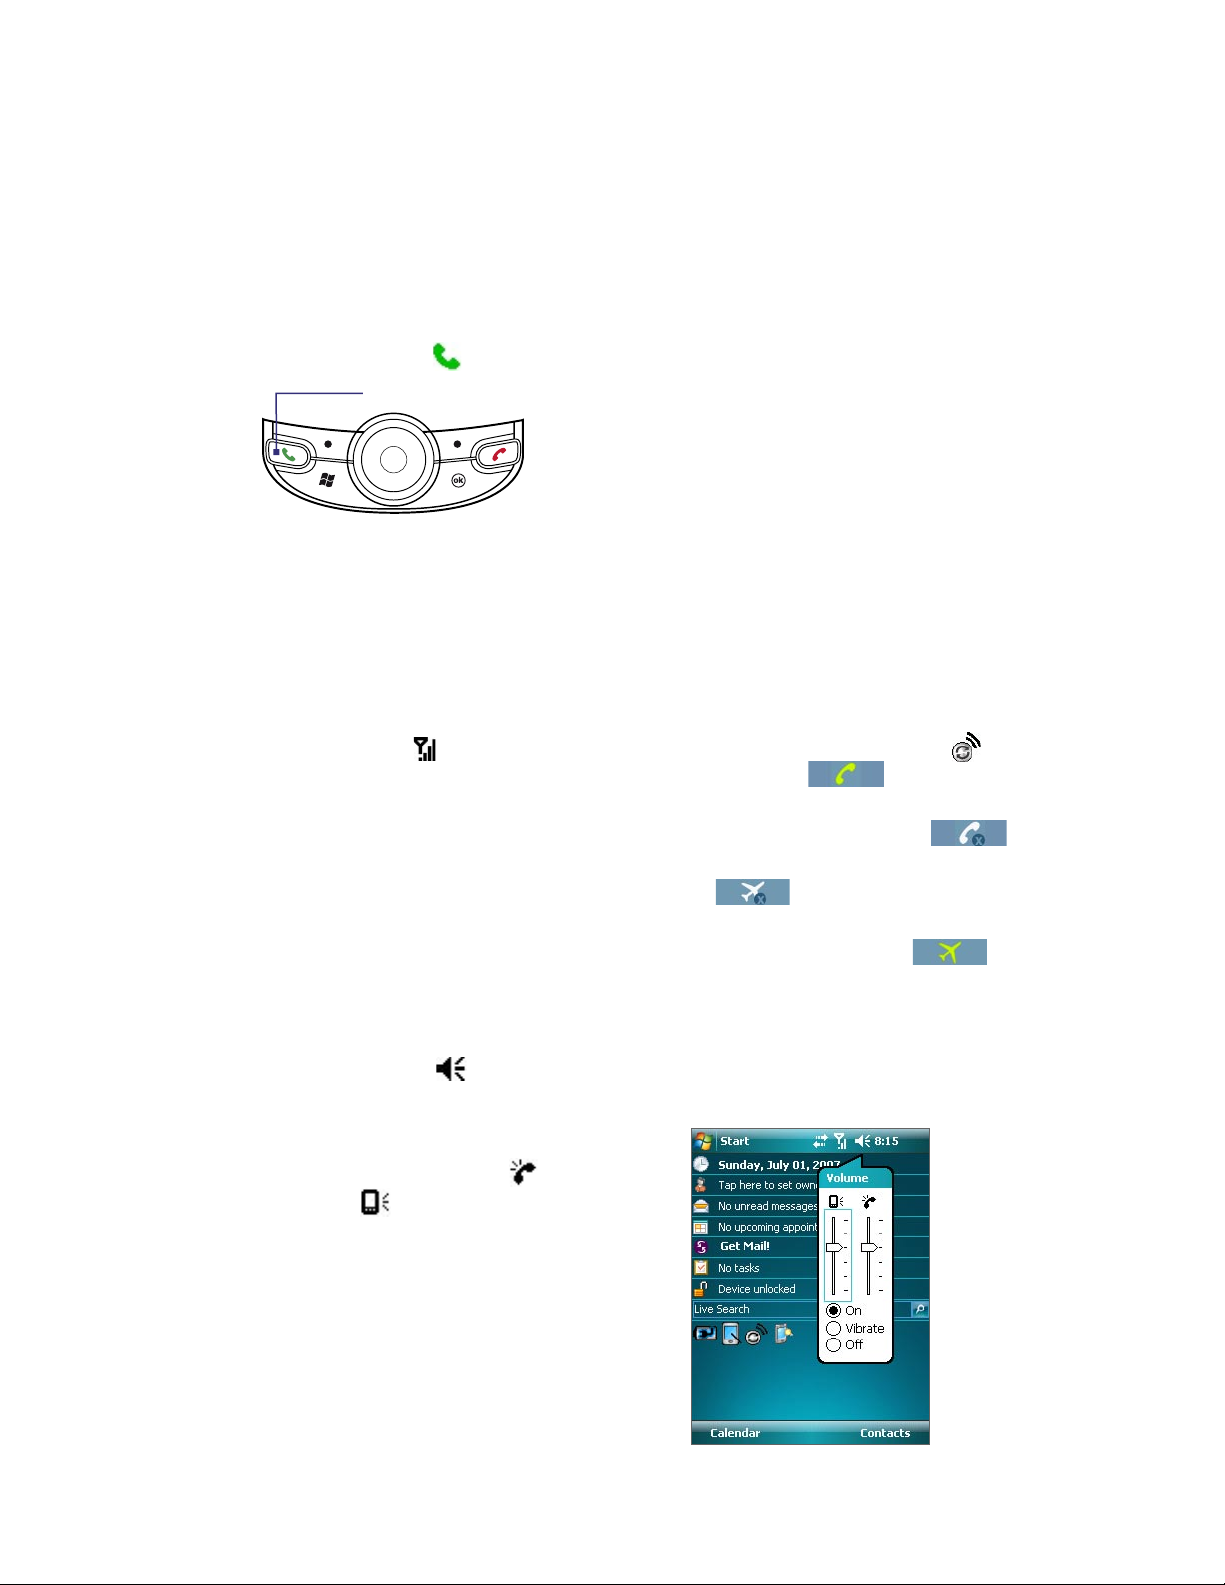
Turn the phone function on and off
TALK button
In many countries, you are required by law to turn off your phone while on board an aircraft.
To turn off the phone function, do one of the following:
• Tap the Signal icon ( ) then tap Comm Manager, or
Today screen. On the Comm Manager screen, tap the Phone button ( ) to turn off the phone
function
To resume call function, turn on the phone function by tapping the Phone button ( ) again on
the Comm Manager screen.
• Open
all wireless radios on your device, which include the phone function, Bluetooth, and Wi-Fi.
To resume call function, disable flight mode by tapping the
also restores the previous state of Bluetooth and Wi-Fi.
.
Comm Manager, then tap the Flight Mode button ( ) to enable flight mode
tap the Comm Manager icon ( ) on the
. This turns off
Flight Mode button
( ) again. This
Adjust the device volume
1. Tap the Speaker icon ( ).
2. Under Volume, do the following:
• Adjust the phone volume (
volume (
desired volume level.
) by moving the slider to the
) or device
• Tap On, Vibrate, or Off to change both
the system and ringer volume settings.
Volume adjustment

Notes • To adjust the conversation phone volume, you must do it during a call. Adjusting the volume at another time will
affect the ring, notification, and MP3 sound levels.
• When you activate Vibrate mode, sound will automatically be muted and your device will vibrate when an
incoming call is received. The Vibrate icon ( ) will appear in the title bar to indicate that Vibrate mode is
activated.
3.2 Making a Call
With your device, you can make a call from Phone, Contacts, Speed Dial, and Call History.
Make a call from Phone
1. Tap Start > Phone (or press the TALK button).
2. On the Phone screen, tap the desired phone number, and tap Talk.
Using Phone Features 29
Location Setting indicator
Voice Privacy notification indicator
Battery Power indicator
Talk button
Phone screen
Tips • If you tap a wrong number, tap the Back arrow (
the entire number, tap and hold the Back arrow.
• The icons on the upper right of the Phone screen indicate the battery power level and optional phone services.
For more information about optional phone services, see Chapter 4.
) to erase each subsequent digit of a number. To erase
Make a call from Contacts
Tap Start > Contacts, then do one of the following:
• Tap the desired contact in the contacts list, and tap the phone number that you want to call.
• Tap and hold the desired contact, and on the shortcut menu, tap Call Work, Call Home, or Call Mobile.
• Press Navigation Key ( ) up or down or roll the Jog Wheel to select a contact, and press TALK twice
(once to send the number to the Phone keypad, and once to dial the number).
To choose one of the numbers of a contact to dial
By default, the mobile telephone number (m) of a contact is dialed when you make a call from Contacts.
However, you can specify that a different phone number is dialed instead.
1. Tap Start > Contacts.
2. Press Navigation Key ( ) up or down to select a contact.
3. Press Navigation Key ( ) left or right. The letters representing the number will change as you scroll
through them.

30 Using Phone Features
Make a call from Call History
1. On the Phone screen, tap Call History.
2. Scroll to the desired contact or phone number, and tap Call.
Make a call from Speed Dial
Use Speed Dial to call frequently-used numbers with a single tap. For example, if you assign a contact to the
location 2 in Speed Dial, you can simply tap and hold on the Phone screen to dial the contact’s number.
Before you can create a Speed Dial entry, the number must already exist in Contacts.
To create a Speed Dial entry
1. On the Phone screen, tap Menu > Speed Dial.
2. Tap Menu > New.
3. Tap a contact. Select the phone number that you want to add to Speed Dial.
4. In the Location box, select an available location for the new Speed Dial entry.
Note Location 1 is generally reserved for your voice mail, and Speed Dial will designate the next available location by
default. If you want to place a phone number in a position that is already occupied, the new number will replace
the number that is already there.
Tips •
 Loading...