

Tannoy REVEAL 66, REVEAL 6 Owner's Manual
6481 0413
6 & 66 PASSIVE STUDIO MONITORS
OWNERS MANUAL
Tannoy adopts a policy of continuous improvement and product specification is subject to change.
Tannoy United Kingdom T: +44 (0) 1236 420199 F: +44 (0) 1236 428230 E: enquiries@tannoy.com
Tannoy North America T: (519) 745 1158 F: (519) 745 2364 E: inquiries@tannoyna.com
Tannoy Deutschland T: (04102) 888 393 F: (04102) 888 959 E: info@tannoy.com
2 3
1.0: INTRODUCTION
You're thinking, "Come on, a user's manual for speakers? That's like a user's manual for a toothbrush." You know enough not
to plug your speakers into an AC outlet, and you know you should hook them up in phase and then you listen to them. How
much more do you need to know? We know these speakers are headed for the professional or semi-professional studio market,
so we know we don't need to tell you about putting your potted plants on top of the speakers, or to avoid putting the right one
on the bookshelf, and the left one on the floor behind the sofa. We know you are serious listeners or you wouldn't have bought
Tannoy monitors. We decided that someone needed to produce this type of manual, and because we're actually interested in
monitoring, not just speaker sales, we figured it would have to be us. This user's manual will tell you how to get the absolute
best performance out of your new monitors.
2.0: THE BASICS
The Reveal 6 is the latest playback monitor from Tannoy, a company with unrivalled experience in studio monitoring. It has
an extremely detailed, dynamic sound with a wide, flat frequency response - all of which are essential for monitoring with reliable
accuracy.
The 25mm (1") titanium WideBand™ high frequency unit is seamlessly matched to a 165mm (6.5") long throw, low distortion
bass unit by a precision low-loss crossover network. How have we reduced the distortion in this new monitor? By introducing
flux control rings and copper caps into the magnet system to linearise the voice coil inductance as it moves in and out of the
magnetic air gap - otherwise a source of nasty third harmonic distortion. What does WideBand™ mean? Although frequencies
2.1: UNPACKING AND VISUAL CHECKS
To remove the speakers from the carton without damage, open the end flaps fully and bend them right back (remember they
are packed in pairs). Turn the package upside-down on the floor and lift the carton vertically up to leave the speakers resting
on their packing tray. Nothing on or in your speakers should rattle about. Inspect each speaker for signs of transit damage. In
the unlikely event of this having occurred, inform the carrier and the supplier. Keep all the packaging if damage has occurred,
as this will show evidence of excessive handling forces. It is also a good idea to keep the carton, if possible, for future transportation.
2.2: PRELIMINARY RECOMMENDATION
Initially we would like to give a word of warning on high sound levels, which these speakers are capable of generating over
sustained periods of time. Levels over 95 dB for 8 hours per day will eventually cause permanent hearing loss. Because Tannoy
monitors have very low levels of time, amplitude and frequency distortion it is not always obvious that the sound level is high
while working with them.
For continuous exposure we recommend the occasional use of a sound level meter capable of integrating the sound level over
a period of exposure according to noise control standards. This should be used just to check that noise levels are always within
safety limits.
2.3: CONNECTING YOUR SPEAKER
The types of cable used to connect the speakers to the power amplifier will marginally affect the sound. The cross-sectional area
of the cable should be large enough so as not to affect the damping factor; generally a cable with a cross-sectional area of
2.5 mm
2
, or greater is recommended.
The lower the resistance of the cable between the amplifier and the speakers, the better the damping factor acting on the speaker.
This has been covered in every audio magazine that has ever been written about speakers, so we won't beat it to death here.
You don't need to buy speaker wire that costs as much as your speakers to get some benefit from wire size, select a finely stranded
speaker cable, and dress the cable ends to prevent "hairs" or stray conductors from shorting across the terminals. If your amplifier
will not directly accept that size of cable, you can trim down the cable size at the amplifier end. Ensure that the binding post
retaining nuts are screwed down firmly without stripping or over tightening them.
1.0: INTRODUCTION
2.0: THE BASICS 2.1 Unpacking and visual checks
2.2 Preliminary recommendation
2.3 Connecting your speakers
2.4 Observing polarity
2.5 Power Amplifiers
3.0: PLACEMENT OF THE SPEAKERS 3.1 Orientation
3.2 Positioning
3.3 Console Reflections
3.4 Speaker Mounting
3.5 Bass Ports
3.6 Equalisation
4.0: PERFORMANCE DATA
5.0: REVEAL 6 DIMENSIONS
6.0: REVEAL 6 TECHNICAL SPECIFICATIONS
7.0: SERVICING 7.1 Cabinet finish
7.2 Driver removal
7.3 Crossover
7.4 List of spare parts
8.0: WARRANTY
9.0: DECLARATION OF CONFORMITY
CONTENTS
2.4: OBSERVING POLARITY
You already know about connecting the positive terminal on the amplifier to the positive terminal on the speakers, and ensuring
that both channels are "in phase" by checking to ensure that there's more bass with both speakers on and not less bass. Absolute
polarity is a bit trickier to confirm. Absolute polarity is the maintenance of a positive pressure wave from the microphone capsule
to the listening room. A kick drum, for instance, has the drum skin whacked by the foot pedal, and it pushes the air, which pushes
the microphone diaphragm, which goes through the electronics and should eventually come out of the speakers as a positive
pressure wave, which should have the speaker cones moving towards you, just like the drum skin. It turns out that you can't trust
a conventional recorded source to test this because there is no way to confirm that absolute polarity was maintained, it can even
change from track to track. This isn't a trivial thing, especially when you're using a true stereo microphone setup, or trying to
accurately place things in your mix. This is something that should be rigorously checked with every microphone and every signal
line in a studio, but the first step would be to use the kickdrum test described above with a few microphones. If you don't believe
it can make a difference, set up a little test using a mix you know and flip the polarity of both channels at the same time, while
listening to the same program...imaging, vague imaging, imaging, vague imaging. Hear - Believe.
higher than 20kHz are inaudible in all but a few human beings, by extending the high frequency response to 35kHz and beyond
we can correct the phase response within the audible band up to 20kHz. Go to www.tannoy.com for our white paper on this
subject. Both drive units are mounted on a massive 40mm thick baffle, curved to minimise diffraction and creating the loudspeakers
distinctive styling. The drive units are magnetically shielded to reduce stray magnetic fields and allow the system to be used close
to video monitors.
Don't put potted plants on top of your speakers, don't plug them into AC outlets, or hook them up out of phase. Now that we've
got that out of the way, let's talk about some of the technical things to keep in mind.
4 5
2.5: POWER AMPLIFIERS
The power amplifier should be reasonably well matched in power to the power rating of the speakers (see specifications). The
use of a powerful amplifier (i.e. in excess of the recommended figure) provides headroom, which is useful especially for highly
dynamic programme materials.
Due of the high peak power handling of Tannoy monitors, responsible use of even more powerful amplifiers should not represent
a danger to the speakers if the amplifiers are not overdriven. Now, just because you have a Ferrari, it doesn't mean to say you
can drive it at the red line all of the time, it will eventually blow up. Same thing goes here, just because the speakers will handle
a large amplifier, it doesn't mean that you can run them flat out constantly without eventually blowing something up.
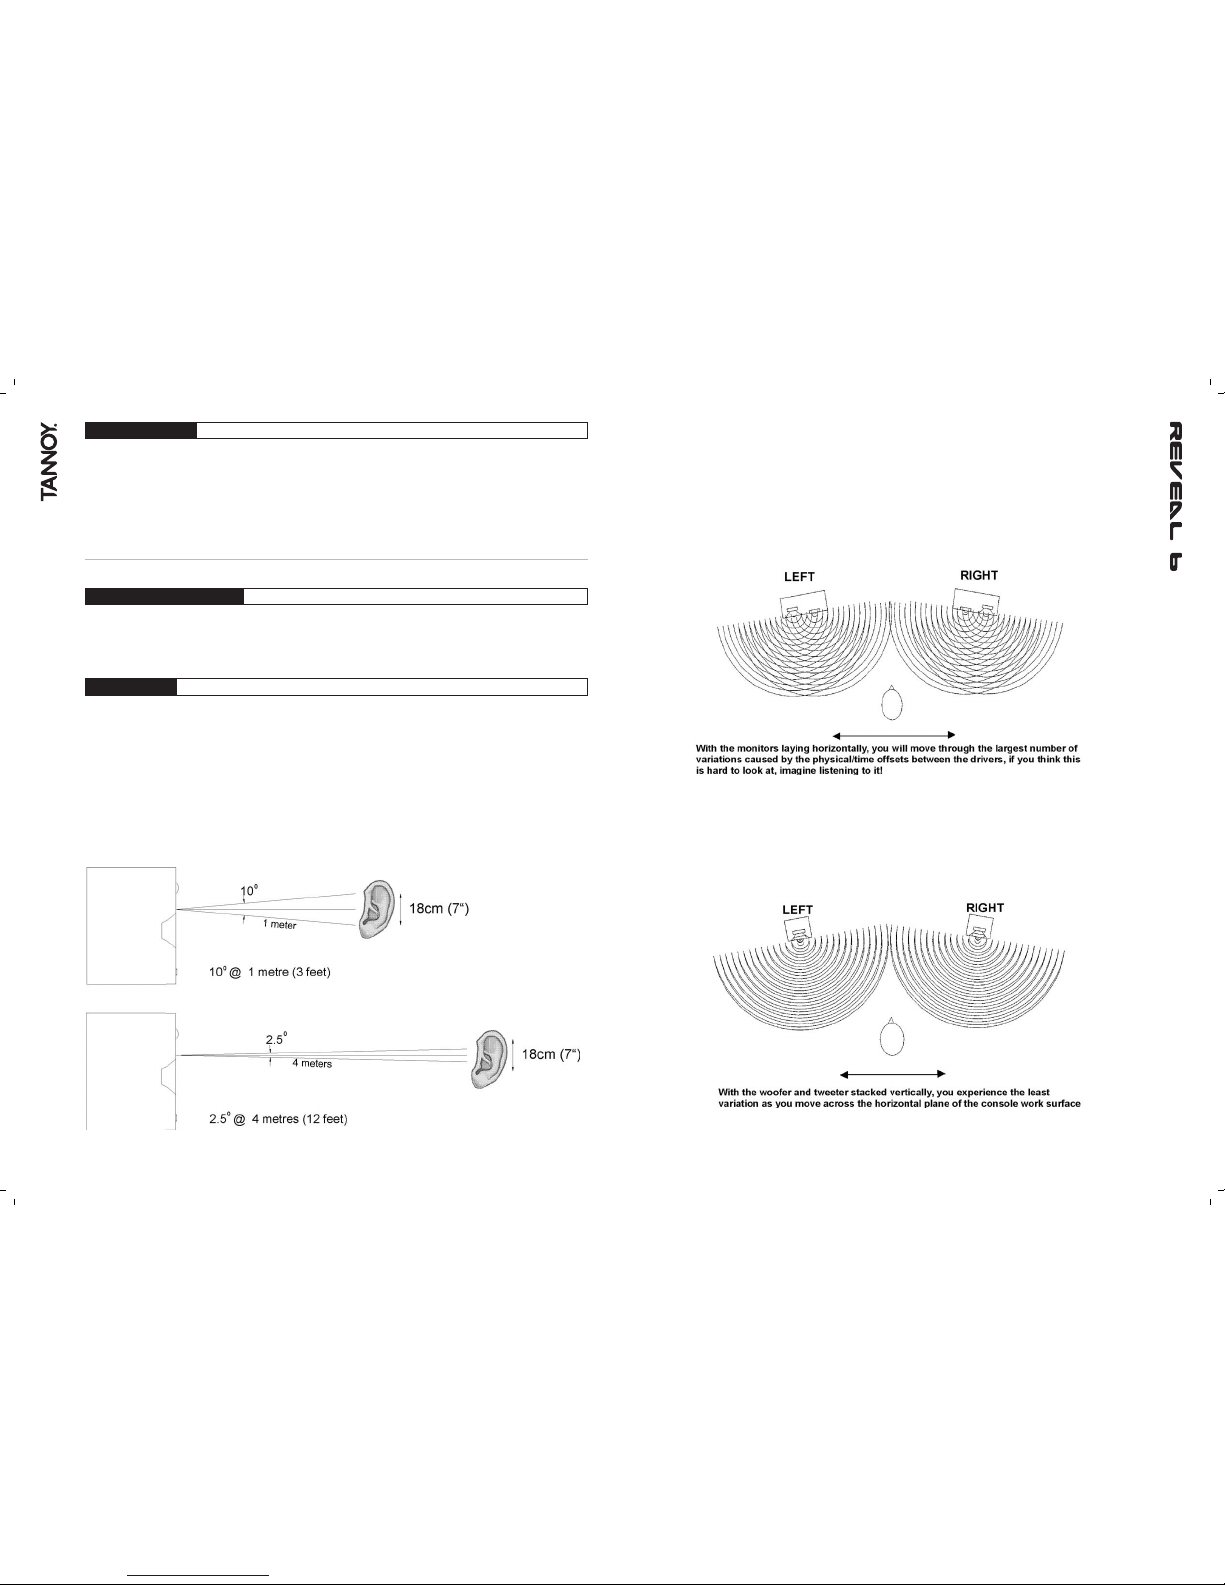
3.1: ORIENTATION
Two-way speakers have a correct orientation for the serious listener. Two way systems use a separate woofer and tweeter mounted
in a vertical line on the baffle. There is a fixed vertical distance between the centre of the two devices on the baffle, and there
is fixed distance between the apparent acoustic centre of each device and the plane of the baffle at the crossover point. By
stacking the woofer and tweeter vertically, we minimise the problems caused by these physical offsets. The near-field listening
conditions magnify the effects of the driver offsets, so we really need to optimise the speaker orientation. When you are very
close to a speaker system, vertical head movements are significant because your movement represents a large change in angle
of arc, and therefore the number of degrees above and below the axis (that's the line between the woofer and tweeter). In other
words, bob your head up and down a few centimeters within a metre of the cabinet, and your ear moves through a larger angle
relative to the speaker axis than it does with the same vertical motion 4 or 5 metres away. Need proof? Put on some music,
not loud, and get really close, about 500mm (20") away. Move your head up and down now, and you can actually get the
musical image to break into a separate high frequency and low frequency source. This is a wildly exaggerated example of what
we're talking about. It isn't that bad out here in the normal listening position, but the variations are still there.
All two way component systems have to live with some listening position dependent compromises at the crossover point. The
crossover frequency of all of these small systems falls into the center of the midband (2.0kHz to 3.0kHz), where we are most
capable of recognising frequency/phase response deviations.
In the diagrams below we have a graphical representation of the speaker systems operating at the crossover point where both
high and low frequency drivers produce the same output level. The first one shows a pair of two-way loudspeakers lying on their
side. Note that each driver is producing sound, and because there is a physical distance separating them on the baffle, there
is also a time difference separating the drivers, and the result is what you see here. Around the crossover point, the speaker
will produce numerous lobes, producing changes in midrange sound character as you move across the horizontal listening plane.
Stereo occurs from left to right, so that is the listening plane in which we try to minimise the changes in physical/time offset
between the woofers and tweeters. And we have to be honest, it's not perfect, the driver offset is still there, but by stacking the
woofer and tweeter vertically on the baffle we can give the mix engineer the widest range of movement in the horizontal plane.
You can roll your chair across the length of your mixing console and not change the relationship between the woofer and tweeter
(just don't bob your head up and down while you do it).
HORIZONTAL
VERTICAL
3.0: PLACEMENT OF THE SPEAKERS
Now here's the truly critical stuff. Speaker placement and the listening environment can completely compromise the performance
of any loudspeaker, no matter how much it costs. It is important to understand some limitations of near-field speakers, and the
operating environment, in order for you to gain the maximum performance from the pair sitting in front of you.
 Loading...