

Page 1
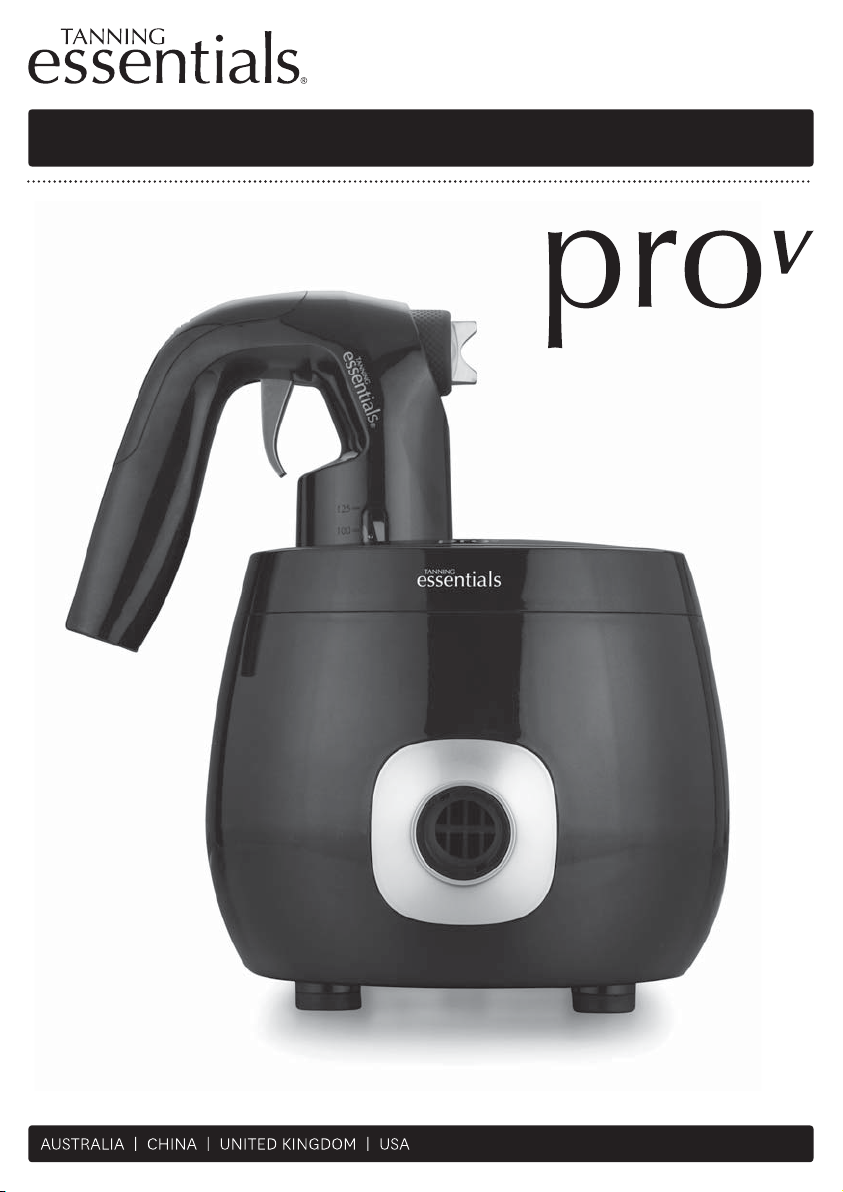
SIMPLE TANNING SYSTEMS built purposely for a perfect spray tan.
PROV - TRAINING MANUAL
www.tanningessentials.co
Page 2
WELCOME
Thank you for choosing the Tanning Essentials ProV Spray Tan System. Please read the
following to help assist you with the set up and maintenance of your spray tan unit.
You can also view the full video on Pro V Spray Tan System Set Up, Maintenance and
Troubleshooting via You Tube.
QUICK SET UP GUIDE
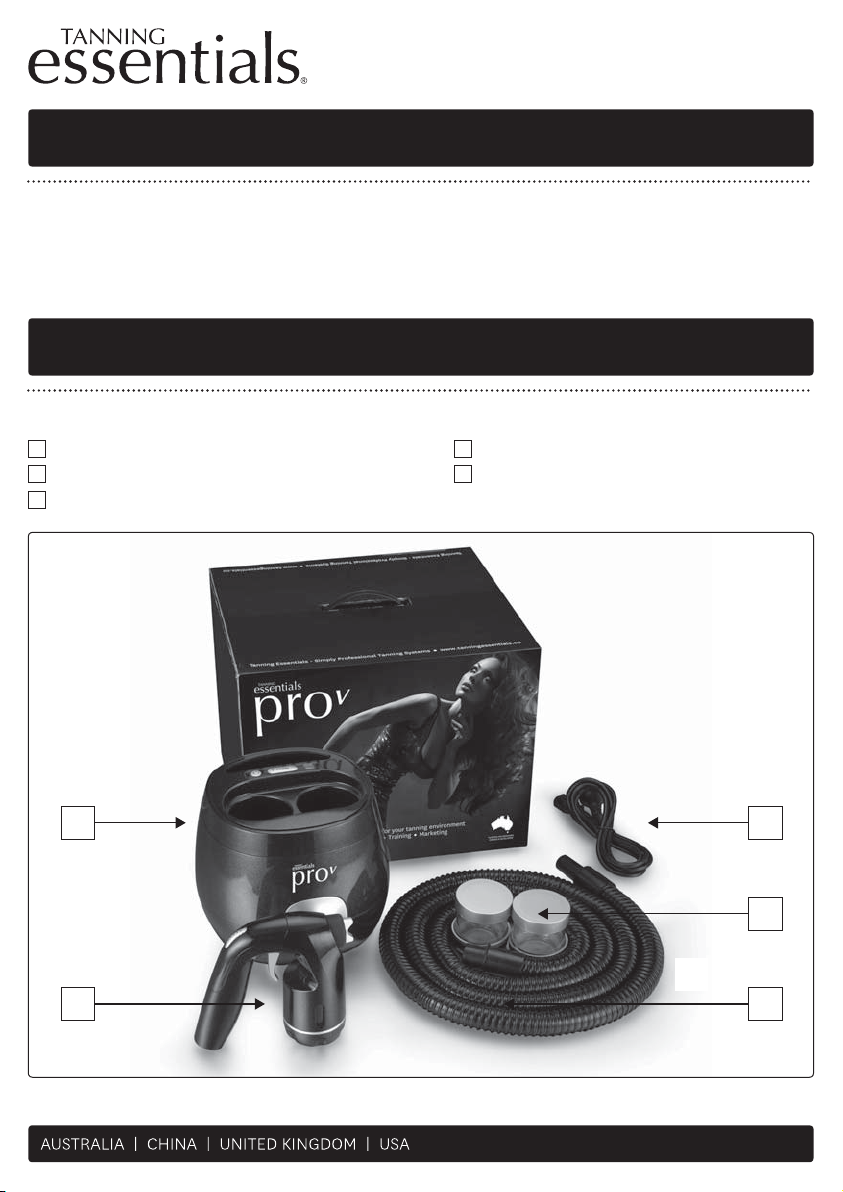
The Tanning Essentials ProV Spray Tan System contains:
1
1 x
2
1 x ProV Spray Applicator 1 x Power Cord
3
1 x
ProV Spray System 2 x Solution Cups
ProV Spray Hose 1 x Manual (not pictured)
4
5
1
2
5
4
3
www.tanningessentials.co
Page 3
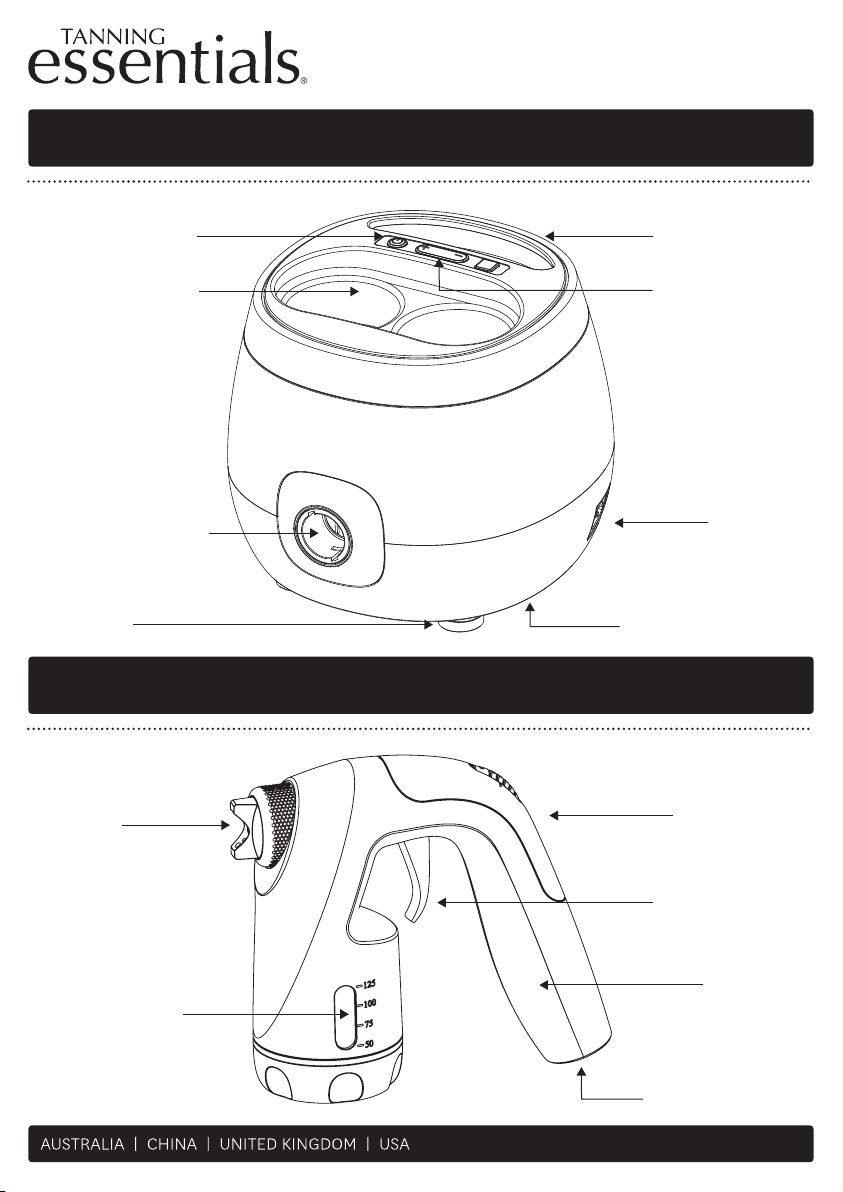
SPRAY SYSTEM
ON/OFF Switch
Cup Holders
Hose Connector
Shock Absorbing
Feet
SPRAY APPLICATOR
Adjustable
Spray
Nozzle
Carry Handle
Control Panel
Power Plug
Socket
Washable Filter
(Underneath Unit)
Solution Dial
(On Side)
Solution Cup
Spray Trigger
Handle
Hose Connector
(Underneath)
www.tanningessentials.co
Page 4
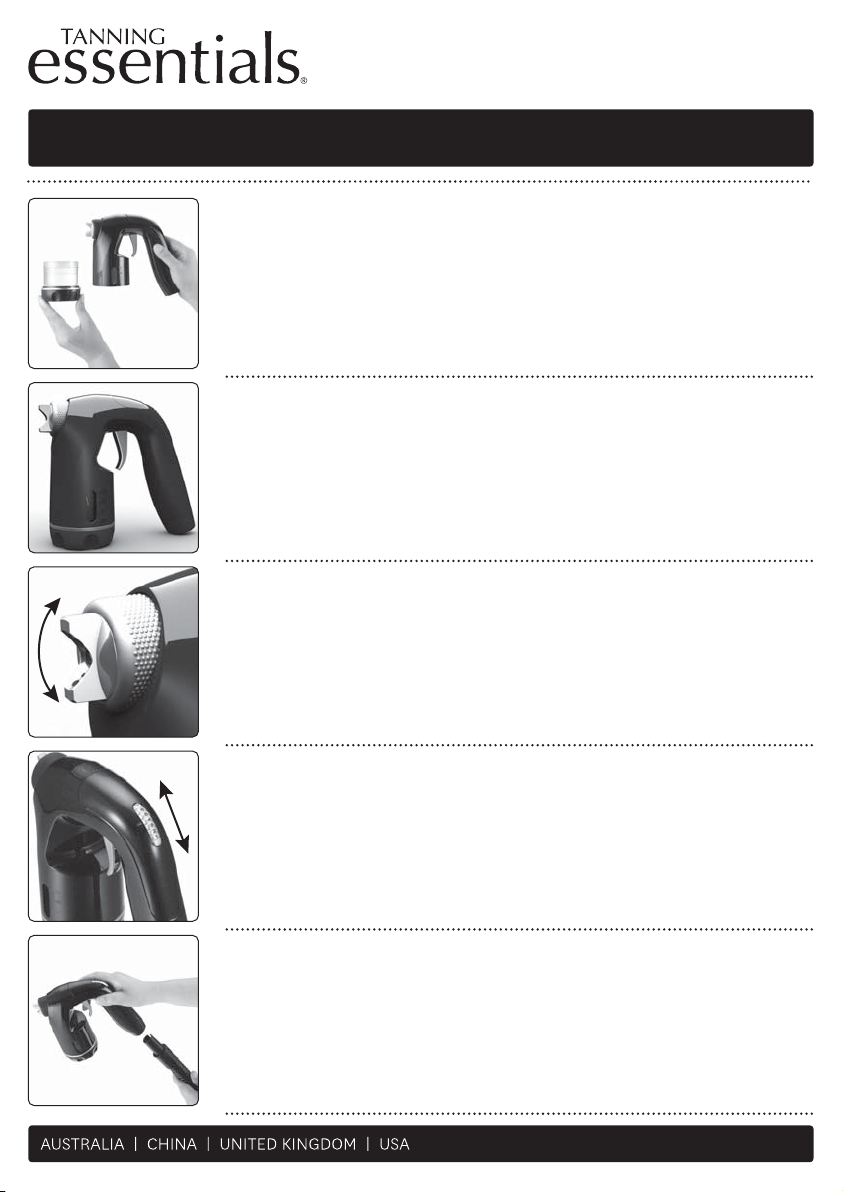
SPRAY APPLICATOR
STEP 1
Unscrew the solution cup and fill ¾ full. Overfilling the solution cup
may cause leaks.
STEP 2
Insert solution cup and screw tightly.
STEP 3
Set nozzle by turning, vertical position for up and down and
horizontal position for left and right spraying. The nozzle can also
be turned 360° and adjust diagonally for technicians that are trained
in contouring.
STEP 4
Adjust solution dial on the back of the applicator to choose the
amount/flow of solution you would like to dispense. A higher setting
will result in more solution being distributed. Setting your applicator
on 2-4 for the body and 2 for the face are best recommended.
STEP 5
Attach hose- Insert the longer narrow hose fitting into the bottom of
the applicator and turn anticlockwise until firm, ensuring the fitting
lines up with the bottom of the applicator.
www.tanningessentials.co
Page 5
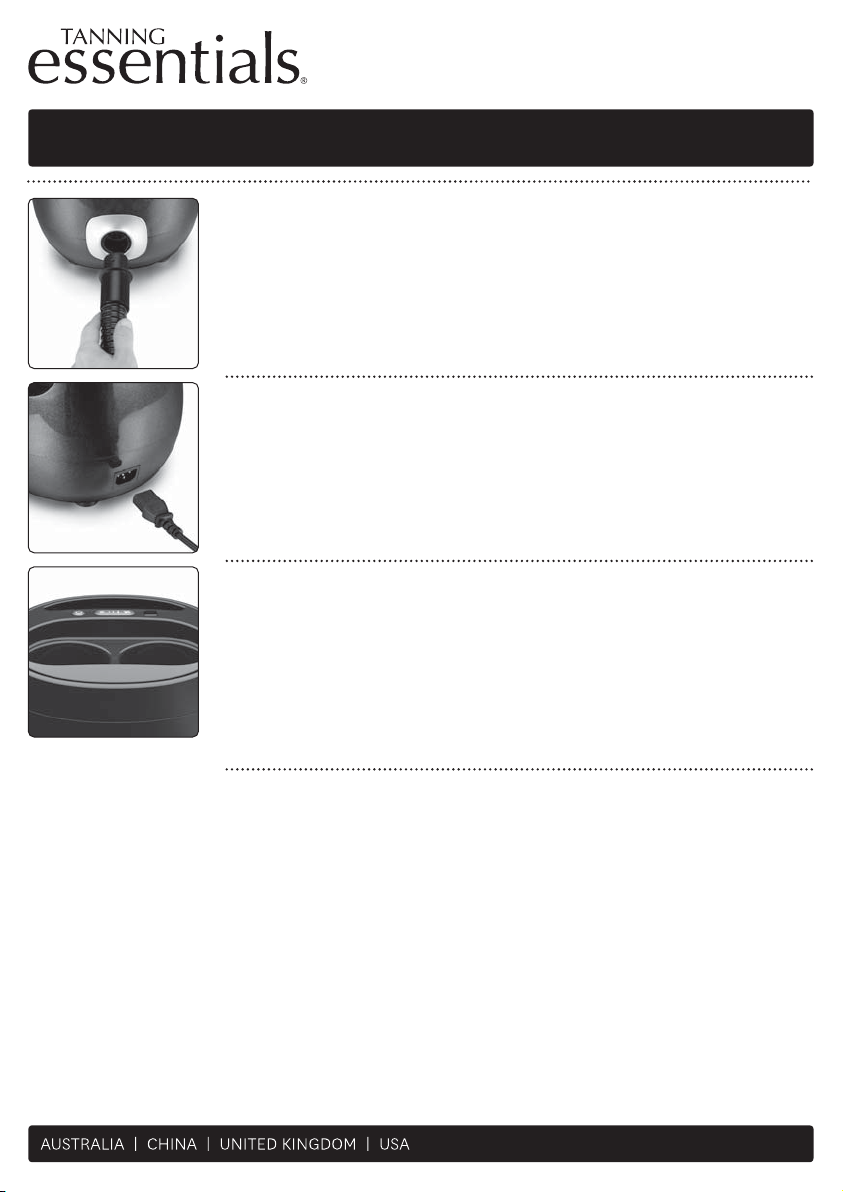
SPRAY UNIT
STEP 1
Attach hose to unit. Insert hose fitting into unit and turn clockwise
until firm. This connection is similar to a light bulb connection and
avoid over tightening as this may result in broken components.
STEP 2
Attach Power cord and turn power on at the wall switch.
STEP 3
Turn on your unit by pressing the ON/OFF button and choose your
desired POWER setting by pressing the + or – on the control panel.
The power is controlled via the digital control button located at the
top of the unit and consists of six spray levels. Recommended power
setting is 3 depending on the solution and speed of application.
www.tanningessentials.co
Page 6
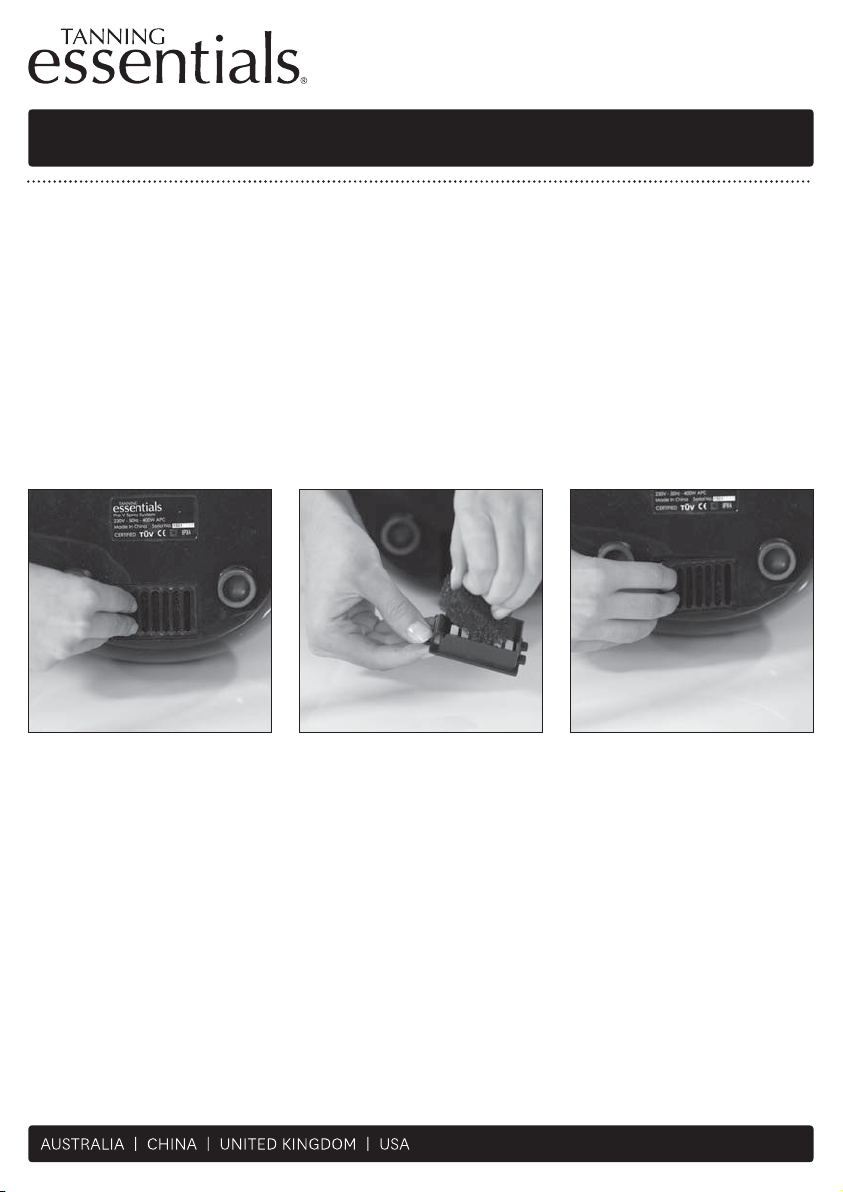
SPRAY UNIT MAINTENANCE GUIDE
STEP 1 Clean the spray unit with a cloth. Avoid using anything abrasive. Windex
and Mr. Sheen are useful products for maintaining the gloss finish of your
spray unit.
STEP 2 Clean the filter. Remove the filter from the base of the unit and rinse in
warm water. Wait until filter is completely dry before re-fitting. Positioning
the spray unit behind the spray technician when in use will ensure the unit
stays cleaner for longer.
www.tanningessentials.co
Page 7
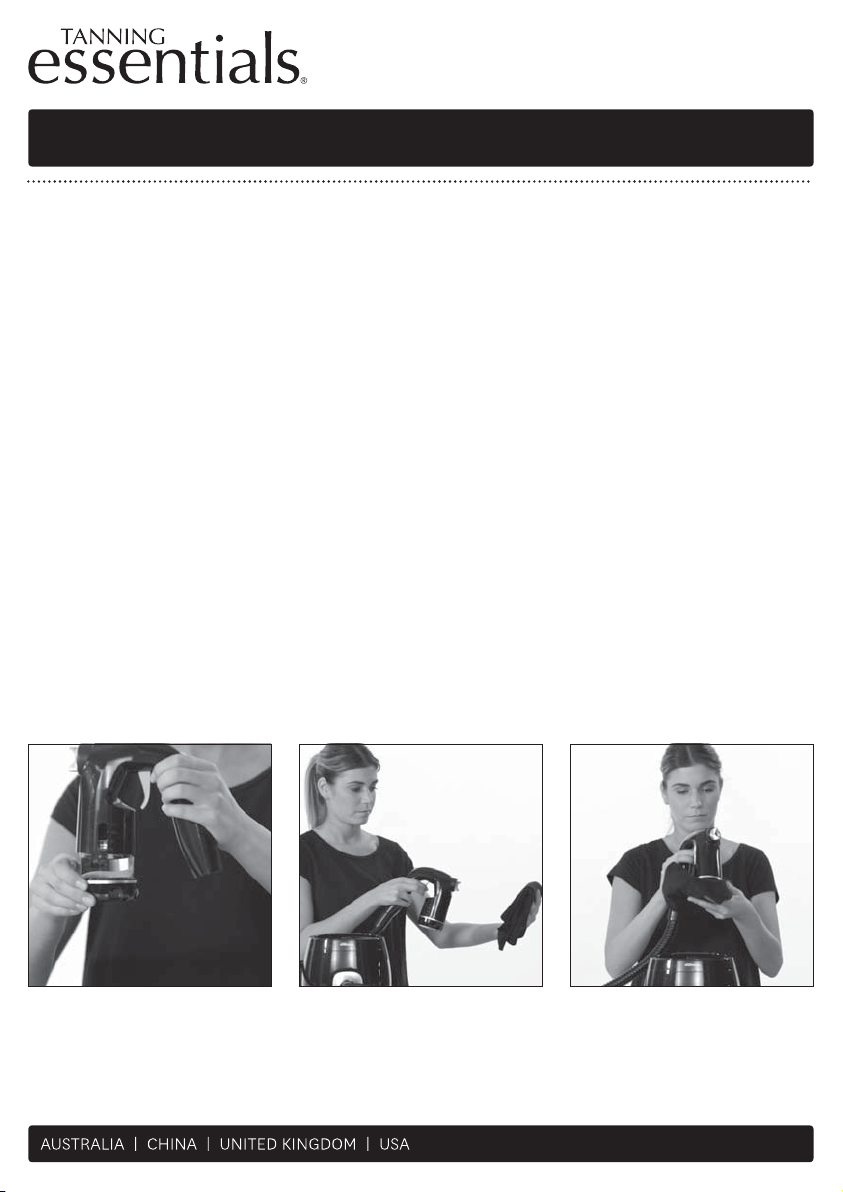
SPRAY APPLICATOR MAINTENANCE GUIDE
Maintenance on the Applicator must be run at the end of each day the applicator is used.
STEP 1 Remove hose.
STEP 2 Unscrew solution cup and empty any excess solution. It is recommended
that this be done over a sink or a wet area.
STEP 3 Rinse the empty solution cup with warm water.
STEP 4 Refill the cup with warm water and screw back into the applicator, fix the
solution dial to ‘C’ and spray until the water runs clear. Rinse and repeat
if required
STEP 5 Empty solution cup and re-set the solution dial on the back of the gun
to the regular spray setting.
STEP 6 Wipe any excess water from the applicator with a cloth and leave out
to dry.
www.tanningessentials.co
Page 8
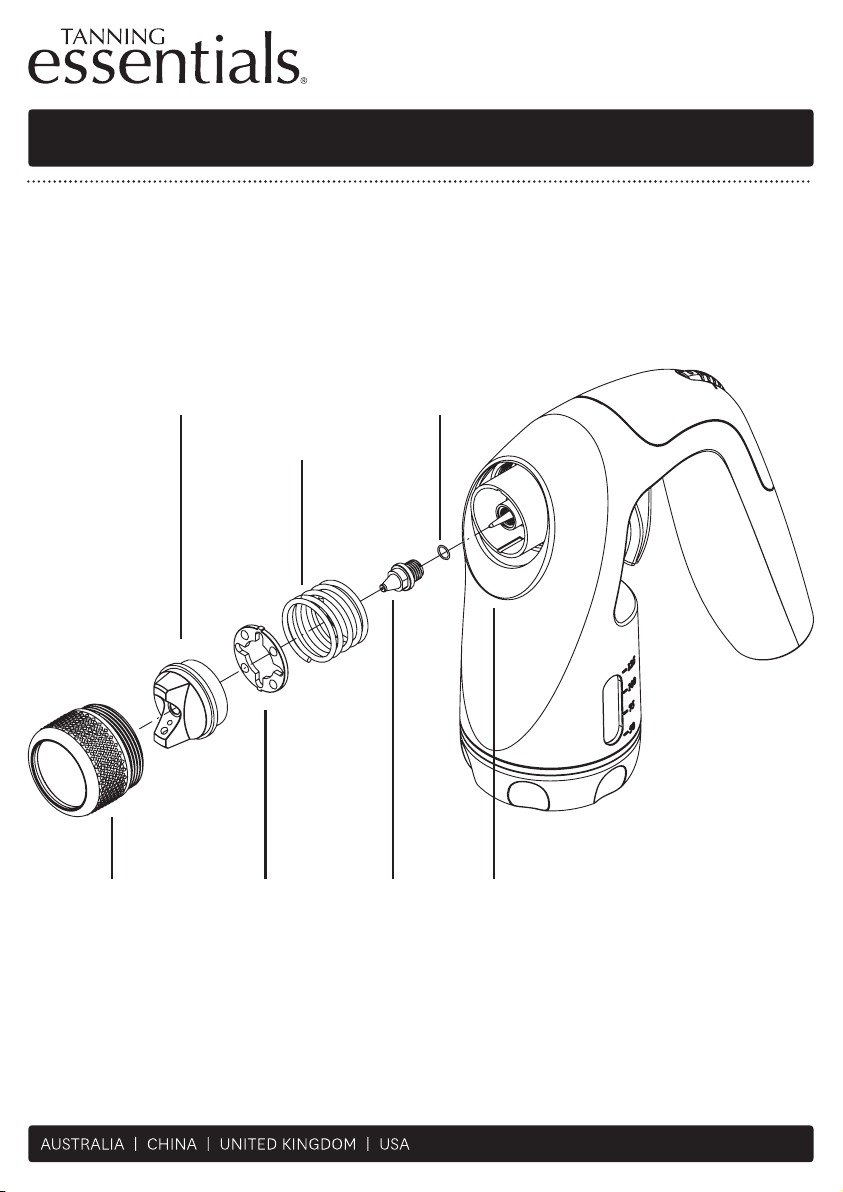
SECONDARY SPRAY APPLICATOR MAINTENANCE
Secondary maintenance must be run on the applicator every 2-4 weeks or when required.
Secondary maintenance will deliver a more thorough clean to prevent or clear any blockages
and uphold the applicators performance.
ADJUSTABLE
NOZZLE
RETAINING
RING
SPRING
METAL
DISC
O-RING SEAL
FLUID
NOZZLE
FLUID
NEEDLE
www.tanningessentials.co
Page 9
SECONDARY SPRAY APPLICATOR MAINTENANCE
TROUBLESHOOTING - BLOCKED NOZZLE OR CONTINUOUS SPRAY
WITHOUT PRESSING THE TRIGGER
STEP 1 Locate and unscrew retaining ring. To release; turn retaining ring in an
anti-clockwise motion.
STEP 2 Gently pull on the adjustable nozzle to remove.
STEP 3 Gently remove the metal disc and spring.
STEP 4 Fit an 8mm spanner to the flat edges of the fluid nozzle and turn
anti-clockwise to unscrew.
STEP 5 Ensure you do not misplace the o-ring seal, which is located behind the
fluid nozzle .
STEP 6 Once removed, visually inspect the fluid nozzle for small particles or
blockages - rinse thoroughly with hot water.
STEP 7 Gently wipe the fluid needle to clean and remove any debris (the fluid
needle should not be removed from the applicator at any time).
STEP 8 Once visually clear of any debris, re-attach fluid nozzle, ensuring the
O-ring is in position, then use the spanner (8mm) to gently tighten back
into place.
STEP 9 Replace spring, then gently insert metal disc ensuring the grooves on
the disc line up with the sides and the raised front is forward facing.
STEP 10 Replace adjustable nozzle and rotate back into position.
STEP 11 Repeat previous step, this time with the retaining ring.
www.tanningessentials.co
Page 10
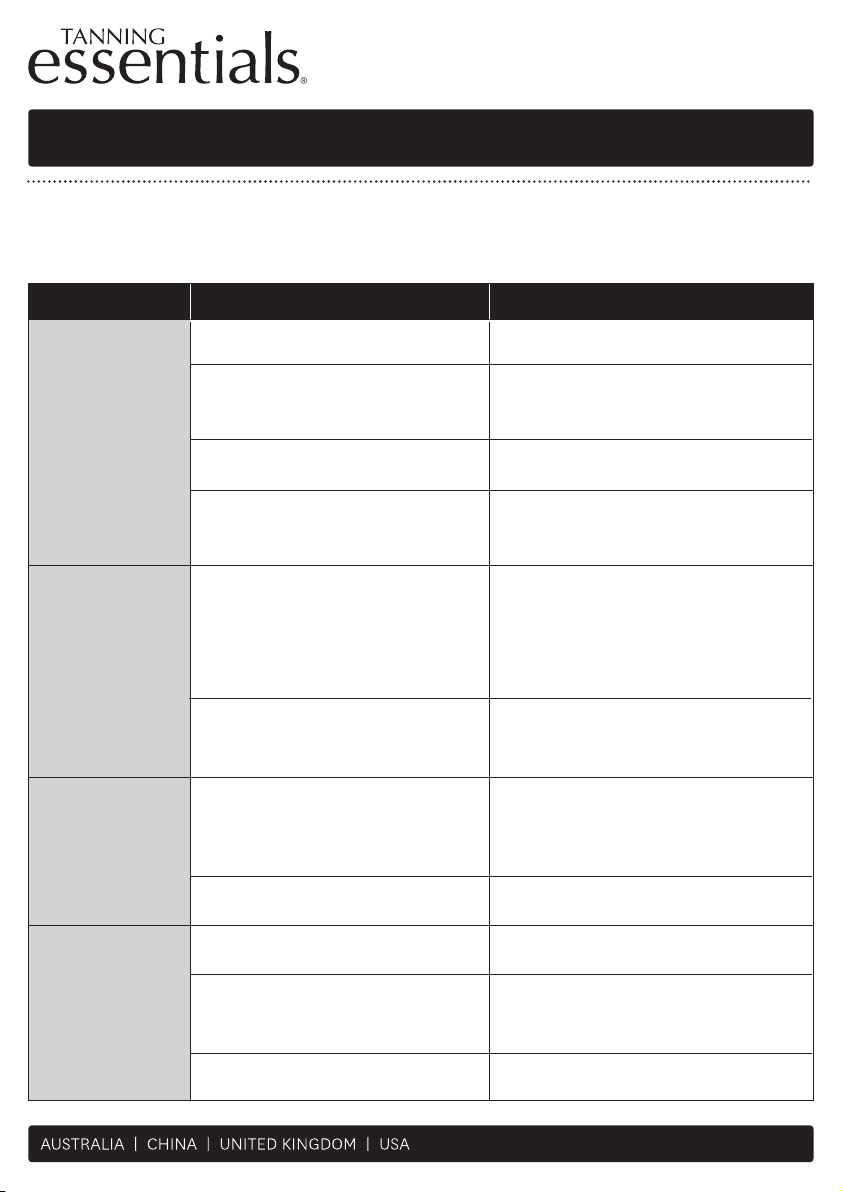
TROUBLESHOOTING
If you are experiencing problems with this unit, in the first instance please carefully read the
relevant sections of the User Manual and the Troubleshooting section below. If you cannot
solve your problem please contact your supplier for further assistance.
PROBLEM CAUSE WHAT TO DO
My solution is
bubbling from
the cup
The air flow is
cutting in an out
The Spray Unit
will not turn on
Seal is not in properly
Solution Cup is not screwed in
correctly
The cup is cross-threaded
Solution cup is overfilled
The filter is dirty
The power setting need
adjusting
Power cord not attached
Electricity not turned on
Fit the gun seal correctly.
Unscrew and reattach the cup.
Unscrew and reattach the cup.
Empty some solution from the
cup so it is half to 3/4 full.
Remove the filter from the base of
the unit and rinse in warm water.
Wait until filter is completely dry
before refitting.
Increase the power on your system.
Ensure that the power cord is
pushed in firmly to the base of the
unit and wall socket
Ensure that the power point is on
The spray
applicator is
leaking
Spray Cup is not tight enough
Too much solution
Nozzle may be blocked
Tighten the solution cup
Empty some solution from the
cup so it is half to 3/4 full
Perform secondary maintenance
www.tanningessentials.co
Page 11
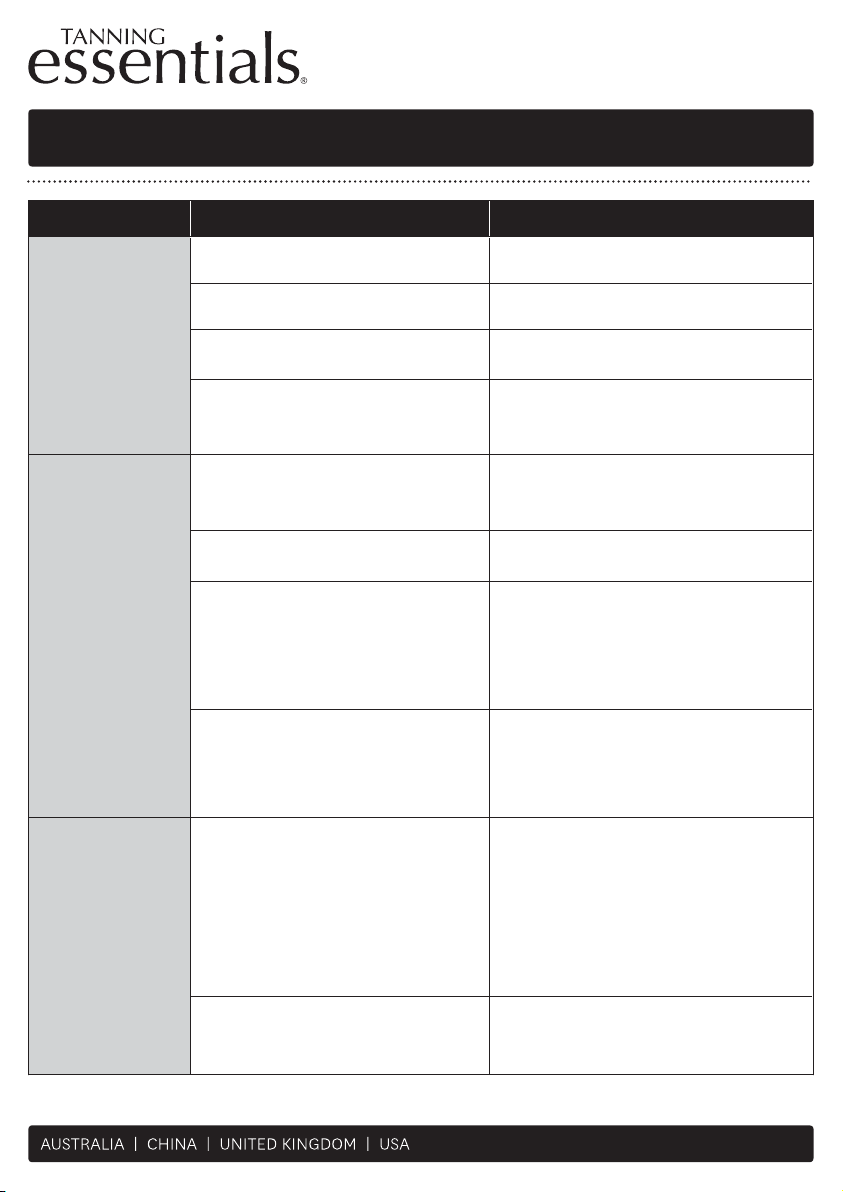
TROUBLESHOOTING
PROBLEM CAUSE WHAT TO DO
The spray is
spluttering
No solution is
coming out of
the spray
applicator
Hose coming
out of unit
Solution in cup low
Control dial is set too low
Nozzle may be blocked
Air pressure is low
Nozzle may be blocked
Solution in cup too low
Trigger is jamming
Solution Dial on applicator set
too low
Hose not correctly fitted to unit
Add solution to the cup
Increase power
Perform secondary maintenance
Increase air pressure
Clean filter in machine
Spray warm water through the
applicator
Add solution to the cup
Spray warm water through the
applicator while the Solution Dial
is set at C and pull the trigger
repeatedly until it frees
Increase solution dial on applicator,
number 1 being the lowest and
Number 6 being the highest setting
Ensure the fitting is inserted and
turned to lock. The hose connection
will feel tight upon first use and will
require some force to lock, you will
feel a seal break and the hose click
into place when connected correctly.
Hose fitting broken from over
tightening
Contact your supplier or service
agent
www.tanningessentials.co
Page 12
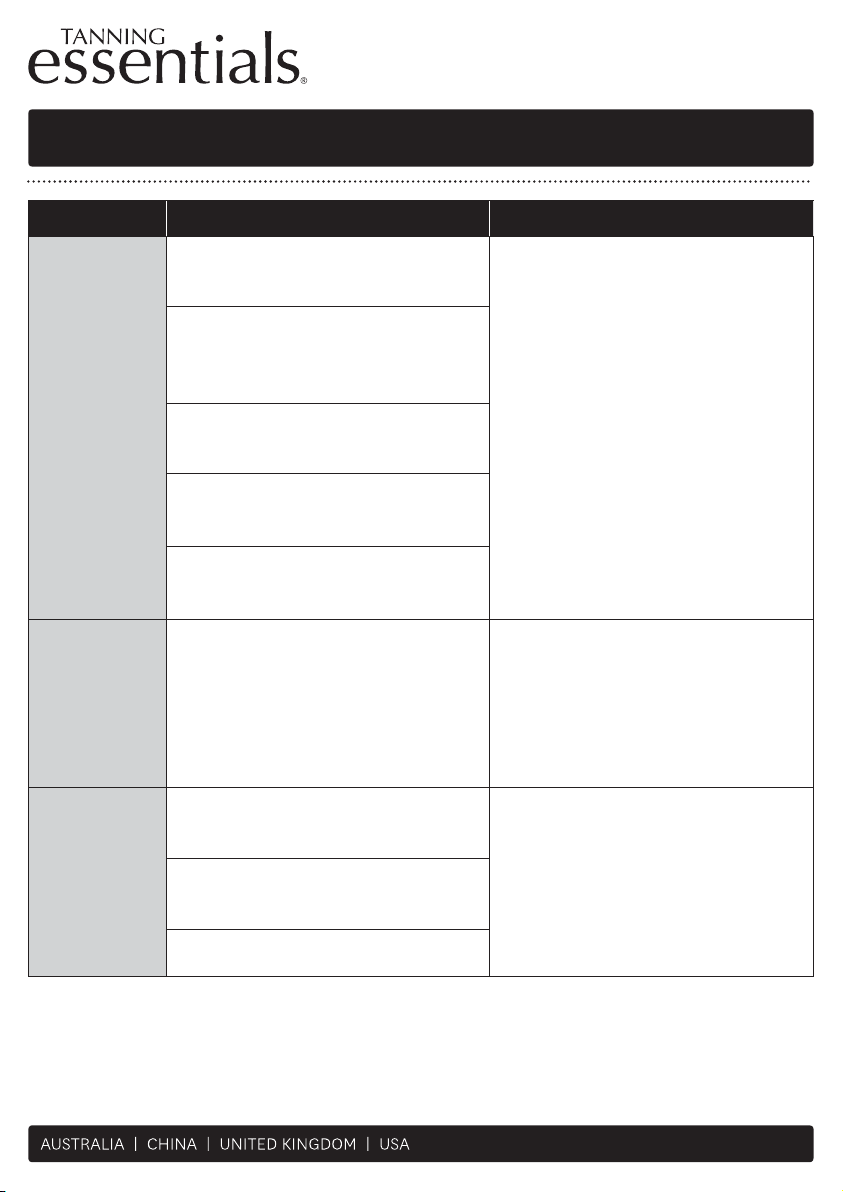
TIPS & TRICKS
PROBLEM CAUSE WHAT TO DO
The solution
is sitting on
the skin or
beading on
the client
The client
has tanning
solution in
areas they
don’t wish
to tan
The client
appears
orange
Too much tanning solution has been
sprayed onto the skin
Client has not prepared their skin
correctly i.e. moisturiser or perfume
on the skin
Client maybe excessively hot and
perspiring
If machine air pressure is set to low
it will not atomise the solution
Client may have used a body wash
or scrub high in oil.
The technician has sprayed the area
incorrectly
Client has touched part of their body
with a spray tanned area
Too much tanning solution has been
sprayed onto the skin
The client may have left a rapid
tanning solution on too long
Dab area gently with a clean dry
towel and re-spray lightly, blending
the tan in
Increase the air speed.
The client needs to remove the
product from the skin.
Exfoliate the area using tan removing
product for best results or a cloth
and soap
Exfoliate the skin before re-spraying
and ensure the spray application is
lighter
The client may have low tolerance to DHA
www.tanningessentials.co
Page 13
WARRANTY INFORMATION
IMPORTANT
Please keep your proof of Purchase and User Manual in a safe place as you will
require these to make a warranty claim. Prior to making a claim you should read
through the trouble shooting section in the manual and contact your supplier.
All warranty claims should be made directly to your supplier.
If within one (1) year from the date of purchase, the product fails due to a defect in
material or workmanship, we will repair if possible or replace it free of charge with a
comparable unit which may be new or refurbished. This warranty applies only to the
original purchaser and is not transferable. The goods must be returned to the seller
with proof of purchase to be assessed at the purchasers cost.
Warranties shall not apply to any defect, failure or damage caused by improper use or
improper or inadequate maintenance and care. The manufacturer shall not be obligated
under these warranties:
a) to repair damage resulting from attempts by personnel other than authorised
representatives to install, repair or service the product;
b) to repair damage, malfunction, or degradation of performance resulting from
improper use or incompatible solution;
c) to perform maintenance or cleaning or to repair damage, malfunction, or
degradation of performance resulting from failure to perform user maintenance
and cleaning as prescribed;
d) to repair damage, malfunction, or degradation of performance resulting from
use of the product in an environment not meeting the operating specifications,
To activate your warranty, please complete the information and post to Tanning
Essentials within 14 days of purchase.
www.tanningessentials.co
Page 14
WARRANTY RETURN FORM
TROUBLE SHOOTING
Please include this form when returning warranty items.
Customer Information:
DATE:
CUSTOMER NAME:
BUSINESS NAME:
CONTACT NUMBER:
E MAIL:
ADDRESS :
(PO Box Not Accepted)
I give my authority for goods to be left at the postal address mentioned above: Please circle YES / NO
Please Note: If circled Yes, no liabillity will be taken
Product Information:
PRODUCT NAME:
PURCHASE DATE:
SUPPLIER INVOICE No*:
* All waranty claims must include proof or purchase. This must be a photocopy of the original invoice.
Reason for Return:
www.tanningessentials.co
Page 15
SAFETY INFORMATION
The Tanning Essentials ProV Spray Tan System is designed and built to the highest
standards. This system must be used with professional spray tan solution, kept away
from water, be connected to the correct power supply at all times and must not be
operated by children.
Please note the details of your model here:
MODEL NAME:
SERIAL NUMBER:
DATE OF PURCHASE:
SUPPLIER NAME:
V
The Tanning Essentials Pro
....................................................................................................................................................................... ..................
Spray Tan System is made in China
WARRANTY CARD
MODEL TYPE: SERIAL NUMBER:
SUPPLIER NAME:
NAME:
ADDRESS:
POST CODE: STATE:
EMAIL:
BEAUTY BUSINESS TYPE TANNING HAIR MOBILE HOME
To submit your warranty online, please visit www.tanningessentials.co and select the warranty link. Please include proof of purchase.
DATE OF PURCHASE:
SUBURB:
COUNTRY:
PHONE:
www.tanningessentials.co
Page 16
OUR DETAILS
ADDRESS:
10 Apex Court, Thomastown, VIC. 3074 Australia
PHONE:
1300 877 677 (within Australia)
INTERNATIONAL PHONE:
+613 9463 8900
EMAIL:
[email protected] www.facebook.com/tanningessentials
WEB:
www.tanningessentials.co
....................................................................................................................................................................... ..................
www.youtube.com/user/TanningEssentials
www.tanningessentials.co
AFFIX
POSTAGE
STAMP
HERE
Tanning Essentials
10 Apex Court,
Thomastown, VIC. 3074
Australia
 Loading...