

Page 1
Instruction Manual – HD-340
Page 2

2
Table of contents
Safety precautions.............................................................................................. 3
Important notes for users................................................................................... 3
Displays and keys .............................................................................................. 3
Specifications ..................................................................................................... 3
Before use.......................................................................................................... 3
Inserting/Replacing the batteries ....................................................................... 4
Weight Mode switch........................................................................................... 4
Positioning the unit............................................................................................. 4
Handling tips....................................................................................................... 4
Product features................................................................................................. 5
Body Mass Index................................................................................................ 5
Setting (resetting) Calendar and Time............................................................... 6
Setting (resetting) personal data in memory ..................................................... 6
Classic and Weightless mode............................................................................ 8
Instructions for use............................................................................................. 8
Recall function .................................................................................................... 10
Troubleshooting.................................................................................................. 11
Contact information............................................................................................ 12
Page 3
3
Safety precautions
• Do not use this unit on slippery surfaces.
• Do not step on the platform when wet.
Important notes for users
Recorded data may be lost if the unit is used incorrectly or is exposed
to electrical power surges.TANITA assumes no responsibility for any loss
of recorded data.TANITA assumes no responsibility for damage or loss
caused by these units, or any claim made by a third person.
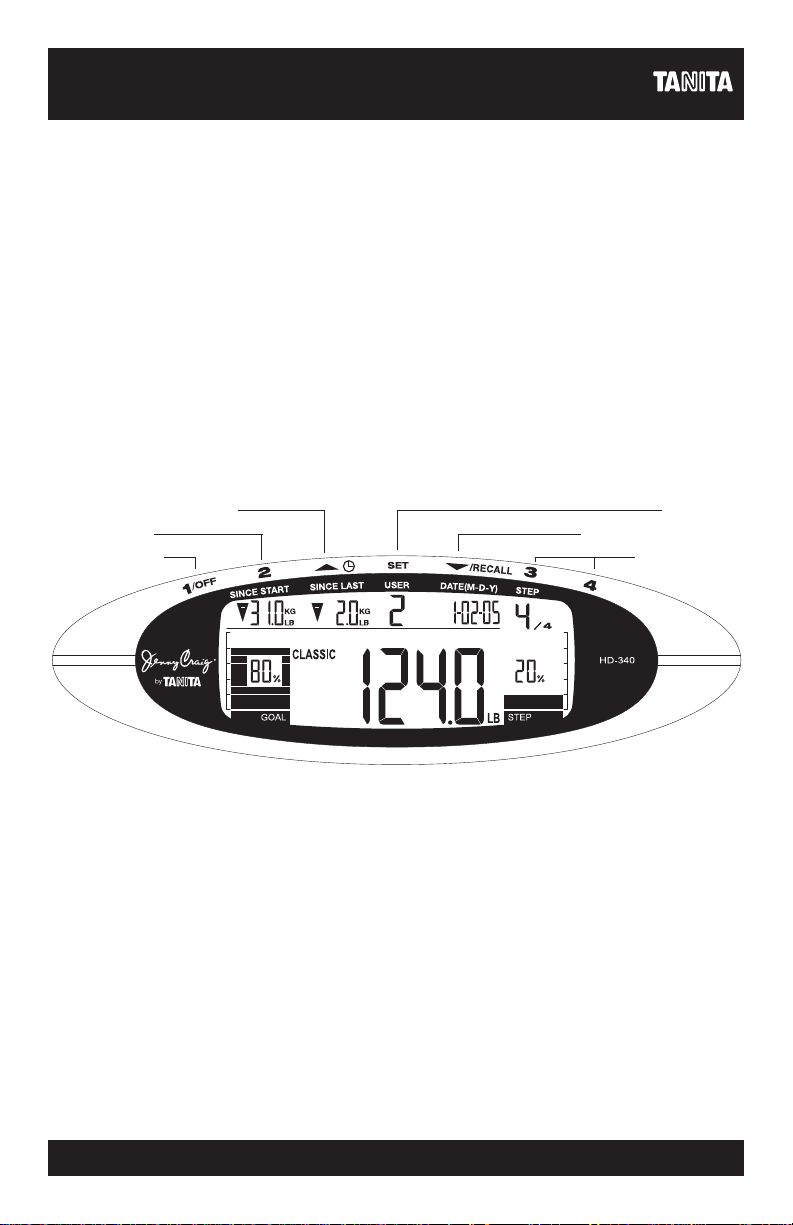
Display and keys
Specifications
Maximum capacity: 400 lb (180 kg)
Graduations: 0.2 lb (0.1 kg)
Power supply: Two 3-volt CR2032 replaceable lithium batteries (included)
One 9-volt Alkaline battery (included)
Before use
1. Insert the supplied batteries as explained in the next section. Please note
that if the batteries were inserted at the factory, their energy level may
have decreased.
2. Set the calendar, time and personal data.Please see page 6 for details.
Up / Date & Time button
Personal keys
Personal keys /
Off button
Set button
Down / Recall button
Personal keys
Page 4
4
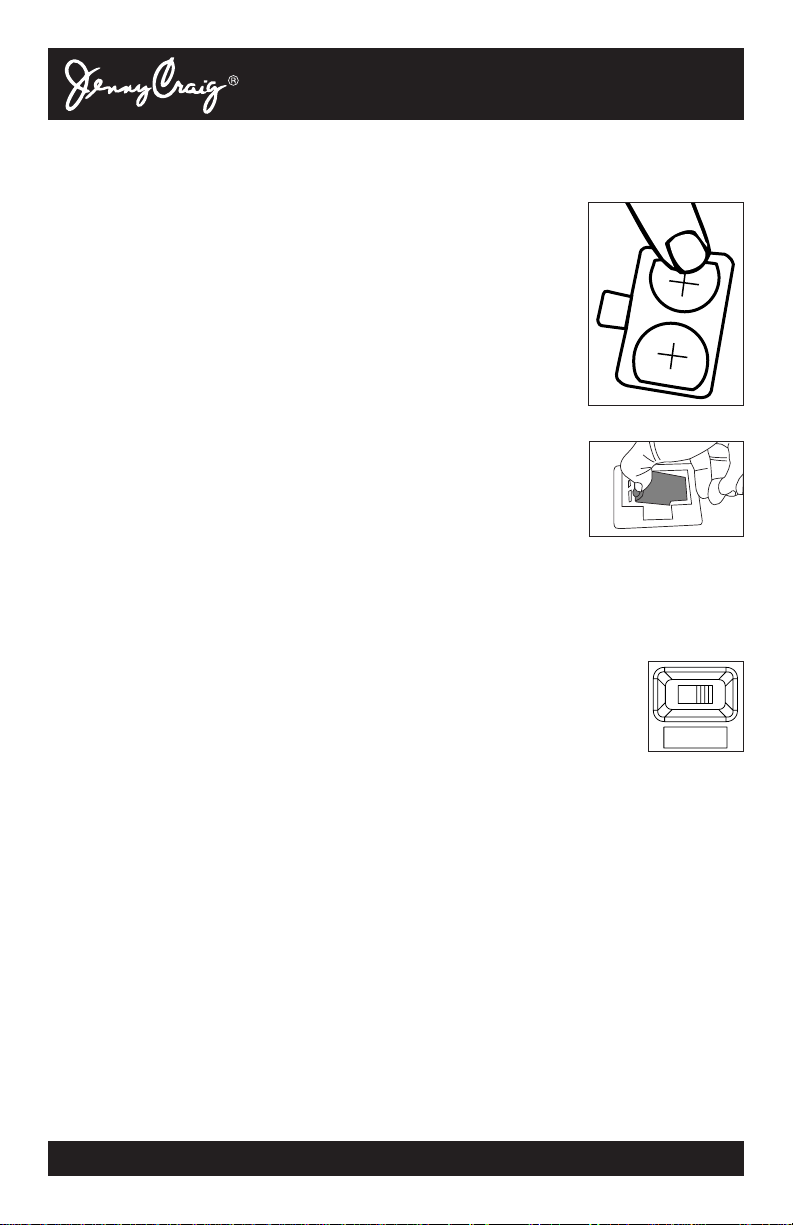
Inserting/Replacing the batteries
The battery boxes are located on the back of the measuring platform.
1. Two 3-volt CR2032 replaceable lithium batteries
Lithium batteries can typically be used for many years
before replacement is necessary.When the low battery
sign, “LO” appears on the LCD, please replace with two
new lithium batteries.
Gently remove the smaller battery cover. Press the edge
of the battery to lift and remove the old batteries. Place
new batteries positive (+) side up being sure that they are
placed under the outer edge, as shown.Replace battery
box cover. Please program the calendar and time.
2. One 9-volt replaceable Alkaline battery
The blue backlight of the LCD display is operated by one
9-volt battery. If the backlight does not work, please
replace with new battery.
Gently remove the larger battery cover and pull the old battery back from the
connections to remove it.Place new battery in same position being sure that
the positive (+) and negative (-) connections are correct.The scale accuracy
and display will function normally without the backlight display.
Weight Mode Switch
Select your preferred weight mode using the weight mode switch
located on the rear of the scale.
Positioning the unit
Place the measuring platform on a hard, flat surface where there is minimal
vibration to ensure safe and accurate measurement.
NOTE: To avoid possible injury, do not step on the edge of the platform.
Handling tips
• Do not attempt to disassemble the unit.
• Store the unit horizontally, and place it so that the buttons will not be
pressed accidentally.
• Avoid excessive impact or vibration to the unit.
• Place the unit in an area free from direct sunlight, heating equipment, high
humidity, or extreme temperature change.
• Never submerge the scale in water or spill chemical liquids on it.To clean,
use a dampened cloth and mild detergent.
• Do not drop any objects onto the platform.
KG LB
Page 5

5
Product Features
How the Scale Determines Your Auto Goal Weight
During the programming process, you will enter your height.Once your height
is entered, the scale automatically suggests your ideal goal weight corresponding
to a Body Mass Index (BMI).According to National Institutes of Health, the ideal
BMI range is 18.5-24.9. If your current BMI is above 24, the scale automatically
suggests a target weight corresponding to a Body Mass Index (BMI) of 24.
If your current BMI is 24 or below, the scale automatically suggests a target
weight corresponding to a Body Mass Index (BMI) of 22.
Once the auto goal weight is given, you still have the option to change
to your desired goal weight (= Input Goal Weight). Use the + or - keys
to change to desired goal weight.
How the Scale Determines Your Step Goals (Milestones)
Your Jenny Craig HealthyTrack Scale automatically establishes realistic step
goals (milestones) in increments of 5 lb or greater depending on your target
weight established by the user. If your weight loss is
9.8 lb or less – you will have 1 step
14.8 lb or less – you will have 2 steps
19.8 lb or less – you will have 3 steps
20.0 lb or greater – you will have 4 steps
NOTE: Users will not be able to change the steps once they are established
by scale.
Body Mass Index (BMI)
Please consult with your physician before you start your diet program.
Source: National Institutes of Health
Underweight Normal Weight Overweight Obese
HEIGHT
100 105 110 115 120 125 130 135 140 145 150 155 160 165 170 175 180 185 190 195 200 205 210 215 220 225 230 235 240 245 250
21 22 23 24 25 26 27 28 29 30 31 32 33 34 36 37 38 39 40 41 42 43 44 45 46 47 48 49 50 51 52
4'10"
4'11"
20 21 22 23 24 25 26 27 28 29 30 31 32 33 34 35 36 37 38 39 40 41 42 43 44 45 47 48 49 50 51
5'0"
5'1"
5'2"
5'3"
5'4"
5'5"
5'6"
5'7"
5'8"
5'9"
5'10"
5'11"
6'0"
6'1"
6'2"
6'3"
6'4"
21
22
20
19
20
21
20
18
19
20
19
18
19
20
19
17
18
19
18
17
17
19
18
16
17
18
17
15
16
17
17
15
16
17
16
15
16
17
16
14
15
16
15
14
15
16
15
14
14
15
15
13
14
15
14
13
13
14
14
12
13
14
13
12
13
25
24
23
24
23
22
23
22
21
22
21
21
22
21
20
21
20
19
20
20
19
20
19
18
19
18
18
19
18
17
18
17
17
18
17
16
17
16
16
17
16
16
16
16
16
16
15
15
25
24
23
22
21
20
28
27
26
27
26
26
27
26
25
26
25
24
25
24
23
24
23
22
23
23
22
23
22
21
22
21
21
21
21
20
21
20
19
20
20
19
20
19
18
19
18
18
19
18
17
18
17
17
18
17
16
WEIGHT (LBS)
44
43
42
41
40
39
38
37
36
35
34
33
32
31
30
29
28
27
27
26
25
24
23
23
22
22
21
20
20
19
19
18
31
30
29
30
29
28
29
28
27
28
27
27
27
27
26
27
26
25
26
25
24
25
24
24
24
24
23
24
23
22
23
22
22
22
22
21
22
21
20
21
21
20
21
20
19
20
19
19
34
33
32
33
32
31
32
31
30
31
30
29
30
29
28
29
28
27
28
27
27
27
27
26
27
26
25
26
25
24
25
24
24
24
24
23
24
23
22
23
22
22
22
22
21
22
21
21
37
36
35
36
35
34
35
34
33
34
33
32
33
32
31
32
31
30
31
30
29
30
29
28
29
28
27
28
27
27
27
26
26
26
26
25
26
25
24
25
24
24
24
24
23
24
23
23
40
39
38
39
38
37
38
37
36
37
36
35
36
35
34
35
34
33
34
33
32
33
32
31
32
31
30
31
30
29
30
29
28
29
28
27
28
27
26
27
26
26
26
26
25
26
25
24
43
42
41
41
40
40
40
39
39
39
38
38
37
37
37
36
36
36
35
35
35
34
34
34
33
33
33
32
32
32
31
31
31
31
30
30
30
29
29
29
28
28
28
27
27
27
27
26
45
44
43
43
42
42
41
40
39
39
38
38
37
37
36
36
35
35
34
34
33
33
32
32
31
31
30
30
30
29
29
29
28
47
46
46
46
45
44
44
43
43
43
42
41
42
41
40
40
40
39
39
38
38
38
37
36
37
36
35
36
35
34
35
34
33
34
33
33
33
32
32
32
31
31
31
31
30
30
30
29
49
48
47
46
Page 6

6
Setting (resetting) Calendar and Time
1. Set month
Press and hold the Up / button for two seconds to turn on the unit.Press
the Up / Down buttons to set month and then press the SET button.The unit
will beep once to confirm.
2. Set day
Press the Up / Down buttons to set day and then press the SET button.
The unit will beep once to confirm.
3. Set year
Press the Up / Down buttons to set year and then press the SET button.
The unit will beep once to confirm.
4. Set hour
Press the Up / Down buttons to set hour and then press the SET button.
The unit will beep once to confirm. Please be sure to set AM/PM correctly.
5. Set minute
Press the Up / Down buttons to set minute and then press the SET button.
The unit will beep twice to confirm and will flash all data to confirm the
program.The power will then shut down automatically.
NOTE:
• After you replace the lithium batteries, press and hold the Up / button to
begin the Calendar and Time programming process. Replacing the batter ies
will cause the loss of Calendar and Time settings.
• Thirty seconds or more of inactivity will cause automatic shut off during this
process. No data will be saved as a result.
• If you make a mistake or wish to turn the unit off before you complete the
programming, press and hold the “1/OFF”button for three seconds or more
to turn the unit off. No data will be saved as a result.
Setting (resetting) personal data in memory
The unit can be operated only if data has been programmed into one of the
personal data memories.
Place your scale on a flat, even floor.You will need to measure your
current weight during this process.
1. Turn on the power
Press SET button to turn on the unit.The unit will beep to confirm activation.
The personal key number will flash.
• If Calendar and Time are not programmed the scale automatically enters
Calendar and Time setting mode.Please follow the instructions above.
Page 7

7
2. Select a personal key number
Press the Up / Down buttons to select a personal key number (1-4). Once
you reach the personal key number you wish to use, press the SET button.
The unit will beep once to confirm.
3. Specify the height
The display defaults to 5' 7" (170 cm).Use Up / Down buttons to specify
height and then press the SET button.The unit will beep once to confir m.
NOTE: Height setting range is from 3' 4" – 7' 3" (100 cm – 220 cm)
4. Measuring weight
Make sure that the scale is placed on a flat, even floor.
When “0.0” displays, step on the platform.The result will be displayed and
will beep twice to confirm.You may then step off the scale.
NOTE: “Err” appears when the unit cannot accurately measure your weight
or it detects movement.The scale will automatically shut off after
20 seconds.
5. Select “Auto Goal Weight”or “Input Goal Weight”
The scale displays your “Auto Goal Weight.”You may press SET button to
confirm.The unit will beep once to confirm. If you wish to change the goal
weight, use Up / Down buttons to set goal weight and then press the SET
button.The unit will beep once to confirm. “Input Goal Weight”icon will appear.
NOTE: “Input Goal Weight” setting range is ± 99 lb (± 50 kg) from the
current weight.
6. Select CLASSIC Mode or WEIGHTLESS Mode (Description on page 8.)
The display defaults to Classic Mode. Use Up / Down buttons to select
Classic Mode or Weightless Mode and press the SET button.The unit will
beep twice to confirm and store the personal data.The scale will then
automatically shut off.
• Classic Mode will display your current weight in center of the display.
• Weightless Mode will not display your current weight; instead your
“Since Start” weight and “Since Last”weight will flash alternately in the
center of the display.
NOTE:
• If the calendar and time are not programmed, you will not be able to program
your personal data. Please program calendar and time first.
• If you reset the personal data, your history data will be deleted.
• Thirty seconds or more of inactivity will cause automatic shut off during this
process. No data will be saved as a result.
• If you make a mistake or wish to turn the unit off before you complete the
programming, press and hold the “1/OFF”button for three seconds or more
to turn the unit off. No data will be saved.
Page 8

8
Classic and Weightless Mode
Classic Mode
The LCD displays the actual weight, the weight change (loss/gain) from
previous reading in lb/kg, weight change (loss/gain) since Day 1 in lb/kg,
% achieved toward the goal, and % achieved within the step and bar graph.
Weightless Mode (Privacy Mode)
The LCD does not display the actual weight.All other information from Classic
Mode will be displayed.
This unique and patented Weightless Mode allows you to maintain your actual
weight in privacy from other household members.By selecting this mode, your
actual weight is not displayed, but only your progress.All other features of the
Classic Mode remain the same.
Instructions for use:
Classic and Weightless Mode
NOTE:
• Please set the date, time and your personal data before operating the scale.
• If you wish to turn the unit off before automatic shut off, press the “1/OFF”
button for three seconds or more.No history will be saved as a result.
1. Select personal key and step on scale
Press personal key and the display will show “0.0.”
Step onto the platform.
NOTE:
• If you step onto the platform before “0.0”appears, the display will show “Err.”
• If you do not step onto the platform within 30 seconds after “0.0” appears,
the scale will automatically shut off.No history will be saved as a result.
• If calendar and time are not programmed the scale automatically enters
calendar and time setting mode. Please follow the instructions on page 6.
• If personal data is not programmed, the scale will display “- - - -” and
automatically shut off.Please follow the instructions on page 6.
Page 9

9
2. View your readings
NOTE: While the current result is being displayed, you may press the
Down/Recall button to enter Recall Functions.Please see
page 10 for more details.
3. Additional callouts
Jenny Craig Benefit Icon – First 5% weight loss from Day 1.
Losing 5% of your body weight is a very important achievement.
It represents an amount of weight that lowers your risk for health
conditions such as heart disease, diabetes and hypertension.
When you reach this very significant milestone, your HealthyTrack
Scale will notify you by displaying an apple icon at the top of the
screen.
Reward Icon – Each completion of one step.
NOTE:
• If you remain on the platform after your weight is displayed, the power shuts
off automatically in about 20 seconds.
• If you step off the platform after your weight is displayed, the power shuts off
automatically in about 20 seconds.
Gain or loss of
weight since Day 1
with up/down
& +/- arrow
Gain or loss of weight
since previous reading
with up/down &
+/- arrow
User number
Date
Current step
Total Steps
established
% achieved in
current step
% achieved in current
step in bar graph
Actual weight
Mode you are currently using
(Classic or Weightless)
% achieved toward
goal in bar graph
% achieved
toward goal
Page 10

10
Weight Only Mode
No personal data or calendar/time set up is necessary.The readings will not be
saved and recall function will not apply to this Weight Only Mode.
If you wish to turn the unit off before automatic shut off, press the “1/OFF”
button for three seconds or more.
1. Tap on the center of platform
The display will flash “8888” (calibrate) and then “0.0”will be displayed.
2. Step onto the platform
NOTE:
• If you step onto the platform before “0.0” appears, the display will show “Err.”
• If you do not step onto the platform within 30 seconds after “0.0” appears,
the scale will automatically shut off.
3. The display will show your weight
NOTE:
• If you remain on the platform after your weight is displayed, the power shuts
off automatically in about 20 seconds.
• If you step off the platform after your weight is displayed, the power shuts off
automatically in about 20 seconds.
Recall function
The recall function allows users to monitor their progress by showing the last
12 reading results with the date. After each reading is completed in Classic
or Weightless Mode, the scale automatically stores the last 12 reading results.
THE SCALE WILL NOT STORE THE HISTORY IN WEIGHT ONLY MODE.
1. Press the Down / Recall button
The display will show “1” under User Number.
2. Press your personal key
The display will show the weight and date of previous reading.
Press the Up / Down button to navigate the last 12 readings.
The scale will automatically shut off after the last recall reading is displayed.
NOTE:
• If there is no recorded data, the scale will show “- - - -”in the center.
• The scale will automatically shut off after 30 seconds of inactivity of buttons.
• If you wish to turn the unit off before automatic shut off, press the “1/OFF”
button for three seconds or more.
• If you reset the personal data, your history data will be deleted.
Page 11

11
Troubleshooting
“Err”appears on the display
You stepped on the scale before “0.0” appeared on the display.
Wait until “0.0” appears, then step on the scale.
“- EE -”appears on the display
Reading cannot be obtained if the weight capacity is exceeded.
“- - - -”appears on the display
If it is during weight measuring process, there is no memory of your personal
data. Please program your personal data.
If it is during Recall function, there is no history of your weight data.
“LO”appears on the display
Two lithium batteries are low. Please change the batteries immediately.
Blue backlight of LCD disappeared
9-volt battery is dead. Please change the batter y immediately.
All bars are displayed and 00% is shown in Goal
You over-achieved your goal. No bar and % in Goal will be displayed.
Bars and % are displayed in Goal but nothing is in Step
This happens when the difference between your goal weight and initial
weight is less than 10 lb or 5 kg.
Unable to obtain the last 12 readings in Recall Function
If you change your personal data (i.e., height or goal weight) the history will
be deleted. Batter y replacement will not cause the loss of history.
Calendar and Time settings are lost
If you replace the batteries, the calendar and time settings will be lost.
Please follow the instructions on setting (resetting) calendar and time.
Page 12

Tanita Corporation
14-2, 1-Chome, Maeno-Cho
Itabashi-Ku, Tokyo, Japan 174-8630
Tel: +81(0)-3-3968-2123
Fax: +81(0)-3-3967-3766
www
.tanita.co.jp
ISO 9001 Certified
Tanita Corporation of America
2625 South Clearbrook Drive
Arlington Heights, IL 60005 USA
Tel: +1-847-640-9241
Fax: +1-847-640-9261
www
.tanita.com
(800) Tanita-8 (USA & Canada Only)
Tanita France S.A.
Villa Labrouste
68 Boulevard Bourdon
92200 Neuilly-Sur-Seine France
Tel: +33 (0)-1-55-24-99-99
Fax: +33 (0)-1-55-24-98-68
www
.tanita.fr
Tanita Health Equipment H.K. Ltd.
Unit 301-303 3/F Wing On Plaza
62 Mody Road, Tsimshatsui East
Kowloon, Hong Kong
Tel: +852 2838 7111
Fax: +852 2838 8667
Tanita Europe GmbH
Dresdener Strasse 25
D-71065 Sindelfingen
Germany
Tel: +49 (0)-7031-6189-6
Fax: +49 (0)-7031-6189-71
www
.tanita.de
Tanita UK Ltd.
The Barn, Philpots Close, Yiewsley,
Middlesex, UB7 7RY UK
Tel: +44 (0) 1895 438577
Fax: +44 (0) 1895 438511
www
.tanita.co.uk
© 2005 Tanita Corporation HD340 7801
For technical questions about this product,
please contact Tanita at 1-800-Tanita8.
For information about Jenny Craig programs,
please contact Jenny Craig at 1-800-Jenny20
or log on to the Jenny Craig Web site at www.jennycraig.com
 Loading...