

Page 1
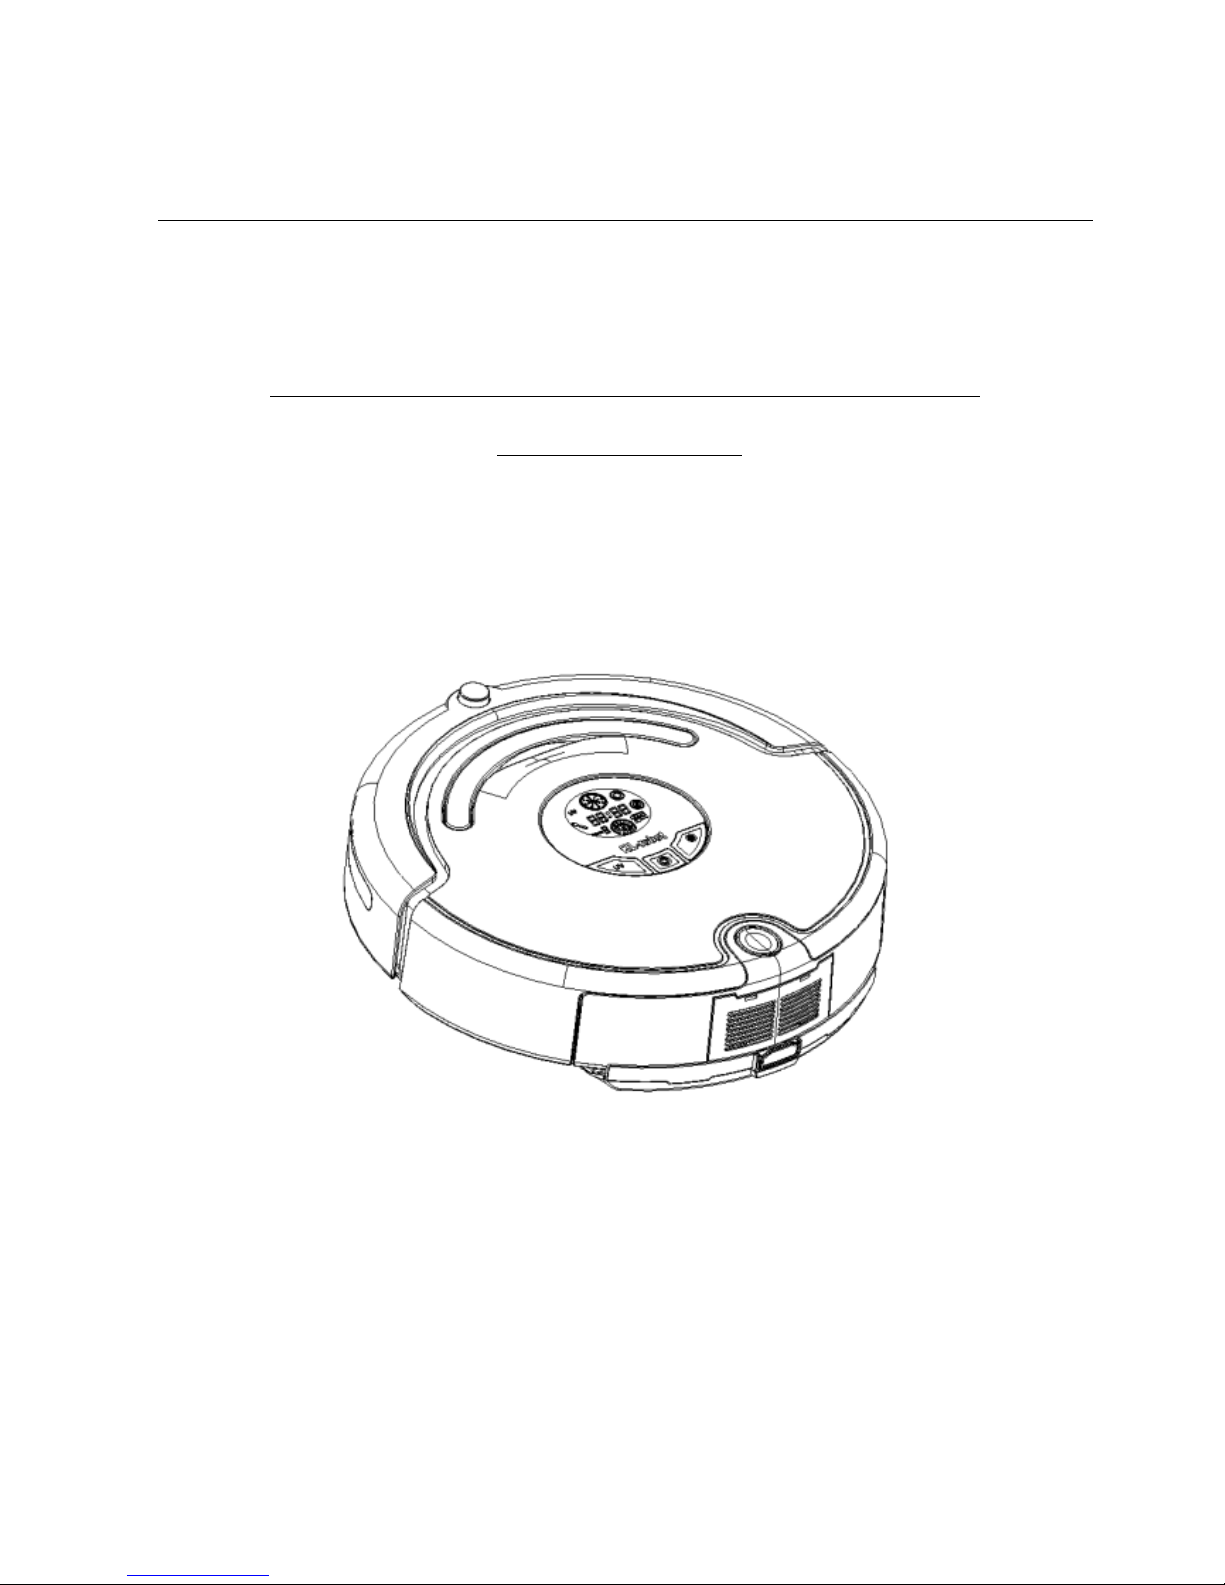
TanGO X3s
MULTIFUNCTIONAL VACUUM
CLEANER
USER MANUAL
MODEL NO.: TanGO X3s
Page 2

1
Thank you for purchasing our new robotic vacuum cleaner.
Please read this manual carefully before using the product.
Page 3

2
Table of Contents
Safety Tips ................................................................................ 4
Components of the cleaner ..................................................... 5
Function Introduction ............................................................. 5
Applicability ............................................................................. 5
Main body ................................................................................ 6
Control Panel of the main body ..................................................................................................................................... 6
Usage of Control Panel ................................................................................................................................................. 7
Assembly & Disassembly and Cleaning of Dustbin ..................................................................................................... 8
Assembly & Disassembly and Cleaning of Brush ........................................................................................................ 9
Assembly & Disassembly and Cleaning of Wheel ..................................................................................................... 10
Cleaning of Sensor and Infrared Transparent Window ............................................................................................... 11
Replacement of Battery ............................................................................................................................................... 11
Remote Control ...................................................................... 12
Using Method & Functional Status of Control Panel ................................................................................................. 12
Auto Charging Docking Station ........................................... 14
The Docking Station Display and Control Panel ........................................................................................................ 14
Using Method & Functional Status of the Docking station ........................................................................................ 14
Installation of Auto Charging Docking Station and Charging for the cleaner ............................................................ 15
Virtual Wall ........................................................................... 17
Using Method & Functional Status of Virtual Wall ................................................................................................... 17
Installation method of Virtual Wall ............................................................................................................................ 18
Storage .................................................................................... 19
Trouble shooting .................................................................... 19
Error Codes ................................................................................................................................................................. 19
Technical Specifications ........................................................ 21
Page 4

3
Technical Specifications of Remote Control .............................................................................................................. 21
Technical Specifications of Docking Station .............................................................................................................. 21
Technical Specifications of Virtual Wall .................................................................................................................... 22
Page 5
4
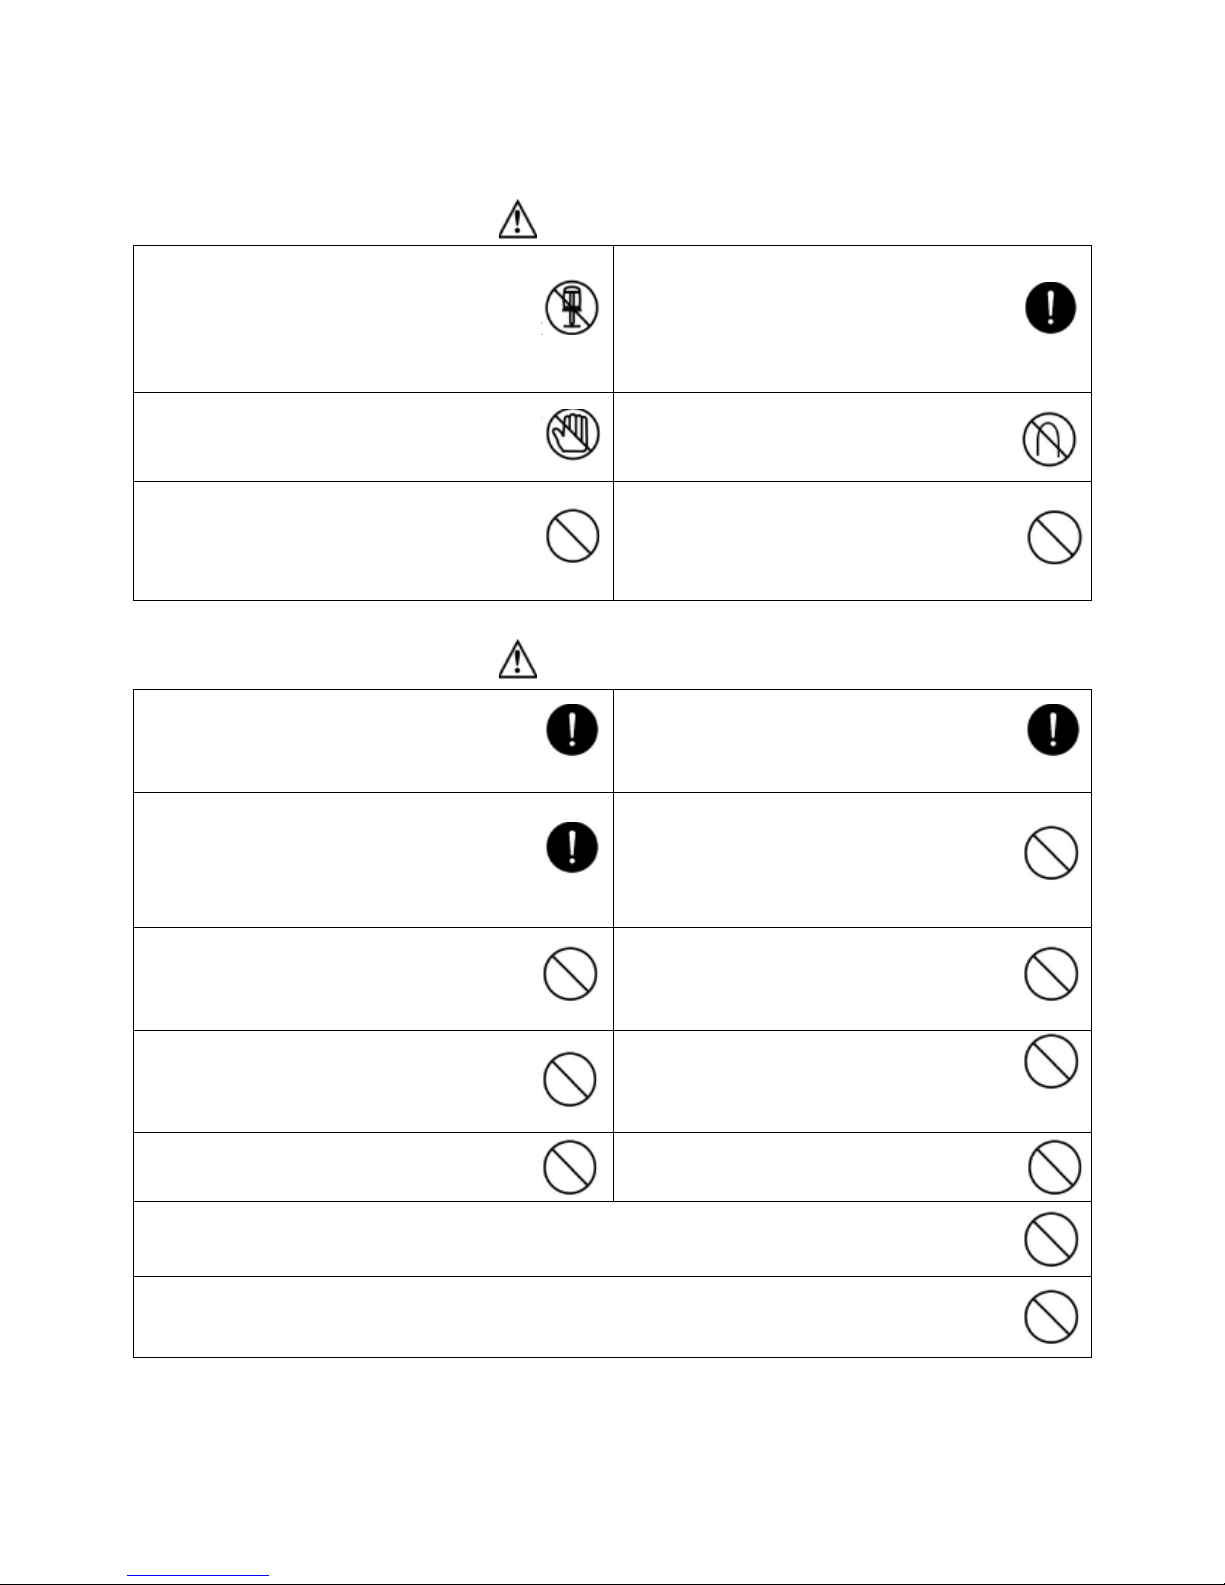
Safety Tips
Warnings
No one else can disassemble, maintain or
transform the product except the
maintenance technicians designated by the
company, or it may cause fire, electric shock
or personal injury.
Don’t use other charger but the equipped
one of the Robot, or it may cause product
damage, electric shock or fire due to high
voltage.
Don’t touch high-voltage power cord of the
electric appliance with your wet hand, or it
may cause electric shock.
Don’t bend the power cord overly or place
weight on it, or it may cause power cord
damage, fire or electric shock.
Don’t twist your clothes or any part of your
body (head, finger, etc.) into the brush or
wheel of the Robot, or it may cause personal
injury.
Don’t approach cigarette, lighter, match and
other heat objects or combustible materials
such as the gasoline cleaner.
Attentions
Don’t forget to turn off the power while
transporting or storing the Robot for long, or the
battery may be damaged.
Insert the power cord of the charger well or it
may cause electric shock, short circuit, smoking
or fire.
Check whether the charger and socket is
connected well, or it may cause charging failure
or even fire.
Remove all easily damaged objects (including
luminous objects, fabrics, glass bottles, etc.)
before using, or it may cause damage to these
objects or affect the using of the Robot.
Please use the Cleaner cautiously in the presence
of the children to avoid frightening or harming
them.
Don’t stand or sit on the Cleaner, or it may cause
damage to the Robot or personal injury.
Don’t make the Cleaner take in water and other
liquors for fear of the product damage.
Don’t use the Cleaner on small tables and chairs
or other small space, otherwise the Cleaner may
be damaged.
Don’t use the Cleaner outdoors, or it may cause
the product damage.
Don’t use the Cleaner in commercial places, or
the Cleaner may be damaged by excessive use.
Don’t leave movable thread, wire and other objects with the length of more than 150mm on the ground or the
brush may be entangled.
The Cleaner is not for use of the disabled (people with physical or mental handicap), children and those who
use the Cleaner before reading the User Manual carefully.
Page 6
5
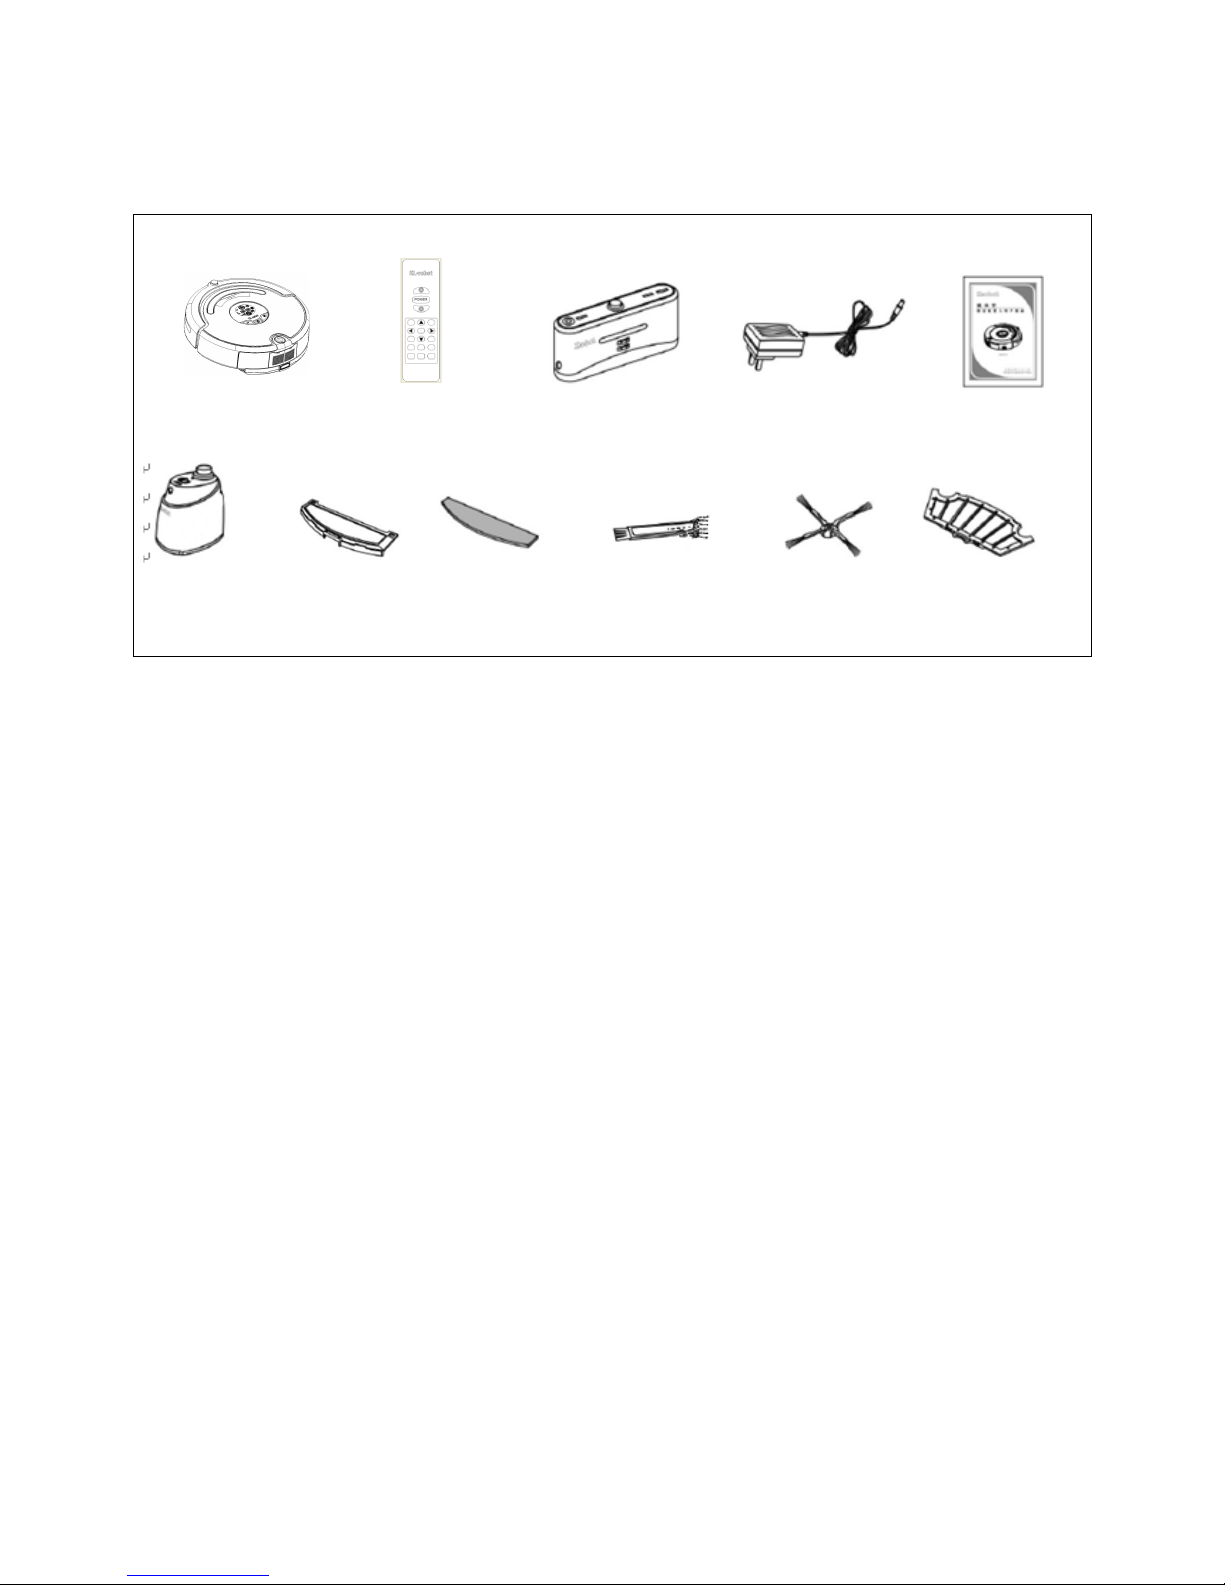
Components of the cleaner
Cleaner Remote control Auto charging docking station Adaptor User Manual
Virtual Wall Mopping part Mop Dust brush Side bruch Filter
Function Introduction
It is the Robotic vacuum cleaner with rechargeable battery, controlled by microcomputer intelligent and integrated with
automatic cleaning, dust absorption, mopping, sterilizing, timing, reservation cleaning, remote control, speed selection,
various identification protection functions, various automatic cleaning modes and automatic charging.
Applicability
The product, mainly applicable to residence houses, hotel rooms and small offices, is good for cleaning to various
short-haired carpet, wood flooring, hard flooring, ceramic tile, etc.
Page 7
6
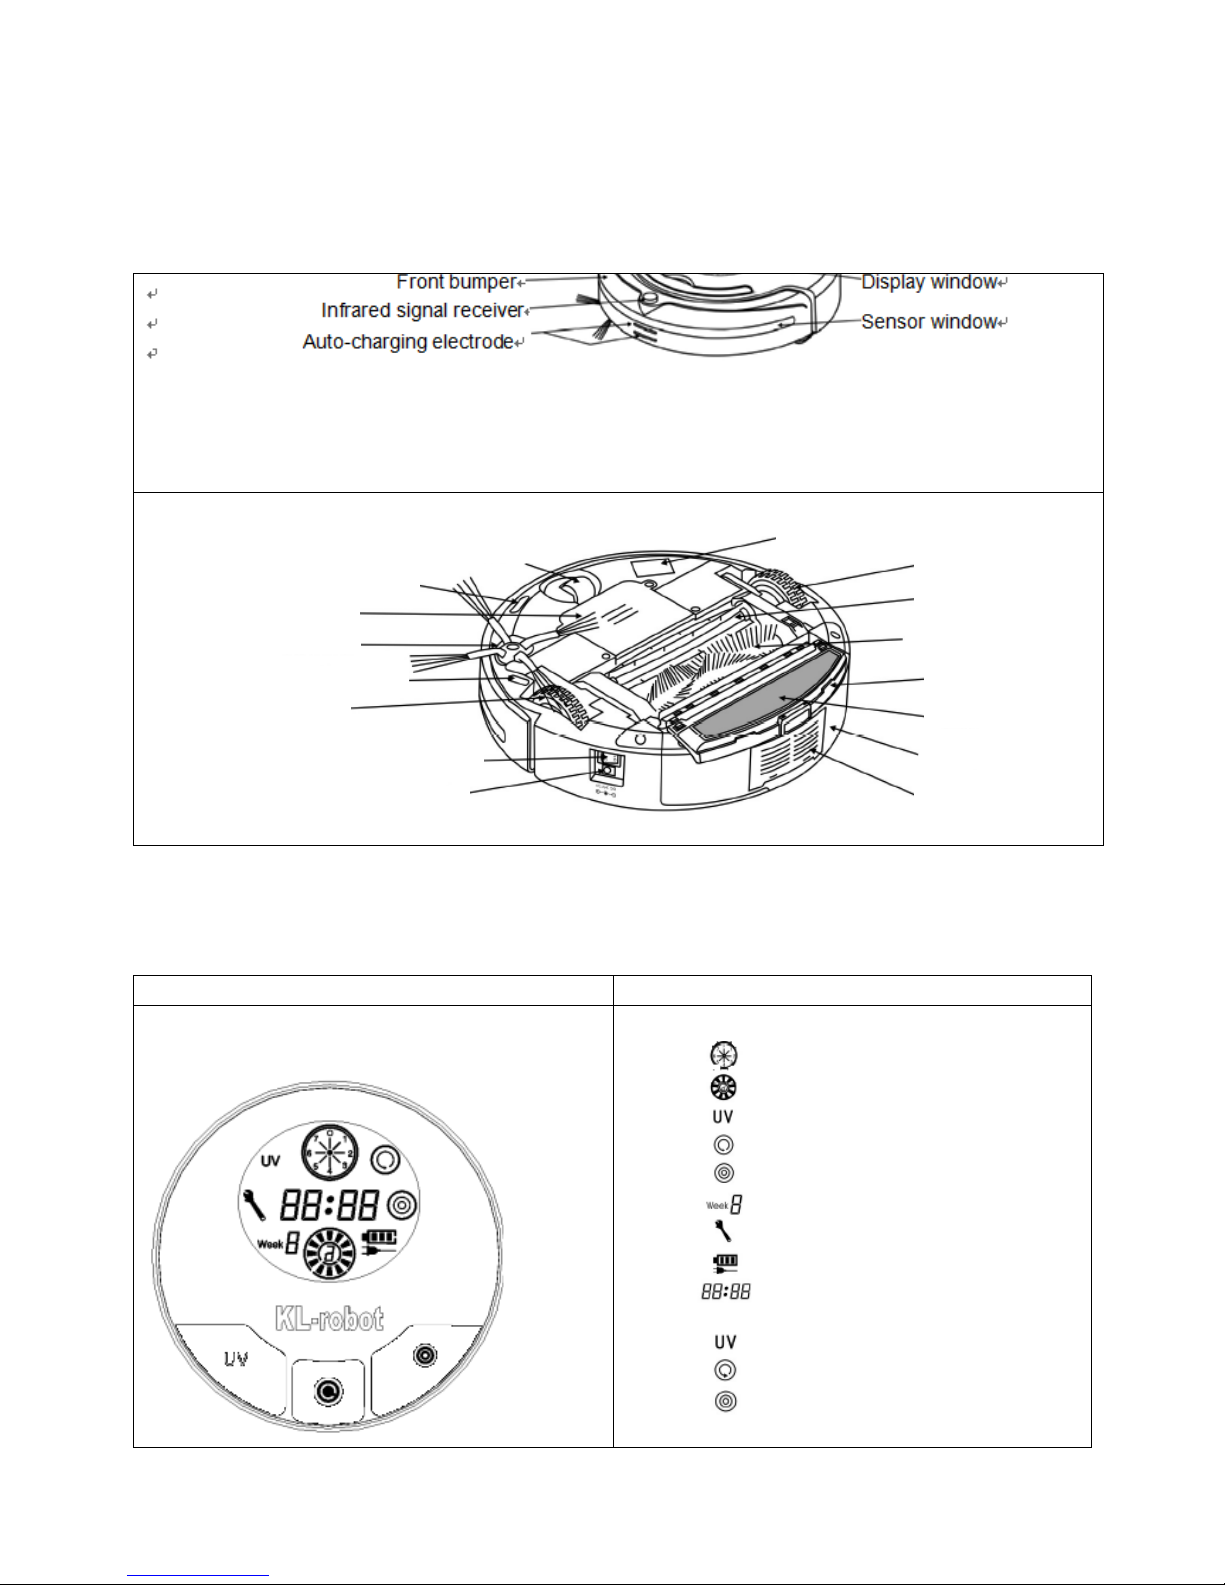
Main body
Top of main body
Bottom of main body
Control Panel of the main body
Display Interface
LCD directive sign
Menu Display:
1. Date/week set display
2. Wheel rotation/speed display
3. UV lamp display
4. Automatic cleaning display
5. Timing cleaning display
6. Current week display
7. Breakdown maintenance display
8. Charging/power display
9. Time/error code display
Touch keys:
1. UV lamp key
2. Automatic cleaning key
3. Timing cleaning key
Front wheel
Ground detection sensor
Battery cover
Side cleaning brush
Ground detection sensor
Right wheel
Power switch
DC socket
UV sterilizing lamp
Left wheel
Rubber brush
Main brush
Mopping part
Mop
Dustbin
Air outlet window
Page 8
7
Usage of Control Panel
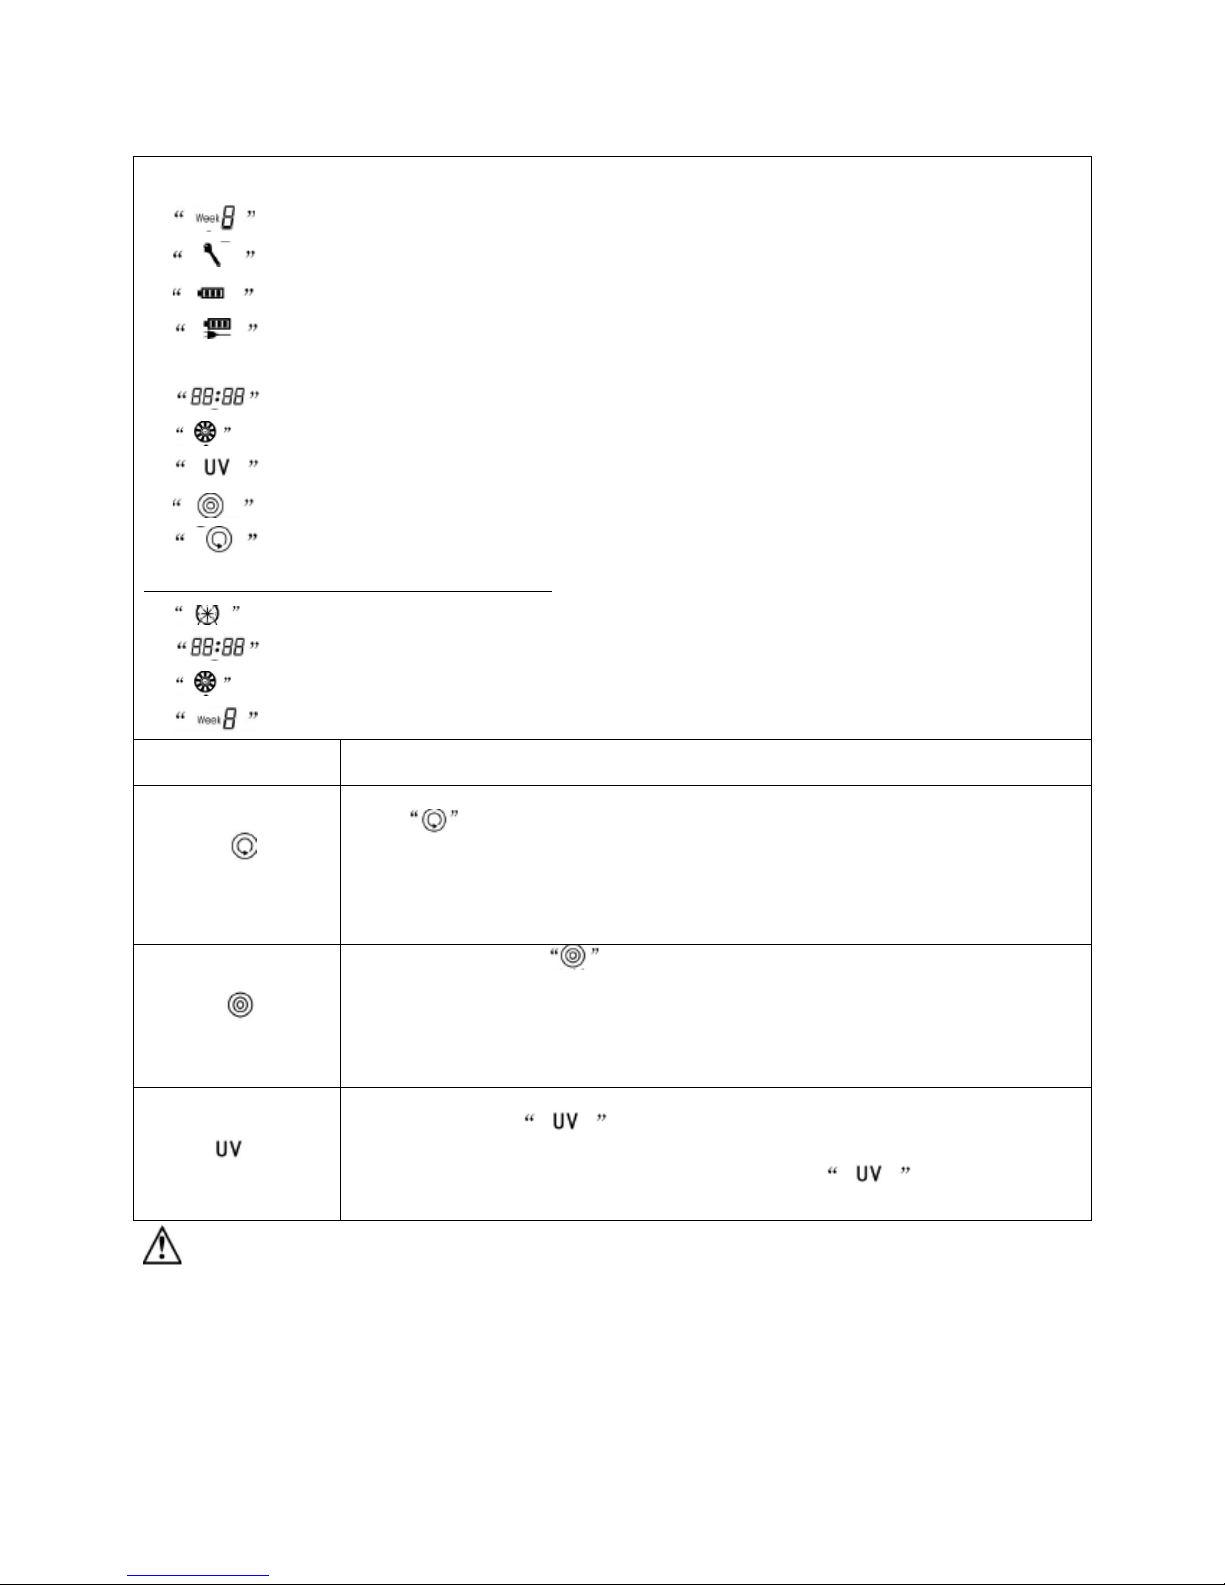
1. Check the batteries are installed correctly with enough power, and then turn on the power switch, the buzzer will ring once and icons
will show as follows:
2. Indicates the current date per week.
3. Indicates malfunction, “88:88” displays the failure code from E001 to 034.
4. Indicates the battery, three grids mean full power, or decreased power with less grids.
5. Indicates the charging state. It keeps flickering while the battery is charging, and stops flickering while the battery is
full.
6. Indicates the timing time, current time and failure code.
7. Indicates the wheel speed. It moves fast while the Robot is working on speed 1, or slowly on speed 2.
8. Indicates the UV lamp.It is on while the Robot is working, and is off while the Robot is not working.
9. Indicates the timing mode.
10. Indicates the automatic mode.
Followings are selected and set only by the remote controler
1. means selecting reservation of any day or some days of one week.
2. displays the reservation set.
3. means adjusting the speed of the wheel.
4. displays the current date per week.
Operating Function of
Touch Keys
Function Description
1. Auto Cleaning Key
a Clear up gadgets or obstacles in the room before cleaning, and then press Automatic Cleaning
Key , it will clean by spiral, linear, zigzag, follow the wall modes automatically.
b The Robot may choose fast or slow running while cleaning.
c The Robot will stop running in case of low battery, then it will ring ten times and search the recharger
for charging automatically.
d The Robot will stop cleaning if you press any keys during its cleaning.
2. Spot Cleaning Key
a Press Spot Cleaning Key , it will enter the area about 1m
2
and clean by the spiral mode.
b Choose the fast cleaning time of about 2 minutes and low cleaning time of about 4 minutes, and it will
stop automatically after the cleaning.
c The Robot will stop running in case of low battery, then it will ring ten times and search the recharger
for charging automatically.
d The Robot will stop cleaning if you press any keys during its cleaning.
3. UV Lamp Key
a Turn on the power of the main body, the display will light.
b Press the Key then, will be on, UV lamp will be on if the Robot is working, or off if the
robot stops working.
c If the UV lamp is unused, press the key to turn off, then the icon will be off.
d The on/off mode of UV lamp will be memorized automatically.
: The keys of main body are of electronic touch type, you only need to touch them lightly with your finger while using it. Besides,
you should clean the keys and the space between them to remove water or oil stains, or may cause the touch failure.
Page 9
8
Assembly & Disassembly and Cleaning of Dustbin
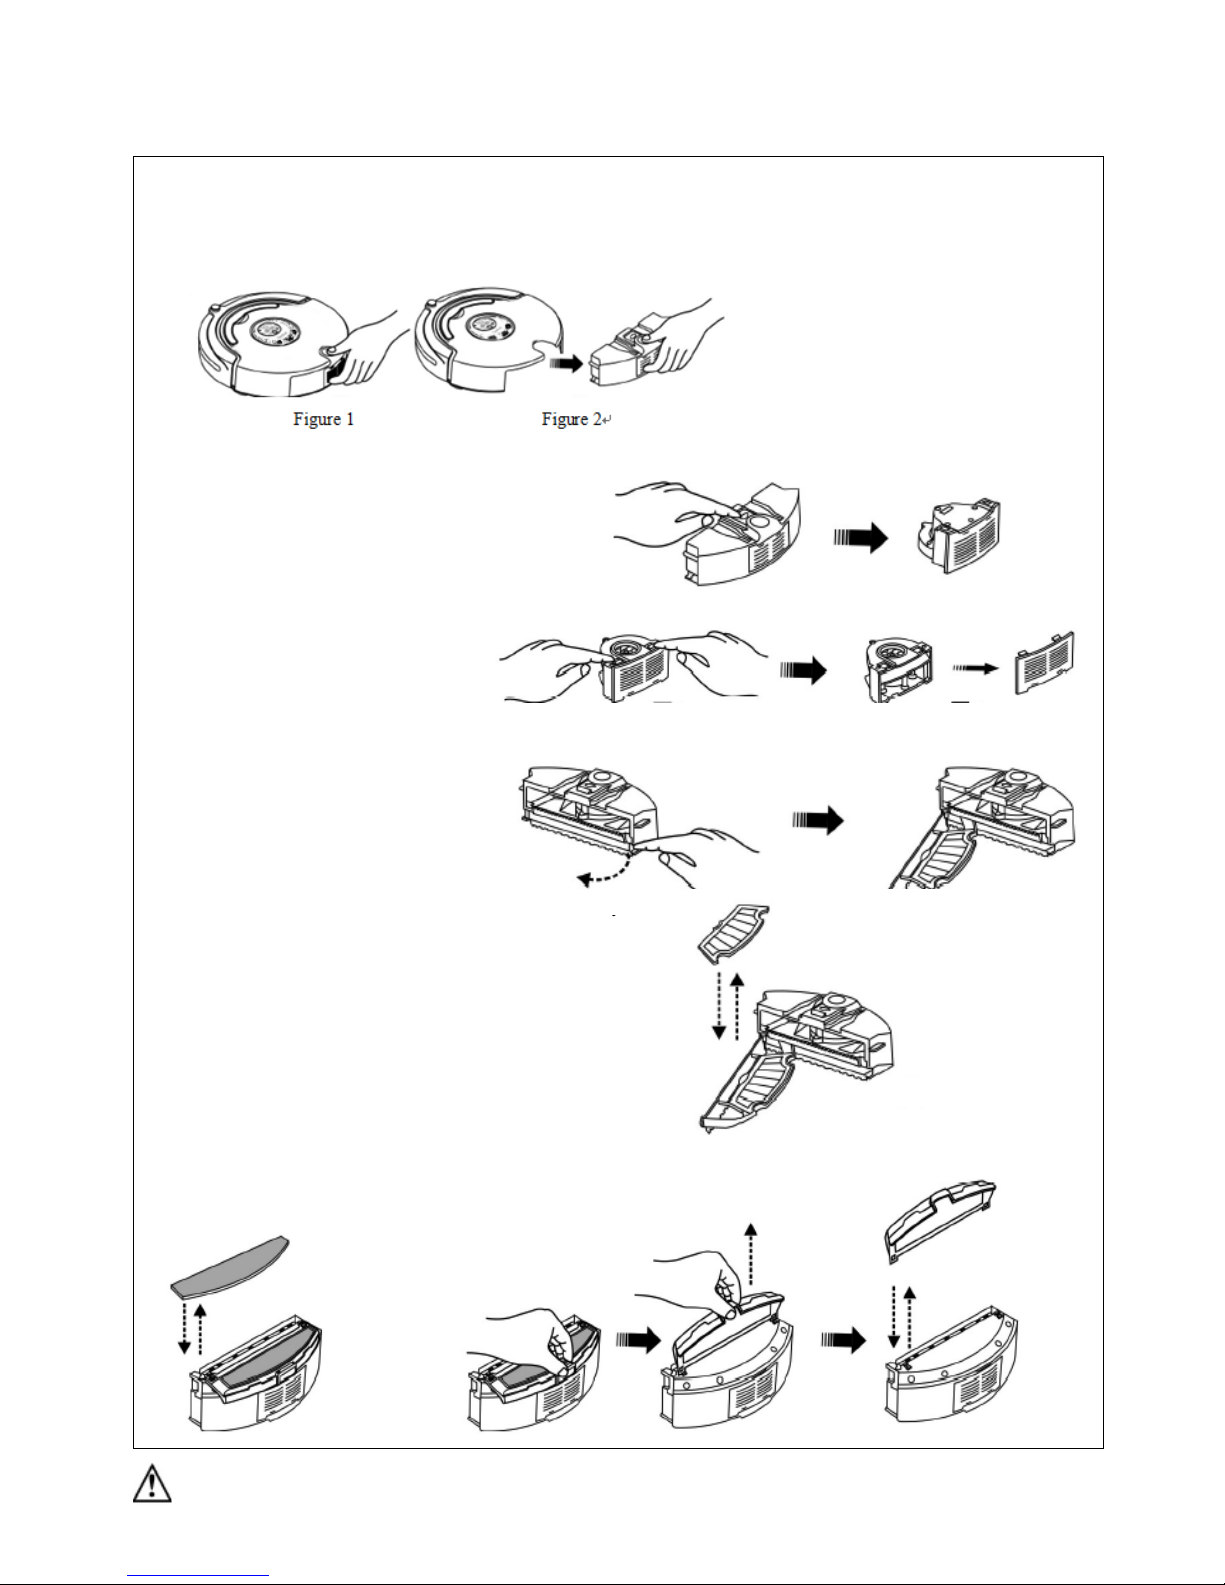
Assembly & Disassembly of Dustbin:
1. Extract the dustbin by pressing the
key on it. (Refer to Figure 1 and
Figure
2. Press the red button on it, and then
the blower will pop up
automatically. (Refer to Figure 3)
3. Reverse the blower, release 2
fasteners and open the cover.
(Refer to Figure 4 and Figure 5)
Figure 4 Figure 5)
4. Open the bracket and the filter will
appear. (Refer to Figure 6)
5. Change a new filter, press the semicircle bracket by one
hand to release the fastener from the filter screen, and
remove the filter grid by the other hand and then change a
new one. (Refer to Figure 7)
6. Reverse the dustbin, tear out the mop, release the trailing
bar and then unplug the right and left fasteners on the
bottom of the dustbin (Refer to Figure 8 and Figure 9). All
parts should be assembled as before disassembly.
Figure 8 Figure 9
: Don’t use the mop and mopping part in the figure above on the carpet or uneven ground.
Figure 3
Figure 6
Figure 7
Page 10
9
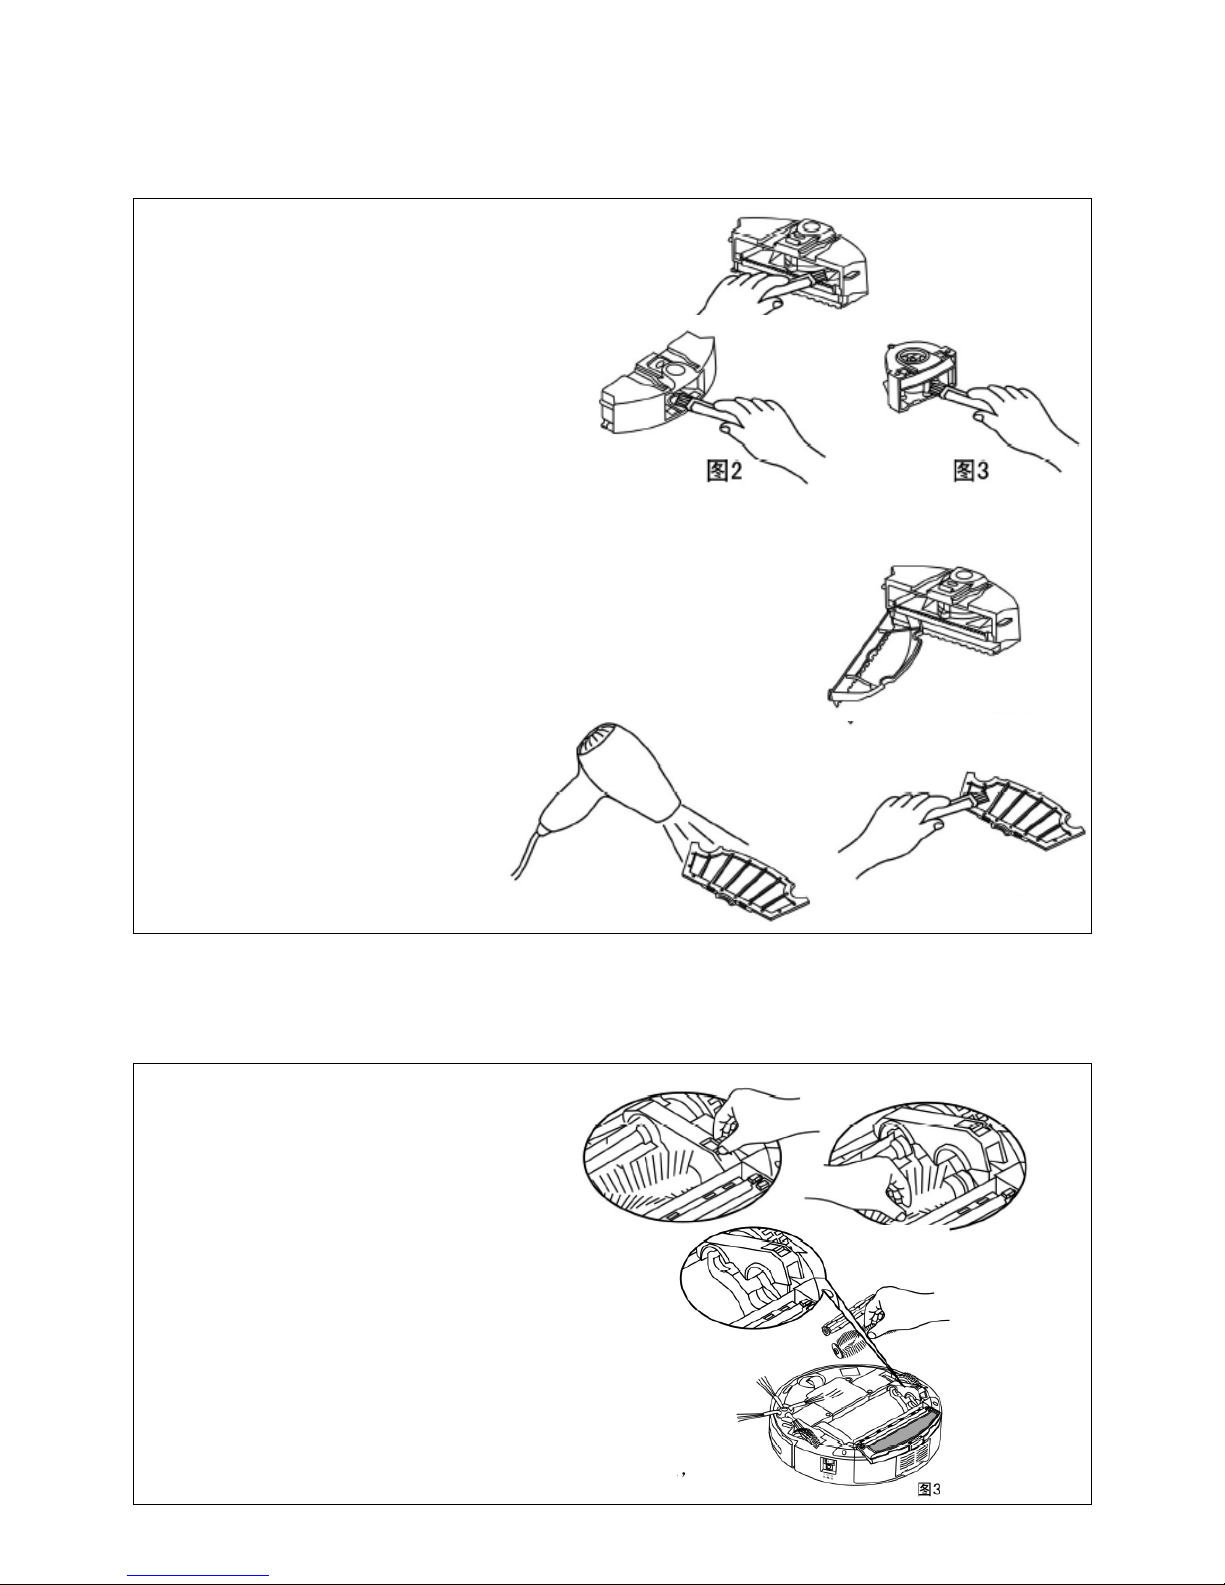
Cleaning of Dustbin and Blower:
1. First dump the dust, and then clean it with
Dust Brush. (Refer to Figure 1)
2. Pop up the blower, and then clean the air
inlet/outlet with brush cleaner. (Refer to
Figure 2 and Figure 3)
3. Don’t clean the blower in water!
4. Pop up the blower, take out the filter, and
then clean the dustbin in water. (Refer to
Figure 4)
5. Clean the filter by hairdryer or Dust
brush. (Refer to Figure 5 and Figure
6)
6. After cleaning, you can assemble it
firmly as before the disassembly.
Assembly & Disassembly and Cleaning of Brush
Assembly & Disassembly of Mid Cleaning Brush and Floor Brush:
1. Force the locking bar forward and raise
the cover by right thumb, and then raise
rod of the mid cleaning brush by your
left hand. (Refer to Figure 1 and Figure
2)
Figure 1 Figure 2
2. Take out the main brush and floor
brush. (Refer to Figure 3)
3. Insert the main brush and floor brush
into the holes before closing the cover
Figure 1
Figure 2
Figure 3
Figure 4
Figure 5
Figure 6
Figure 3
Page 11
10
in assembly.
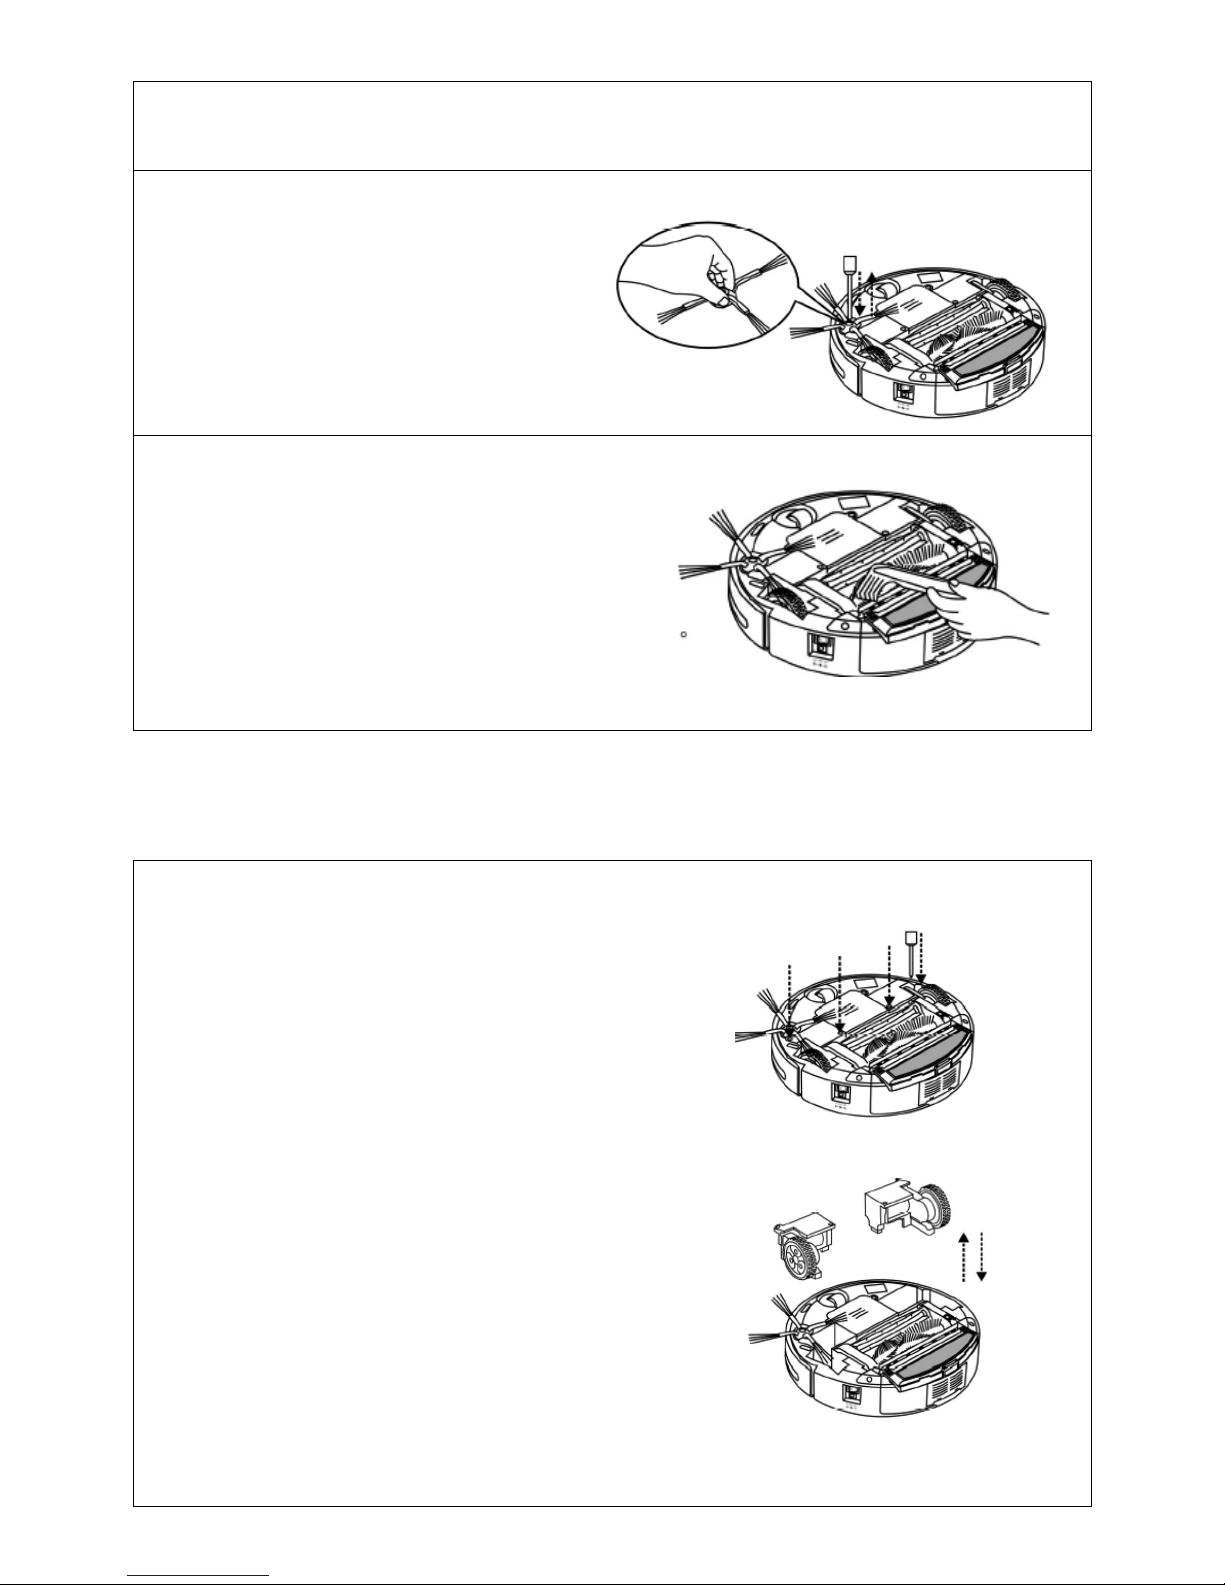
Assembly & Disassembly of Side Brush:
1. Release the screw in the main shaft of the side
brush before changing the side brush.
2. Press the side brush against the main shaft and
then fasten the screw. (Refer to the figure)
Cleaning of Brush and Floor Brush:
1. Clear the hair or big dust particles on the brush
and floor brush regularly to improve the cleaning
performance. Clean the dust at the air intake.
Clean the wastepaper or small particles by brush
cleaner directly. Rotate the brush carefully and cut
by scissors or pull by hand the hair, yarn and other
twisted objects.
2. The cleaning of the brush and floor brush can be
done by reference to the assembly & disassembly.
Assembly & Disassembly and Cleaning of Wheel
Assembly & Disassembly and Cleaning of Left/Right Wheel:
1. Release the screw of the left/right wheel by the screwdriver. (Refer to Figure 1)
Figure 1
2. Take out the left/right wheel and clean them with the brush (Refer
to Figure 2). Don’t wash them in water!
Figure 2
3. Place the left/right wheel in the original position, and tighten the screw while assembling.
Page 12
11
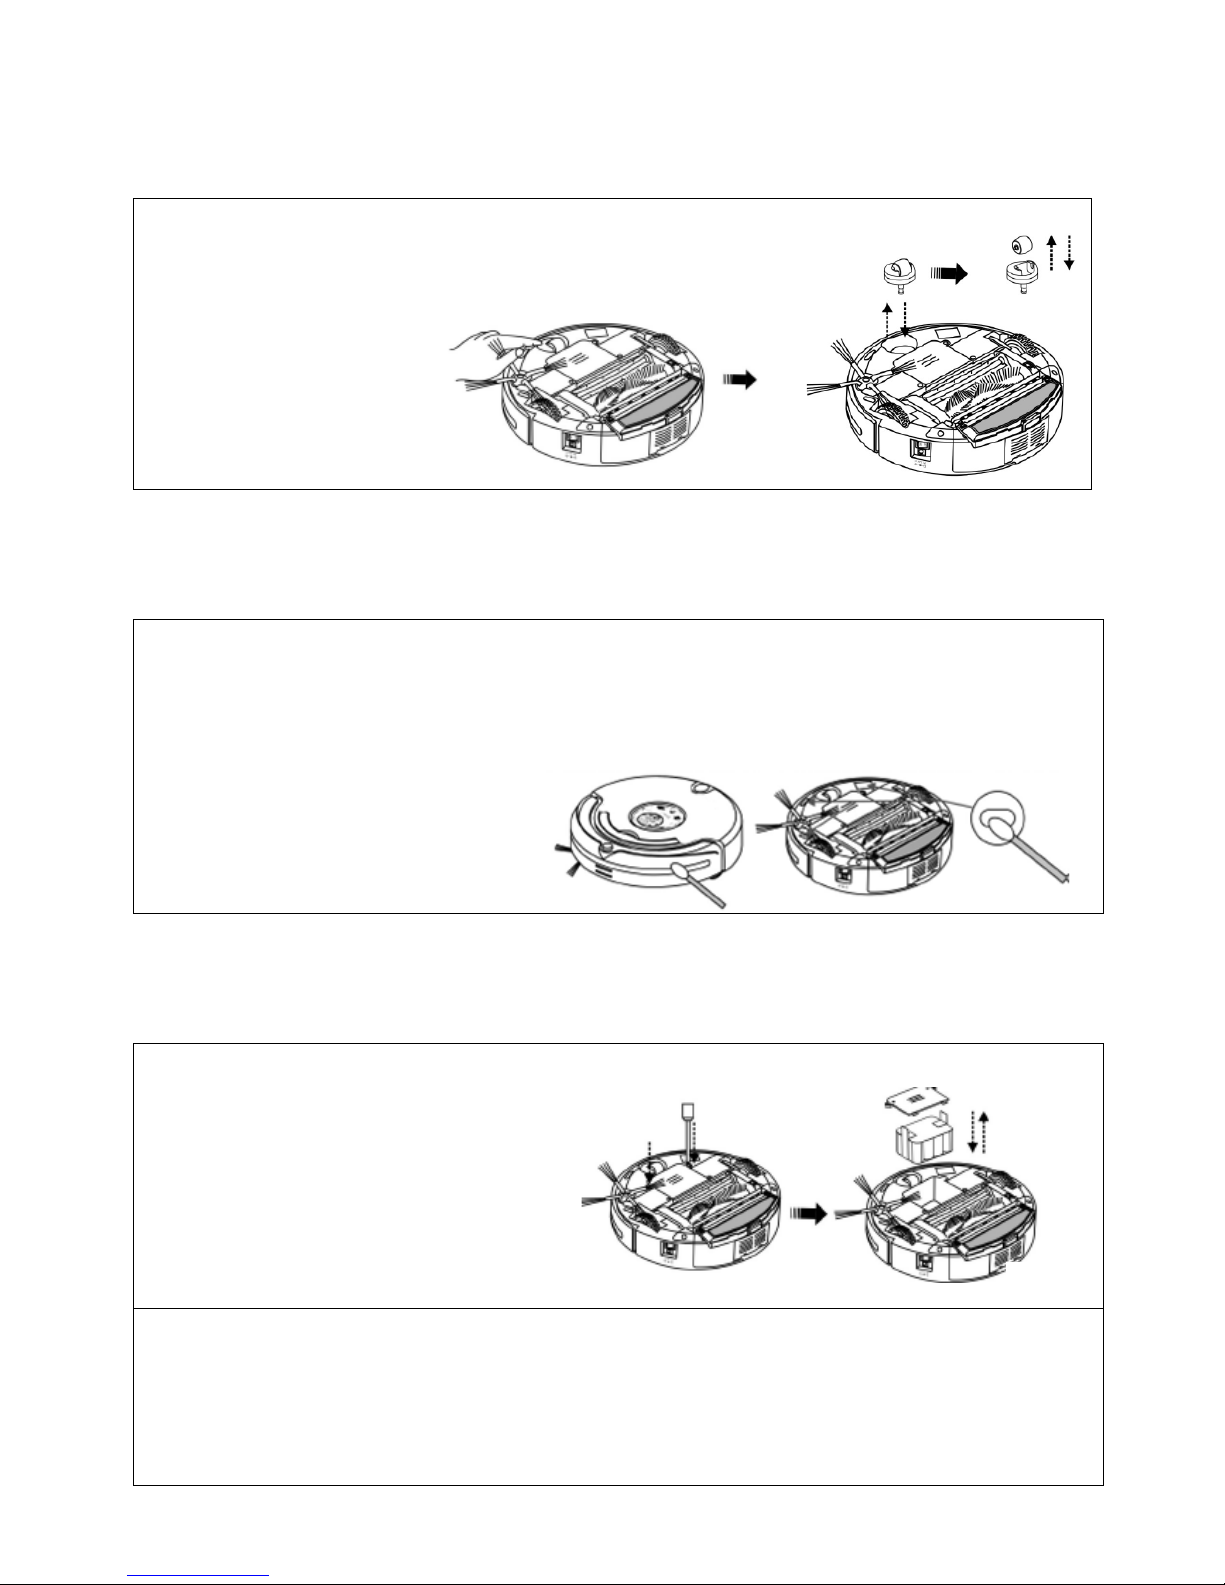
Assembly & Disassembly and Cleaning of Front Wheel:
1. Pull out the front wheel with your finger and tools and then clean it.
(Refer to the figure)
2. Insert and press the front wheel into the right position while assembling.
Cleaning of Sensor and Infrared Transparent Window
1. Clean the sensor and infrared transparent window with the cotton swab or soft cloth.
2. The wall detection sensor is in front of the Cleaner, while the ground detection sensor and infrared transparent
window are at the bottom of the Cleaner. (Refer to the figure below)
3. Please keep the transparent window clean
so as to make the Robot work better.
Replacement of Battery
Battery replacement of the Cleaner:
1. Release the screw with the screwdriver, open its
base plate and then take out the battery. (Refer to
Figure 1 and Figure 2)
2. Please place the positive and negative electrode
correctly for fear of the damage due to wrong
electrode!
3. Please set the Cleaner in charging state to keep the
best of the battery while the Cleaner is unused.
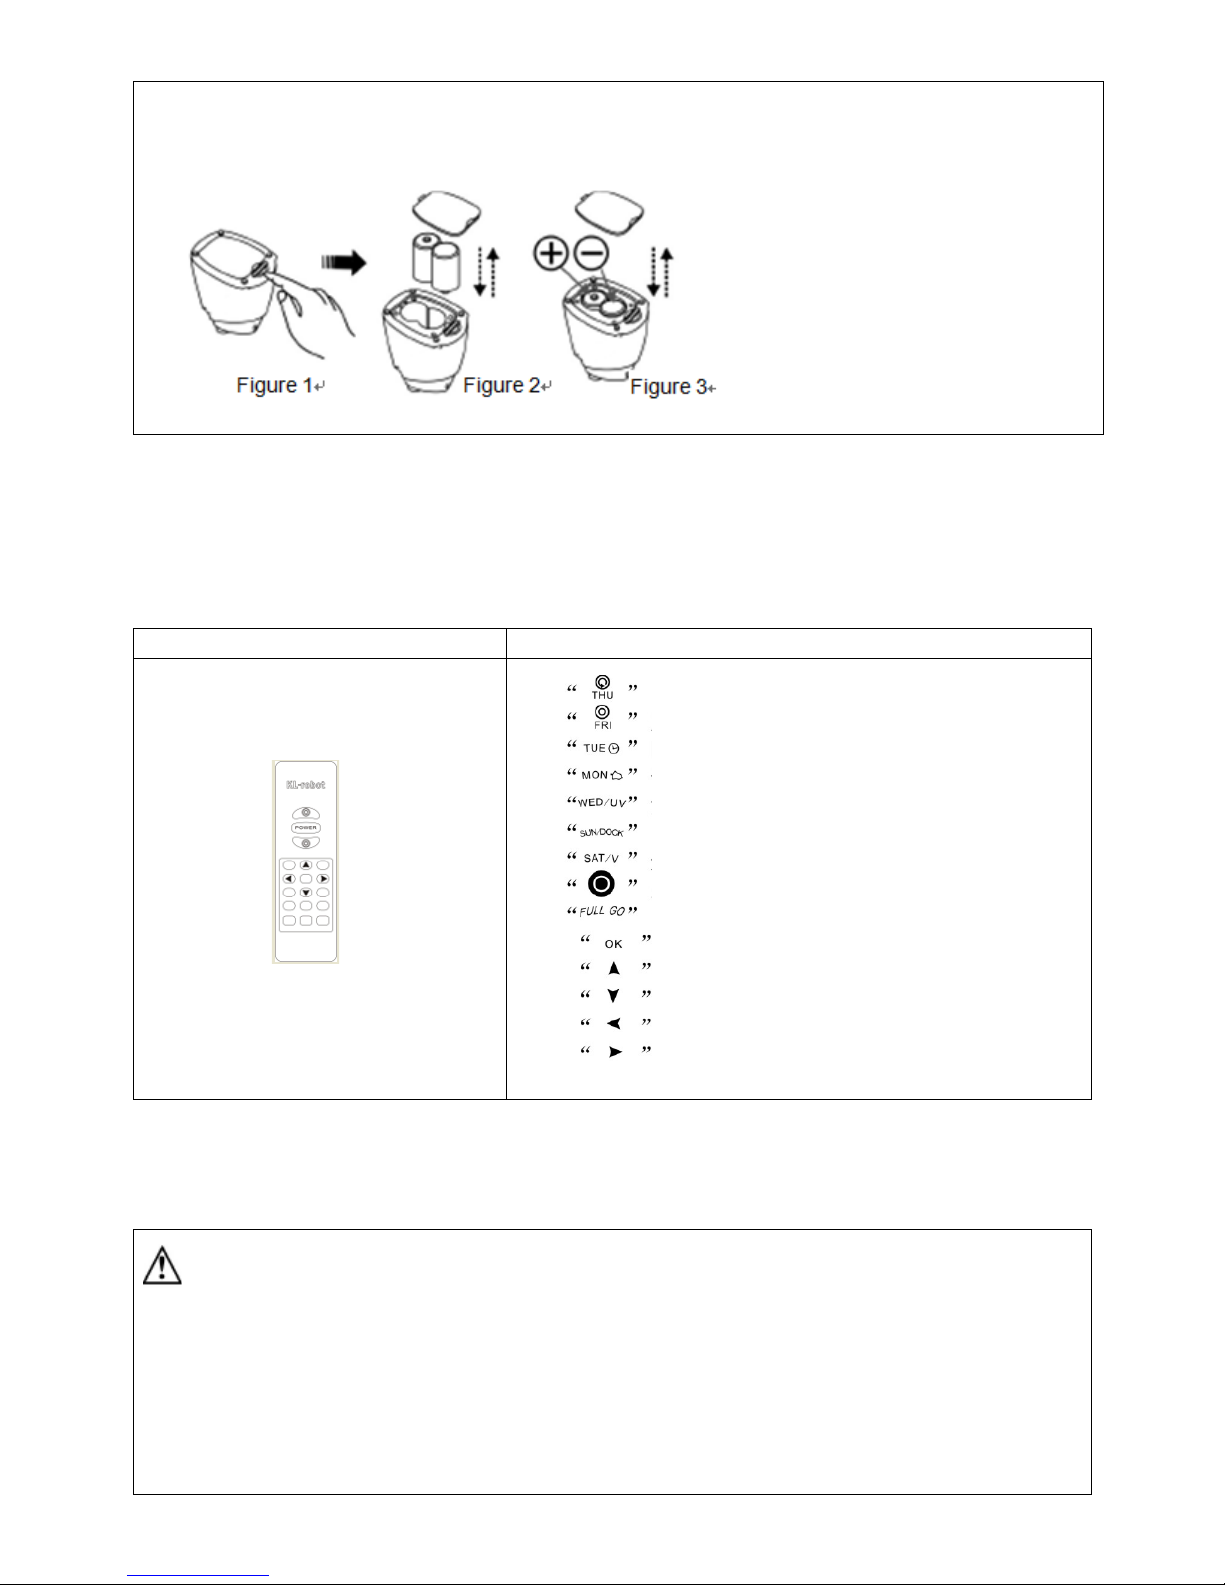
Battery replacement of the virtual wall:
1. Release the screw with the screwdriver and then
open its base plate. (Refer to Figure 1)
2. Please place the positive and negative Electrode
correctly for fear of the damage due to wrong
Electrode! (Refer to Figure 2)
Figure 1
Figure 2
Page 13
12
3. The right place of battery. (Refer to Figure 3)
4. Please take out the battery if it was unused
for
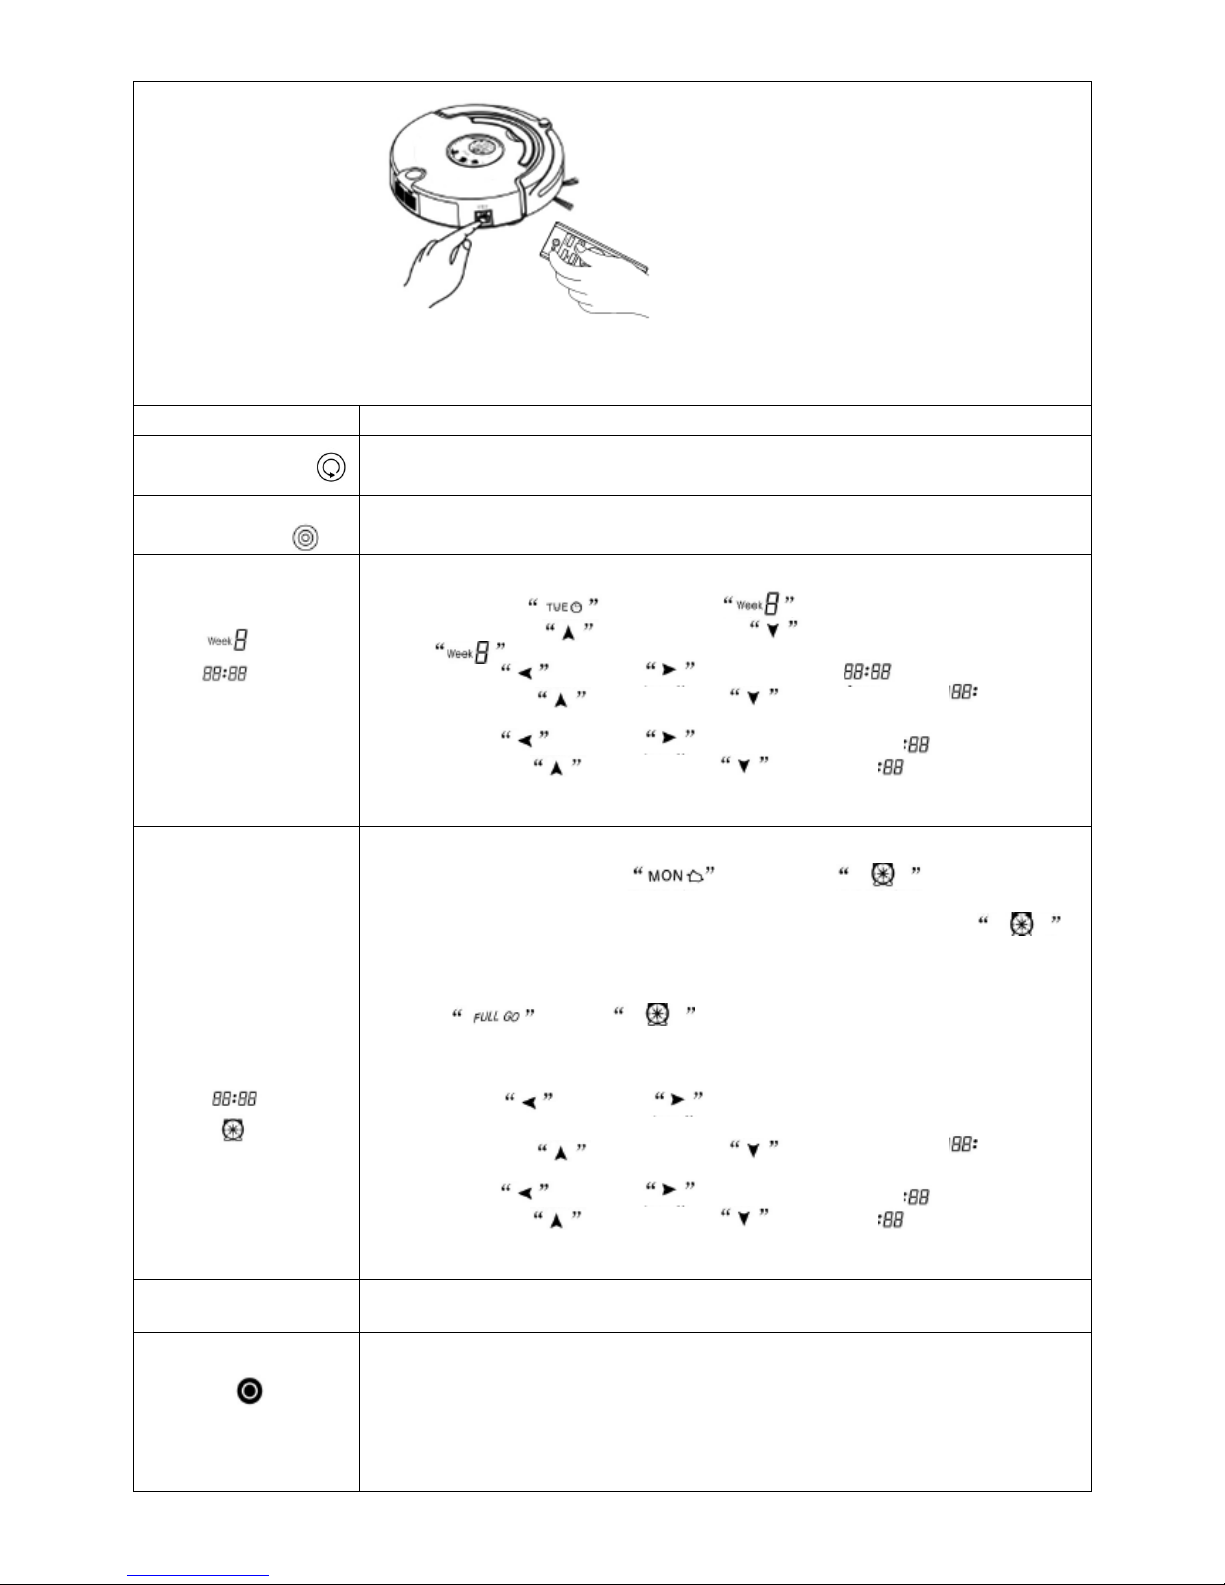
Remote Control
Overall Appearance
Key Description
1. Automatic cleaning key/Thursday
2. Spot cleaning key/Friday
3. Time set key/Tuesday
4. Reservation key/Monday
5. UV sterilizing key/Wednesday
6. Automatic recharging key/Sunday
7. Speed selection key/Saturday
8. Turn off/cancel
9. It will work automatically after the battery is full
10. Confirmation key
11. Forward key
12. Back key
13. Turn left key
14. Turn right key
14 keys in total
Using Method & Functional Status of Control Panel
: the following steps are very important, or the remote control may fail.
1. You should check code of the remote control or cleaner again while changing them after first use or maintenance.
2. Check the remote control and Cleaner have enough power, turn off
the Cleaner, press OK on the remote control for more than 4s, and
then turn on the Cleaner without releasing OK. After the Cleaner
toots twice, release OK, then the code check set is finished.
3. If you fail to hear toot during the code check, just repeat the above
process.
Page 14
13
Function Guide
Function Information
Automatic Cleaning
Press the key, the Cleaner will clean in the automatic mode as per the pre-set speed. Press
the key again, the Cleaner will stop running. The function cannot be memorized.
Spot Cleaning
Press the key, the Cleaner will clean in the timing mode as per the pre-set speed. Press the
key again, the Cleaner will stop running. The function cannot be memorized.
Week & Time Set
Week and time set:
1. Turn on the Cleaner.
2. Press Time Set , then the icon will flicker.
3. Press Upward and Downward to select the week you’d like.
In , 1 means Sunday, 2 means Monday, accordingly, 7 means Saturday.
4. Press Left and Right to enter Time Set after week selection.
5. Press Upward and Downward again to select the hour you’d
like.
6. Press Left and Right again to enter the minute flickering.
7. Press Upward and Downward to select the minute you’d like.
8. After finishing Week & Time Set, press “OK” to save it and then exit Week &
Time Set.
Reservation Cleaning
Reservation Time of Automatic Cleaning:
1. Turn on the Cleaner.
2. Press Reservation Cleaning , then the icon will flicker.
3. Press the key from Sunday to Saturday when you want to reserve cleaning on any
day during a week or every day, then the selected date will flicker. In , 1
means Sunday, 2 means Monday, accordingly, 7 means Saturday.
4. Press any date from Sunday to Saturday when you want the reserve interval or
cleaning time for several days per week, then the selected date will flicker.
5. Press , “D” in will flicker, and then you can select automatic
cleaning after charging or reservation time per day.
6. Press SUN, MON, TUE, WED, THU, FRI, SAT and TULL GO in week set to delete
or select reservation date.
7. Press Left and Right to enter reservation time set after setting the
reservation date per week.
8. Press Upward and Downward again to select the hour you’d
like.
9. Press Left and Right again to enter the minute flickering.
10. Press Upward and Downward to select the minute you’d like.
11. After finishing Reservation Date & Time Set per week, press “OK” to save it and
then exit Reservation Date & Time Set.
V Speed selection
Press the key repeatedly, you can choose fast first gear and slow second gear. It will have
automatic memory after the speed selection.
Turn off/cancel/stop
1. Turn on the power switch of the cleaner, and press the key to turn on/off the Cleaner
in case of the normal function state on the display.
2. You can stop the running mode by pressing the key under various modes while the
Cleaner is on.
3. You can delete and return to the original reservation, week and time set if you get
wrong sets or want to stop setting.
Page 15
14
4. Press the key for more than 5s, you can delete all set and memory and return to the
initial state before the Robot leaves the factory.
OK key
1. You should press “OK” to save the set and exit Reservation Date Set after finishing
the reservation date setting.
2. You should press “OK” to save the set and exit Reservation Time Set after finishing
the reservation time setting.
UV lamp key
You can turn on/off UV lamp by pressing the key while the Robot is in the Standby mode
or running. The on/off set will be memorized automatically.
DOCKING Automatic
recharging
While the Cleaner is in the Standby mode or running, the Cleaner will search the Docking
Station for charging after you press the key. While the Cleaner stops running, the Cleaner
will stop recharging after you press the key again.
Forward key
Press “Forward”, the Cleaner will run forward cleaning as the arrow, press “Off” to stop.
It will stop automatically in case of the obstacle.
Backward key
Press “Backward” for long, the Robot will run backward cleaning as the arrow, and it will
stop after you release the key.
Turn left key
Press “Turn left” for long, the Cleaner will turn counterclockwise in situ, and while you
release the key, it will run forward as you expected. Press “Off” to stop the Robot. It will
stop automatically in case of the obstacle.
Turn right key
Press “Turn right” for long, the Cleaner will turn counterclockwise in situ, and while you
release the key, it will run forward as you expected. Press “Off” to stop the Robot. It will
stop automatically in case of the obstacle.
:
1. You should use the remote control within 10m (radio signal scope), or you may fail to control the main body.
2. The Cleaner may fail to find the Docking Station due to the obstacle, complex condition or because the battery was
used out while you press Auto charging.
Auto Charging Docking Station
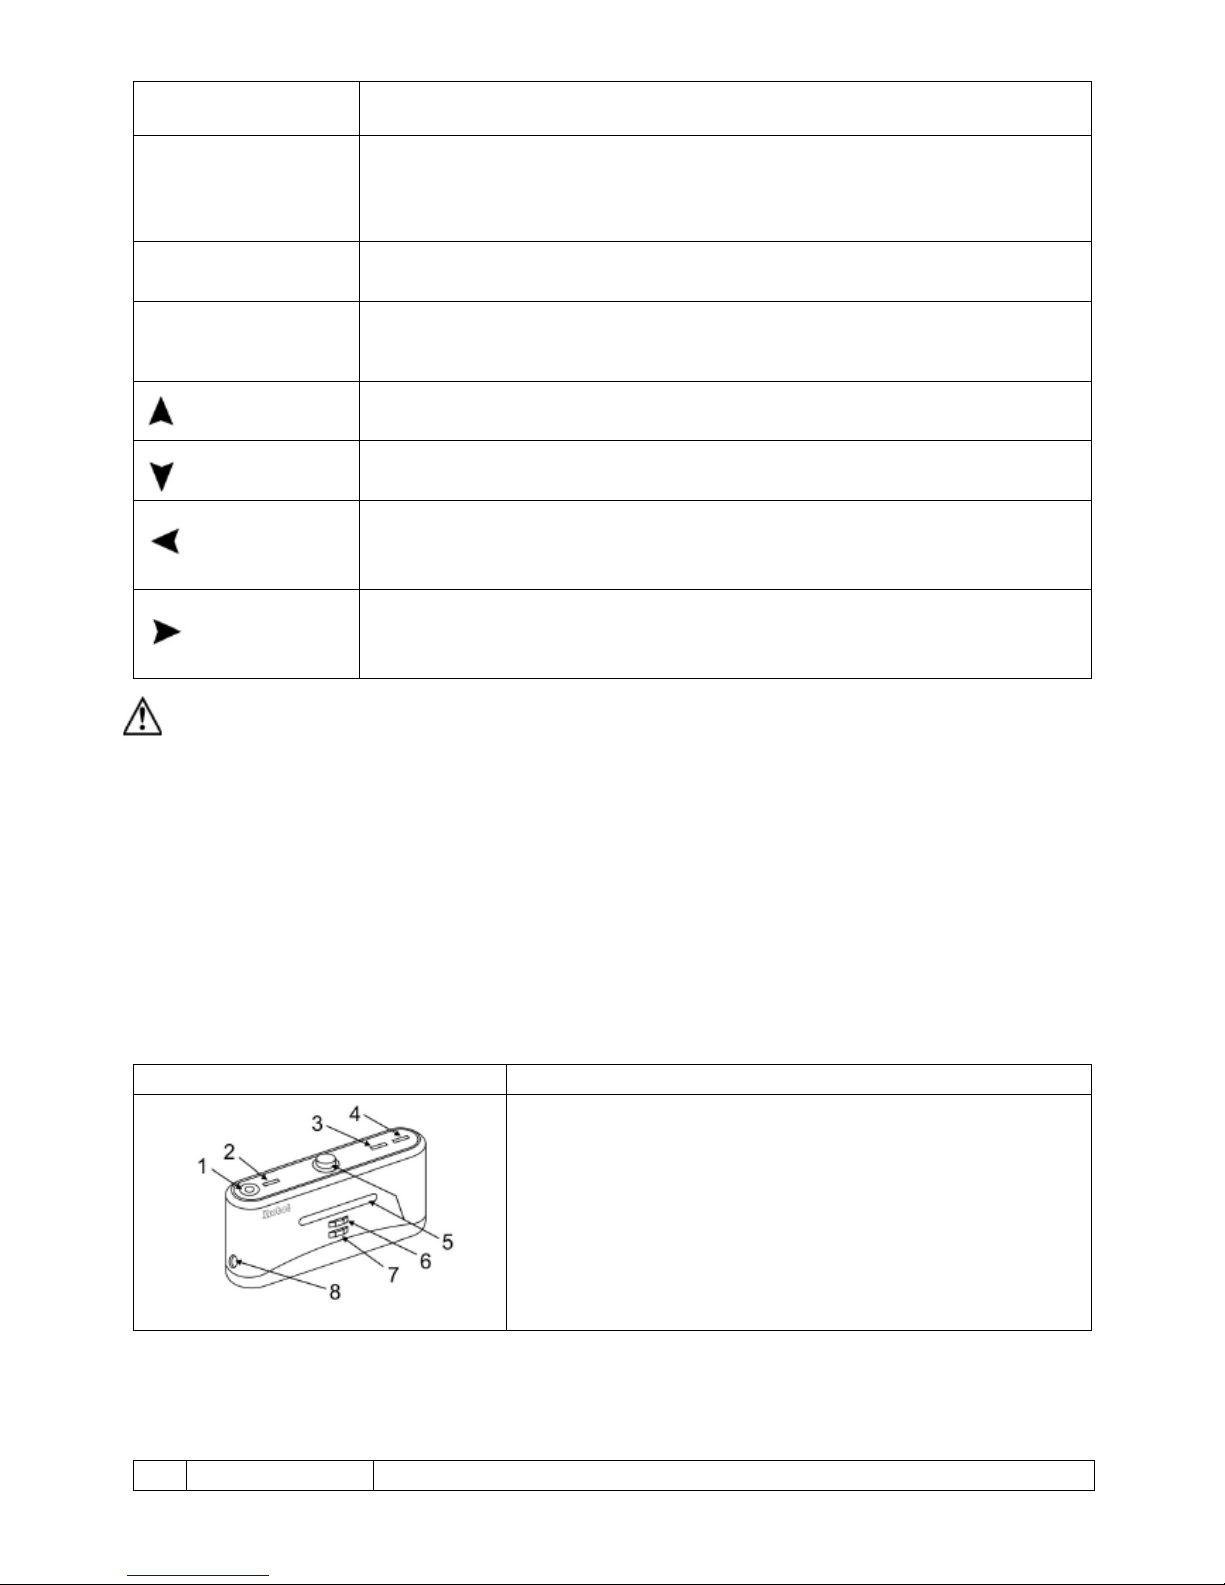
The Docking Station Display and Control Panel
Overall Display
Function Instructions
1. LED decorative light (a little essence can be placed above)
2. Decorative light switch
3. Power LED
4. Charging indicator
5. Signal transmitting
6. Charging positive electrode
7. Charging negative electrode
8. Charging power DC socket
Using Method & Functional Status of the Docking station
No.
Function Guide
Function Information
Page 16
15
1
LED decorative
light
Turn on the decorative light to activate the atmosphere, and place in the glowing center
of the light a little essence, which will give off charming aroma after heating.
2
Decorative light
switch
Press the switch to turn on/off while the decorative light is on.
3
Power LED
The Power LED will light when the Docking Station is connected with the power, or
turn off if not connected.
4
Charging indicator
The indicator will flicker while the recharger is connected with the cleaner.
5
Signal transmitting
Transmitting signal is the only way to lead the cleaner to return the Docking Station for
charging, so the signal transmitting position should be clean for long without any
obstacle on it.
6、7
Recharging positive
& negative electrode
The electrode and that of the Cleaner are connected to charge under contact mode, so
the position should be clean without any obstacle on it while using, or there will be
impact to the charging.
8
Charging power DC
socket
The power DC socket, called recharger for short, used to connect output terminal
DC24V of the adaptor, is the charging transit station between the Cleaner and adaptor,
so the recharger should be placed against the wall firmly and the adaptor cable should
be away from the recharger, or the Robot may have impact and winding during
cleaning.
:
Some essence may damage the plastic surface, so please make purchase and use after consideration.
Installation of Auto Charging Docking Station and Charging for the cleaner
Automatic recharging:
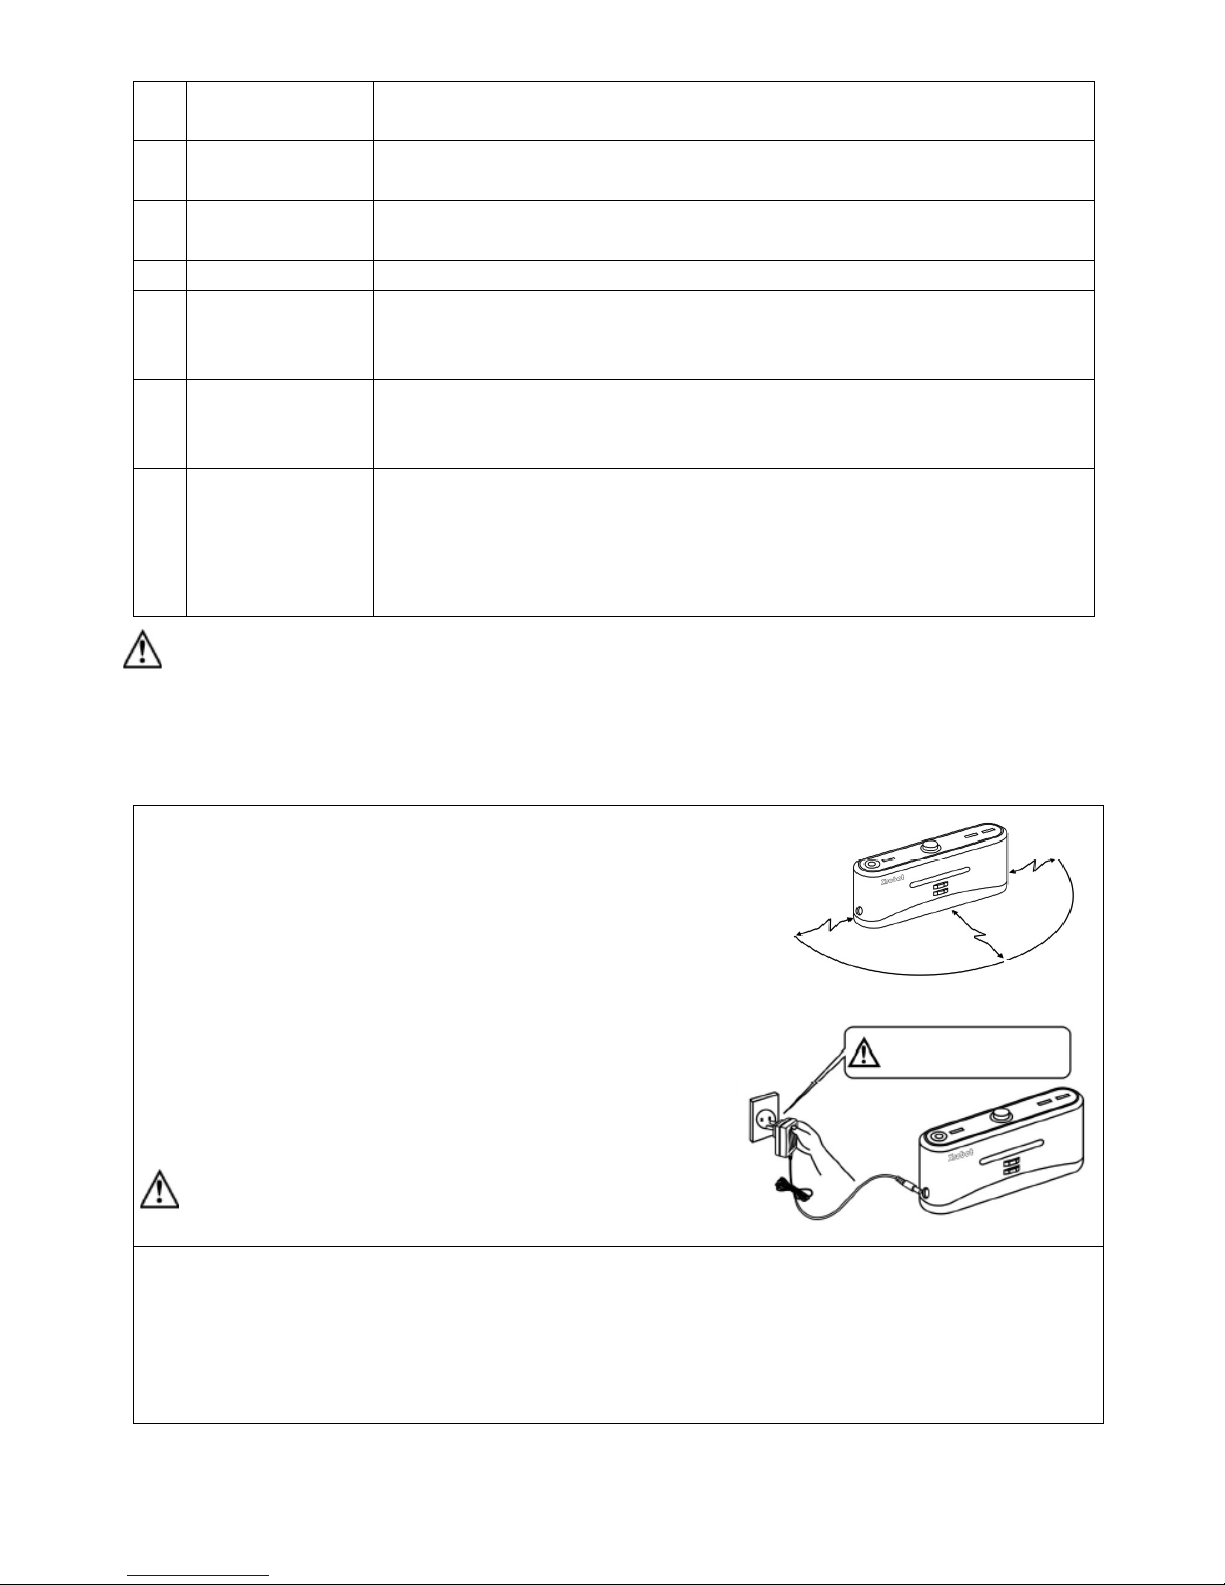
1. Install the Docking Station on the flat ground firmly and
against the vertical wall.
2. No obstacle or hollow areas 3m away from the Docking
Station in the front and 0.5m on the right and left. (Refer to
Figure 1)
3. The Cleaner cannot search the Docking Station for charging
if the infrared signal transmitting window of the recharger is
covered.
4. Connect the output terminal of the adaptor with DC socket of
the Docking Station. (Refer to Figure 2)
: Please put the power cord of the adaptor in order and place
it along the wall, or it may affect the automatic recharging.
Manual charging:
1. You can use the adaptor or Docking Station of the
Cleaner to charge for the main body directly.
2. Connect the output terminal of the adaptor with
DC socket of the main body while using the
adapter for charging. (Refer to)
0.5m
0.5m
3m
Figure 1
High Voltage! Electrical
hazard! Please dry your
Figure
Page 17
16
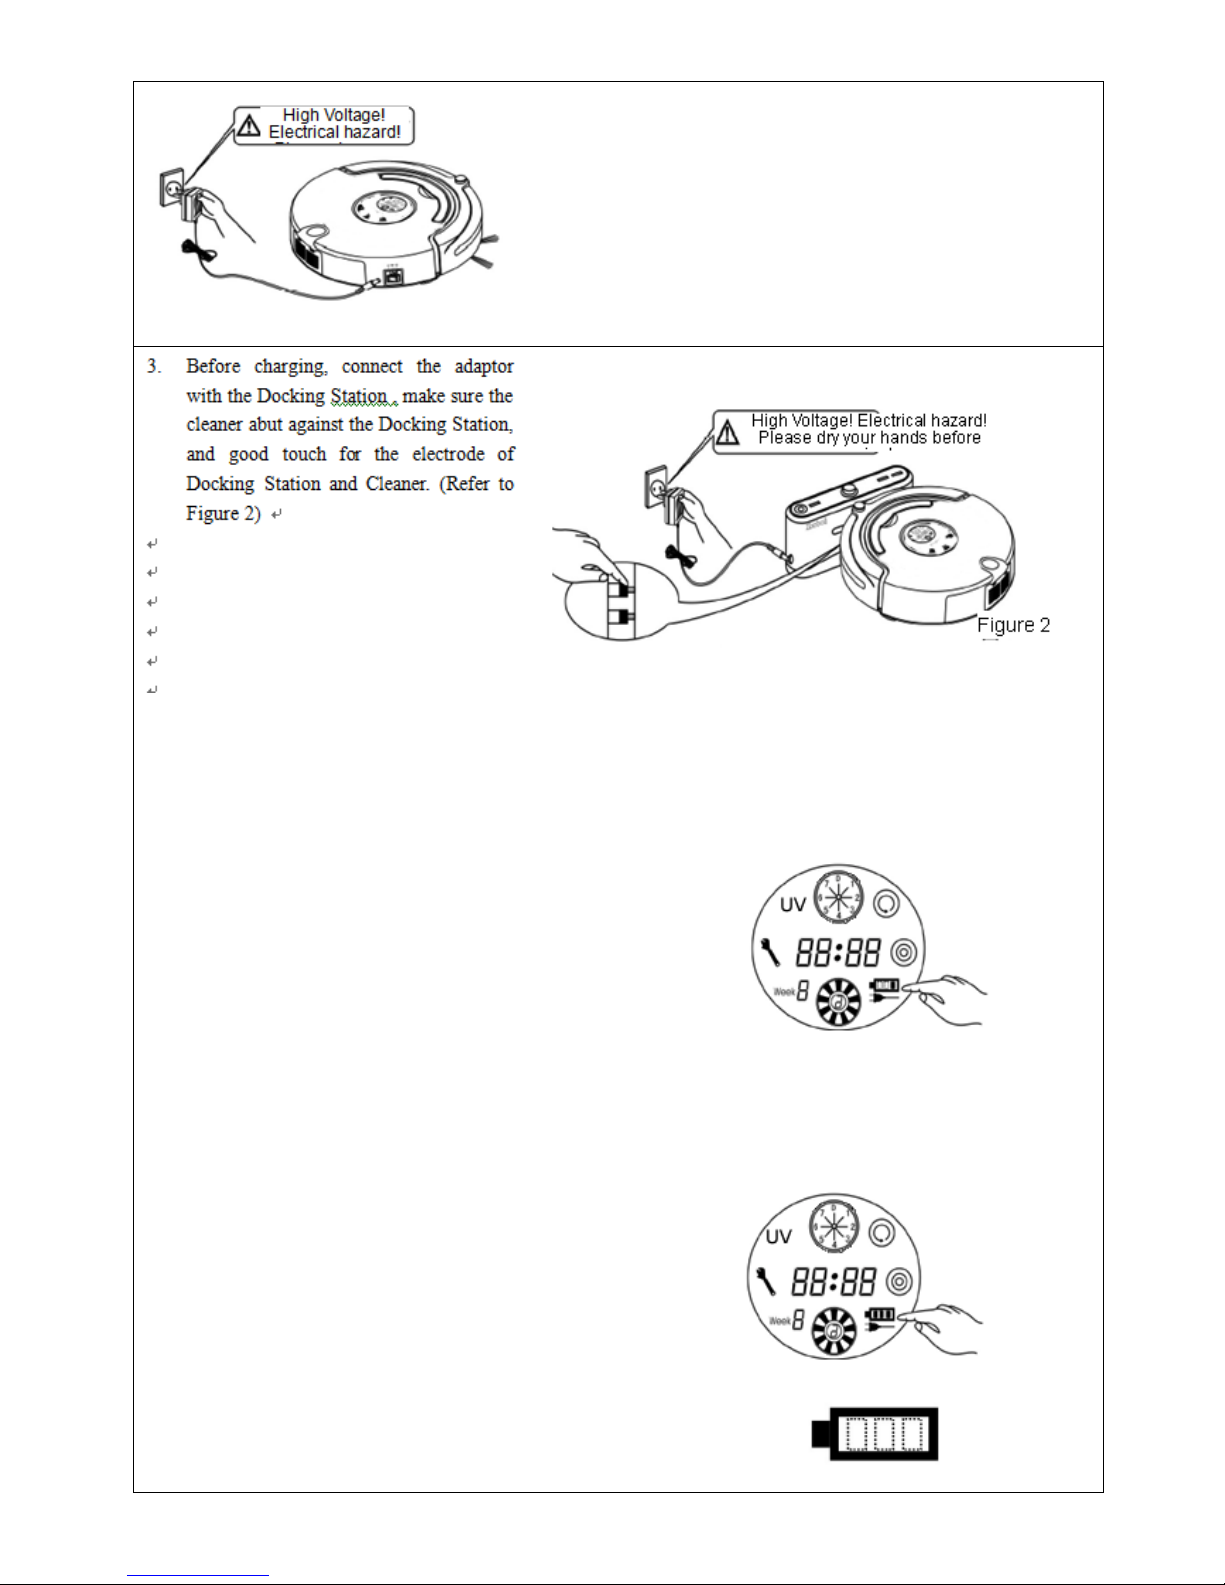
4. Press DOCKING in the remote control if you want to
charge for the main body, the Cleaner will search the
Docking Station for charging within available scope
automatically.
5. Press any key in host panel or POWER OFF and
DOCKING keys in the remote control while the
Cleaner is searching for the recharger, the Cleaner will
then stop searching.
Figure 3
6. After the battery is used up, the first grid of the
charging icon will flicker, when the second and then the
third grid will flicker showing it is charging, stop
flickering after completing the charging. (Refer to
Figure 3 and Figure 4)
Figure 4
7. Turn on the Cleaner, full three grids show enough
power, one grid missing means the decreased power,
and it should be charged after three grids missing.
Page 18
17
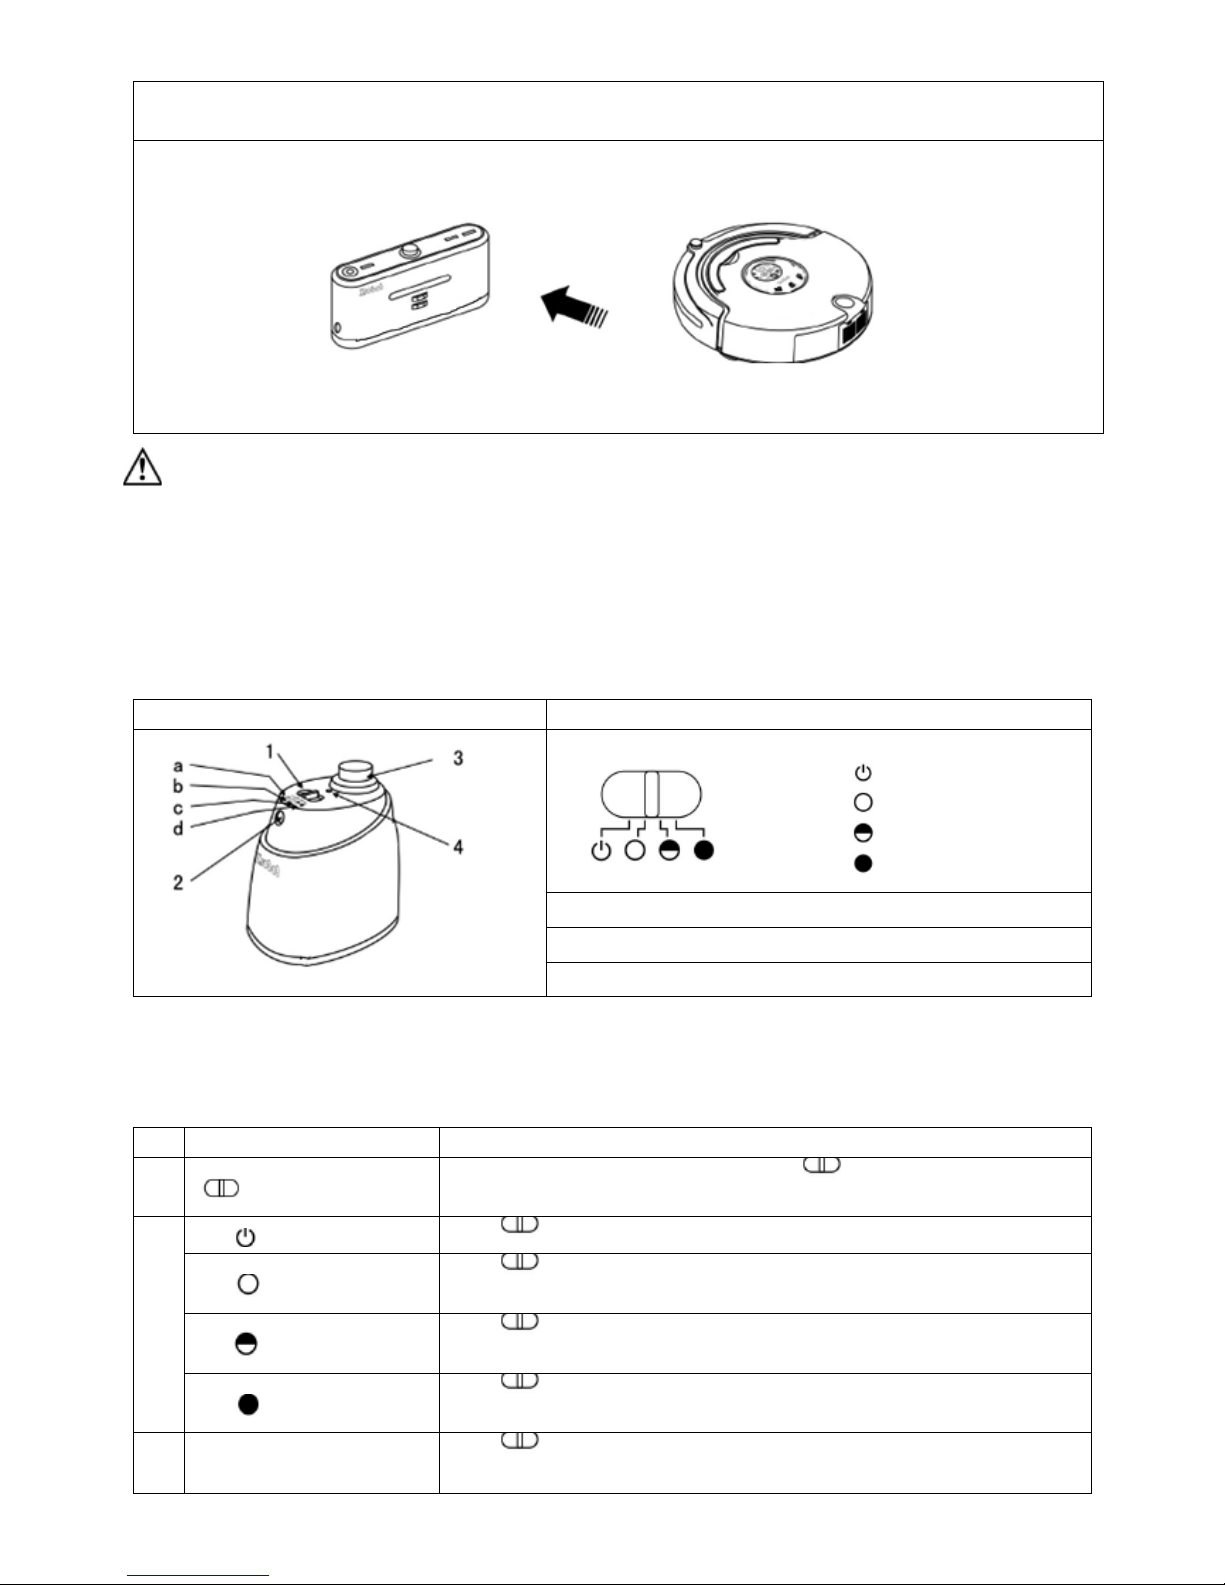
(Refer to Figure 5)
Figure 5
Automatic charging:
The Cleaner will search the Docking Station for charging automatically in case of low battery during cleaning.
: 1. The Cleaner may fail to find the Docking Station due to the obstacle, decreased battery and complex condition, so the Docking
Station should be put in wide space as far as possible.
2. When the cleaner finish cleaning , the temperature of the battery is very high ; so charging time will be longer
Virtual Wall
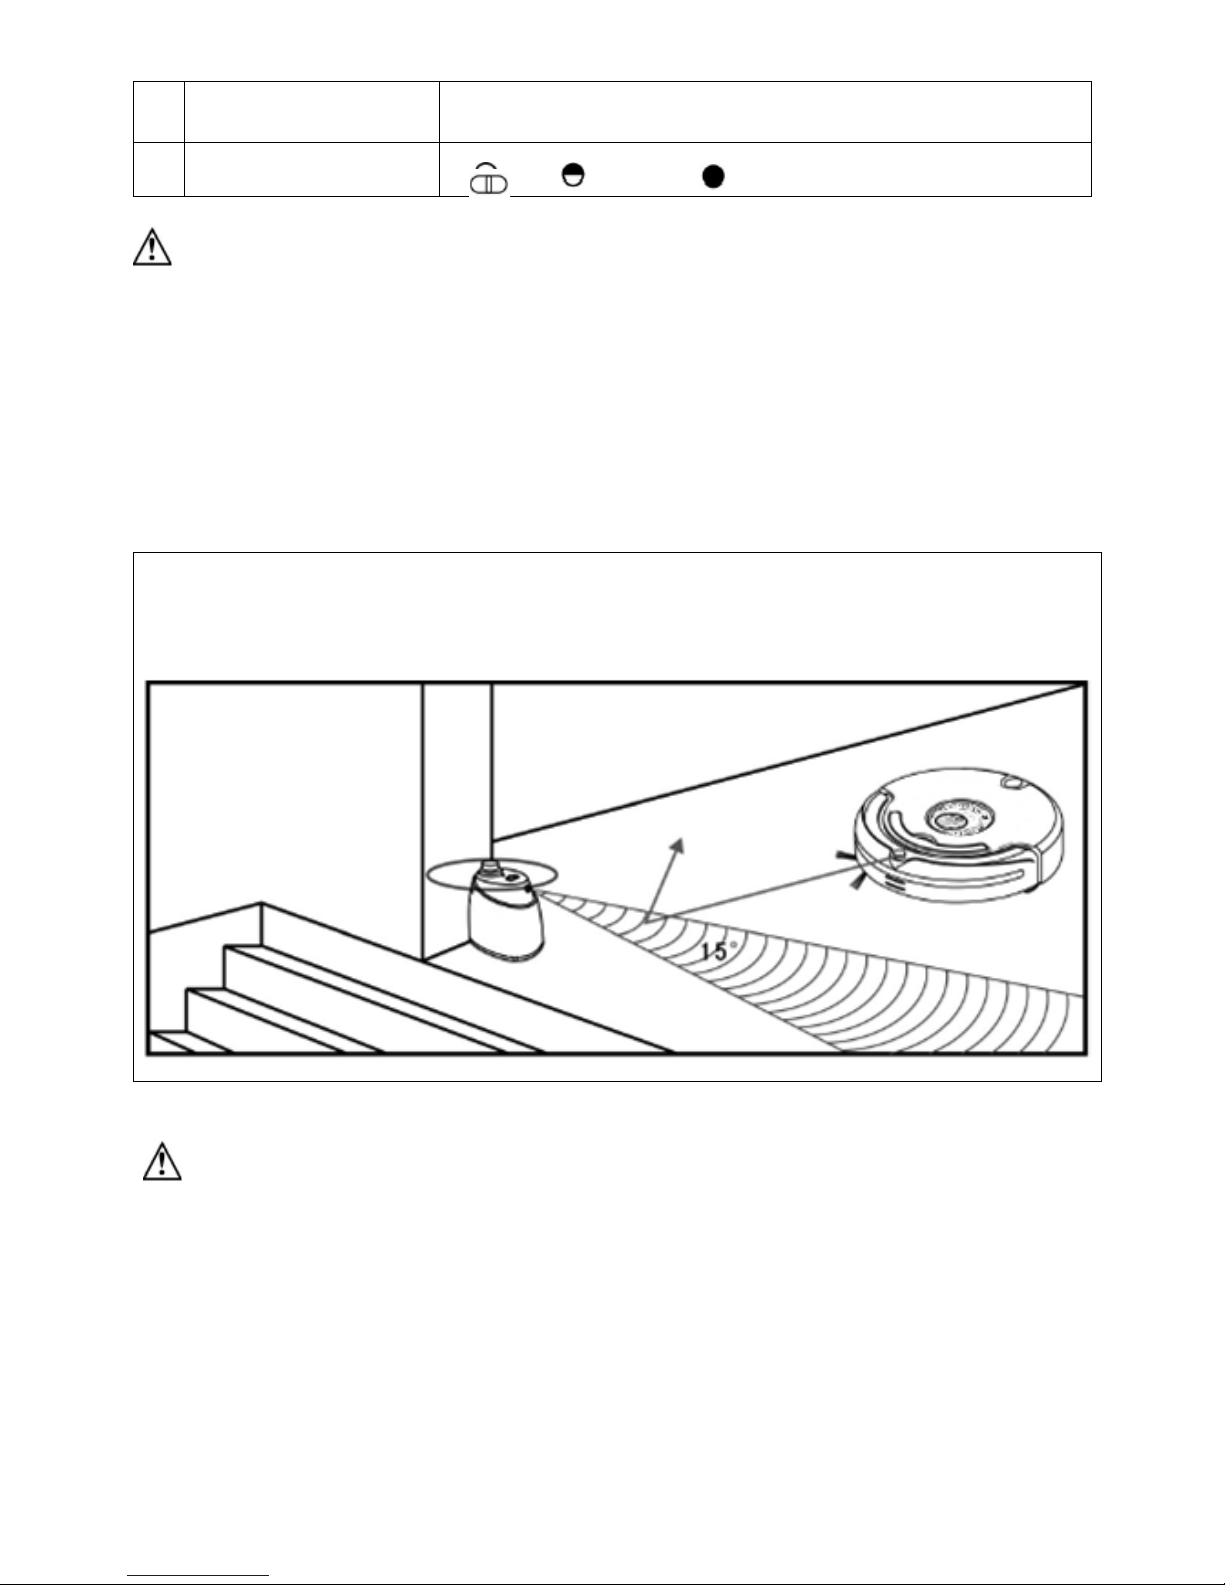
Virtual wall, an accessory of the cleaner, can block area by sending special infrared signal so as to prevent the Cleaner
from entering some unnecessary areas. It is called that because the effect is like a wall.
Virtual Wall Display and Control Panel
Overall Display
Function Instructions
1. Toggle switch
(1) Turn off
(2) Low
(3) Middle
(4) High
2. Infrared wall transmitting signal head
3. Near-infrared transmitting head
4. Power LED
Using Method & Functional Status of Virtual Wall
No.
Name
Function Information
1
Toggle switch
You can switch the function by sliding repeatedly: Turn off, Low,
Middle and High.
(1) Turn off
Slide to the position, then the power is off.
(2) Low
Slide to Low and turn on the power, you can select the distance within
4m as required by infrared wall.
(3) Middle
Slide to Middle and turn on the power, you can select the distance within
6m as required by infrared wall.
(4) High
Slide to High and turn on the power, you can select the distance within
8m as required by infrared wall.
2
Infrared wall transmitting
signal head
Slide , then you can adjust the distance of the virtual wall.
Page 19
18
3
Near-infrared transmitting
head
The near-infrared transmitting signal makes the Cleaner run outside the virtual
wall scope of 50-100cm without any impact to it.
4
Power LED
The Power LED will flicker once every 8s until the low battery after you slide
to Low, Middle and High, and the Cleaner works normally.
:
1. Open the battery bottom before using, check the right positive and negative electrode and place 2x”D” batteries into
the box correctly. Pay attention to the electrode or the virtual wall will not work, resulting the damage and accident.
2. The battery consumption duration is related to the selected transmitting distance and working duration, please select
proper transmitting distance and low transmitting power to save the battery, so don’t forget to turn off the toggle
switch while the virtual wall is unused.
3. There will be some difference in the direction, transmitting infrared signal of the virtual wall and receiving distance
of the Cleaner due to environmental impact and movement of the Cleaner during the actual using. The difference
above may vary based on the actual environment and different battery power of the Cleaner and virtual wall.
Installation method of Virtual Wall
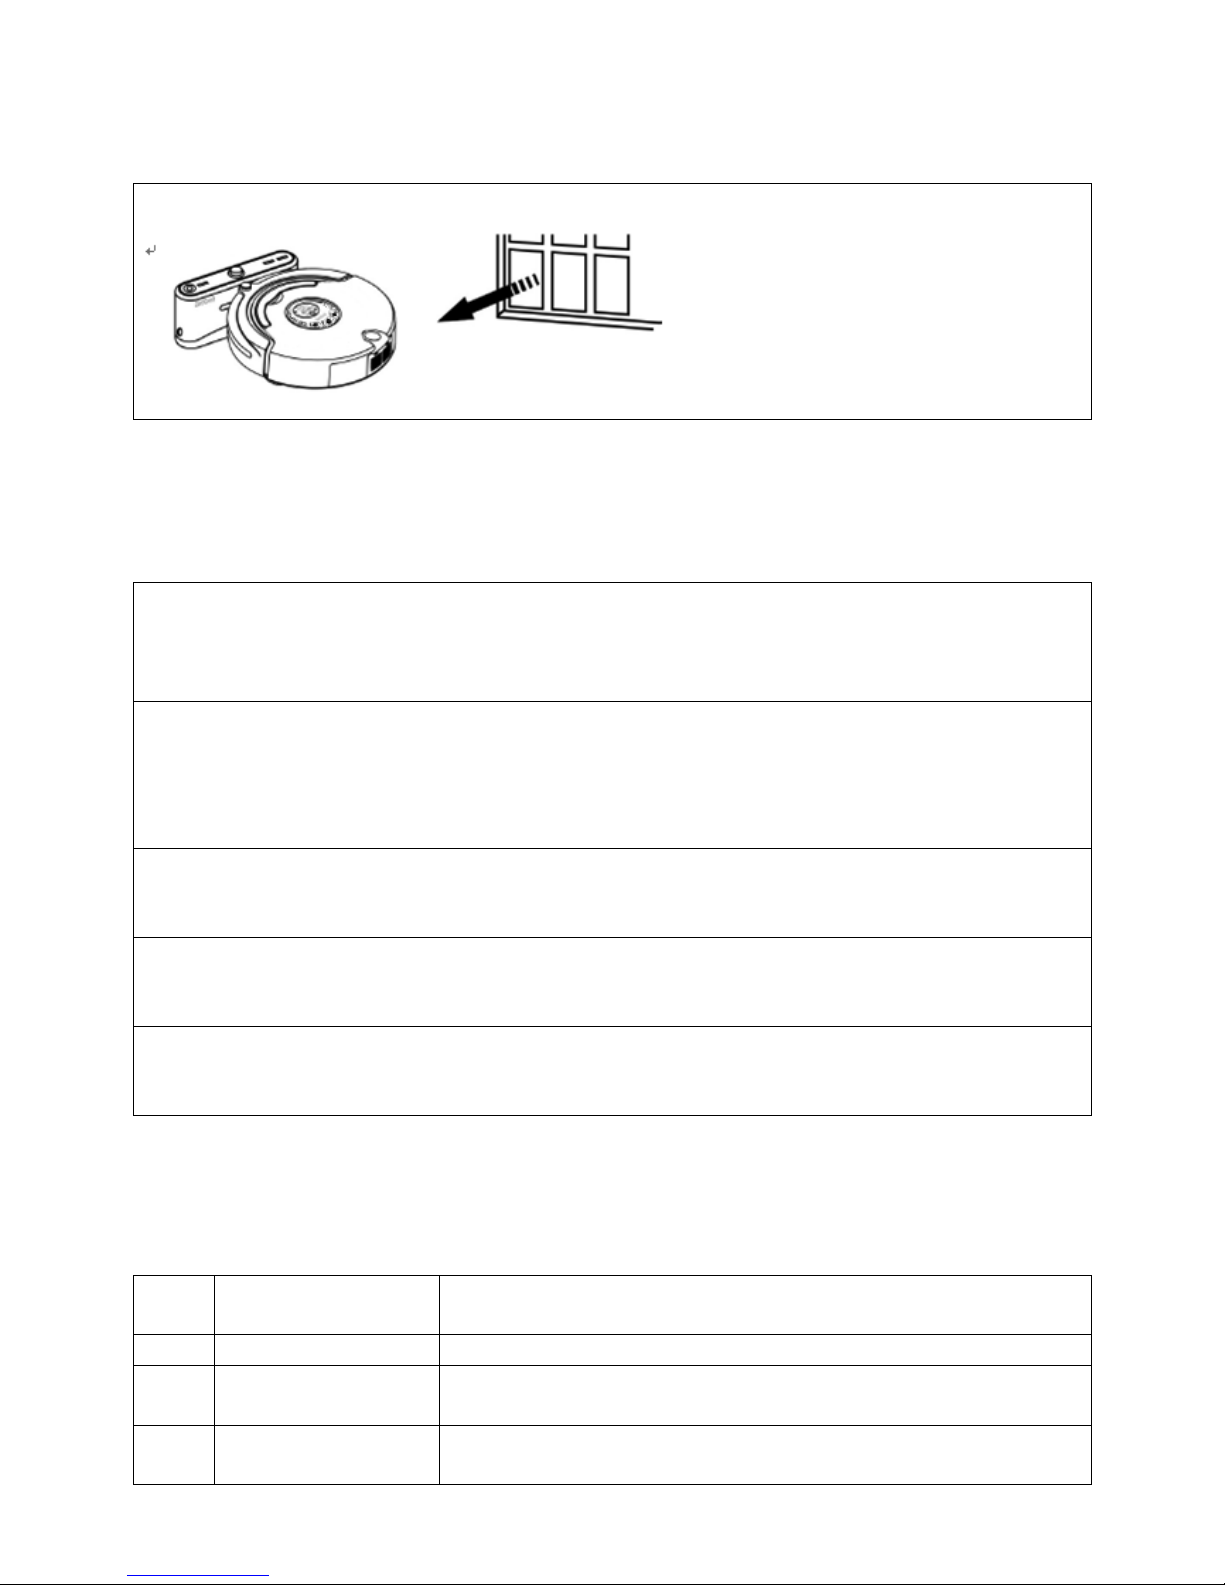
1. The virtual wall is placed at the entrance to the stair or room generally.
2. You can place the virtual wall at proper position to stop the Cleaner passing through some places.
3. Remove obstacles from the area you want to block in front of the virtual wall as much as possible for fear of
poor effect.
1.The virtual wall should be placed at the same level of the ground where the Cleaner is running.
2. You should check whether the Cleaner can pass the virtual wall while using it first.
3. The distance between the virtual wall and recharger should be more than 2.5m, or there will be interference.
4. The Docking Station should not be installed within the signal scope of the virtual wall.
Page 20
19
Storage
The Robot should be stored in dry place with good ventilation.
Trouble shooting
The Cleaner doesn’t work or clean poorly
1. Check whether turning on the switch.
2. Check whether the dust box, filter and intake are clean, and whether the side brush works.
3. Check whether the battery voltage declines greatly.
The remote control doesn’t work
1. Check the battery status of the remote control.
2. Check the battery status of the Robot.
3. Whether check code between the remote control and main body.
4. Check whether the remote control is within the available scope of the signal transmitting.
The Cleaner can not charge
1. Check whether the adaptor is connected well with the charger and whether power LED of the recharger lights.
2. Check whether the battery power is too low, in case of that, charge the Cleaner with the adaptor directly.
Increased noise in cleaning
1. Clean the dust box and filter.
2. Check whether the brush or side brush is too dirty.
The Cleaner stops working suddenly and rings intermittently
1. Check whether the set cleaning time is over.
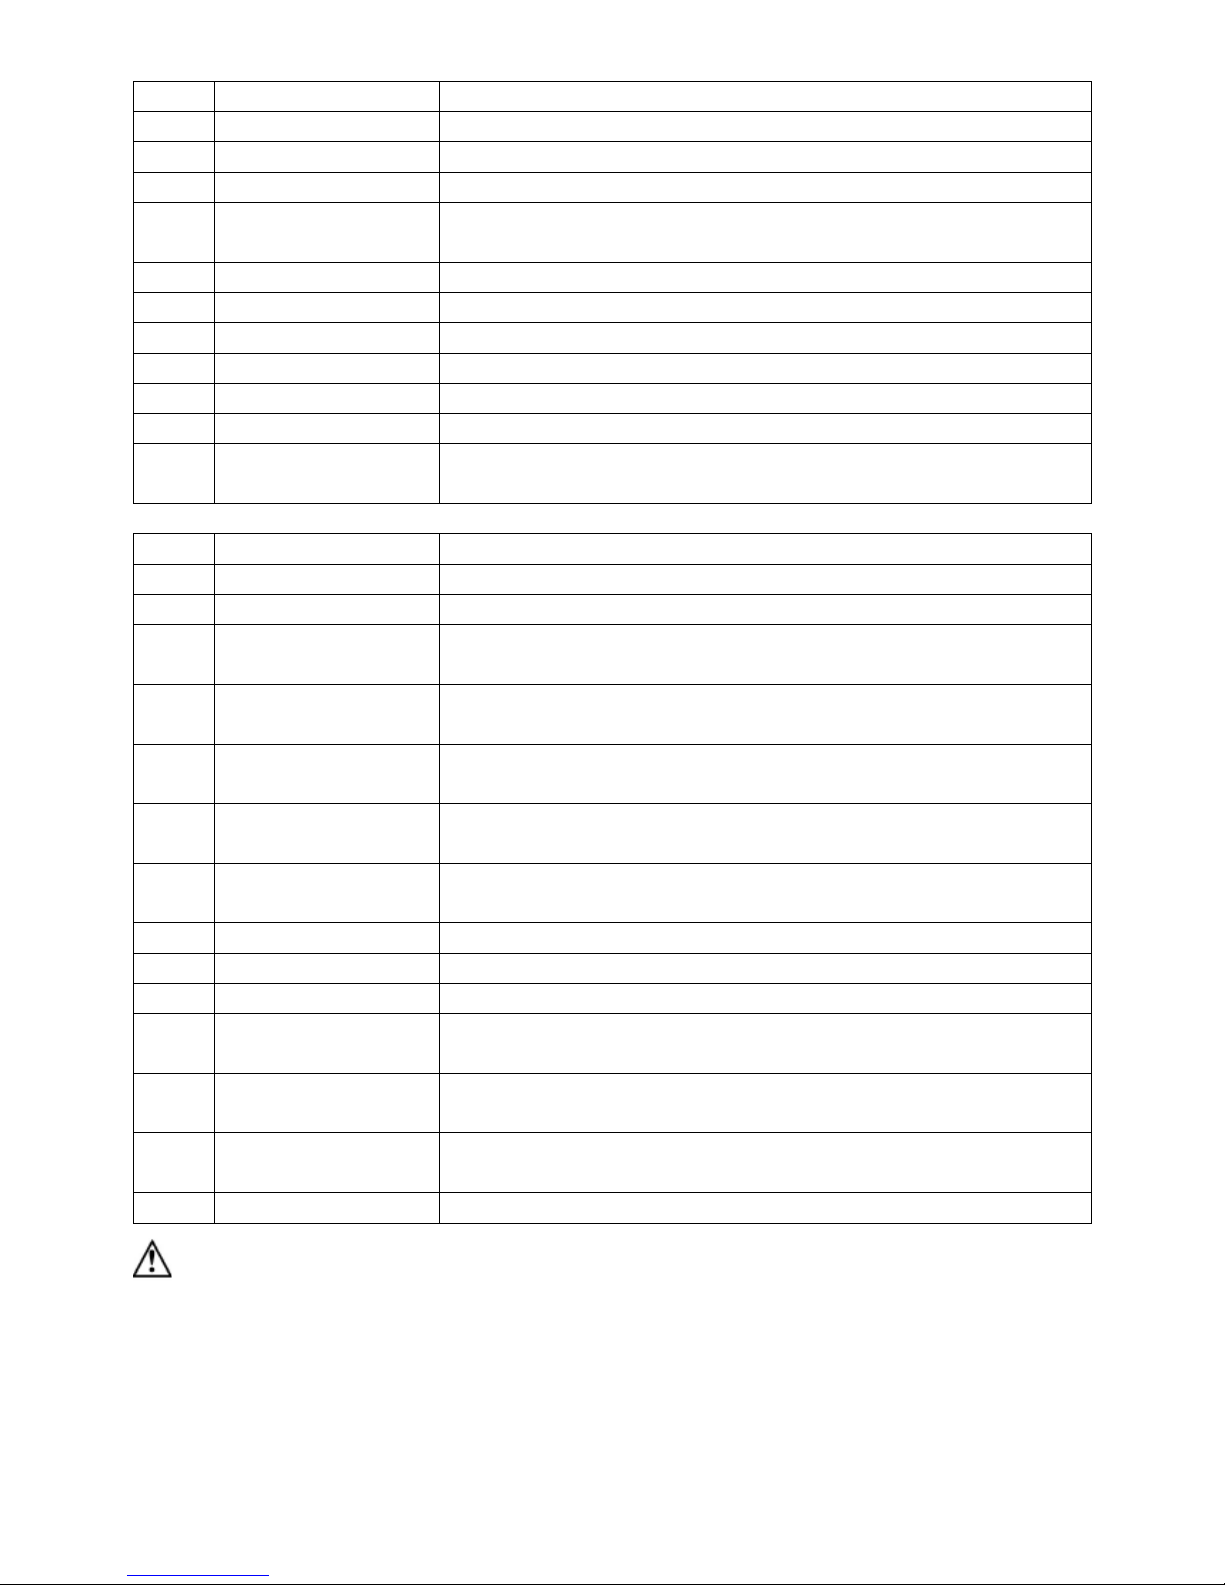
2. Check whether there are failure codes on the display by reference of the followings.
Error Codes
Failure
Code
Failure Cause
Failure identify content
E001
Left ground detection
The sensing head was blocked or the cleaner was jammed on the step.
E002
Left-middle ground
detection
The sensing head was blocked or the cleaner was jammed on the step.
E003
Right-middle ground
detection
The sensing head was blocked or the cleaner was jammed on the step.
Page 21
20
E004
Right ground detection
The sensing head was blocked or the cleaner was jammed on the step.
E005
Left collision
The left of front housing was jammed and cannot return.
E006
Right collision
The right of front housing was jammed and cannot return.
E007
Left wall detection
The cleaner was jammed near the obstacle.
E008
Left-middle wall
detection
The cleaner was jammed near the obstacle.
E009
Middle wall detection
The cleaner was jammed near the obstacle.
E010
Top infrared receiving
It fails to receive due to the block of the obstacle or was damaged.
E011
Left infrared receiving
It fails to receive due to the block of the obstacle or was damaged.
E012
Middle infrared receiving
It fails to receive due to the block of the obstacle or was damaged.
E013
Right infrared receiving
It fails to receive due to the block of the obstacle or was damaged.
E014
Right wall detection
The cleaner was jammed by the obstacle.
E015
Right-middle wall
detection
The cleaner was jammed by the obstacle.
E016
Middle brush current
The cleaner was jammed by the obstacle.
E017
Dust blower current
Dust blower motor was jammed or damaged.
E018
Low battery
On charging
E019
No speed detection of the
left wheel
The left wheel and speed grating was damaged.
E020
No speed detection of the
right wheel
The right wheel and speed grating was damaged.
E021
No rotational speed of the
front wheel
The front wheel was jammed or speed grating was damaged.
E022
The left wheel is off the
ground
The left wheel is falling on the step or off the ground, the switch was damaged.
E023
The right wheel is off the
ground
The right wheel is falling on the step or off the ground, the switch was
damaged.
E024
Battery temperature
Too high, please turn off and wait for a while and then turn on.
E025
Battery NTC short circuit
Battery temperature sensor was short circuit or damaged.
E026
Battery NTC open circuit
Poor contact of battery temperature sensor was short circuit or damaged.
E031
Excessive current in right
wheel motor
The left wheel was jammed or motor was damaged.
E032
Excessive current in left
wheel motor
The right wheel was jammed or motor was damaged.
E033
No current in dust box
motor
No dustbin or poor contact of the line, the motor was damaged.
E034
Middle brush failure
Poor contact of middle brush, the motor was damaged.
Provided that the failure still exist after the above check, please contact the after-sale service maintenance, professional
maintenance staff or the technical center of the company, don’t disassemble and maintain it by yourself.
Page 22
21
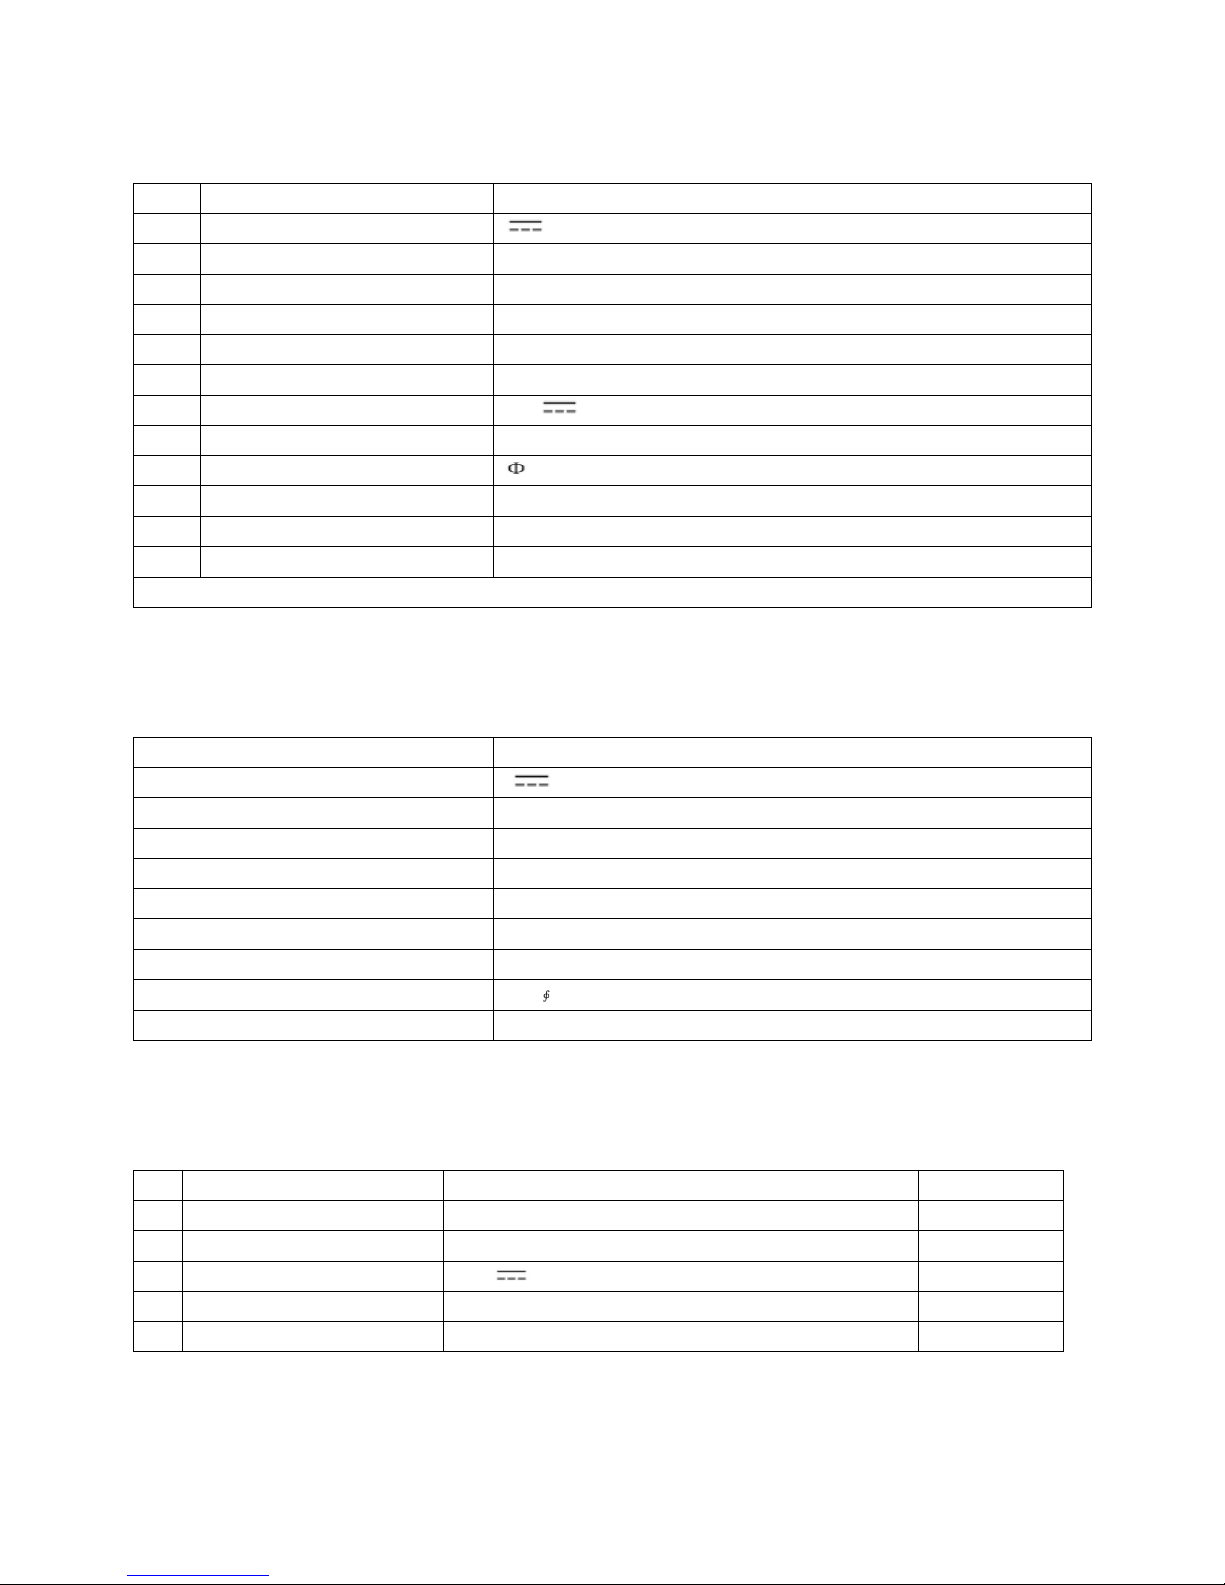
Technical Specifications
Model
KL-XXX
1
Rated Voltage
14.4V
2
Battery
Rechargeable battery (the charge time is about 3-4h)
3
Working Hours
About 60~90min
4
Rated Power
<24W
5
Operating Temperature Range
-10~45
6
Operating Humidity Range
≤85RH
7
Input Voltage/Current
24V 1A
8
Wireless Remote
ISM Frequency Band 2.4GHz
9
Specification
320×87mm (including the wheel height)
10
Weight
3.2kg
11
Battery Capacity
1500mA
12
Dustbin Capacity
350mL
Place of Origin : China
Technical Specifications of Remote Control
Applicable Models
KL-XXX
Rated Voltage
3V
Battery
2 AAA batteries
Remote Mode
ISM Frequency Band 2.4GHz
Receiving & Transmitting Distance
≥10M
Transmitting Power
0dB
Operating Temperature Range
-10~45
Operating Humidity Range
≤85RH
Specification
100×25mm (thickness)
Weight
0.08kg
Technical Specifications of Docking Station
No.
Models
Parameters
Remark
1
Specification
L×W×H: 200×51×102mm
2 Weight
0.23kg
3 Rated Voltage
24V
4 Operating Temperature Range
-10~45
5 Operating Humidity Range
≤85RH
Page 23

22
Technical Specifications of Virtual Wall
No.
Models
Parameters
Remark
1
Specification
L×W×H: 102×71×106mm
2 Weight
0.14kg
3 Rated Voltage
3V
4 Operating Temperature Range
-10~45
5 Operating Humidity Range
≤85RH
 Loading...