

Page 1

Important: C heck w
w
Tan
g
Crowbus
h
Toddin
g
www.t
a
U
s
w.tang
e
gent Wav
e
h Farm, L
u
ton, LU5
6
ngentwa
v
Mode
ers
M
ntwave.
Ltd.
ton Road,
HU, UK.
e.co.uk
No.
C
an
u
rev 3
o.uk fo
r
P30
0
al v
1
r updat
e
.4
s.
Page 2

Wave - CP300 - Control Panel - Users Manual v1.4 rev 3
1
Table of Contents
1. Important safety instructions / Instructions De Sécurité Importantes .................................. 2
2. CE Declaration of Conformity ............................................................................................. 3
3. FCC Compliance Statement ............................................................................................... 3
4. Disposal and Recycling information .................................................................................... 3
5. About this manual ............................................................................................................... 4
6. What’s in the box ................................................................................................................ 4
7. About Wave ........................................................................................................................ 5
7.1 Drivers ........................................................................................................................... 5
7.2 Power and communication ............................................................................................ 5
8. Positioning and use of the panel ......................................................................................... 5
9. Getting started .................................................................................................................... 6
10. Test mode ......................................................................................................................... 6
10.1 Version ........................................................................................................................ 7
10.2 USB state .................................................................................................................... 7
10.3 Knobs and dials ........................................................................................................... 7
10.4 Buttons ........................................................................................................................ 7
10.5 Trackerballs ................................................................................................................. 7
11. Trouble-shooting ............................................................................................................... 8
11.1 A button doesn’t work .................................................................................................. 8
11.2 A knob doesn’t seem to work ...................................................................................... 8
11.3 A trackerball doesn’t seem to work ............................................................................. 8
11.4 My software isn’t communicating with the panel ......................................................... 9
12. Care of your panel ............................................................................................................ 9
13. Firmware updates ............................................................................................................. 9
14. Connecting the Wave to Da Vinci Resolve ..................................................................... 10
14.1 Connection ................................................................................................................ 10
14.2 Setting up communication with Resolve .................................................................... 10
14.3 Important Note ........................................................................................................... 10
15. Connecting the Wave to Color (Apple) ........................................................................... 11
15.1 Introduction ................................................................................................................ 11
15.2 Installing the software ................................................................................................ 11
15.3 Configuring Color to use your Wave panel ................................................................ 12
16. Connecting the panels to Scratch (Assimilate) ............................................................... 14
16.1 Connection ................................................................................................................ 14
16.2 Setting up communication with SCRATCH ............................................................... 14
16.3 Setting up the default panel mapping ........................................................................ 14
17. Connecting the Wave to Speedgrade / Framecycler (Iridas) .......................................... 15
17.1 Overview ................................................................................................................... 15
17.2 Setup ....................................................................................................................
..... 15
17.3 Changing the sensitivity of trackballs, wheels and knobs ......................................... 15
Page 3

1.
Imp
o
rtant safe
t
y instructi
Read t
h
Keep t
h
Heed al
Follow
a
Do not
Install
a
Do not
registe
r
produc
e
Unplug
period
s
Refer a
l
when:
o
To Lo Oo To To T
Lire les
Conser
v
Tout a
v
Respe
c
Ne pas
Nettoy
e
Installe
produc
t
Ne pas
radiate
u
Débran
c
interval
Se réfè
r
l’appar
e
o
L
o
Lo Oo S
l
o
O
Wave
-
ons / Instr
u
is manual
ese instru
l warning
s
ll instruc
t
se this a
p
nd use th
e
nstall nea
r
s, stoves,
heat.
the appar
a
of time.
l servicin
g
he appar
a
iquid has
bjects ha
v
he appar
a
he appar
a
he appar
a
instructio
n
er ces in
s
ertisseme
n
ter les ins
t
utiliser ce
t
r unique
m
selon le
m
ion.
installer p
r
rs ou app
her l'app
a
les.
er à un pe
il. Une ré
v
’appareil
a
iquide ré
p
bjets to
m
i l’appare
i
’humidité.
u s’il ne f
CP300 -
C
ctions D
e
first befor
e
ctions for
f
in this m
a
ions in thi
s
paratus n
e
panel on
l
r any heat
or other a
p
tus when
to qualifi
e
tus has b
e
been spill
e
ve fallen i
n
tus has b
e
tus does
n
tus has b
e
ns suivan
t
tructions.
t doit êtr
e
ructions
à
appareil
p
ent avec
u
ode d’e
m
ès de sou
areils pro
d
reil si cel
u
rsonnel q
u
ision de l’
a
été endo
andu à l’i
n
bés à l’int
é
il a été mi
s
onctionne
ontrol Pa
n
Sécurité I
using th
e
uture refe
nual.
manual.
ar water.
y as instr
u
sources s
u
paratus (i
it’s not go
d person
n
en damag
d on the
a
to the ap
p
en expos
e
ot operat
e
en dropp
e
es.
pris com
p
la lettre.
rès de so
u
n torchon
ploi fourn
i
rces de ch
uisant de
i-ci ne se
r
alifié pou
r
ppareil e
s
mmagé.
térieur de
rieur de l’
au conta
c
pas norm
a
el - Users
mportante
panel.
rence.
cted.
ch as rad
i
ncluding
a
ing to be
u
el. Servici
ed in any
w
pparatus.
aratus.
d to rain
o
normally.
d.
te.
rces d’ea
u
sec.
t par la ch
a
aleur; c’e
s
la chaleur.
a pas utili
s
toute révi
t néccess
a
l’appareil.
ppareil.
t de la plu
lment ou
a
Manual v
1
s
iators, he
a
mplifiers)
sed for lo
n
ng is requ
ay.
r moistur
e
.
aîne de
t-à-dire
é à de lo
n
sion de
aire:
ieou expo
s
éte renv
e
.4 rev 3
2
t
that
g
ired
.
gs
é à
rsé.
Page 4

2.
CE
D
3.
FCC
4.
Disp
o
eclaration
T
aKinreq
20
T
o
AnOp
Complian
c
T
hthe
int
in
c
sal and
R
T
h
ac
of
of Confor
m
ngent Wav
gdom dec
l
uirements
06/95/EC
a
ddington,
J
dy Knox
erations D
i
e Statem
e
is device c
o
following
t
erference,
a
luding inte
r
ecycling i
n
is symbol i
n
cording to l
its life plea
s
Wave
-
ity
Ltd of 4
C
are that ou
and other
r
nd carries
t
anuary 20
0
rector
nt
mplies wit
h
wo conditi
o
nd (2) this
ference th
a
formatio
n
dicates th
a
ocal laws a
e contact
y
CP300 -
C
rowbush
F
r Wave pro
elevant pr
o
he CE ma
r
9
h part 15 o
f
ns: (1) Thi
s
device mu
s
t may cau
s
t your pro
d
nd regulati
o
our suppli
e
ontrol Pa
n
arm, Luton
duct is in c
o
visions of
D
k accordin
g
the FCC
R
device m
a
t accept a
n
e undesir
e
uct must b
ns. When
r for dispo
s
el - Users
Road, Tod
d
mpliance
w
irectives 2
ly.
ules. Oper
a
y not caus
y interfere
d operatio
n
disposed
our produ
c
al and rec
y
Manual v
1
dington, U
n
ith the es
s
004/108/E
C
ation is su
b
e harmful
nce receiv
e
.
of properl
y
t reaches
t
cling opti
o
.4 rev 3
3
ited
ential
and
ject to
d,
he end
ns.
Page 5

5.
Abo
u
Th
pl
e
Th
inf
o
inf
o
If
y
Ta
ou
6.
Wha
t
N
ooptha
t this ma
n
is manual
a
ase check
is manual
rmation p
l
rmation b
y
ou find an
y
ngent Wav
r services
a
’s in the b
te: also i
n
tionally fit
t it may l
e
ual
pplies to
W
www.tang
e
does not
ease cont
a
the softw
a
errors wit
h
e. It is onl
y
nd produc
t
ox
cluded in
to your
W
ave resid
u
Wave
-
ave contr
o
ntwave.co.
t
ell you h
o
ct your so
f
re vendors
this man
u
through y
o
s.
the box i
ave. If yo
u
al adhesi
v
CP300 -
C
l panel (
M
uk and loo
k
w to use
f
tware ven
d
we have i
n
al or you h
ur feedba
c
s a self a
d
decide t
o
e on your
W
ontrol Pa
n
odel No.
C
under Do
w
the panel
or. Where
cluded thi
s
ave any su
k and sug
hesive
w
remove i
ave or
m
el - Users
P300). Fo
r
nloads: D
o
with your
we have
b
.
ggestions t
gestions th
rist rest.
T
t
at a late
r
ay mark t
h
Manual v
1
the latest
cumentati
o
software.
F
een provi
d
hen pleas
e
at we can
his is for
date plea
e surface
.4 rev 3
4
updates
n.
or that
ed with
contact
improve
you to
se note
of it.
Page 6
7.
Abo
u
W
aind
int
edesconmo
pri
pu
N
o
Th
no
tfunthe
7.
1
Th
wi
t
dri
v
7.
2
W
a
Th
ca
n
po
8.
Posi
t
t Wave
ve is a co
n
ustry. It do
rface to
s
igned to i
m
trols at y
o
use clicks.
maries an
d
rpose.
te: What
W
e Wave co
n
designed
ction any
o
software t
Drivers
ere are no
h all curre
er that all
o
Power a
n
ve receive
e only req
u
supply 5
0
rtable devi
c
ioning an
d
H
Ssn
T
trol panel
t
esn’t do an
oftware pa
prove sp
e
ur finger ti
p
Colourists
they will
ave will c
o
trol panel
specificall
y
f the cont
r
hat you ar
e
drivers to
nt operatin
ws your U
S
d commu
n
s its power
irement is
t
0mA thou
g
es that ca
n
use of th
e
ealth Wa
r
ome expe
r
erious inju
r
umbness,
o reduce t
h
take fre
q
times e
v
vary yo
u
keep yo
control
p
Adjust
y
Avoid r
e
Wave
-
hat is aim
e
y processi
n
ckages, m
u
ed, ease o
s without
h
will be fa
m
know how
ntrol in y
o
s designe
d
to be us
e
ols has is
n
using the
p
install for
W
g systems
:
B keyboa
r
ication
and comm
hat your c
o
h its USB
p
’t. If your i
n
panel
ning
ts believe
t
y to hands
weakness
i
e risks of
s
uent short
ery hour.
r tasks thr
o
ur shoulde
r
anel so yo
our chair a
n
sting your
w
CP300 -
C
d at the c
o
g of video
ch like y
o
f use, and
aving to
a
iliar with
t
essential i
ur softw
a
to be gen
e
d with just
ot determi
anel with.
ave. Wav
Windows,
d and mou
s
unicates w
i
mputer su
ort. Most
d
doubt che
hat use of
a
, wrists, ar
m
n these ar
e
uch injuri
e
breaks. G
e
ughout th
e
relaxed wi
u don't hav
d control
p
rists on s
h
ontrol Pa
n
lour correc
t
data itself,
ur comput
e
efficiency
o
ccess the
m
he three tr
a
t is to ha
v
re
ric. What
w
one type
o
ned by Ta
n
e uses the
Mac and
e to work
w
th your co
m
pports hig
h
esktop co
m
ck your co
m
ny human
s, neck or
as see a q
s follow th
e
t up and w
a
day.
th your elb
o
e to reach.
anel so yo
u
arp edges
.
el - Users
ion and vi
d
t just provi
d
r keyboar
d
f your soft
w
through
m
ckerball l
a
e them on
e mean b
y
f software
gent Wav
e
inbuilt HI
D
Linux. Th
e
ith your c
o
puter thro
u
power US
B
puters ca
n
puters sp
e
input devi
c
back. If yo
u
alified he
a
se precaut
i
lk around
ws at your
r wrists ar
e
Manual v
1
eo post pr
o
es a phys
i
and mo
u
are by pu
enu functi
yout for
a
the panel
generic is
. This mea
, but is de
c
drivers th
a
HID driv
e
mputer.
gh the US
B devices,
, it is only l
a
cifications.
e may cau
s
feel pain,
lth profess
i
ions:
at least a c
side. Posi
t
straight.
.4 rev 3
5
duction
cal user
se. It is
t
ting the
ns and
djusting
for this
that it is
ns what
ided by
t come
r is the
B cable.
that is it
ptop or
e
onal.
ouple of
ion your
Page 7
9.
Getti
C
o
Fi
ryoucom
lig
h
Y
o
thi
s
pa
inf
othethe
10.
Tes
By
an
d
To
Th
ng started
nnecting
t
st make su
r comput
e
puter. Th
e
t up showi
u are now
manual f
o
nel. Also
r
rmation in
Tangent
W
ir latest m
a
t mode
default th
e
your soft
w
enter the
T
Turn the
p
Make sur
e
Turn the
p
e displays
w
he panel t
o
re that the
r. Use the
USB con
ng somethi
ready to u
s
r your soft
w
efer to th
e
either this
ave web
s
nual.
panel will
are is not
est Mode,
anel off by
your soft
w
anel back
o
ill now sh
o
Wave
-
your co
m
software y
o
supplied c
a
nector is o
n
ng similar t
o
e the pane
are whic
h
manual t
h
manual or
t
ite for the
come up i
unning.
do the follo
unpluggin
g
are is not
r
n by plug
g
w somethi
CP300 -
C
puter:
u are goi
n
ble to plu
g
the rear
o
o the follo
w
l with your
will detail
at came
w
he manual
latest versi
n a test m
o
wing:
the USB
c
unning.
ing in the
U
ng similar t
o
ontrol Pa
n
g to use th
the pane
l
f the pane
ing:
software.
R
how to co
n
ith your
s
that came
on or cont
a
de when
y
able.
SB cable.
the follo
w
el - Users
e panel wit
into a fre
e
l. If all is w
efer to the
figure the
s
oftware. If
with your s
ct your so
f
ou plug it
ing:
Manual v
1
h is not ru
n
USB slot
ell the dis
p
relevant s
e
oftware to
you can
f
oftware th
e
ftware pro
v
into your c
o
.4 rev 3
6
ning on
on your
lays will
ction of
use the
ind any
n check
ided for
mputer
Page 8

Wave - CP300 - Control Panel - Users Manual v1.4 rev 3
7
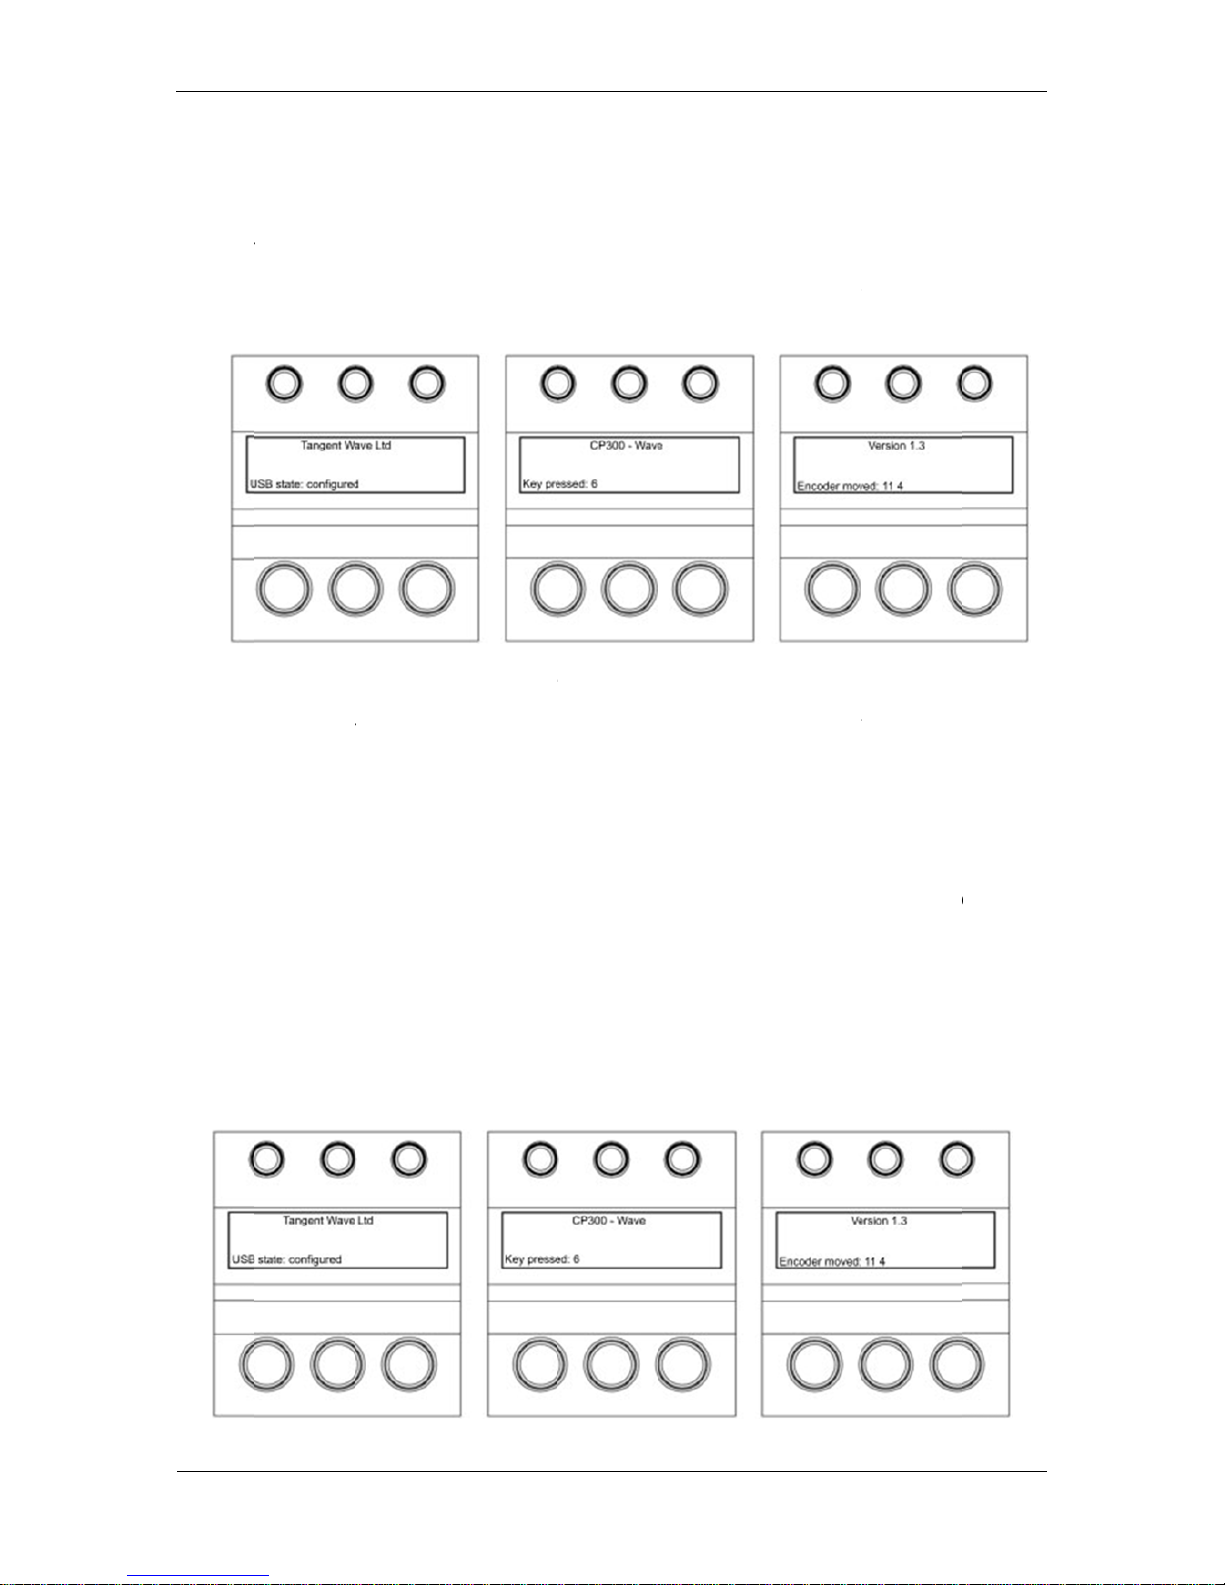
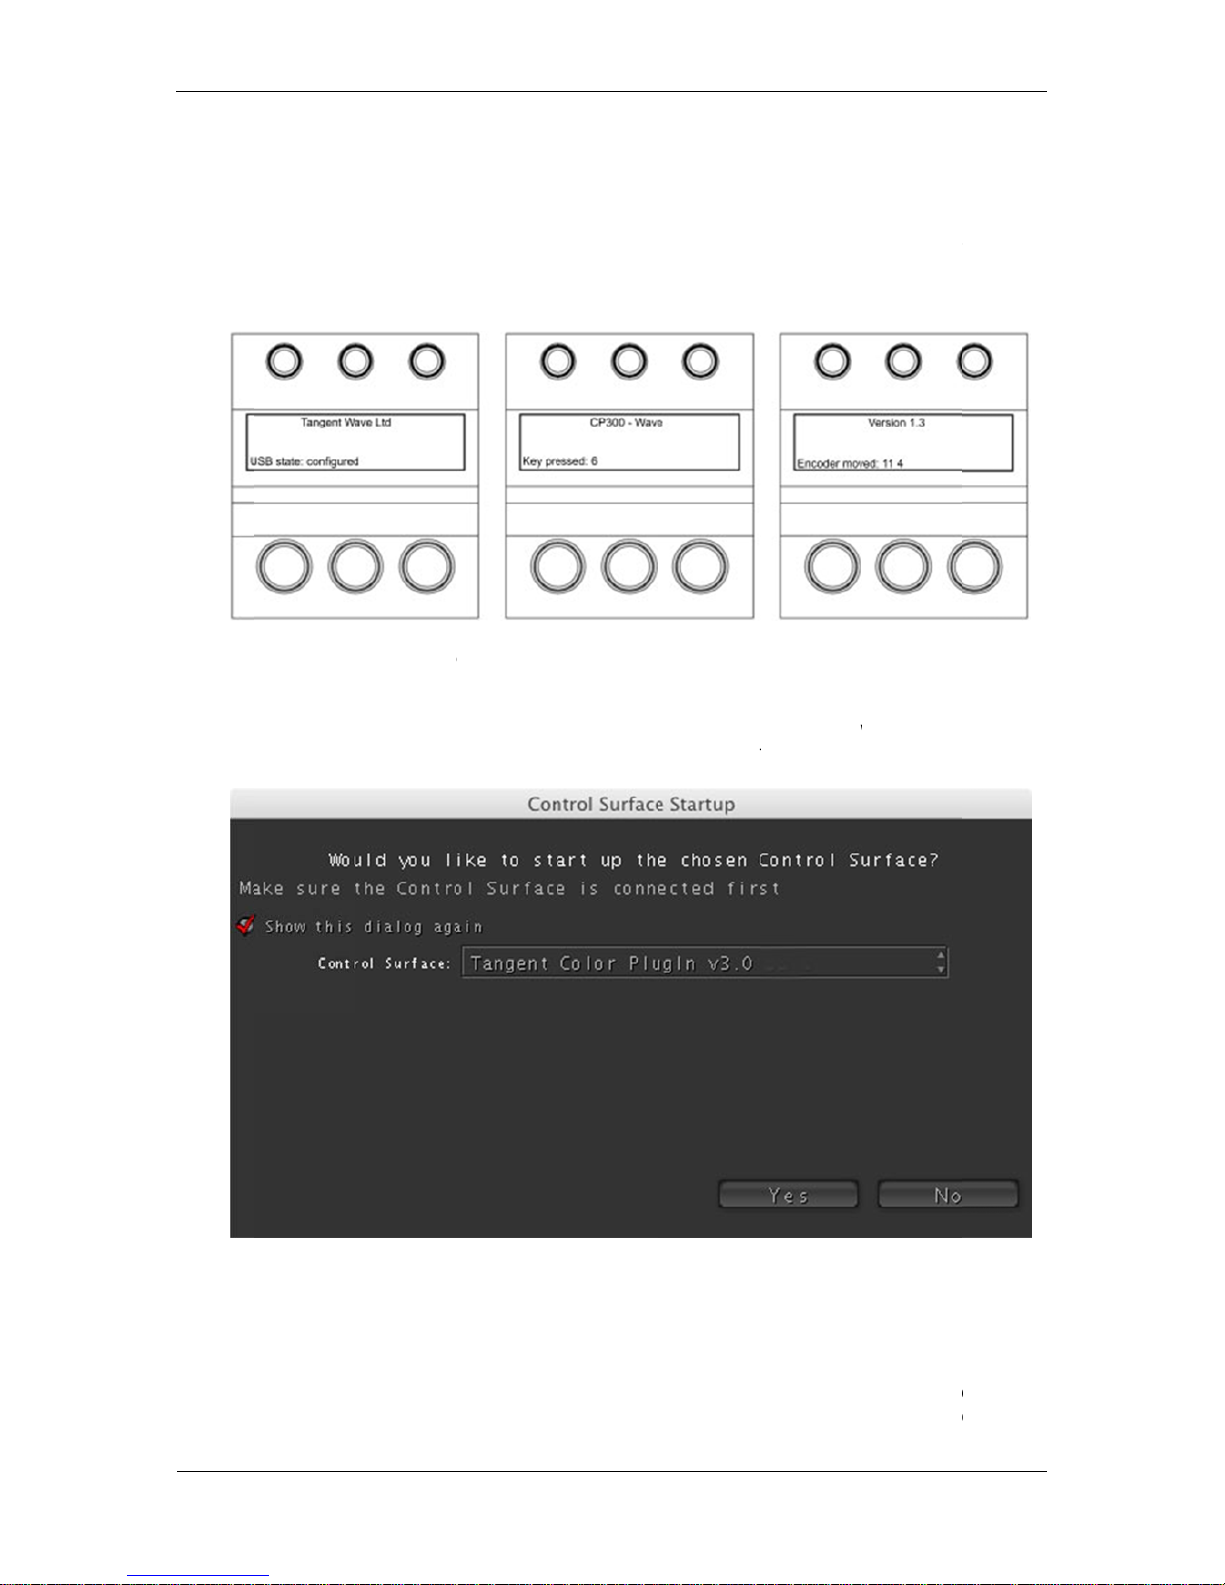
What you see will differ slightly, but basically lines above tell you the following:
10.1 Version
This is the panel firmware version number. See the section on updating the firmware for
more information on this.
10.2 USB state
This is the current status of the USB connection. This will change and update rapidly
when the panel is first plugged in but it should finish by saying configured. If it
doesn’t say this after a few seconds then remove the USB connection and plug it back
in again.
If you move any of the controls or press any of the buttons the appropriate bottom line
of the display will change to show you the status of the control or button which has been
changed. The following describes what you should see for each control or button:
10.3 Knobs and dials
If you move a knob, dial or a trackerball the bottom line of the right display will show
something similar to this:
Encoder moved: 11 4
The first number is the ID number for that control, in this case 11. The second number is
the amount it’s moved by, in this case 4. The number gets bigger the faster you turn the
control. This should be positive when the knob is turned clockwise and negative if
turned anti-clockwise. If the number is always -1 or 1, or doesn’t change then the knob
or dial is faulty.
10.4 Buttons
If you press a button the bottom line of the middle display will show something similar to
this:
Key pressed: 6
In this case button number 6 has been pressed. If this doesn’t happen then the button is
faulty.
Note: in test mode the buttons are scanned slowly so pressing a button too quickly and
releasing it may mean that the press is missed. So be sure to press each button slowly.
Under normal working conditions this will not be an issue.
10.5 Trackerballs
Just like the knobs and dials, moving the trackerball will cause the bottom line of the
right display to show something similar to this:
Encoder: 15 3
The first number is the ID number for that control, in this case 15. The second number is
the amount it’s moved by, in this case 3. The number gets bigger the faster you turn the
Page 9

Wave - CP300 - Control Panel - Users Manual v1.4 rev 3
8
control. This should be positive when the ball is moved to the right or up. It will be
negative if the ball is moved to the left or down. If it does not change then the ball is
faulty.
Note: due to the way the software scans the movements of the balls, it will be hard to
see only changes in the left / right direction. The up / down movements are always
displayed in preference by the test mode, and as it’s difficult to move the ball in just the
left / right direction with out moving it up / down, you’ll always see mostly up / down
changes.
11. Trouble-shooting
11.1 A button doesn’t work
Go into test mode and follow the button test procedure. If the button doesn’t work in the
test mode then the button is broken. In this case please contact Tangent Wave or your
reseller.
If the button works in the test mode then it may be a problem with the software you are
using the panel with. Contact your software vendor.
11.2 A knob doesn’t seem to work
Go into test mode and follow the knob test procedure. If the knob doesn’t work in the
test mode then the knob is broken. In this case please contact Tangent Wave or your
reseller.
If the knob works in the test mode then it may be a problem with the software you are
using the panel with. Contact your software vendor.
Note: if the knob is turned to quickly then it is possible that the Wave will not be able to
keep up with the movement. Try to avoid turning the knob too quickly.
11.3 A trackerball doesn’t seem to work
Go into test mode and follow the trackerball test procedure. If the trackerball doesn’t
work in the test mode then the trackerball is broken. In this case please contact Tangent
Wave or your reseller.
If the trackerball works in the test mode then it may be a problem with the software you
are using the panel with. Contact your software vendor.
Note: from time to you will need to clean the trackerballs. See Care of your panel Cleaning the balls. If there is a build up of dust inside the panel it may affect the optical
sensor used to track the balls movements.
Note: if the ball is moved to quickly then the optical sensor will not be able to track it.
This will produce erratic behaviour in the output from the ball. Try to keep movements of
the ball smooth and avoid rapid changes of direction or spinning the ball.
Page 10

Wave - CP300 - Control Panel - Users Manual v1.4 rev 3
9
11.4 My software isn’t communicating with the panel
Generally problems with communication are related to setting up your software to talk to
the panel. Refer to your software vendors instructions for doing this.
Make sure the USB cable is connected properly. Also make sure the USB port on your
computer can supply the 500mA the panel requires. Some laptops do not allow this.
If after doing the above, and taking any relevant action, you’re still having trouble, then
contact Tangent Wave or your reseller.
12. Care of your panel
Your Wave panel should not be cleaned with harsh abrasives or chemical cleaning
products. If they become dirty wipe them with a soft damp cloth.
Cleaning the balls
From time to time you may need to clean the balls and the trackerball unit that holds
them. To do this you need to remove the clip on cover over the ball and then remove
the ball. See Getting started - Fitting the balls in to the trackerballs. Clean the ball with a
soft damp cloth. To clean inside the trackerball unit use a damp cotton bud, paying
close attention to the three metal balls the ball sits on, and the lens which houses the
optical sensor.
13. Firmware updates
The firmware in your Wave panel was the most up to date version when your panel was
manufactured. It is possible however that a newer version may be available from our
website www.tangentwave.co.uk. Check there under the support tab to see if a newer
version is available. Also be sure to read the instructions and release notes with the
version.
Page 11
14.
Co
n
14
C
o
14
W
h
C
h
14
Pl
econ
W
h
ret
necting t
h
.1 Connec
t
nnect and
i
.2 Configu
en Resolv
e
oose Tan
g
.3 Importa
n
ase note t
h
trol of the
en you wa
urn to the
a
e Wave to
ion
nstall the
C
ring Resol
v
is runnin
g
ent Devic
e
t Note
at, when
c
panel. This
nt to use t
h
bove wind
o
Wave
-
Da Vinci
R
P300 Wav
e
e
click Pref
e
s Wave fr
o
onfigured t
o
is even tru
e Wave pa
w and cho
CP300 -
C
esolve
e to the Re
rences an
d
m the men
use the
W
e when Re
s
nel with an
o
ose None
a
ontrol Pa
n
solve com
p
the follow
i
u and click
ave panel,
olve is no
t
ther appli
c
s the pan
e
el - Users
uter using
t
ng window
Save.
Resolve t
a
running.
ation then
y
l option.
Manual v
1
he USB c
a
will appea
r
kes exclus
ou will ne
e
.4 rev 3
10
ble.
.
ive
d to
Page 12
15.
Co
n
15
A
lt
en
atheMa
O
nPa
Su
15
In
s
Y
oaccsys
necting t
h
.1 Introdu
c
hough Wa
v
ble it to t
a
re’s an ap
p
c OS X in
s
ce you ha
nel Contro
pport Pack
a
.2 Installin
g
ert the dis
c
Ope
n
disc
i
Dou
b
to s
t
instr
u
u may be
ount on y
o
tem softw
a
e Wave to
tion
e does no
t
lk to Colo
r
lication ca
l
tallation pa
ve installe
d
l Mapper t
o
ge Manu
a
the soft
w
that came
the disc i
n
con.
le click on
art the in
s
ctions.
prompted
ur Mac a
n
re.
Wave
-
Color (Ap
p
need a dri
v
. Also, in o
led the Pa
n
ckage call
e
the Tang
select th
l for details
are
with your
W
a finder
w
the Tange
n
tallation a
n
to enter y
o
d the pas
s
CP300 -
C
le)
er to work
rder for yo
u
el Control
d Tangent
ent Color
S
e Wave p
a
. You’ll find
ave panel
indow by
d
t Color Su
nd follow
t
ur passw
o
word that
ontrol Pa
n
with Mac
O
to custo
m
Mapper. T
h
Color Sup
p
upport p
a
nel. Plea
s
on the dis
c
into your
M
ouble click
pport pack
a
he on-scr
e
rd. This i
s
you enter
el - Users
S X, it do
e
ise how
W
ese are b
u
ort.
ckage you
e refer to
that came
ac.
ing on the
ge
en
the pass
w
when you
Manual v
1
s need a p
ave contr
o
ndled toge
t
must first
the Tange
n
with your
W
ord for y
o
update yo
u
.4 rev 3
11
lug-in to
ls Color
her in a
run the
t Color
ave.
ur user
r Mac’s
Page 13
15
M
aPa
Y
o
is
jyou
If
y
N
othe
is
r
Th
yo
upre
If
y
Cli
w
h
.3 Configu
ke sure y
o
nel Control
u need to
p
ust a stan
d
should s
e
ou don’t s
e
w start Co
l
one show
unning as
e
e Control
S
are using
ss Yes.
ou don’t s
e
ck on the
U
ich is at th
e
ring Color
u have in
s
Mapper a
s
lug your
W
ard USB
c
e the follo
w
e the abov
e
or. When
y
n below. D
o
xplained l
a
urface me
n
Color with
.
e the Con
t
ser Prefs t
a
top right
o
Wave
-
to use yo
u
talled the
T
described
ave panel
able so y
o
ing (or sim
then refe
r
ou start C
o
n’t worry i
f
ter. This i
s
u in the mi
If this isn’
t
rol Surfac
e
b at the b
o
f the User
CP300 -
C
r Wave p
a
angent C
o
in the Inst
a
into your
M
u can use
ilar) on the
to the Tro
u
lor you m
a
you don’t
a
the Color
C
ddle of the
set to Tan
Setup wi
n
ttom and t
h
Prefs. Do
n
ontrol Pa
n
nel
lor Suppo
r
lling the so
ac with th
e
your own i
Waves’ di
s
ble-shooti
n
y get a p
o
s you can
ontrol Sur
f
window all
o
gent Color
dow then i
n
en click o
n
’t forget yo
el - Users
t
package
a
f
tware sect
USB cabl
e
you wish.
plays:
g section
o
p-up dialo
g
get to this
w
ace Setup
ws you to
PlugIn the
n
Color go
Show Co
n
u will have
Manual v
1
and config
u
ion above.
it came
w
If everythi
f this man
u
window s
window on
c
window.
choose wh
do this n
o
to the Set
u
trol Surfac
e
to load or
c
.4 rev 3
12
red the
ith. This
ng is ok
al.
imilar to
e Color
at panel
w. Then
p room.
Dialog
reate a
Page 14
pr
oConow
lat
e Aft
Y
oand
ject in Col
lor PlugIn
to also c
h
r.
er you hav
e
u now nee
d
the displ
a
or in order
as the con
t
eck the S
h
clicked Y
e
to load a
p
ys will upd
a
Wave
-
to get to t
rol surfac
e
ow this di
a
s the displ
a
roject. On
c
te to refle
c
CP300 -
C
he rooms.
type quit
C
log again
o
ay on Wav
e
e you hav
e
t this.
ontrol Pa
n
Once you
olor and
r
ption, you
should sh
done this
el - Users
have sele
c
estart it. It
can alway
s
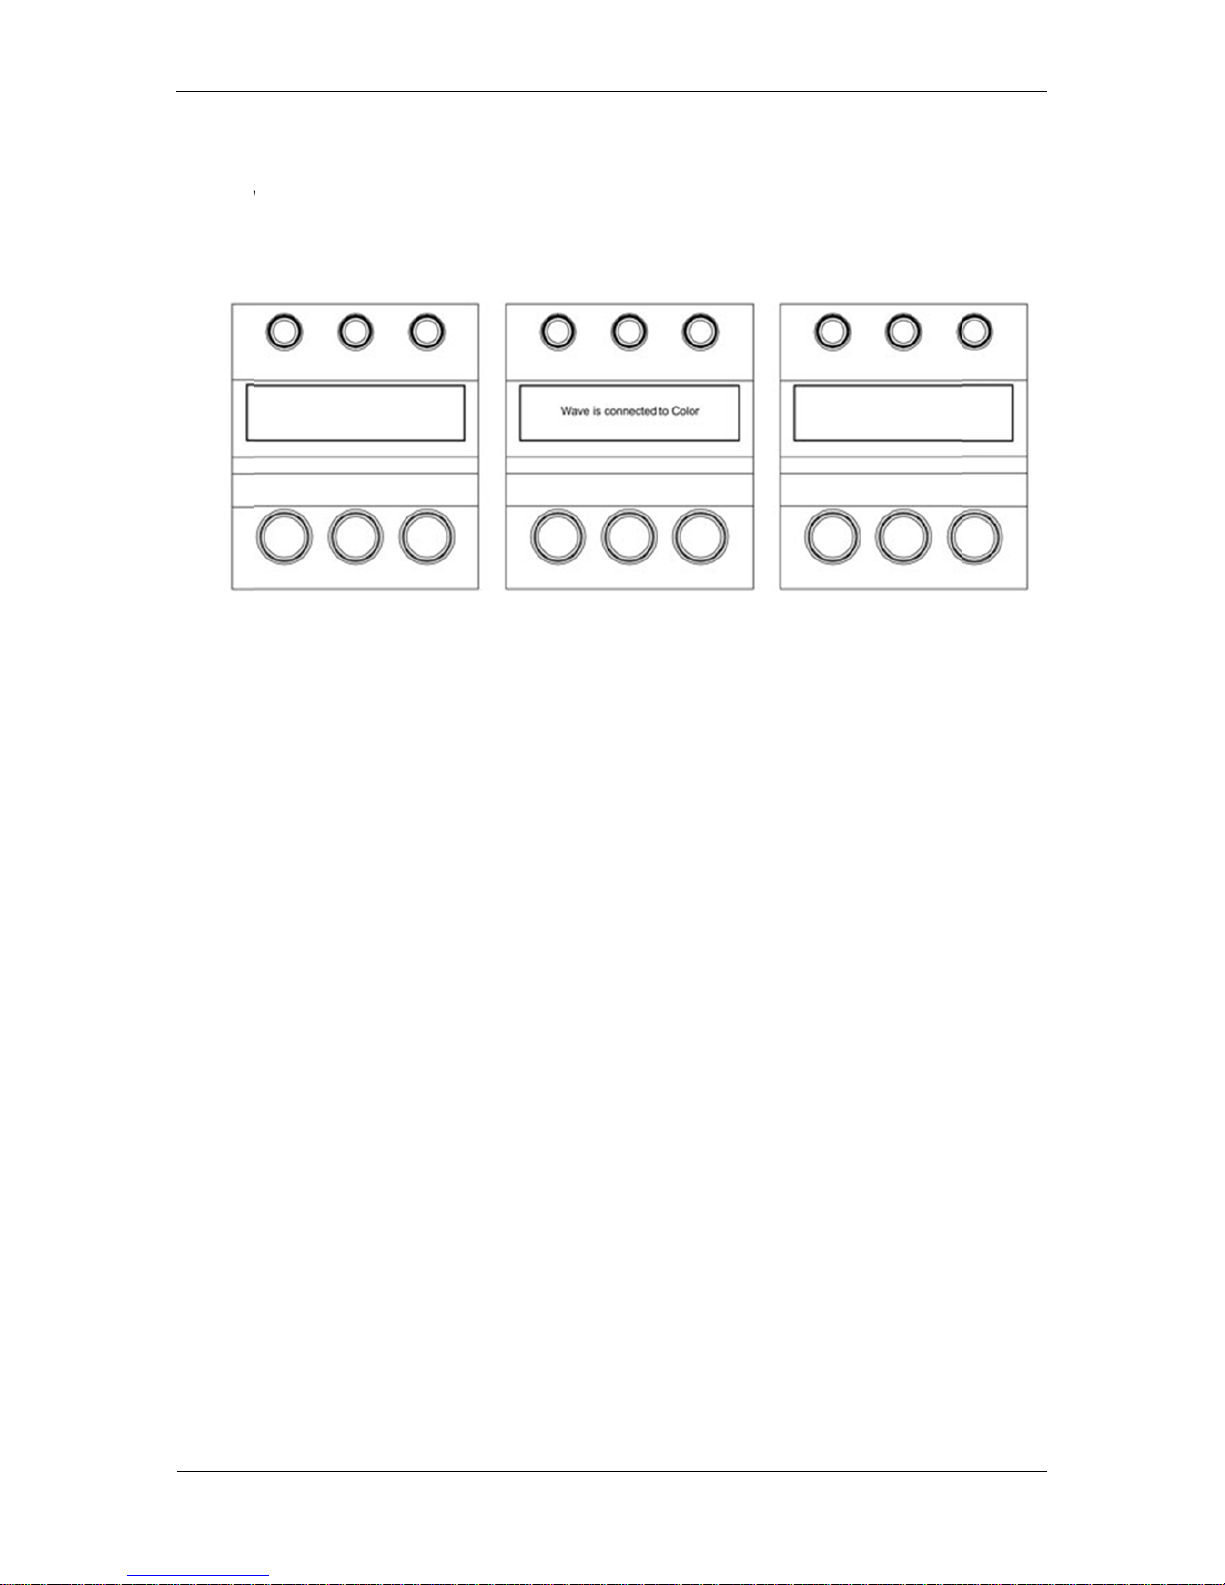
ow the foll
o
Wave will l
Manual v
1
ted Tange
n
is a good
turn this
o
wing:
oad its con
.4 rev 3
13
t Wave
idea for
ff again
t
rol map
Page 15

Wave - CP300 - Control Panel - Users Manual v1.4 rev 3
14
16. Connecting the panels to Scratch (Assimilate)
16.1 Connection
Connect and install the CP300 Wave to the SCRATCH computer using the USB cable.
16.2 Setting up communication with SCRATCH
SCRATCH uses the cs_devices.xml file to configure communications with external
control surface devices. This file is located at C:\Program Files\Assimilate\Settings.
Do not edit the default file. Instead, create a copy of the file and rename it
‘cs_devices_init.xml’. Then open this file in any text editing program such as Notepad.
The file lists all devices that can be configured with SCRATCH. Locate the section
dedicated to the CP300. It will look like this:
<device name="Tangent CP-300 Wave" mode="disabled" >
<driver>CsDrv_TangentCP300.dll</driver>
<entry_data>
<!-- The Tangent Wave panel does not require a specific ID number -->
<vip>0x04D8</vip>
<pid>0xFDCF</pid>
<idle_timeout>125</idle_timeout>
</entry_data>
<!-- We have 3 displays with 5 lines each -->
<display>0</display>
<lines>15</lines>
</device>
To enable the CP300, change the mode=”disabled” to mode=”enabled”. in the first line.
No further modifications are necessary, so save the file and exit the text editor.
16.3 Setting up the default panel mapping
SCRATCH installs a default file for use with the CP300 Wave.
In the folder C:\Program Files\Assimilate\Settings, locate the ‘cs_mappings_Wave.xml’
file. This is the file that contains the default CP300 mappings. To use this file with
SCRATCH, create a copy of this file and rename it ‘cs_mappings_init.xml’. If you
already have a file with this name, make a backup copy of it before overwriting with this
new version.
Launch SCRATCH and you will have the default CP300 mappings available. The
display will show the current SCRATCH build number. The panels will switch to
displaying the actual functions once you have entered the SCRATCH Player.
See the SCRATCH User Guide for details on customizing the control surface functions.
Note: If you have ‘cs_mappings.xml’ files in your SCRATCH User folder, they will be
used instead of the default mapping file. To use the default mappings, remove any
existing ‘cs_mappings.xml’ files from all SCRATCH User folders.
Page 16

Wave - CP300 - Control Panel - Users Manual v1.4 rev 3
15
17. Connecting the Wave to Speedgrade / Framecycler (Iridas)
17.1 Overview
The Tangent CP300 "Wave" is supported with all IRIDAS FrameCycler and
SpeedGrade 2009 products. Depending on the feature set of the application the CP300
can be used for playback control, applying looks, color grading.
17.2 Setup
Connect Wave computer as descibed in this manual.
Open your FrameCycler or SpeedGrade application, it will automatically detect that the
CP300 is present. You don't need to make any further adjustments, the device is ready
to use.
17.3 Changing the sensitivity of trackballs, wheels and knobs
To adjust the sensitivity simply open the settings of FrameCycler or SpeedGrade, then
check for "Tangent". This area applies to both the CP200 and the CP300 series. You
can leave all fields for IP address space and unit IDs blank when using the CP300.
Scroll to the end of the page. Use the sliders to adjust the sensitivity.
 Loading...