

Page 1

DVR-500
Instruction Manual
DVD Recorder
Page 2

Page 3

Table of Contents
Table of Contents..................................1
Safety Precautions...............................2
Important Safety Notices...................... 3
Important Information.......................... 5
Playable and Recordable Discs.............6
Disc Protection.....................................7
Identification of Controls….........……… 8
The remote control...............................10
Connection……………………………….....11
Mp3……................................……..........15
Playing Back a Disc………………….........16
Playing a Normal Disc…………….…....16
Playing a DVD+RW or DVD+R Disc….. 17
Using the On-screen Display……..............26
Setting the Parental Lock………................27
Customizing DVD Function Settings…..... 28
Recording Options………………….............28
Channel Search……………………...........29
Normal Recording…………………..……..29
One-Touch Record………………….…….. 30
Time Record……………………………...... 31
Editing…………………………………….........32
Editing a Title of DVD+RW………………..32
Editing a Disc of DVD+RW or DVD+R..... 35
General Features……………………......17
Locating a Specific Title,
Chapter or Track……………………..........19
Playing Repeatedly……..……………...... 21
Playing in Random Order……………......22
Selecting Camera Angles, Languages
& Audio Settings………………….........….23
Playing in a favorite Order………..……...24
Selecting Subtitles…………………...…...25
Specifications…………………………….......36
Trouble Shooting Guide…………………..... 37
01
Page 4
Safety Precautions
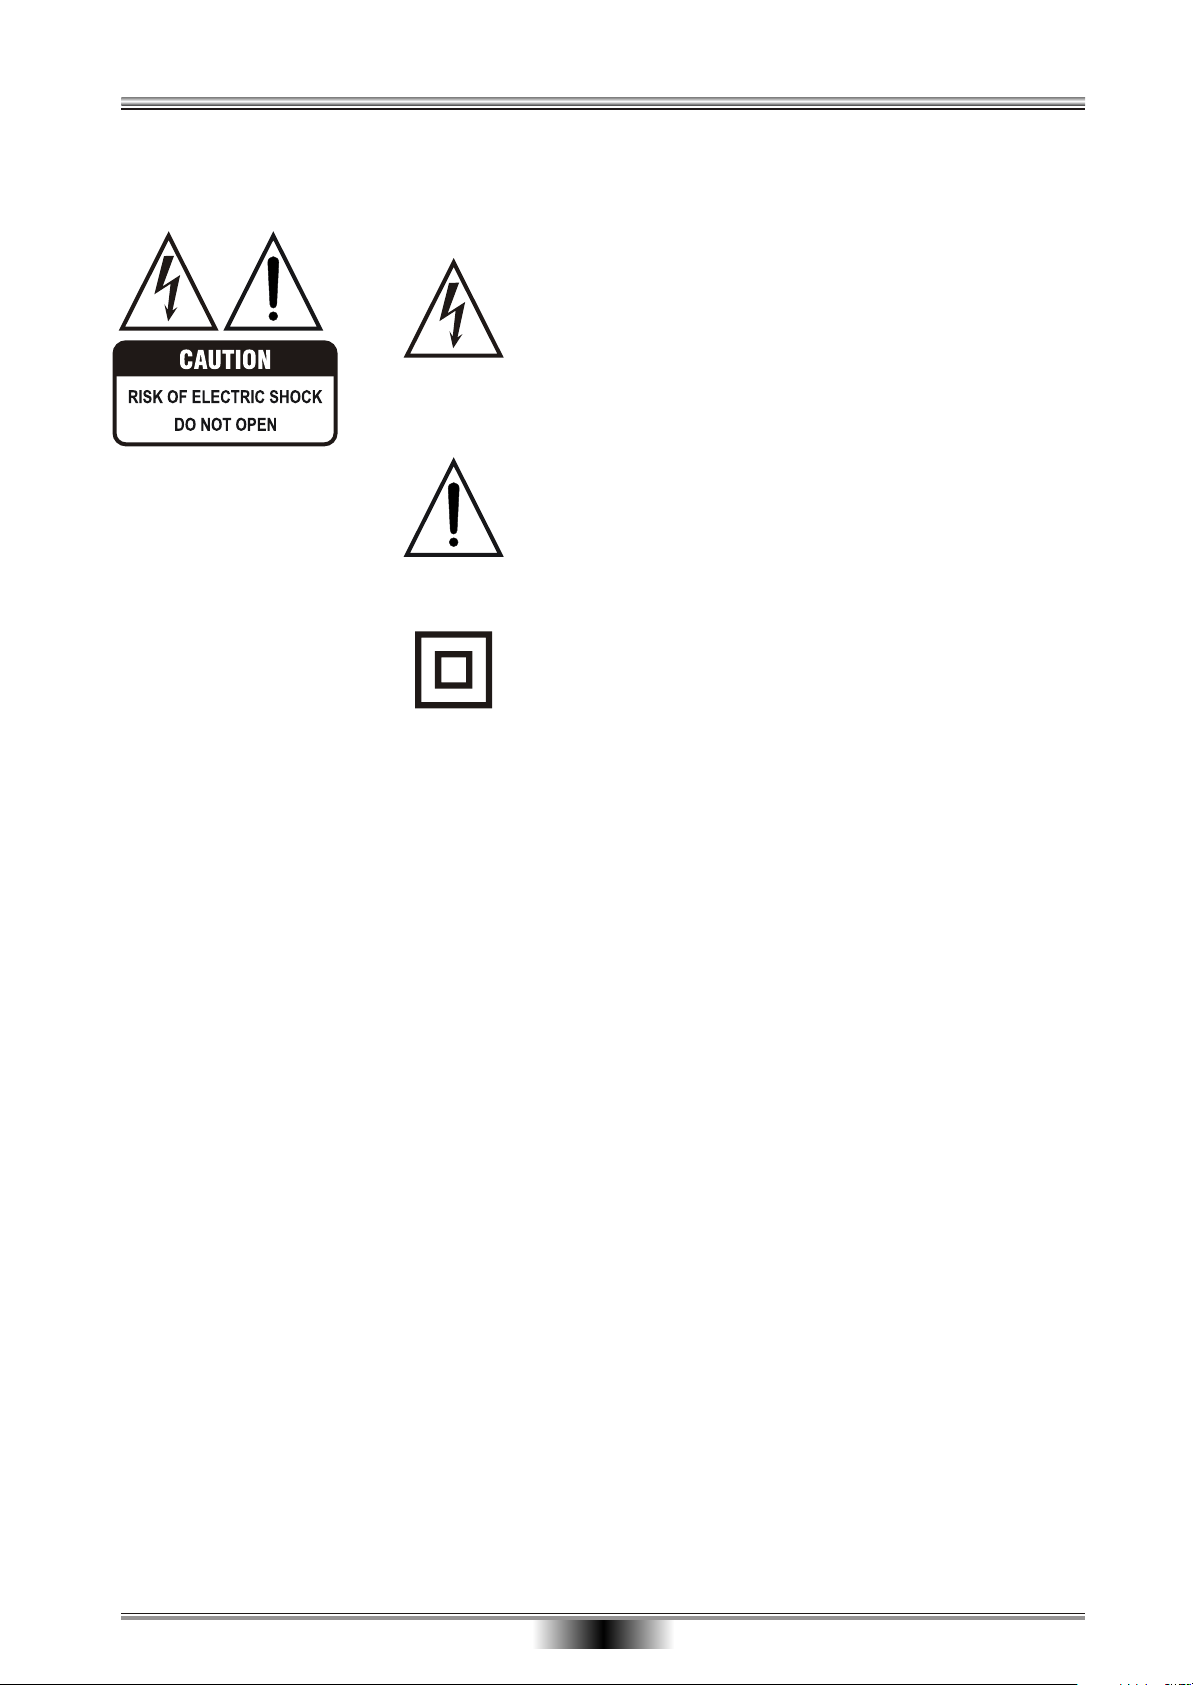
A triangle with a lightning symbol draws the user's attention
to “dangerous voltage” without insulation in the housing
which may be high enough to entail a risk of electric shock.
A triangle with an exclamation mark draws the user's
attention to important instructions for use and maintenance
in the accompanying manual which should be studied.
WARNING:
CAUTION:
Symbol for Class II (double insulation).
TO MINIMISE THE RISK OF FIRE AND ELECTRIC SHOCK,DO NOT EXPOSE
DEVICE TO RAIN OR MOISTURE. DO NOT OPEN THE HOUSING AS IT
CONTAINS DANGEROUS VOLTAGE. ONLY SKILLED TECHNICIANS ARE
ALLOWED TO CARRY OUT REPAIR AND SERVICE.
If the power cord plug is to be replaced, it is important that the replacement is identical
to the plug to be replaced, or that the new plug has been recommended by the
manufacturer.
TO AVOID THE RISK OF ELECTRIC SHOCK, IT IS IMPORTANT TO INSERT THE
PLUG CORRECTLY INTO THE SOCKET.
This DVD player includes a laser system.
There is a risk of dangerous radiation from the laser beam if buttons, controls and
procedures are not used or carried out as described in this manual. To avoid contact
with the laser beam, do not open the device.
DO NOT LOOK DIRECTLY INTO THE LASER BEAM.
02
Page 5

Important Safety Notices
WARNING: IT IS IMPORTANT THAT YOU STUDY AND OBSERVE BOTH THE INSTRUCTIONS IN THIS MANUAL AND
THE INSTRUCTIONS ON THE DEVICE. KEEP THIS MANUAL FOR FUTURE USE.
This device was developed and made with a view to providing maximum safety for the user. Incorrect use of the device
may cause electric shock or fire. The protection built into this device will protect the user if the procedure below is
observed in connection with installation, use and repair. This device is fully electronic and contains no parts which can be
repaired by the user.
THE HOUSING MUST NOT BE REMOVED. RISK OF DANGEROUS VOLTAGE. ONLY SKILLED TECHNICIANS ARE
ALLOWED TO REPAIR THE DEVICE.
Read the manual
On unpacking the device,
please read the manual
carefully and observe all
instructions given.
Power supply
Only the power supply indicated on the
rating plate must be used for this
device. If you are not sure which power
supply you have, please contact the
distributor or the local electricity
supplier.
Earthing or polarization
If the plug cannot be inserted properly into the
socket, or if the plug does not fit, the device must
not be used in your country.
Ventilation
The housing is provided with slots and
openings to ensure ventilation and reliable
operation and protect the device against
overheating. Do not block or cover these
openings. The openings must never be
blocked, for example by placing the device
on a bed, a sofa, a carpet or similar surface.
Heat
Do not place the device near
sources of heating such as
radiator, register, stove or other
heat-producing devices (including
amplifiers).
Water and moisture
The device must not be placed
close to water, such as bath
tub, wash basin, kitchen sink or
wash tub, in a damp cellar or
close to a swimming pool, etc.
Cleaning
Unplug the device before
cleaning. Do not use liquid
detergents and aerosol cleaning
agents. Use a dry cloth.
Power cords
Wiring must be organised to
prevent people from stepping on
the cables and to avoid pinching
by objects placed on or beside
them. Take special care around
sockets and plug boxes and
where the cable leaves the
device.
Overloading
Make sure that sockets,
extension flexes and plug
boxes are not overloaded as
this may lead to fire or electric
shock.
03
Page 6

Important Safety Notices
Lightning
Unplug the device for additional
protection during thunder or when
the device is not used for prolonged
periods. This will prevent damage to
the device from lightning and surges.
Penetration of objects and liquid
Never push any objects through the
openings into the device, as they may
touch dangerous voltage points or
short circuit parts and cause fire or
electric shock. Do not spill liquid on
the DVD player.
Accessories
The device must not be placed on unstable surfaces
such as a trolley, stand, tripod, shelf or table.
The device may fall and injure children or
adults or be damaged. Use only trolley,
stand, tripod, shelf or table which are very
stable or provided with the device. The
Device must be installed in accordance with the
manufacturer's instructions and by means of installation
equipment recommended by the manufacturer.
If the device is placed on a trolley, the trolley must be
moved carefully. Sudden stops, unnecessary force and
uneven surfaces may cause the trolley to turn over.
Discs
Do not use scratched, deformed or
repaired discs. Such discs will break
easily and may cause serious injury
and damage to the device.
Damage
Unplug the device and contact skilled technicians in the
following cases:
A) If power cord or plug is damaged.
B) If liquid has been spilled on the device or objects
have fallen into the device.
C) If the device has been exposed to rain or water.
D) If the device does not work properly after
adhering to the instructions in the user manual.
Make only the setups mentioned in the manual, as
incorrect setup may cause damage and will often
make it difficult for a skilled technician to make the
device work properly again.
E) If the device has been dropped or damaged in any
other way.
F) When the operation of the device changes
drastically, the device requires service.
Service
Do not attempt to carry out any
service work yourself. By opening or
removing the housing, you will be
exposed to dangerous voltage, etc.
Any service work should be carried
out by skilled technicians.
Disc drive
Keep your hands off the drive
when it closes to avoid trapping
your fingers.
Loads
Do not place heavy loads on the
DVD player, and do not step on it.
The load may fall and cause
serious injury or damage to the
device.
Spare parts
If spare parts are required, make sure that the
technician uses spare parts specified by the
manufacturer or with the same characteristics as the
original component. Unauthorised spare parts may
cause fire, electric shock, etc.
Safety check
After service or repairs on the DVD
player, ask the service technician to
carry out a safety check to ensure
that the device is ready for use.
04
Page 7
Important Information
Handling instructions
The DVD player's top and back panel may
become warm after prolonged use. This is not due
to a defect.
When the DVD player is not used, remove the
disc and turn off the device.
If the DVD player is not used for a long period, its
function may deteriorate. Therefore, the DVD
player should be turned on and used now and
then.
Protect the power cord
Follow the instructions below to avoid irregular
function, electric shock, fire, or injury:
Hold the plug firmly when inserting it into the
socket
Avoid heat-producing devices
Do not place objects on the power cord
Do not carry out service work on or change the
power cord
Condensation
Condensation may occur in the following cases:
When the DVD player is moved directly from a
cold to a warm place.
When the DVD player is used in a room where
the radiator has just been switched on or where
the cold air from the air condition plant is directed
at the device.
If the DVD player is used in the summer in a
warm and humid room just after it has been
removed from an air conditioned room.
If there is steam or a high level of humidity in the
room.
In case of condensation, the DVD player will not
work properly. Remove the disc and turn off the
device. Unplug the device and leave it for 2-3
hours. The DVD player will then have adapted to
the environment and any condensation will have
disappeared.
Positioning
Do not place the device in any of the following
places:
In sunlight, close to heat-producing devices and
in a closed trolley
At high temperatures (40ºC or above) or high
relative humidity (90% or more)
In dirty places as some internal parts may be
damaged
Do not put your fingers or any
other objects into the device
Touching the internal parts is dangerous and may
cause injury or damage. Do not open the
housing.
Do not place foreign matter on the drive.
Interference
Placing the DVD player near a television set,
radio or video player may cause poor picture and
sound quality. In that case, move the DVD player
further from television set, radio or video player.
NOTE:
An Ø may appear on the screen when the
device is turned on. This means that the
required operation is not available.
05
Page 8
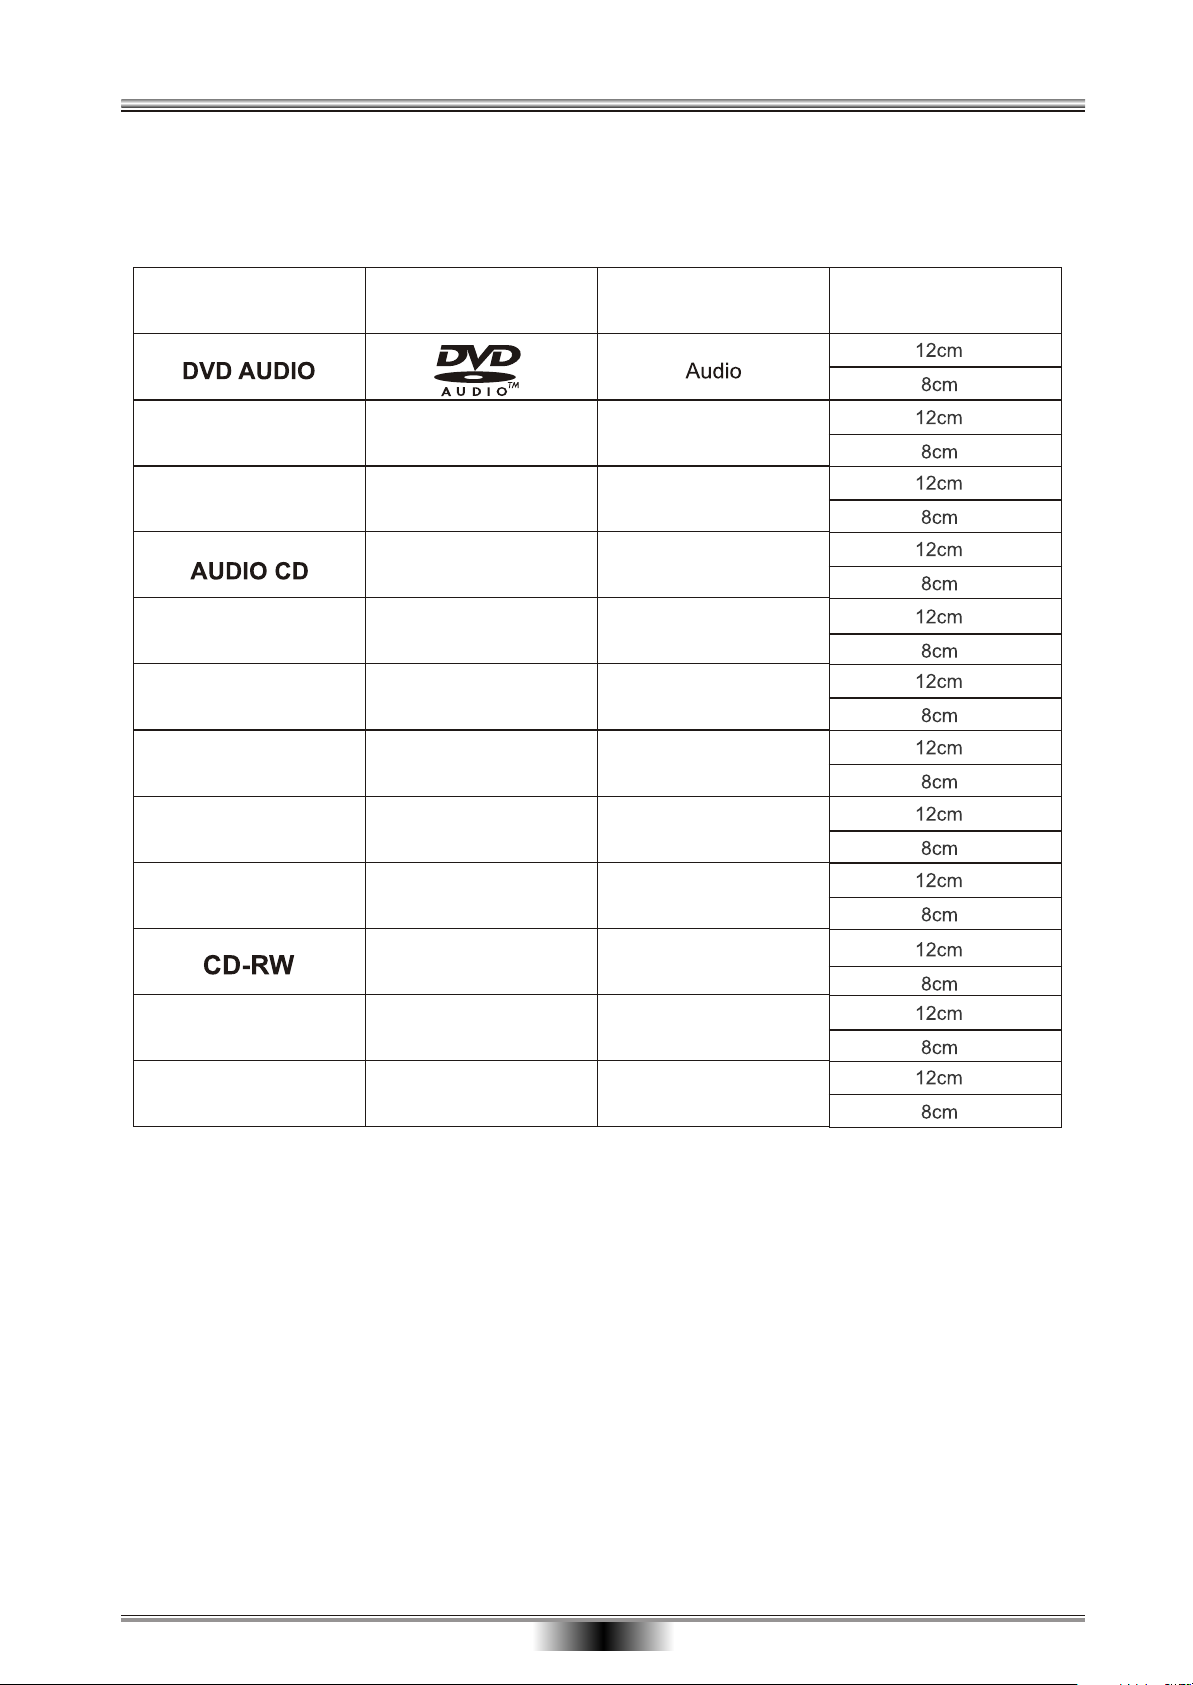
Playable and Recordable Discs
The following discs can be played:
06
Page 9
Disc Protection
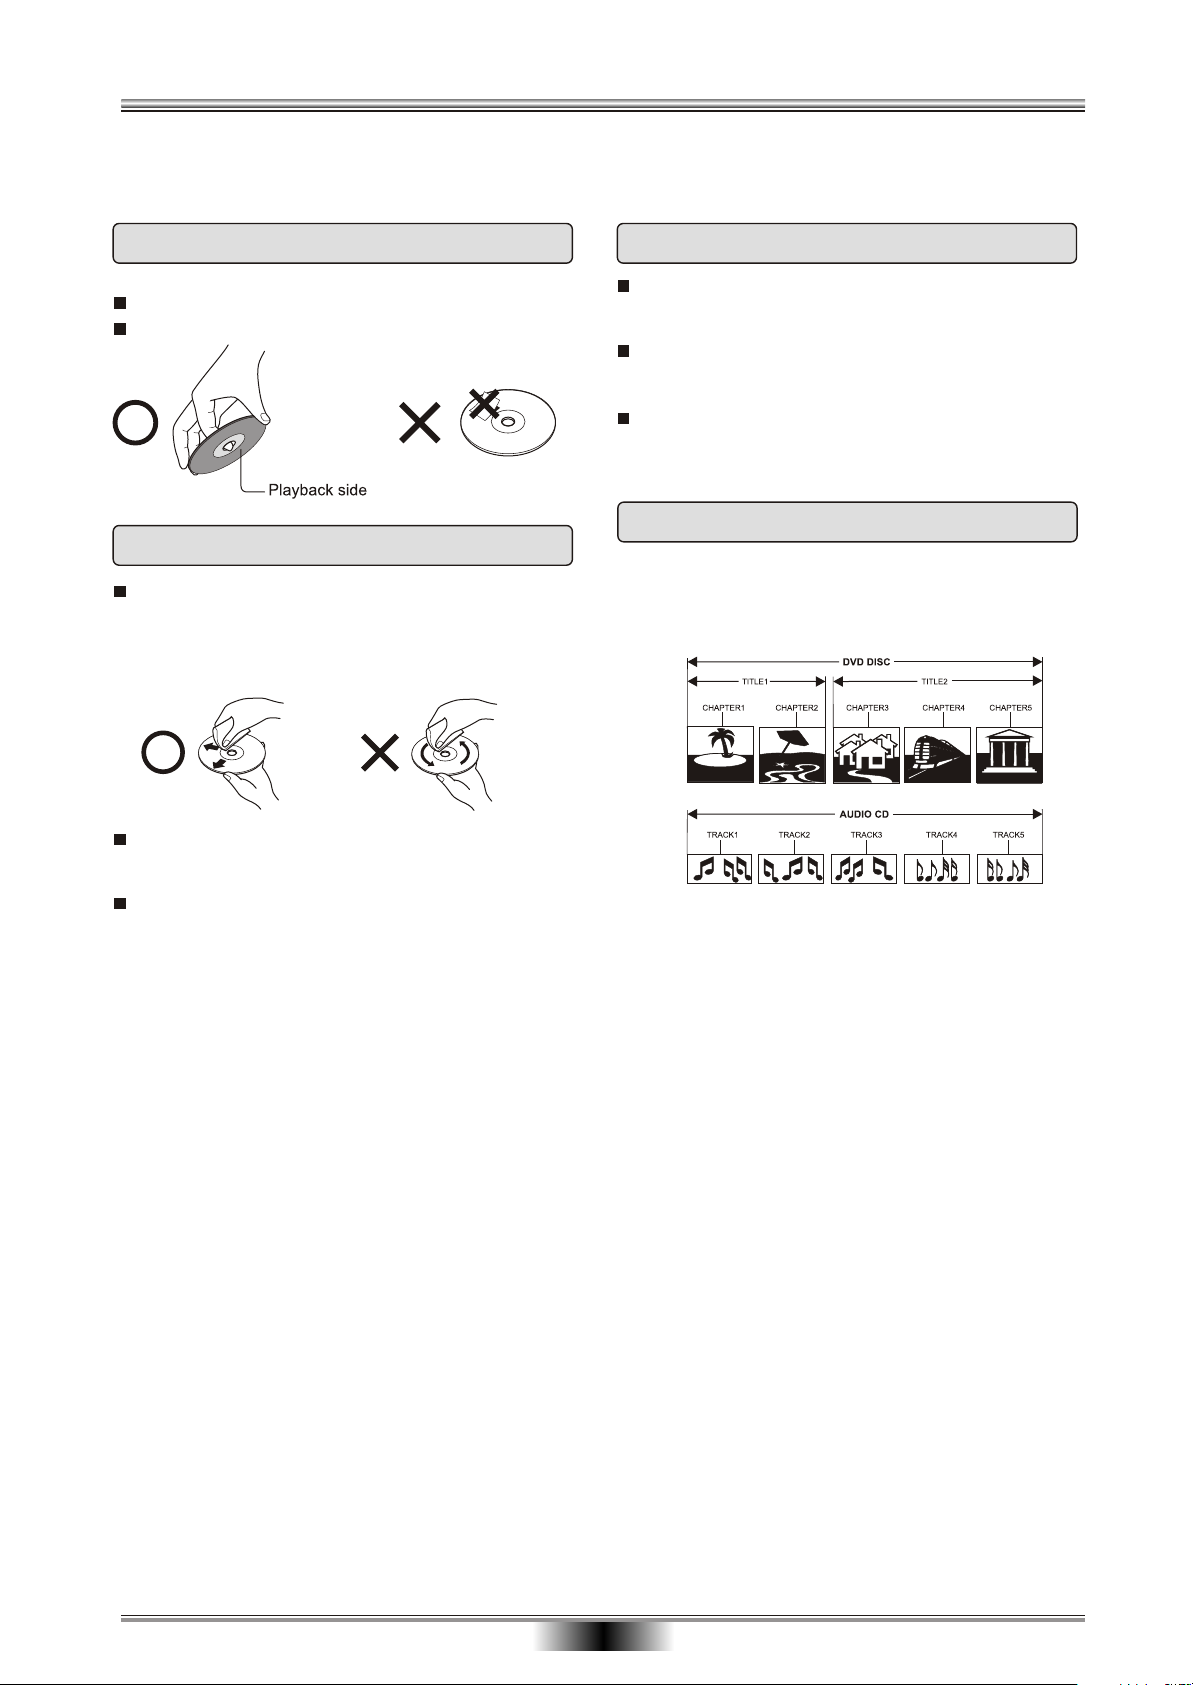
Disc handling
Do not touch the playback side of the disc
Do not put paper or tape on the disc
Cleaning the discs
Finger prints and dust may cause poor sound
and picture quality. Wipe the disc with a dry, soft
cloth. Wipe from the centre out. The disc should
always be clean.
Storing the discs
Do not store the discs where they may be
exposed to direct sunlight or where they are close
to sources of heat.
Do not store the discs where they may be
exposed to moist or dust, for example in a
bathroom or close to a humidifier.
Store the discs standing in a cassette. If the
cassettes are stacked or an object is placed on
the cassettes, the discs may become uneven.
Organisation of discs
Normally, DVD discs are divided into titles, and the
titles are then divided into chapters. Music CDs are
divided into tracks.
If the dust cannot be removed with a soft cloth,
wipe the disc carefully with a moist cloth and then
with a dry cloth.
Do not use any type of solvents such as thinner,
petrol, commercial detergents and anti-static
spray for vinyl records. These may damage the
disc.
Each title, chapter and track has been given a
number, designated title number, chapter number
and track number, respectively.
07
Page 10
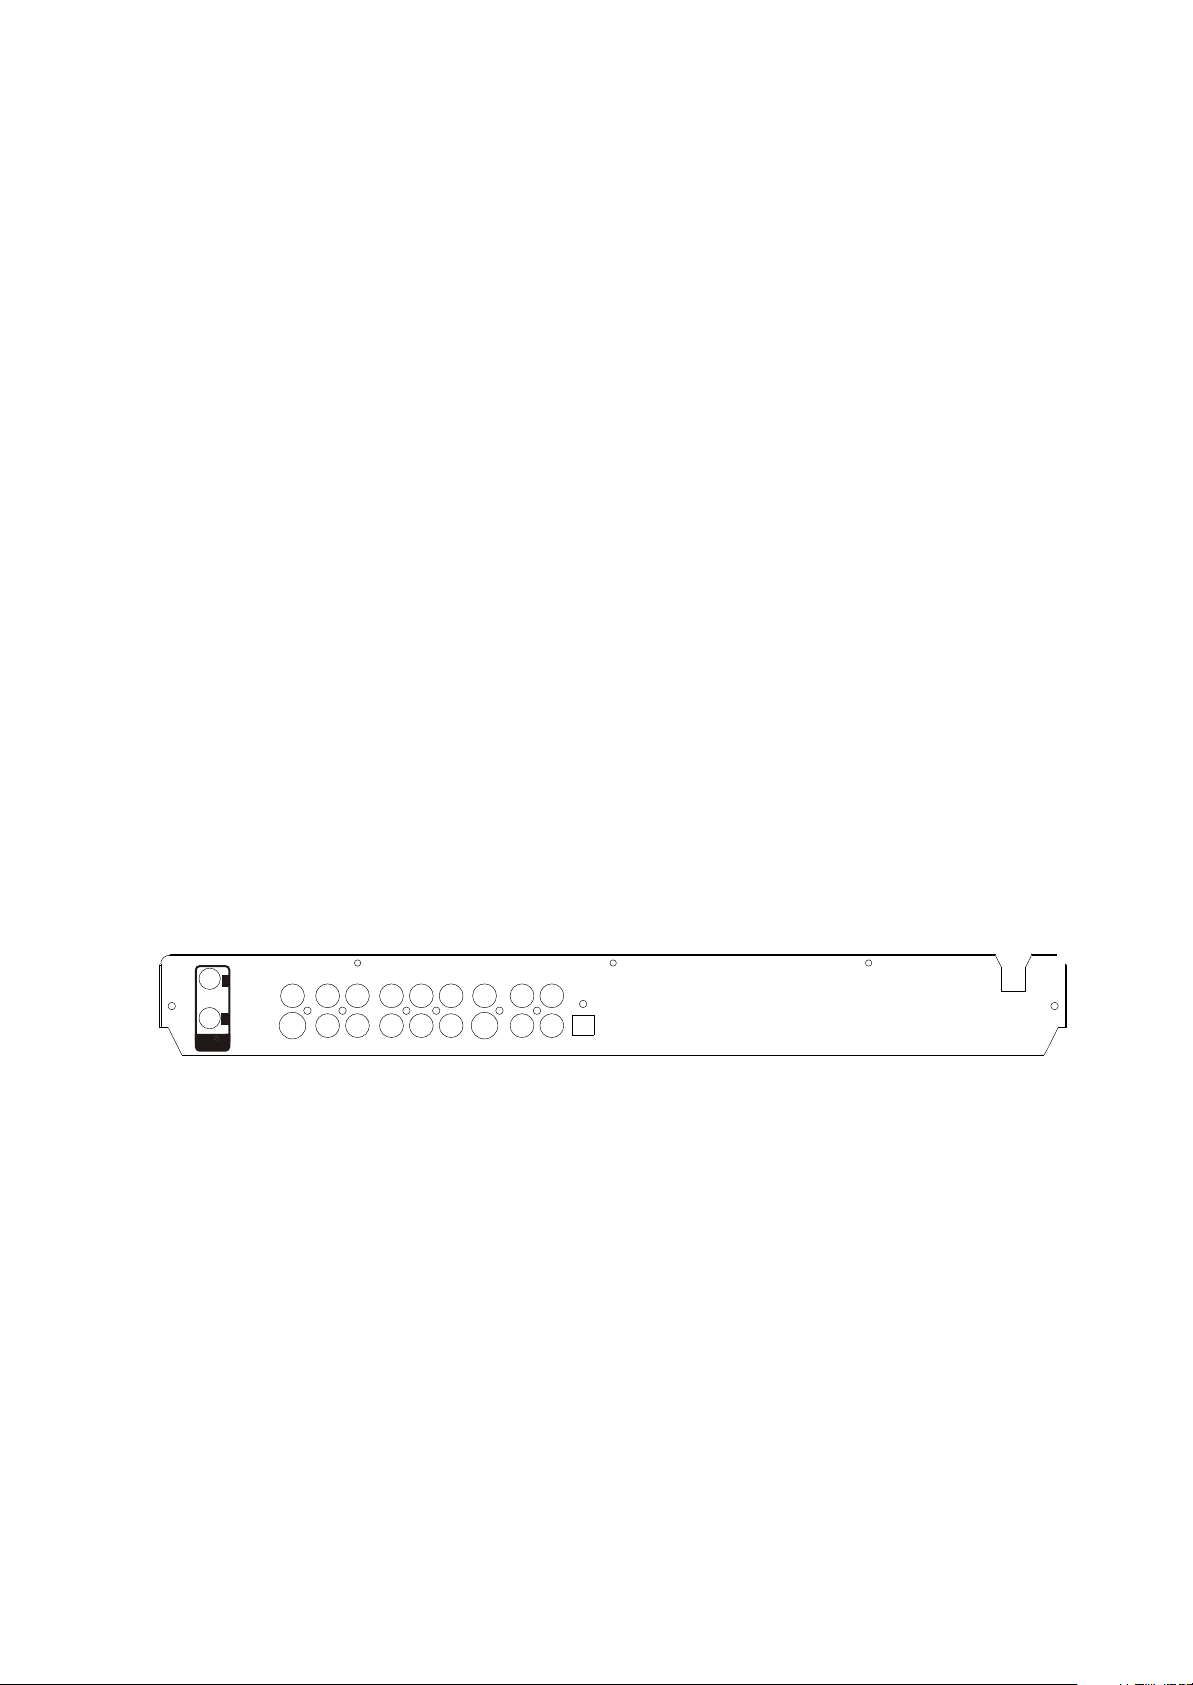
TV75
ANTENNA
IN
OUT
230V~50Hz
Page 11
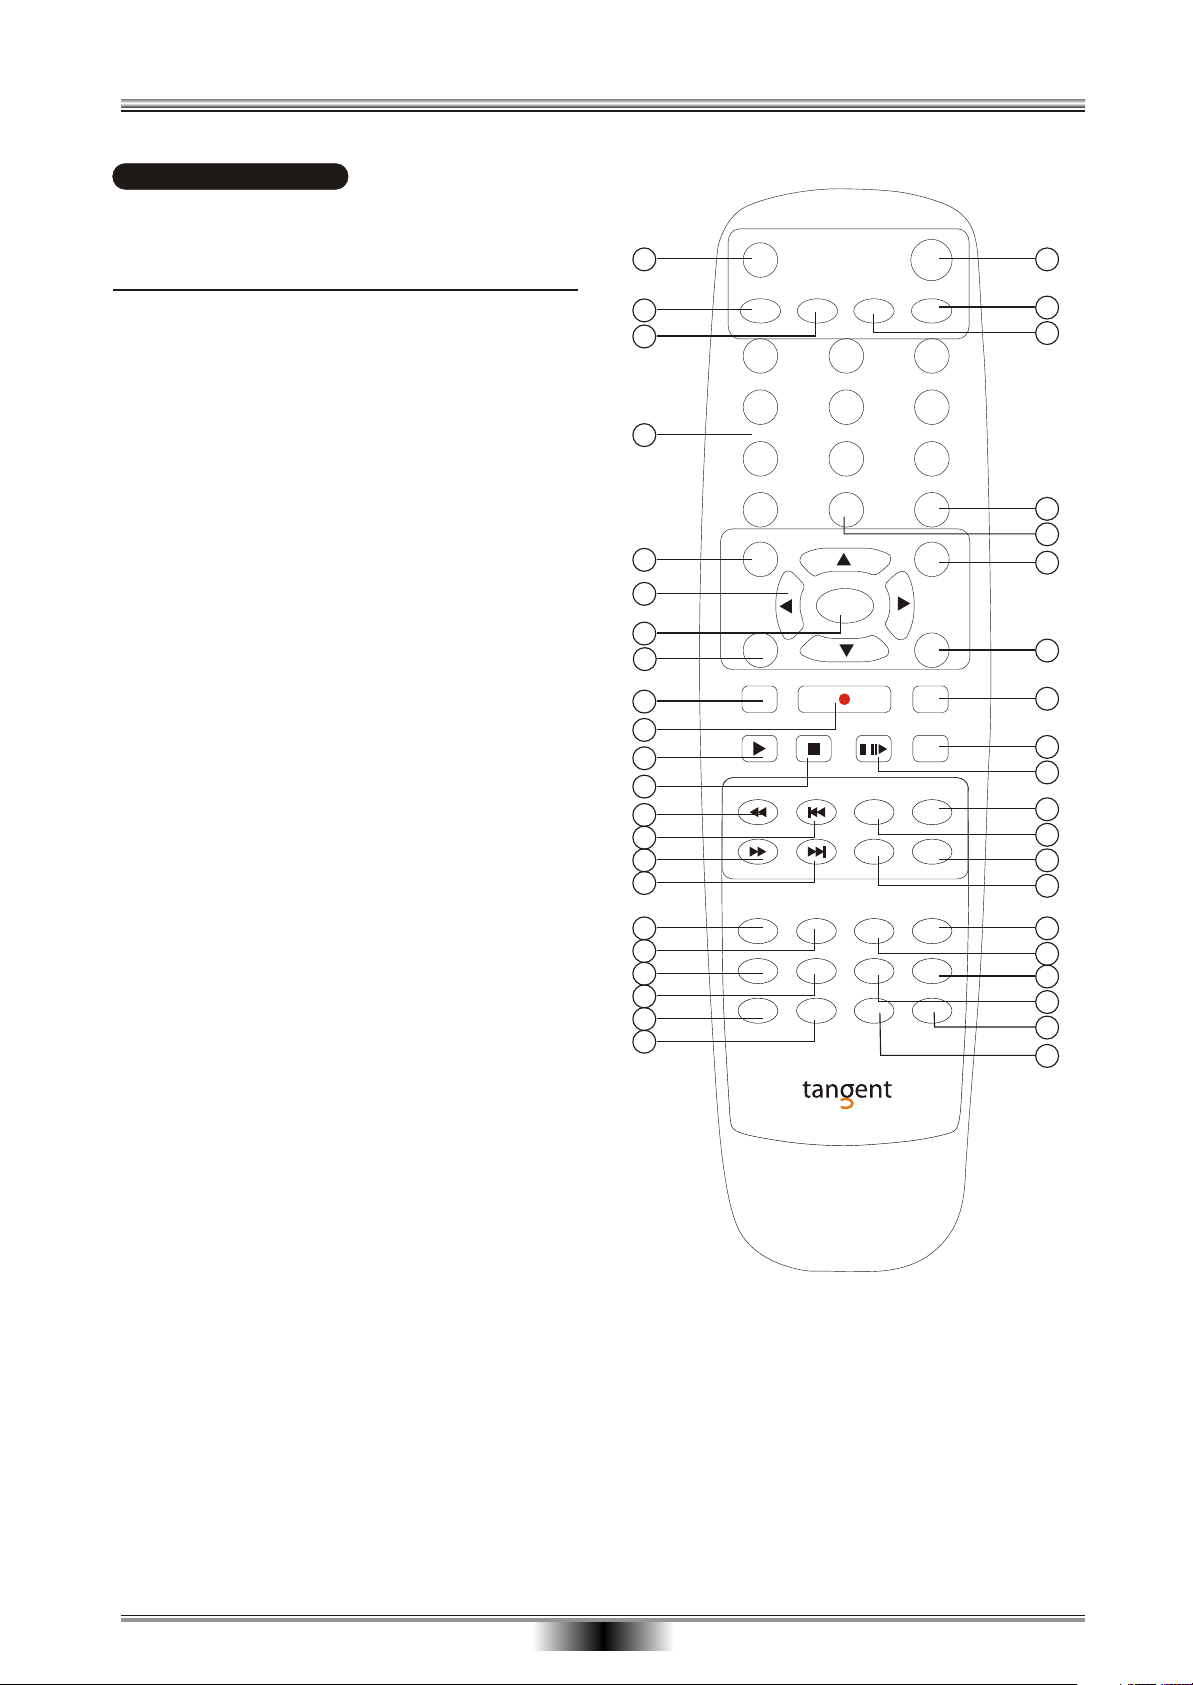
REMOTE CONTROL
Identification of Controls
THE INSTRUCTIONS BELOW DESCRIBE THE
FUNCTIONS OF THE REMOTE CONTROL
1. OPEN/CLOSE
2. DV
3. TV
4. NUMBERS
5. SETUP
6. DIRECTION
(UP/DOWN/LEFT/RIGHT)
7. SELECT
8. MENU
9. TIMER
10.REC/OTR
(RECORD/ONE-TOUCH RECORD)
11.PLAY
12.STOP
13.REVERSE
14.PREVIOUS
15.FWD
16. NEXT
17.AUDIO
18.SUBTITLE
19.REPEAT
20.SLOW
21.PROG
22.RANDOM
23.ST ANDBY/ON
24.SCAN
25.AV(SOURCE)
26.NAVIGATION
27.ADD/CLEAR
28.TITLE
29.DISCOPER ATION
30.EDIT
31. MUTE
32.PAUSE/STEP
33.VOLUME+
34.CHANNEL+
35.VOLUME-
36.CHANNEL-
37.RETURN
38.ANGEL
39.DISPLAY
40.ZOOM
41.GOTO
42.PS/IS(PROGRE SSIVE / INTERLACE SCAN)
1
10
11
12
13
14
15
16
17
18
19
20
21
22
23
OPEN/CLOSE
2
3
4
5
6
7
8
9
DV
1 2
4
7
ADD/CLEAR NAVIGATION
0
SETUP
MENU
TIMER REC/OTR
PLAY
REV PREV
FWD NEXT
AUDIO
REPEAT
PROG
SELECT
STOP
SUBTITLE
SLOW
RANDOM
STANDBY/ON
AVTV
SCAN
5
8 9
TITLE
DISC OPER
EDIT
/ /
CH+
CH-
ZOOM
MUTE
VOL+
VOL-
DISPLAY
GOTOPS/IS
PAUSE/STEP
ANGLE RETURN
24
25
3
6
26
27
28
29
30
31
32
33
34
35
36
37
38
39
40
41
42
09
Page 12
Battery Installation
1. Push downward and outward the leaf spring
to remove the battery compartment cover.
2. Insert two size AA batteries according to the
"+" and "-" markings.
3. Make sure the batteries have been properly
installed, then close the battery compartment
cover.
Notes:
Do not mix different types together, or old
batteries with new batteries.
While the remote controller will not be used for
an extended period of time, remove the batteries to
prevent possible corrosion.
To prevent corrosion resulting in damage,
remove exhausted batteries immediately. Where
the remote controller doesn't appear to operate
normally, replace both of the batteries.
Typical life for the batteries provided with this
product is about 6 months. The life expectance may
vary according to the use status.
Use of the remote controller
Point the remote controller toward the remote
sensor on your DVD home theater center. Upon
receipt of the signal from the remote controller, the
equipment will operate accordingly.
The description in this Manual is based on the
buttons on the equipment. You may use the
counterparts on the remote controller to do the same.
Notes:
Do not place this equipment in a place exposed
to direct sunlight or strong light source like inverting
fluorescent light, or else it may interfere with correct
operation of the remote controller.
When other similar remote controller is used in
the same room, or when this product is used near
other equipment using infrared ray, interference with
the operation of this remote controller may occur.
Do not place any object on the remote controller,
or else it may cause unintentional depression of the
N
O
I
T
A
G
I
V
A
N
R
A
E
L
C
/
D
D
A
T
E
L C
E
S
E
T
U
M
P
E
T
S
E
US /
A
P
P
O
T
S
Y
A
L
P
buttons and waste the batteries unnecessarily.
The front of the chassis should not be glazed
with color glass, or else it may cause interference
with normal operation of the remote controller.
Any barrier between the remote controller and
remote sensor will inactivate any operation of the
remote controller.
The operating range between the remote
controller and the equipment shall be no more than
5 meters (16 inches). When the operating range
becomes shorter, replace the batteries with new
ones.
Page 13

Connection
CONNECTION FOR AUDIO OUTPUT
Dolby Pro Logic Surround Sound (GOOD)
Enjoy Dolby Pro Logic Surround by connecting
an amplifier and speaker system (right and left
front speakers, a center speaker, and one or
two rear speakers).
IN
OUT
TV75
ANTENNA
Enjoying Digital Stereo Sound (BETTER)
Enjoy the dynamic sound of Digital Stereo by
connecting an amplifier equipped with a digital
audio input and speaker system (right and left
front speakers, a center speaker, and one
subwoofer speaker, and two rear speakers)
S-VIDEO
INPUT
VIDEO
L
R
MIXED
Audio cable
(Analog out)
AUDIO OUTPUT
SL
C
L
SRSW
R
5.1CH
VIDEO OUTPUT
VIDEO
FL
FR
S-VIDEO OPTICALCOAXIAL
AMPLIFIER
DIGITAL
Pb/Cb
Y
OUTPUT
Pr/Cr
SCART OUTPUTSCART OUTPUT
TV75
ANTENNA
VIDEO
FL
FR
S-VIDEO OPTICALCOAXIAL
VIDEO OUTPUT
S-VIDEO
INPUT
VIDEO
IN
OUT
L
R
AUDIO OUTPUT
L
R
MIXED
SL
C
SRSW
5.1CH
Audio cable
DIGITAL
Pb/Cb
Y
OUTPUT
Pr/Cr
SCART OUTPUTSCART OUTPUT
or
AMPLIFIER
11
Page 14

CONNECTION FOR VIDEO OUTPUT
Connection
GOOD
TV75
ANTENNA
VIDEO
FL
FR
S-VIDEO OPTICALCOAXIAL
COMPOSITE
VIDEO
VIDEO OUTPUT
S-VIDEO
INPUT
VIDEO
IN
OUT
L
R
AUDIO OUTPUT
L
R
MIXED
SL
C
SRSW
5.1CH
DIGITAL
Pb/Cb
Y
OUTPUT
Pr/Cr
SCART RGB VIDEO OUTPUT (BEST)
The SCART Video OUTPUTput allows you to enjoy
the best picture quality from a DVD video disc.
BETTER
VIDEO
FL
FR
S-VIDEO OPTICALCOAXIAL
SCART OUTPUT
VIDEO OUTPUT
Pb/Cb
Pr/Cr
Y
TV75
ANTENNA
S-VIDEO
INPUT
VIDEO
IN
OUT
L
R
AUDIO OUTPUT
L
R
MIXED
SL
C
SRSW
5.1CH
S-VIDEO
Connect your recorder with the S-Video cable,
if the TV has an S-Video input. Do not connect the
yellow video cable of using the S-Video cable.
AUDIO OUTPUT
C
L
R
MIXED 5.1CH
VIDEO OUTPUT
SL
L
SRSW
R
DIGITAL OUTPUT
OPTICALCOAXIAL
DIGITAL
OUTPUT
CONNECTION FOR TV TUNER
YOUR RECORDER
SCART OUTPUTSCART OUTPUT
TV75
ANTENNA
IN
OUT
Signal Input
INPUT
L
VIDEO
R
S-VIDEO
MIXED
AUDIO Signal Output
AUDIO OUTPUT
SL
C
L
SRSW
R
5.1CH
VIDEO
FL
FR
S-VIDEO OPTICALCOAXIAL
VIDEO OUTPUT
DIGITAL
Pb/Cb
Y
OUTPUT
Pr/Cr
NOTE
¡ Refer to the manual of the connected TV.
¡ Turn off the power and unplug both units before setting up any
connections.
12
Page 15

TV75
ANTENNA
IN
OUT
VIDEO
S-VIDEO
INPUT
L
R
AUDIO OUTPUT
L
R
MIXED
SL
C
5.1CH
FL
SRSW
FR
VIDEO OUTPUT
Pb/Cb
VIDEO
S-VIDEO OPTICALCOAXIAL
Pr/Cr
DIGITAL
Y
OUTPUT
Page 16

Connection
CONNECTION FOR AV SIGNAL (A/V FRONT INPUT)
RECORDER REAR
Audio in
TV75
ANTENNA
IN
OUT
VIDEO
S-VIDEO
INPUT
L
R
AUDIO OUTPUT
L
R
MIXED
SL
C
5.1CH
FL
SRSW
FR
VIDEO OUTPUT
Pb/Cb
VIDEO
S-VIDEO OPTICALCOAXIAL
Pr/Cr
DIGITAL
Y
OUTPUT
Audio out Video out
TV set
or
Video in
DV INPUT VIDEO
L---- AUDIO -----R
S-VIDEO
DV input
Connect your recorder with the S-Video cable, if the Signal
DIGITAL
Source has an S-Video input. Do not connect the yellow
video cable if using the S-Video cable.
Vidicon
NOTE
¡ Refer to the manual of the connected system.
¡ Turn off the power and unplug both units before setting up any
connections.
RECORDER FRONT
14
Page 17

Mp3 & Progressive Scan
WHAT IS MP3?
MP3 refers to a new format of music files available for playback over the internet. The
popularity of MP3 allows people to download music from MP3 websites onto ones home
computer.
WHAT IS PROGRESSIVE SCAN?
Progressive Scan creates a picture with double the scan lines of traditional component video
pictures and creates a sharper image. The advantages of progressive scan video output are
reduced picture flickering and motion artifacts as well as a sharper image on large screens.
15
Page 18

PLAYING A NORMAL DISC
Playing Back a Disc
1. Power on your recorder.
2. Insert a DVD disc.
3. Press direction Keys or the number buttons to select
the title.
Title1 Title 2
Title3
Title 4
4. Press the SELECT or PLAY button.
The DVD video player will start playback from the title
selected.
5. To remove the disc, press the OPEN/CLOSE button.
PLAYING A DVD+RW OR DVD+R DISC
Index Picture Screen
OPEN/CLOSE
SELECT
PLAY
OPEN/CLOSE
DV
1 2
4
7
ADD/CLEAR NAVIGATION
0
SETUP
SELECT
MENU
TIMER REC/OTR
STOP
PLAY
REV PREV
FWD NEXT
AUDIO
SUBTITLE
SLOW
REPEAT
PROG
RANDOM
STANDBY/ON
AVTV
5
8 9
PAUSE/STEP
/ /
CH+
CH-
ANGLE RETURN
ZOOM
DISPLAY
SCAN
3
6
TITLE
DISC OPER
EDIT
MUTE
VOL+
VOL-
GOTOPS/IS
1. 1. TITLE
2. 01/01/00
3. 12:03:47
4. SP 00:00:20
5.
1. TITLE
01/01/00
12:03:47
SP00:00:20
1. TITLE
01/01/00
12:06:50
HQ00:00:20
1. TITLE
01/01/00
12:08:57
SLP00:00:20
Description:
1.The name of the pre-recorded. The default is TITLE.
2.The date and time of the record.
3.Title time of the record.
4.The quality.
5.Length of the record
16
Page 19

Playing Back a Disc
PLAYING A DVD+RW OR DVD+R DISC
1. Power on your recorder.
2. Insert a DVD+RW or DVD+R disc
The index pictures will appear on the screen.
3. Press the OPEN/CLOSE button
To open or close the disc tray.
4. Use direction keys(UP/DOWN/RIGHT/LEFT) to highlight
the item you desired.
5. Press SELECT or PLAY.
To select identified part of movie, or enjoy one(From the
start).
6. Stop playback
Press the STOP button once to freeze the imagine; press the
PLAY button to resume .
If playback from the start, press the STOP button twice then
press the PLAY button.
OPEN
CLOSE
SELECT
PLAY
STOP
OPEN/CLOSE
DV
1 2
4
7
ADD/CLEAR NAVIGATION
0
SETUP
SELECT
MENU
TIMER REC/OTR
STOP
PLAY
REV PREV
FWD NEXT
AUDIO
SUBTITLE
SLOW
REPEAT
PROG
RANDOM
STANDBY/ON
AVTV
5
8 9
PAUSE/STEP
/ /
CH+
CH-
ANGLE RETURN
ZOOM
DISPLAY
SCAN
3
6
TITLE
DISC OPER
EDIT
MUTE
VOL+
VOL-
GOTOPS/IS
UP/DOWN
/RIGHT/LEFT
Note:
After finishing playback all titles contained on a
DVD+RW or DVD+R disc, it will return to the Index Picture
Screen.
GENERAL FEATURES
All playback operation can be realized by the navigation.
During playback, press DISPLAY button twice to access
the control bar:
DVD
MODE Normal
TRICK Play
TITLE 35/41
CHAPTER 01/01
AUDIO 01/02-OTH
SUBTITLE Off
ANGLE 01/01
T-TIME
00:00:00-00:00:00
The details of every functions is as follows:
Press RIGHT/LEFT to highlight one icon and press SELECT to enter , after pressing UP/DOWN
to select item, press SELECT.
Press DISPLAY again to cancel the control bar.
MODE Normal
Playback mode Set your appreciated playback
mode such as PROGRAM, RANDOM and
AUDIO 01/02-OTH
Audio Select your desired audio setting, if
Available.
various repeat mode.
TRICK Play
SUBTITLE Off
Playback control Control playback by various
setting such as FAST FORWARD, FAST
REVERSE, PAUSE, STOP, etc.
TITLE 35/41
Title Select to choose an available title by
inputting numbers.
CHAPTER 01/01
Chapter Select to choose an Available
chapter by inputting numbers.
Subtitle Select to choose anavailable subtitle
by inputting Numbers.
ANGLE 01/01
Angle Select your desired camera angle, if
Available.
T-TIME
00:00:00-00:00:00
Timer Goto the point you want to start from
by inputting the time.
17
Page 20

Playing Back a Disc
GENERAL FEATURES
1. Fast forward playback
Press >> during normal playback.
The speed will cycle with each press as: FF2, FF4,FF16,FF32 or
play.
Press PLAY to resume normal playback.
2. Fast reverse playback
Press << during normal playback.
The speed will cycle with each press as: FB2, FB4,FB16,FB32
or play.
Press PLAY to resume normal playback.
OPEN/CLOSE
DV
1 2
4
7
0
SETUP
MENU
STANDBY/ON
AVTV
SCAN
3
5
6
8 9
ADD/CLEAR NAVIGATION
TITLE
SELECT
DISC OPER
3. Pause playback
Press PAUSE/STEP during normal playback to pause
and press PLAY to resume normal playback.
4. Frame advance
Press PAUSE/STEP during normal playback.
One frame is advanced when pressing PAUSE/STEP.
Press PLAY to resume normal playback.
5. Slow
Press the SLOW button during plsyback
The playback speed becomes 1/2, 1/4, 1/8 of the normal speed
or normal play when pressing the SLOW button.
Note:
The above features vary depending on the disc type such as
MP3, Audio CD, etc.
PLAY
PRVERSE/
FORWARD
TIMER REC/OTR
STOP
PLAY
REV PREV
FWD NEXT
AUDIO
SUBTITLE
SLOW
REPEAT
PROG
RANDOM
EDIT
MUTE
PAUSE/STEP
/ /
CH+
VOL+
CH-
VOL-
ANGLE RETURN
ZOOM
DISPLAY
GOTOPS/IS
PAUSE/STEP
18
Page 21

Locating a Specific Title, Chaptor or Track
DVD VIDEO DISCS ARE NORMALLY DIVIDED INTO TITLES AND SUB-DIVIDED INTO CHAPTERS.
SIMILARLY, CD'S(AUDIO,HDCD, and MP3) ARE DIVIDED INTO TRACKS. YOU CAN CONVENIENTLY
LOCATE ANY SPECIFIC TITLE, CHAPTER,OR TRACK WITH THIS DVD PLAYER.
Chapter1
TITLE1
Chapter1 Chapter2 Chapter2 Chapter3
TITLE2
DVD Video Disc
Track1 Track2 Track3 Track4 Track5
Audio CD
LOCATING A TITLE USING THE TITLE MENU
You can locate a specific title using the title menu function, if a DVD video disc contains a title menu.
1. Press the TITLE button
TITLE
On the TV screen, the title menu will appear.
Title 1
Title 2
2. Press the / / / button to select the title you want
3. Press the SELECT button
Title 3
Title 4
This will cause the DVD video player to start playback from
chapter 1of the title selected.
SELECTSELECT
Example of a title menu
NOTICE
There are some disc that does not respond to this function.
If different instructions appear on the TV screen, follow those instructions. The instructions
above are describe the basic procedure, but procedures may depend on the contents of
the DVD video disc.
LOCATING A SPECIFIC CHAPTER OR TRACK
This player allows you to locate consecutive chapters or tracks.
Press the SKIP I<< or >>I button repeatedly to display the requested chapter or track
The player starts playback from the selected chapter or track.
PREV NEXT
How to locate proceeding chapters or tracks
When you press the SKIP I<< button , the player starts playback from the beginning of the
preceding chapter or track.
How to locate succeeding chapters or tracks
When you press the SKIP >>I button , the player starts playback from the beginning of the
succeeding chapter or track..
Notice: on some discs the titles may not display the sub-divided chapters.
19
Page 22

Locating a Specific Title, Chaptor or Track
LOCATING A TITLE
If a DVD video disc contains title numbers, you can locate a specific title by directly selecting
a title number.
1. Press GOTO during playback.
The control bar will display on the screen.
CHAPTER---
TITLE:--
TIME-: --:--
2. To select your desired Chapter, input the number of a vailable chapter, then press
SELECT to confirm it.
e.g. To select Chapter2
CHAPTER- -2
3. To select your desired title, press GOTO to highlight the icon
OPEN/CLOSE
SETUP
MENU
TIMER REC/OTR
PLAY
REV PREV
FWD NEXT
AUDIO
REPEAT
PROG
TITLE:--
DV
1 2
4
7
0
SUBTITLE
STOP
SLOW
RANDOM
STANDBY/ON
AVTV
SCAN
3
5
6
8 9
ADD/CLEAR NAVIGATION
TITLE
SELECT
DISC OPER
EDIT
MUTE
PAUSE/STEP
/ /
CH+
VOL+
CH-
VOL-
ANGLE RETURN
ZOOM
DISPLAY
GOTOPS/IS
and input the number of a vailable title, then press SELECT.
4. If you want to start playback from some point, press GOTO to highlight the icon
,and input the time, then press SELECT.
TIME-: --:--
SELECT
GOTO
Note:
The function is invalid on MP3 disc.
For CD disc, GOTO is used for track/time selection.
20
Page 23

Playing Repeatedly
THIS RECORDER ALL ALLOWS YOU TO PLAYBACK A SPECIFIC TITLE, CHAPTER, TRACK, OR
SEGMENT REPEATEDLY.(TITLE REPEAT, CHAPTER/TRACK REPEAT,A-B REPEAT)
HOW TO REPEAT A TITLE, CHAPTER, OR TRACK
1. Press the REPEAT button during playback.
The repeat mode changes, each time you press the REPEAT
Button.
C-RPT
T-RPT
D-RPT
Repeats the same chapter.
Repeats the same title.
Repeats the whole disc.
REPEAT
OPEN/CLOSE
DV
1 2
4
7
ADD/CLEAR NAVIGATION
0
SETUP
SELECT
MENU
TIMER REC/OTR
STOP
PLAY
REV PREV
FWD NEXT
AUDIO
SUBTITLE
SLOW
REPEAT
PROG
RANDOM
STANDBY/ON
AVTV
5
8 9
PAUSE/STEP
/ /
CH+
CH-
ANGLE RETURN
ZOOM
DISPLAY
SCAN
3
6
TITLE
DISC OPER
EDIT
MUTE
VOL+
VOL-
GOTOPS/IS
NORMAL
Resumes normal playback.
HOW TO REPEAT A SPECIFIC SEGMNET
1. Press DISPLAY button twice to access the control bar.
2. Highlight by pressing RIGHT/LEFT, press SELECT.
3. Use UP/DOWN to select and press SELECT at the beginning of the
MODE Mormal
A-B Repeat
segment in which you want to repeat playback(point A).
DVD
MODE Normal
4. Press SELECT again at the end of the segment( point B)
The player will automatically return to point A and
Start to repeat playback to the selected segment(A-B)
TRICK Play
TITLE 35/41
CHAPTER 01/01
AUDIO 01/02-OTH
SUBTITLE Off
ANGLE 01/01
T-TIME
5. Highlight by pressing RIGHT/LEFT, press SELECT.
MODE A-B Repeat
00:00:00-00:00:00
Use UP/DOWN to select NORMAL and press SELECT to resume normal playback.
Normal
A-B Repeat
Chapter Repeat
Title-Repeat
Disc Repeat
Note:
There are two repeat modes for MP3/CD disc. On CD disc, they are track repeat
and disc repeat, and on MP3 disc, they are repeat song and repeat directory.
VCD
MODE Normal
TRICK Play
TRACK 01/01
AUDIO Stereo
PBC PBC on
TR-TIME
00:01:50-01:25:40
Normal
A-B Repeat
Frack-Repeat
Disc-Repeat
Program
Random
21
Page 24

Playing in Random Order
THIS RECORDER ALLOWS YOU TO PLAYBACK TITLES, CHAPTERS WITHIN A TITLE, OR
TRACKS IN RANDOM ORDER.
PLAYING TITLES IN RANDOM ORDER
1. During normal playback press the RANDAM button.
The player will start random playback now.
Random
Normal
2. Press RANDOM again to resume normal playback.
RANDOM
OPEN/CLOSE
DV
1 2
4
7
0
SETUP
MENU
TIMER REC/OTR
PLAY
REV PREV
FWD NEXT
AUDIO
REPEAT
PROG
AVTV
5
8 9
ADD/CLEAR NAVIGATION
SELECT
STOP
PAUSE/STEP
/ /
CH+
CH-
SUBTITLE
ANGLE RETURN
SLOW
ZOOM
RANDOM
STANDBY/ON
SCAN
3
6
TITLE
DISC OPER
EDIT
MUTE
VOL+
VOL-
DISPLAY
GOTOPS/IS
Note:
• T he player will go to another chapter or track and start playback, if you press the SKIP button >>I ,I<< , during
random playback.
22
Page 25

This player allows you to select a preferred language and sound recording system from those
included on the DVD video disc.
1.Press the AUDIO button during playback
2.Press the AUDIO button repeatedly to
cycle through the options
PLAY
ADD/CLEAR NAVIGATION
SELECT
STOP
PAUSE/STEP
MUTE
Page 26

Playing in a Favorite Order
THIS PLAYER ALLOWS YOU TO PROGRAM UP TO 99 ITEMS INTO MEMORY AND THEN PLAY THEM
BACK IN THAT ORDER. (PROGRAM/PLAYBACK)
HOW TO SET TITLES, CHAPTERS, OR TRACKS IN A FAVORITE ORDER
1. Press DISPLAY button twice to access the control bar.
2. Highlight by pressing RIGHT/LEFT, press SELECT.
MODE Normal
3. Use UP/DOWN to select PROGRAM and press SELECT, two volumes
will appear on the screen.
• The left volume displays all titles on the disc.
Edit program play list
TITLE
TITLE 01
TITLE 02
TITLE 03
TITLE 04
TITLE 05
TITLE 06
TITLE 07
TITLE 08
Favorite/Program
TITLE 02 Chapter 01
TITLE 04 Chapter 01
PROGRAM
• The right volume allows you to edit titles in your favorite order.
2. In the left volume, use UP/DOWN to select one title, and press
ADD/CLEAR to add it to the right volume.
You can also select one chapter by pressing SELECT after highlighting
the title.
OPEN/CLOSE
DV
1 2
4
7
ADD/CLEAR NAVIGATION
0
SETUP
MENU
TIMER REC/OTR
STOP
PLAY
REV PREV
FWD NEXT
AUDIO
SUBTITLE
SLOW
REPEAT
PROG
RANDOM
5
8 9
SELECT
PAUSE/STEP
ANGLE RETURN
ZOOM
STANDBY/ON
AVTV
SCAN
3
6
TITLE
DISC OPER
EDIT
MUTE
/ /
CH+
VOL+
CH-
VOL-
DISPLAY
GOTOPS/IS
3. To clear one title you have added in the right volume, highlight
the one and then press ADD/CLEAR to clear it. Use RIGHT/LEFT to
move the cursor between the volumes.
4. Press PROG to return the PROGRAM play back.
ADD/CLEAR
5. Press DISCPLAY button twice to access the control bar
Select use UP/DOWN to select NORMAL and press
MODE Program
SELECT toresume normal playback.
Note:
• On the MP3/CD disc, there are some differences on OSD.
OPEN/CLOSE
DV
1 2
4
7
ADD/CLEAR NAVIGATION
0
SETUP
SELECT
MENU
TIMER REC/OTR
STOP
PLAY
REV PREV
FWD NEXT
AUDIO
SUBTITLE
SLOW
REPEAT
PROG
RANDOM
STANDBY/ON
AVTV
5
8 9
PAUSE/STEP
/ /
CH+
CH-
ANGLE RETURN
ZOOM
SCAN
TITLE
DISC OPER
EDIT
MUTE
VOL+
VOL-
DISPLAY
GOTOPS/IS
3
6
24
Page 27

Selecting Subtitles
THIS RECORDER ALLOWS YOU TO DISPLAY THE SUBTITLES FROM THOSE INCLUDED ON THE
DISC ON TO YOUR TV SCREEN.
Good afternoon Bonsoir Buenas tardes
HOW TO DISPLAY SUBTITLES
Press the SUBTITLE button during playback to choose
one of the subtitles available on the disc, or turn the
subtitle off.
SUBTITLE :01/07 ENG
SUBTITLE :02/07 GER
SUBTITLE :03/07 SPA
SUBTITLE :04/07 FRE
SUBTITLE :05/07 CHI
SUBTITLE :06/07 HUN
SUBTITLE
OPEN/CLOSE
DV
1 2
4
7
ADD/CLEAR NAVIGATION
0
SETUP
SELECT
MENU
TIMER REC/OTR
STOP
PLAY
REV PREV
FWD NEXT
AUDIO
SUBTITLE
SLOW
REPEAT
PROG
RANDOM
STANDBY/ON
AVTV
5
8 9
PAUSE/STEP
/ /
CH+
CH-
ANGLE RETURN
ZOOM
DISPLAY
SCAN
TITLE
MUTE
3
6
DISC OPER
EDIT
VOL+
VOL-
GOTOPS/IS
SUBTITLE :07/07 HIN
OFF
Note:
• Due to the nature of some DVD’s, you may not be able to turn off the subtitles as they will appear on
screen automatically.
• As you press the SUBTITLE button, the subtitles may not appear immediately during some scenes.
• If the subtitles continue to show on your TV even after the DVD has been turned off, please check the
closed caption settings on your TV.
25
Page 28

Using the On-Screen Display
THIS PLAYER ALLOWS YOU TO VIEW STATUS AND DISC INFORMATION ON YOUR TV SCREEN.
CHECKING THE OPERATIONAL STATUS
With this function, you can view on your TV the following informations:
- Play back status
- Current title
- Current chapter
- Current language
- Current title Time
Press DISPLAY button during DVD playback.
Normal Play T01/25 C06/21 AU01/03 00:26:48
PLAY BACK STATUS
Normal Play T01/25 C06/21 AU01/03 00:26:48
CURRENT TITLE/TOTAL TITLE
OPEN/CLOSE
DV
1 2
4
7
ADD/CLEAR NAVIGATION
0
SETUP
SELECT
MENU
TIMER REC/OTR
STOP
PLAY
REV PREV
FWD NEXT
AUDIO
SUBTITLE
SLOW
REPEAT
PROG
RANDOM
AVTV
5
8 9
PAUSE/STEP
/ /
CH+
CH-
ANGLE RETURN
ZOOM
STANDBY/ON
SCAN
TITLE
DISC OPER
EDIT
MUTE
VOL+
VOL-
DISPLAY
GOTOPS/IS
3
6
DISPLAY
Normal Play T01/25 C06/21 AU01/03 00:26:48
CURRENT CHAPTER/TOTAL CHAPTER
Normal Play T01/25 C06/21 AU01/03 00:26:48
CURRENT LANGUAGE
Normal Play T01/25 C06/21 AU01/03 00:26:48
CURRENT TITLE TIME
26
Page 29

Setting the Parental Lock
YOU CAN USE THE PARENTAL LOCK FUNCTION ONLY WITH DVD EQUIPPED WITH THE
PARENTAL LOCK FEATURE
SETTING THE PARENTAL LOCK
DVD equipped with the parental lock function is rated according to
their content. The contents allowed by a parental lock level and the
way a DVD can be controlled may vary from disc to disc. For
example, if the disc allows it, you could edit out violent scenes
unsuitable for children and replace them with more suitable scenes,
or lock out playback of the disc all together.
1.Press STOP button twice during playback.
6. Press SELECT , the sub-menu of Set Rating
Level appears, use UP/DOWN to select one
2. Press SETUP during stop status.
3. Highlight the PLAY icon by pressing
RIGHT/LEFT.
The menu appears on the TV screen.
SYSTEM SETUP - PLAYBACK
rating, press SELECT to confirm it.
SYSTEM SETUP - PLAYBACK
OFF
SETUP
OK
NEW
OPEN/CLOSE
DV
1 2
4
7
ADD/CLEAR NAVIGATION
0
SETUP
SELECT
MENU
TIMER REC/OTR
STOP
PLAY
REV PREV
FWD NEXT
AUDIO
SUBTITLE
SLOW
REPEAT
PROG
RANDOM
1 Kid Sate
2 G
3 PG
4 PG 13
5 PG-R
6 R
7 NC-17
8 Adult
OFF
STANDBY/ON
AVTV
5
8 9
PAUSE/STEP
/ /
CH+
CH-
ANGLE RETURN
ZOOM
SCAN
TITLE
DISC OPER
EDIT
MUTE
VOL+
VOL-
DISPLAY
GOTOPS/IS
3
6
TV aspect ratio
Rating level
Digital audio output
1
Pan Scan
OFF
RAW
4. Use UP/DOWN to select Rating Level, press
SELECT button.
5. Input your password ofnumbers, highlight
OK and press SELECT.
The pre-set password is 3308
7. Highlight OK and press SELECT to save your
setting.
8. Press SETUP button to exit setup,
press PLAY button to start
TO CHANGE YOUR PASSWORD:
1. Follow step 1-6 to select “New”.
2. Enter new password.
3. Re-enter to confirm your new password.
5. Highlight OK and press SELECT to save it.
6. Press SETUP button to exit.
27
Page 30

Customizing Function Settings
THIS PLAYER ALLOWS YOU TO CUSTOMIZE THE PERFORMANCE TO YOUR PERSONAL
PREFERENCES.
SETUP MENU
GENGERAL
DISPLAYING THE SETUP MENU SCREEN
The SETUP MENU screen asks you to select a setting category from General, Speaker, Audio and
Preferences. The selected category will provide you the setting details using the succeeding screen.
PLAYBACK
RECORD
LANGUAGE
CHANNEL SCAN
CLOCK
Main Page
GENGERAL
PLAYBACK
RECORD
LANGUAGE
CHANNEL
SCAN
CLOCK
screen saver
Scart output
Video output format
Restore factory settings
TV aspect ratio
Rating level
Digital audio output
Closed captions
Audio chapter market
Default source
Default quality
OSD language
Menu language
Subtitle language
Audio language
Date(mm/dd/yy)
Time(hh:mm:ss)
General Setup
On/Off
CVBS/RGB
PAL/NTSC
OK
Playback Setup
16:9/Pan Scan/Letter box
Off
RAM/LPCM
ON/OFF
Record Setup
On/Off
F-CS/ F-SV/ RE-CS / RE-SV/ DV/TUNER
SLP/EP/SP/HQ
Language Setup
English/Spanish/......
English/Chinese/....../Original
Off/English/Chinese/......./Original
English/Chinese/......./Original
Deltails see page 26
Date& Time Setup
01/01/00
01:15:01
1. Press SETUP during stopstatus.
2. Press direction keys(UP/DOWN/RIGHT/LEFT) to select category (highlight), then press SELECT.
3. Press SETUP to exit the setup menu.
28
Page 31

Recording Options
CHANNEL SEARCH
To record TV programs, you should search TV channels
first.
1. Press SCAN to access the TV setup menu.
2. Use the UP/DOWN button to highlight SCAN
and press SELECT.
It will search channels automatically.
During auto-searching, press STOP to cancel searching.
3. To browse the found channels, use the UP/
DOWN button to highlight EDIT and press
SELECT to setup it, press UP/DOWN to Name,
and you can also input numbers and press SELECT.
In the SKIP column, The channel cannot be found
will be “YES”.
4. If you want to skip one channel, select the
corresponding channel. use UP/DOWN button
to highlight the skip and press SELECT, press
UP/DOWN to highlight the yes, and press SELECT,
5. use UP/DOWN to highlight the OK and press SELECT.
SYSTEM SETUP - CHANNEL SCAN
Scan channels
Modify channel information
Sort channel order
Channel audio language
1
Total found 1 channel. Press STOP to
stop scanning
CHANNEL EDIT
Name
Manual Scan
TV System
Sound Mode
Skip
Fine tune
3%
OK
SCAN
EDIT
SORT
Language A
P001/S-008
55.25MHz
PAL I
Stereo
NO
6. Press SETUP again to exit.
LEFT/RIGHT to manual scan, 0~9 or
CH+/CH- to Change Channel
SETUP RECORD QUALITY
1. Press SETUP during stop status.
2. Press direction keys (UP/DOW/RIGHT/LEFT) to select.
3. Select default quality.
HQ: Perfect quality, nearly 60 minutes in a blank disc
SP: Standard play quality, nearly 120 minutes in a blank disc
EP: Extend play, nearly 240 minutes in a blank disc
SLP: Standard long play, nearly 360 minutes in a blank disc
NORMAL RECORDING
1. Make connections illustrated as page11 -14.
2. Insert a recordable DVD+RW or DVD+R into the recorder.
3. Press DV. TV or AV to select the input source which you have connected as step 1.
F-A/V: Front Audio/Video Input (on the front panel)
R-A/V: Rear Audio/Video Input (on the rear panel)
F-SV: Front S-Video (on the front panel)
R-SV: Rear S-Video (on the rear panel)
TV: (you can select it by pressing CHANNEL+/- or input the assigned number of
the channel to select your desired one directly)
DV: Digital vidicon
4. Press RECORD to start recording.
If you want to stop recording, press STOP.
If the DVD+RW or DVD+R is new, it will take about three minutes to stop.
When is recording, press the STOP button the TV display postprocess please wait a moment .
29
Page 32

Recording Options
ONE-TOUCH RECORD
1. During normal recording, press RECORD, the recorder will automatically stop in 30 minutes.
2. The recording time will extend for another 30 minutes with each press.
The length of recording time is determined by disc capacity and record quality.
With your setting, if it will exceed the capacity of the disc, OTR will be canceled, and switched to
normal record.
3. If you want to stop recording, press STOP.
REC/OTR
OPEN/CLOSE
DV
1 2
4
7
ADD/CLEAR NAVIGATION
0
SETUP
SELECT
MENU
TIMER REC/OTR
STOP
PLAY
REV PREV
FWD NEXT
AUDIO
SUBTITLE
SLOW
REPEAT
PROG
RANDOM
HOW TO SWITCH TO PLAYBAK MODE
When the recording is suspended, you can press PLAY to switch to normal playback mode.
CLOCK SETUP
STANDBY/ON
AVTV
5
8 9
PAUSE/STEP
/ /
CH+
CH-
ANGLE RETURN
ZOOM
SCAN
TITLE
DISC OPER
EDIT
MUTE
VOL+
VOL-
DISPLAY
GOTOPS/IS
3
6
1. During stop status, press SETUP to access the Setup Menu.
2. Use RIGHT/LEFT to highlight the CLOCK icon as the
right figure.
3. With “Date (mm/dd/yy)” highlighted, press SELECT,
and input the local date by numbers, press SELECT
again.
4. With “Time (hh:mm:ss)” highlighted, press SELECT,
and input the local time of numbers, press SELECT
again.
Note:
If you want to cancel, press RETURN.
SYSTEM SETUP - CLOCK
Date(mm/dd/yy)
Time(hh:mm:ss)
1
0 1 / 0 1 / 0 0
1 4 / 2 9 / 5 2
30
Page 33

Recording Options
TIMER RECORD
1. First setup the clock of your system as “CLOCK SETUP” on page 30.
It is recommended to setup your local date and time.
2. Press TIMER, the record scheduler will pop up.
Record scheduler
Quality
Date Start End
SP DAILY
07:03 08:33
W
W
W
1
Rear CVBS
2
3
4
5
6
Source
DV SP 12/01/03 14:41 15:11
Ch057 HQ 12/31/03 12:44 13:05
SELECT
TIMER
STOP
OPEN/CLOSE
DV
1 2
4
7
ADD/CLEAR NAVIGATION
0
SETUP
MENU
TIMER REC/OTR
STOP
PLAY
REV PREV
FWD NEXT
AUDIO
SUBTITLE
SLOW
REPEAT
PROG
RANDOM
5
8 9
SELECT
PAUSE/STEP
STANDBY/ON
AVTV
/ /
CH+
CH-
ANGLE RETURN
ZOOM
DISPLAY
SCAN
TITLE
DISC OPER
EDIT
MUTE
VOL+
VOL-
GOTOPS/IS
3
6
Note:
If you want to delete a scheule, highlight the one, press ADD/CLEAR.
2. Use UP/DOWN to select one schedule, and press SELECT to access Item Editor as below:
In each item you can also use direction keys to highlight and press SELECT to choose
Your
Item Editor
Signal input source, details see page 29,step 3.
Record frequency, once, daily or weekly.
Mm/dd/yy
Start time for recording
End time for recording
Sorce
ONCE
Start
End
Quality
Record quality, details see
page 29 setup record quality.
Confirm
3. Select and Confirm to save your setting.
4. In five minutes before it is ready to record the scheduled, it appears a Record Prompt dialog,
affirm press Confirm, abolish press CANCEL, and if without operation for a moment it will
record the scheduled automatically.
DV
0 1/0 1 /0 0
1 4 : 4 1
1 5 : 1 1
SP
Cancel
Note:
In standby mode, your recorder can wake up in 2 minutes before recording.
During recording, you can press STOP to suspend the recording.
A DVD+RW/DVD+R can record for upto 360 minutes.
31
Page 34

EDITING A TITLE OF DVD+RW
Editing
1. Insert a recorded DVD+RW on the disc tray.
The Index Picture screen pops up.
2. Use the direction keys to highlight the title
which you want to edit.
3. Press EDIT, the edit bar appears on the
screen while playing back.
Press RIGHT/LEFT to highlight one icon and
enter it, press UP/DOWN to select a sub-item.
EDIT MODE
Title:04/04
Chapter:01/01
PLAY
Chapter marker
Hide chapter
Index picture
View current title/total title
Title:04/04
View current chapter/total
chapter
Chapter:01/01
Current operation status
PLAY
Chapter editing Select to add one
chapter, or delete the current/all
chapters, details see the next page.
Chapter marker
Chapter hide or unhide Select to
hide the current chapter,, details
see the next page
Hide chapter
Title face or Title name Select to
set the current image played back to
the face of the title or select to name
the current title, details see the next
page.
Split title
T- Elapsed: 0:00:02
Index picture
Divide current to 2 titles at current
point
Split title
Title Timer
T- Elapsed: 0:00:02
4.Press EDIT to quit the menu.
32
Page 35

Editing
CHAPTER EDITING
From the control bar, select the fourth icon, press SELECT repeatedly, it will cycle as
following:
Chapter marker
Insert marker
Delete marker
Delete all markers
When is selected by pressing SELECT, a new chapter marker will be added
to the current point.
When is selected by pressing SELECT, the marker of the current chapter
will be deleted.
When is selected by pressing SELECT, all of the chapter markers will
be deleted.
Note:
From the second icon in the control bar, the above operation can be viewed.
If only one chapter is available in the current title, there is only to select.
CHAPTER HIDE OR UNHIDE
From the control bar, select the fifth icon, press SELECT.
Insert marker
Delete marker
Delete all markers
Insert marker
When the icon displays , it shows the current chapter is visible, and you
can select it to hide it by pressing SELECT.
When the icon displays , it shows the current chapter is invisible, and you
can select it to unhide it by pressing SELECT.
Hide chapter
Unhide chapter
33
Page 36

Editing
TITLE ICON AND SPLIT TITLE
From the control bar, select the sixth icon, press SELECT .
When you want to set the current frame as the icon of the current title which miniature picture will
appear in the Index Picture Screen, Press SELECT with displayed.
From the control bar, select the seventh icon, press SELECT .
When is selected by pressing SELECT, a new title marker will be added
to the current point.
EDIT TITLE NAME
1. Insert a recorded DVD+RW on the disc tray.
The Index Picture screen pops up.
Split title
Index picture
2. Use the direction keys to highlight the title which you want to edit.
3. Press RIGHT, the edit bar appears on the screen while playing back.
Press UP/DOWN to highlight one icon and SELECT it.
4. From the control bar, select the fourth icon, press SELECT .
On the screen, there appears a keyboard:
Title name
Play title
Erase title
Edit title
Rename title
Overwrite title
TITLE_
A B C D E F G H I J K
L M NOPQR S TUV34
W X Y Z
Space Caps BkSp
( )
_
:
Delete
?
Clear
0
.
678 9
Exit
1 2
5
OK
Overwrite disc
Press the direction keys (UP/DOWN/RIGHT/LEFT) to highlight the one which you want to input, and
press SELECT to confirm it.
The control bars of the last line in the keyboard is for editing command.
Select OK to save the name.
Note:
The maximum length of the title name is up to 9 characters.
34
Page 37

Editing
EDITING A DISC OF A DVD+RW
1. Insert a DVD+RW on the disc tray.
2. Press DISC OPER to access the disc
editing menu.
3. With each icon highlighted by pressing
UP/DOWN, the corresponding description
of each operation will display on the
screen, such as Erase disc, Rename disc,
Record a new title, Overwrite disc, etc.
4. Press SELECT to run the operation.
EDITING A DISC OF A DVD+RW OR DVD+R
Play
Press SELECT to playback from the disc.
DVD+RW Display
Play
Erase disc
Rename disc
Make compatible
Record a new title
Overwrite disc
Lock disc
DVD+R Display
Play
Rename disc
Finalize disc
Record a new title
Erase disc
ERASE (only DVD+RW )
Press SELECT to begin erasing.
Rename disc
Press the direction keys (UP/DOWN/RIGHT/LEFT) to
highlight the one which you want to input, and press
SELECT to confirm it.
The control bars of the last line in the keyboard is for
edit command. Select OK to save the name.
Note:
lThe maximum length of the title name is up to
9 characters.
Disc name
W_
.
678 9
Exit
0
A B C D E F G H I J K
L M NOPQR S TUV34
W X Y Z
Space Caps BkSp
( )
_
:
Delete
?
Clear
Make compatible
compatible(only DVD+RW)
It shows you can make your current disc compatible. If you want to make your disc compatible
with the other DVD player. You should go on COMPATIBLE operation.
Lock disc
1 2
5
OK
LOCK(only DVD+RW )
When the icon display LOCK, it shows you can lock your current disc. If you have locked
Your disc, you can't make any changes any more except play it back, but you can unlock
it by UNLOCK.
Finalize disc
Finalize(only DVD+R)
Highligh the icon and press SELECT. It will take a few minutes to finalize the disc.
Note:
If a DVD+R has been finalized, you can not record or edit DVD+R any more. If you want
to make your disc compatible with the other DVD player, you should go on FINALIZE
operation.
35
Page 38

Specifications
DVD Player
TV System NTSC/PAL
Compatible Discs DVD+R, DVD, CD,
DVD-R, DVD-RW, MP3, DVD+RW,CD-R, CD-RW
Recordable discs format DVD+RW, DVR+R
Resolution Ratio Greater Than 500 lines
Video S/N Ratio 65dB
Frequency Response fs (96KHz/24bit)
4Hz - 44KHz:+/-2dB
Audio S/N Ratio 95dB
Degree of Distortion <0.01%
D/A Converter 192KHz/24bit
Video Out 1Vp-p
S-Video Out Y: 1Vp-p(75 )
C: 0.3Vp-p(75 );
Audio Out 2.0V
5.1 Channel,2Channel mixed
Digital Audio Output Optical, Coaxial
Connections YUV, SCART, CVBS, S-Video
Remote Control
Transmitter Infrared Ray
Signal Range Approximately 5m
Power Source 2 AAA Batteries
General
Power Supply AC 230V 50Hz
Consumed Power 30W
Standby Power <3W
Because its products are subject to continuous
improvement, We reserves the right to modify
product design and/or specifications without
notice and without incurring any obligations.
""
36
Page 39

Trouble shooting Guide
Check the following guide for a possible correction to a problem before contacting customer service.
SYMPTOMS AND CORRECTION
Symptom
No power
No picture
No sound
Black & White
picture
The playback
picture Has
occasional distortion
Brightness is
unstable or noises
are produced on
playback pictures
The DVD video
player does not start
playback
Correction
Connect the power plug into the wall outlet securely.
Verify the connection from the DVD video output to the TV video input. Then
Switch TV to appropriate mode(video 1)
Connect the video cable into the jacks securely. Refer to your television
owners manual.
Connect the audio cables into the jacks securely.
Verify the connection from the DVD audio output to the TV or receiver audio
input. Then switch to the appropriate source on the receiver. Refer to your
Audio amplifier owners manual.
Damaged S connector (bent pin)
A small amount of picture distortion may appear because of a poor quality
video/sound transfer to disc. This is especially true of some discs
Manufactured between 1997-1998.
Scratched disc
Connect the DVD player directly through the TV and not through any other
source. What you're viewing is the effect of the copy protection circuitry
Required on all DVD players.
If you don't have a video input on your TV, you must purchase an Therefore
Adapter from your dealer.
Place the disc with the graphics side up.
Place the disc on the disc tray correctly inside the guide.
Make sure the disc is free from scratches & fingerprints.
Press the SETUP button to turn off the menu screen.
Cancel the parental lock function or change the parental lock level. (The
Pre-set password is 3308.)
Turn the power off then disconnect the power plug and reinsert it back into
the wall. Retry again.
MP3 won't read disc
or It skips
The remote control
does not work
Properly
The recorder cannot
record.
Some keys do not
work
The image is
distorted.
Return disc as the software edition used may not be compatible with the
player. Check web site for instruction.
Use new editions of software such as Voyetra Audiostation 4, Adaptec's
“Easy CD Creator”, NTI or Roxio's Toast Titanium.
Make sure MP3 file are not encoded with a variable bit rate such as
provided by Real Networks.
Replace the batteries with new ones.
The type of the disc is wrong, it's not a DVD+RW or DVD+R disc.
The disc is recorded full.
The disc (DVD+R,DVD+RW) is locked, it should be unlocked.
The DVD+R has been finilized.
The type of the disc is wrong, it's not a DVD+RW or DVD+R disc.
The unit is in record mode or it is recording.
The setup of interlaced or Progressive is wrong.
Press the I/P button to switch from each other.
37
Page 40

www. .comtangent-audio
 Loading...