

Page 1
Page 2

For your own
the space provided. You
protection,
we urge youtorecord the serial numberofthis
will
find the serial number on the
bottomofthe unit.
unit
in
Serial
Number
.
Page 3

TERMS
AND
SOFTWARE
STORES
I.
CUSTOMER
A.
CUSTOMER
copiesofsoftware
capacity,
B,
CUSTOMER
the
II,
III.
IV.
V.
VI.
Equipment
LIMITED
WARRANTIES
A,
Foraperiodofninety
purchaseofthe
medium
to
purchasesofTandy
centers,
VOIdifthe
discovered
Computer
dealer
exclusive
refundofthe
replaceorrepair
B,
RADIO
exceptasprOVidedmthis
CUSTOMER'S
within
Software,
a
participating
C,
ExceptasproVided
warrantiesofany
o
EXCEPTASPROVIDED
WARRANTYOFMERCHANTABILITYORFITNESS
TO
THE
Some
applytoCUSTOMER
L1MITATIDNOFLIABILITY
A,
EXCEPTASPROVIDED
OR
ANY
ALLEGEDTOBE
LICENSEDORFURNISHEDBYRADIO
SERVICE,
THE
USEOROPERATIONOFTHE
LIABLE
ANY
BREACHOFTHIS
LEASE,
NOTWITHSTANDING
DAMAGES
THE
PARTICULAR
B,
RADIO
Software
No
action
more
than
RadiO
Shack
Some
limitation(s)orexcluslon(s)
SOFTWARE
RADIO
SHACK
subjecttothe
A.
Exceptasotherwise
B
Titletothe
CUSTOMER,
C,
CUSTOMER
tobefor
termmalonwhich
0,
CUSTOMER
~~1t;~r~s
E.
CUSTOMERispermittedtomake
additional
Software
limited
CUSTOMER
copyofthe
applicabletothird
G,
All
copyright
APPLICABILITYOFWARRANTY
A,
The
terms
saleofthe
conveys
B,
The
limifationsofliability
owner
STATE
LAW
The
warranties
have
other
fIghts
CONDITIONSOFSALE
PURCHASED
AND
RADIO
SHACK
OBLIGATIONS
assumes
full
responsibility
Included
capabiiitles,
versatility,
assumes
tuli
responSibility
and
Software
AND
CONDITIONSOFSALE
(90)
Equipment
upon
which
the
SoftwareisstoredISfree
retail
EquipmentorSoftware
dUring
Center,aRadio
for
repair,
remedyinthe
SHACK
thirty
The
DURATIONOFTHE
statesdonot
OTHER
LOSSOFBUSINESSORANTICIPATORY
FOR
LOSSOFPROFITS,ORANY
LICENSE,
INCURREDBYCUSTOMEROROTHERS
SHACK
a"sing
two
sales
statesdonot,
LICENSE
grantstoCUSTOMERanon-exclUSive,
followmg
mediumonwhich
may
useona
shall
specifically
copies
allowsabackup
numberofadditional
may
Software
notices
and
EqUipment
such
andorlicensorofthe
RIGHTS
granted
which
Equipmentbythe
stores,
and
the
stated
Shack
along
withacopyofthe
eventofa
purchase
price,atRADIO
expendabie
makesnowarrantyosto
paragraph,
exclusive
remedy,inthe
(3D)
calendar
defective
Software
Radio
Shack
hereinnoemployee,
natureonbehalfofRADIO
HEREIN,
allow
ilmltatlonsonhow
HEREIN,
PERSONORENTITY
CAUSED
WARRANTYORIN
USEORANTICIPATED
THE
ABOVE
"EQUIPMENT"OR"SOFTWARE"
shall
notbeliable
outofany
(2)
years
after
document
allow
proVisions:
providedinthiS
but
not
titletothe
use
Softwareona
multiuserornetwork
SoftwareIStobeused
not
use,
make,
providedmthis
are
reqUiredinthe
copytobe
resellordistribute
for
each
parties
recelvmg
shallberetamedonall
conditionsofthiS
and/or
Equipmenttoa
and
herein
give
vary
from
FROM
wifh
aretofunction,
Radio
Items,
daysofthe
franchiseeorRadiO
WRITIEN
DIRECTLYORINDIRECTlYBY"EQUIPMENT"OR"SOFTWARE"
claimed
for
the
may
copies
Software
statetostate
AND LICENSEOFTANDY
RADIO
SHACK
FRANCHISEESDRDEALERSATTHEIR
USA
the
EqUipmentorlicensed
and
other
calendar
RADIO
Shack
has
warranty
retail
defectISiimltedtothe
shalibereturnedtoa
RADIO
RAOID
"EQUIPMENT"OR"SOFTWARE."INNO
LIMITATIONS
for
breachofthiS
the
causeofaction
the
EqUipmentorSoftware,
limitationorexclusionatmCldentalorconsequential
not
applytoCUSTOMER,
Software
the
Softwareisrecorded
Software
muilluserornetwork
manufacture,orreproduce
additional
for
unmodified
one
soldordistributed,
copiesofthe
Warranty
Software
third
party
Warranty
the
original
COMPANY-OWNED
LIMITED
that
for
days
SHACK
been
period,
store,aparticipating
SHACK'S
Softwareislicensedonan
eventofa
dateofthe
LIMITED
SHACK
WITH
SHACK,
USEOFTHE
any
Software
operationofone
made,
CUSTOMER'S
LicensetoCUSTOMERortoatransaction
for
provisions
and
WARRANTY
this
computer
requirementsofCUSTOMER
the
condition
and
for
ItS
from
the
warrantstothe
from
original
franchisees
and
subjectedtoimproperorabnormal
the
defective
sales
documentoriease
election
the
deSign,
capability,
Software
RadiO
Shack
dealer
agent,
franchisee,
SHACK
SHACK
MAKESNOEXPRESS
FORAPARTICULAR
WARRANTIES
longanImplied
SHALL
RESPECTTOANY
INCLUDING,
PROFITSORCONSEQUENTIAL
INDIRECT,
SPECIAL,ORCONSEQUENTIAL
ANY
MANNER
"EQUIPMENT"OR"SOFTWARE."
AND
WARRANTIES,
SHALL
INVOLVED.
damages
causedbydelayIndeliveringorfurnishing
Warrantyortransactions
has
paid-up
License,
applicable
(cassette
system,orone
simultaneously,
License,
copiesatthe
However,
for
own
copiesofthe
Software
copiesofthe
are
applicableasbetween
leasetoCUSTOMER
herem
any
manufacturerofthe
CUSTOMER
COMPUTER
EQUIPMENT
COMPUTER
AUTHORIZED
hardware
purchased
separately
(the
"Software")
and
effectivenessofthe
installation,
dateofthe
customer
accruedormore
RadiO
Shack
orlgmai
manufactUring
dealersattheir
and
Radio
HAVENOLIABILITYORRESPONSIBILITYTOCUSTOMER
NOT
licensetouse
system
Customerisexpressly
computer
TASDOS
use,
The
from
Software,
shall
specific
CUSTOMER
defects,
from
Radio
EqUipment
RadiO
Shack
franchiseeora
agreement
correctionofthe
sale
expense
capacity,orsuitabillfy
"AS
IS"
manufacturing
Shack
sales
document
Shack
Computer
along
With
the
dealerorother
PURPOSEISLIMITEDINITS
SET
FORTH
warranty
iasts,sothe
LIABILITY,
BUT
NOT
ARISING
OUTOFOR
RADIO
EXCEED
THE
than
whichever
tirst
COPYright
and/or
diskette)orstored
onlyiteither,
copyofthiS
softwareispurchased
copiesofSoftware
Software
only
With
the
Software,
Software
proVided
prOVISionsofthis
CUSTOMER,
RADIO
Inuretothe
Equipment
legal
rights,
This
Shack
authorized
use,Ifa
mustbereturnedtoa
The
defectbyrepair,
RADIO
baSIS,
defect,isits
Center,aRadiO
sales
personISauthOrIZedtogive
WARRANTIES,
HEREIN,
LOSSORDAMAGE
LIMITED
EVENT
SHACK'S
AMOUNT
under
four
occurs,
the
TANDY
laws
shall
the
prohibited
for
backuporarchival
Software,
CUSTOMERISpermittedtomake
SHACK
benefitofRADIO
soldbyRadio
and
AND
CENTERS,
RETAIL
LOCATIONS
(the
"EqUipment"),
meefs
operafmg
environmentInwhich
sales
document
that
the
warrantyisonly
company-owned
locations,
manufactUring
participating
orlgmai
CUSTOMER'S
SHACK
hasnoobligation
for
useofthe
without
warranty,
repairorreplacement
received
upon
do~ument
AND
above
limitafion(s)
TO,
ANY
DAMAGES
SHALL
DAMAGES
CONNECTED
LIABILITY
PAIDBYCUSTOMER
this
Warranty
(4)
years
after
damages,sothe
Softwareonone
applytothe
(ROM)IStransferred
SoftwareISexpressly
except
for
useonone
from
but
onlytothe
CUSTOMER
Software
License
and
CUSTOMERtoeither
whereby
RadiO
SHACK,
Shack
the
original
and
the
specifications
received
and
applicable
computer
The
wdrranty
defect
RadiO
Radio
soie
repiacement
Software,
The
original
iicenseofthe
retali
ANY
IMPLIED
DURATION
may
CAUSED
SOLO,
LEASED,
FROM
SHACK
ARISING
OUT
THE
SALE,
and'or
maybebrought
the
dateatthe
computer
Software,
labeled
tor
each
node
computer
purposesorIf
extent
purchased
shall
also
Shack
sells
the
author,
CUSTOMER
upon
Shack
Shack
store,
above
may
4/87
EqUipment
Shack
INTERRUPTION
RESUlTING
RADIO
WITH
HEREUNDER
Equipment
disassembling
has
any
the
and
any
not
OR
OF
BE
OF
FOR
FOR
the
the
one
be
or
IS
IS
or
to
fa
0'
a
a
Page 4
This
The FCC Wants
equipment
that is in
radio and
It has been type
accordance
in
to provide reasonable
However, there is no
If
this
determinedbyturning
terference by one
generates and uses radio
strict
accordance
television
tested
with
the
equipment
or
with
reception.
and foundtocomply
specifications
protection
guarantee
does
cause
the
equipment
moreofthe
You
frequency
the
manufacturer's
in SUbpart JofPart 15ofFCC Rules,
against
that
interference
interferencetoradioortelevision
off
and on, the
following
with
such
interference
will
measures:
instructions,
to
energy.Ifnot
the
limits
for
not
occur
user
Is encouragedtotrytocorrect
Know
Installed and used properly,
It may cause
a Class B
in a
in a
particular
reception,
computing
which
residential
interference
device
are
designed
installation.
installation.
which
can be
to
the in-
• Reorient the receiving
• Relocate the
• Move the
Plug the
branch
This
equipment
pursuanttoSubpart JofPart15of
devices, terminals,
this
computer.
radio andTVreception.
computer
computer
computer
circuits.
has been
printers,
Operation
antenna
with
respecttothe receiver
away
from
intoadifferent
certifiedtocomply
etc.)
certifiedtocomply
with
non-certified
Dot Matrix Printer
© 1987
All
Reproductionoruse, without express written permission from Tandy Corporation and/or its licensor,
of any portion of this manual
reasonable efforts have
tion of this manual to assure its accuracy,
Corporation assumes no liability resulting from any
or
errors
of
IBM
Tandy and Scrips
omissions in this manual,orfrom the use
the information contained herein.
is
a registered
Business Machines, Corp.
Tandy Corporation.
the receiver
outletsothat
computer
and receiver areondifferent
Warning
with
the
limits
for
a Class B
FCC Rules.
DMP
Tandy
Rights
it
are registered trademarks of
Only
peripherals
with
peripheralsislikelytoresultininterference
the Class B
(computer
limits
132 Operation
Corporation
Reserved.
is
prohibited. While
been
taken in the prepara-
trademarkofInternational
computing
input/ouput
may be
attached
Manual:
Tandy
device,
to
to
2/86
10
9 8 7 6 5 4 3 2
Page 5

Contents
Introduction
About
Printer
1
Setting
Choosing a Location 5
Installing
Tractor
Ribbon Cassette
Connecting
Paper
Print
Performing
Connecting
Print
Power
Character
Hex Dump
Startup
the
Printer
Components 3
Up
the
DMP
the
Paper
Feed Unit 7
the
DMP
Loading
Head Adjustment Lever
a Self-Test
the
DMP
Function
Up
Sequence
Pitch
Checklist
(DIP)
Set Switches
Function
132
Rack 6
132toa Power Source
132tothe
Switches.......................
Computer
1
1
5
10
12
13
18
19
20
21
24
24
26
26
2
Printing
Control Codes
Sending Control Codes from BASIC
Data
Processing Mode
Word Processing Mode
Graphics Mode
Selecting a
Applications
Print
Mode
27
28
29
30
30
31
32
Page 6
Contents
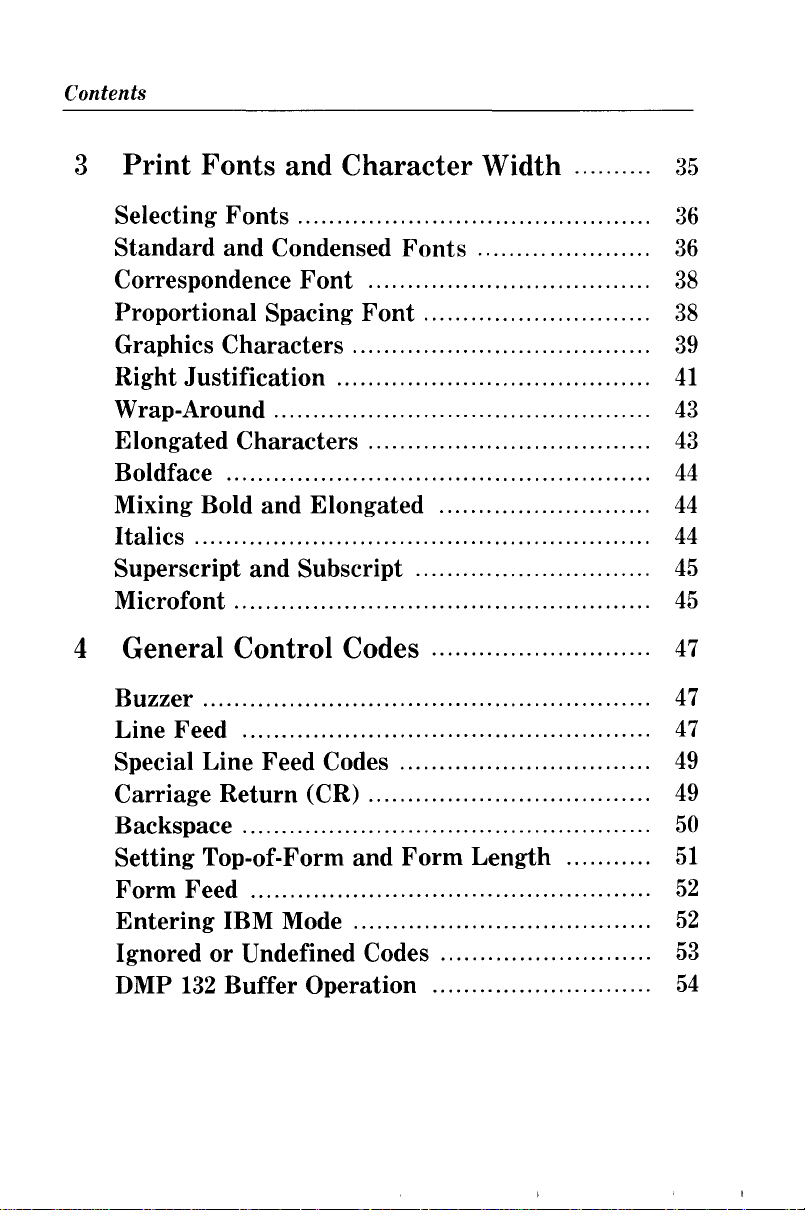
3
Print
Fonts
and
Character
Width
35
Selecting
Standard
Correspondence
Proportional Spacing
Graphics
Right
Wrap-Around
Elongated
Boldface
Mixing Bold
Italics..........................................................
Superscript
Microfont
Fonts
and Condensed
Font
Characters
Justification
Characters
and
and
Subscript
Fonts
Font
Elongated
4 General Control Codes
Buzzer
Line Feed
Special Line Feed Codes
Carriage
Backspace
Setting Top-of-Form
Form
Entering
Ignored
DMP
Return
Feed
IBM Mode
or
Undefined Codes
132
Buffer Operation
(CR)
and
Form
Length
36
36
38
38
39
41
43
43
44
44
44
45
45
47
47
47
49
49
50
51
52
52
53
54
Page 7
Contents
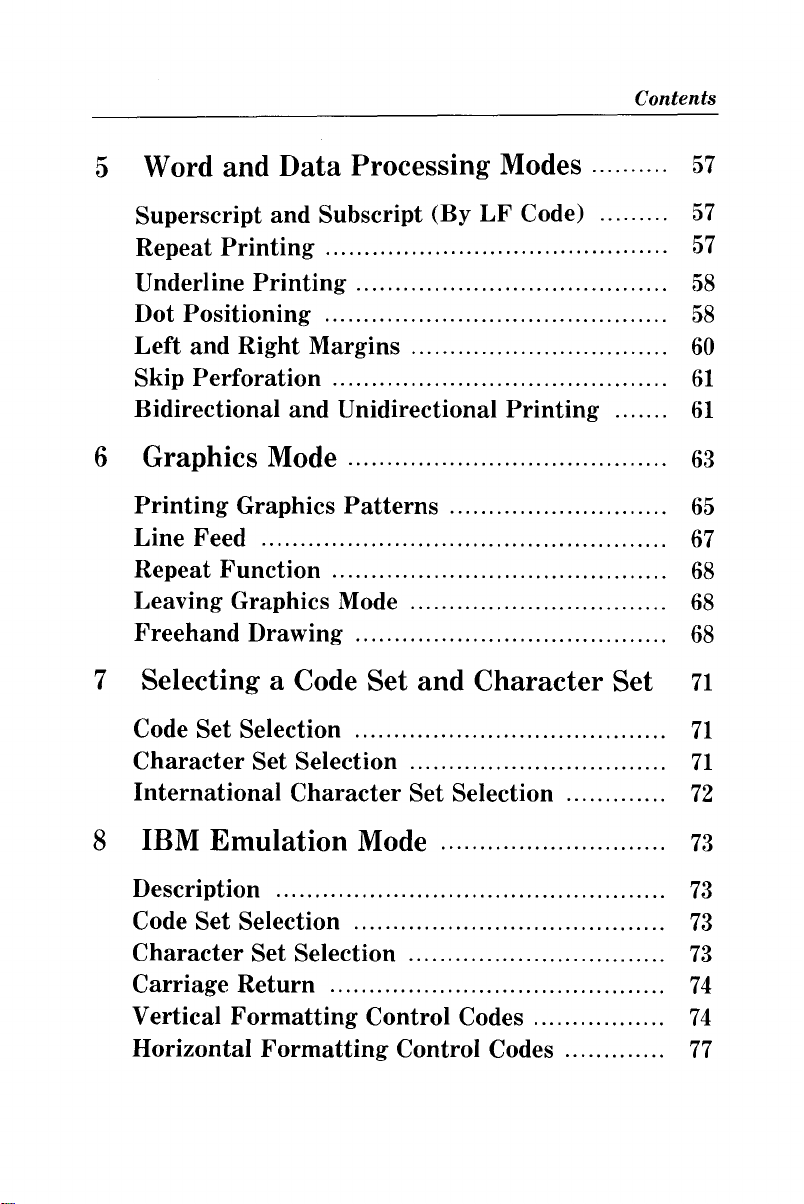
5 Word and
Superscript
Repeat
Underline
Dot
Positioning
Left
and
Skip
Perforation....................
Bidirectional
Data
and
Printing
Printing
Right
and
Processing Modes
Subscript (By
Margins
Unidirectional
6 Graphics Mode
Printing
Line
Repeat
Leaving Graphics Mode
Freehand
Graphics
Feed
Function
Drawing
Patterns
7 Selecting a Code Set
Code Set Selection
Character
International
Set Selection
Character
LF
Code)
Printing
and
Character
Set Selection
Set
57
57
57
58
58
60
61
61
63
65
67
68
68
68
71
71
71
72
8 IBM
Description
Code Set Selection
Character
Carriage
Vertical
Horizontal
Emulation
Return
Formatting
Mode
Set Selection
...........................................
Control
Formatting
Codes.................
Control Codes
73
73
73
73
74
74
77
Page 8
Contents
Printing
Other
Mode Control
Control Codes
Appendices
Character
A
Tandy
Dot-Column WidthofTandy
IBM
IBM
Dot-Column WidthofIBM
International
Character
Character
Character
Sets
Set Table ......
Set 1
Set
2
Character
Characters
Characters
Table in Tandy Mode..
B Control Codes
Tandy Control Codes
IBM Control Codes
C Programming Information
Programming
Examples
.. .. ..... .. ..... ..
79
83
87
87
88
90
91
92
94
95
95
99
107
108
D Care and Maintenance
General
If
you
have
problems...................................
E Specifications...........................................
F
Interfaces.
..............................................
G Schematic Diagrams................................
Index
111
111
112
113
..
115
117
121
Page 9
About the Printer
Introduction
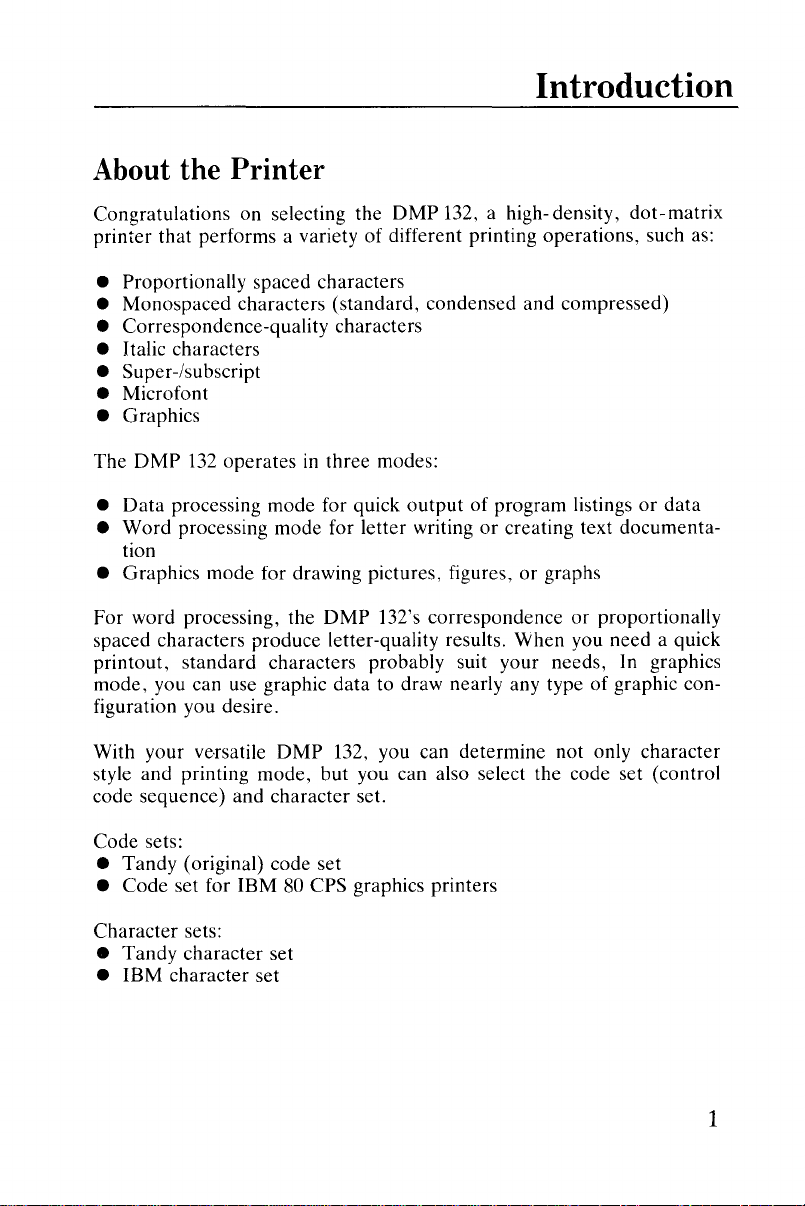
Congratulations on selecting the
printer that performs a variety of different printing operations, such as:
• Proportionally spaced characters
• Monospaced characters (standard, condensed and compressed)
• Correspondence-quality characters
• Italic characters
• Super-/subscript
• Microfont
• Graphics
DMP
132
The
Data
•
•
Word
tion
• Graphics mode for drawing pictures, figures,
For
word processing, the
spaced characters produce letter-quality results. When you need a quick
printout, standard characters probably suit your needs,
mode, you can use graphic data to draw nearly any type of graphic con-
figuration you desire.
With your ve·rsatile
style and printing mode, but you can also select the code set (control
code sequence) and character set.
operatesinthree modes:
processing mode for quick
processing mode for letter writingorcreating text documenta-
DMP
DMP
DMP
132, a high-density,
output
132's correspondenceorproportionally
132, you can determine not only character
of program listingsordata
or
graphs
dot-matrix
In
graphics
Code sets:
• Tandy (original) code set
• Code set for IBM
Character sets:
• Tandy character set
• IBM character set
80
CPS graphics printers
1
Page 10
Introduction
You can use two typesofpaper
•
Tractorholes.
carbon
• Friction-fed, single-sheet
Other
• Full-orhalf-line feed
Underline
•
•
Buzzer
Automatic
•
•
Character
fed 4- inch
The
copies.
features
function.
or
10- inch
DMP 132 can also
typewriter
include:
and
capability.
paper
loading.
pitch
set
function
with the DMP 132:
computer
print
3/4or4/5 line feed.
fanfold forms with guide
one
original
paper.
andupto
two
non-
2
Page 11
Printer Components
CD
o
®
-<-->-----
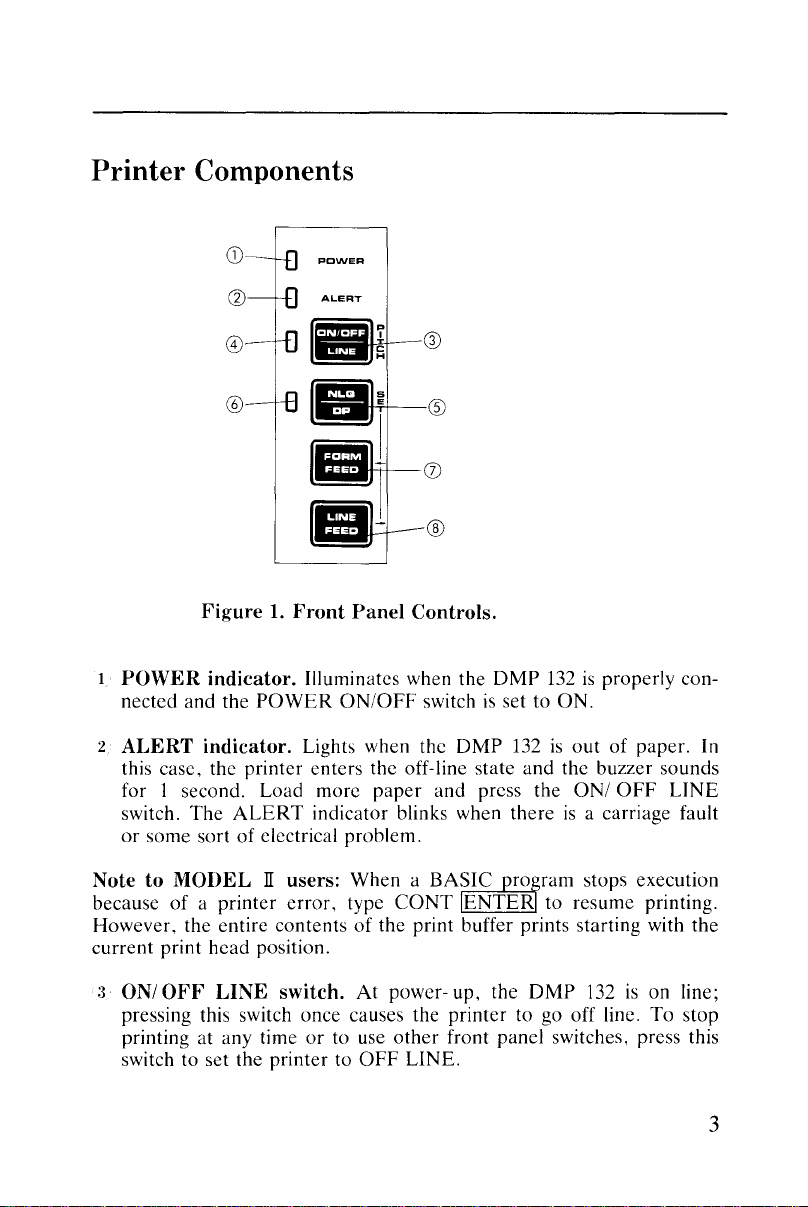
Figure1.Front
1
POWER
nected and the
2
ALERT
this case, the printer enters the off-line state
for I second. Load more
switch.
or
some sortofelectrical problem.
indicator. Illuminates when the
POWER
indicator. Lights when the
The
ALERT
Panel
ONIOFF switch
indicator blinks when thereisa carriage fault
NotetoMODELIIusers: When a
because
However, the entire contents
current
:3
of
a printer
print head position.
ONIOFF
pressing this switch once causes the
printing at any time
switch to set the
LINE
error,
switch.
printertoOFF
or
type
of
At
to use
®
Controls.
paper
and press the
BASIC
CaNT
the print buffer prints starting with
power- up, the
other
LINE.
DMP
132
is
properly con-
is
set to
ON.
DMP
132
is
outofpaper. In
and
the buzzer sounds
aNI
OFF
LINE
proram
JENTER to resume printing.
printer
front panel switches, press this
to go off line. To stop
stops execution
DMP
132
is
on line;
the
3
Page 12
Introduction
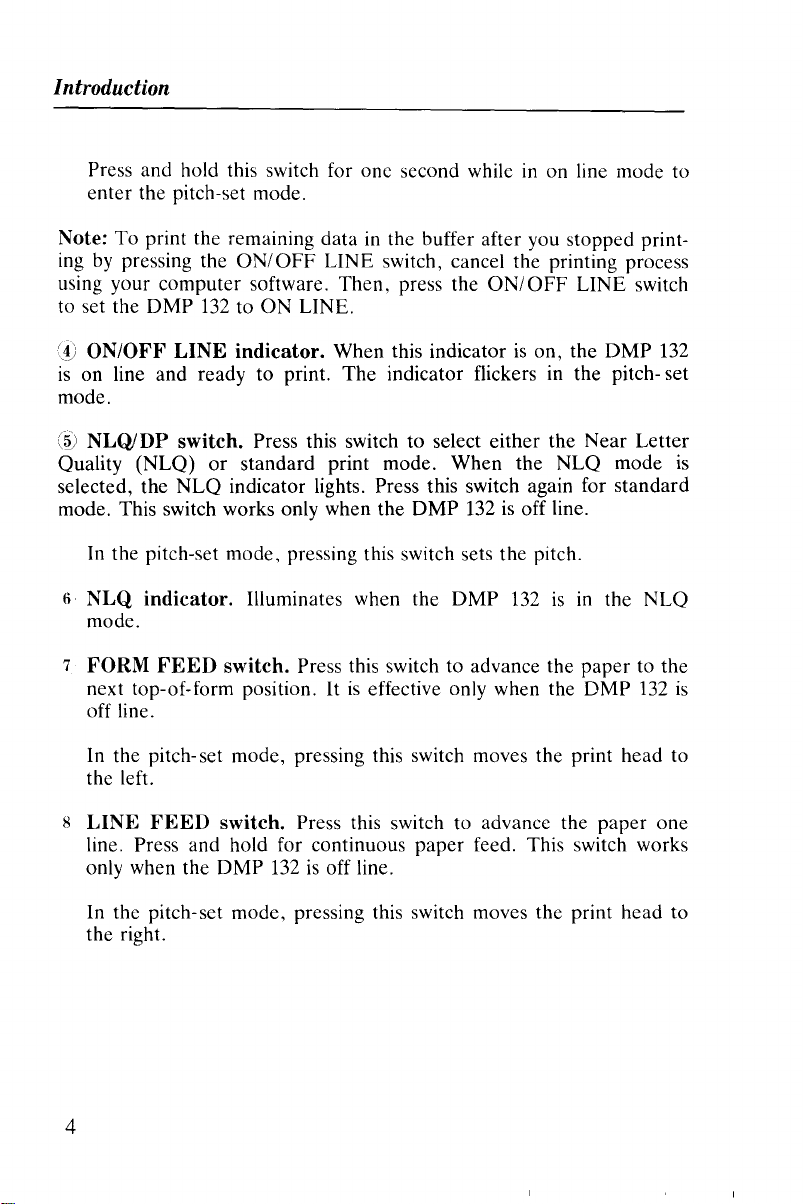
Press and hold this switch for one second while in on line mode to
enter the pitch-set mode.
Note: To print the remaining data
by
ing
pressing the
ON/OFF
using your computer software. Then, press the
132
to set the DMP
(V
ON/OFF
is
on line and ready to print. The indicator flickers in the pitch- set
LINE
to ON LINE.
indicator.
in
the buffer after you stopped print-
LINE switch, cancel the printing process
ON/OFF
LINE switch
When this indicatorison, the DMP
mode.
(~)
NLQlDP
Quality (NLQ)
selected, the
mode. This switch works only when the DMP
In
the pitch-set mode, pressing this switch sets the pitch.
6
NLQ
switch. Press this switch to select either the Near Letter
or
standard print mode. When the NLQ mode
NLQ
indicator lights. Press this switch again for standard
132isoff line.
indicator.
Illuminates when the DMP
132isin
the NLQ
mode.
7
FORM
next top-of-form position.
FEED
switch. Press this switch to advance the paper to the
It
is
effective only when the DMP
off line.
In the pitch-set mode, pressing this switch moves the print head to
the left.
132
132
is
is
8
LINE
FEED
switch. Press this switch to advance the paper one
line. Press and hold for continuous paper feed. This switch works
only when the DMP
132isoff line.
In the pitch-set mode, pressing this switch moves the print head to
the right.
4
Page 13
Setting
This
chapter
using it
• Choosing a location for the printer
• Installing the
• Installing/adjusting the tractor feed unit
• Installing
• Loading
• Connecting the printer to a power source
• Connecting the printer to your
• Powering up the printer
• Performing a self-test
Carefully unpack the
paper
rack. Keep the empty box and packing material in case you ever
need to transport the
shows you how to set up the
as
soon as possible. Setting up the printer involves:
paper
rack
or
replacing a ribbon
paper
DMP
132, being sure to locate the ribbon and the
DMP
132.
Up
computer
the DMP
DMP
132
so you can begin
132
1
Choosing a Location
When you choose the location for your printer, be sure to consider the
following:
The
•
•
• Space for paper.
• Noise generation.
Once you choose a location for
ting it up.
work surface. Place the printer on a sturdy surface.
The
length of the printer cable. This determines the distance from
the
computer
tractor-feed paper.
such as refrigerators
that you can place
Be
suretoleave enough room for smooth flow
Do
not place the printer
or
industrial equipment.
the
printer.
near
noise generators
the
printer, you are ready to begin set-
of
5
Page 14
SettingUpthe DMP
132
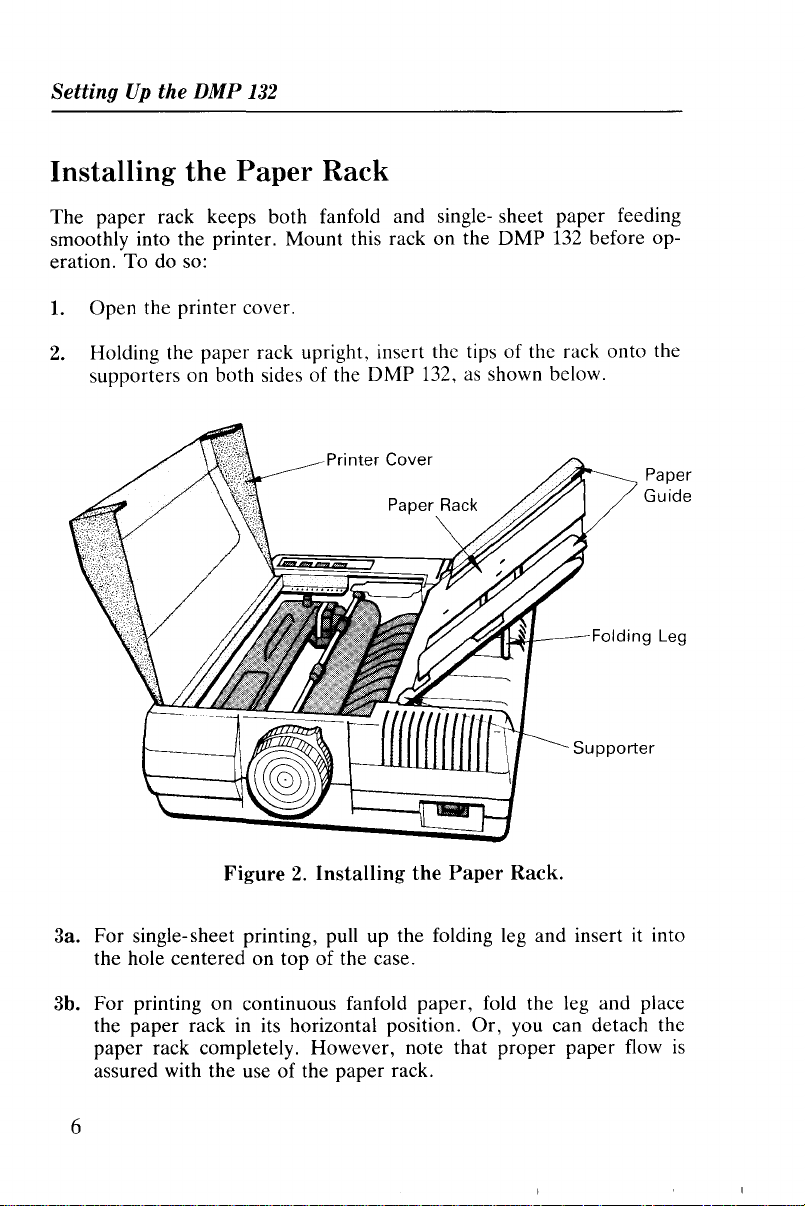
Installing the Paper Rack
The paper rack keeps both fanfold and single- sheet paper feeding
smoothly into the printer. Mount this rack on the DMP
eration. To do so:
1.
Open the printer cover.
2.
Holding the paper rack upright, insert the tips of the rack onto the
as
supporters on both sides of the DMP 132,
shown below.
132
before op-
Printer Cover
Paper Rack
Figure2.Installing
the
~,..~~_-
Paper
Rack.
Supporter
Paper
Guide
Folding Leg
3a. For single-sheet printing, pull up the folding leg and insert it into
the hole centered on top of the case.
3b. For printing on continuous fanfold paper, fold the leg and place
the paper rack in its horizontal position. Or, you can detach the
paper rack completely. However, note that proper paper flow
assured with the use of the paper rack.
is
6
Page 15
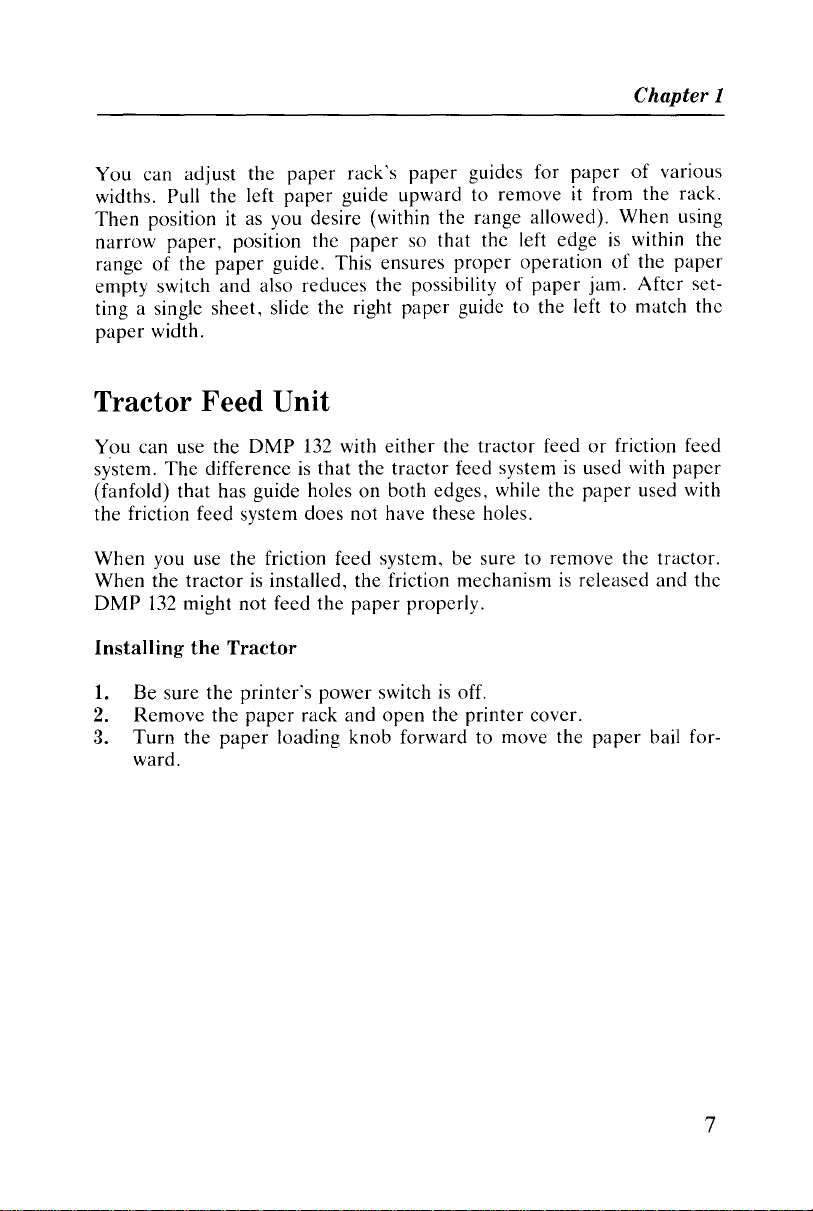
You
can adjust the
widths. Pull
Then
position it as you desire (within the range allowed). When using
narrow
range
empty switch
ting a single sheet, slide the right
paper
paper,
of
the
width.
the
paper
and
paper
left
paper
position the
guide. This ensures
also reduces the possibilityofpaper
rack's
paper
guide upward to removeitfrom the rack.
paper
paper
guides for
so that the left edgeiswithin the
proper
guidc to the left to match
paper
operationofthe
jam.
Tractor Feed Unit
Chapter 1
of
various
paper
Aftcr
set-
thc
You can use the
system.
(fanfold) that has guide holesonboth edges, while the
the friction feed system does not have these holes.
When
When the
DMP
The
you use the friction feed system, be sure to remove the tractor.
tractorisinstalled, the friction mechanismisreleased
132
might not feed the
DMP
132 with
differenceisthat
either
the
tractor
the tractor feed systemisused with
paper
properly.
feedorfriction feed
Installing the Tractor
1.
Be
2.
3.
sure the printer's
Remove
Turn
ward.
the
the
paper
paper
power
switchisoff.
rack and
loading knob forward to move the
open
the
printer
cover.
paper
paper
paper
used with
and
the
bail for-
7
Page 16

SettingUpthe DMP
132
Printer Cover Paper Rack
POWER Switch
Figure3.Right Side View.
4.
Place the front pins of the tractor unit into the holes on both sides
of the printer. Then push down on the rear of the tractor unit until
is
the tractor
securely locked into position.
Tractor
Figure4.Installing the Tractor.
8
Page 17
Chapter 1
5. Turn the
the paper bail toward the platen.
6. Close the printer cover. Replace the
Removing
1.
Turn off the printer.
2.
Open
Turn
3.
toward the front.
4. Lift the tractor unit from the rear, then pull it upward.
5.
Turn
6.
Replace the paper rack and close the printer cover.
paper
loading knob backward (away from you) to move
paper
the
Tractor
the printer cover. Remove the
the
paper
loading knob toward you to move the
the paper loading knob away from you.
paper
rackifdesired.
rackifnecessary.
paper
bail
9
Page 18
Setting
Up
the DMP
132
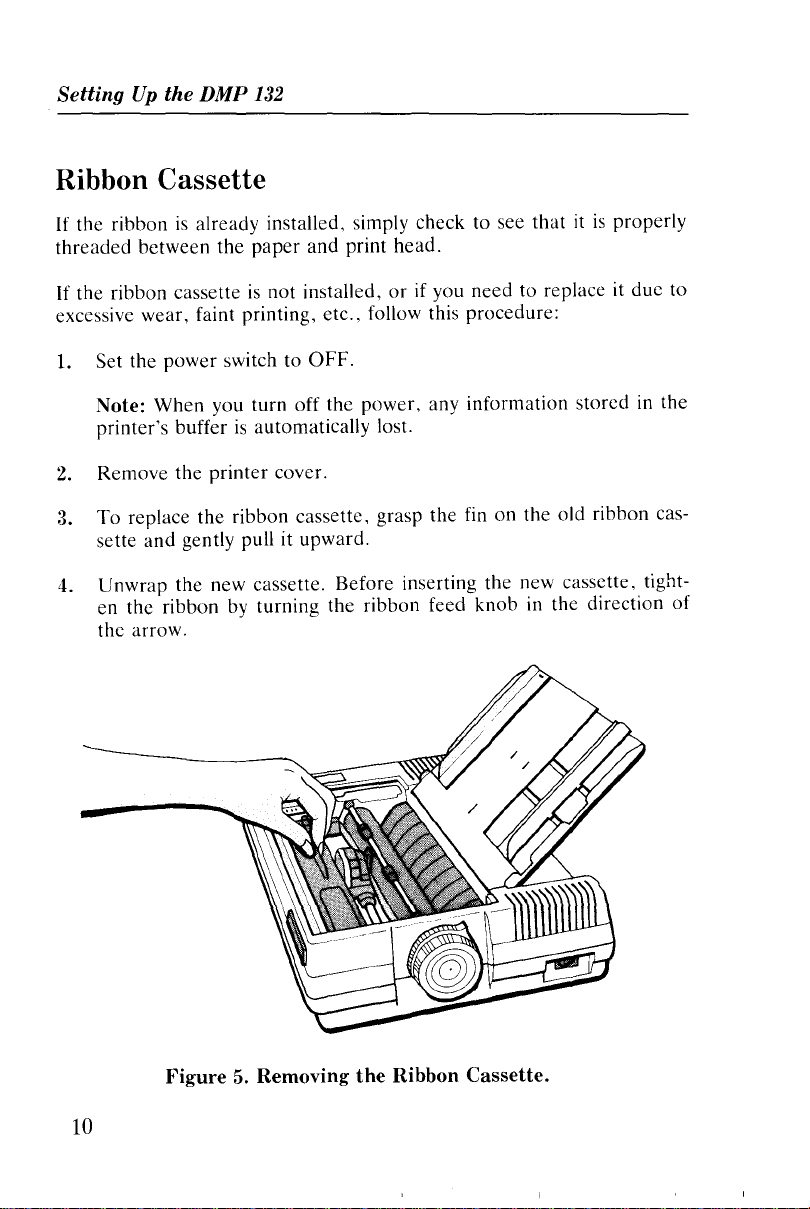
Ribbon Cassette
If
the ribbonisalready installed, simply check to see
threaded
If
the ribbon cassetteisnot installed,orif you need to replace it due to
excessive wear, faint printing, etc., follow this procedure:
1.
between
Set the power switch to
the
paper
and print head.
OFF.
Note: When you turn off the power, any information stored in the
is
printer's buffer
2.
Remove the printer cover.
3.
To
replace the ribbon cassette. grasp the fin on the old ribbon cas-
sette
and
gently pull it upward.
4. Unwrap the new cassette. Before inserting the new cassette. tighten the ribbon
the arrow.
automatically lost.
by
turning the ribbon feed knob in the direction of
thatitis
properly
10
Figure5.Removing
the
Ribbon
Cassette.
Page 19
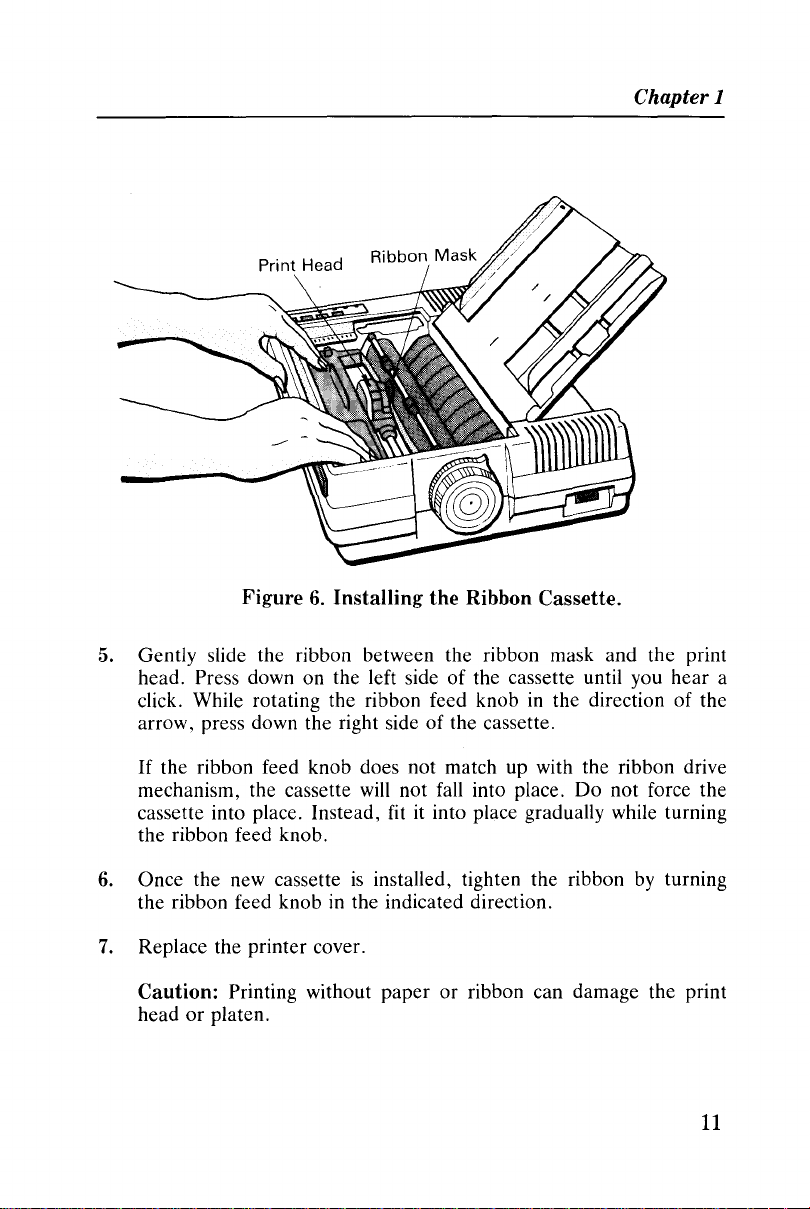
Chapter 1
Print Head
Figure6.Installing the Ribbon Cassette.
5. Gently slide the ribbon between the ribbon mask and the print
head. Press down on the left sideofthe cassette until you hear a
click. While rotating the ribbon feed knobinthe direction of the
arrow, press down the right sideofthe cassette.
If
the ribbon feed knob does not match up with the ribbon drive
mechanism, the cassette
cassette into place. Instead, fit it into place gradually while turning
the ribbon feed knob.
6. Once the new cassetteisinstalled, tighten the ribbon by turning
the ribbon feed knob in the indicated direction.
7.
Replace the printer cover.
will
not fall into place.
Do
not force the
Caution: Printing without paper or ribbon can damage the print
headorplaten.
11
Page 20
SettingUpthe DMP
132
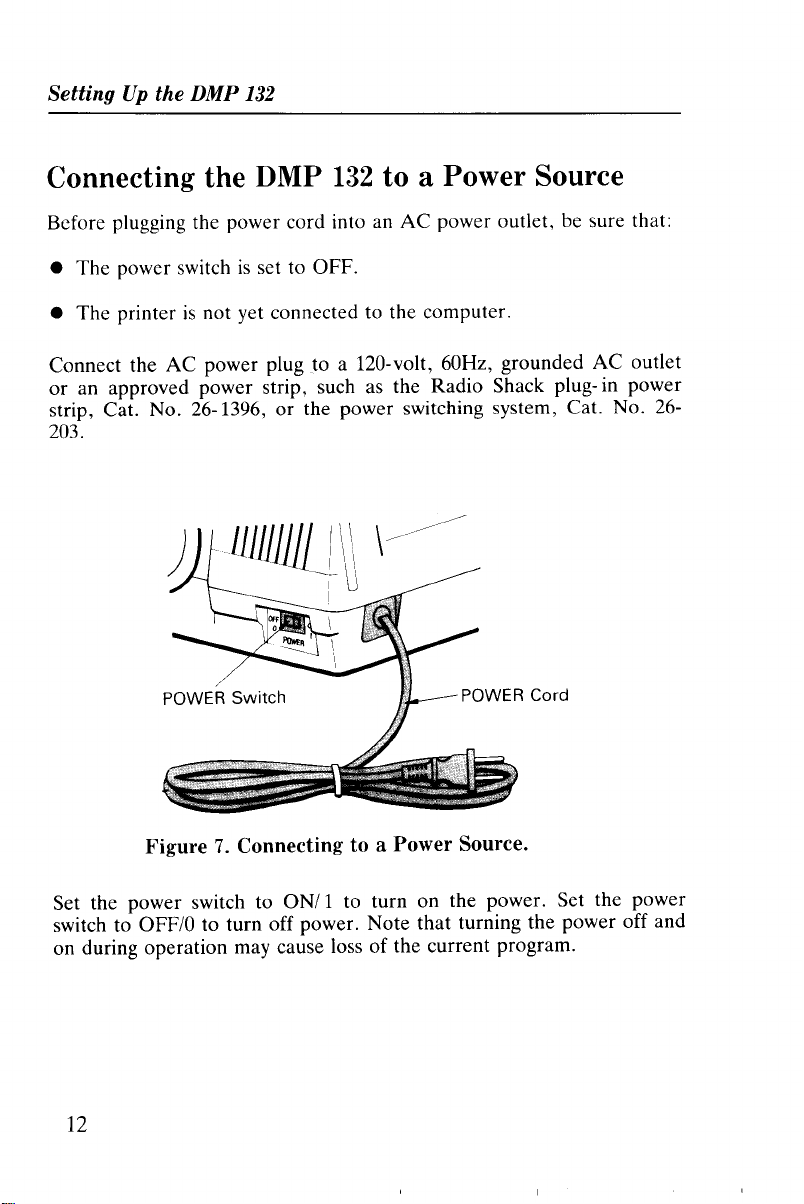
Connecting the DMP
Before plugging the power cord into an
is
• The power switch
• The printer
Connect the
or
an approved power strip, such as the Radio Shack plug- in power
strip, Cat. No. 26-1396,
203.
is
AC
set to OFF .
not yet connected to the computer.
power plug to a 120-volt, 60Hz, grounded
1II11111LI\\
132
to a Power Source
AC
power outlet, be sure that:
or
the power switching system, Cat. No.
\
......./
I
AC
outlet
26-
Figure7.Connecting to a Power Source.
Set the power switch to
switch to
on during operation may cause loss of the current program.
12
OFF/O
to turn off power. Note that turning the power off and
ONII
to turn on the power. Set the power
Page 21
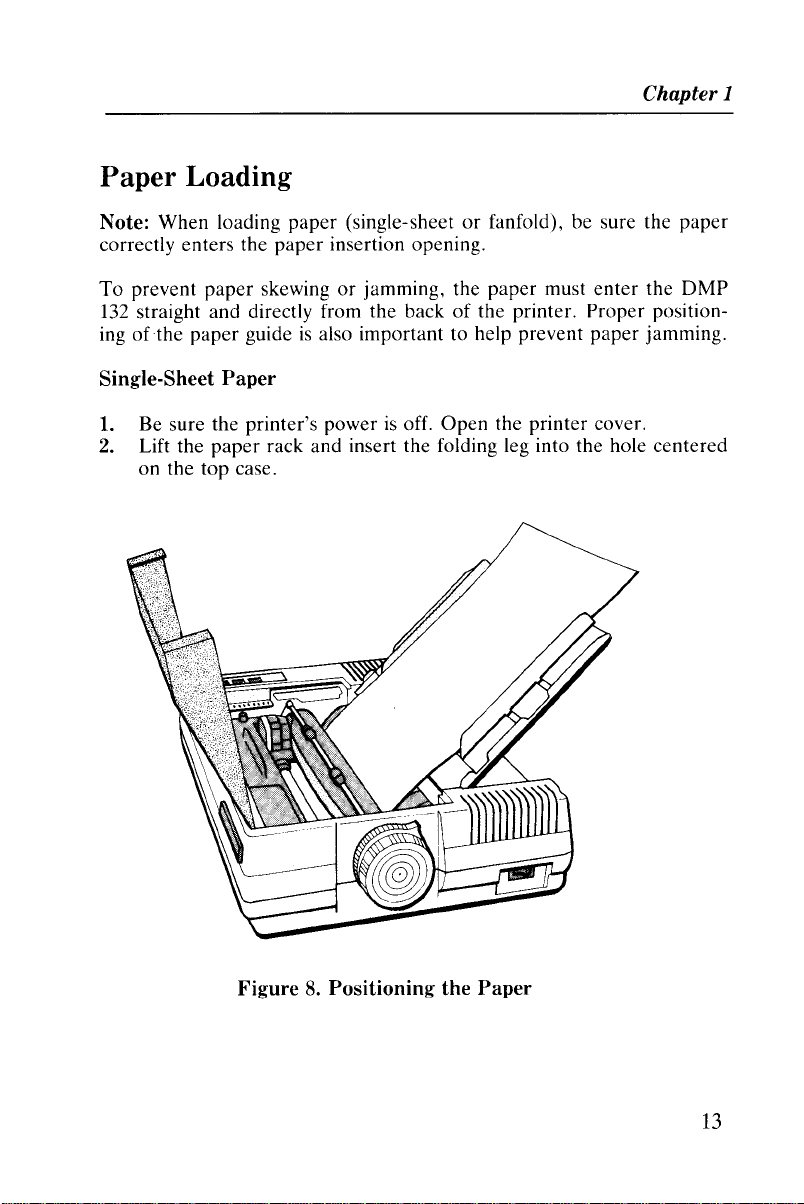
Paper Loading
Chapter 1
Note: When loading paper (single-sheet
correctly enters the
To
prevent paper skewingorjamming, the paper must
132
straight and directly from the backofthe printer. Proper position-
ing
of
the paper guideisalso important to help prevent paper jamming.
paper
insertion opening.
or
fanfold), be sure the
enter
Single-Sheet Paper
1.
Be sure the printer's powerisoff.
2. Lift the
on the top case.
paper
rack and insert the folding leg into the hole centered
Open
the printer cover.
the
paper
DMP
Figure8.Positioning the Paper
13
Page 22
Setting
3. Position the paper on the paper rack, aligning it with the paper
4.
5.
6.
7.
Up
the DMP
guide. Since the auto-paper-loading system pulls the paper into the
printer, just placing the paper on the paper rack
you insert the paper into the opening, the
that the paperisalready in place and might not activate the autoloading mechanism.
Turn on the printer.
Turn the paper loading knob toward you. The paper automatically
advances to the print-start position.
If
Note:
system does not work. In such a case, remove the sheet and position it again to turn on the indicator.
Turn the paper loading knob away from you to return the paper
bail to the platen.
To align the paper, use the platen knoborthe front panel LINE
FEED
Verify that the paper bail
necessary.
the
switch (see "Printer Components") to advance the paper.
132
ALERT
is
sufficient.
DMP
132
might "think"
indicatorisnot lit, the auto- paper-loading
is
against the platen. Adjust the paper
If
as
Note: The paper bail MUST be against the platen for paper
adjustment.
8.
Set the print head adjustment lever located on the inside right of
the printer to the appropriate position. Refer to "Print Head
Adjustment Lever."
9.
Close the printer cover.
Hints
and
Tips on Single-Sheet
• With the paper properly installed, printing continues until the paper
passes the paper empty sensor. The printer then goes off line. Insert
another sheet and turn the paper loading knob to set the paper.
When the paper
DMP
132
continues printing where it left off.
isinplace, press the
Paper
Loading
ON/OFF
LINE switch and the
14
Page 23
•
If
you want to print
detects the
nottoexceed the bottom edgeofthe paper.
paper
end,
another
press the
few lines after the
ON/OFF
Fanfold Paper
The
DMP
132
accepts standard fanfold paper from 4 inches to10inches
wide. Before using fanfold
installed.
1.
2.
3.
4.
Referto"Tractor
Turn
off the power.
Open
the printer cover. Remove the
Turn
the
paper
away from the platen.
Feed
the
paper
into the printer through the
ing. Use the
appears between the platen and the print head.
paper
paper,
Feed
loading knob toward you to move the
feed knob to pull the
however, the tractor unit should be
Unit."
LINE
paper
rack temporarily.
paper
paper
Chapter 1
paper
empty sensor
switch. Be careful
paper
insertion open-
around
until it
bail
Adjust
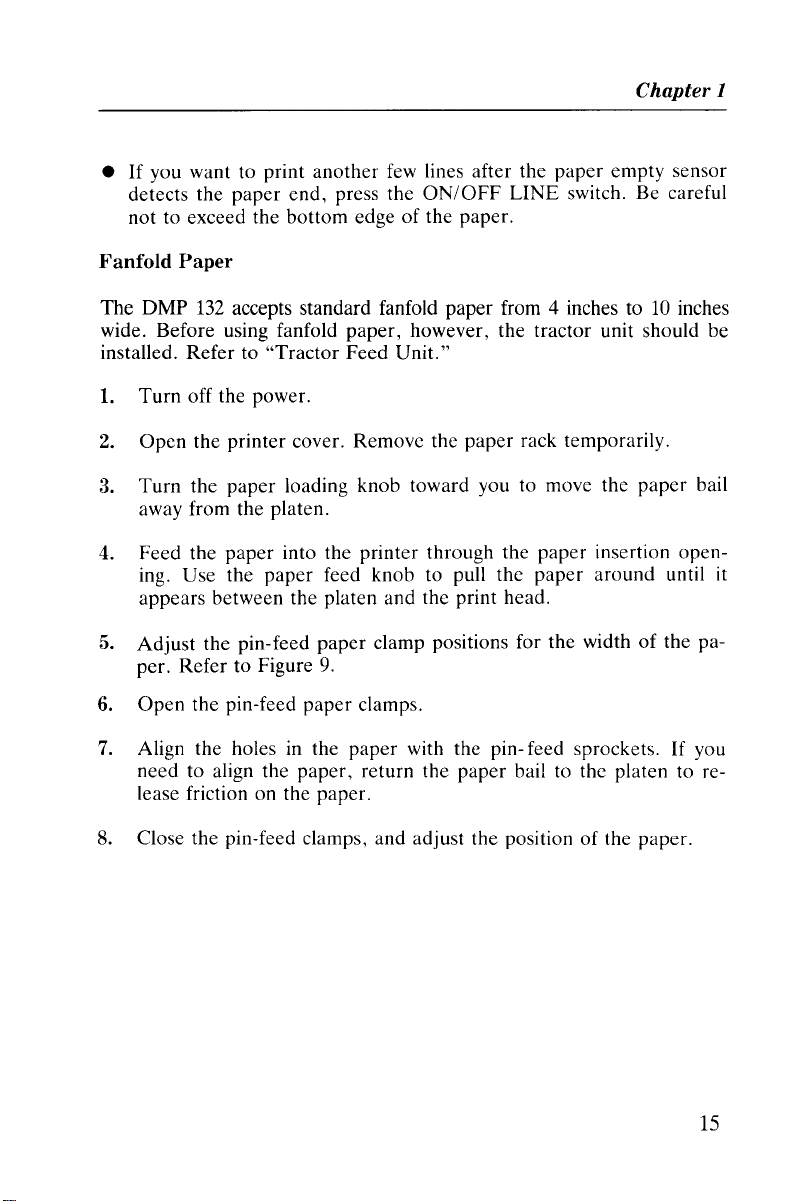
5.
per.
6.
Open
7.
Align the holes in the
need to align the
lease friction on the paper.
8. Close the pin-feed clamps, and adjust the position of the paper.
the pin-feed
RefertoFigure
the
pin-feed
paper
9.
paper
paper,
clamp positions for
clamps.
paper
with the pin- feed sprockets.Ifyou
return the
paper
the
widthofthe pa-
bail to the platen to re-
15
Page 24
Setting
Up
the DMP
132
Pin-feed Paper Clamps
Figure9.Front
9.
Turn
the
paper
loading knob away from you to move the
bail toward the platen.
leased by setting the
that
you perform this step to
10. Set the print
the
printer.
11. Replace the paper rack and the printer cover. For the proper paper
flow, we
flat with
10).
head
Referto"Print
recommend
the
paper
The
paper
bail against
adjustment
Head
that
you attach
feeding
friction roller under the platenisre-
preventapaper
underneath
View.
paper
the
platen. (Itisimportant
jam
from occurring.)
lever located on the inside right
Adjustment
the
Lever."
paper
rack and lay it down
it into the
printer
(Figure
16
of
Page 25
Tractor
Chapter 1
Rack
Print Head
Figure
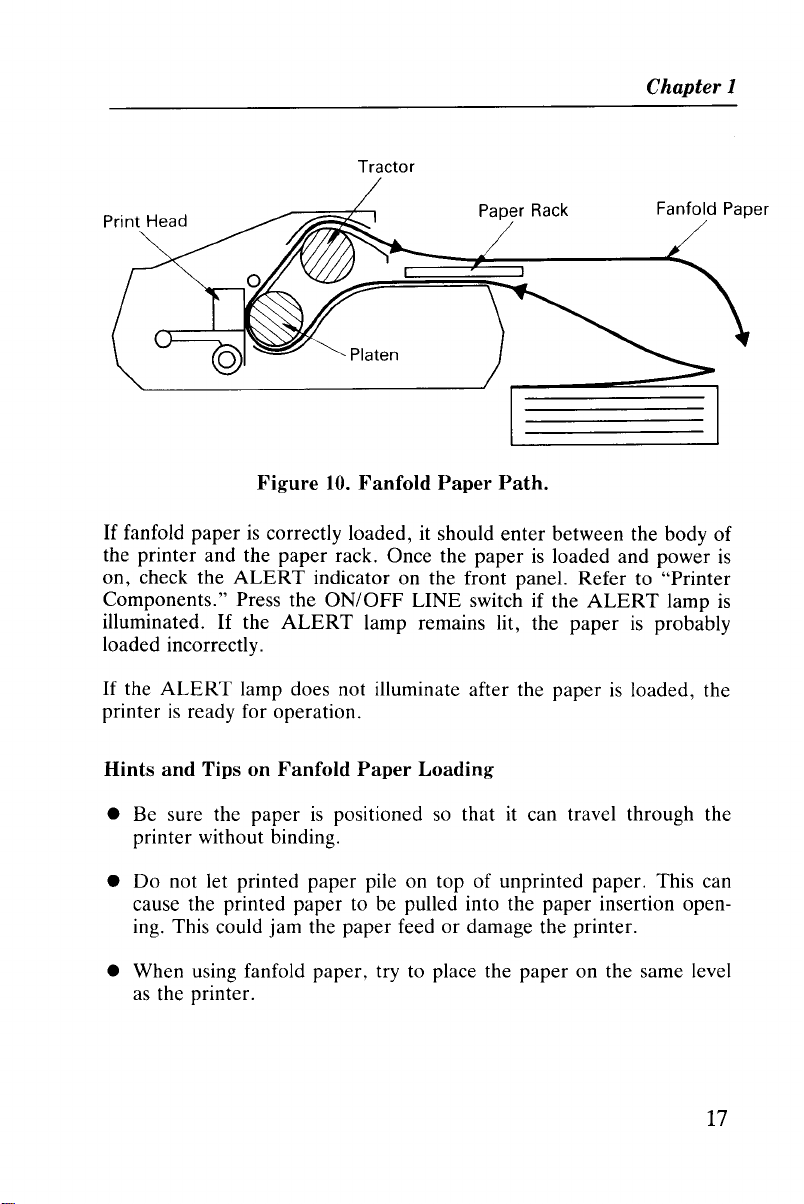
If
fanfold paperiscorrectly loaded, it should enter between the body of
10.
Fanfold Paper Path.
the printer and the paper rack. Once the paper
on, check the
Components." Press the
illuminated.Ifthe
ALERT
ALERT
indicator on the front panel. Refer to "Printer
ON/OFF
LINE switch if the
lamp remains lit, the
Paper
is
loaded and power
ALERT
paperisprobably
Fanfold Paper
lamp
loaded incorrectly.
If
the
printer
ALERT
is
lamp does not illuminate after the paperisloaded, the
ready for operation.
Hints and Tips on Fanfold Paper Loading
is
is
• Be sure the paperispositioned so thatitcan travel through the
printer without binding.
Do
•
not let printed paper pile on top of unprinted paper. This can
cause the printed paper to be pulled into the paper insertion opening. This could jam the paper feed or damage the printer.
• When using fanfold paper, try to place the paper on the same level
as
the printer.
17
Page 26
Setting
Up
the DMP
132
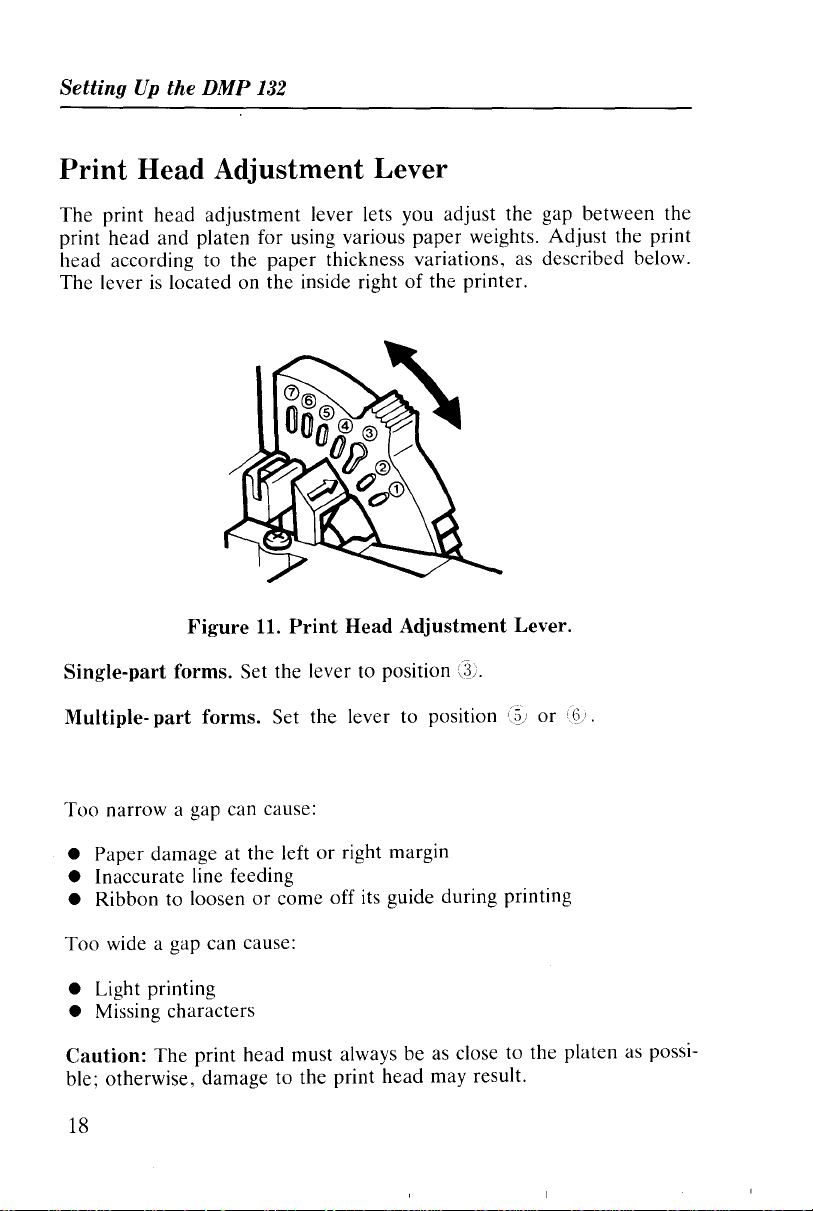
Print Head Adjustment Lever
The
print
head
adjustment
print
head
and platen for using various
head
according to
The
leverislocated on the inside rightofthe
the
lever lets you adjust the gap
paper
paper
thickness variations, as described below.
weights.
printer.
between
Adjust
the
the print
Figure
Single-part forms.
11.
Set the lever to position
Multiple- part forms. Set
Too
narrow a gap can cause:
Paper
•
• Inaccurate line feeding
• Ribbon to loosen
Too
• Light printing
• Missing characters
Caution:
ble; otherwise, damage to
damageatthe leftorright margin
or
come off its guide during printing
wide a gap can cause:
The
print
head
18
Print Head Adjustment Lever.
the
lever to position
must always be as closetothe platen as possi-
the
print
head
may result.
or
Page 27

If
smudging occurs, set the print
ting, by moving the lever toward the front of the printer.
head
adjustment lever to a higher set-
Performing a Self-Test
The
DMP
132 has a built-in self-test feature to check the print quality
and general printer operation before you begin using it.
the
Before running the self-test, be sure to load
paper
since the test prints from one end of the platen to the other.
DMP
Chapter 1
132 with lO-inch
Caution: Printing
the print head.
To
run the self-test:
1.
Press and hold either the
"Printer
2. Set the
ternal buzzer, the
programmed into
If
you press
font.
The
correspondence quality fontisused during
NLQ
switchispressed.
Printing continues until you press the
endisdetected.
on
the platen can shorten the life of the platen and
Components."
POWER
LINE
switch to ON. Starting with the soundofthe in-
DMP
the
FEED,
LINE
132 will print the ASCII96characters pre-
printer.
the
self- testisperformed in the
FEED
ON/OFF
switchorNLQ
the
LINE
switchorpaper
switch. See
standard
test when the
19
Page 28
Setting
Up
the DMP
132
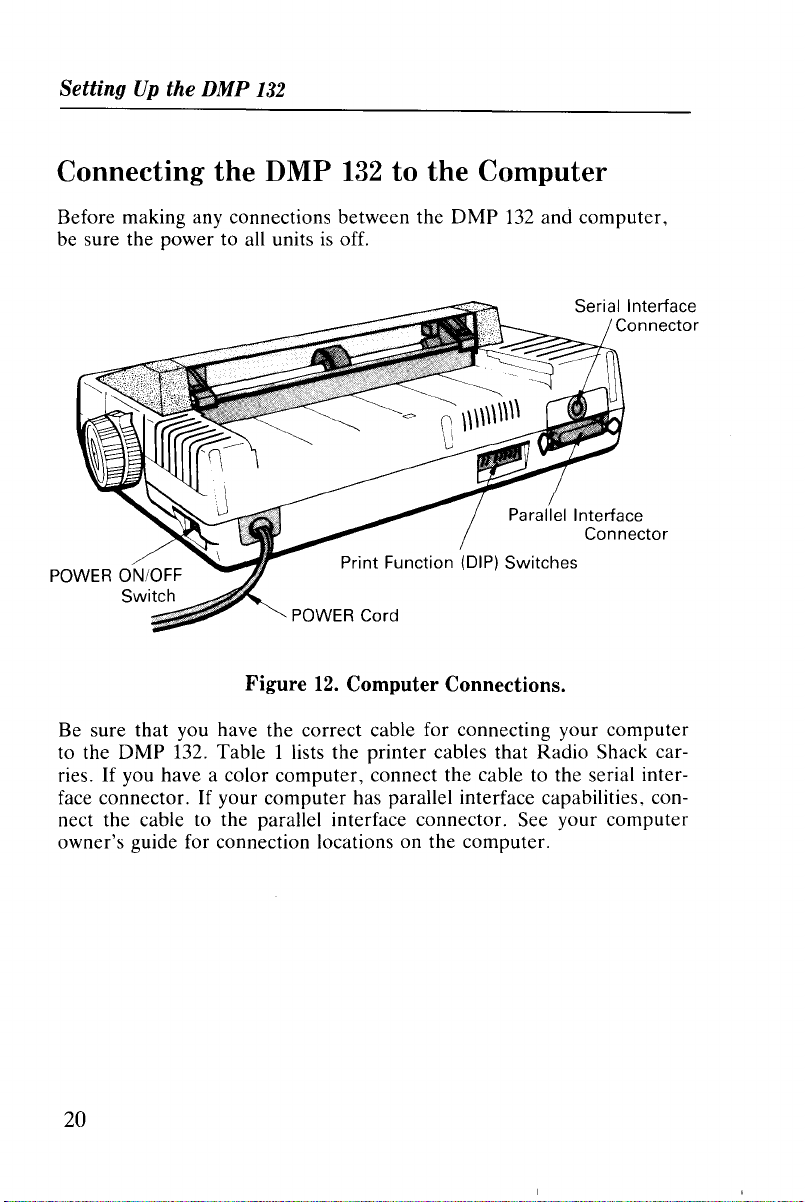
Connecting the DMP
Before making any connections between the
be sure the power to all units
Figure
Be sure that you have the correct cable for connecting your computer
DMP
to the
If
ries.
face connector.
nect the cable to the parallel interface connector. See your computer
owner's guide for connection locations on the computer.
132. Table 1 lists the printer cables that Radio Shack car-
you have a color computer, connect the cable to the serial inter-
If
your computer has parallel interface capabilities, con-
132
to the Computer
is
off.
POWER Cord
12.
Computer Connections.
DMP
132
and computer,
20
Page 29

Chapter 1
Table 1. Computer to DMP
Computer
Model I (Keyboard only)
Model I (Exp. Interface)
Model I1/12/16/16BIDT-1 /Tandy 2000/6000
Model III/4/4D/4P/1000
Model100/Tandy
Tandy 1000EX/1 000SX/1 000HX/1
Tandy 1200/3000
Tandy
3000HLl3000HD/4000/1400LT
DT-100
Color
Computer
*Note:
If
a cableissupplied with your computer, be sure to use it.
102/200/600
OOOTX
132
Cables.
Cable
26-1411
26-1401
26-4401
26-1401
26-1409
26-225*
26-1347
26-227*
26-1361
26-3020
Number
1. Attach the molded male end of the cable to the connector on the
right rear of the
one way, turn it over and try again. Lock a parallel interface con-
nector to the
2. Connect the other end of the cable to your computer's printer
jack. See your computer owner's manual for specific instructions.
DMP
DMP
132.
Do
not force the plug.Ifit does not fit
132
by snapping the cable latches inward.
Print
There
switches allow you to customize some
applications.
Function
are10switches located on the
Switch 2
(DIP) Switches
1
.....
OFF
Figure
13.
DIP Switch Panel.
rear
panel of the printer. These
DMP
132
features for your own
Switch 1
1 2 3 4 5 6 7 8
21
Page 30
SettingUpthe DMP
132
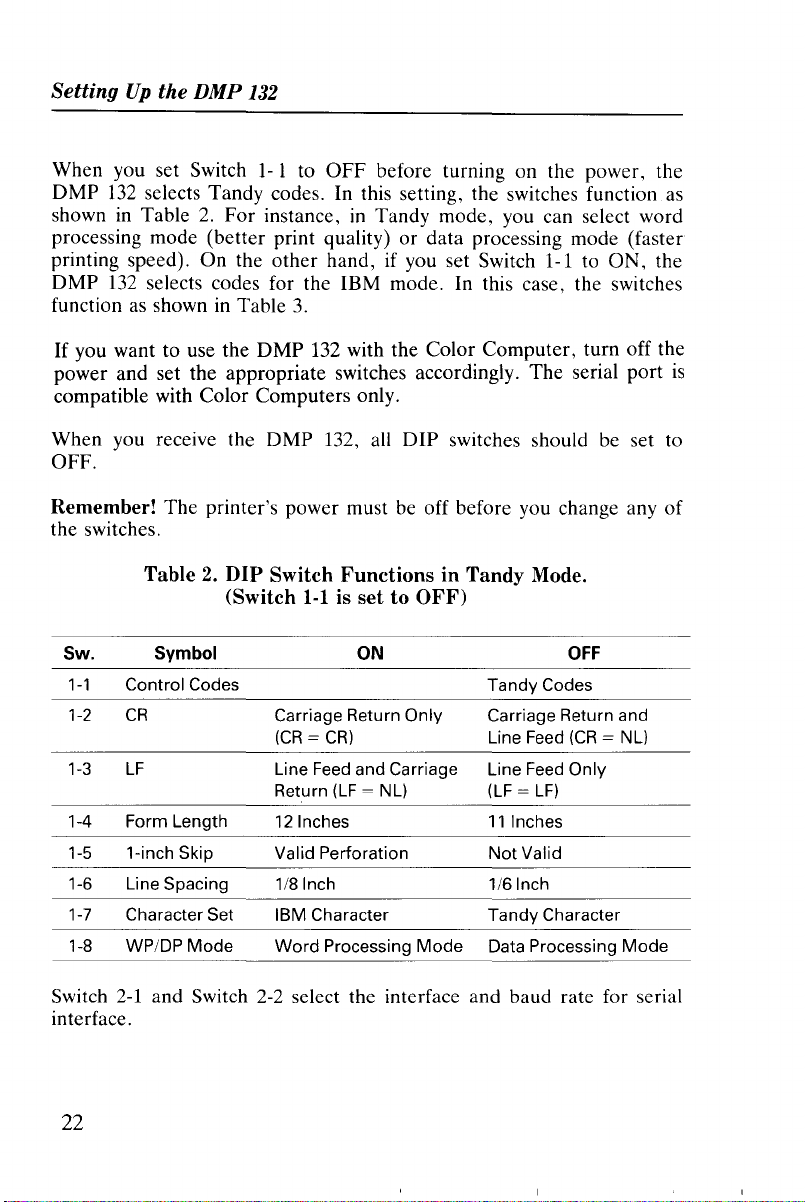
When you set Switch1-1 to
DMP
132
selects Tandy codes. In this setting, the switches function
OFF
before turning on the power, the
as
showninTable2.For instance,inTandy mode, you can select word
processing mode (better print quality) or data processing mode (faster
printing speed). On the other hand, if you set Switch 1-1 to ON, the
132
DMP
function
If
you want to use the DMP
selects codes for the IBM mode. In this case, the switches
as
shown in Table
3.
132
with the Color Computer, turn off the
power and set the appropriate switches accordingly. The serial port
compatible with Color Computers only.
When you receive the DMP 132, all DIP switches should be set to
OFF.
Remember! The printer's power must be off before you change any of
the switches.
Table2.DIP
Sw. Symbol ON
1-1
Control Codes
1-2
CR
1-3
LF
1-4
Form Length
1-5
1-inch Skip
1-6 Line Spacing 1/8 Inch 1/6 Inch
1-7
Character Set IBM Character
1-8
WPIDP
Mode
Switch
(Switch
Carriage Return Only Carriage Return and
(CR=CR)
Line Feed and Carriage Line Feed Only
Return
12
Valid Perforation
Word
FunctionsinTandy Mode.
1-1
is settoOFF)
(LF
= NL)
Inches
Processing
Mode
Tandy Codes
Line Feed
(LF=LF)
11
Inches
Not
Valid
Tandy
Data Processing
OFF
(CR
= NL)
Character
Mode
is
Switch
interface.
22
2-1
and Switch
2-2
select the interface and baud rate for serial
Page 31

Chapter 1
Interface
Parallel
Serial
Serial
Serial 2400
Table3.DIP
Baud Rate
600
1200
Switch
(Switch
Sw. Symbol
1-1
Control Codes
1-2
CR
1-3
LF
1-4 Form Length
1-5 1-inch Skip Valid
Perforation
1-6 Line Spacing
1-7
Character Set IBM Character Set 2
1-8
Buffer Full
Codes
Carriage Return Only Carriage Return and
(CR=CR)
Line Feed and Carriage
Return
12
1/8 Inch
Carriage Return Only Carriage Return and
FunctionsinIBM
1-1issettoON)
ON
for
IBM
(LF
= NL)
Inches
Switch
2-1
OFF
OFF
ON
ON ON
2-2
OFF
ON
OFF
Mode.
OFF
Line Feed
Line Feed Only
(LF=LF)
11
NotValid
1/6 Inch
IBM Character Set 1
Line Feed
(CR
Inches
= NL)
Switch
interface.
Interface
Parallel
Serial
Serial
Serial
2-1
and Switch 2-2 select the interface
Baud Rate
600
1200
2400
and
baud rate for serial
Switch
2-1
OFF OFF
OFF
ON
ON
2-2
ON
OFF
ON
23
Page 32

SettingUpthe
DMP
132
Power
The specific power- up sequence depends on your computer. Consult
your computer owner's guide for details on powering up your computer
with peripheral devices, such
In any event, the
on.
It
is
computer.
nected but not turned on, the entire system might operate erratically.
Up
Sequence
POWER
essential that the
If
you turn the power onoroff,orif the
as
printers.
indicator remains lit while the
DMP
132 remains on when connected to the
DMP
DMP
132
is
132
con-
Character Pitch Set Switches
You can set the character pitchofthe
by
once you set the pitch
from the computer has no effect on the printing.
the pitch from the computer or your application software, do not set
the pitch by the front panel method, The default
pitch must he used. Turning the power off and then hack on restores the
pitch to default
CODE.
the front panel method, any control code
o
POWER
DMP
132; however, note that
If
you want to change
CODE
setting of
is
24
ON/OFF LINE
Indicator--
NLQ Indicator
Figure
o
14.
ALERT
Front
.-1--+------>
Panel.
PITCH
Switch
SET Switch
<-
Switch
Switch
Page 33

1.
Be sure the ON LINE indicatorislighted.
2.
Press and hold the PITCH
(ON/OFF
LINE indicator blinks.
Chapter1
LINE) switch until the
ON
3. Press the
--+
(LINE
FEED)
or+-(FORM
FEED)
switch to move
the print head to the position indicated on the printer cover you
as
wish to set
4.
Press the SET (NLO/DP) switch to set the character pitch.
PITCH
~ ~
SELECT
~~
Caracter Pitch
PICA 10
ELITE 12
CONDENSED 17
MICROFONT 17
PROPORTIONAL
a character pitch.
~
~
Figure 15.
Print
Printer
Examples.
-.~"-
~~L.'~'~~
2.b
abcdefghiJklmnopqrstuvwxyz
CONDENSED
.-.j
C
ije
17
Cover.
Print Example
..••
IJ:·::lrGlll::l~rl:l)~S
f i;lh i
.j
k 1
mnopqr'=:.
tu'/!;.}: :\/:::
When the
CODEisselected, you can change the character pitch
sending control codes from the computer.
by
25
Page 34

Setting
Up
the
DMP
132
Hex Dump Function
The
DMP
132 can print the hexadecimal values for data transmitted to
it. This modeisuseful for checking exactly what informationisbeing
received by the
power to the
FEED
switch.
DMP
DMP
132
132.
To
implement this function, turn on the
while simultaneously holding down the
FORM
Before printing, be sure that lO-inch
avoid printingonthe platen. Then press the
the program that you want to check.
To
exit hex dump mode, turn the printer off and then on again.
paperisloaded in the
ON-LINE
switch and run
DMP
132 to
Start-up Checklist
The checklist that follows reminds youofthe things you should do each
time you use the
prepare to use the printer.
w Is the power off?
w Does the printer have enough paper?
w Is the ribbon installed?
w
Is
the printer connected to a power source?
w
Is
the printer connected to the computer?
w Are the
w Turn power on and perform self-test. Does the printer pass the self-
test?
DMP
132. Be sure to check the list each time you
DIP
switch positions correct?
26
Page 35

The
DMP
132isdesigned for three distinct applications:
•
Data
processing
• Word processing
• Graphics
Printing Applications
2
The DMP
computer - one for each application. The three response patterns,
modes, have many similarities, but each has its own unique features.
Data
The only difference between these two modes
line feed commands - commands that determine the direction and distance the paper
• In the word processing mode, each line feed command causes an
immediate paper advancement. Word processing programs (such as
SCRIPSIT®) use immediate line feeds for superscripts, subscripts,
and
• In the data processing mode, a line feed command other than five
special line feed commands (see page
ate line feed. Instead, line feeds are stored
along with other data. When a line
mands stored
paper feed.
In both data processing and word processing modes, the DMP
print in different fonts (type styles) and pitches (character spacing).
One font
spaced character set.
132
has three different responses to software codes from the
processing and word processing modes are for printing characters.
is
in the way they handle
is
fed.
other
special printing styles.
49) does not cause an immediin
the printer's memory
is
printed, the line feed com-
in
memory determine the direction and pitch of ·the
132
can
is
the proportional character set and anotheristhe mono-
or
• Proportionally spaced characters have variable widths.
an M takes up more space than an
create professional-looking documents.
• Monospaced characters are so named because each character
allotted the same space width. This uniformity makes this font preferable for tables and charts that require vertical alignment.
I.
Use proportional characters to
For
example,
is
27
Page 36

Printing Applications
Charactersinthe various fonts are createdina dot- matrix pattern.
Monospaced characters use an
proportionally spaced characters use a matrix
n depends on the width
of
11
by 9 and a
the character being printed.)
of
23
n by
by
18
matrix, while
18.
(The value
of
The print pitch (character spacing)isdesignated by the space the
132
puts between each printed character. The font selectedisalso a
factorindetermining the pitch. Consequently, you must thinkofpitch
in
termsofthe numberofcharacters printed
and 17CPI for normal printing, and 5CPI, 6CPI, and 8.5CPI for elongated printing.
The graphics mode can be used to create custom letterheads, designs,
and special fonts. However, many control codes which can be used in
data processing and word processing modes cannot be usedingraphics
mode. The
send such a code; it simply ignores the code. This includes control
codes that change line feed pitch and direction.
To ensure full coverageofthe paper in graphics mode, the line feed
lengthofthe LF code (10 Dec.)isfixed at 7/72 inch. The five special
line feeds canbeexecuted by dynamic
DMP
132
does not give you an
per
inch - IOCPI, 12CPI,
error
message when you
paper
movement commands.
DMP
Control Codes
Before you proceed, consider how the computer communicates with the
printer.
All informationissent to the
decimal (00- FF hexadecimal). The printer interprets these numbers
according to the American Standard Code for Inforntation Interchange,
commonly referred to as the ASCII code. (See Appendix A for a list
ASCII codes.) Most numbers
bers,orsymbols. However, the numbers 0-31, as well as some special
sequencesofcode numbers, are used to "control" various printer functions. These control codes let you change character sets, select print
modes, underline, superscript, subscript, and perform
functions.
DMP
132
as numbers between 0 and
(or
codes) are printedasletters, num-
other
255
special
of
28
Page 37

Chapter 2
The control codes have different meanings, depending on the current
print mode.
X.
The next few sections demonstrate how some of the control codes
activate various printer functions.
If
a codeisnot recognizedbythe printer,itis
printed
as
Sending Control Codes from BASIC
Some printer features are activatedbya single code, but many func-
or
tions require a sequence of two
sequences begin with decimal
The ESC code notifies the printer that a special sequence
The next code(s) sent determines which printer feature
BASIC, use CHR$ ( ) to send these codes to the printer.
For instance, set up the
and enter BASIC in the normal way.
Then, type and run the following program:
10
REM
20
LPRINT "DATA
30
LPRINT
"MODE"
27
DMP
"jCHR$(27)CHR$(28)j"PROCESSING"
more codes. Most multiple- code
referred toasthe ESC (escape) code.
is
on its way.
is
selected. In
132inTandy modeasdescribed earlier,
Note: The command LPRINT
DMP
to the
PRINT-2, for LPRINT.
Roll the paper forward and look at the results. The word
printed over part of the word
CHR$(28) tell the printer to change the forward line feed to half its
normal distance. The chart in Appendix B shows the various code sequences understood
132.Ifyou are using a Tandy Color Computer, substitute
by
the
is
used in the examples that send codes
DATA.
DMP
Why? The codes CHR$(27) and
132.
MODE
Tandy Computer Code Set
The Tandy computer code setisthe default DMP
is
ly, this code set
Tandy computer, the DMP
processing, and graphics printing modes,
DMP
132
control codes.
used on Tandy computer systems. When you use a
132
lets you use the data processing, word
as
132
code set. Usual-
wellasthe other original
29
Page 38

Printing Applications
Code Set
When you select the code set for IBM, the
80 CPS graphics printer's code set.
you can use the
IBM-compatible systems without code conversion and get the same results as you would with an IBM printer. Detailed information
Chapter
Character
The
character sets as well.
ified ASCII, 64
others are the IBM character sets 1 and
set at any time.
Data
How can you tell which mode the
on? Some reflection on the program you previously
you need to know.
Line feed commands are executed immediately in word processing
(WP) mode, but not
quence did not cause a half- forward line feed until after the first line
was printed. Thus, the printer must be in
feed stays
mode). To see this, type:
for
IBM
DMP
132
with the IBM personal
7, "Selecting a Code Set and
Set
OMP
132
not only has two kindsofcode sets, but three kinds
Oneisa Tandy character set (96 ASCII, 4 mod-
European
Processing
in
effect until further notice
Mode
in
data processing (OP) mode.
If
you select this operation mode,
Character
symbol, and
OMP
DMP
132 emulates the IBM
computer
Set."
30
block graphics), and the
2.
You can use any character
132isin
OP
(another
when itisfirst turned
entered
The
mode.
And
characteristicofOP
system
tells you all
(27, 28) se-
this new line
is
or
in
of
LLIST
The
Word
If
you executed the same program in WP mode, the line feed would
have occurred immediately after the word
and try it. To
ITNTE~
short line feedisstill there.
Processing
enter
Mode
WP
mode, change line10to:
DATA.
Go
into WP mode
30
Page 39

10
LPRINT CHR$(20):REM
and run the program.
CHR$(20)
SELECTS
Chapter 2
WP
MODE
As you can see, the line feed
Note that in WP mode, the
LUST
once.
IENTERI to prove that the half- forward line feed occurs only
The
line feed then returns to normal.
is
immediately executed.
new line feedisonly temporary. Type
Graphics Mode
Graphics modeisvery different from the other two printer modes.
one thing, in graphics mode the
opposed to the ordinary 1/6" pitch in WP and
only a few WP and
letters and symbols, for example, are ignored by the
is
in graphics mode. Instead, numeric data from
into dot patterns for the print head. This lets you produce graphic
printouts
For
10
20
30
40
and run the program.
of
charts, graphs, logos, andsoon.
a quick look at this mode, change your test program to:
LPR1NT
FOR
1=128
LPRINT
NEXT
DP
features are available in graphics mode. Normal
CHR$(18)
TO
CHR$(!);
255
LF
code (10 Dec.) feeds
DP
paper
modes. Furthermore,
DMP
132
128to255istranslated
For
7/72"
when it
as
DMP
132
CHR$(18) puts the
through
Type
again to be sure you are no longeringraphics mode.
255
are interpretedasdot patterns.
LPRINT
CHR$(30) IENTERI to return to WP mode. Try
into graphics mode. The numbers
128
LUST
33
Page 40

Printing Applications
Selecting a Print Mode
To move from one mode to another, refer to Table 4 for the required
_
-,
Page 41

Print Fonts and Character Widths 3
The
DMP
132
has four distinct print (character) fonts:
• Standard and condensed
• Correspondence (NLQ)
• Proportional
• Graphics
Each font
is
created with a unique dot pattern laid outina grid,
or
matrix.
The character styles differ in the size of the matrix and the way in
which individual characters are created within the matrix.
132
Table 5 shows that the DMP
•
10
CPI
•
12
CPI
• 17 CPI
Table5.Character
Font
Style
Standard
Condensed
Correspondence
(NLQ)
Proportional n x
Remember that the
Matrix Size
11x18
11
x 9
23x18
DMP
setting to receive character select control codes.
other than
CODE
by
using the front panel switch, the set character
has three basic dot pitches:
Widths
18
and
Densities.
Pitch
Normal 10 CPl/Elongated 5
Normal12CPl/Elongated 6
Normal
Normal10CPl/Elongated 5
Normal
Variable Width (canbeElongated)
17
CPl/Elongated 8.5
12
CPl/Elongated 6
132 must be set to the default
If
you set the pitch to
CODE
CPI
CPI
CPI
CPI
CPI
pitch
pitch stays valid even if you send control codes from the computer.
35
Page 42

Print
Fonts and Character Widths
If
you change a fontina line without changing the dot pitch, the line
For
prints continuously without pausing.
not pause while changing from proportional printing to correspondence
10
CPI because both use the same dot density.
of
the density
one, the
printing in the new character style. When condensed characters are
printed on the same line with
because
when you change from standard to condensed characters.
the new style characterisdifferent from the preceding
DMP
132
prints the current buffer contents and then resumes
other
of
the changingofthe dot density.
example, the
On
characters, some dot spaceisleft
For
example, this happens
the
DMP
other
132
does
hand, if
Selecting Fonts
You can select character fonts by using the control codes from the com-
NLQ
puter, as well as by using the control panel
switch.
A font style stays in effect until you choose
graphics mode does not change the font.
to the last active font upon leaving graphics mode.
another
The
font style. Entering
DMP
132
simply returns
Standard and Condensed Fonts
Standard characters are composedofan11by 9 dot matrix. The character pitch
tween each character
This font prints in three character widths:
• Standard-IO characters per inch (CPI)
• Standard-12 CPI
• Condensed-17 CPI
You can elongate each
width), which gives you half as many characters
six
different print widths.
To
see the different print widths available, print a few sample lines.
Type this BASIC program:
36
is
determined either by the space the
or
by the dot pitch.
of
these widths (print characters at double-
DMP
132
per
inch and a total
puts be-
of
Page 43

NEW
IENTERI
110
F$="STANDARD
120
N=19:W$="10
130
N=23:W$="12
140
N=20:W$="17
230
240
250
LPRINT
LPRINT
RETURN
CHR$(27)jCHR$(19):STOP
CHR$(27)jCHR$(N)jF$j"CHARACTERS
Then, run the program.
AND
CONDENSED"
CPI":GOSUB
CPI":GOSUB
CPI":GOSUB
Chapter 3
240
240
240
"iW$
STANDARD
STANDARD
STANDARD
The subroutine
DMP 132. Line
ram execution.
Send
27
27
27
27
27
27 29
27
27
27
27
276601
276600
278301
278300
27
27
AND
AND
CONDENSED
CHR$(
19
18
17
23
20
14
15
31
32
88
77
AND
CONDENSED
CONDENSED
CHARACTERS
CHARACTERS12CPI
10
CHARACTERS17CPI
in
Line
240
sends the required control codes to the
230
returns to normal character width and stops prog-
Table6.Font
):
Style Change Commands.
If
you
want:
Standard-10
Correspondence-10
Proportional
Standard-12
Condensed-17
Correspondence-12
Start Elongation
End Elongation
Start Bold
End Bold
Start Italics
End Italics
Start Subscript
Start Superscript
End Sub-/Superscript
Microfont
Print Example
AE:Chijk
ABCh1jk
ABCh1jk
A8Chi j k
ABChijk
ABChljk
AE:C:hi
AE:Ct-,
ABChijk
AE:Chijk
A8Chi
A8Chijk
ADChlJk
A8ChlJk
ABChijk
118ChlU.
CPI
j k
i j k
-ik
37
Page 44

Print
Fonts and Character Widths
Correspondence Font
The second character setisa23by18dot matrix character set for cor-
10
respondence
from. standard-l0
ty.
(23
dots wide fits in the same space as11dots wide.) You can elon-
gate correspondence print to 5 and 6 CPI.
• Correspondence-lO CPI
• Correspondence-12 CPI
and12CPI. The characters have different total widths
or12characters, but print with the condensed densi-
Correspondence characters appear to be the same
ters in normal width, but they are an entirely unique character style.
As an example, add these lines to the program, and then compare the
two styles.
150
F$="CORRESPONDENCE
160
!{=29:W$="12
Run the program.
STANDARD
STANDARD
STANDARD
AND
AND
AND
CONDENSED
CORRESPONDENCE
CORRESPONDENCE
You can see the differences between the characters. The correspond-
is
ence style
support proportional characters.
good for use with word processing programs that do not
CPI":GOSUB
CONDENSED
CONDENSED
CHARACTERS17CPI
CHARACTERS
CHARACTERS12CPI
":N=18:W$="10
240
CHARACTERS
CHARACTERS12CPI
10
as
CPI":GOSUB
cpr
standard charac-
240
10
cpr
Proportional Spacing Font
The third character setisthe proportionally spaced character set. This
font
is
also different from the
width varies from character to character.
11
dots (including two columns of blank dots to allow space between
to
the characters).
other
two fonts, and the character matrix
The
widths vary from 3 dots
38
Page 45

To
see an exampleofthis font, add this line to the program.
170
F$="PROPORTIONAL
180
W$="VARIABLE
Run the program.
":N=17
PITCH":
GOSUB
240
Chapter
3
STANDARD
STANDARD
STANDARD
CORRESPONDENCE
CORRESPONDENCE
PROPORTIONAL
Proportional characters add a quality look to word processing documents by eliminating wide gaps between characters. You can also elongate these characters to twice their normal width.
AND
AND
CONDENSED
AND
CONDENSED
CONDENSED
CHARACTERS
CHARACTERS12CPI
CHARACTERS17CPI
CHARACTERS
CHARACTERS12CPI
CHARACTERS
VARIABLE
10
CPI
10
PITCH
CPI
Graphics Characters
The fourth character setisused for block graphics printing. The characters can be normal10CPI width,12CPI widthorcondensed17CPI.
This setisnot fully compatible with the screen graphicsofmost Tandy
computers. Rather, itisa unique character set.
To
see that the various character widths do not affect graphics charac-
ters, add these lines to the program:
190
N=19:W$="10
200
GOSUB
210
N=23:W$="12
220
N=20:W$="17
260
FOR
270
LPRINT:RETURN
240:
1=224
CPI":F$="GRAPHIC
GOSUB
260
CPI":GOSUB
CPI":GOSUB
TO
254:
LPRINT
":LPRINT
240:
GOSUB
240:GOSUB
260
260
CHR$(I)j:NEXT
I
39
Page 46

Print
Fonts and Character Widths
Run the program.
STANDARD
STANDARD
STANDARD
CORRESPONDENCE
CORRESPONDENCE
PROPORTIONAL
GRAPHIC
1ft
m.
..'"
GRAPHIC
••••••-.,j
GRAPHIC
Since the normal line-to-line spacingis1/6
the graphics characters are 6 dots high, you can create continuous vertical graphics by using the half forward line feed (CHR$(27);
CHR$(28)).
10
20
30
40
50
60
70
80
90
CHARACTERS17CPI
• I
LPRINT
FOR
FOR
READ
NEXT
NEXT
DATA
DATA
DATA
AND
AND
CDNDENSED
AND
CONDENSED
CONDENSED
CHARACTERS17CPI
CHARACTERS
CHARACTERS
CHARACTERS12CPI
10
CHARACTERS12CPI
CHARACTERS
CHARACTERS
...........
.111
DII"""1IIDI",,,,1lIlIlRI
r----.
VARIABLE
10 CPI
..,..
I-
I
LJ...L..j
+p"
CHARACTERS12CPI
llr'
Add
I11""'III-8,...-,..,..
r-,.,.fILJ.q+'A
these lines to the program and run it.
I-
I
U...L..J
-+J'"
A"'IIi..
CHR$(27);CHR$(28)1
R=l
TO
3
C=l
TO
7
N:LPRINT
CHR$(N);
C:LPRINT
R:LPRINT
CHR$(27);CHR$(54);
241,243,241,224,241,243,241
224,244,241,241,241,249,224
241,248,241,224,241,248,241:STOP
CPI
PITCH
..4"'111h...
inch,or12
10 CPI
dots high, and
After you print the results, delete lines10through
40
90.
Page 47

Wrap-Around
The
DMP
132isa dot-addressable printer.
termined
per
word processing mode is:
• Standard-1O=960
• Standard-12=1l52
• Condensed-17=1918
• Correspondence-lO=1920
• Correspondence-12=2304
If
the lengthoftext the
line
feed, and the "leftover" character(s)
next line. This
not by the
line.
The
numberofaddressable dots
(or
the right margin if it has
is
numberofcharacters but by the
called wrap-around.
DMP
132 receives exceeds the limitofdots
been
is
printed at the beginningofthe
Elongated Characters
You
can elongate any font to twice its normal width.
Therefore,
per
line in
set), the
line lengthisde-
numberofdots
data
processing
printer
inserts a line
Chapter 3
or
per
Table8.Elongated Printing.
Send CHR$( ):
27
14
15
27
Enter
the codes to start
times within a line in any mode.
and
Start elongation
End elongation
end
elongated characters any
To:
number
of
43
Page 48

Print Fonts and Character Widths
Boldface
The printer produces boldface characters by widening each character's
line width horizontally.
Send
CHR$( ):
27
31
27
32
Table9.Bold
Printing.
To:
Start bold
End bold
printing
printing
When the printer receives a (27,31) code sequence, it begins bold character printing at the next character it receives.
Mixing Bold
and
Elongated
You can activate both bold and elongated characters at the same time.
Italics
You can print any font on a "slant."
Table
10.
Italic
Printing.
Send
27
27
CHR$( ):
66
1
66
0
To:
Start italic
End italic
printing
printing
The printer starts printing italic characters at the first character it encounters after receiving the (27
If
the printer receives a super-/subscript command during italic charac-
ter
printing, the
DMP
132
66
1) code sequence.
prints the current buffer contents and then
enters the super-/subscript printing mode.
44
Page 49

Chapter 3
Superscript
and
Subscript
In superscript and subscript, character heightiscutinhalf. In superscript character printing, the character prints on the upper half of the
line. In subscript, the character prints on the lower half of the line.
Table
11.
Super-/Subscript
Send
CHR$( ):
27
83
0
27
83
1
27
88
When the printer receives a (27830)or(27831)
Printing.
To:
Start superscript
Start subscript
End super-/subscript
printing
printing
code sequence, sub-
printing
sequent characters printinsuperscriptorsubscript until the printer receives a (27 88) code.Itthen returns to the font that wasinuse before
entering super-/subscript character printing.
The printing speedorhorizontal dot resolutionisfixed at17CPr.
The
underline positionisnot changed.
Microfont
In the microfont mode, all printouts areinsuperscript, with half forward line feeds (1/12 inch)inWP mode,orhalf the designated line
pitchinDP
mode.
Table
12.
Send
CHR$( ):
27
77
Microfont
Printing.
Start
To:
microfont
Microfont stops when you send another font select command, such as
CHR$(27);CHR$(19);orCHR$(27);CHR$(23). (See Table 6 for
other
character style change commands.)
45
Page 50

Print
Fonts and Character Widths
As with superscript, printing pitch for
CPI.
the
microfont
modeisfixedto17
46
Page 51

Buzzer
General Control Codes 4
In IBM
132
mode,
sounds a buzzer for one second.
when the printer receives thc code CHR$(07), the
DMP
Line Feed
When
the
DMP
132
receives an LF code (ASCII 10), all
is
print buffer
wise, the
paper
(or
If
the
DIP
with the line feed, moving the printing position to the next print line.
the settingisoff, the printing position staysinthe
and moves down one line.
Other
line feed codes control the pitch and directionofthe line feed.
DP
In
they
Pitch and direction settings are sent to the
sequence. First, a control code
DMP
mines the specific pitch and direction. These control codes are listed in
Table
mode,
take
132
13.
printed, followed by a line feed. Unless you tell it other-
DMP
132
uses 1/6- inch forward line feed when advancing
liS-inch if the
switch 1-3isset to
these codes are usually stored in the buffer. In
effect immediately.
that a special code sequence follows.
DIP
switch 1-6isset to
ON,
27issent (CHR$(27)). This tells the
ON).
a carriage returnisalso
current
DMP
132ina two- code
The
next
data
in the
performed
print column
WP
mode,
number
deter-
If
Table
Send CHR$( ):
27
10
27
28
27
30
27
54
27
56
13.
Line Feed Control Codes.
Full reverse line feed (1/6 inch)
Half
forward
Half reverse line feed (1/12 inch)
forward
Full
3/4
forward
To:
line feed (1/12 inch)
line feed (1/6 inch)
line feed (1/8 inch)
47
Page 52

General Control Codes
Hints
About Line Feed
• In data processing mode, codes are stored in the print buffer. They
are not activated until you send an LF code. In word processing
mode, these code sequences cause the
in
formation
pitch and direction.
• CHR$(27);CHR$(1O) does not work from some BASICs with the
CHR$
sent to the printer as
• All the codes in Table13are ignored in graphics mode.
•
If
the
each line feed.
its buffer and then execute a line feed of the specified
function. The LF code (10)isintercepted by BASIC and
13.
DIP
switch 1-3isset to
LF&CR,
DMP
132
to print the in-
a carriage return follows
Note these restrictions for paper feeding:
• None of the reverse feed commands can feed the paper backward
beyond the "top- of- form" position. When the paper reaches this
point, the printer ignores these commands.
• A paper jam occurs if paper
of the paper
is
nearing the print head.
48
is
fed backward when the bottom edge
Page 53

Special Line Feed Control Codes
Chapter
4
There
are five special line feed codes that operates in all three print
mode. They are:
Table
14.
Special Line Feed Control Codes.
Send
CHR$( ):
27 26
27
50
27
51
27
57
27 64 n
These codes initiate an immediate
1/8
forward
1112
forward
1/36
forward
1/24 forward line feed
nl24
forward
dump
of the print buffer followed by
the specified line feed, with one exception. In
is
sequence
stored
A carriage return
in the buffer andisactivated by
is
not performed, regardlessofthe settingofthe
switch 1-3.
These special line feed codes are useful
in
matrix picture.
Carriage
Return
(CR)
To:
line feed (1/48 inch)
line feed
linefeed
linefeed
DP
(1172
(1/216 inch)
(1/144 inch)
(n/l44
mode,
the2764 n code
the
next
inch)
inch)
LF
code.
DIP
adjusting a print lineordot-
A
CR
(13or141) code tells the printer to print the current buffer con-
If
tents and then perform a carriage return.
OFF.
one line feed (the current active line feed)isperformed at the
If
same time.
the switchisset to
ON.
the DIP switch
a line feedisnot activated, and
printing continues on the same line.
or
In addition, the line feed function can be set to ON
of
codes, independent
switch settings.
CHR$(27); CHR$(22). the line feed function
feed function
is
turned off when you send control code CHR$(27);
If
you send control code
is
OFF
turned ON; the line
CHR$(21).
1-2isset to
via control
49
Page 54

General Control Codes
Backspace
You can backspace on
sending it a two-code sequence.
is
code
ing the
position.
LPRINT
would backspace the printing position 150 dot-columns from the
position.
In general, backspacing should be specified
character
should
acters).
two characters.
the
If
backspace
If
ning
Backspace works
mode,
ent
in the form
numberofdot-columns to backspace from the
For
example:
CHR$(B)jCHR$(150)
size.
That
be12dots
For
instance,
To
numberofdots.
n
is
0, backspacing does not occur.
more
than
n
is
greater
of
the backspace codeisignored, and nistreated
character.
than the
the line.
the
DMP
132, from 1 to
The
first codeisCHR$(8).
CHR$(n),
is, backspacing for the
per
character
LPRINT
backspace over elongated characters, simply double
255 dot-spaces.
current
in
both
where nisa value from 1 to
(9 dots plus 3 for spacing
CHR$(8);
dot-position, printing startsatthe begin-
data
and
word processing modes. In graphics
You
CHR$(24)
can use the
255
dot-columns,
in
multiplesofthe
standard-lO
would backspace
repeat
as an independ-
The
255
current
character
between
by
second
specify-
printing
current
current
set
char-
feature to
The
backspace
command
execute a backspace
The
widths
portional
commandisa print
causes the
of
the available fonts are shown in Table
character
50
command.
DMP
132
to print all
operation.
widths naturally vary from
Receiving the backspace
data
in the buffer
character
and
15.
The
to character.
then
pro-
Page 55

Table
Font
Style
Standard-10
Standard-12
Condensed-17
Correspondence-1010CPI
Correspondence-1212CPI
The
dots/character
characters.
10
5CPI 24
12
6CPI
17
8.5
5CPI
6CPI 48
columninthe
15.
CPI
CPI
CPI
CPI
Character
Set Width.
Dots!
Character
12
12
24
14
28
12
24
24
preceding table includes dots
To
Backspace
1Character
08
12
24
08
12
08
24
08
14
08
28
08
24
08
48
08
24
08
48
08
Chapter 4
n Character
12xn
08
24xn
08
12xn
08
24xn
08
14xn
08
28xn
08
24xn
08
48xn
08
24xn
08
48xn
08
between
Setting
The
in
all
resets
form position.
inch)tobe used with
Ifnis0or
Top-of-Form
control
code
three
print modes.
the
line feed
L it is changed to 2.
and
CHR$(27);CHR$(52);CHR$(n)
After
printing the
counttozero
The
line length
the
form feed code.
and sets the
per
Whenever
activated, line feed pitchiscounted
inchor1/8 inch).
On
initial
power-up,
paper
position and
DIP
switches 1-4 and 1-6. See
Be
sure
the
paper
the
DMP
132
the
form length in accordance with
Table
is properly positioned
132.
Form
pageisset
up
and
sets the
16.
before
Length
sets the form length
current
current
any line feed
compared
top-of-form
buffer
line as
to
n (by 1/6 inch
with n (by 1/6
the
you
turnonthe
at the
contents,
the
top-of-
or
1/8
operation
current
settingofthe
DMP
51
it
is
Page 56

General Control Codes
Table
DIP
Switch
1-4 1-6
OFF OFF
OFF
ON
ON
16.
Form
ON
OFF
ON
Length/Lines-per-Page.
Form
length
11
inches
11
inches
12 inches
12 inches 961ines
lines-per-Page
66
lines
881ines
72
lines
In single-sheet printing, the
numberoflines-per-pageis56.
Form Feed
When the printer receives a
tents print
out
completely,
tion, and the line feed counter resets to zero.
However, a small problem exists in communicating with the
through BASIC. Most BASICs keep trackofthe top-of-form internally, intercept the form feed (FF) code on its way to the printer, and
send
out, instead, a seriesofline feeds. Since theFFcode never gets to
the printer, the CHR$(12)
POKEorOUT
statement to send the form feed directly to the printer
and bypass the interceptor.
Note:
Do
not use CHR$(12) except in graphics applications. Most Tandy application programs have the top-of-form
plication program
user's guide for instructions on setting
the program does the rest.
CHR$(
paper
12)
command, the print buffer con-
advances to the next top-of-form posi-
DMP
is
not activated. Some BASICs can use the
"built-in." See your ap-
FORMS,
132
and
Entering IBM Mode
When the printer receives a CHR$(27);CHR$(33) code, the
resets to the defaults of the IBM mode.
That
is, buffer contents print
out, the carriage returns to its home position, and all settingsofthe
DIP
switches (except the switch 1-1) are read again.
DMP
132
52
Page 57

Chapter 4
Ignored
or
Undefined Codes
Codes that are unusableorundefined in a given print mode are either
ignored or printed with the symbol
Z , which represents an invalid
code.
There are several reasons a code might be unusableina certain mode.
Redundant codes that do not change the current printer status are
usually ignored. For example, if the DMP
DP
a CHR$(19) (used to enter
ASCII control codes
in
the range 0 to31that the DMP
recognize. ASCII 0, for example,
mode)isignored. And there are many
is
132isin DP mode, sending
132
does not
not used in any of the three print
modes.
17
Table
summarizes the undefined print codes.
Table
17.
DMP
132
Ignored Control Codes.
All
Modes:
• Out
of
range on repeat sequence.
of
range
pas
• Out
• Redundant codes that do not change the current printer status.
DP
Mode:
WP
Mode:
Graphics
Unprintable repeat sequence data n2 is also ignored.
Codes Printed
inDPand WP:
• All codes
• Unprintable repeat data
Mode:
0-31
above ignored codes.
sequence.
0,1,19,30,127,255
0,1,20,30,127,255
All codes in the range 0-127 are ignored except:
(7), (10), (12). (13).
(27,21),
(27,
as
X
and 128-159, except the active function codesorthe
57),
(27,
(27,
n2.
22),
64,
(27,
14), (27,15), (27,16, n1, n2),
(27,
33),
(27,
50),
(27,
n).
(27,
72, n).
(28,
n1, n2). (30).
51),
(27,
52, n)
53
Page 58

General Control Codes
DMP 132 Buffer Operation
The
DMP
132's ability to temporarily store
over
advantages
you press)
a typewriter. Codes sent to a typewriter
are
transferred
immediately to the
dataisone
paper.
of
its main
(thatiskeys
Codes sent to a
separate
a
buffer fillsorcertain codes
is
emptied
data
buffer
ing continues
different position relative to
In the
can be
Tips on
For
•
•
•
DP
stored
the
DP, WP,
The
buffer allocates a fixed
acter width selected.
equals
The
last
the next line following an
The
form feed code
ing (if the code
If
you select
the
print
return. Otherwise, the printing position
top-of-form line.
printer
sectionofmemory
and
all
prints
on
mode,
in the
DMP
and
that
number.
character
"LF
head
are
dataisprintedonthe
dependsonthe circumstances. In some cases, print-
the same line;inothers,
commands for changing fonts, line feed,
print
buffer until
132
Buffer
graphics modes:
Printing resumesatthe startofthe next line.
received by the bufferisprintedatthe start
(FF=12
is
received by the
only" (the
moves to the next top-of-form line without a carriage
not
printed
in the
are
received
the
paper.
numberofdots, dependingonthe char-
The
buffer empties when the
automatic
decimal) automatically activates print-
DIP
immediately; they are
printer
called the buffer.
(that
is,
LForCR),
paper.
dataisprinted.
line feed
DMP
switch 1-3), the buffer prints
What
happens
the
print
head moves to a
and
carriage return.
132).
is
set at the startofthe next
When
the buffer
andsoon,
data
stored
the
after the
stored
and
in
of
The
•
carriage
printing (assuming
buffer).
the printing position moves to the
return
If
you select "carriage
code
that
at least
(CR=13
54
decimal) automatically activates
one
character
return
startofthe
only" (the
codeisalready in the
DIP
switch 1-2),
current
line,
and
the
Page 59

Chapter
4
next buffer full prints
Otherwise, subsequent characters print
The
•
line feed code
select
print
"LF
head
only" (the
moves to the next print line without a carriage return.
Otherwise, the printing position
subsequent
(LF
= 10) automatically activates printing.
DIP
characters over the
at
switch
1-3),
is
set at the startofthe next print
the startofthe next line.
the buffer prints
line.
•
If
the
computer
delays
more
than
a second before sending the next
print code, the buffer prints. Printing continues from the
position.
The
dot
•
positioning sequence (27, 16,
designated position
continues in the
is
to the leftofthe
current
line at the
nl,
n2) prints the buffer if the
current
dot
address specified by the (27,
position. Printing
16) command.
Data
and
word processing modes only:
•
The
backspace
the
current
•
If
you select a character setofdifferent
command
activates printing. Printing continues
line at the dot address specified by the command.
dot
density, the
buffer prints. Codes for changing character sets are: (27,
(27,19), (27,20), (27,23),
18),
ing continues in the
current
(27, 29), (27 31),
and
line with the new character style.
current
data
(2732).
line.
If
you
and
the
current
in the
17), (27,
Print-
In
When
the
•
lowed by
printer
standard
ing continues from the
Graphics
•
When
standard
prints.
mode only:
the
printer
or
The
DMP
receives the
characters, the buffer prints.
current
receives the
condensed character printing condition, the buffer
132 returns to the previous print
ing continues in the same line from the
start
graphics
mode
Dot
code (18) folgraphics print-
character position.
end
graphics code and returns to a
mode,
current
print position.
and
print-
55
Page 60

General Control Codes
Notes:
• In the description, "next line" means the new line reached by performing a line feed operation. In data processing mode, if a reverse
line feedisset in the memory, the line feed operation causes paper
to move in the reverse direction.
•
Repeat
flow characters are wrapped around and printed at the beginning
the next line.
data can cause a buffer fulloroverflow condition. The over-
of
56
Page 61

Word
and Data Processing Modes 5
Superscript and Subscript
In an earlier chapter,
essing and word processing modes
codes. In data processing mode, LF codes are stored until the end of
the line and become the current line feed standard; in word processing
mode, these codes are executed immediately and are only temporary.
Printing superscripts and subscripts
to take advantage of the immediate response to line feed codes.
this program in BASIC:
10
E$=CHR$(27)
20
D$=CHR$(28)
30
U$=CHR$(30)
40
LPRINT
100
LPRINT
110
LPRINT
120
LPRINT
130
LPRINT
Run the program.
you
learned that the difference between data proc-
'ESC
'DOWN
'UP
CHR$(20)
"(X"i
E$D$j"l"jE$U$j"+X"j
E$D$j"2"jE$U$j")"j
E$U$j"2"jE$D$
(By
LF Code)
is
in the way they handle line feed
in
word processing modeisone way
Enter
In this program, frequently used codes are stored in variables E$,
and U$ to shorten the program. The directionsinlines10through 30
refer to the motion you would make when drawing the script characters
by
hand - move down to print the subscripts 1 and2.then back up to
the output line, and then move up to print the superscript
2.
0$,
Repeat Printing
The DMP
to repeat a single character codeasmanyas255
for repeating graphic codes, underlining, repeating block graphics, and
so on. The repeat feature uses a three-code sequence:
132
also provides a built-in repeat capability, You can use
times. Itisalso useful
57
it
Page 62

Word and Data Processing Modes
• CHR$(28)
• The number of repetitions
• The code to be repeated
Underline Printing
To underline any textineither
CHR$(15). All text that follows this code
DP
or WP mode, send the DMP
is
underlined until you send a
132
CHR$(14), which stops underlining.
Dot Positioning
In any mode, you can position the print head to a specified dot posi-
in
ROM
tion. However, even though the character stored
the print head positions, you cannot.
For example, using the correspondence-IO character sets (10 CPI),
there are 1920 dots
is
The same
true with proportional characters.
Character
Standard-10
Standard-12
Condensed-17
Correspondence-10
Correspondence-12
per
line, but only half (960) are accessible by you.
Table 18. DMP
132
Dot Positioning.
Dots
Per
960
1152
1918
1920
2304
line
Elongated characters use the same dot columns, even though the char-
as
acters are printed twice
wide.
can use
Available
1152
Columns
480
576
959
960
a
all
16)
To position the print head to a specific position, send a (27,
(n1
sequence, and then send two numbers
and n2) that specify the de-
code
sired position. In other words:
1. Send a control code to specify the character set (standard, conor
densed, correspondence, proportional,
graphics).
58
Page 63

Chapter
5
2. Send a CHR$(27);
to position the
print
3. Tell the printer which
DMP
4. Tell the
To
specify a
132 what you want to print.
dot
column at which printingisto begin, first use
CHR$(16)
headata specific
dot
column you want to print.
to tell
to send the (27, 16) code. Follow this with
For
Table
instance:
a value 0-255.
19.
Dot Positioning.
n1
must
o
1
2
3
4
to specify the position.
LPRINT
wherenlis
Remember
CHR$(27)jCHR$(16);CHR$(nl)jCHR$(n2)
a value 0-15 andn2is
To specify
dot
0-255
256-511
512-767
768-1023
1024-1151
that:
column:
the
dot
column.
another
be:
DMP
132 you
two-code sequence
n2mustbe:
0-255
0-255
0-255
0-255
0-127
want
CHR$
• standard-lO printing allows you to access up to 479
= 1, n2 = 233)
• standard-12 printing allows you to access up to 575
= 2, n2 = 63)
• condensed-17 printing allows you to access up to 958
(nl
= 3, n2 = 190)
dot
dot
columns
columns
dot
• correspondence-lO printing allows you to access up to 959
umns
(nl
= 3, n2 = 191)
to
• correspondence-12 printing allows you
umns
(nl
= 4, n2 = 127)
access up to
1151
(nl
(nl
columns
dot
col-
dot
col-
59
Page 64

Word and Data Processing Modes
Why two numbers (n1 and n2)?
the
DMP
132 with one numberis255, and you have more than
The
maximum value you can send to
255
dot
positions available.
The
DMP
132
interprets these two numbers as a single
through 11) value.
of
n1
are used as bits 8 through 11; the four
n2 represents bits 0 through 7.
upper
12-
The
four lower bits
bits
bit (bits 0
of
nl
are
ignored.
Left and Right Margin
You can position the left/ right margin to a specific character position
designated
To change the left! right margin to a new position, first send a
CHR$(27);CHR$(81) to tell the
low this with
leftmost position.
by
the current font pitch.
another
code to specify the
Table
Send CHR$( ):
27
81
n
27
82
n
DMP
132 to change the margin. Fol-
numberofcharacters from the
20.
Left/Right Margin Set.
Set left
Set
right
To:
margin
margin
The
value n indicates the
number
of characters counted by the current
font pitch from the leftmost margin.
• Once the left/ right margin position
change, even when the character mode
is
set, this margin does not
is
changed.
• This command does not affect previously set tab stop positions.
• When setting the left margin, the maximum value of
n
is
limited to
the maximum printable characters in the current printing mode
minus 2 (for example,
136
- 2 =
134
in normal printing mode);
otherwise, the printer ignores this command.
60
Page 65

ChapterS
• When setting the right margin, the value of n must exceed the left
margin value
by
at least2;otherwise, the printer ignores this com-
mand.
Skip Perforation
You can set a skip zone for a perforation at the bottomofa form
sending the code sequence, CHR$(27); CHR$(72); CHR$(n). The skip
is
zone
determined by the number of n times
DIP switch
1-6isset to ON). n equals the number of full lines to leave
1/6
inch (or
1/8
inch if the
blank at the bottom of the form.
•
If
the valueisalready set, the
DMP
132
automatically skips the des-
ignated area when printing.
•
If
n exceeds the form length, the printer ignores this sequence.
At
power ON, the
•
perforation
is
DIP
performed.
switch 1-5 determines whether I-inch skip
Bidirectional and Unidirectional Printing
In
DPorWP mode, you can select either bidirectionalorunidirectional
printing.
Table
21.
Send
27
27
CHR$(
85 0
85 1
Bidirectional/Unidirectional
):
Start bidirectional printing
Start unidirectional printing
Printing.
To:
by
At
power-up, bidirectional printingisselected.
61
Page 66

Page 67

Graphics Mode 6
In graphics mode, you have no pre-defined characters at your disposal.
the
You are responsible for
There
are 480 addressable
addressable dots vertically (dot columns). This means that you can specify
oneofup to 3,360 individual dots
To
print only a few dots in a
dure:
1.
Send a CHR$(18) to
positioning and actionofthe print head.
dot
columns across the paper.
(7
X 480 = 3,360).
dot
column, follow this general proce-
put
the
DMP
132
into graphics mode.
There
are 7
2. Send a CHR$(27); CHR$(16) to tell the
position
3. Tell the
the
DMP
print
132
head
to print a specific dot.
in which dot column you want to print. This
DMP
explained shortly.
4. Tell the
number
To
specify a dot column at which printingisto begin, first use
to send the (27, 16) code. Follow this with
to specify the position.
LPRINT
wherenlis
DMP
132 what you want to print. You can do this in a
of ways.
For
another
instance:
two-code sequence
CHR$(27)jCHR$(16)jCHR$(nl)jCHR$(n2)
a value 0-3 and n2isa value 0-255.
Table 22. Graphics Dot Positioning.
n1
must
To
---~---'-------------------
specify
Remember
dot
columns
dot
column:
0-255
256-479
that graphics printing allows you to accessasmany as 479
(nl=l,
n2=223).
be:
o
1
132 you want to
CHR$
n2
must
be:
-
--
----
0-255
0-223
is
63
Page 68

Graphics Mode
Even though dot columns greater than
values greater than 255.
break it into a two-byte value.
For instance, to draw a vertical
program:
10
LPRINT
20
LPRINT
25
LPRINT
In line 10, CHR$(18) puts the
CHR$(27); CHR$(16) tells it to
Try these program lines to print a vertical
dot column - 479.
10
LPRINT
15
LPRINT
The
program
• CHR$(18) puts the
• CHR$(27); CHR$(16) tells the
print head.
CHR$(18)
CHR$(27);CHR$(16)jCHR$(0);
CHR$(144);CHR$(255)
CHR$(18);CHR$(27)jCHR$(16)i
CHR$(1);CHR$(223)jCHR$(255);
works like this:
That
is, CHR$(400)isnot allowed. You must
bar
DMP
132
prepare
DMP
132
into graphics mode.
DMP
255
exist, you cannot send
at dot column 144, try this
into graphics mode. In line 20,
to position the print head.
bar
at the rightmost available
132
to prepare to position the
•
CHR$(I)
equal to 255.
• CHR$(223) specifies the last available dot column.
Note:Ifyou had used CHR$(48) in line15insteadofCHR$(47), the
DMP
132
tion to the first dot column in the next line.
tells the
would ignore the positioning command and set the new posi-
DMP
132
that the position IS greater than
64
or
Page 69

Chapter 6
Printing Graphics Patterns
Besides positioning the print head, you also need to be able to tell the
DMP
132 what to print once the headispositioned.
Remember that there are seven vertical dotsina dot column. You can
print anyorallofthese dotsinany combination you want.
Look back at the sample programs used to illustrate print head positioning. The last partofthe program line (CHR$(255)), which always
printed a vertical bar,isan example of all seven dots being printed at
once.
Try printing just the top dotofthe last dot column (479):
10
LPRINT
15
LPRINT
How does the CHR$(129) print just the top dot? Even though the
seven dots in a dot column are a vertical row, they are not numbered
sequentially from 1 to7.Table27describes the numbering system to
use with the
CHR$(18)jCHR$(27)jCHR$(16);
CHR$(1)jCHR$(223)jCHR$(129)j
DMP
132
when specifying an individual dot.
Table
23.
DMP
132
Addressable Dot Numbering System.
Dot#:
1
2
4
8
16
32
64
Dot:
Number
to
print
you
the
129
130
132
136
144
160
192
must
dot:
use
You have seen how to print the top dotinthe column. To print the
bottom dot, change the program lines to:
10
15
LPRINT
LPRINT
CHR$(18)jCHR$(27)jCHR$(16)j
CHR$(1)jCHR$(223)jCHR$(192)j
65
Page 70

Graphics Mode
To print a combinationofdots, use this procedure:
1.
Specify the dot numbers that represent the individual dots you
want to print.
2.
Add
those individual dot numbers together.
3.
Add
the sumofthe combined dot numbers to 128.
For example, to print the first dot (dot # 1), the fourth dot (dot # 8),
and the last dot (dot #64), add them together: 1 + 8 +
add the sum (73) to
dot pattern in the form
10
LPRINT
15
LPRINT
The following sample program line prints a box with a line through the
middle:
10
20
30
LPRINT
LPRINT
LPRINT
CHR$(18)jCHR$(27);CHR$(16);
~HR$(1)jCHR$(30);CHR$(255);CHR$(201);
CHR$(201)jCHR$(201)jCHR$(201);CHR$(255)j
128:
73+128
CHR$(20l):
= 201. Use
201
CHR$(18)jCHR$(27)jCHR$(16)j
CHR$(1)jCHR$(223)jCHR$(201)j
64
=73.
Then
as the addressable
Now,
enter
and run this new program:
5
'WIDTH
10
LPRINT
20
8=1:N=128
30
FOR
40
FOR
80
IF
90
LPRINT
100
120
Be prepared for a pause.Ittakes time to fill the print buffer.
ILPT1:",255
1=1
J=O
8<0
NEXT
LPRINT
CHR$(18)j
TO
20:8=-8
TO
6
THEN
CHR$(N)j
J:NEXT
CHR$(30)
N=N+2~(6-J)
I
EL8E
N=N-2~J
66
Page 71

Chapter 6
This program alternately adds and substracts powers of two to the cur-
rent code pattern stored in the variable
remove a single dot from the preceding dot pattern.
n. The net effect
is
to add
or
Line Feed
In graphics mode, itisassumed that you want to print rows of graphics
one right after another, each seven dots high. Therefore, graphics
mode provides only one fine feed. A single line feed advances the paper seven dots,
allows for continuous printing without unwanted space between lines.
or
approximately 0.12 inch. This small paper advance
Modify the current program to demonstrate this fixed line feed. Add
change:
20
FOR
K=l
TO
2:S=1:N=128
50
IF
K=l
THEN
60
IF
S<O
THEN
70
GOTO
110
Run the program.
These lines infiltrate the current loop and produce a mirror image
the first pass of the print head. The LPRINT in line 110 causes the line
feed between passes.
In addition to a 7/72 inch line feed, the following four line feed codes
are available:
1/72
•
• 1/144 inch line
• nl144 inch line
n should be a value between 1-255.
• 1/216 inch line
90
LPRINT:NEXT K
inch line
feed-(27
80
N=N+2~J
feed-en
feed-(27
feed-(27
50)
57)
64
51)
n)
ELSE
N=N-2~(6-J)
or
of
67
Page 72

Graphics Mode
Repeat Function
CHR$(28);CHR$(n) tells the DMP
specified number
The format for the repeat function
repeat code + number of times to repeat + what to repeat
For instance, LPRINT CHR$(28);CHR$(15);CHR$(255) prints the
solid vertical bar
Change line
90
LPRINT
and run the program.
Or
run this program:
10
LPRINT
20
LPRINT
of
times.
15
times.
90
to:
CHR$(28)iCHR$(2)iCHR$(N);
CHR$(18)j
CHR$(28)iCHR$(50)jCHR$(135)j
132
to repeat a graphics pattern a
is:
Leaving Graphics Mode
CHR$(30) exits graphics mode.Itplaces the DMP
(DP or WP) the printer was in when it entered graphics mode. In addi-
as
tion, all the previous conditions, such
are restored.
underline and character style,
132inthe mode
Freehand Drawing
Having graphics at your disposal requires a good amount of data.
computer can do most of the work in drawing figures that can be described
hand, requires translating the figure into a matrix of dots and then calculating the dot printing combinations for each print head position.
by
a mathematical function. Freehand drawing, on the
68
The
other
Page 73

Chapter 6
Because seven dots are available for graphics, separate the matrix into
rows seven dots high.
The numbers can be stored
and typing time, store the data
128
as you send them to the DMP
NEW
I
ENTER
120
DATA
160
DATA
190
DATA
210
DATA
The 999's signify the end of a line. The other numbers are between °
and
127.
send them to the DMP
Enter and run this program.
10
LPRINT
20
FOR
30
READ
40
LPRINT
80
LPRINT:NEXT I
90
LPRINT
100
LPRINT
The resultisnot spectacular. However, you can make it repeat a num-
ber several times. A good approach
cate the number of repetitions, followed
Add:
I
999
4,102,3,115,1,127,999
14,31,15,70,64,32,39,16,19,8,15,999
16,16,8,8,'4,4,2,2,1,1,999
Now, for the program to read the numbers, add 128, and then
CHR$(18)
1=1
TO
N:
IF
N=999
CHR$(128+N)i:GOTO
CHR$(30)
"DMP
4
132.
in
132"
DATA
THEN
statements. To conserve memory
as
numbers from °to
132.
80
is
to use negative numbers to indi-
by
127.
Then, add
30
the number to be repeated.
120
DATA
130
180
Do not run the program yet!
In line 120, the sequence -4,
the program to recognize the negative numbers. Change:
34,-4,66,68,-4,4,-5,8,-5,16,-5,32,-8,64,999
DATA
64,96,80,72,68,66,33,16,24,28,30,31,31,-5,62
DATA
-3,35,39,39,71,103,87,79,71,67,33,16,8,4,2,1,0,0
66
means four
66s:
66, 66, 66,
66.
Modify
69
Page 74

Graphics Mode
40
IF
50
60
70
N>=O
READ
LPRINT
GOTO
THEN
M
CHR$(28);CHR$(-N);CHR$(128+M)j
30
Now, run the program.
LPRINT
CHR$(128+N)j:GOTO
30
The figure still does not look like much.
lines and see what you have been working on.
110
DATA
140
150
170
200
-7,0,64,64,96,96,16,15,72,72,36,36,18,18,17,-4,33
DATA
-5,124,-5,120,-2,112,-2,113,-3,97,-3,98,66,66,68
DATA
100,68,-2,100,84,8,72,32,32,16,16,8,8
DATA
63,32,32,64,64,-5,1,-5,2,-5,4,8,8,-3,9,-3,17,19,19
DATA
-5,0,-5,1,-5,2,-5,4,-5,8,-5,16,-5,39,64,127,32
Run the program.
The resultisworth the effort!
Add
the remaining
OAT
A
70
Page 75

Selecting a Code Set and 7
Character Set
The DMP
These modes can operate independently of each other. Three different
character sets are also provided so that different characters can be
printed using the same binary code.
132
provides two operation modes with different capabilities.
Code Set Selection
Two types of code sets are available with the DMP
ginal Tandy code set, described earlier in this manual. The other
is
code set for IBM, which
printer. (Refer to Chapter 8,
Select these two operation modes
operations:
• Send control code CHR$(27);CHR$(33)
changes the operation mode to the other mode.
DIP
• Set the
use the Tandy code set, set the switch to OFF.
switch
like that used with the IBM80CPS graphics
"IBM Emulation Mode" for details.)
by
performing one of the following
1-1
to ON; this selects the code set for IBM. To
132.
Oneisthe ori-
in
either mode. This
is
Character Set Selection
The DMP
acter set, which can print
characters,
The other character sets are the IBM character sets 1 and
print
select a character set from either Tandy
132
has three kinds of character sets. Oneisthe Tandy char-
94
ASCII characters, four modified ASCII
64
European symbols, and
94
ASCII characters and48block graphics characters. You can
30
block graphics characters.
2,
or
IBM emulation mode.
which can
a
Select IBM character set 1 by using control code CHR$(27);
CHR$(58). To return to the Tandy character set, send control code
is
CHR$(27);CHR$(59). Only IBM character set 1
mode.
Note: Select between IBM character sets 1 and 2
code sequences in IBM code set mode.
LPRINT CHR$(27)
LPRINT CHR$(27)
"7" for character set 1
"6" for character set 2
applicableinTandy
by
using the following
71
Page 76

Selecting a
Code
Set
and Character
Set
International Character Set Selection
You can select the following international character sets using the "international character sets" command (27, 89,n)by
following numbers for
Table
n.
25.
International
Characters
selecting one of the
Sets.
Character Sets
U.S.A.
Germany
France
Norway
Sweden
Denmark
Finland
Italy
Spain
England
Belgium
When the DMP
132
receives this command, the ASCII codes that are
input print characters specified
power up.
Codes (Hexadecimal)
20
21
22
23
24
25
26
27
28
29
2A
asinAppendix A. USAisdesignated at
72
Page 77

IBM Emulation Mode 8
Description
The
DMP
132
has two different control code sets; oneisthe original
DMP
132
code set, and the otherisa code set for IBM, similar to the
80
one used with the IBM
are independent.
Code Set Selection
You can easily select the code set for IBMbyperforming one of the
following operations:
CPS graphics printer. These two code sets
• Set the
• When using the Tandy (original code set) mode, send the code
sequence CHR$(27);"!".
DIP switch
1-1
to ON.
Character Set Selection
In
the
IBM
emulation mode, you can select two different character sets
(not character styles). One
character set2.Select IBM emulation modebysetting the DIP switch
1-1toONorby
pondence between ASCII codes and character patterns, refer to
Appendix A.
Choose between IBM character sets 1 and 2 by sending the following
control codes at any time:
• CHR$(27);"6" for IBM character set 2
• CHR$(27);"7" for IBM character set 1
You can also select the IBM character sets
switch 1-7: set to
designate the character set
In
addition, character codes with a decimal value below32(normally
as
used
CHR$(27);""". That is, one character following this control code sequence
ter code has a decimal value less than 32. For the character patterns
control codes) can be printed
is
sending the correct control code. For details on corres-
OFF
handled like a normal printable character, even if the charac-
is
IBM character set1,and another
by
the setting of the DIP
to designate the character set1,set to
2.
by
sending control code
is
ON
IBM
of
73
to
Page 78

IBM Emulation Mode
codes with a decimal value below 32, refer to printable characters for
32
codes below
(decimal)inAppendix A.
Carriage Return
A carriage return (CHR$(13» prints the datainthe buffer, then the
print head moves to the leftmost dot position. A line feed
the
DIP
switch1-2isset to OFF or if the printer has received a
CHR$(27);"5";CHR$(1) code sequence. This command terminates the
double-width print mode. Automatic line feed capability can be set to
ON or OFF using the following code sequence:
• CHR$(27);"5";CHR$(O) for carriage return without line feed
• CHR$(27);"5";CHR$(1) for carriage return with line feed
is
executed if
Vertical Formatting Control Codes
Setting the Command for Line Feed Pitch
The line feed pitchisset to
ting of
ing one of these control codes: CHR$(27);"O", CHR$(27);"1",
CHR$(3), or CHR$(27);"A".
The control code CHR$(27);"O" changes the line feed distance to
inch.
The control code CHR$(27);"1" changes the line feed distance to 7/72
inch.
DIP
switch 1-6) at power up. You can change the pitchbysend-
1/6
inch or
1/8
inch (designatedbythe set-
1/8
Start Variable Line Feed
The control code CHR$(27);"2"isan execution command for the
by
CHR$(27);"A" command. That is, the line feed pitch designated
is
CHR$(27);"A" command
sent.Ifno CHR$(27)"A" command has been given, the line feed dis-
tance
is
set to
1/6
inch.
For example, if the line spacing
mode and you want to return the line spacing to
sent after the CHR$(27);"2" command
is
set to 7/72 inch for the bit image
1/6
inch, send a con-
the
74
is
Page 79

Chapter 8
trol code CHR$(27);"2" only (without a CHR$(27);"A" command).
will
The line spacing
return to
1/6
inch.
Variable Line Feed
The control code CHR$(27);"3";CHR$(n) changes the line feed distance to
any number between 1-255.
n/216 inch. n
is
a single-byte binary number and can represent
Setting the Variable Line Feed
The control code CHR$(27);"A";CHR$(n) defines the line feed pitch
in
increments of 1/72 inch. nisa single- byte binary number and can
represent any value 1-127.
Remember that this command only defines the pitch; you need to send
a control code CHR$(27);"2" to change the line feed distance.
Execution Command for Line Feed
The code CHR$(lO) prints out the character and feeds the paper one
line. The paper feed distance
switch or
mand terminates a double-width print mode.
by
the line spacing set commands discussed above. This com-
is
specified
by
the function selection
Carriage return
is
wise, it
not performed.
performed if the DIP switch
1-3isset to
ON;
other-
is
Execute Variable Line Feed
The control code CHR$(27);"J";CHR$(n) prints out the current buffer
contents and feeds the paper
ber and can represent any value 1-255. A carriage return
if the
DIP
switch
When, for example, you want a one- inch line feed, send the control
code CHR$(27);"J";CHR$(216) instead of sending an LF command
times.
1-3isset to ON; otherwise, itisnot performed.
n/216 inch. n
is
a single-byte binary num-
is
performed
six
75
Page 80

IBM Emulation
Mode
Reverse Line Feed
When you issue the control code CHR$(27);CHR$(93), the printer
prints out the character followed by this code and feeds
in
the reverse direction.
paper
1/6
inch
Notes:
• Reverse line feed cannot be executed beyond the top-of-form position.
• A paper jam can occur if the printer performs a reverse line feed
near the endofa page.
• Carriage returnisperformed if the automatic carriage return (function selection switch1-3)isset to
formed.
ON;
otherwise, itisnot per-
Setting
You can change the form length at any time, whether you are using the
friction feed
CHR$(27);"C";CHR$(n) sets lines
CHR$(27);"C";CHR$(O);CHR$(m) sets inches
byte binary number and can represent any value 1-127. misalso a singlebyte binary number and can represent any value 1-22.
positionisset at the current line after the printer executes
length setting command. Form lengthisset to11inchesor12
(selected by the
Setting
You can set the top-of-form position at any vertical position by using
control code CHR$(27);"4".
margin setting, first feed the
control code CHR$(27);"4" .
Note: Since the control code sequence
the form lengthinline numbers, the actual form length varies according to the line feed pitch you select.
Top-of-Form
or
the bidirectional tractor feed.
DIP
Top-of-Form
and
Form
Length
per
page, and the control code
switch 1-4) at power up.
Position
To
set the top-of-form position for the top
paper
to the target line, and then issue
CHR$(27);"C";CHR$(n)
The
control code
per
page. nisa single-
The
top-of-form
the
form
inches
counts
76
Page 81

Chapter 8
Form
Feed
When you issue control code CHR$(12), the current buffer contents
print out, and the paper feeds to the next top- of- form position. This
is
command terminates a double-width print mode. Carriage return
formed if the DIP switch 1-3
formed.
Skip
Perforation
is
set to ON; otherwise, itisnot per-
per-
Set the skip perforation function
"N";CHR$(n)
be used on a page, allowing you to avoid printing on the perforation.
is
a single-byte binary number and can represent any value 1-127. This
function
length set command.
If
Note:
this command.
You can also set the
1-5
to on.
command. n shows the value for the number of lines to
is
terminated
you designate n to exceed the page length, the printer ignores
by
the CHR$(27);"O" command or the form
1-
inch skip perforationbysetting the
by
using the CHR$(27);
DIP
switch
Horizontal Formatting Control Codes
Selecting
To select the font, you can use the control panel NLQ switch, but you
can also change the font from your computer. Send CHR$(27);
'T;CHR$(l)
quence CHR$(27);'T';CHR$(2) or CHR$(27);"I";CHR$(3) selects the
IBM near letter quality font.
Once you have selected the font, designate the pitch
Fonts
and
Pitches
to select the high-speed. standard font. The code se-
by
sending:
n
• CHR$(18) for
• CHR$(27);CHR$(58) for
• CHR$(27);"P";CHR$(n) for proportional spacing
10
characters per inch
12
characters per inch
77
Page 82

IBM
Emulation
Mode
Proportional
When proportional spacingison, characters print in different sized
spaces, depending on the width
acters, such as i, are given a small amount
ters, such as W, are given a wide space.
Control code
monospacing to proportional spacing, and control code
"P";CHR$(O) terminates proportional spacing and returns to monospacIng.
Note:
CHR$(18)
code CHR$(27);"P";CHR$(O).
The
Horizontal
Using horizontal tabulation, you can easily place and format sections
horizontally aligned. You can set the maximum
stops to any column (left marginiscolumn0)using the following control codes:
•
CHR$(27);"D";CHR$(nl);CHR$(n2)
n
is
a single- byte binary
position; it represents any value 1-136. Designate
tions
in
horizontal
CHR$(9) skips to the next right
tion
is
affected by character pitch and printing mode. Therefore, when
you change character pitches during compressed print
print mode, horizontal
on, the width of the space codeisusedasthe character pitch.
Spacing
of
each character.
CHR$(27);"P";CHR$(1)
proportional spacing
or
control code CHR$(27);CHR$(58),
changes the printing pitch from
is
not terminated by control code
of
That
is, narrow char-
space, while wide charac-
CHR$
but
only by control
(27);
Tabulation
28
horizontal
... CHR$(nk);CHR$(O)
number
ascending order. Send a null code (CHR$(O)) to terminate the
TAB
designation. Once
TAB
that
indicates the horizontal column
other
column posi-
TAB
stops are set, control code
TAB
position. Horizontal
or
double-width
positions shift.Ifproportional spacing
TAB
TAB
posi-
is
Control code
positions they were in at power up (one
CHR$(27);"R"
sets the horizontal
78
TAB
stops to the same
TAB
in every eighth column).
Page 83

ChapterS
Notes:
•
If
the horizontal TAB stopisnot set, the printer ignores control
code CHR$(9).
is
• When the horizontal TAB
in
ascending order, or if the number of TABs exceeds 28,
is
terminated.
ting
• All previously set TABs are cleared when you designate new TAB
stop positions. To clear all TAB stops, send the control code
CHR$(27);"D";CHR$(O).
• Horizontal TAB stops are set at every eight columns when the printer
powers up.
set, if the TAB stops are not entered
TAB
set-
Printing Mode Control
In IBM emulation mode, you can print elongated, condensed, bold,
emphasized, superscript, or subscript characters, or even change the
in
printing mode. These features are useful
ing in word processing systems.
printing a title or highlight-
Double-Width Printing
In double-width printing mode, the width of a printed characterisdou-
is
bled; space
are not affected, and their pitches are not doubled. Start double-width
printing with CHR$(14), CHR$(27);CHR$(14)
CHR$(l).
CHR$(27);CHR$(14), it
When it
with CHR$(27);"W";CHR$(O) only.
affected, and its pitchisdoubled, but horizontal TABs
or
CHR$(27);"W";
When you establish double-width printing with CHR$(14) or
is
released with CHR$(20) or a line feed.
is
established with CHR$(27);"W";CHR$(1), itisreleased
Compressed Printing
In compressed printing mode,10CPIischanged to17CPI.
Horizontal TABs and spaces are condensed, too. Designate compressed
or
printing with CHR$(15)
CHR$(18).
CHR$(27);CHR$(15), and releaseitwith
79
Page 84

IBM
Emulation
Mode
Notes:
• Compressed printingissuspendedinbit image modeoremphasized
printing mode. When the
printing restores.
• Compressed printingisavailable onlyinstandard font; the printer
ignores the code if itisin
DMP
132
exits either mode, compressed
correspondence font mode.
Data can be printed with up to
eight-inch paper.
Emphasized
In emphasized printing mode, the current characters are wider than
"normal" ones, thereby forming a sortofboldface. This emphasized
printing modeisestablished using control code,
cancelled by CHR$(27);"F".
Double-Strike
In double-strike printing mode, characters are printed once on the normal print line, and again with a small shift vertically. Start this mode by
using
CHR$(27);"G",
Printing
Printing
and cancel it by using CHR$(27);"H".
136
characters in a line when usmg
CHR$(27);"E"
and
Superscript/Subscript
You can print superscript and subscript charactersinIBM emulation
mode. These modes are useful for printing algebraic expressions. In superscript mode, a character prints on the upper halfofa normal character space, and in subscript mode, a characterisprinted on the lower
halfofa normal character space. Superscript modeisestablished by
CHR$(27);"S";CHR$(O), and subscript mode
CHR$(27);"S";CHR$(I);
both are cancelled by CHR$(27);"T".
is
established by
Underlining
In this mode, all characters, spaces, and the spaces moved by horizontal TABs (except bit image data and graphic symbols) are underlined.
This modeisestablishedbyCHR$(27);"-";CHR$(I).
underline mode, send the code sequence CHR$(27);"-";CHR$(O).
To
terminate the
80
Page 85

Bit
Image Mode
There
are four kindsofbit image modes in the
tical line
ticular horizontal
of
dot image consistsofeight-bit data. Each mode has its par-
dot
density, and its maximum number of bitsonone
lineisas follows:
Table
26.
Bit
DMP
Image Modes.
Chapter 8
132, and one ver-
Mode
60
DPI
bit image
DPI
120
120
240
60
DPI
Bit
In 60
DPI
code sequence
LPRINT
CHR$(dn)
nl
and n2 are the numbersofthe horizontal dot positions. Eachisa
single-byte binary number;
the upper
n2.
The
the dot
pattern
bit image
DPI
bit image (Normal speed)
DPI
bit image
Image Mode
bit image mode, horizontal dot (bit) densityis1/60 inch. The
of
CHR$
this mode
(27);
"K";
is:
CHR$
(n!)
i CHR$
nl
is
the lower partofthe value, and n2
partofthe value. Therefore, the actual value
total data number
(nl,
n2) should not exceed 816.
per vertical line andisa single-byte binary number.
Numberofbits/line
816 bits/line
1632 bits/line
1632 bits/line
3264 bits/line
(n2);
CHR$
(dD;
is
nl
+ 256 X
dl
to dn
...
Unlike Tandy mode, the dot patterns are numbered from bottom to
top.
;
is
is
81
Page 86

IBM
Emulation
128 •
64
32
16
8 •
4
2
1
Add
the numbersofthe
data
fordlthrough dn.
120
DPI
Bit
Mode
Image Mode
dot
patterns
you
wanttoprinttoobtain
the
In 120
The
The
In 120
DPI
code
LPRINT
CHR$Cdn)
total
120
DPI
DPI
120 inch,
but
the bitsonthe
or
ly,
damage
mode
is:
LPRINT
CHR$Cdn)
The
definition
"120
DPI
bit image
sequenceofthis
CHR$
data
number
Bit
Image Mode (Normal Speed)
bit image
and
the
to the
CHR$
Bit Image
mode,
(27)i"L"
(nl,
mode
dot
construction is
same
printer
(27)i"Y"
and
limitsofthis
Mode."
horizontal
mode
is:
i CHR$
n2) should
(normal
vertical position
could occur.
i CHR$
dot
Cni);CHR$
not
exceed 960.
speed),
the
same as 120
cannotbeprinted
The
Cn1)iCHR$
mode
are
(bit) densityis1/120 inch.
<n2)
the
i CHR$
dot
Cd1)
i
...
densityisalso
DPI
bit image,
continuous-
code sequenceofthis
Cn2);
CHR$
Cd1)
i
...
the
same
as described
i
1/
;
In
82
Page 87

240
DPI
Bit
Image Mode
In
240
DPI bit image mode, horizontal dot (bit) densityis11240
In this mode, the
DMP
132
does not print the bits on the same vertical
line continuously. The code sequence of this mode
Chapter 8
inch.
is:
LPRINT
CHR$(dn)
The total data number
CHR$
(27);
"2";
CHR$
(n!);
CHR$
(nl,
n2) should not exceed 1920.
(n2);
CHR$
(dU;
...
Other Control Codes
Paper
You can turn theFAUL
printer detects a paper end condition. By combining this function and
the override function, you can print the last printable line on a page
without a device fault on the external terminal.
The
end), and
paper end). .
Backspace
In this mode, the printer prints out the character thatisfollowedbya
control code CHR$(8) and moves the printing position to the left one
character space. This command
ters such
by
uses the width of the space code
End
Detection
T signal to the interface on or off when the
FAULT
signalisinhibitedbysending CHR$(27);"8" (ignore paper
is
enabled afterwardbysending CHR$(27);"9" (cancel ignore
is
useful for printing composite charac-
as
slashed zeroes. The distance of a backspaceisdetermined
the currently selected pitch.Ifproportional spacingison, the printer
as
the backspace distance.
;
83
Page 88

IBM
Emulation
Mode
Cancel
This command clears all data in the print buffer that was received be-
fore CHR$(24).
affected at all.
Other
control codes received before this code are not
Unidirectional
Usually, the
ing technique, but it allows you to print using a unidirectional printing
method to avoid slight vertical misalignment. This functionisuseful
printing charts, graphs, and so on.
Execute this function using
with CHR$(27);"U";CHR$(O).
When only a small numberofcharacters are required to print, printing
the other characters in bidirectional mode decreases the efficiency
the
DMP
the required characters in unidirectional mode. This codeiscancelled
by CHR$(13).
Printing
The code sequence CHR$(27);"A";CHR$(n) prints the character
assigned to code n when nisbelow
assigned to n, a space (20 hex) prints instead.
Printing
DMP
132
executes printing with a bidirectional logic-seek-
CHR$(27);"U";CHR$(1),
132. Use the home head code CHR$(27);" (" to print only
Characters
with
a Code Below20Hex
20
hex.Ifthereisno character
and cancel it
in
of
Bell
When the printer receives the code, CHR$(07), the printer buzzer
sounds for one second.
84
Page 89

Appendices
Page 90

Page 91

Character Sets A
Tandy Character Set Table
Upper
Bit
Lower
Bit
Hex.
a 0000
1 0001
2
3
4
5 0101
6
7
8 1000
9
A 1010
B
C 1100
D
E
F 1111
Hex.
Binary
0010
0011
0100
0110
0111
1001
1011
1101
1110
0000
BEL
BS
IF
FF
CR
SO
51
0
10
r-;-
12
13
14
Is
16
17
Is
[9
r;o
111
rn
Ii3
Ii4
r;s
1
0001 0010
SP
POS
116
I
OCt
r;7
OC2
liS
DO
#
119
OC4
$
120
% 5
121
&
rn
ETB
123
(
f24
I
125
SUB
*
125
F K
ESC
Iz7
FS
Fa
GS
119
RS
f30
US
[31
2 3
132
133
134
[35
Ii
137
138
139
r;
f"
f42
[43
f44
145
f46
f47
4
5 6
0011 0100 0101 0110 0111 1000
lu
0
t A 0 a Q
2
3 C
4 D
6 F
7 G
8
9 I Y
<
=
>
,
P p
r;
164
laO
r;
[65
Is1
B R b r
[65
I5Q
rs;-
f52
Is3
r;
[55
Is6
157
158
159
r;;o
161
162
f63
Ia2
S
167
Ia3
T d t
f68
Is4
E
U
[69
[85
V
rm
Ia6
W
[87
171
H X h x
rn
Is8
123
Is9
J Z
f74
197
I
f75
191
L
rJ6
192
]
M
rn
f93
A n
N
r;;-
178
-
0
f79
Ii
7 8 9 A B C D
196
rm
197
G13
r,;
f98
c s £
199
rm
r;oo
I1i6
e u
r101
r117
f v a e N
r;o;
G18
w
9
r;oo
r;;
r;o4
G2G
,
y
[105
rm
IF
Z
J
r;o;;
fill
,
,
k
r107
r123
I
r;oo
1124
r;o,
GW
f111
i
CR
rI15
r126
rrn
m
a
rm
G9
ri30
~
r;J2
rw
r;;;
r1i
ri36
G37
r;;a
r;39
r;4O
r141
r145
1146
1001
r;;
ri45
fM6
1147
r148
r;49
f150
f151
r152
j,53
Il54
fi55
fi56
G57
1158
rl59
1011 1100 1101 1110 1111
1010
¥
a
[160
rm
rm-
0
rna
U
rm
~
r;oo
G81
f182
a
[1i3
u a
r;;
[\
r;B5
TM
[186
e
f®
u
r;66
e
[Ii9
r;go
f
rm-
rm
f193
(
r;;
6 a
r;;
U
fi96
A
rm
r;98
,
r;99
1200
,
rw
6 6
r;o;
u u
Iz03
I i
rIDi
n
[205
a
[206
6 A
rmJ
a A e
G61
,
rw
r;63
r;;
I'
G65
r;66
..,
f167
t
r;63
§
r;;
I"
rm
©
rm
%
rm
3/
4
rm
'h
f1i4
~
rm
A'
'"
A
0
"
A
u
E
i
Eo
[208
r;;
rm
1m
rm
rm
rm
fill
1216
1m
rm
r;9
fllO
lUI
rm
rm
E F
rm
•
[225
•
rm
•
rm
•
rm
..
rm
.1
f2i
-
rru
-
-rm
I
rm
I
r;;
•
f235
"I
f2i
..
f237
..
I2:i8
•
rro
-
-L
,.
...
T
I-
I
L...
-,
--1
+
AI
[24D
r;1
Iz42
Iz43
r;;:;
r;5
f246
G47
I24B
f249
r;;o
f251
[252
"'Il
r;53
f254
f255
!
"#$%&'
(']A_'abcdefghijklmnopqrstuvwxyz{:}~
~
il<;£'}J
Qc!..01;:A•..
()
0
'1'§8etH
*+,
.........
-.
/0123456789:
'1¥1{tlO¢~li/jUj3~u~"
=,-,.,..1-1
;
<=>?~ABCDEFGHIJKLMNOPQRSTUVWXYZ
JAtHOQA
w...L-.l-+J"'
..........
~~616ui
nllO.falM.I2l(llD£A10
87
Page 92

Character Sets
Dot
Column Width
Standard Proportional Characters
Upper
Bit
Lower
Bit
Hex.
a
1
2
3
4 0100
5
6
7 0111
8
9
A
B
C
D
E
F
Hex.
Binary
0000
0001
0010
0011
0101
0110
1000
1001
1010
1011
1100
1101
1110
1111
1
0
0000 0001 0010 0011 0100 0101 0110
ro
r;-
f2
f3
[4
15
f6
[7
f6
f9
GO
\l1
fI2
[13
1M
[15
116
ru
r;s
[19
f20
f2l
rn
f23
124
f25
126
[27
[36
\29
r;o
[31
12
9
9
11
11
11
11
9
8
9
11
11
9
11 11
9
10 10
2 3 4
11
11
r;a
Ii2
9
11
r;
f33
11 11
[34
Gl
11
11
[35
f51
11
11 11 11 11
[36
f52
11
11
fJ7
f53
11
11
[38
Is4
11 11
[39
f55
11 11
f40
f56
11
[41
[57
9
11
f42
f58
9
11
[43
f59
10
11
[44
f60
11
[61
145
10
11
[46
162
11
[43
f63
5
11
f64
11
rss
11
[66
11
[67
168
11
f69
11
rro
11
f71
10
rn
9
11
f73
11
IJ4
9 9 9
f75
10 9 9
r;s
9
rn
9
rJ8
11
[79
rso
r;
Is'
f83
r;
f85
f85
f87
IsS
[89
r>J
f91
[97
f93
r;
f95
of
Tandy Characters
1001
r;44
f145
r;46
f147
r;;
[149
r;;o
f151
r;52
[153
r;54
f155
r;56
G57
[158
f159
A
1010
8
r;6O
11
f161
r;62
fI63
8 10
r;64
12 10
f165
9
r;66
9
fi67
12
f168
11
G69
12 12
rm
12
rm
12
rill
12
rm
f174
9
fill
1011 1100
11
11
11
11
11
11
11
11
11
11
10
6 7 8 9
0111 1000
8
11
196
rm
11 11
[97
11
[98
9
[99
r;oo
11 11
~
9
rw;-
11
f103
11
r;o:;
9
[W5
8
r;;
f107 f123
r;oo
11
fW9 f125
11
rm
11
G11
rrn
fill
fi29
10 9
r;3ii
G14
11 11 11 11 11
r115
rm
r;;6
fill
/J17
rm
11
r;;;
rm
11
f119
fG5
11
f120
rG6
11
rm
fi37
11
r;i
fill
G39
r;4O
rrn
9
f141
10 12
r;42
rrn
fill
f143
C
B
1101
11
11
.r;;,
rm
11
11
rm
rm
11
9
r;;
rrn
rm
G95
11 11
r;oo
[196
11
9
f181
f197
11
11
r;;
rm
11
9
f183
fI99
11
11
r;s;
FoG
9
9
[2D1
G85
11
11
r;86
f202
11
11
f187 f203 f219
10
9
[204
r;86
11
11
[105
f189
11
fI90
rm
11
1206
11
11
f207
9
D E
1110
12
1200
rrn
12 12
Ii09
rm
12
rm;
rm
12
f21i
rm
12
rm
rm
12
rm
rm
12
r;t
rna
12
rm
f231
12 12
rm
rm
12
rm
rrn
12 12
[234
rm
12 12
f235
12
rna
f236
12
rm
rw
12 12
rm
r2i8
12
rm
f2i
'--y---1
GRAPHICS
. 12
1111
12
12
12
12
12
12
12
12
12
F
r;;o
r;41
f242
Ii43
12M
f245
f"6
rw
f"8
f249
f2"i
~
r;52
f253
1254
f255
X
11
88
P:
11
- 6 i
12
11
Ij
I
9
11
9
Page 93

Correspondence Proportional Characters
Upper
Bit
Hex.
Lower
Bit
Hex.
Binary
0 0000
1
0001
2 0010
0011
3
4 0100
5
0101
0110
6
7
0111
8 1000
9
1001
A 1010
B
1011
C 1100
D
1101
E 1110
F
1111
M
X
23 23 24
0
0000
II
12
13
14
15
Ie
Is
19
-
1 2 3
0010
0001
ro
f7
rw
111
117
I1J
114
115
0
22
0011
21
24
132
116
117
r;a
liS
120
[21
rn
rn
124
f25
126
f27
126
Ii9
GO
IJ1
f48
13 20
Ii3
f48
17
21
rJ4
f50
21
23
Ii5
f51
21 21
136
152
23
21
137
f53
21
23
rJ8
154
13
21
139
155
20
21
140
156
21
16
141
157
13 19 22 16
22
142
158
22 13 23 13 23
143
159
13 19 22 23 20 13
144
rw
21
21
f45
161
13 19 24
f46
182
21
23
[47
I6J
I
i
I
20
13
4
5 6
0101
0100
21
22
[64
f80
23 23 22 23 22 23
f65
Ia1
23 23 22 22 23 20 23
23
f66
182
23 23 22 23
I6J
Is3
23 23 23
[64
f66
23 23
f69
Is5
23 23
rm
Ia6
24
23
rn
I6J
23 23
rn
188
18 23 20 23
rn
Ia9
fM
roo
175
f91
176
143
24 13
rn
193
19
176
f94
23 24 22
f96
f79
Ij
24
7 9
0110
0111
17
23
f96
f97
r;
199
21
r;oo
21
23
r;m
21
23
rw
24
23
G03
23 23 22 23 22 23 24
r;o;
r;o;
21
r;oo
21
G07
r;oo
16
24
r;og
21
23
G10
rJ11
f112
f113
~
rm
f116
G17
f118
f119
r;m
rm-
fill
fill
f124
rill"
rl26
rm
8
1000
rue
r;29
rT30
rm
rill
rG3
r;;;
rG5
rG6
rill
[Ii
rG9
r;4O
rw-
f142
r;43
1001
19
r;:;:;
G45
r;46 r;62
21
rw
17
r;:;a
23
f149
19
f150
17
r;s;
r;52
21
G53
21
r;;;
21
G55
19 23 13
r;56
G57
19
r;;
20
f159l
A
1010
23 22
G60
r;61
flli3
r;64
21
1165
[;66
rm
1168
f169
G70
rm
r;72
21
G73
G74
rill
B
C
1011
1100
rm
G92
21
r;93
1m
r;;
rm
23 22 22
f179
ri95
21
23 23
r;64
G96
16 19
r;B1
Ii97
21
22
[;66
G82
22
21
r;;
I1i3
r;;
r;oo
21
20
f185
rzm
24 22 23
[;66
f202
21
23
rw
1203
[204
r;88
21
23
r;89
1205
20 22
r;;;
1208"
21
22
[207
rm
Appendix A
D E F
1110
1208
rm
24
24
'ms
1209
24 24
r;o
f226
24
24
rm
1m
24 24
rm
rna
24 24
r;i3
rm
24 24
rrn
1230
24
r215
r231
24
rm
rw
24
r;i7
rm
24 24
me
rrn
24
rm
I2i5
24 24
r;i
rna
24
rm
rm
24
24
rm
I2i
24
1m
rm
GRAPHICS
1111
1240
r;41
rw
1243
r;;
[245
I24S
f247
1248
r;;
f2sQ
G51
f252
f253
1254
G55
1101
24 24 24
24
24
23 24
19 24
23 24
21
23 24
23
23
89
Page 94

Character Sets
IBM Character Set 1
Uppe,
Bit
Hex.
lower
Bit
Hex.
0
1 0001
2 0010
3 0011
4 0100
5
6 0110
7 0111
B 1000
9
A 1010
B
C
D
E 1110
F
Note:
21
are printed as
!"#$%&'
0 31
Binary
0000
NUL
0000
ro
[1
12
13
14
0101
15
f6
BEL
17
BS
Is
HT
1001
19
IF
rw
VI
1011
r;1
FF
1100
112
CR
1101
[13
SO
114
SI
1111
r;5
When using the
(H+,-./0123456789:
0001 0010
Sf
Ii6
I
[17
DC2
118
#
118
DC4
$
rm
% 5 E
121
&
III
rn
(
CAN
124
I
125
*
Ii6
ESC
+
rn
f28
-
129
Fa
131
2
Ii2
[33
134
Fs
f36
f37
r;8
139
f4D
141
f42
f43
144
f45
146
f47
.,
['JA_'&bcdefghijklmnopqrstuvwxyz<:)-
6.f61Jf1f1t~Qc!..~"1
...
ptxJ3r7trO'J..I1'i:2en&~E'n=_:>:sr
«»III-n
4
5 6
0011 0100
a
1 A
2
3 C
4 D T
6 F V
7
8 H x h x
9 I Y
<
~
>
7
0101 0110 0111 1000 1001
p
(u
f48
Is4
roo
Q
a
[49
[65
fBI
B R
roo
151
lsi
Is3
[54
G W
155
156
157
J Z j
156
K
f59
L
roo
M
f81
N
f62
a
[63
f66
167
[68
f69
rm
rn
rn
rn
174
[75
[76
rn
[76
f79
Ia2
S c
Ia3
Is4
U e
[65
f66
167
[68
f89
roo
[
f81
192
I
Ia3
[94
-
f95
b
d
9
m }
0
ESC';\'n
.,
oft,
• , !!,
I
~
ii"
i J1J J J 1
-;-::::0.
196
[97
198
199
r;oo
flOl
f
f102
fi03
r;o.;
,
r;os
r;os
k {
G07
I
r;oa
fiGS
n
r;o
rm-
command,
:<=>?~ABCDEFGHIJKLMNOPQRSTUVWXYZ
7
B
p a
G12
rrn
q
rm
rm
r
r;;o
fl14
s u
rm
f131
t
r;16
rm
u N
rm
rm
v a
r;;;
rm
w
BEL
r;35
rm
BS
r;36
f120
y
HT
rm
rm
l
IF
[Ii
rm
VI
fill
rrn
I
FF
,
r;4O
rrn
CR
rJ25
G41
SO
rl26
rJ42
~
[143
G27
DC2
DC4
CAN
ESC
9
r;44
[145
G46
rw
r;48
r;;
r;s;;
G51
r;s;
G53
r;54
rl55
[156
f157
r;sa
f159
1010
i
0
n
~
,
~
,
'/2
'14
I
«
»
A
1160
f161
rl62
r;63
r;;
G65
r;66
G67
[168
f169
rm
rm
rill"
rm
rrn
fl75
B
1011
1100 1101 1110 1111
~
Hi
rm
1-
::!:!
rm
T
i
•.
!'
C::::f17B
f-
I
f179
-j
-
r;;;
-j
+
G81
-j
f-
G82
,
f-
r;B3
,
~
r;;
~
-j
rm
.1
I
Fs8
,
T
f187
f-
-'
r;a;;
-
-'
r;89
-'
+
r;;
,
~
rm
codes 3, 4, 5, 6,
~
and §, respectively.
w....,r-t~~Lr-r1
-.[nJ_
~
f200
T
[209
T
rm
,-
rm
L_
rm
~
rm
~
f214
+
f215
+
rm
-'
fill
,
rm
• "
rm
-
rm
I
rm
I
rm
-
rm
E F
"
fl
I"
"
V
"
"
,
<P
H
II
x
0
c
n
C D
r;g,
[193
r;;
r;95
r;96
rm
r;98
~
1200
f201
Fo2
f203
1204
f205
r;oo
Iz07
19,20
I'
I I I LLrrtt-' r
I1i4
rm
rm
rm
rm
rm
f230
[231
rm
rro
[234
1235
1236
rm
r;;s
[i39
-
±
-
00
r
J
~
.
-
\
n
,
•
SP
and
r;;o
rw
f242
fi43
[i44
r;l5
[246
fW
[246
r;9
[250
f251
r;52
f253
r;;
f255
90
Page 95

Appendix A
IBM Character Set 2
Uppe,
Bit
Hex.
0
Lower
Bit
Hex.
Binary
0000
NUL
o 0000
1
4 0100 f4
5 0101"''---5 §
6 0110
7
8 1000
9
A 1010
10
0001
11
•
I 5
• & 6 F V f v a u a
f6
0111
BEL
r::-,
17
B5f8CAN
HT
1001
19
LF
r;o
8
1011
VI
f11
FF
1100
C
D
E
F
Note:
as
..
++§
V~XYZ[']A_'abcdefghijklmnopqrstuvwxyz{:}-CU~A~A~9~~~11lXA£~
~OtlOQ~Y~O¢£¥RJA160ffn~Q6~~i«»m.HI~iilltJ1JJJl
II I \ I
112
CR
1101
Ii3
50
1110
114
51
1111
f15
When using the
!!
and~,respectively.
1"#$%&'
LLrrHr
2 3 4
0001
0010
0011
SP
0
f16
132
f48
I 1 A Q a q u
IU
f33
~
DC4
$ 4 D T d
rw
f36
f51
e-
% 5
121
rn
rc:-
123
f24(f40
125
e-Ee-
137
153
f36
f54
r-
7 rc:- Gr-W
139 155
8
f56
l 9 I Y i
[41
f57
0100
0101
((/
f64
rGS
f68
U
\69
f70
171
H
rnxroo
rn
P
567
roo
f81
f84
,---
185
Ia6
r:::c
187
roo
0110
f96
G7
GOO
e
,---
1101
r;o,
9 = W
1103
h
[104
f105
* J Z j z e U
125
141
f56
Ii4
100
[i06
E5C
+ K [ k
rn
f43
[59
f75
Is1
192
193
[94
r;s
r;D7
[i06'rrn
r;o9
n
r;;o
rm
< L \ I I i £
128
144
roo
~
161
>N
162
[53
176
M I m
rn
178
O~o
178
f29
IJO
Ii1
-
f45
f'6
i 7
f47
ESC·/\.n command, codes19and 20 are printed
0*+,
-.
/0123456789:
~
rax~rXL~~TQeOO~€n=-->--<r
8 9
0111
1000
peE
f1l2
f12s
rm
rm
tao
f116
fill
U
,---
a
,---
1117
1133
r;;a
r;34
,---
I = U
1119 1135
x
r;2oer;36
yeO
rm
fill
rm
r;3i
Ii
rm
r;3i
fl40
Ii
r;25
fW
APt
f1i6
f142
A
fill
f143
i
<=>?~ABCDEFGHIJKLMNOPQRSTU
1001
f144
'"
r145
r;4i
6r-N
1149 1165
[150
r-
1151
Y
fI52
r;53
[154
¢ 'Iz
r;55
r;56
¥ i
r;57
r;56
f»)
[i59
ABC
1010
1011
a iil
fWJ"
,
[i76
i.....
r;61
::;;:
rm
n
-I
r;64
GOO
,---
-I
r-+r-
1181
-i
-
f166
1182
~=~
r-
1167 1183
i
[168
~
r;;;
r-
-i
r;;
r;;;
~
I
[170
G86
~
rm
r;a;
1/4
-..J
rm
G86
--'-102
rm
[189
(.......J+.
rrn
[190
-,l.-n
r;75
f19i
1100
L-
r;g,
1.
[193
- L
r;96
1197 1213
)-
r;;
I--
r-
1199
~
[200
r
[201
1.
r;o,
T •
[203
t-
r;;
f205
r;;i8
r;o,
D E F
1101
1110
.1
u _
r;;i8
T
11
f209
~
rm rm
r
,---
n
I
LI
1214
+= '
1215
+
1216
1>
--l
tI
rm rm
r-
()
1216
Il
[219
_ x n
rm
[W
E
rm
rm
LLrr-trrL~~
~~o._~n1.
rm
rm
,---
1229
r;;;
r-
1231
rw"
rn.;
I23s
f2i
rro
f2i
[239
1111
~
r
J,---
-
~
•
-
V
•
SP
[240
r;4",.
1244
245
1
r;m
e-
247
1
[248
f249
[250
r;s;
r;;;
Iz53
Ii54
[2s5
91
Page 96

Character Sets
Dot
Column Width
Standard Proportional Characters
UPP~:
Hex. 0
~1,w"
Hex.
Binary
0 0000
1 0001
2
0010
3 0011
4 0100
5 0101
6 0110
7 0111
8
1000
1001
9
A
1010
B
1011
C
1100
D
1101
E 1110
F
1111
II"
In
11
11
1
1
0000 0001 0010 0011 0100
[0
r;-
12
11
[3
11
14
11 11 11
15
11 11 11 11
[6
17
f8
f8
GO
~
rn
f13
ru
[15
-
12
1
[16
117
r;s
9
[19
9
f20
Iz1
rn
123
f24
[25
f26
f17
[2s
f29
130
[31
..
I '
9 I 8
2
12
[32
9 9
rJ3
9
134
11
[35
11
136
[37
[38
9
[39
8
f49
9
[41
11
142
11
143
9 10
[44
11
145
9 10
f49
10 10
[47
3
11
[48
f49
11
rso
11
151
11
Is2
11
f53
[54
11
155
11 11
156
11
[57
9
[58
9
f59
[6Q
11
lsi
162
[63
I,
11 11
9
4 5
0101
11
11
[80
1M
11
11
[65
~
11 11 11
f66
Is2
11
11
[67
[83
11 11
168
Ii4
11
11
[9s
Ia5
11
[70
[86
11
11
[67
f71
10
rn
168
11
9
[73
[89
11 11
f74
f90
11
9 9 9
175
f91
11
10
[76
[92
11
9
rn
193
11
9
I7B
f94
11
11
[79
[95
ij
K
of
IBM Characters
7
6
0110 0111 1000
11
[96
f112
11
197
rm
10
r;
~
11
[9s
f115
11
GOO
rm
11 11 11
[101
rm
11
G02
G18
11
rw;
f119
11 11
r;;
rrn
11
[105
rm
11 11 11
GOO
rm
r;o,
/ill
9
[100
fl24
9 9
r;;
rill
10
f110
rm
[111
rm
11
11
11
11
11
11
9
11
9
9
11
8
11
9
11
11
9
11
11
9
8
9
11
11
11 11
8 9
f128
rm
f130
f131
rm
rm
[i34
fii
f136
rw
fii
r;i
[140
f141
G42
[143
A
1001
1010
11
11
[16Q
r;44
11
9
f145
rw
11
11
f146
G62
11
11
rw
\163
11
11
r;;
f146
11
f149
rl65
11 11
[166
f150
11
11
f151
f167
11
10 12 12 12 10
[166
f152
11
11
G53
f169
11
r;;;
rm
10
11
G55
fi71
11
11
r;;;;
fill
11
9 12 12 12
G57
rm
11 11
1158
rrn
10
11
[159
f175
B C D E F
1011
1100 1101 1110
12
12
rrn
12 12
~
12
12
f178
12 12 12
rrn
12
12
f180
12
12
G81
12
12
f182
12 12 12
[1i3
r;;
12
12
[185
12 12 12
[166
12
12
r;a;
12 12
[liB
f146
12 12 12 10
r;;;
12 12
[191
fl92
r®
r;;
G95
f196
rm
[198
[199
roo
I2D1
rm;
f203
[2M
1205
[200
f207
12
[200
12
[200
12
rm
f211
12
rill
12
rm
12 12
f214
rill
rm
12
rw
rm
12
rm
12
rm
rw
rm
12
rm
11
11
10
11
10
11
11
11
11
11
11
11
10
GRAPHICS
rrn
[22s
f226
rm
rm
rm
1230
f231
I2i2
1233
r;;;
f2i5
i2i
rw
I2i
I2i9
1111
11
f"D
11
r;1
10
[242
10
[243
12
f244
12
rM5
11
[246
11
rw
9
[24B
9
f249
9
[25Q
11
r;51
9
f252
8
f253
9
r;;
12
fi55
92
Page 97

Correspondence Proportional Characters
Upper
Bit
Lower
Bit
Hex.
0 0000
1
2
3
4 0100
5
6
7
8 1000
9
A 1010
B
C
D
E 1110
F
i1l
19
Hex.
8inary
0001
0010
0011
0101
0110
0111
1001
1011
1100
1101
1111
P
23 24
1
0
0001
0000
10
Il6
r;-
f1i
r;-
Il6
24 19
f3
G9
24
20
14
rw
24
21
[21
f5
24 23
f5
122
r;-
f23
IS
f24
f9
f25
liD
126
[27
f11
[12
126
[29
f13
114
roo
[31
115
..
-
20
4 7
3 5
2
0011
0010
24
13
17
23
21 21
23
13
20
16
22
22 13 23 13 23
13 19
21 21
13 19 24 19 23
23
19
0100
21
21
132
148
f64
20 23 23
133
f49
f65
21
23
134
150
166
21
23
f35
f51
f67
23 23 23
Ii
f52
166
21
23 23
f37
153
f69
21
23 23
r;4
Ii
f39
140
j41
142
r43
f44
f4s
loS
f47
rm
21
23 24 23 24 22 23 23 24 24 24
[55
171
21
23 23 23 23
Is6
rn
21
18 23 20 23
f57
f73
13
19 22 16
Is6
174
159 175
22
roo
176
24
f51
rn
Ia2
f78
21
23
[63
f25
ij
I
13
24
6 8
0101
0110
0111
17
22
23
23
IsO
f81
Ia2
196
22
f97
23 22
196
22
23 23 23 22
23
23
f83 f99
21
r;oo
f84
21
23 22 22
f85
f101
21
23 22 23 23 24
r;oo
166
Ia7
f103
r;;
Ia8
f69
fi05
rm
21
r;oo
roo
21
191
Ii07
23 20 13 20
r;oo
192
24
13
24
193
f109
f84
GW
22 23
f85
1m
16 20 23 13
21
X
23
A B C D E F
9
1000
1001
1010
rm
fill
G14
rm
rm
rm
r;;s
r1i9
rm
rm
rm
rrn
rm
rm
rm
r;;
1128
23 24 20
rm
21
fGO
22 22 23 24 24
f131
22 22 23
fill
fG3
1134
f1i5
21
Gi
21
fill
21
r;i
21
rrn
[140
f141
23 24 22
f142
r;43
G60
f145
f161
24 22 24 24 24
r;:;s
r;62
f147
f163
r;;
r;54
24 24
r;;
f165
r;5o
[166
rJ51
f167
21
23
f152
f168
23 24 24 24 24
r;69
r;53
24 24 24 24
23
r;;
rm
21
23 24 24 24
r;55
rm
21
23 24
[1s6
fill
f157
rm
f168
rrn
21
22 24
r;5s
rm
Appendix A
1011
1100
24
24
rm:
f192
24
24 24
fill
f19i
r;g:;
f178
[195
rm
24
24
r;so
r;96
24
G81
1197
24
[198
r;B1
r;;
f183
24
24 24
r;g:;
f100
r;m
r;B5
r;B6
1202
r;a;
r;D3
24
r;;
r;sa
24
24
[205
r;B9
24 24 24
r;;;
r;oo
24
r;g,
f207
v
GRAPHICS
1101
24
24
24
24
24
24
24
24
[208
Fo9
f210
rm
f2i2
r;u
1214
rm
rm
fro
r;18
rm
rm
rm
rm
1m
1110
24
1224
21
rm
19
1226
23
rm
17
rna
20
rm
23
1230
19
rru
23 19
1232
19
rm
23
[234
21
Ii35
23
Ii35
23
rw
18
I2i8
19
[2i
1111
24
r;;
24
rw
24
IW
24
l243
24
f244
24
r;45
23
[246
24
f247
[246
13
f249
13
1250
24
r;51
18
f252
15
[153
17
r;;
24
f156
93
Page 98

Character Sets
International Character Table in Tandy
n
Country
ASCII Code
(23)H
35
(24lH
36
64
(40lH
(5B)H [
91
(5C)H
92
(5D)H
93
(5E)H
94
96
(60lH
126
(7B)H
(7C)H
(7D)H
(7EjH
123
124
125
32
33
(21)H (22)H (23)H
(20)H
U.S.A.
Germany
#
#
$
$
§
@
A
6 g
\
0
1
, , ,
a e
{
I
6 U
I
(j
)
-
IS
34
35
36
37
(24)H (25)H
France
Norway
Sweden
Denmark
£
#
# # #
$ D
$
D
a 0 E E
0
§
A: A
0
A A
A
(j
re
l3
6
0 0
e
a
6
A: A
0
A A
e
re
l3
e a a a a e
..
(j
a
(j
38
Finland
D
@
6
,
a
6
- 1
39
40
(27)H
(28)H (29)H(26)H (2A)H
Italy
Spain
£ £
$
$ $ $
§
§
0
i
g N
e
L
, , , ,
u
0
a
0 Ii
g
-
Mode
41
42
England
Belgium
£
#
@
a
[
\
]
{ e
I
I
) e
- -
0
g
§
ij
94
U.S.A.
Germany
France
Norway
Sweden
Denmark
Finland
Italy
Spain
England
Belgium
#$@[
\.)
A_
<:
}_
#$§xtJo
A -
l:HjU~
f$A°c§A-€!i)E;"
#~O..mAXUI2~a.M
#~EXtJAO€!Mtla.U
#$E..mAO€!I2~a.U
#~@
XtJAA'Mtla.-
f$§OC€lAi)AOE;!
f$§j1t~A_Of1C
f$@[ \.)
A_
<:}-
#$AOC§A_€!:ljE;-
Page 99

Tandy Control Codes
Dec.
Code
0
I
Hex
((XI)
(01)
Symbol
NUL
SOH
DP
Mode
Ignored Ignored Ignored
Control Codes
WP
Mode 81 Mode
B
Remarks
(07)
7
X
11
III
or
I3X
12
1.1
or or CR only or plus only or plus only or plus
141
14
I)
IX
IlJ
20
27
n
27
10
27
14
BEL
Sound huzzer Sound huzzer
Dot
(OX)
BS
11
(OA)
or
LF
(XA)
(OC)
FF
(00)
(XD)
(OE)
SO
(OF)
SI
(
12)
Del
(
1.1)
DO
(14)
DC4 SelectWPMode Ignored Ignored
(IB)
ESC
11
(IB) ESC
(OA)
LF
(lB)
ESC
(OE)
SO
column
backspace
11:
dot numher
Execute LF accord-
ing
to latched
information font
Form Feed Form Feed Form Feed
Carriage Return Carriage Return Carriage Return
Line Feed Line Feed
End Underline End Underline
Start Underline Start Underline Ignored
Select Graphics Mode
Ignored Select DP Mode. Ignored
Microspacing Microspacing Ignored
1/6"
Reverse
Set
Start Elongation Start Elongation Start Elongation
Dot column Ignored
hackspace Receive fl as
11:
dot numher character data
1/6"
LF 7172"LF
1/12"LFin
Select Graphics Mode Ignored
Perform
LF
Reverse
Micro Receive
1/6"
LF
Sound hUller
print data
Line
Feed
Ignored
Ignored
L1Xasa
I
:'Sn::s255
Page
length
selectahle
DIP switch selects
CRorCR+LF.
2nd hyte
column numher.
ISnsY
is
is
dot
27
(IB) ESC
I)
(OF)
End Elongation End ElongatIOn End Elongation
51
95
Page 100

Character Sets
Dec.
27
16
nJ
n:.
27
17
27
IH
27
1'1
27
211
27
21
27
22
27
2.1
27
26
27
2H
27
29
27
.'0
27
:1
Code
I
Hex
(IB)
(10)
(IB)
(II)
(IB)
(
12)
(IB)
(13)
(IB)
(
14)
(IB)
(I:;)
(IB)
(16)
(IB)
(
17)
(IB)
(IA)
(IB)
(IC)
(IB)
(I D)
(IB)
(IE)
(IB)
([F)
Symbol
DPMode
WPMode
BIMode
ESC
POS
Positioning Positioning Positioning position from home
III
l1:o.
Select NLQ Select NLQ
ESC
Proportional Proportional Ignored
DCI
Character
ESC
Select
NLQ
Character
DC2
ESC
Select Standard
Character
DC.'
ESC
Select Condensed Select Condensed
Character
DC4
ESC
Set onlyCRfor
CRCode
NAK
ESC
SYN
ESC
FTB
ESC
SUB
ESC
ESC
ESC
ESC
CR
and LF for SetCRand
Set
CR
Code
Select
Compressed
Perform
Set 1/21.1' Perform 1/21.1'
FS
Select NLQ Select NLQ
Compressed
CiS
Select
Reverse
RS
Character
I/H
Character
1/12"
1.1'
Select Bold Select Bold
Character Character
LIS
Character
Select
NLQ
Character
Select Standard
Character
Character
Set only
CR
Code
CR
Code
Select
Compressed
1.1'
Perform1mLF Perform
Compressed
Perform
Reverse
Ignored
Ignored
Ignored
CR
for Set onlyCRfor Reset DIPSwitch
CR
Code
LFfor
Character
Character
1112"
1.1'
SetCRand
CR
Ignored
I!!llofcd
Igmlrcd
IgJ1()fcd
Code
1.1'
lor
I/H
[T
Ignored
Remarks
fl
t
fl:'
indicate
dot
position
III
CPI
III
CPI
17
CPI
1-7.
Reset DIPSwiteh
1-7.
CPI
12
1/4H
Inch
11I21nch
12
CPI
Invalidincondensed,
micf()font. superscript
96
 Loading...