

Page 1
TANDY
Dot-Matrix
OPERATIO.':\1
Printer
DMP-130
A1\'('
('\T'l
AI.
2tj-l~)
Page 2

Page 3
TERMS
AND
CONDITIONSOFSALE
AND
SOFTWARE
CENTERS
CUSTOMER
A
ft
LIMITED
A
o
lit,
LIMITATIONOFLIABILITY
A
IV
SOFTWARE
RADIO
following
A
B
o
G
APPLICABfLlTYOFWARRANTY
A
Vf
STATE
The
which
OBLIGATIONS
CUSTOMER
mcluded
and
CUSTOMER
and
Foraperiodofninety
Equipment
storedISfree
customer
their
Software
period.
Radio
agreement
by
obligationtoreplaceorrepair
RADIO
In
the
Radio
Computer
document
Exceptasprovided
natureonbehalfofRADIO
EXCEPTASPROVIDED
MERCHANTABILITYDRFITNESS
WRITTEN
Some
CUSTOMER
EXCEPTASPROVIDED
OTHER
OIRECTLYORfNDlRECTLYBY"EQUfPMENT"OR"SOFTWARE"
INCLUOING,
CONSEQUENTIAL
EVENT
OAMAGES
THE
NOTWfTHSTANDING
INCURREDBYCUSTOMEROROTHERS
"EQUIPMENT"DR"SOFTWARE"
RADIO
No
(2)
the
Some
exclusion(s)
Exceptasotherwise
Titletothe
but
CUSTOMER
permits
CUSTOMER
specil'ically
CUSTOMERispermittedtomake
are
made
own
CUSTOMER
Software
receiving
All
The
Equipment
a
The
licensorofthe
warranties
assumes
with
other
Software
WARRANTIES
authorized
has
the
Shack
repair.
SHACK
this
paragraph
eventofa
Shack
statesdonot
PERSONORENTITY
SHALL
SALE,
SHACK
action
years
after
EquipmentorSoffware
statesdonot
LICENSE
SHACK
provisions:
not
titletothe
this
requiredinthe
However
use
for
copiesofthe
copyright
terms
third
party
limitationsofliability
LAW
RfGHTS
vary
from
fUll
the
Equipmentorlicensed
requirementsofCUSTOMER
assumeS
full
arefofuncfion
AND
RADIO
SHACK
from
manufactUllng
from
Radio
locaftons
been
subfectedtoImproperorabnormal
defecHve
Equipment
franch',seeora
The
original
replacemenlorrefundofthe
makesnowarrantyasto
Softwareislicensedonan
Software
sales
document
Center.aRadio
hereinnoemployee
LIMITED
WARRANTIESHTFORTH
ailow
BUT
NOT
OAMAGES
RAOIO
ARISING
OUTOFANY
LEASE,
LICENSE,
THE
shall
notbeliable
arising
outofany
the
causeofaction
allow
may
not
applytoCUSTOMER
grantstoCUSTOMERanon·excluslve
providedinthiS
mediumonwhich
Software
may
use
Softwareonone
function
shall
not
providedmth',s
operafionofone
for
TRSDOS
may
resellordlstnbute
each
one
nofices
shallberetainedonall
and
condifionsofthis
and/or
Software
for
leasetoCUSTOMER
Software
granfed
herein
statetostate
PURCHASED
RETAIL
STORES
responsibility
responsibility
CONDITIONSOFSALE
(90)
warrantstofhe
Shack
CUSTOMERSsole
manufactunng
Shack
SHACK
HEREIN,
HEREIN,
L1MITEO
SHACKBELIABLE
ABOVE
use
Software
soldordistnbuted
Software
licensetoCUSTOMERortoatransaction
and
and
give
thaf
separately
for
and
for
ItS
installation
calendar
days
detects
company·ownedcomputer
The
warrantyISvOidIfthe
mustbereturnedtoa
participating
purchase
expendable
Items
the
defecl.ISItS
received
upon
retail
storeaparticipating
agenl
RADIO
SHACK
FORAPARTICULAR
limitationsonhow
RADIO
WITH
RESULTING
USEORANTICIPATED
claimed
whichever
the
make,
Software
any
SHACK
RESPECTTOANY
TO,
ANY
INTERRUPTIONOFSERVICE,
FROM
BREACHOFTHfS
LIMITATIONS
SHALL
INVOLVED
for
any
damages
breachofthis
has
accruedormore
first
limitationorexclusion01Incidentaiorconsequential
Software
the
SoftwareISrecorded
host
manufactureorreproduce
License
additional
computer
CUSTOMERISpermittedtomakealimited
unmodified
from
CUSTOMER
Warranty
Warranty
provisions
manufacturerofthe
the
original
AND
LICENSEOFTANDY
FROM
RADIO
SHACK
AND
RADIO
SHACK
AUTHORIZED
LIMITED
this
the
from
ollginal
This
Radio
and
design.
licenseofthe
occurs
computer
copiesofthe
The
copiesofthe
are
CUSTOMER
WARRANTY
computer
(the
"Software')meets
condiHon
and
the
dateofthe
CUSTOMER
warranfyisonly
Equlpment"s
useIfa
RadiO
Shack
dealer
exclUSive
remedymthe
pnce.atRADIO
capability.
'AS
IS"
baSIS,
repairorreplacement
franchisee
MAKESNOEXPRESS
PURPOSEfSLIMITEDINITS
HEREIN
longanimplied
SHALL
LIABILITY,
THE
USEOROPERATIONOFTHE
FOR
LOSSOFPROFITS,DRANY
WARRANTYORIN
USEOFTHE
ANO
WARRANTIES,
NOT
EXCEED
causedbydelayindeliveringorfurnishing
Warrantyortransactions
than
paid·up
license
applicable
(cassette
and
Customerisexpressly
with
the
Software,
copiesotthe
provIsionsofthiS
Software
applicableasbetween
herem
EqUipment
specific
COMPANY·OWNED
FRANCHISEESDRDEALERSATTHEIR
LOCATIONS
hardware
purchased
ettectivenessofthe
Radio
Shack
that
the
Equlpmenf
applicabletopurchasesofTandy
centers,
retail
stores,
caseorcabinet
manufacturing
Shack
Computer
for
repair,
eventofa
SHACKSelection
capacity,orsuitability
Without
warranfy
Software.
The
Radio
dealerorother
HAVENOLIABILITYORRESPONSIBILITYTOCUSTOMERORANY
lour
licensetouse
access
Software
shall
defective
Shack
franchiseeorRadio
WARRANTIES,
warranfy
LOSSOROAMAGE
SOLO,
LEASEO,
LOSSOFBUSINESSORANTICIPATORY
ANY
"EQUIPMENT"OR"SOFTWARE,"
RADIO
THE
AMOUNT
(4)
years
the
copyright
and/or
diskette)orstored
that
Software
copiesofSoftware
prohibited
only
for
but
onlytothe
Software
provided
Software
RADIO
whereby
inuretothe
soldbyRadiO
legal
rights
COMPUTER
EQUIPMENT
COMPUTER
(the
Equipment"),
the
speclficaHons.
operaHng
sales
documenf
and
the
and
Radio
has
defectisdiscovered
Center.aRadio
along
withacopyofthe
defectISlimitedtothe
and
for
useofthe
The
original
Within
thirty
Software
personisauthorizedtogive
DURATIONTOTHE
lastssothe
CAUSEOORALLEGEDTOBE
LICENSEDORFURNISHEOBYRAOIO
"EQUIPMENT"OR"SOFTWARE,"INNO
INOIRECT,
MANNER
ARISING
SHACK'S
LIABILITY
PAIDBYCUSTOMER
under
this
Warranty
after
the
dateofthe
damages.sothe
TANDY
Softwareonone
laws
shall
applytothe
through
except
from
disassembling
backuporarchival
extent
the
numberofadditional
CUSTOMER
License
shall
SHACK
and
RadiO
Shack
benefitofRADIO
Shack
and
the
original
and
capaclfy.
enwonmentinwhich
received
medium
upon
Equipmentbythe
Shack
franchisees
been
opened.orif
during
Shack
retail
sales
sole
expense
Software.
CUSTOMER'S
(30)
calendar
daysofthe
shallbereturnedtoa
Shack
dealer
AND
ANY
IMPLIED
above
limitation(s)
SPECIAL,ORCONSEQUENTIAL
OUTOFDR
HEREUNDER
FOR
Equipment
and,or
maybebrought
RadiO
Shack
computer.
Software
(ROM)IStransferredtoCUSTOMER
oneormore
terminalsiffhe
for
useonone
the
Software
purposesorif
Software
allowsabackup
copies
has
purchased
alsobeapplicabletothird
CUSTOMERtoeitherasaleofthe
sellsorconveys
SHACK.
the
CUSTOMER
any
copiesofsoffware
capabilities.
correcHonofthe
versatility.
the
Equipment
upon
purchaseofthe
which
the
Software
original
and
dealers
the
Equipment
the
stated
store,aparHcipatmg
RADIO
exclusive
any
above
author.
may
warranty
documentorlease
exceptasprovided
along
DURATIDNOFTHE
may
CONNECTED
THE
sales
computer
such
defect
SHACK
has
remedy.
dateofthe
Radio
Shack
with
the
warrantiesofany
WARRANTY
not
apply
CAUSEO
SHACK,
PROFITS
WITH
FOR
DAMAGES
PARTICULAR
Software
more
than
document
IlmitaHon(s)
subjecttothe
Software
andasIS
additional
copies
copytobe
for
CUSTOMER'S
one
copyofthe
parties
Equipment
owner
and
have
other
rights
12/84
sales
OF
OR
two
for
is
at
or
no
m
to
or
to
or
Page 4
The
This
equipment
properly,
interferencetoradio and television reception
device in accordance
are designedtoprovide
installation, However, there is no guarantee that interference
installation.
be
correct
If necessary,
for
Communications
ence Problems,
DC
that
!t
has been
If
this
equipment
determinedbyturning
the
interference by oneormoreofthe
• Reorient the receiving antenna
• Relocate the
•
Move
• Plug the
different
additional
This
bookletisavailable
20402, Stock No. 004-000-00345-4,
FCC
generates and uses radio
is, in strict accordance
tYre
tested and
with
computer
the
computer
computer
branch circuits
you
should
suggestions, You
Commission
VVants
foundtocomply
the specifications in
reasonable protection against such interference in a residential
does cause interference to radio or television reception,
the
equipment
with
away
intoadifferent
consult
the dealeroran experienced radio/television technician
may
helpful:
from
You to
frequency
with
the
manufacturer's
with
SubpartJof
off
and
on, the user is encouragedtotry
following
respecttothe receiver
from
the receiver
outlet
so that
find
the
following
HowtoIdentify
the US
Government
energy. If
the
booklet preparedbythe Federal
and Resolve Radio-TV Interfer-
Warning
This
equipment
device,
pursuanttoSubpartJof
output
devices, terminals, printers, etc.) certifiedtocomply
be attachedtothis
in
interference
has been certifiedtocomply
computer,
to radio and TV reception
Part 15ofFCC
Operation
with
with
the
Rules, Only
non-certified
limits
Knovv
not
instruction,itmay
limits
for
a Class B
Part 15ofFCC
will
not
measures:
computer
Printing
for
a Class B
peripherals
with
the Class B
peripherals
...
installed and used
occurina particular
and receiver are on
Office,
(computer
is likelytoresult
cause
computing
Rules,
which
which
can
Washington,
computing
input!
limits
may
to
IBM
IS a registered
trademarkofInternational
Business Machines, Corp.
Dot-Matrix Printer DMP-130 Operation Mannal
© 1985 Tandy Corporation
All Rights Reserved.
Reproductionoruse, without express
mission from
of
any
reasonable efforts have
Tandy
portionofthis
Corporation
manualisprohibited.
been
takeninthe
tionofthis manual to assure its accuracy,
Corporation
errorsoromissionsinthis
of
the information
assumes no liability resulting from any
manual,orfrom
contained
10
9 8 7 6 5 4 3 2
herein,
and/or
written
its licensor,
While
prepara-
Tandy
the
per-
use
Page 5
Contents
Introduction 0
1 Description
2 Setting up
Paper
Tractor
Power
Paper
Ribbon
Print
Margin-set
Print
Self-test
Computer
Power-up
3 Using
Control
Sending control codes from
Data
Word
Graphics Inode 00..................
Print
rack
feed
source
loading
cassette 17
head
function
00
sequence
the
codes
processing mode 27
processing mode 27
mode selection 28
••
000
•••••••
of
the
unit
0000.0.0.0000
the
DMP-130 3
••
0.0
••••0••
0.....
DMP-130 9
00....................
00
••..•••.•.••.•0
~
o
••••
oooo
000
••••••
0........... 10
•••00..••0...... 11
oo.o••o
•••o••
o.o.
10
11
adjustment lever 18
switches 19
(DIP)
switches 19
0...............................
21
connections 22
..
00
00.....................
23
DMP-130 25
..
00.................................
BASiC........
26
26
28
1
4
Print
font styles
and
character
widths 31
Selecting character styles 31
Standard
Correspondence quality
characters 32
characters 33
Page 6
5
Proportionally spaced characters 33
Graphics characters
Right
l'l'rap-ar()UI'IO
Elongated
Bold characters
Itali
Superscript
Microfont
General
Line
justification 35
•
.0••0.000
••
000
••••0••
00.0.0.0.........
('haracters 37
00
cs
0 • 0••0••0
and
•••••••••
It
••••
0 • 0 • 0 0
••••
subscript 38
00
•••
000
••••••••
0 0
•••
0 • 0 • 0 0
••
0 • 0 0 • • • • • • • 38
00..................................
control codes 41
feed
codes (LF) 41
00
Special line feed codes 42
Carriage
Backspace
return
.0
Setting top-of-form
Form
Entering
Ignored
DMP-130
Hex
feed
(FF) ..
IBM
or
undefined codes 46
buffer
print mode
IBM character set
(CR) 42
•••••
0
••••
,.
00••000.0.0.
and
form length
0••00
•••It0••0.....
•......
0
•••••••••
0000
•••••••
mode
operation
...
oOC!loeeoeoe
••••••
o••aooeooooo
••
00..
00
e 49
34
~<
..YU
37
39
43
45
45
46
47
49
6 Word
Repeat
Underline
Print
Left
Skip perforation 0
Bidirectional
International
and
data
printing 0
printing
head
and
positioning 52
right margins
and
characters
processing
00...................
0....................
unidirectional
modes
printing..
0........
0........
51
51
51
55
56
56
57
Page 7
7 Graphics
Printing graphics
Line
Repeat
feed
Leaving graphics
Freehalld
8
IBM
Carriage retllrll
elTIulation
Vertical formatting control codes 68
Horizontal formatting control
Printing
Other
control codes 76
Appendices
Inode
patterns
G........................
fllnctioll 63
mode
(Irawillg 64
mode
codes
mode
control
59
61
63
64
67
67
70
71
A Character sets
Tandy
Dot-column width
IBM
IBM
Dot-{~ohlmn
B Control
Tandy
IBM control codes 93
C
Character
character
character
cllar~lcter
width
codes
control
category
D ProgranllTIing
Programming
E
Care
Gelleral
and
ITIaintenance
.0••0••0••0.0••000••0
set table
of
Tandy
set 1
set 2
of
IBM
{~odes
priority
infonnation
examples
dlaracters
duuacters
••••••••••
table
00.0.0000
81
81
82
DO.
84
85
86
89
89
101
107
lOS
111
••
0.0
111
Page 8
If
you
have
problems
112
Specifications
F
G
Interlaces
Schematic Diagrams
113
.0
ctO
0 0
•••
0.0000000000000000000.
117
Page 9
Introduction
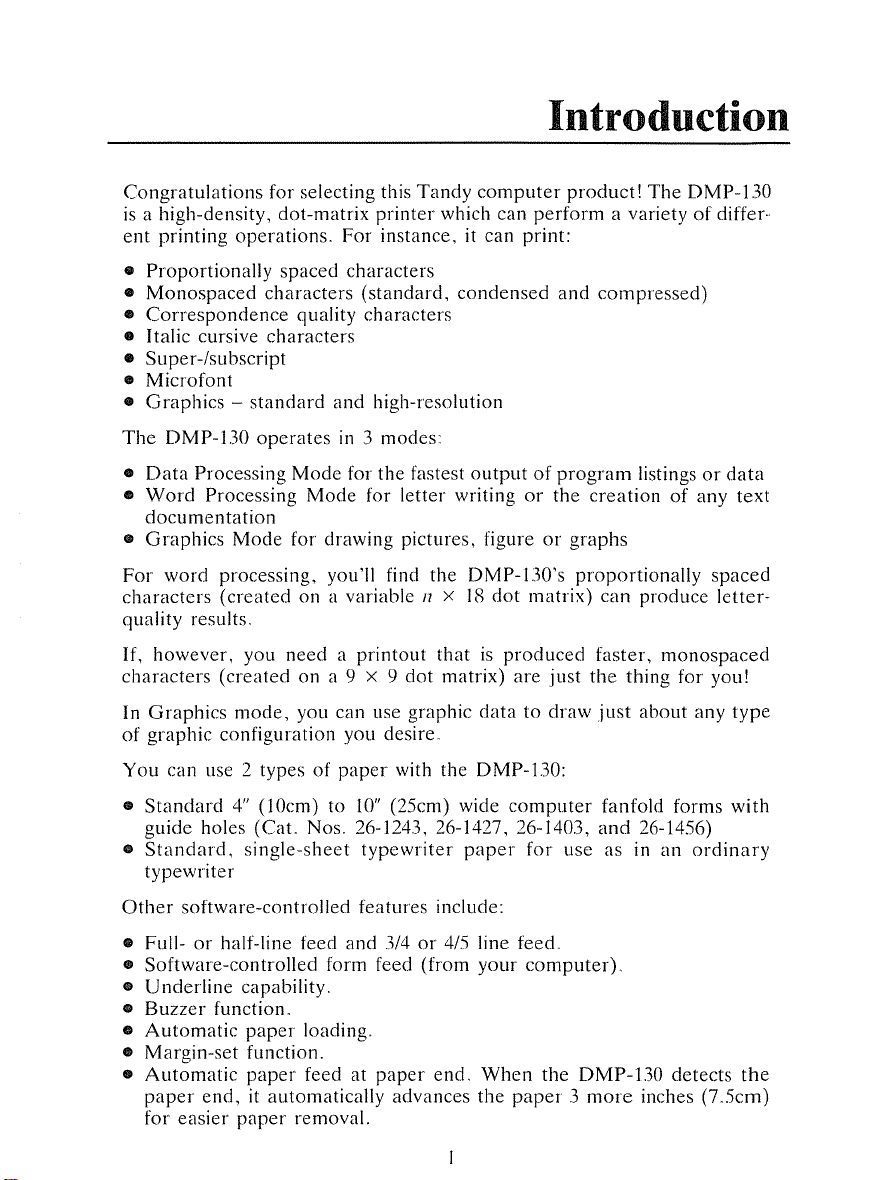
Congratulations
is
a high-density, dot-matrix
ent
printing
•
Proportionally
•
Monospaced
•
Correspondence
• Italic cursive
• Super-/subscript
• Microfont
•
Graphics
The
DMP-l.30
•
Data
Processing
•
Word
documentation
•
Graphics
For
characters
quality results.
If,
characters
In
of
You can use 2 types
Processing
word
however, you
Graphics
graphic configuration you desire.
for selecting this
printer
operations.
spaced characters
characters
characters
standard
operates
Mode
processing, you'll find the DMP-130's
(created
(created
mode,
For instance, it can print:
(standard,
quality characters
and
high-resolution
in.3modes:
Mode
for the fastest
Mode
for letter writingorthe
for drawing pictures, figureorgraphs
on a variable
needaprintout
on a 9 x 9 dot matrix)
you can use graphic
of
paper
Tandy
with the DMP-130:
computer
which can
condensed
outputofprogram
11
x
18
thatisproduced
perform
dot
matrix) can produce
are
datatodraw
product!
and
proportionally
just
The
a varietyofdiffer·
compressed)
listingsordata
creationofany text
faster,
the
just
monospaced
thing for you!
about
DMP-130
spaced
letter-
any
type
•
Standard4"(IOcm) to
guide holes (CaL
•
Standard,
typewriter
Other
software-controlled features include:
• Full-orhalf-line feed and
Software-controlled form feed (from your
e
•
Underline
•
Buzzer
•
Automatic
• Margin-set function.
•
Automatic
paper
for
easier
single-sheet
capability.
function.
paper
paper
end,
it automatically advances the
paper
removal.
10"
(25cm) wide
Nos.
26-1243,26-1427,26-1403,
typewriter
.3/4or4/5 line feed.
loading.
feedatpaper
end.
computer
paper
When
paper.3more
fanfold forms with
and
26-1456)
for
use as in an
computer).
the DMP-130 detects
inches (7.5cm)
ordinary
the
Page 10

Page 11
Description
of
the
DMP-130 1
Carefully
paper
ever
It's
and
unpack
rack.
Keep
needtotransport
importanttobecome
begin using it.
the
the
DMP-130,
empty
box
the
Printer.
familiar with
being
and
packing
the
suretolocate
material
DMP-130
the
just
before
ribbon
in case you
you
and
set it
the
up
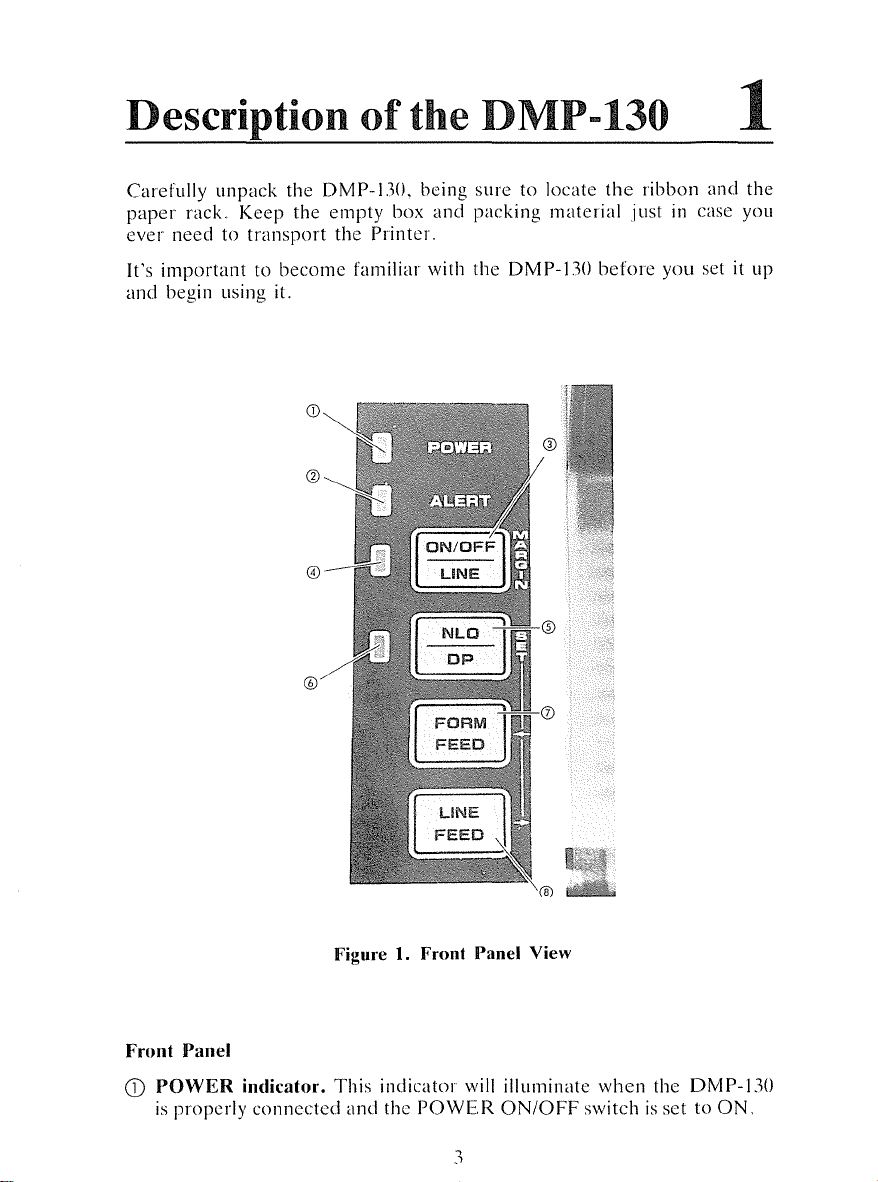
Front Panel
CD
POWER
is
properly
indicator.
connected
Figure 1. Front Panel View
This
and
indicator
the
will
POWER
3
illuminate
ON/OFF
when
the
DMP-130
switchissettoON.
Page 12
Descriptionofthe
Q)
ALERT
paper
In this case.
DMP-130
indicator. This lamp will light when the
the
buzzer sounds for I second. Load
LINE
switch. It flickers when
electrical problem.
Printer
enters
more
the
OFF-LINE
paper
and press the
thereisa carriage faultorsome
Printerisout
state
and
ON/OFF
sort
of
the
of
ModelIIusers,'
Printer
error,
the entire contentsofthe print buffer will be printed starting with
current
Note:
print head position.
To
WhenaBASIC
type
print
the
CONT
and press
remaining
program
IENTER\
datainthe
stops execution becauseofa
to resume printing.
buffer when
the
However,
ON/OFF
the
LINE
switchispressed to stop the printing, first, cancel the printing process
using your
the DMP-130 to
@
ON/OFF
ing this switch 1 time causes
printing at any time
switch to set the
Press and hold this switch for
modetoenter
The
this switch
@)
ON/OFF
ON
computer
ON
LINE
print
head
is
pressed.
LINE
LINE
and ready to print.
software, then press the
ON/OFF
LINE.
switch.
the margin-set
does not move
At
power-up, the
the
or
to use
PrintertoOFF
more
mode,
PrinterisON
Printer
other
to go
OFF
front panel switches, press this
LINE.
than 1 second whileinON
when
the
Printer
goes
indicator. When this indicatorisON,
This
indicator will flickerinthe
LINE
switchtoset
LINE;
LINE,
ON
LINE
the DMP-130
press-
To
stop
LINE
after
margin-
set mode.
®
NLQ/DP
Letter
indicator turns
work only when the
switch. Press this switch to select the print
Qualityorstandard.
ON,
When
the
Press again for
PrinterisOFF
NLQ
modeisselected, the
standard
LINE.
mode
- NearNLQ
mode, This switch will
is
@
(j)
In
the
margin-set
mode,
pressing
this switch will
position.
NLQ
indicator. This indicator will illuminate when the
NLQ
mode.
FORM
to
is
FEED
the
logical top of the next form. Itiseffective only when the
OFF
LINE.
switch. When this switch
is
pressed,
4
set
Printerisin
the
paper
the
margin
advances
Printer
the
Page 13
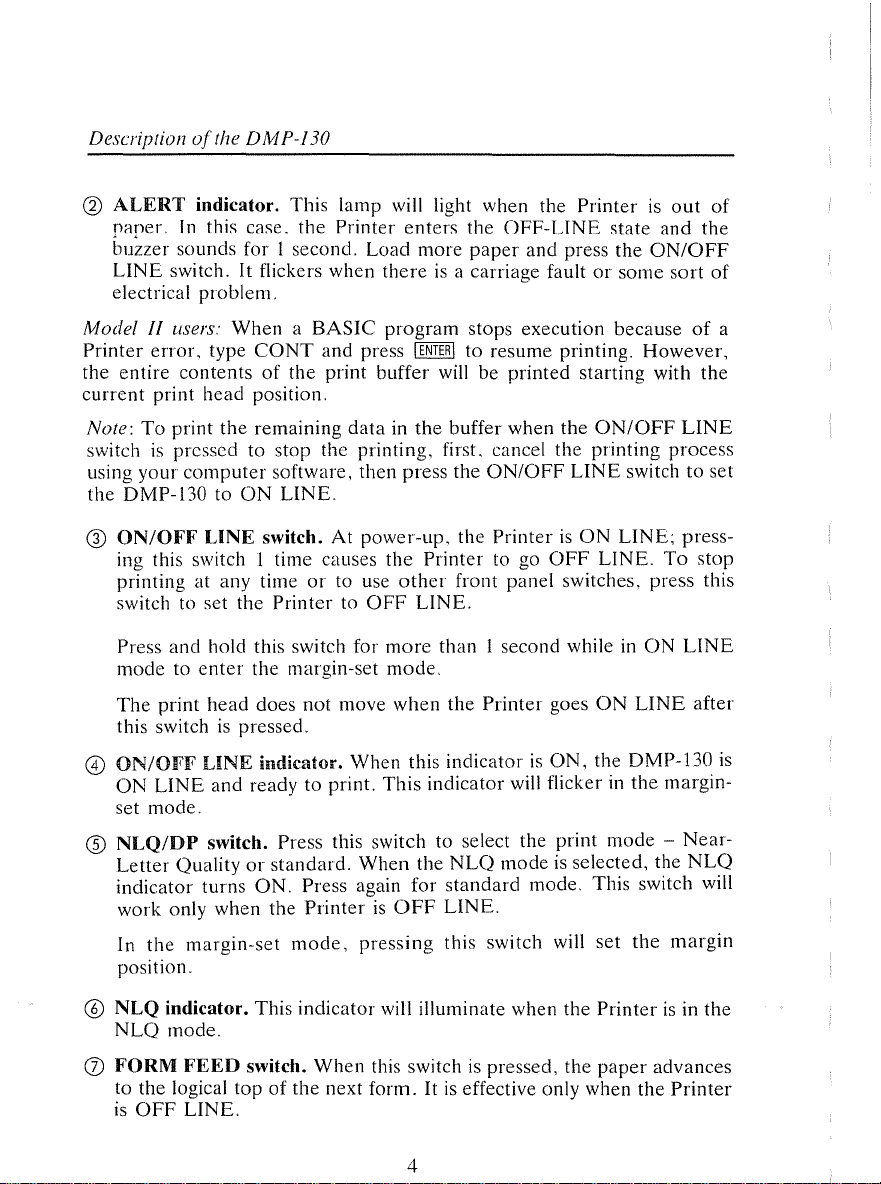
In
the
the
margin-set
left.
mode,
pressing this switch moves
the
Chapter 1
print
head
to
® LINE
I line.
switch will
In
the
the
right.
Rear Panel
CD
POWER
the
left sideofthe
power
program.
FEED
When
switch.
it is held
work
margin-set
ON/OFF
OFF
and
When
this switchispressed,
down,
only
mode,
continuous
when
the
PrinterisOFF
pressing this switch moves
paper
Figure 2. Rear Panel View
switch. Press
switchtoturn
ON
during
ON/Itoturn
power
operation
may cause lossofthe
the
feedisperformed.
LINE.
the
the
power
OFF.
Note
paper
print
that
advances
head
ON.
turning
current
This
to
Press
the
@
POWER
power
cord. Plug
strip.
the
power
® Print function (DIP) switches.
mine exactly how
@)
Parallel interface connector. If
capabilities,
the
right cable for your
connect
your
Printer
the
cable here. See Setting
computer.
cord into a wall
The
settingofthese
will print.
your
Computer
outlet
has
up
or
switches will
parallel
the DMP·130 for
approved
deter-
interface
Page 14
[)elcrip/ioll
oj/he
[)/v!
P-IW
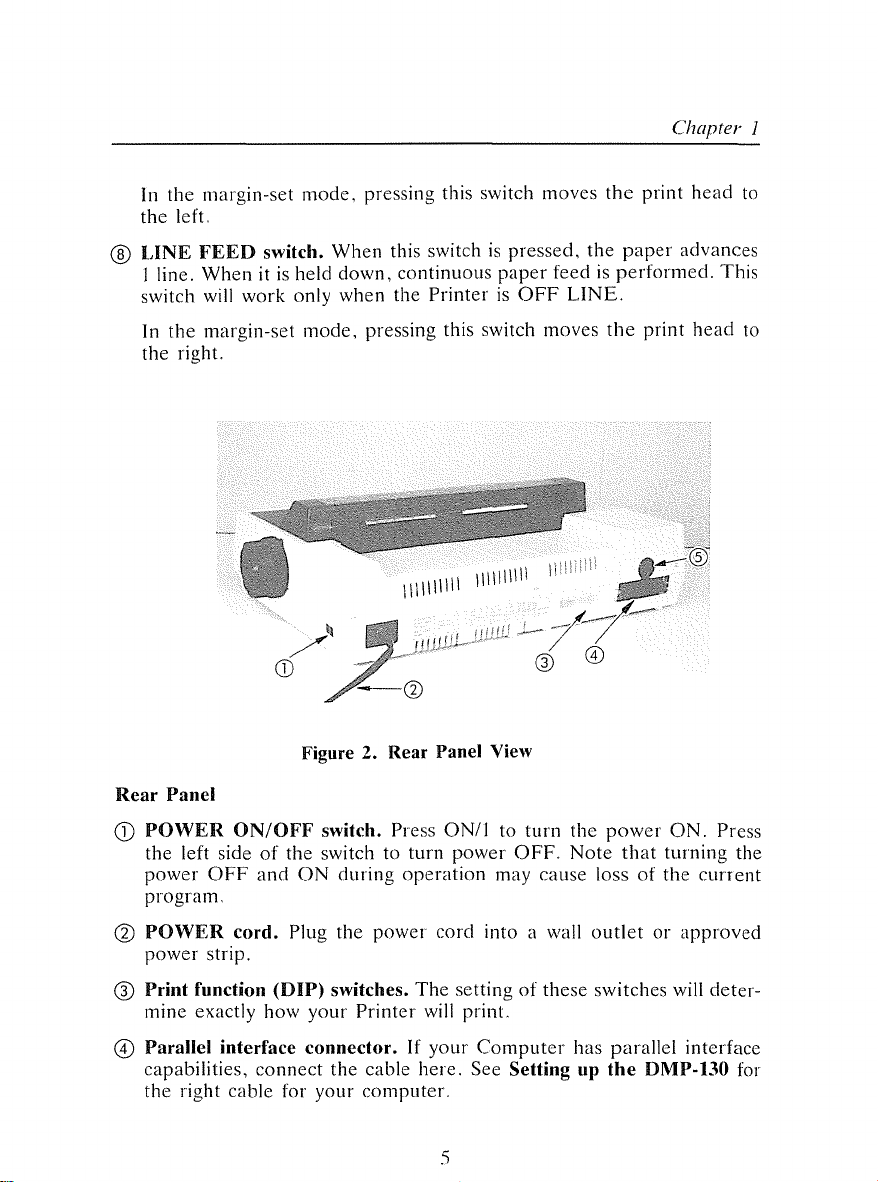
® Serial interface connector. If
cabletothe
DMP·130
CD
Ribbon cassette. Be
Q) Print head adjustment lever.
away
smudging
away
from
from
serial
for
the
you
occurs
the
interface
right
cable
Figure 3. Inside View
suretoreplace
to
move
during
paper.
printing,
you
have a
connector
for
your
When
the
print
Color
indicated
Color
Computer.
the
ribbon
printingisfaint,
head
toward
move
the
print
Computer,
See
when
headIor2notches
connect
Setting
printingisfaint
move
the
paper.
the
up
When
the
the
lever
@ Paper bail.
When
platen.
@ Paper feed knob.
you
For
single-sheet
use
fanfold
Turn
printing,
paper,
this
knobtomanually
® Automatic paper loading knob.
the
paper.
@ Platen.
(]) Tractor feed
tractor
feed.
Turn
unit.
backward
See
Settingupthe
to
push
Turn
reset
6
keep
the
lever
toward
the
paper
DMP·130
the
bail
downonthe
on
the
right
advance
youtoautomatically
bail
for
the
detailsonusing
paper.
toward
paper
the
load
the
Page 15
Chapler J
® Paper rack. Lift this
locatedonthe
for
fanfold
(2)
Paper guide.
@>
Printer cover.
topofthe
paper.
Set
accordingtothe
rack
case
and
for
insert
the
single-sheet
widthofthe
folding
paper.
paper
leg
Lay
used.
into
the
the
rack
hole
flat
7
Page 16

Page 17
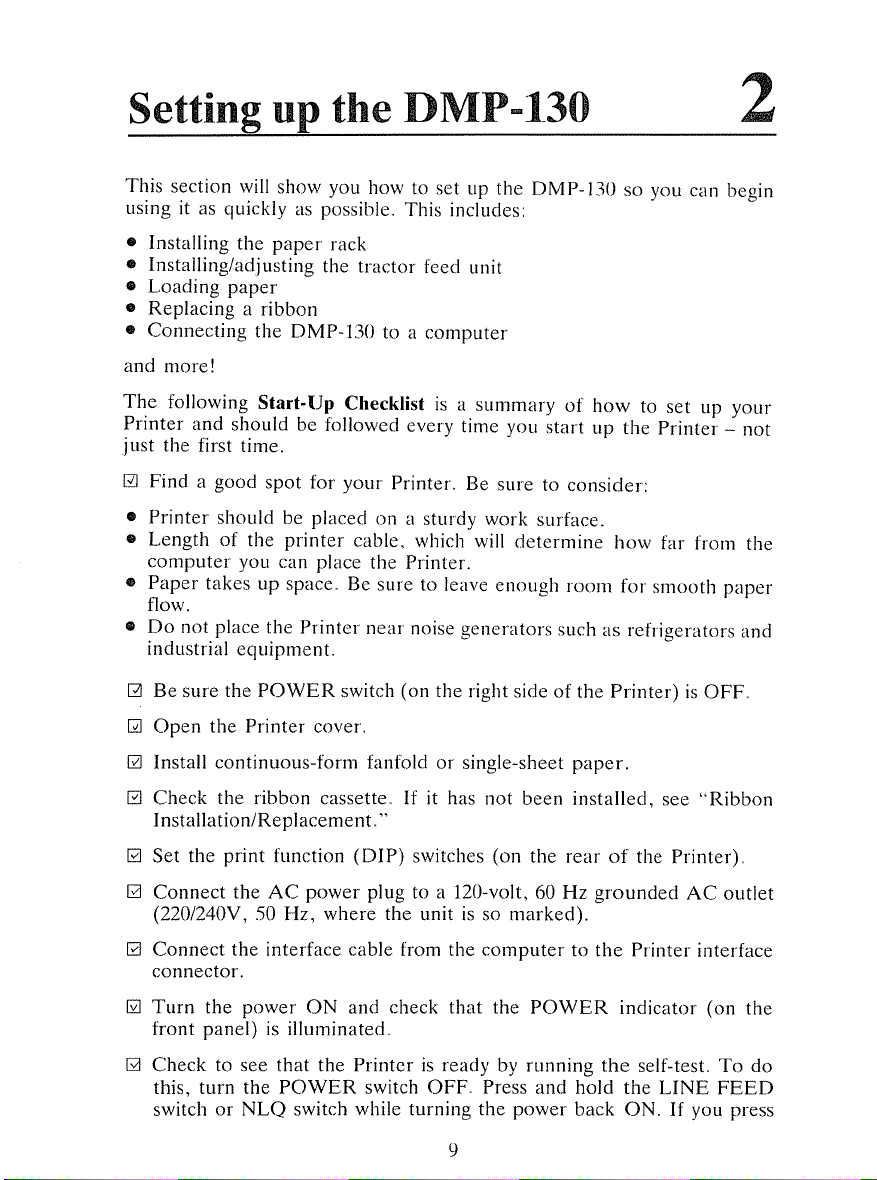
Setting up the DMP-130
This section will show you how to set up the DMP-130soyou can begin
using it as quickly as
possible, This includes:
2
• Installing the
• Installing/adjusting the
• Loading
• Replacing a ribbon
•
Connecting
and
more!
The
following Start-Op Checklistisa
Printer
just the first time.
EJ
•
•
•
•
G
GJ
[2]
[2]
and
Find a good
Printer
Lengthofthe
computer
Paper
takes
flow.
Do
not place the
industrial
Be
sure the
Open
the Printer cover.
Install continuous-form fanfoldorsingle-sheet
Check
Installation/ReplacemenL"
paper
rack
tractor
paper
the DMP-130 to a
should be followed every time you
spot
for
your
should be placedona sturdy work surface.
printer
you can place the Printer.
up space, Be sure to leave
equipmenL
POWER
the ribbon cassette,Ifit has
cable, which will
Printer
switch (on the right sideofthe
feed unit
computer
summaryofhowtoset
Printer. Be sure to
near
noise
generators
not
start
determine
enough
been
up
up
the
Printer
consider:
how
far from the
room
for
smooth
such as refrigerators
Printer)isOFF,
paper.
installed, see
"Ribbon
your
not
paper
and
[2]
Set the
GJ
Connect
(220/240Y, 50
GJ
Connect
connector.
[2]
Turn
the
front
panel)isilluminated,
GJ
Check
this, turn the
switchorNLQ
print
function
the
AC
Hz,
the
interface cable from the
power
to see
that
POWER
switch while turning the
(DIP)
power
where
ON
and check
the
Printerisready by
switches (on the
plug to a 120-volt,60Hz
the unitisso
computertothe
that
the
switch
OFF,
9
Press
rearofthe Printer),
marked).
POWER
running
and
power
grounded
Printer interface
indicator
the
self-tesL
hold
the
back
ON.Ifyou press
AC
LINE
outlet
(on the
To
do
FEED
Page 18
Setting
the
if
linue
lip thef)M
LINE
you
press
ulllii
FEED
NLO,
you
P-/30
switch,
press
the
the
self-test
the
Oi-i/OFF
self-testisperformed
runsinNLO
LiNE
mode,
switch
in
standard
Printing
will
mode:
con-
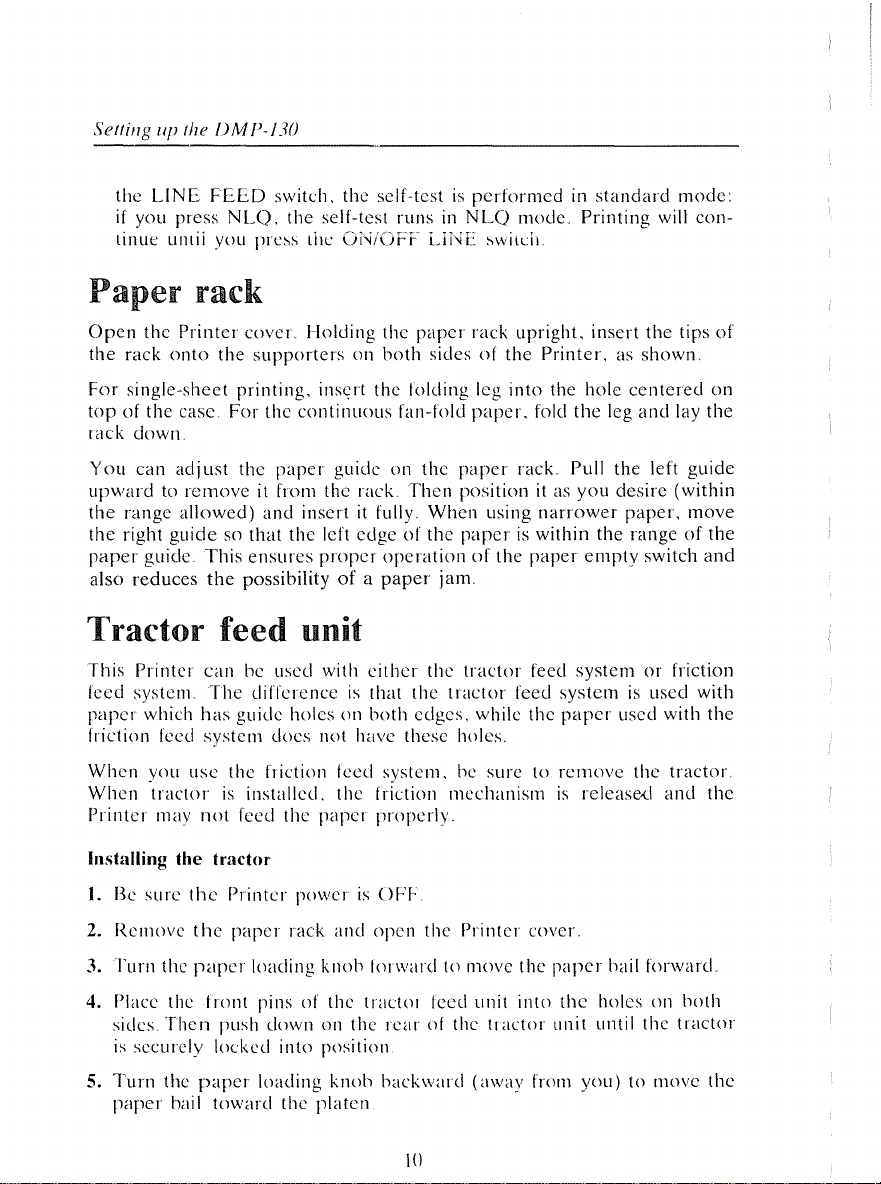
Paper
Open
the
rack
For
single-sheet
topofthe
rack
down
You
upwardtoremove
the
range
the
right
paper
also
reduees
rack
the
Printer
onto
case
can
adjust
allowed)
guidesothat
guide
cover
the
supporters
printing,
For
the
the
paper
it from
and
This
ensures
the
possibilityofa
Holding
inst;rt
continuous
guide
the
insert
the
left
proper
l'ractor feed unit
This
Printer
feed
system
paper
friction feed
When
When
Printer
Installing the tractor
which
you
tractor
may
can
The
has
system
use
not
be
used
with
differenceisthat
guide
holesonboth
does
not
the
friction
is
installed,
feed
the
paper
feed
the
the
paper
on
both
sidesofthe
the
folding leg
fan-fold
on
the
rack,
Then
it fully.
edgeofthe
either
have
When
operationofthe
paper
friction
properly,
jam.
the
the
edges,
these
system,
rack
upright.
Printer,asshown,
into
paper,
paper
position
paperiswithin
tractor
tractor
while
holes,
he
mechanism
fold
rack
it as
using
narrower
paper
feed
feed
the
suretoremove
insert
the
the
hole
centered
the
leg
and
Pull
the
left
you
desire
paper,
the
rangeofthe
empty
switch
systemorfriction
systemisused
paper
used
with
the
is
release,d
and
tips
lay
the
guide
(within
move
and
with
the
tractor
the
of
on
l.
2.
3.
4.
5.
Be
sure
Remove
Turn
Place
sides,
is
securely
Turn
paper
the
the
Then
the
bail
the
the
paper
front
paper
toward
Printer
paper
loading
push
locked
power
rack
and
knob
pinsofthe
downonthe
into
position
loading
the
knob
platen
is
OFI~
open
forward
tractOl
rearofthe
hack
!O
the
tOll1ove
feed
ward
Printer
unit
tractor
(away
covel'.
the
into
from
paper
bail
the
holesonboth
unit
until
you)tomove
forward
the
tractor
the
Page 19
Chapter 2
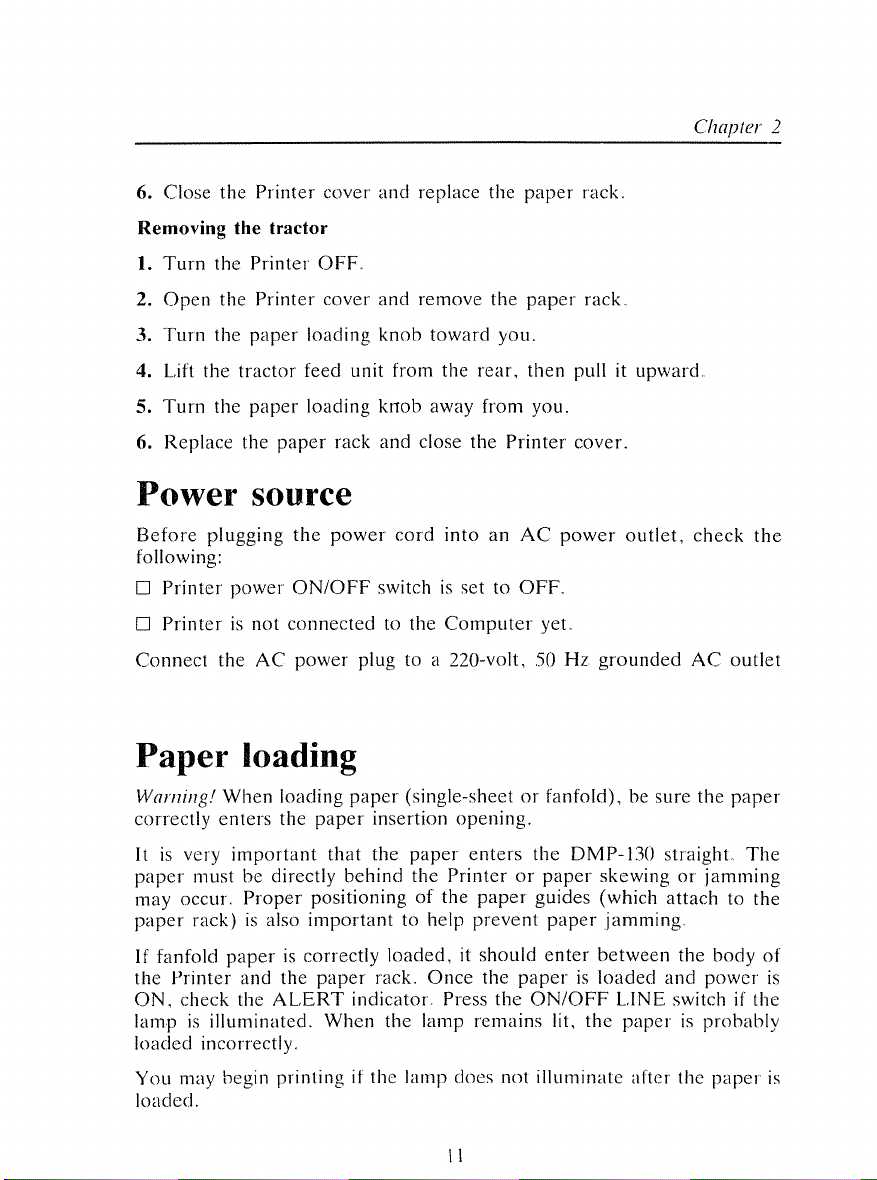
6. Close the
Printer
cover
Removing the tractor
1.
Turn
the
2.
Open
3.
Turn
4. Lift
5.
Turn
6.
Replace
the
the
the
the
tractor
the
Printer
Printer
paper
paper
OFF,
cover
loading
feed unit from the
loading
paper
rack
Power source
Before
following:
D
D
Connect
plugging
Printer
Printerisnot
power
the
AC
the
power
ON/OFF
connected
power
Paper loading
and
replace the
and
remove
knob
toward
knob
away from you.
and
close the
cord
switchissettoOFF,
to the
plug to a
the
you.
rear,
Printer
into
an
Computer
nO-volt,
paper
paper
then
AC
yet.
50
rack,
rack,
pull it
cover.
power
Hz
upward
outlet,
grounded
check
AC
the
outlet
Warning!
correctly
It
is
paper
may
paper
If
fanfold
the
ON,
lampisilluminated.
loaded
You
loaded.
When
loading
enters
very
mustbedirectly
occur.
rack)isalso
Printer
check the
incorrectly,
may begin printingifthe
the
important
Proper
paperiscorrectly
and
the
ALERT
paper
(single-sheetorfanfold),besure
paper
insertion
that
the
paper
behind
positioningofthe
importanttohelp
paper
indicator. Press
When
the
Printerorpaper
loaded,itshould
rack,
Once
the
lamp
lamp
II
opening.
enters
paper
prevent
the
the
remains
does
not
the
DMP-130
skewingorjamming
guides (which
paper
jamming.
enter
between
paperisloaded
ON/OFF
lit,
illuminate
LINE
the
paperisprobably
after the
the
paper
straight.
attachtothe
the
and
switch if the
The
body
powcr
paper
of
is
is
Page 20
Settingupthe
DMP-130
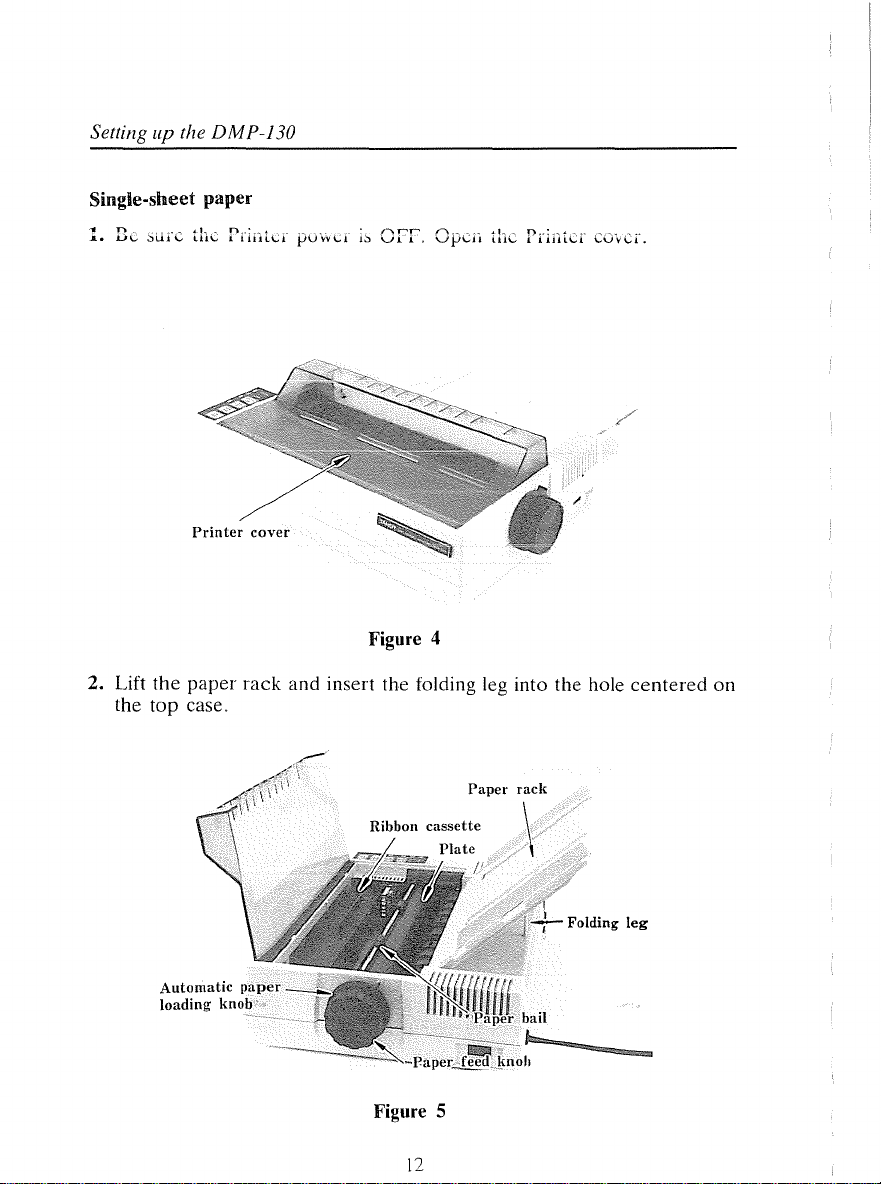
Single-sheet paper
1. Be sure the Printer
Printer
cover
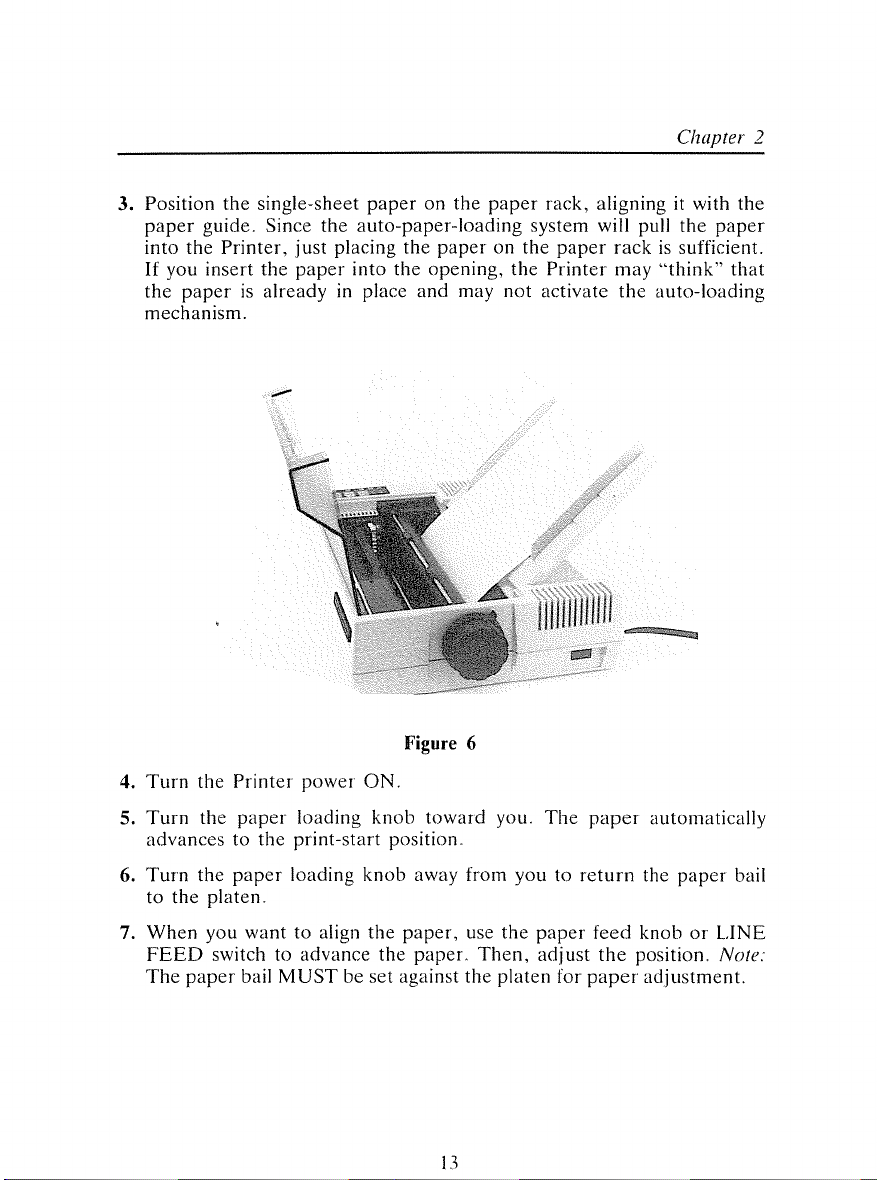
2. Lift the
the
top
paper
case,
rack
povvcr
1s0FF.
Opcn the Printer cover.
Figure 4
and insert the folding leg into the hole
centered
on
Figure 5
12
Page 21
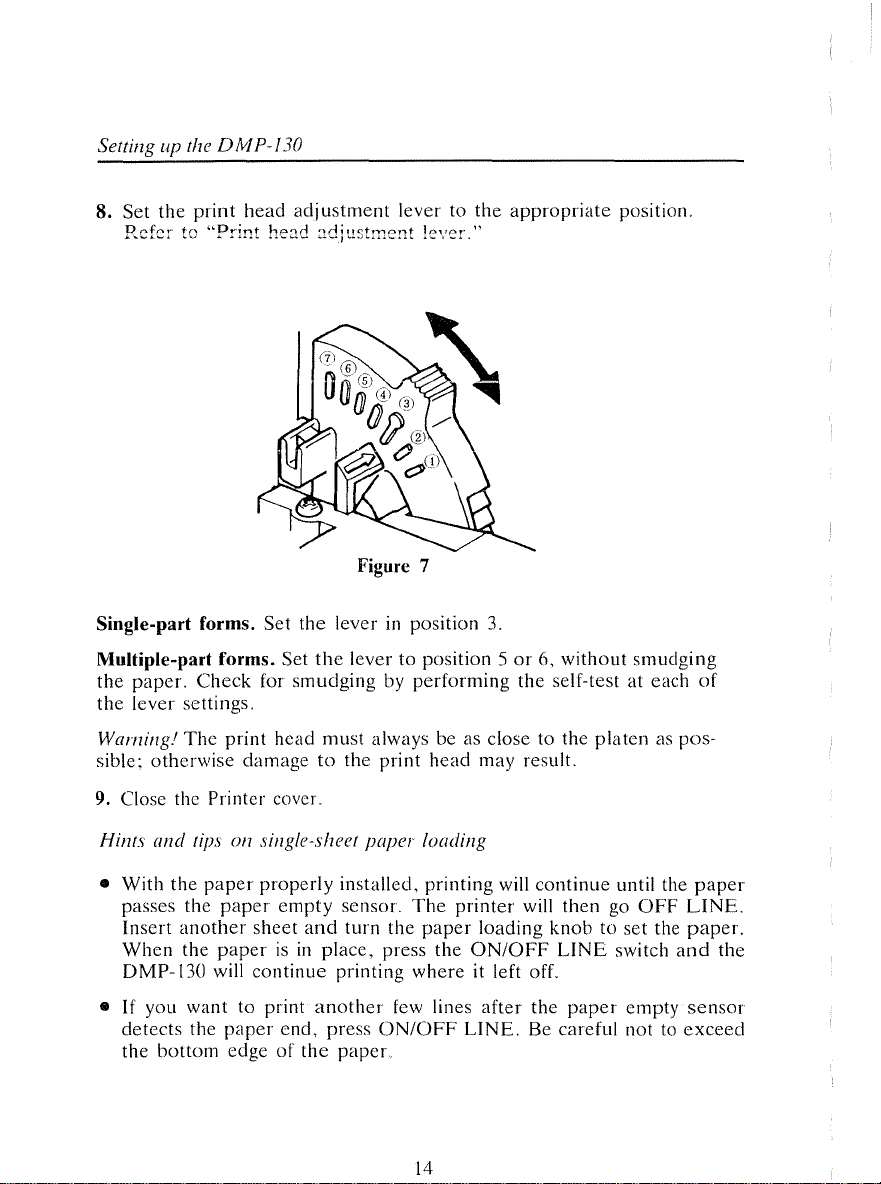
3.
Position
paper
into
If
you
the
mechanism.
the
single-sheet
guide.
the
paperisalready
Printer,
insert
Since
the
just
paper
paper
on
the
auto-paper-loading
placing
in place
into
the
the
and
the
paper
paperonthe
opening,
may
the
not
rack,
system
paper
Printer
activate
aligning
will pull
rack
may
the
Chapter 2
it with
is sufficient.
"think"
auto-loading
the
the
paper
that
4.
Turn
the
5.
Turn
the
advancestothe
6.
Turn
the
to
the
platen.
7.
When
you
FEED
The
switchtoadvance
paper
Printer
paper
paper
bail
power
loading
print-start
loading
wanttoalign
MUSTbeset
ON
knob
position.
knob
the
the
Figure 6
toward
away
paper,
paper.
against
13
from
use
Then,
the
you.
the
platen
The
paper
youtoreturn
paper
feed
adjust
for
the
paper
automatically
the
paper
bail
knoborLINE
position.
adjustment.
Note:
Page 22
Setting up the D M P-130
8. Set
Single-part forms.
the
Rnfr-l"" tr'\
... "-' .>-\o...l
print
"P-r'~nt
..
,.j
head
hp~rl
Set
Multiple-part forms. Set
the
paper.
the
lever settings.
Warning.'
sible;
Check
The
otherwise
for
print
head
damagetothe print
adjustment
''l0;!!~h""''r'(:1.nt
.....:,;,..:. \ j
...,'__.•"
lever to
100""01"
,_.,__" .
the
"
Figure 7
the
leverinposition 3.
the
lever to position 5or6,
smudgingbyperforming
must
always be as close to the
head
may result.
appropriate
without
position.
smudging
the self-test at each
platenaspos-
of
9. Close the Printer cover.
Hints
and
tips on single-sheet
• With
•
the
paper
passes the
Insert
When
DMP-
If
you wanttoprint
detects
the
bottom
paper
another
the
paperisin
130
will
the
paper
edgeofthe
properly
empty
sheet
and
continue
end,
paper
loading
installed, printing will
sensor.
turn the
place,
printing
another
press
The
paper
press the
where
few lines
ON/OFF
printer
paper.
14
will
loading
ON/OFF
it left off.
after
LINE.
continue
until the
thengoOFF
knobtoset the
LINE
switch
the
paper
empty
Be careful not to
paper
LINE.
paper.
and
sensor
exceed
the
Page 23
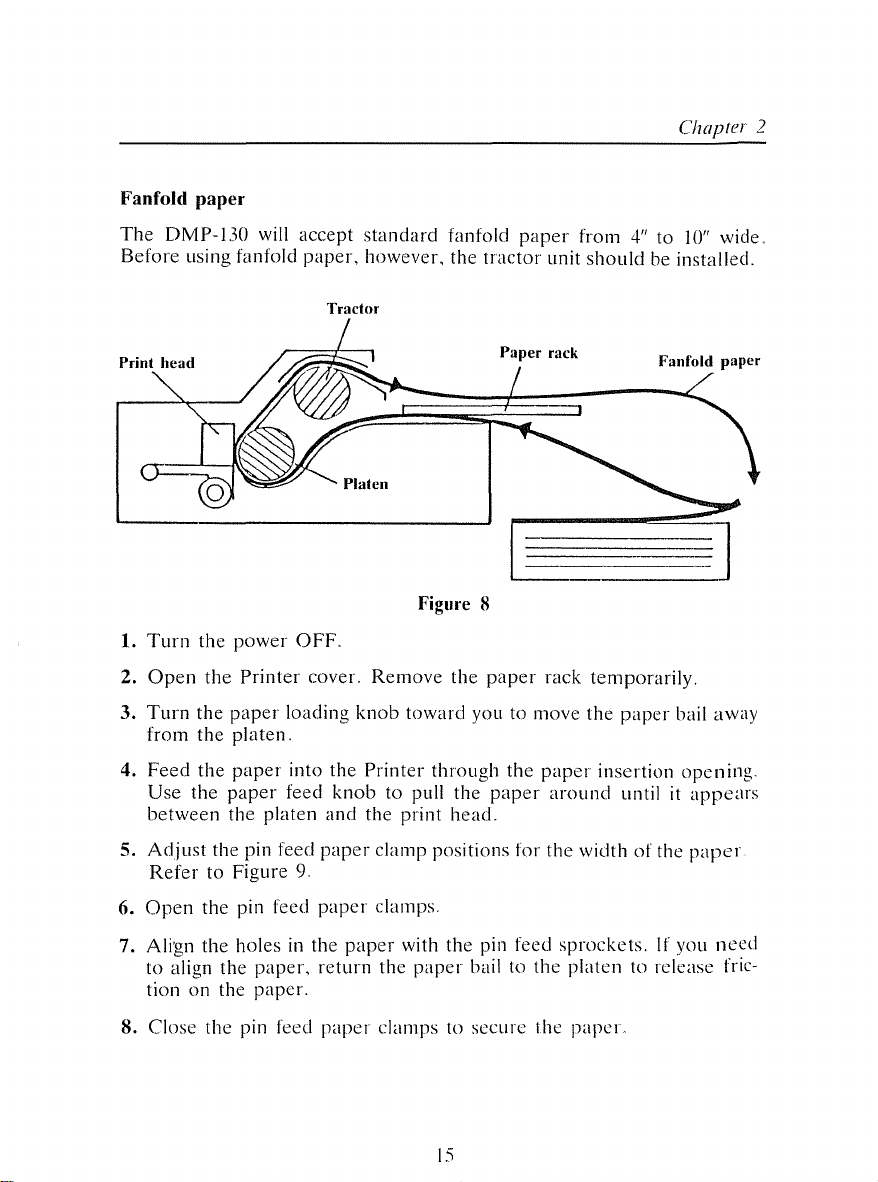
Fanfold paper
The
DMP-1.30 will accept
Before
1.
2.
using fanfold
Turn
the
Open
the
power
Printer
paper,
OFF.
cover.
standard
however, the
Tractor
Remove
fanfold
Figure 8
the
paper
tractor
Paper rack
paper
from4"to
unit
should
rack
Chap/er
be installed.
temporarily.
10"
2
wide.
3.
Turn
the
paper
from
the
platen.
4.
Feed
the
paper
Use
the
paper
between
5.
Adjust
Refer
6.
Open
7. AIi'an the holes
to
tion on the
8. Close
the pin feed
to Figure 9.
the
b
align
the
the
platen and the print
pin feed
the
paper,
paper.
pin feed
loading
into the
feed
knob
Printer
knobtopull the
paper
paper
in
the
paper
return
paper
toward
youtomove
through
the
paper
paper
around
the
paper
insertion
untilitappears
head.
clamp positions for the widthofthe
clamps.
with
the
pin feed
the
paper
bail to the
clamps to secure the
15
sprockets.
If you
platentorelease
paper.
bail away
opening.
papel
need
.'
tnc-
Page 24
Setting up the
DMP-130
Pin
teed
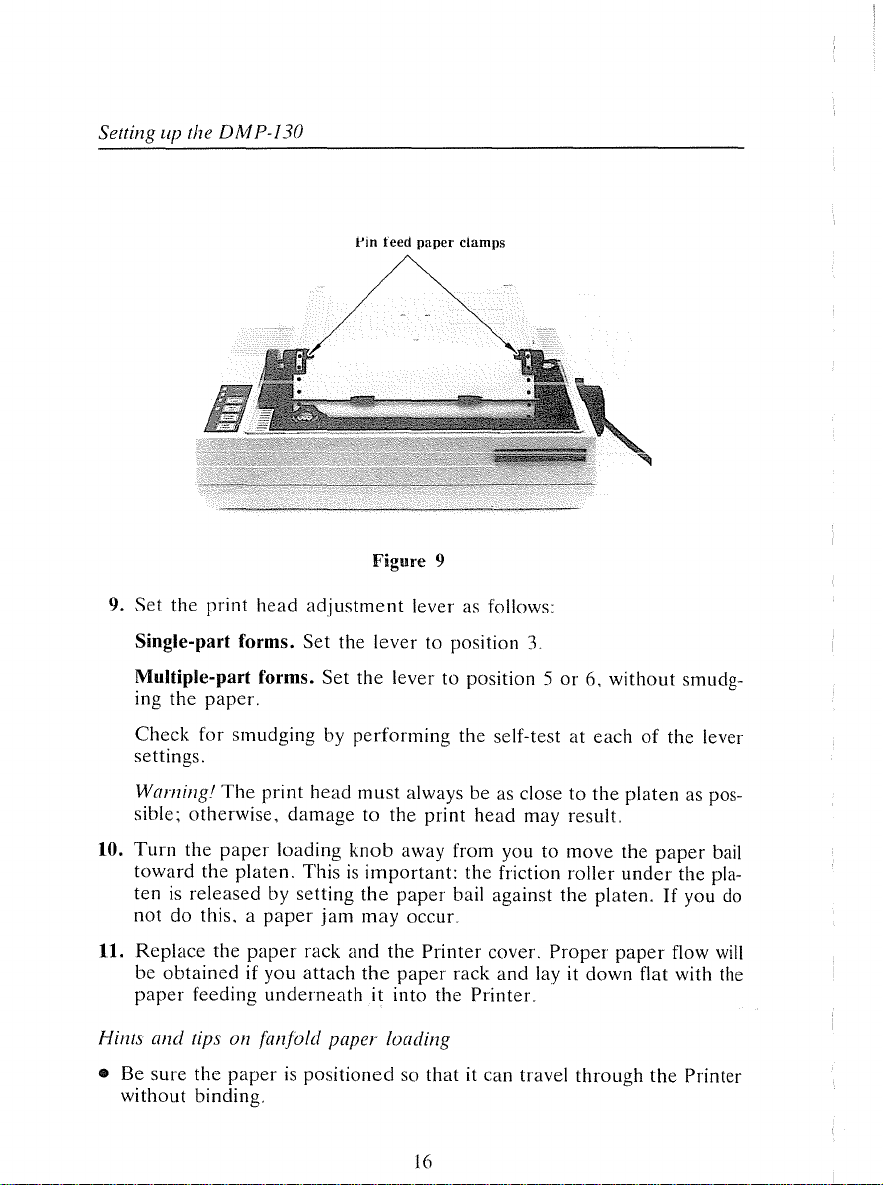
Figure 9
paper
clamps
9. Set the
Single-part forms. Set the
Multiple-part forms.
ing the
Check
print
head
paper.
for smudging by
settings.
Warning
sible; otherwise,
10.
Turn
the
The
'
paper
print
toward the platen. This
ten
is
released by setting
not do this, a
11. Replace the
be
obtained
paper
feeding
and
Hints
•
Be
tips on {anjold paper loading
sure the
paper
paper
if you
underneath
paperispositionedsothat
without binding.
adjustment
Set
head
damage
loading
jam
rack and the
attach
lever as follows:
lever
to position
3.
the lever to position 5or6,
performing
must
the self-test at eachofthe lever
always be as close to
to the print head may result.
knob
away from you to move the
is
important:
the
paper
may
the
paper
occur.
Printer
the
friction roller
bail against
cover.
rack
and
lay it down flat with the
the
Proper
it into the Printer.
it can travel
16
without
the
platen
paper
under
platen.Ifyou
paper
through
the
smudg-
as pos-
the pla-
flow
Printer
bail
do
will
Page 25
•
Do
not
let
paper
pile on
may
be pulled
paper
feedordamage
•
As
much as possible, place
into
the
the
Ribbon cassette
If
the
ribbonisalready
threaded
If
the ribbon
excessive
between
cassetteisnot
wear,
faint printing,
installed, simply checktosee
the
paper
topofunprinted
paper
insertion
PrinteL
the
paperonthe
and
print
head.
installed,orif
etc.,
follow this
paperorthe
opening.
same
height
it must
procedure:
This
thatitis
be
replaced
printed
could
as the
Chapter
paper
jam
printer.
properly
due
2
the
to
1. Set the
any information
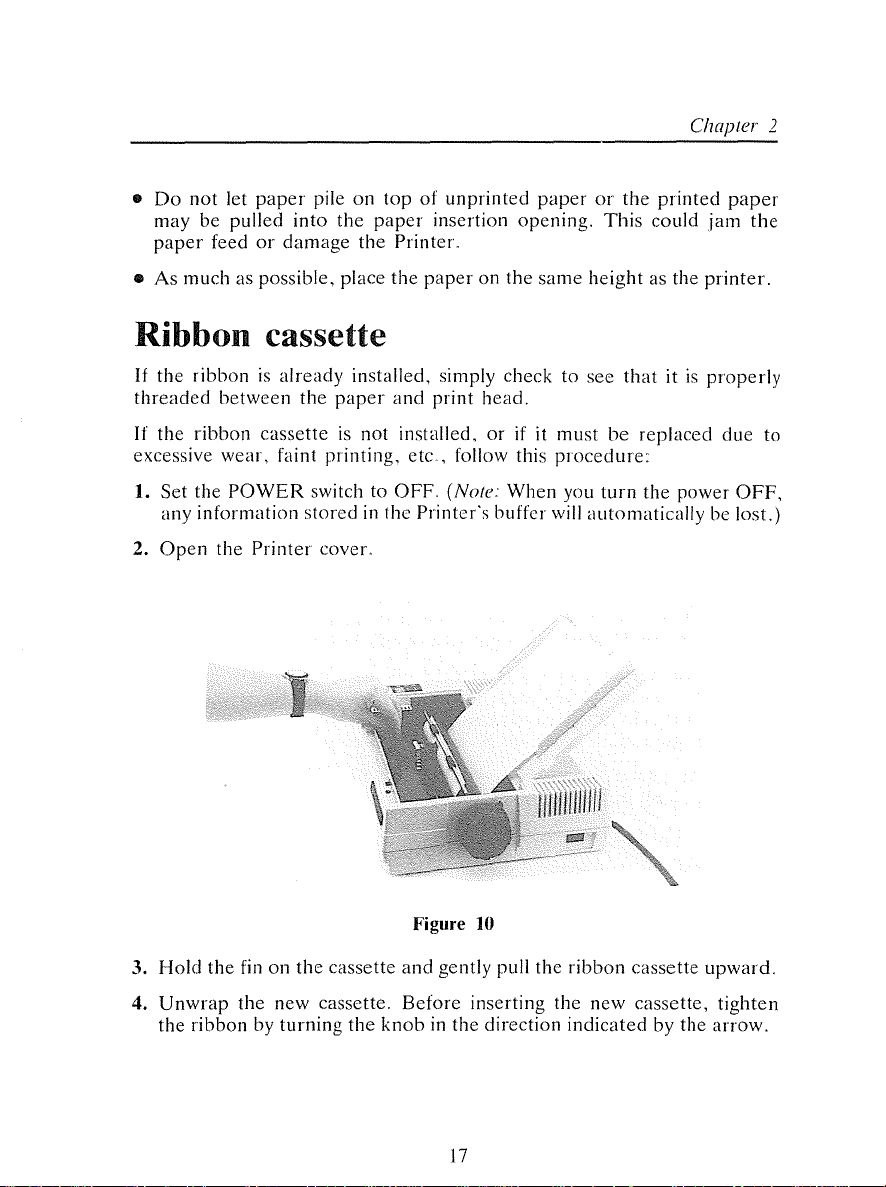
2.
Open
the
3.
Hold
the fin on
4.
Unwrap
the ribbon by
POWER
Printer
the
new cassette.
turning
switch to
storedinthe
covel.
the
cassette
the
OFF,
(Note: When you
Printer's
Figure
and
gently pull the
Before
knobinthe
buffer will
to
inserting the
direction
turn
the
automatically
ribbon
indicated
new
cassette
cassette,
power
by the
OFF,
be lost.)
upward.
tighten
arrow.
17
Page 26
Setting up the
DMP-130
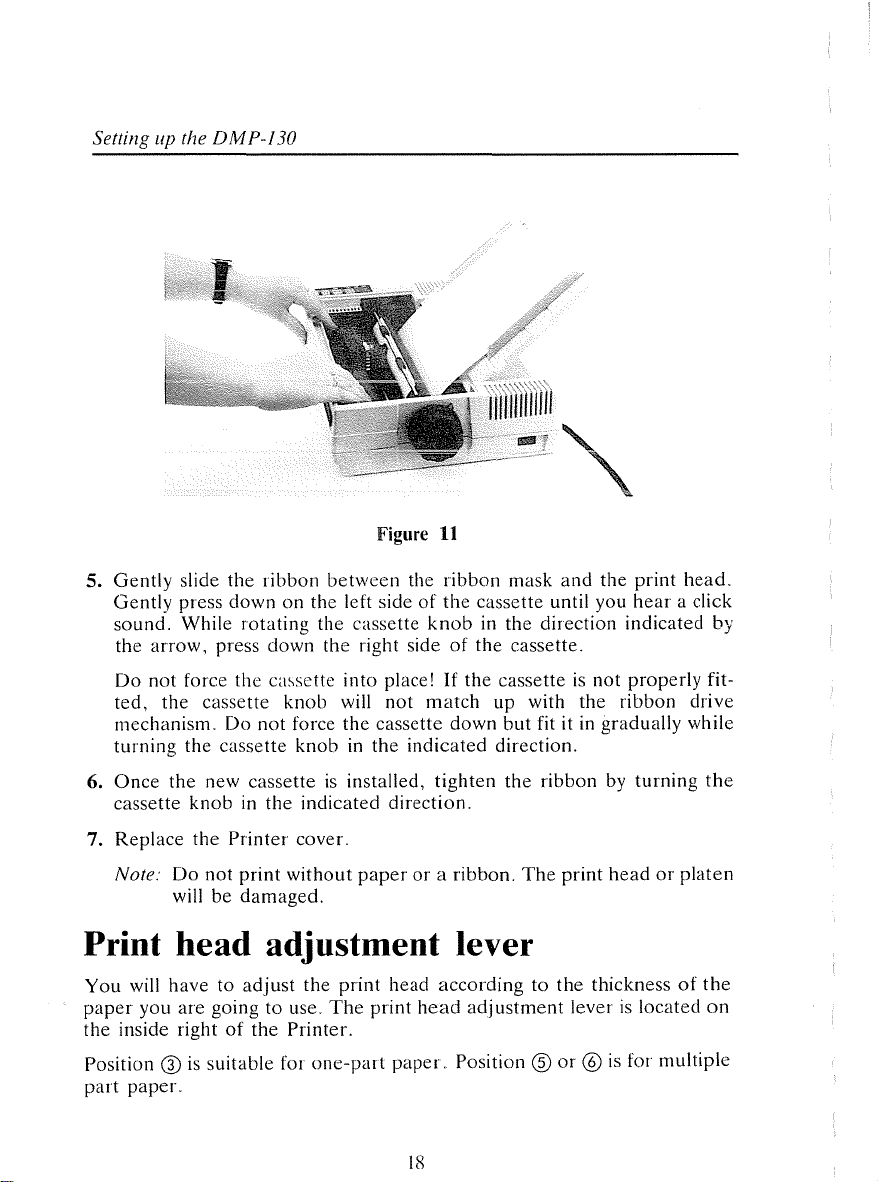
5.
Gently
Gently
sound.
the
Do
ted,
mechanism.
turning
6.
Once
cassette
7.
Replace
Note
Figure
slide
the
ribbon
press
down
While
arrow,
not
the
the
Do
will be
rotating
press down
force the cassette into place!Ifthe
cassette
Do
not
the
cassette
new cassetteisinstalled,
knobinthe
the
Printer
not
print
damaged.
between
on the left sideofthe
the cassette
the
right sideofthe
knob
will
force
the
cassette
knobinthe
indicated
cover.
without
paperora
11
the
ribbon
knobinthe direction indicated
not
match
indicated
tighten
direction.
mask
cassette until you
cassette.
cassetteisnot
up with
down
but
direction.
the
ribbon.
Print head adjustment lever
You
will havetoadjust
paper
you
are
goingtouse.
the
inside rightofthe
Position @issuitable for
part
paper.
the
The
Printer.
one-part
print
head
print
paper.
accordingtothe
head
adjustment
Position ®
and
the
print
hear
a click
properly
the
ribbon drive
fit itingradually while
ribbon by
The
print
leverislocated
or®is
turning
headorplaten
thicknessofthe
for multiple
head.
by
fit-
the
on
18
Page 27
Margin-set switches
1.
Be
sure
the
ON
LINE
lampisONo
2.
Press
and
hold
the
MARGIN
LINE
lamp
blinkso
3.
Press
the
4.
5.
-iO(LINE
the
print
headtothe
Press
the
SET
Press
the->switch to move the print head to a desired position for a right
marglll
0
(NLQ
FEED)
position
DP)
andf-(FORM
switchtoset
(ON/OFF
you
wishtoset
LINE)
FEED)
as a left margino
the
left margin"
Chapter 2
switch
until
switchestomove
the
ON
6. Press the
Note:
SET
switch to set the right margiil
Once
the
left
and
right
margins
margins
OFF
(Refertochapter6,"Left
and
wider
back
than
ON
the
again"
present
You
and
are
ones
can
right
set,
you
unless
change
marginso")"
cannot
margins
Print function (DIP) switches
There
switches
applications"
When
130
TableLOn
selects
showninTable
For
print
begin using
(suchasthe
priate
When
Remember
switches.
are
10
switches
allow youtocustomize
you
set
switch I-ItoOFF
selects
codes
Tandy
the
for the
codes" In this
other
20
instance,inTandy
quality)ordata
the
DMP-130
Color
Computer),
switch accordingly"
you
receive
'
The
the
Printer
located
hand,
if you
IBM
mode" In this
mode,
processing
DMP-I30,
you
with a
powel
on
the
rear
some
DMP-130
before
setting,
mode
computer
turn
all
mustbeOFF
turning
the
set
switch I-ItoON,
can
select
(faster
the
DIP
switches
panel
switches
case,
word
which
power
before
features
the
the
processing
printing
has
OFF
should
manually
the
poweristurned
via software"
of
the
Printer
for
your
power
ON,
the
functionasshown
the
DMP-130
switches
serial
and
you
function as
mode
speed)"
change
Or,
printer
set
the
be settoOFF.
anyofthe
reset
These
own
DMP-
in
(better
if you
output
appro-
19
Page 28

Setting up the DMP-130
Table 1.
Sw.
1-1
Control Codes Tandy Codes
1-2
CR
1-3
1-4
1-5
1-6
1-7
1-8
SW2-1 and SW2-2 select the interface and baud rate
Parallel
Serial
Serial
Serial
LF
Forms
1-lnch Skip Over
Perforation
Line Spacing
Character
Generator
WP/DP
Mode
Interface
DIP
Switch FunctioninTandy Mode
(Switch
1-1 set to OFF)
ON
Carriage Return Only Carriage Return &
(CR
CR)
Line Feed & Carriage Line Feed Only
(LF
NL)
Mode
2·1
Return
12
Inches
Valid
1/8
Inch 1/6 Inch
IBM Character Tandy Character
Word
Baud Rate
OFF
600
1200
2400
OFF
ON
ON
Line Feed
(LF=LF)
11
Inches
Not
Valid
Data Processing
for
serial interfacing.
Switch
OFF
(CR
= NL)
Mode
2-2
OFF
ON
OFF
ON
DIP
switch view
Switch 2
Figure
Switch I
12
20
Page 29
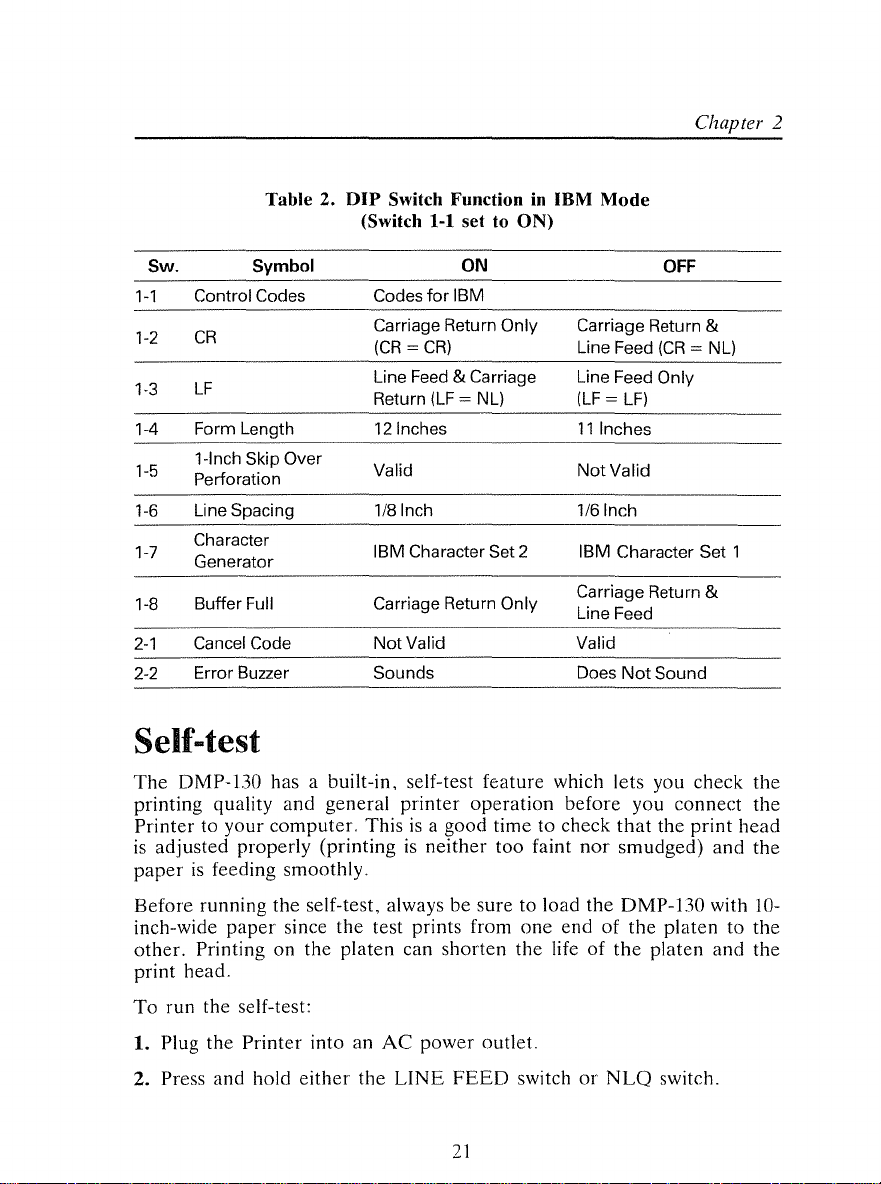
Table 2. DIP Switch FunctioninIBM Mode
(Switch 1-1 set to ON)
Chapter 2
Sw. Symbol
Control Codes Codes
1-1
1-2
CR
LF
1-3
1-4
1-5
1-6 Line Spacing
1-7
1-8
2-1
2-2
Form Length
1-lnch Skip Over
Perforation
Character
Generator
Buffer Full Carriage Return Only
Cancel Code
Error Buzzer
Carriage Return Only
(CR=CR)
Line Feed &Carriage
Return
12
Inches
Valid
1/8
Inch 1/6 Inch
IBM Character Set 2 IBM Character Set 1
Not
Sounds Does
ON
for
IBM
Carriage Return
Line Feed
Line Feed Only
(LF
= NL)
Valid Valid
(LF=LF)
11
NotValid
Carriage Return
Line Feed
Inches
Not
Self-test
The
DMP-1.30 has a built-in, self-test feature which lets you check
printing quality
Printer
is
to your
adjusted
paperisfeeding smoothly.
and
general
computer.
printer
Thisisa good time to check
properly (printingisneither
operation
too faint
before you connect
that
nor
smudged) and
OFF
(CR
Sound
the
print
&
NL)
&
the
the
head
the
Before running the self-test, always be sure to load
inch-wide
other.
paper
since
the
test prints from
Printing on the platen can shorten
one
the
life of
print head.
To
run the self-test:
1. Plug
2. Press and hold
the
Printer
into an
either
the
AC
LINE
power
FEED
outlet.
switchorNLQ
21
the
end of
DMP-1.30 with
the
platen to
the
platen and
switch.
w-
the
the
Page 30
Setting up
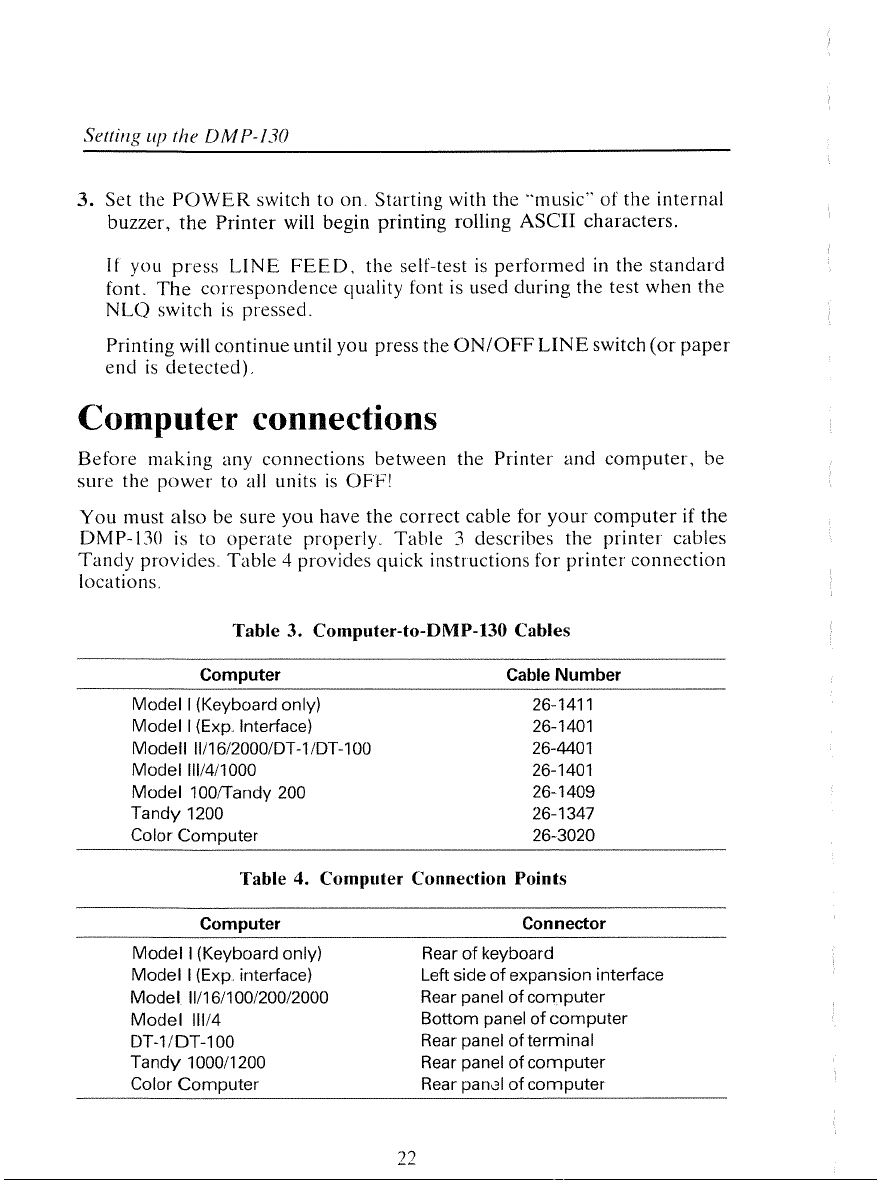
3.
Set the
buzzer,
If
you
font.
NLQ
the
DM
P-/30
POWER
the
press
The
switch to on.
Printer
LINE
will begin
FEED,
correspondence
switchispressed.
Starting
printing
with the "music"ofthe
rolling
ASCII
the self-testisperformedinthe
quality font is
Llsed
during
the test when the
internal
characters.
standard
Printing will
continue
until you press the
endisdetected).
Computer connections
Before
sure
You
DMP-130 is to
Tandy
locations.
the
must
making
power
any connections
to all unitsisOFF!
alsobesure
you have
operate
provides.
Table
4 provides quick instructions
Table 3. Computer-to-DMP-130 Cables
Computer
Model I (Keyboard only)
Model I (Exp. Interface)
Modell
Model
Model
Tandy 1200
Color
1I/16/2000/DT-1/DT-100
111/4/1000
100ITandy 200
Computer
Table 4. Computer Connection Points
Computer
Model
I (Keyboard only)
Model
I (Exp..interface)
Model
11/16/100/200/2000
Model
DT-1/DT-100
Tandy
Color
111/4
1000/1200
Computer
properly.
between
the
correct
Table
Rear panel
ON/OFF
the
cable for
3 describes
Rearofkeyboard
Left side
Bottom panelofcomputer
Rear panel
Rear panelofcomputer
Rear
pan01ofcomputer
LINE
switch
Printer
of
and
computer,
your
computerifthe
the
printer
for
printer
Cable
Number
26-1411
26-1401
26-4401
26-1401
26-1409
26-1347
26-3020
Connector
expansion interface
of
computer
ofterminal
(or
paper
be
cables
connection
22
Page 31

1.
Attach
rearofthe
turn it
2.
Connect
ter.
See
the
molded male
Printer.
over
and
the
other
your
endofthe cable to the
Do
not
force the plug.Ifit
try again.
endofthe cable to the
computer
owner's
Power-up sequence
The
your
with
specific
computer
peripheral
power-up
owner's
devices (such as printers).
sequence will
manual
tor
Chapter 2
connectoronthe right
does
not
fit
one
Printer
manual for specific instructions.
depend
detailsonpowering
on
jackofyour compu-
your
computer.
up your
computer
way,
Consult
is
essential
It
event,
you
ON,
turn
In any
PrinterisON.
It
ter.
turned
the
that
the
erratic
power
the
Printer
power
operation
lamp on the DMP-130 will
remain
ONorOFF,orthe
of the
ON
when
Printerisconnected
entire
system may occur.
connected
remain
to the compu-
lit while the
but
not
23
Page 32

Page 33

Using the
The
DMP-130isdesigned for
•
Data
Processing
•
Word
Processing
•
Graphics
This
Printer
one
for each application.
similarities, but each has its own unique features,
Data
only
in
which direction
•
In
paper
can use
•
In
data processing mode, line feed
printing.
other
storedinmemory
Both
the proportionally spaced
character
Printing
responds
and
word processing
the way they
word processing mode, each line feed
advancement.
immediate
Instead,
data.
When
data
and
word processing modes
set.
DMP..130
three
applications:
to software codes from the
These
handle
and
how far the
Word
line feeds for superscripts, subscripts, and the like.
they
the
current
determine
response
modes,
are
character
both
line feed
paperisfed),
processing programs (suchasSCRIPSIT)
storedinthe
lineisprinted,
the direction
patterns,ormodes,
used for printing
commands
command
commandsdonot
Printer's
and
printin2 print styles.
set and
the
computerinthree
have
characters,
(commands
memory
the line feed
pitchofthe
otheristhe
causes
cause
paper
that
immediate
immediate
along with
commands
One
monospaced
3
waysmany
differ
decide
feed,
style
is
Proportionally spaced characters have variable widths: M
•
more
space than an L Proportionally
create
• Monospaced characters
the same width, This uniformity makes it
charts that require vertical alignment.
In
graphics
can be used to
However,
used with
not
code,
Graphics
of
professional looking
mode,
create
with graphics
data
and
returnanerror
This includes codes
mode has restricted
the paper.
documents.
aresonamed
you have complete controlofthe
a custom
word processing)
when you send such a
letterhead,
operation,
that
change line feed pitch and direction,
numbersofline feed to
spaced
because each
designs, special type fonts, etc.
many control codes (which can be
cannot
characters
character
preferable
print
be used,
code
The
- it simply ignores the
ensure
25
takes
are
used to
takes
for tables
head. This
DMP-130 does
full coverage
mode
up
up
and
Page 34

Using the D M P-130
Control codes
Before investigating the various print modes, let's consider how the
communicates
All information
(00
-FFhexadecimal).
the
American
referredtoas
Most
numbers
However,
numbers,
control codes allow you to change
underline,
The
control codes have different meanings
mode.Ifa
next few sections
ious Prin
with the Printer.
is
senttothe
Standard
the ASCII code. (See Appendix A for a listofASCII
(or
codes)
the
numbers
are
used to control various functions
superscript, subscript, etc.
codeisnot recognized by the
demonstrate
ter
functions.
Printer
The
Printer
Code
are
0 - 31, as well as some special sequencesofcode
Read
as numbers
interprets
for Information
printed as letters,
character
how someofthe control codes activate var-
these sections carefully.
between0and
these
numbers
Interchange,
numbers,orsymbols.
of
sets, select print
dependingonthe
Printer,itis
printed
the
255
according to
commonly
Printer.
current
as
Sending control codes from BASIC
Some
Printer
requireasequenceof2ormore
begin with decimal27(referred
notifies
code(s)
CHR$
This section discusses
IBM
codes,
the
Printer
you to use
to
Chapter
features
the
Printer
sent
determines
( ) to send
tum
ON,orsend
the
DMP-130 with
8, IBM emulation mode, for
are
activated by a single code,
thataspecial
which
these
codes to
Tandy
the
Printer
ESC
codes
Tandy's
codes. Most multiple code
to as
the
ESCape
sequenceison
Printer
OFF,
+ !
featureisselected. In
the
Printer.
(DIP
switch
set DIP switch 1-1 to
CHR$(27);
MS-DOS
the
code).
1-1toOFF).
CHR$(33).
operating
IBM
codes.
but
many functions
The
its way,
BASIC,
ON
This will allow
systems.
computer
decimal
codes.)
These
modes,
print
".z".
The
sequences
ESC
code
The
next
use
To
select
and
tum
Refer
Note:
The
command
codes to the Printer.Ifyou're
stitute
For
in the normal way.
PRINT#-2,
instance,
setupthe
LPRINT will be used in examples that
for
DMP-I30
Then
using a
LPRINT.
type the following
Tandy
as described
26
Color
earlier
program:
send
Computer., sub-
and
enter
BASIC
Page 35

10
J.\.EM
20
LPRINT
"DATA
";CHR$(27)iCHR$(56);
"PROCESSING"
:30
LPRINT
and
RUN
Roll
the
paper
over
partofthe
are
the
guilty parties.
the
various
code
sequence
feedtothree-quarterofits normal
it.
code
"MODE"
forward
word
sequences
CHR$
and
look at
DATA.
Take
a quick look at
(27),
the
Why?
understood
CHR$
(56)
distance."
The
results.
codes
Appendix
by
means
Data processing mode
How
can you tell which
on?
A little reflection on the above program tells you all
mode
the
DMP-130 uses
The
world
CHR$(27)
the
DMP-nO.
"change
whenitis
MODE
and
B. This
the
you
Chapter 3
printed
CHR$
cahrt
The
forward line
first
needtoknow
(56)
shows
control
turned
Line feed
mode,
not
Thus,
new line feed staysineffect until
the
LLIST
Sure
feed pitch, type:
LPRINT
commands
but
notindata
c,iuse a 3/4-forwarcl line feed until
the
Printer
DP
mode).
IENTERI
enough.
You
are
executed
processing
must beinDP
Type:
still have
that
immediatelyinword
(DP)
mode.
further
short
CHR$(27)jCHR$(54)
line feed
Word processing mode
When
the
same
programisexecutedinWP
immediately
WP
mode,
10
LPRINT
and
RUN
Just
as you
after
the
change
line
CHR$(20):REM
thc
program.
suspected,
word
DATA.
IOta:
Go
CHR$(20)
the line feedisimmediately
27
mode
into
The
after
the
And,incase
notice
(another
To
mode,
WP
mode
processing
(27, 56)
first line was
returntonormal line
the line feed
sequence
you
missed it, this
characteristic
and
try it.Toen
selects
executed.
(WP)
printed.
occurs
WP
did
of
ter
Mode
Page 36

Using the
Note
and
then
DMP-130
thatinWP
press
returnstonormal.
IENTERI
mode,
to
prove
the
Graphics mode
new
line feedisonly
that the half-forward line feed occurs only
temporary.
Type
LUST
once,
Graphics
one
ordinary
WP
symbols, for
mode.
terns
graphics
Foraquick
10
20
30
40
and
CHR$(18)
255
Type
mode.
modeisdifferent
thing,
code
CHR$(lO)
1/6"
pitch in
and
DP
features
example,
Instead,
for
the
for
numeric
print
charts,
lookatthis
LPR1NT
FOR
1=128
LPR1NT
NEXT
RUN
the
program.
puts
the
are
interpretedasdot
LPRiNT
Try
CHR$
LLISTing
from
in graphics
WP
and
DP
are
available in graphics
are
ignoredbythe
data
from 128to255istranslated
head.
This lets you
logos, etc.
mode
in action, change
CHR$(18)
TO
255
CHR$(I);
DMP-130 in grpahics
patterns.
(30)
and
the
programtobe
the
modes.
press
Print mode selection
Table5summarizes
to
another.
the
control
codes
word
and
data
mode
feeds
Furthermore,
mode.
Printer
produce
IENTERI
sure
requiredtomove
printoutsofhigh-resolution
mode.
The
to
return
you're
processing
paper
7/72" against
only a fewofthe
Standard
when
it is in graphics
our
test
program
numbers
the
PrintertoWP
not
stuckingraphics
from
modes.
letters
into
128
one
For
the
and
dot
pat-
to:
through
land.
mode
28
Page 37

Chapter 3
TableS.Control Codes
If
you're in:
DP
WP
Graphics
*Returns to last mode
And
changeto:
WP
Graphics
DP
Graphics
DP
WP
(WPorDP)
want
used.
for
Changing Modes
to
Send a CHR$(
(Dec)
20
18
19
18
30*
30*
Hints and tips about print modes
Data processing
• All commands which decide line feed pitch are
memory. They are not executed until a
is
received.
tion codes stored in the
• Line feed commands stay
mode
Then,
the
LF
code (10
paper
advances according to
Printer's
in
memory.
effect until replaced by a new
storedinthe
• All printable characters can be printed in this mode.
(Hex)
Dec.or1.38
the
pitch and direc-
command.
):
14
12
13
12
1E
1E
Printer's
Dec.)
Word processing
• Line feed codes that
• Line feed pitch changes affect only the
mode
determine
pitch are executed immediately.
current
print line.
• All printable characters can be printed in this mode.
Graphics
•
The
• Decimal numbers 128
as pin firing
mode
LF
code causes the
patterns
paper
125
for the
to move 7/72" forward.
sent via
print
CHR$inBASIC
head.
• Only a few control code sequences are recognized.
29
are
interpreted
Page 38

Page 39

Print font styles and
character widths
The
DMP-130
•
Standard
•
Correspondence
•
Proportionally
•
Graphic
Each
styleiscreated
The
character
characters
The
horizontal
Style Matrix
Standard 9 x 9
Correspondence
Quality (NLQ)
Proportionally
Spaced
has
four
distinct print
quality
spaced
characters
styles differinthe
are
created
dot
positions overlap;
Table 6. Character Widths and Densities
19x19
n x
with a
within
Size
18
(NLQ)
unique
sizeofthe
the
Normal
Compressed
Condensed
Normal
Compressed
Variable character width
(Condensed density)
(character)
dot
pattern
matrix.
the
font styles:
laid
outina gridormatrix.
matrix
vertical
Width
and
Density
10
CPII Elongated 5
12
CPII Elongated 6
17
CPII Elongated
10
CPII Elongated 5
12
CPII Elongated 6
and
ones
the
way individual
do
noL
CPI
CPI
8.5
CPI
CPI
CPI
4
Table
6 shows
condensed.
that
there
are.3basic pitches:
Selecting character styles
Character
Characer
Even
DMP-1.30
Table7isasummaryofthe
styles can be selected by control codes from
styles stayineffect until
entering
returns
graphics
mode
to the last active set on leaving graphics
character
does
another
not
style
.31
change
normal,
character
the
change
compressed,
the
computer.
styleisselected.
character
mode.
commands
.
set.
and
The
Page 40

Print
font
styles and character widths
Table 7. Character Style Change Commands
SendCHR$( )
(Dec)
27
27 23
27
20
27
17
27
18
27 29
27
66 1
27
66 0
27
83
27
83
27
88
27
77
27
27
27
31
27
32
19
1
0
14
15
(Hex)
1B
13
1B
17
1B
14
1B
11
1B
12
1B
10
1B
42
1B
42
1B
53
1B
53
1B
58
1B
4D
1B
OE
1B
OF
1B 1F
1B
20
1
0
1
0
Standard characters
Standard
dots
Eachofthe
•
Normal,10Characters-per-inch
•
Elite,12CPI
•
Condensed,17CPI
high).
characters
standard
are
printed
characters
in a 9 x 9
canbeprinted
If
you
want:
Normal (10
Compressed
Condensed
Proportionally Spaced
Correspondence
Correspondence Compressed
Start Italics
End
Start Subscript
Start Superscript
End sub-/superscript
Microfont
Start Elongation
End
Start Bold
End Bold
CPI)
(17
Italics
Elongation
dot
in 3
(12
CPI)
CPI)
Normal
matrix (9
main
(10
dots
character
(CPI)
CPI)
(12CPI)
wide by 9
widths:
Condensed
also
can be
gated
(double
totalof6
You
can
sample
lines.
NEW
characters
elongatedtodouble
are
printed
width.
width) which gives halfasmany
different
get a
I
ENTER
better
Type
I
print
feel
in this
widths.
for
the
program:
in a
11
Eachofthese
available
32
X 9
print
dot
matrix for 17
characters
widths by
widths
CPI.
can
per
inch
printing
This
be elon-
and
a few
a
Page 41

120
F$="STA.NDARD":
130
F$="COMPRESSED":
140
F$="CONDENSED":N=20:W$="
230
LPRINT
240
LPRINT
250
RETURN
and
RUN
it.
The
subroutineinline 240 sends the required control codes to the
130. Line
execution.
CHR$(27)CHR$(19):STOP
CHR$(27)CHR$(N)F$''
2.30
returns to normal characters width and stops program
N=19:
N=23:
W$="
W$="
10CPI":
12CPI":
GOSUB
GOSUB
17CPI":GOSUB
CHARACTERS
Correspondence quality characters
Chapter 4
240
240
240
"iW$
DMP-
Correspondence quality characters
CPr.
The
10
ters,
but
wide fit in the same space as 9 dots wide).
also has
Add
these lines to the program, then
150
UB
240
160
and
RUN
You'll find a great difference between the two styles.
characters have the same total width as normal width charac-
they are printed with the condensed
12
CPI and be elongated to 5
F$="CORRESPONDENCE
N=29:W$="
the program.
12CPI":GOSUB
are
printed in a
Correspondence
CPII6
compare
":N=18:W$="
240
19x18
character
CPr.
the two styles.
density (19 dots
10CPI":GOS
dot matrix for
quality print
Proportionally spaced characters
Proportionally spaced characters are the sameascorrespondence quality,
but the character matrix width varies from
characters are18dots high; the widths vary from.3dots to11dots (includ-
ing 2 columns of blank dots to allow space between the characters).
Proportionally spaced characters add a quality look to word processing
documents by eliminating wide gaps between characters. These characters
can also be elongated to double their normal width.
To
see how this font looks, add:
character
to character.
The
.33
Page 42

Prill!
fOil!
styles alld charllcter widths
170
and
180
RUN
F$="PROPORT10NAL
N=17:W$="":GOSUB
the program.
".
240
Graphics characters
The
graphics
can be
This
setisnot fully compatible with
computers:itis
available with correspondence characters
To
see how the various
190
N=19:W$="NORMAL
200
GOSUB
210
N=23:W$="COMPRESSED
220
N=20:W$="CONDENSED
260
FOR
270
LPRINT:RETURN
and
RUN
Since
the
graphics characters are 6 dots high, you can
graphics by using the half line feed
normal
character
10
a unique
setisused for block graphic printing.
CPI width, compressed
character
character
widths affect the graphic characters,
":F$="GRAPH1C
240:
GOSUB
1=224
the program
normal line-to-line spacingis1/6"
TO
260
254:LPR1NT
12
the
screen graphicsofmost
seL
The
or
":GOSUB
":GOSUB
(CHR$(27);
Characters
CPI,orcondensed 16.7
graphics characters
proportional
characters.
are
":LPR1NT
240:
GOSUB
240:
GOSUB
CHR$(1);
or
12
create
CHR$(28)).
: NEXT I
dots high and
continuous
CPI.
Tandy
not
add:
260
260
the
vertical
Add
these
lines to the
10
LPR1NT
20
FOR
30
FOR
40
READ
50
NEXT
60
NEXT
70
DATA
80
DATA
90
DATA
and
RUN
When you've printed
CHR$(27);CHR$(28);
R=l
TO
C=1
TO 7
N:LPR1NT
C:LPR1NT
R:LPR1NT
241,243,241,224,241,243,241
224,244,241,241,241,249,224
241,248,241,224,241,248,241
it.
program:
3
CHR$(N);
CHR$(27);CHR$(54);
out
the results, delete lines10through 90.
34
Page 43

Right justification
Chapter 4
Proportionally spaced
cessing programs.
words
that
monospaced
slivers
a page without destroying
justification,
ing from 1
You can
program.
lines
up the right margins.
70
SO
The
Enter:
Now
of
space
is
usually
130 provides codes to allow you to insert spaces
dot
to 9 dots wide.
demonstrate
When
of
proportionally
DATA
DATA
lines willbereadinas a string of
10
LPRINT
20
FOR
30
FOR
40
LPRINT
50
REM
60
NEXT
90
LPRINT
RUN
"THE
"DMP-130
1=1
J=1
J:LPRINT:NEXT
the
program.
characters
They
do not carry
print
between
you
characters to line up the right marginoftext
handled
the way these codes
add
the following 2 lines, the DMP-130 will print 2
spaced characters, then insert
are designed to be used with word pro-
around
styles do. As a result,
character
spacing. This process, called right
by word processing software.
These
codes
work
PROPORTIONAL CHARACTER
PRINTER
CAN
characters
CHR$(27)CHR${17)
TO
2:READ
TO
LEN(A$)
MID$(A$,J,
A$
1);
1
CHR$(27)CHR$(19):END
all the
wasted
you
between
are
summarizedinTable
by modifying
space
can
characters,
enough
SET
BE
RIGHT
with the
MID$
between
sneakinlittle
on
The
DMP-
rang-
8.
the
current
space to line
OF
THE"
JUSTIFIED"
function.
To
line up the right
first 8 letters
50
IF
then
RUN
The
following table will help when inserting spaces.
in
1=2
the
edge,
insert a single, blank dot-column
the second print line.
AND
J<S
THEN
program
Add:
LPRINT
35
between
CHR$(27)CHR$(1);
the
Page 44

Print
font
styles
and
character widths
Table 8. Proportional Spacing
spacing
spacing
text,
\
I
(Hex)
18
01
18
02
18
03
18
04 4 Dot Spaces
18
05 5 Dot Spaces
18
06
18
07
18
08
18
09
commandisused at
a line-full condition. Printing will start
command
and
if the
SendCHR${
(Dec)
27
01
27
02
27
03
27
04
27
05
27
06
27
07
27
08
27
09
If
a
proportional
ing a line
the
If
several kindsofproportional
at
the
length),itgenerates
proportional
endofthe
causes a line-full condition, only
setatthe
Delete
headofthe next line.
lines 10
through90of
your
Wrap-around
The
DMP-130isa dot-addressable printer.
determinedbythe
line.
The
numberofaddressable dots-per-lineindata
processing
mode
numberofcharacters, but by the
follows:
the
will beginatthe
spacing
commandsinsuccession
rowofproportional
the
last
proportional
sample
program
Therefore,
To
insert:
1
Dot
Space
2
Dot
Spaces
3 Dot Spaces
6 Dot Spaces
7 Dot Spaces
8 Dot Spaces
9 Dot
endofthe
text (exceed-
startofthe next line.
spacing
spacing
before
commands
command
going
line lengthisnot
numberofdots-per-
processingorword
are
and
used
is
on.
Standard10CPI
Standard12CPI
Standard17CPl
Correspondence
Correspondence
If
the
lengthoftext
a line feed
is
inserted
10
CPI 1920
12
CPI 2304
the
next line. This is called
Printer
and
the last
wrap-around.
960
1152
1918
receives exceeds the limitofdots-per-line,
characterisprinted
from the
startofthe
36
Page 45

Elongated characters
Chapter 4
Anyofthe
character
styles can be
Table 9. Elongated Printing
Send
CHR$ ( )
The
entered
You
100
230
and
(Dec)
27
27
start
(27 14)
any
can
easily
LPRINT
LPRINT
RUN
14
15
numberoftimes within a line
elongate
CHR$(27)CHR$(14)
CHR$(27)CHR$(19)CHR$(27)CHR$(15):STOP
the
program.
and
(Hex)
1B
1B
end
Bold characters
Bold
characters
characters.
(Dec)
27
27
are
SendCHR$(
31
32
implemented
elongatedtotwice
OE
OF
(27 15) codes for
the
charactersinthe
in much
Table 10. Bold
(Hex)
1B 1F
1B
20
Start Elongation
End
elongated
and
usedinevery
current
the
same way as
Printir.o
Start Bold Printing
End Bold
their
To:
characters
program.
To:
normal
width.
can
mode.
Change:
elongated
be
When
rent
buffer
character
Bold
characters
100
LPRINT
230
LPRINT
Now
RUN
a (27 31)
contents,
received.
the
code
sequenceisreceived,
then
resumes
can be
addedtothe
bold
current
the
character
program
DMP-130
prints
printing from the
by changing lines:
CHR$(27)CHR$(31)
CHR$(27)CHR$(19)CHR$(27)CHR$(32):STOP
program.
37
the
cur-
next
Page 46

Prilltfollt
Italics
styles alld character widths
Any01the
When
rent
buffer
received.
Whenasuper-/subscript
ing, the
the super-/subscript
Change
100
230
i
CHR
and
character
Send CHR$ (
(Dec)
27
66 1
27
66 0
a (27 66 I)
contents,
DMP-130
the
following
LPRINT
LPRINT
$(19):STOP
RUN.
tont
styles can be
Table 11. Italic
(Hex)
18 42 1
18 42 0
code
sequenceisreceived,
then
it begins italic printing from
commandisreceived during italic
prints
the
current
printing
program
mode.
lines to:
printed
Prilntirll'
buffer
CHR$(27)jCHR$(66)jCHR$(1)
CHR$(27);CHR$(66);CHR$(O);CHR$(27)
Superscript and subscript
on a slanL
To:
Start Italic Printing
End Italic Printing
the
DMP-130
the
character
contents;
thenitenters
prints
next
the
cur-
character
print-
into
In
superscript
superscript
line;
andinsubscript,acharacterisprinted
27
27
27
When
characters
a (27830)
and
SUbscript printing,
character
Send CHR$ ( )
(Dec) (Hex)
83 0 18530
83 1 18531
88 18
are
printing,acharacterisprintedonthe
Table
12. Super-/Subscript Printing
58
or
(27
831)code
printedinsuperscriptorSUbscript
character
Start Superscript Printing
Start Subscript Printing
End Super-/Subscript
sequenceisreceived,
38
heightiscutinhalf. In
on
the lower halfofa line.
printing
To:
upper
Pri,..,tir,n
subsequent
mode
halfofa
until a
Page 47

Chapter 4
(27 88) is
130
which
The
is
current
position
Type
10
20
SO
40
50
60
70
and
In
this
ends
received,
prints
the
prevailed
printing
upon
changed,
in this
LPRINT
LPRINT
LPRINT
LPRINT
LPRINT
LPRINT
END
RUN
it.
program,
the
super-/subscript.
current
speedorhorizontal
program.
Microfont
In
microfont
line
mode,
feed
mode,
(1/12") in
When
before
entering
a (27 88)
buffer
entering
superscriptorsubscript.
code
sequenceisreceived,
contents;
super-/subscript
dot
thenitreturns
resolutionisnot
CHR$(27);CHR$(8S);CHR$(0);
"SUPERSCRIPT
";
CHR$(27);CHR$(8S);CHR$(1);
"SUBSCRIPT
CHR$(27)i
CHR
";
$(88);
"CHARACTERS"
lines10and
all
WP
.30
printouts
mode
start
will be in
and
superscript
superscript
halfofthe
designated
to
the
character
Neitheristhe
and
printing.
changed
subscript
withahalf-forward
line
the
DMP-
font
from
underline
and
line
pitch
style
what
50
in DP
(Dec) (Hex)
27
When
a (27 77)
rent
buffer
In
this
mode,
As
with
superscript.
the
previous
Typeinthe
Table 13. Microfont
Send
CHR$ ( )
77
code
contents;
the
italic function is invalid.
font
following
18 48
sequenceisreceived.
thenitenters
the
printing
as follows:
NEW
pitch
program:
39
the
for
Priintiino
Start Microfont
the
microfont
evenifyou
the
microfont
To:
DMP-130
mode,
send
prints
an italic
mode
the
code.
depends
cur-
on
Page 48

Print
10
20
30
40
50
60
100
110
120
and
font
styles
LPRINT
GOSUB
LPRINT
LPRINT
LPRINT
END
LPRINT
LPRINT
RETURN
RUN
it.
and
character widths
CHR$(27)iCHR$(19)
100
CHR$(27)iCHR$(23):GOSUB
CHR$(27)iCHR$(20):GOSUB
CHR$(27)iCHR$(29):GOSUB
CHR$(27)iCHR$(77)i
"THIS
IS
NICROFONT."
100
100
100
40
Page 49

General control codes
Line feed codes (LF)
When
the
DMP-130 receives aLFcode
bufferisprinted followedbya line feed. Unless you tell it otherwise,
DMP-130 uses
DIP
switch 1-6 to
1/6"
forward line feed when advancing
ON
before turning on the
set to 1/8".
If
DIP
switch
feed, moving the print
switch
1-3isOFF,
1-3isON,
the
a carriage
head
to the
print head stays in
moves down 1 line.
Other
line feed codes control the pitchofthe
codes can be stored in the buffer. In
printing.
(ASCII
power,
returnisalso
start
of the next print line.IfDIP
the
line feed. InDPmode,
WP
mode,
10), all
the
performed
current
they cause
datainthe
Printer
paper.Ifyou set
line feed pitch
with
the
print
column
immediate
5
the
is
line
and
these
Pitch setting
27
code
sequence
These
is
senttothe DMP-130 in a 2-code sequence. First, a control
(CHR$(27))issent. This tells the DMP-130
will follow.
The
control codes are listed in
Table 14. Line Feed Control Codes
)
(Hex)
18
18
18
18
18
27 10
27 28
30
27
54
27
27 56
SendCHR$(
Hints and tips on line feed
• In
data
are
processing
not
activated until a
mode,
these sequences cause the
then
execute a line feed with the specified pitch
that
a special code
next
OA
lC
lE
36
38
codes are
LF
codeissent
number
Table
determines
the
specific pitch.
14.
To:
Full-Reverse Line Feed
or
or
or
or
or
1/8")
3/32")
1/8")
1/16")
1/16")
Printer
buffer.
(1/6"
Half-Forward Line Feed
(1/12"
Half-Reverse Line Feed
(1/12"
Full-Forward Line Feed
(1/6"
Three-quarter Forward Line Feed
(1/8"
storedinthe
In word processing mode,
Printertoprint the informationinits buffer,
and
direction.
They
41
Page 50

General control codes
Ell
CHR$(!O)
TheLFcode
o All
the
•
When
will not
work
from
some
(10)isinterceptedbyBASIC
codesinTable14are ignoredingraphics
DIP
switch
1-3
is
ON,
a
carriage
Special line feed codes
BASIC
and
return
with
the
sent to
CHR$
the
function.
Printer
as 13.
mode.
follows each line feed.
There
are
5 special
forward
line feed codes
modes.
Table 15. Special Line Feed Control Codes
SendCHR$( )
(Dec)
27 26
27
50
27
51
27
57
27
64 n
118,
1/12, 1/36, 1/24 forward line feed
These
line feed codes
•
They
cause an
immediate
feed, regardlessofthe
• A carriage
1-3.
These
or
printing a
returnisnot
special line feed
dot-matrix
(Hex)
18
1A
18
32
18
33
18
39
18
40 n
are
unique for two
dumpofthe
print
performed,
picture.
mode.
codes
Carriage return (CR)
A
CR
(13or141) code tells the Pri
and
then
perform
return
only,
on the setting
a carriage
depending
of
DIP
on
switch
ntertoprint
return
the
followed by a line feedora carriage
following new line
1-2.
that
operateinall 3 print
To:
1/8
Forward Line Feed
1112
Forward Line Feed (1/72")
1/36 Forward Line Feed (1/216")
1124
Forward Line Feed (1/144")
Forward Line Feed (nI144")
nl24
(1/48")
reasons:
Printer
regardlessofthe
are useful for
buffer
followed by a line
adjustingaprint
the
current
control
settingofswitch
buffer
code
line
contents,
setting
or
42
Page 51

Table
16. New Line
Control
Codes
Chapter
.5
SendCHR$(
(Dec)
27
21
27
22
•
WhenaCR
CHR$(27),
CHR$(21)
onlyacarriage
•
WhenaCR
received,orwith
line feed
•
At
switch
(NL)iscarried
power-on,
1-2issettoOFF)
Backspace
-rhe
OM
P-130
canbebackspaced
send
a 2-cocle
code
is in
specifies
position
LPRINT
would
backspace
sequence,ofwhich
the
formofCH
how
many
For
example:
)
(Hex)
18
15
18
16
(13
or
141)
codeisreceived
already
received,orwith
returnisperformecl
codeisreceived
0 IP
switdl
with a
1-2
OFF,acarriage
out.
the
PrinterISset
to a
from Ito255
the
R$
(11),
where11is a
dot
columnstobackspace
CHR$(8J;CHR$(150)
the
print
head
150
dot
CR CR
CR=CR+LF
after
printing
CHR$(27);
new
first
codeisCHR$
columns
by
line
from
from
Set
the
mode
dot
value
the
To:
(NL) Set
DMP-130
DIP
switch 1-2
the
buffer.
CHR$(22)
return
(provided
columns
(8),
from
current
the
current
with
ON,
already
followedbya
0 IP
when
you
The
second
I to 255
print
and
head
position
a
In
general,
ter
size,
dots
instance,
If
11
backspace
If
11
is'
ningofthe
is
treatedasan
word
Type
backspacing
That
is,
per
character
LPRINT
is0,backspacingisnot
more
greater
than
line In
independent
processing
in this
program,
shouldbedoneinmultiplesofthe
backspacing
(9
dots
CHR$(8),
than
255
the
current
graphics
modes,
for
plus 3 for
CHR$(24)
clone
dot
spaces,
clot
mode,
character.
the
standard
The
position,
the
43
character
spacing
would
repeat
printing
backspace
Backspace
between
current
set
characters),
chara(>
should
backspace2characters
feature
can
be
startsatthe
used
begin-
codeisignored
worksinhoth
data
be
and
12
FOI
to
11
and
Page 52

General control codes
10
LFRINT
20
LPRINT
and
RUN
Go
ahead
The
first string starts at position
tion right after theO.CHR$(8);
ter
widths (12 dots each,
and P.
You
TAB(30);"D
CHR$
(8);
CHR$
F 1
(72);
0";
"M
-
3"
the program.
and run it again. This time watch the actionofthe print head.
30>
The trailing semincolon holds the posi-
can imagine
CHR$(72);
remember?)
what
would
to place the M right between the 0
backspaces 6 normal charac-
happen
if the
dot
miscalculated!
To
backspace over elongated characters, simply double the number
dots. Try it. Change the program to:
10
20
30
and
LFRINT
LPRINT
LPRINT
RUN
TAB(30);CHR$(27);CHR$<14);"D
CHR$
CHR$(27);CHR$(15)
(8);
CHR$
(144);
the program.
"M
-
3"
distance is
of
P 1
0";
CHR$
in and
pensate for the double-width characters by doubling the 72
The
proportionally spaced
(27);
CHR$
outofelongated
(14) and
character
CHR$
(27);
width.
CHR$
(15)
Remember
get
the
that you must com-
in
line20to 144.
widthsofthe available character sets are showninTable
character
widths naturally vary from character to
character.
Table 17.
Font style
Standard
NLQ
The
10
CPI
12
CPI
17
CPI
10
CPI
24
CPI
numbers in the dots/character column include blank dots between
Dots/Character
12
12
14
24
24
Character
Set Width
To
1 Character
08
12
08
12
08
14
08
24
08
24
Backspace
nCharacters
08
08
08
08
08
characters.
44
DMP-130
17.
The
12
x n
12
x n
14 x n
24
x n
24
x n
Page 53

Chapter
Setting top-of-form and form length
The
control
all.3print
as
the
tobeused with
Whenever
up
and
On
initial
paper
setting
positIoned
code
CHR$
(27);
modes.Itresets
top-of-form position.
the
form feed code.
any line feed
compared
power-up,
position
of
DIP
before
and
switches
operationisactivated,
with n
the DMP-130 sets
the
form lengthisset as follows,
you
turnonthe
the
(x
1-4
CHR$
line feed
The
line length
116").
and
(52)isusedtoset
countto0
If
n is 0
per
pageisset
or
and
line
the
top-of-formatthe
1~6.
Be
sure
Printer.
the form length in
sets
the
current
ton(x
1, itischanged
feed
pitchiscounted
depending
the
paperisproperly
line
116")
to
L
current
on
the
.5
Table 18.
DIP
Switch
1-4 1-6 Form
OFF OFF
OFF
ON
ON
In
single-sheet printing,
ON
OFF
ON
the
Form feed (FF)
WhenaCHR$
printed
tion,
out
and
However,
Printer
through
internally
send
out,
ittothe
the
POKE
bypass
the
(12)
completely,
the
line feed
thereisone
BASIC.
and
intercept
instead,
Printer,
or
the
OUT
interpreter.
commandisreceived,
the
counterisreset
slight
Most
the
a seriesofline feeds. Since
CHR$(12)isnot
statementtosendaFF
Form
Length/Lines-per-page
11
inches
11
inches
12
inches
12
inches
number
of Iines-per-pageis56.
the
print
paperisadvancedtothe
to
O.
problem
BASICs
form feed
when
you
keep
codeonits
track
the
activated.
directly to the
Lines-per-page
buffer
next
top-of-form posi-
communicate
of
the
waytothe
FF
code
Some
BASICs
66
lines
88
lines
72
lines
96
lines
contents
to
top-of-form
Printer
never
can use
printer
are
the
and
makes
and
45
Page 54

General
cOl1lrol codes
Entering
WhenaCHR$(27);
defaultsofthe
carriage
I-I)
returnstoits
are
read
Ignored
Codes
ignoredorprinted
There
Redundant
ignored.
(usedtoenter
codesinthe
ASCII
The
that
are
For
0, for
following
All
Modes:
•
Outofrange on repeat sequence.
It
Outofrange on
• Redundant codes that do not change the current Printer status. For example,
if
send a CHR$(14)
DP
mode:
WPmode:
Graphics
Unprintable
Codes
in
• All codes
• Unprintable repeat data n2.
mode:
printed as
DP
and WP modes:
above ignored codes.
IBM
mode
CHR$(33)isreceived,
IBM
mode.
home
That
is,
position,
buffer
and
all
again.
or
Undefined
are
unusableorundefined
with
the
symbol which
several
eodes
reasonsacode
thatdonot
example,ifthe
DP
mode)isuseless.
range0to31that
example,isnot
table
sUlllmarizes
change
Printerisin
the
used in any of
the
Table 19. DMP·130 Ignored
POS
sequence.
when
underline is set.
0,1,19,30,127,255
0,1,20,30,127,255
All codes in the range 0 - 127 are ignored, except
(7),
(10), (12),
(2722), (2726),
(2764
repeat sequence data n2 is also ignored.
from
0-31
and 128
n),
(27
(13),
(27
72
n),
-159,
codes
in a
represents
can be
DM
undefined
(2714), (27,15), (2716
33),
(28
except the activefunction codes or the
the
And
(27
n1
unusable
current
DP
there
P-130
Control
50),
n2),
the
DMP-130isresettothe
contents
DIP
given
mode,
simply
the3print
are
printed
switches
print
Printer
an
in a
(except
mode
invalid
certain
status
sendingaCHR$(19)
are
many
ASCII
does
not
modes.
print
codes.
Codes
n1
n2),
(2751),
and
(30).
(27
52n)(27,
out,
are
code.
are
recognize.
(27,
21),
57),
the
switch
either
mode.
usually
control
46
Page 55

Chapter
.5
DMp..130 buffer
The
DMP-130's
tages
overatypewriter.
transferred
printed
the
received(e.g.,
printed
depends
same
tivetothe
In
be
Understanding
controlofthe
immediately;
Printer
on
on
line; in
the
DP
storedinthe
Hints and tips on the
DP, WP,
•
The
buffer
width
selected.
number
1-2 is
settoON
on
the
The
bufferisprinted
abilitytotemporarily
immediately
they
called
the
LForCR),
the
paper.
the
circumstances.
others,
paper.
mode,
and
allocates
Printing
same
the
commands
buffertotake
how
the
DMP-130.
graphics
The
resumesatthe
(CR
line,
the
Codes
to
are
buffer
What
print
buffer
DMP-BO
modes
a fixed
bufferisemptied
only).Ifdifferent
last
without
operation
store
dataisoneofits
senttoa
the
paper.
stored
When
the
happens
In
headismovedtoa
for
effect
worksisimportantifyou
numberofdots,
character
typewriter
Codes
in a
the
bufferisemptied
after
some
changing
when
senttoa
separate
buffer
the
cases,
printing
print
the
dataisdumpedtopaper.
buffer
dependingonthe
when
the
startofthe
added
this last
next
character
may
character.
fills,orcertain
fonts,
main
(i.e.,
keys
pressed)
Printer
sectionofmemory
codes
and
all
dataisthen
buffer
different
data
widths
line
stored
line
unless
exceed
continues
wishtogain
dataisprinted
position
feed,
etc.,
character
equals
DIP
have
been
the
dot
advan-
are
on
rela-
switch
used
count.
are
not
in
are
the
can
full
that
•
The
the
next
e
The
form
(if
the
switch 1-3),
next
line.
next
•
The
printing
carriage
the
print
next
Otherwise,
last
character
print
feed
code
top-of-form
Otherwise,
top-of-form
carriage
(assumingatleast I
return
headismovedtothe
buffer-full
subsequent
receivedbythe
line followinganautomatic
code
makesitto
then
the
line
the
line.
return
only
condition
bufferisprintedatthe
(FF=12
bufferisprinted
withoutacarriage
print
code
has
characters
decimal)
the
Printer)IfLF
headispositionedatthe
(CR
=
character
been
selectedbythe
beginningofthe
will
resultinprinting
will be
47
line feed
automatically
only
and
the
returntothe
13
decimal)
codeisalreadyinthe
printedatthe
and
has
been
print
automatically
settingofDIP
current
over
beginning
carriage
activates
selected
head
beginningofthe
beginningofthe
the
startofthe
return.
printing
movestothe
activates
buffer).
switch 1-2,
line
and
current
of
(DIP
If
the
line
next
Page 56

General control codes
print line.
•
The
line feed code
If
LF only has been selected
and
the print
the
code
head
to
computer
return
positioned at the
•
If
print
continues from
•
The
continues
command.
head
the beginning
through the parallel interface, the bufferisprinted. Printing
the
positioning sequence (2716111
in
the
(IF=10
moves to the next print line without a carriage
startofthe next print line.
delays more than a second before sending the next
currrent
current
decimal) automatically activates printing.
(DIP
switch 1-3), then
of
the line. Otherwise, the print
postion.
112)
line at the dot address specified by
the
bufferisprinted
prints the buffer. Printing
the
head
(27 16)
is
Data and
•
The
current line at the
oIfa
erisprinted.
(27 19), (27 20), (27 23), (27 29), (27 31), and (27 32). Printing continues in
o
Dot
• When a start bold
printed. Bold printing continues from
•
Whenastart
spondence,
the
Graphics
When
the
current
word
processing
backspace
character
graphics printing continues from
bufferisprinted.
mode
the
end
previous
print
Note
1:
by a
line
feed
has
paper
command
setofdifferent
Codes
the
current
super-/subscript,
proportional
only
graphics
print mode and printing continues in
position.
In the description, next line means the
feed
operation.Indata
been
set in
to move in
modes
activates printing. Printing continues in the
dot
address specifiedbythe
for changing
line with
or
end
bold
quality12CPI,orcompressed codeisreceived,
mode
commandisreceived,
the
memory,
the
reverse direction.
only
dot
densityisselected,
character
the
new character style.
the
current
commandisreceived,
the
current
italics,
microfont,
processing
the line feed
command.
sets
are:
the
mode,
the
data
(27 17), (27 18),
character
the
character
compressed
the
Printer
same
line from the
new
line
if a reverse line
operation
in the buff-
position.
buffer
position.
returns to
performed
will cause
is
corre-
Note
2:
overflow
Repeat
data
can cause a buffer-full
by single characters.
48
condition,
as well as an
Page 57

Hex print mode
The
DMP-130iscapable of printing hexadecimal values for
transmitted to it. This hex print
information
turn
ON
the
FORM
is
being received by the Printer.
the
powertothe
FEED
switch.
mode
Printer
is
useful for checking exactly what
To
implement
while
simultaneously
Chapter
data
that
this function,
holding
down
.5
is
Before printing, be sure that lO-inch-wide
to avoid printing on
RUN
the program
For
example, the
10
LPRINT
will normally print
NOW
If
4E
54
To
IS
THE
you
enter
4F
57
49
exit hex print
hex print
4D
that
BASIC
"NOW
out
TIME
20
45
mode,
the
platen.
you want to check.
program line:
IS
as
Then
THE
TIME FOR"
FOR
mode,
the printout will look like this:
49
53
20
46
turn the Printer
20
4F
IBM character set
You
can use
sequence
To
return
IBM
character
the
IBM
character
CHR$
(27) ;
CHR$
to the
Tandy
set 2isapplicable in
(58).
character
set 2 in
set, send
Tandy
paperisloadedinthe
press
the
ON-LINE
54
48
52
OFF
Tandy
CHR$
mode.
and
mode
(27);
OD
then
by sending
CHR$
45
ON
Printer
switch and
20
again.
the
code
(59). Only
49
Page 58

Page 59

Word and data
processing
modes
Repeat printing
The
DMP-130
repeat
graphics
a .3-code
Typeinthis
10
a single
•
CHR$(28)
•
Numberofrepetitions
•
Codetobe
LPRINT"
E /
20
LPRINT
30
LPRINT
Code
241isfrom
40
LPRINT
50
LPRINT
60
LPRINT
;
"2"
j
CHR$
70
LPRINT
SO
END
Now
RUN
provides
codes,
sequence:
new
(2'1);
the
a built-in
character
underlining,
program:
code
repeated
/"jREM
CHR$(27)jCHR$(2S);
CHR$(2S)jCHR$(13)jCHR$(241)
the
graphics
"
"jREM
CHR$(S)jCHR$(7)j
CHR$
(92)j"/
"X";
"+2X+1)"
program.
repeat
upto255
block
graphics,
2 BLANK
character
1 BLANK
(X"
capability.
times.
set
SPACE
CHR$
It's
etc.
The
SPACES
(2'1);"S"
You
great
repeat
BEFORE
can
for
feature
;
CHR$
6
use it
repeating
uses
TH
(0)
to
With
a little fancy
came
up
with a
bad
memories,
Note:
Depending
of
repetitions)isinterpreted
maybeinterpretedasthe
move
to
the
times.
Refertothe
footwork,
rough
doesn't
next
you
approximationofa
it?
on
the
computer,
TAB
TAB
position
owner's
manualofyour
Underline printing
When
you
needtounderline
DMP-130aCHR$
(15). All text
any
were
abletoline
the
differently.
command,
instead
textineither
that
follows this
51
square
second
For
causing
of
computer
DPorWP
up
root
parameter
example,
the
printing
code
the2slashes
sign, Brings
(number
CHR$(9)
print
head
characters
for
details,
mode.
will be
underlined
send
and
back
to
9
the
Page 60

Word and data processing modes
until you
If
d print
underline-selected
home
designatedbythe
If you
condition,
designationofunderlineisthe
mode.
For
10
20
30
40
50
60
In this
(LEEWAY
underline
sendaCHR$(14)
head
positioning
condition,
position (leftmost printing position) and
print
enter
graphics
when
you
returntothe
SendCHR$(
(Dec)
15
14
example,
LPRINT
LPRINT
LPRINT
LPRINT
LPRINT
type in this
CHR$(20)j:REM
CHR$(15)j:REM
"LEEWAY
CHR$(14);:REM
"GIVES
which stops underlining.
coueisreceivedvvhile
the
head
positioning code.
mode
while
Table
20. Underline Printing
)
(Hex)
OF
OE
short
BUSINESS
GOOD
END
example,
off
line 20
BUSINESS
and
GIVES
turnsonthe
PRODUCTS)
GOOD
the
Printer
underlineisnot
the
Printerisinanunderline-selected
former
same
program:
character
as it was
WORD
printed
the
dot
column
printing
before
Start Underline
Stop Underline
entering
To:
PROCESSING
START UNDERLINE
PRODUCTS"
STOP UNDERLINE
SERVICE"
underline
is
SERVICEisnot
and
underlined.
the
first lineoftext
Line
underlined.
is
between
position
mode,
graphics
40
turns
HI
an
the
the
the
Print head positioning
In
either
dot
position.
tioning
Using the
line,
but
cates
the
DPorWP
Every
sequence.
normal
only
available
mode,
other
character
half
(480)
columnsineach
you can position
print
head
positionisaccessible
sets (10
are
accessible by you. the following
CPI),
mode.
52
there
the
are 960
print
headtoa specific
through
dot
the
positions
table
posi-
per
indi-
Page 61

Table 21. Print Head Positioning
Chapter 6
Character Width
Normal
Compressed (12
Condensed (17
Correspondence(10
Elongated
(10
CPI)
characters
CPI)
CPI)
(12
CPI)
CPI)
use the same
ters are printed twice as
wide.
960
1152
1918
1920
2304
dot
columns, even
Even if underlineisdesignated, underline
home
position
by the print
To
position the
numbers
other
words,
1.
Send
(the
leftmost printing position)
head
positioning code.
print
head to a specific position, send a (27 16),
(we'll call
themnland n2) that specify the desired
just
follow this general
procedure:
a control code which specifies the
densed,orcompressed).
2.
SendaCHR$(27);
the
print
headtoprint
3. Tell the
more
stand
4. Tell
Printer
complicated
that
the
Printer
you simply tell the
CHR$(l6)
a specific
which
dot
and
will be explained shortly.
to tell the
dot
column you
Printer
what you want to print.
does
and
character
Printer
column.
want
which
Available Columns
480
576
959
960
1152
not
the
though
appear
position
the charac-
between
designated
then
position.
set
(normal,
you want to position
to print. Thisisa little
For
now,
just
under-
dot
column you
want.
the
2
In
con-
When
you want to specify a dot column
must first use
CHR$tosend
the (27 16) code. Follow this with
where
2-code sequence which specifies the position.
LPRINT
wherenlis a value
CHR$(27);CHR$(16);CHR$(nl);CHR$(n2)
between
0-4
andn2is
53
printingisto begin, you
For
instance:
a value
between
0-255.
another
Page 62

Word
and
datil processing
If you wishtospecify
dot
column:
0-255
256-511
512-767
768-1023
1024-1152
modes
Table 22. Print Head Positioning
n1
must
be:
o
1
2
3
4
n2
must be:
0-255
0-255
0-255
0-255
0-128
Remember'
(nl
=
upto575
columns
allows
pondence
n2 =
Normal
I,
n2 = 223);
(nl
= 2,n2= 63);
upto958
youtoaccess
12
CPI
127)0
Why2numbers
DMP-130
positions
If
you
interpreting
3
lower
Note:
Seeifyou
III = I gives 256
be
sent
10
with I
available,
are
a fanofbinary
bits
Use
can
as
112,
LPRINT
these2numbersasa single
ofnlare
lO-inch-wide
);"*"
and
RUN
the
Whoops!
you
lineo
10
The
needtoleave
Try:
LPRINT
);"*"
printing
compressed
(nl
dot
allows
(Ill
and
numberis255.
printacharacter
of
those
allows
condensed
=
3,
n2
columns
youtoaccess
n2)?
The
math,
used
as
b(8),
paper
dots.
youtoaccess
printing
allows
you
printing
= 190);
and
you
for
correspondence
upto959
dot
maximum
clearly
will
recognize
II-bit
b(9),
this
next
(nl
columns
value
you
(b(O) -
and
b(IO),
example,
startinginposition
and
480 - 256 = 224 is
dot
columns
to access
allows
youtoaccess
= 3, n2 = 189);
upto1151
you
have
more
that
b(IO))
480innormal
Type:
CHR$(27);CHR$(16);CHR$(1);CHR$(224
program,
asterisk
printedatleft
enough
room
edgeofthe
for
the
paper.
asterisktofit
on
CHR$(27);CHR$(16);CHR$(1);CHR$(218
10
CPI
can
than
the
DMP-130
the
difference
Hmmm!
the
upto479
dot
columns
clot
printing
cones-
(nl
= 4.
sendtothe
255 dot
value,
The
density,
Maybe
endofthe
is
to
54
Page 63

and
Try
RUN
this
the
program.
program
with
That's
the
betterItfits
different
character
nicelyatthe
densities.
C!lapler 6
endofthe
line.
Positionisa little like a
giving
modes,
If
10
20
30
+I
40
50
you
much
its
potentialisgreatestingraphics
you
wanttomakeareal
LPR1NT
FOR
1=1
LPR1NT
*3
I N(l/5
LPR1NT
NEXT I
Get
outofthe
finer
CHR$(27)jCHR$(28);
TO
CHR$(27)jCHR$(16);CHR$(1);CHR$(150
) ) ;
"*"
double-width
controL
100
TAB,
mess
butitgets
Although
on
mode
your
and
IJeft and right margins
You
can
designated
When
must
margin.
characters
27
27
you
first
(Dec)
81
82
position
by
wanttochange
send
Follow
from
SendCHR$(
n
n
the
the
current
a
CHR$(27):
this
the
Ieltmost
left/right
with
font
pitch.
the
left/right
CHR$(RI)
another
position
margin
code
Table 23. Left/Right Margin Set
)
(Hex)
18
51
18
~2
right
down
itisavailable
mode.
paper,
then
toaspecific
margin
to
which
try:
RUN
toanew
tell
the
specifies
Left Margin Set
Right
to
the
clot
in all.)print
the
program
charactel
pOSItion,
Printertochange
the
llllllll;er
To:
Margin
Set
level,
position
you
the
of
The
value/Iindicates
font
pitch
e
Once
the
changed
~
Previously
o
When
maximum
from
Ieltlright
even
set
setting
printable
the
leftmost
when
tab-stop
the
left
the
number
margin.
margin
the
character
positions
margin,
characters
of
characters
positionisset,
modeischanged.
will
notbeaffectedbythis
the
maximum
in
the
current
55
counted
this
value
printing
margin
of11is
by
the
current
will
not
command.
limitedtothe
mode
minus
be
2
Page 64

Word and data processing
(e.g.,
137 - 2 =
mand
•
When
margin
will he
setting
ignored
the
value by 2;
modes
135innormal
right
margin,
otherwise,
Skip perforation
You
can
set
a skip
SendCHR$( )
(Dec) (Hex)
27
72
The
skip
zoneisdetermined
switch 1-6issettoON).nequals
at
the
bottomofthe
•
If
the
valueisalready
area
when
•
If
n
extends
n
printing.
the
zone
foraperforationatthe
Table
24. Skip
1B
48 n
by the
form.
set,
the
form
length,
printing
the
this
numberofn times 1/6"
the
Printer
this
mode);
value
command
Perforation
numberoffull linestoleave
automatically
sequence
otherwise,
ofnmust
will be
bottomofthe
Set
Set Skip Perforation
willbeignored.
ignored.
To:
skips
exceed
(or
the
this
com-
the
left
form.
1/8"ifDIP
blank
designated
•
At
power-on,
willbeperformed.
DIP
switch 1-5
determines
whether
I-inch
Bidirectional and unidirectional
printing
In
DP
or
WP
selectable.
SendCHR$( )
(Dec) (Hex)
27
85
0 1B
27
85
1 1B
If
you
need
to select unidirectional
CHR$
(0)
and,
mode,
Table
either
25. Bidirectional/Unidirectional Printing
to
return
bidirectionalorunidirectional
55
a
55
1
to
bidirectional
printing,
Start Unidirectional Printing
Start Bidirectional Printing
sendaCHR$
printing,
56
To:
sendaCHR$
skip
printing
(27);
perforation
is
CHR$
(85);
(27);
Page 65

CHR$
(85);
CHR$
(1).
At
power-up, bidirectional printingisselected.
International characters
The
(2789n)
n must be within
commandisused to designate each International character.
the
rangeof32
::::;
n
::::;
Chapter 6
42.
Table 26. International Character
33
ASCII
35
36
64
91
92
93
94
96
123
124
125
126
n
Code
Country
(23)H
(24)H
(40)H
(5B)H
(5C)H
(5D)H ]
(5E)H
(60)H
(7B)H
(7C)H
(7D)H
(7E)H
32
(20)H
(21)H (22)H
USA
Germany
#
#
$ $ $
§
(ii'
[
A
6
\
U
0 0
0
ii e
{
I
6
u e
}
-
B
34
35 36
(23)H
France
Norway
£
# #
:a
a
u
0
A: A A: A
y
0
§
A A A
A u u
u e e u
i33
U
0
a a a
ii U u
37 38 39
(24)H (25)H (26)H
Sweden
Denmark
# # £
$
n
E E
6
0
ii
i33
6
0
When the DMP-130 receives this command, the
Table
(27)H
Finland
llaly
q
$ $
§ .§
@l
0
6 y N
A
e
0 0
ii
a
6
a ii
a
e y }
- j
ASCII
40
(28)H
Spain
£
i
l
0
0
-
codes
41
(29)H
England
[
$ $
(iLl
[
\
]
0
{ e
I
-
that
input will print characters as specified above. USAisdesignated at
power-on.
42
(2A)H
Belgium
#
a
0
y
§
0
ijI
e
-
are
57
Page 66

Page 67

Graphics mode
In
graphics
posal.
head,
The
DMP-130
of
the
How
answeris480,
How
answeris7.
That
480 = .3,.3(0),
mode,
You
are
available
many
across the paper
many
lip
means
you
younolonger
responsible
allows you to
graphic
and
can
down
specify
dots,
(dot
for
have
addressable
anyone
have
the
positioning
direct,
columns)
ofupto.3,.360
pre-defined
and
programmable
dot
columns
addressable
charactersatyour
the
actionofthe
are
there?
dots
individual
control
are
over
The
there?
dots
correct
7
dis-
print
all
The
(7 x
Howdoyou
umn
you
topinthe
Simple,.JlIst follow this
1.
SendaCHR$
2.
SendaCHR$
the
3. Tell
more
stand
4. Tell
ways.
just
When
must
first use
2-code
LPRINT
where
print
just
want?
(For
400th
dot
(I8)toput
(27);CHR$ (16)totell
print
headtoprint
the
Printer
complicated
that
the
Printer
Again,
keep
you
want
sequence
in which
you simply tell
what
this will be
this overall
to specify a
CHR$tosend
which specifies
CHR$(27);CHR$(16)iCHR$(nl);CHR$(n2)
n I
is
a value
between0-I
one
(or
twoorthree)ofthose
example,
column?)
general
and willbeexplained
how
can
procedure:
the
DMP-130ingraphics
a specific
dot
the
you
wanttoprint.
explainedinmore
procedureinmind.
dot
column
the
dot.
Printer
column
(27 16)
the
position.
and
n2
dotsinthe
you
print
the
third
mode,
the
Printer
you wishtoprint.
shortly.
which
You
where
code.
isavalue
you
For
dot
column
candothis a
detail
shortly
printingisto
Follow
For
instance'
between
this with
dot
col-
dot
from
the
wanttoposition
Thisisa little
now,
just
under-
you
want.
number
For
now,
begin, you
another
0-255.
of
59
Page 68

Graphics
mode
Table 27. Graphic
If
you wish to
dot
column:
0-255
256-479
Remember'
(n1 =
greater
into a
For
10
20
(Don't
1.,
n2 = 223).
Even
though
than
two-byte
instance,todraw
LPRINT
LPRINT
) ;
CHR$
(255)
worry,
In line 10,
CHR$
(27);
(Note
that
Try this line to
10
LPRINT
specify
Graphic
printing allows you to access
dot columns
255.
That
value.
a vertical
CHR$(18)
CHR$(27)jCHR$(16)jCHR$(0)jCHR$(144
that
last
CHR$
(18) puts the
CHR$
CHR$
(16) tells it to get
(0)isnecessary.)
print
a vertical
CHR$(18)jCHR$(27)jCHR$(16)jCHR$(1)
jCHR$(223);CHR$(255)j
What
happens
is:
greater
is,
CHR$
baratdot
CHR$(255)
Printeringraphics
bar
Dot
Positioning
n2
n1
must
be:
o
1
than 255 exist,
dot
you
must
0-255
0-223
columns up to 479
cannot
send
(400)isnot allowed - you must
column 144, try this
willbediscussed
shortly.)
mode
readytoposition
at the rightmost available
and,
the
dot
program:
print
be:
values
break
in line 20,
head.
column.
it
1.
CHR$(18)
2.
CHR$(27);
print
3.
CHR$(I)
4.
CHR$
Note.
If
DMP-130
puts the
CHR$(16)
Printer
into graphics
tells the DMP-130 to
head.
tells the
(223) specifies the last available
you use
Printer
CHR$
(224)
that
the position will be
in
this line
would wrap-around to the first dot
60
clot
mode.
get
column.
instead
column
ready
to position the
greater
of
CHR$
than
(223), the
in the next line.
255.
Page 69

Printing graphics patterns
By
now,
you
shouldbeadeptatpositioning
need
to be
able
to
tell
the
DMP-130
positioned.
whattoprint
the
print
head.
once
Chapter 7
But
you
the
head
also
is
Remember
print
Look
discussed.
which always
printedatonce.
Try
printing
10
LPRINT
that
anyorallofthese
backatthe
Do
just
;CHR$(223)i
How
does
CHR$(l29)
Even
though
numbered
tem
sequentially
you
must
Table 28. DMP-130 Addressable Dot Numbering System
Dot#:
1
2
4
8
16
32
64
there
are
sample
you
remember
printed
the
7 vertical
dots
programs
a vertical
top
dotofthat
in any
the last
dotsineach
combination
used
when
partofthe
bar?
That'sanexampleofall 7
last
dot
you
print
program
column
dot
head
CHR$(18);CHR$(27)iCHR$(16)iCHR$(1)
$(129);
CHR
print
just
the
top
dot?
the7dotsina
use with
dot
column
fromIto7.Table28describes
the
DMP-130
Dot:
are
in a
vertical
when
specifyinganindividual
Number You Must Use
To Print the Dot:
column.
want.
positioning
line
(479).
row,
the
numbering
129
130
132
136
144
160
192
You
can
was
(CHR$(255))
dots
being
they
are
not
sys-
dot.
For
instance,
buttoprint
10
LPRINT
i
$(223);CHR$(192);
CHR
Thisisfine if you
a
combinationofdots?
you've
the
bottom
CHR$(18);CHR$(27);CHR$(16);CHR$(1)
already
wanttoprint
dot,
seen
change
how to
an individual
the
print
program
61
the
dot,
top
line
but
dotinthe
to:
howdoyou
column,
print
Page 70

Graphic.l
mode
That's
1. Specify the
2.
3.
For
(dot
73.
addressable
actually
dots
you
wanttoprint.
Add
those
individual
Add
the
sumofthe
example,ifyou
#8),
and
Then
acid
dot
10
LPRINT
quite
simple,
dot#(i-64,
wanttoprint
the
last
the
sum
patterninthe
too.
seer
dot
# 's
combined
dot (dot
(73) to 128:
form
abie 28)
together.
dot
the
#64),
CHR$
lhal
#'s
to 128.
first
dot
add
them
73
+ 128 = 201.
(201):
represelll:>
(dot
together:
CHR$(18)jCHR$(27)jCHR$(16)jCHR$(1)
jCHR$(223);CHR$(201);
Remember
Tryout
1 + 2 + 4 + 8 +
The
following
middle:
10
how
the
formula
sample
LPRINT
CHR$(255)
on
16
that:
+ 32 +
program
printed
64=127
line will
a solid (all
+ 128 = 255
print
a box with a line
dots
CHR$(18);CHR$(27);CHR$(16)jCHR$(1)
;CHR$(3)jCHR$(255)jCHR$(201);CHR$(201);CHR$(
201);CHR$(201)jCHR$(255);
Now
to flex
our
muscles.
Typeinthe
following
program:
# 1),
Use
printed)
the
individual
the
fourth
1 + 8 +
201
vertical
through
as
64
bar?
dot
=
the
the
NEW 1
10
ENTER
LPRINT
208=1:N=128
30
FOR
40
FOR
80
IF
90
LPRINT
100
NEXT
120
LPRINT
RUN
the
program.
buffer.
This
program
code
pattern
a single
dot
I
CHR$(18)
1=1
TO
J=O
8<0
TO
THEN
CHR$(N);
J:NEXT
CHR$(30)
Be
alternately
storedinthe
from
the
20:8=-8
6
N=N+2-(6-J)
I
prepared
adds
variableN.The
preceding
EL8E
forapause;ittakes
and
dot
62
subtracts
pattern.
powersof2 to
net
effectisto
N=N-2-J
time
to fill
addorremove
the
the
current
print
Page 71

Line feed
Chapter
7
In graphics
one
right after
vides a 7/72" line feed. A single 7/72" line feed
or
approximatelyO.I inch. This small
printing
Modify
change:
20
FOR
50
IF
60
IF
70
GO
110
and
RUN
These
first passofthe
between
In
addition
available:
III 1/72" line
• 1/144" line feed -
III
11/144"
11
should
• 1/216" line
mode,itis
another,
without
the
K=l
current
K=l
unwanted
programtodemonstrate
TO
THEN
S<O THEN
TO
90
LPRINT:NEXT
the
program.
lines infiltrate the
print head.
passes.
to
a 7/72" line
feed-
line feed
be a value
feed-
CHR$(27);CHR$(50)
assumed
each 7 dots high.
space
that
you
paper
between
wanttoprint
Therefore,
advance
lines.
2:S=1:N=128
80
N=N+2-J
ELSE
K
current
CHR$
CHR$(27);CHR$(64);CHR$(n)
between
CHR$(27);CHR$(51)
loop
The
LPRINTinline
feed,
the
(27);
CHR$
1-255.
and
produceamirror
following
(57)
rowsofgraphics
graphics
advances
this fixed line feed,
the
allows for
paper7dots
continuous
N=N-2-(6-J)
image of the
110
causes
4 line
the
feed
mode
Add
line feed
codes
pro-
or
are
Repeat function
CHR$
(28) will tell
numberoftimes.
The
format
FOI
instance,
solid vertical
Change
90
LPRINT
for this
repeat
line 90 to:
the
DMP-130 to
repeat
code
+ l1umber
LPRINT
bar15times.
CHR$(28);CHR$(l5);CHR$(255)
CHR$(28);CHR$(2);CHR$(N);
repeat
function is:
of
times to repeat + what to repeat
63
a graphic
pattern
a specified
will
print
the
Page 72

Graphics
mode
and RUN
the
program
..
Leaving graphics mode
CHR$(30)isused to exit graphics mode.Itreturns
same
mode
In
addition,
style,
5
LPRINT
are
restored.
(OPorWP)
all the
CHR$(27)jCHR$(23)j"COMPRESSED
the
previous
Change
Printer
the sample program to:
wasinwhenitentered
conditions, such as underline and
CTER WIDTH"
90
LPRINT
130
LPRINT
and RUN it.
Sure
enough,
CHR$(N);
"STILL
the
compressed
IN
COMPRESSED
modeisstill alive
and
Freehand drawing
The
computer
described by a
hand,
require
the dot printing
7 dots available for
can
do
mostofthe workindrawing figures
mathematical
translating
combinations
graphics,
function.
the figure into a matrixofdots,
for each print
separate
Freehand
head
position. Since
the matrix into rows 7
the
OMP-130 to the
graphics mode.
MODE"
well.
drawings, on
then calculating
character
CHARA
that
can
the
there
dots
be
other
are
high.
The
numbers
and
typing
as you
NEW
120
160
190
210
The
between0and
then
time,
send
I
ENTER
I
DATA
DATA
DATA
DATA
999's will be
send
themtothe
can be
themtothe
storedinOATAstatements.
store
the
dataasnumbers
Printer.
Enter
999
13,12,112,999
32,32,18,18,8,15,999
16,16,8,8,4,4,2,2,1,1,999
used
to signify the
127.
Now
for the
Printer.
program
from 0to127,
these sample
endofa line.
to read
64
To
The
the
conserve
then
OAT
A lines:
other
numbers,
memory
add
numbers
add
128
are
128,
Page 73

10
LPRINT
20
FOR R=1
30
READ
40
LPRINT
80
LPRINT:NEXT
90
LPRINT
100
LPRINT
Now
RUN
Not
much to
repeatanumber
bers to indicate the
repeated.
120
DATA
CHR$(18)
N:
IF
CHR$(128+N)j
CHR$(30)
the
program,
brag
several times, A good
Add:
17,-2,33,34,-4,66,68,-4,4,-5,8,-5,
16,-5,32,-5,64,999
130
DATA
64,96,80,72,68,66,33,16,8,12,94,-7,
127,-5,126
180
DATA
95,79,71,67,65,32,16,8,4,2,1,-4,0,3
,71,67
Don't
RUNityet!
TO
4
N=999
THEN
80
:GOTO
30
R
"DMP130"
about
yet, Maybe what it needsisto
approachisto use negative
numberofrepetitions followed by the
Chapter 7
be jazzed up
num-
numbertobe
to
In
line 120, the
You
must
modify
Change:
40
IF
N)=O
50
READ M
60
LPRINT
70
GOTO
and
RUN
the
The
figure still
and
see what you have
sequence
THEN
-4,66isused to
the
program
LPRINT
mean
to recognize
CHR$(128+N);
CHR$(28)jCHR$(-N);CHR$(128+M);
30
program,
does
not
look like much,
been
working on.
65
Add
the remaining
four 66s: 66,66,66,66,
the
negative
numbers,
: GOTO
DATA
30
lines
Page 74

Graphics
110
mode
DATA
114,-2,57
140
DATA
8,98,-2,100
150
DATA
2,5,5,3
170
DATA
-5,63,-6,127
200
DATA
4,64,127,32,32
RUN
the
program.
Now,
that's
-7,0,-2,64,-2,96,80,-2,72,2,100,
-5,124,-2,120,-3,121,-2,113,-3,114,9
-2,116,92,88,72,64,32,32,16,80,104,7
127,-4,64,3,-3,2,3,-5,7,-5,15,-5,31,
-5,0,-5,1,
worth
the
effort!
5,2,-5,4,
5,8,-5,19,
-2,
5,38
66
Page 75

IBMemulation mode
The
DMP-130 has 2 control code sets;
code set and the
are
independent
Code set selection
The
IBM emulation modeisprovided for use with the IBM code set.
You
can select itbysetting
power
If
mode.
Character set selection
ON.
you send a
(Refer
otheristhe IBM control code set.
of each other,
DIP
CHR$
(27);
"!",
it resets the
to Appendix B.)
oneisthe original
switch
1-1toON
Printer
Tandy
These
two code sets
and then turning the
to the
defaulted
8
control
Tandy
Three
sets (refer to
Font selection
The
CHR$(27);
letter-quality font.
When either
are printed out; the Printer then enters the new
character sets
oneisthe
switch
selects the IBM character set2.You can also designate
character
"7"
Tandy
1-7toOFF
set
(set 1)orCHR$(27);
code
CHR$(27);'T';
"I";
of
(not
character styles)
character set and the
Appendix
2 via software by
CHR$(2)orCHR$(27);
these commandsisdesignated, the
A).
In the IBM emulation
selects the IBM
sending
"6"
(set 2).
CHR$(1)
selects the IBM high-speed font, and
are
other
character
the
"I";
two
providedinthe DMP-130;
are
set 1, while setting it
control
CHR$(3)
current
font.
Carriage return
The
code
CHR$(13)
ing position to the leftmost dot position. A line feed
switch
When
"5";
CHR$(27);
DIP
1-2isset to
CRisreceived, only a carriage returnisperformedifCHR$
CHR$
(0)isset; both carriage return and line feed are
"5";
switch
1-2
prints the buffer contents and then moves the print-
OFF
(CR with LF).
CHR$(l)isset. This commandisgiven priority over the
selection.
the IBM character
mode,
setting
character
codes
selects the IBM
buffer contents
is
executedifDIP
set 1
CHR$
performed
DIP
ON
(27);
(27);
or
if
67
Page 76

IBM
emulation
mode
Vertical formatting control codes
Setting the line feed pitch
TheLFpitchisset to 1/6 inchor1/8
switch 1-6) at power ON. You can change the pitch by sending the com-
CHR$
(27);
"0",
mand
CHR$
inch (designated by the settingofDIP
(27);
"1"orthe command
CHR$
(27);
"A".
liS-inch line feed
The
control code
inch.
7
In-inch
The
control code
inches.
line feed
CHR$(27);
CHR$
"0" changes the line feed distance to
(27); "1" changes the line feed distance to 7/72
1/8
Variable line feed
The
control code
CHR$(27);
CHR$
mand. If no
distance
Usefitl Hint,' If you want to return the
example, the line spacing has been
send a control code
command),
Setting
The
control code
in
increments
represent any value between 1 and
can be set to 7/72 inch by designating
"A"
(27);
"A"
is
set to
The
the
variable pitch line feed
CHR$
(27);
"2"isan execution command for the
command.
commandisexecuted after the
CHR$(27);
1/6
inch.
CHR$(27);
LF pitch will
CHR$
of
1/72 inch, nisa single-byte binary
"A"
(27);
That
is, the
command has been given, the line feed
LF
set
at 7/72 inch for the bit image
"2"
only (without a
returnto1/6
"A";
CHR$
(n)
85.
For
bit image graphics, line spacing
n as
LF
pitch designated by the
CHR$
(27);
"2"
com-
pitch to 1/6 inch when, for
mode,
CHR$(27);
inch.
defines the line feed pitch
number
7.
and can
"A"
This commandisonly to define the
CHR$
code
(27); "2" to change
the
LF
pitch; you need to send a control
line feed pitch.
68
Page 77

Enter
10
20
3 0
40
then
the following
LPRINT
LPRINT
LPRINT
LPRINT
RUN
it.
LF
program:
CHR$
CHR$(27)j"2"
"NORMAL
"HALF
(27)
LINE
pitchischanged
j"
A"jCHR$
SPACLNG
FEED
to 1/12 inch.
(6)
LINE
IS
EXECUTED"
j
FEED"
Chapter
8
Setting the variable line feed
The
control code
11/216
inch.11is
CHR$(27);
a value
Variable line feed execution
The
control code
determined
CHR$(27);
by the valueof11.11isanumber
(n/216")
"3";
CHR$(I1) sets the line feed pitch to
betweenIand
(n/216")
"J";
CHR$(I1) executes a
255.
between I
11/216"
and
Execution command for line feed
Line
feed
The
code
CHR$
The
paper
feed distanceisspecified by the
set commands
width print
Reverse
The
code
mode
line feed
sequence
(10) prints
(mentioned
set by code14or
(27 93) executes a
out
the
character
above). This
and
DIP
command
code
sequence (27 14).
1/6"
reverse line feed.
feeds
the
switchorthe
will
terminate
paper
Setting top-of-form and form length
The
form length can be changed at any time if the friction feedisused.
The
control
the control code
page. nisa single-byte binary
tween 1 and 127. m
any value
line
after
set to11or12inches (selected by
the
current
code
CHR$(27);
CHR$(27);"C";
is
also a single-byte binary
between1and
a form length setting
"C";
CHR$(I1) sets the lines per
CHR$(O);
number
22.
The
top-of-form positionissetatthe
commandisexecuted.
DIP
CHR$(m)
and
can
switch 1-4) at
print position as the top-of-form, send
represent
number
CHR$(27);
sets the inches
any value be-
and
can
The
form
power
line feed
255.
1 line.
line spacing
a double-
page
and
per
represent
current
length
ON.
To
set
"4".
is
69
Page 78

IBM
emulation
Form feed
mode
Whenacontrol
contents
and
code
feeds
CHR$(l2)isissued, the
the
papertothe
next
Printer
top-of-form
prints
position.
out
Skip perforation
The
skip
perforation
CHR$(n)
single-byte
127.
form
If
the
commandisignored.
If
you
the
following
10
Line61is
command.ndesignates
binary
This
functionisterminatedbythe
length
LPRINT
set
value
forIIexceeds
wanttoprint
program:
CHR$(27)j"N"jCHR$(60)j
printedonthe
command.
function
number
60 lines
next
and
the
page
per
top-of-form
can
be
the
can
represent
length,
pageona
set
by
the
number
CHR$(27);
the
withoutaform
of
any value
CHR$(27);
sheetofII-inch
CHR$(27);
lines to skip. nisa
betweenIand
"0"
commandorthe
"N";
paper,
feed
command.
Horizontal formatting control codes
Horizontal tabulation
With
horizontal
maximum
rnargin
is
28
horizontal
column
tabulation,
0) by using
you can easily align
TAB
stops
can
the
following
be
settoany
control
sections
codes:
horizontally.
column
the
buffer
"N";
CHR$(n)
RUN
The
(the
left
CHR$
(27);"D"
; CHR$
CHR$(nk)jCHR$(O)
n
indicates
betweenIand
order.
to
terminate
send
•
When
• All
positions.
the
When
control
TAB
the
previously set
horizontal
80;
all
TABs
the
horizontal
code
CHR$(9)
stops
column
are
column
have
not
TABs
(n!)
j CHR$
position
positions
been
TAB
to
skip to
set,
control
are
(n2)
and
can
represent
should
selected,
designation.
clearedbydesignating
70
the
code
be
designatedinascending
send
a null
Once
next right
CHR$(9)isignored
code
the
TAB
any
(CHR$
TABs
position
new
number
are
TAB
(0»
set,
.
.
stop
Page 79

•
Horizontal
is
powered
TAB
stops are set at every
ON.
Reset all TABs
The
code
CHR$(27);
of
every
eighth column.
Backspace
CHR$
after
printing
selected,
(ASCII
(8) causes
the
32, 20 hex).
the
the
current
lengthofthe
Home head
If
you
send
the
code
returntothe
home
positiontoprint a line.
Left and right margins
You
can position
designated
wherenlis
(1<nl
characters
the
is
used.
< n2 < 233).
current
the
by
the
current
the
left margin position
countcd
fontisproportionally
by the
"R"
restores all
print
headtobackspace
buffer
backspaceisthe
sequence
left
CHR$
and
right marginstoa specific
font pitch.
Both
valuesnland
current
eighth
TAB
columnstothe
contents.
(27);
Send
and
font pitch from
spaced,
If
sameasthe
CHR$(60),
This
control
n2isthe
n2
the
widthofspace
column
the
proportional
will
indicate
when
default
length of 1
lengthofa space
the
print
occur
for I line only.
character
codes
(2788nl
right margin position
the
the
leftmost margin.
(ASCII
Chapter 8
the
Printer
value
character
spacing
head
position
n2),
number
is
will
of
If
32)
Once
set,
the margin positions
character
The
give values
The
the
be
printed
font pitch.
minimum
commandisa print
Printer
distance
that
resultinless
prints
from
out
the
between
than
start
command.
the
current
designated left margin.
Variable forward/backward space
You
can
move
the
print
head
1/120".
Use
the
code
sequence
do
not
the
left
1/5",
buffer
forward
(27
IOO
71
change
and
the
Printer
When
contents
or
nl
evenifyou
right
marginsis1/5".Ifyou
setstominimum
this
command
and
subsequent
backward
n2) for
in
forward
change
1/5".
is received,
data
increments
spacing
the
will
of
and
Page 80

IEMemulation
(27
101
numberofprint
binary
of
If
the
position
the
number;nlis
the
value,
the
position you specifyisbeyond the right margin in forward spacing,
next
next
mode
nl
n2) for backward spacing, In
head motionsinthe unitof11120",
the lower
Therefore,
print positionisset to the left margin position.Ifthe
is
beyond
print position to the left margin.
the left margin in
partofthe value
the actual valueisnl
either
backward
case,n1andn2are
Each
andn2is
+ 256 x n2
spacing, the
Printing mode control
In
IBM
emulation
emphasized
image
to highlight effectivelyinthe
Double-width printing
In
double-width
doubled;
executed
CHR$(I).
CHR$(14),itis
with
CHR$(O)
characters; you can also print in super-orsubscript
mode
the pitch spaceisalso doubled.
via
When
CHR$(27);
only.
mode,
and
so on. Use these various
printing
CHR$(l4)
this
released by
"W";
you can
character
mode,
or
CHR$(27);
modeisestablished with
CHR$(20)ora line feed; when itisestablished
CHR$(l),
print
elongated,
print
printing
the
width
Double-width
CHR$(14)
itisreleased
condensed,
styles to
mode.
ofaprinted
or
CHR$(27);
CHR$(14)orCHR$(27);
by
CHR$(27);
the
is a single-byte
the
upper
part
(x
1/120").
specified
Printer
print
character
printing can be
bold,
mode,
a title
sets
and
bit
or
"W";
"W";
is
instance,
For
10
LPRINT
20
LPRINT
and
RUN
TEXT
Compare
Compressed printing
In
pressed
CHR$(15),
PRINTING
10
LPRINT
20
LPR I
the
compressed printing
enter
CHR$(27)jCHR$(14)j"
"TEXT
it. TITLEisprinted
these
results with the resultsofthe following
CHR$(27)j"W"jCHR$(1)j"
NT
"TEXT
printing can be selected with
and
released with
the following
PRINTING"
is
not since a
PR INTI
mode,10CPIischanged
CHR$
prognnll:
in
double-width
LF
took
NG"
(18).
72
TITLE
character
placeatthe
CHR$
(15)
"
mode,
endofline 10.
program:
TITLE
to17CPI. Com-
or
CHR$
but
(27);
"
Page 81

Chapter 8
Notes.1.Condensed
printing
condensed
2.
Condensed
ignored when
Typeinthe following
10
LPRINT
20
LPRINT
and
RUN
it.
Selecting 12 CPI
If
the
current
CHR(27);
fontisa letter-quality
will be selected.
Proportional spacing
Proportional spacing
When
contents
This
":"issenttothe
the code
are
command
mode;
CHR$(15);
"THIS
Data
can be
fontisone
To
CHR$
printed
only resets
pllntmgissuspendedinbit
when
the
Printer
printingisrestored.
printingisavailable onlyinstandard
the
correspondence
program:
IS
COMPRESSED"
printed
of the high-speed
character
returnto10
ON/OFF
OFF
(27);
out
and
the
with upto137
Printer,12CPI will be selected.Ifthe
set,
CPI,
"P";
CHR$
the
fontischangedtoa
proportional
exits
character
correspondence
send
(0)isreceived,
imageoremphasized
eitherofthese
fontisselected.
charactersina line,
sets,
12
CHR$(27);
the
monospaced
spacing condition.
when
CPI
"M".
current
modes,
font; it
the
code
current
characters
buffer
font.
is
Proportional spacing
When
current
proportional
This
Emphasized printing
In
normal printing line,
emphasized
Enter
the
buffer
command
the
emphasized
"E"
and cancelled by
the
code
CHR$(27);
contents
spacing font.
sets
printing
following
printing
ON
"P";
CHR$(I)issenttothe
are
printed
the
character
mode,
and
again with a small shift horizontally. This
modeisestablishedbythe
CHR$
(27);
program:
out
and
fonttoproportional
each
characterisprinted
"F".
73
DMP-130,
the fontischanged
spacing.
onceonthe
control
code,
CHR$
the
to
(27);
a
Page 82

I
EM
emu/ation
10
LPRINT
20
LPRI~JT
30
LPRINT
40
LPRINT
and
RUNiLThe
Double-strike printing
mode
CHR$(27)j"E"j
"Emphasized
CHR$(27)j"F"j
"Printing"
word Emphasizedisprintedinboldfaced
";
characters.
In the
normal
highlighted
also by
CHR$(27);
Superscript and subscript
With your
In
character
halfofa
lishedbyCHR$(27);
established by
can be
This
Try
10
20
30
40
50
60
70
80
90
double-strike
printing
characters
the
double-strike
"G"
DMP-130,
superscript
cancelledbyCHR$(27);
functionisuseful for printing algebraic expressions.
the
mode,acharacterisprintedonthe
line,
normal
CHR$
example
LPRINT
LPRINT
LPRINT
LPRI
NT
LPRINT
LPRI
NT
LPRINT
LPRI
NT
LPRINT
printing
line,
and
again with a small shift vertically;
can be
printing
and
cancelled by
you can print superscript and
andinsubscript
character
program
"Y=AX"
CHR$
ft
"3
CHR$
"+BX"
CHR$
"2'"
, I
CHR$
"
+C"
line.
"5";
CHR$(O),
(27);
"5";
below:
j
(27)j"8";
;
(27)j"T"
;
(27)j"8"
(27);"T"
mode,
printed
characters
not
onlybyemphasized
mode.
CHR$(27);
mode,acharacterisprintedonthe
The
CHR$
"T".
This
superscript printing
and the subscript
(I).
Both
CHR$
(0);
;
j CHR$
(0);
;
are
printed
modeisestablished
"H".
subscript
upper
superscript
once
therefore,
printing,
characters.
halfofa
modeisestab-
printing
and
on
the
but
by
normal
lower
mode
subscript
is
74
Page 83

Underlining
In
the
underlining
moved
will be
and
Enter
10
20
30
and
The
by
horizontal
underlined
cancelledbyCHR$(27);
the
following
LPRINT
LPRINT
; CHR$
LPRINT
RUN
word
"THIS
CHR$(27)i"-"iCHR$(1)i"UNDER.LINE"
(27)i"-"
" WITH TEXT AUTOMATICALLY"
it.
UNDERLINE
Bit image mode
There
are
four
kindsofbit
of
dot
image
consistsof8-bit
tal
dot
density,
and
mode,
This
all
characters,
TABs
(except
modeisestablishedbyCHR$(27);
"-",
program:
FUNCTION
; CHR$
is
printed
image
modesinthe
data.
its
maximum
numberofbitsona
spaces
bit
image
CHR$(O).
CAN
(0)
i
with an
Each
mode
underline.
and
the
data
and
PRINT"
DMP-130.
has
its
particular
line,asindicated.
spaces
graphic
"-";
One
Chapter 8
which
are
symbols)
CHR$(I)
vertical line
horizon-
Mode
480 Bit Image
960 Bit Image
960 Bit Image
(Normal
1920 Bit Image
480
hit image mode
In
480 bit image mode, horizontal dot (bit) densityis1/60
of
sequence
CHR$
this modeisas follows:
(27)j"K"
Speed)
j CHR$
<nl)
i CHR$
Number of Bits/Line
480 Bits/Line
960 Bits/Line
960 Bits/Line
1920 Bits/Line
inch.
(n2)
j CHR$
(vl);
The
CHR$(vK)
/11,
/12
are
the
numberofthe
byte binary
of the value. Therefore, the actual value
number
l'1
through l'K represent the dot patterns for each vertical line and single-byte
binary
number;
(Ill,
number
112)
/11isthe lower partofthe value and
should not exceed 480.
Unlikeinthe Tandy mode, the dot patterns are numbered
horizontal
dot
positions.
is
III + 256 x
Each
112
is
the upper part
ilL
The
is a single-
total data
75
code
....
Page 84

IEMemulatio/1l11ode
from bottom to top:
1
""'leI
lLO
64
32
16
8
4
2
Add the numbersofthe dot patterns you want to print to obtain the data for
1'1
960
In
960
throught
bit
vK
image
bit image
mode
mode,
horizontal dot (bit) densityis1/120 inch. A dot pattern
which eorresponds with I bitiscomposed of 3 vertical dots x 3 horizontal
dotsinl/360-inch
dot
pitch. The code sequence of this modeisas follows:
CHR$
CHR$(vK)
The total data
960
In
The difference between these two
ference between boldfaced characters and normal characters.
quenceofthis
CHR$
CHR$(vK)
The total data
1920
In
(27)j"L"jCHR$
number
bit
image
mode
960
bit image
modeisas
(27)
number
bit image
1920
mode
bit image
(nl,
(normal speed)
mode
(normal speed). the dot densityisequally
j
..
Y";CHR$
(n1, n2) should not exceed 960.
mode,
(nl)jCHR$
/12)
should not exceed 960.
960
bit image modesisequivalent to the dif-
(n2)jCHR$
follows:
(nl)jCHR$
(n2);CHR$
horizontal dot (bit) densityis1/240
(vl)
+.
1/120
inch.
The
code se-
(vl)
j
inch. The bits on
the same hOlizontaI line should not be printed continuouslyinthis mode. The
code sequence of
CHR$
CHR$(vK)
(27)
The total data
this
j
..
Z"jCHR$
number
modeisas
(nl,
/12)
follows:
(nl)jCHR$
should not exceed
(n2)jCHR$
1920.
(vl)
j
76
Page 85

Other control codes
Paper end detection
The
FAULT
detected,
override
without
inhibitedbyCHR$(27);
CH
R$ (27);
Cancel
CH
R$ (24)
command;
code
remainineffect.
Unidirectional printing
signal
canbeturned
function,
a device fault
"9"
clears
the
the
(cancel
the
other
to
the
interface,
ONorOFF.
last
printable
on
the
external
"8"
(ignore
ignore
data
paper
in
the
print
control codes
whenapaper
By
line
terminal.
paper
end).
buffer
that
were
combining
on
the
end),
andismade
that
was
received
end
this
function
paper
can
The
FAULT
received
priortothis
Chapter 8
condition
with
be
printed
signal is
available
priortothis
control
is
an
by
Usually,
allows
slight vertical
oragraph
CHR$(27);
When
printing
the
only
byCHR$ (13);
the
DMP-130
youtoprint
misalignment.
perfectly.
"U";
CHR$(I),
only
a small
all
the
charactersona
efficiencyofthe
specific
charactersinthe
only
executes
by using a
By using this
This
functionisexecuted
and
numberofcharacters
DMP-130.
unidirectional
I line which follows this
Printing characters below 20 hex
The
code
assigned
to
11,
a
sequence
tonwhennis
space
(20
CHR$(27);
hex)
below
will
be
Bell
When
I
second.
the
code
If
CH
DIP
switch 2-2 is
R$ (07)isreceived,
bidirectional
unidirectional
cancelledbyCHR$(27);
aretobe
pageinthe
Use
the
""'.
CHR$(n)
20 hex.Ifthereisno
printed
OFF,
instead.
the
pllntll1g,
printing
function,
by
printed
unidirectional
code
CHR$(27);
mode.
codeisprinted
the
Printer
buzzer
does
Tl
but
method
you
can
the
code
"U";
unidirectionally,
mode
"<"
This
codeiscancelled
unidirectionally.
prints
the
character
buzzer
not
sound.
this
Printer
to
avoid
printachart
sequence
CHR$(O).
decreases
to
print
character
assigned
sounds
for
Page 86

Page 87

Appendices
Page 88

Page 89

Character sets
Tandy character set table
Upper
8.,
Hex
0
~:''''
Hex.
0
1
2
.3
4
5
6
7
B
9
A
B
C
D
E
F
Binary
0000
0001
0010
0011
0100
0101
0110
0111
1000
1001
1010
1011
1100
1101
1110
1111
0000
BEL
BS
If
ff
CR
SO
SI
ro
"
12
f3
ro
IS
f6
17
18
f9
rw
iii
r;)
Ii3
IN
115
0001
pos
DCI
DC2
DC]
DC'
ETB
SUB
ESC
IS
GS
RS
us
1
116
r;)
r;B
r-
19
120
111
I2i
123
r;;
125
116
I2i
I1a
119
130
IJ7
2
0011 0100 0101
0010
SP
0
I3i
I
1 A
I3:i
2
r;;
3
"
ri
S
"
136
5
IJ7
&
6
138
7 G
[39
(
B
r:;o
I 9
i4,
:1:
141
143
I····
1M
[45
146
,
r:;;
4
.3
p
'"
r;
r;
Q
r;g
165
B R b
r;o
165
S
C
r;,
I6i
T
0
r;
152
E
U
I5:l
169
F V f v
r;
170 186
w
lis
171
H
X
r56
rn
I Y
r;J
173
.J
Z
[58
170
K
I
[75
119
1
160
176
M
I
177
161
N
162
f78
-
0
I5:l
119
6 7
5
0110 0111 1000 1001 1010 1011 1100
196
reo
a q
197
Is1
[9a
[82
I
[99
IiJ
cJ
r;
GOO
e
[101
/81
rw;
9
[87
rwJ
h x
ru;:;
rea
1
rms
189
I
[90
G06
k
[91
r;D7
I
rwa
192
m
f,09
r93
n
r;u;
r;
0
~
195
B
p
fila
rm
l129
rm
I
r130
~
S
rm
~
I
fill
rm
LJ
rm
rm
IGi
f1i8
w 'I'
f1i
f119
rrn;
N6
Y
f!37
rm
1
"
fi3a
rrn
:
rrn
rm
1
1
rwo
~
CR
:
ftM
G2s
r;E
rMS
rw3
rill
9 A
11M
iJ
~5
,
~
I:
rw
r;;;a
I'
/l49
Il50
~
fl52
r;;;
G5.1
(C'l
f1S5
L'I
f156
'1;1
r;s;
L':>
1158
~
G59
t
§
fi6D
ri6l
r162
G63
r;;;;
G65
[;66
[167
1168
r169
ruo
rm
rm
rm
rrn
r,;;;
B
y
rm
A
rm
0
ruB
U
[179
¢
r;oo
GB1
a e
r;g,
"
fi83
II
r,&1
II
1185
TM
f186
e
1187
LJ
r;s;;
e
1189
G90
I
f,91
C
a
1192
e
f,9J
i A
r;;
6
rl95
[I
iii
A
G97
r,gs
1
iii
iJ
f200
,
I1ii1
"
IWi
LJ
r203
I
I20l
r\
r;o;
[l
r206
"
1207
D E
1101 1110
AO
f108
III -
re
f209
III
f2W
a
III
rm
0
III
-~28
rill
"lII
"
rm
N
rI'
rrn
IIfIII
Eo
rm
A
I11III
[;"6
i
I
~7
6
III
r;-a
U
•
rm
L
..
rno
U
Is
rm
Eo
..
rm
A
II
rm
A
1111
r
rrn
f225
-,
rm
T
rm
~
I
rm
L
r;;
-.!
rru
..L
rm
-1
I23i
+
r;t
,..
fils
...
r;36
~
rm
...
Iii
Iii
F
r;o
~
rm
rm
r;:;
r;s
r;6
rw
rim
G19
[250
f2!i~
f252
rm
[b;
[lSs
!
"#$%&'
']-_-abcdefghijk1rnnopqrstuvwxyz{:)--A~£'~"'t§§atft~I¥XbU¢-H8U
j3"ME!ue·'fi3.elClD'
I
'-'
-'-I
+f'"
.........
()
*+.
-,
/0123456789:
EH
a16Gi
f1i'l.okE.J\.';0¢~EA16uLl}EA
;
(=)
7@ABCDEFGHIJKLMNOPQRSTUVWXYZ[
.....
~...
...
~
~
f-
ill
Page 90

Character sets
Dot-column width
Standard and proportional characters
Upper
Bil
lower
Bil
Hex.
0 0000
1 0001
2 0010
3
4 0100
5
6 0110
7
8 1000
9
A 1010
B
C 1100
D 1101
E
F 1111
Hex
Binary
0011
0101
0111
1001
1011
1110
0
0000 0001
10
[1
f2
f3
14
[5
16
17
[8
19
flO
fI1
111
f13
114
115
1
0010
.
12
116
9
Ii7
9
118
11
[19
11
[20
11
[21
11 11 11
rn
9
Ii3
B
124
9
[3s
11
[26
11
127
9
[26
11
[26
9
[30
10
131
2
Ii'
Ii
134 150
[3s
r36
f37
G8
[3s
f40
f'1
r:n
143
144
f49
f49
r:n
4
3
0011 0100 0101 0110 0111 1000 1001 1010
11 11
1'8
9
f49
11
11 11
[51
11
152
11
153
f54
11
ISs
11 11
156
11
Is7
9
156
9
Is9
10
180
11 11
\61
10
r;
10
r;;J
11
f64
11
11
r;
11
11 11
[66
11
167
11
11
180
11
11
[69
11
[20
11
11 11
171
10
rn
9
11
rn
11
11
124
11
9 9
175
11
10 9
176
9
f13
11
9
176
11
11
[79
5 6 7 8
8
180
196
11
Isl
197
Ia2
180
9
183
180
11
r;oo
r;
11
185
f10i
9
r;D2
180
/87
GOO
11
r;oo
180
9
rws
180
8
roo
fi06
[91
rwJ
192
f108
11
193
fW9
11
r;w
r;
11
195
f11l
of
'randy characters
B
A
9
11
Ii2s
rm
11
rm
rm
10
fl14
f130
11 11
f115
rm
11
r;;;
rJi6
11
f117
rm
11
r;;:;
f118
11
rm
rm
11
[lj6
1120
11
rm
rm
11
rrn
f138
9
rm-
fi39
9
G24
rwo
9
rw
fill
10 12 9
rm
rw
[143
rrn
8
r;;
[1W
11
f]m
G45
9
[146
f162
f147
Ii63
8
r;;
r;;;i
12 10 9
G49
f165
9
[i5o
G66
9
f151
rJ67
12
fi5i
fi68
11
f153
rJe9
12 12
r;;;
f170
12
Il55
rm
12
fI56
fill
12
[157
rm
f15i
rrn
9 10
G59
rm
C
1011
1100
11
11
I19i
rm
11
11
rm
f193
11
9
r;;
rrn
11
11
rm
f195
10
11 11
r;oo
f196
[l8i
rm
11 11 11
f182
G98
11
9
[183
r;99
11
11
[200
r;B4
11
9 9 12
r;m
f18S
11
flB6
f202
11
11 11
G87
f20i
11
9 10 12
r;;
~
11
11
[1B9
f2O\
11
[190 [200
11 11
rm
r207
D
1101
1110
11
12
f208
11
12
r;o9
11
12
rm
11
12
rm
12
rm
11
12
fiG
12
f214
11
12
rm
11
12
rm;
rw
11
12
rm
12
rro
I2io
11
12
rm
11
12
rm
12
rm
'----v---1
GRAPHICS
E
rrn
rm
rm
rm
rm
rm
rno
rn;
rm
rm
f2i1
r;Js
rn5
rrn
[2i
rn;
F
1111
12
[i4O
12
~
12
rw
12
f243
12
r;;
12
r;5
12
r246
12
f247
12
I2i8
12
[249
12
r;5O
12
r251
12
f252
12
[i53
12
IBl
[2s5
Z
11 11
p.
-
12
i
0
9
11
ij
I
11
9
Page 91

Correspondence and proportional characters
Upper
Bil
Hex
a 1 2 3 4 5 6 7 B 9
~ft"
Binary
0000
0001
0010
0011
0100
0101
Hex.
a
1
2 0010
3
4 0100
5
6
7
B 1000
-
9
A
B
C
D
E 1110
F
0000
0001
0011
0101
0110
0111
1001
1010
1011
1100
1101
1111
ro
11
12
13
I'
Is
16
17
Is
f9
rw
[11
112
ru
r,4
1'-;;
f16
r;7
f16
f19
120
[21
Ii2
123
124
125
Ii6
Ii2
128
[29
130
131
24
21
21
132 148
13 20 23 23
r;9
133
17
21
23 23
r;
[50
21
23
21
23
23
13
20
16
22
22
13
21
13
23
23 23 22 23
[51
135
21
23 23 23
rJ6
Is2
21
23
[53
132
21
23
r;
138
21
23 24 23 24
r;
138
21
23 23 23 23 22
r;o
r;
21
18
141
157
13
19
f42
158
13
23
r:;J
r;
19
22
r:;;
160
21
24
[45
f61
19
24
146
i82
21
23
r:;i
I6J
0110
22
I&'
I6s
166
f6J
[6a
23
169
23
170
I"
rn
23 20
173
22
174
13
f75
23 20
r;6
1.3
Ii2
19 23
128
24
179 195
0111
17
23
IsO
Is6
fill
22 23
Ia1
197
fi13
23 22 22 23
i82
Fs
fl14
f83
199
rJ15
21
r;
GOO
rm
21
23
[lol
I6s
166
r;
I8s
189
GO
[91
i82
193
r;-
rm
21
23
rw;
f118
1'119
f103
r;w
f164
23
rws
rm
16
21
G06
fill
23
21
[W7
rm
13 19
I10i
f124
24 16
f109
rrn
21
rm
rm
22 20
rJ11
rm
1000
r;;s
rrn
r;3o
rm
rm
rm
r;;;;
rm
G36
fill
rJi
rrn
f140
rw
rw
f1ii
1001
1144
r,;l5
046
rw
r;;
G49
Ii50
f151
G52
G53
r;;;
G55
Ii50
G57
r;;a
I1i
A
1010
19
r;;;;;
22
r;61
G62
21
fI63
17
f164
23
f165
19
Ii66
17
f167
fI68
21
f169
21
rm
21 21
rm
fill
21
rm
19
rrn
1175
B C D
1011 1100
22 24
23
/i76
23
21
f177
20
rrn
23
22
rm
21
23 23
1100
16
21
fl81
21
22
f182
21
22
1183
23
22
r;B4
21
20 19
f185
24
22
f186
23
f187
13
23
rw
21
23
[189
20
22
fl90
21
22
~
Appendix
1101
rm
rws
24
rz;
f193
23
r;;
[2iO
22
[i95
rm rm
G96
rm
19
f197
rm rm
24
f198
f214
23
119"9
f215
23
rmo
rm
f201
rm
23
f202
rm
2.3
r2D3
rm
21
r;;;;
fllo
23
f10s
rm
23
1206
rm
23
rw;
[ill
A
E F
1110
1111
24
24
r;;o
rrn
24
24
[2.1i'
I22s
24
24
rm
J242
24
24
1243
24
24
rm
12M
24
24
f245
24
24
r;6
f230
24
24
rm
rw
24
24
r;;o
rm
24
24
rm
~
24
24
rii1
f250
24
24
rm
f25i
24
24
f236
1252
24
24
rm
Ii5i
24
24
r;;-
fiJi
24
rm
fi55
GRAPHICS
Z
23
t~
23 24
-
i
0
22
20
ij
I
13
24
83
Page 92

Character
set,s
IBM character set 1
Upper
8n
Hex
Binary
0001
0010
0111
1010
1011
1101
1111
a
0000 0001
NUL
10
[1
12
13
I'
[5
10
BEL
17
85
Is
H1
f9
IF
flO
VT
[11
FF
[12
L11
r;J
SO
G'
51
liS
Lower
8il
Hex.
a 0000
1
2
3 0011
4 0100
5 0101
6 0110
7
B 1000
9 1001
A
B
C 1100
0
E 1110
F
Note: By the
respectively,
!"
#$%&'
[\d~_-abcdefghij
11
i J1J J J 1 u..,-r-trrLrTl
2:.~r.~o
()
•.
..[n
2
1 3 4 5
0010 0011 0100 0101
SP
0
'"
[16
117
DC2
[16
fI9
DC'
120
121
rn
[23
CAN
114
[25
r;6
ESC
121
r;6
f29
f30
131
ESC·
[4B
132
,
1 A
[4B
133
2 8
I5Q
134
#
3 C S C 5 U
Is1
135
$ 4 0 T
G6
Is2
~o
5 E U
137
153
& 6
G6
[39
I
r;o
I
141
*
[42
I
143
144
f45
146
F V
154
7 G
IsS
H X h x
B
156
[
9
Is2
J Z
166
K
166
L
<
f60
~
M
f"1
N n
>
[61
,
0
[42 [63
/\·n
printedas..,•.
*+.
.
/0123456789:
klmnopqrstuvwxyz
J•
6
0110 0111
p
[6.1
reo
196
0
a
[81
f65
166
167
168
[69
Fa
121
rn
[73
r;;
I7s
fiG
rn
r;a
[79
R
182
f8:l
Is'
185
166
W
Is7
f88
y ,
[89
r;o
I
[91
[92
I
193
Is'
-
I9s
f97
b r
f98
[99
d
GOO
e
G01
I
[1Oi
9
[103
r;o:;
/105
J
Ilo£
k
r;o7
J
[lOB
m
fi09
f110
0
fill
command.
"',
; <~>?@ABCDEFGHIJKLMNOPQRSTUVWXYZ
I"
I I LLrrtT'
B C 0 E
DC2
DC'
CAN
ESC
,-r
A
1011
a
!lj
'"
r;:;;
fi45
r;;i6
r,;;;
r;;i6
1149
G50
rl5i
I15i
f153
[1s:;1
I15s
fi56
fi57
r;;
r;59
ri76
Ii60
i
I:::i,
r;61
rm
6
',',
r;;a
f162
I
1163
f179
Ii
j -
r;oo
r;;
~
r;6s
fi81
a
j
fi66
f182
,
2
Ii67
1183
,
1
r;s:;
fi6S
r
j
I18s
fi69
-,
I
f170
f186
,
'h
rm
f187
J
'14
rrn
1199
J
,
fiBS
f173
J
«
rrn
G90
1
"
ri75
G91
19.20
and
§.
f
g-xi3
rrI:lY}JTQ80o",i2Jcn=-
1100
..L
178
+
,-
1101
L
..L
G92
T
f19J
T
T
r;;
L
f-
ri95
L
f1%
r
r;97
I-
r
r;;
f-
+
1199
L
+
1200
J
r
[20;
..L
r
1202
T
IIIiII
~f2i9
f203
I-
l1li
~fi20
r;;
III
l205
III
+
I20B
..L
JlIIlII
I20i
.Im
and21are,
«"mmllji
7 B 9
1000 1001 1010
p
rli2
fii
q
rm
f129
[1jO
r;1:1
r;I5
fiJi
t
~
rm
u N
fi17
rm
v
r;;;
r;l8
w
8El
r;I5
fi3s
85
r;i
fi20
y
H1
rm
rm
IF
z
[Ii
rrn-
,
VT
-
[Ii
ri23
,
FF
I
fM;
/124
LR
I
rI2s
fi41
SO
rm
f142
51
ri27
f143
code
3,4.5.6.
+, !!,
{:
}
-§16Gf'il:t1'!Q<.~--.l2~j
rW
1110
n
I20B
rm
0
f209
Illi
[ >
rm rm
"
f1i1
1m
,.
rill
1m
"
rm rm
"
[214
fiiO
T
I1i5
rw
'I-
I21i
rm
n
f2i7
rm
!l
r;;;
rm
"
[2i
x
I2i
arm
I22i
E
[2i
1m
n
I2i9
ii
1111
-
r
J
~
.
-
y~
n
-
•
5P
F
r;o
rw-
rw
G43
r;;
[245
f246
rw
1248
[249
r;;
I2S1
G52
1253
I2s4
I2s5
84
Page 93

IBM character set 2
Appendix
A
upp~:
Hex 0
1
li~"'"
Hex,
Binary
0000
0
1 0001
0010
2
0011
3
4 0100
0101
5
0110
6
0111
7
8 1000
1001
9
A 1010
B
1011
1100
C
0
1101
1110
E
F
1111
Note,'
tively,
••
++§ !
VWXYZ(
k:13t1iHluY/:)U<l:£YP.fa!
I"
II
0001
0000
NUL
ro
j,
OC2
11
"
[J
DC'
•
§
of-
"
15
'"
Is
BEL
17
CAN
BS
Is
HT
19
IF
r;o
vr
ESC
fI1
FF
r;2
CR
[13
SO
Ii'
51
f1S
When
printed
"#$%&'
'-J
. _ -a
LLrrt-f-l
[15
r;7
r;a
r;;
'"
121
rn
rn
12'
125
170
rn
f28
170
flo
f31
using the
bcdef
2
0010
SP
Ii1
I
rJJ
G'
"
135
S
136
Ii1
& 6
fi
fi
(
[40
I
r;;
*
r.;1
1'3
1M
r;s
1'5
,
r.;1
4
3
0011 0100 0101 0110 0111 1000
0
r:;
1 A 0 a q
r:;
2 B
[10
3 C S C 5 a
Is'"
4
f52
5 E U e u a a
113
r;:;
7 G W
[55
8 H X
Is6
9
f52
rsa
[59
..
'
rw
[81
1621
5 6
P
'"
Iii
180
[81
[61
R
I6S
IB2
[81
f83
T
0
168
1M
lsi
f85
F V f v
170
Ia6
f7l
fi7
r;7
Ia6
I
Y
[73
[89
J
Z
r;;
1M
[
K
[J5
[81
\
L
170
197
[
M
121
/93
N
I7s1
1M
'rJ°rJ-l95
ESc-l\'n
7
P C
[%
r;;1
197
GG
b r
I9a
GW
r;;5
199
d I
GOO
fi16
r;;1
G01
[102
rm
w
9
G03
rm
h x
r;;;
GW
I
Y
fW5
Gil
l e
I
fW6
rrn
k
:
fi07
rm
I
I
,
GOB
~
m
:
G09
G25
n
f1W
f126
a
~
rill
command,
8 9 A B
1001
1010 1011 1100
E a
G28
lJ
'"
G29
e IE a
fI30
()
Irm
a
a
........
fill
rm
lJ a
a
fI34
,
lJ
Gi
y
0
f1i
e
0
rm
U
fIi8
I
c
r;39
;
(
r;:;;;
,
y
r,:;
P,
A
[Wi
A
f
r;43
~
rm
rws
rw
r;;
f149
~
G51
f152
~
r;;
G55
G56
r;;,
r;58
1'59
-,
1/;,
lJ
Ii
N
a
,
1/;-,
"
"
,
r
i
G60
~
G62
G63
r;M
f,6S
r;66
G67
1168
G69
rm;
rm
rm
1m
rrn
G75
Hi
•••••
:r;7
.
I
j
~
~
,
,
1 r
I
1
J
J
J
1
codes19and20are,
r;76
rue
f179
GOO
f181
f182
[1i3
r;a:;
rlB5
GB6
G87
fl88
fl88
1190
G91
C.
L
G92
--L
rm
,-
r;;;;
J-
rt95
-
r;5
+
r;;,
I-fI9ij
I-
G99
L
Foti
r;o;
...L
r;D2
,-
rm;
I-
r;;
-
f205
+
f1o£
--L
rw
as!!and~.
0*+,
-.
/0123456789:;
ghi.J
k 1
6Gf'iIH~Q,,-~~~~
rl.l
mnopqrst
ruJ3r1t[tY}JT?:l806~EI'1=-~r
I
<=>?@ABCDEFGHIJKLMNOPQRSTU
uvwxyz{:}
<o'!Hlllllll
~
-C;:U~IlEli'l~9"H!€!'i
ii
J1J J J 1
1l1
.,.",0
..
L.L,-HrrLr-rr
n1
..r
•
D E F
1101
1110
-'-
"
rn;
rma
.,
P
r;o;
rm
.,
I
Fa
rm
L
'"
rm
1m
L
C
rm
rna
r
"
rm
rm
r
"
f2W
rna
,
+
rn;
[215
'I'
+
f216
rm
J
"
r;u
rm
II
r
r,;
[218
III
"
[2i
rm
"
l1li
rna
f236
0
I
rm
rrn
I
[23a
rm
,
Ell
1m
f239
respec-
I I AAlj:re
1111
"
r
J
I)
.
-
V-
I
,
II
SP
r;:;o
r,:,-:-,
r;2
r;J
r;M
rw
r;;6
rw
f24a
r;49
,,";;
~
[2i2
f25i
fb1
1251
85
Page 94

Character sets
Dot-column width
of
Standard and proportional characters
UP's',:
Hex
~?,"m.
Hex.
Binary
0 0000
1
0001
2 0010
3
0011
4
0100
5
0101
6 0110
7
0111
8
1000
9
1001
A
1010
B
1011
C 1100
D
1101
E 1110
F
1111
0000
11
11
11
11
0
ro
[1
[2
13
f7
15
16
[7
16
f9
riO
Ii1
f12
f13
r;4
[15
1 2
0001
116
f17
116
9
119
9
f20
11
f2I
III
f23
[24
[25
f26
[27
f73
[29
f30
f31
3 4
0011
0010
11 11 11
12
r;
148
9
9
f49
f33
11
9
~
f50
11 11 11
11
f35
Is1
11
11
r;
152
11
11
[97
153
11 11
11
f54
f3a
11 11 11 11
9
r;
Is5
11
8
[:;0
Is5
11
9
r;
152
9
11
[42
158
9
11
fGB
f43
10
9
r;
\60
11
11
[61
f49
10
9
[67
f46
10
10
[47
153
5 6 7 8 9
0100
0101
0110
8
164
laO
11 11 11 11
165
11 11 11
f66
[67
11 11
fGB
11
169
GO
f71
11
rn
9
f73
11
rm
11
175
11
f76
11
rn
11
178
11 11
Ii9
rao
[97
Ia1
Is2
I9a
9
[83
[99
11
r;
fiOO
11 11 11 11 11 11
r;o;
185
11
9
186
I10i
r;oJ
f87
10
11
fGB
r1M
11
9
[99
f105
11
8
laO
1106
9 9
r;07
f91
10
9 9 9
r;oa
r;
9
11
[93
G09
9
11
r;
1110
11
[i11
f95
IBM characters
C D E
12 12 12
r;i6
I19i
r;;;
rm
12 12 12 10 10
r;l
rrn
12
12
[195
rm
12
12 12
f18Q
f196
12
12 12
r;a,
[19i
12 12 12 12
r;a,
[19s
12
12 12
r;83
i199
12
12 12 10 9
r;;
[200
12
12 12
[201
f185
12
12
[186
f202
12
12 12
r;a,
G03
12
12 12
[i6o
r;;;;
12
12 12
[205
fi89
12
12 12 10 9
[206
f190
12
12 12 10 12
r;o;
[207
GRAPHICS
0111
1000
11
11 11
rm
rm
11
rm
rm
10
11 11
rm-
fi30
11
11 11
f1i5
G31
11 11 11
[ill
r;l6
rm
rm
11
11
rm
f134
11
9
r;;g
rm
11
11
[1i
f1iO
11
11
rrn
rm
11 11 11
[1i
rm
9 9
[1i
rm
r,;;
G40
9
9
r;25
rw
10
11
[142
rm
11
rrn
G43
A B
1001
1010 1011 1100
11
[i6o
r;:;:;
9 12 12 12
11
f145
Gfil
11
f146
G62
11
[163
rw
11
r;;
f148
fi6s
rJ49
11
11
r;5O
1166
11
11
rJ51
f167
10
11
[i6o
f152
11
11
[i6o
G53
11
Fa
11"
10
11
rm
~
11
11
G56
rm
9
11
G57
rm
11
11
[i6o
riM
11
10
[i75
f159
1101
I20i
f209
rm
12
rm rm
rm rm
I2i3
12M
f2i5
rm
fW
12
rm
rm
rm
rm
[ill
[ill
1110
11
rrn
11
f225
rm
11
10 12
11
rm
1230
11
f231
1231
11
1233
11
[2:i4
11 11
I23s
11
[235
11
1231
fi3ii
rw
F
1111
11
r240
11
f241
r;42
10
[i43
12M
12
1245
11
r240
11
rw
[i4a
9
[i4a
9
[i5o
I25i
9
f252
8
[i5o
f2s4
r255
86
Page 95

Correspondence and proportional characters
Appendix
A
uprJ,:
I§f,wo<
Hex.
0
1
2 0010
3
4 0100
5
6
7
B 1000
9
A 1010
B
C
D
E 1110
F
11l
19
Hex
Binary
0000
0001
0011
0101
0110
0111
1001
1011
1100
1101
1111
b:
23
0
0000
ro
11
12
24
f3
24 20
r;
24
15
24
136
[7
/8
f9
r;o
f11
r;;
fI3
r;:l
Ii5
-
24
0001
19
21
..
20
1
Ii6
r;;
r;a
[19
120
J21
122
123
'"
125
f26
f27
f28
f29
GO
/31
2 3
0010
24
131
13
rn
17
G'
23
135
21
136
23
/37
23
136
13
139
20
f40
16
141
22
1'2
22
143
13
1M
21 21
r;5
13
146
23
147
19 13
4
5 6 7
0011
0100
21
20 23
21
21
21
21
21
21
21
21
13
13
19 22 23 20
19
[61
21
I
0101
21
22
148
164
/80
23
[65
148
r;o
r51
152
153
164
f55
f55
/6i
/80
/80
/80
161
f6J
f81
23 23 23 22
[65
/82
23
23 22
/6i
183
23 23 23
/80
184
23
23
/80
135
23 23
r;o
/80
23 24
J21
187
23 23 23
rn
/80
18
23 20 23
rn
fB9
19
22
r;;
/80
23
13
r;s
191
[92
f76
24
1:3
J21
183
24
19
r;
[78
23
24
[78
195
ij
X
24
23
0110
0111
17
23
r;12
/80
22 23
197
fiG
[98
r;M
23
r;15
/80
21
r;oo
rrn
21
23
rw;
rm
21
23
r;;s
rwz
24 22 23
23
fi03
rm
23
r;M
fi20
rws
rm
16
21 21
fi06
rrn
23
21
fW7
fl13
13
GOO
rrn
24
16
r;o9
rm
23
21
r;w
fi26
22 23
Gil
rrn
8
9
1000
1001
23
23 22
I12s
11M
23
24
rrn
fi45
21
24
G30
~
22 22 23
rm
rw
22
22 23
rm
ri48
22 22
rm
f149
22
23 23
r;;;
r;so
rG5
f15l
21
23
f1i
G52
21
23
[1s3
rm
23 24
[ii
fi54
21
21
r;J9
G55
20
21
r;56
fi40
20 23
fMi
f157
23 24
r;sa
r142
21
r;:;3
Ii59
A B
1010 1011
24
r;oo
20
24
f161
22
24
G62
24
/163
24
r;;
24
24
rws
24
[l66
23
24
r®
21
24
r;68
24 24
G69
24
rm;
23
24
rm
23
24
fill
13
24
rm
22
24
fi74
22
24
rm
C D E
1100
1101
24 24 24
rm
rm
24
24
rm
G93
24 24
G78
~
24
24 23
rm
fi95
24 24 17
r;s;;
G96
24
24
G81
rm
24 24
r;B2
f198
24 24
[183
r;99
24
24
r;a:;
f200
24 24
r;m
fi85
24
24
r;as
1202
Irm
24
124
rm
f203
24
24 23
r;;;
[188
24
24 23
G89
f20s
24
24
r;s;;
f206
24
24
fi91
i207
v
GRAPHICS
1110
f208
rrn
21
1209
fi25
19
[2W
rm
rm rm
rz,2
rm
20
rm
rm
23
[2W
[2iO
19
rm
rm
23
rm
rm
19
rm
1233
23
r;;;
21
[235
rm
rna
f236
f221
IW
18
rm
f238
19
rm
rm
24
24
24
24
24
24
23
24
19
13
13
24
18
15
17
24
F
1111
f240
ri41
rw
i143
r;;;;
f245
r;6
rw
r;s
f249
1250
r;51
f252
[253
r;
fi55
87
Page 96

Page 97

Control
codes
B
Tandy
Code
Hes
Hec.
(1111)
II
(III)
(117)
(IIX)
11 11
(IIA)
III
or or
(XA)
UN
I.,
(IIC)
(111))
U
or
or
(XD)
1+1
(III') SO
1+
(111')
15
IX(12)
19
(U)
control codes
Symbol HP Mode
NUL
Ignored Igm)fctl Ignored
SOH
Sound
BEL
BS
LF
IT
CR
SI
DC
DC,
huzzcr
DOl
column Dol column Ignored
backspace backspace
11:
dOl
number
Execules LI'accord-
ingtolatched
inf{)fI1wtion
Form Feed Form Feed Form Feed
C"arriage
Return
only
or plus only or plus
Line Feed
End Underline
Start Underline Start Underline
Select graphics Mode Select graphics Mode
Ignored
WP
Mode
Sound
huzler
11:
dol number
1/6"
IF
1/12"LFin
fonl print data
Carriage Return
Line Feed
End Underline
ScleciI)I'
Micro
Mode Ignored
81
Mode
Sound
huzzer
ReceivesJ1as
cbaracler dala
7/72"
LF
Receives
Carriage
Retllrn
only
or plus
Linc Feed
Ignored
Ignored
Ignored
lJXasa
Remarks
1::511:5255
Page
length
selectable
I)
II'switch selects
CRorCR+LF
is
(14
211
27
27
III
27
14
27
15
)
(IB) ESC
11 11
(IB)
(IIA)
(IB) ESC
(111'.)
(IB)
(111')
DCA
Seleci WI' Mode
rVlicrospacing
ESC
Sci
IF
Start
SO
ESC
I::
SI
1/6"
Elongation
nL!
Elongation
Reverse
Ignored
i\Jl
jcrospacing Ignored
1/6"
Perform
LF
Reverse LI'
Start
Elongation Start Elongalion
End
EllH1gation
89
Ignored
Ignored
E:ntl
Elongation
2nd
byteisdot
column
t:So:S9
number
Page 98

COlltrol codes
Code
Dec.
27
16
III
/12
27
17
27
IX
27
19
27
20(14)
27
21(15)
27
27
27
26
27
2K
27
29
27
30
27
31
Hex
(
1(3)
(III)
(
1(3)
(II)
(113)
(
12)
(113)
(U)
(113)
(IB)
(113)
(
16)
(IB)
(IB)
(IA)
(113)
(IC)
(IB)
(ID)
(113)
(IE)
(Ill)
(I
F)
Symbol
DPMode
ESC
PUS
Positioning
III
112
Select NLO Select NLO
ESC
Proportional
DCI
Character Character
ESC
Select NLO Select NLO
III
CPI Character
DC2
ESC
Select Standard
10
CPI Character
DO
ESC
Select Condensed Select Condensed
Character Character
DC4
ESC
NAK
ESC
SYN
ESC
ESC
SUB
ESC
FS
ESC
GS
ESC
RS
ESC
US
CR
Set only
lUi
CRCode
Set CRandLFfor
CRCode
Select Standard
Perform
I/R
LF
1/HF
Set
Select NLO Select NLO
12
CPI Character
Select
1112"
Reverse LF Reverse
Select Bold Select Bold
Character Character
WPMode
Positioning
Prop{)rtional
10
CPI Character
Select Standard
10
CPI Character
III Mode
Positioning
Ignored
Ignored
Ignored
Ignored
Sct only CR for Set only CR lor
CRCode
Set CR andLFfor
CRCode
Perform1mLF
Perform
1/2
12
CPI Character
Perfroml/12"
LF
CR Code
Set CR and
for CR Code
Ignored
Perform
I/R
LF
Ignored
Ignored
Ignored
Ignored
LF
LF
Remarks
1/1
112
indicate
position from home
position
III
CPI
10
CPI
17
CPI
Reset DIP Switch
1-7
Reset DII'Switch
1-7
12
CPI
1/4R
Inch
11I21neh
12
CPI
Invalidincondensed.
microhmt"
superscript
90
Page 99

Appendix
B
Code
Dec. Hex
(113)
17
,2
(211)
(113)
17
(21)
33
(113)
17
511
(m
(113)
17
(33)
51
(113)
17
(J.) )
52
/I
(113)
17
5,)
(3h) h
(113)
17
(JX)
56
(113)
17
(J9) 9
57
(113)
17
(3A)
5R
(113)
17
(JB)
59
(113)
17
(411)
6.J
/I
(113)
17
(,)2)
h6
/I
(113)
17
(4X)
72
/I
Symbol
DPMode
ESC
End Bold Character
SP
ESC
Select
ESC
I'erlnrm
ESC
Perform
ESC
Specify
.)
Length
/I
ESC
SetILF
ESC
Set
114
ESC
I'erform
ESC
Select
113M
Mode Select
1/12
LF
1/36
LF Perlonn
Page
LF
1/1·1.J"
IBM
LF
Character Set I Character
ESC
Select Tandy
Character
Set
ESC
(n
Set
/11144"
LF
/I
ESC
Select Italic Select Italic
13
Character
/I
ESC
Set
/1/6"
H
/I
Skip
Perforation
WI'Mode III Mode
Charactel
End Bold
113M
Mode Select
l'eriorml1l2
11J6LF
Specify
Page
Length
Ignored
3/4
Perform
PerfDlmI1l4.)"LF
Select
113M
Set
Select Tandy
CharacterSet
l'erform/l1l4')"
Character
Set
/llh" Skip
Perforation Perforation
LF
LF
I
LF
Ignored
113M
Perlnrm
Perform
Specify
Page
Length
Ignored
Ignored
I'erform
Ignored
Ignored
Perlnnn /III,),)" LF
Ignored
Set
/1/6"
Skip
Mode
1112
11J6
11144"
LF
LF
LF
Remarks
1/72
Inch
1/216
Inch
/IX
1/6lnch
1/6
Inch
IIX
Inch
Starts Italic
/1=1:
Ends Italic
/1=11:
/1=11:
EndsSkip
Perforation
91
Page 100

Control codes
Code
Dec_
Hex
(113)
n
77
(4D)
(113)
n
XI
(51)
1/ 1/
n
(113)
H2
(
52)
1/ 1/
n (
113)
53
(5.1)
1/
(IB)
n
X5
(55)
1/ 1/
n ( IB)
(5X)
XX
(113)
27
(54)
X4
1/
(IC)
2X
nr
II:!.
30
(IE)
In
(71')
255
(H)
Symbol
ESC
M
OPMode
Select Microfont
WPMode
Sclect Microfont
ESC
Set Left Margin
Q
Set I.eft Margin Ignored
ESC
R Set Right Margin Sct Right Margin
ESC
I/~O
Sets Unidirectional
S
I/~
ISetsSuhscript
1/
ESC
I/~O
Sets Unidirectional
U
n~
ISets Bidirectional
ESC
End Superscript End Superscript
and Suhscript and Suhscript
X
ESC
Select International
Y
Character
1/
I'S
Repeat Character Repeat Character
(U ndefined code
III
is
ignored )
112
Ignored
RS
DEL
Ignored Ignored Ignored
Ignored
DEL
1/
=0
Sets Superscript
1/~ISets Suhscript
1/=(ISets
Unidirectional
1/=
ISets Bidirectional
Select International
Character
(Undefined code Repeat Print Data
is
ignored)
Ignored
Ignored
BIMode
Ignored
Ignored
Ignored
Ignored
Ignored
Ignored
End graphics
Ignored
Remarks
1/2U'
is
set
Set
at
position
(1/
x characterwidth)
St;.'l at position
(11
x character width)
ESC
Xends this
se1edioll
1/=.12-42
Ill;
Repeat number
11~: Char
or
data
print
Other
undefined
coesinfunction area
2t031
(02to
IFhex)
Other
undefined
in
function
codes
128to
154
(80104Fhex)
area,
Print
X Print X Ignored
P .
X Print X Printing Data
rrnt
92
 Loading...