


400
INSULIN ON BOARD: 1.1 u | 1:09 hrs
10:20
14 Nov 2019
100%
235 u
350
300
250
200
150
100
84
mg/dL
3
HRS
50
with Basal-IQ™ Technology
User Guide
1 2 3


t:slim X2 Insulin Pump with Basal-IQ Technology User Guide Software Version: Carlsbad
Congratulations on the purchase of
your new t:slim X2 insulin pump with
Basal-IQ technology.
This user guide is designed to assist
you with the features and functions of
the t:slim X2 insulin pump with Basal-IQ
technology. It provides important
warnings and cautions on proper
operation as well as technical
information to ensure your safety. It also
provides step-by-step instructions on
how to properly program, manage and
care for your t:slim X2 insulin pump with
Basal-IQ technology.
Changes in equipment, software, or
procedures occur periodically;
information describing these changes
will be included in future editions of this
user guide.
No part of this publication may be
reproduced, stored in a retrieval
system, nor transmitted in any form or
by any means, electronic or
mechanical, without the prior written
permission of Tandem Diabetes
Care™.
Please contact Customer Technical
Support to obtain a replacement copy
of the user guide that is the correct
version for your pump. For contact
information in your region see the back
cover of this user guide.
Tandem Diabetes Care, Inc.
11075 Roselle Street
San Diego, CA 92121 USA
tandemdiabetes.com
1

Table of Contents
Chapter 1 – Introduction
1.1 Conventions of this Guide . . . . . . . . . . . . . . . . . . . . . . . . . . . . . . . . . . . . . . . . . . . . . 18
1.2 Explanation of Symbols . . . . . . . . . . . . . . . . . . . . . . . . . . . . . . . . . . . . . . . . . . . . . . . 20
1.3 System Description . . . . . . . . . . . . . . . . . . . . . . . . . . . . . . . . . . . . . . . . . . . . . . . . . . 22
1.4 About this User Guide . . . . . . . . . . . . . . . . . . . . . . . . . . . . . . . . . . . . . . . . . . . . . . . . 22
1.5 Indications for Use . . . . . . . . . . . . . . . . . . . . . . . . . . . . . . . . . . . . . . . . . . . . . . . . . . . 23
1.6 Contraindications . . . . . . . . . . . . . . . . . . . . . . . . . . . . . . . . . . . . . . . . . . . . . . . . . . . . 23
1.7 Compatible iCGMs . . . . . . . . . . . . . . . . . . . . . . . . . . . . . . . . . . . . . . . . . . . . . . . . . . . 24
1.8 Important User Information . . . . . . . . . . . . . . . . . . . . . . . . . . . . . . . . . . . . . . . . . . . . 24
1.9 Important Pediatric User Information . . . . . . . . . . . . . . . . . . . . . . . . . . . . . . . . . . . . . 25
1.10 Emergency Kit . . . . . . . . . . . . . . . . . . . . . . . . . . . . . . . . . . . . . . . . . . . . . . . . . . . . . . 25
Chapter 2 – Important Safety Information
2.1 t:slim X2 Insulin Pump Warnings . . . . . . . . . . . . . . . . . . . . . . . . . . . . . . . . . . . . . . . . 30
2.2 t:slim X2 Insulin Pump Precautions . . . . . . . . . . . . . . . . . . . . . . . . . . . . . . . . . . . . . . 33
2.3 Potential Benefits From Using Your Pump . . . . . . . . . . . . . . . . . . . . . . . . . . . . . . . . . 35
2.4 Possible Risks From Using Your Pump . . . . . . . . . . . . . . . . . . . . . . . . . . . . . . . . . . . 36
2.5 Working with your Healthcare Provider . . . . . . . . . . . . . . . . . . . . . . . . . . . . . . . . . . . 36
2.6 Verification of Proper Functionality . . . . . . . . . . . . . . . . . . . . . . . . . . . . . . . . . . . . . . 37
2

Table of Contents
Chapter 3 – Getting to Know Your t:slim X2 Insulin Pump
3.1 What your t:slim X2 Pump Package Includes . . . . . . . . . . . . . . . . . . . . . . . . . . . . . . 40
3.2 Pump Terminology . . . . . . . . . . . . . . . . . . . . . . . . . . . . . . . . . . . . . . . . . . . . . . . . . . . 40
3.3 Explanation of t:slim X2 Insulin Pump Icons . . . . . . . . . . . . . . . . . . . . . . . . . . . . . . . 42
3.4 Explanation of Pump Colors . . . . . . . . . . . . . . . . . . . . . . . . . . . . . . . . . . . . . . . . . . . 44
3.5 Lock Screen . . . . . . . . . . . . . . . . . . . . . . . . . . . . . . . . . . . . . . . . . . . . . . . . . . . . . . . . 46
3.6 Home Screen . . . . . . . . . . . . . . . . . . . . . . . . . . . . . . . . . . . . . . . . . . . . . . . . . . . . . . . 48
3.7 Current Status Screen . . . . . . . . . . . . . . . . . . . . . . . . . . . . . . . . . . . . . . . . . . . . . . . . 50
3.8 Bolus Screen . . . . . . . . . . . . . . . . . . . . . . . . . . . . . . . . . . . . . . . . . . . . . . . . . . . . . . . 52
3.9 Options Screen . . . . . . . . . . . . . . . . . . . . . . . . . . . . . . . . . . . . . . . . . . . . . . . . . . . . . 54
3.10 My Pump Screen . . . . . . . . . . . . . . . . . . . . . . . . . . . . . . . . . . . . . . . . . . . . . . . . . . . . 56
3.11 Device Settings Screen . . . . . . . . . . . . . . . . . . . . . . . . . . . . . . . . . . . . . . . . . . . . . . . 58
3.12 Number Keypad Screen . . . . . . . . . . . . . . . . . . . . . . . . . . . . . . . . . . . . . . . . . . . . . . 60
3.13 Letter Keypad Screen . . . . . . . . . . . . . . . . . . . . . . . . . . . . . . . . . . . . . . . . . . . . . . . . 62
Chapter 4 – Getting Started
4.1 Charging the t:slim X2 Pump . . . . . . . . . . . . . . . . . . . . . . . . . . . . . . . . . . . . . . . . . . . 66
4.2 Turning the Pump On . . . . . . . . . . . . . . . . . . . . . . . . . . . . . . . . . . . . . . . . . . . . . . . . 67
4.3 Using the Touchscreen . . . . . . . . . . . . . . . . . . . . . . . . . . . . . . . . . . . . . . . . . . . . . . . 67
4.4 Turning the t:slim X2 Pump Screen On . . . . . . . . . . . . . . . . . . . . . . . . . . . . . . . . . . . 68
4.5 Turning the Pump Screen Off . . . . . . . . . . . . . . . . . . . . . . . . . . . . . . . . . . . . . . . . . . 68
4.6 Turning the Pump Off . . . . . . . . . . . . . . . . . . . . . . . . . . . . . . . . . . . . . . . . . . . . . . . . 68
3

Table of Contents
4.7 Selecting Your Language . . . . . . . . . . . . . . . . . . . . . . . . . . . . . . . . . . . . . . . . . . . . . . 68
4.8 Unlocking the t:slim X2 Pump Screen . . . . . . . . . . . . . . . . . . . . . . . . . . . . . . . . . . . . 69
4.9 Edit Time . . . . . . . . . . . . . . . . . . . . . . . . . . . . . . . . . . . . . . . . . . . . . . . . . . . . . . . . . . . 69
4.10 Edit Date . . . . . . . . . . . . . . . . . . . . . . . . . . . . . . . . . . . . . . . . . . . . . . . . . . . . . . . . . . . 70
Chapter 5 – Infusion Site Care and Loading Cartridge
5.1 Infusion Site Selection and Care . . . . . . . . . . . . . . . . . . . . . . . . . . . . . . . . . . . . . . . . 72
5.2 Cartridge Instructions for Use . . . . . . . . . . . . . . . . . . . . . . . . . . . . . . . . . . . . . . . . . . 73
5.3 Filling and Loading a t:slim Cartridge . . . . . . . . . . . . . . . . . . . . . . . . . . . . . . . . . . . . . 74
5.4 Filling Tubing . . . . . . . . . . . . . . . . . . . . . . . . . . . . . . . . . . . . . . . . . . . . . . . . . . . . . . . 79
5.5 Filling Cannula . . . . . . . . . . . . . . . . . . . . . . . . . . . . . . . . . . . . . . . . . . . . . . . . . . . . . . 81
5.6 Setting Site Reminder . . . . . . . . . . . . . . . . . . . . . . . . . . . . . . . . . . . . . . . . . . . . . . . . . 81
Chapter 6 – Personal Profiles
6.1 Personal Profiles Overview . . . . . . . . . . . . . . . . . . . . . . . . . . . . . . . . . . . . . . . . . . . . . 84
6.2 Creating a New Profile . . . . . . . . . . . . . . . . . . . . . . . . . . . . . . . . . . . . . . . . . . . . . . . . 84
6.3 Programming a New Personal Profile . . . . . . . . . . . . . . . . . . . . . . . . . . . . . . . . . . . . . 86
6.4 Editing or Reviewing an Existing Profile . . . . . . . . . . . . . . . . . . . . . . . . . . . . . . . . . . . 88
6.5 Duplicating an Existing Profile . . . . . . . . . . . . . . . . . . . . . . . . . . . . . . . . . . . . . . . . . . 89
6.6 Activating an Existing Profile . . . . . . . . . . . . . . . . . . . . . . . . . . . . . . . . . . . . . . . . . . . 89
6.7 Renaming an Existing Profile . . . . . . . . . . . . . . . . . . . . . . . . . . . . . . . . . . . . . . . . . . . 89
6.8 Deleting an Existing Profile . . . . . . . . . . . . . . . . . . . . . . . . . . . . . . . . . . . . . . . . . . . . . 90
4

Table of Contents
Chapter 7 – Bolus
7.1 Bolus Overview . . . . . . . . . . . . . . . . . . . . . . . . . . . . . . . . . . . . . . . . . . . . . . . . . . . . . 92
7.2 Correction Bolus Calculation . . . . . . . . . . . . . . . . . . . . . . . . . . . . . . . . . . . . . . . . . . . 92
7.3 Bolus Override . . . . . . . . . . . . . . . . . . . . . . . . . . . . . . . . . . . . . . . . . . . . . . . . . . . . . . 94
7.4 Food Bolus Using Units . . . . . . . . . . . . . . . . . . . . . . . . . . . . . . . . . . . . . . . . . . . . . . . 94
7.5 Food Bolus Using Grams . . . . . . . . . . . . . . . . . . . . . . . . . . . . . . . . . . . . . . . . . . . . . . 94
7.6 Extended Bolus . . . . . . . . . . . . . . . . . . . . . . . . . . . . . . . . . . . . . . . . . . . . . . . . . . . . . 95
7.7 Canceling or Stopping a Bolus . . . . . . . . . . . . . . . . . . . . . . . . . . . . . . . . . . . . . . . . . 96
Chapter 8 – Stop/Resume Insulin
8.1 Stopping Insulin Delivery . . . . . . . . . . . . . . . . . . . . . . . . . . . . . . . . . . . . . . . . . . . . . . 98
8.2 Resuming Insulin Delivery . . . . . . . . . . . . . . . . . . . . . . . . . . . . . . . . . . . . . . . . . . . . . 98
Chapter 9 – Temporary Basal Rate
9.1 Setting a Temp Rate . . . . . . . . . . . . . . . . . . . . . . . . . . . . . . . . . . . . . . . . . . . . . . . . 100
9.2 Stopping a Temp Rate . . . . . . . . . . . . . . . . . . . . . . . . . . . . . . . . . . . . . . . . . . . . . . . 100
Chapter 10 – Quick Bolus
10.1 Setting Up Quick Bolus . . . . . . . . . . . . . . . . . . . . . . . . . . . . . . . . . . . . . . . . . . . . . . 104
10.2 Delivering Quick Bolus . . . . . . . . . . . . . . . . . . . . . . . . . . . . . . . . . . . . . . . . . . . . . . . 104
5

Table of Contents
Chapter 11 – Device Settings
11.1 Display Settings . . . . . . . . . . . . . . . . . . . . . . . . . . . . . . . . . . . . . . . . . . . . . . . . . . . . 108
11.2 Mobile Connection . . . . . . . . . . . . . . . . . . . . . . . . . . . . . . . . . . . . . . . . . . . . . . . . . . 108
11.3 Mobile Connection Security . . . . . . . . . . . . . . . . . . . . . . . . . . . . . . . . . . . . . . . . . . . 109
11.4 Time and Date . . . . . . . . . . . . . . . . . . . . . . . . . . . . . . . . . . . . . . . . . . . . . . . . . . . . . 109
11.5 Sound Volume . . . . . . . . . . . . . . . . . . . . . . . . . . . . . . . . . . . . . . . . . . . . . . . . . . . . . 109
11.6 Turn Security PIN On or Off . . . . . . . . . . . . . . . . . . . . . . . . . . . . . . . . . . . . . . . . . . . 109
Chapter 12 – t:slim X2 Insulin Pump Information and History
12.1 t:slim X2 Pump Info . . . . . . . . . . . . . . . . . . . . . . . . . . . . . . . . . . . . . . . . . . . . . . . . . 112
12.2 t:slim X2 Pump History . . . . . . . . . . . . . . . . . . . . . . . . . . . . . . . . . . . . . . . . . . . . . . . 112
Chapter 13 – t:slim X2 Insulin Pump Reminders
13.1 Low BG Reminder . . . . . . . . . . . . . . . . . . . . . . . . . . . . . . . . . . . . . . . . . . . . . . . . . . 114
13.2 High BG Reminder . . . . . . . . . . . . . . . . . . . . . . . . . . . . . . . . . . . . . . . . . . . . . . . . . . 114
13.3 After Bolus BG Reminder . . . . . . . . . . . . . . . . . . . . . . . . . . . . . . . . . . . . . . . . . . . . . 115
13.4 Missed Meal Bolus Reminder . . . . . . . . . . . . . . . . . . . . . . . . . . . . . . . . . . . . . . . . . . 115
13.5 Site Reminder . . . . . . . . . . . . . . . . . . . . . . . . . . . . . . . . . . . . . . . . . . . . . . . . . . . . . . 116
Chapter 14 – User Settable Alerts and Alarms
14.1 Low Insulin Alert . . . . . . . . . . . . . . . . . . . . . . . . . . . . . . . . . . . . . . . . . . . . . . . . . . . . 118
6

Table of Contents
14.2 Auto-Off Alarm . . . . . . . . . . . . . . . . . . . . . . . . . . . . . . . . . . . . . . . . . . . . . . . . . . . . . 118
Chapter 15 – t:slim X2 Insulin Pump Alerts
15.1 Low Insulin Alert . . . . . . . . . . . . . . . . . . . . . . . . . . . . . . . . . . . . . . . . . . . . . . . . . . . 123
15.2 Low Power Alerts . . . . . . . . . . . . . . . . . . . . . . . . . . . . . . . . . . . . . . . . . . . . . . . . . . . 124
15.3 Incomplete Bolus Alert . . . . . . . . . . . . . . . . . . . . . . . . . . . . . . . . . . . . . . . . . . . . . . . 126
15.4 Incomplete Temp Rate Alert . . . . . . . . . . . . . . . . . . . . . . . . . . . . . . . . . . . . . . . . . . 127
15.5 Incomplete Load Sequence Alerts . . . . . . . . . . . . . . . . . . . . . . . . . . . . . . . . . . . . . . 128
15.6 Incomplete Setting Alert . . . . . . . . . . . . . . . . . . . . . . . . . . . . . . . . . . . . . . . . . . . . . 131
15.7 Basal Rate Required Alert . . . . . . . . . . . . . . . . . . . . . . . . . . . . . . . . . . . . . . . . . . . . 132
15.8 Max Hourly Bolus Alert . . . . . . . . . . . . . . . . . . . . . . . . . . . . . . . . . . . . . . . . . . . . . . 133
15.9 Max Bolus Alerts . . . . . . . . . . . . . . . . . . . . . . . . . . . . . . . . . . . . . . . . . . . . . . . . . . . 134
15.10 Max Basal Alert . . . . . . . . . . . . . . . . . . . . . . . . . . . . . . . . . . . . . . . . . . . . . . . . . . . . 136
15.11 Min Basal Alerts . . . . . . . . . . . . . . . . . . . . . . . . . . . . . . . . . . . . . . . . . . . . . . . . . . . . 138
15.12 Connection Error Alert . . . . . . . . . . . . . . . . . . . . . . . . . . . . . . . . . . . . . . . . . . . . . . . 140
15.13 Pairing Code Timeout . . . . . . . . . . . . . . . . . . . . . . . . . . . . . . . . . . . . . . . . . . . . . . . 141
15.14 Power Source Alert . . . . . . . . . . . . . . . . . . . . . . . . . . . . . . . . . . . . . . . . . . . . . . . . . 142
15.15 Data Error Alert . . . . . . . . . . . . . . . . . . . . . . . . . . . . . . . . . . . . . . . . . . . . . . . . . . . . 143
Chapter 16 – t:slim X2 Insulin Pump Alarms
16.1 Resume Pump Alarm . . . . . . . . . . . . . . . . . . . . . . . . . . . . . . . . . . . . . . . . . . . . . . . . 147
16.2 Low Power Alarm . . . . . . . . . . . . . . . . . . . . . . . . . . . . . . . . . . . . . . . . . . . . . . . . . . . 148
7

Table of Contents
16.3 Empty Cartridge Alarm . . . . . . . . . . . . . . . . . . . . . . . . . . . . . . . . . . . . . . . . . . . . . . . 149
16.4 Cartridge Error Alarm . . . . . . . . . . . . . . . . . . . . . . . . . . . . . . . . . . . . . . . . . . . . . . . . 150
16.5 Cartridge Removal Alarm . . . . . . . . . . . . . . . . . . . . . . . . . . . . . . . . . . . . . . . . . . . . . 151
16.6 Temperature Alarm . . . . . . . . . . . . . . . . . . . . . . . . . . . . . . . . . . . . . . . . . . . . . . . . . . 152
16.7 Occlusion Alarm 1 . . . . . . . . . . . . . . . . . . . . . . . . . . . . . . . . . . . . . . . . . . . . . . . . . . 153
16.8 Occlusion Alarm 2 . . . . . . . . . . . . . . . . . . . . . . . . . . . . . . . . . . . . . . . . . . . . . . . . . . 154
16.9 Screen On/Quick Bolus Button Alarm . . . . . . . . . . . . . . . . . . . . . . . . . . . . . . . . . . . 155
16.10 Altitude Alarm . . . . . . . . . . . . . . . . . . . . . . . . . . . . . . . . . . . . . . . . . . . . . . . . . . . . . . 156
16.11 Reset Alarm . . . . . . . . . . . . . . . . . . . . . . . . . . . . . . . . . . . . . . . . . . . . . . . . . . . . . . . 157
Chapter 17 – t:slim X2 Insulin Pump Malfunction
17.1 Malfunction . . . . . . . . . . . . . . . . . . . . . . . . . . . . . . . . . . . . . . . . . . . . . . . . . . . . . . . . 160
Chapter 18 – Lifestyle Issues and Travel
18.1 Overview . . . . . . . . . . . . . . . . . . . . . . . . . . . . . . . . . . . . . . . . . . . . . . . . . . . . . . . . . . 164
Chapter 19 – Taking Care of Your Pump
19.1 Overview . . . . . . . . . . . . . . . . . . . . . . . . . . . . . . . . . . . . . . . . . . . . . . . . . . . . . . . . . . 168
Chapter 20 – Important CGM Safety Information
20.1 CGM Warnings . . . . . . . . . . . . . . . . . . . . . . . . . . . . . . . . . . . . . . . . . . . . . . . . . . . . . 172
8

Table of Contents
20.2 CGM Precautions . . . . . . . . . . . . . . . . . . . . . . . . . . . . . . . . . . . . . . . . . . . . . . . . . . 173
20.3 Potential Benefits From Using the t:slim X2 System . . . . . . . . . . . . . . . . . . . . . . . . 174
20.4 Possible Risks From Using the t:slim X2 System . . . . . . . . . . . . . . . . . . . . . . . . . . 175
Chapter 21 – Getting to Know Your CGM System
21.1 CGM Terminology . . . . . . . . . . . . . . . . . . . . . . . . . . . . . . . . . . . . . . . . . . . . . . . . . . 178
21.2 Explanation of CGM Pump Icons . . . . . . . . . . . . . . . . . . . . . . . . . . . . . . . . . . . . . . 180
21.3 CGM Lock Screen . . . . . . . . . . . . . . . . . . . . . . . . . . . . . . . . . . . . . . . . . . . . . . . . . . 182
21.4 CGM Home Screen . . . . . . . . . . . . . . . . . . . . . . . . . . . . . . . . . . . . . . . . . . . . . . . . . 184
21.5 My CGM Screen . . . . . . . . . . . . . . . . . . . . . . . . . . . . . . . . . . . . . . . . . . . . . . . . . . . 186
Chapter 22 – CGM Overview
22.1 CGM System Overview . . . . . . . . . . . . . . . . . . . . . . . . . . . . . . . . . . . . . . . . . . . . . . 190
22.2 Receiver (t:slim X2 Insulin Pump) Overview . . . . . . . . . . . . . . . . . . . . . . . . . . . . . . . 190
22.3 Transmitter Overview . . . . . . . . . . . . . . . . . . . . . . . . . . . . . . . . . . . . . . . . . . . . . . . . 190
22.4 Sensor Overview . . . . . . . . . . . . . . . . . . . . . . . . . . . . . . . . . . . . . . . . . . . . . . . . . . . 192
Chapter 23 – CGM Settings
23.1 About Bluetooth . . . . . . . . . . . . . . . . . . . . . . . . . . . . . . . . . . . . . . . . . . . . . . . . . . . . 194
23.2 Disconnecting from the Dexcom Receiver . . . . . . . . . . . . . . . . . . . . . . . . . . . . . . . 194
23.3 Entering Your Transmitter ID . . . . . . . . . . . . . . . . . . . . . . . . . . . . . . . . . . . . . . . . . . 194
9

Table of Contents
23.4 Setting CGM Volume . . . . . . . . . . . . . . . . . . . . . . . . . . . . . . . . . . . . . . . . . . . . . . . . 195
23.5 CGM Info . . . . . . . . . . . . . . . . . . . . . . . . . . . . . . . . . . . . . . . . . . . . . . . . . . . . . . . . . 197
Chapter 24 – Setting CGM Alerts
24.1 Setting Your High Glucose Alert and Repeat Feature . . . . . . . . . . . . . . . . . . . . . . . 200
24.2 Setting Your Low Glucose Alert and Repeat Feature . . . . . . . . . . . . . . . . . . . . . . . . 201
24.3 Rate Alerts . . . . . . . . . . . . . . . . . . . . . . . . . . . . . . . . . . . . . . . . . . . . . . . . . . . . . . . . 201
24.4 Setting Your Rise Alert . . . . . . . . . . . . . . . . . . . . . . . . . . . . . . . . . . . . . . . . . . . . . . . 202
24.5 Setting Your Fall Alert . . . . . . . . . . . . . . . . . . . . . . . . . . . . . . . . . . . . . . . . . . . . . . . . 202
24.6 Setting Your Out of Range Alert . . . . . . . . . . . . . . . . . . . . . . . . . . . . . . . . . . . . . . . . 203
Chapter 25 – Starting a CGM Sensor Session
25.1 Start the Sensor . . . . . . . . . . . . . . . . . . . . . . . . . . . . . . . . . . . . . . . . . . . . . . . . . . . . 206
25.2 Sensor Startup Period . . . . . . . . . . . . . . . . . . . . . . . . . . . . . . . . . . . . . . . . . . . . . . . 208
Chapter 26 – Calibrating Your CGM System
26.1 Calibration Overview . . . . . . . . . . . . . . . . . . . . . . . . . . . . . . . . . . . . . . . . . . . . . . . . 212
26.2 Startup Calibration . . . . . . . . . . . . . . . . . . . . . . . . . . . . . . . . . . . . . . . . . . . . . . . . . . 212
26.3 Calibration BG Value and Correction Bolus . . . . . . . . . . . . . . . . . . . . . . . . . . . . . . . 214
26.4 24 Hour Calibration Update . . . . . . . . . . . . . . . . . . . . . . . . . . . . . . . . . . . . . . . . . . . 214
26.5 Other Reasons You May Need to Calibrate . . . . . . . . . . . . . . . . . . . . . . . . . . . . . . . 215
10

Table of Contents
Chapter 27 – Viewing CGM Data on Your t:slim X2 Insulin Pump
27.1 Overview . . . . . . . . . . . . . . . . . . . . . . . . . . . . . . . . . . . . . . . . . . . . . . . . . . . . . . . . . 218
27.2 CGM Trend Graphs . . . . . . . . . . . . . . . . . . . . . . . . . . . . . . . . . . . . . . . . . . . . . . . . . 219
27.3 Rate of Change Arrows . . . . . . . . . . . . . . . . . . . . . . . . . . . . . . . . . . . . . . . . . . . . . . 220
27.4 CGM History . . . . . . . . . . . . . . . . . . . . . . . . . . . . . . . . . . . . . . . . . . . . . . . . . . . . . . 222
27.5 Missed Readings . . . . . . . . . . . . . . . . . . . . . . . . . . . . . . . . . . . . . . . . . . . . . . . . . . . 222
Chapter 28 – Ending Your CGM Sensor Session
28.1 Automatic Sensor Shut-Off . . . . . . . . . . . . . . . . . . . . . . . . . . . . . . . . . . . . . . . . . . . 224
28.2 Ending a Sensor Session Before Automatic Shut-Off . . . . . . . . . . . . . . . . . . . . . . . 224
28.3 Removing the Sensor and Transmitter . . . . . . . . . . . . . . . . . . . . . . . . . . . . . . . . . . 224
Chapter 29 – CGM Alerts and Errors
29.1 Startup Calibration Alert . . . . . . . . . . . . . . . . . . . . . . . . . . . . . . . . . . . . . . . . . . . . . 229
29.2 Second Startup Calibration Alert . . . . . . . . . . . . . . . . . . . . . . . . . . . . . . . . . . . . . . . 230
29.3 12 Hour Calibration Alert . . . . . . . . . . . . . . . . . . . . . . . . . . . . . . . . . . . . . . . . . . . . . 231
29.4 Incomplete Calibration . . . . . . . . . . . . . . . . . . . . . . . . . . . . . . . . . . . . . . . . . . . . . . . 232
29.5 Calibration Timeout . . . . . . . . . . . . . . . . . . . . . . . . . . . . . . . . . . . . . . . . . . . . . . . . . 233
29.6 Wait 15 Minute Calibration Error Alert . . . . . . . . . . . . . . . . . . . . . . . . . . . . . . . . . . . 234
29.7 Calibration Required Alert . . . . . . . . . . . . . . . . . . . . . . . . . . . . . . . . . . . . . . . . . . . . 235
29.8 CGM High Alert . . . . . . . . . . . . . . . . . . . . . . . . . . . . . . . . . . . . . . . . . . . . . . . . . . . . 236
11

Table of Contents
29.9 CGM Low Alert . . . . . . . . . . . . . . . . . . . . . . . . . . . . . . . . . . . . . . . . . . . . . . . . . . . . . 237
29.10 CGM Fixed Low Alert . . . . . . . . . . . . . . . . . . . . . . . . . . . . . . . . . . . . . . . . . . . . . . . . 238
29.11 CGM Rise Alert . . . . . . . . . . . . . . . . . . . . . . . . . . . . . . . . . . . . . . . . . . . . . . . . . . . . . 239
29.12 CGM Rapid Rise Alert . . . . . . . . . . . . . . . . . . . . . . . . . . . . . . . . . . . . . . . . . . . . . . . 240
29.13 CGM Fall Alert . . . . . . . . . . . . . . . . . . . . . . . . . . . . . . . . . . . . . . . . . . . . . . . . . . . . . 241
29.14 CGM Rapid Fall Alert . . . . . . . . . . . . . . . . . . . . . . . . . . . . . . . . . . . . . . . . . . . . . . . . 242
29.15 Unknown Sensor Reading . . . . . . . . . . . . . . . . . . . . . . . . . . . . . . . . . . . . . . . . . . . . 243
29.16 Out of Range Alert . . . . . . . . . . . . . . . . . . . . . . . . . . . . . . . . . . . . . . . . . . . . . . . . . . 244
29.17 Low Transmitter Battery Alert . . . . . . . . . . . . . . . . . . . . . . . . . . . . . . . . . . . . . . . . . . 245
29.18 Transmitter Error . . . . . . . . . . . . . . . . . . . . . . . . . . . . . . . . . . . . . . . . . . . . . . . . . . . . 246
29.19 Failed Sensor Error . . . . . . . . . . . . . . . . . . . . . . . . . . . . . . . . . . . . . . . . . . . . . . . . . . 247
29.20 CGM System Error . . . . . . . . . . . . . . . . . . . . . . . . . . . . . . . . . . . . . . . . . . . . . . . . . . 248
Chapter 30 – CGM Troubleshooting
30.1 CGM Pairing Troubleshooting . . . . . . . . . . . . . . . . . . . . . . . . . . . . . . . . . . . . . . . . . 250
30.2 Calibration Troubleshooting . . . . . . . . . . . . . . . . . . . . . . . . . . . . . . . . . . . . . . . . . . . 250
30.3 Unknown Sensor Reading Troubleshooting . . . . . . . . . . . . . . . . . . . . . . . . . . . . . . . 250
30.4 Out of Range/No Antenna Troubleshooting . . . . . . . . . . . . . . . . . . . . . . . . . . . . . . . 251
30.5 Failed Sensor Troubleshooting . . . . . . . . . . . . . . . . . . . . . . . . . . . . . . . . . . . . . . . . . 251
30.6 Sensor Inaccuracies . . . . . . . . . . . . . . . . . . . . . . . . . . . . . . . . . . . . . . . . . . . . . . . . . 252
12

Table of Contents
Chapter 31 – Getting to Know Basal-IQ Technology
31.1 Responsible Use of Basal-IQ Technology . . . . . . . . . . . . . . . . . . . . . . . . . . . . . . . . 256
31.2 Explanation of Basal-IQ Technology Icons . . . . . . . . . . . . . . . . . . . . . . . . . . . . . . . 256
31.3 Basal-IQ Lock Screen . . . . . . . . . . . . . . . . . . . . . . . . . . . . . . . . . . . . . . . . . . . . . . . 258
31.4 Basal-IQ Home Screen . . . . . . . . . . . . . . . . . . . . . . . . . . . . . . . . . . . . . . . . . . . . . . 260
31.5 Basal-IQ Screen . . . . . . . . . . . . . . . . . . . . . . . . . . . . . . . . . . . . . . . . . . . . . . . . . . . . 262
Chapter 32 – Basal-IQ Technology Overview
32.1 Basal-IQ Overview . . . . . . . . . . . . . . . . . . . . . . . . . . . . . . . . . . . . . . . . . . . . . . . . . . 266
32.2 How Basal-IQ Works . . . . . . . . . . . . . . . . . . . . . . . . . . . . . . . . . . . . . . . . . . . . . . . . 266
32.3 Turn Basal-IQ On and Off . . . . . . . . . . . . . . . . . . . . . . . . . . . . . . . . . . . . . . . . . . . . 269
Chapter 33 – Viewing Basal-IQ Technology Status on Your t:slim X2 Pump
33.1 Overview . . . . . . . . . . . . . . . . . . . . . . . . . . . . . . . . . . . . . . . . . . . . . . . . . . . . . . . . . 272
33.2 Basal-IQ Status Indicators . . . . . . . . . . . . . . . . . . . . . . . . . . . . . . . . . . . . . . . . . . . . 272
33.3 Basal-IQ History . . . . . . . . . . . . . . . . . . . . . . . . . . . . . . . . . . . . . . . . . . . . . . . . . . . . 273
Chapter 34 – Basal-IQ Alerts
34.1 Out of Range Alert . . . . . . . . . . . . . . . . . . . . . . . . . . . . . . . . . . . . . . . . . . . . . . . . . . 277
34.2 Suspend Alert . . . . . . . . . . . . . . . . . . . . . . . . . . . . . . . . . . . . . . . . . . . . . . . . . . . . . 278
34.3 Resume Alerts . . . . . . . . . . . . . . . . . . . . . . . . . . . . . . . . . . . . . . . . . . . . . . . . . . . . . 279
13

Table of Contents
Chapter 35 – Basal-IQ Technology Clinical Study Overview
35.1 Introduction . . . . . . . . . . . . . . . . . . . . . . . . . . . . . . . . . . . . . . . . . . . . . . . . . . . . . . . 282
35.2 Clinical Study Overview . . . . . . . . . . . . . . . . . . . . . . . . . . . . . . . . . . . . . . . . . . . . . . 282
35.3 Demographics . . . . . . . . . . . . . . . . . . . . . . . . . . . . . . . . . . . . . . . . . . . . . . . . . . . . . 283
35.4 Intervention Compliance . . . . . . . . . . . . . . . . . . . . . . . . . . . . . . . . . . . . . . . . . . . . . . 284
35.5 Primary Analysis . . . . . . . . . . . . . . . . . . . . . . . . . . . . . . . . . . . . . . . . . . . . . . . . . . . . 286
35.6 Secondary Analysis . . . . . . . . . . . . . . . . . . . . . . . . . . . . . . . . . . . . . . . . . . . . . . . . . 288
35.7 Insulin Delivery Differences . . . . . . . . . . . . . . . . . . . . . . . . . . . . . . . . . . . . . . . . . . . 290
35.8 Basal-IQ Technology Performance Accuracy . . . . . . . . . . . . . . . . . . . . . . . . . . . . . 292
Chapter 36 – Technical Specifications
36.1 Overview . . . . . . . . . . . . . . . . . . . . . . . . . . . . . . . . . . . . . . . . . . . . . . . . . . . . . . . . . . 296
36.2 t:slim X2 Pump Specifications . . . . . . . . . . . . . . . . . . . . . . . . . . . . . . . . . . . . . . . . . 297
36.3 t:slim X2 Pump Options and Settings . . . . . . . . . . . . . . . . . . . . . . . . . . . . . . . . . . . . 303
36.4 t:slim X2 Pump Performance Characteristics . . . . . . . . . . . . . . . . . . . . . . . . . . . . . . 305
36.5 Electromagnetic Compatibility . . . . . . . . . . . . . . . . . . . . . . . . . . . . . . . . . . . . . . . . . 310
36.6 Wireless Co-existence and Data Security . . . . . . . . . . . . . . . . . . . . . . . . . . . . . . . . 310
36.7 Electromagnetic Emissions . . . . . . . . . . . . . . . . . . . . . . . . . . . . . . . . . . . . . . . . . . . 311
36.8 Electromagnetic Immunity . . . . . . . . . . . . . . . . . . . . . . . . . . . . . . . . . . . . . . . . . . . . 312
36.9 Distances Between the t:slim X2 Pump and RF Equipment . . . . . . . . . . . . . . . . . . 316
36.10 Quality of Wireless Service . . . . . . . . . . . . . . . . . . . . . . . . . . . . . . . . . . . . . . . . . . . . 318
36.11 FCC Notice Concerning Interference . . . . . . . . . . . . . . . . . . . . . . . . . . . . . . . . . . . . 318
14

Table of Contents
36.12 Warranty Information . . . . . . . . . . . . . . . . . . . . . . . . . . . . . . . . . . . . . . . . . . . . . . . . 319
36.13 Returned Goods Policy . . . . . . . . . . . . . . . . . . . . . . . . . . . . . . . . . . . . . . . . . . . . . . 322
36.14 t:slim X2 Insulin Pump Event Data (Black Box) . . . . . . . . . . . . . . . . . . . . . . . . . . . . 323
Index . . . . . . . . . . . . . . . . . . . . . . . . . . . . . . . . . . . . . . . . . . . . . . . . . . . . . . . . . . . . . . . . . . .324
15

Section 1
Overview

Before You Begin
Chapter 1
Introduction

Chapter 1 – Introduction
1.1 Conventions of this Guide
The following are conventions used in this user guide (such as terms, icons, text formatting, and other conventions) along with their
explanations.
Formatting Conventions
Convention Explanation
Bolded Text Text that is in bold in a sentence or step indicates an on-screen icon or physical button name.
Italic Text Text that is in italics indicates the name of a screen or menu on the pump display.
Numbered
Items
Blue Text Calls out a reference to a separate user guide location or website link.
Terminology Definitions
Term Definition
Touchscreen The front glass screen of your pump, which displays all programming, operating, and alarm/alert information.
Tap Quickly and lightly touch the screen with your finger.
Press Use your finger to depress a physical button (the Screen On/Quick Bolus button is the only physical/hardware button on your pump).
Hold Keep pressing a button or touching an icon or menu until its function is complete.
Menu A list of options on your touchscreen that allow you to perform specific tasks.
Numbered items are step-by-step instructions for how to perform a specific task.
18

Chapter 1 – Introduction
Terminology Definitions (Continued)
Term Definition
Icon An image on your touchscreen that indicates an option or item of information, or a symbol on the back of your pump or its packaging.
Calls out an important note regarding the use or operation of the system.
Calls out safety precautions which, if ignored, could result in minor or moderate injury.
Calls out critical safety information which, if ignored, could result in serious injury or death.
Indicates how the pump responds to the previous instruction.
19

Chapter 1 – Introduction
1.2 Explanation of Symbols
The following are symbols (and their descriptions), which you may find on your pump, pump supplies and/or their packaging. These
symbols tell you about the proper and safe use of the pump. Some of these symbols may not be relevant in your region, and are
listed for informational purposes only.
Explanation of t:slim X2 Insulin Pump Symbols
Symbol Meaning Symbol Meaning
Caution; Consult Manual for Important Safety
Documentation
Follow Instructions for Use Use By Date
See Instructions for Use Do Not Re-Use
Serial Number of Device Non-ionizing Radiation
Part Number
Lot Number Sterile by Radiation
Manufacturer Number Sterile by Ethylene Oxide
Watertight Equipment (protected against the effects of
temporary immersion in water)
20
Type BF Applied Part (patient isolation, not defibrillator
protected)
Non-pyrogenic
For sale by or on the order of a physician only (U.S.)

Explanation of t:slim X2 Insulin Pump Symbols (Continued)
Symbol Meaning Symbol Meaning
Chapter 1 – Introduction
Authorized Representative in the European Community
Manufacturer Keep Dry
Direct Current (DC) voltage Two-Sided Humidity Limits
European Union WEEE Directive 2006/66/EC Two-sided Temperature Limits
Electric Equipment Designed Primarily for Indoor Use IEC Class II Equipment
Wall Power USB Adapter Outlet Adapter (for regions outside the U.S. only)
Cartridge Removal Tool Pump Case
USB Cable User Guide
Marking Certifies That the Device Meets the European
Council Directive 93/42/EEC
21

Chapter 1 – Introduction
1.3 System Description
The t:slim X2 insulin pump is made up
of the t:slim X2 insulin pump, the t:slim
3mL (300 units) cartridge, and a
compatible infusion set. In this user
guide, the t:slim X2 insulin pump may
be referred to as the “pump” or the
“t:slim X2 pump.”
The combination of the t:slim X2 pump
with Basal-IQ technology and a
compatible continuous glucose monitor
(CGM) may be referred to as the
“System.”
The Dexcom G6 transmitter may be
referred to as the “transmitter.” The
Dexcom G6 sensor may be referred to
as the “sensor.” Together, the Dexcom
G6 transmitter and Dexcom G6 sensor
may be referred to as the “CGM.”
The pump delivers insulin in two ways:
basal insulin delivery (continuous) and
bolus insulin delivery. The disposable
cartridge is filled with up to 300 units of
U-100 insulin and attached to the
pump. The cartridge is replaced every
48–72 hours.
The t:slim X2 pump comes preloaded
with Basal-IQ technology, or can be
updated to include Basal-IQ
technology. The addition of this feature
enables the t:slim X2 System to
automatically suspend and resume the
delivery of insulin based on CGM
sensor readings. The Basal-IQ
technology utilizes the CGM sensor
readings to calculate a predicted
glucose value 30 minutes into the
future. For more information on how
Basal-IQ technology is activated, see
Chapter 32 Basal-IQ Technology
Overview.
The pump can be used for basal and
bolus insulin delivery with or without a
CGM. If a CGM is not used, sensor
glucose readings will not be sent to the
pump display and you will not be able
to use Basal-IQ technology.
The sensor is a disposable device that
is inserted under the skin to
continuously monitor glucose levels for
up to 10 days. The transmitter
connects to the sensor pod and
wirelessly sends readings to the pump,
which acts as a receiver for the
therapeutic CGM, every 5 minutes. The
pump shows sensor glucose readings,
a trend graph, as well as the direction
and rate of change arrows.
The sensor measures glucose in the
fluid under the skin—not in blood, and
sensor readings are not identical to
readings from a blood glucose meter.
The t:connect™ mobile app enables
you to connect a mobile device to the
pump using Bluetooth wireless
technology to display your pump
information on the mobile device. The
t:connect mobile app may not yet be
available in your region.
PRECAUTION
Federal (USA) law restricts this device to sale by
or on the order of a physician.
1.4 About this User Guide
This user guide covers important
information on how to operate your
System. It provides step-by-step
instructions to help you properly
program, manage and care for the
System. It also provides important
warnings and cautions on proper
22

Chapter 1 – Introduction
operation and technical information to
ensure your safety.
The user guide is organized into
sections. Section 1 provides important
information you need to know before
you start using the System. Section 2
covers instructions for using the t:slim
X2 pump. Section 3 covers instructions
for using CGM with your pump. Section
4 covers instructions for using Basal-IQ
technology on your pump. Section 5
provides information on the technical
specifications of your pump.
Pump screens used in this user guide
to demonstrate how to use features are
examples only. They should not be
considered suggestions for your
individual needs.
For customers in the United States,
product information, including
electronic versions of the user guide,
Guide to Successful Pumping,
t:connect Getting Started Guide,
t:connect user guides, and a CGM
training tutorial, are available at
tandemdiabetes.com
information for users outside the United
. Product
States can be provided by your local
Tandem distributor.
1.5 Indications for Use
The t:slim X2 System with Basal-IQ
technology consists of the t:slim X2
insulin pump which contains Basal-IQ
technology (the System), and a
continuous glucose monitor (CGM). The
t:slim X2 insulin pump is intended for
the subcutaneous delivery of insulin, at
set and variable rates, for the
management of diabetes mellitus in
persons requiring insulin. The t:slim X2
insulin pump can be used solely for
continuous insulin delivery and as part
of the t:slim X2 insulin pump with BasalIQ technology System.
When the System is used with a
compatible integrate Continuous
Glucose Monitor (iCGM), Basal-IQ
technology can be used to suspend
insulin delivery based on CGM sensor
readings.
Compatible iCGMs are listed in the
labeling for this device.
The System is indicated for use in
individuals 6 years of age and greater.
The System is intended for single
patient use and requires a prescription.
Federal (USA) law restricts this device
to sale by or on the order of a
physician.
The System is indicated for use with
NovoLog or Humalog U-100 insulin.
1.6 Contraindications
The pump is not intended for anyone
unable or unwilling to:
• Test blood glucose (BG) levels as
recommended by a healthcare
provider
• Demonstrate adequate
carbohydrate-counting skills
(preferred, not required)
• Maintain sufficient diabetes selfcare skills
• See a healthcare provider(s)
regularly
23

Chapter 1 – Introduction
The user must also have adequate
vision and/or hearing in order to
recognize pump alerts.
The t:slim X2 pump, transmitter, and
sensor must be removed before
Magnetic Resonance Imaging (MRI),
Computed Tomography (CT) scan, or
diathermy treatment. Exposure to MRI,
CT, or diathermy treatment can
damage the components.
1.7 Compatible iCGMs
Compatible CGMs include the following
integrated continuous glucose monitors
(iCGMs):
• Dexcom G6 CGM
For information about Dexcom G6
CGM product specifications and
performance characteristics, visit the
manufacturer’s website for applicable
user guides.
The Dexcom G6 sensors and
transmitters are sold and shipped
separately by Dexcom.
NOTE: Device Connections
The Dexcom G6 CGM currently allows pairing
with one medical device at a time (either the
t:slim X2 pump or the Dexcom receiver), but you
can still use the Dexcom G6 CGM app and your
t:slim X2 pump simultaneously using the same
transmitter ID.
NOTE: Use of CGM for Treatment
Decisions
Product information for the Dexcom G6 CGM
System includes important information on how
to use the Dexcom G6 CGM information
(including sensor glucose readings, trend graph,
trend arrow, alarm/alerts) to make treatment
decisions. Ensure that you have reviewed this
information and discussed it with your
healthcare provider, who can guide you in
correctly using your Dexcom G6 CGM
information when making treatment decisions.
1.8 Important User Information
Review all instructions in this user guide
before using the System.
If you are not able to use the System
according to the instructions in this user
guide, you may be putting your health
and safety at risk.
If you are new to using CGM, continue
using your blood glucose meter until
you are familiar with CGM usage.
If you are currently using the pump
without Dexcom G6 CGM, or if you are
currently using Dexcom G6 CGM, it is
still very important that you review all
instructions in this user guide before
using the combined System.
Pay special attention to Warnings and
Precautions in this user guide.
Warnings and Precautions are identified
with a or symbol.
If you still have questions after reading
this user guide, contact Customer
Technical Support 24 hours a day, 7
days a week.
24

Chapter 1 – Introduction
1.9 Important Pediatric User Information
The following recommendations are
meant to help younger users and their
caregivers program, manage and care
for the System.
Younger children may inadvertently
press or tap the pump, leading to
unintentional delivery of insulin.
It is the responsibility of the healthcare
provider and caregiver to determine if
the user is appropriate for treatment
with this device.
We recommend reviewing the Quick
Bolus and Security PIN capabilities of
the pump and determining how they
best fit with your care plan. These
features are detailed in Chapters 10
Quick Bolus and 11 Device Settings.
Inadvertent dislodgement of the
infusion site may occur more frequently
with children so consider securing the
infusion site and tubing.
WARNING
DO NOT allow small children (either pump users
or non-users) to ingest small parts, such as the
rubber USB port cover and cartridge
components. Small parts could pose a choking
hazard. If ingested or swallowed, these small
component pieces may cause internal injury or
infection.
WARNING
The pump includes parts (such as the USB cable
and infusion set tubing) that could pose a
strangulation or asphyxiation hazard. Always
use the appropriate length of infusion set tubing
and arrange cables and tubing to minimize the
risk of strangulation. ENSURE that these parts
are stored in a secure place when not in use.
WARNING
For patients who do not self-manage their
disease, the Security PIN function should
ALWAYS be on when the pump is not being
used by a caregiver. The Security PIN function is
intended to prevent inadvertent screen taps or
button presses that may lead to insulin delivery
or changes in the pump settings. These
changes can potentially lead to hypoglycemia
(low BG) or hyperglycemia (high BG) events. See
Section 11.6 Turn Security PIN On or Off for
details on how to turn the Security PIN function
on.
WARNING
For patients whose insulin administration is
managed by a caregiver, ALWAYS turn off the
Quick Bolus feature to avoid inadvertent bolus
delivery. If the Security PIN is turned on, the
Quick Bolus feature is automatically disabled.
Inadvertent screen taps, button presses, or
tampering with the insulin pump could result in
over delivery or under delivery of insulin. This
can cause hypoglycemia (low BG) or
hyperglycemia (high BG) events. See Section
11.6 Turn Security PIN On or Off for details on
how to turn the Security PIN function off.
1.10 Emergency Kit
Make sure that you always have an
insulin syringe and vial of insulin or a
prefilled insulin pen with you as a
backup for emergency situations. You
should also always have an appropriate
emergency kit with you. Talk with your
healthcare provider regarding what
items this kit should include.
Supplies to carry every day:
• BG testing supplies: meter, strips,
control solution, lancets, meter
batteries
25

Chapter 1 – Introduction
• Fast-acting carbohydrate to treat
low BG
• Extra snack for longer coverage
than fast-acting carbohydrate
• Glucagon emergency kit
• Rapid-acting insulin and syringes or
a prefilled insulin pen
• Infusion sets (minimum of 2)
• Insulin pump cartridges (minimum
of 2)
• Infusion site preparation products
(antiseptic wipes, skin adhesive)
• Diabetes identification card or
jewelry
26

Chapter 1 – Introduction
THIS PAGE IS
INTENTIONALLY
LEFT BLANK
27

Section 2
t:slim X2 Insulin Pump

Before You Begin
Chapter 2
Important Safety Information

Chapter 2 – Important Safety Information
The following includes important safety
information related to your t:slim X2
pump and its components. The
information presented in this chapter
does not represent all warnings and
precautions related to the System. Pay
attention to other warnings and
precautions listed throughout this user
guide as they relate to special
circumstances, features, or users.
2.1 t:slim X2 Insulin Pump Warnings
t:slim X2 Insulin Pump
WARNING
DO NOT start to use your pump before reading
the user guide. Failure to follow the instructions
in this user guide can result in over delivery or
under delivery of insulin. This can cause
hypoglycemia (low BG) or hyperglycemia (high
BG) events. If you have questions or need
further clarification on your pump use, ask your
healthcare provider or call Customer Technical
Support.
WARNING
DO NOT start to use your pump before you have
been appropriately trained on its use by a
certified trainer or through the training materials
available online if you are updating your pump.
Consult with your healthcare provider for your
individual training needs for the pump. Failure to
complete the necessary training on your pump
could result in serious injury or death.
WARNING
ONLY use U-100 Humalog or U-100 NovoLog
with your pump. Only U-100 Humalog and
NovoLog have been tested and found to be
compatible for use in the pump. Use of insulin
with lesser or greater concentration can result in
under delivery or over delivery of insulin. This
can cause hypoglycemia (low BG) or
hyperglycemia (high BG) events.
WARNING
DO NOT put any other drugs or medications
inside your pump cartridge. The pump is
designed only for Continuous Subcutaneous
Insulin Infusion (CSII) using U-100 Humalog or
U-100 NovoLog insulin. Use of other drugs or
medications can damage the pump and result in
injury if infused.
WARNING
DO NOT start to use your pump before
consulting with your healthcare provider to
determine which features are most appropriate
for you. Only your healthcare provider can
determine and help you adjust your basal
rate(s), carb ratio(s), correction factor(s), target
BG, and duration of insulin action. In addition,
only your healthcare provider can determine
your CGM settings and how you should use your
sensor trend information to help you manage
your diabetes. Incorrect settings can result in
over delivery or under delivery of insulin. This
can cause hypoglycemia (low BG) or
hyperglycemia (high BG) events.
WARNING
ALWAYS be prepared to inject insulin with an
alternative method if delivery is interrupted for
any reason. Your pump is designed to deliver
insulin reliably, but because it uses only rapidacting insulin, you will not have long-acting
insulin in your body. Failure to have an
alternative method of insulin delivery can lead to
very high BG or Diabetic Ketoacidosis (DKA).
WARNING
ONLY use cartridges and infusion sets with
matching connectors and follow their
instructions for use. Failure to do so may result
in over delivery or under delivery of insulin and
may cause hypoglycemia (low BG) or
hyperglycemia (high BG) events.
WARNING
DO NOT place your infusion set on any scars,
lumps, moles, stretch marks or tattoos. Placing
30

Chapter 2 – Important Safety Information
your infusion set in these areas can cause
swelling, irritation or infection. This can affect
insulin absorption and cause high or low BG.
WARNING
ALWAYS carefully follow the instructions for use
accompanying your infusion set for proper
insertion and infusion site care, as failure to do
so could result in over delivery or under delivery
of insulin or infection.
WARNING
NEVER fill your tubing while your infusion set is
connected to your body. Always ensure that the
infusion set is disconnected from your body
before filling the tubing. Failure to disconnect
your infusion set from your body before filling
the tubing can result in over delivery of insulin.
This can cause hypoglycemia (low BG) events.
WARNING
NEVER reuse cartridges or use cartridges other
than those manufactured by Tandem Diabetes
Care. Use of cartridges not manufactured by
Tandem Diabetes Care or reuse of cartridges
may result in over delivery or under delivery of
insulin. This can cause hypoglycemia (low BG)
or hyperglycemia (high BG) events.
WARNING
ALWAYS twist the tubing connector between the
cartridge tubing and the infusion set tubing an
extra quarter of a turn to ensure a secure
connection. A loose connection can cause
insulin to leak, resulting in under delivery of
insulin. This can cause hyperglycemia (high BG).
WARNING
DO NOT disconnect the tubing connector
between the cartridge tubing and the infusion
set tubing. If the connection comes loose,
disconnect the infusion set from your body
before tightening. Failure to disconnect before
tightening can result in over delivery of insulin.
This can cause hypoglycemia (low BG).
WARNING
DO NOT remove or add insulin from a filled
cartridge after loading onto the pump. This will
result in an inaccurate display of the insulin level
on the Home screen and you could run out of
insulin before the pump detects an empty
cartridge. This can cause very high BG, or
Diabetic Ketoacidosis (DKA).
WARNING
DO NOT deliver a bolus until you have reviewed
the calculated bolus amount on the pump
display. If you deliver an insulin amount that is
too high or too low, this could cause
hypoglycemia (low BG) or hyperglycemia (high
BG) events. You can always adjust the insulin
units up or down before you decide to deliver
your bolus.
WARNING
DO NOT allow small children (either pump users
or non-users) to ingest small parts, such as the
rubber USB port cover and cartridge
components. Small parts could pose a choking
hazard. If ingested or swallowed, these small
component pieces may cause internal injury or
infection.
WARNING
The pump includes parts (such as the USB cable
and infusion set tubing) that could pose a
strangulation or asphyxiation hazard. ALWAYS
use the appropriate length of infusion set tubing
and arrange cables and tubing to minimize the
risk of strangulation. ENSURE that these parts
are stored in a secure place when not in use.
WARNING
For patients who do not self-manage their
disease, the Security PIN function should
ALWAYS be on when the pump is not being
used by a caregiver. The Security PIN function is
intended to prevent inadvertent screen taps or
button presses that may lead to insulin delivery
or changes in the pump settings. These
31

Chapter 2 – Important Safety Information
changes can potentially lead to hypoglycemic or
hyperglycemic events.
WARNING
For patients whose insulin administration is
managed by a caregiver, ALWAYS turn off the
Quick Bolus feature to avoid inadvertent bolus
delivery.
WARNING
If the Security PIN is turned on, the Quick Bolus
feature is automatically disabled. Inadvertent
screen taps, button presses, or tampering with
the insulin pump could result in over delivery or
under delivery of insulin. This can cause
hypoglycemia (low BG) or hyperglycemia (high
BG) events.
Radiology and Medical Procedures
and Your t:slim X2 System
WARNING
ALWAYS notify the provider/technician about
your diabetes and your pump. If you need to
discontinue use of the pump for medical
procedures, follow your healthcare provider’s
instructions to replace missed insulin when you
reconnect to the pump. Check your BG before
disconnecting from the pump and again when
you reconnect and treat high BG levels as
recommended by your healthcare provider.
WARNING
DO NOT expose your pump, transmitter, or
sensor to:
» X-ray
» Computed Tomography (CT) scan
» Magnetic Resonance Imaging (MRI)
» Positron Emission Tomography (PET)
scan
» Other exposure to radiation
WARNING
The System is magnetic resonance (MR) Unsafe.
You must take off your pump, transmitter, and
sensor and leave them outside the procedure
room if you are going to have any of the above
procedures.
In addition to the above, DO NOT expose your
pump, transmitter, or sensor to:
» Pacemaker/Automatic Implantable
Cardioverter Defibrillator (AICD)
placement or reprogramming
» Cardiac Catheterization
» Nuclear Stress Test
WARNING
You must take off your pump, transmitter, and
sensor and leave them outside the procedure
room if you are going to have any of the above
medical procedures.
There are other procedures where you should
proceed with caution:
» Laser Surgery – Your System can
usually be worn during the procedure.
However, some lasers can create
interference and cause the System to
alarm.
» General Anesthesia – Depending on the
equipment being used, you may or may
not need to remove your System. Be
sure to ask your healthcare provider.
WARNING
There is no need to disconnect for
electrocardiograms (EKGs) or colonoscopies. If
you have questions, contact Customer Technical
Support.
WARNING
DO NOT use the pump if you have a condition
which, in the opinion of your healthcare
provider, would put you at risk. Examples of
individuals who should not use the pump
include those with uncontrolled thyroid disease,
renal failure (e.g. dialysis or eGFR < 30),
32

Chapter 2 – Important Safety Information
hemophilia, or another major bleeding disorder,
or unstable cardiovascular disease.
2.2 t:slim X2 Insulin Pump Precautions
PRECAUTION
DO NOT open or attempt to repair your insulin
pump. The pump is a sealed device that should
be opened and repaired only by Tandem
Diabetes Care. Modification could result in a
safety hazard. If your pump seal is broken, the
pump is no longer watertight and the warranty is
voided.
PRECAUTION
CHANGE your infusion set every 48 to 72 hours
as recommended by your healthcare provider.
Wash your hands with anti-bacterial soap before
handling the infusion set and thoroughly clean
the insertion site on your body to avoid infection.
Contact your healthcare provider if you have
symptoms of infection at your insulin infusion
site.
PRECAUTION
ALWAYS remove all air bubbles from the pump
before beginning insulin delivery. Ensure there
are no air bubbles when drawing insulin into the
filling syringe, hold the pump with the white fill
port pointed up when filling the tubing, and
ensure that there are no air bubbles in the
tubing when filling. Air in the system takes
space where insulin should be and can affect
insulin delivery.
PRECAUTION
CHECK your infusion site daily for proper
placement and leaks. REPLACE your infusion
set if you notice leaks around the site.
Improperly placed sites or leaks around the
infusion site can result in under delivery of
insulin.
PRECAUTION
CHECK your infusion set tubing daily for any
leaks, air bubbles, or kinks. Air in the tubing,
leaks in the tubing, or kinked tubing may restrict
or stop insulin delivery and result in under
delivery of insulin.
PRECAUTION
CHECK the tubing connection between your
cartridge tubing and infusion set tubing daily to
ensure it is tight and secure. Leaks around the
tubing connection can result in under delivery of
insulin.
PRECAUTION
DO NOT change your infusion set before
bedtime or if you will not be able to test your BG
1–2 hours after the new infusion set is placed. It
is important to confirm that the infusion set is
inserted correctly and delivering insulin. It is also
important to respond quickly to any problems
with the insertion to ensure continued insulin
delivery.
PRECAUTION
ALWAYS check that your cartridge has enough
insulin to last through the night before going to
bed. If you are sleeping, you could fail to hear
the Empty Cartridge Alarm and miss part of your
basal insulin delivery.
PRECAUTION
CHECK your pump’s personal settings regularly
to ensure they are correct. Incorrect settings
can result in over delivery or under delivery of
insulin. Consult with your healthcare provider as
needed.
PRECAUTION
ALWAYS make sure that the correct time and
date are set on your insulin pump. Not having
the correct time and date setting may affect safe
insulin delivery. When editing time, always
check that the AM/PM setting is accurate, if
applicable. AM is to be used from midnight until
11:59 AM. PM is to be used from noon until
11:59 PM.
33

Chapter 2 – Important Safety Information
PRECAUTION
CONFIRM that the screen display turns on, you
can hear audible beeps, feel the pump vibrate,
and see the green LED light blinking around the
edge of the Screen On/Quick Bolus button
when you connect a power source to the USB
port. These features are used to notify you about
alerts, alarms, and other conditions that require
your attention. If these features are not working,
discontinue use of the pump and contact
Customer Technical Support.
PRECAUTION
CHECK your pump regularly for potential alarm
conditions that may display. It is important to be
aware of conditions that may affect insulin
delivery and require your attention so you can
respond as soon as possible.
PRECAUTION
DO NOT use the vibrate feature for alerts and
alarms during sleep unless otherwise directed
by your healthcare provider. Having the volume
for alerts and alarms set to high will help ensure
that you don’t miss an alert or alarm.
PRECAUTION
ALWAYS look at the screen to confirm correct
programming of the bolus amount when you
first use the Quick Bolus feature. Looking at the
screen will ensure that you are correctly using
the beep/vibration commands to program the
intended bolus amount.
PRECAUTION
DO NOT use your pump if you think it might be
damaged due to dropping it or hitting it against
a hard surface. Check that the pump is working
properly by plugging a power source into the
USB port and confirming that the display turns
on, you hear audible beeps, feel the pump
vibrate, and see the green LED light blinking
around the edge of the Screen On/Quick Bolus
button. If you are unsure about potential
damage, discontinue use of the pump and
contact Customer Technical Support.
PRECAUTION
AVOID exposure of your pump to temperatures
below 40°F (5°C) or above 99°F (37°C). Insulin
can freeze at low temperatures or degrade at
high temperatures. Insulin that has been
exposed to conditions outside of the
manufacturer’s recommended ranges can affect
the safety and performance of the pump.
PRECAUTION
AVOID submerging your pump in fluid beyond a
depth of 3 feet (0.91 m) or for more than 30
minutes (IPX7 rating). If your pump has been
exposed to fluid beyond these limits, check for
any signs of fluid entry. If there are signs of fluid
entry, discontinue use of the pump and contact
Customer Technical Support.
PRECAUTION
AVOID areas where there may be flammable
anesthetics or explosive gases. The pump is not
suitable for use in these areas and there is a risk
of explosion. Remove your pump if you need to
enter these areas.
PRECAUTION
MAKE SURE to not move further than the length
of the USB cable when you are connected to the
pump and to a charging source. Moving further
than the length of the USB cable may cause the
cannula to be pulled out of the infusion site. For
this reason it is recommended not to charge the
pump while sleeping.
PRECAUTION
DISCONNECT your infusion set from your body
while on high-speed/high gravity amusement
park thrill rides. Rapid changes in altitude or
gravity can affect insulin delivery and cause
injury.
PRECAUTION
DISCONNECT your infusion set from your body
before flying in an aircraft without cabin
pressurization or in planes used for aerobatics
or combat simulation (pressurized or not). Rapid
34

Chapter 2 – Important Safety Information
changes in altitude or gravity can affect insulin
delivery and cause injury.
PRECAUTION
CONSULT your healthcare provider about
lifestyle changes such as weight gain or loss,
and starting or stopping exercise. Your insulin
needs may change in response to lifestyle
changes. Your basal rate(s) and other settings
may need adjustment.
PRECAUTION
CHECK your BG using a blood glucose meter
following a gradual elevation change of up to
each 1,000 feet (305 meters), such as when
snow skiing or driving on a mountain road.
Delivery accuracy can vary up to 15% until 3
units of total insulin have been delivered or
elevation has changed by more than 1,000 feet
(305 meters). Changes in delivery accuracy can
affect insulin delivery and cause injury.
PRECAUTION
ALWAYS check with your healthcare provider for
specific guidelines if you want or need to
disconnect from the pump for any reason.
Depending on the length of time and reason you
are disconnecting, you may need to replace
missed basal and/or bolus insulin. Check your
BG before disconnecting from the pump and
again when you reconnect, and treat high BG
levels as recommended by your healthcare
provider.
PRECAUTION
ENSURE that your personal insulin delivery
settings are programmed into the pump before
use if you receive a warranty replacement.
Failure to enter your insulin delivery settings
could result in over delivery or under delivery of
insulin. This can cause hypoglycemia (low BG)
or hyperglycemia (high BG) events. Consult your
healthcare provider as needed.
PRECAUTION
Interference with your pump’s electronics by cell
phones can occur if worn in close proximity. It is
recommended that your pump and cell phone
be worn at least 6.4 inches (16.3 cm) apart.
PRECAUTION
ALWAYS dispose of used components such as
cartridges, syringes, needles, infusion sets, and
CGM sensors following the instructions from
your healthcare provider. Wash your hands
thoroughly after handling used components.
2.3 Potential Benefits From Using Your Pump
• The pump provides an automated
way to deliver basal and bolus
insulin. Delivery can be fine-tuned
based on up to 6 customizable
Personal Profiles, each with up to
16 time-based settings for basal
rate, carb ratio, correction factor,
and target BG. In addition, the temp
rate feature allows you to program a
temporary basal rate change for up
to 72 hours.
• The pump gives you the option of
delivering a bolus all at once, or
delivering a percentage over an
extended period of time without
navigating to different menus. You
can also program a bolus more
discreetly using the Quick Bolus
feature, which can be used without
looking at the pump, and can be
programmed in increments of either
units of insulin or grams of
carbohydrate.
• From the Bolus screen, the
“calculator within a calculator”
feature allows you to enter multiple
carbohydrate values and add them
together. The insulin pump’s bolus
calculator will recommend a bolus
based on the entire amount of
35

Chapter 2 – Important Safety Information
carbohydrates entered, which can
help eliminate guesswork.
• The insulin pump keeps track of the
amount of active insulin from food
and correction boluses (IOB). When
programming additional food or
correction boluses, the pump will
subtract the amount of IOB from
the recommended bolus if your BG
is below the target set in your active
Personal Profile. This can help
prevent insulin stacking, which can
lead to hypoglycemia (low BG).
• You can program a number of
reminders that will prompt you to
retest your BG after a low or high
BG is entered, as well as a “Missed
Meal Bolus Reminder” which will
alert you if a bolus isn’t entered
during a specified period of time. If
activated, these can help reduce
the likelihood that you will forget to
check your BG or bolus for meals.
• You have the ability to view a variety
of data right on your screen,
including the time and amount of
your last bolus, your total insulin
delivery by day, as well as broken
into basal, food bolus, and
correction bolus.
2.4 Possible Risks From Using Your Pump
As with any medical device, there are
risks associated with using your pump.
Many of the risks are common to insulin
therapy in general, but there are
additional risks associated with
continuous insulin infusion and
continuous glucose monitoring.
Reading your user guide and following
the Instructions for Use are critical for
the safe operation of your System.
Consult your healthcare provider about
how these risks may impact you.
Inserting and wearing an infusion set
might cause infection, bleeding, pain or
skin irritations (redness, swelling,
bruising, itching, scarring or skin
discoloration).
There is a remote chance that an
infusion set cannula fragment could
remain under your skin if the cannula
breaks while you are wearing it. If you
think a cannula has broken under your
skin, contact your healthcare provider
and call Customer Technical Support.
Other risks associated with infusion
sets include occlusions and air bubbles
in the tubing, which can affect insulin
delivery. If the condition persists, call
Customer Technical Support or seek
medical attention as required.
Risks that could result from pump
failure include the following:
• possible hypoglycemia (low BG)
from over-delivery of insulin due to a
hardware defect.
• hyperglycemia (high BG) and
ketosis possibly leading to Diabetic
Ketoacidosis (DKA) due to pump
failure resulting in cessation of
insulin delivery due to either a
hardware defect or software
anomaly.
2.5 Working with your Healthcare Provider
Any clinical language presented in this
user guide is based on the assumption
that you have been educated by your
healthcare provider on certain terms
36

Chapter 2 – Important Safety Information
and how they apply to you in your
diabetes management. Your healthcare
provider can help you establish
diabetes management guidelines that
best fit your lifestyle and needs.
Consult your healthcare provider before
using the pump to determine which
features are most appropriate for you.
Only your healthcare provider can
determine and help you adjust your
basal rate(s), insulin-to-carbohydrate
ratio(s), correction factor(s), BG target,
and duration of insulin action. In
addition, only your healthcare provider
can determine your CGM settings and
how you should use your sensor trend
information to help you manage your
diabetes.
2.6 Verification of Proper Functionality
A power supply (AC adapter with
micro-USB connector) is provided with
your pump. Before using your pump,
ensure that the following occur when
you connect a power supply into the
USB port of your pump:
• You hear an audible alert
• You see the green light illuminate
from the edge around the Screen
On/Quick Bolus button
• You feel a vibratory alert
• You see a charge symbol (lightning
bolt) on the battery level indicator
In addition, before using your pump,
ensure the following:
• Press the Screen On/Quick Bolus
button to turn the screen on so that
you can see the display
• When the display screen is on, the
touchscreen responds to your
finger tap
PRECAUTION
CONFIRM that the screen display turns on, you
can hear audible beeps, feel the pump vibrate,
and see the green LED light blinking around the
edge of the Screen On/Quick Bolus button
when you connect a power source to the USB
port. These features are used to notify you about
alerts, alarms, and other conditions that require
your attention. If these features are not working,
discontinue use of your pump and contact
Customer Technical Support.
37

Chapter 2 – Important Safety Information
THIS PAGE IS
INTENTIONALLY
LEFT BLANK
38

Before You Begin
Chapter 3
Getting to Know Your t:slim X2
Insulin Pump

Chapter 3 – Getting to Know Your t:slim X2 Insulin Pump
3.1 What your t:slim X2 Pump Package Includes
Your pump package should include the
following items:
1. t:slim X2 insulin pump
2. pump case
3. t:slim X2 Insulin Pump with Basal-IQ
Technology User Guide
4. USB cable
5. wall power USB adapter
6. cartridge removal tool
If any of these items are missing,
contact Customer Technical Support.
If you use a CGM, the Dexcom G6
sensors and transmitters are sold and
shipped separately by Dexcom.
Your pump is shipped with a clear
screen protector. Do not remove the
screen protector.
Your pump comes with a protective
cover in the place where the cartridge is
normally inserted. This cover must be
removed and replaced with a cartridge
prior to initiating insulin delivery.
Your pump also includes consumable
components that may require
replacement during the life of your
pump, including:
• pump case(s)/clip(s)
• screen protector
• USB rubber door
• USB cable
Supply Reordering
To order cartridges, infusion sets,
supplies, accessories, screen
protectors, please contact Customer
Technical Support or your usual
supplier of diabetes products.
3.2 Pump Terminology
Basal
Basal is a slow continuous delivery of
insulin, which keeps glucose levels
stable between meals and during sleep.
It is measured in units per hour (units/
hr).
BG
BG is the abbreviation for blood
glucose, which is the level of glucose in
the blood, measured in mg/dL.
BG Target
BG target is a specific blood glucose
goal, an exact number, not a range.
When a glucose value is entered in the
pump, the calculated insulin bolus will
be adjusted up or down as needed to
attain this target.
Bolus
A bolus is a quick dose of insulin that is
usually delivered to cover food eaten or
correct high glucose. With the pump it
can be delivered as a Standard, a
Correction, an Extended, or a Quick
Bolus.
Cannula
The cannula is the part of the infusion
set that is inserted under the skin
through which insulin is delivered.
Carb
Carb or Carbohydrate refers to sugars
and starches that the body breaks
down into glucose and uses as an
energy source, measured in grams.
40

Chapter 3 – Getting to Know Your t:slim X2 Insulin Pump
Carb Ratio
The carb ratio is the number of grams
of carbohydrate that 1 unit of insulin will
cover. Also known as insulin-tocarbohydrate ratio.
Correction Bolus
A correction bolus is given to correct
high glucose.
Correction Factor
A correction factor is the amount of
glucose that is lowered by 1 unit of
insulin. Also known as the Insulin
Sensitivity Factor (ISF).
Extended Bolus
An extended bolus is a bolus that is
delivered over a period of time. It is
commonly used to cover food that
takes longer to digest. When
administering an extended bolus with
your pump, enter the DELIVER NOW
portion to dose a percentage of insulin
immediately and the remaining
percentage over a period time.
Grams
Grams are the measurement for a
carbohydrate.
Insulin Duration
Insulin duration is the amount of time
that insulin is active and available in the
body after a bolus has been delivered.
This also relates to the calculation for
Insulin on Board (IOB).
Insulin On Board (IOB)
IOB is the insulin that is still active (has
the ability to continue to lower the
glucose) in the body after a bolus has
been delivered.
Load
Load refers to the process of removing,
filling, and replacing a new cartridge
and infusion set.
Personal Profile
A personal profile is a personalized
group of settings that defines the
delivery of basal and bolus insulin within
specific time segments throughout a 24
hour period.
Quick Bolus
Quick bolus (using the Screen On/
Quick Bolus button) is a way to deliver
a bolus by following beep/vibration
commands without navigating through
or viewing the pump screen.
Temp Rate
Temp rate is an abbreviation for a
temporary basal rate. It is used to
increase or decrease the current basal
rate for a short period of time to
accommodate special situations. 100%
is the same basal rate as programmed.
120% means 20% more and 80%
means 20% less than the programmed
basal rate.
Units
Units are the measurement for insulin.
USB Cable
USB is the abbreviation for Universal
Serial Bus. The USB cable connects
into the pump’s micro USB port.
41

Chapter 3 – Getting to Know Your t:slim X2 Insulin Pump
3.3 Explanation of t:slim X2 Insulin Pump Icons
The following icons may appear on your pump screen:
Pump Icon Definitions
Symbol Definition Symbol Definition
The amount of charge left in the pump battery. Amount of insulin remaining in the cartridge.
CGM sensor session is active, and the transmitter is
communicating with the pump.
CGM sensor session is active, but the transmitter is not
communicating with the pump.
CGM calibration is required. A temporary basal rate of 0 u/hr is active.
A system reminder, alert, error, or alarm is active. A bolus is being delivered.
Basal insulin is programmed and being delivered. All insulin deliveries are stopped.
Accept. Tap to continue to the next screen or to answer yes
to a message on the pump screen.
Save. Tap to save settings on the screen.
New. Tap to add a new item. Back. Tap to navigate to the previous screen.
42
A temporary basal rate is active.
A basal rate of 0 u/hr is active.
Cancel. Tap to cancel the current operation.
Decline. Tap to exit the screen or answer no to a message
on the pump screen.

Chapter 3 – Getting to Know Your t:slim X2 Insulin Pump
Pump Icon Definitions (Continued)
Symbol Definition Symbol Definition
Delete. Tap to delete characters or digits on a keypad. Total. Tap to total values on a keypad.
Space. Tap to enter a space on the character keypad.
The associated setting is turned on. The associated setting is turned off.
Bluetooth
OK
OK. Tap to confirm the current instruction or setting on the
screen.
Security PIN has been enabled. See Section 11.6 Turn
Security PIN On or Off.
43

Chapter 3 – Getting to Know Your t:slim X2 Insulin Pump
12:00
Basal
0.75 u/hr
Correction Factor Press to Set Up
Carb Ratio Press to Set Up
Target BG Press to Set Up
3.4 Explanation of Pump Colors
Red LED
1 red blink every 30 seconds indicates a malfunction or alarm condition.
Yellow LED
1 yellow blink every 30 seconds indicates an alert or reminder condition.
Green LED
• 1 green blink every 30 seconds indicates the pump is functioning normally.
• 3 green blinks every 30 seconds indicate the pump is charging.
Orange Highlight
When editing settings, changes are highlighted in orange for review before saving.
44

Chapter 3 – Getting to Know Your t:slim X2 Insulin Pump
THIS PAGE IS
INTENTIONALLY
LEFT BLANK
45

Chapter 3 – Getting to Know Your t:slim X2 Insulin Pump
3.5 Lock Screen
The Lock screen appears anytime you
turn on the screen. You must tap 1–2–3
in sequential order to unlock the pump.
1. Time and Date Display: Displays
the current time and date.
2. Alert Icon: Indicates a reminder,
alert or alarm is active behind the
Lock screen.
3. Battery Level: Displays the level of
battery power remaining. When
connected for charging, the
charging icon (lightning bolt) will
display.
4. 1–2–3: Unlocks pump screen.
5. Insulin On Board (IOB): Amount
and time remaining of any active
insulin on board.
6. Active Bolus Icon: Indicates a
bolus is active.
7. Status: Displays current system
settings and insulin delivery status.
9. Tandem Logo: Returns to the
Home screen.
8. Insulin Level: Displays the current
amount of insulin in the cartridge.
46

Chapter 3 – Getting to Know Your t:slim X2 Insulin Pump
10:20
14 Nov 2019
INSULIN ON BOARD (IOB)
Units 1.1 u 1:09 hrsTime Remaining
235 u
100%
!
5
4
3
2
1
8
9
7
6
B
2 31
47

Chapter 3 – Getting to Know Your t:slim X2 Insulin Pump
3.6 Home Screen
1. Battery Level: Displays the level of
battery power remaining. When
connected for charging, the
charging icon (lightning bolt) will
display.
2. USB Port: Port to charge your
pump battery. Close the cover
when not in use.
3. Bolus: Program and deliver a bolus.
4. Options: Stop/Resume insulin
delivery, manage pump and CGM
settings, program a temp rate, load
a cartridge, and view history.
5. Insulin On Board (IOB): Amount
and time remaining of any active
insulin on board.
6. Time and Date Display: Displays
the current time and date.
7. Status: Displays current system
settings and insulin delivery status.
8. Insulin Level: Displays the current
amount of insulin in the cartridge.
9. Tandem Logo: Returns to the
Home screen.
10. Cartridge Tubing: Tubing that is
attached to the cartridge.
11. Tubing Connector: Connects the
cartridge tubing to the infusion set
tubing.
12. Screen On/Quick Bolus button:
Turns the pump screen on/off or
programs a Quick Bolus (if
activated).
13. LED Indicator: Illuminates when
connected to a power supply and
indicates proper functionality.
48

Chapter 3 – Getting to Know Your t:slim X2 Insulin Pump
10:20
14 Nov 2019
INSULIN ON BOARD (IOB)
Units 1.1 u 1:09 hrsTime Remaining
235 u
100 %
OPTIONS
BOLUS
6
1
3
2
4
5
10
13
12
11
9
8
7
B
49

Chapter 3 – Getting to Know Your t:slim X2 Insulin Pump
3.7 Current Status Screen
The Current Status screen can be
accessed from the Lock screen and the
Home screen by tapping the insulin
level symbol. It is for display only; no
changes can be made from this screen.
1. Profile: Displays current active
Personal Profile.
2. Basal Rate: Displays current basal
rate being delivered in units/hr. If a
Temp Rate is active, this row will
change to display current
temporary basal rate being
delivered in units/hr.)
3. Last Bolus: Displays amount, date
and time of last bolus.
4. Basal-IQ Status: Displays Basal-IQ
technology status.
5. Up/Down Arrow: Indicates there is
more information.
6. Correction Factor: Displays current
correction factor used to calculate a
bolus.
7. Carb Ratio: Displays current carb
ratio used to calculate a bolus.
8. Target BG: Displays current BG
target used to calculate a bolus.
9. Insulin Duration: Displays current
insulin duration setting used to
calculate insulin on board.
10. Last Calibration: Displays date and
time of last calibration.
11. Time Sensor Started: Displays date
and time of last time sensor started.
12. Transmitter Battery: Displays
transmitter battery status.
13. Mobile Connection: Displays
whether the mobile connection is
turned on or off, whether a mobile
device is paired with the pump, and
if so whether the mobile device is
actively connected to the pump.
The mobile connection may not yet
be available in your region.
50

Chapter 3 – Getting to Know Your t:slim X2 Insulin Pump
Current Status
Weekday
P
Basal Rate 0.75 u/hr
Last Bolus
5.5 u
14 Nov - 10:20
ON
Current Status
Insulin Duration
5 hours
Target BG
120 mg/dL
Carb Ratio
1u: 10 g
Correction
Factor
1u: 50 mg/dL
Current Status
14 Nov 2019
10:02
Time Sensor
Started
14 Nov 2019
12:15
Last Calibration
OK
Transmitter
Battery
Basal-IQ
ON
Mobile
Connection
OFF
6
7
8
9
10
11
12
1
2
3
4
5
13
B
51

Chapter 3 – Getting to Know Your t:slim X2 Insulin Pump
3.8 Bolus Screen
1. : Returns to the Home screen.
2. Carbs: Enter grams of
carbohydrate. See Section 10.1
Setting Up Quick Bolus for details
on how to set the Increment Type.
3. Units: Displays total units
calculated. Tap to enter a bolus
request or change (override) a
calculated bolus.
4. View Calculation: Displays how the
insulin dose was calculated using
the current settings.
5. Glucose: Enter blood glucose level.
6. : Moves to next step.
7. Insulin: Enter units of insulin. See
Section 10.1 Setting Up Quick
Bolus for details on how to set the
Increment Type.
52

Chapter 3 – Getting to Know Your t:slim X2 Insulin Pump
units
0
units
0
2 7
63 54
Using Grams Using Units
1
CARBS
0
grams
GLUCOSE
Add BG
View Calculation
INSULIN
0
units
View Calculation
GLUCOSE
Add BG
53

Chapter 3 – Getting to Know Your t:slim X2 Insulin Pump
3.9 Options Screen
1. : Returns to the Home screen.
2. Stop Insulin: Stops insulin delivery.
If insulin delivery is stopped,
RESUME INSULIN will be
displayed.
3. Load: Change Cartridge, Fill
Tubing, Fill Cannula, and Site
Reminder.
4. Temp Rate: Programs a temporary
basal rate.
5. My Pump: Personal Profiles, Alerts
& Reminders, Basal-IQ, Pump
Settings, and Pump Info.
6. Up/Down Arrow: Indicates there is
more information.
7. My CGM: Start/Stop Sensor,
Calibrate CGM, CGM Alerts,
Transmitter ID, and CGM Info.
8. Device Settings: Display settings,
Bluetooth settings, Time and Date,
Sound Volume, and Security PIN.
9. History: Displays historical log of
pump and CGM events.
54

Chapter 3 – Getting to Know Your t:slim X2 Insulin Pump
Options
Temp Rate
Load
STOP INSULIN
My Pump
Options
My CGM
Device Settings
History
7
8
9
2
1
3
4
5
6
55

Chapter 3 – Getting to Know Your t:slim X2 Insulin Pump
3.10 My Pump Screen
1. : Returns to the Home screen.
2. Personal Profiles: A group of
settings that define basal and bolus
delivery.
3. Basal-IQ: Turn on/off Basal-IQ
technology, and Basal-IQ Alerts.
4. Alerts & Reminders: Customize
Pump Reminders and Pump Alerts.
5. Pump Settings: Customize Quick
Bolus.
6. Pump Info: Displays pump serial
number, Customer Technical
Support contact information,
website, and other technical
information.
56

Chapter 3 – Getting to Know Your t:slim X2 Insulin Pump
My Pump
Alerts & Reminders
Basal-IQ
Personal Profiles
Pump Settings
My Pump
Pump Info
62
1
3
4
5
57

Chapter 3 – Getting to Know Your t:slim X2 Insulin Pump
3.11 Device Settings Screen
1. Display Settings: Customize the
Screen Timeout settings.
2. Bluetooth Settings: Turn on/off
mobile connection. The mobile
connection may not yet be available
in your region.
3. Time and Date: Edit the time and
date that will be displayed on the
pump.
4. Sound Volume: Customize the
sound volume for pump alarms,
pump alerts, reminders, keypad,
bolus, quick bolus, fill tubing, and
CGM alerts.
5. Security PIN: Turn on/off the
Security PIN.
58

Chapter 3 – Getting to Know Your t:slim X2 Insulin Pump
Device Settings
Time and Date
Display Settings
Sound Volume
Device Settings
Security PIN
Bluetooth Settings
51
2
3
4
59

Chapter 3 – Getting to Know Your t:slim X2 Insulin Pump
3.12 Number Keypad Screen
1. Value Entered.
2. : Returns to previous screen.
3. Keypad Numbers.
4. : Allows numbers to be added
on gram screen. If in units, this
displays as a decimal point.
5. : Completes task and saves
information entered.
6. Units/Grams: Unit of measure
associated with the value entered.
7. : Deletes last number entered.
60

Chapter 3 – Getting to Know Your t:slim X2 Insulin Pump
grams
21 3
0
87 9
54 6
20
1
2
3
4
7
6
5
61

Chapter 3 – Getting to Know Your t:slim X2 Insulin Pump
3.13 Letter Keypad Screen
1. Name of Profile.
2. : Returns to previous screen.
3. Space: Enters a space.
4. 123: Changes keypad mode from
letters (ABC) to numbers (123).
5. : Saves entered information.
6. Letters: Tap once for first letter
displayed, 2 quick taps for middle
letter, and 3 quick taps for third
letter.
7. : Deletes last letter or number
entered.
62

Chapter 3 – Getting to Know Your t:slim X2 Insulin Pump
name
defabc ghi
vwxstu yz
mnojkl pqr
Weekday
123
1
2
3
4
7
6
5
63

Chapter 3 – Getting to Know Your t:slim X2 Insulin Pump
THIS PAGE IS
INTENTIONALLY
LEFT BLANK
64

Key Pump Features
Chapter 4
Getting Started

Chapter 4 – Getting Started
4.1 Charging the t:slim X2 Pump
The pump is powered by an internal
lithium polymer rechargeable battery. A
full charge will typically last between 4
and 7 days, depending on your use of
CGM and the t:connect mobile app (if
available in your region) features. If you
utilize both CGM and the t:connect
mobile app, your battery life will last up
to 4 days. Please be aware that the
battery life on a single charge can vary
considerably depending on individual
usage, including insulin delivered,
display-on time, and frequency of
reminders, alerts and alarms.
Accessories for charging from wall and
automobile outlets, as well as from a
computer USB port, are included with
the pump. Use only the accessories
provided to charge your pump. If you
lose any of the accessories, or need a
replacement, contact Customer
Technical Support.
The battery level indicator is displayed
in the upper left portion of the Home
screen. The charge amount will
increase or decrease by 5% at a time
(for example, you will see 100%, 95%,
90%, 85%). When the charge amount
is less than 5%, it will begin decreasing
1% at a time (for example, you will see
4%, 3%, 2%, 1%).
When you first receive your pump, you
will need to connect it to a charging
source before it can be used. Charge
the pump until the battery level indicator
on the upper left portion of the Home
screen reads 100% (initial charge can
take up to 2.5 hours).
The pump continues to operate
normally while charging. You do not
need to disconnect from the pump
while charging.
PRECAUTION
MAKE SURE to not move further than the length
of the USB cable when you are connected to the
pump and to a charging source. Moving further
than the length of the USB cable may cause the
cannula to be pulled out of the infusion site. For
this reason it is recommended not to charge the
pump while sleeping.
If you choose to disconnect from the
pump while charging, check with your
healthcare provider for specific guidelines. Depending on the length of time
you are disconnected, you may need to
replace missed basal and/or bolus
insulin. Check your BG before
disconnecting from the pump and
again when you reconnect.
To charge the pump from an AC Power
Outlet:
1. Plug the included USB cable into
the AC power adapter.
2. Plug the AC power adapter into a
grounded AC power outlet.
3. Plug the other end of the cable into
the micro USB port on the pump.
To charge the pump using the optional
Car Power USB Adapter:
1. Plug the USB cable into the Car
Power USB Adapter.
2. Plug the Car Power USB Adapter
into a grounded auxiliary power
outlet.
3. Plug the other end of the cable into
the micro USB port on the pump.
WARNING
When using an optional Car Power USB Adapter,
the charger must be connected to an isolated,
battery powered 12 Volt system, such as an
66

Chapter 4 – Getting Started
automobile. Connecting the DC vehicle adapter
charger to 12 Volt DC that is generated by a
power supply connected to alternating current
(AC) mains is prohibited.
To charge the pump using a USB port
on a computer:
Ensure that the computer complies with
the IEC 60950-1 (or equivalent) safety
standard.
1. Plug the included USB cable into
your computer.
2. Plug the other end of the cable into
the micro USB port on the pump.
NOTE: For Customers Using the
t:connect Web Application
Before using a computer to charge the pump, it
is recommended that a driver be installed on the
computer by downloading the t:connect
uploader software from our website at
tandemdiabetes.com. This will also allow
communication between the pump, the
computer, and the t:connect web application.
The t:connect web application may not yet be
available in your region.
Depending on your computer, charging
time will vary. The pump will display a
CONNECTION ERROR ALERT
message if it is not charging properly.
When you charge the pump, you will
notice the following:
• The screen illuminates
• An audible alert
• The LED (edge around the Screen
On/Quick Bolus button) blinks
green
• A vibrating alert
• A charge symbol (lightning bolt) on
the battery level indicator appears
PRECAUTION
CONFIRM that the screen display turns on, you
can hear audible beeps, feel the pump vibrate,
and see the green LED light blinking around the
edge of the Screen On/Quick Bolus button
when you connect a power source to the USB
port. These features are used to notify you about
alerts, alarms, and other conditions that require
your attention. If these features are not working,
discontinue use of the t:slim X2 pump and
contact Customer Technical Support.
Charging Tips
Tandem Diabetes Care recommends
that you periodically check the battery
level indicator, charge the pump for a
short period of time every day (10 to 15
minutes), and avoid frequent full
discharges.
NOTE: Fully Discharged Battery
If the battery is fully discharged, the screen may
not power on immediately when connected to a
charging source. The LED around the Screen
On/Quick Bolus button will blink green until
there is enough charge to power on the
touchscreen.
4.2 Turning the Pump On
Plug in your pump to a charging
source. The pump will make an audible
noise when it has turned on and is
ready for use.
4.3 Using the Touchscreen
To turn on your pump screen, first
press the Screen On/Quick Bolus
button, then use the pad of your finger
to quickly and lightly tap on the screen.
Do not use your fingernail or other
67

Chapter 4 – Getting Started
object to interact with the screen. It will
not activate the screen or its functions.
Your pump is designed to give you
quick and easy access to the functions
that you will use in your day-to-day
diabetes management whether basic or
advanced.
The pump has several safety features to
prevent unintentional interaction with
the touchscreen. The screen must be
unlocked by tapping 1–2–3 in
sequence. On all screens, if three nonactive areas of the touchscreen are
tapped before an active area is tapped,
the screen will turn off to prevent
accidental screen interactions. There is
also a Security PIN feature that can be
set up to prevent unintentional access
(see Section 11.6 Turn Security PIN On
or Off).
NOTE: Touchscreen Tips
When using the pump, tap the Tandem logo to
return to the Home screen or tap to return
to the previous screen.
4.4 Turning the t:slim X2 Pump Screen On
To turn on your pump screen, press the
Screen On/Quick Bolus button,
located on the top of the pump, once.
The Lock screen will be displayed.
4.5 Turning the Pump Screen Off
To turn the pump screen off, press and
release the Screen On/Quick Bolus
button. This turns off the screen, but
not the pump.
NOTE: Turning off the Pump
Screen
Turn off the pump screen by pressing the
Screen On/Quick Bolus button before placing
the pump back in its case or any pocket/
clothing. Always position the pump screen away
from the skin when worn under clothing.
The pump continues to function
normally when the screen is not on.
4.6 Turning the Pump Off
To turn the pump off completely, plug
the pump into a power source and hold
the Screen On/ Quick Bolus button
down for 30 seconds.
4.7 Selecting Your Language
The Language Selection screen
displays when you unlock the pump
screen for the first time, or when you
unlock the screen after turning the
pump off.
To select your language:
1. Tap the circle next to the language
you want to display. Tap the Down
68

Chapter 4 – Getting Started
Language
Français (Canada)
Español
English
Italiano
Arrow to see additional language
selections.
2. Tap to save the selection and
continue with pump setup.
4.8 Unlocking the t:slim X2 Pump Screen
The Lock screen appears anytime you
turn on the screen, and after a bolus or
temp rate is requested. To unlock the
screen:
1. Press Screen On/Quick Bolus
button.
2. Tap 1.
3. Tap 2.
4. Tap 3.
The pump screen is now unlocked.
The last screen that was viewed will
be displayed.
You must tap 1–2–3 in sequential order
to unlock the pump. If you do not tap
1–2–3 in sequential order, the pump will
force you to restart the unlock
sequence from the beginning.
If the Security PIN feature is enabled,
you will need to enter your PIN after
unlocking the screen.
4.9 Edit Time
After powering up your pump for the
first time, set the current time and date.
Refer back to this section if you need to
edit the time for either traveling in a
different time zone or adjusting for
Daylight Savings Time.
PRECAUTION
ALWAYS make sure that the correct time and
date are set on your pump. Not having the
correct time and date setting may affect safe
insulin delivery. When editing time, always
check that the AM/PM setting is accurate, if
applicable. AM is to be used from midnight until
11:59 AM. PM is to be used from noon until
11:59 PM.
1. From the Home screen, tap
OPTIONS.
2. Tap the Down Arrow.
3. Tap Device Settings.
4. Tap Time and Date.
5. Tap Edit Time.
6. Tap Time.
7. Using the on-screen keypad, enter
the hour and minutes. Verify and
tap .
8. Tap Time of Day to set AM or PM,
or tap 24-hour Time to toggle that
setting on.
9. Verify the correct time is set and tap
.
Any edits to Time or Date will not be
saved until you tap .
69

Chapter 4 – Getting Started
4.10 Edit Date
1. From the Time and Date screen tap
Edit Date.
2. Tap Day.
3. Using the on-screen keypad enter
the current day. Verify and tap .
4. Tap Month.
5. Find and tap the current month
displayed on the right. Use Up/
Down Arrow to view months not
displayed.
6. Tap Year.
7. Using the on-screen keypad enter
the current year. Verify and tap
.
8. Verify the correct date is set and tap
.
Tap the Tandem logo to return to
the Home screen.
70

Key Pump Features
Chapter 5
Infusion Site Care and Loading
Cartridge

Chapter 5 – Infusion Site Care and Loading Cartridge
5.1 Infusion Site Selection and Care
WARNING
ALWAYS use only cartridges and insulin infusion
sets with matching connectors and follow their
instructions for use. Failure to do so may result
in over delivery or under delivery of insulin and
may cause hypoglycemia (low BG) or
hyperglycemia (high BG) events.
WARNING
ALWAYS carefully follow the instructions for use
accompanying your infusion set for proper
insertion and infusion site care, as failure to do
so could result in over delivery or under delivery
of insulin or infection.
WARNING
DO NOT place your infusion set on any scars,
lumps, moles, stretch marks or tattoos. Placing
your infusion set in these areas can cause
swelling, irritation or infection. This can affect
insulin absorption and cause hypoglycemia (low
BG) or hyperglycemia (high BG) events.
PRECAUTION
CHECK your infusion site daily for proper
placement and leaks. REPLACE your infusion
set if you notice leaks around the site.
Improperly placed sites or leaks around the
infusion site can result in under delivery of
insulin.
PRECAUTION
DO NOT change your infusion set before
bedtime or if you will not be able to test your BG
1–2 hours after the new infusion set is placed. It
is important to confirm that the infusion set is
inserted correctly and delivering insulin. It is also
important to respond quickly to any problems
with the insertion to ensure continued insulin
delivery.
General Guidelines
Site Selection
• Your infusion set can be worn
anywhere on your body that you
would normally inject insulin.
Absorption varies from site to site.
Discuss options with your
healthcare provider.
• The most commonly used sites are
the abdomen, upper buttocks, hips,
upper arms, and upper legs.
• The abdomen is the most popular
site because of access to fatty
tissue. If using the abdominal area,
AVOID:
Areas that would constrict the
site such as the belt line,
waistline, or where you would
normally bend.
Areas 2 inches (5 cm) around
your belly button.
Any scars, moles, stretch marks,
or tattoos.
Areas within 3 inches (7.6 cm) of
your CGM sensor site.
Site Rotation
PRECAUTION
CHANGE your infusion set every 48–72 hours
as recommended by your healthcare provider.
Wash your hands with anti-bacterial soap before
handling the infusion set and thoroughly clean
the insertion site on your body to avoid infection.
Contact your healthcare provider if you have
symptoms of infection at your insulin infusion
site.
• The infusion set must be replaced
and rotated every 48–72 hours, or
more often if needed.
72

• With experience, you will find areas
Areas of Body for Infusion Set Insertion
that not only provide better
absorption, but are more
comfortable. Keep in mind, using
the same areas may cause scarring
or lumps which can affect insulin
absorption.
• Consult your healthcare provider to
establish a rotation schedule that
best fits your needs.
Keep it Clean
• When changing your infusion set,
use clean techniques to avoid an
infection.
• Wash your hands, use antiseptic
wipes or infusion site preparation
products, and keep the area clean.
• Site preparation products that have
both an antiseptic and an adhesive
are encouraged.
Chapter 5 – Infusion Site Care and Loading Cartridge
5.2 Cartridge Instructions for Use
For complete cartridge labeling, consult
the cartridge Instructions for Use
included in the t:slim cartridge box.
73

Chapter 5 – Infusion Site Care and Loading Cartridge
Connector
Tail of the
Cartridge
Insulin
Fill Port
5.3 Filling and Loading a t:slim Cartridge
This section describes how to fill the
cartridge with insulin and load the
cartridge into your t:slim X2 pump. The
single-use disposable cartridge can
hold up to 300 units (3.0 mL) of insulin.
WARNING
ONLY use U-100 Humalog or NovoLog with your
pump. Only U-100 Humalog and NovoLog have
been tested and found to be compatible for use
in the pump. Use of insulin with lesser or greater
concentration can result in under delivery or
over delivery of insulin. This can cause
hypoglycemia (low BG) or hyperglycemia (high
BG) events.
WARNING
ALWAYS use cartridges manufactured by
Tandem Diabetes Care. Use of any other
cartridge brand may result in over delivery or
under delivery of insulin. This can cause
hypoglycemia (low BG) or hyperglycemia (high
BG) events.
WARNING
DO NOT reuse cartridges. Reuse of cartridges
may result in over delivery or under delivery of
insulin. This can cause hypoglycemia (low BG)
or hyperglycemia (high BG) events.
Before you begin, make sure you have
the following items:
• 1 unopened cartridge
• 3.0 mL syringe and fill needle
• Vial of U-100 Humalog or U-100
NovoLog insulin
• Alcohol prep swab
• 1 new infusion set
• Infusion set Instructions for Use
NOTE: Fill Tubing Sound Volume
The pump will beep or vibrate, depending on
your pump settings, while the tubing is filling
with insulin. To change the Fill Tubing sound
setting, see Section 11.5 Sound Volume.
NOTE: Removing the Cartridge
DO NOT remove the used cartridge from the
pump during the load process until prompted on
the pump screen.
The illustration identifies the
connector and insulin fill port used in
the cartridge filling process.
PRECAUTION
CHANGE your cartridge every 48–72 hours as
recommended by your healthcare provider.
Wash your hands with anti-bacterial soap before
handling the infusion set and thoroughly clean
the insertion site on your body to avoid infection.
Contact your healthcare provider if you have
symptoms of infection at your insulin infusion
site.
74

Chapter 5 – Infusion Site Care and Loading Cartridge
Instructions for Drawing Insulin from
Vial into Syringe
PRECAUTION
ALWAYS remove all air bubbles from the
cartridge before beginning insulin delivery.
Ensure there are no air bubbles when drawing
insulin into the filling syringe, hold the pump
with the white fill port pointed up when filling the
tubing, and ensure that there are no air bubbles
in the tubing when filling. Air in the system takes
space where insulin should be and can affect
insulin delivery.
The fill estimate displayed on the pump
is the amount of insulin available for
delivery. It does not include insulin
needed to fill the tubing (up to 30 units)
and a small amount of insulin that is not
available for delivery. When filling the
syringe, add approximately 45 units to
the amount of insulin you want available
for delivery.
For example, the pump requires a
minimum of 50 units available for
delivery after fill tubing has been
completed. Fill the syringe with
approximately 95 units to have enough
to fill your tubing and still have 50 units
available for delivery.
1. Inspect the needle and syringe
package for any signs of damage.
Discard any damaged product.
2. Wash your hands thoroughly.
3. Wipe the rubber septum of the
insulin vial with an alcohol swab.
4. Remove the needle and syringe
from their packaging. Securely twist
needle onto syringe. Safely remove
protective cap from needle by
pulling outward.
5. Draw air into syringe up to the
amount of insulin desired.
6. With insulin vial upright, insert
needle into vial. Inject air from
syringe into vial. Maintain pressure
on syringe plunger.
7. With needle still inserted into vial,
turn vial and syringe upside down.
Release syringe plunger. Insulin will
begin to flow from the vial into the
syringe.
75

Chapter 5 – Infusion Site Care and Loading Cartridge
8. Slowly pull back the plunger to the
desired amount of insulin.
9. While the filling needle is still in the
vial and upside down, tap the
syringe so that any air bubbles rise
to the top. Then slowly push the
plunger upwards, forcing any air
bubbles back into the vial.
10. Check the syringe for air bubbles
and do one of the following:
If there are air bubbles present,
repeat step 9.
If no air bubbles are present,
remove the filling needle from the
vial.
Instructions for Filling the Cartridge
1. Inspect the cartridge package for
any signs of damage. Discard any
damaged product.
2. Open the package and remove the
cartridge.
3. Hold the cartridge upright and
gently insert the needle into the
white insulin fill port on the
cartridge. The needle is not
intended to go all the way in, so do
not force it.
4. Keeping the syringe vertically
aligned with the cartridge, and the
needle inside the fill port, pull back
on the plunger until it is fully
retracted. This will remove any
residual air from the cartridge.
Bubbles will rise toward the
plunger.
76

Chapter 5 – Infusion Site Care and Loading Cartridge
5. Make sure the needle is still in the fill
port and release the plunger.
Pressure will pull the plunger to its
neutral position but it will NOT push
any air back inside the cartridge.
6. Withdraw the needle from the fill
port.
7. Turn the syringe upright and pull
down on the plunger. Flick the
barrel to make sure that any air
bubbles rise to the top.
8. Gently press on the plunger to
remove air bubbles until insulin fills
the needle hub and you see a drop
of insulin at the tip of the needle.
9. Re-insert the needle in the fill port
and slowly fill the cartridge with
insulin. It is normal to feel some
back pressure as you slowly press
on the plunger.
10. Maintain pressure on the plunger
while you remove the needle from
the cartridge. Check the cartridge
for leaks. If you detect insulin
leaking, discard the cartridge and
repeat entire process with a new
cartridge.
11. Always dispose of used needles,
syringes, cartridges, and infusion
sets following the instructions from
your healthcare provider.
Instructions on How to Install a
Cartridge
If this is the very first time you are
loading the cartridge, remove the
77

Chapter 5 – Infusion Site Care and Loading Cartridge
shipping canister (which is not for
human use) from the back of the pump.
1. From the Home screen, tap
OPTIONS.
2. Tap Load.
During the load sequence, the
Tandem logo is disabled.
Tapping it will not return to the
Home screen.
3. Tap Change Cartridge.
4. Screen will display that all insulin
deliveries will be stopped. Tap
to continue.
NOTE: First Time Use
This screen will not be displayed if this is
the first time loading a new cartridge and
you have not started actively pumping.
5. Disconnect the infusion set from
your body and tap to continue.
Preparing for Cartridge screen is
displayed.
6. Remove the used cartridge. If
needed, place the cartridge removal
tool or the edge of a coin in the slot
at the bottom of the cartridge and
twist to aid in the removal of the
cartridge.
7. Place bottom of the cartridge at the
end of the pump. Make sure
cartridge is lined up to both guide
tracks.
8. Push on the circular fill port next to
the cartridge tubing to slide the
cartridge onto the pump. Tap the
UNLOCK icon when completed.
9. Tap to continue.
Detecting Cartridge screen is
displayed.
After completing the cartridge
change, the pump will automatically
prompt you to fill the tubing.
10. Tap to fill the tubing.
OK
WARNING
DO NOT remove or add insulin from a filled
cartridge after loading onto the pump. This will
result in an inaccurate display of the insulin level
on the Home screen and you could run out of
insulin before the pump detects an empty
78

Chapter 5 – Infusion Site Care and Loading Cartridge
cartridge. This can cause very high BG, or
Diabetic Ketoacidosis (DKA).
5.4 Filling Tubing
Filling the Infusion Set Tubing with
Insulin
WARNING
NEVER fill your tubing while your infusion set is
connected to your body. Always ensure that the
infusion set is disconnected from your body
before filling the tubing. Failure to disconnect
your infusion set from your body before filling
the tubing can result in over delivery of insulin.
This can cause hypoglycemia (low BG) events.
This section describes how to fill the
infusion set tubing with insulin after you
change the cartridge. If you just
completed step 10 from the previous
section, skip to step 5.
NOTE: Fill Tubing Sound
Volume
The pump will beep or vibrate, depending on
your pump settings, while the tubing is filling
with insulin. To change the Fill Tubing sound
setting, see Section 11.5 Sound Volume.
To fill the tubing without changing the
cartridge, from the Home screen tap
OPTIONS, tap Load, tap Fill Tubing
and then follow the instructions.
• Tap NEW if you installed a new
cartridge.
• Tap FILL if you did not install a new
cartridge and want to continue with
filling the tubing.
PRECAUTION
CHECK your infusion set tubing daily for any
leaks, air bubbles, or kinks. Air in the tubing,
leaks in the tubing, or kinked tubing may restrict
or stop insulin delivery and result in under
delivery of insulin.
1. Verify that the infusion set is
disconnected from your body.
2. Ensure that the new infusion set
package is not damaged, and
remove the sterile tubing from the
package. If the package is
damaged or opened, discard of
properly and use another tubing
set.
3. Remove the infusion set tubing cap
from the tubing connector. Be
careful to keep the tubing
connector away from unclean
areas.
4. Attach the infusion set tubing to the
tubing connector on the cartridge
tubing. Twist clockwise until finger
tight and then twist another quarter
of a turn to ensure a secure
connection.
WARNING
ALWAYS twist the tubing connector
between the cartridge tubing and the
infusion set tubing an extra quarter of a turn
to ensure a secure connection. A loose
connection can cause insulin to leak,
resulting in under delivery of insulin. This
can cause hyperglycemia (high BG) events.
5. Hold the pump vertically to ensure
any air in the cartridge will be
79

Chapter 5 – Infusion Site Care and Loading Cartridge
dispelled first. Tap START. The
pump will beep and vibrate regularly
while the tubing is being filled,
depending on your Sound Volume
settings.
Starting Fill screen is displayed.
The following are approximate
amounts of insulin to fill different
tubing lengths:
15–20 units for 23 inch (60 cm)
tubing
20–25 units for 32 inch (80 cm)
tubing
25–30 units for 42 inch (110 cm)
tubing
6. Tap STOP after 3 drops of insulin
are seen at the end of the infusion
set tubing.
Stopping Fill screen is displayed.
Detecting Insulin screen is
displayed.
7. Verify that drops are seen and tap
DONE.
• If you do not see drops, tap FILL.
The Fill Tubing screen appears,
repeat steps 3 to 5 until you see 3
drops of insulin at the end of the
tubing.
• The tubing may be filled with a
maximum of 30 units of insulin
during each fill cycle. If you do not
tap STOP, a notification screen will
appear letting you know that the
maximum amount has been filled.
Do one of the following:
a. If you are finished filling the
tubing, tap DONE.
b. If you want to fill the tubing with
more than 30 units, tap FILL to
go back to the Fill Tubing
screen.
Fill Tubing is complete screen is
temporarily displayed.
NOTE: Initial Display of Insulin
After tubing fill is complete, when the pump
returns to the Home screen, an estimate of
how much insulin is in the cartridge is
displayed in the upper right portion of the
screen. You will see one of the following on
the screen:
+ 40 u More than 40 units detected
in the cartridge
+ 60 u More than 60 units detected
in the cartridge
+ 120 u More than 120 units detected
in the cartridge
+ 180 u More than 180 units detected
in the cartridge
+ 240 u More than 240 units detected
in the cartridge
After 10 units are delivered, an actual
number of units remaining in the cartridge
will be displayed on the Home screen
The amount of insulin remaining displayed
on the Home screen will decrease 5 units at
a time (for example, you will see 140, 135,
130, 125). When less than 40 units remain,
it will begin decreasing 1 unit at a time (for
80

Chapter 5 – Infusion Site Care and Loading Cartridge
example, you will see 40, 39, 38, 37) until
there is 1 unit remaining.
5.5 Filling Cannula
Filling the Infusion Set Cannula with
Insulin
This section describes how to fill the
infusion set cannula with insulin after
you fill the tubing.
To fill the cannula without filling the
tubing, from the Home screen, tap
OPTIONS, tap Load, tap Fill Cannula
and then follow the instructions below.
If you are using a steel needle infusion
set, there is no cannula; skip this
section.
To Fill the Cannula:
1. Tap Fill Cannula.
2. Insert a new infusion set and
connect filled tubing to site, then
tap .
3. Tap Edit Fill Amount.
The cannula fill amount displayed is
based on your last cannula fill
amount. Filling stops at this
amount.
4. Select amount needed for cannula
fill.
See your infusion set instructions
for use for proper cannula fill
amount.
If the amount needed is not
listed, tap Other amount and use
the on-screen keypad to enter a
value between 0.1 to 1.0 unit.
5. Tap .
The STARTING FILL screen is
displayed.
After fill is complete, STOPPING
FILL screen is displayed.
NOTE: Stopping Fill
You can tap STOP at any time during the fill
process if you want to stop filling the
cannula.
The screen will return to the Load
menu if the Site Reminder is turned
off.
6. Tap to resume insulin if
finished. Or tap Site Reminder to
set reminder. If Site Reminder is on,
the pump will automatically display
the Site Reminder screen (see the
next section).
5.6 Setting Site Reminder
This section describes how to set the
Site Reminder after you fill the cannula.
To set the Site Reminder without filling
the cannula, from the Home screen, tap
OPTIONS, tap Load, tap Site
Reminder then follow the instructions
below.
1. Tap if correct. Tap Edit
Reminder if settings need to be
changed.
2. Tap Remind Me In and select the
number of days (1–3).
The default for the Site Reminder is
set for 3 days
3. Tap Remind Me At. Use the onscreen keypad to enter time and
tap .
4. Tap Time of Day to change AM or
PM, if applicable. Tap .
81

Chapter 5 – Infusion Site Care and Loading Cartridge
5. Verify Site Reminder is set correctly
and tap .
Setting Saved screen is displayed.
Load screen is displayed.
6. Tap .
A reminder to test BG in 1 to 2
hours will display.
7. Tap .
NOTE: First Time Use
If this is the first time using your pump and
a Personal Profile has not been defined, a
screen will notify you that a profile must be
activated to resume insulin. Tap CLOSE.
RESUMING INSULIN screen is
temporarily displayed.
NOTE: Changing Cartridge with
Basal-IQ Technology
Basal-IQ technology will continue to operate
while changing a cartridge. If you complete
a cartridge change and resume insulin
while Basal-IQ technology is suspending
insulin, insulin will resume until the next five
minute CGM reading. At this time the pump
will resume normal operation.
82

Key Pump Features
Chapter 6
Personal Profiles

Chapter 6 – Personal Profiles
6.1 Personal Profiles Overview
WARNING
DO NOT start to use your pump before
consulting with your healthcare provider to
determine which features are most appropriate
for you. Only your healthcare provider can
determine and help you adjust your basal
rate(s), carb ratio(s), correction factor(s), target
BG, and duration of insulin action. In addition,
only your healthcare provider can determine
your CGM settings and how you should use your
sensor trend information to help you manage
your diabetes. Incorrect settings can result in
over delivery or under delivery of insulin. This
can cause hypoglycemia (low BG) or
hyperglycemia (high BG) events.
A Personal Profile is a group of settings
that define basal and bolus delivery
within specific time segments throughout a 24-hour period. Each profile can
be personalized with a name. Within a
Personal Profile the following can be
set:
• Timed Settings: Basal Rate,
Correction Factor, Carb Ratio and
Target BG.
• Bolus Settings: Insulin Duration,
Max Bolus and Carbohydrates
setting (on/off).
The t:slim X2 pump uses the settings in
your active profile to calculate the
delivery of basal insulin, food boluses
and correction boluses based on your
target BG. If you only define a basal rate
in Timed Settings, your pump will only
be able to deliver basal insulin and
standard and extended boluses. Your
pump will not calculate correction
boluses.
Up to six different Personal Profiles can
be created and up to 16 different time
segments can be set in each Personal
Profile. Having several Personal Profiles
provides more flexibility for your body
and lifestyle. For example, you could
have “Weekday” and “Weekend”
profiles if you have different insulin
delivery needs on weekdays and
weekends, based on schedule, food
intake, activity, etc.
6.2 Creating a New Profile
Creating Personal Profiles
You can create up to six Personal Profiles; however, only 1 can be active at a
time. In the Personal Profiles screen,
the active profile is positioned at the top
of the list and is marked as ON. When
you create a Personal Profile, you can
set any or all of the following Timed
Settings:
• Basal Rate (your basal rate in units/
hr)
• Correction Factor (amount 1 unit of
insulin lowers BG)
• Carb Ratio (grams of carbohydrate
covered by 1 unit of insulin)
• Target BG (your ideal BG level,
measured in mg/dL)
Although you do not need to define
every setting, some pump features
require certain settings to be defined
and activated. When you are creating a
new profile, your pump prompts you to
set up any required settings before you
can continue.
84

Chapter 6 – Personal Profiles
The ranges you can set for Timed
Settings are:
• Basal (range: 0 and 0.1 to 15 units/
hr)
• Correction Factor (range: 1 unit:1
mg/dL to 1 unit:600 mg/dL)
• Carb Ratio (range: 1 unit:1 gram to
1 unit:300 grams)
Below a carb ratio of 1:10,
increments can be entered in 0.1 g.
For example a carb ratio of 1:8.2
can be programmed.
• Target BG (range: 70 mg/dL to 250
mg/dL)
In addition, you can set any or all of the
following Bolus Settings:
• Carbs (ON indicates entering grams
of Carb; OFF indicates entering
units of insulin)
• Insulin Duration (how long a bolus
lowers your BG)
• Max Bolus (the maximum amount
for a single bolus)
The default settings and ranges for
Bolus Settings are as follows:
• Carbs (default: off if no Carb Ratio is
defined)
• Insulin Duration (default: 5 hrs;
range: 2 to 8 hrs)
• Max Bolus (default: 10 units; range:
1 to 25 units)
Insulin Duration and Insulin on Board
(IOB)
Your pump remembers how much
insulin you have taken from previous
boluses. It does this by relying on the
insulin duration. The insulin duration
reflects the amount of time that insulin
is actively lowering your BG.
Consult your healthcare provider to
accurately set your insulin duration.
While the insulin duration setting
reflects how long insulin from previous
boluses lowers your BG, the IOB
feature reflects how much insulin is
remaining in your body from previous
boluses. IOB is always displayed on the
Home screen and is used in bolus
delivery calculations when applicable.
When a glucose value is entered during
bolus programming, your pump will
consider any active IOB and calculate
an adjusted bolus if necessary.
1. From the Home screen, tap
OPTIONS.
2. Tap My Pump.
3. Tap Personal Profiles.
4. Tap to create a new profile.
5. Using the on-screen keypad, enter
a profile name (up to 16 characters)
and tap .
To use the letter keypad, tap once
for first letter displayed, 2 quick taps
for middle letter; and 3 quick taps
for the third letter.
85

Chapter 6 – Personal Profiles
Weekday
Press to Set Up
5 hrs
DURATION
10 u
MAX BOLUS
OFF
CARBS
12:00
Basal Press to Set Up
Correction Factor Press to Set Up
Carb Ratio Press to Set Up
Target BG Press to Set Up
6. Tap Press to Set Up to begin
setting insulin delivery settings.
Timed Settings
Bolus Settings
6.3 Programming a New Personal Profile
Once the Personal Profile has been
created, the settings must be
programmed. The first time segment
will start at midnight.
• You must program a basal rate in
order to have a Personal Profile that
you can activate.
• You must set a basal rate,
correction factor, carb ratio, and
target BG in order to turn Basal-IQ
technology on.
• Be sure to tap after entering or
changing a value.
PRECAUTION
ALWAYS confirm that the decimal point
placement is correct when entering your
Personal Profile information. Incorrect decimal
point placement can prevent you from getting
the proper insulin amount that your healthcare
provider has prescribed for you.
Timed Settings
1. Once the new profile has been
created, Tap Basal.
Using the on-screen keypad, enter
your basal rate and tap .
2. Tap Correction Factor.
3. Using the on-screen keypad, enter
your correction factor (the mg/dL
that 1 unit of insulin will lower BG)
and tap .
4. Tap Carb Ratio.
5. Using the on-screen keypad, enter
your insulin-to-carbohydrate ratio
(the grams of carbohydrate to be
covered by 1 unit of insulin) and tap
.
6. Tap Target BG.
7. Using the on-screen keypad, enter
your target BG and tap .
8. Review entered values and tap
.
9. Confirm Settings.
Tap if entered data is
correct.
Tap to make changes.
10. Tap to set the Bolus Settings.
86
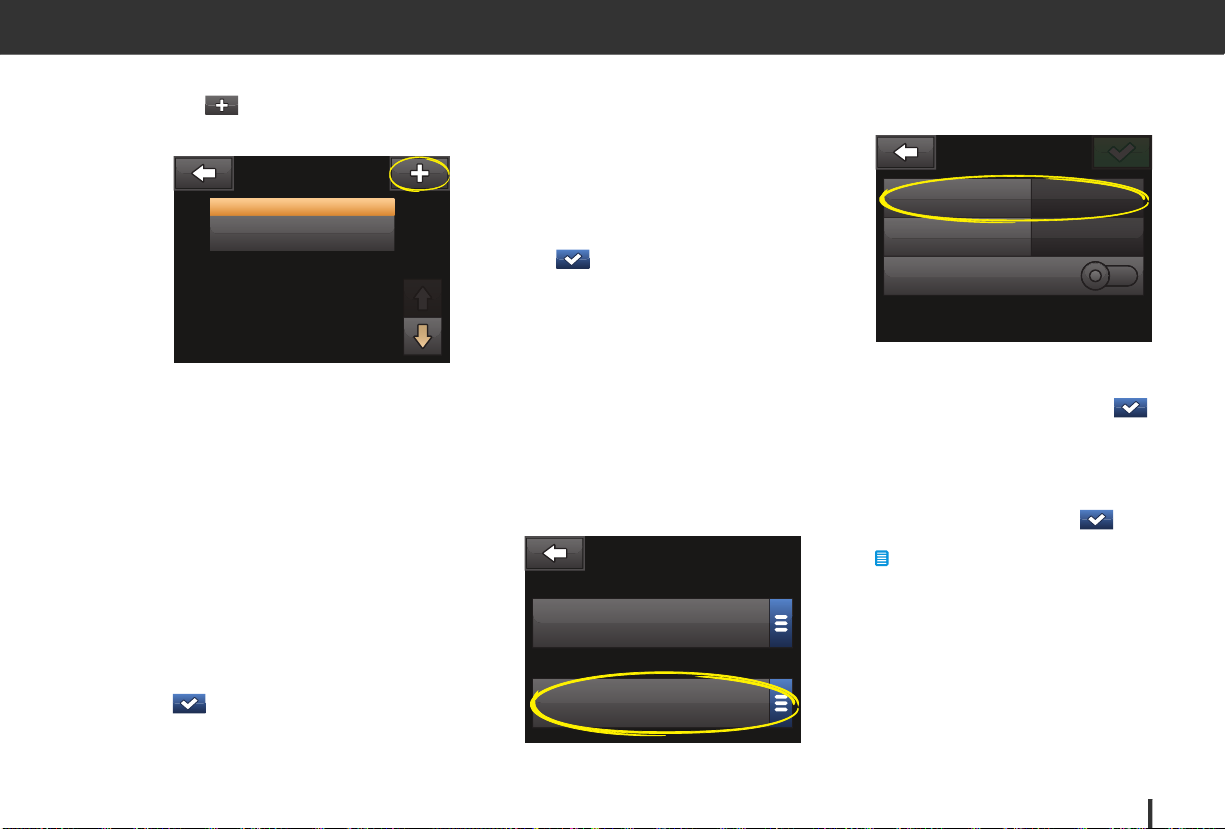
Chapter 6 – Personal Profiles
Timed Settings
12:00
0.75
BASAL
1:50
CORRECT
1:10
CARB TARGET BG
120
Weekday
5 hrs
DURATION
10 u
MAX BOLUS
OFF
CARBS
0.75
BASAL
1:50
CORRECT
120
TARGET BG
1:10
CARB
Insulin Duration
5 hrs
Max Bolus
10 u
Bolus Settings
Carbohydrates
Tap to create additional time
segments.
Adding More Time Segments
When adding more time segments, any
settings that you entered in the
previous time segment are copied and
appear in the new segment. This allows
you to simply adjust only the specific
settings you want, rather than have to
enter them all over again.
1. On the Add Segment screen, tap
Start Time.
2. Using the on-screen keypad, enter
the time (hour and minutes) that you
want the segment to begin, and tap
.
3. On the Add Segment screen, tap
Time of Day to select AM or PM, if
applicable.
Once a time segment is set beyond
12:00 PM, the default will change to
PM.
4. Tap .
5. Repeat steps 1 to 6 from the
Creating a New Profile section
above for each segment you want
to create (up to 16).
To find time segments in the list that
are not displayed on the first
screen, tap the Down Arrow.
Bolus Settings
1. Tap the Bolus Settings panel.
Timed Settings 12:00 - 00:00
Bolus Settings
2. Tap Insulin Duration.
3. Using the on-screen keypad, enter
the desired time for the duration of
insulin action (2–8 hrs) and tap .
4. Tap Max Bolus.
5. Using the on-screen keypad, enter
the desired amount for maximum
bolus (1–25 units) and tap .
NOTE: 25 Unit Max Bolus
If you set the max bolus to 25 units and a
bolus larger than 25 units is calculated
using your carb ratio or correction factor,
after the bolus is delivered a reminder
screen will appear. The option of delivering
the remaining amount of the bolus up to an
additional 25 units will be given (see
Section 15.9 Max Bolus Alerts).
87

Chapter 6 – Personal Profiles
6. Tap Carbohydrates to turn on and
use the carb ratio when calculating
boluses.
7. Review entered values and tap
.
8. Confirm Settings.
Tap if entered data is
correct.
Tap to make changes.
9. Tap Tandem logo to return to the
Home screen.
Adding More Personal Profiles
1. From the Home screen, tap
OPTIONS.
2. Tap My Pump.
3. Tap Personal Profiles.
4. Tap .
5. Name the new profile and repeat
steps for Timed Settings and Bolus
Settings.
NOTE: Carbohydrates Options
If the first profile you created is
programmed using a carb ratio, any new
profile will also have the Carbohydrates
option turned on, but a ratio will still need to
be defined.
6.4 Editing or Reviewing an Existing Profile
1. From the Home screen, tap
OPTIONS.
2. Tap My Pump.
3. Tap Personal Profiles.
4. Tap the name of the Personal
Profile to edit or review.
5. Tap Edit.
NOTE: Review Settings
To review settings but bypass editing the
settings, skip the remaining steps in this
section. You can tap to navigate to the
Personal Profiles list or tap the Tandem
logo to return to the Home screen.
6. Tap Timed Settings panel.
7. Tap the desired time segment to
edit.
8. Tap Basal, Correction Factor,
Carb Ratio or Target BG to make
changes as needed and use the onscreen keypad to enter changes.
Tap .
9. View recent changes and tap .
10. Confirm Settings.
Tap if entered data is
correct.
Tap to make changes.
11. Edit other time segments within the
Timed Settings by tapping on them
and using the same steps
described above.
12. Tap after editing all of the time
segments.
13. Tap the Bolus Settings panel to
change Insulin Duration, Max Bolus,
or Carbohydrates as needed. Use
the on-screen keypad to enter
desired changes. Tap .
14. Confirm Settings.
88

Chapter 6 – Personal Profiles
Tap if entered data is
correct.
Tap and make changes.
15. Tap Tandem logo to return to the
Home screen.
NOTE: Adding a Time Segment
To add a time segment, tap and enter the
desired start time.
NOTE: Deleting a Time Segment
To delete a time segment, tap on the to
the left of the time segment and tap to
confirm.
6.5 Duplicating an Existing Profile
1. From the Home screen, tap
OPTIONS.
2. Tap My Pump.
3. Tap Personal Profiles.
4. Tap the name of the Personal
Profile to duplicate.
5. Tap Duplicate.
6. Confirm profile to duplicate by
tapping .
7. Using the on-screen keypad, enter
the name (up to 16 characters) for
the new profile and tap .
Profile Duplicated screen is
displayed.
A new Personal Profile will be
created with the same settings as
the profile copied.
8. Tap the Timed Settings or Bolus
Settings panel to make changes to
the new profile.
6.6 Activating an Existing Profile
1. From the Home screen, tap
OPTIONS.
2. Tap My Pump.
3. Tap Personal Profiles.
4. Tap the name of the Personal
Profile to be activated.
The Activate and Delete options
are disabled for the active profile
because the profile is already
activated. You cannot delete a
profile until you have activated
another profile.
If you have only 1 profile defined,
you do not need to activate it
(that profile is automatically
activated).
5. Tap Activate.
A screen to confirm the activation
request is displayed.
6. Tap .
Profile Activated screen is
displayed.
6.7 Renaming an Existing Profile
1. From the Home screen, tap
OPTIONS.
2. Tap My Pump.
3. Tap Personal Profiles.
4. Tap the name of the Personal
Profile to be renamed.
5. Tap Down Arrow, and then
Rename.
89

Chapter 6 – Personal Profiles
6. Using the on-screen keypad,
rename the profile name (up to 16
characters) and tap .
7. Tap Tandem logo to return to the
Home screen.
6.8 Deleting an Existing Profile
1. From the Home screen, tap
OPTIONS.
2. Tap My Pump.
3. Tap Personal Profiles.
4. Tap the name of the Personal
Profile to be deleted.
NOTE: Active Personal Profile
The active Personal Profile cannot be
deleted.
5. Tap Delete.
6. Tap .
Profile Deleted screen is displayed.
7. Tap the Tandem logo to return to
the Home screen.
90

Key Pump Features
Chapter 7
Bolus

Chapter 7 – Bolus
7.1 Bolus Overview
WARNING
DO NOT deliver a bolus until you have reviewed
the calculated bolus amount on the pump
display. If you deliver an insulin amount that is
too high or too low, this could cause
hypoglycemia (low BG) or hyperglycemia (high
BG) events. You can change the amount of
insulin before you deliver your bolus.
A bolus is a quick dose of insulin that is
usually delivered to cover food eaten or
to correct high glucose.
The minimum bolus size is 0.05 units.
The maximum bolus size is 25 units. If
you attempt to deliver a bolus that is
larger than the amount of insulin in the
cartridge, a message screen appears
indicating that there is not enough
insulin to deliver the bolus.
Your t:slim X2 pump offers you the
ability to deliver different boluses to
cover carbohydrate intake (food bolus)
and bring your BG back to target
(correction bolus). Food and correction
boluses can also be programmed
together.
If Carbohydrates is turned on in your
active personal profile, you will enter
grams of carbohydrate and the bolus
will be calculated using your Carb
Ratio.
If Carbohydrates is turned off in your
active personal profile, you will enter
units of insulin to request the bolus.
If Basal-IQ technology is enabled and
has suspended insulin delivery during a
standard or quick bolus, all bolus
deliveries will continue until completed.
A new bolus cannot be started until
insulin is resumed.
PRECAUTION
CHECK your pump’s settings regularly to ensure
they are correct. Incorrect settings can result in
over delivery or under delivery of insulin. Consult
your healthcare provider as needed.
7.2 Correction Bolus Calculation
Once the pump knows your glucose
value it will determine whether or not to
recommend a correction bolus.
When your glucose value is:
• Above Target BG: the insulin for the
food bolus and the correction bolus
will be added together. If IOB is
present, it will only be used in the
calculation of the correction portion
of the bolus.
• Between 70 mg/dL and Target BG:
You will be given an option to
reduce the food bolus to correct for
the lower glucose. In addition, if IOB
is present, it will also be used to
reduce the bolus calculation.
• Below 70 mg/dL: The food bolus
will be reduced to automatically
correct for the low glucose value. In
addition, if IOB is present, it will also
be used to reduce the bolus
calculation.
Always treat hypoglycemia (low BG)
with fast-acting carbohydrates
according to the instructions of your
healthcare provider and then re-test
your BG to ensure that the treatment
was successful.
Glucose Value Manual Entry
You will need to enter your glucose
value into the pump manually before
92

Chapter 7 – Bolus
units
0
Your BG is Above Target
Add Correction Bolus?
Your BG is Below Target
Reduce Bolus Calculation?
advancing to the Correction Bolus
screens. You can use the glucose value
from your CGM or from your BG meter.
1. From the Home screen tap BOLUS.
2. Tap Add BG.
CARBS
3. Using the on-screen keypad, enter
your glucose value and tap .
Once is tapped, the glucose
value is saved in your pump history
whether or not a bolus is delivered.
4. Follow the steps in the appropriate
Target section below depending on
the results of your glucose value.
Above Target
If your glucose value is above your
Target BG, the pump presents you with
0
grams
View Calculation
GLUCOSE
Add BG
the option for the pump to calculate
and add a correction bolus to any other
bolus you request.
Current IOB 0 u
Current BG 280 mg/dL
• To accept the correction bolus
press . A correction bolus is
calculated and will be added to any
food bolus you request on the
Bolus screen.
• To decline the correction bolus,
press . No correction bolus will
be added to any food bolus you
request on the Bolus screen.
Below Target
If your glucose value is below your
Target BG, the pump presents you with
the option for the pump to calculate
and subtract a correction bolus from
any other bolus you request.
Current IOB 0 u
Current BG 85 mg/dL
• To accept the correction bolus
press . A correction bolus is
calculated and will be subtracted
from any food bolus you request on
the Bolus screen.
• To decline the correction bolus,
press . No correction bolus will
be subtracted from any food bolus
you request on the Bolus screen.
Within Target
If your glucose value is the same value
as your Target BG, no Correction Bolus
screen is displayed.
93

Chapter 7 – Bolus
units
2.98
7.3 Bolus Override
You can override the calculated bolus
by tapping on the calculated units value
and entering the units of insulin you
want delivered. The bolus override is
always active.
CARBS
0
grams
GLUCOSE
View Calculation
225
mg/dL
7.4 Food Bolus Using Units
If bolusing using a carb ratio, skip to the
section 7.5 Food Bolus Using Grams.
1. From the Home screen, tap
BOLUS.
2. Tap 0 units.
3. Using the on-screen keypad enter
units of insulin to be delivered, then
tap .
WARNING
ALWAYS confirm that the decimal point
placement is correct when entering bolus
information. Incorrect decimal point
placement can prevent you from getting the
proper amount of insulin that your
healthcare provider has prescribed for you.
4. Tap to confirm the units of
insulin to be delivered.
5. Confirm Request.
Tap if entered data is
correct.
Tap to go back to make
changes or view calculations.
6. Tap .
The BOLUS INITIATED screen is
temporarily displayed.
7.5 Food Bolus Using Grams
1. From the Home screen, tap
BOLUS.
2. Tap 0 grams.
3. Using the on-screen keypad enter
grams of carb and tap .
To add multiple carb values enter
first value, then tap , enter
second value, tap . Continue
until done.
To clear the value entered and
start over, tap the back
arrow.
4. Check that the grams of carb are
entered in the correct location on
the screen.
5. Tap to confirm the units of
insulin to be delivered.
You can always tap View
Calculation to display the Delivery
Calculation screen.
6. Confirm Request.
Tap if entered data is
correct.
Tap to go back to make
changes or view calculations.
7. Tap .
94

Chapter 7 – Bolus
The BOLUS INITIATED screen is
temporarily displayed.
7.6 Extended Bolus
The Extended Bolus feature allows you
to deliver part of the bolus now and part
of the bolus slowly over a period of up
to 8 hours. This can be helpful for high
fat meals such as pizza or if you have
gastroparesis (delayed stomach
emptying).
When extending a bolus, any correction
bolus amount will always be given in the
DELIVER NOW portion. Talk with your
healthcare provider to determine if this
feature is appropriate for you, as well as
for recommendations on the split
between now and later and the duration
for the later portion.
Only 1 extended bolus can be active at
any given time. However, if the
DELIVER LATER portion of an
extended bolus is active, you can
request another standard bolus.
1. From the Home screen, tap
BOLUS.
2. Tap 0 grams (or 0 units).
3. Using the on-screen keypad enter
grams of carb (or units of insulin).
Tap .
4. If desired, tap Add BG and using
the on-screen keypad enter a
glucose value. Tap .
5. Tap to confirm the units of
insulin to be delivered.
You can always tap View
Calculation to display the Delivery
Calculation screen.
6. Confirm Request.
Tap if entered data is
correct.
Tap to go back to make
changes or view calculations.
7. Tap EXTENDED to turn on the
extended feature, then tap .
8. Tap 50% under DELIVER NOW to
adjust the percentage of the food
bolus that is to be delivered
immediately.
The percentage value for DELIVER
LATER is automatically calculated
by the pump. The default is 50%
NOW and 50% LATER. The default
for DURATION is 2 hours.
9. Use the on-screen keypad to enter
the percentage of the bolus to
DELIVER NOW and tap .
For the DELIVER NOW portion, the
minimum amount is .05 units. If the
DELIVER NOW portion is less than
.05 units, you will be notified and
the DELIVER NOW portion will be
set to .05 units.
The DELIVER LATER portion of the
extended bolus also has minimum
and maximum rates. If you program
a DELIVER LATER rate outside of
these limits, you are notified and the
duration of the DELIVER LATER
portion is adjusted.
10. Tap 2 hrs under DURATION.
11. Use the on-screen keypad to adjust
the length of time the bolus is to be
delivered, then tap .
12. Tap .
95

Chapter 7 – Bolus
INSULIN ON BOARD (IOB)
Units 1.1 u 1:09 hrsTime Remaining
10:20
14 Nov 2019 235 u100%
OPTIONS
BOLUS
You can always tap View Units to
display the breakdown of units to
be delivered NOW versus LATER.
13. Confirm Request.
Tap if entered data is
correct.
Tap to go back to make
changes or view calculations.
14. Tap .
15. The BOLUS INITIATED screen is
temporarily displayed.
Only 1 extended bolus can be active at
any given time. However, if the
DELIVER LATER portion of an extended bolus is active, you can request
another standard bolus.
NOTE: Extended Bolus During
Insulin Suspension
If Basal-IQ technology is on and has suspended
insulin delivery during an extended bolus, all
remaining bolus insulin will be canceled. If
desired, a new bolus must be initiated after
insulin delivery has been resumed.
7.7 Canceling or Stopping a Bolus
Canceling a Bolus If delivery HAS
NOT STARTED:
1. Tap 1–2–3 to access the Home
screen.
2. Tap X (stop icon) to cancel the
bolus.
B
Requesting 10 u Bolus ...
BOLUS will remain inactive while
the bolus is being canceled.
Once canceled, BOLUS will
become active again on the Home
screen.
Stopping a Bolus if delivery of the
BOLUS HAS STARTED:
1. Tap 1–2–3 to access the Home
screen.
2. Tap X (stop icon) to stop delivery.
3. Tap .
The BOLUS STOPPED screen is
displayed and the units delivered
are calculated.
Units requested and delivered are
shown.
4. Tap .
OK
96

Key Pump Features
Chapter 8
Stop/Resume Insulin

Chapter 8 – Stop/Resume Insulin
8.1 Stopping Insulin Delivery
You can stop all insulin delivery at any
time. When you stop all insulin delivery,
any active bolus and any active temp
rate are immediately stopped. No
insulin delivery can take place while
your pump is stopped.
1. From the Home screen, tap
OPTIONS.
2. Tap STOP INSULIN.
3. Tap .
The All Deliveries Stopped screen
appears before returning to the
Home screen showing the status
ALL DELIVERIES STOPPED. A red
exclamation mark icon also appears
to the right of the time and date.
NOTE: Manually Stopping Insulin
and Basal-IQ Technology
If you manually stop insulin delivery, you must
manually resume insulin delivery. Basal-IQ
technology does not automatically resume
insulin if you decide to stop it manually.
8.2 Resuming Insulin Delivery
If pump screen is not on, press Screen
On/Quick Bolus button once to turn on
your t:slim X2 pump screen.
1. Tap 1–2–3.
2. Tap .
The RESUMING INSULIN screen is
temporarily displayed.
– OR –
1. From the Home screen, tap
OPTIONS.
2. Tap RESUME INSULIN.
3. Tap RESUME.
The RESUMING INSULIN screen is
temporarily displayed.
98
 Loading...