

Page 1
INSULIN ON BOARD (IOB)
Units 1.1 u 1:09 hrsTime Remaining
B
10:20 AM
March 15, 2015 235 u
OPTIONS
BOLUS
100%
Page 2

Page 3

Customer Technical Support: 1-877-801-6901 3
At Tandem Diabetes Care, Inc., we listen closely to the diabetes community
in order to understand your needs. We
recognize and respect the importance
of your decision to begin insulin pump
therapy as a member of our family.
We also recognize that your pump
purchase is only the beginning of your
relationship with Tandem. Our commitment goes much deeper than simply
supplying products to help you in your
diabetes management. We pledge to
be here to support you with training
and education through our network of
Clinical Diabetes Specialists. We also
pledge to be here to support you with
our dedicated Customer Technical
Support.
This User Guide is designed to assist
you with the features and functions of
the t:slim System. It provides important
warnings and cautions on proper operation as well as technical information
to ensure your safety. It also provides
step-by-step instructions on how to
properly program, manage and care for
your t:slim System.
Changes in equipment, software, or
procedures occur periodically; information describing these changes will be
included in future editions of this User
Guide. Please contact Tandem Diabetes Care Customer Technical Support
at 1-877-801-6901 to obtain a replacement copy of the User Guide that is the
correct version for your pump.
No part of this publication may be
reproduced, stored in a retrieval system, nor transmitted in any form or by
any means, electronic or mechanical,
without the prior written permission
of Tandem Diabetes Care, Inc., San
Diego, California, USA.
Tandem Diabetes Care, Inc.
11045 Roselle Street
San Diego, CA 92121 USA
(858) 366-6900
www.tandemdiabetes.com
Need help? We are here for you
24 hours a day, 7 days a week
at 1-877-801-6901.
© 2015 Tandem Diabetes Care, Inc.
All rights reserved. touch simplicity,
t:slim, t:connect and Tandem Diabetes Care are registered trademarks of
Tandem Diabetes Care, Inc.
Humalog® is a registered trademark of
Eli Lilly and Company.
NovoLog® is a registered trademark of
Novo Nordisk A/S.
Comfort™ is a trademark of Unomedical
A/S.
Bluetooth® is a registered trademark of
Bluetooth SIG, Inc.
All other trademarks and copyrights are
the property of their respective owners.
t:slim Insulin Pump User Guide Software Part Number 007234
Page 4

Customer Technical Support: 1-877-801-69014
1. Patients have the right to good quality service and high professional standards that are continually maintained
and reviewed.
2. A patient has the right to have all records pertaining to his or her medical care treated as confidential, except as
otherwise provided by law or third party contractual arrangements.
3. A patient has the right to respectful service provided by competent personnel.
4. A patient, or when appropriate, a patient’s representative has the right to be informed of his or her rights at the
earliest possible time.
5. A patient has the right to have their personal preferences be heard.
6. A patient has the right to be free from all forms of abuse or harassment.
7. A patient has the right to receive services in a safe setting. A safe setting includes environmental safety, infection control,
security, protection of emotional health and safety, including respect, dignity, and comfort, as well as physical safety.
8. A patient has the right to medical services including training without discrimination based upon race, color, religion,
gender, sexual preference, national origin or source of payment.
9. A patient shall not be denied the right to designate a legally allowed individual or agency, who is authorized, to act
on his or her behalf.
10. Tandem Diabetes Care shall provide a patient, or patient designee, upon written request, access to all information
contained in their patient information record.
11. Except for medical emergencies, Tandem Diabetes Care must obtain the necessary informed consent prior to the start of
collection or sharing of personal medical information as it relates to the purchase of Tandem products and or services.
Tandem Diabetes Care, Inc. Patient Bill of Rights
Page 5

Customer Technical Support: 1-877-801-6901 5
12. Tandem Diabetes Care is committed to ensuring the safety of its customers. Tandem has implemented policies covering
situations when a Tandem employee believes that a customer is suffering from a medical emergency, including contacting
the applicable emergency medical care.
13. A patient has a right to full information and counseling on the availability of known financial resources for his or her health
care received by Tandem Diabetes Care for the purpose of beneficiary coverage of Tandem Product and Services.
14. A patient has the right to examine and receive a detailed explanation of his or her financial bill.
15. A patient has the right to be advised when they are being considered for a medical care research program. In this
occurrence, Tandem Diabetes Care will send an informed consent agreement to a patient, requesting their participation
in a clinical investigation.
16. A patient has the right to decide whether their personal health information could be used for any fundraising efforts.
17. A patient, and when appropriate, a patient’s representative has the right to have any concerns, complaints and grievances
addressed. Sharing concerns, complaints and grievances will not compromise a patient’s care, treatment or services.
18. If a patient has a concern, complaint, or grievance, he or she may contact Tandem Diabetes Care Customer Support by:
» Calling Customer Support
1-877-801-6901
» Writing a letter to Tandem Diabetes Care
ATTN: Customer Support
and sending it to
11045 Roselle Street
San Diego, CA 92121
Page 6

Customer Technical Support: 1-877-801-69016
1. Patients and their families when appropriate are responsible for providing correct and complete information when
requesting assistance with insurance verification and other services provided by Tandem Diabetes Care.
2. Patients and their families are responsible for reporting unexpected changes with their medical, financial, or
insurance condition.
3. Patients and their families are responsible for asking questions when they do not understand the service being provided
or the reason for the information being requested.
4. Patients and their families are responsible for following the product training, instructions for use and service that have
been developed by Tandem Diabetes Care and agreed to by a patient.
5. Patients and their families are responsible for the outcomes if they do not follow the product instructions for use,
service and payment plans.
6. Patients and their families are responsible for being considerate of Tandem Diabetes Care’s staff and property,
as well as other patients and their property.
7. Patients and their families are responsible to promptly meet any financial obligation agreed to with Tandem Diabetes Care.
8. Patient and their family agree to hold harmless Tandem Diabetes Care from any expenses they may incur as a result of
Tandem contacting the applicable emergency medical care on their behalf.
Patient Responsibilities
Page 7

Table of Contents
Customer Technical Support: 1-877-801-6901 7
Section 1 – Welcome
Chapter 1 – About this User Guide
1.1 Introduction to this Guide ..............................................................................................18
1.2 Important Safety Information.........................................................................................18
1.3 Working with your Healthcare Provider .........................................................................19
1.4 Emergency Kit ...............................................................................................................19
1.5 Verification of Proper Functionality................................................................................20
1.6 Indications for Use and Contraindications ....................................................................21
1.7 Warnings and Precautions ............................................................................................21
1.8 Conventions of this Guide .............................................................................................26
Chapter 2 – Introduction
2.1 Welcome ........................................................................................................................28
2.2 What your t:slim System Package Includes ..................................................................28
2.3 Explanation of Symbols .................................................................................................29
2.4 Explanation of Icons ......................................................................................................30
2.5 Explanation of System Colors .......................................................................................31
2.6 Warranty Information .....................................................................................................32
Page 8

Table of Contents
Customer Technical Support: 1-877-801-69018
Chapter 3 – t:slim Pump Overview
3.1 t:slim Pump Overview ...................................................................................................36
3.2 System Terminology ......................................................................................................36
3.3 Screen Lock ..................................................................................................................38
3.4 Home Screen .................................................................................................................40
3.5 Status Screen ................................................................................................................42
3.6 Bolus Screen .................................................................................................................44
3.7 Options Screen ..............................................................................................................46
3.8 My Pump Screen ...........................................................................................................48
3.9 Number Keypad Screen ................................................................................................50
3.10 Letter Keypad Screen ....................................................................................................52
Section 2 – Key Pump Features
Chapter 4 – Getting Started
4.1 Charging the t:slim Pump ..............................................................................................56
4.2 Turning on the t:slim Pump Screen ...............................................................................58
4.3 Unlocking the t:slim Pump Screen ................................................................................58
Page 9

Table of Contents
Customer Technical Support: 1-877-801-6901 9
4.4 Edit Time .......................................................................................................................59
4.5 Edit Date ........................................................................................................................59
Chapter 5 – Infusion Site Care and Loading Cartridge
5.1 Infusion Site Selection and Care ...................................................................................62
5.2 Cartridge Instructions for Use .......................................................................................64
5.3 Filling and Loading a t:slim Cartridge ............................................................................64
5.4 Filling Tubing .................................................................................................................70
5.5 Filling Cannula ...............................................................................................................72
5.6 Setting Site Reminder ...................................................................................................73
Chapter 6 – Personal Profile
6.1 Personal Profile Overview .............................................................................................76
6.2 Creating a New Profile ...................................................................................................76
6.3 Programming a New Personal Profile ...........................................................................78
6.4 Editing or Reviewing an Existing Profile ........................................................................81
6.5 Duplicating an Existing Profile .......................................................................................82
6.6 Activating an Existing Profile .........................................................................................82
6.7 Renaming an Existing Profile .........................................................................................83
6.8 Deleting an Existing Profile ............................................................................................83
Page 10

Table of Contents
Customer Technical Support: 1-877-801-690110
Chapter 7 – Bolus
7.1 Bolus Overview .............................................................................................................86
7.2 Food Bolus Using Units.................................................................................................87
7.3 Food Bolus Using Grams ..............................................................................................87
7.4 Correction Bolus ............................................................................................................88
7.5 Extended Bolus .............................................................................................................89
7.6 Canceling or Stopping a Bolus......................................................................................91
Chapter 8 – Stop/Resume Insulin
8.1 Stopping Insulin Delivery ...............................................................................................94
8.2 Resuming Insulin Delivery .............................................................................................94
Section 3 – Additional Pump Operations
Chapter 9 – Temporary Basal Rate
9.1 Setting a Temp Rate ......................................................................................................98
9.2 Stopping a Temp Rate ...................................................................................................99
Page 11

Table of Contents
Customer Technical Support: 1-877-801-6901 11
Chapter 10 – Quick Bolus
10.1 Setting Up Quick Bolus ...............................................................................................102
10.2 Delivering Quick Bolus ................................................................................................102
Chapter 11 – t:slim Pump Settings
11.1 t:slim Pump Volume .....................................................................................................106
11.2 Screen Options ............................................................................................................106
Chapter 12 – t:slim Pump Info and History
12.1 t:slim Pump Info ..........................................................................................................110
12.2 t:slim Pump History .....................................................................................................110
Chapter 13 – t:slim Pump Reminders
13.1 Low BG Reminder .......................................................................................................112
13.2 High BG Reminder ......................................................................................................113
13.3 After Bolus BG Reminder ............................................................................................114
13.4 Missed Meal Bolus Reminder......................................................................................114
13.5 Site Reminder ..............................................................................................................115
Page 12

Table of Contents
Customer Technical Support: 1-877-801-690112
Chapter 14 – User Settable Alerts and Alarms
14.1 Low Insulin Alert ..........................................................................................................118
14.2 Auto-Off Alarm ............................................................................................................118
Section 4 – t:slim Pump Safety Alerts and Alarms
Chapter 15 – t:slim Pump Alerts
15.1 Low Insulin Alert ..........................................................................................................123
15.2 Low Power Alerts ........................................................................................................124
15.3 Incomplete Bolus Alert ................................................................................................126
15.4 Incomplete Temp Rate Alert ........................................................................................127
15.5 Incomplete Load Sequence Alerts ..............................................................................128
15.6 Incomplete Setting Alert ..............................................................................................131
15.7 Basal Rate Required Alert ...........................................................................................132
15.8 Max Hourly Bolus Alert ................................................................................................133
15.9 Max Bolus Alerts .........................................................................................................134
15.10 Max Basal Alerts .........................................................................................................136
15.11 Min Basal Alerts ..........................................................................................................138
Page 13

Table of Contents
Customer Technical Support: 1-877-801-6901 13
15.12 Connection Error Alert .................................................................................................140
15.13 Power Source Alert......................................................................................................141
15.14 Data Error Alert ............................................................................................................142
Chapter 16 – t:slim Pump Alarms
16.1 Resume Pump Alarm ..................................................................................................145
16.2 Low Power Alarms ......................................................................................................146
16.3 Empty Cartridge Alarm ................................................................................................148
16.4 Cartridge Error Alarm ..................................................................................................149
16.5 Cartridge Removal Alarm ............................................................................................150
16.6 Temperature Alarm ......................................................................................................151
16.7 Occlusion Alarms ........................................................................................................152
16.8 Screen On/Quick Bolus Button Alarm .........................................................................154
16.9 Altitude Alarm ..............................................................................................................155
16.10 Reset Alarm .................................................................................................................156
Chapter 17 – t:slim Pump Malfunction
17.1 Malfunction ..................................................................................................................158
Page 14

Table of Contents
Customer Technical Support: 1-877-801-690114
Section 5 – System Care and Maintenance
Chapter 18 – Taking Care of Your t:slim System
18.1 Overview ......................................................................................................................162
Section 6 – System Technical Specifications
Chapter 19 – Technical Specifications
19.1 Overview ......................................................................................................................166
19.2 t:slim Pump Specifications ..........................................................................................166
19.3 t:slim Pump Options and Settings ..............................................................................172
19.4 Electromagnetic Compatibility ....................................................................................174
19.5 Electromagnetic Emissions .........................................................................................175
19.6 Electromagnetic Immunity ...........................................................................................176
19.7 Distances Between the t:slim Pump and RF Equipment ............................................178
19.8 FCC Notice Concerning Interference ..........................................................................181
Page 15

Table of Contents
Customer Technical Support: 1-877-801-6901 15
THIS PAGE IS
INTENTIONALLY
LEFT BLANK
Page 16

Section 1
Welcome
Page 17

Chapter 1
About this User Guide
Page 18
Customer Technical Support: 1-877-801-690118
Chapter 1 – About this User Guide
1.1 Introduction to this Guide
This User Guide is for people who
use the t:slim® Insulin Delivery System
(t:slim System). The t:slim System is
made up of the t:slim Insulin Pump and
the t:slim 3 mL (300 units) cartridge.
Only the t:slim 3 mL cartridge will
connect to and work with the t:slim
System. The System is not compatible
with any other cartridge.
In this Guide, the t:slim Pump may be
referred to as “your pump” or “your
t:slim Pump.” The t:slim cartridge may
be referred to as “your cartridge.”
Together, the t:slim Insulin Pump and
the t:slim cartridge may be referred to
as “your system”.
1.2 Important Safety
Information
This User Guide covers important information on how to operate your t:slim
Pump. It provides step-by-step instructions to help you properly program,
manage and care for the System. It
also provides important warnings and
cautions on proper operation and technical information to ensure your safety.
Review all instructions in this User
Guide before using the System.
If you are not able to use the System
according to the instructions in this
User Guide, you may be putting your
health and safety at risk.
Pay special attention to Warnings
and Precautions in this User Guide.
Warnings and Precautions are identified
with .
If you still have questions after reading this User Guide, contact Tandem
Diabetes Care Customer Technical
Support at 1-877-801-6901. We are
here for you 24 hours a day, 7 days
a week.
The User Guide is organized in sections that allow you to learn to use your
t:slim System. Pump screens used
in this guide to demonstrate how to
use features are examples only. They
should not be considered suggestions
for your individual needs.
WARNING
United States (U.S.) Federal law restricts this
device to sale by or on the order of a physician.
Page 19
Customer Technical Support: 1-877-801-6901 19
Welcome1
Chapter 1 – About this User Guide
1.3 Working with your
Healthcare Provider
Any clinical language presented in this
User Guide is based on the assumption
that you have been educated by your
healthcare provider on certain terms
and how they apply to you in your
diabetes management. Your healthcare
provider can help you establish diabetes management guidelines that best fit
your lifestyle and needs.
Monitor your blood glucose (BG) with
the guidance of your healthcare provider. According to the American Association of Diabetes Educators’ white paper
Insulin Pump Therapy: Guidelines for
Successful Outcomes, patients should
routinely check their BG levels at least
4 times daily (optimally 6–8 times daily)
in order to detect hyperglycemia (high
blood glucose) and hypoglycemia (low
blood glucose) early. Undetected hyperglycemia or hypoglycemia can result
without proper monitoring.
Consult your healthcare provider before
using the System to determine which
features are most appropriate for you.
Only your healthcare provider can de-
termine and help you adjust your basal
rate(s), insulin-to-carbohydrate ratio(s),
correction factor(s), blood glucose (BG)
target, and duration of insulin action.
1.4 Emergency Kit
Make sure that you always have an insulin syringe and vial of insulin with you
as a backup for emergency situations.
You should also always have an appropriate emergency kit with you. Talk
with your healthcare provider regarding
what items this kit should include.
Supplies to carry every day:
•
Blood glucose testing supplies:
meter, strips, control solution,
lancets, meter batteries
•
Fast-acting carbohydrate to treat
low blood glucose
•
Extra snack for longer coverage
than fast-acting carbohydrate
•
Glucagon emergency kit
•
Rapid-acting insulin and syringes
•
Infusion sets (minimum of 2)
•
Insulin pump cartridges
(minimum of 2)
Page 20
Customer Technical Support: 1-877-801-690120
Chapter 1 – About this User Guide
•
Infusion site preparation products
(antiseptic wipes, skin adhesive)
•
Diabetes identification card
or jewelry
1.5 Verification of Proper
Functionality
A power supply (AC adapter with
micro-USB connector) is provided as
part of the System. Before using your
System, ensure that the following occur
when you connect a power supply into
the USB port of your t:slim Pump:
•
You hear an audible alert
•
Your see the green light illuminate
from the edge around the Screen
On/Quick Bolus Button
•
You feel a vibratory alert
•
You see a charge symbol (lightning
bolt) on the battery level indicator
In addition, before using the System,
ensure the following:
•
Press the Screen On/Quick Bolus
Button to turn the screen on so that
you can see the display
•
When the display screen is on, the
touch screen responds to your
finger tap
PRECAUTION
If any of these conditions fail to occur, do
NOT use the t:slim System, as this may be an
indication that the pump’s alarms, alerts, and
other built-in safety features may not be working
properly. If the pump is connected to your body,
disconnect the infusion set from your body
and contact Tandem Diabetes Care Customer
Technical Support at 1-877-801-6901.
Page 21
Customer Technical Support: 1-877-801-6901 21
Welcome1
Chapter 1 – About this User Guide
1.6 Indications for Use
and Contraindications
Indications for Use
The t:slim Insulin Delivery System is
intended for the subcutaneous delivery
of insulin, at set and variable rates, for
the management of diabetes mellitus in
persons requiring insulin, for individuals
12 years of age and greater.
Contraindications
The t:slim System is not intended for
anyone unable or unwilling to:
•
Test blood glucose (BG) levels
as recommended by your
healthcare provider
•
Demonstrate adequate
carbohydrate-counting skills
(preferred, not required)
•
Maintain sufficient diabetes
self-care skills
•
See your healthcare
provider(s) regularly
You must also have adequate vision
and/or hearing in order to recognize
your System alerts.
1.7 Warnings and Precautions
Warnings
Before using your System, consult with
your healthcare provider for your individual training needs and ensure that you
have been appropriately trained on its
use by a certified t:slim Pump trainer.
Incorrect use of your System or failure
to follow the appropriate instructions
in this User Guide can lead to serious injury or even death. If you have
questions or need further clarification
on your t:slim System use, ask your
healthcare provider or call our aroundthe-clock Customer Technical Support
Department at 1-877-801-6901.
Your t:slim System is designed to deliver insulin reliably, but because it uses
only rapid-acting insulin, you will not
have long-acting insulin in your body. In
order to prevent Diabetic Ketoacidosis
(DKA) or a very high BG, you must be
prepared to inject insulin if delivery is
interrupted for any reason.
Only use Humalog® or NovoLog®
U-100 insulin, as any lesser or greater
concentration can result in serious
Page 22

Customer Technical Support: 1-877-801-690122
Chapter 1 – About this User Guide
health consequences. Only Humalog®
and NovoLog® have been tested by
Tandem Diabetes Care, Inc., and found
to be compatible for use in the t:slim
System. It is not intended for use with
any other delivery substance.
Never fill your tubing while your infusion
set is connected to your body. Doing
so can result in unintended delivery
of insulin, which can result in serious
injury or death.
Do not disconnect the luer-lock connection between the cartridge tubing
and the infusion set tubing. If the
connection comes loose, disconnect
the infusion set from the site (from your
body) before tightening to avoid unintentional insulin delivery.
Do not deliver a bolus until you have
reviewed the calculated bolus amount
on the pump display. If you dose an insulin amount that is too high or too low,
this could lead to a very low or very
high BG level. You can always adjust
the insulin units up or down before you
decide to deliver your bolus.
Use only FDA cleared insulin infusion
sets with a standard luer-lock connection and consult its instructions
for use. Failure to do so may result in
over-infusion or under-infusion and
may cause serious injury or death.
Change your infusion set every 48–72
hours. Consult your healthcare provider for more information.
Use only single-use disposable cartridges from Tandem Diabetes Care.
The efficacy of your t:slim System
cannot be guaranteed if cartridges
other than those manufactured by Tandem Diabetes Care, Inc. are used or
if cartridges are filled more than once.
Use of cartridges not manufactured by
Tandem Diabetes Care, Inc. or reuse of
cartridges may result in over-infusion or
under-infusion and may cause serious
injury or death.
Do not remove or add insulin from a
filled cartridge. This will result in an
inaccurate display of the insulin level on
the Home Screen.
Do not modify this equipment. Modification could result in a safety hazard.
Radiology and Medical
Procedures
Always notify the provider/technician
about your diabetes and your insulin
pump.
You must take off your t:slim System
and leave it outside the procedure
room if you are going to have any of
the following procedures. Follow your
healthcare provider’s instructions
to replace missed insulin when you
reconnect to the pump. Check your
blood glucose before disconnecting
from the pump and again when you
reconnect and treat high blood glucose levels as recommended by your
healthcare provider:
•
X-ray
•
Computed Tomography (CT) scan
•
Magnetic Resonance Imaging (MRI)
•
Positron Emission Tomography
(PET) scan
•
Other exposure to radiation
Page 23
Customer Technical Support: 1-877-801-6901 23
Welcome1
Chapter 1 – About this User Guide
In addition to the above, you must
take off your t:slim System and leave
it outside the procedure room if you
are going to have any of the following
medical procedures:
•
Pacemaker/Automatic Implantable
Cardioverter Defibrillator (AICD)
placement or reprogramming
•
Cardiac Catheterization
•
Nuclear Stress Test
There are other procedures where you
should proceed with caution:
•
Laser Surgery – Your System
can usually be worn during the
procedure. However, some lasers
can create interference and cause
the System to alarm.
•
General Anesthesia – Depending
on the equipment being used, you
may or may not need to remove
your System. Be sure to ask your
healthcare provider.
There is no need to disconnect for
electrocardiograms (EKGs) or colonoscopies.
If you have questions, contact Tandem
Diabetes Care Customer Technical
Support at 1-877-801-6901
Extreme Temperatures
Avoid exposure of your t:slim to temperatures below 40°F (5°C) or above
99°F (37°C), as insulin can freeze at
low temperatures or degrade at high
temperatures. Do not steam, sterilize,
or autoclave your System at any time.
Amusement Park Rides
Very powerful electromagnets are
sometimes used on “free-fall” or thrill
rides. Remove your t:slim System
and do not take it on these types of
rides. Also, you should disconnect the
infusion set from your body while on
high-speed/high-gravity roller coasters.
Aircraft Without Cabin
Pressurization
Disconnect the infusion set from your
body before flying in an aircraft without
cabin pressurization or in planes used
for aerobatics or combat simulation
(pressurized or not).
Small Parts Potentially Ingestible
by Children
The System includes small parts (such
as pieces of the infusion set, rubber
USB port cover, and cartridge components) that could pose a choking
hazard for small children. Ensure that
any small parts are kept away from
small children.
Strangulation or Asphyxiation
The System includes parts (such as the
USB cable and the infusion set tubing)
that could pose a strangulation or asphyxiation hazard. Arrange cables and
tubing to minimize the risk of strangulation or asphyxiation. Ensure that these
parts are stored in a secure place when
not in use.
Do Not Use in the Presence
of Flammable Anesthetics or
Explosive Gases
The risk of ignition of flammable anesthetics and explosive gases by the
pump is remote. While this risk is remote, it is not recommended to operate the t:slim System in the presence
of flammable anesthetics or explosive
gases. If you have questions, contact
Page 24

Customer Technical Support: 1-877-801-690124
Chapter 1 – About this User Guide
Tandem Diabetes Care Customer
Technical Support at 1-877-801-6901.
Submersion in Fluid
The t:slim System is watertight to a
depth of 3 feet for up to 30 minutes
(IPX7 rating). If your t:slim System has
been submerged, check your pump
for any signs of fluid entry. If there are
signs of fluid entry, disconnect the set
from your body, and contact Tandem
Diabetes Care Customer Technical
Support at 1-877-801-6901.
Air Travel
Your System should not be exposed
to X-ray screening used for carry-on
and checked luggage. Newer full
body scanners used in airport security
screening are also a form of X-ray and
your System should not be exposed to
them. Notify the Transportation Security
Administration (TSA) Agent that your
System cannot be exposed to X-ray
screening and request alternate means
of screening other than X-ray.
Your System has been designed to
withstand common electromagnetic
interference including airport metal
detectors.
For further information, contact Tandem
Diabetes Care Customer Technical
Support at 1-877-801-6901.
Additional Precautions
Your System is a sealed device that
should be opened and repaired only by
the manufacturer. If your t:slim System
seal is broken, the warranty is voided
and the System is no longer watertight.
Replace the cartridge every 48 hours
if using Humalog®; every 72 hours if
using NovoLog®.
Always follow proper aseptic (clean)
technique when handling your pump,
filling syringe/needle, cartridge, and
infusion set.
•
Wash your hands with anti-bacterial
soap before handling.
•
Use only sterile, unopened
products, such as needles,
cartridges, and infusion sets.
•
Thoroughly clean the insertion site
on your body.
Always remove all air bubbles when
drawing insulin into the filling syringe.
Always hold the pump with the white
fill port pointed up when filling the cartridge. Always ensure that there are no
air bubbles in the tubing when filling.
Avoid changing your infusion set before
bedtime or if you will not be able to test
your blood glucose 1-2 hours after the
new infusion set is placed.
Before bedtime, always check that your
cartridge has enough insulin to last
through the night.
Unless otherwise directed by your
healthcare provider, do not use the
vibrate feature during sleep. Having the
volume for alerts and alarms set to high
will help ensure that you don’t miss an
alert or alarm.
Conduct regular checks of your t:slim
System and infusion set, particularly:
•
Check that your luer-lock
connection between the cartridge
tubing and the infusion set tubing is
tight and secure.
•
Check your infusion site for proper
Page 25

Customer Technical Support: 1-877-801-6901 25
Welcome1
Chapter 1 – About this User Guide
placement and leaks. Improperly
placed sites or leaks around the
infusion site can result in underinfusion.
•
Check your infusion set tubing for
any damage, leaks, or kinks while
using your t:slim System. Damaged,
leaking, or kinked tubing may
restrict or stop insulin delivery and
result in under-infusion.
•
Check your t:slim System’s personal
settings to ensure they are correct.
•
Check your t:slim System’s audible
tones and vibration to ensure they
are easily detectable.
Regularly check your t:slim Pump
screen for potential failure conditions
that may display.
If you damage or drop your t:slim System, ensure that it is still working properly. If you are unsure about potential
damage, disconnect the infusion set
from your body and contact Tandem
Diabetes Care Customer Technical
Support at 1-877-801-6901.
It is very important to set the current
time and date accurately to ensure
safe insulin delivery. When editing time,
always check that the AM/PM setting
is accurate. AM is to be used from midnight until 11:59 AM. PM is to be used
from noon until 11:59 PM.
When you are connected to the pump
and to a charging source, take caution
when moving further than the length of
the USB cable. Failure to do so may result in the cannula becoming dislodged
at the infusion site. For this reason it is
recommended not to charge the pump
while sleeping.
Your insulin needs may change in
response to lifestyle changes such
weight gain or loss, and starting or
stopping exercise. Consult your healthcare provider for help with adjusting
your basal rate(s) and other settings.
When you first use the Quick Bolus
feature, you should always look at the
screen to confirm correct programming until you are comfortable with
this feature.
Interference with your System’s
electronics by cell phones can occur
if worn in close proximity. It is recommended that your pump and cell phone
be worn at least 6.4 inches apart.
Always check with your healthcare
provider for specific guidelines if you
want or need to disconnect from the
pump for any reason. Depending on
the length of time and reason you are
disconnecting, you may need to replace
missed basal and/or bolus insulin.
Check your blood glucose before
disconnecting from the pump and again
when you reconnect, and treat high
blood glucose (BG) levels as recommended by your healthcare provider.
If you receive a warranty replacement
System from Tandem Diabetes Care,
ensure that your personal settings are
programmed before using the pump.
Always dispose of used cartridges,
syringes, needles, and infusion sets
following your community’s regulations.
Wash your hands thoroughly after handling any insulin-holding device.
Page 26
Customer Technical Support: 1-877-801-690126
Chapter 1 – About this User Guide
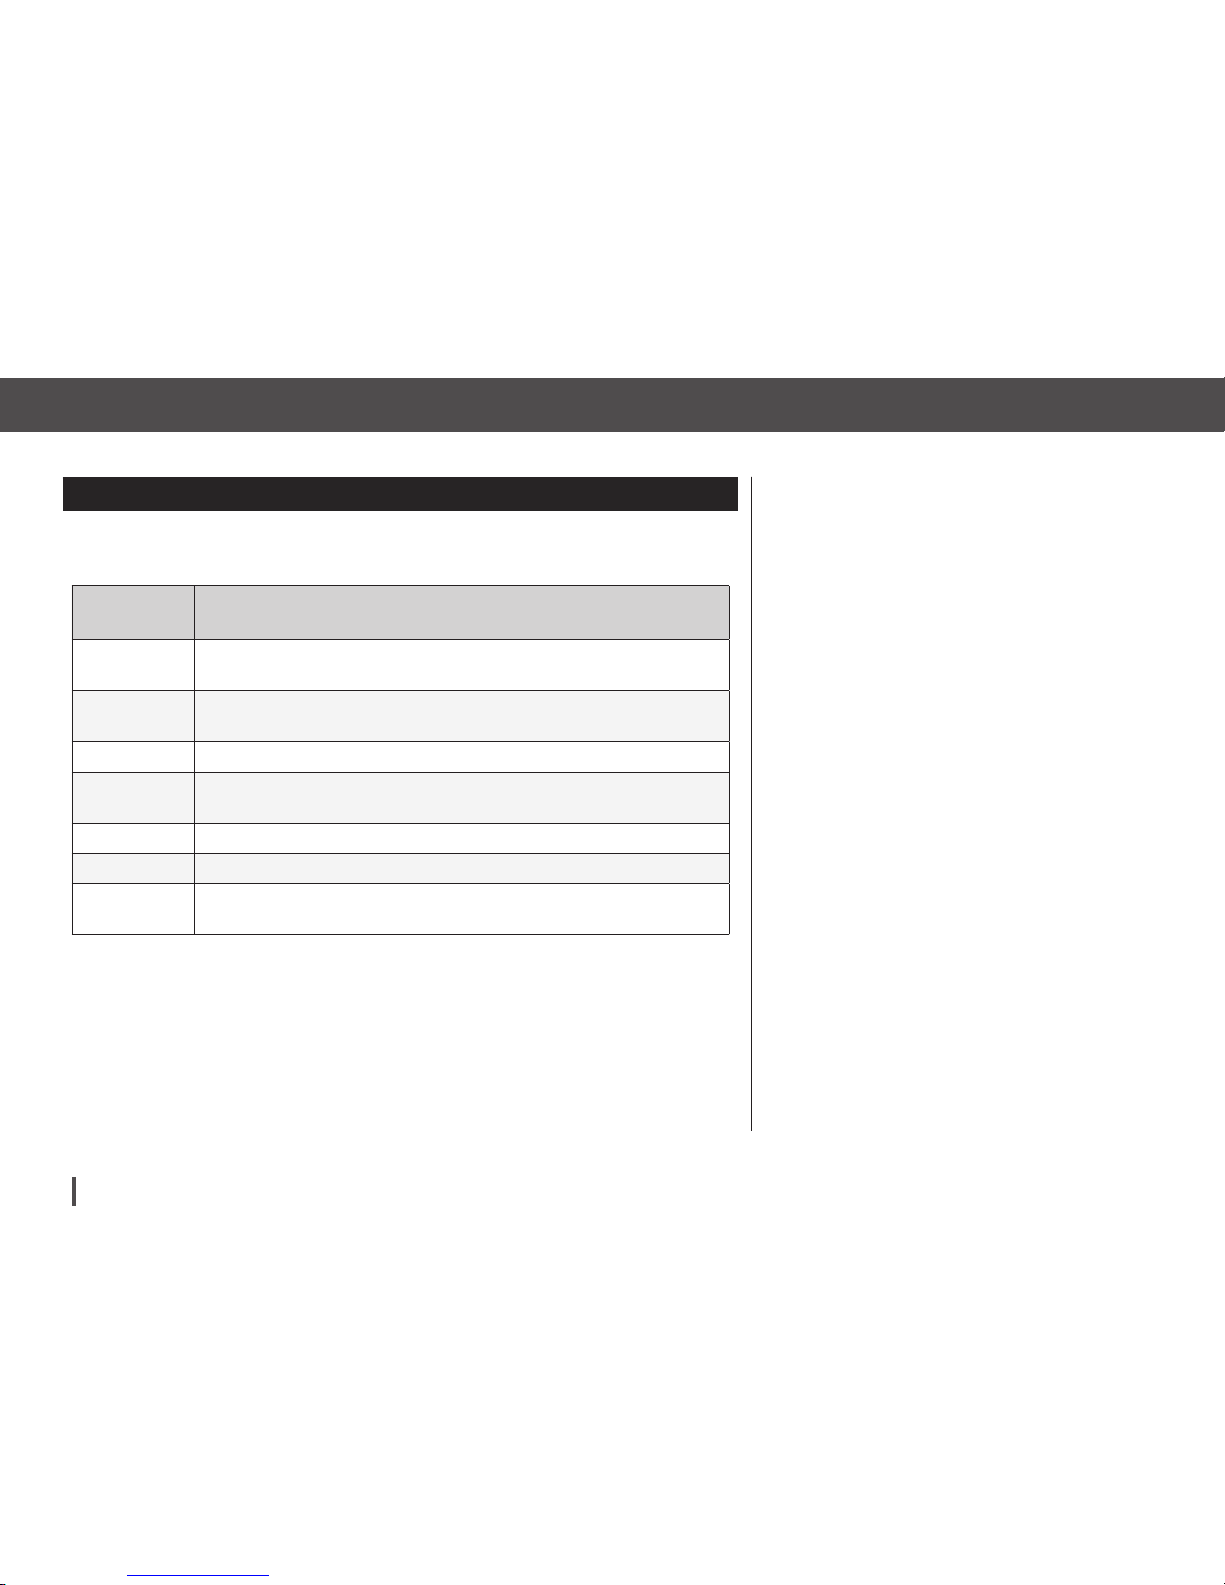
1.8 Conventions of this Guide
The following are conventions used in this Guide (such as terms, icons, text formatting, and other conventions) along with their explanations.
Convention Explanation
Bolded Text
Text that is in bold and in a different font than the rest of the sentence or step
indicates an onscreen or physical button name.
Touch Screen
The front glass screen of your pump, which displays all programming, operating,
and alarm/alert information.
Tap
Quickly and lightly touch the screen with your finger.
Press
Use your finger to depress a physical button (the Screen On/Quick Bolus Button
is the only physical/hardware button on your t:slim Pump).
Hold
Keep pressing a button or touching an icon or menu until its function is complete.
Menu
A list of options on your touch screen that allow you to perform specific tasks.
Icon
An image on your touch screen that indicates an option or item of information, or
a symbol on the back of your t:slim Pump or its packaging.
Page 27

Chapter 2
Introduction
Page 28
Customer Technical Support: 1-877-801-690128
Chapter 2 – Introduction
2.1 Welcome
Congratulations on the purchase of
your new t:slim System. Your decision
to use insulin pump therapy is a sign
of your commitment to your diabetes
care. The t:slim System delivers insulin
in two ways: continuous, or basal insulin
delivery, and bolus insulin delivery to
cover carbohydrates eaten and to lower
high blood glucose. The following pages
provide step-by-step instructions on
how to properly program, manage, and
care for your System.
If any of these items are missing, contact Tandem Diabetes Care Customer
Technical Support at 1-877-801-6901.
NOTE
Your t:slim Pump is shipped from Tandem
Diabetes Care, Inc. with a clear screen
protector. Do not remove the screen protector.
Additional screen protectors can be ordered by
contacting Tandem Diabetes Care Customer
Technical Support at 1-877-801-6901.
NOTE
Your t:slim Pump is shipped from Tandem
Diabetes Care, Inc. with a protective cover
in the place where the cartridge is normally
inserted. This cover must be removed and
replaced with a cartridge prior to initiating
insulin therapy.
Supply Reordering
To order cartridges, infusion sets,
supplies, and accessories, please
contact Tandem Diabetes Care, Inc. at
1-877-801-6901 or your usual supplier
of diabetes products.
2.2 What your t:slim System
Package Includes
Your t:slim System should include the
following items:
1. t:slim Insulin Pump
2. Pump Case
3. t:slim User Guide
4. t:connect® Getting Started Guide
5. USB Cable
6. Wall Power USB Adapter
7. Car Power USB Adapter
8. Cartridge Removal Tool
Page 29
Customer Technical Support: 1-877-801-6901 29
Welcome1
Chapter 2 – Introduction
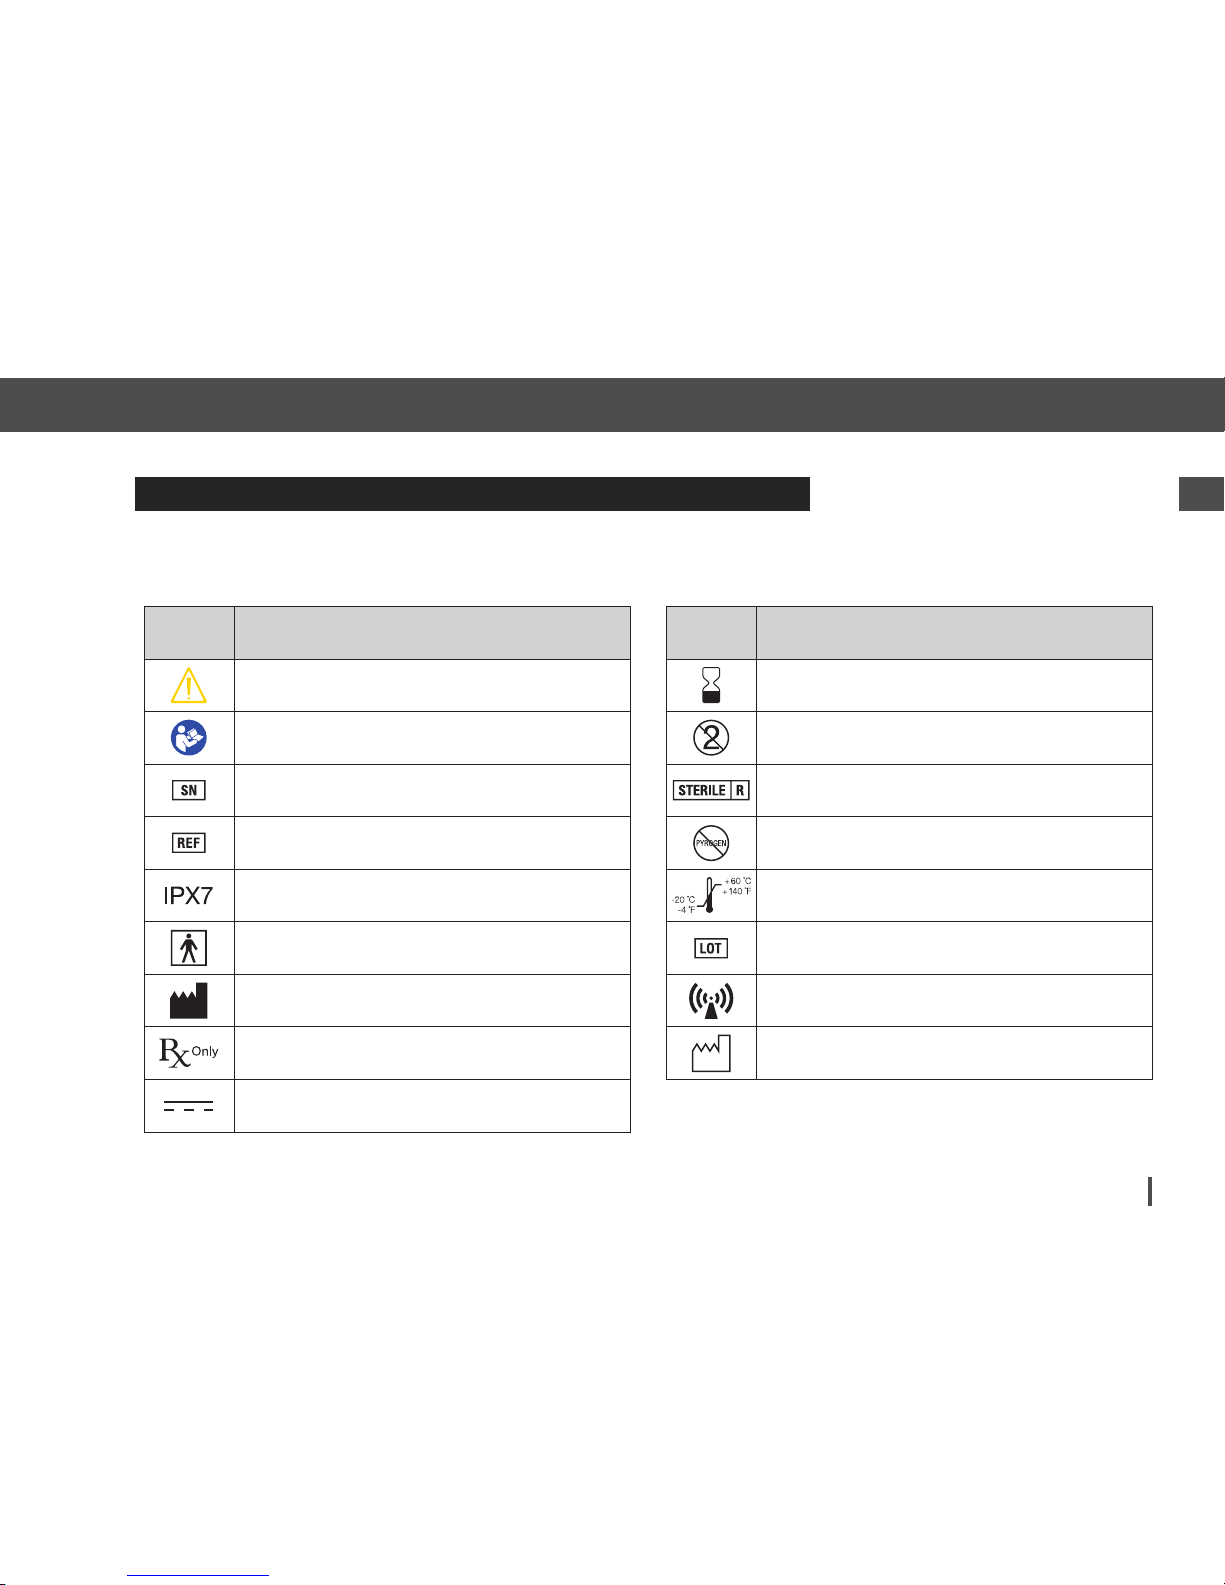
2.3 Explanation of Symbols
The following are symbols (and their descriptions), which you may find on your t:slim
System and/or its packaging.
Symbol Meaning Symbol Meaning
Caution; Consult Manual for Important
Safety Documentation
Use By Date
See Instructions for Use Do Not Re-Use
Serial Number of Device Method of Sterilization: Gamma
Part Number Non Pyrogenic
Watertight Equipment (protected against the effects
of temporary immersion in water)
Temperature Limits
Type BF Applied Part (patient isolation,
not defibrillator protected)
Lot Number
Manufacturer Non-ionizing Radiation
For sale by or on the order of a physician only (U.S.) Date of Manufacture
Direct Current (DC) voltage
Page 30
Customer Technical Support: 1-877-801-690130
Chapter 2 – Introduction
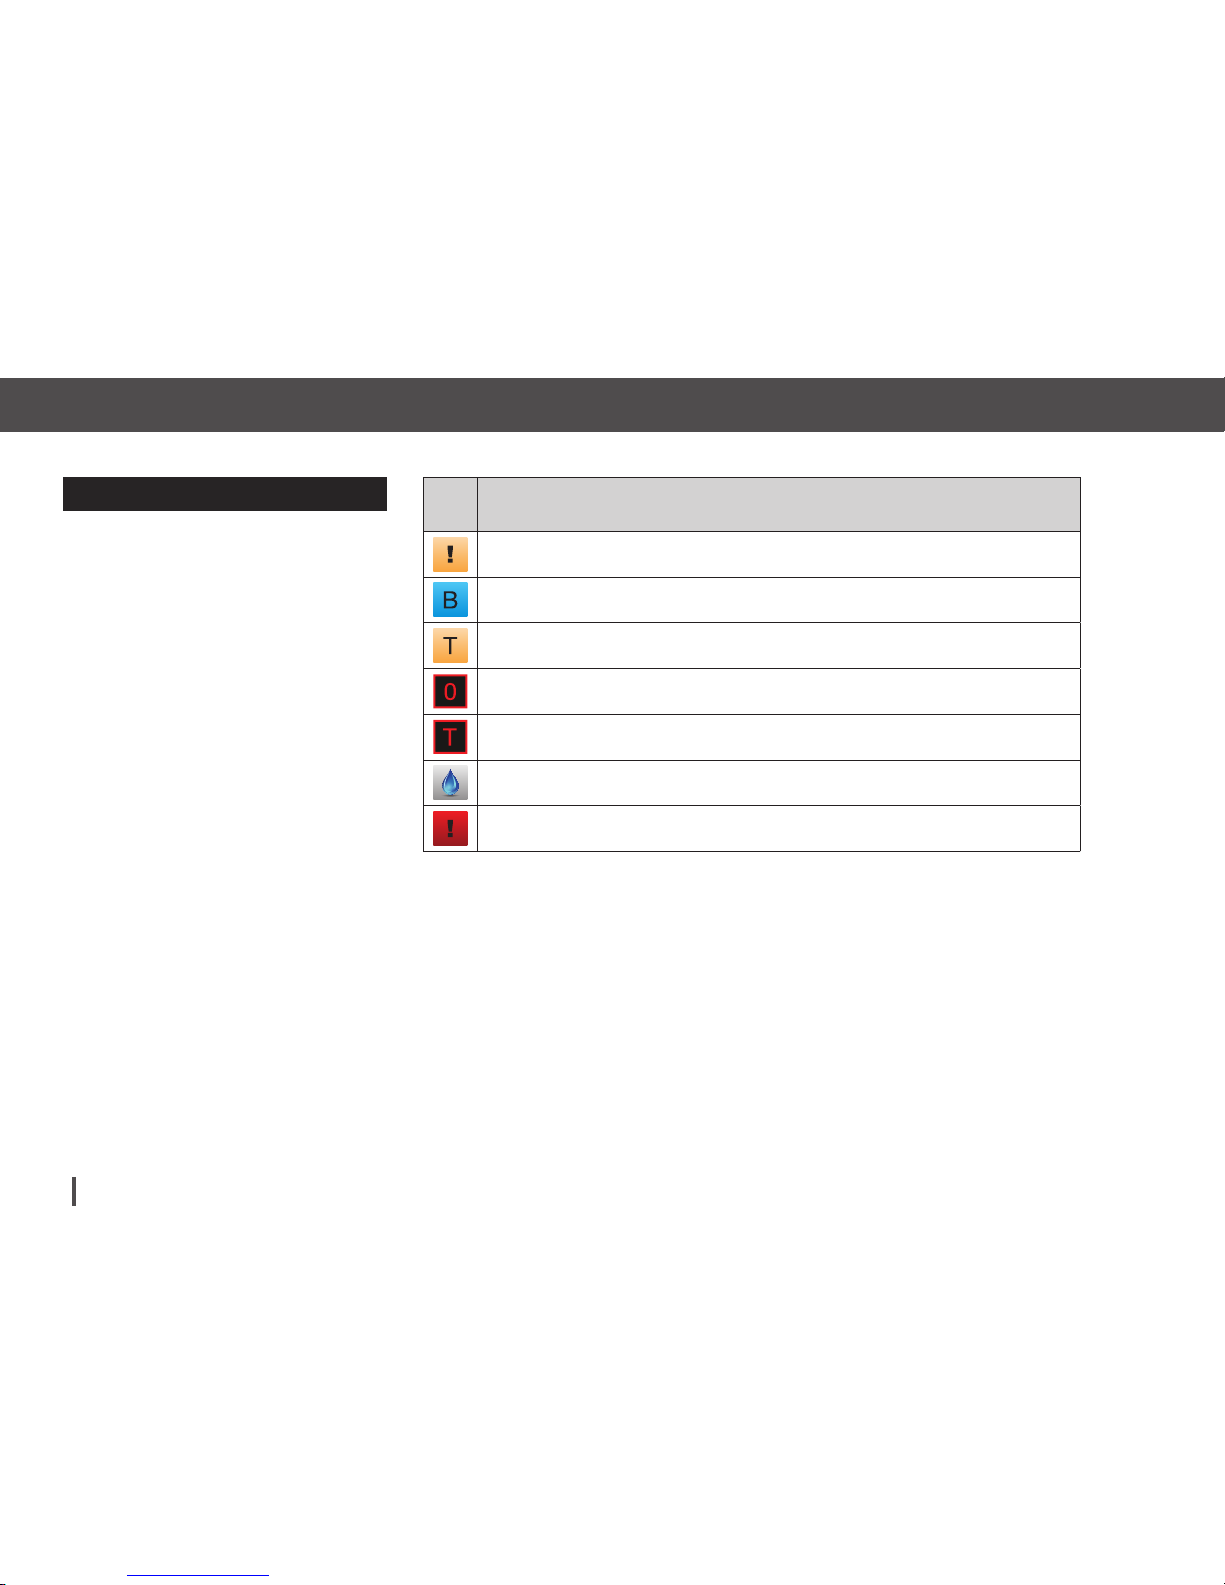
2.4 Explanation of Icons
The following icons may appear in
the status area (to the left or right
of the time and date) on your t:slim
Pump Home Screen. Tap the icon to
access the status screen for more
information.
Icon Meaning
A system reminder, alert, error, or alarm is active.
Basal insulin is programed and being delivered.
A temporary basal rate is active.
A basal rate of 0 u/hr is active.
A temporary basal rate of 0 u/hr is active.
A bolus is being delivered.
All insulin deliveries are stopped.
Page 31
Customer Technical Support: 1-877-801-6901 31
Welcome1
Chapter 2 – Introduction
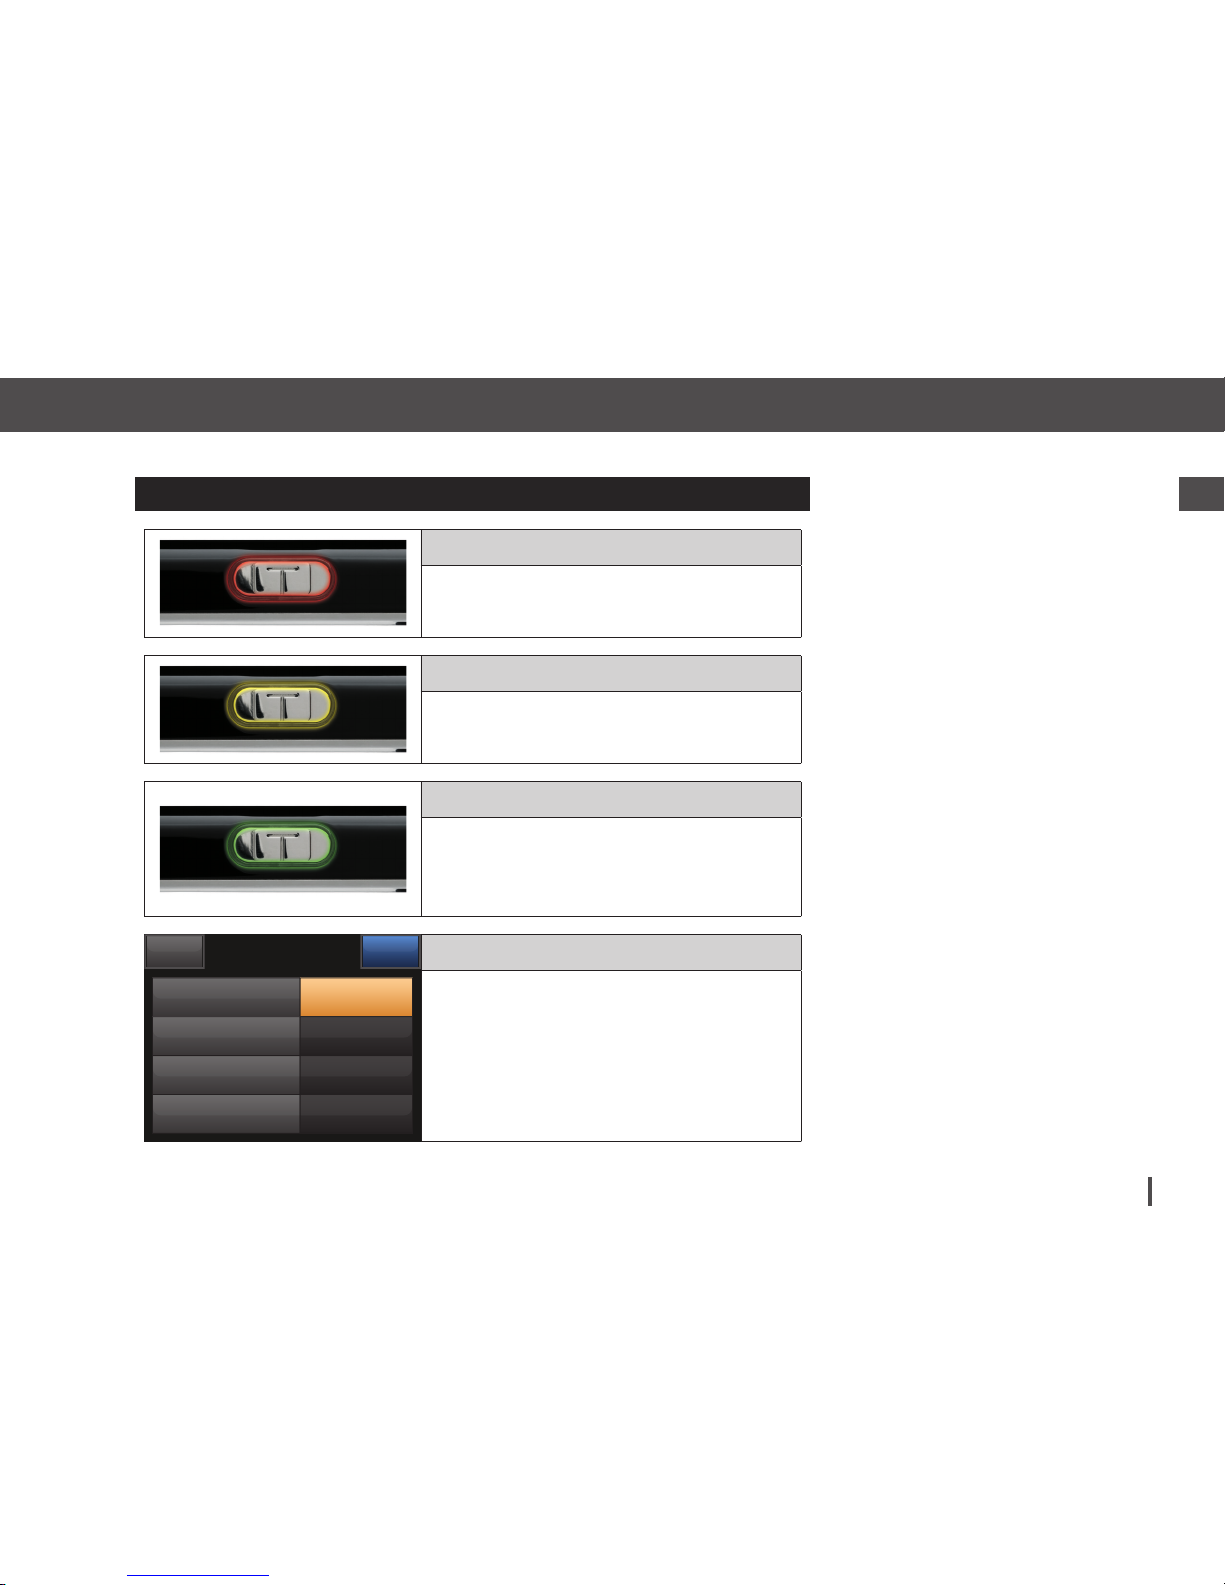
2.5 Explanation of System Colors
Red LED
» 1 red blink every 30 seconds indicates a malfunction
or alarm condition.
Yellow LED
» 1 yellow blink every 30 seconds indicates an alert
or reminder condition.
Green LED
» 1 green blink every 30 seconds indicates the pump
is functioning normally.
» 3 green blinks every 30 seconds indicate the pump
is charging.
Orange Highlight
» When editing settings, changes are highlighted in
orange for review before saving.
12:00 AM
SAVEBACK
Basal
0.75 u/hr
Correction Factor Press to Set Up
Carb Ratio Press to Set Up
Target BG Press to Set Up
Page 32
Customer Technical Support: 1-877-801-690132
Chapter 2 – Introduction
2.6 Warranty Information
Warranty
t:slim Insulin Pump
The expected life of the t:slim Pump
is a maximum of 4 years. Tandem
Diabetes Care, Inc. (“Tandem”) warrants
the t:slim Insulin Pump against defects
in materials and workmanship for the
period of 4 years from the original date
of shipment of the pump to the original
end use purchaser (the “Warranty
Period”). During the Warranty Period,
Tandem will replace any defective t:slim
Pump, subject to the conditions and
exclusions stated herein.
The warranty is valid only if the t:slim
Pump is used in accordance with
Tandem’s instructions and will not
apply:
•
If: damage results from changes
or modifications made to the
t:slim Insulin Pump by the user
or third persons after the date of
manufacture;
•
If: damage results from service or
repairs performed to any part of the
t:slim Pump by any person or entity
other than Tandem;
•
If: the t:slim Pump seal is broken;
•
If: a non-Tandem cartridge is used
with the t:slim Pump;
•
If: damage results from a force
majeure or other event beyond the
control of Tandem; or
•
If: damage results from negligence
or improper use, including but
not limited to improper storage or
physical abuse.
This warranty shall be personal to the
original end use purchaser. Any sale,
rental or other transfer or use of the
t:slim Pump covered by this warranty
to or by a user other than the original
end use purchaser shall cause this
warranty to immediately terminate.
This warranty only applies to the t:slim
Pump and does not apply to other
products or accessories.
THE REMEDIES PROVIDED FOR IN
THIS WARRANTY ARE THE EXCLUSIVE REMEDIES AVAILABLE FOR
ANY WARRANT CLAIMS. NEITHER
TANDEM NOR ITS SUPPLIERS OR
DISTRIBUTORS SHALL BE LIABLE
FOR ANY INCIDENTAL, CONSEQUENTIAL, OR SPECIAL DAMAGE OF ANY
NATURE OR KIND CAUSED BY OR
ARISING OUT OF A DEFECT IN THE
PRODUCT. ALL OTHER WARRANTIES,
EXPRESS OR IMPLIED, ARE EXCLUDED, INCLUDING THE WARRANTIES
OF MERCHANTABILITY AND FITNESS
FOR A PARTICULAR PURPOSE.
Page 33

Customer Technical Support: 1-877-801-6901 33
Welcome1
Chapter 2 – Introduction
Warranty
Infusion Sets and Cartridges
Tandem Diabetes Care, Inc. (“Tandem”)
warrants its infusion sets and cartridge
against defects in materials and workmanship for the period of 3 days after
the individual cartridge/infusion set
sterile packaging has been opened, not
to exceed 6 months from date of shipment of the infusion set or cartridge to
the end user (the “Warranty Period”).
During the Warranty Period, Tandem
will replace any defective cartridge or
infusion set, subject to the conditions
and exclusions stated herein.
The warranty is valid only if the
infusion sets and cartridges are used
in accordance with Tandem’s instructions and will not apply:
•
If: the infusion set or cartridge has
been used for more than a singletime use by a single end-user;
•
If: damage results during the
improper opening of the sterile
package not in conformance with
the procedures outlined in the
associated Instructions for Use;
•
If: the sterile package is
compromised while in the control of
the user by any means other than
purposeful opening by the user at
the time of intended product use;
•
If: damage results from changes
or modifications made to the
infusion set or cartridge by the user
or third persons after the date of
manufacture;
•
If: damage results from service or
repairs performed to any part of
the infusion set or cartridge by any
person or entity other than Tandem;
•
If: damage is caused by use of the
cartridge or infusion set with any
non-Tandem insulin pump;
•
If: damage results from a force
majeure or other event beyond the
control of Tandem; or
•
If: damage results from negligence
or improper use, including but
not limited to improper storage or
physical abuse such as dropping
or otherwise.
This warranty shall be personal to the
original end use purchaser. Any sale,
rental or other transfer or use of the
product covered by this warranty to
or by a user other than the original
end use purchaser shall cause this
warranty to immediately terminate.
This warranty does not apply to insulin
pumps and other accessories.
THE REMEDIES PROVIDED FOR IN
THIS WARRANTY ARE THE EXCLUSIVE REMEDIES AVAILABLE FOR
ANY WARRANT CLAIMS. NEITHER
TANDEM NOR ITS SUPPLIERS OR
DISTRIBUTORS SHALL BE LIABLE
FOR ANY INCIDENTAL, CONSEQUENTIAL, OR SPECIAL DAMAGE OF ANY
NATURE OR KIND CAUSED BY OR
ARISING OUT OF A DEFECT IN THE
PRODUCT. ALL OTHER WARRANTIES,
EXPRESS OR IMPLIED, ARE EXCLUDED, INCLUDING THE WARRANTIES
OF MERCHANTABILITY AND FITNESS
FOR A PARTICULAR PURPOSE.
Page 34

Customer Technical Support: 1-877-801-690134
Chapter 2 – Introduction
THIS PAGE IS
INTENTIONALLY
LEFT BLANK
Page 35

Chapter 3
t:slim Pump Overview
Page 36
Customer Technical Support: 1-877-801-690136
Chapter 3 – t:slim Pump Overview
3.1 t:slim Pump Overview
To turn on your t:slim Pump screen,
first press the Screen On/Quick Bolus
Button, then use the pad of your finger
to quickly and lightly tap on the screen.
Do not use your finger nail or another
object to interact with the screen. It will
not activate the screen or its functions.
Your t:slim Pump is designed to give
you quick and easy access to the functions that you will use in your day-today diabetes management – whether
basic or advanced.
NOTE
The t:slim Pump has several safety features to
prevent unintentional interaction with the touch
screen. The screen must be unlocked by tapping
1–2–3 in sequence. On all screens, if three
non-active areas of the touch screen are tapped
before an active area is tapped, the screen will
turn off to prevent accidental button presses.
NOTE
Turn off the pump screen by pressing the
Screen On/Quick Bolus button before placing
the pump back in its case or any pocket/
clothing. Always position the pump screen away
from the skin when worn under clothing.
3.2 System Terminology
Pump Terminology
Basal
Basal is a slow continuous delivery of
insulin, which keeps BG levels stable
between meals and during sleep. It is
measured in units per hour (units/hr).
BG
BG is the abbreviation for blood glucose, which is the level of glucose in
the blood, measured in mg/dL.
BG Target
BG target is a specific blood glucose
goal, an exact number, not a range.
When a BG is entered in the t:slim
Pump, the calculated insulin bolus will
be adjusted up or down as needed to
attain this target.
Bolus
A bolus is a quick dose of insulin that is
usually delivered to cover food eaten or
a high BG. With the t:slim Pump it can
be delivered as a Standard, a Correction, an Extended, or a Quick Bolus.
Cannula
The cannula is the part of the infusion
set that is inserted under the skin
through which insulin is delivered.
Carb
Carbs or Carbohydrates are sugars
and starches that the body breaks
down into glucose and uses as an
energy source, measured in grams.
Carb Ratio
The carb ratio is the number of grams
of carbohydrate that 1 unit of insulin will
cover. Also known as insulin-to-carbohydrate ratio.
Correction Bolus
A correction bolus is given to correct
high BG.
Correction Factor
A correction factor is the amount of
BG that is lowered by 1 unit of insulin.
Also known as the Insulin Sensitivity
Factor (ISF).
Extended Bolus
An extended bolus is a bolus that is
delivered over a period of time. It is
commonly used to cover food that
Page 37

Customer Technical Support: 1-877-801-6901 37
Welcome1
Chapter 3 – t:slim Pump Overview
takes longer to digest. When administering an extended bolus with your
t:slim Pump, enter the DELIVER NOW
portion to dose a percentage of insulin
immediately and the remaining percentage over a period time.
Grams
Grams are a unit of measurement
for carbohydrates.
Insulin Duration
Insulin duration is the amount of time
that insulin is active and available in the
body after a bolus has been delivered.
This also relates to the calculation for
Insulin on Board (IOB).
Insulin On Board (IOB)
IOB is the insulin that is still active
(has the ability to continue to lower
the BG) in the body after a bolus
has been delivered.
Load
Load refers to the process of removing,
filling, and replacing a new cartridge
and infusion set.
mg/dL
Milligrams per deciliter. The standard
unit of measure for blood glucose
readings in the United States.
Personal Profile
A personal profile is a personalized
group of settings that defines the delivery of basal and bolus insulin within
specific time segments throughout a
24 hour period.
Quick Bolus
Quick bolus (using the Quick Bolus
Button) is a way to deliver a bolus by
following beep/vibration commands
without navigating through or viewing
the t:slim Pump screen.
Temp Rate
Temp rate is an abbreviation for a
temporary basal rate. It is used to
increase or decrease the current
basal rate for a short period of time
to accommodate special situations.
100% is the same basal rate as programmed. 120% means 20% more
and 80% means 20% less than the
programmed basal rate.
Units
Units are the measurement for insulin.
USB Cable
USB is the abbreviation for Universal
Serial Bus. The USB cable connects
into the t:slim Pump’s micro USB port.
Page 38
Customer Technical Support: 1-877-801-690138
Chapter 3 – t:slim Pump Overview
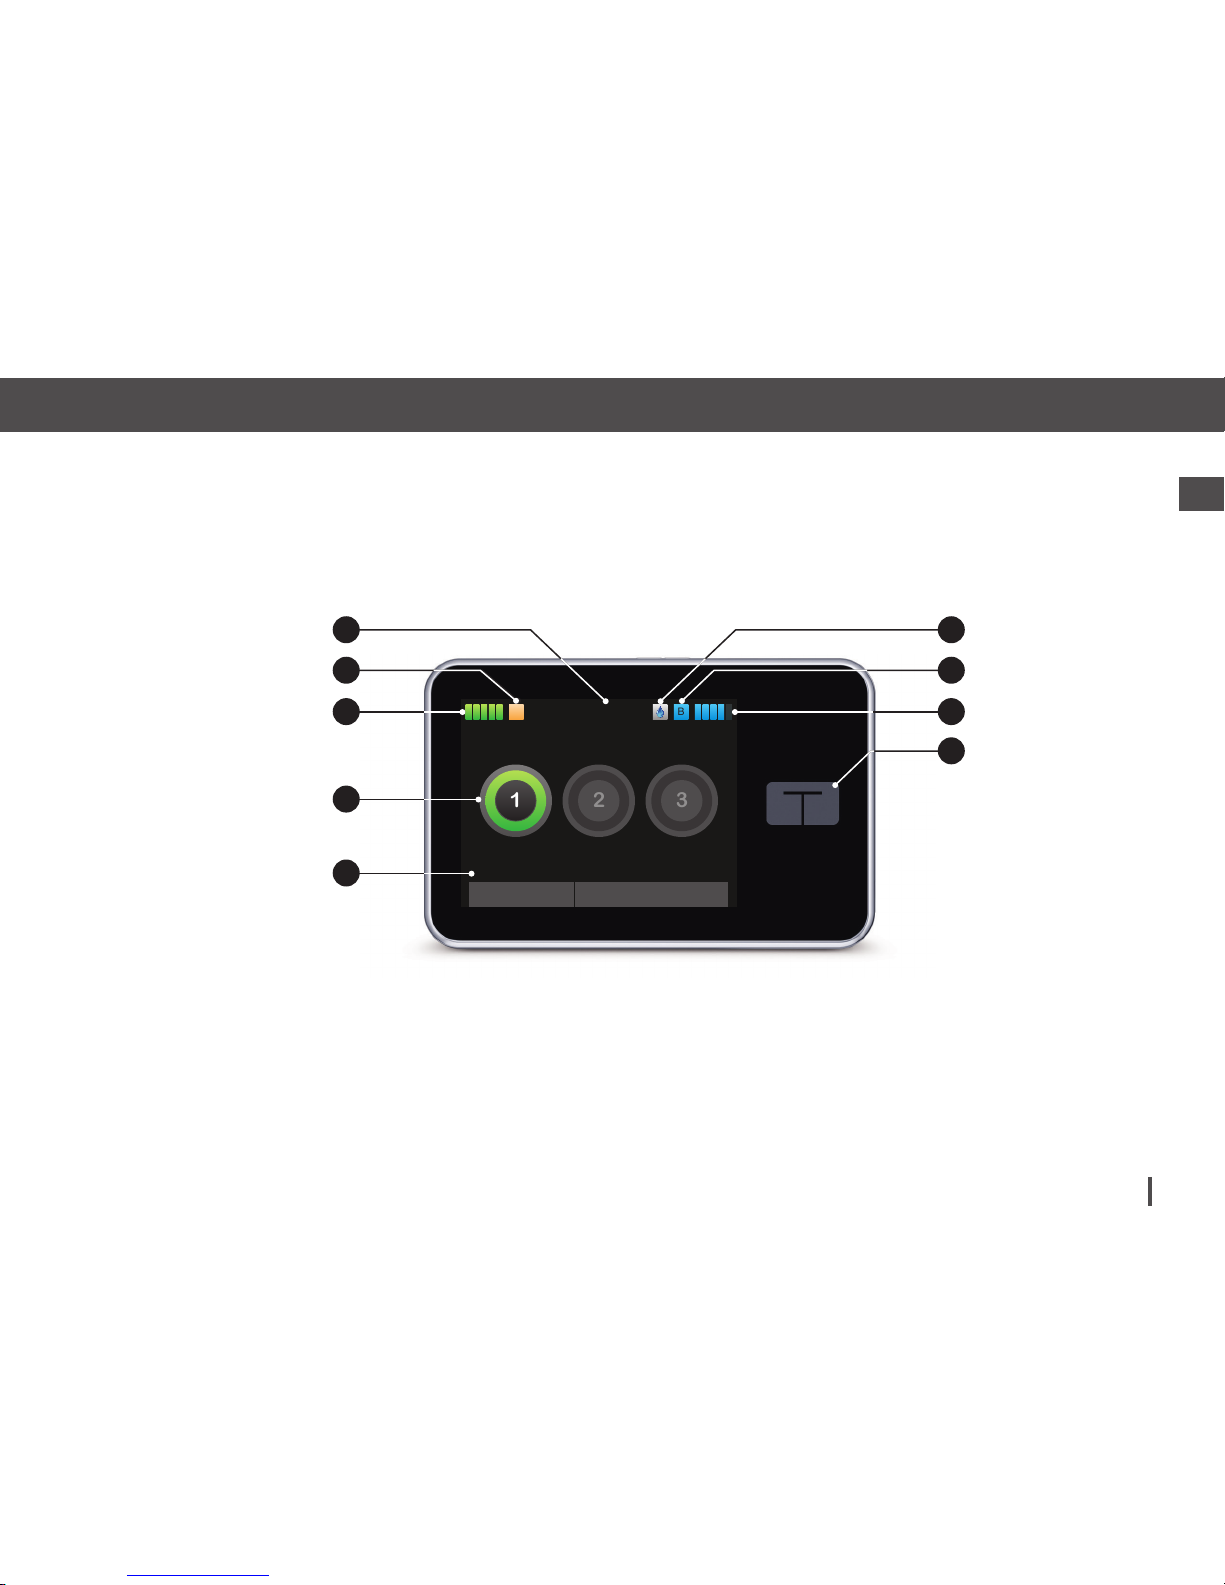
3.3 Screen Lock
1. Time and Date Display: Displays
the current time and date.
2. Alert Icon: Indicates a reminder,
alert or alarm is active behind the
lock screen.
3. Battery Level: Displays the level
of battery power remaining.
When connected for charging,
the charging icon (lightning bolt)
will display.
4. 1-2-3: Unlocks pump screen.
5. Insulin On Board (IOB): Amount
and time remaining of any active
insulin on board.
6. Active Bolus Icon: Indicates a
bolus is active.
7. Status: Displays current system
settings and insulin delivery
status.
8. Insulin Level: Displays the current
amount of insulin in the cartridge.
9. Tandem Logo: Returns to the
Home Screen.
Page 39
Customer Technical Support: 1-877-801-6901 39
Welcome1
Chapter 3 – t:slim Pump Overview
INSULIN ON BOARD (IOB)
Units 1.1 u 1:09 hrsTime Remaining
B
10:20 AM
March 15, 2015 235 u
100%
231
!
8
6
7
9
5
3
4
1
2
Page 40
Customer Technical Support: 1-877-801-690140
Chapter 3 – t:slim Pump Overview
3.4 Home Screen
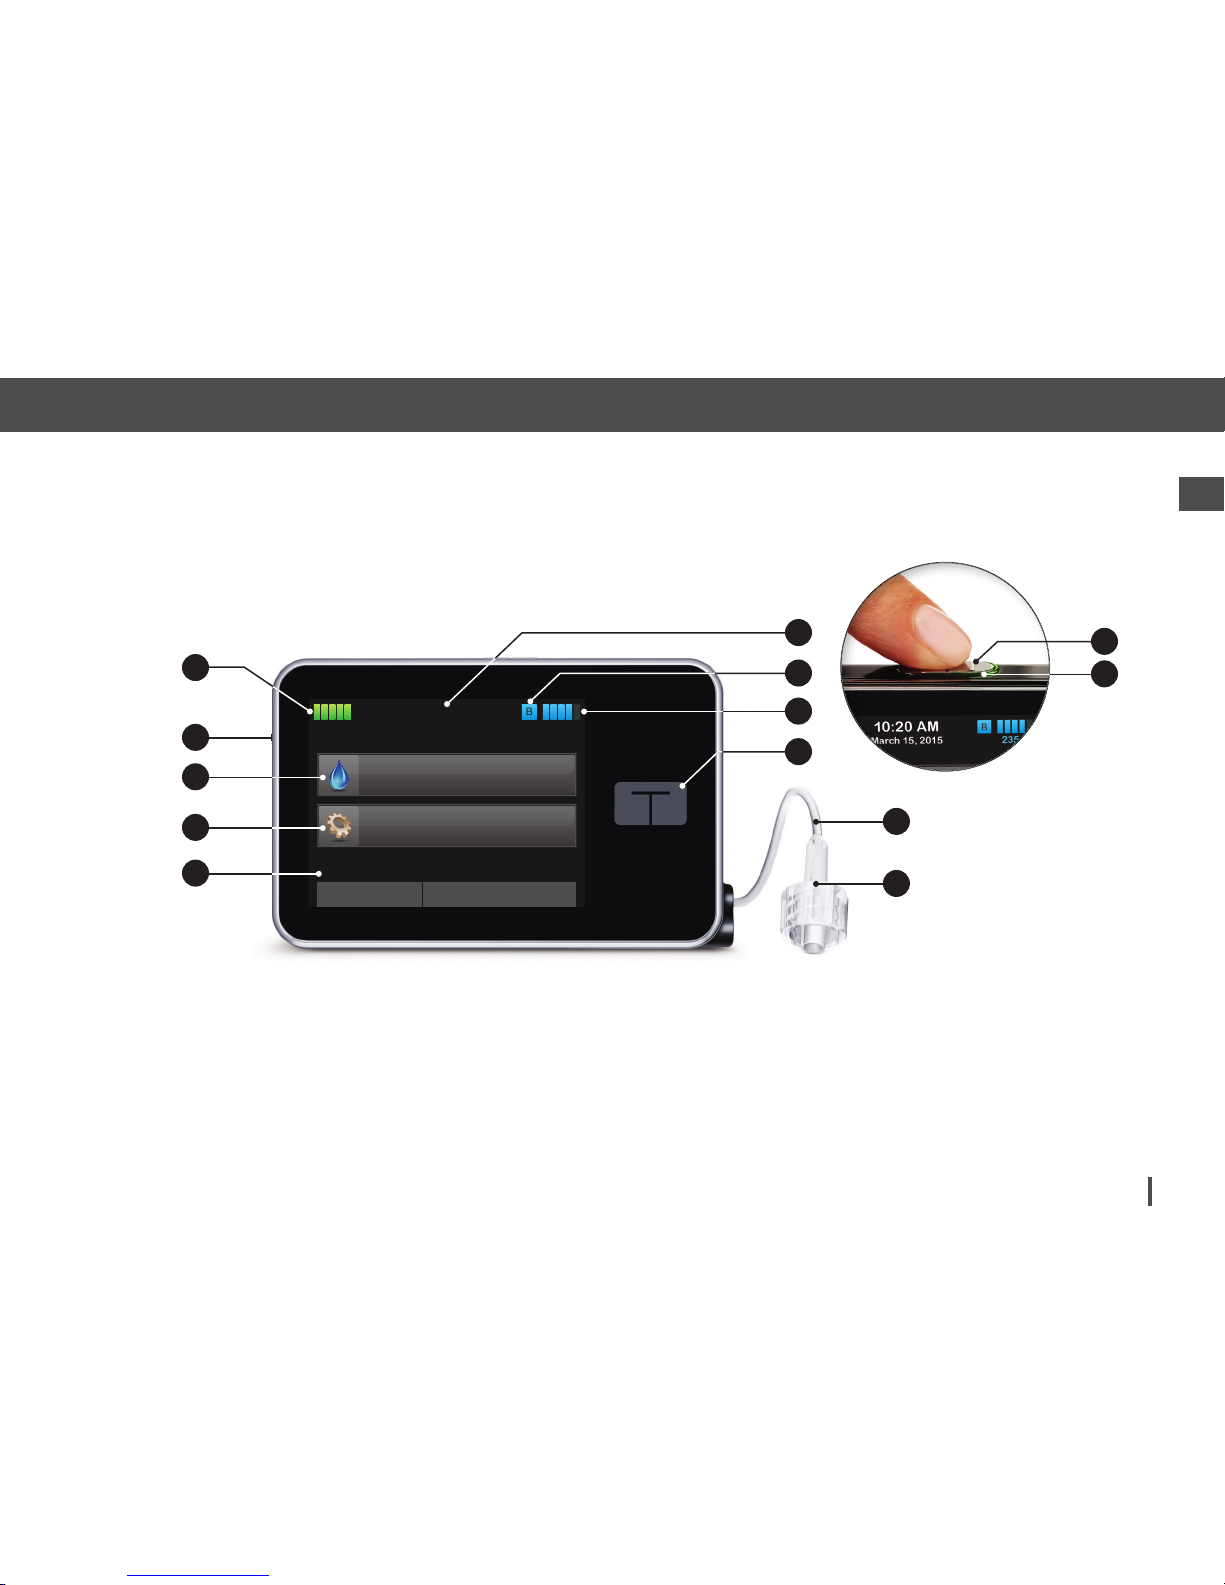
1. Battery Level: Displays the level
of battery power remaining.
When connected for charging,
the charging icon (lightning bolt)
will display.
2. USB Port: Port to charge your
t:slim Pump battery. Close the
cover when not in use.
3. Bolus: Program and deliver a
bolus.
4. Options: Stop/Resume insulin
delivery, manage Pump Settings,
Load cartridge, program a Temp
Rate, and view History.
5. Insulin On Board (IOB): Amount
and time remaining of any active
insulin on board.
6. Time and Date Display: Displays
the current time and date.
7. Status: Displays current system
settings and insulin delivery
status.
8. Insulin Level: Displays the current
amount of insulin in the cartridge.
9. Tandem Logo: Returns to the
Home Screen.
10. Cartridge Tubing: Tubing that is
attached to the cartridge.
11. Luer-Lock Connection: Connects
the cartridge tubing to the infusion
set tubing.
12. Screen On/Quick Bolus Button:
Turns the t:slim Pump screen on/
off or programs a Quick Bolus (if
activated).
13. LED Indicator: Illuminates when
connected to a power supply and
indicates proper functionality.
Page 41
Customer Technical Support: 1-877-801-6901 41
Welcome1
Chapter 3 – t:slim Pump Overview
INSULIN ON BOARD (IOB)
Units 1.1 u 1:09 hrsTime Remaining
B
10:20 AM
March 15, 2015 235 u
100%
OPTIONS
BOLUS
10
11
8
7
9
6
2
1
3
4
5
13
12
Page 42
Customer Technical Support: 1-877-801-690142
Chapter 3 – t:slim Pump Overview
3.5 Status Screen
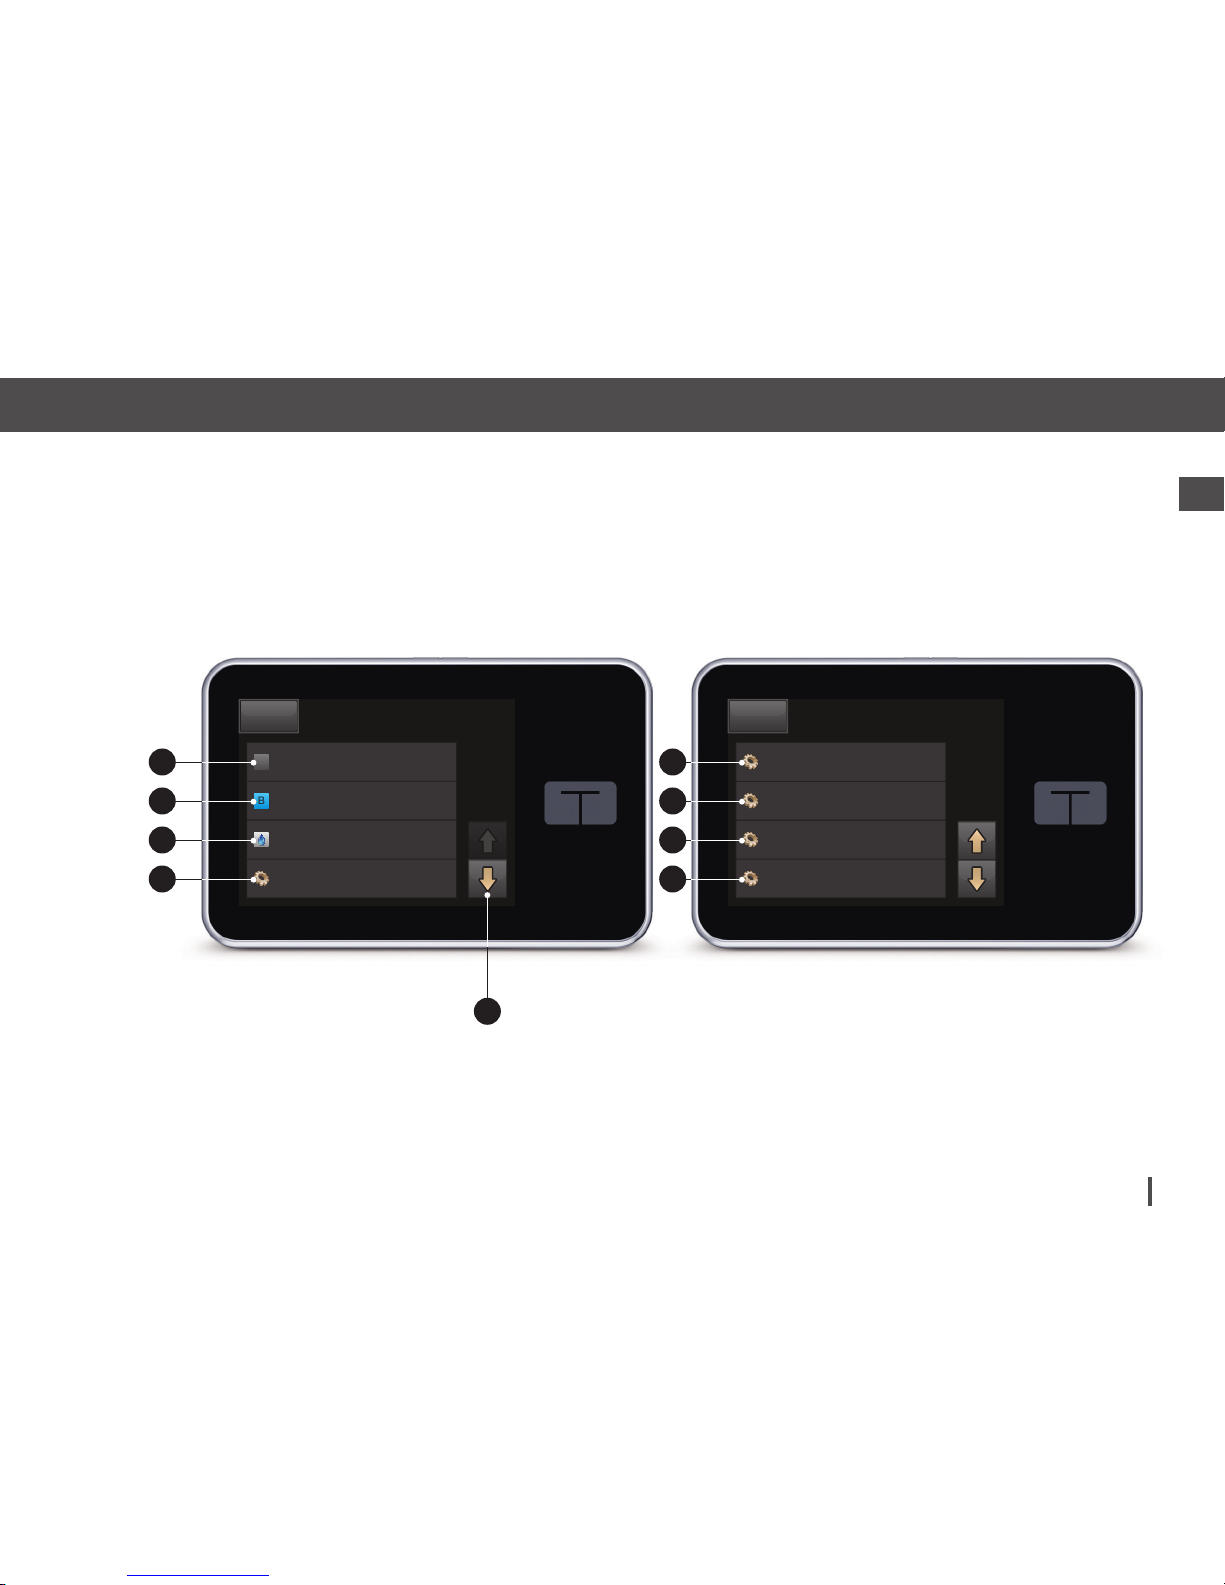
1. Profile: Displays current active
Personal Profile.
2. Basal Rate: Displays current basal
rate being delivered. (Temp Rate:
If active, displays in units/hr.)
3. Last Bolus: Displays the amount,
date and time of last bolus.
4. Carbohydrates: Indicates whether
feature is on or off.
5. Up/Down Arrow: Indicates there
is more information.
6. Correction Factor: Displays
current correction factor used to
calculate a bolus.
7. Carb Ratio: Displays current carb
ratio used to calculate a bolus.
8. Target BG: Displays current BG
target used to calculate a bolus.
9. Insulin Duration: Displays current
insulin duration setting used to
calculate insulin on board.
NOTE
NA represents Not Applicable (does not
apply).
NOTE
The status screen can be accessed from
the lock screen and the Home Screen. It is
for display only, no changes can be made
from this screen.
Page 43
Customer Technical Support: 1-877-801-6901 43
Welcome1
Chapter 3 – t:slim Pump Overview
BACK
Current Status
Weekly
P
Basal Rate 0.2 u/hr
B
Carbohydrates
ON
Last Bolus
3 u
12/23 - 10:45 PM
BACK
Current Status
Insulin Duration
5 hours
Target BG
120 mg/dL
Carb Ratio
1u: 10g
Correction
Factor
1u: 50 mg/dL
1
2
3
4
5
6
7
8
9
Page 44
Customer Technical Support: 1-877-801-690144
Chapter 3 – t:slim Pump Overview
3.6 Bolus Screen
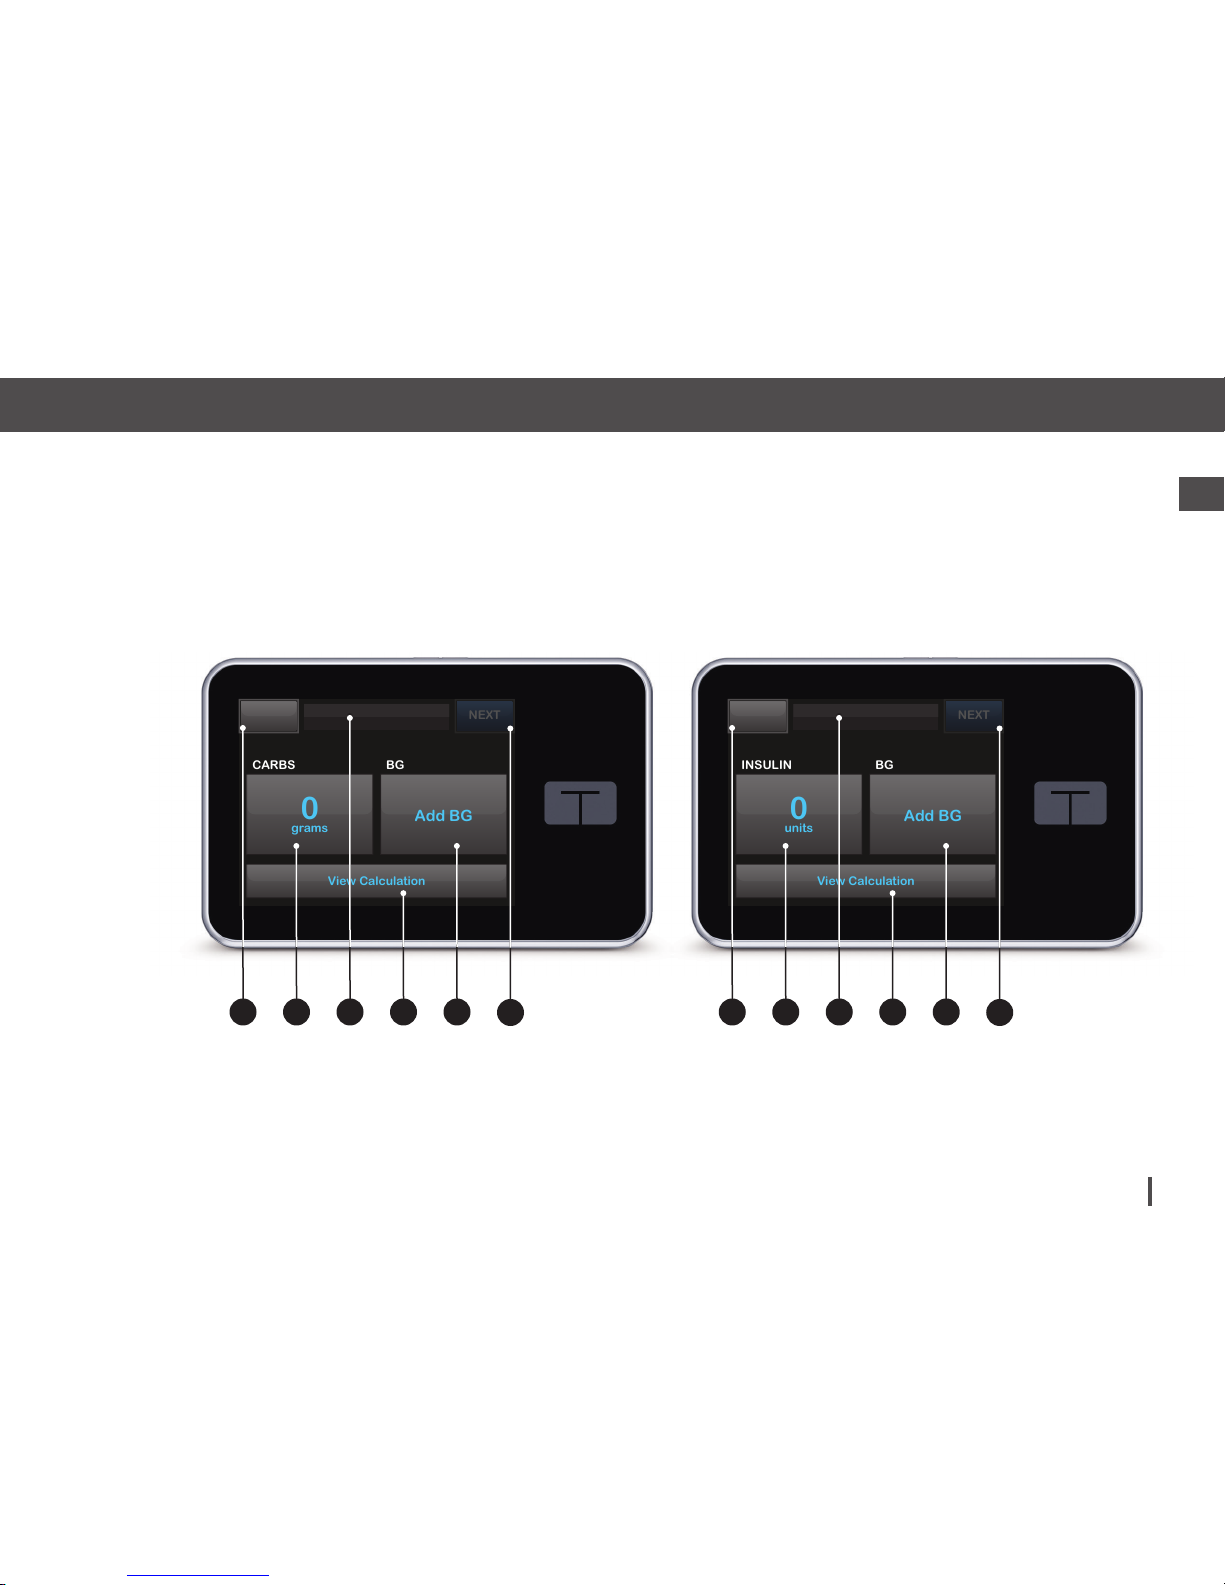
1. Back: Returns to the Home
Screen.
2. Carbs: Enter grams of carb.
3. Units: Displays total units
calculated. Tap to enter a bolus
request or change (override) a
calculated bolus.
4. View Calculation: Displays how
the insulin dose was calculated
using the current settings.
5. Add BG: Enter blood glucose
level.
6. Next: Moves to next step.
7. Back: Returns to the Home
Screen.
8. Insulin: Enter units of insulin.
9. Units: Displays total units
calculated. Tap to enter a bolus
request or change (override) a
calculated bolus.
10. View Calculation: Displays how
the insulin dose was calculated
using the current settings.
11. Add BG: Enter blood glucose
level.
12. Next: Moves to next step.
Page 45
Customer Technical Support: 1-877-801-6901 45
Welcome1
Chapter 3 – t:slim Pump Overview
Using Grams Using Units
units
NEXT
BACK
0
BG
View Calculation
Add BG
CARBS
grams
0
units
NEXT
BACK
0
BG
View Calculation
Add BG
INSULIN
units
0
1 2 4 5
6
3 7 8 10 11
12
9
Page 46
Customer Technical Support: 1-877-801-690146
Chapter 3 – t:slim Pump Overview
3.7 Options Screen
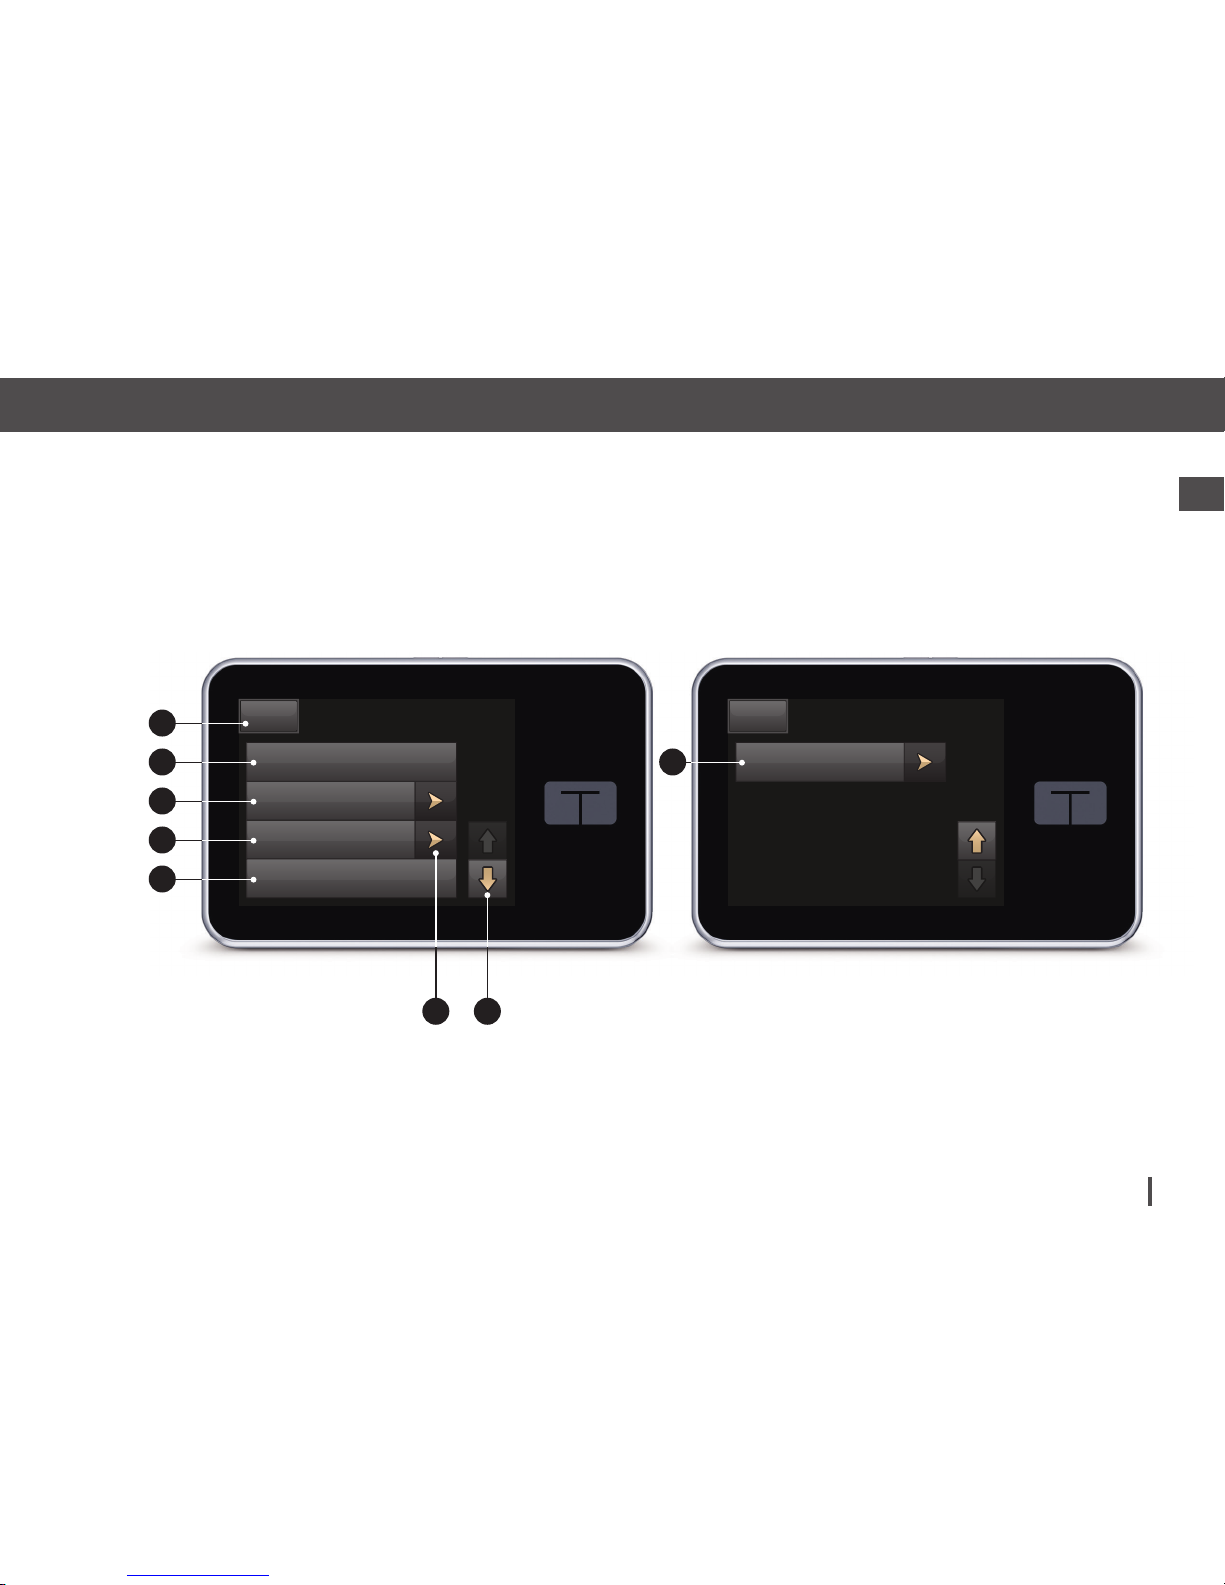
1. Back: Returns to the Home
Screen.
2. Stop Insulin: Stops insulin
delivery. If insulin delivery is
stopped, RESUME INSULIN will
be displayed.
3. My Pump: Personal Profiles, Alert
Settings, Pump Settings, and
Pump Info.
4. Load: Change Cartridge, Fill
Tubing, Fill Cannula, and Site
Reminder.
5. Temp Rate: Programs a
temporary basal rate.
6. Menu Arrows: Indicates additional
menu options are available.
7. Up/Down Arrow: Indicates there
is more information.
8. History: Displays historical log of
pump events.
Page 47
Customer Technical Support: 1-877-801-6901 47
Welcome1
Chapter 3 – t:slim Pump Overview
BACK
Options
Load
My Pump
STOP INSULIN
Temp Rate
BACK
Options
History
2
1
3
4
5
76
8
Page 48
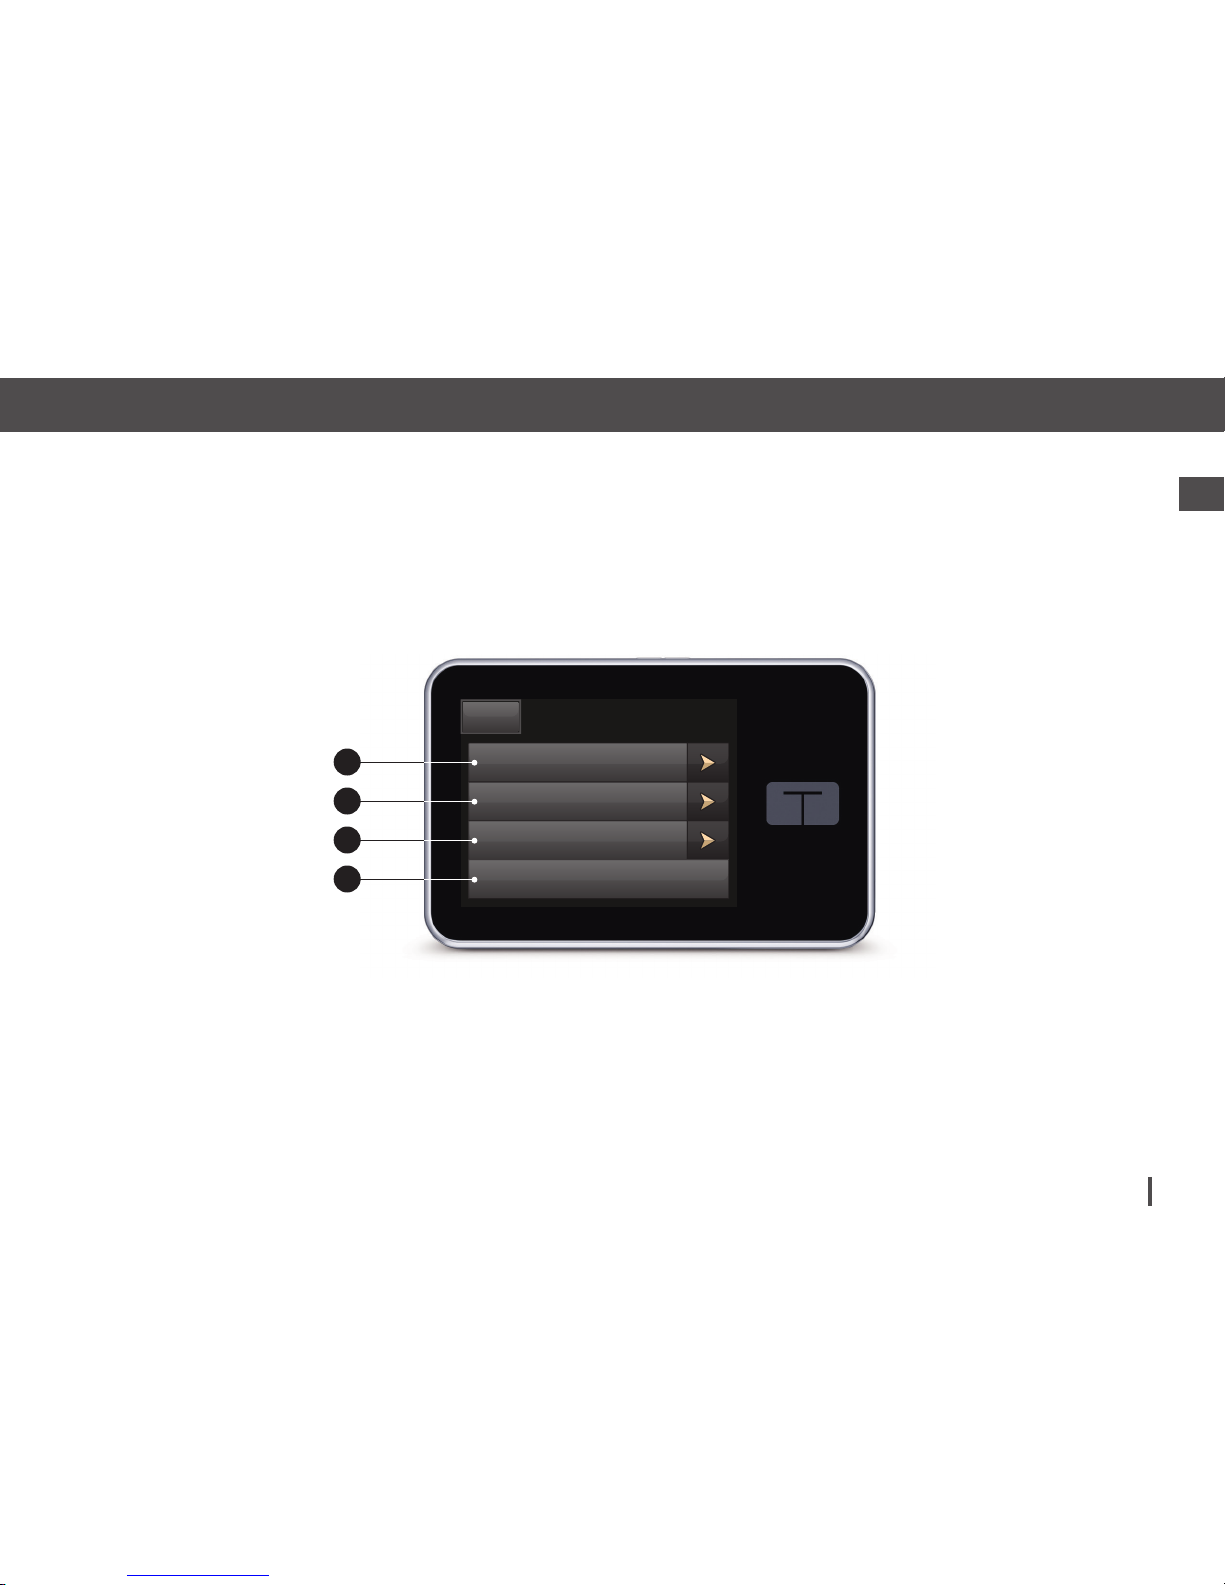
Customer Technical Support: 1-877-801-690148
Chapter 3 – t:slim Pump Overview
3.8 My Pump Screen
1. Personal Profiles: A group of
settings that defines basal and
bolus delivery.
2. Alert Settings: Customize Pump
Reminders and Alerts.
3. Pump Settings: Customize Quick
Bolus, Pump Volume, Screen
Options, and Time and Date.
4. Pump Info: Displays t:slim Pump
serial number, Tandem Diabetes
Care Customer Technical Support
phone number, website, and other
technical information.
Page 49
Customer Technical Support: 1-877-801-6901 49
Welcome1
Chapter 3 – t:slim Pump Overview
BACK
My Pump
Pump Settings
Alert Settings
Personal Profiles
Pump Info
1
2
3
4
Page 50
Customer Technical Support: 1-877-801-690150
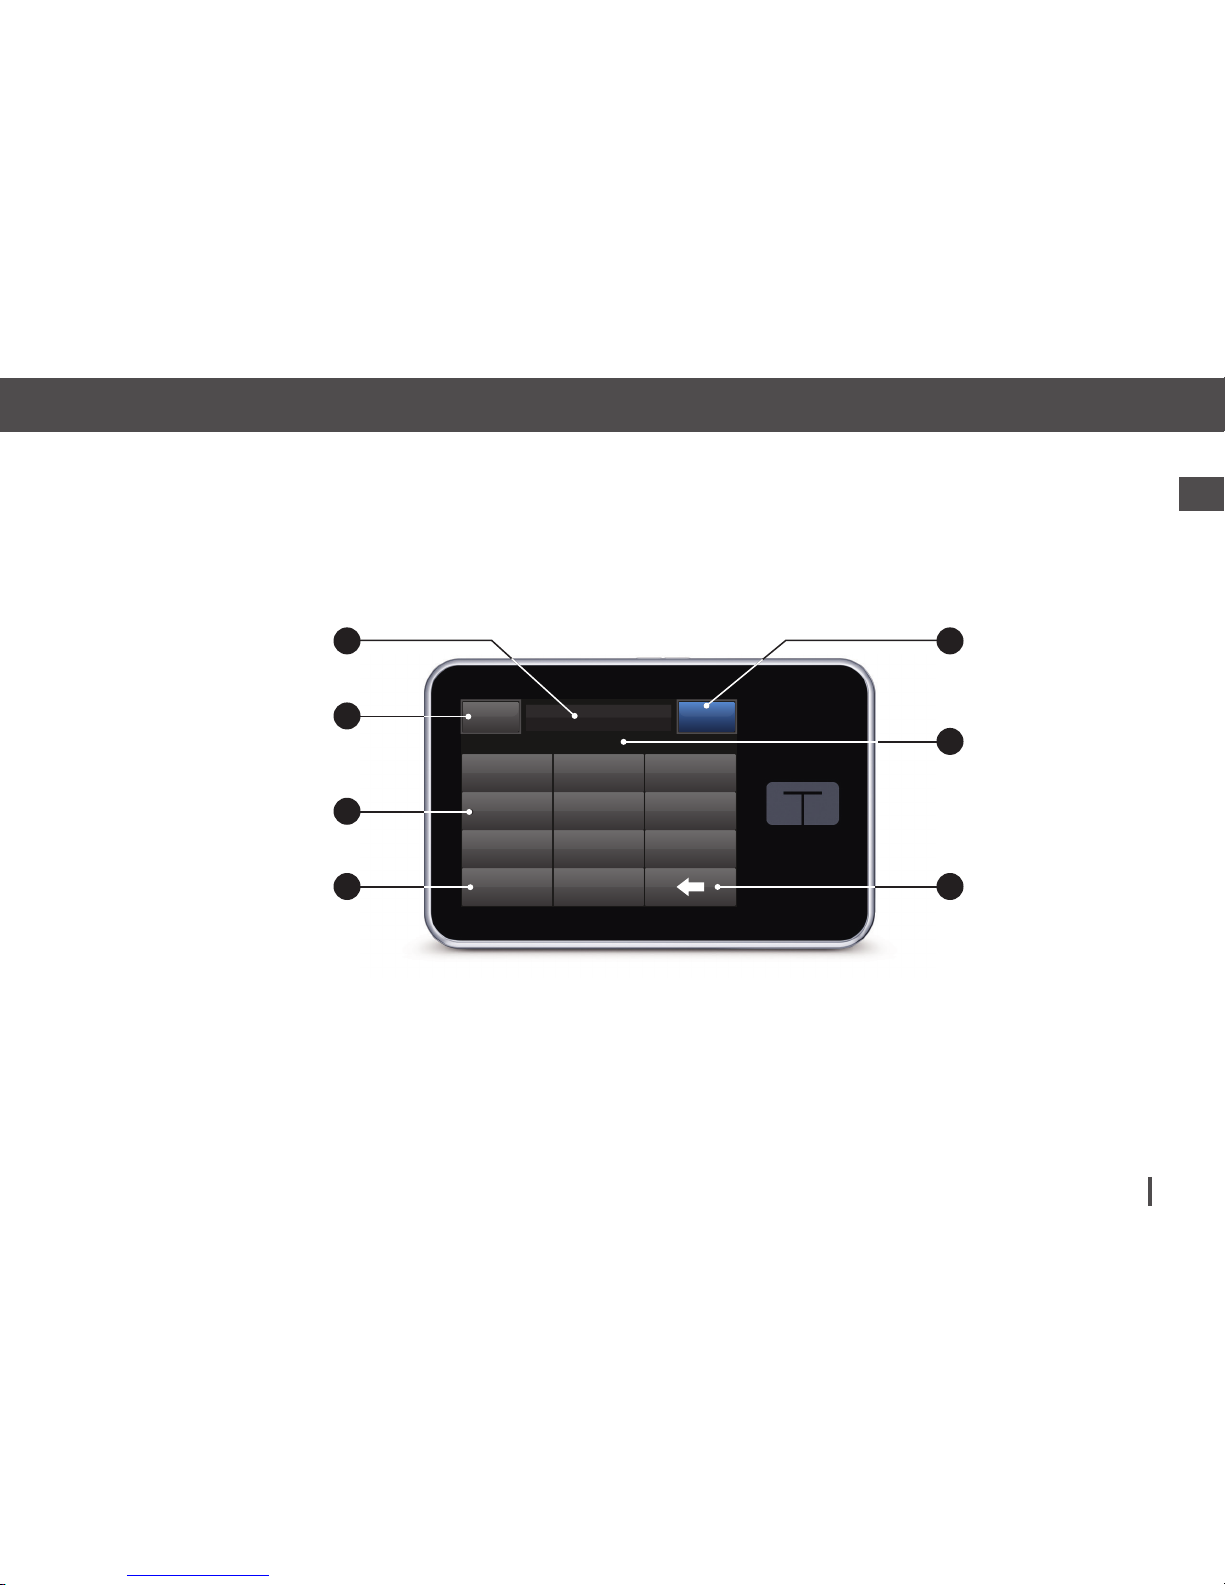
Chapter 3 – t:slim Pump Overview
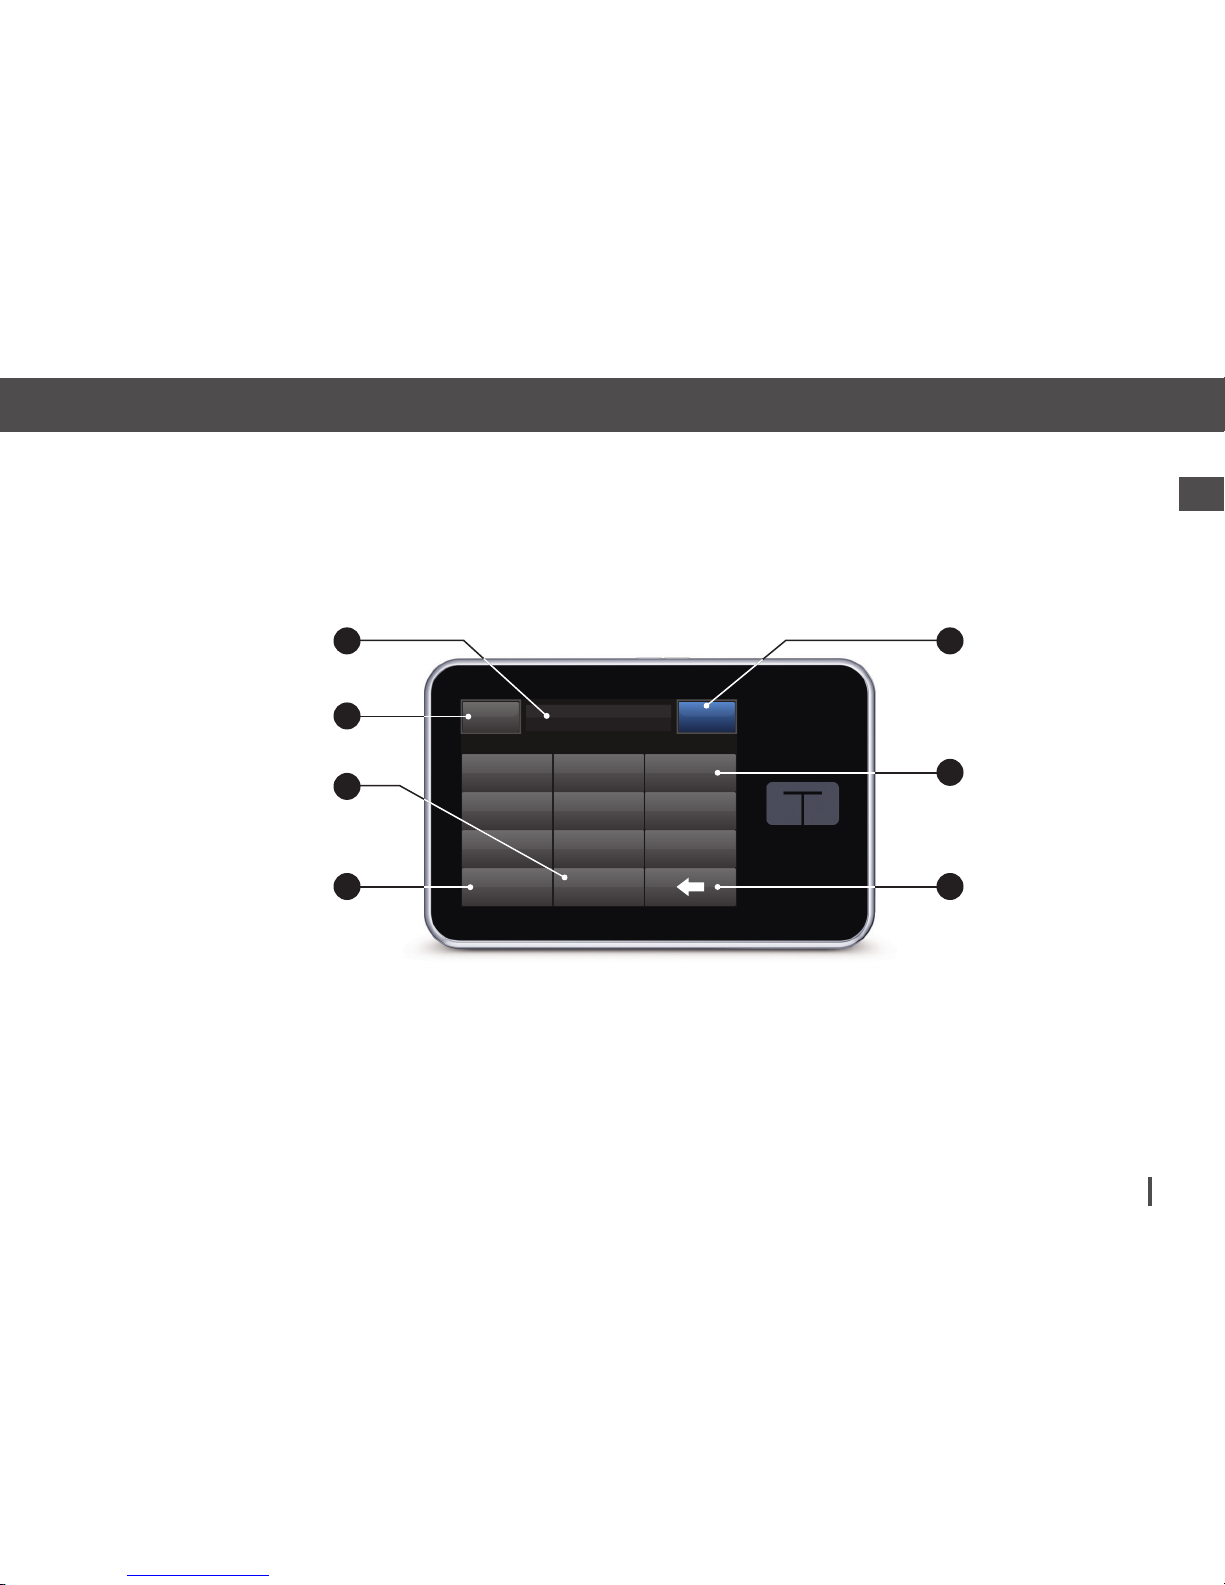
3.9 Number Keypad Screen
1. Value Entered.
2. Back: Returns to previous screen.
3. Keypad Numbers.
4. +/=: Allows numbers to be added
on gram screen. If in units, this
displays as a decimal point.
5. Done: Completes task and saves
information entered.
6. Units/Grams: Value of what is
entered.
7. : Deletes last number entered.
Page 51
Customer Technical Support: 1-877-801-6901 51
Welcome1
Chapter 3 – t:slim Pump Overview
grams
21 3
0
87 9
54 6
DONEBACK
20
+ / =
3
4
1
2
5
6
7
Page 52
Customer Technical Support: 1-877-801-690152
Chapter 3 – t:slim Pump Overview
3.10 Letter Keypad Screen
1. Name of Profile.
2. Back: Returns to previous screen.
3. Space: Enters a space.
4. 123: Changes keypad mode from
letters (ABC) to numbers (123).
5. Save: Saves entered information.
6. Letters: Tap once for first letter
displayed, 2 quick taps for middle
letter, and 3 quick taps for third
letter.
7. : Deletes last letter or number
entered.
NOTE
If changing an existing name, begin
by tapping the letters on the keypad to
enter new text. The maximum number of
characters is 16.
Page 53
Customer Technical Support: 1-877-801-6901 53
Welcome1
Chapter 3 – t:slim Pump Overview
name
defabc ghi
space
vwxstu yz
mnojkl pqr
SAVEBACK
Weekday
123
1
3
6
2
4 7
5
Page 54

Section 2
Key Pump Features
Page 55

Chapter 4
Getting Started
Page 56

Customer Technical Support: 1-877-801-690156
Chapter 4 – Getting Started
WARNING
Before you can safely and effectively use
your t:slim System, it is very important
that you carefully follow the instructions in
these sections.
4.1 Charging the t:slim Pump
The t:slim Pump is powered by an
internal lithium polymer rechargeable
battery. A full charge will last up to 7
days with normal use. Accessories
for charging from wall and automobile
outlets, as well as from a PC USB port
are included with the pump. Use only
the accessories provided with the System to charge your t:slim Pump. If you
lose any of the accessories, or need a
replacement, contact Tandem Diabetes
Care Customer Technical Support at
1-877-801-6901.
The battery level indicator is displayed
in the upper left portion of the Home
Screen. The charge amount will
increase or decrease by 5% at a time
(for example, you will see 100%, 95%,
90%, 85%). When the charge amount
is less than 5%, it will begin decreasing
insulin. Check your blood glucose before disconnecting from the pump and
again when you reconnect.
To charge the pump from an AC
Power Outlet:
1. Plug the included USB cable into
the AC power adapter.
2. Plug the AC power adapter into a
grounded AC power outlet.
3. Plug the other end of the cable into
the micro USB port on the pump.
To charge the pump using the included Car Power USB Adapter:
1. Plug the USB cable into the
included Car Power USB Adapter.
2. Plug the Car Power USB Adapter
into a grounded auxiliary power
outlet.
3. Plug the other end of the cable
into the micro USB port on the
pump.
1% at a time (for example, you will see
4%, 3%, 2%, 1%).
When you first receive your t:slim
Pump, you will need to connect it to a
charging source before it can be used.
Charge the pump until the battery level
indicator on the upper left portion of
the Home Screen reads 100% (initial
charge can take up to 2.5 hours).
The t:slim Pump continues to operate
normally while charging. You do not
need to disconnect from the pump
while charging.
PRECAUTION
When you are connected to the pump and to
a charging source, take caution when moving
further than the length of the USB cable.
Failure to do so may result in the cannula
becoming dislodged at the infusion site. For
this reason it is recommended not to charge
the pump while sleeping.
If you choose to disconnect from the
pump while charging, check with your
healthcare provider for specific guidelines. Depending on the length of time
you are disconnected, you may need
to replace missed basal and/or bolus
Page 57
Customer Technical Support: 1-877-801-6901 57
Key Pump Features2
Chapter 4 – Getting Started
WARNING
When using the Car Power USB Adapter, the
charger must be connected to an isolated,
battery powered 12 Volt system, such as an
automobile. Connecting the DC vehicle adapter
charger to 12 Volt DC that is generated by a
power supply connected to alternating current
(AC) mains is prohibited.
To charge the pump using a USB port
on a Personal Computer (PC):
Ensure that the PC complies with
the IEC 60950-1 (or equivalent)
safety standard.
1. Plug the included USB cable into
your computer.
2. Plug the other end of the cable
into the micro USB port on the
pump.
NOTE
Before using a Mac or PC to charge the t:slim
Pump, it is recommended that a driver be
installed on the computer by downloading the
t:connect Uploader Software from our website
at www.tandemdiabetes.com. This will also
allow communication between the pump, the
PC, and the t:connect Application. Depending
on your computer, charging time will vary.
The pump will display a CONNECTION ERROR
ALERT message if it is not charging properly.
When you charge the t:slim Pump,
you will notice the following:
•
The screen illuminates
•
An audible alert
•
The LED (edge around the
Screen On/Quick Bolus Button)
blinks green
•
A vibrating alert
•
A charge symbol (lightning bolt) on
the battery level indicator appears
PRECAUTION
If any of these conditions fail to occur, do
NOT use the t:slim Pump, as this may be an
indication that the pump’s alarms, alerts, and
other built-in safety features are not working
properly. If the t:slim Pump is connected to
your body, disconnect the set from your body
and contact Tandem Diabetes Care Customer
Technical Support at 1-877-801-6901.
Charging Tips
Tandem Diabetes Care, Inc. recommends periodically checking the
battery level indicator, charging the
pump for a short period of time every
day (10–15 minutes), and also avoiding
frequent full discharges.
NOTE
If the battery is fully discharged, the screen will
not power on immediately when connected to
a charging source. The LED around the Screen
On/Quick Bolus Button will blink green every 2
seconds until there is enough charge to power
on the touch screen.
Page 58
Customer Technical Support: 1-877-801-690158
Chapter 4 – Getting Started
4.2 Turning on the t:slim
Pump Screen
1. To turn on your t:slim Pump
screen, press the Screen On/
Quick Bolus Button, located on
the top of the pump, once.
The Screen Lock screen
will be displayed.
NOTE
The pump continues to function normally when
the screen is not on.
NOTE
When using the t:slim Pump, tap the Tandem
Logo to return to the Home Screen or tap BACK
to return to the previous screen.
4.3 Unlocking the t:slim
Pump Screen
1. Press Screen On/Quick Bolus
Button.
2. Tap 1.
3. Tap 2.
4. Tap 3.
The pump screen is now unlocked.
The last screen that was viewed will
be displayed.
NOTE
You must tap 1–2–3 in sequential order to
unlock the pump. If you do not press 1–2–3
in sequential order, the pump will force you to
restart the unlock sequence from the beginning.
NOTE
The pump will return to the Screen Lock
position after a bolus or temp basal is
requested.
NOTE
Turn off the pump screen by pressing the
Screen On/Quick Bolus button before placing
the pump back in its case or any pocket/clothing
to prevent unintentional interactions with the
touchscreen. Always position the pump screen
away from the skin when worn under clothing.
Page 59
Customer Technical Support: 1-877-801-6901 59
Key Pump Features2
Chapter 4 – Getting Started
4.4 Edit Time
After powering up your t:slim Pump for
the first time, set the current time and
date. Refer back to this section if you
need to edit the time for either traveling
in a different time zone or adjusting for
Daylight Savings Time.
PRECAUTION
It is very important to set the current time and
date accurately to ensure safe insulin delivery.
When editing time, always ensure that the AM/
PM setting is accurate. AM is to be used from
midnight until 11:59 AM. PM is to be used from
noon until 11:59 PM.
1. From the Home Screen,
tap OPTIONS.
2. Tap My Pump.
3. Tap Pump Settings.
4. Tap Time and Date.
5. Tap Edit Time.
6. Tap Time.
7. Using the onscreen keypad, enter
the hour and minutes. Verify and
tap DONE.
8. Tap Time of Day to set AM or PM.
9. Verify the correct time is set and
tap SAVE.
NOTE
Any edits to Time or Date will not be saved until
you tap SAVE.
4.5 Edit Date
1. From the Time and Date screen
tap Edit Date.
2. Tap Month.
3. Find and tap the current month
displayed on the right. Use Up/
Down Arrow to view months not
displayed.
4. Tap Day. Using the onscreen
keypad enter the current day.
Verify and tap DONE.
5. Tap Year.
6. Using the onscreen keypad enter
the current year. Verify and tap
DONE.
7. Verify the correct date is set and
tap SAVE.
8. Tap Tandem Logo to return to the
Home Screen.
Page 60

Customer Technical Support: 1-877-801-690160
Chapter 4 – Getting Started
THIS PAGE IS
INTENTIONALLY
LEFT BLANK
Page 61

Chapter 5
Infusion Site Care and
Loading Cartridge
Page 62
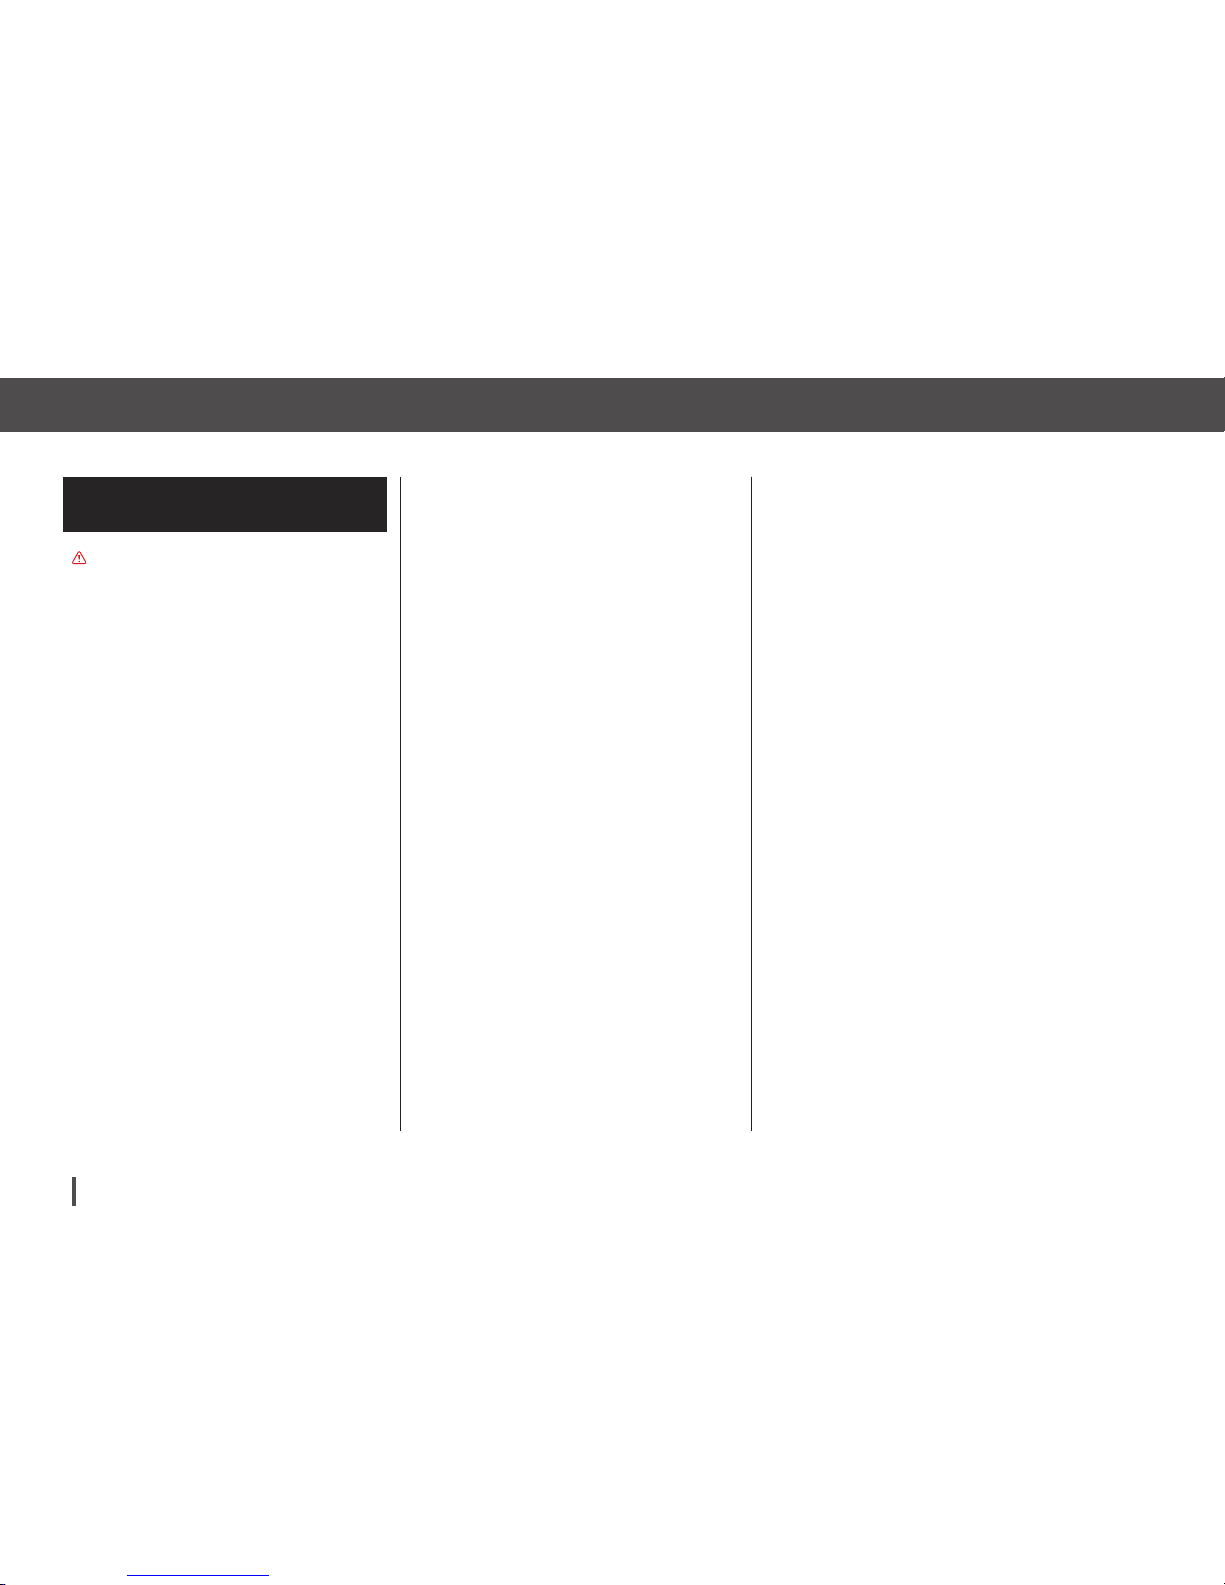
Customer Technical Support: 1-877-801-690162
Chapter 5 – Infusion Site Care and Loading Cartridge
5.1 Infusion Site Selection
and Care
WARNINGS
» Use only FDA cleared insulin infusion sets with
a standard luer-lock connection and consult
its instructions for use. Failure to do so may
result in over-infusion or under-infusion and
may cause serious injury or death.
» Change your infusion set every 48–72 hours.
Consult your healthcare provider for more
information.
» Use only single-use disposable cartridges
from Tandem Diabetes Care. The efficacy
of your t:slim Pump cannot be guaranteed
if cartridges other than those manufactured
by Tandem Diabetes Care, Inc. are used or
if cartridges are filled more than once. Use
of cartridges not manufactured by Tandem
Diabetes Care, Inc. or reuse of cartridges
may result in over-infusion or under-infusion
and may cause serious injury or death.
» Only use Humalog® or NovoLog® U-100
insulin, as any lesser or greater concentration
can result in serious health consequences.
Only Humalog® and NovoLog® have been
tested by Tandem Diabetes Care, Inc., and
found to be safe for use in the t:slim Pump.
Site Rotation:
•
The infusion set must be replaced
and rotated every 48–72 hours, or
more often if needed.
•
With experience, you will find
areas that not only provide
better absorption, but are more
comfortable. Keep in mind, using
the same areas may cause scarring
or lumps which can affect insulin
absorption.
•
Consult your healthcare provider to
establish a rotation schedule that
best fits your needs.
Keep it clean:
•
When changing your infusion set,
use clean techniques to avoid an
infection.
•
Wash your hands, use antiseptic
wipes or infusion site preparation
products, and keep the area clean.
•
Site preparation products that have
both an antiseptic and an adhesive
are encouraged.
General Guidelines
Site Selection:
•
Your infusion set can be worn
anywhere on your body that you
would normally inject insulin.
Absorption varies from site to
site. Discuss options with your
healthcare provider.
•
The most commonly used sites
are the abdomen, upper buttocks,
hips, upper arms, and upper legs.
•
The abdomen is the most popular
site because of access to fatty
tissue. If using the abdominal area,
AVOID:
» Areas that would constrict
the site such as the belt line,
waistline, or where you would
normally bend.
» Areas 2 inches around your
belly button.
» Any scars, moles, stretch marks,
or tattoos.
» Areas within 3 inches of your
sensor site, if using Continuous
Glucose Monitoring.
Page 63
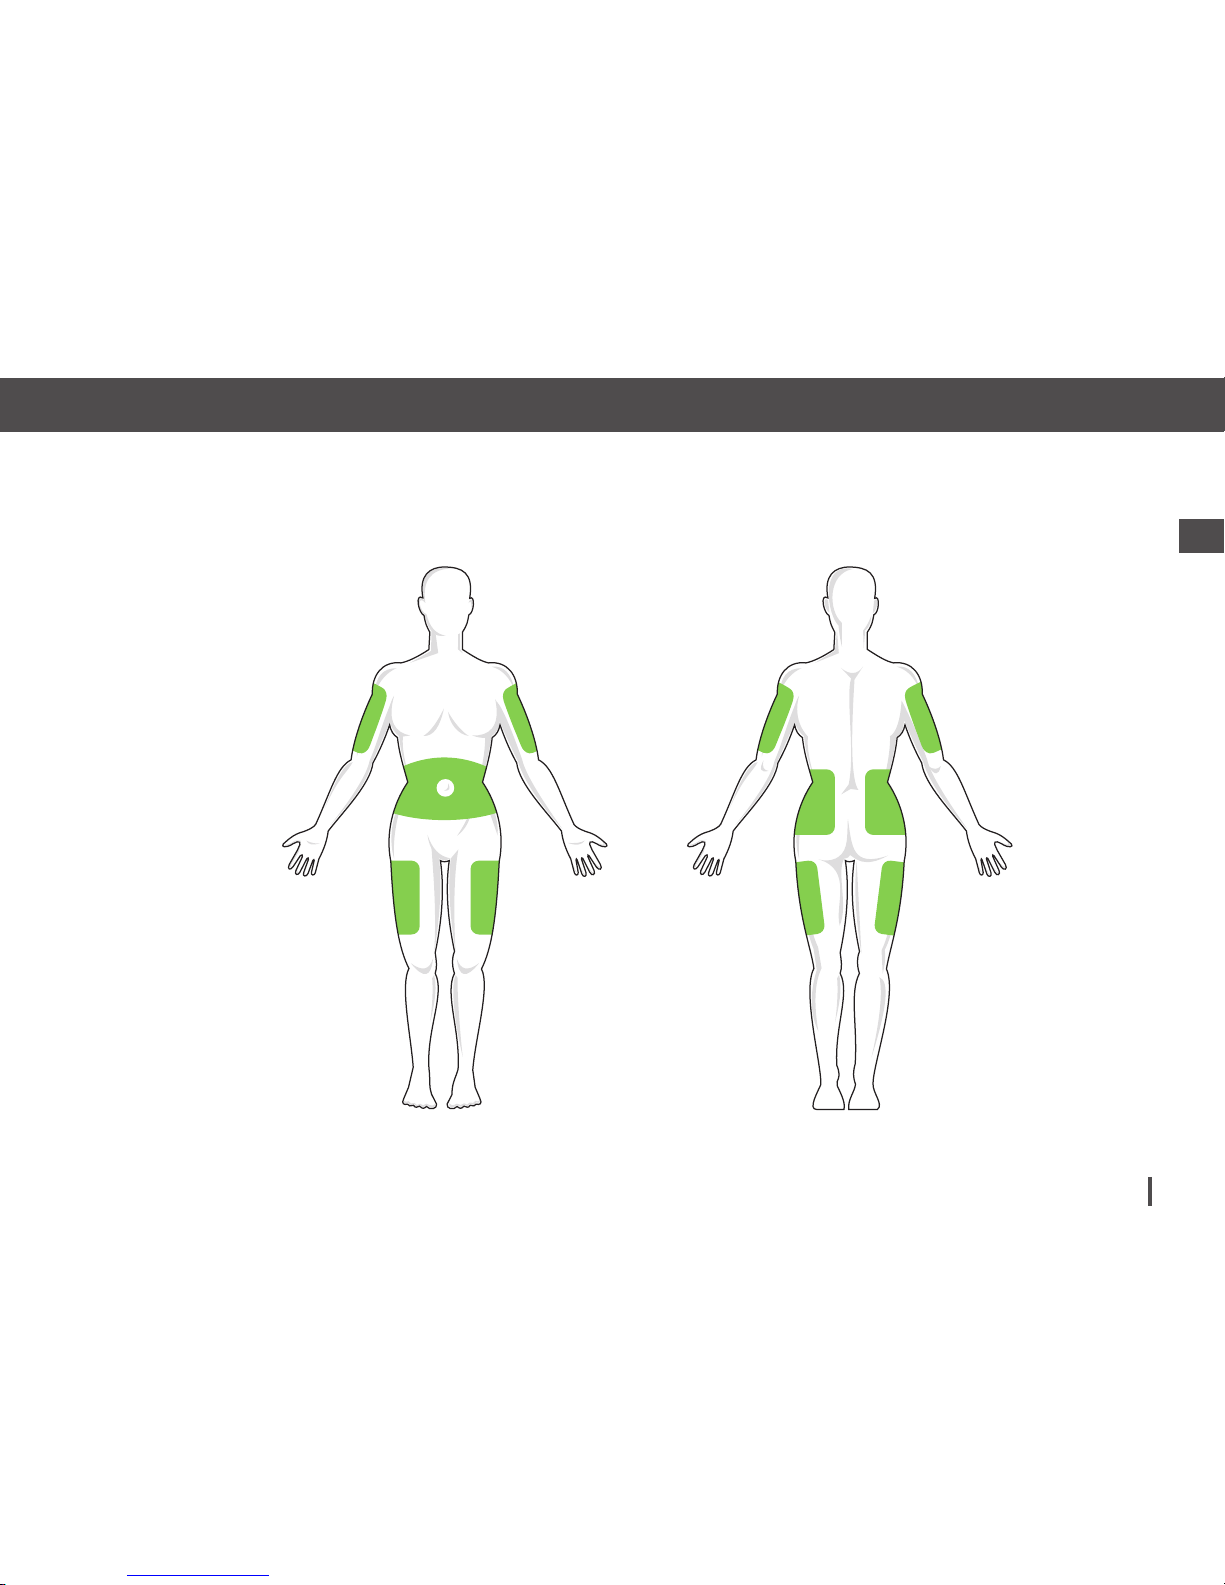
Customer Technical Support: 1-877-801-6901 63
Key Pump Features2
Chapter 5 – Infusion Site Care and Loading Cartridge
Areas of Body for Infusion Set Insertion
Page 64
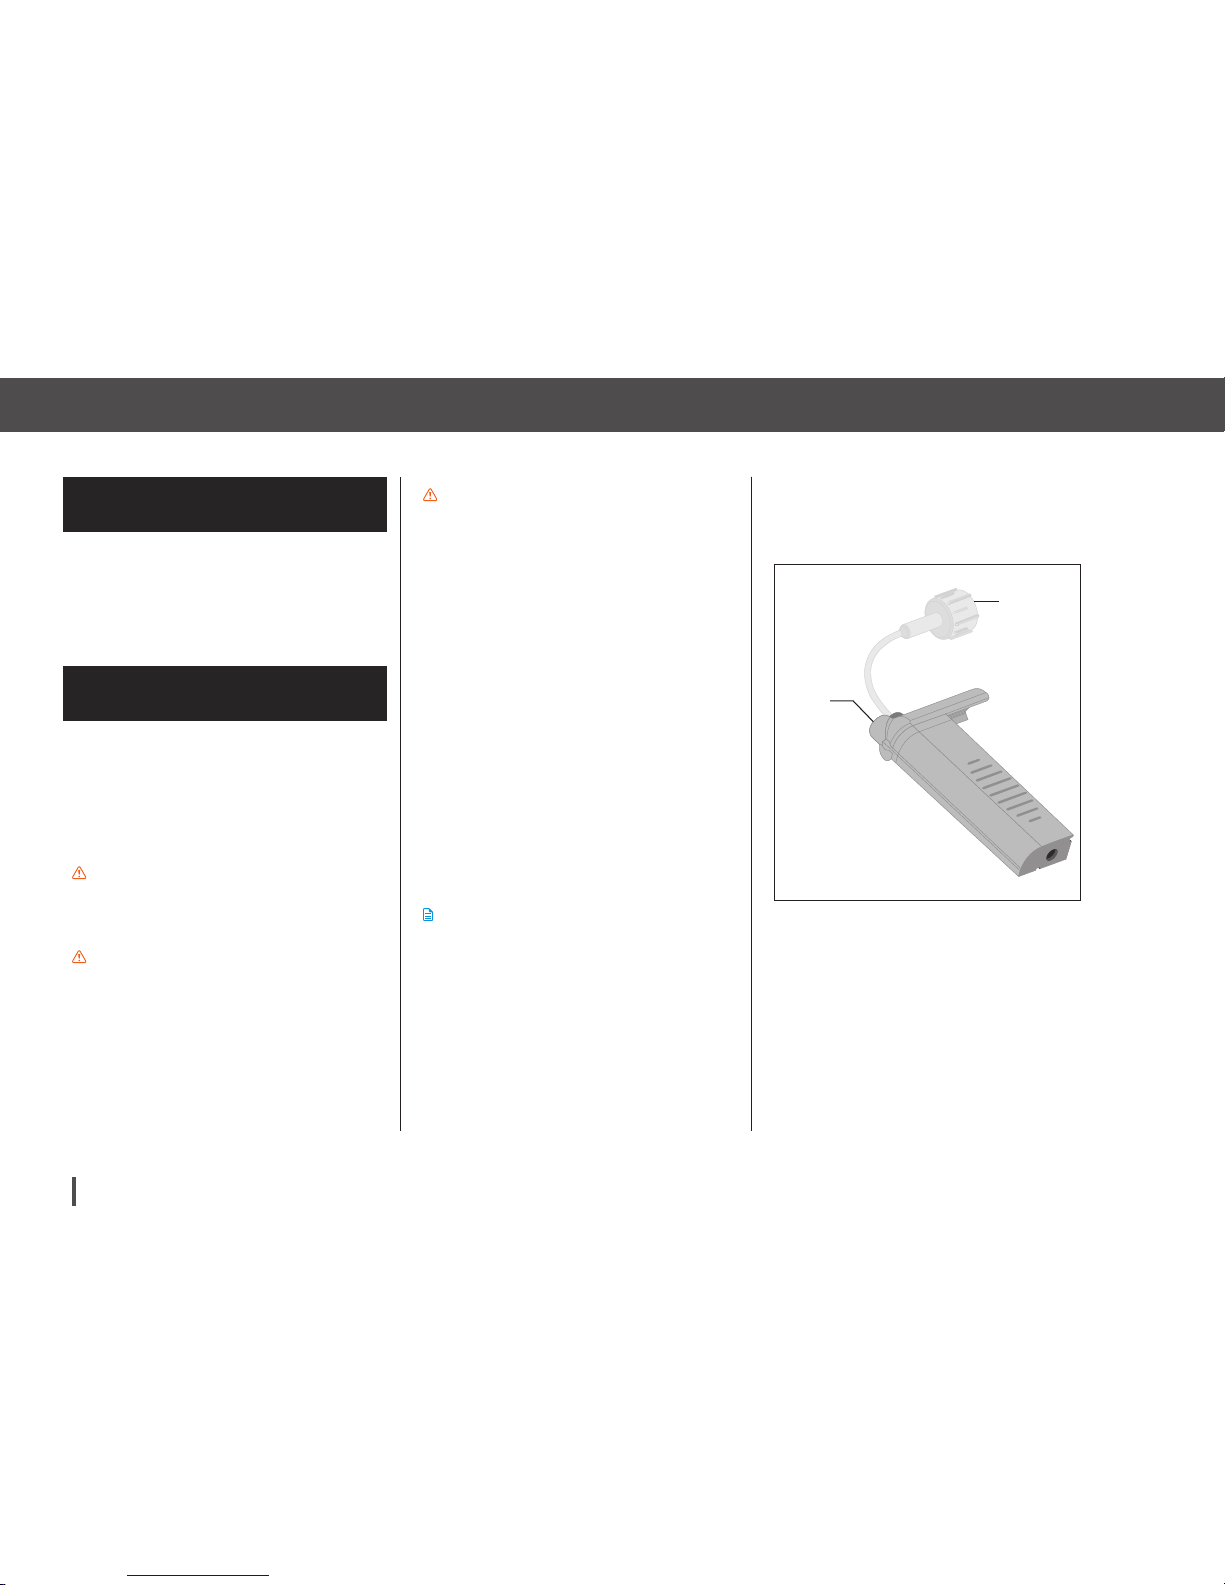
Customer Technical Support: 1-877-801-690164
Chapter 5 – Infusion Site Care and Loading Cartridge
5.2 Cartridge Instructions
for Use
For complete cartridge labeling, consult
the Cartridge Instructions for Use
included in the t:slim Cartridge box.
5.3 Filling and Loading a
t:slim Cartridge
This section describes how to fill the
cartridge with insulin and load the
cartridge into your t:slim Pump. The
single-use disposable cartridge can
hold up to 300 units (3.0 mL) of insulin.
PRECAUTION
Replace the cartridge every 48 hours if using
Humalog®; every 72 hours if using Novolog®.
PRECAUTION
Inspect the cartridge to ensure that there is no
damage. Never use a cartridge that is damaged
(cracks, dislodged tip connectors, etc.). If
there is damage, call Tandem Diabetes Care
Customer Technical Support at 1-877-8016901 to request a replacement cartridge.
PRECAUTION
Before you begin, verify that the infusion set is
NOT connected to your body.
Before you begin, make sure you
have the following items:
•
1 unopened cartridge
•
3.0 mL syringe and fill needle
•
Vial of Humalog® or NovoLog®
insulin
•
Alcohol prep swab
•
1 new infusion set
•
Infusion set Instructions for Use
NOTE
Do NOT remove the used cartridge from the
pump during the load process until prompted
on the t:slim Pump screen.
The illustration identifies the
luer-lock and insulin fill port used in
the cartridge filling process.
Luer-Lock
Tail of the
Cartridge
Insulin
Fill Port
Page 65
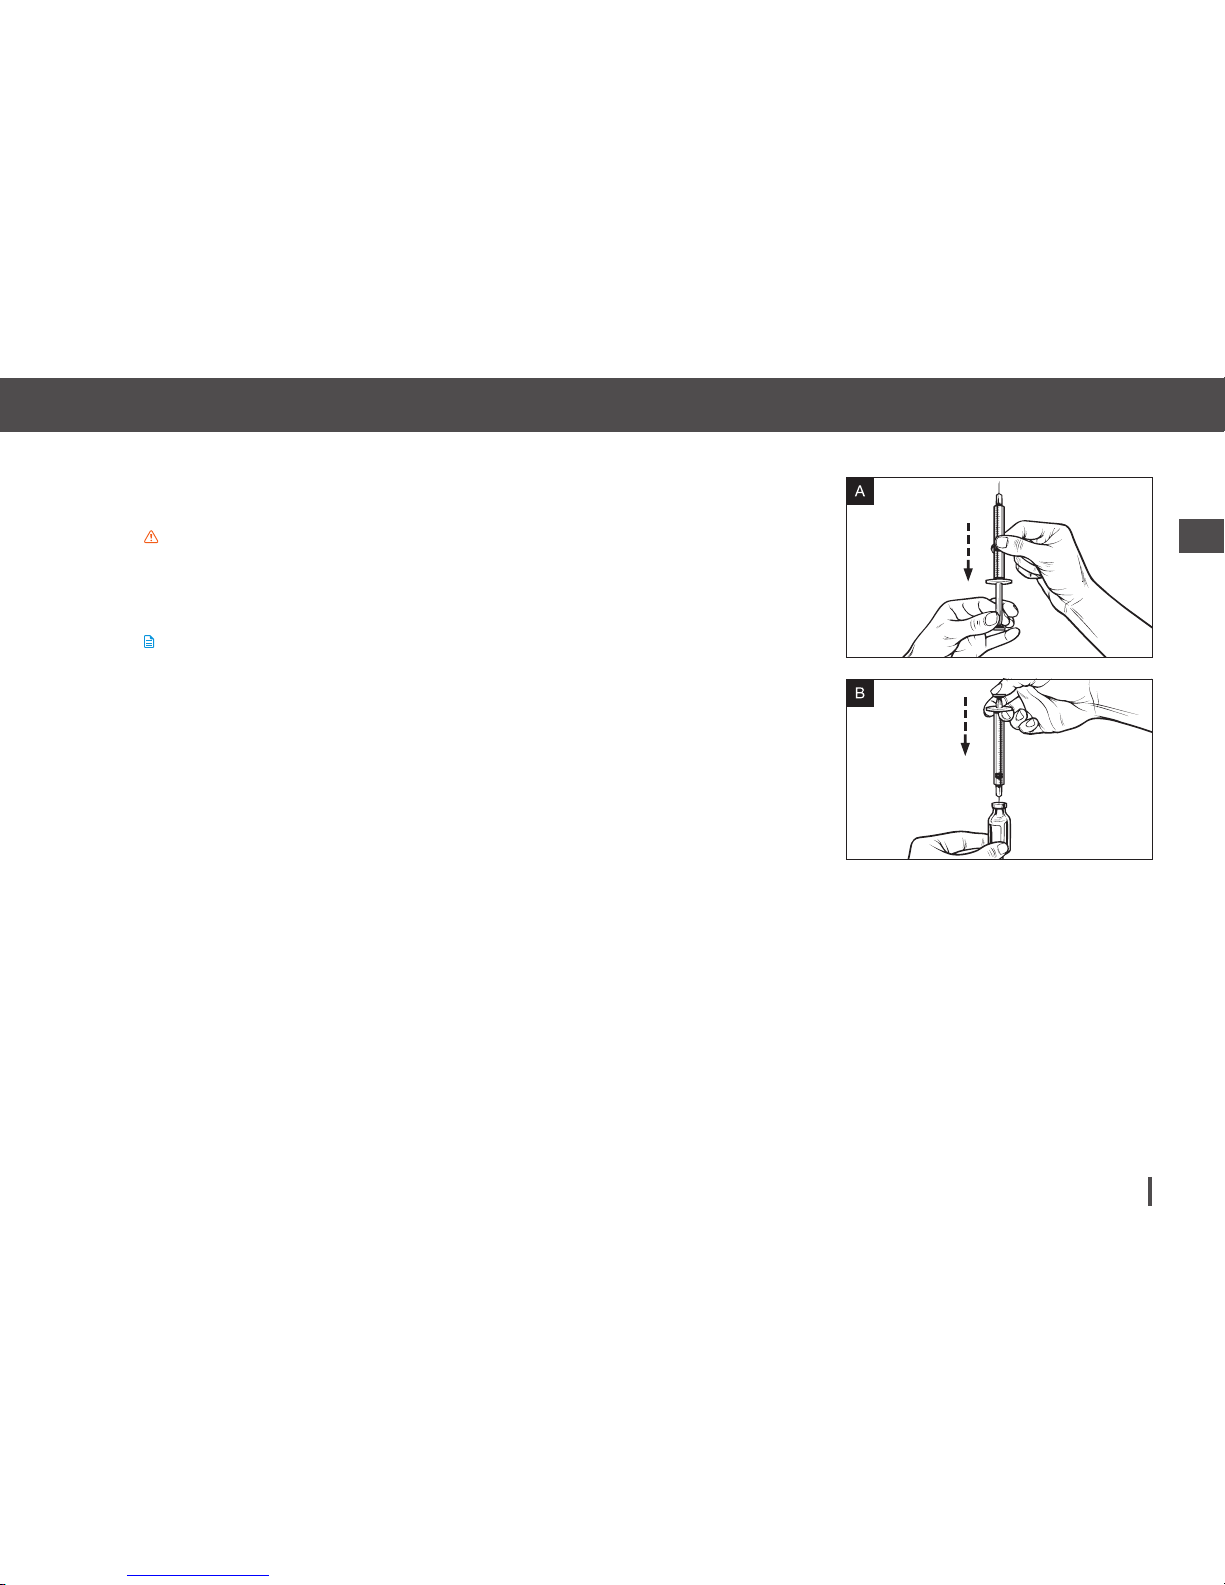
Customer Technical Support: 1-877-801-6901 65
Key Pump Features2
Chapter 5 – Infusion Site Care and Loading Cartridge
Instructions for Drawing Insulin from Vial into Syringe
PRECAUTION
Use only the syringe and needle provided by Tandem Diabetes Care, Inc. to fill the cartridge. After filling
the cartridge and before connecting and filling the tubing, reduce the possibility of trapped air in the
cartridge by holding your t:slim Pump vertically with the cartridge insulin fill port on top.
NOTE
The fill estimate displayed on the pump is the amount of insulin available for delivery. It does not
include insulin needed to fill the tubing (up to 30 units) and a small amount of insulin that is not
available for delivery. When filling the syringe, add approximately 45 units to the amount of insulin you
want available for delivery.
For example, the pump requires a minimum of 50 units available for delivery after fill tubing has been
completed. Fill the syringe with approximately 95 units to have enough to fill your tubing and still have
50 units available for delivery.
1. Inspect the needle and syringe package for any signs of damage. Discard any
damaged product.
2. Wash your hands thoroughly.
3. Wipe the rubber septum of the insulin vial with an alcohol swab.
4. Remove the needle and syringe from their packaging. Securely twist needle
onto syringe. Safely remove protective cap from needle by pulling outward.
5. Draw air into syringe up to the amount of insulin desired (see image A).
6. With insulin vial upright, insert needle into vial. Inject air from syringe into vial.
Maintain pressure on syringe plunger (see image B).
Page 66
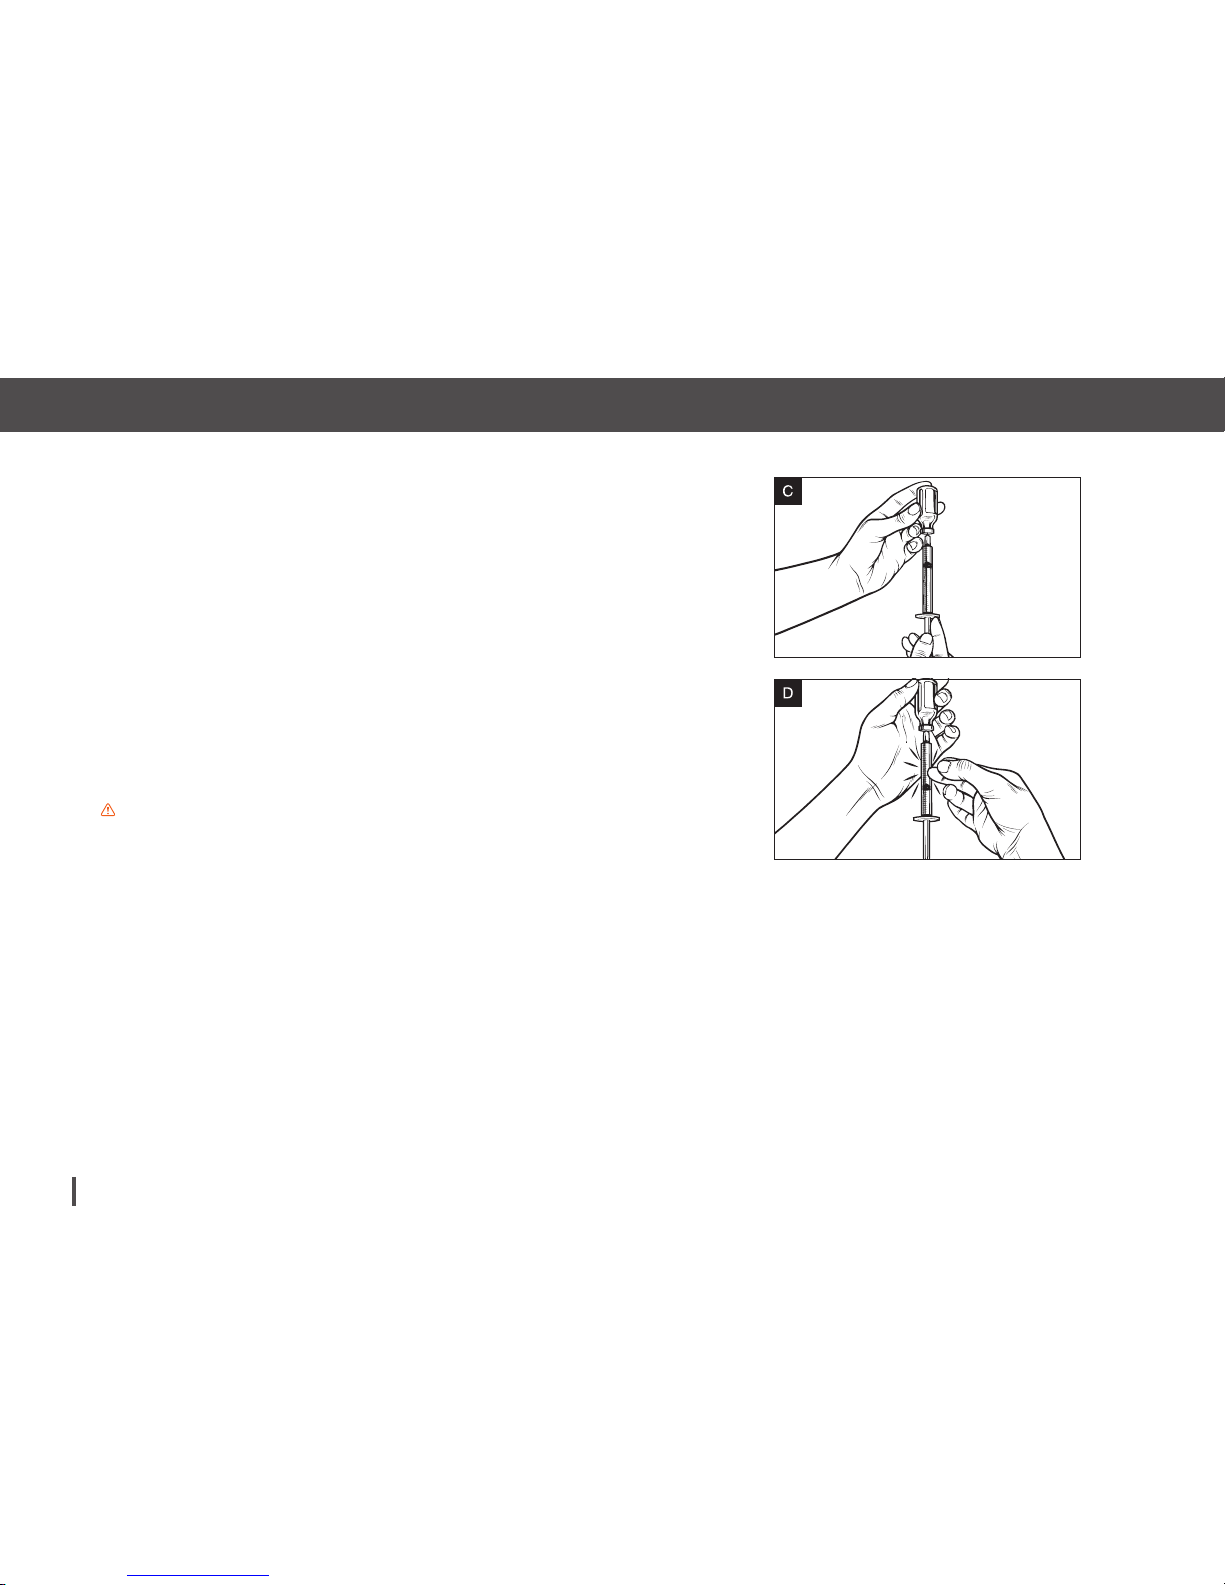
Customer Technical Support: 1-877-801-690166
Chapter 5 – Infusion Site Care and Loading Cartridge
7. With needle still inserted into vial, turn vial and syringe upside down. Release
syringe plunger. Insulin will begin to flow from the vial into the syringe.
8. Slowly pull back the plunger to the desired amount of insulin (see image C).
9. While the filling needle is still in the vial and upside down, tap the syringe
so that any air bubbles rise to the top (see image D). Then slowly push the
plunger upwards, forcing any air bubbles back into the vial.
10. Check the syringe for air bubbles and do one of the following:
» If there are air bubbles present, repeat step 9.
» If no air bubbles are present, remove the filling needle from the vial.
PRECAUTION
Always remove all air bubbles when drawing insulin into the filling syringe.
Page 67
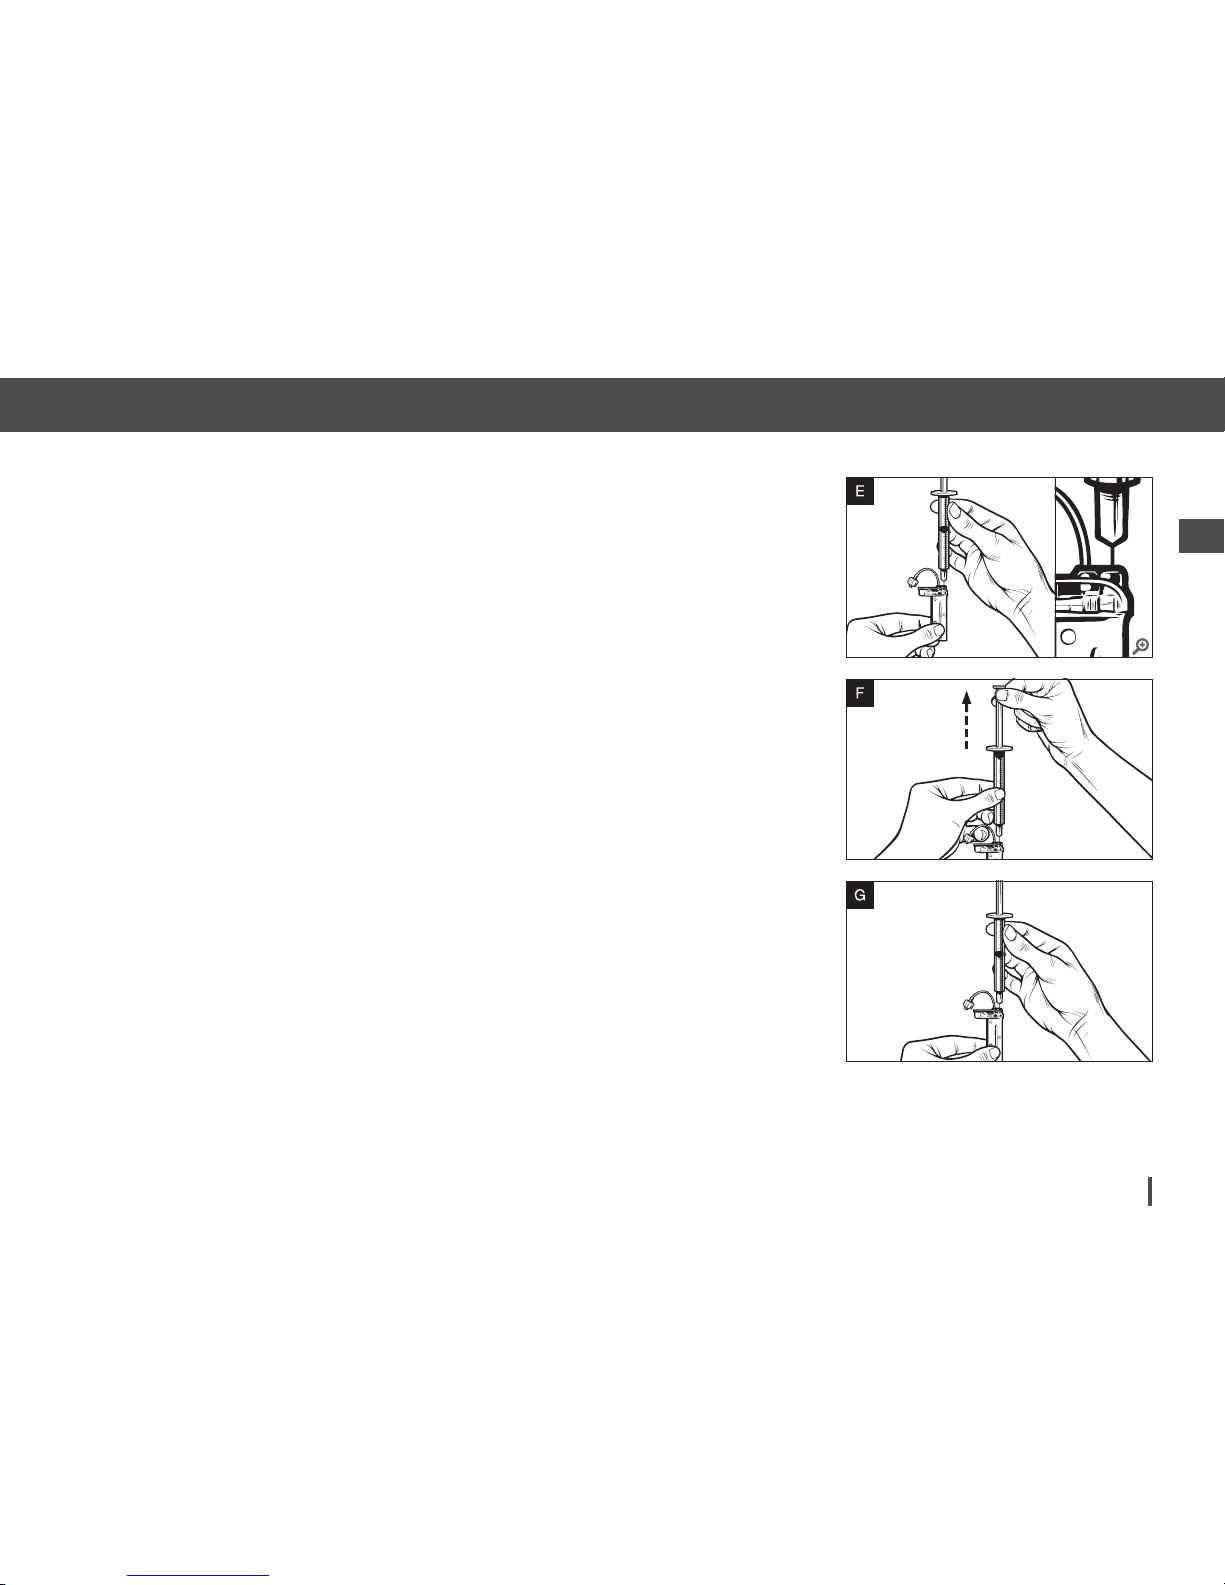
Customer Technical Support: 1-877-801-6901 67
Key Pump Features2
Chapter 5 – Infusion Site Care and Loading Cartridge
Instructions for Filling the Cartridge
1. Inspect the cartridge package for any signs of damage.
Discard any damaged product.
2. Open the package and remove the cartridge.
3. Hold the cartridge upright and gently insert the needle into the white
insulin fill port on the cartridge (see image E). The needle is not intended
to go all the way in, so do not force it.
4. Keeping the syringe vertically aligned with the cartridge, and the needle
inside the fill port, pull back on the plunger until it is fully retracted
(see image F). This will remove any residual air from the cartridge.
Bubbles will rise toward the plunger.
5. Make sure the needle is still in the fill port and release the plunger.
Pressure will pull the plunger to its neutral position but it will NOT
push any air back inside the cartridge (see image G).
Page 68
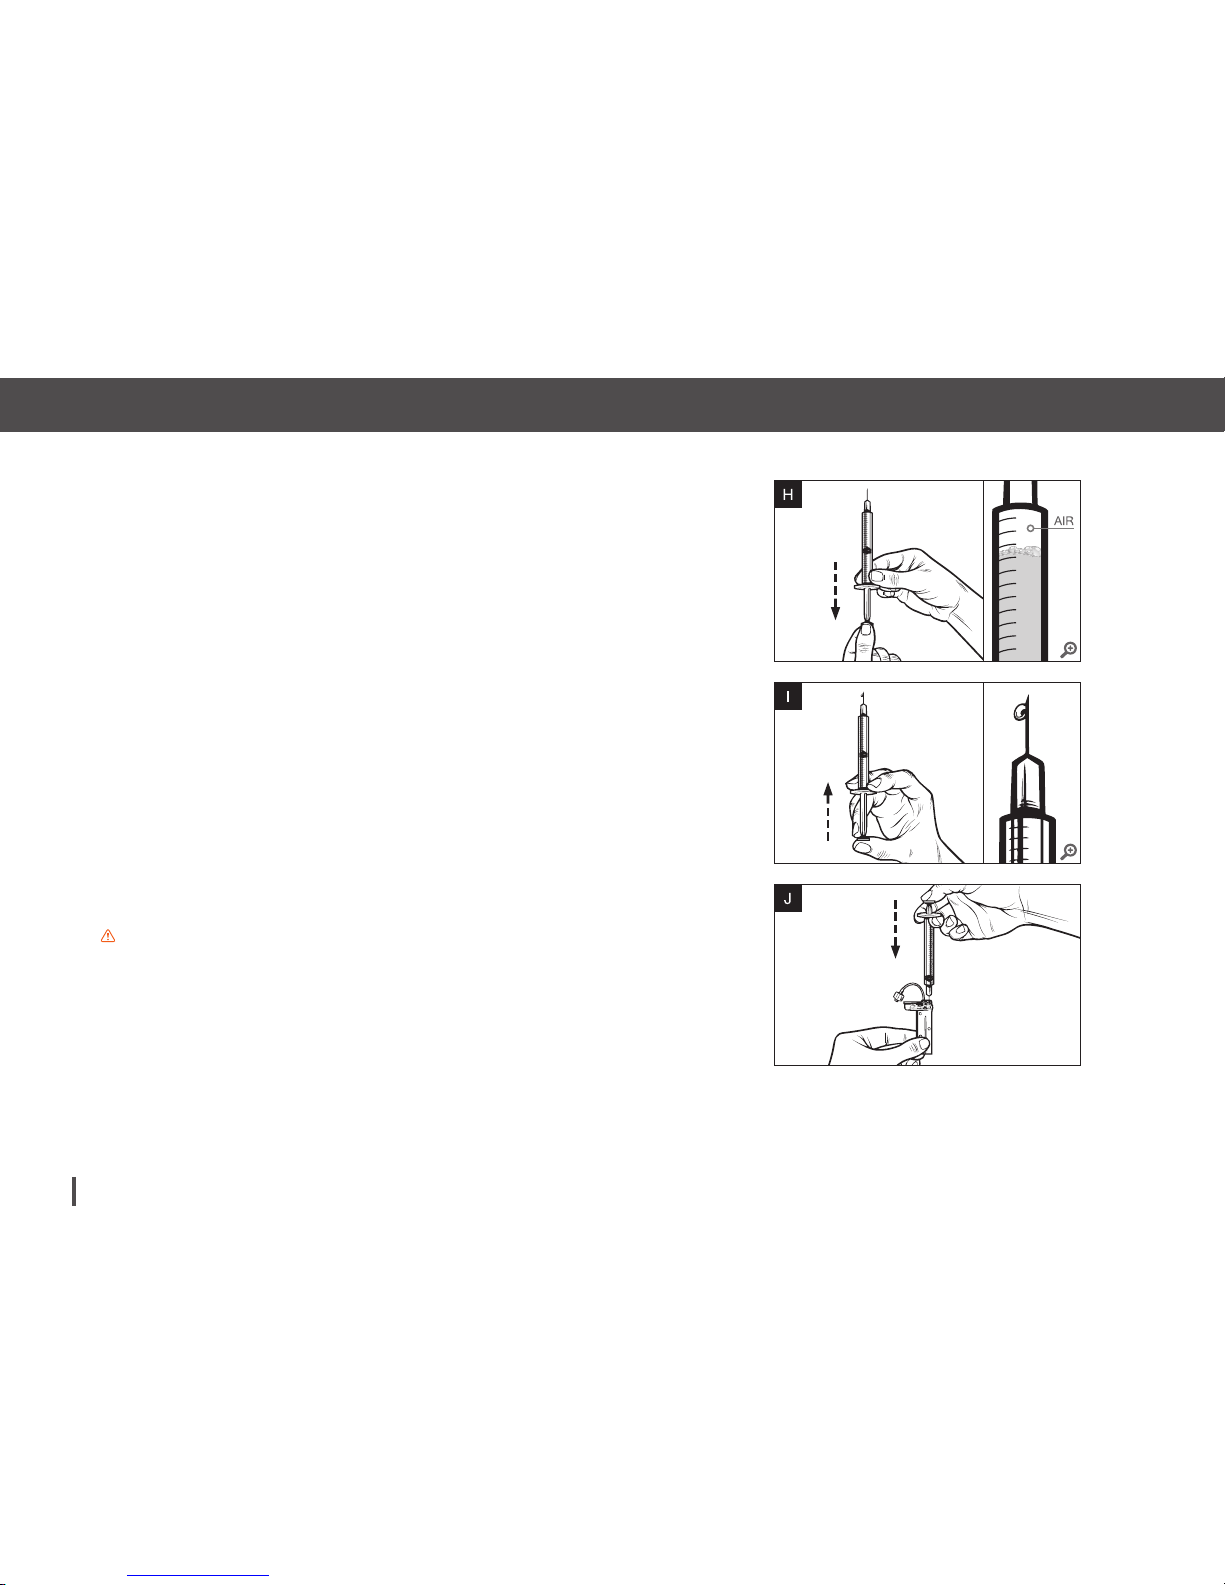
Customer Technical Support: 1-877-801-690168
Chapter 5 – Infusion Site Care and Loading Cartridge
6. Withdraw the needle from the fill port.
7. Turn the syringe upright and pull down on the plunger (see image H).
Flick the barrel to make sure that any air bubbles rise to the top.
8. Gently press on the plunger to remove air bubbles until insulin
fills the needle hub and you see a drop of insulin at the tip of
the needle (see image I).
9. Re-insert the needle in the fill port and slowly fill the cartridge
with insulin (see image J). It is normal to feel some back pressure
as you slowly press on the plunger.
10. Maintain pressure on the plunger while you remove the needle
from the cartridge. Check the cartridge for leaks. If you detect
insulin leaking, discard the cartridge and repeat entire process
with a new cartridge.
11. Always dispose of used needles, syringes, cartridges, and infusion
sets following your community’s regulations.
PRECAUTION
Do not fill the cartridge with more than 300 units. This can cause a cartridge error.
Page 69
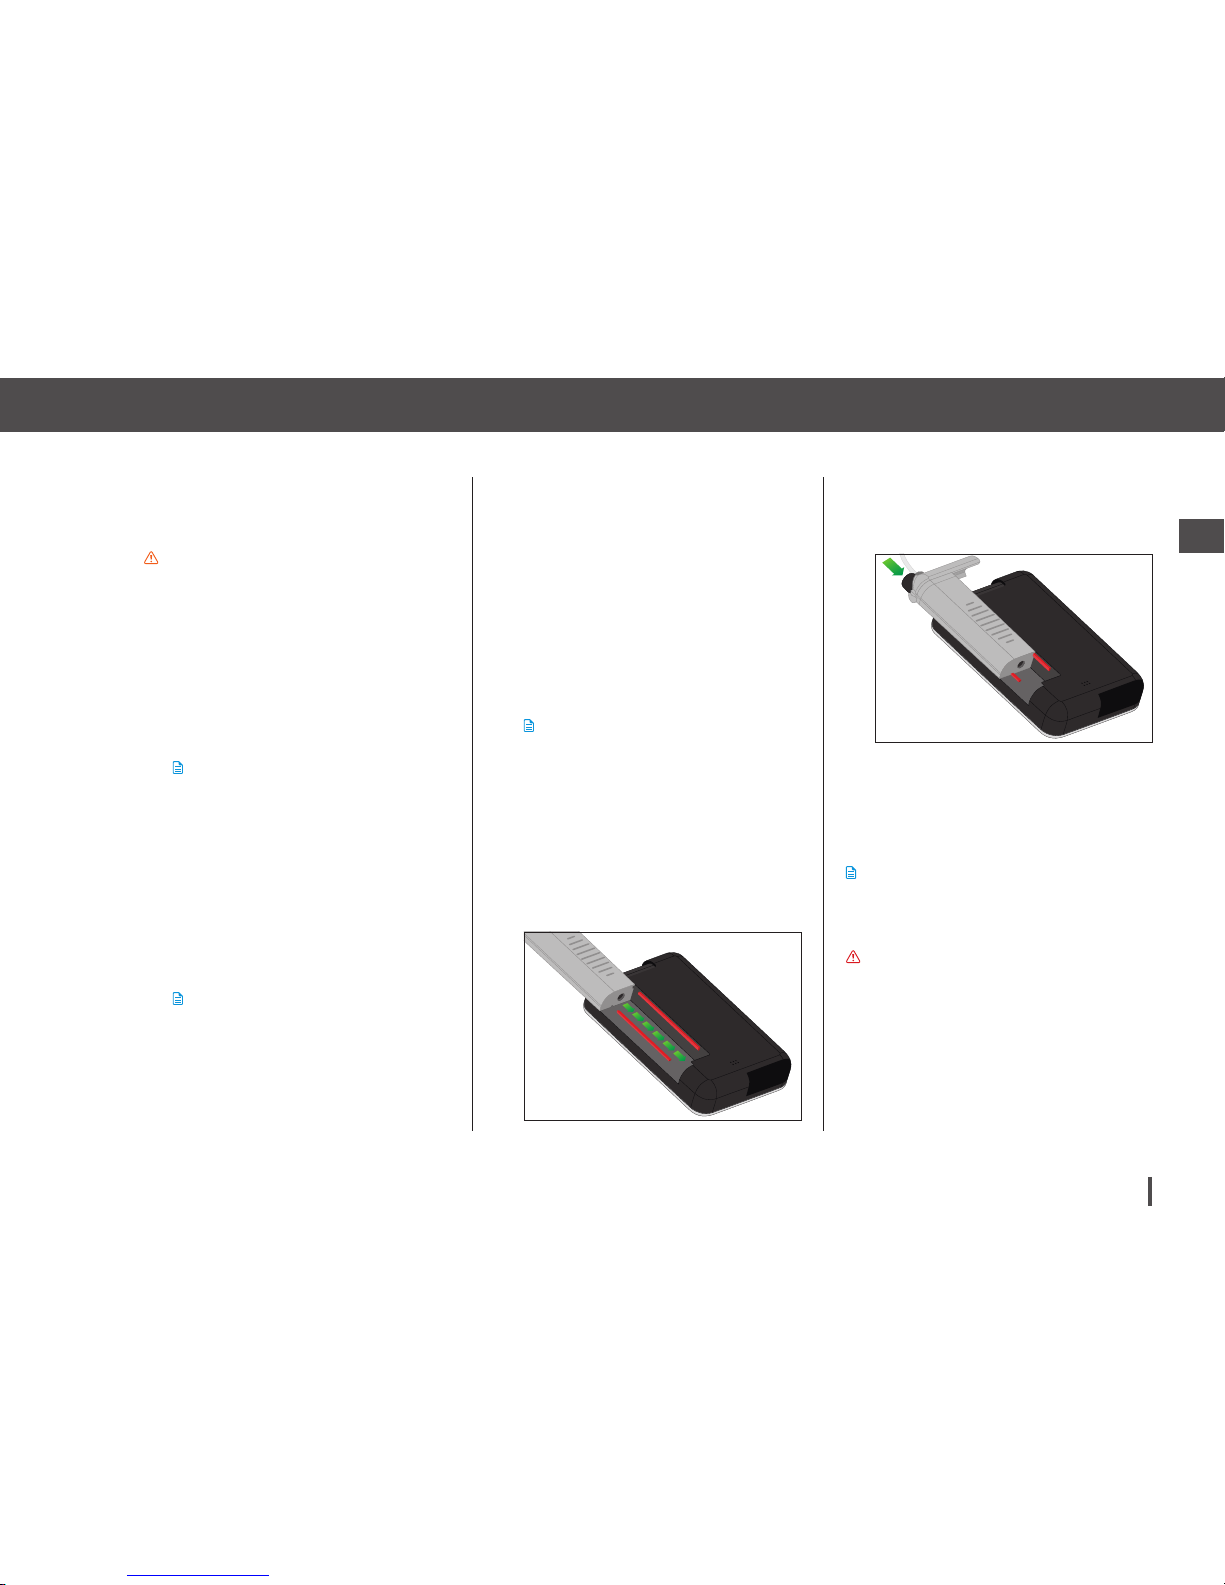
Customer Technical Support: 1-877-801-6901 69
Key Pump Features2
Chapter 5 – Infusion Site Care and Loading Cartridge
Instructions on How to Install
a Cartridge
PRECAUTION
If this is the very first time you are loading the
cartridge, remove the shipping canister (which is
not for human use), from the back of the pump.
1. From the Home Screen,
tap OPTIONS.
2. Tap Load.
NOTE
During the load sequence, the Tandem
Logo is disabled. Tapping it will not return
to the Home Screen.
3. Tap Change Cartridge.
4. Screen will display that all insulin
deliveries will be stopped. Tap
YES to continue.
NOTE
This screen will not be displayed if this is
the first time loading a new cartridge and
you have not started actively pumping.
5. Disconnect the infusion set from
your body and tap NEXT to
continue.
“Preparing for Cartridge” screen
is displayed.
6. Remove the used cartridge and
install a filled cartridge. Tap
UNLOCK icon when completed.
NOTE
If needed, place the cartridge removal
tool or the edge of a coin in the slot at the
bottom of the cartridge and twist to aid in
the removal of the cartridge.
Place bottom of the cartridge at
the end of the pump. Make sure
cartridge is lined up to both
guide tracks.
Push on the circular fill port next to
the cartridge tubing to slide the
cartridge onto the pump.
7. Tap NEXT to continue.
“Detecting Cartridge” screen
is displayed.
NOTE
After completing the cartridge change, the pump
will automatically prompt you to fill tubing.
WARNING
Do not remove or add insulin from a filled
cartridge after it is installed on the pump. This
will result in an inaccurate display of the insulin
level on the Home Screen.
Page 70
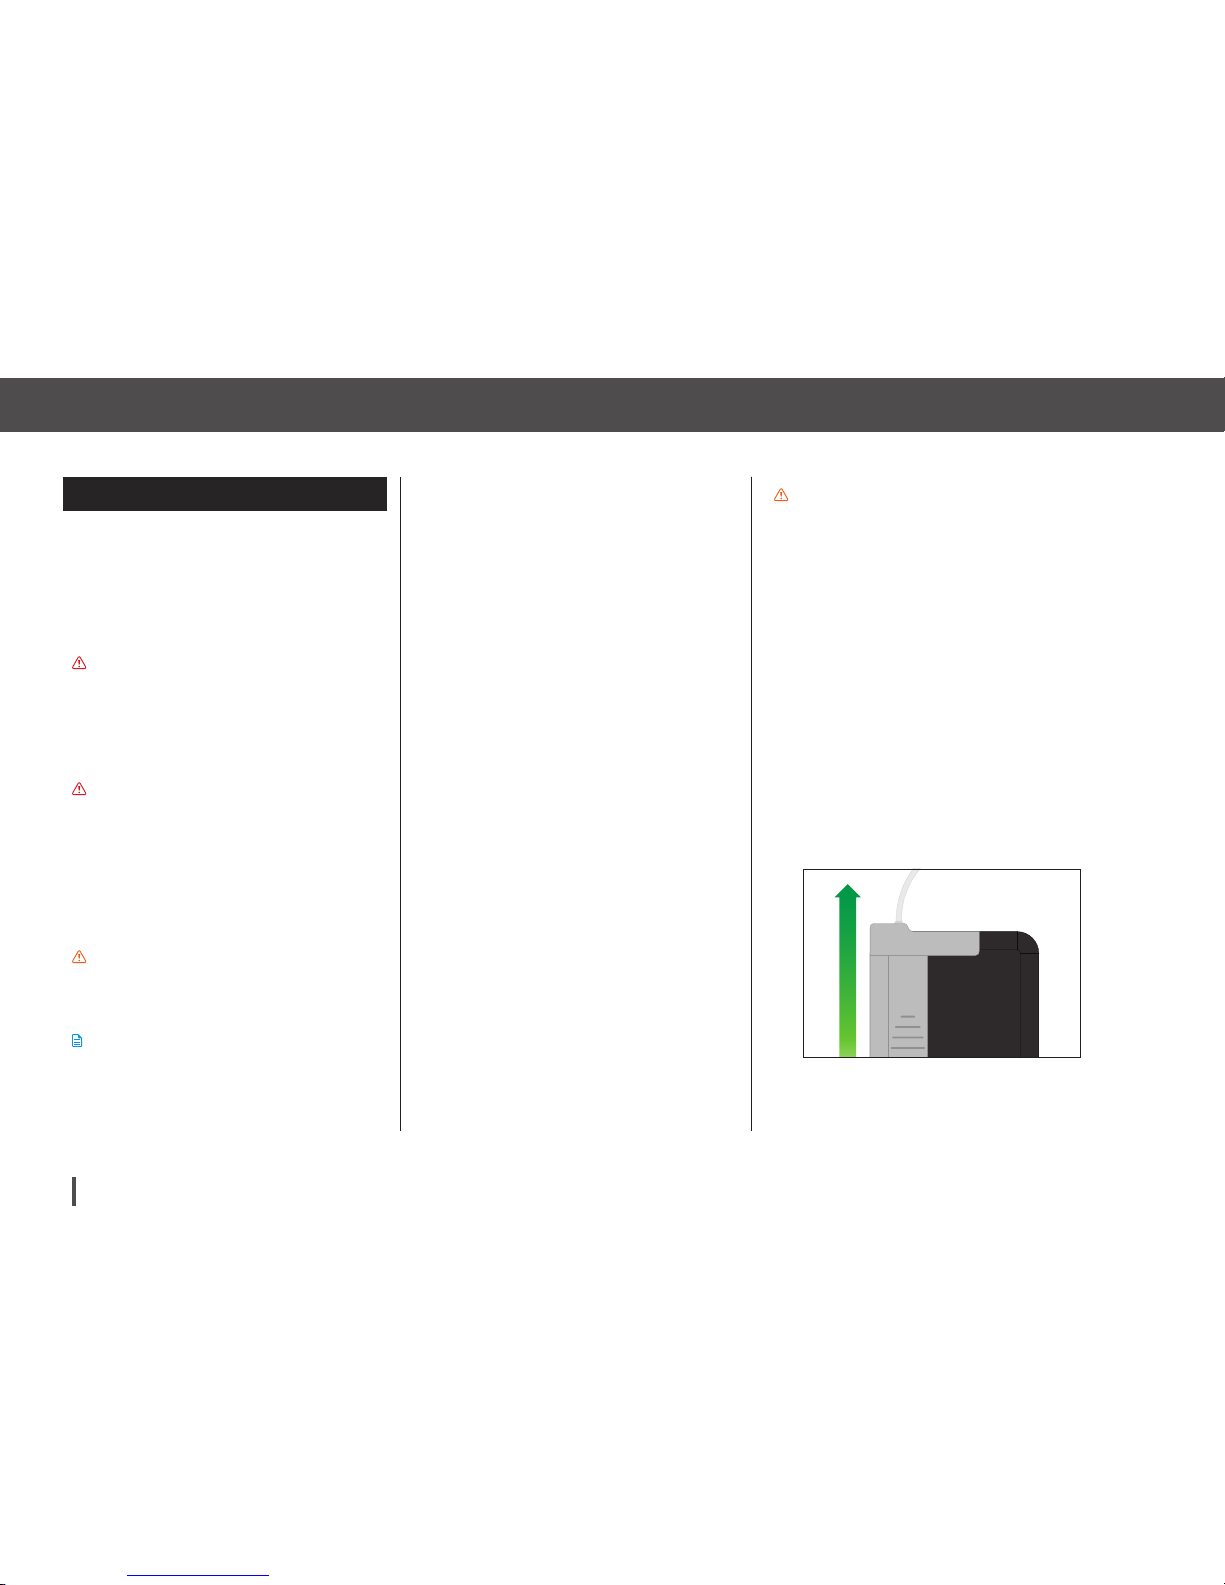
Customer Technical Support: 1-877-801-690170
Chapter 5 – Infusion Site Care and Loading Cartridge
5.4 Filling Tubing
Filling the Infusion Set Tubing
with Insulin
This section describes how to fill the
infusion set tubing with insulin.
WARNING
Never fill the infusion set tubing while the tubing
is connected to your body. Filling the tubing
while it is connected to your body can result in
unintended delivery of insulin.
WARNING
Do not disconnect the luer-lock connection
between the cartridge tubing and the infusion
set tubing. If the connection comes loose,
disconnect the infusion set from the site
(from your body) before tightening to avoid
unintentional insulin delivery.
PRECAUTION
Always ensure that there are no air bubbles in
the tubing when filling.
NOTE
If starting from the Home Screen, tap OPTIONS,
tap Load, tap Fill Tubing and then follow the
instructions. Tap NEW if you installed a new
cartridge. Tap FILL if you did not install a new
cartridge and want to continue with filling the
tubing.
1. Verify that the infusion set is
disconnected from your body.
2. Connect the infusion set tubing to
the luer-lock on the cartridge:
a. Ensure that the new infusion set
package is not damaged, and
remove the sterile tubing from
the package. If the package is
damaged or opened, discard of
properly and use another tubing
set.
b. Remove the infusion set tubing
cap from the luer connector. Be
careful to keep the luer connector away from unclean areas.
c. Attach the infusion set tubing
to the luer connector on the
cartridge tubing. Twist clockwise
until finger tight and then twist
another quarter of a turn to ensure a secure connection.
Tap NEXT.
PRECAUTION
Conduct regular checks of your t:slim Pump
and infusion set, particularly:
» Check that your luer-lock connection
between the cartridge tubing and the infusion
set tubing is tight and secure.
» Check your infusion set tubing for any
damage, leaks, or kinks while using your
t:slim Pump. Damaged, leaking, or kinked
tubing may restrict or stop insulin delivery
and result in under-infusion.
3. Hold the pump vertically to
ensure any air in the cartridge will
be dispelled first. Tap START.
The pump will beep and vibrate
regularly while the tubing is being
filled.
“Starting Fill” screen is displayed.
Page 71

Customer Technical Support: 1-877-801-6901 71
Key Pump Features2
Chapter 5 – Infusion Site Care and Loading Cartridge
NOTE
The following are approximate amounts of
insulin to fill different tubing lengths:
» 15–20 units for 23 inch tubing
» 20–25 units for 32 inch tubing
» 25–30 units for 42 inch tubing
4. Tap STOP after 3 drops of insulin
are seen at the end of the infusion
set tubing.
“Stopping Fill” screen is displayed.
“Detecting Insulin” screen
is displayed.
5. Verify that drops are seen and
tap DONE.
•
If you do not see drops, tap FILL.
The Fill Tubing screen appears,
repeat steps 3–5 until you see 3
drops of insulin at the end of the
tubing.
•
If you did not tap STOP, the “Max
fill amount reached!” screen will
appear. Do one of the following:
a. If you are finished filling the tub-
ing, tap DONE.
b. If you want to fill the tubing with
more than 30 units, tap FILL to
go back to the Fill Tubing screen.
6. Fill Tubing is complete.
NOTE
After tubing fill is complete, when the pump
returns to the Home Screen, an estimate
of how much insulin is in the cartridge is
displayed in the upper right portion of the
screen. You will see one of the following on
the screen:
» + 40 u More than 40 units
detected in the cartridge
» + 60 u More than 60 units
detected in the cartridge
» + 120 u More than 120 units
detected in the cartridge
» + 180 u More than 180 units
detected in the cartridge
» + 240 u More than 240 units
detected in the cartridge
After 10 units are delivered, an actual
number of units remaining in the cartridge
will be displayed on the Home Screen
The amount of insulin remaining displayed
on the Home Screen will decrease 5 units
at a time (for example, you will see 140,
135, 130, 125). When less than 40 units
remain, it will begin decreasing 1 unit at a
time (for example, you will see 40, 39, 38,
37) until there is 1 unit remaining.
Page 72
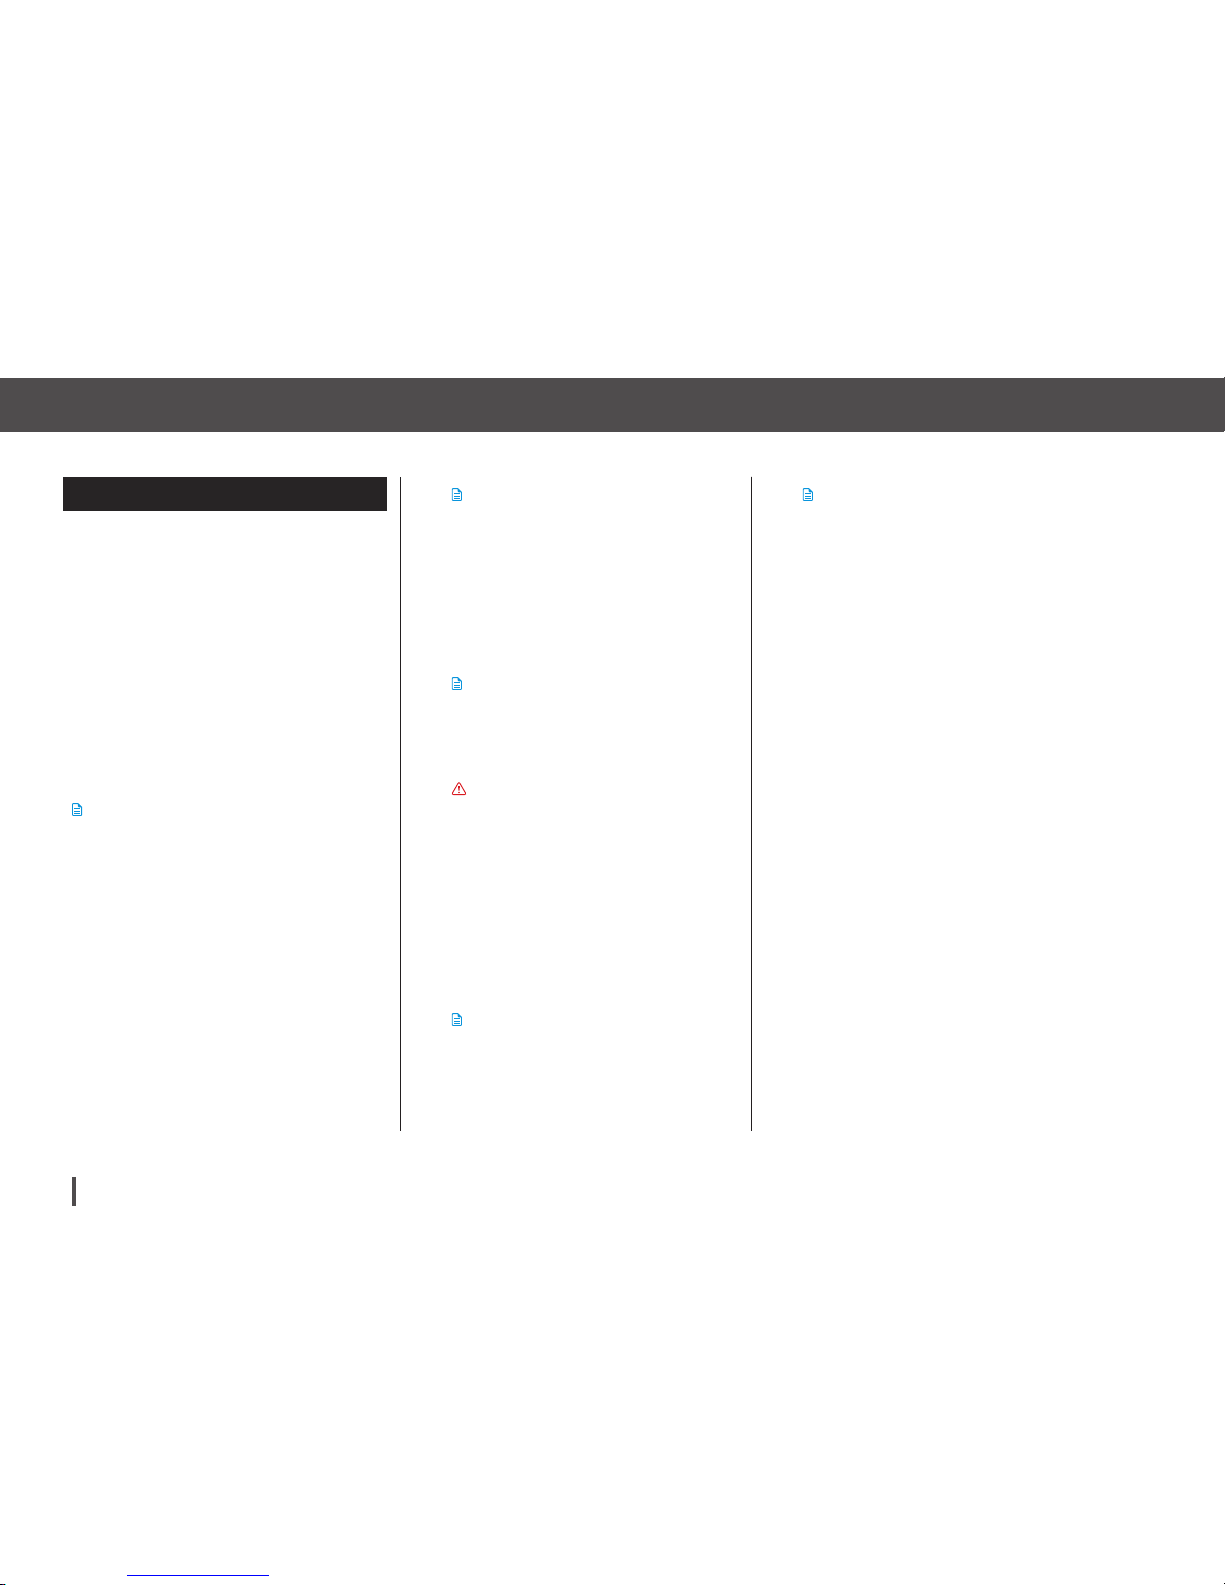
Customer Technical Support: 1-877-801-690172
Chapter 5 – Infusion Site Care and Loading Cartridge
5.5 Filling Cannula
Filling the Infusion Set Cannula
with Insulin
This section describes how to fill the
infusion set cannula with insulin.
For the correct cannula fill amount, as
well as proper insertion technique, refer
to the instructions for use included with
the infusion set.
To Fill the Cannula
NOTE
» If starting from the Home Screen, tap
OPTIONS, tap Load, tap Fill Cannula and
then follow the instructions. Insulin delivery
will be stopped and must be resumed upon
completion.
» If using a steel needle infusion set, there is
no cannula. Skip this section.
1. Tap Fill Cannula.
2. Insert a new infusion set and
connect filled tubing to site, then
tap NEXT.
3. Tap Edit Fill Amount.
NOTE
The cannula fill amount displayed is based
on your last cannula fill amount. Filling
stops at this amount (unless you tap STOP
before this amount is reached).
4. Select amount needed for
cannula fill.
NOTE
If the amount needed is not listed, tap Other
amount and use the onscreen keypad to
enter a value between 0.1 to 1.0 unit.
WARNING
Refer to your infusion set instructions for
proper insertion and cannula fill amount.
5. Tap START.
“Starting Fill” screen is displayed.
After fill is complete, “Stopping Fill”
screen is displayed.
NOTE
You can tap STOP at any time during
the fill process if you want to stop filling
the cannula.
NOTE
The screen will return to the Load menu if
the Site Reminder is turned off. Tap DONE
to resume insulin if finished. Or tap Site
Reminder to set reminder. If Site Reminder
is on, the pump will automatically display
the Site Reminder Screen (refer to next
section).
Page 73
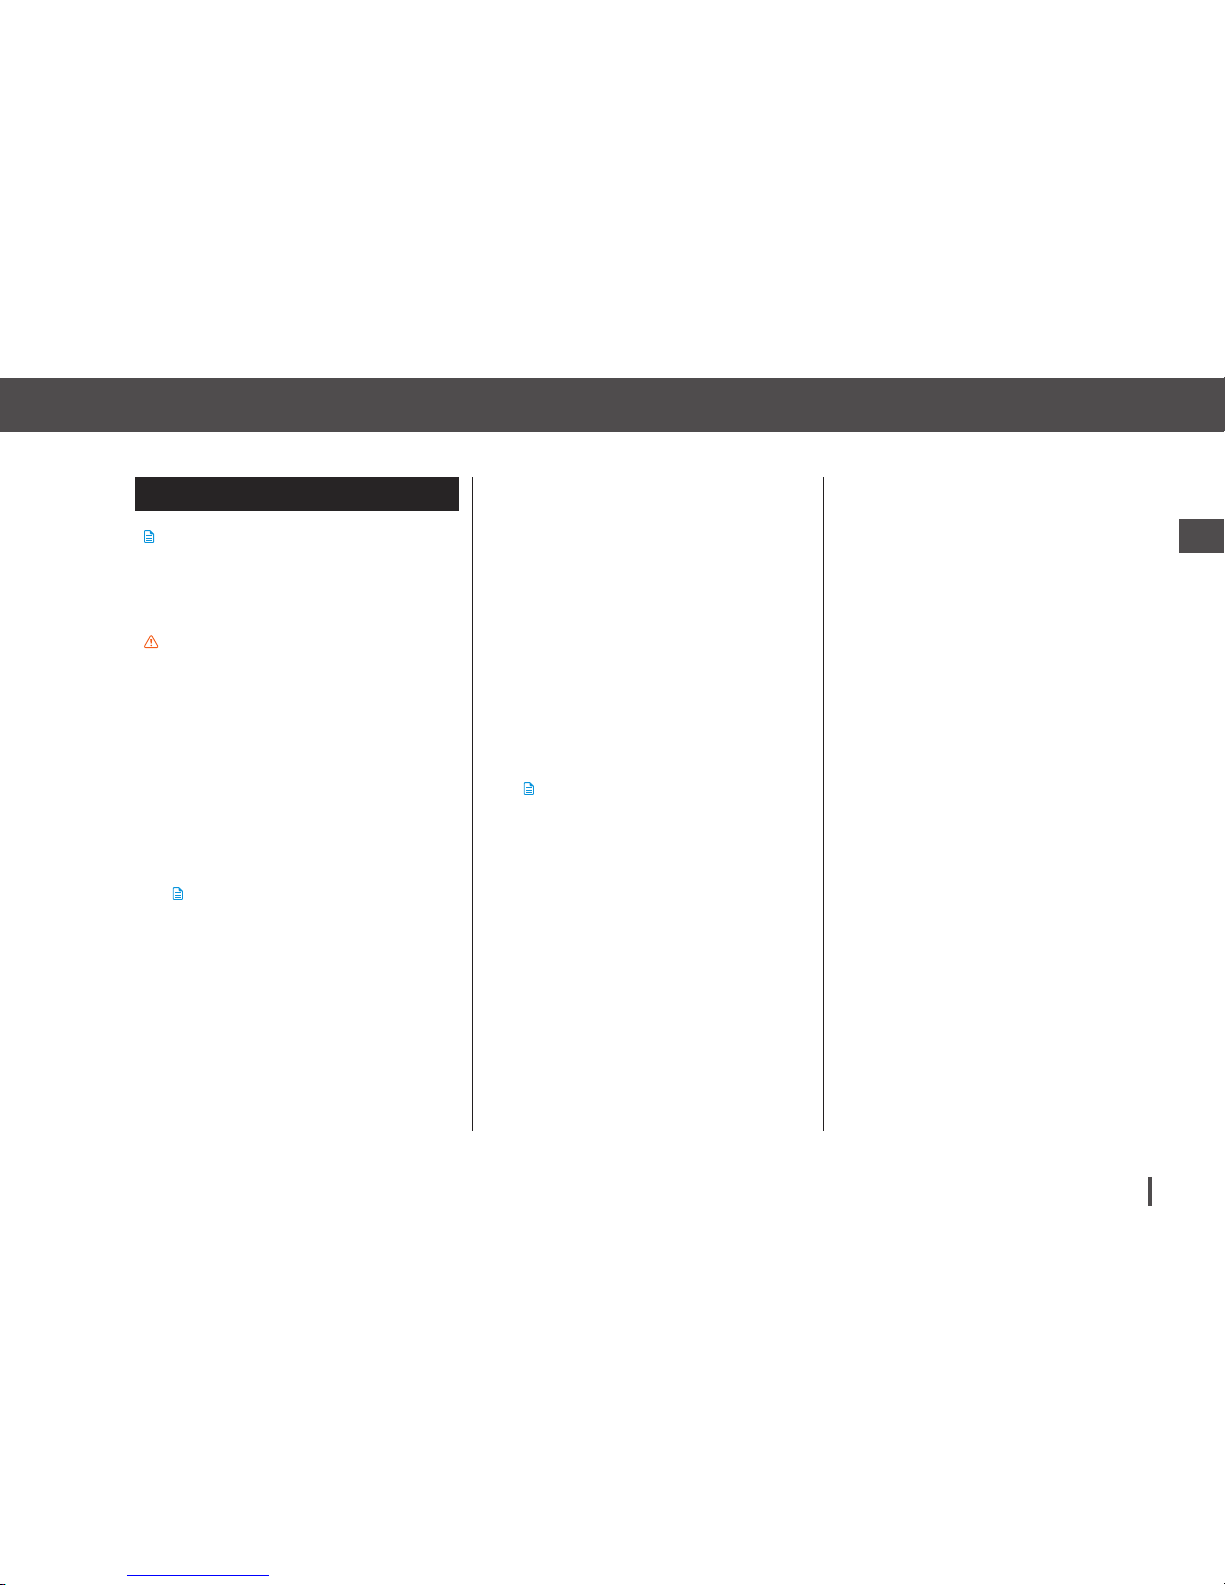
Customer Technical Support: 1-877-801-6901 73
Key Pump Features2
Chapter 5 – Infusion Site Care and Loading Cartridge
5.6 Setting Site Reminder
NOTE
If starting from the Home Screen, tap OPTIONS,
tap Load, tap Site Reminder then follow the
instructions below.
PRECAUTION
Avoid changing an infusion set before going
to bed or if you will not be able to test your BG
1–2 hours after a new set is placed.
1. Tap SAVE if correct. Tap Edit
Reminder if settings need to
be changed.
2. Tap Remind Me In and select the
number of days (1-3).
NOTE
Default reminder is set for 3 days.
3. Tap Remind Me At. Use the
onscreen keypad to enter time
and tap DONE.
4. Tap Time of Day to change AM
or PM. Tap DONE.
5. Verify Site Reminder is set
correctly and tap SAVE.
“Setting Saved” screen
is displayed.
6. Load screen is displayed.
Tap DONE.
A reminder to test BG in 1–2 hours
will display.
7. Tap RESUME.
NOTE
If this is the first time using your t:slim
Pump and a Personal Profile has not been
defined, a screen will notify you that a
profile must be activated to resume insulin.
Tap CLOSE.
8. RESUMING INSULIN splash
screen is displayed.
Page 74

Customer Technical Support: 1-877-801-690174
Chapter 5 – Infusion Site Care and Loading Cartridge
THIS PAGE IS
INTENTIONALLY
LEFT BLANK
Page 75

Chapter 6
Personal Profile
Page 76
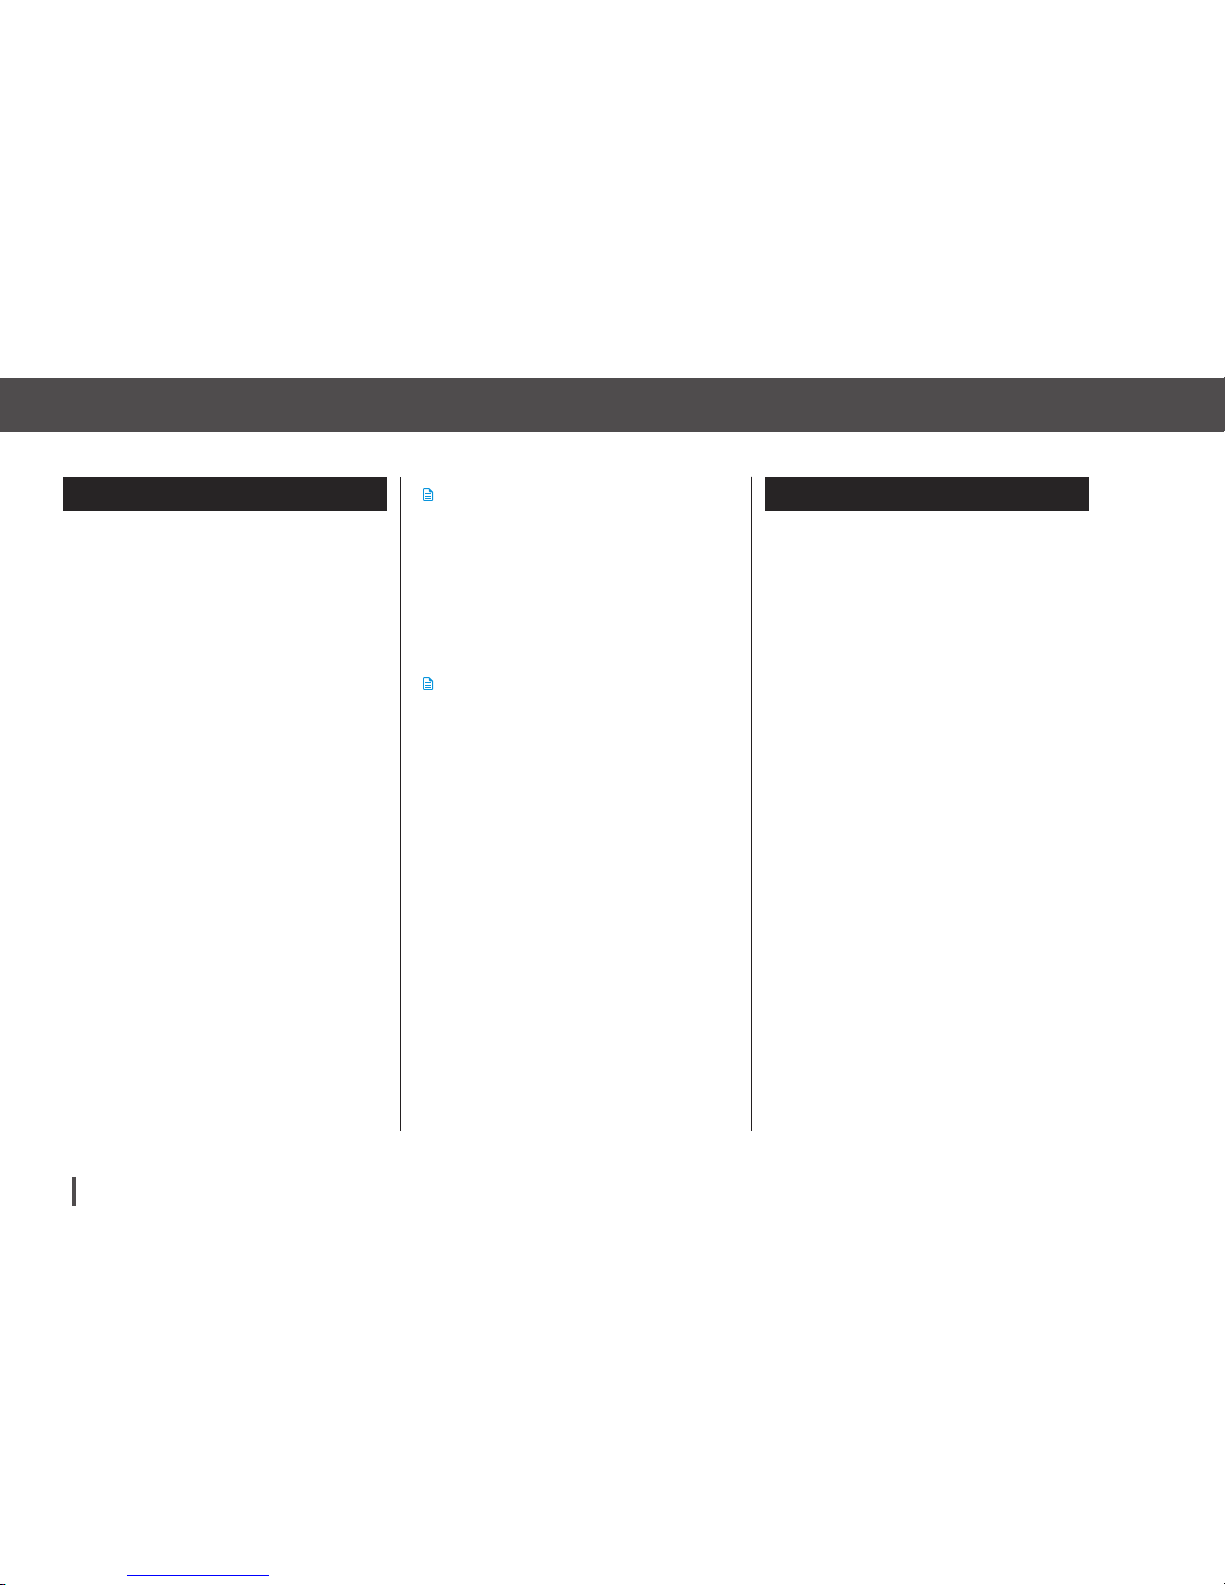
Customer Technical Support: 1-877-801-690176
Chapter 6 – Personal Profile
6.1 Personal Profile Overview
A Personal Profile is a group of settings
that define basal and bolus delivery
within specific time segments throughout a 24-hour period. Each profile can
be personalized with a name. Within a
Personal Profile the following can be set:
•
Timed Settings: Basal Rate,
Correction Factor, Carb Ratio and
Target BG.
•
Bolus Settings: Insulin Duration,
Max Bolus and Carbohydrates
setting (on/off).
The t:slim Pump uses the settings
in your active profile to calculate the
delivery of basal insulin, food boluses
and correction boluses based on your
Target BG.
Having several Personal Profiles provides more flexibility for your body and
lifestyle. For example, you could have
“Weekday” and “Weekend” profiles if
you have different insulin delivery needs
on weekdays and weekends, based
on schedule, food intake, activity, and
exercise, etc.
6.2 Creating a New Profile
Creating Personal Profiles
You can create up to 6 Personal Profiles, however, only 1 can be active at
a time. In the Personal Profiles screen,
the active profile is positioned at the
top of the list and is marked as ON.
When you create a Personal Profile,
you can set any or all of the following
Timed Settings:
•
Basal Rate (your basal rate in
units/hr)
•
Correction Factor (amount 1 unit
of insulin lowers BG)
•
Carb Ratio (grams of carbs covered
by 1 unit of insulin)
•
Target BG (your ideal BG level,
measured in mg/dL)
The ranges you can set for Timed
Settings are:
•
Basal (range: 0 and 0.1 – 15
units/hr)
NOTE
Up to 6 different Personal Profiles can be
created and up to 16 different time segments
can be set in each Personal Profile. For
example, within your “Weekday” profile you
might have time segments set up for 12:00
AM, 5:30 AM and 3:00 PM based on your
healthcare provider’s recommendation.
NOTE
Once defined, a Personal Profile can be viewed
by selecting EDIT from the profile menu.
Page 77
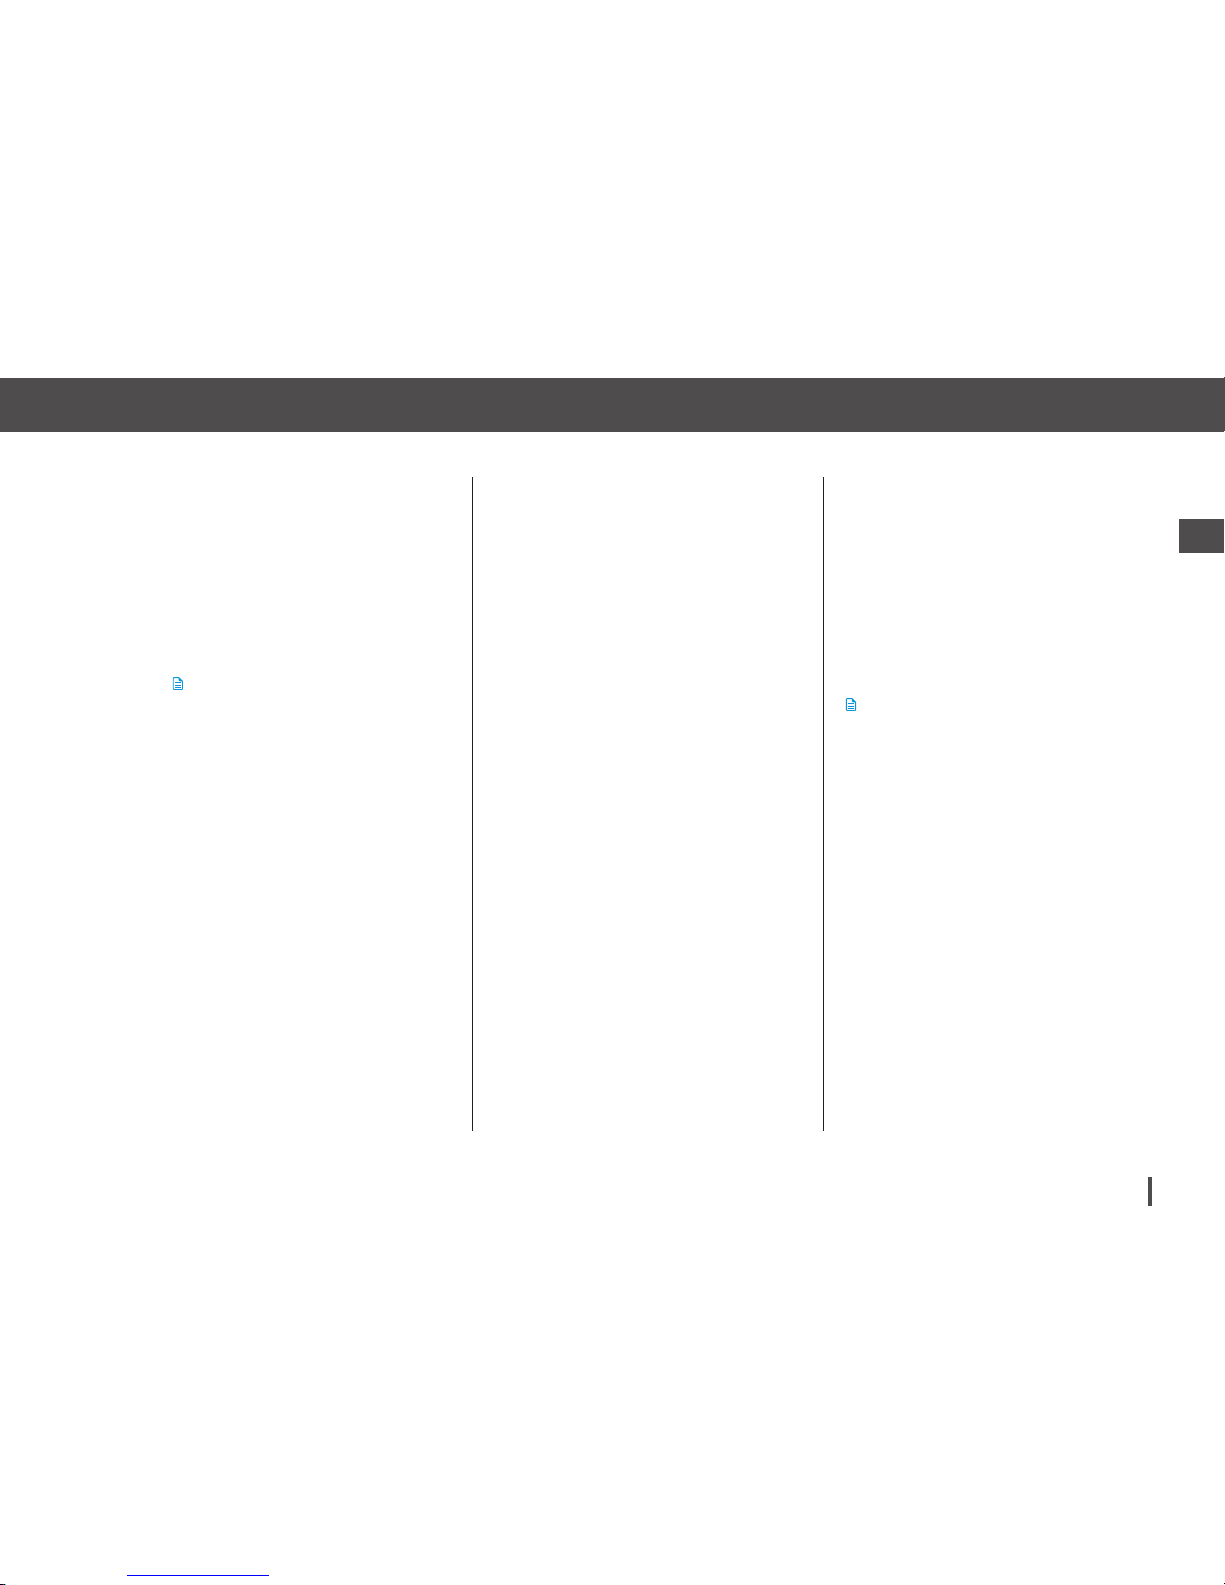
Customer Technical Support: 1-877-801-6901 77
Key Pump Features2
Chapter 6 – Personal Profile
•
Correction Factor (range: 1 unit:1
mg/dL – 1 unit:600 mg/dL)
•
Carb Ratio (range: 1 unit:1 gram –
1 unit:300 grams)
•
Target BG (range: 70 mg/dL –
250 mg/dL)
NOTE
Below a carb ratio of 1:10, increments can
be entered in 0.1 g. For example a carb
ratio of 1:8.2 can be programmed.
In addition, you can set any or all of
the following Bolus Settings:
•
Carbs (on indicates entering grams
of Carb; off indicates entering units
of insulin)
•
Insulin Duration (how long a bolus
lowers your BG)
•
Max Bolus (the maximum amount
for a single bolus)
The default settings and ranges for
Bolus Settings are as follows:
•
Carbs (default: off if no Carb
Ratio is defined)
•
Insulin Duration (default: 5 hrs;
range: 2–8 hrs)
•
Max Bolus (default: 10 units;
range: 1–25 units)
Insulin Duration and Insulin on
Board (IOB)
Your t:slim Pump remembers how
much insulin you have taken from
previous boluses. It does this by relying
on the Insulin Duration. The Insulin Duration reflects the amount of time that
insulin is actively lowering your BG.
Insulin Duration in your t:slim Pump is
set from the factory at 5 hours but can
be changed from 2 to 8 hours. Please
consult your healthcare provider to
accurately set your Insulin Duration.
While the Insulin Duration setting
reflects how long insulin from previous boluses lowers your BG, the IOB
feature reflects how much insulin is
remaining in your body from previous
boluses. IOB is always displayed on
the Home Screen and is used in bolus
delivery calculations when applicable.
When a BG is entered during bolus
programming, your t:slim Pump will
consider any active IOB and calculate
an adjusted bolus if necessary.
NOTE
Although you do not need to define every
setting, some pump features require certain
settings to be defined and activated. During
profile setup, your pump prompts you to set up
any required settings before you can continue.
1. From the Home Screen,
tap OPTIONS.
2. Tap My Pump.
3. Tap Personal Profiles.
4. Tap NEW to create a new profile.
5. Using the onscreen keypad,
enter a profile name (up to 16
characters) and tap SAVE.
Page 78
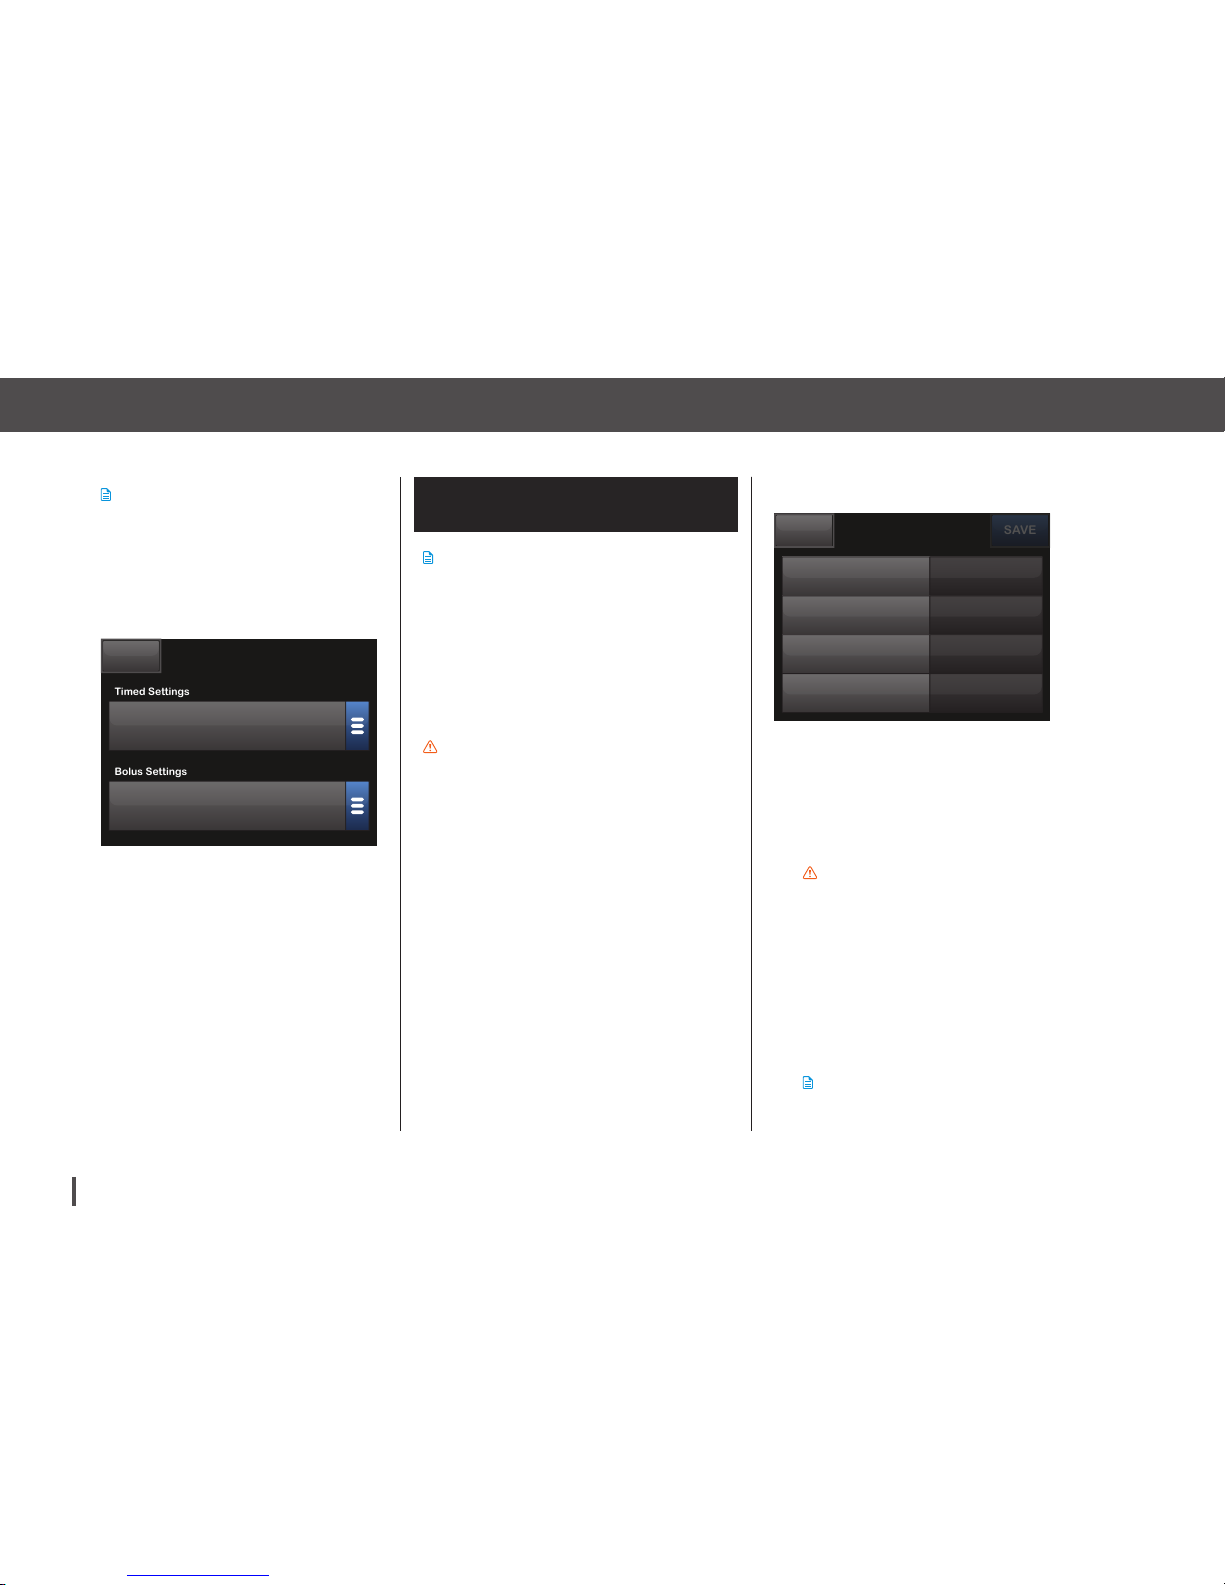
Customer Technical Support: 1-877-801-690178
Chapter 6 – Personal Profile
NOTE
Tap once for first letter displayed, 2 quick
taps for middle letter; and 3 quick taps for
the third letter.
6. Tap Press to Setup to begin
setting insulin delivery settings.
BACK
Weekday
Timed Settings
Press to Set Up
Bolus Settings
5 hrs
DURATION
10 u
MAX BOLUS
OFF
CARBS
6.3 Programming a New
Personal Profile
NOTE
Once the Personal Profile has been created, the
settings must be programmed. The first time
segment will start at 12:00 AM (midnight).
» You must program a basal rate in order to
have a Personal Profile that you can activate.
» Be sure to tap SAVE after entering or
changing a value.
PRECAUTION
If you only define a basal rate in Timed Settings
your pump will only be able to deliver basal
insulin and standard and extended boluses.
Your pump will not deliver correction boluses or
trigger BG alerts.
Timed Settings
1. Once the new profile has been
created, Tap Basal.
2. Using the onscreen keypad, enter
your basal rate and tap DONE.
PRECAUTION
Always confirm that the decimal point
placement is correct.
3. Tap Correction Factor.
4. Using the onscreen keypad, enter
your correction factor and tap
DONE.
NOTE
Enter the mg/dL that 1 unit of insulin will
lower BG.
12:00 AM
SAVE
BACK
Basal Press to Set Up
Correction Factor Press to Set Up
Carb Ratio Press to Set Up
Target BG Press to Set Up
Page 79
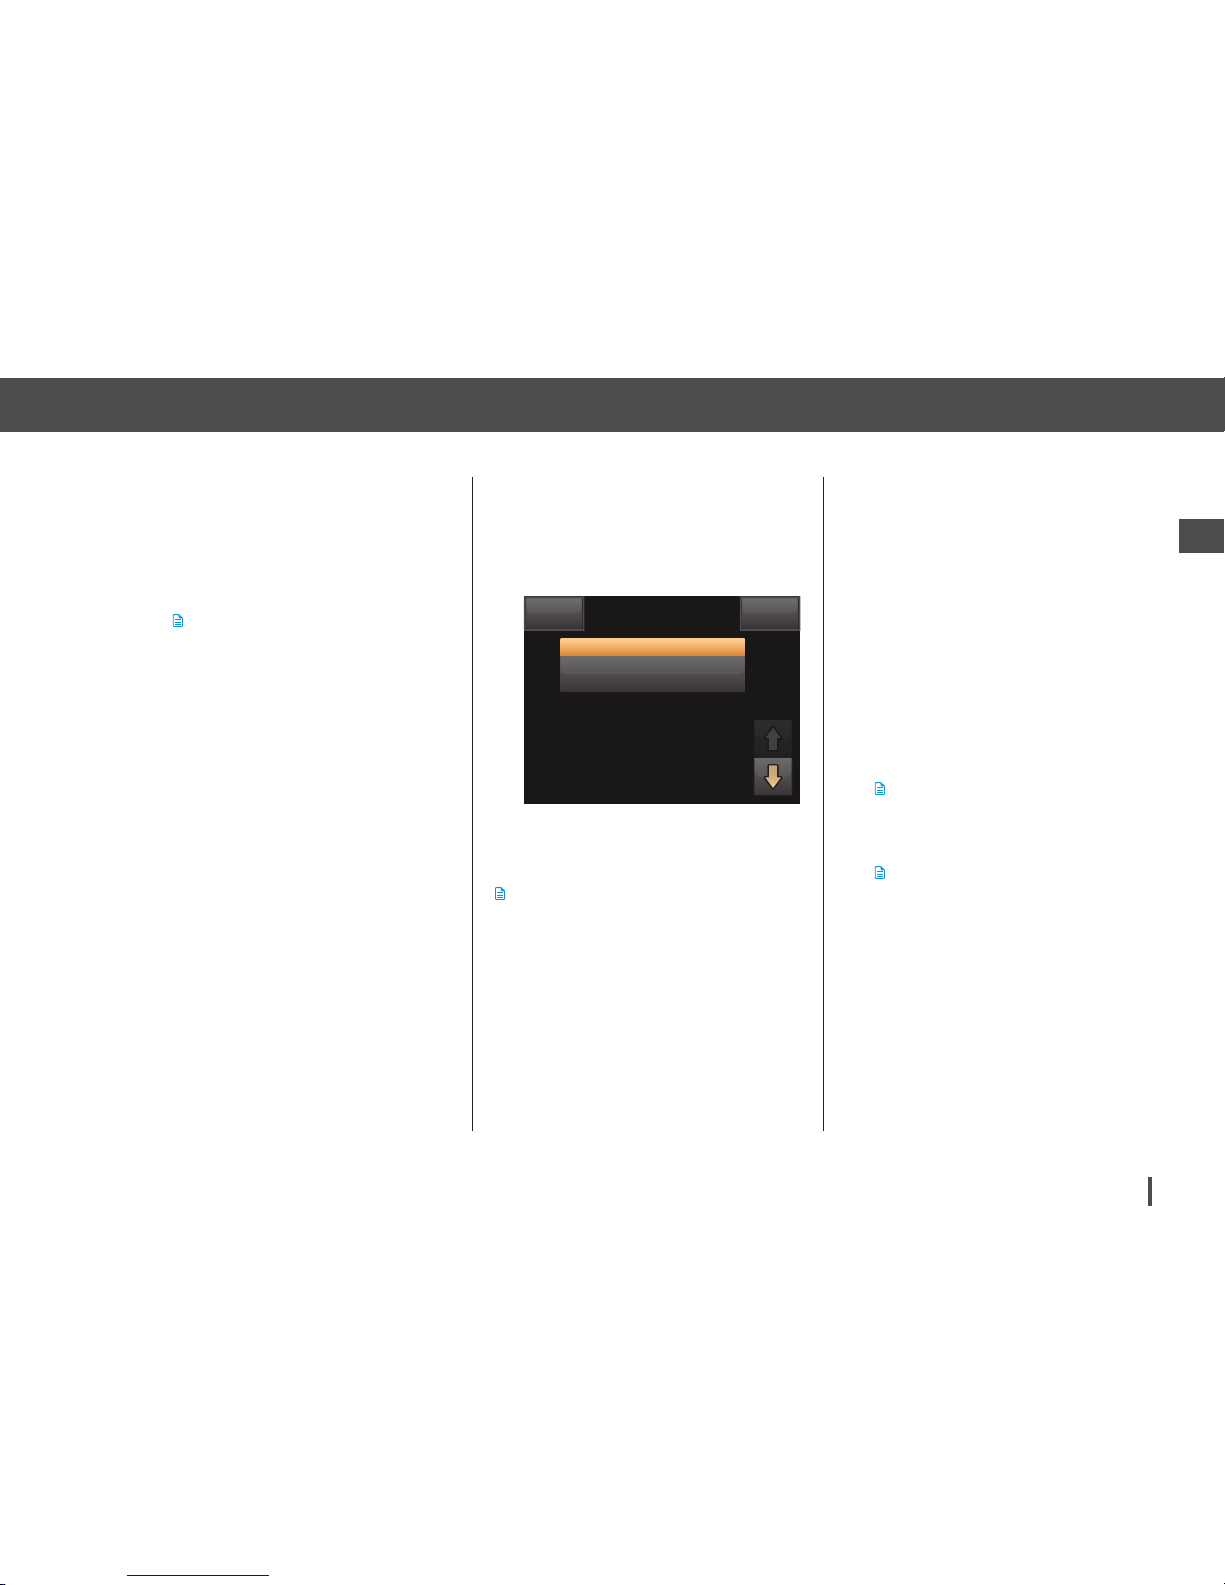
Customer Technical Support: 1-877-801-6901 79
Key Pump Features2
Chapter 6 – Personal Profile
5. Tap Carb Ratio.
6. Using the onscreen keypad, enter
your insulin-to-carbohydrate ratio
and tap DONE.
NOTE
Enter the grams of carb to be covered by 1
unit of insulin.
7. Tap Target BG.
8. Using the onscreen keypad, enter
your target BG and tap DONE.
9. Review entered values and
tap SAVE.
10. Confirm Settings.
Tap YES if entered data is correct.
Tap NO to make changes.
11. Tap BACK to set the Bolus
Settings.
Tap ADD to create additional
time segments.
Adding More Time Segments
NOTE
Any settings that you entered in the previous
time segment are copied and appear in the new
segment. This allows you to simply adjust only
the specific settings you want, rather than have
to enter them all over again.
1. On the “Add Segment” screen,
tap Start Time.
2. Using the onscreen keypad, enter
the time (hour and minutes) that
BACK
Timed Settings
ADD
12:00 AM
0.75
BASAL
1:50
CORRECT
1:10
CARB TARGET BG
120
you want the segment to begin,
and tap DONE.
3. On the “Add Segment” screen, tap
Time of Day to select AM or PM.
4. Tap NEXT.
5. Repeat steps 1–10 from the
“Programming a New Personal
Profile” section above for each
segment you want to set up (up
to 16).
NOTE
Once a time segment is set beyond 12:00
PM, the default will change to PM.
NOTE
To find time segments in the list that are
not displayed on the first screen, tap the
scroll arrows.
Page 80
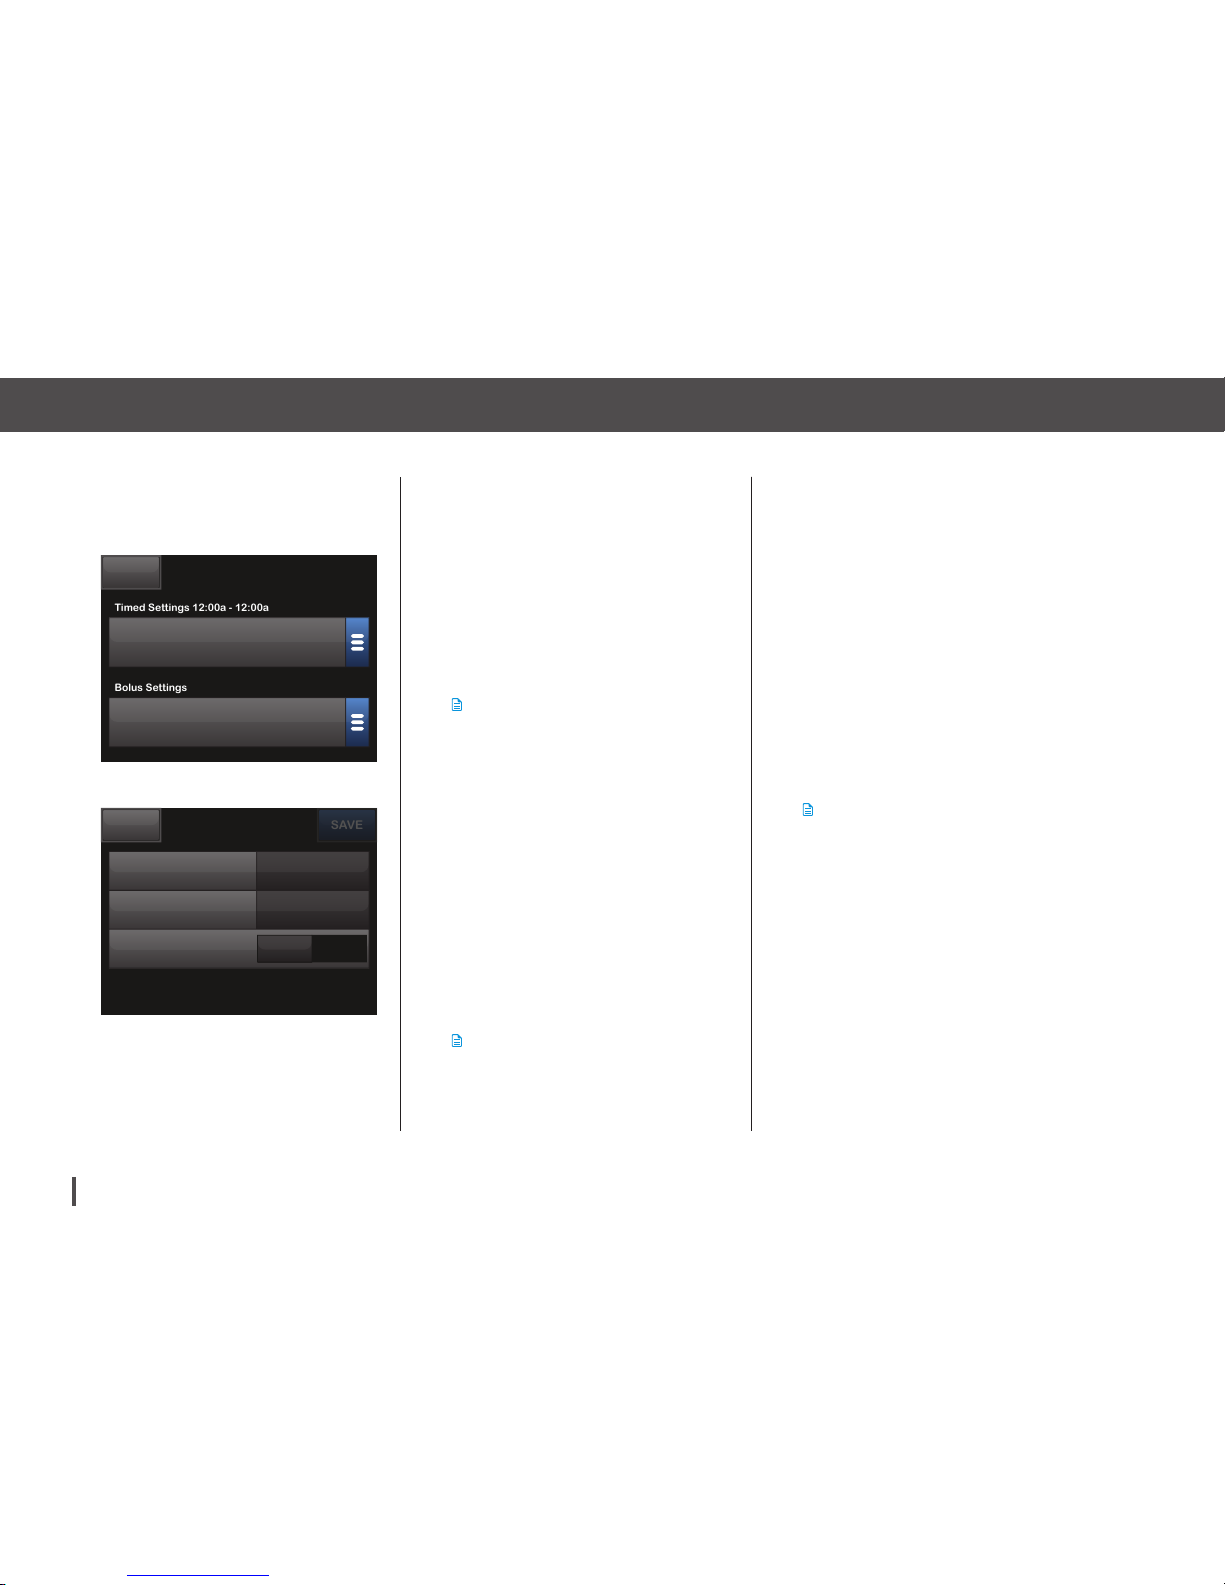
Customer Technical Support: 1-877-801-690180
Chapter 6 – Personal Profile
Bolus Settings
1. Tap the Bolus Settings Panel.
2. Tap Insulin Duration.
3. Using the onscreen keypad, enter
the desired time for the duration
of insulin action (2-8 hrs) and
tap DONE.
BACK
Weekday
Bolus Settings
5 hrs
DURATION
10 u
MAX BOLUS
OFF
CARBS
Timed Settings 12:00a - 12:00a
0.75
BASAL
1:50
CORRECT
120
TARGET BG
1:10
CARB
SAVE
BACK
Insulin Duration
5 hrs
Max Bolus
10 u
Bolus Settings
Carbohydrates
ON
OFF
4. Tap Max Bolus.
5. Using the onscreen keypad, enter
the desired amount for maximum
bolus (1–25 units) and tap DONE.
6. Tap Carbohydrates to turn on
and use the carb ratio when
calculating boluses.
NOTE
If not using a carb ratio, do not turn the
Carbohydrates setting to ON.
7. Review entered values and
tap SAVE.
8. Confirm Settings.
Tap YES if entered data is correct.
Tap NO to make changes.
9. Tap Tandem Logo to return to the
Home Screen.
NOTE
Editing, duplicating and renaming an
inactive profile will not automatically
activate that profile. Refer to Chapter 6.6
for instructions on activating profiles.
Adding More Personal Profiles
1. From the Home Screen,
tap OPTIONS.
2. Tap My Pump.
3. Tap Personal Profiles.
4. Tap NEW.
5. Name the new profile and repeat
steps for Timed Settings and
Bolus Settings.
NOTE
If the first profile is programmed using a
carb ratio, any new profile will also have
the Carbohydrates option turned ON, but a
ratio will still need to be defined.
Page 81
Customer Technical Support: 1-877-801-6901 81
Key Pump Features2
Chapter 6 – Personal Profile
6.4 Editing or Reviewing
an Existing Profile
1. From the Home Screen,
tap OPTIONS.
2. Tap My Pump.
3. Tap Personal Profiles.
4. Tap the name of the Personal
Profile to edit or review.
5. Tap Edit.
6. Tap Timed Settings Panel.
7. Tap the desired time segment
to edit.
8. Tap Basal, Correction Factor,
Carb Ratio or Target BG to make
changes as needed and use
the onscreen keypad to enter
changes. Tap DONE.
9. View recent changes and
tap SAVE.
10. Confirm Settings.
Tap YES if entered data is correct.
Tap NO to make changes.
11. Tap BACK after editing all of the
time segments.
NOTE
Edit other time segments within the Timed
Settings by tapping on them and using the
same steps described above.
NOTE
To Add a time segment:
» Ta p ADD.
» Enter desired start time.
To Delete a time segment:
» Tap on the X to the left of the time
segment.
» Ta p YES to confirm.
12. Tap the Bolus Settings Panel to
change DURATION, MAX BOLUS
or CARBS as needed. Use the
onscreen keypad to enter desired
changes. Tap SAVE.
13. Confirm Settings.
Tap YES if entered data is correct.
Tap NO and make changes.
14. Tap Tandem Logo to return to the
Home Screen.
Page 82
Customer Technical Support: 1-877-801-690182
Chapter 6 – Personal Profile
6.5 Duplicating an Existing
Profile
1. From the Home Screen,
tap OPTIONS.
2. Tap My Pump.
3. Tap Personal Profiles.
4. Tap the name of the Personal
Profile to duplicate.
5. Tap Duplicate.
6. Confirm profile to duplicate by
tapping YES.
7. Using the onscreen keypad, enter
the name (up to 16 characters) for
the new profile and tap SAVE.
“Profile Duplicated” screen
is displayed.
A new Personal Profile will be created with the same settings as the
profile copied.
8. Tap the Timed Settings or Bolus
Settings Panel to make changes
to the new profile.
6.6 Activating an Existing
Profile
1. From the Home Screen,
tap OPTIONS.
2. Tap My Pump.
3. Tap Personal Profiles.
4. Tap the name of the Personal
Profile to be activated.
NOTE
» The Activate and Delete options are
disabled for the active profile because
the profile is already activated. You
cannot delete a profile until you have
activated another profile.
» If you have only 1 profile defined, you
do not need to activate it (that profile is
automatically activated).
5. Tap Activate.
A screen to confirm the activation
request is displayed.
Page 83
Customer Technical Support: 1-877-801-6901 83
Key Pump Features2
Chapter 6 – Personal Profile
6. Tap YES.
“Profile Activated” screen
is displayed.
6.7 Renaming an Existing
Profile
1. From the Home Screen,
tap OPTIONS.
2. Tap My Pump.
3. Tap Personal Profiles.
4. Tap the name of the Personal
Profile to be renamed.
5. Tap Down Arrow, and
then Rename.
6. Using the onscreen keypad,
rename the profile name (up to 16
characters) and tap SAVE.
7. Tap Tandem Logo to return to the
Home Screen.
6.8 Deleting an Existing
Profile
1. From the Home Screen,
tap OPTIONS.
2. Tap My Pump.
3. Tap Personal Profiles.
4. Tap the name of the Personal
Profile to be deleted.
NOTE
The active Personal Profile cannot
be deleted.
5. Tap Delete.
6. Tap YES.
“Profile Deleted” screen
is displayed.
7. Tap Tandem Logo to return to the
Home Screen.
Page 84

Customer Technical Support: 1-877-801-690184
Chapter 6 – Personal Profile
THIS PAGE IS
INTENTIONALLY
LEFT BLANK
Page 85

Chapter 7
Bolus
Page 86
Customer Technical Support: 1-877-801-690186
Chapter 7 – Bolus
7.1 Bolus Overview
A bolus is a quick dose of insulin that is
usually delivered to cover food eaten or
to correct a high BG.
Your t:slim Pump offers you the ability
to deliver different boluses to cover
carbohydrate intake (food bolus) and
bring your BG back to target (correction
bolus). Food and correction boluses
can also be programed together.
If Carbohydrates is turned on in your
active personal profile, you will enter
grams of carbohydrate and the bolus
will be calculated using your Carb
Ratio.
You can always override the calculated
bolus by tapping the area above “units”
located at the top of the bolus screen
between BACK and NEXT. The override
function is always active.
If Carbohydrates is turned off in your
active personal profile, you will enter
units of insulin to request the bolus.
NOTE
When attempting to deliver a bolus that exceeds
the amount of insulin remaining in the cartridge,
a message screen appears indicating there
is not enough insulin to deliver the requested
bolus. You are required to enter a new amount.
WARNING
Do not deliver a bolus until you have reviewed
the calculated bolus amount on the pump
display. If you dose an insulin amount that is too
high or too low, this could lead to a very low or
very high BG level. You can always adjust the
insulin units up or down before you decide to
deliver your bolus.
PRECAUTION
» Before delivering insulin, always check your
pump and infusion set for damage, leaks, or
kinks in the tubing, as these problems could
restrict or stop insulin delivery and possibly
result in under-infusion.
» Before delivering insulin, check your t:slim
Pump’s personal settings to ensure they are
correct.
NOTE
If the max bolus is set at 25 units and the
requested bolus is greater than 25 units, after
the bolus is delivered a reminder screen will
appear. The option of delivering the remaining
amount of the bolus of up to an additional 25
units will be given. Refer to Max Bolus Alert in
Chapter 15.9.
Page 87
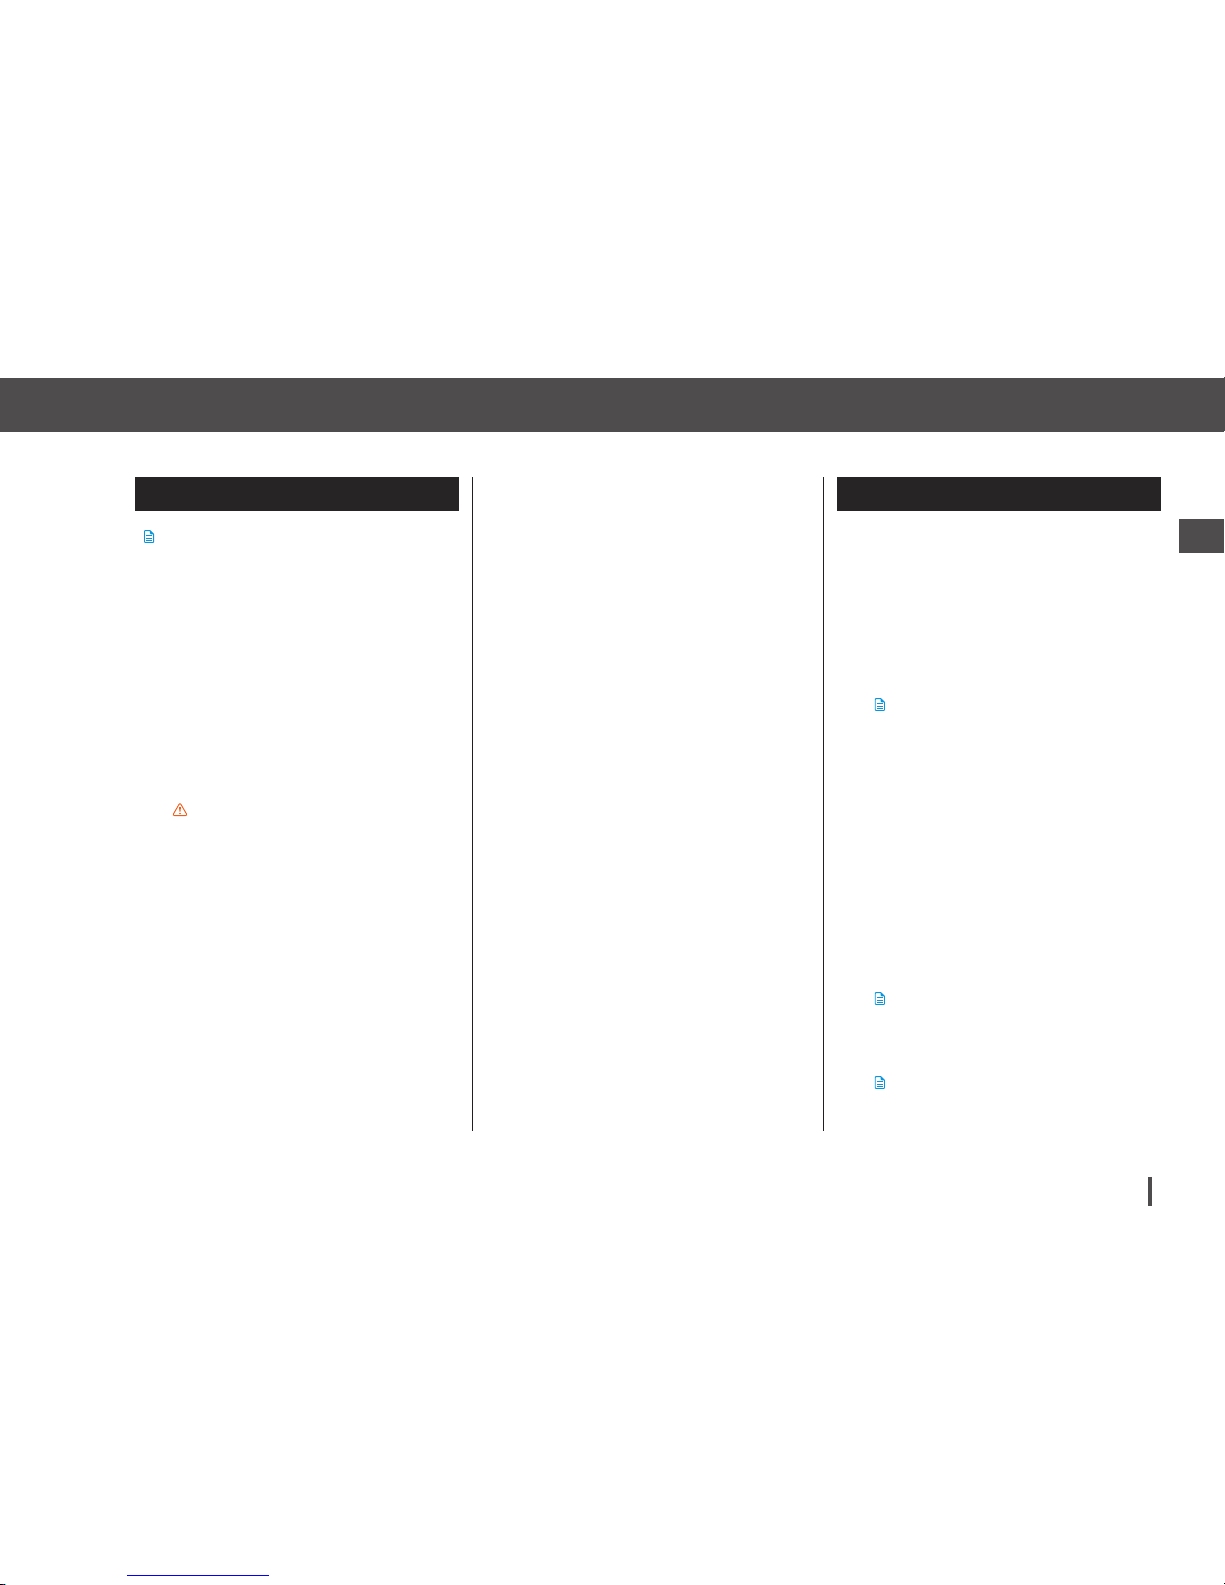
Customer Technical Support: 1-877-801-6901 87
Key Pump Features2
Chapter 7 – Bolus
7.2 Food Bolus Using Units
NOTE
If bolusing using a carb ratio skip to the next
chapter, Food Bolus Using Grams.
1. From the Home Screen,
tap BOLUS.
2. Tap 0 units.
3. Using the onscreen keypad enter
units of insulin to be delivered,
then tap DONE.
PRECAUTION
Always confirm that the decimal point
placement is correct.
4. Tap NEXT to confirm the units of
insulin to be delivered.
5. Confirm Request.
Tap YES if entered data is correct.
Tap NO to go back to make
changes or view calculations.
6. Tap DELIVER.
7. The bolus splash screen
is displayed.
7.3 Food Bolus Using Grams
1. From the Home Screen,
tap BOLUS.
2. Tap 0 grams.
3. Using the onscreen keypad enter
grams of carb and tap DONE.
NOTE
» To add multiple carb values enter first
value, then tap +/=, enter second value,
tap +/=. Continue until done.
» To clear the value entered and start over,
tap the back arrow.
4. Check that the grams of carb are
entered in the correct location on
the screen.
5. Tap NEXT to confirm the units of
insulin to be delivered.
NOTE
Tap View Calculation to display the Delivery
Calculation screen.
NOTE
Tap the displayed units calculated to
override the amount.
Page 88
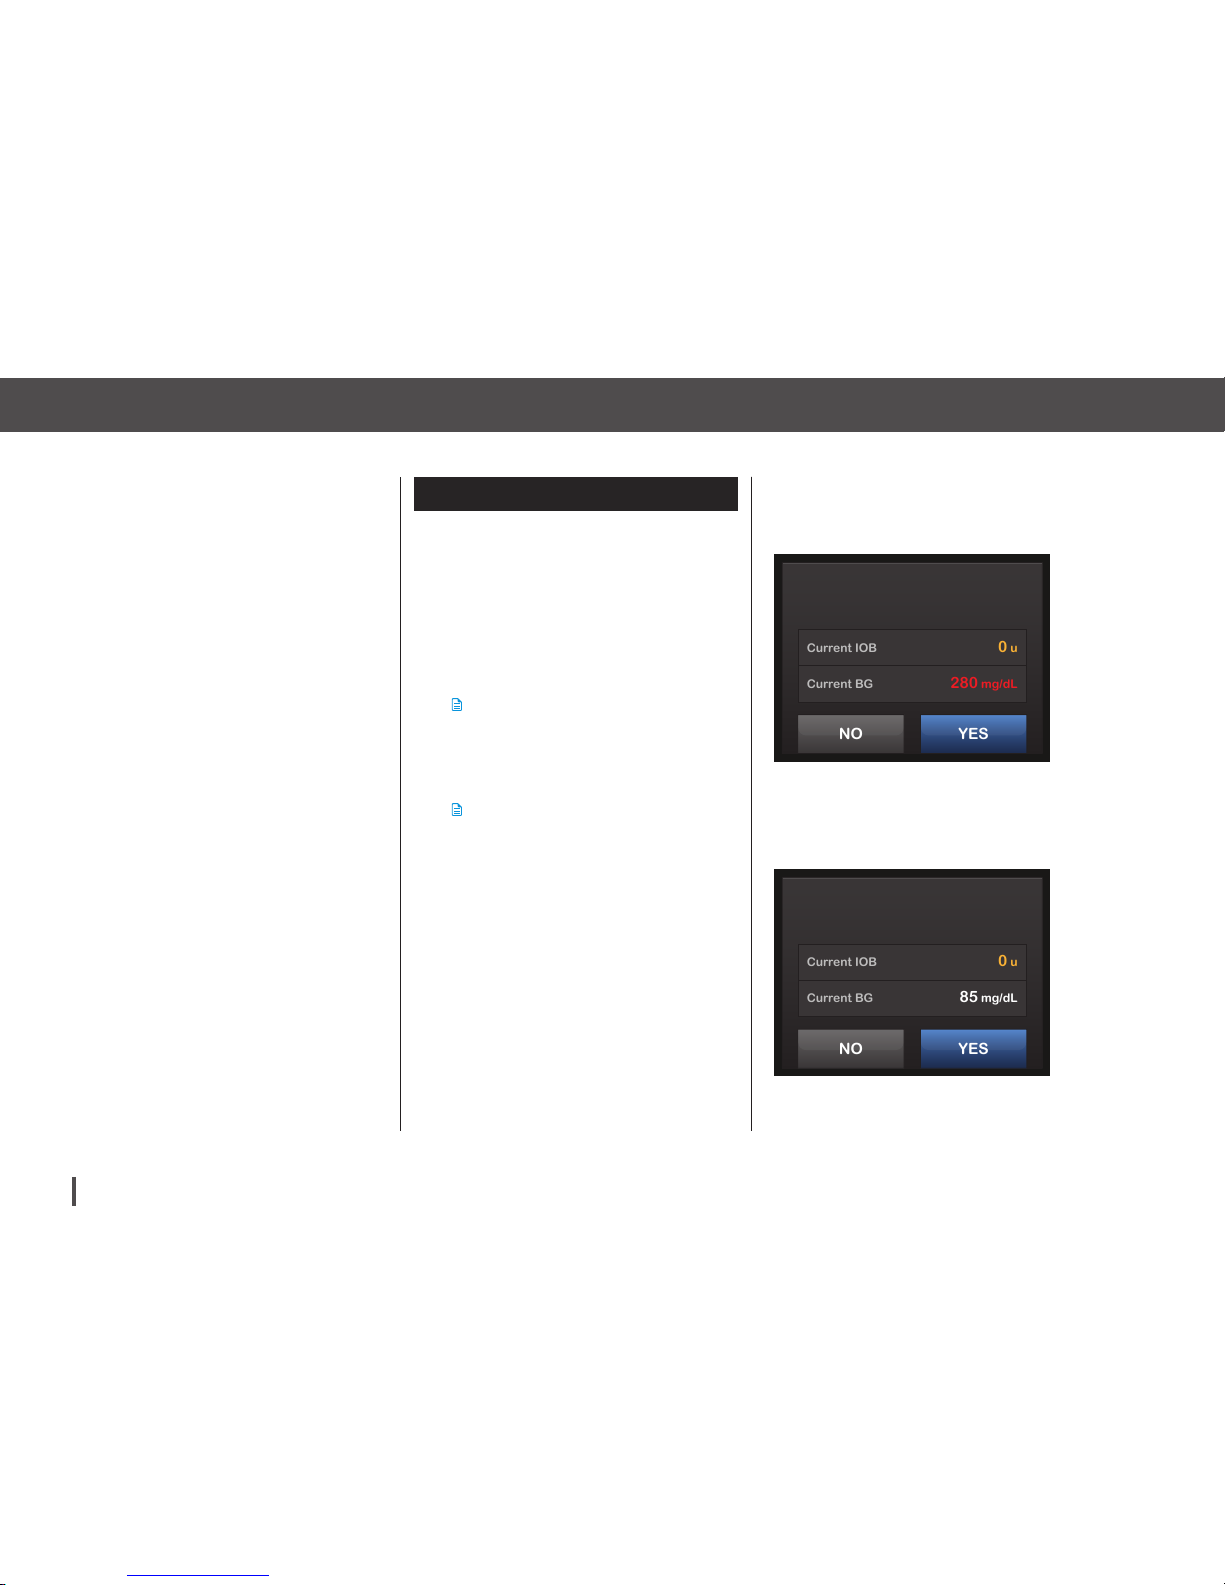
Customer Technical Support: 1-877-801-690188
Chapter 7 – Bolus
6. Confirm Request.
Tap YES if entered data is correct.
Tap NO to go back to make
changes or view calculations.
7. Tap DELIVER.
8. The bolus splash screen
is displayed.
7.4 Correction Bolus
1. From the Home Screen,
tap BOLUS.
2. Tap Add BG.
3. Using the onscreen keypad, enter
BG value and tap DONE.
NOTE
Once DONE is tapped, the BG value is
saved in pump History whether or not a
bolus is delivered.
NOTE
» Tap the view calculation screen to
display the Delivery Calculation Screen.
» Tap the displayed units calculated to
override the amount.
If BG is above the Target BG, a
message screen will indicate BG is
above Target.
To add a correction bolus tap YES.
If BG is below Target BG, a message
screen will indicate BG is below Target.
To reduce bolus calculation tap YES.
NO
YES
Your BG is Above Target
Add Correction Bolus?
Current IOB
0 u
Current BG
280 mg/dL
NO
YES
Your BG is Below Target
Reduce Bolus Calculation?
Current IOB
0 u
Current BG
85 mg/dL
Page 89
Customer Technical Support: 1-877-801-6901 89
Key Pump Features2
Chapter 7 – Bolus
NOTE
When your blood glucose is:
» Above Target BG: the insulin for the food
bolus and the correction bolus will be
added together. If IOB is present, it will
only be used in the calculation of the
correction portion of the bolus.
» Between 70 mg/dL and Target BG: You
will be given an option to reduce the
food bolus to correct for the low blood
glucose. In addition, if IOB is present,
it will also be used to reduce the bolus
calculation.
» Below 70 mg/dL: The food bolus will be
reduced to automatically correct for the
low blood glucose. In addition, if IOB is
present, it will also be used to reduce
the bolus calculation.
Always treat hypoglycemia (low blood
glucose) with fast-acting carbohydrates
according to the instructions of your
healthcare provider and then re-test your
blood glucose to ensure that the treatment
was successful.
4. Tap NEXT to confirm the units of
insulin to be delivered.
5. Confirm Request.
Tap YES if entered data is correct.
Tap NO to go back to make
changes or view calculations.
6. Tap DELIVER.
7. The bolus splash screen
is displayed.
7.5 Extended Bolus
The Extended Bolus feature allows you
to deliver part of the bolus now and
part of the bolus slowly over a period
of up to 8 hours. This can be helpful for
high fat meals such as pizza or if you
have gastroparesis (delayed stomach
emptying). Talk with our healthcare
provider to determine if this feature
is appropriate for you as well as for
recommendations on the split between
now and later and the duration for the
later portion.
Only 1 extended bolus can be active
at any given time. However, if the
DELIVER LATER portion of an extended bolus is active, you can request
another standard bolus.
1. From the Home Screen,
tap BOLUS.
2. Tap 0 grams (or 0 units).
3. Using the onscreen keypad enter
grams of carb (or units of insulin).
Tap DONE.
Page 90
Customer Technical Support: 1-877-801-690190
Chapter 7 – Bolus
4. If desired, tap Add BG and using
the onscreen keypad enter BG
value. Tap DONE.
5. Tap NEXT to confirm the units of
insulin to be delivered.
NOTE
Tap View Calculation to display the Delivery
Calculation screen.
6. Confirm Request.
Tap YES if entered data is correct.
Tap NO to go back to make
changes or view calculations.
7. Tap EXTENDED to turn on the
extended feature, then tap NEXT.
8. Tap 50% under DELIVER NOW
to adjust the percentage of the
food bolus that is to be delivered
immediately.
NOTE
The percentage value for DELIVER LATER is
automatically calculated by the pump. The
default is 50% NOW and 50% LATER. The
default for DURATION is 2 hours.
NOTE
A correction bolus will always be given in
the DELIVER NOW portion.
9. Use the onscreen keypad to enter
the percentage of the bolus to
DELIVER NOW and tap DONE.
NOTE
For the DELIVER NOW portion, the
minimum amount is .05 units. If the
DELIVER NOW portion is less than .05
units, you will be notified and the DELIVER
NOW portion will be set to .05 units.
10. Tap 2 hrs under DURATION.
NOTE
The DELIVER LATER portion of the
Extended Bolus also has minimum and
maximum rates. If you program a DELIVER
LATER rate outside of these limits, you will
be notified and the duration of the DELIVER
LATER portion will be adjusted.
11. Use the onscreen keypad to
adjust the length of time the bolus
is to be delivered, then tap DONE.
12. Tap NEXT.
NOTE
Tap View Units to display the breakdown of
units to be delivered NOW versus LATER.
13. Confirm Request.
Tap YES if entered data is correct.
Tap NO to go back to make
changes or view calculations.
14. Tap DELIVER.
15. The bolus splash screen
is displayed.
Page 91
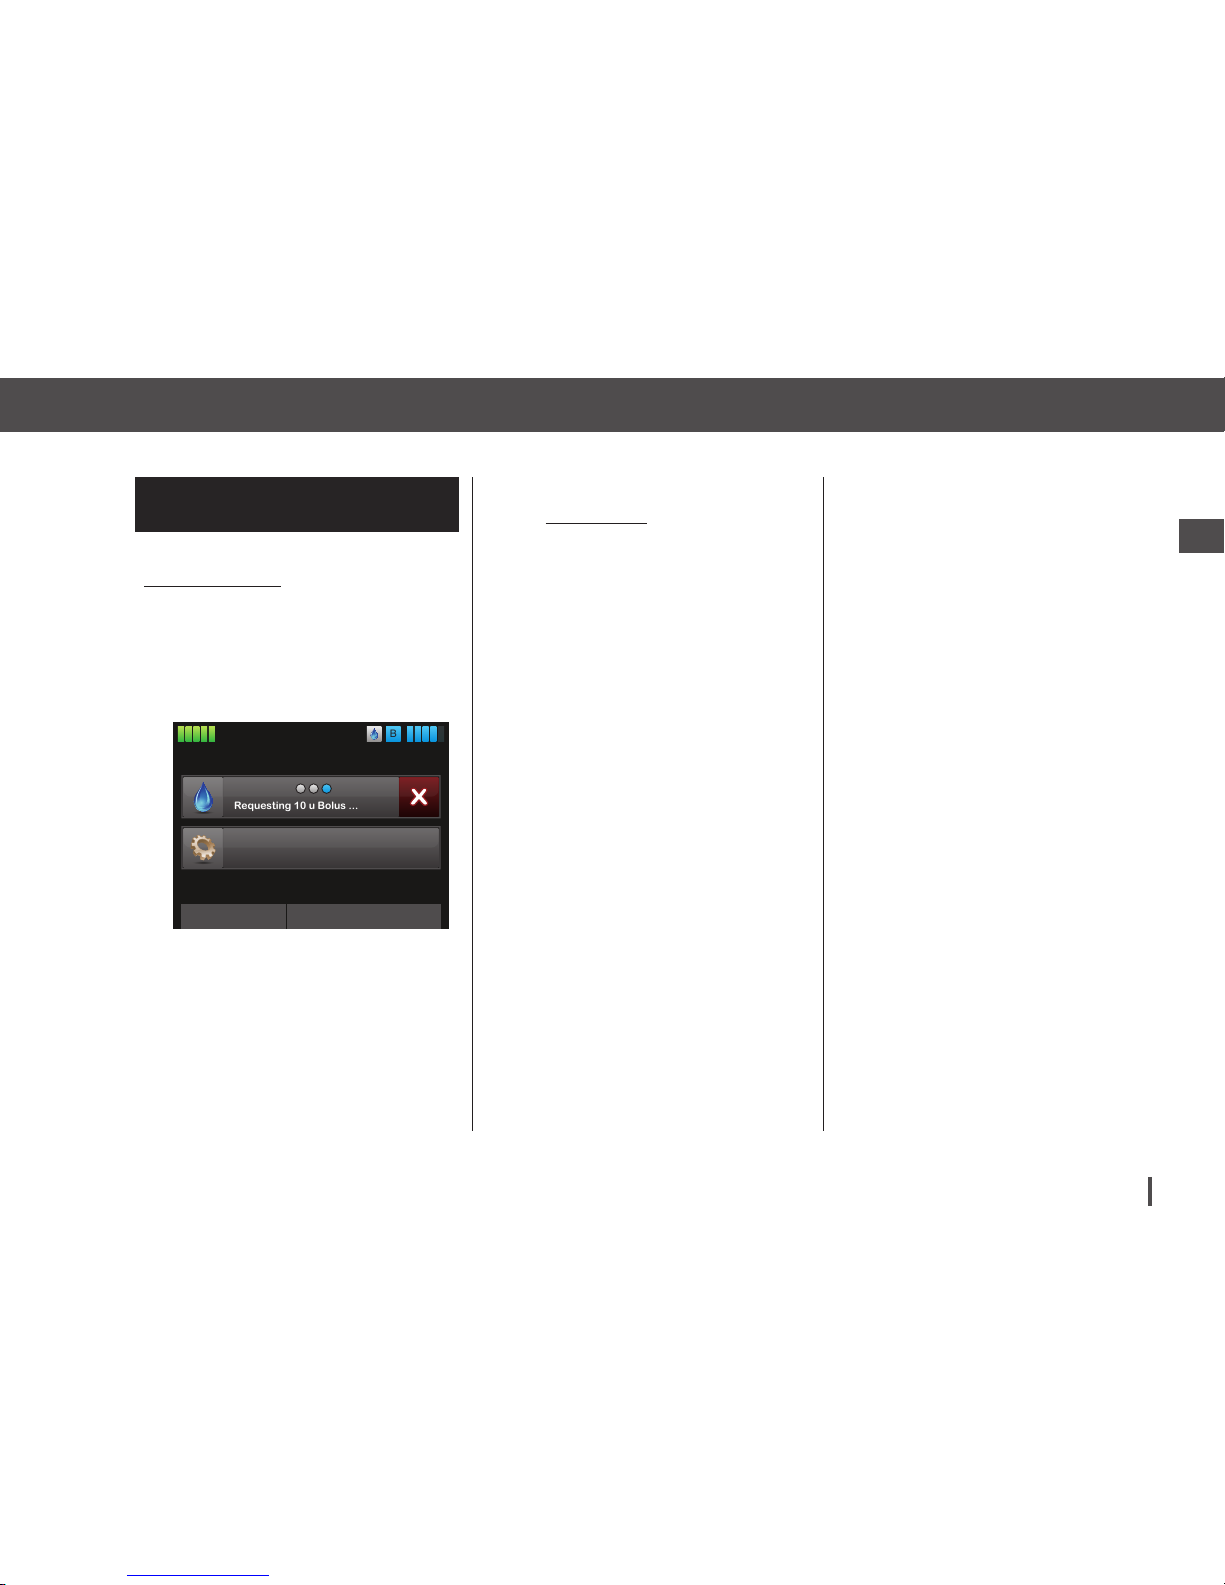
Customer Technical Support: 1-877-801-6901 91
Key Pump Features2
Chapter 7 – Bolus
7.6 Canceling or Stopping
a Bolus
Canceling a Bolus If delivery
Has Not Started
1. Tap 1-2-3 to access the
Home Screen.
2. Tap X (stop icon) to cancel
the bolus.
The bolus button will remain
inactive while the bolus is
being canceled.
Once canceled, the bolus button
will become active again on the
Home Screen.
INSULIN ON BOARD (IOB)
Units 1.1 u 1:09 hrsTime Remaining
B
10:20 AM
March 15, 2015 235 u
OPTIONS
100%
Requesting 10 u Bolus ...
BOLUS
Stopping a Bolus if delivery of the
bolus Has Started:
1. Tap 1-2-3 to access the
Home Screen.
2. Tap X (stop icon) to stop delivery.
3. Tap YES.
The BOLUS STOPPED screen is
displayed and the units delivered
are calculated.
4. Units requested and delivered are
shown. Tap CLOSE.
Page 92

Customer Technical Support: 1-877-801-690192
Chapter 7 – Bolus
THIS PAGE IS
INTENTIONALLY
LEFT BLANK
Page 93

Chapter 8
Stop/Resume Insulin
Page 94
Customer Technical Support: 1-877-801-690194
Chapter 8 – Stop/Resume Insulin
8.1 Stopping Insulin Delivery
You can stop all insulin deliveries,
including basal, and any active bolus or
temp rate at any time.
1. From the Home Screen,
tap OPTIONS.
2. Tap STOP INSULIN.
3. Tap STOP.
The “All Deliveries Stopped” screen
appears before returning to the
Home Screen showing the status
“ALL DELIVERIES STOPPED”. A red
exclamation mark icon also appears
to the right of the time and date.
NOTE
When you tap STOP on the confirmation
screen, any active bolus and any active
temp rate are immediately stopped. If you
tap BACK on the confirmation screen, bolus
delivery continues.
» No insulin delivery can take place while
your pump is stopped.
8.2 Resuming Insulin Delivery
1. If pump screen is not on, press
Screen On/Quick Bolus Button
once to turn on your t:slim Pump
screen.
2. Tap 1-2-3 to access the
Home Screen.
3. Tap RESUME.
4. The RESUMING INSULIN splash
screen is displayed.
– OR –
1. From the Home Screen,
tap OPTIONS.
2. Tap RESUME INSULIN.
3. Tap RESUME.
4. The RESUMING INSULIN splash
screen is displayed.
Page 95
Customer Technical Support: 1-877-801-6901 95
Key Pump Features2
Chapter 8 – Stop/Resume Insulin
THIS PAGE IS
INTENTIONALLY
LEFT BLANK
Page 96

Section 3
Additional Pump
Operations
Page 97

Chapter 9
Temporary Basal Rate
Page 98
Customer Technical Support: 1-877-801-690198
Chapter 9 – Temporary Basal Rate
9.1 Setting a Temp Rate
A Temp Rate is used to increase or
decrease (by percentage) the current
basal rate for a period of time. This feature can be helpful for situations such
as exercise or illness.
When you enter the Temp Rate screen,
the default values are 100% (current
basal rate) and a Duration of 0:15
min. The Temp Rate can be set from a
minimum of 0% of current basal rate to
a maximum of 250% of current basal
rate in increments of 1%.
Duration can be set from a minimum of
15 minutes to a maximum of 72 hours
in increments of 1 minute.
If you program a Temp Rate greater
than 0% but less than the minimum
allowable basal rate of 0.1 units/hr, you
will be notified that the selected rate
is too low and that it will be set to the
minimum allowable rate for delivery.
If you program a Temp Rate more than
the maximum allowable basal rate of
15 units/hr, you will be notified that the
selected rate is too high and that it will
NOTE
If a Temp Rate is active, the status of
insulin delivery displays an orange “T”. If
a Temp Rate of 0% is active, the status of
insulin delivery displays a red “T”.
8. The Screen Lock screen will be
displayed with the icon indicating
a Temp Rate is active.
be set to the maximum allowable rate
for delivery.
1. From the Home Screen,
tap OPTIONS.
2. Tap Temp Rate.
3. Tap Temp Rate.
4. Using the onscreen keypad enter
desired percentage. Tap DONE.
NOTE
Current rate is 100%. An increase is
greater than 100% and decrease is less
than 100%.
5. Tap Duration. Using the onscreen
keypad enter desired length of
time for Temp Rate. Tap DONE.
NOTE
To see the actual units to be delivered tap
View Units.
6. Verify settings and tap START.
7. The “TEMP RATE STARTED”
splash screen is displayed.
Page 99
Customer Technical Support: 1-877-801-6901 99
Additional Pump Operations3
Chapter 9 – Temporary Basal Rate
9.2 Stopping a Temp Rate
To stop an active temp rate:
1. From the Home Screen,
tap OPTIONS.
2. On the Options screen, tap X
(stop icon) on the right side of
Temp Rate.
3. On the confirmation screen,
tap STOP. The “TEMP RATE
STOPPED” screen appears before
returning to the Options screen.
Page 100

Customer Technical Support: 1-877-801-6901100
Chapter 9 – Temporary Basal Rate
THIS PAGE IS
INTENTIONALLY
LEFT BLANK
 Loading...