

Page 1

Tandberg DLT7000
GB
D
F
Reference Guide
Bedienungshandbuch
Guide pratique
Revision 2 - January 1999
Page 2

Introduction
About This Manual
GB
Tandberg DLT7000 Front Panel
These control points on the DLT7000 front panel are for operating the drive (Figure 1):
Use this manual as a quick reference when operating the Tandberg
DLT7000 tape drive in your system. For additional information, see the
Tandberg DLT7000 Tape Backup System Installation Guide.
Status
Density
Indicators
(Yellow)
1442443
2.6
6.0
10.0/
15.0
20.0
35.0
Compress
Density
Override
Cartridge Door
Write
Protected
Tape in Use
Use
Cleaning
Tape
Operate
Handle
Indicators
123
Write Protect
(Orange)
Tape in Use
(Yellow)
Use Cleaning
Tape (Yellow)
Operate
Handle
(Green)
Density
Select
Push
Select
Unload
Unload
Push Button
Button
Cartridge insert / release handle (down)
Figure1 DLT7000 Front Panel View
Operation Buttons / Handle
FUNCTION LOCATION COLOR USAGE
Density Select Lower Left Gray Used to override the default density which would normally be
recorded on a tape
Unload Lower Right Gray Used to request the drive to position the tape and allow unload
via cartridge insert / release handle
NOTE: Unload operation can be disabled by the drive application software
Cartridge Insert/ Centre Gray Used to load / unload data cartridges
Release Handle
Page 3

Summary of Front Panel Indicators
Use the following tables to determine the drive’s operating conditions:
LABEL COLOR STATE OPERATING CONDITION
STATUS INDICATOR (right front panel)
Write Protected Orange On Cartridge is write-protected
Tape in use Yellow Blinking Cartridge is loaded and the tape is moving.
Use Cleaning Yellow On Drive head needs cleaning, or the tape is bad.
Cartridge
Operate Handle Green On Okay to operate the cartridge/ insert release handle.
All four right side On Power-on Selftest is starting.
or all left side Blinking A Power-on Selftest error has occurred. Press the Unload
indicators button or turn drive power off and then on again to clear the
LABEL COLOR STATE OPERATING CONDITION
DENSITY INDICATOR LEFT front panel)
2.6 Yellow On Indicates the tape is recorded in 2.6 GB format.
6.0 Yellow On Indicates the tape is recorded in 6.0 GB format.
10.0/15.0 Yellow On (default) Indicates the tape is recorded in 10.0 GB format if the DLTtape™III
20.0 Yellow On (default) Indicates the tape is recorded in 20.0 GB format.
35.0 Yellow On (default) Indicates the tape is recorded in 35.0 GB format.
Compress Yellow On Compression mode enabled. (Compression can be done in 10.0,
Density Override Yellow On You have selected a density from the front panel.
All four right side Blinking A Power-on Selftest error has occurred. Press the Unload button or
or all left side turn drive power off and then on again to clear the error. If the
indicators error remains, call your service representative.
Off Cartridge is write-enabled
On Cartridge is loaded; ready for use.
Remains on after Cleaning tape attempted to clean the drive head, but the tape
you unload the expired, so cleaning was not done.
cleaning cartridge
After cleaning, Problem data cartridge. Try another cartridge.
turns on again
when you reload
the data cartridge
Off Cleaning is complete, or cleaning is unnecessary.
Off Do not operate the cartridge insert/release handle.
error. If the error remains, call your service representative.
Blinking Indicates the tape is recorded in another density. You have
selected this density for a write from BOT.
Blinking Indicates the tape is recorded in another density. You have
selected this density for a write from BOT.
tape is used.
Blinking Indicates the tape is recorded in15.0 GB format if the DLTtape™IIIxt
tape is used or indicates the tape is recorded in another density.
You have selected this density for a write from BOT.
Blinking Indicates the tape is recorded in another density. You have selected
this density for a write from BOT.
Blinking Indicates the tape is recorded in another density. You have selected
this density for a write from BOT.
15.0, 20.0 and 35.0 GB densities only.)
Off Compression mode disabled.
Off (default) Density to be selected by the host (automatic).
Blinking You are in density selection mode.
Page 4

Indicator Activity During Power-on Selftest
Powering up the system power, the drive performs the power-on selftest (POST). The sequence of
events are:
STAGE WHAT HAPPENS
1. The indicators on the right side turn on sequentially, from top to bottom. All indicators stay on for
2. The indicators on the left side turn on simultaneously for approximately three seconds, and then
3. The green Operate Handle indicator, the yellow Use Cleaning Tape indicator, and the orange Write
4. After initialization, the drive is in one of the following four states:
DRIVE STATE INDICATOR DISPLAYS AND ACTIONS
1. No cartridge is loaded 1. The yellow Tape In Use indicator is off
2. A cartridge is The drive loads the cartridge. When the yellow Tape In Use indicator stops flashing and
loaded and the stays on, the indicator turns on next to the label of the tape’s native density. For
handle is down example, if the actual tape density is 2.6 GB, then the indicator turns on next to the 2.6
3. A cartridge is The yellow Tape In Use indicator flashes and turns off. The green Operate Handle
loaded, but the indicator flashes. The handle should then be lowered and the cartridge loads.
handle is up (not
recommended)
4. The drive detects All four right-side or left-side indicators blink repeatedly. You may try to unload the
an error condition tape and reinitialize the drive by pressing the unload button. The indicators stop
a few seconds.
turn off.
Protected indicator turn off.
The yellow Tape in Use indicator blinks while the tape drive initializes.
2. The green Operate Handle indicator is on
3. The handle is unlatched
4. The drive beeps
You can now raise the handle and insert a cartridge.
label. You can now select a density. The drive is ready for use.
blinking and the drive tries to reinitialize.
Result: POST completes in about 15 seconds and the drive responds normally to all commands.
However, it might take longer for the media to become ready. After a bus reset, the tape drive responds within a bus selection time-out period.
Page 5

Loading a Cartridge
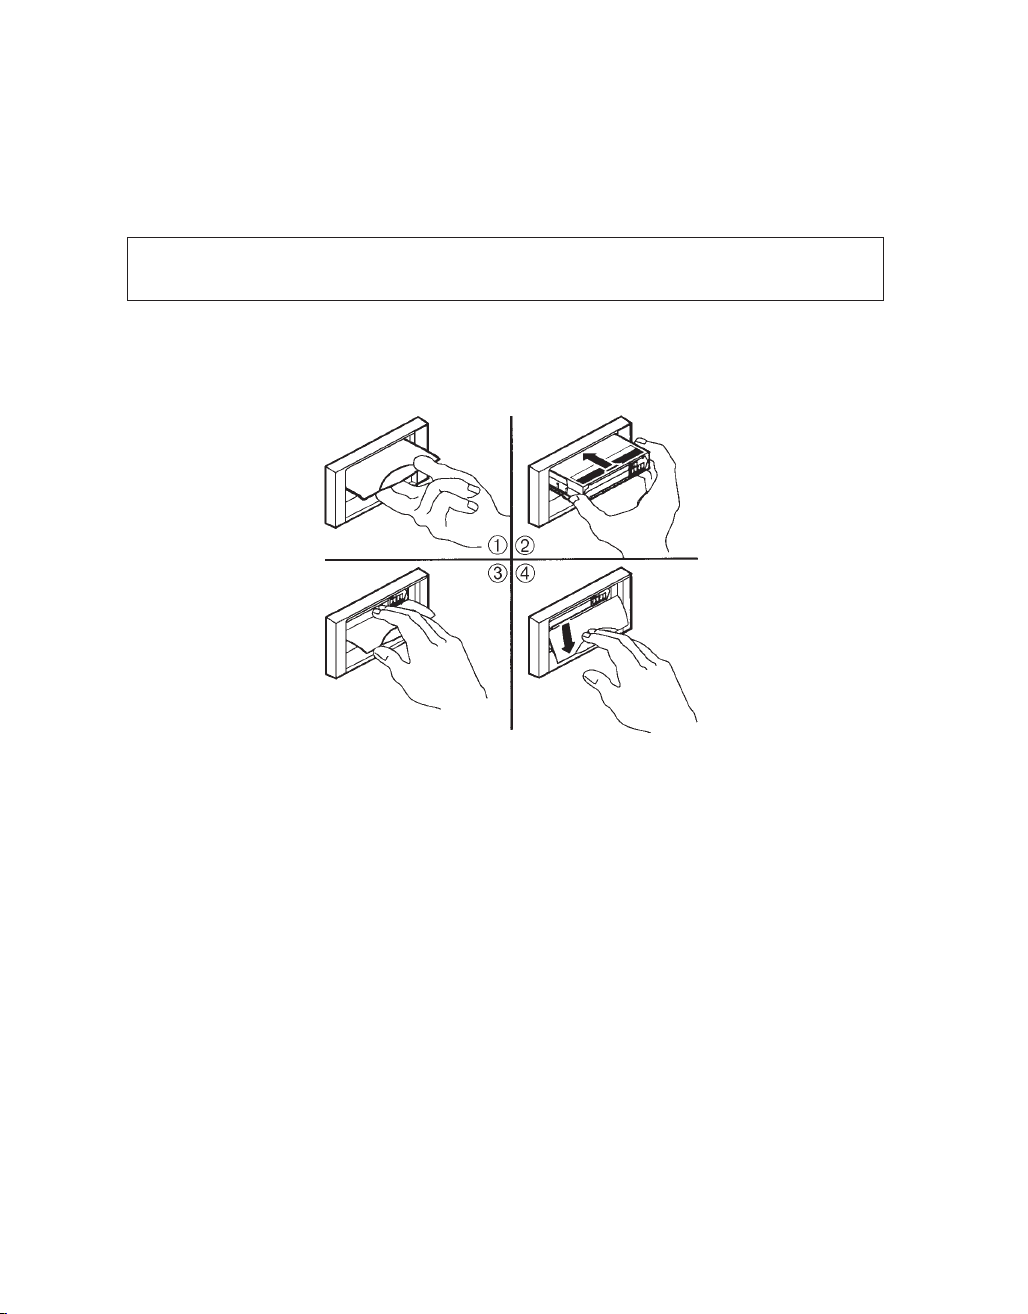
To load a cartridge into the drive (Figure 2):
1. When the green indicator is on steadily, pull the cartridge insert/release handle open
2. Insert the cartridge
3. Push the cartridge into the drive
4. Push the handle closed
NOTE:
To prevent handle failure, assist the handle to the closed position. Do not flip it.
The green indicator turns off and the yellow indicator blinks to show the tape is loading. When the
tape is at the beginning-of-tape (BOT) marker, the yellow indicator turns on steadily. The tape is now
ready for use.
Figure 2 Loading a Cartridge
Page 6

Unloading a Cartridge
CAUTION!
Always remove the cartridge from the drive before turning off host system power. Failure to remove
a cartridge can result in cartridge and drive damage.
When you remove the cartridge from the drive, return the cartridge to its plastic case to prolong the
cartridge life.
To unload a cartridge from the drive (Figure 3):
1. Press the Unload button (or issue the appropriate system software command). The yellow Tape in
Use indicator blinks as the tape rewinds.
2. When the green indicator turns on (the beeper also sounds), pull the cartridge insert/release handle open to eject the cartridge.
CAUTION!
Immediate extraction of the tape cartridge can lead to tape leader failure. Delay tape cartridge extraction by one to two seconds to avoid this problem.
3. Remove the cartridge.
4. Push the handle closed.
Figure 3 Unloading a Cartridge
Page 7

Cartridge Write-Protect Switch
• The drive may be prevented from writing/recording on the media by enabling the write protect
switch (Figure 4).
Orange
Indicator
Write-Protect
Switch
WriteEnabled (right)
WriteProtected (left)
Figure 4 Tape Cartridge Write-Protect Switch
Cleaning the Drive
• If the yellow Use Cleaning Tape indicator turns on, unload the data cartridge and load the cleaning
cartridge. The cleaning cartridge automatically cleans the read/write head and unloads when cleaning is complete. Be sure to remove the cleaning cartridge when cleaning is complete. Cleaning
cartridges may be purchased from Tandberg Data, ordering no. P/N 43 18 78. The cleaning cartridge provides approx. 20 drive cleanings before replacement is necessary.
Operating Hints
• Never operate the cartridge insert/release handle if the green Operate Handle indicator is not on
steadily or blinking, or drive power is off.
• Make sure the cartridge leader is in the correct position; open the cartridge door to inspect the
leader (Figure 5).
Cartridge
leader
Figure 5 Tape Cartridge Leader – Correct Position
Door lock
(Release by lifting door
lock with thumb)
Page 8

• Insert the cartridge into the drive with a slow, steady motion.
• Do not drop or bang the cartridge. This can displace the tape leader, making the cartridge unusable and possibly damaging the drive.
• Keep tape cartridges out of direct sunlight and away from heaters and other heat sources.
• Place an identification label only in the slide-in slot on the front of the cartridge.
• Do not adhere labels to a cartridge anywhere except in the slide-in slot.
Tandberg DLT7000 Media Compatibility
STORAGE 70GB* 35GB 40GB* 20GB 30GB* 15GB 20GB* 10GB 6GB 2.6GB
CAPACITY
Hardware Data Yes No Yes No Yes No Yes No No No
Compression
DLTtape™IV Default Override Override Override N/A N/A N/A N/A N/A N/A
DLTtape™IIIXT N/A N/A N/A N/A Default Override N/A N/A N/A N/A
DLTtape™III N/A N/A N/A N/A N/A N/A Default Override Override Override
* Assuming 2:1 data compression – capacity may vary depending on native data.
Default = The density that will be recorded on a blank tape cartridge without an override from either the application software or
Override = The lower density that may be selected to be recorded on the tape cartridge from BOT with an override from either the ap-
from the Density select button.
plication software or from the Density Select button.
NOTE:
The density may only be selected/overridden from BOT (Beginning Of Tape). On tape which already contains
pre-recorded data, the pre-recorded density will automatically be selected by the drive.
Page 9

Page 10

Einführung
Über dieses Handbuch
D
Tandberg DLT7000 Vorderansicht
Bitte beachten Sie die folgenden Hinweise für Anzeigen und Bedienungselemente beim Betrieb des
Tandberg DLT7000 (Bild 1):
Benutzen Sie dieses Handbuch als Kurzinformation beim Betrieb des
Tandberg DLT7000-Laufwerks in Ihrem System. Weitere Informationen
finden Sie im Tandberg DLT7000 Tape Backup System Installation
Guide.
Betriebsanzeigen
123
Schreibschutz
ein (orange)
Band läuft
(gelb)
ReinigungsCartridge einlegen (gelb)
Bedienungs-
Anzeige-
leuchten für
Speicher-
dichte (gelb)
1442443
2.6
6.0
10.0/
15.0
20.0
35.0
Compress
Density
Override
Cartridge-Schacht
Write
Protected
Tape in Use
Use
Cleaning
Tape
Operate
Handle
klappe betäti-
Taste für
Auswahl der
Speicher-
dichte
Select
Unload
gen(grün)
Entnahmetaste
Bedienungsklappe (unten)
Bild 1 Tandberg DLT7000 Vorderseite
Bedienungselemente
FUNKTION PLAZIERUNG FARBE GEBRAUCH
Taste für Aus- unten links grau Zur Änderung der Standardspeicherdichte des Bandes
wahl der
Speicherdichte
Entnehme- unten rechts grau Zum Spulen des Bandes für die anschließende Entnahme durch
taste die Bedienungsklappe
WICHTIG: Die Entnahme kann durch die Anwendungssoftware
gesperrt sein.
Bedienungs- mitte grau Zum Einlegen und Entnehmen der Cartridge
klappe
Page 11

Leuchtanzeigen
Aus folgender Übersicht können Sie den jeweiligen Betriebszustand entnehmen.
BETRIEBS- FARBE ZUSTAND BESCHREIBUNG
ANZEIGEN (rechts)
"Schreibschutz orange an Cartridge ist schreibgeschützt.
ein" aus Cartridge ist nicht schreibgeschützt.
"Band läuft" gelb blinkt Cartridge ist eingelegt, Band läuft.
"Reinigungs- gelb an Schreib/-Lesekopf muß gereinigt werden, oder schlechte
Cartridge Bandqualität
einlegen"
"Bedienungs- grün an Bedienungsklappe kann betätigt werden.
klappe aus Bedienungsklappe darf nicht betätigt werden.
betätigen"
"Alle Leucht- an Automatischer Funktionstest beim Einschalten.
anzeigen blinken Fehler beim automatischen Funktionstest. Entnahmetaste
recht oder drücken oder Laufwerk aus- und wieder einschalten, um
links" Fehler abzustellen. Wenn dies nicht hilft, Kundendienst
ANZEIGEN FÜR FARBE ZUSTAND BESCHREIBUNG
SPEICHERDICHTE (links)
2.6 gelb an Speicherung im 2,6 GB-Format.
6.0 gelb an Speicherung im 6,0 GB-Format.
10.0/15.0 gelb an (Standard) Speicherung im 10,0 GB-Format, wenn DLTtape™III benutzt
20.0 gelb an (Standard) Speicherung im 20 GB-Format.
35.0 gelb an (Standard) Speicherung im 35 GB-Format.
Daten gelb an Datenverdichtung eingeschaltet (nur bei 10,0/15,0/20,0/35,0 GBverdichten Format).
Ändern der gelb an Dichte mit Taste ausgewählt.
Speicherdichte aus (Standard) Dichte wird vom Computer ausgewählt (automatisch).
Alle Leucht- blinken Fehler beim automatischen Funktionstest. Entnahmetaste
anzeigen drücken oder Laufwerk aus- und wieder einschalten, um
recht oder Fehler abzustellen. Wenn dies nicht hilft, Kundendienst
links verständigen.
an Cartridge ist eingelegt, Band ist betriebsbereit.
leuchtet auch Trotz Einlegen der Reinigungs-Cartridge wurde der Schreib/
nach Entnahme Lesekopf nicht gereinigt (Reinigungsband aufgebraucht).
der ReinigungsCartridge
leuchtet nach der Cartridge-Problem, andere Cartridge einlegen.
Reinigung beim
Einlegen der
Cartridge auf
aus Reinigung abgeschlossen oder nicht erforderlich.
verständigen.
blinkt Speicherung mit anderer Dichte. Ausgewählte Dichte gilt ab
Bandanfang.
blinkt Speicherung mit anderer Dichte. Ausgewählte Dichte gilt ab
Bandanfang.
wird.
blinkt Speicherung im 15,0 GB-Format, wenn DLTtape™IIIxt benutzt
wird, oder mit anderer Dichte. Ausgewählte Dichte gilt ab
Bandanfang.
blinkt Speicherung mit anderer Dichte. Ausgewählte Dichte gilt ab
Bandanfang.
blinkt Speicherung mit anderer Dichte. Ausgewählte Dichte gilt ab
Bandanfang.
aus Datenverdichtung ausgeschaltet.
blinkt Dichte auswählen.
Page 12

Anzeigen während des automatischen Funktionstests
Beim Einschalten des Systems wird ein automatischer Funktionstest durchgeführt (power-on selftest,
POST). Die folgende Tabelle beschreibt den Ablauf dieses Tests:
PHASE BESCHREIBUNG
1. Die Anzeigen auf der rechten Seite leuchten nacheinander für einige Sekunden auf
(von oben nach unten).
2. Die Anzeigen auf der linken Seite leuchten für etwa drei Sekunden gleichzeitig auf und erlöschen
3. Die grüne Anzeige "Bedienungsklappe frei", die gelbe Anzeige "Reinigungs-Cartridge einlegen"
4. Nach Abschluß der Initialisierung befindet sich das Laufwerk in einem der folgenden
BETRIEBSZUSTAND OPTISCHE UND AKUSTISCHE ANZEIGEN
1. Keine Cartridge 1. Gelbe Anzeige "Band läuft" leucht nicht.
eingelegt 2. Grüne Anzeige "Bedienungsklappe betätigen" leuchtet auf.
2. Cartridge ist ein- Das Laufwerk lädt die Cartridge. Wenn die gelbe Anzeige "Band läuft" aufhört zu
gelegt, Klappe blinken und konstant leuchtet, wird links die originale Speicherdichte des Bandes
geschlossen angezeigt (z.B. leuchtet Anzeige "2,6" auf, wenn das betreffende Band für diese Dichte
3. Kassette ist ein- Die gelbe Anzeige "Band läuft" blinkt und erlischt. Die grüne Anzeige"Bedienungsgelegt, doch die klappe betätigen" blinkt. Klappe schließen, damit die Cartridge geladen werden kann.
Klappe ist offen
(sollte vermieden
werden!)
4. Laufwerk entdeckt Alle rechten oder linken Anzeigen blinken. Fehler kann eventuell durch Herauseinen Fehler nehmen der Cartridge und erneutes Initialisieren des Laufwerks behoben werden
wieder.
und die orange Anzeige "Schreibschutz ein" erlöschen. Die gelbe Anzeige "Band läuft" blinkt,
während das Band initialisiert wird.
Betriebszustände:
3. Die Bedienungsklappe kann betätigt werden (nicht gesperrt).
4. Akustisches Signal ertönt.
Der Benutzer kann jetzt die Bedienungsklappe öffnen und eine Cartridge einlegen.
vorgesehen ist). Jetzt kann eine andere Dichte eingestellt werden, und das Laufwerk ist
speicherbereit.
(Entnahmetaste drücken). Die Anzeigen erlöschen, und der Initialisierungsvorgang
beginnt.
Ergebnis: Der automatische Funktionstest ist nach etwa 15 Sekunden beendet. Das Laufwerk kann
jetzt benutzt werden. Es kann jedoch etwas länger dauern, bis das Band speicherbereit ist. Bei einem
Bus-Reset reagiert das Laufwerk nach einer bestimmten Bus-Auswahl-Pause.
Page 13
Einlegen der Cartridge
Zum Einlegen der Cartridge vgl. Bild 2:
1. Wenn die grüne Anzeige aufleuchtet, öffnen Sie die Bedienungsklappe.
2. Legen Sie die Cartridge ein.
3. Schieben Sie die Cartridge in das Laufwerk.
4. Schließen Sie die Bedienungsklappe.
BITTE BEACHTEN:
Um eine Beschädigung der Bedienungsklappe zu vermeiden, lassen Sie diese erst los, wenn sie ganz
geschlossen ist. Klappe nicht herunterfallen lassen!
Die grüne Anzeige erlischt, und die gelbe Anzeige blinkt (Band wird positioniert). Wenn das Band bis
zum Anfang (beginning-of-tape, BOT) zurückgespult ist, leuchtet die gelbe Anzeige konstant auf. Das
Band ist jetzt speicherbereit.
Bild 2 Einlegen der Cartridge
Page 14

Cartridge entnehmen
ACHTUNG!
Nehmen Sie immer die Cartridge aus dem Laufwerk, bevor Sie den Computer abschalten. Eine fehlerhafte Entnahme der Cartridge kann zu einer Beschädigung der Cartridge und des Laufwerks führen.
Legen Sie die Cartridge, nach dem Herausnehmen aus dem Laufwerk, wieder in die Kunststoffhülle.
So wird die Lebensdauer des Bandes verlängert.
Zum Entnehmen der Cartridge vgl. Bild 3:
1. Drücken Sie die Entnahmetaste (oder geben Sie den entsprechenden Software-Befehl ein). Die
gelbe Anzeige "Band läuft" blinkt, während das Band zurückgespult wird.
2. Wenn die grüne Anzeige aufleuchtet (gleichzeitig ist ein akustisches Signal zu hören), öffnen Sie
die Bedienungsklappe, um die Cartridge auszuwerfen.
ACHTUNG!
Eine unmittelbare Entnahme der Cartridge kann eine Beschädigung der Bandführung zur Folge
haben. Um dies zu vermeiden, warten Sie ein bis zwei Sekunden.
3. Entnehmen Sie die Cartridge.
4. Schließen Sie die Bedienungsklappe.
Bild 3 Entnahme der Cartridge
Page 15

Schreibschutz-Schieber
• Wenn der Schreibschutz bei der Cartridge aktiviert ist (Bild 4), können keine (neuen) Daten auf
dem Band gespeichert werden.
Anzeigefeld
(orange)
SchreibschutzSchieber
Schreibschutz aus
(Schieber nach rechts)
Schreibschutz ein
(Schieber nach links)
Bild 4 Schreibschutz-Schieber an der Cartridge
Reinigung des Laufwerks
• Wenn die gelbe Anzeige "Reinigungs-Cartridge einlegen" aufleuchtet, entnehmen Sie die
Cartridge und legen Sie die Reinigungs-Cartridge ein. Die Reinigungs-Cartridge reinigt den
Schreib-/Lesekopf automatisch und kann anschließend entnommen werden (Herausnehmen der
Reinigungs-Cartridge nach Beendigung des Reinigungsvorgangs nicht vergessen!). ReinigungsCartridges erhalten Sie bei TANDBERG DATA (Bestellnummer P/N 43 18 78). Eine ReinigungsCartridge reicht für etwa 20 Reinigungsvorgänge.
Bedienungshinweise
• Bewegen Sie die Bedienungsklappe nur, wenn die grüne Anzeige "Bedienungsklappe betätigen"
leuchtet oder blinkt
(Klappe nie
• Kontrollieren Sie, daß sich die Band-Öse in der richtigen Stellung befindet. Hierzu öffnen Sie den
Cartridge-Deckel (Bild 5).
Band-Öse
.
bewegen, wenn die Anzeige erloschen ist oder der Strom abgeschaltet ist!)
Deckelverschluß (zum Öffnen hochziehen)
Bild 5 Band-Öse – richtige Stellung
Page 16

• Führen Sie die Cartridge langsam und gleichmäßig in das Laufwerk ein.
• Lassen Sie die Cartridge nicht fallen oder behandeln Sie diese auf eine andere Weise unvorsichtig.
Dadurch könnte die Band-Öse verrutschen – die Cartridge wird unbrauchbar, und das Laufwerk
könnte beschädigt werden.
• Schützen Sie die Cartridges vor direktem Sonnenlicht und halten diese von anderen Wärmequellen
fern.
• Führen Sie das Cartridge-Label nur in den dafür vorgesehenen Ausschnitt an der CartridgeVorderseite ein.
• Bringen Sie keine Kennzeichnungen an anderer Stelle auf der Cartridge an.
Tandberg DLT7000 Medien-Kompatibilität
SPEICHER- 70GB* 35GB 40GB* 20GB 30GB* 15GB 20GB* 10GB 6GB 2.6GB
KAPAZITÄT
Hardware Daten- Ja Nein Ja Nein Ja Nein Ja Nein Nein Nein
Kompression
DLTtape™IV Standard Ändern Ändern Ändern – – – – – –
DLTtape™IIIXT – – – – Ändern Ändern – – – –
DLTtape™III – – – – – – Standard Ändern Ändern Ändern
* Bei Hardware-Daten-Kompression im Verhältnis 2:1 hängt die Kapazität von den ursprünglichen Daten ab.
Standard = Die für ein unbespieltes Band eingestellte Speicherdichte, wenn diese nicht von der Anwendungssoftware oder durch
Ändern = Eine geringere Speicherdichte (ab Bandanfang) kann durch die Anwendungssoftware oder durch Betätigen der entspre-
Betätigen der entsprechenden Taste auf der Vorderseite des Laufwerks geändert wird.
chenden Taste auf der Vorderseite des Laufwerks ausgewählt werden.
WICHTIG:
Die Dichte kann nur ausgewählt bzw. verändert werden, wenn das Band an den Anfang zurückgespult ist (beginning of tape, BOT). Bei teilweise bespielten Bändern wird die Dichte automatisch vom Laufwerk ausgewählt.
Page 17

Page 18

Introduction
A propos de ce manuel
F
Face avant du Tandberg DLT7000
Ces éléments de contrôle sur la face avant du Tandberg DLT7000 permettent de faire fonctionner le
lecteur (Figure 1):
Ce manuel s’utilise comme un aide-mémoire pour le fonctionnement du
lecteur Tandberg Data DLT7000 dans votre système. Pour plus d’informations, reportez-vous au Guide d’Installation du Tandberg DLT7000.
Voyants de
densité
(jaune)
Bouton de
sélection
de densité
Voyants
d’etats
1243
Protection en
écriture (orange)
Avancement de
la bande (jaune)
Utiliser la cartouche de nettoyage
(jaune)
Fonctionnement
1442443
2.6
6.0
10.0/
15.0
20.0
35.0
Compress
Density
Override
Porte de la cartouche
Write
Protected
Tape in Use
Use
Cleaning
Tape
Operate
Handle
de la poignée
(vert)
Select
Unload
Bouton de
déchargement
Poignée insertion/retrait de cartouche (abaissée)
Figure1 Face avant Tandberg DLT7000
FONCTION EMPLACEMENT COULEUR UTILISATION
Selecteur de Inférieur Gris Utilisé pour forcer par défaut la densité qui peut être
densité Gauche normalement enregistrée sur une bande
Déchargement Inférieur Gris Utilisé pour demander au lecteurde positionner la bande qui
Droit permet le déchargement via la poignée insertion/retrait de
Cartouche
NOTE: Une opération de déchargement peut être rendue
impossible par le logiciel de sauvegarde du lecteur
Poignée Centre Gris Utilisé pour charger/décharger les cartouches insertion/retrait
de cartouche
Page 19

Boutons et voyants de fonctionnement
IDENTIFICATION COULEUR ETAT SIGNIFICATION
VOYANT D’ETAT (côte droit)
Protection en Orange Allumé La cartouche est protégée en écriture.
ecriture Eteint La cartouche n’est pas protégée en écriture.
Avancement Jaune Clignotant La cartouche est chargée et en fonctionnement.
de bande Allumé La cartouche est chargée; prête à l’emploi.
Utiliser la Jaune Allumé Le lecteur a besoin d’un nettoyage, ou la bande est de mauvaise
cartouche de qualité.
nettoyage
Fonctionnement Vert Allumé Poignée insertion/retrait de cartouche prête à l’emploi.
de la poignée Eteint Poignée insertion/retrait de cartouche inopérante.
Le quatre voyants Allumé L’autotest de mise sous tension débute.
de droite ou les Clignotant L’autotest a détecté une erreur. Appuyez sur le bouton de
voyants de gauche déchargement ou éteignez le lecteur, puis rallumez pour effacer
IDENTIFICATION COULEUR ETAT SIGNIFICATION
VOYANT D’ETAT (côte gauche)
2.6 Jaune Allumé Indique que la bande est enregistrée au format 2.6 Go.
6.0 Jaune Allumé Indique que la bande est enregistrée au format 6.0 Go.
10.0/15.0 Jaune Allumé (par défaut) Indique que la bande est enregistrée au format 10.0 Go si la
20.0 Jaune Allumé (par défaut) Indique que la bande est enregistrée au format 20.0 Go.
35.0 Jaune Allumé (par défaut) Indique que la bande est enregistrée au format 35.0 Go.
Compresser Jaune Allumé Le mode compression est sélectionné.
Paramétrage Jaune Allumé Vous avez sélectionné une densité à partir de la face avant.
de densité Eteint (par défaut) La densité est sélectionnée par le système carte (automatiquement).
Le quatre voyants Clignotant L’autotest a détecté une erreur. Appuyez sur le bouton de
de droite ou les déchargement ou éteignez le lecteur, puis rallumez pour
voyants de gauche effacer l’erreur. Si l’erreur subsiste, appelez le service technique.
Reste allumé après La bande de nettoyage a essayé de nettoyer la tête de lecture,
déchargement de mais elle est arrivée au bout, et n’a pu réaliser le nettoyage.
la cartouche de
nettoyage
Après nettoyage, Problème de cartouche. Essayez-en une autre.
continue de fonctionner quand vous
rechargez la cartouche
Eteint Le nettoyage est effectuée correctement ou n’est pas nécessaire.
l’erreur. Si l’erreur subsiste, appelez le service technique.
Clignotant Indique que la bande est enregistrée dans une autre densité.
Vous avez sélectionné cette densité pour une écriture à partir
du BOT.
Clignotant Indique que la bande est enregistrée dans une autre densité.
Vous avez sélectionné cette densité pour une écriture à partir du BOT.
bande DLTtape™III est utilisée.
Clignotant Indique que la bande est enregistrée au format 15.0 Go si la
bande DLTtape™IIIxt est utilisée ou indique que la bande est
enregistrée dans une autre densité. Vous avez sélectionné cette
densité pour une écriture à partir du BOT.
Clignotant Indique que la bande est enregistrée dans une autre densité.
Vous avez sélectionné cette densité pour une écriture à partir du BOT.
Clignotant Indique que la bande est enregistrée dans une autre densité.
Vous avez sélectionné cette densité pour une écriture à partir du BOT.
(La compression ne peut être réaliser que pour la densité 10.0, 15.0,
20.0 et 35.0 Go uniquement).
Eteint Le mode compression n’est pas activé.
Clignotant Vous êtes en mode de sélection de densité.
Page 20

Voyants de la face avant
Les tableaux suivants permettent de déterminer les conditions de fonctionnement du lecteur:
Voyant d’activité pendant l’auto-test de démarrage
ETAPE CE QUI PASSE
1. Les voyants de droite s’allument successivement de haut en bas. Tous les voyants restent allumés
pendant quelques secondes.
2. Les voyants de gauche s’allument simultanément pendant approximativement 3 secondes, puis
3. Le voyant vert de la poignée de commande, le voyant jaune de nettoyage de cartouche et le voyant
4. Après initialisation, le lecteur est dans l’un de ses quatre états:
ETAT DE LECTEUR ETAT DES VOYANTS ET ACTIONS
1. Aucune cartouche 1. Le voyant d’avancement de la bande est éteint
n’est pas chargée 2. Le voyant de poignée de commande est allumé
2. Une cartouche est Le lecteur charge la cartouche. Quand le voyant jaune cesse de de clignoter et reste
chargée et la poignée allumé, le voyant de la densité native de la bande s’allume. Par exemple, si la densité
est baissée actuelle est de 2.6 Go, alors le voyant correspondant s’allume. Vous pouvez maintenant
3. Une cartouche est Le voyant d’avancement de la bande clignote et s’éteint. Le voyant de poignée de
chargée mais la commande clignote. La poignée doit être abaissée pour que la cartouche se charge.
poignée est relevée
(très déconseillé)
4. Le lecteur détecte Les quatre voyants de droite ou de gauche clignotent de façon répétitive. Vous devez
une erreur essayer de décharger la cartouche etréinitialiser le lecteur en poussant le bouton de
s’éteignent.
orange de protection d’ecriture s’éteignent. Le voyant jaune de d’avancement de la bande clignote
pendant l’initialisation du lecteur.
3. La poignée est déverrouillée
4. Le lecteur émet des bips
L’utilisateur peut maintenant relever la poignée et insérer la cartouche.
électionner une densité. Le lecteur est prêt à l’emploi.
déchargement. Les voyants cessent de clignoter et le lecteur essaye de se réinitialiser.
A la mise sous tension de l’alimentation du système, le lecteur effectue un auto-test de démarrage
(POST). La séquence des événements est la suivante:
Résultat: POST est réalisée correctement en à peu près 15 secondes et le lecteur répond normalement à toutes les commandes. Indépendamment, ce temps peut être plus long pour que le média soit
prêt. Après une remise à zéro du bus, le lecteur répond dans les limites de temps (time-out) d'une sélection du bus.
Page 21

Chargement d’une cartouche
Pour charger une cartouche dans le lecteur (Figure 2):
1. Quand le voyant vert reste fixement allumé, tirez la poignée insertion/retrait de cartouche pour ouvrir
2. Insérez la cartouche
3. Poussez la cartouche dans le lecteur
4. Refermez la poignée en poussant
NOTE:
Pour prévenir une défaillance de la poignée, accompagnez le mouvement de fermeture de la poignée. Ne pas
forcer.
Le voyant vert s’éteint et le voyant jaune clignote pour montrer que la bande est chargée. Quand la
bande est calée à son repère de début (BOT), le voyant jaune s’allume fixement. La bande est maintenant prête à l’emploi.
Figure 2 Chargement de cartouche
Page 22

Déchargement de cartouche
ATTENTION!
Retirez toujours la cartouche du lecteur avant d’éteindre votre système. Une défaillance d’éjection
de la cartouche peut endommager la cartouche ou le lecteur.
Quand vous retirez la cartouche du lecteur, rangez la cartouche dans son étui plastique pour la protéger et prolonger sa durée de vie.
Pour décharger une cartouche du lecteur (Figure 3) :
1. Appuyez sur le bouton de déchargement (ou tapez une commande du logiciel appropriée).
Le voyant jaune d’avancement de la bande clignote lorsque la bande se rembobine.
2. Lorsque le voyant vert s’allume (bip sonore), tirez sur la poignée insertion/retrait pour ouvrir et
éjecter la cartouche.
ATTENTION!
Une extraction immédiate de la cartouche peut endommager l’extracteur de bande. Attendez une ou
de seconde pour retirer la cartouche et ainsi éviter ce problème.
3. Retirez la cartouche
4. Refermez la poignée en poussant sans forcer
Figure 3 Déchargement de la cartouche
Page 23

Onglet de protection d’ecriture de la cartouche
• L’écriture/enregistrement sur le média peut être interdit en agissant sur l’onglet de protection
d’écriture (Figure 4).
Indicateur
orange
Onglet de protection
d’ecriture
Ecriture possible
(position droite)
Ecriture interdite
(position gauche)
Figure 4 Onglet de protection d’ecriture de la cartouche
Nettoyage du lecteur
• Si le voyant jaune de nettoyage de cartouche s’allume, déchargez la cartouche et chargez la cartouche de nettoyage. Elle nettoie automatiquement la tête de lecture/écriture et se décharge quand le
nettoyage est effectuée. Assurez-vous que le nettoyage est bien terminé avant de retirer la cartouche de nettoyage. Les cartouches de nettoyage peuvent être achetées chez Tandberg Data, sous la
référence no. P/N 43 18 78. La cartouche de nettoyage fournit approximativement 20 nettoyages
avant son remplacement.
Conseils d’utilisation
• N’utilisez jamais la poignée insertion/retrait de cartouche lorsque le voyant vert n’est pas allumé fixement ou ne clignote, ou si le lecteur est éteint.
• Assurez-vous que l’extracteur de cartouche est toujours en position correcte; ouvrez la porte de la
cartouche pour inspecter l’extracteur (Figure 5).
Extracteur de
cartouche
Figure 5 Extracteur de cartouche - position correcte
Fermeture de porte (effectuée en
relevant la porte avec le pouce)
Page 24

• Insérez la cartouche dans un mouvement lent et continu.
• Ne pas heurtez ou laisser tomber la cartouche. Ceci peut déplacer l’extracteur de bande, rendre la cartouche inutilisable et endommager le lecteur.
• Tenez les cartouches à l’écart de l’action direct du soleil et d’autres sources de chaleur.
• Placer une étiquette d’identification seulement sur l’emplacement prévu sur le devant de la cartouche.
• Ne collez pas d’étiquettes ailleurs qu’à cet endroit.
Compatibilité média Tandberg DLT7000
CAPACITE DE 70Go* 35Go 40Go* 20Go 30Go* 15Go 20Go* 10Go 6Go 2.6Go
STOCKAGE
Compression Oui Non Oui Non Oui Non Oui Non Non Non
de données
matériel
DLTtape™IV DP P P - - - - - -
DLTtape™IIIXT ----DP----
DLTtape™III ----- -DPPP
* Assumant un taux de compression de données de 2 :1 - la capacité peut varier en fonction des données.
D = par défaut : La densité qui peut être enregistrée sur une cartouche vierge indépendamment d’un paramétrage du logiciel de sauvegarde ou du bouton de sélection de densité.
P = paramétrage : La densité minimale qui peut être sélectionnée pour être enregistrée sur une cartouche à partir du début de la bande (BOT) avec un paramétrage du logiciel de sauvegarde ou à partir du bouton de sélection de densité.
- : pas applicable.
NOTE:
La densité ne peut être sélectionnée/paramétrée qu’à partir du début de la bande (BOT). Sur une bande qui
contient déjà des données pré-enregistrée, la densité pré-enregistrée sera automatiquement sélectionnée par le
lecteur.
Page 25

Page 26

Page 27

Page 28

Tandberg Data
International
Headquarters
Tandberg Data ASA,
Kjelsåsveien 161, Oslo,
P.O. Box 134 Kjelsås,
N-0411 Oslo, Norway.
Tel: +47 22 18 90 90.
Fax: +47 22 18 95 50.
Worldwide Subsidiaries
Tandberg Data, Inc., 2685-A Park Center Drive,
Simi Valley, CA 93065-6211, U.S.A. Tel: +1 805 579 1000.
Tandberg Data GmbH, Feldstrasse 81,
D-44141 Dortmund, Germany. Tel: +49 23 1 5436 0.
Tandberg Data S.A., 16/18 Ave. Morane-Saulnier,
F-78941 Velizy Cedex, France. Tel: +33 1 39 26 01 01.
Tandberg Data (U.K.) Ltd., Regus House,
1010 Cambourne Business Park, Cambourne, Cambridge CB3 6DP, U.K.
Tel: +44 1223 598 002.
Tandberg Data (Asia) Pte. Ltd., 801 Lorong 7,
Toa Payoh #02-00, Singapore 319319. Tel: +65 259 9330.
Tandberg Data (Japan) Inc., Shinkawa-nittei Annex Bldg.,
7th floor, 22-4 Shinkawa, 1-chome, Chuo-ku, Tokyo 104, Japan.
Tel: +81 3 5566 2871.
www.tandberg.com
DLT, DLTtape and the DLTtape logo are trademarks of Quantum Corporation.
© 1999 Tandberg Data. All Rights reserved. Part No. 43 18 87-2, Publ. No. 9115-2 January 1999.
Specifications subject to change without notice.
 Loading...