

Page 1
tams elektronik
Manual
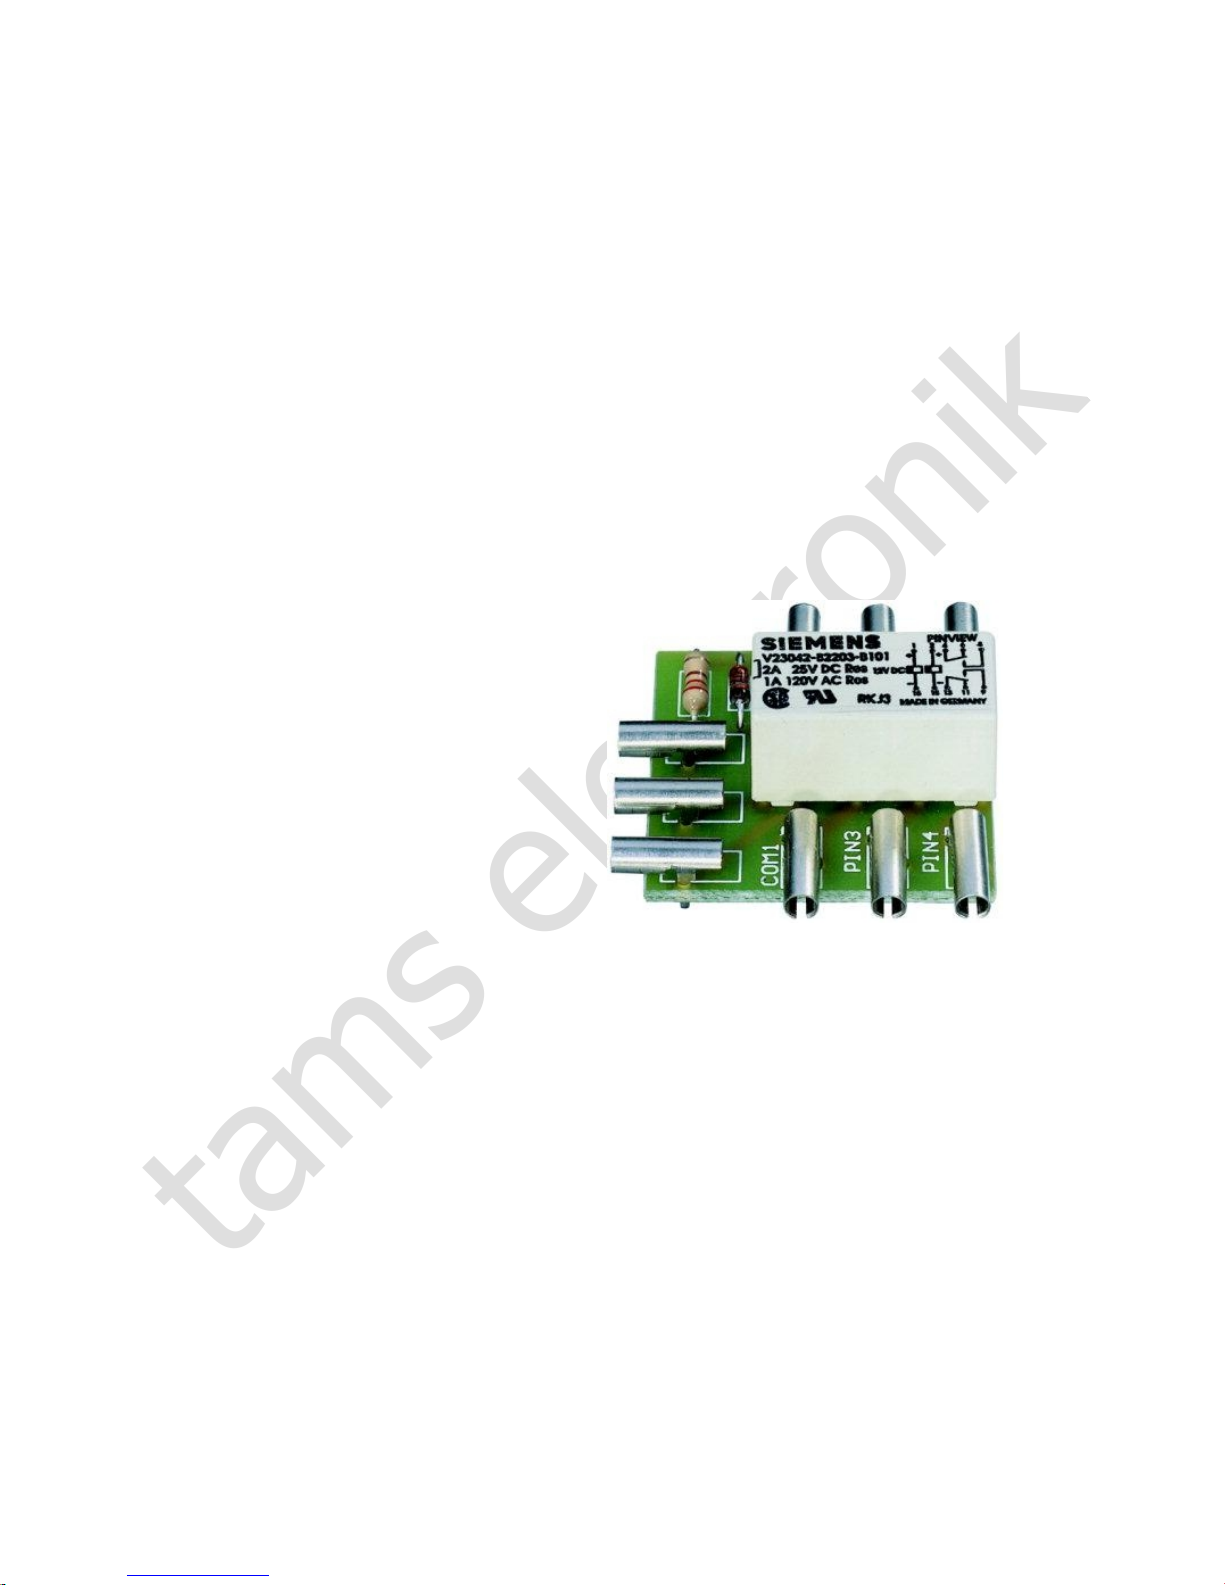
RL-2
Item no. 72-00055 / 72-00056
Relay Circuit Board
tams elektronik
n n n
Page 2

tams elektronik
English RL-2
Table of contents
1. Getting started............................................................................3
2. Safety instructions.......................................................................5
3. Safe and correct soldering...........................................................7
4. Operation overview.....................................................................9
5. Technical specifications...............................................................9
6. Assembling the kit.....................................................................10
7. Performing a functional test.......................................................13
8. Connecting the relay circuit board..............................................14
9. Check list for troubleshooting.....................................................16
10. Guarantee bond........................................................................17
11. EU declaration of conformity......................................................18
12. Declarations conforming to the WEEE directive...........................18
© 09/2016 Tams Elektronik GmbH
All rights reserved. No part of this publication may be reproduced or
transmitted in any form or by any means, electronic or mechanical,
including photocopying, without prior permission in writing from Tams
Elektronik GmbH.
Subject to technical modification.
Page 2
Page 3
tams elektronik
RL-2 English
1. Getting started
How to use this manual
This manual gives step-by-step instructions for safe and correct
assembly of the kit and fitting and connecting of the ready-built
module, and operation. Before you start, we advise you to read the
whole manual, particularly the chapter on safety instructions and the
checklist for trouble shooting. You will then know where to take care
and how to prevent mistakes which take a lot of effort to correct.
Keep this manual safely so that you can solve problems in the future. If
you pass the kit or the ready-built module on to another person, please
pass on the manual with it.
Intended use
The relay circuit board RL-2 is designed to be operated according to the
instructions in this manual in model building, especially with model
railways. Any other use is inappropriate and invalidates any guarantees.
The RL-2 should not be assembled or mounted by children under the
age of 14.
Reading, understanding and following the instructions in this manual
are mandatory for the user.
Checking the package contents
Please make sure that your package contains:
one kit, containing the components listed in the parts list and one
PCB or
one ready-built module
a CD (containing the manual and further information)
Page 3
Page 4
tams elektronik
English RL-2
Required materials
For assembling the kit you need:
an electronic soldering iron (max. 30 Watt) or a regulated soldering
iron with a fine tip and a soldering iron stand,
a tip-cleaning sponge,
a heat-resistant mat,
a small side cutter and wire stripper,
as necessary a pair of tweezers and long nose pliers,
electronic tin solder (0,5 mm. diameter).
For testing the module you need an electric light bulb.
In order to connect the module you need wire. Recommended
diameters: > 0,25 mm² for all connections (e.g. item no. 73-1031x,
x=0..9).
For the connection to the switching inputs you need:
two push buttons, e.g. item no. 84-5212x, x=1..5 (or circuits to
release a switching pulse).
Page 4
Page 5
tams elektronik
RL-2 English
2. Safety instructions
Mechanical hazards
Cut wires can have sharp ends and can cause serious injuries. Watch
out for sharp edges when you pick up the PCB.
Visibly damaged parts can cause unpredictable danger. Do not use
damaged parts: recycle and replace them with new ones.
Electrical hazards
Touching powered, live components,
touching conducting components which are live due to malfunction,
short circuits and connecting the circuit to another voltage than
specified,
impermissibly high humidity and condensation build up
can cause serious injury due to electrical shock. Take the following
precautions to prevent this danger:
Never perform wiring on a powered module.
Assembling and mounting the kit should only be done in closed,
clean, dry rooms. Beware of humidity.
Only use low power for this module as described in this manual and
only use certified transformers.
Connect transformers and soldering irons only in approved mains
sockets installed by an authorised electrician.
Observe cable diameter requirements.
After condensation build up, allow a minimum of 2 hours for
dispersion.
Use only original spare parts if you have to repair the kit or the
ready-built module.
Page 5
Page 6
tams elektronik
!
English RL-2
Fire risk
Touching flammable material with a hot soldering iron can cause fire, which
can result in injury or death through burns or suffocation. Connect your
soldering iron or soldering station only when actually needed. Always keep
the soldering iron away from inflammable materials. Use a suitable
soldering iron stand. Never leave a hot soldering iron or station unattended.
Thermal danger
A hot soldering iron or liquid solder accidentally touching your skin can
cause skin burns. As a precaution:
use a heat-resistant mat during soldering,
always put the hot soldering iron in the soldering iron stand,
point the soldering iron tip carefully when soldering, and
remove liquid solder with a thick wet rag or wet sponge from the
soldering tip.
Dangerous environments
A working area that is too small or cramped is unsuitable and can cause
accidents, fires and injury. Prevent this by working in a clean, dry room
with enough freedom of movement.
Other dangers
Children can cause any of the accidents mentioned above because they
are inattentive and not responsible enough. Children under the age of 14
should not be allowed to work with this kit or the ready-built module.
Caution:
Little children can swallow small components with sharp edges, with
fatal results! Do not allow components to reach small children.
In schools, training centres, clubs and workshops, assembly must be
supervised by qualified personnel. In industrial institutions, health and
safety regulations applying to electronic work must be adhered to.
Page 6
Page 7
tams elektronik
!
RL-2 English
3. Safe and correct soldering
Caution:
Incorrect soldering can cause dangers through fires and heat. Avoid
these dangers by reading and following the directions given in the
chapter Safety instructions.
Use a small soldering iron with max. 30 Watt or a regulated
soldering iron.
Only use electronic tin solder with flux.
When soldering electronic circuits never use soldering-water or
soldering grease. They contain acids that can corrode components
and copper tracks.
Insert the component connecting pins into the PCB´s holes as far as
possible without force. The components should be close to the
PCB`s surface.
Observe correct polarity orientation of the parts before soldering.
Solder quickly: holding the iron on the joints longer than necessary
can destroy components and can damage copper tracks or soldering
eyes.
Apply the soldering tip to the soldering spot in such a way that the
part and the soldering eye are heated at the same time.
Simultaneously add solder (not too much). As soon as the solder
becomes liquid take it away. Hold the soldering tip at the spot for a
few seconds so that the solder flows into the joint, then remove the
soldering iron.
Do not move the component for about 5 seconds after soldering.
To make a good soldering joint you must use a clean and unoxidised
soldering tip. Clean the soldering tip with a damp piece of cloth, a
damp sponge or a piece of silicon cloth.
Page 7
Page 8
tams elektronik
English RL-2
Cut the wires after soldering directly above the soldering joint with a
side cutter.
After placing the parts, please double check for correct polarity.
Check the PCB tracks for solder bridges and short circuits created by
accident. This would cause faulty operation or, in the worst case,
damage. You can remove excess solder by putting a clean soldering
tip on the spot. The solder will become liquid again and flow from
the soldering spot to the soldering tip.
Page 8
Page 9
tams elektronik
RL-2 English
4. Operation overview
The module switches a bistable relay with two switches which are
separate from each other. It is triggered by 12 to 18 Volt direct (d.c.) or
alternating (a.c.) voltage. The relay is switched by an earth contact and
can be switched by any earth compatible output (e.g. by a points
decoder). This enables the module to switch two connected electric
loads in joint action. It is possible to connect e.g. a light signal and the
block section that it controls.
5. Technical specifications
Supply voltage 12 - 18 Volt a.c. or d.c. voltage
Number of switches
Maximum current per switch
2
1 A
Protected to
IP 00
Ambient temperature in use 0 ... +60 °C
Ambient temperature in storage -10 ... +80 °C
Comparative humidity allowed max. 85 %
Dimensions of the PCB approx. 26 x 28 mm
Weight of the assembled approx. 7.5 g
Page 9
Page 10
tams elektronik
English RL-2
6. Assembling the kit
You can skip this part if you have purchased a ready-built module.
Preparation
Put the sorted components in front of you on your workbench.
The separate electronic components have the following special features
you should take into account in assembling:
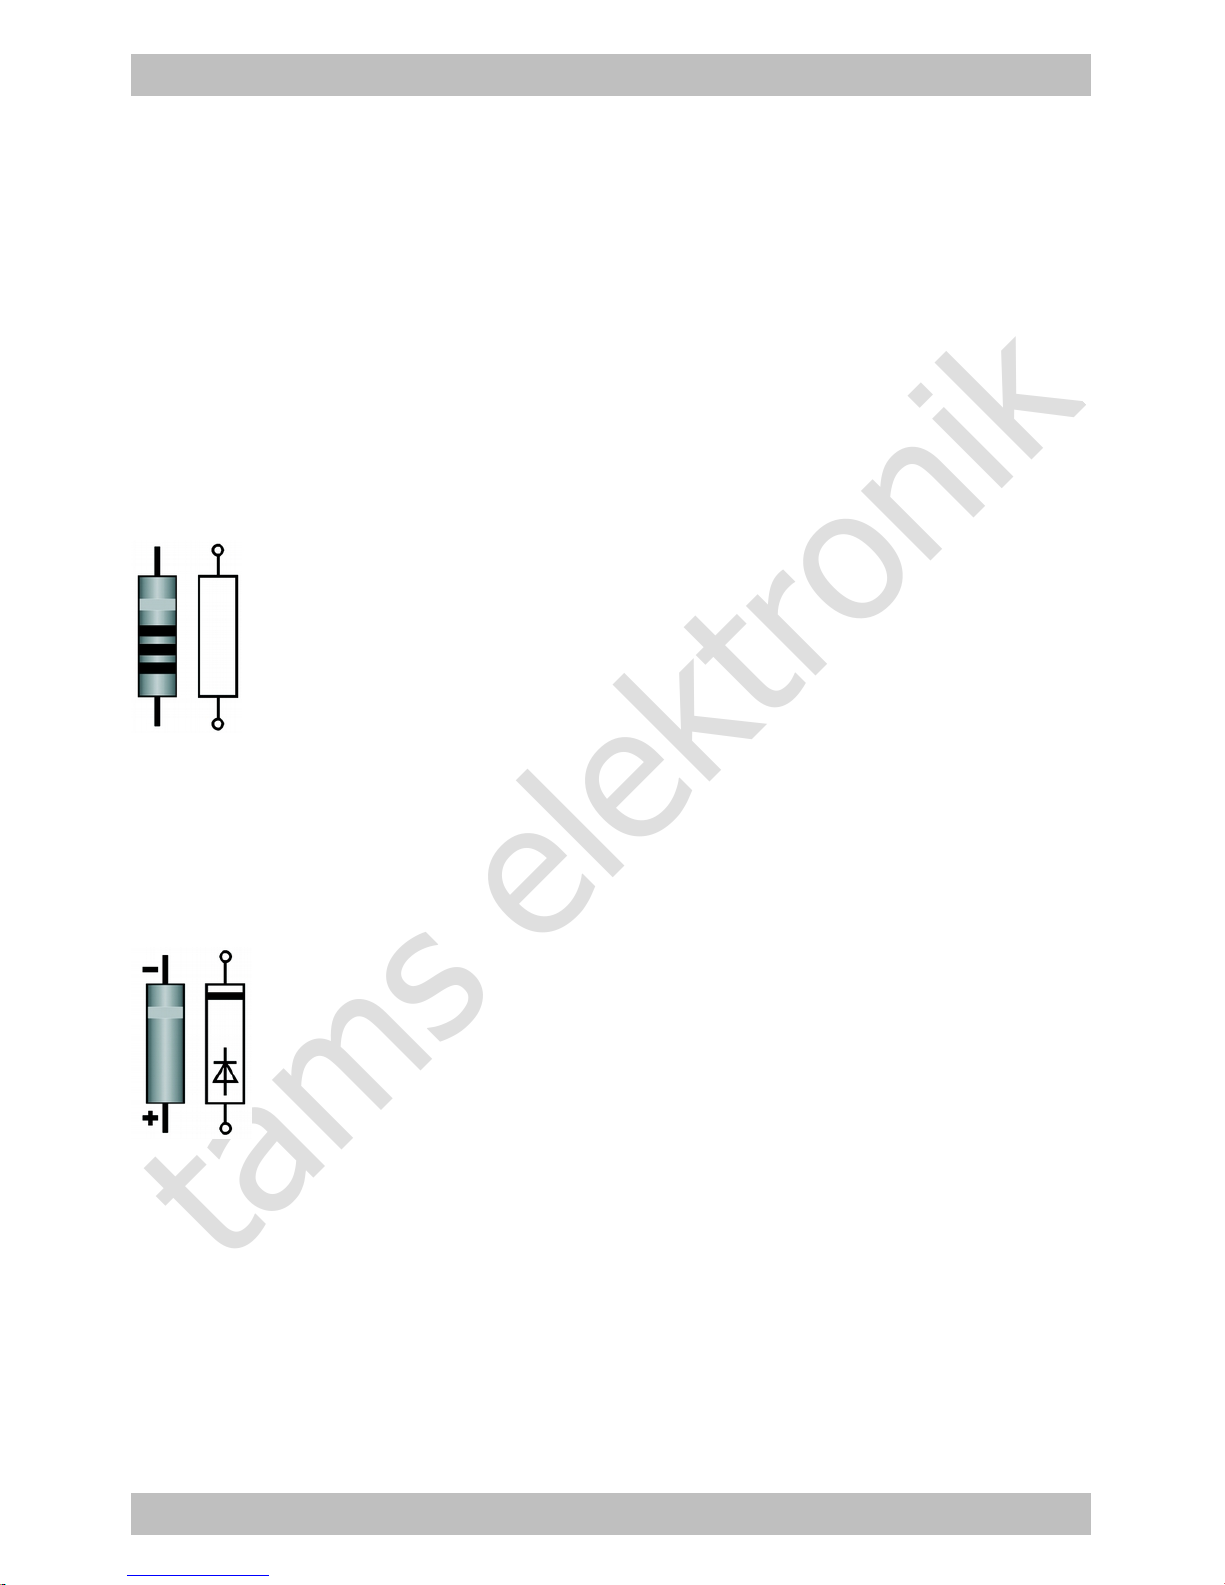
Resistors
Resistors reduce current.
The value of resistors for smaller power ratings is indicated
through colour rings. Every colour stands for another
figure.
Carbon film resistors and some types of have 4 colour
rings. The 4th ring (given in brackets here) indicates the
tolerance of the resistor (gold = 5 %).
220 red - red - brown (gold)
Diodes
Diodes allow the current to pass through in one direction
only (forward direction), simultaneously the voltage is
reduced by 0,3 to 0,8 V. Exceeding of the limit voltage
always will destroy the diode, and allow current to flow in
the reverse direction. The diode type is printed on the
package.
Relays
Relays are electronic switches, depending on their position the one or
other (internal) connection is closed. The mode of operation of
monostable relays can be compared to that of a push-button switch,
i.e. the connection is only closed as long as the voltage is applicated.
Page 10
Page 11
tams elektronik
RL-2 English
Bistable relays keep their status after switching – comparable to a
switch.
Relays which combine two switches in one housing are common as well
(shortly 2xUM). The switching between the two connections can be
heard clearly because of the resulting clicking sound.
PCB sockets
The widely spread 2,6 mm model railway connectors fit exactly to the
sockets. These are used for the connection to the voltage supply and to
connected modules or components.
Parts list
Resistor R1 220 W
Diode D1 1N4148 (or similar)
Relay Bistable relay 2xUm
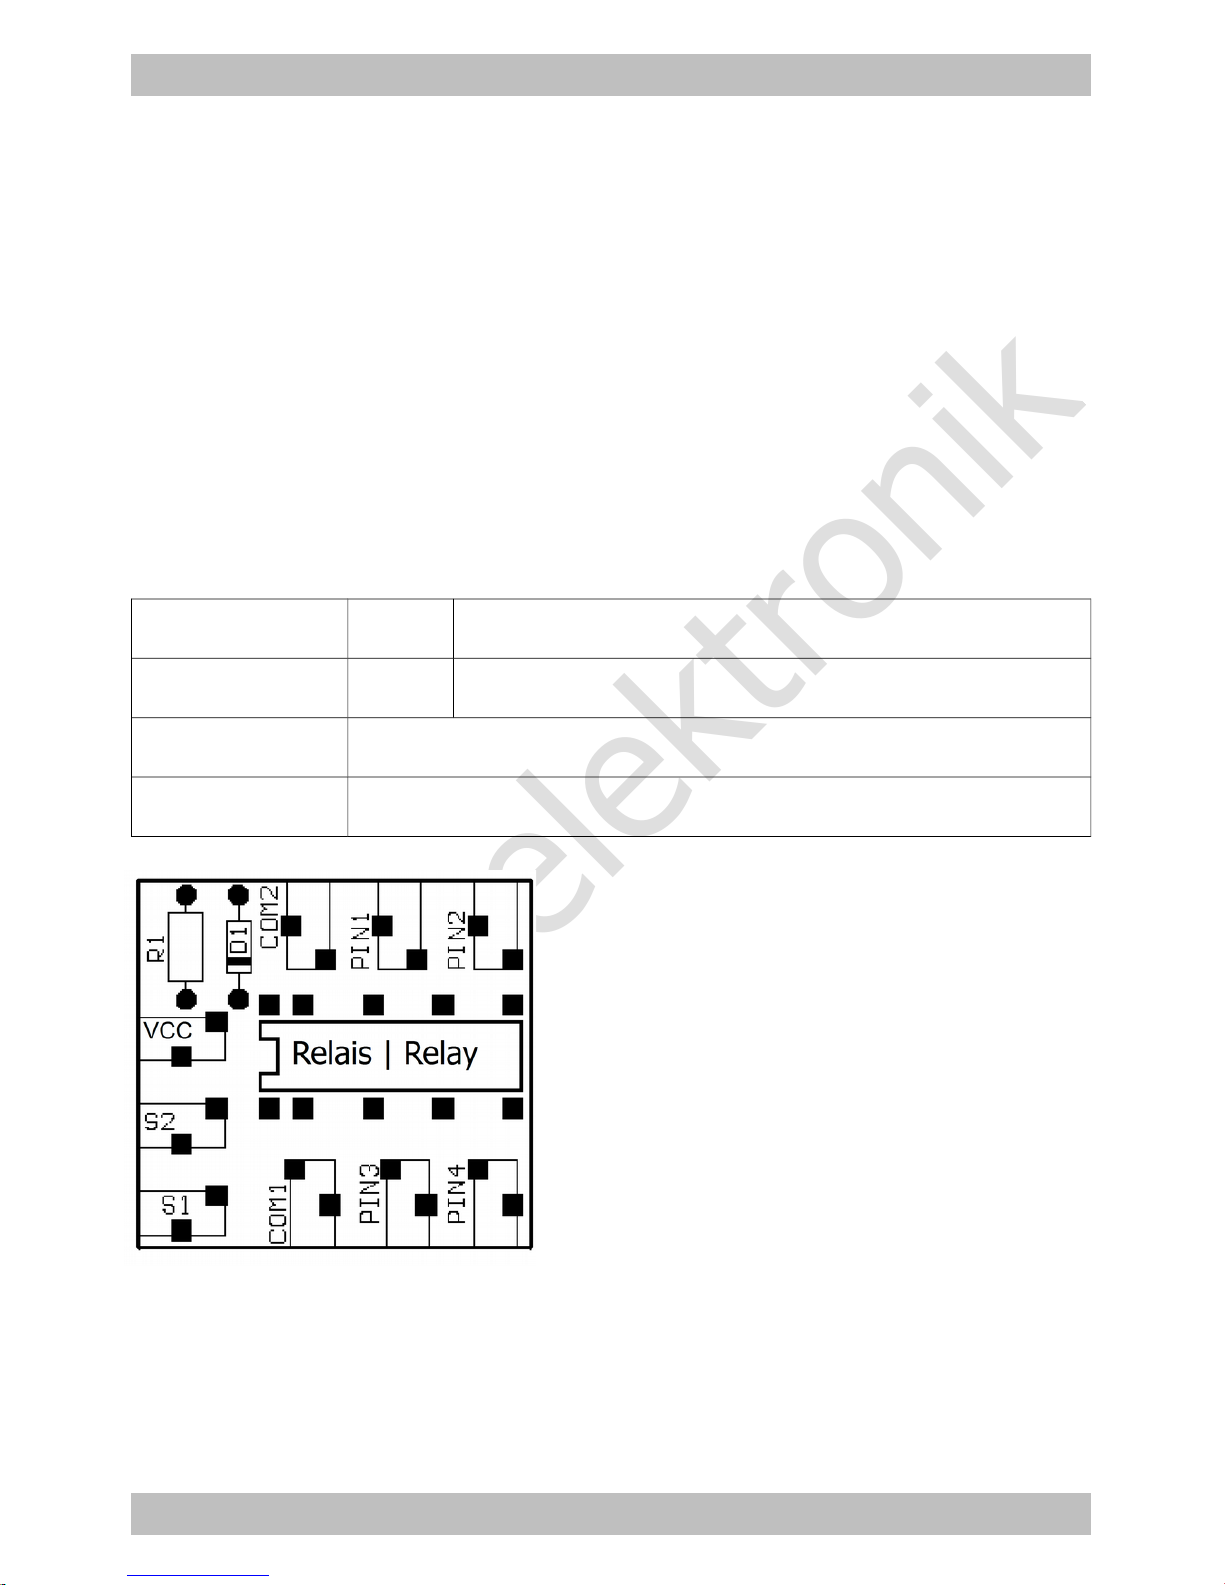
PCB-sockets VCC, S1, S2, COM1, COM2, PIN1, PIN2, PIN3, PIN4
Fig. 1:
PCB layout
Page 11
Page 12
tams elektronik
!
English RL-2
Assembly
Proceed according to the order given in the list below. First solder the
components on the solder side of the PCB and then cut the excess
wires with the side cutter. Follow the instructions on soldering in
section 3.
Caution:
Several components have to be mounted according to their polarity.
When soldering these components the wrong way round, they can be
damaged when you connect the power. In the worst case the whole
circuit can be damaged. At the best, a wrongly connected part will not
function.
1. PCB sockets
2. Resistors Mounting orientation of no importance.
3. Diodes Observe the polarity!
The negative end of the diodes is marked with
a ring. This is shown in the PCB layout.
4. Relays The mounting orientation is given by the
layout of the pins.
Performing a visual check
Perform a visual check after the assembly of the module and remove
faults if necessary:
Remove all loose parts, wire ends or drops of solder from the PCB.
Remove all sharp wire ends.
Check that solder contacts which are close to each other are not
unintentionally connected to each other. Risk of short circuit!
Check that all components are polarised correctly.
When you have remedied all faults, go on to the next part.
Page 12
Page 13
tams elektronik
!
RL-2 English
7. Performing a functional test
You can perform a functional test with an electric light bulb before
mounting the relay circuit board. First connect the relay circuit board
and the light bulb as follows:
Relay circuit board
VCC | COM1 | COM2
Connection to transformer / -
Lampe Anschluss 2 Connection to transformer ~ / +
Then perform the following tests:
Relay circuit board S1 Temporary connection to transformer ~ / +
→ Relay switches when indicated
Lamp connection 1 to PIN3 → lamp does not light
to PIN4 → lamp lights
Lamp connection 1 to PIN1 → lamp does not light
to PIN2 → lamp lights
Relay circuit board S2 Temporary connection to transformer ~ / +
→ Relay switches when indicated
Lamp connection 1 to PIN3 → lamp lights
to PIN4 → lamp does not light
Lamp connection 1 to PIN1 → lamp lights
to PIN2 → lamp does not light
Caution: If a component gets too hot, disconnect the module
and power supply from the mains immediately. Possible short circuit!
Check the assembly.
After a successful test, disconnect the power supply and the lamp from
the module. Mount the module as desired in your model railroad.
Page 13
Page 14
tams elektronik
English RL-2
8. Connecting the relay circuit board
Connecting the power supply
If you use a d.c. transformer for the power supply of the relay circuit
board, you have to regard the polarity when connecting it, if using an
a.c. transformer the polarity is of no importance. If you supply several
components by one a.c. transformer you have to be careful to connect
all devices with the same polarity.
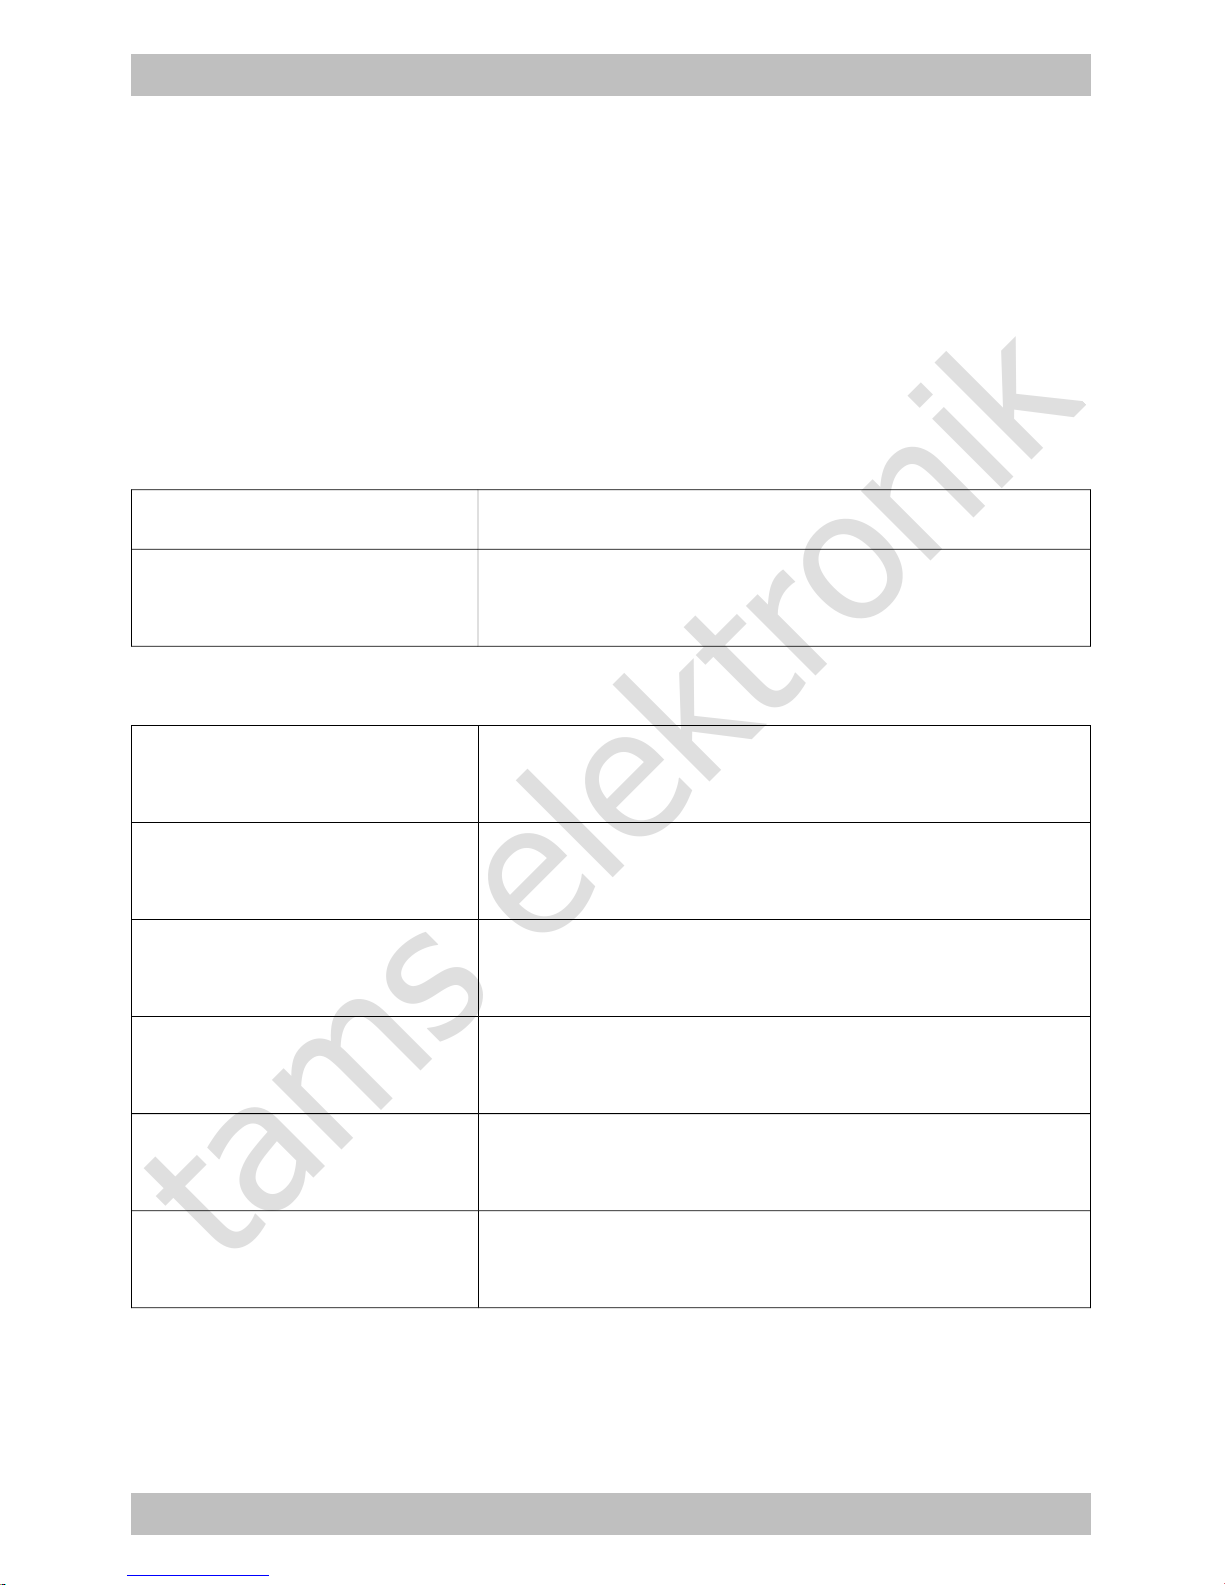
VCC Connection to transformer ~ / +
Relay circuit board
switching inputs S1 | S2
Connection to transformer / -
via push-buttons switching to earth
Connection of the downstream accessories
Relay circuit board
output PIN1
Accessory 1 connection 1
(connected to input 2, when S2 is switched)
Relay circuit board
output PIN2
Accessory 2 connection 1
(connected to input 2, when S1 is switched)
Relay circuit board
output PIN3
Accessory 3 connection 1
(connected to input 1, when S2 is switched)
Relay circuit board
output PIN4
Accessory 4 connection 1
(connected to input 1, when S1 is switched)
Accessories 1 – 4
connection 2
Connection to transformer ~ / +
Relay circuit board
inputs COM1 | COM2
Connection to transformer / -
Page 14
Page 15
tams elektronik
RL-2 English
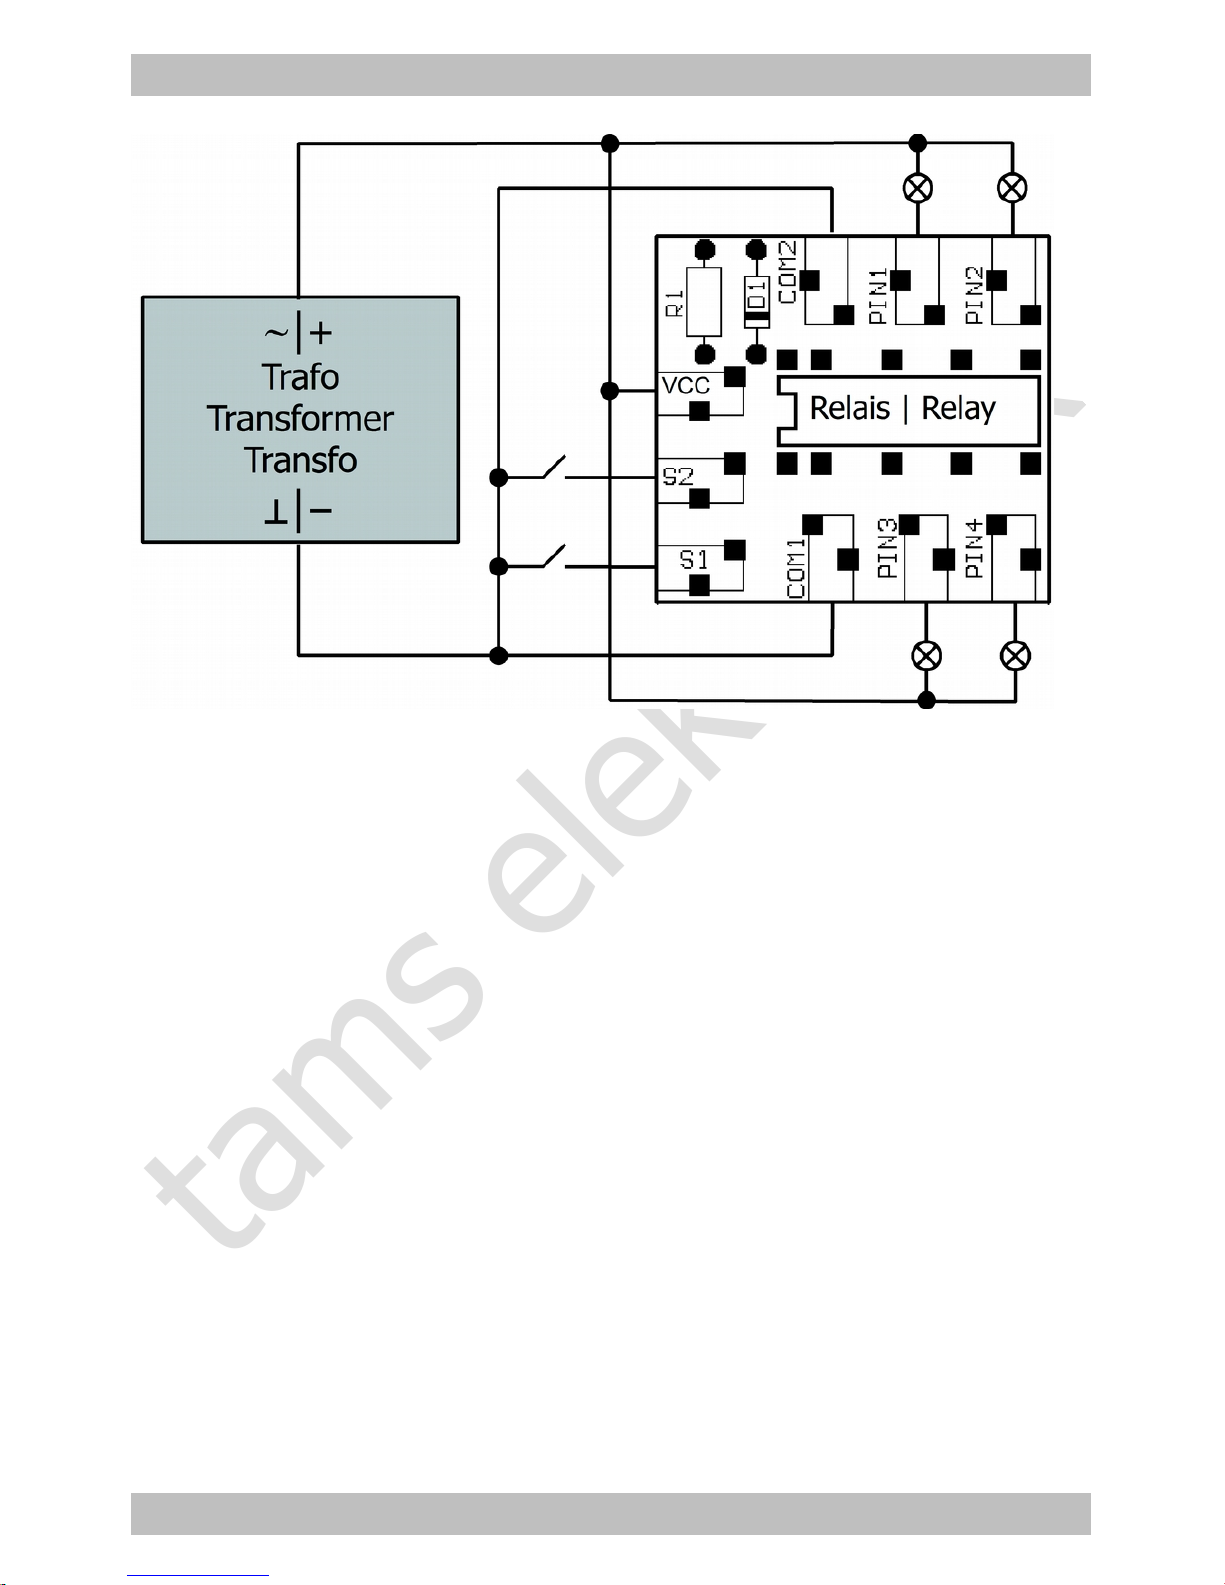
Fig. 2: Connections
It shows as an example, the connection of the relay circuit board to a
double purpose light signal.
Page 15
Page 16
tams elektronik
!
English RL-2
9. Check list for troubleshooting
Parts are getting too hot and/or start to smoke.
Disconnect the system from the mains immediately!
Possible cause: one or more components are soldered incorrectly.
à In case you have mounted the module from a kit, perform a
visual check (à section 6.) and if necessary, remedy the faults.
Otherwise send in the module for repair.
The relay does not switch.
Possible cause: The diode D1 is soldered the wrong way. à Swap
the mounting direction.
Possible cause: The power supply is not connected properly.
à Check the connections.
Hotline: If problems with your module occur, our hotline is pleased to
help you (mail address on the last page).
Repairs: You can send in a defective module for repair (address on the
last page). In case of guarantee the repair is free of charge for you.
With damages not covered by guarantee, the maximum fee for the
repair is the difference between the price for the ready-built module
and the kit according to our valid price list. We reserve the right to
reject the repairing of a module when the repair is impossible for
technical or economic reasons.
Please do not send in modules for repair charged to us. In case of
warranty we will reimburse the forwarding expenses up to the flat rate
we charge according to our valid price list for the delivery of the
product. With repairs not covered by guarantee you have to bear the
expenses for sending back and forth.
Page 16
Page 17
tams elektronik
RL-2 English
10. Guarantee bond
For this product we issue voluntarily a guarantee of 2 years from the
date of purchase by the first customer, but in maximum 3 years after
the end of series production. The first customer is the consumer first
purchasing the product from us, a dealer or another natural or juristic
person reselling or mounting the product on the basis of selfemployment. The guarantee exists supplementary to the legal warranty
of merchantability due to the consumer by the seller.
The warranty includes the free correction of faults which can be proved
to be due to material failure or factory flaw. With kits we guarantee
the completeness and quality of the components as well as the function
of the parts according to the parameters in not mounted state. We
guarantee the adherence to the technical specifications when the kit
has been assembled and the ready-built circuit connected according to
the manual and when start and mode of operation follow the
instructions.
We retain the right to repair, make improvements, to deliver spares or
to return the purchase price. Other claims are excluded. Claims for
secondary damages or product liability consist only according to legal
requirements.
Condition for this guarantee to be valid, is the adherence to the
manual. In addition, the guarantee claim is excluded in the following
cases:
if arbitrary changes in the circuit are made,
if repair attempts have failed with a ready-built module or device,
if damaged by other persons,
if damaged by faulty operation or by careless use or abuse.
Page 17
Page 18
tams elektronik
English RL-2
11. EU declaration of conformity
This product conforms with the EC-directives mentioned below
and is therefore CE certified.
2004/108/EG on electromagnetic. Underlying standards: EN 55014-1
and EN 61000-6-3. To guarantee the electromagnetic tolerance in
operation you must take the following precautions:
Connect the transformer only to an approved mains socket installed
by an authorised electrician.
Make no changes to the original parts and accurately follow the
instructions, connection diagrams and PCB layout included with this
manual.
Use only original spare parts for repairs.
2011/65/EG on the restriction of the use of certain hazardous
substances in electrical and electronic equipment (ROHS). Underlying
standard: EN 50581.
12. Declarations conforming to the WEEE directive
This product conforms with the EC-directive 2012/19/EG on
waste electrical and electronic equipment (WEEE).
Don´t dispose of this product in the house refuse, bring it to the next
recycling bay.
Page 18
Page 19
tams elektronik
RL-2 English
Page 19
Page 20
tams elektronik
n
n
n
Information and tips:
n
http://www.tams-online.de
n
n
n
n
Warranty and service:
n
Tams Elektronik GmbH
n
Fuhrberger Straße 4
DE-30625 Hannover
n
fon: +49 (0)511 / 55 60 60
fax: +49 (0)511 / 55 61 61
n
e-mail: [email protected]
n
n
 Loading...