

Tamerica Products TCC-1200 User Manual

45” Wide Format Hot and Cold Laminator

OPERATING INSTRUCTIONS
TCC1200
1 IMPORTANT SAFEGUARDS
When using electrical machines, basic precautions should always be followed to reduce the risk of
electric shock and injury to people, including the following:
1. Read all instructions.
2. Please not that this machine runs on 220V/50Hz with a rated current requirement of 12A~14A and
comes with a 3 phase NEMA L21-20 AC plug. Make sure the location where the machine will be
installed has the corresponding power source and receptacle appropriate for the machine’s
electrical specifications.
3. Always unplug the machine when not in use or before cleaning.
4. Do not use outdoors.
5. Extreme caution should be taken when the machine is used by or near children or disabled persons.
6. To protect against risk of electrical hazards, do not immerse cord, plugs, or the whole machine in
water or other liquids.
7. Do not operate the machine with a damaged cord or plug, or after the machine malfunctions, has
been dropped or is damaged in any manner. Return the machine to the nearest authorized service
facility for examination, repair, or adjustment.
8. Do not use accessory attachments not recommended or sold by the machine’s manufacturer.
9. Do not let the cord touch hot surfaces or hang over the edge of the work table.
10. Do not use the machine for other than its intended use. This machine is intended for Office or
Household use only.
11. The socket outlet shall be near the machine and shall be easily accessible.
12. Warning-hazardous moving parts-keep fingers and other body parts away.
2 LOCATION
1. Please remove the laminator carefully from its packaging and place it on a flat work surface. Place
the machine in an area where it will normally be used, ensuring adequate room for the finished
laminate to flow or slide out at the back.
2. Please install the shield and feed tray at the correct positions until the two LED lights on the left
side panel turn off, otherwise the machine will not feed the film.

3 HOW TO USE
A. LAMINATING FUNCTION
(1) TWO-SIDED LAMINATION
LOADING THE FILM
This machine has the capability of loading laminating film with 1” cores and with 3” cores using the
adapters on each side of the roll included. Unpack the upper and lower rods. Remove the feed tray.
Slide the roll film onto the rods, leaving equal lengths of rod out of each end. Use the guide marks to
position the roll of film. Load the rods on the laminator. When using the adapters for film with 3”
cores, follow an adapter---film----adapter sequence onto the rod and fit the adapters onto the paper
core. Note: you cannot interchange the upper and lower rods.
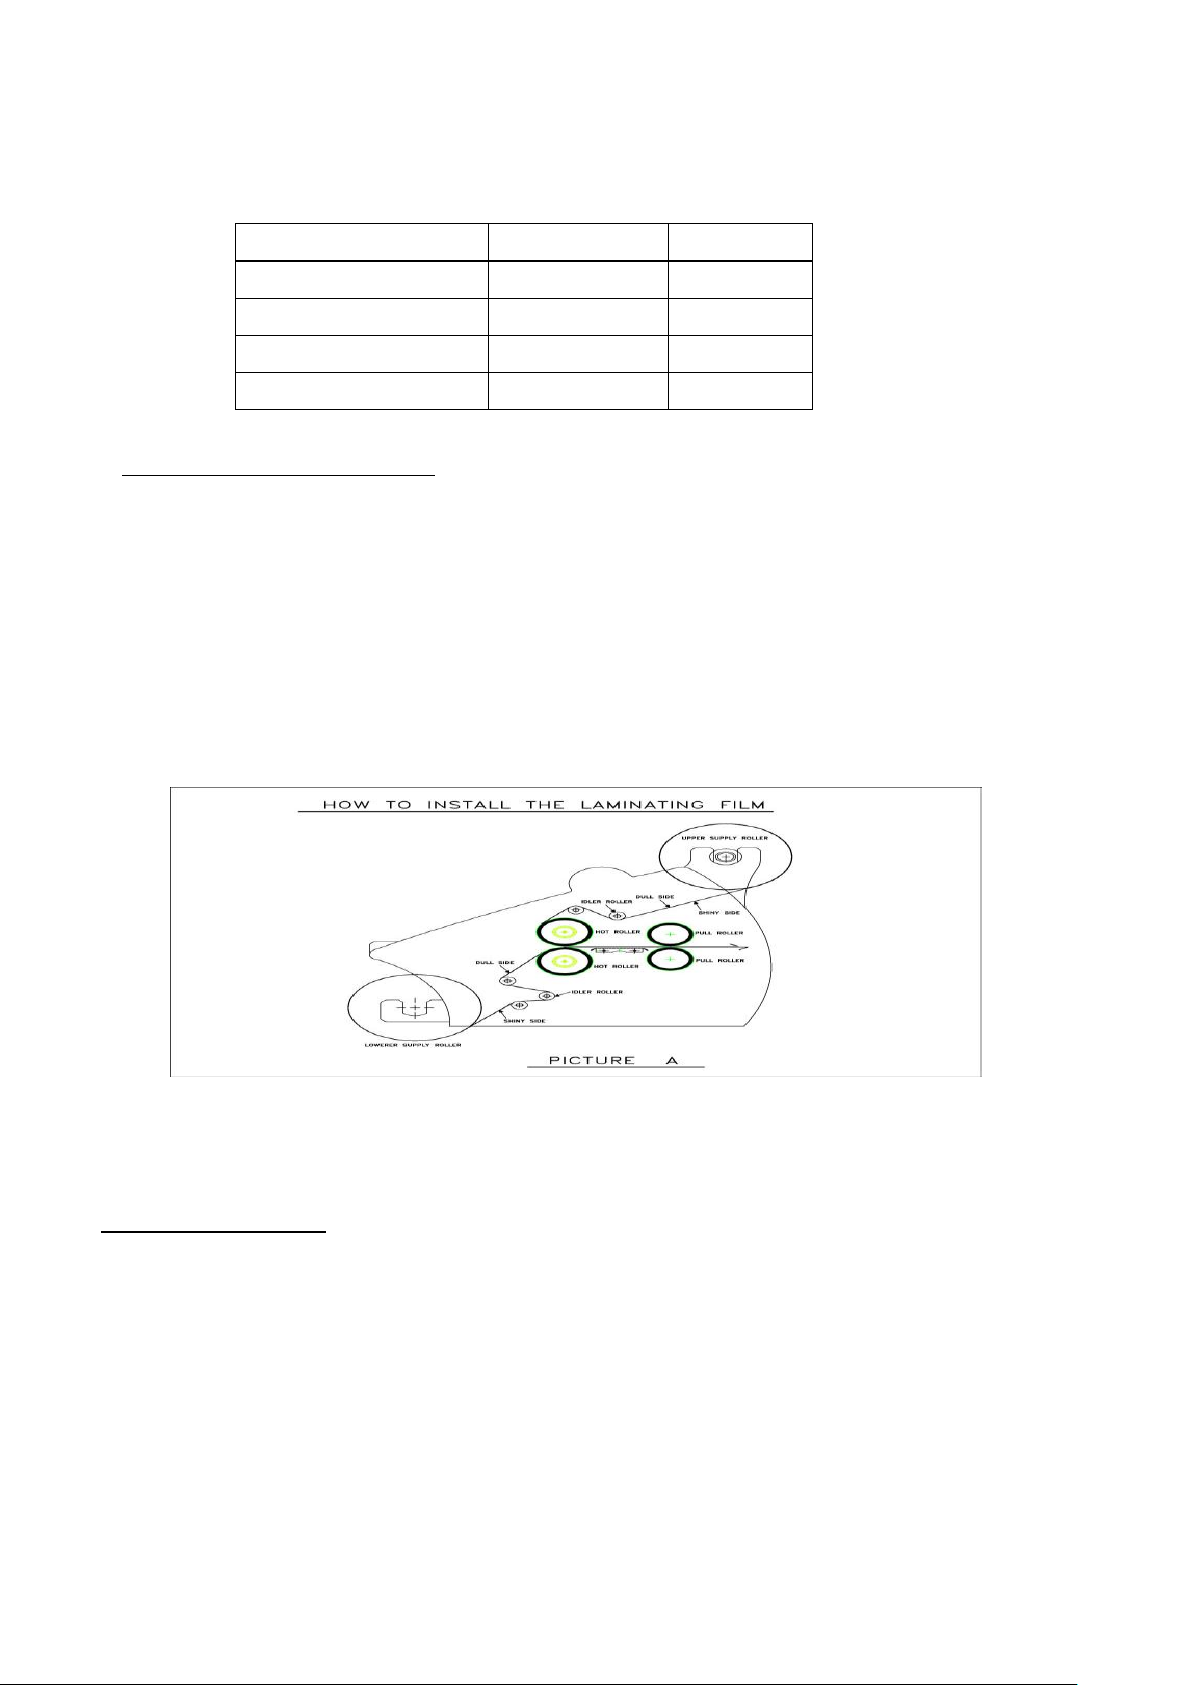
THREADING THE FILM
Read the threading card supplied with each roll of film carefully. Do not mistake the stabilizer bar for the
idler roller.
1. To thread the film through the “hot” rollers & “pull” rollers, please push the handle forward to release
pressure on all the rollers. Insert the handle pin into the farthest notch to lock the handle in place.
2. Push the film through the rollers and make sure the film is perfectly aligned at the top and bottom
Note: Overlap will cause the top film to deposit adhesive on the hot rollers and pull rollers, so this
procedure is critical.
3. Make sure the film is correctly threaded based on the threading guide. A threading diagram is also
located on the right side panel of the machine.
ADJUSTING THE TEMPERATURE & SPEED
1. After turning on the power switch, the digital screen display will show the previous temperature
setting. Please adjust the temperature to the recommended setting based on the thickness of film being
used by pressing the “TEMP/SET” “︿” or “﹀” arrow keys. Said recommendations are found in front
of the machine’s left side panel. The lowest thermal temperature this machine can be set is 80°C
(176°F). The digital screen display will show the set temperature for 3 seconds before showing the
actual machine temperature. Make sure the bottom roller heater switch is in the “ON” position.
2. Once the temperature is set, press the “HOT” key to start the heating process and the heater light will
turn on. Once the set temperature is achieved and the roller temperature is stabilized, the machine will
start beeping and the ready light will turn on. Once the ready light stays on, you can set the
recommended speed.
3. Press the “MOTOR” “︿” or “﹀” arrow keys to set the motor speed. The following table gives some
common temperature/speed setting for typical uses. Wait another 10 ~12 minutes before starting the
Film Thickness
Temperature
Speed
1.5 Mil (38 Micron)
110°C (230°F)
3
3 Mil (75 Micron)
115°C (239°F)
4
5 Mil (125 Micron)
125°C (266°F)
2
10 Mil (250 Micron)
150°C (302°F)
2
lamination job.
LAMINATING PROCEDURES
1. Release the handle from the locked position and insert the handle pin into the “MIN” notch to
engage the rollers. The user can now start laminating as the machine starts feeding in film.
2. To put the lamination temporarily on hold without turning off the machine, the user can release
the handle and reinsert in any of the notches from 3/16” and higher. This will separate the rollers
and stop the motor from feeding more film.
3. Pull the handle back to the “MIN” setting to reengage the rollers and resume the lamination job.
(2) ONE-SIDED LAMINATION
LOADING THE FILM
Unpack only the upper rod. Install nylon or thermal film on 1” or 3” cores by following an
adapter---film----adapter sequence onto the rod and fit the adapters onto the paper core. Leave equal
lengths of the rod out of each end. Use the guide to position the roll of film then tighten the screw on
the adapter to secure the roll film. Load the rod on the laminator.
 Loading...