

Page 1

Get your ParentBox set
up more quickly by
following this simple User
Guide
USER GUIDE
© Tame Technology 2013
Page 2

2
© TAME TECHNOLOGY 2013
USER GUIDE
Your ParentBox
Your family uses the Internet all the time, which is a great thing. But
you sometimes worry that the children spend too much time on
Facebook or that they download too many movies.
What is a responsible parent to do?
Well, you’ve already answered that question by purchasing a
ParentBox, and you’re now going to plug it in and set it up so that
you can:
• Give each member of your family their own, customised
daily quota for downloads.
• Set time limits for each of the children, so there’s no Internet
after bedtime!
Once you’ve done those things, you can sit back while ParentBox
monitors Internet usage and collects statistics. Next week you can:
• Review graphs of each day’s activity to see who’s using the
Internet most, and at what times of the day.
• Review graphs of the month’s activity to see how the family
as a whole is tracking against your ISP’s data plan.
Page 3

© TAME TECHNOLOGY 2013
3
Contents
Your ParentBox .......................................................................................... 2
Getting started .......................................................................................... 5
Have you got all the bits and pieces?................................................ 7
Connecting the cables ........................................................................ 9
Logging into ParentBox for the first time ........................................... 11
Setting the family’s monthly limit ....................................................... 13
Turning on the wireless ........................................................................ 15
Day-to-day running of the ParentBox .................................................. 17
Adding family members to ParentBox .............................................. 18
Assigning computers to family members ......................................... 21
Setting daily download limits for a family member ......................... 23
Setting timeslots for a family member ............................................... 26
Temporarily unblocking a family member ....................................... 29
How a family member checks his or her progress .......................... 31
How you check the family’s progress for a day .............................. 35
How you check the family’s progress for a month ......................... 36
Reference................................................................................................. 39
Changing the ParentBox password .................................................. 40
Configuring ParentBox so it can send emails .................................. 41
Choosing which emails to send ......................................................... 44
Ensuring the ParentBox clock stays accurate .................................. 46
Page 4

4
© TAME TECHNOLOGY 2013
USER GUIDE
Using static or dynamic IP addresses ................................................ 47
Switching the ParentBox off ............................................................... 47
Understanding the lights on the ParentBox ...................................... 48
Can’t connect to ParentBox? ........................................................... 50
Adding ParentBox to a more complex home network .................. 51
The advanced controls in ParentBox ................................................ 53
Changing the wireless encryption method ..................................... 54
Page 5

© TAME TECHNOLOGY 2013
5
USER GUIDE
Getting started
In this section:
• Have you got all the bits and pieces?
• Connecting the cables
• Connecting to ParentBox for the first time
• Setting the family’s monthly limit
• Turning on the wireless
Page 6
6
© TAME TECHNOLOGY 2013
USER GUIDE
Figure 1
Figure 2
Page 7

© TAME TECHNOLOGY 2013
7
USER GUIDE
Have you got all the bits and pieces?
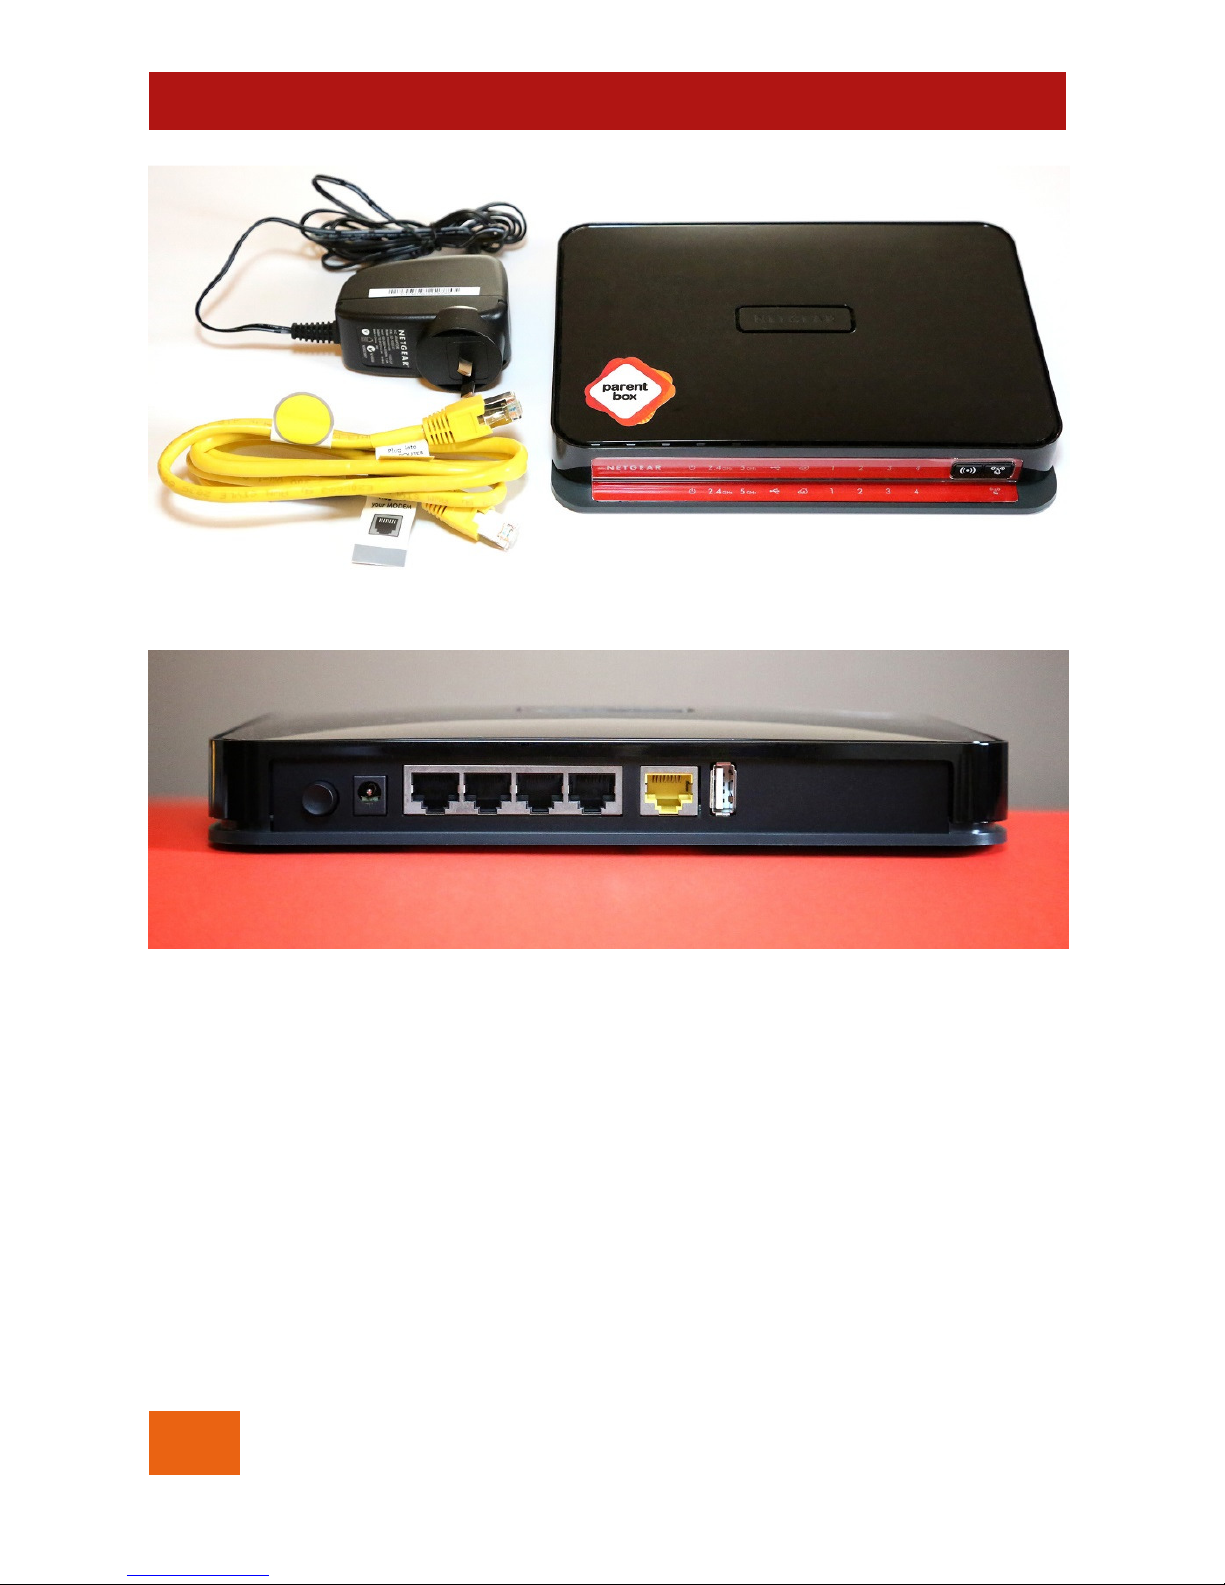
After unpacking your new ParentBox you should have in front of
you (Figure 1):
• The ParentBox unit
• The power supply unit
• The yellow network cable
• A plastic foot (not shown in Figure 1), which you can use to
stand the ParentBox unit on end.
You will also need:
• A PC for configuring the ParentBox.
Actually, a Mac or any kind of computer – as long as you
can plug a network cable into it – can be used. This Guide
will refer simply to ‘your PC’ to save space.
• A network cable, to connect your PC to the ParentBox.
• A free network socket on the back of your modem.
This Guide will refer to ‘your modem’ meaning whatever
electronic box brings the Internet into your home and
provides connections for computers to plug in to.
Page 8
8
© TAME TECHNOLOGY 2013
USER GUIDE
Figure 3
Figure 4
Page 9

© TAME TECHNOLOGY 2013
9
USER GUIDE
Connecting the cables
1. Before connecting any cables, check that your PC can
connect to the Internet using your modem.
2. Disable or turn off any wireless that you may have on your
PC. Disconnect any network cables from your PC and turn
your PC off.
3. Connect the supplied yellow cable between your modem
and the ParentBox.
• At the modem end the yellow cable plugs into the
same kind of socket that your computers plug in to.
• At the ParentBox end it plugs into the yellow socket
(Figure 2).
4. Connect the ParentBox to the mains using the power supply
unit and turn the ParentBox on.
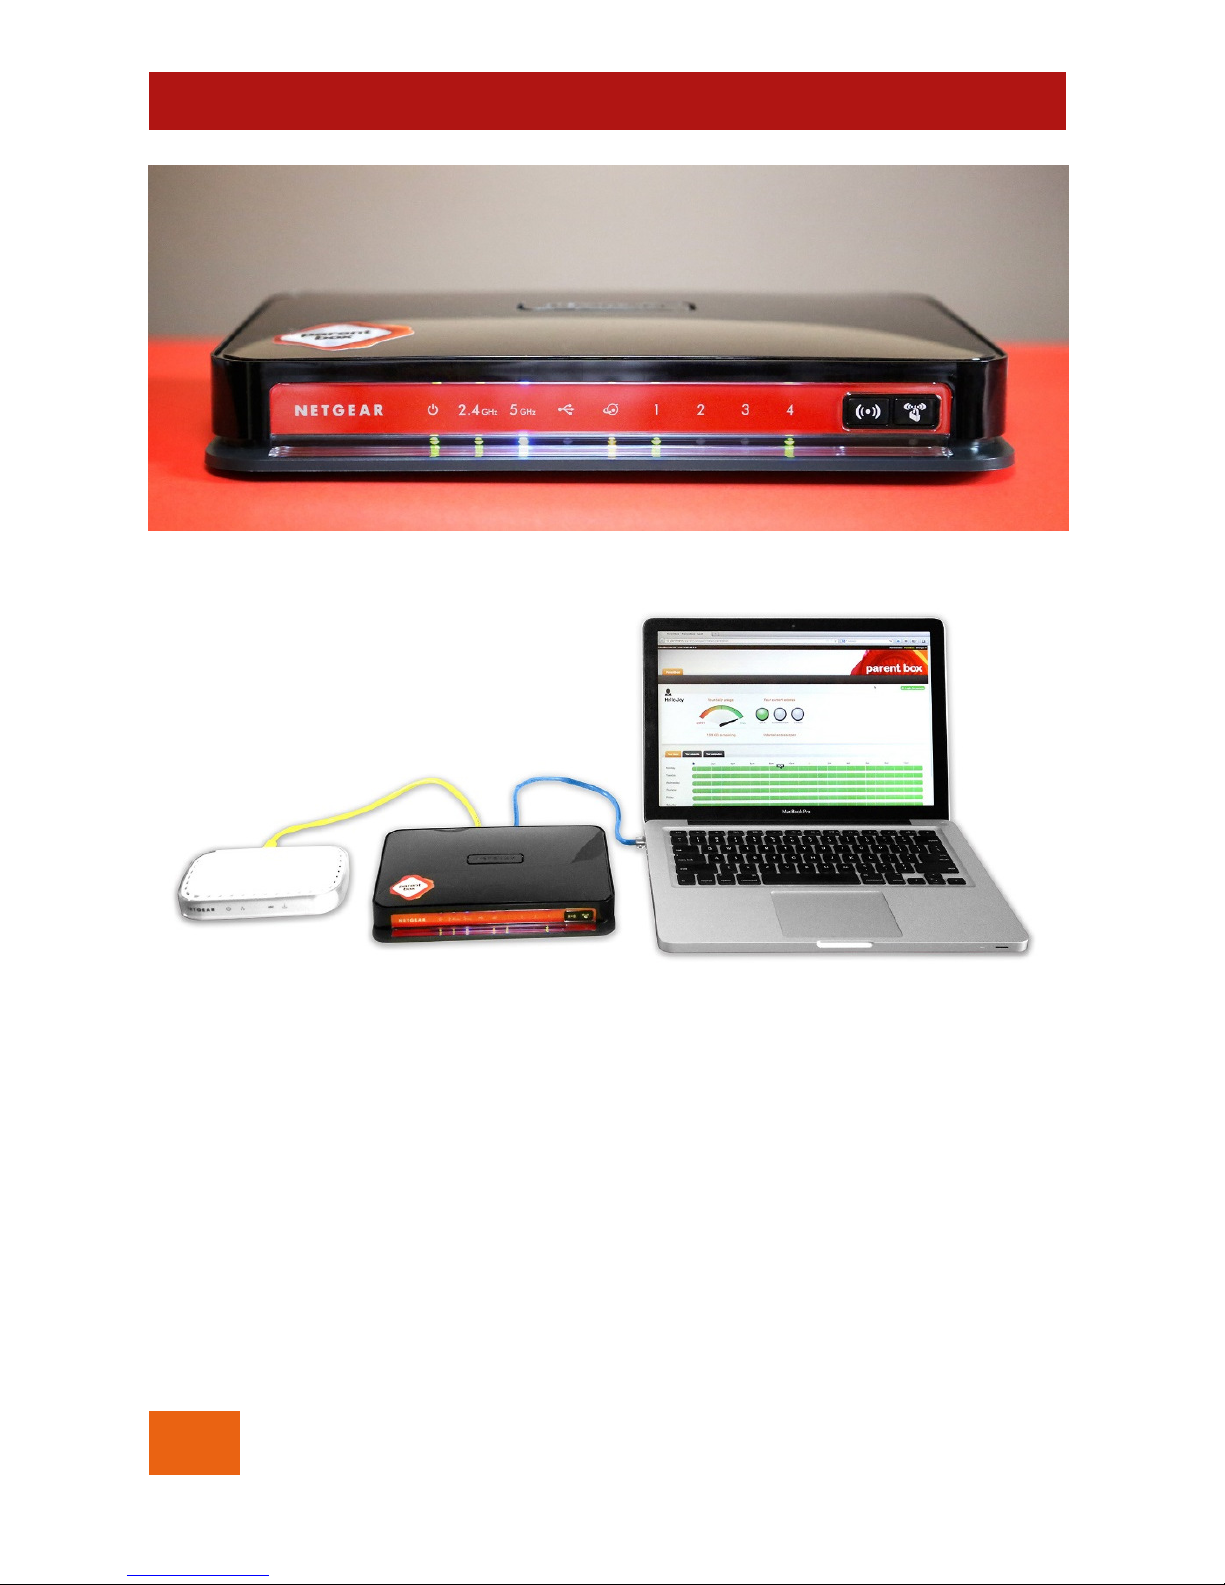
5. Wait approximately 60 seconds until the power light on the
ParentBox (Figure 3) is a steady green.
6. Connect your PC to the ParentBox using a network cable
(not supplied) and turn your PC on.
Your setup should now look similar to that shown in Figure 4 – the
modem at left is connected by the yellow cable to the ParentBox,
which is connected by another cable to the PC at right.
Page 10
10
© TAME TECHNOLOGY 2013
USER GUIDE
Figure 5
Page 11

© TAME TECHNOLOGY 2013
11
USER GUIDE
Logging into ParentBox for the first time
Now that ParentBox is connected between your modem and PC
and everything is switched on you can view the first ParentBox
screen.
1. Open a web browser on your PC and type http://parentbox
into the address bar.
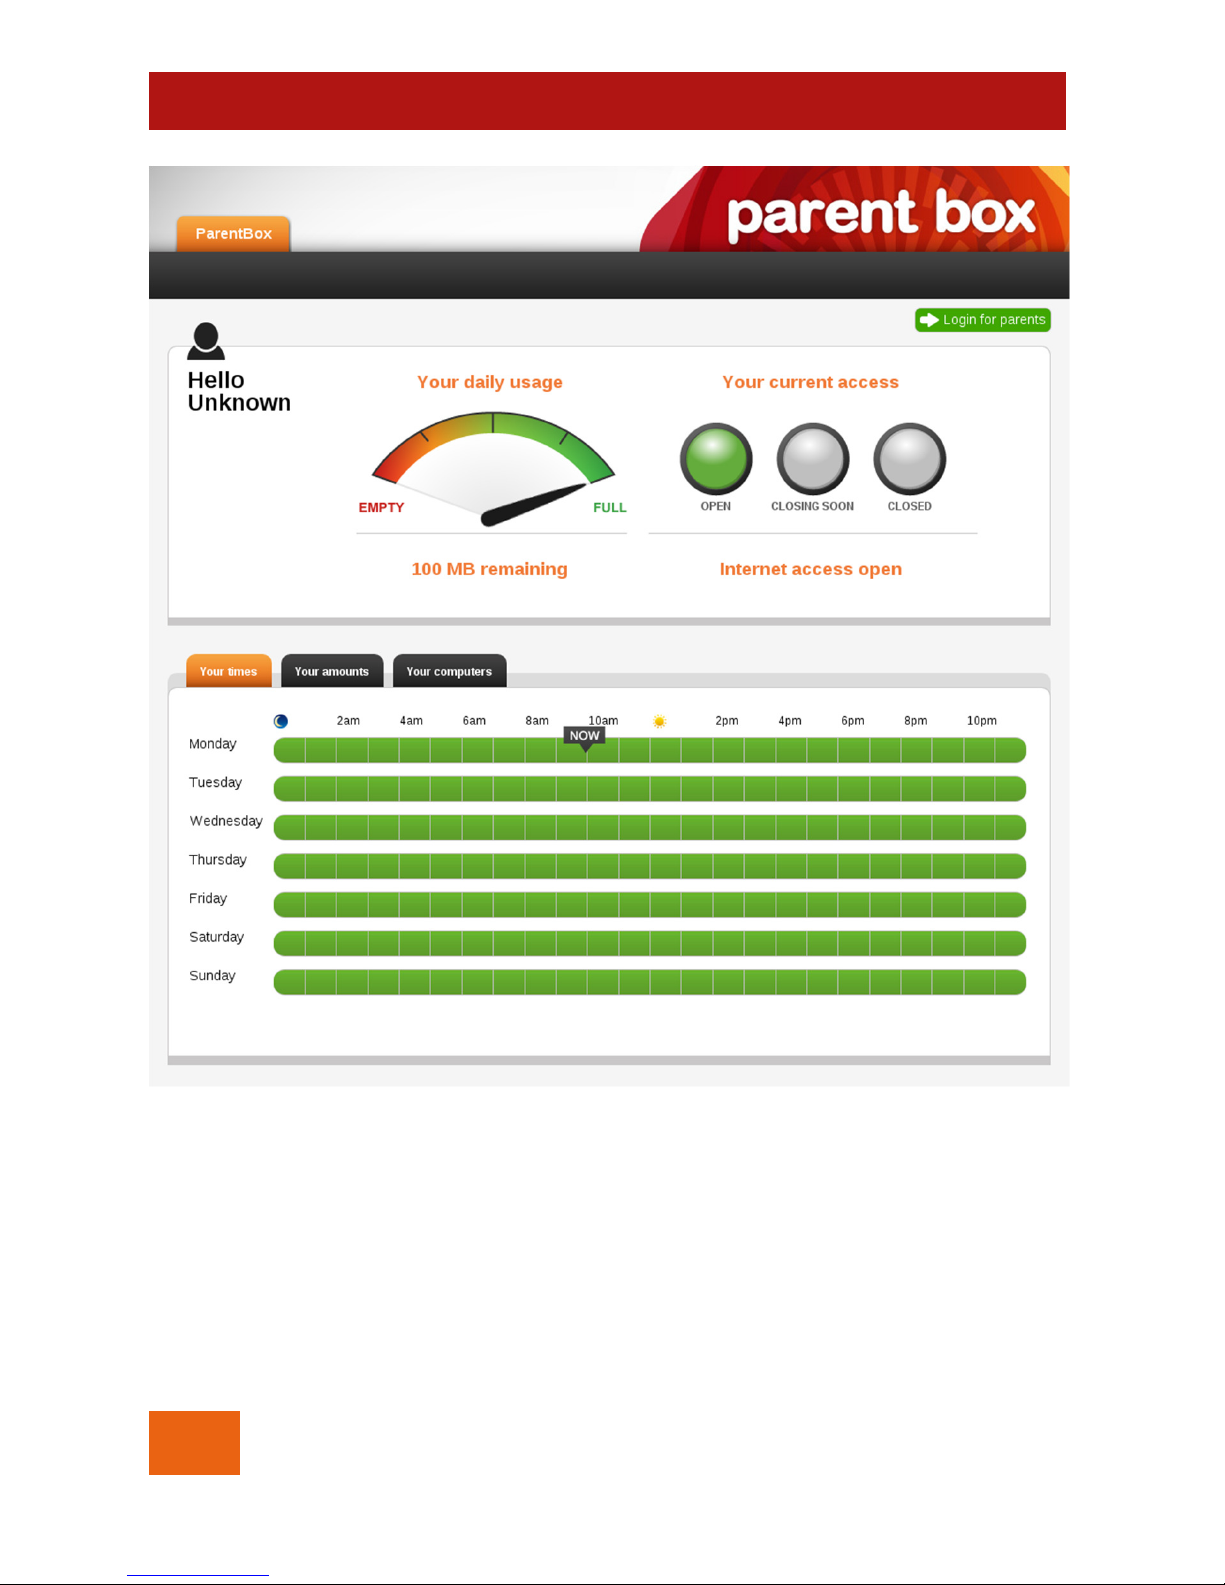
2. After a second or two you should see the screen shown in
Figure 5.
In Figure 5 the fuel gauge shows how much of your daily download
is left and the ‘horizontal traffic lights’ shows whether you are
currently in a timeslot or not.
Next you should enter details of your ISP’s data plan, as described
over the page.
If you don’t see this screen refer to
Can’t connect to ParentBox?
on page 50.
Page 12
12
© TAME TECHNOLOGY 2013
USER GUIDE
Figure 6
Page 13

© TAME TECHNOLOGY 2013
13
USER GUIDE
Setting the family’s monthly limit
The values that you set for the family’s monthly limit are used by
ParentBox for a number of purposes so it’s a good idea to set the
monthly limit before you allocate limits to individual family
members.
1. Go to http://parentbox in your web browser.
2. Click the green, ‘Login for parents’ button at top right.
3. Enter the default ParentBox password (which is ‘password’)
and click the green, ‘Login’ button.
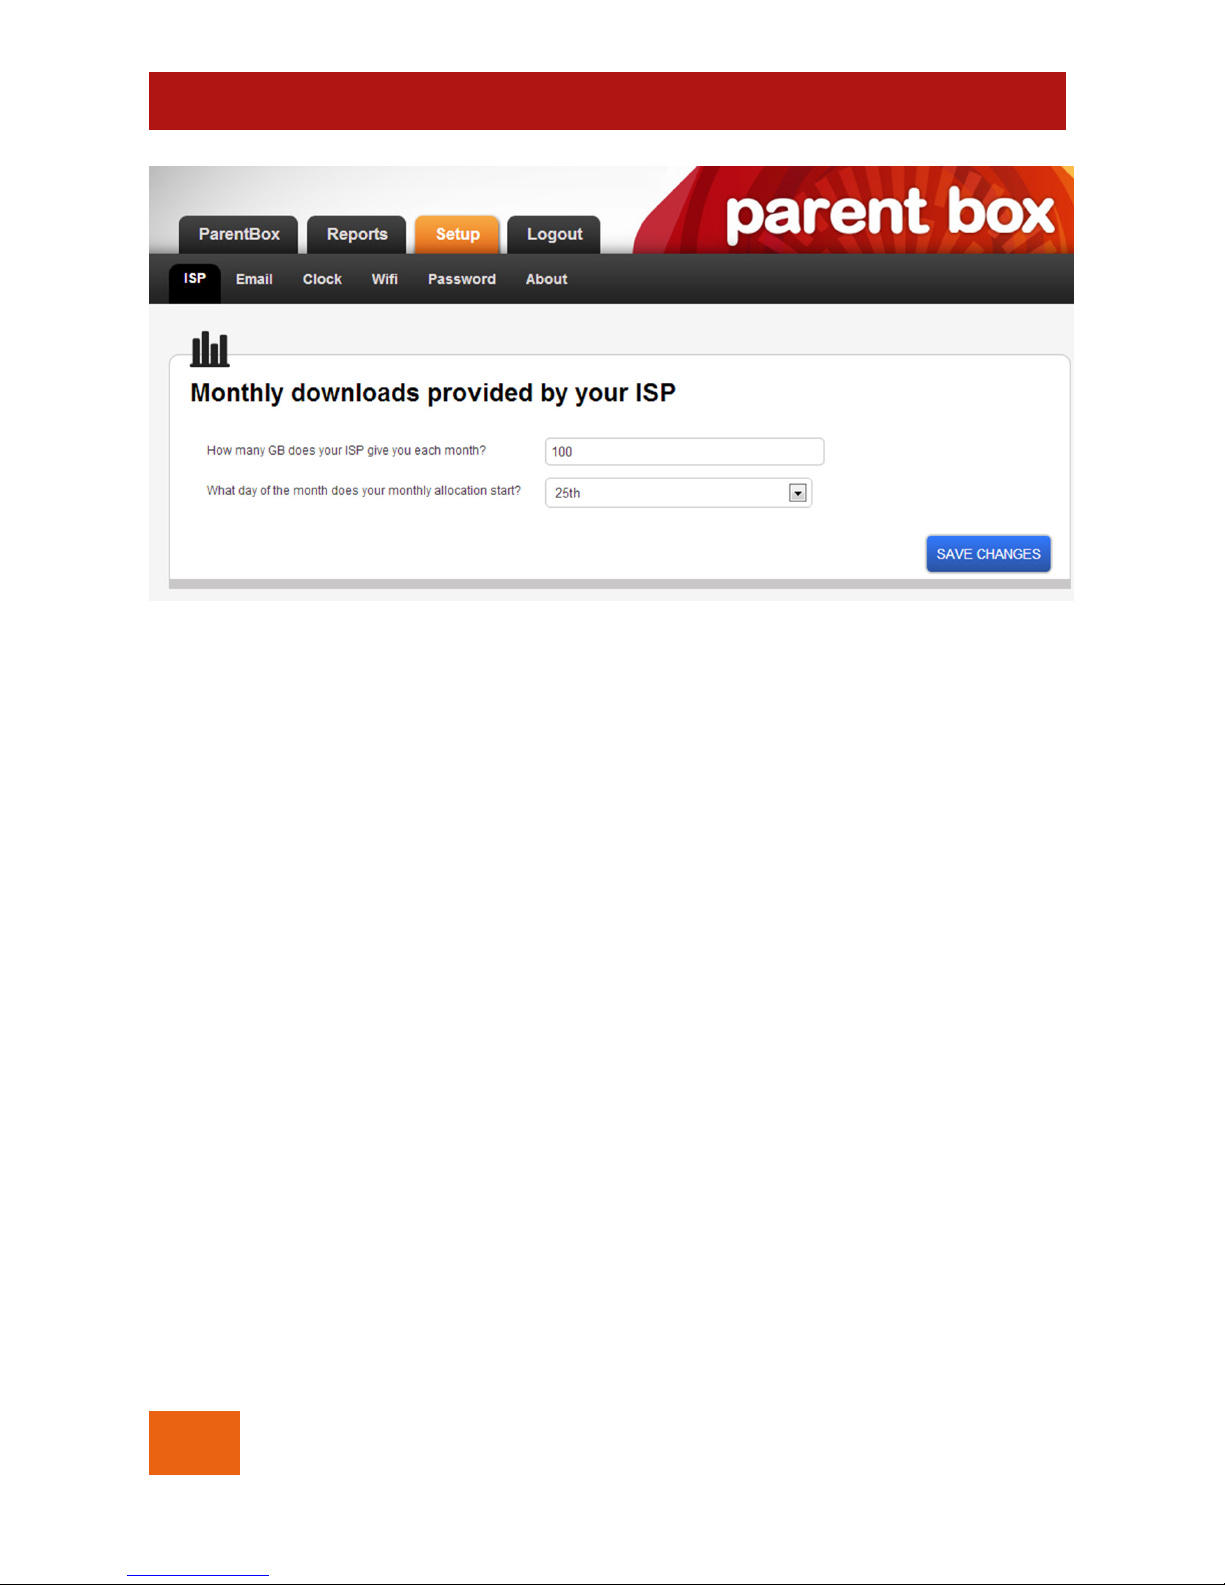
4. Select the ‘Setup’ tab and then the ‘ISP’ tab to see the
screen shown in Figure 6.
5. In the text field enter the number of gigabytes (GB) that you
are allowed to download in a billing cycle by your ISP
without being traffic-shaped or having to purchase
additional data blocks.
6. In the dropdown select the day of the month on which new
billing cycles start.
7. Click the blue SAVE CHANGES button.
Next steps:
• Switch on the ParentBox’s wireless network (next page) so
that computers can connect to the Internet by wireless.
• Or go ahead to the chapter Day-to-day running of the
ParentBox on page 17 if you don’ need wireless right now.
• At some point you should change ParentBox’s default
password to something more secure, see Changing the
ParentBox password on page 40.
Page 14
14
© TAME TECHNOLOGY 2013
USER GUIDE
Figure 7
Page 15

© TAME TECHNOLOGY 2013
15
USER GUIDE
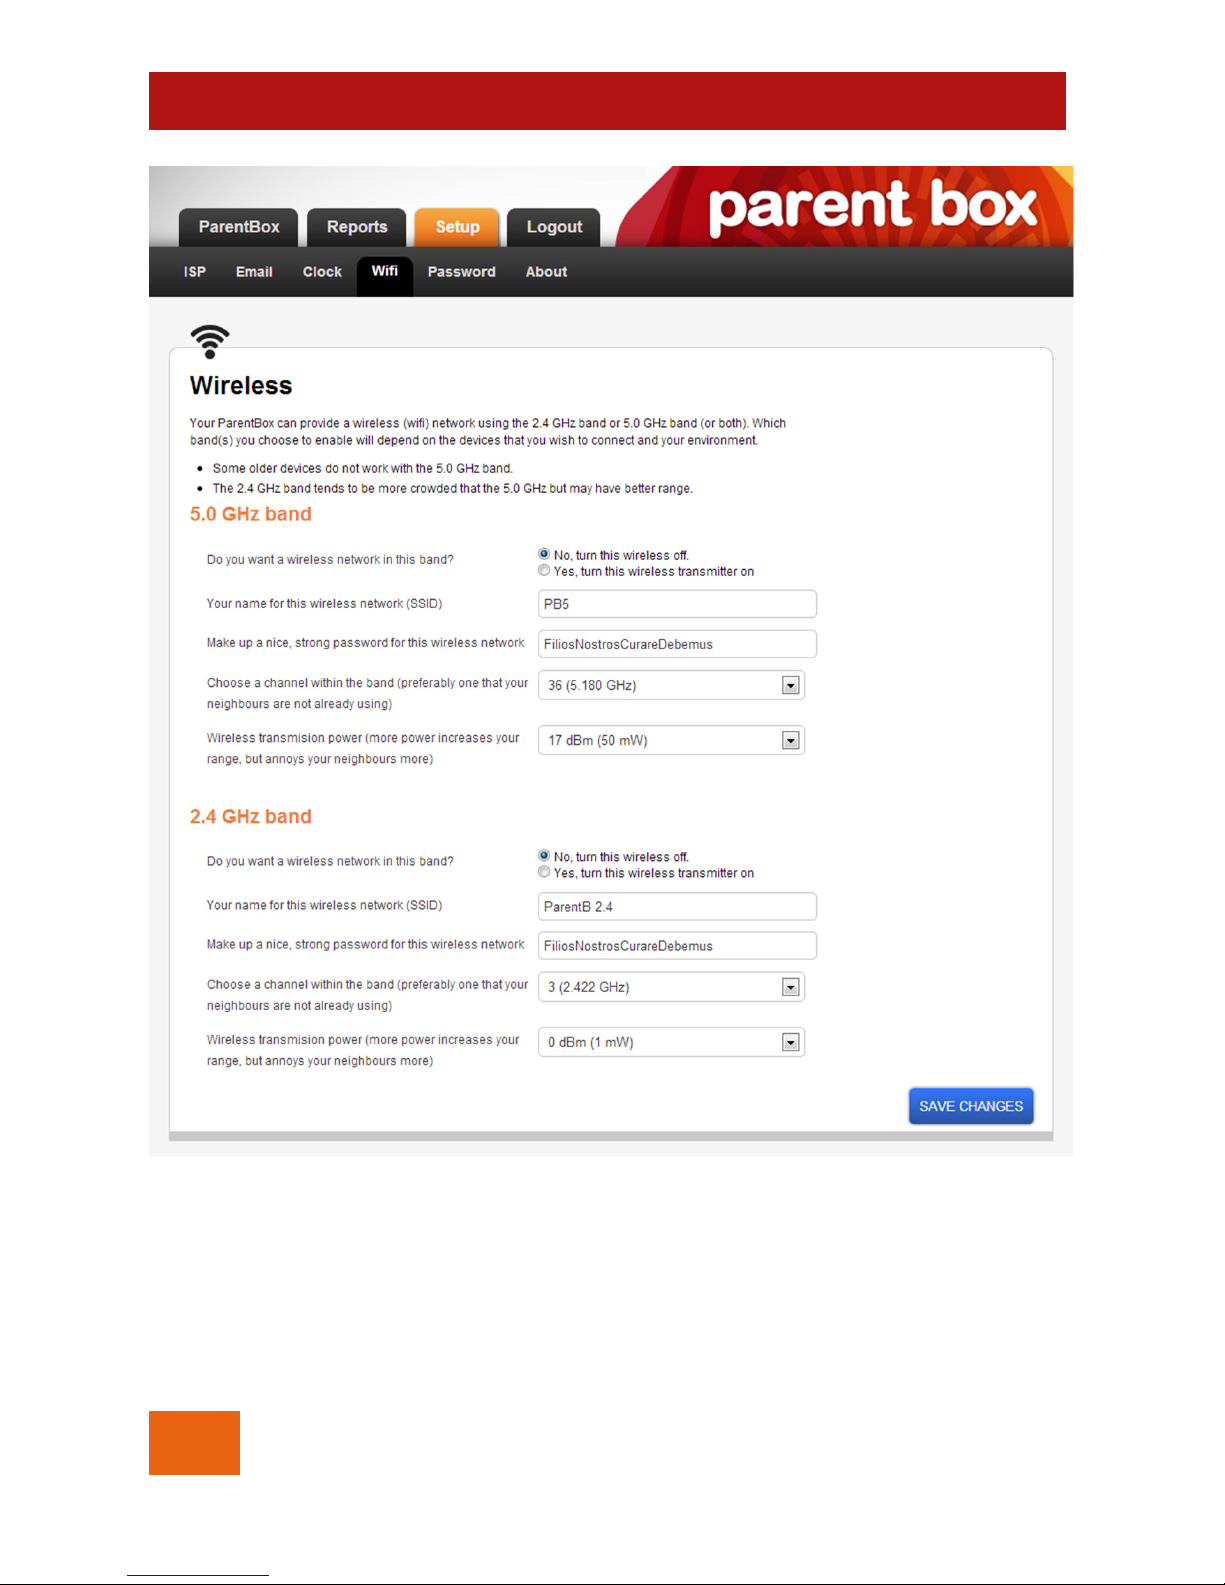
Turning on the wireless
Your ParentBox can be used as an access point for a wireless LAN,
i.e. you can have your family connect to your ParentBox using
wireless instead of a wired connector. In fact, the ParentBox can
provide 2 wireless networks simultaneously – one in the 2.4 GHz
band and one in the 5.0 GHz band.
• The 2.4 GHz band is compatible with more devices,
especially older devices.
• The 2.4 GHz band often has better range, particularly
through house walls.
• The 5.0 GHz band is less congested and may give you better
speeds.
Your ParentBox comes with both wireless networks switched off, but
you can switch either (or both) on.
1. Log in to ParentBox (if you’re not already logged in) and
click the ‘Setup’ tab followed by the ‘Wifi’ tab.
2. Change the radio button for the network or networks that
you want to turn on.
Turn OFF your existing wireless
network – or to change its
password – to ensure your
family members connect to the
Internet via the ParentBox.
Page 16

16
© TAME TECHNOLOGY 2013
USER GUIDE
3. Enter a name (or ‘SSID’) in the text field for the wireless
network(s) that you want to turn on. If you are using both
wireless networks then give them different names.
4. Note the default password, FiliosNostrosCurareDebemus, or
enter your own password.
5. Optionally, change the wireless channel in the dropdown.
You might do this if your neighbour’s wireless network is using
the same channel and causing interference.
6. Optionally, change the wireless transmission power. You
might increase this value to extend the range of your
wireless network. You might decrease this value to reduce
the interference you cause to your neighbour’s network.
7. Click the blue SAVE CHANGES button.
Note: ParentBox is preconfigured to use WPA2-PSK security for the
wireless network. If this doesn’t work for some of your family’s
computers or devices then refer to Changing the wireless
encryption method on page 54.
Next steps:
• Your ParentBox is now successfully set up! Continue on the
next page with Day-to-day running of the ParentBox.
Page 17

© TAME TECHNOLOGY 2013
17
USER GUIDE
Day-to-day running of the
ParentBox
In this section:
• Adding family members to ParentBox
• Assigning computers to family members
• Setting daily download limits for a family member
• Setting timeslots for a family member
• Temporarily unblocking a family member
• How a family member checks his or her progress
• How you check the family’s progress for a day
• How you check the family’s progress for a month
Page 18
18
© TAME TECHNOLOGY 2013
USER GUIDE
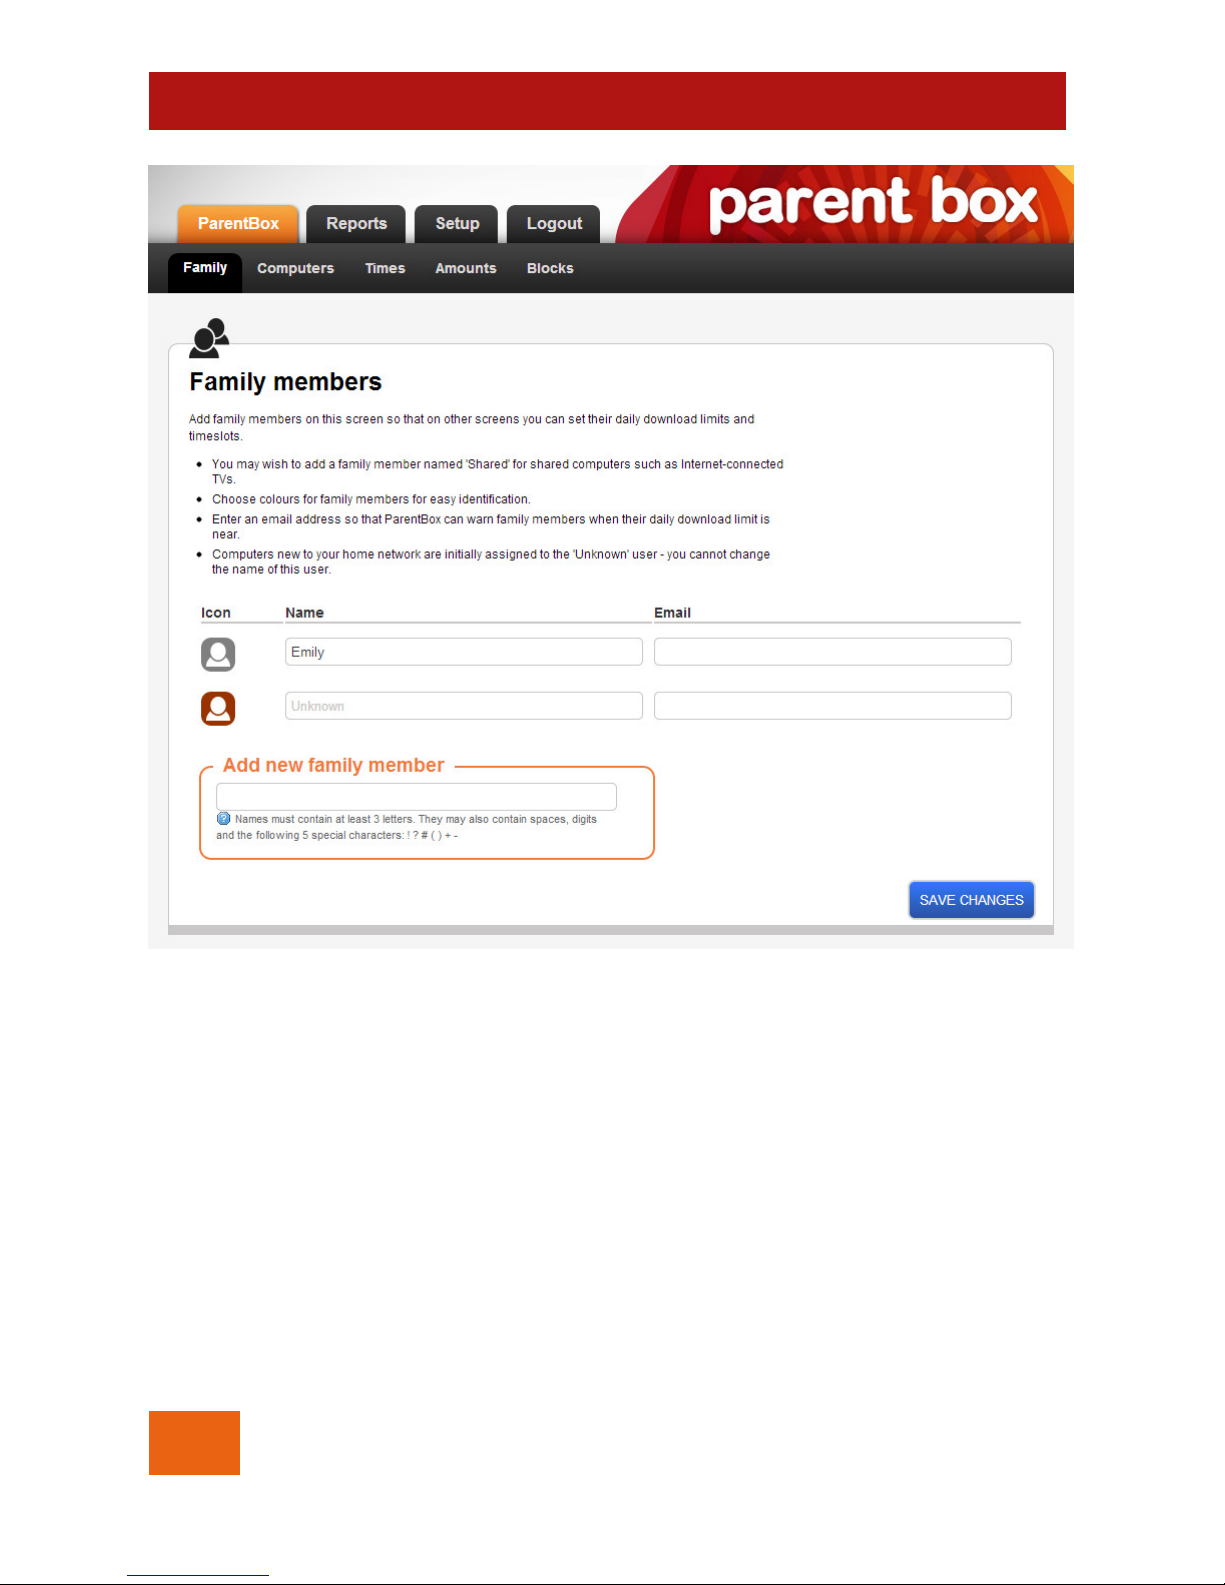
Figure 8
Adding family members to ParentBox
The idea behind ParentBox is that you allocate daily download
limits (and daily timeslots) to your family members. Before you
allocate limits, however, you must enter the names of your family
members into ParentBox using the Family screen under the
‘ParentBox’ tab (Figure 8).
1. Log in to ParentBox (if you’re not already logged in) and
click the ‘ParentBox’ tab followed by the ‘Family’ tab.
Page 19

© TAME TECHNOLOGY 2013
19
USER GUIDE
2. Enter the name of the family member you want to add in
the ‘Add new family member’ text field and then click SAVE
CHANGES.
3. After the screen reloads, you can click the icon beside the
family member to change its colour. You can also edit the
family member’s name or enter an email address. Click
SAVE CHANGES when you’re done.
You can add up to 15 family members. Each family member has a
coloured, ‘person’ icon, which is used to identify them in various
reports. You can give family members an email address – if you
want them to receive emails telling them when they’ve exceeded
75% of their allocation (refer also to Choosing which emails to send
on page 44).
The family member named ‘Unknown’ is special. This family
member is created automatically, cannot be renamed, and is the
family member to which new computers are automatically
assigned until you re-assign them to someone.
As with the ‘Unknown’ family member, not all family members in
ParentBox need correspond to real people. You may wish to
create other ‘unreal’ family members such as ‘Shared’ for the
Internet-enabled TV, or ‘No access’ for specific devices that you
don’t want using the Internet at all.
Once you’ve added a new family member you cannot delete
them, although you can rename them at any time.
Page 20
20
© TAME TECHNOLOGY 2013
USER GUIDE
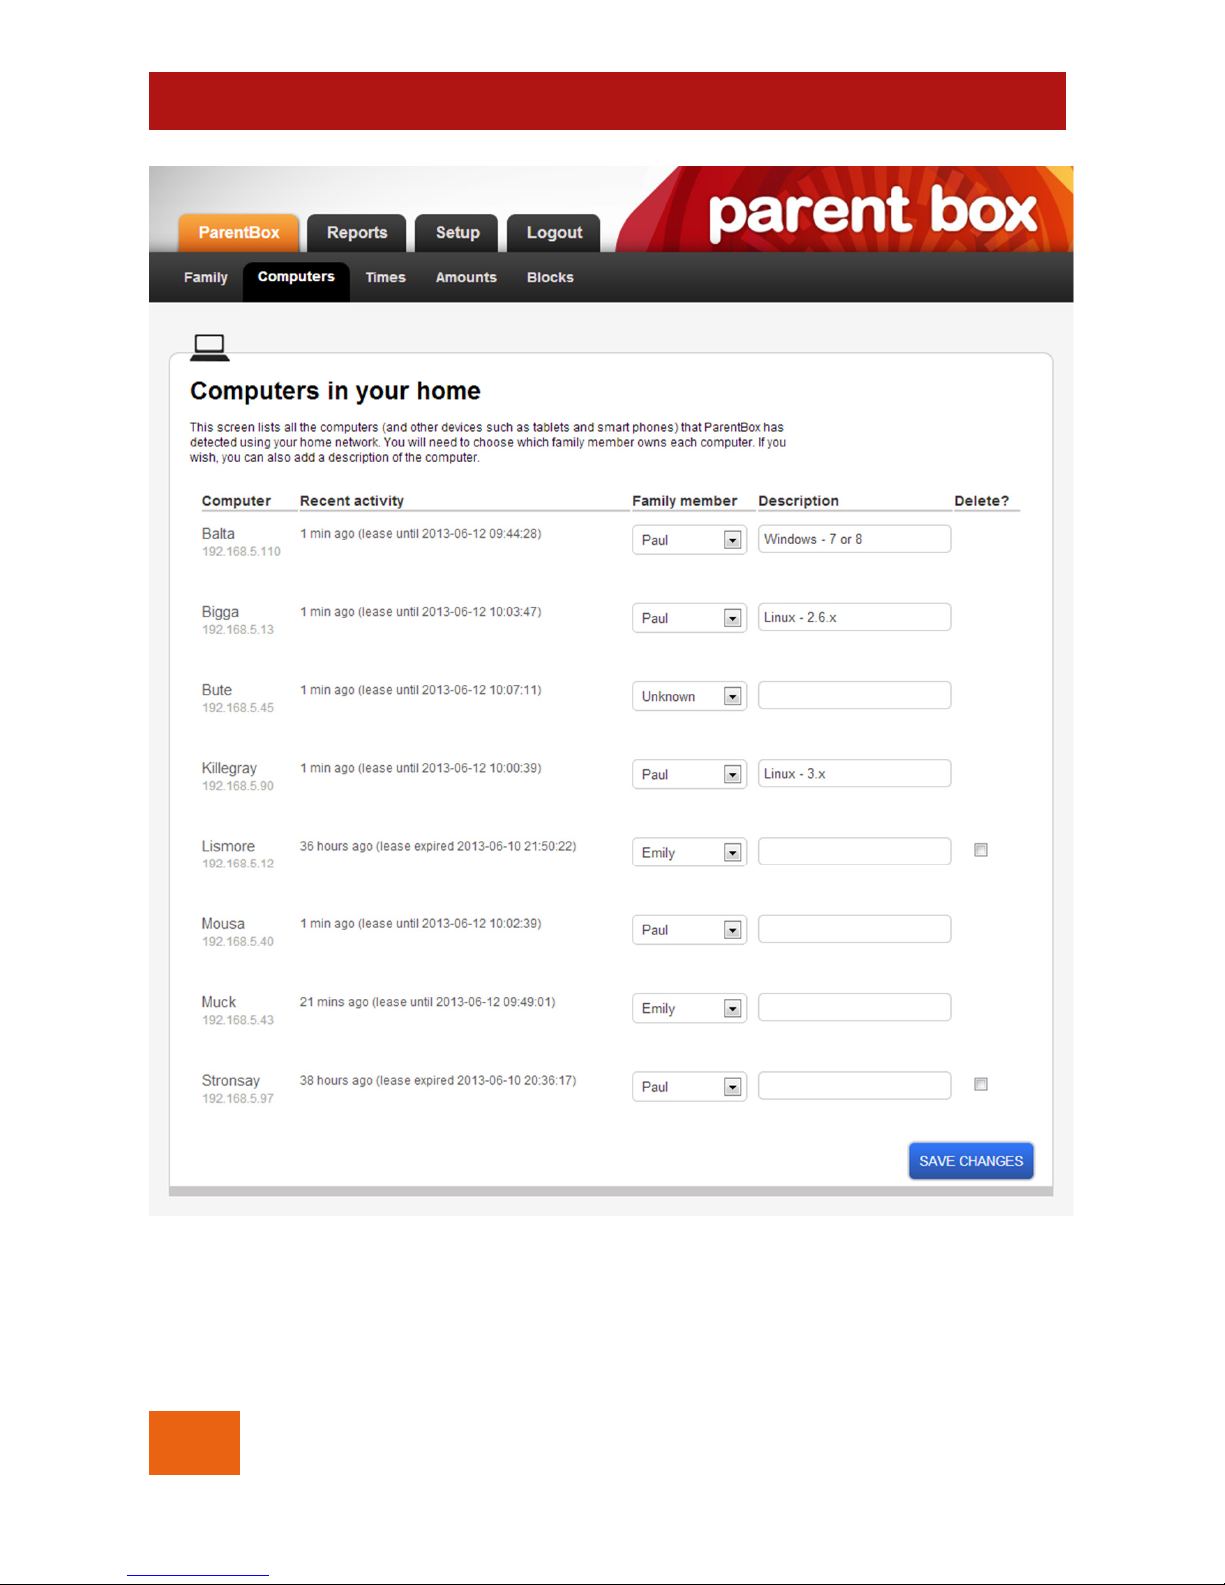
Figure 9
Page 21

© TAME TECHNOLOGY 2013
21
USER GUIDE
Assigning computers to family
members
ParentBox detects each new computer or device when it connects
and lists it on the ‘Computers’ screen (Figure 9). You then assign
those computers to the family members that you have entered
(Adding family members to ParentBox on page 18) on the ‘Family’
screen.
1. Log in to ParentBox (if you’re not already logged in) and
click the ‘ParentBox’ tab followed by the ‘Computers’ tab.
2. For each computer listed, select the appropriate family
member from the dropdown. You can also enter or edit a
description for the computer.
3. Computers that have not connected for some time will show
a delete checkbox. Check the checkbox if you want to
delete the computer.
4. Click SAVE CHANGES when you’re done.
Assuming that you will have a number of computers and devices
using your home network, ParentBox does its best to help you figure
out which computer or device is which.
Figuring out which computer is which
Most of the time it should be obvious which computer (laptop,
tablet or mobile phone) is which from the computer’s name.
However, some devices do not send a name or the name they
send is not meaningful. Fortunately, ParentBox provides you with
several other pieces of information that help you identify devices:
• MAC address, e.g. C4:88:E5:17:D1:AE or C4-88-E5-17-D1-AE
If you suspect which device is involved then you can check
Page 22

22
© TAME TECHNOLOGY 2013
USER GUIDE
the MAC address shown by ParentBox with the MAC address
shown in the device itself. Look for an ‘About’ or ‘Properties’
screen on the device for network or wireless connections.
• IP address, e.g. 192.168.5.123
As with the MAC address, if you suspect which device is
involved then the device should be able to confirm what IP
address it is using on an ‘About’ or ‘Properties’ screen.
• Recent activity
ParentBox shows you (to within 10 minutes) how recently the
device tried to access the Internet.
• Description
ParentBox tries to guess the type of the device and display
its guess in the Description text field.
Page 23

© TAME TECHNOLOGY 2013
23
USER GUIDE
Setting daily download limits for a
family member
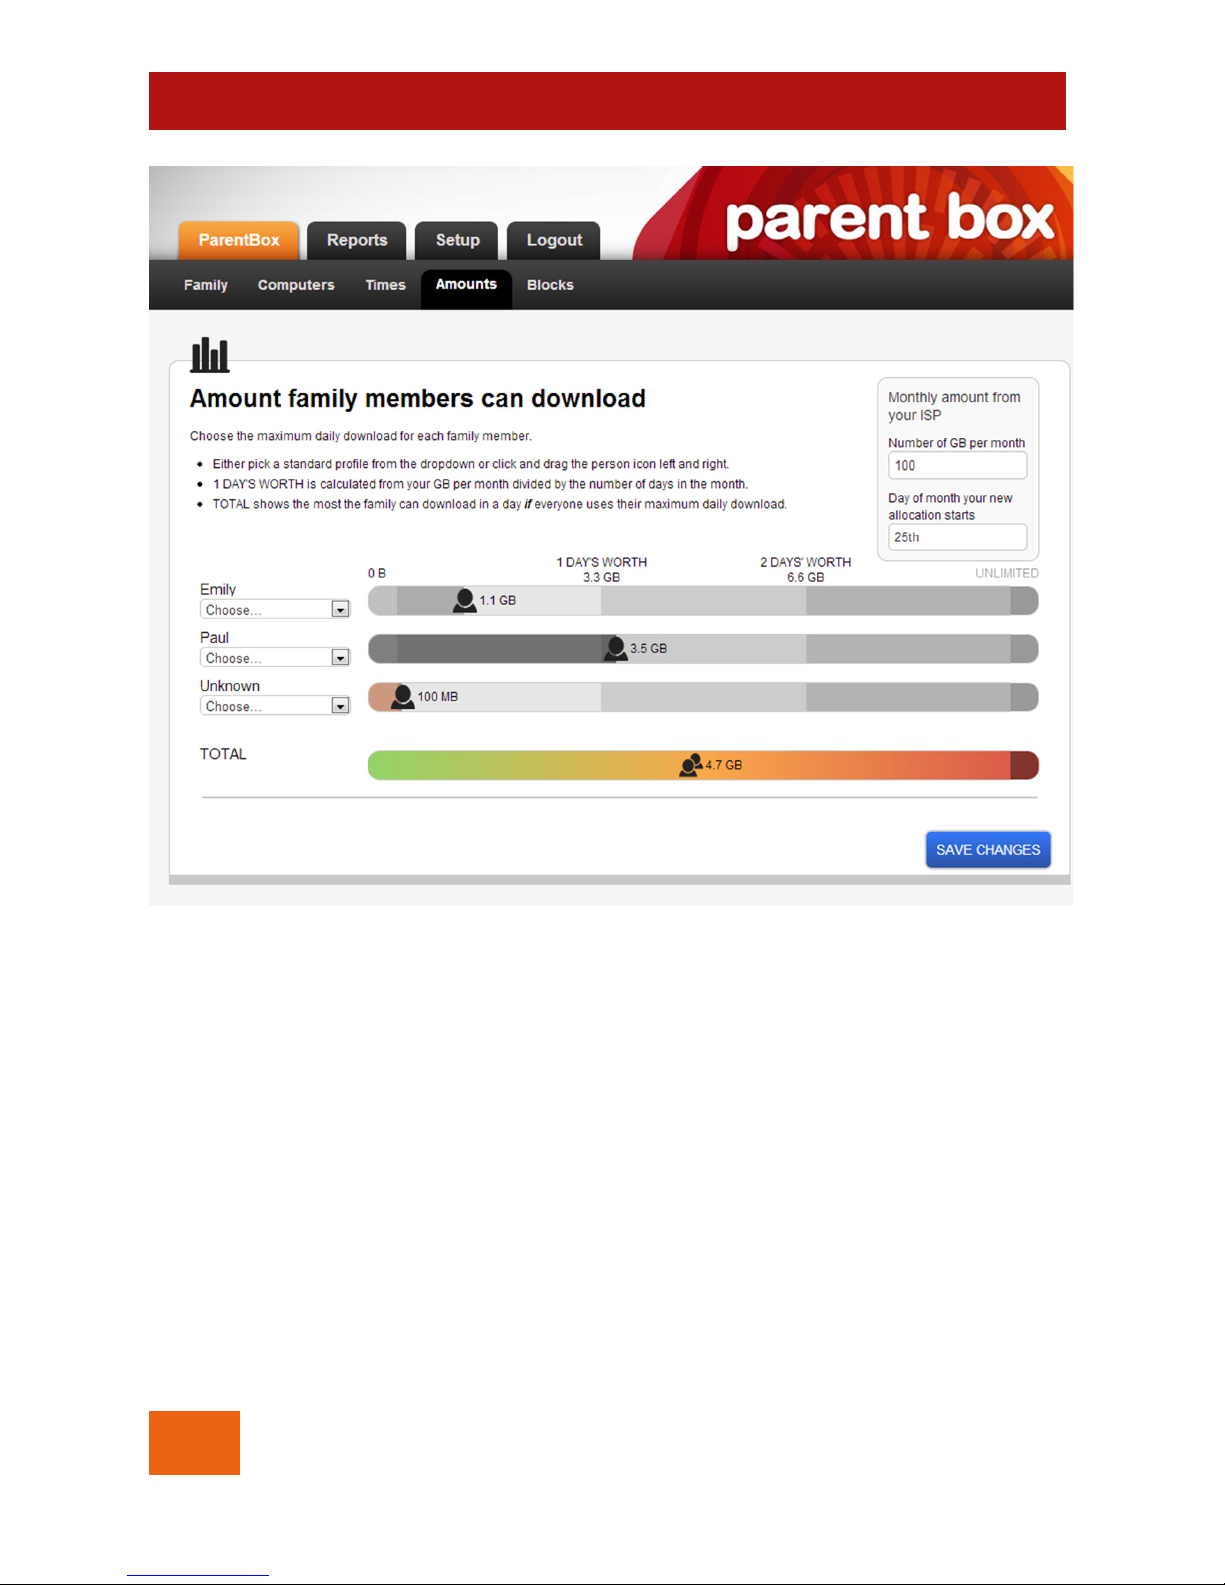
The ‘Amounts’ screen under the ‘ParentBox’ tab (Figure 10) is where
you set a limit on the amount of data that each family member
can download from the Internet in any 24-hour period.
If you have not already configured ParentBox with your monthly
download limit set by your ISP then you should go and do this now
otherwise the numbers displayed on the Amounts screen may be
misleading. Refer to Setting the family’s monthly limit on page 13.
1. Log in to ParentBox (if you’re not already logged in) and
click the ‘ParentBox’ tab followed by the ‘Amounts’ tab.
2. For each family member, drag the person icon left or right.
3. Click SAVE CHANGES when you’re done.
Page 24
24
© TAME TECHNOLOGY 2013
USER GUIDE
Figure 10
Dragging a person icon (Figure 10) to the far left stops them from
having any Internet access at all. Dragging to the far right gives
them unlimited downloads, although they are still subject to the
timeslots you set for them (Setting timeslots for a family member,
page 26). You can also use the dropdown to quickly select a
preset value. The person icon on the TOTAL horizontal bar is driven
by the other bars – you cannot drag that icon.
Page 25

© TAME TECHNOLOGY 2013
25
USER GUIDE
On the screen, 1 DAY’S WORTH is calculated by ParentBox as the
family’s total monthly download limit divided by the (average)
number of days in a month.
• A conservative strategy is to share download limits between
family members so that the TOTAL displayed is exactly 1
day’s worth. Now, if everyone uses all their downloads every
day you are still guaranteed not to run out of downloads
before the end of the month.
• A more liberal strategy is to over allocate. This time you give
family member more generous daily limits so that the TOTAL
displayed is 2 day’s worth or more. Now, assuming most
family members have days of light Internet use as well as
days of heavy use you should still not run out of downloads
before the end of the month.
The ‘Monthly’ report (How you check the family’s progress for a
month on page 36) is designed to help you monitor and adjust your
allocations.
You may find, particularly with younger
children, that they need a fairly firm limit on
their daily downloads as they will happily
use up however much is given to them.
With older children you can discuss
‘responsible Internet use’ and give them a
more flexible and generous limit.
Page 26
26
© TAME TECHNOLOGY 2013
USER GUIDE
Figure 11
Setting timeslots for a family member
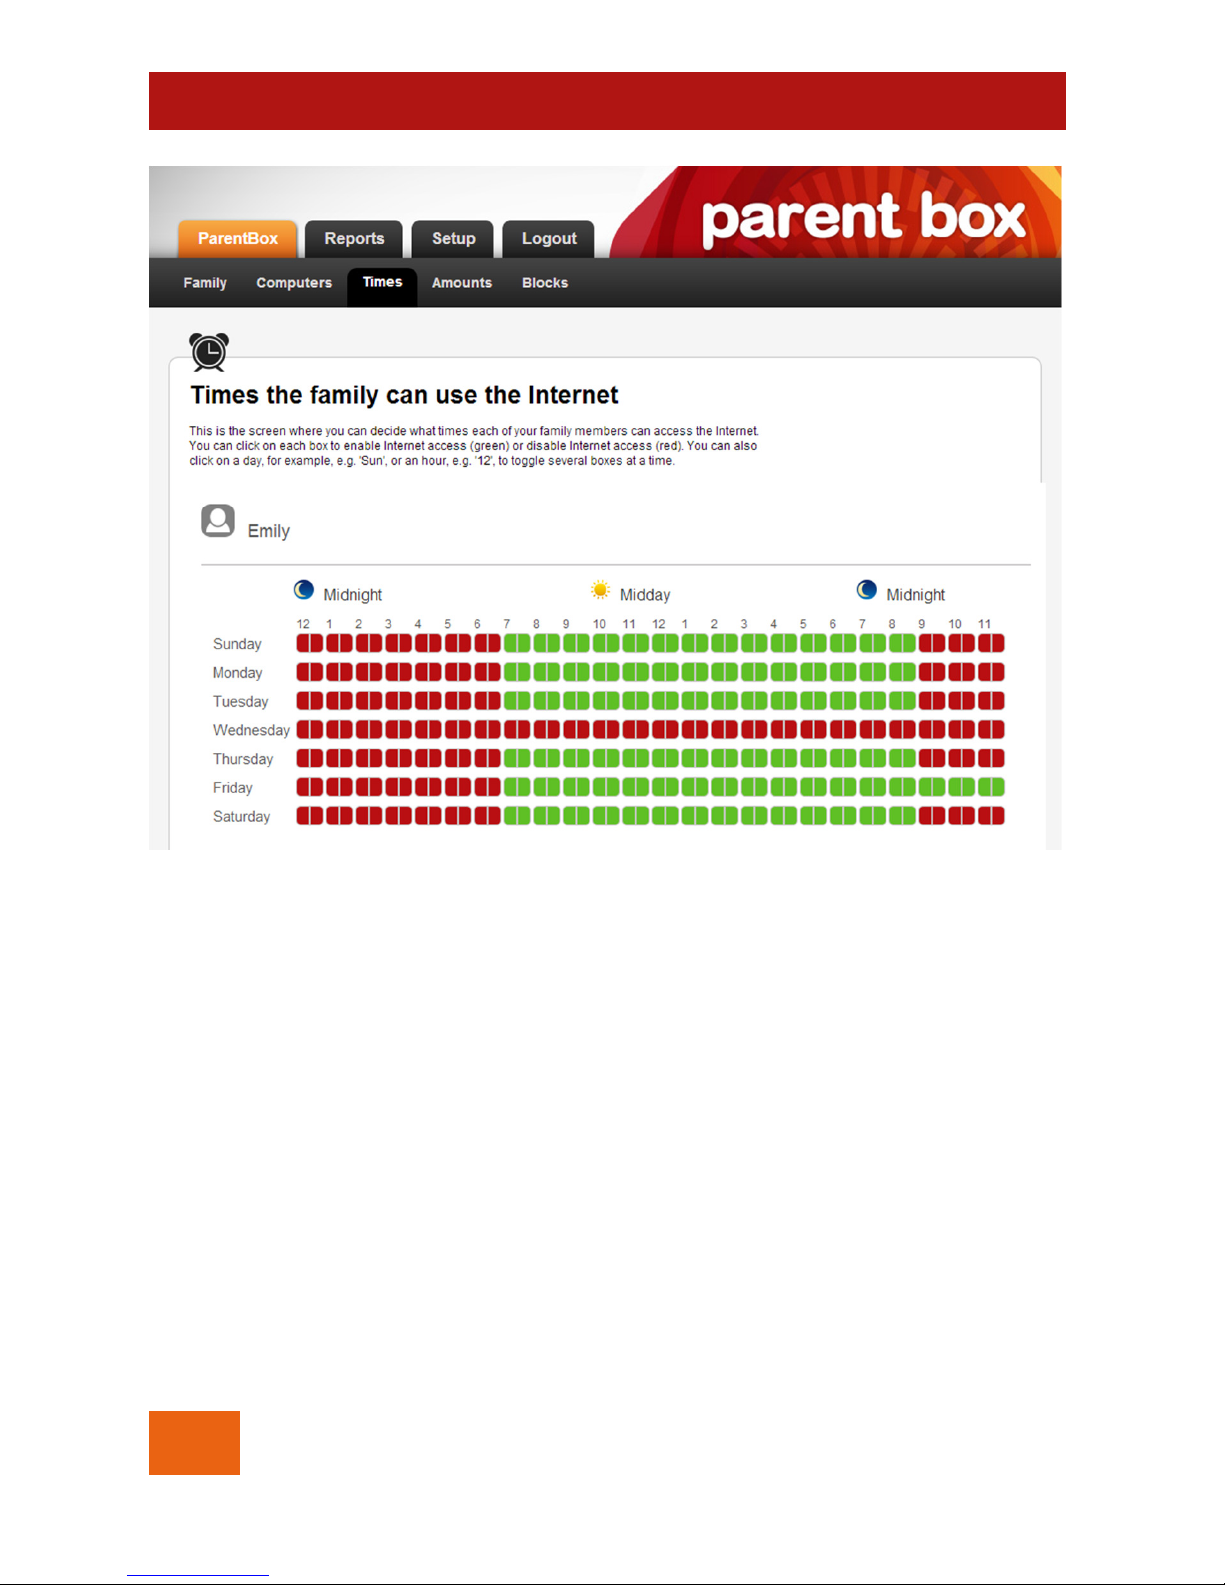
The ‘Times’ screen lets you set timeslots for each family member.
Figure 11 shows the top of the screen and the timeslots for the first
family member. The full screen would include timeslots for all family
members (and a SAVE CHANGES button at the bottom).
1. Log in to ParentBox (if you’re not already logged in) and
click the ‘ParentBox’ tab followed by the ‘Times’ tab.
2. For each family member listed, click on the red and green
boxes to toggle them on and off.
3. Click SAVE CHANGES when you’re done.
Page 27

© TAME TECHNOLOGY 2013
27
USER GUIDE
You can set different timeslots for each day of the week: timeslots
run from midnight to midnight. You set timeslots in blocks of 30minutes – click once to turn the block on (green, meaning that the
family member can access the Internet during that 30-minute
period) and click again to turn the timeslot off. To speed things up
you can, for example, click on ‘Sunday’ to toggle all Sunday’s
blocks on or off and you can click on ‘10’ in the morning to toggle
that column on or off.
In Figure 11, Emily can access the Internet between 7AM and 9PM
each day except Wednesday. Since there is no school on
Saturday, she gets an additional 3 hours on Friday night.
When a family member is outside all their
timeslots then ParentBox blocks them from
accessing the Internet.
They can, however, still access other computers
and devices, such as media servers and
printers, that are connected to the ParentBox.
Page 28
28
© TAME TECHNOLOGY 2013
USER GUIDE
Figure 12
ParentBox checks every 10 minutes
to see whether any family members
need to be blocked or unblocked.
Page 29

© TAME TECHNOLOGY 2013
29
USER GUIDE
Temporarily unblocking a family
member
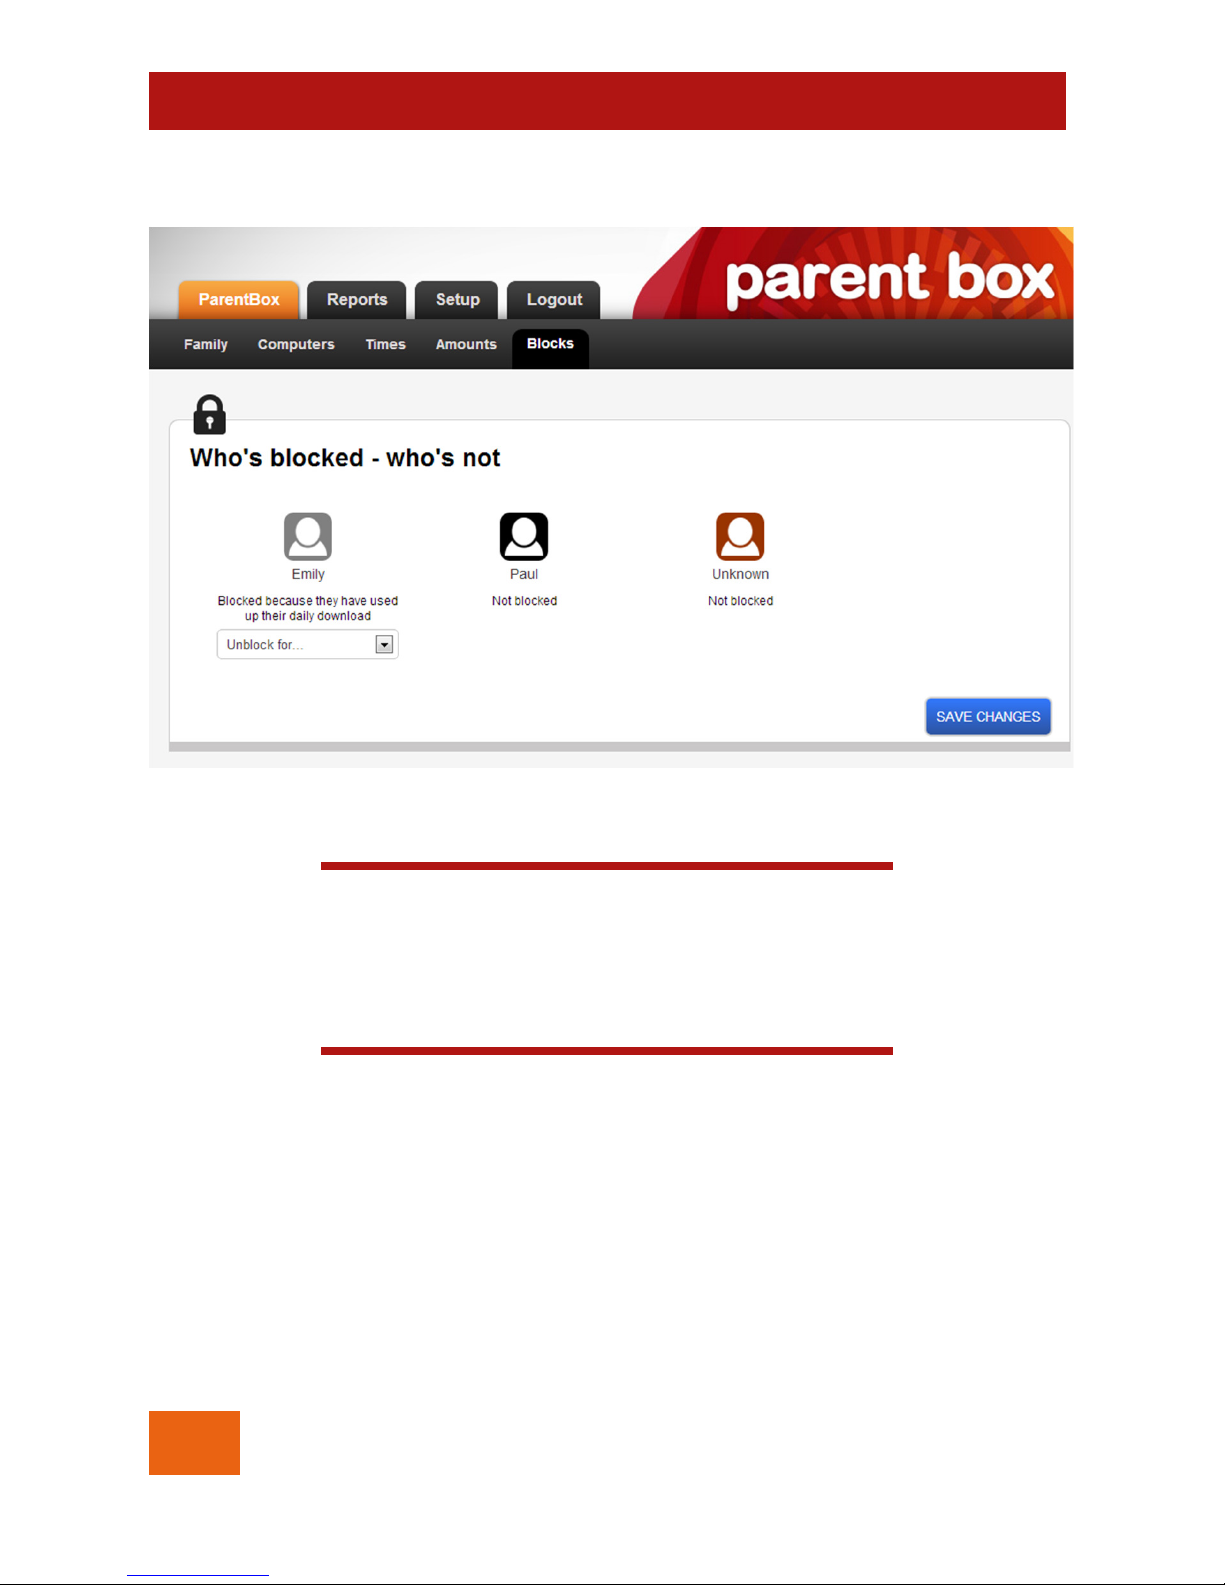
Since there will always be occasions when a family member who is
currently over their daily download limit (or outside their timeslots)
really needs access to the Internet, the ‘Blocks’ screen under the
‘ParentBox’ tab provides a way to temporarily suspend a limit and
unblock the family member (Figure 12).
1. Log in to ParentBox (if you’re not already logged in) and
click the ‘ParentBox’ tab followed by the ‘Blocks’ tab.
2. For any family member listed as blocked, make a choice
from the dropdown.
3. Click SAVE CHANGES when you’re done.
The dropdown lets you choose to unblock the family member for 30
minutes, 1 hour, 2 hours or 4 hours. During this time the family
member can download any amount of data.
Page 30
30
© TAME TECHNOLOGY 2013
USER GUIDE
Figure 13
Page 31

© TAME TECHNOLOGY 2013
31
USER GUIDE
How a family member checks his or her
progress
Only you and the people you share your password with can access
the majority of the ParentBox screens. However, all family members
can access the screen that shows their progress.
1. Enter http://parentbox in your browser or, if you are already
looking at ParentBox screens, click the ‘ParentBox’ tab. It
does not matter whether you are logged in or not.
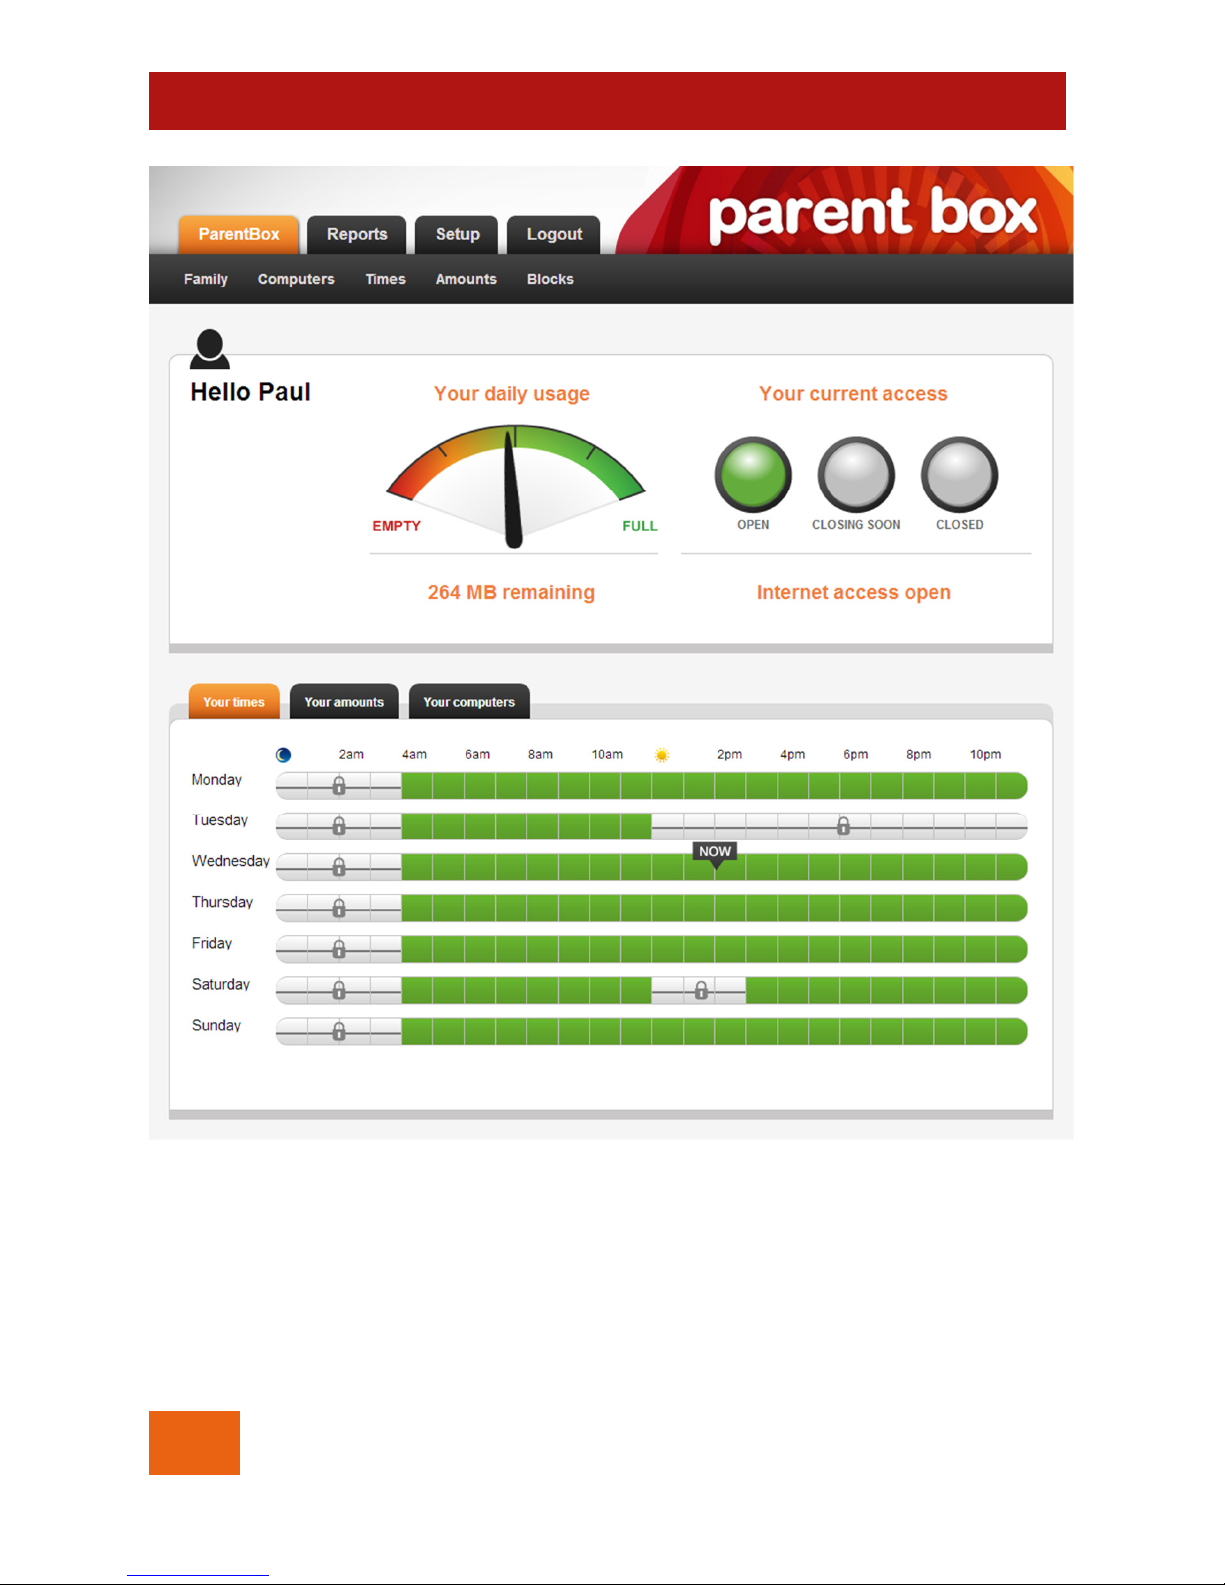
The ‘fuel gauge’ at top left of Figure 13 shows you how much of
your daily download limit is left both as an absolute amount (264
MB in this example) and as a relative amount from ‘full’ to ‘empty’.
The ‘horizontal traffic lights’ tell you about your timeslots:
• If the leftmost, green light is on then your Internet is currently
on.
• If the middle, amber light comes on, then your Internet is on
right now, but will be switching off within 15 minutes.
• If the rightmost, red light is on then your Internet is currently
off.
Your times
Figure 13 has three tabs in the lower half.
Under the ‘Your times’ tab are your timeslots – green meaning times
during which the Internet is on and the grey, padlocked areas
meaning times during which it is off.
ParentBox highlights the current day and time with a ‘NOW’
indicator.
Page 32
32
© TAME TECHNOLOGY 2013
USER GUIDE
Figure 14
Figure 15
Page 33

© TAME TECHNOLOGY 2013
33
USER GUIDE
Your amounts
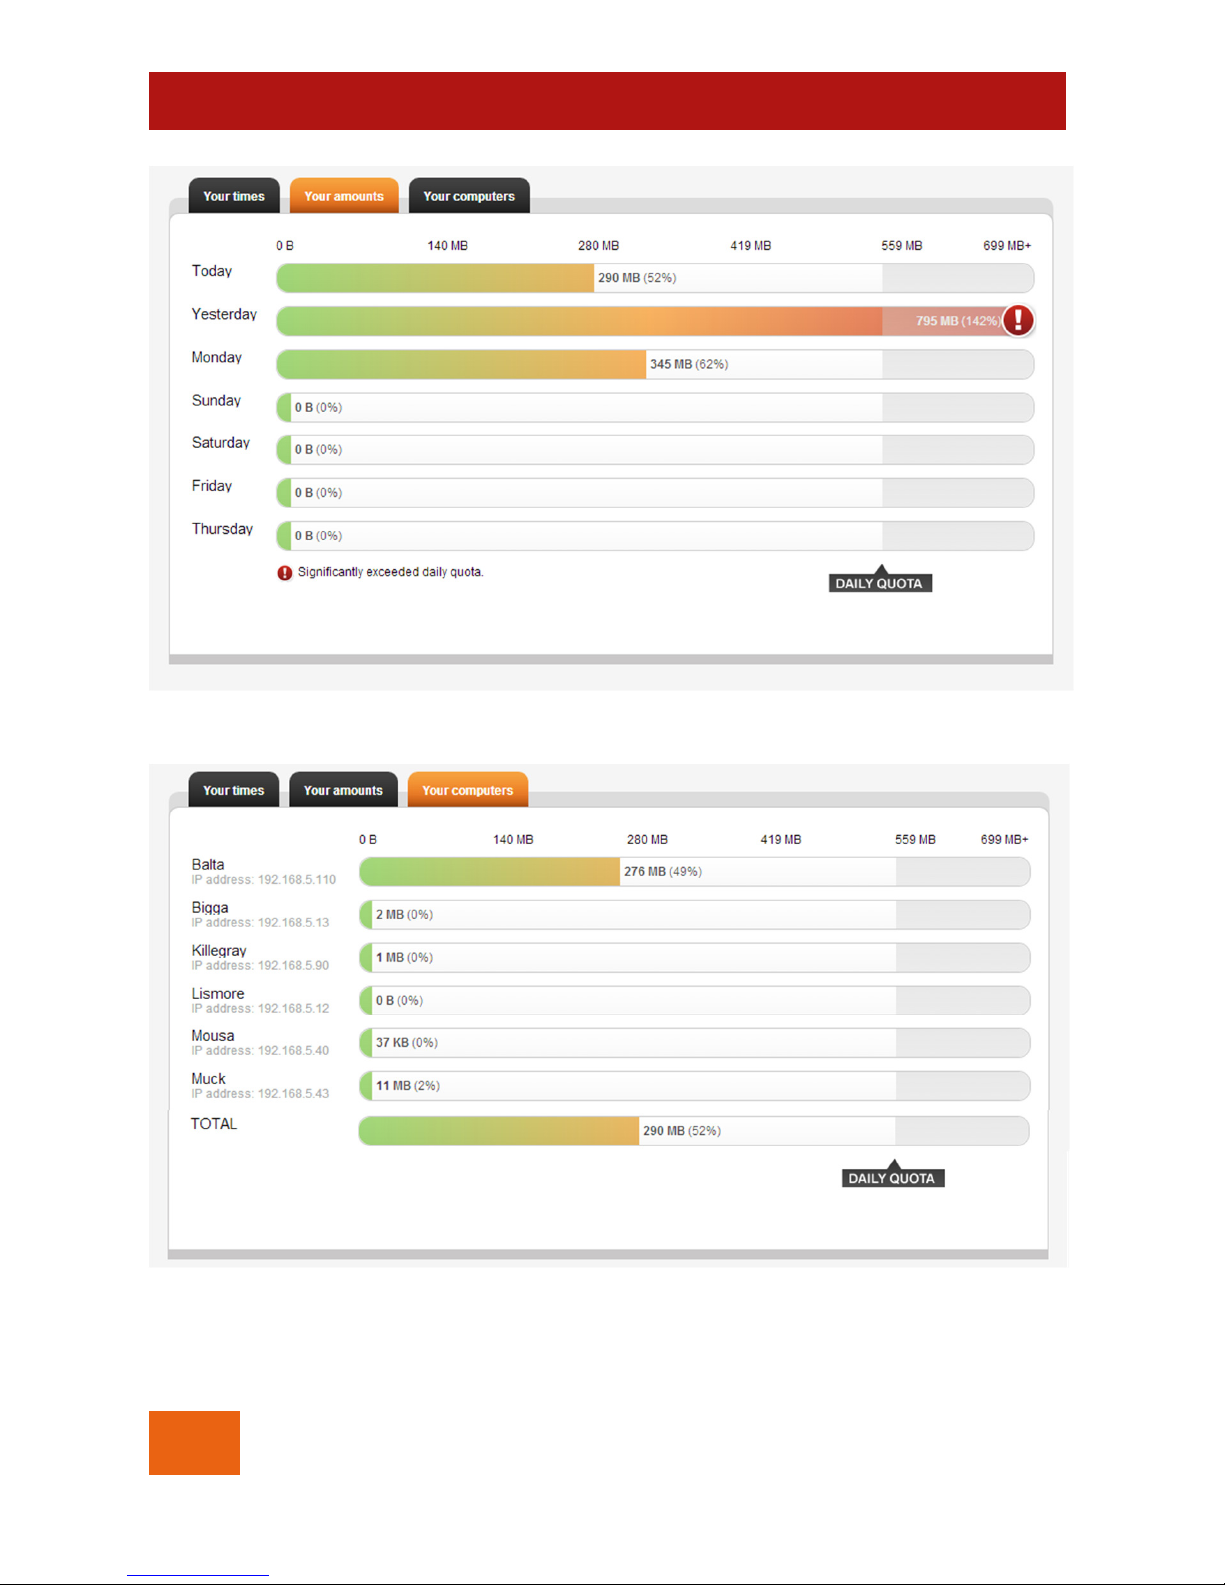
Under the ‘Your amounts’ tab (Figure 14) are the amounts of data
that you’ve used so far today and for the preceding 6 days.
ParentBox updates these download counts every 10 minutes, so the
amount shown for today is never more than 10 minutes behind.
In case you’re wondering, a user can exceed their daily quota – as
shown for ‘yesterday’ – if they are granted a temporary suspension
of their limit as described in Temporarily unblocking a family
member on page 29.
The ‘Your amounts’ tab provides your children with a perfect tool
for learning how different kinds of use of the Internet – watching
videos or using Facebook, for instance – use up different amounts
of download.
Your computers
Under the ‘Your computers’ tab (Figure 15) is a list of all the
computers and other devices assigned to you and a breakdown of
the amounts used by each device (for the current day). This
provides your children with another tool for understanding how the
use of different devices contributes to their total download
amounts.
Page 34
34
© TAME TECHNOLOGY 2013
USER GUIDE
Figure 16
Page 35

© TAME TECHNOLOGY 2013
35
USER GUIDE
How you check the family’s progress
for a day
There are two reports designed primarily for you (the parent) to use:
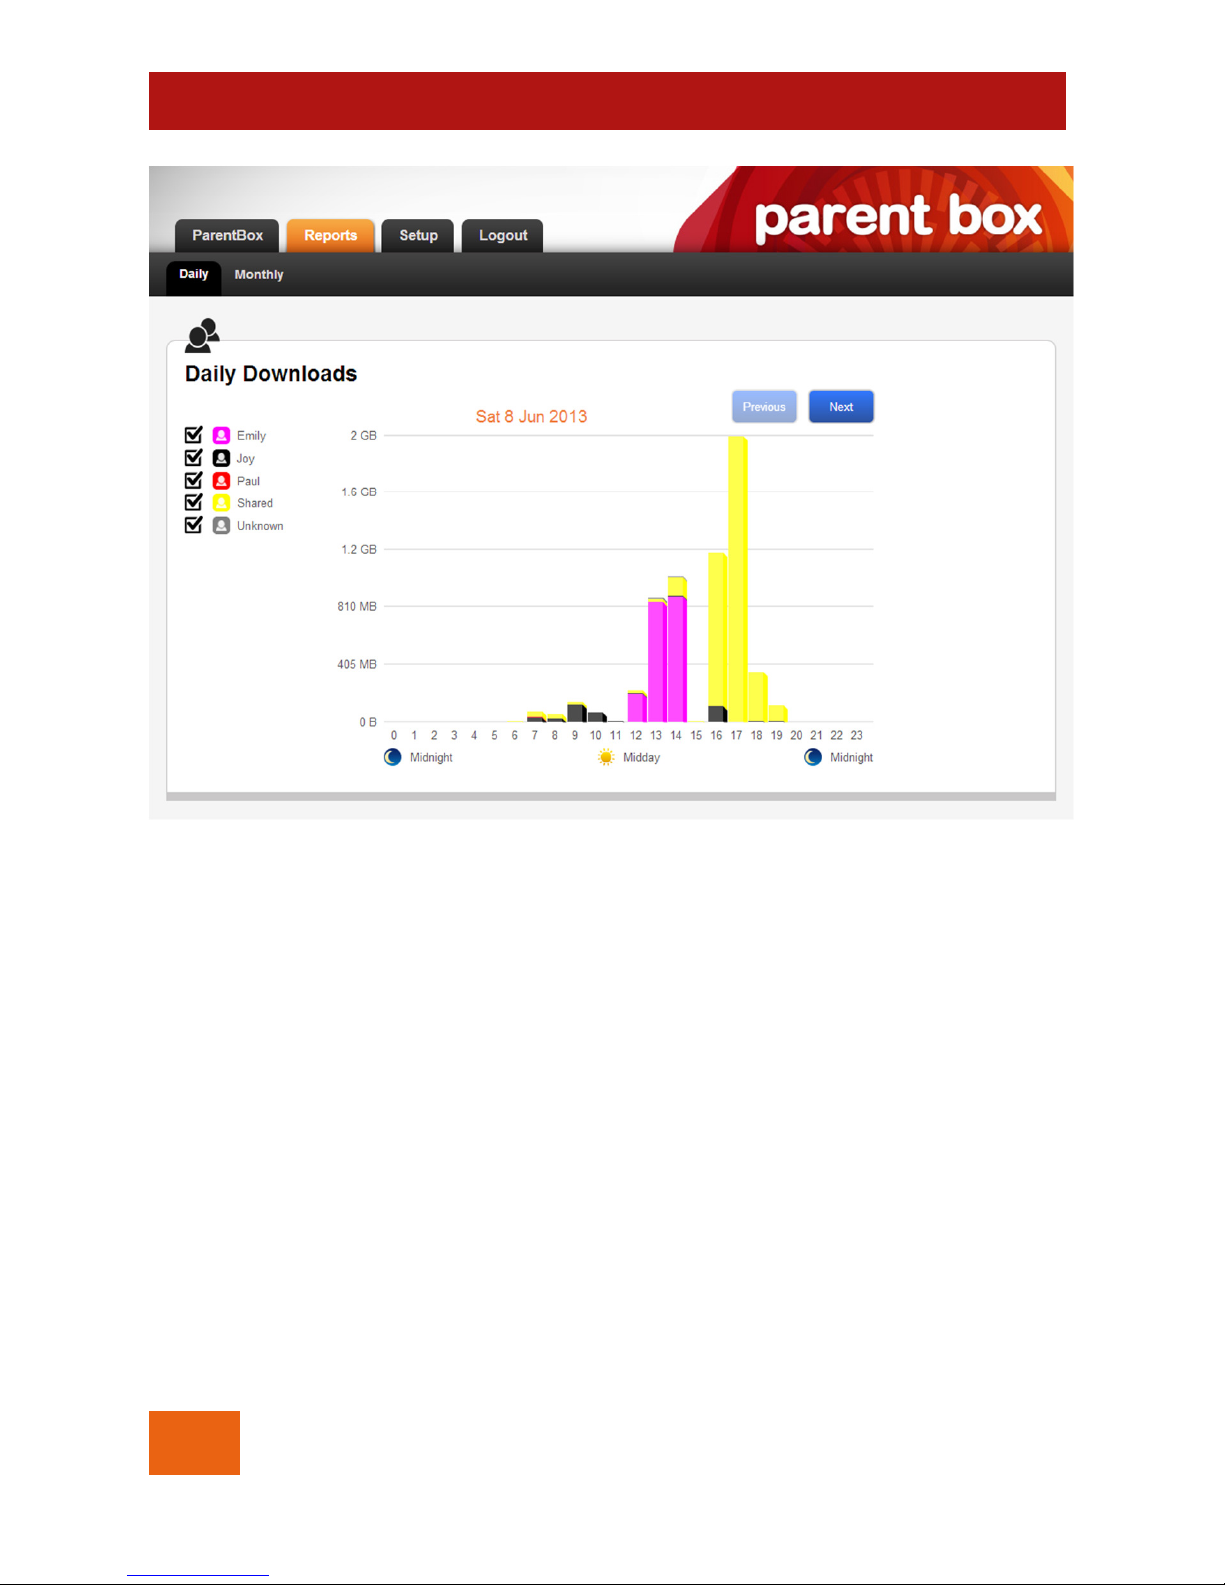
the ‘Daily’ report and the ‘Monthly’ report. The ‘Daily’ report under
the ‘Reports’ tab (Figure 16) shows data for one day at a time.
1. Log in to ParentBox (if you’re not already logged in) and
click the ‘Reports’ tab followed by the ‘Daily’ tab.
2. Click the Previous and Next buttons to move between days.
The ParentBox collects and stores hour-by-hour data for all family
members that have connected to the Internet via the ParentBox
during the last 5 days. Using the Previous and Next buttons you can
click backwards and forwards through the available data.
Along the bottom, the graph shows the hours of the day from
midnight to midnight. The height of each bar shows the total
amount downloaded during a given hour. The colours in the bars
are the same colours that you assigned to each family member on
the Family screen (Adding family members to ParentBox on page
18).
If you wish to focus on some family members and exclude others –
for example to show your children how much they used while not
letting them see how much you used – then you can check and
uncheck one or more of the checkboxes beside the family member
names and the graph will update itself.
You will find two main uses for the Daily report – finding out who in
your family are the big data users, and seeing what times of the
day they are most active.
Page 36
36
© TAME TECHNOLOGY 2013
USER GUIDE
Figure 17
How you check the family’s progress
for a month
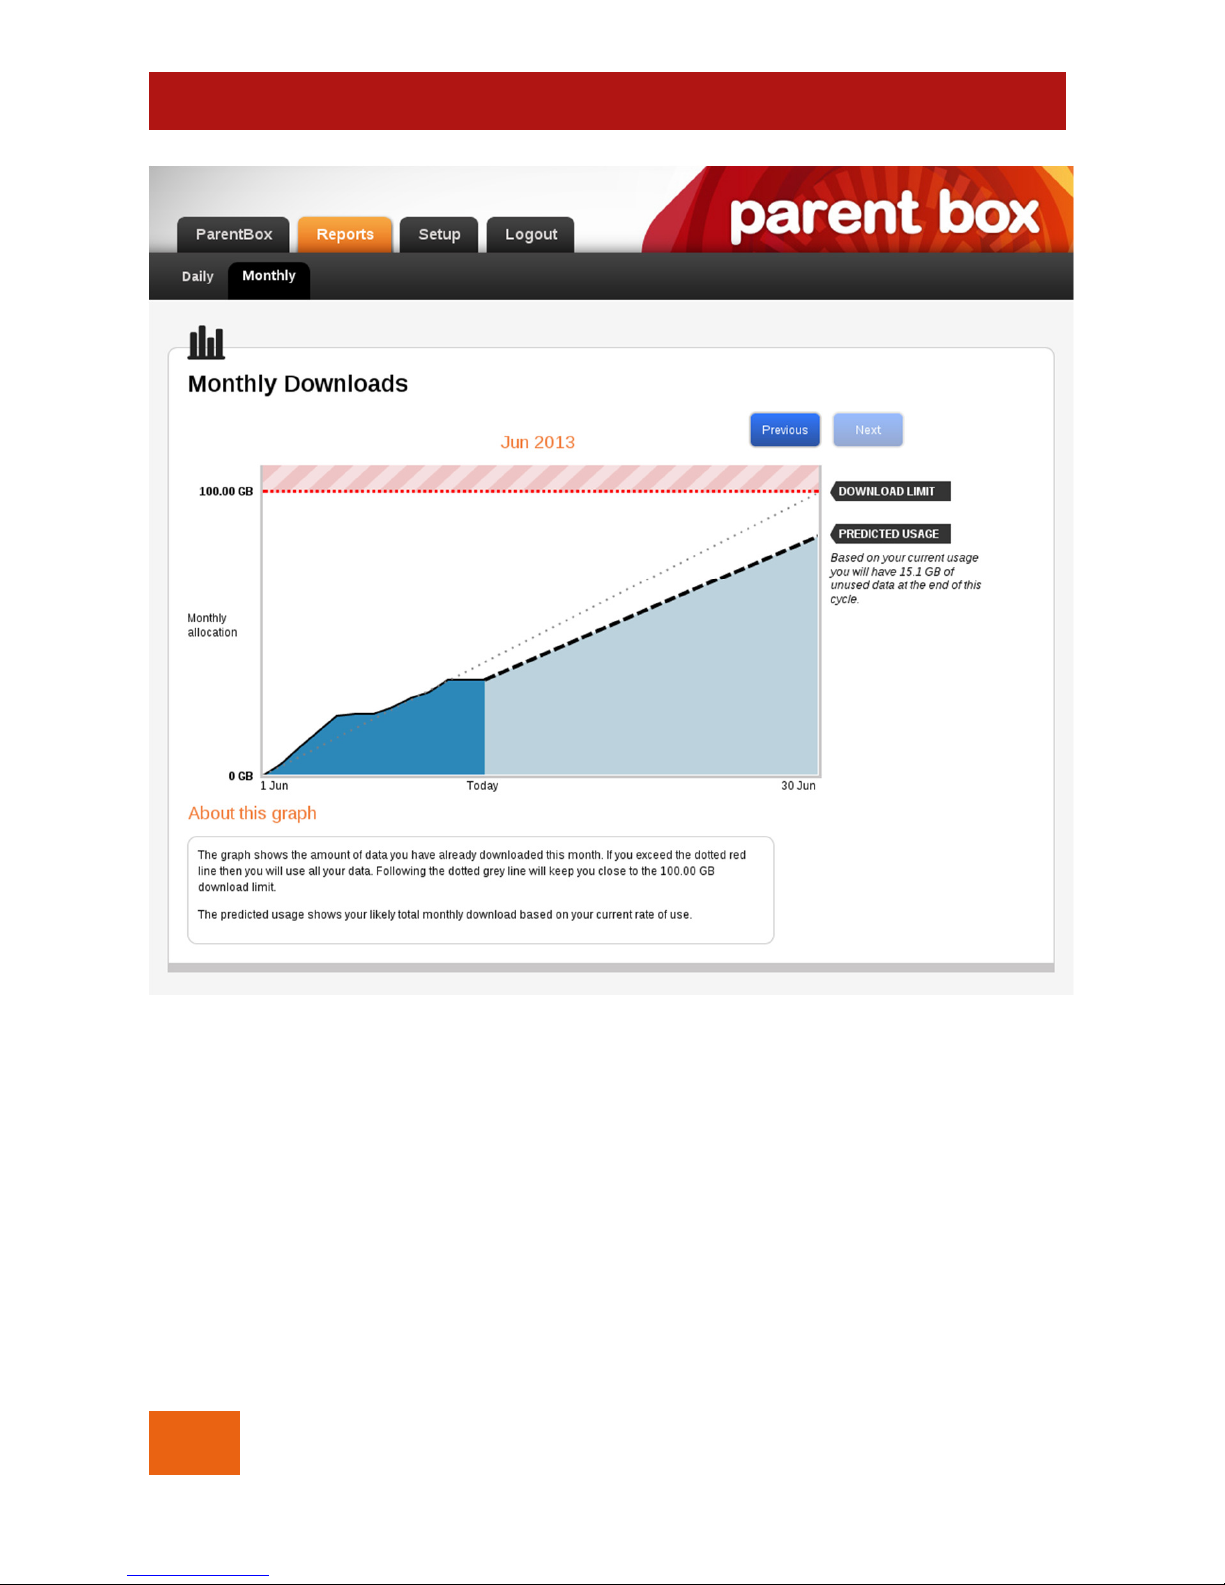
The ‘Monthly’ report under the ‘Reports’ tab (Figure 17) shows a
month’s worth of data at a time. The purpose of this graph is to
help you manage your monthly data allocation from your ISP and
to stop your family from running out of data before month end.
Page 37

© TAME TECHNOLOGY 2013
37
USER GUIDE
1. Log in to ParentBox (if you’re not already logged in) and
click the ‘Reports’ tab followed by the ‘Monthly’ tab.
2. Click the Previous and Next buttons to move between
months.
This screen is accurate only once you have configured your
ParentBox (as described in Setting the family’s monthly limit on
page 13) with the amount of data your ISP plan allows you per
month, and the day of the month on which your new allocation
starts.
Figure 17 shows how your ‘Monthly’ report looks when you are close
to halfway through the month. Between the start of June and
today you are seeing actual data. Between today and the end of
June you are seeing predicted data extrapolated from the actual
data.
The bold, dashed line shows what will happen if your family
continues downloading at the same rate that they’ve been
downloading up until today.
The grey, dotted line shows the ideal rate for downloading. If you
were able to follow this line, then you would use up all of your
monthly data allocated by your ISP on the last day of the month
with none left over.
Page 38
38
© TAME TECHNOLOGY 2013
USER GUIDE
Figure 18
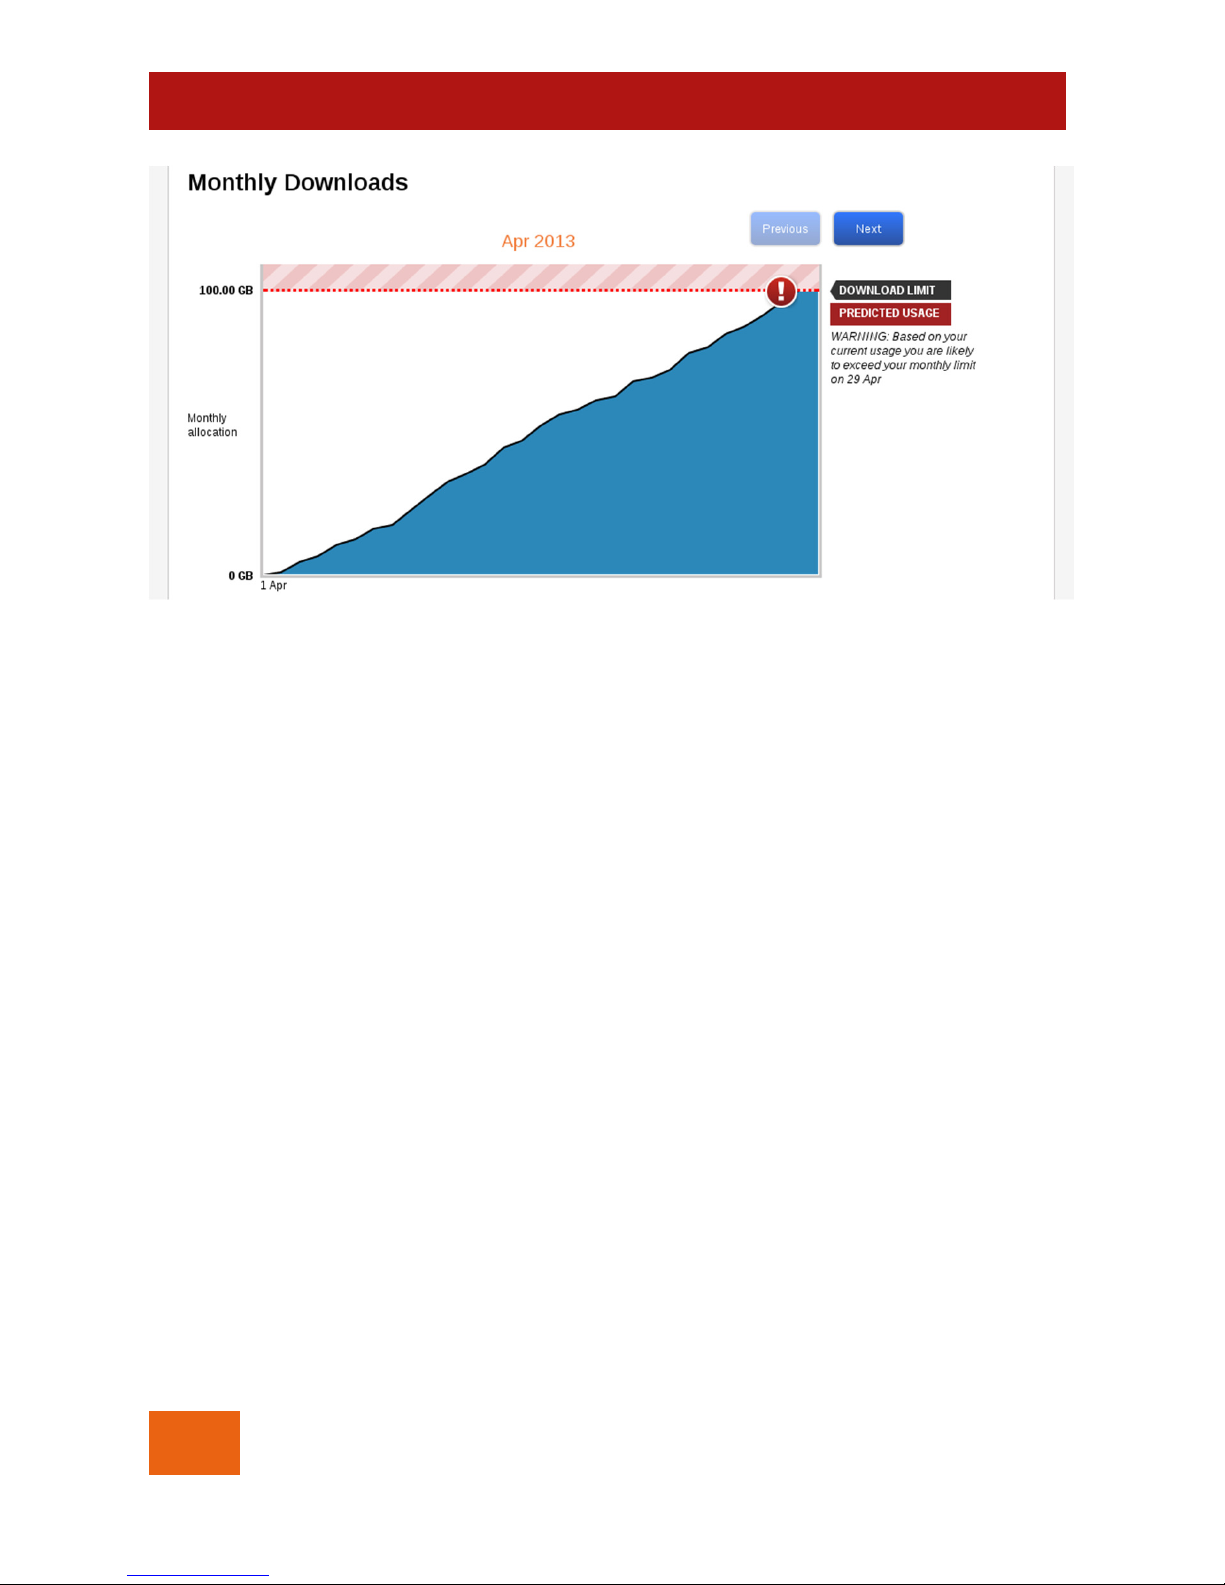
In Figure 17 it looked as if our family is going to come in slightly
below target with about 15.1 GB of data left over. In Figure 18,
which shows what happened 2 months previously, our family went
over target slightly before the end of the month.
Page 39

© TAME TECHNOLOGY 2013
39
USER GUIDE
Reference
In this section is information that you may find useful from time to
time:
• Changing the ParentBox password
• Configuring ParentBox so that it can send emails
• Choosing which emails to send
• Ensure the ParentBox clock stays accurate
• What the lights mean
• Static and dynamic IP addresses
• If a computer has trouble connecting
• Switching the ParentBox off
• Adding ParentBox to a more complex home network
• The advanced controls in ParentBox
Page 40
40
© TAME TECHNOLOGY 2013
USER GUIDE
Figure 19
Changing the ParentBox password
The ParentBox has an easily-guessed initial password of ‘password’.
You should change this as soon as possible to something harder for
your children to guess.
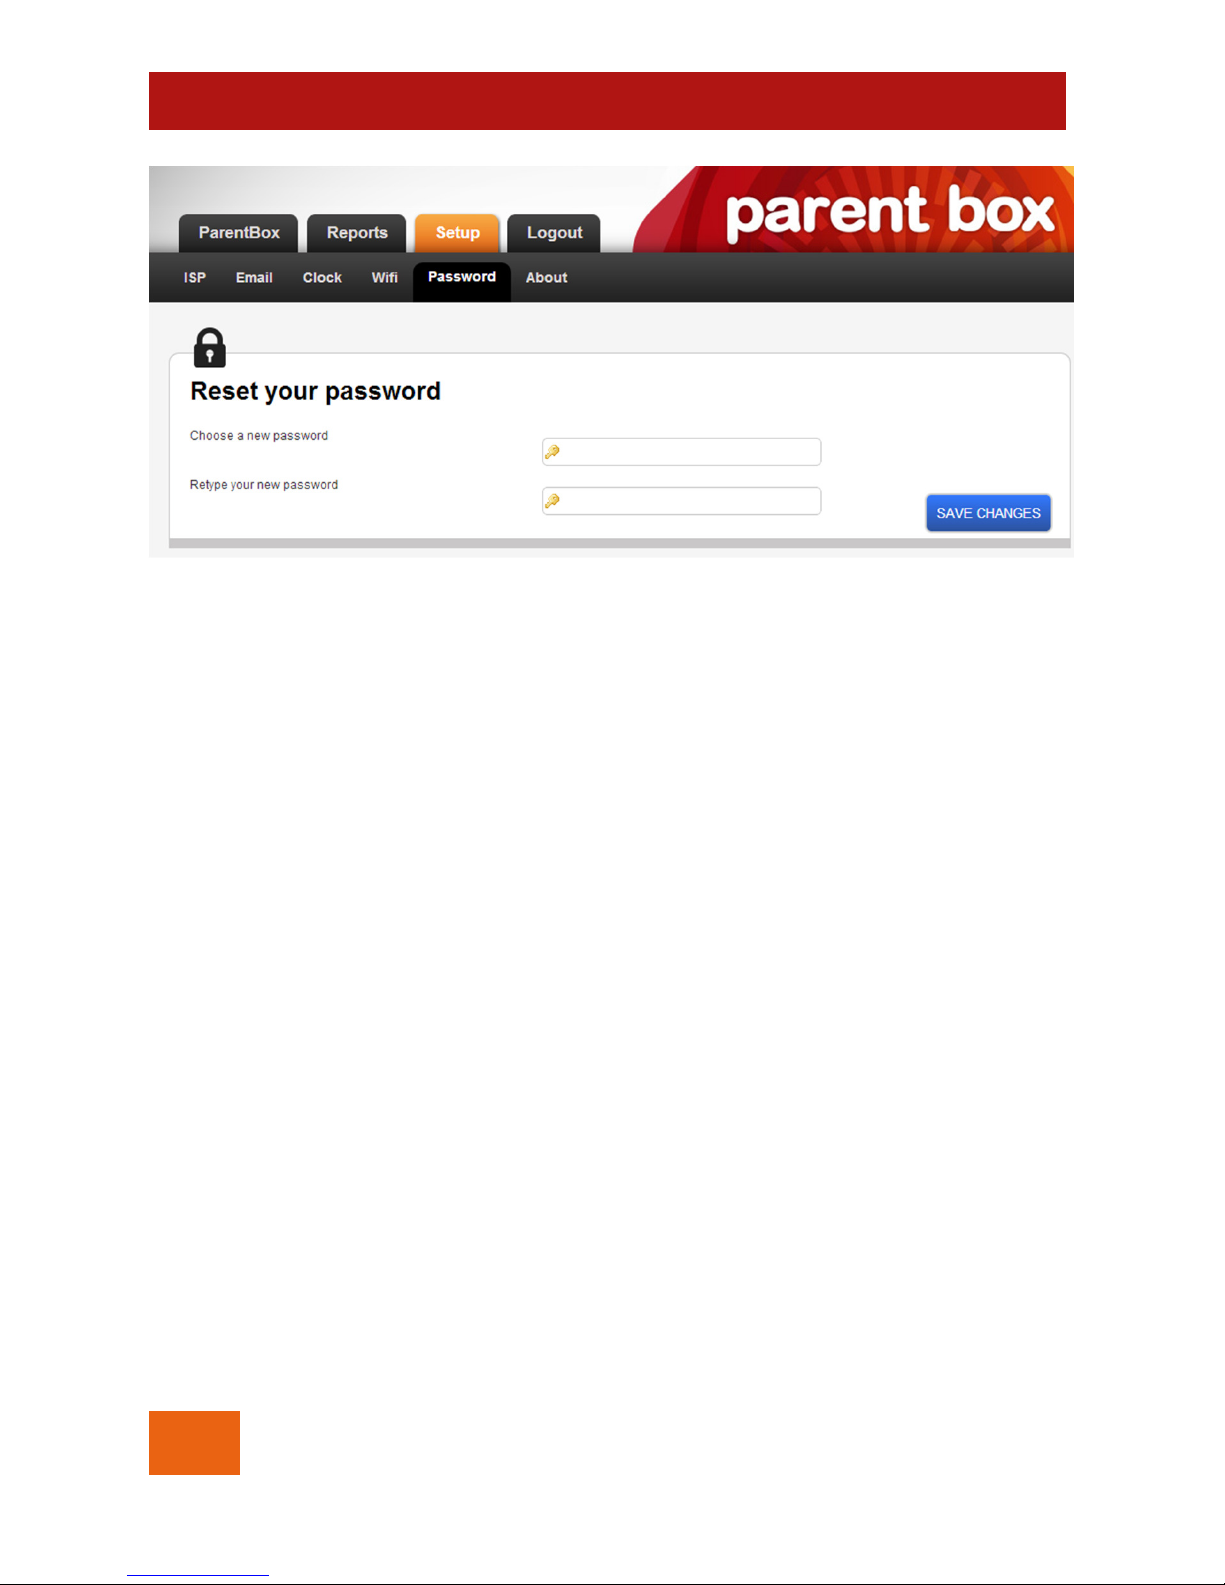
1. Log in to ParentBox (if you’re not already logged in) and
click the tab ‘Setup’ and then the tab ‘Password’.
2. Enter your new password, once in each textbox (Figure 19).
Note that passwords must be at least 8 characters in length.
There is a way to recover a lost password. If you have configured
ParentBox so that it can send emails (Configuring ParentBox so it
can send emails, page 41) then simply click the ‘Forgot your
password?’ link on the login screen.
Page 41
© TAME TECHNOLOGY 2013
41
USER GUIDE
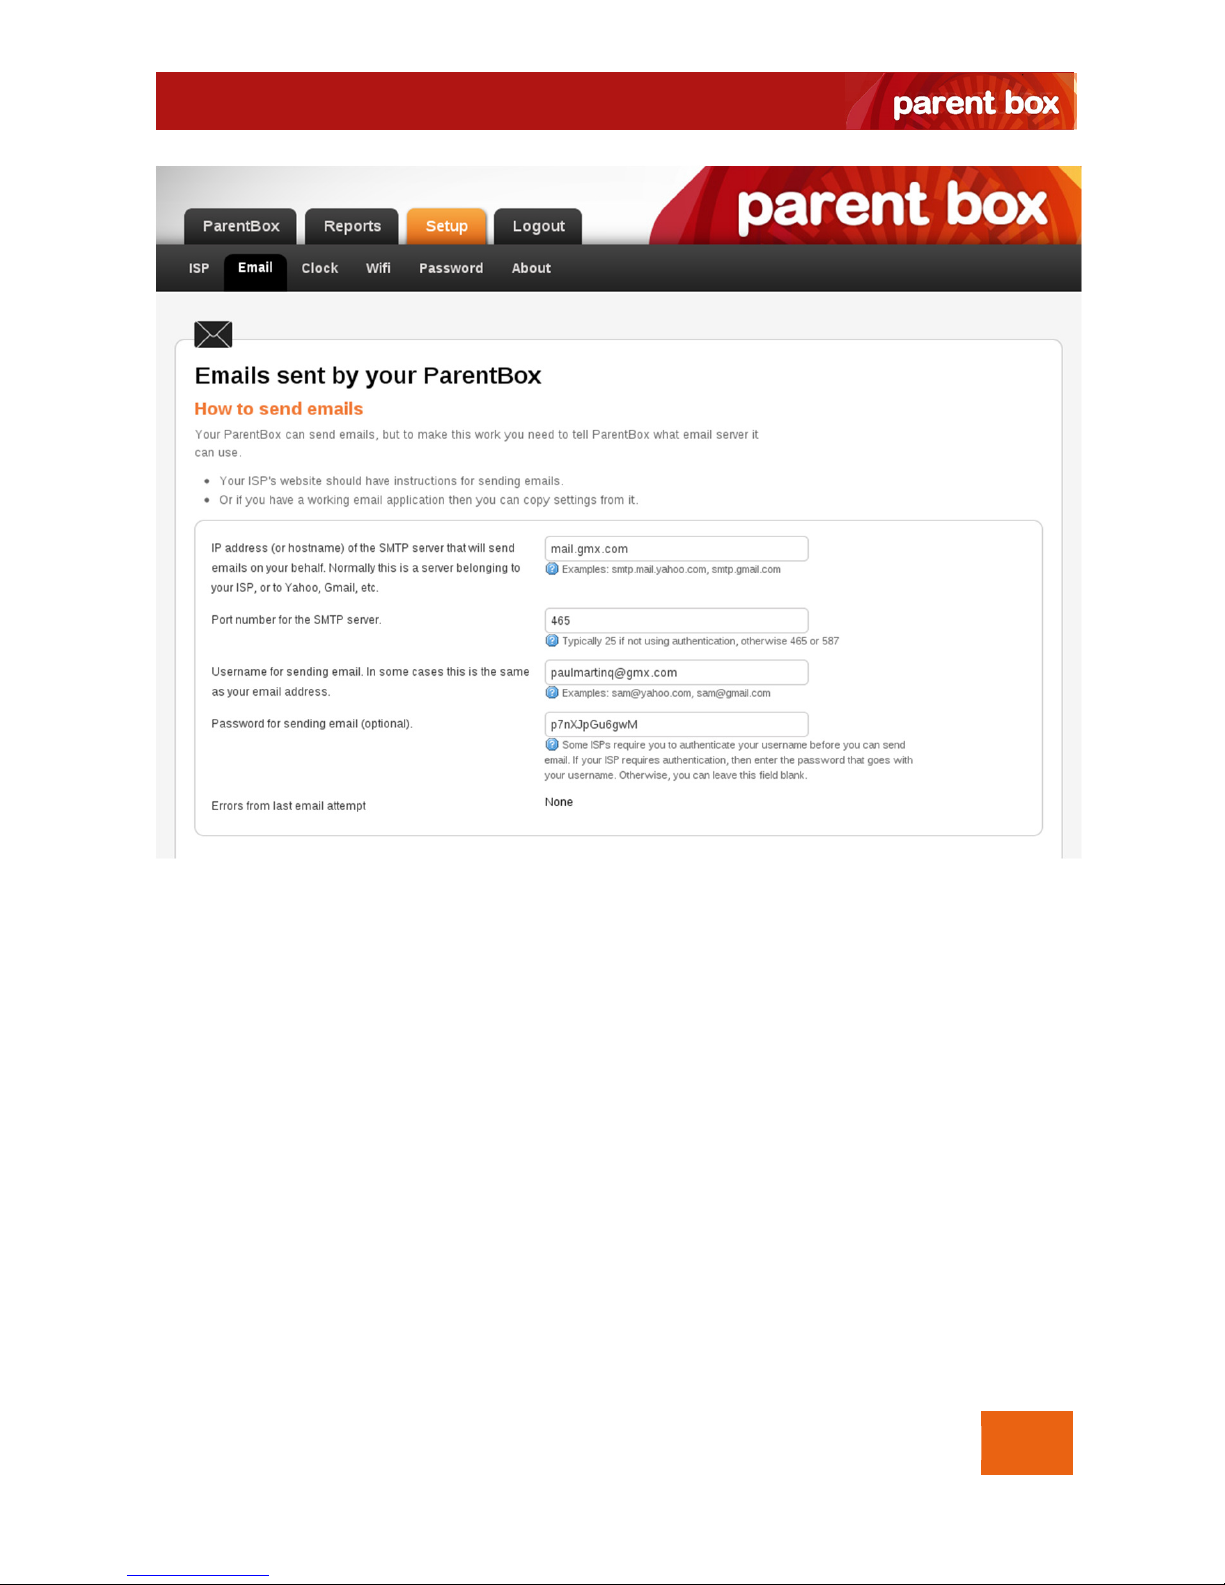
Figure 20
Configuring ParentBox so it can send
emails
There are several kinds of email that you might want your ParentBox
to send you: alerts when your family members are blocked or
unblocked, alerts when a new computer joins your network, and an
email to help you in the event that you forget your ParentBox
password.
In order to configure email you need to provide ParentBox with
enough information for it to send emails on your behalf. If you have
Page 42

42
© TAME TECHNOLOGY 2013
USER GUIDE
an email client such as Outlook (Windows), Mail (Apple OS X) or
Thunderbird already installed on your PC then you can copy its
settings. Otherwise you may need to Google the web pages of
your ISP in order to find the correct settings.
1. Log in to ParentBox and go to the ‘Setup’ tab and then the
‘Email’ tab.
2. In the ‘IP address (or hostname)’ text field (Figure 20) enter a
value such as ‘mail.gmx.com’. This is the address or name of
the ‘SMTP server’ that will send your outgoing email for you.
Real examples of such servers include:
• smtp.mail.yahoo.com (Yahoo)
• smtp.live.com (Windows Live / Hotmail /
Outlook.com)
• smtp.gmail.com (Google Mail / Gmail)
• smtp.aol.com (Aol)
• mail.gmx.com (GMX)
3. In the ‘Port number’ text field enter the port number that
goes with the IP address (or hostname) text field. When your
ISP or email provider doesn’t require you to authenticate
(provide a password) before you send an email then the
port number is invariably 25. When your ISP or email provider
does require authentication then the port number is usually:
• 465 (Yahoo, Google Mail / Gmail, Aol and GMX)
• 587 (Windows Live / Hotmail / Outlook.com)
4. In the ‘Username’ text field enter the username by which
your ISP or email provider knows you. You would have
chosen this username when you signed up with your ISP or
email provider. It may simply be the same as your email
address, or it may be the first part of your email address up
to the ‘@’ symbol.
Page 43

© TAME TECHNOLOGY 2013
43
USER GUIDE
5. In the ‘Password’ text field enter something only if your ISP or
email provider requires authentication. You will have
chosen this password when you chose the username
discussed Step 4.
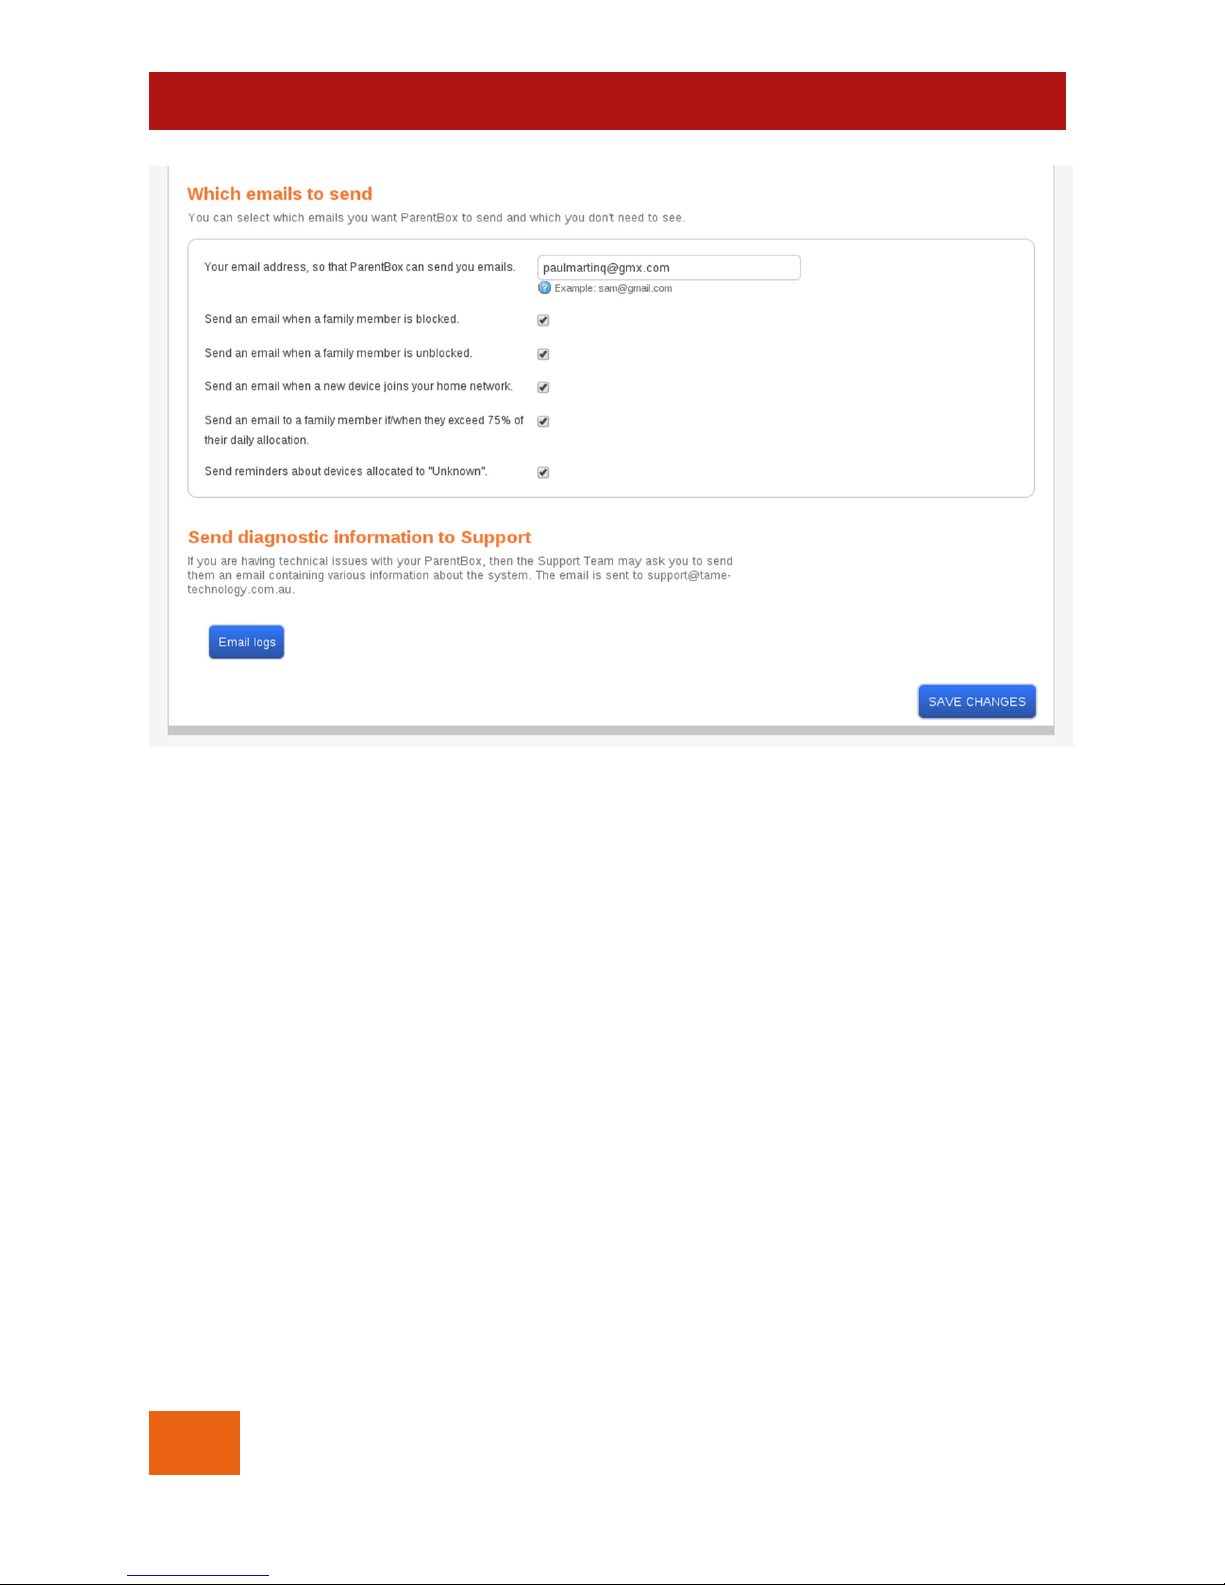
6. Finally, in the ‘Your email address’ text field Figure 21 enter
the email address at which you want to receive emails from
the ParentBox. This can be (but need not be) the email
address related to the details you entered above.
You may now wish to test that ParentBox can indeed send emails.
A simple way to do this is to click the ‘Forgot your password?’ link
on the login screen. This will cause ParentBox to send an email to
the address you specified in Step 6 above.
If you have waited at least 15 minutes for an email and none has
arrived, then there may be a problem with the values you entered
in the Email screen. To help you, ParentBox displays email-related
error messages on the Email screen in the ‘Errors from last email
attempt’ field (bottom of Figure 20).
Your ParentBox does not send
email immediately, but checks
for emails to send once every
10 minutes.
Page 44
44
© TAME TECHNOLOGY 2013
USER GUIDE
Figure 21
Choosing which emails to send
The ‘Email’ screen under the ‘Setup’ tab lets you select which kinds
of email ParentBox sends.
The first two checkboxes (Figure 21) let you control whether you get
an email every time a family member is blocked or unblocked from
the Internet. You may want these emails at the beginning, to be
sure that the ParentBox is working as you intend. However, over
time, these emails can become quite numerous and you may wish
to turn them off.
The ‘email when a new device joins your network’ checkbox
controls whether ParentBox notifies you when a computer or
device that it has not seen before connects for the first time. When
Page 45

© TAME TECHNOLOGY 2013
45
USER GUIDE
ParentBox is new there are likely to be a number of these emails.
However, as time passes these emails are likely to become less
frequent. These emails are probably worth seeing though, because
a new computer usually means that you should assign it to a family
member so that ParentBox can manage the new computer
correctly.
The last, ‘send reminders about devices allocated to “Unknown”’
checkbox is there to remind you daily about devices that are
currently assigned to the ‘Unknown’ user and really should be
assigned to a real family member.
It is also possible that a new device joining your network does not
belong to you or your family – in which case it is certainly
worthwhile receiving the email. Remember that new devices are
automatically assigned to the ‘Unknown’ family member, so you
may wish to give this user a very small daily allocation or to limit
their timeslots.
The ‘email … when they exceed 75%’ checkbox lets you decide
whether individual family members should receive an email
warning if they exceed 75% of their daily download limit. Of course,
you will need to provide email addresses for family members on the
Family screen for ParentBox to be able to send out these emails –
refer to Adding family members to ParentBox on page 18.
Page 46
46
© TAME TECHNOLOGY 2013
USER GUIDE
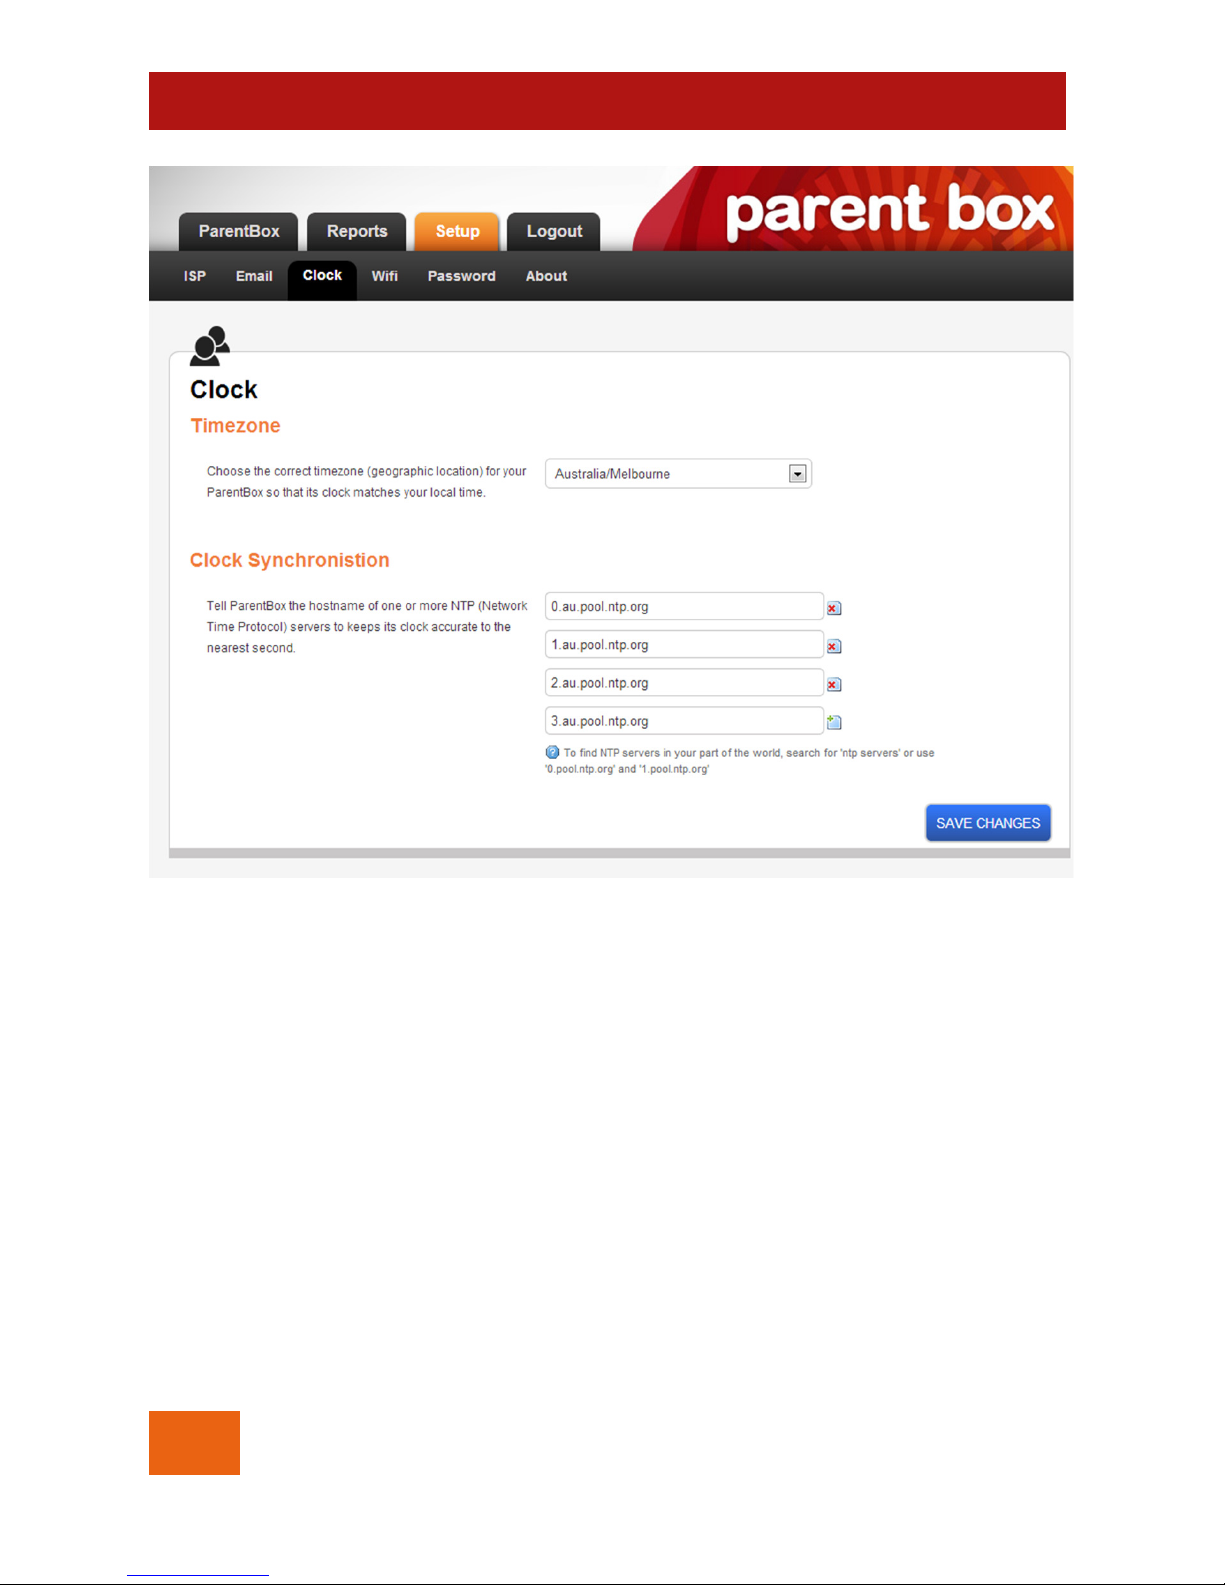
Figure 22
Ensuring the ParentBox clock stays
accurate
ParentBox needs its clock to be synchronised to your local time
zone so that when you tell ParentBox to turn your child’s Internet off
at 10PM then ParentBox does so – at 10PM.
Your ParentBox was made in Melbourne, so it comes preconfigured
for the correct time in Melbourne / Victoria. If you don’t live in
Victoria, then you should change the time zone by choosing
Page 47

© TAME TECHNOLOGY 2013
47
USER GUIDE
something more appropriate from the dropdown shown in Figure
22.
Your ParentBox is also preconfigured to synchronise its internal clock
automatically from time servers (‘NTP’ servers) on the Internet.
Provided you are using your ParentBox in Australia then you should
not need to change any of the NTP server names.
Using static or dynamic IP addresses
Almost any computer or device that can connect to the Internet
will offer you the choice of ‘static’ or ‘dynamic’ IP addresses.
A static IP address is where you choose the IP address that a device
will use to connect to a network. ParentBox does not work with
devices that use static IP addresses.
A dynamic IP address is where a device negotiates an IP address
when it connects to a network. ParentBox needs all connected
devices to be using dynamic IP addresses.
Fortunately, most new devices come preconfigured to use
dynamic IP addresses. (Some devices call this ‘DHCP’.) If you
have reconfigured your computer or device to use a static IP
address then you’ll need to change the device back to use
dynamic IP addresses.
Switching the ParentBox off
The ParentBox is designed to run 24 x 7 – after all it is supposed to
monitor and control Internet activity around the clock. But when
you do switch the ParentBox off – before going on holiday, for
example – you are guaranteed to lose no more than 6 hours’ worth
Page 48
48
© TAME TECHNOLOGY 2013
USER GUIDE
of data because the ParentBox backs up its working memory into
permanent storage four times a day.
Tame Technology recommends that you put the ParentBox
somewhere out of easy reach of children’s fingers lest they make a
particularly large download and then power cycle the ParentBox
hoping that the details of their download will be erased. As a
deterrent, as long as you have set up email (Configuring ParentBox
so it can send emails on page 41) ParentBox will send you an alert
to tell you that it was turned off and back on again.
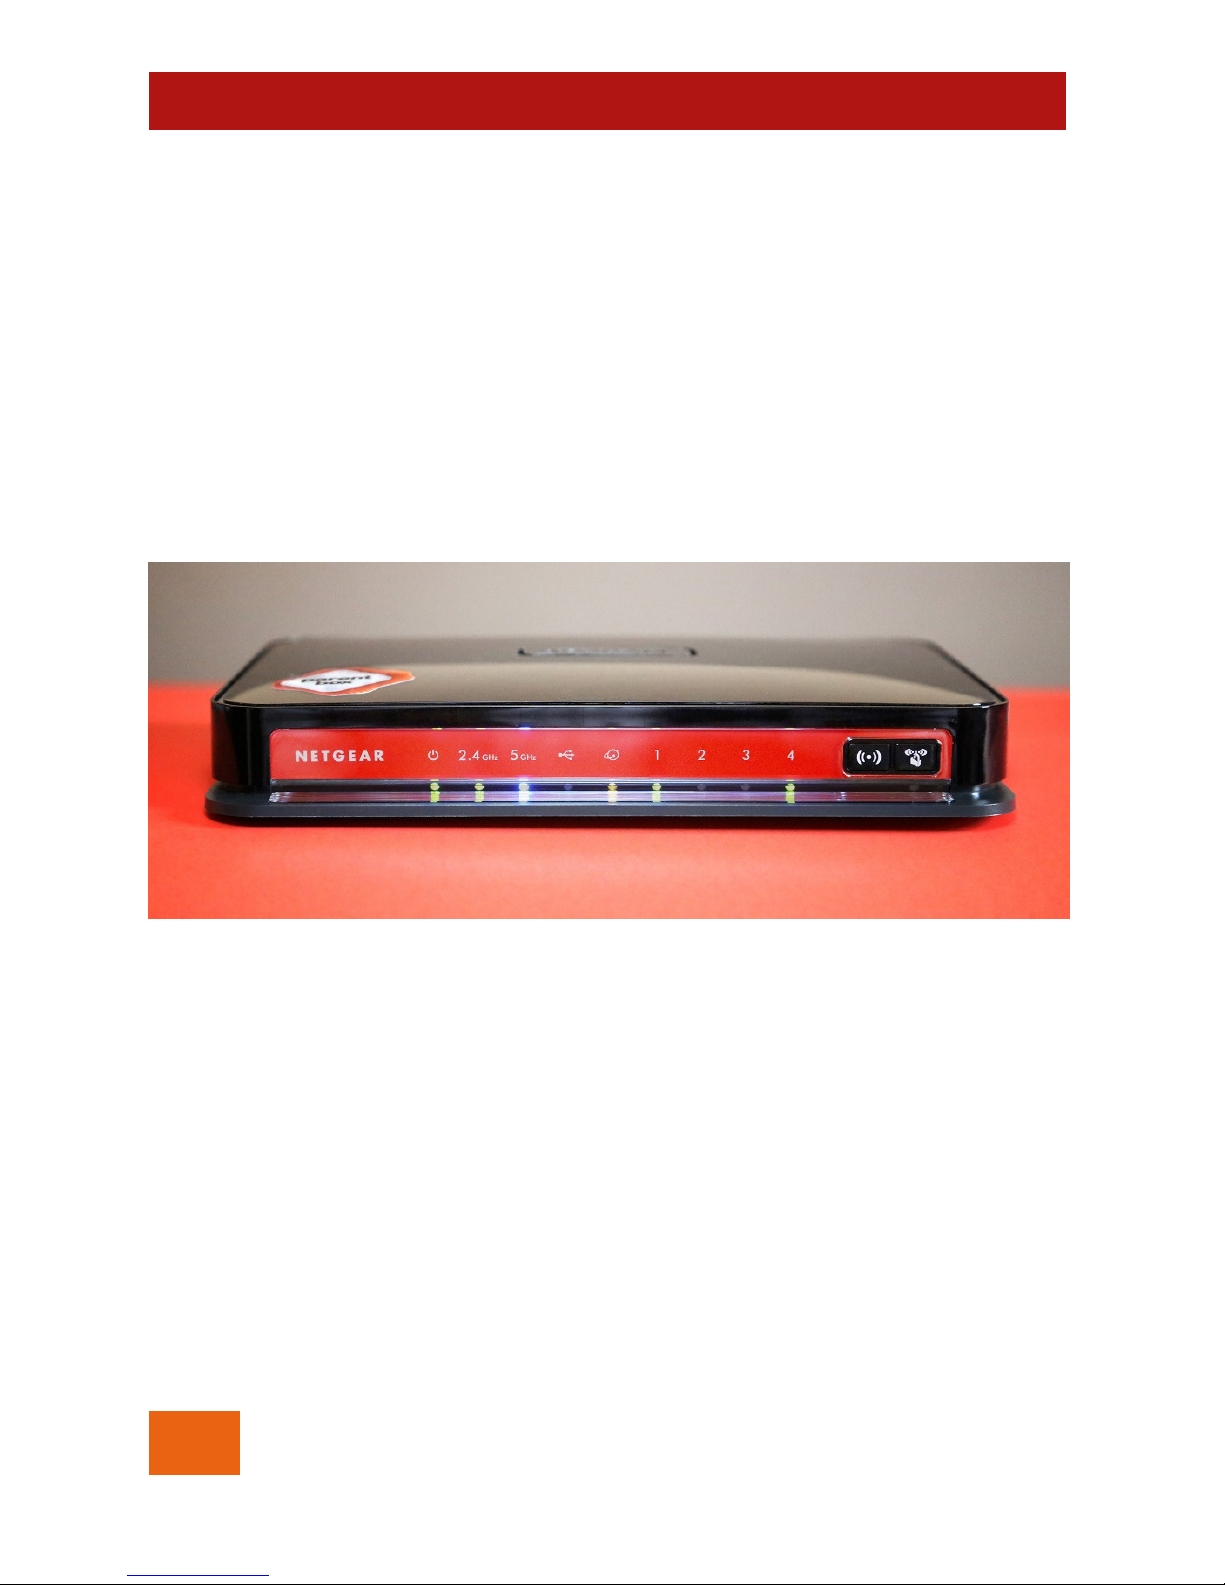
Figure 23
Understanding the lights on the
ParentBox
Your ParentBox has nine LEDs on the front. Sometimes knowing
what the lights are saying can help you understand what the
ParentBox is doing.
Page 49

© TAME TECHNOLOGY 2013
49
USER GUIDE
Starting from the left of Figure 23:
1. The power on/off light should be a solid green when the
ParentBox is switched on and has booted up correctly.
During the booting process, the light will start orange, then
flash green after about 30 seconds, then go solid green after
another 30 seconds.
2. The 2.4 GHz wireless light will be green when the 2.4 GHz
wireless is turned on (Turning on the wireless on page 15).
The light will blink when the wireless network is being used.
3. The 5 GHz wireless light will be blue when the 5 GHz wireless is
turned on and blink when it is being used.
4. The Internet light will be orange when your ParentBox has
managed to establish a connection to your modem via the
yellow cable described in Connecting the cables on page
9. If this light is off then no one using your ParentBox will be
able to access the Internet and your ParentBox will not be
able to send email or set its internal clock.
5. The next four lights indicate whether a PC has been plugged
into one of the four sockets on the back of the ParentBox.
The lights may be green (indicating a fast, 1 Gbps
connection) or amber (indicating a 100 or 10 Mbps
connection). When the light is blinking then data is being
transferred.
Page 50
50
© TAME TECHNOLOGY 2013
USER GUIDE
Figure 24
Can’t connect to ParentBox?
There are some circumstances which may cause computers and
other devices to have difficulty connecting properly to the
ParentBox. The most common circumstance involves the ParentBox
being switched off and back on again shortly after a new
computer has connected to it for the first time.
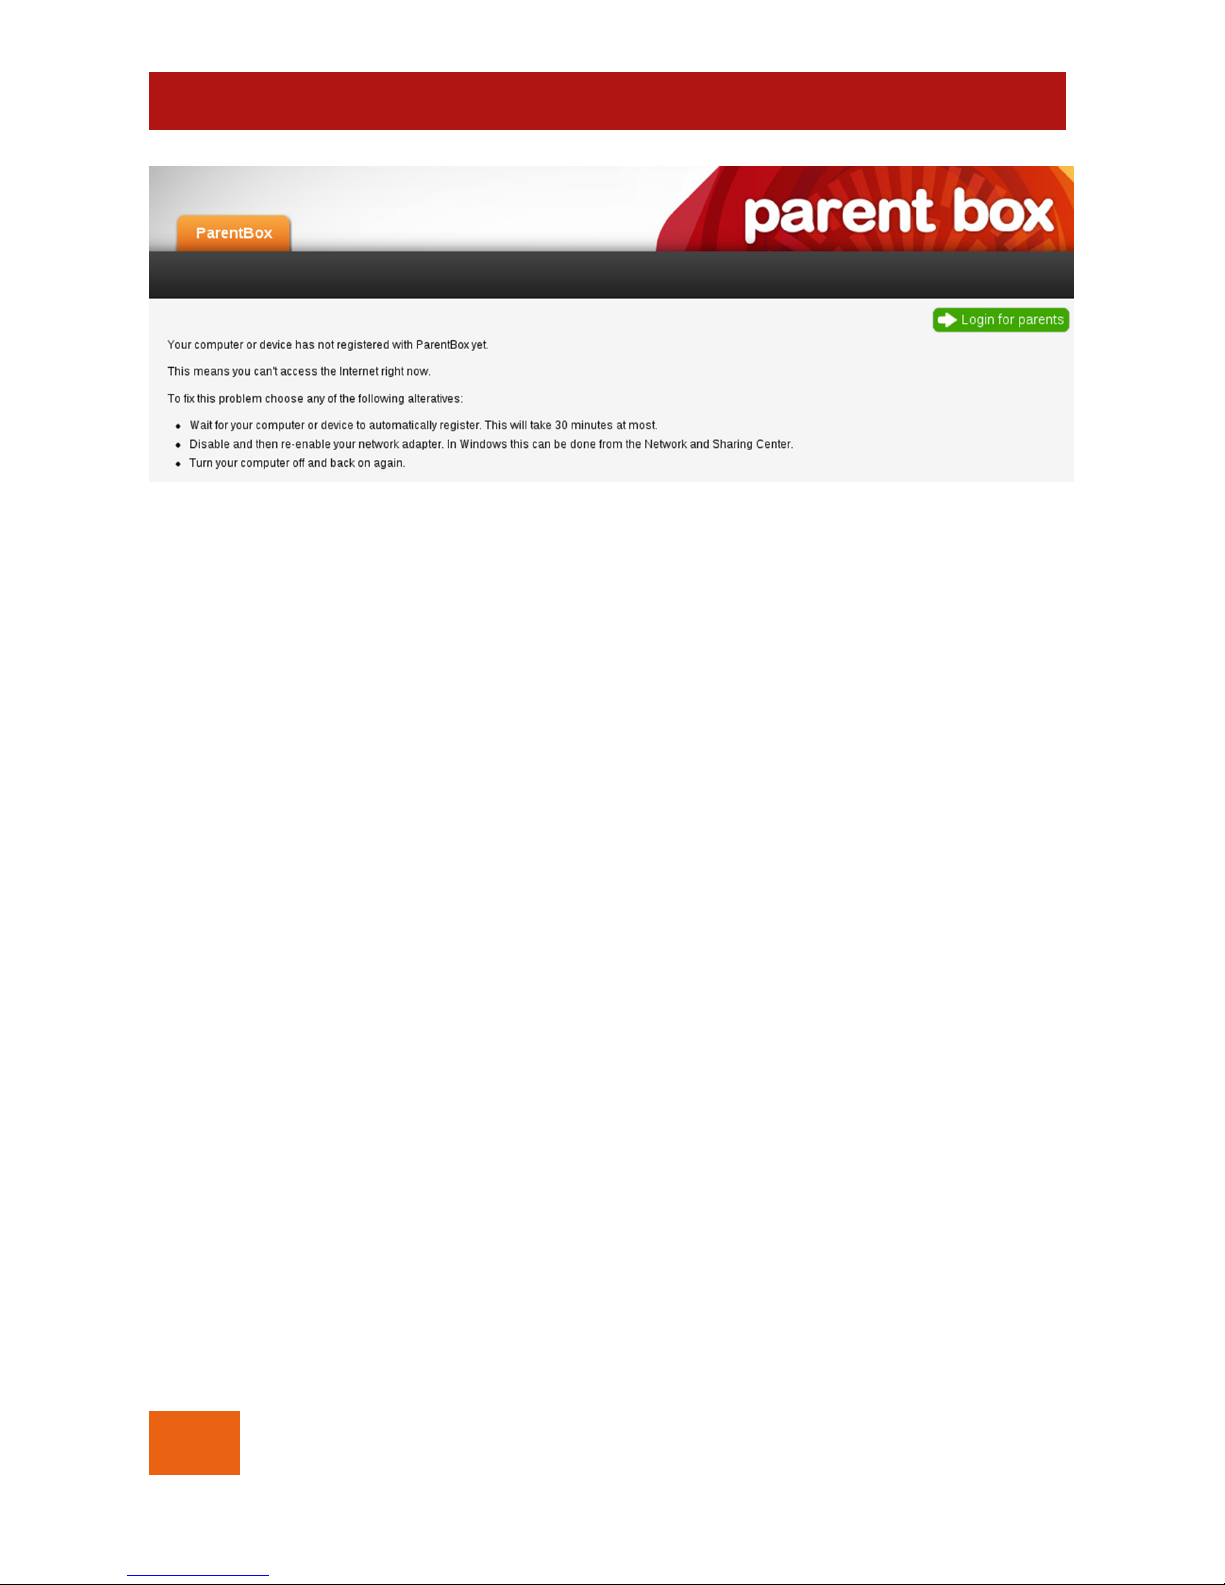
Regardless of the exact circumstances, if browsing to
http://parentbox results in the screen shown in Figure 24 then follow
one or other of the three procedures described next.
1. The simplest and most reliable solution is to turn your
computer or device off and then back on again. This will
reset the network connection between your computer or
device and ParentBox and you should then be able to
access ParentBox normally.
2. Alternatively, you can disable and re-enable just the
network adapter that is connecting your computer or
device to the ParentBox.
• In Windows 7 and 8 this means going to the Network
and Sharing Center (in the Control Panel), clicking
Page 51

© TAME TECHNOLOGY 2013
51
USER GUIDE
the ‘Change adapter settings’ at left, identifying
which adapter is being used if you have more than
one, right clicking on the adapter and selecting
‘Disable’, then right clicking again and selecting
‘Enable’.
• On a mobile device that is connecting over wireless,
simply turning the wireless off and back on again
should work.
• On a MacBook or other OS X computer open the
System Preferences and select Network.
i. If you’re using a wired connection, select
‘Ethernet’ and click the ‘Advanced…’ button.
Then click the ‘Renew DHCP Lease’ button.
ii. If you’re using wireless then you can turn it off
and on again.
3. Finally, you can just wait for up to 30 minutes after which
time your problematic computer or device should have
registered itself with ParentBox.
Adding ParentBox to a more complex
home network
There are many different ways in which you can organise your
home network. The more knowledgeable may build themselves
mini replicas of commercial networks with firewalls, demilitarised
zones, port forwarding and so on. ParentBox can be integrated
into such sophisticated networks, although the user will likely have
to deploy the ‘advanced controls’ (The advanced controls in
ParentBox, page 53), which they must do at their own risk.
Page 52

52
© TAME TECHNOLOGY 2013
USER GUIDE
However, even with a straight-forward home network you may
want to know about some of ParentBox’s features that make it
easier to deploy in some ways rather than others.
1. The first point is that ParentBox will only monitor and control
the computers and devices connected to one of its four
wired ports or two wireless networks. Any devices between
the ParentBox and the Internet – anything on the other end
of the yellow network cable – will not be monitored or
controlled.
This isn’t necessarily a bad thing – you may want the adults’
computers to completely bypass the ParentBox and only the
children’s computers to be monitored.
2. The second point is that computers and devices monitored
and controlled by the ParentBox should have few problems
connecting to other computers (or printers) connected
between the ParentBox and the Internet.
The reverse is not true, however, so other computers
connected between the ParentBox and the Internet are
likely to have difficulty locating and connecting to
computers and devices monitored by the ParentBox.
3. The third point is that the ParentBox has a firewall that stops
incoming connections from the Internet reaching the
computers and devices being monitored and controlled by
the ParentBox.
Consequently, there is minimal risk of data on the ParentBox
being viewed or changed by anyone on the Internet, but if
you are running some sort of server that is meant to be
accessed from the Internet then you will have the
knowledge to locate the server ‘upstream’ from the
Page 53
© TAME TECHNOLOGY 2013
53
USER GUIDE
ParentBox – or to open the appropriate ports on the
ParentBox.
4. The final point is that the ParentBox is preconfigured to live
on the 192.168.5.0/24 subnet. If your home network already
has several subnets, and of them is the 192.168.5.0/24
subnet, you may need to make some special provision for
routing.
Figure 25
The advanced controls in ParentBox
In the preceding sections of this User Guide every ParentBox screen
has been described. However, in addition to the ParentBox screens
there are numerous screens that the more adventurous and
knowledgeable users may wish to access. Please be aware,
however, that you use these advanced screens at your own risk as
you could cause the ParentBox to stop functioning.
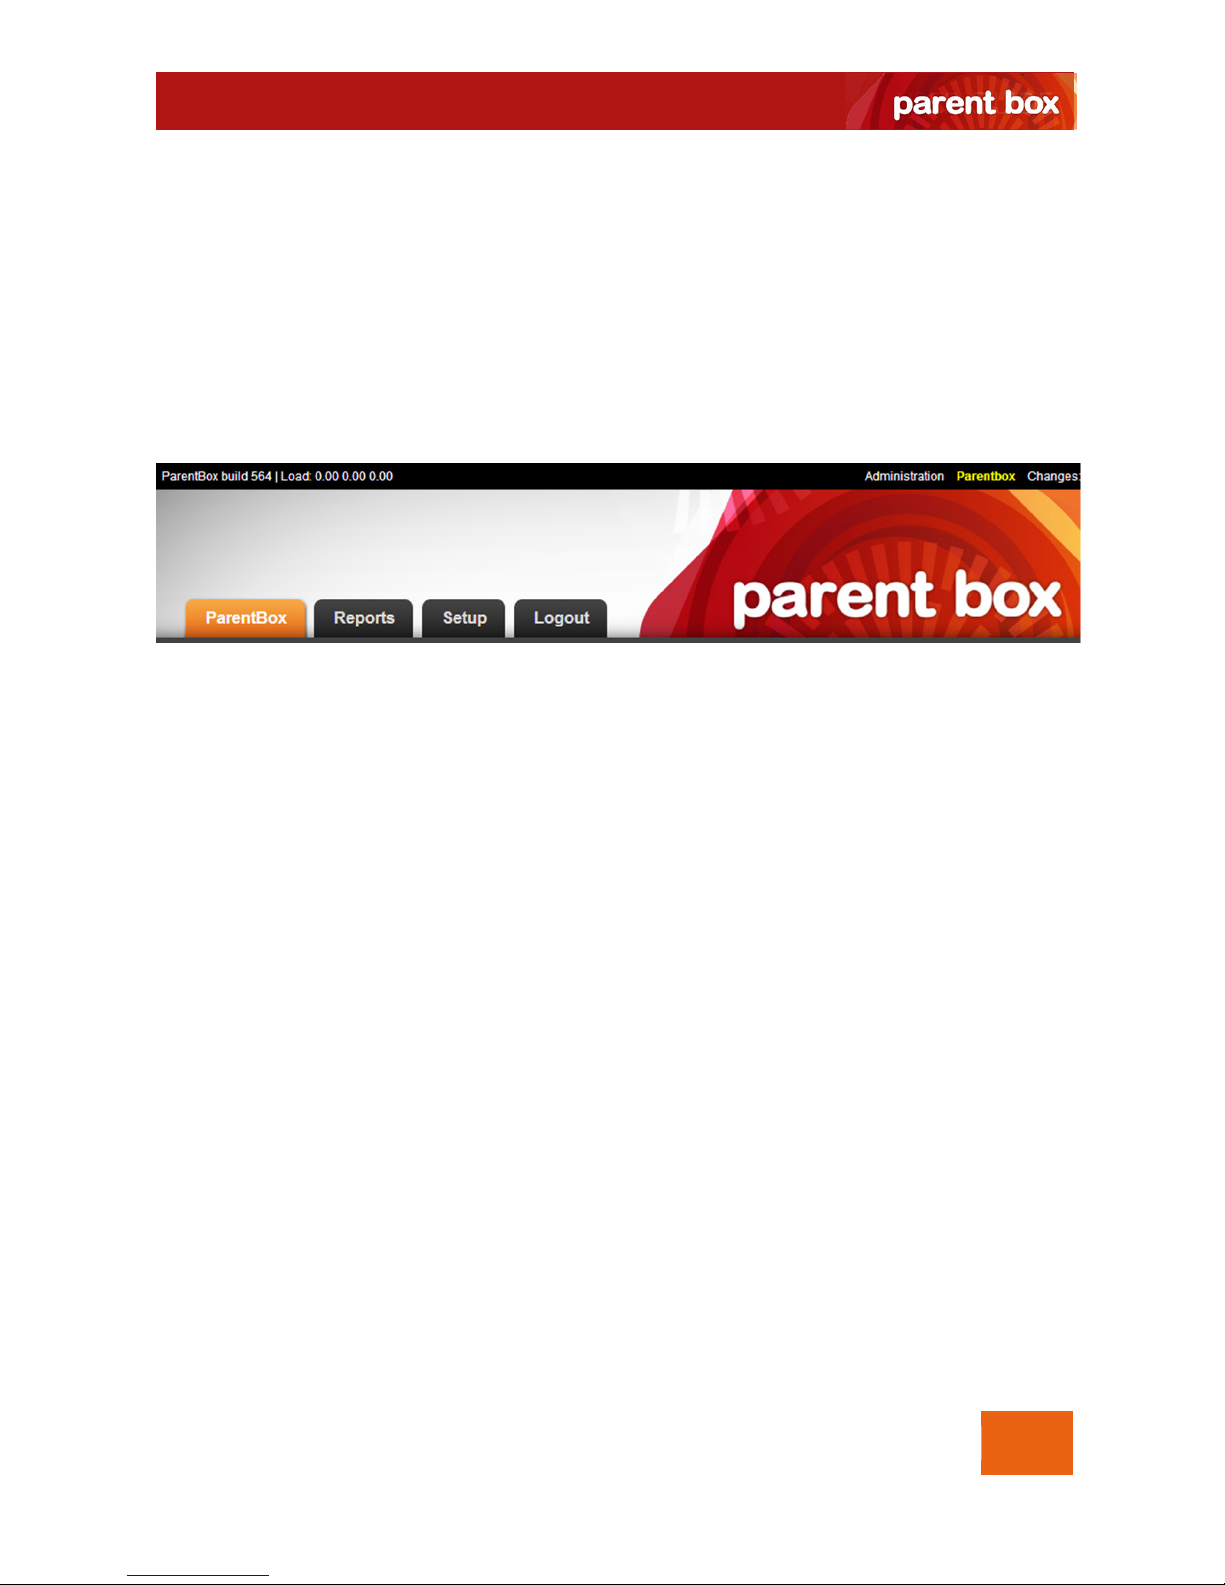
The advanced screens are accessed via the ‘Administration’ link at
the top of the ParentBox screen (Figure 25).
The advanced screens are provided by the excellent, open source
OpenWRT project on which ParentBox is built. OpenWRT’s web
presence is at https://openwrt.org
Page 54
54
© TAME TECHNOLOGY 2013
USER GUIDE
Figure 26
Changing the wireless encryption
method
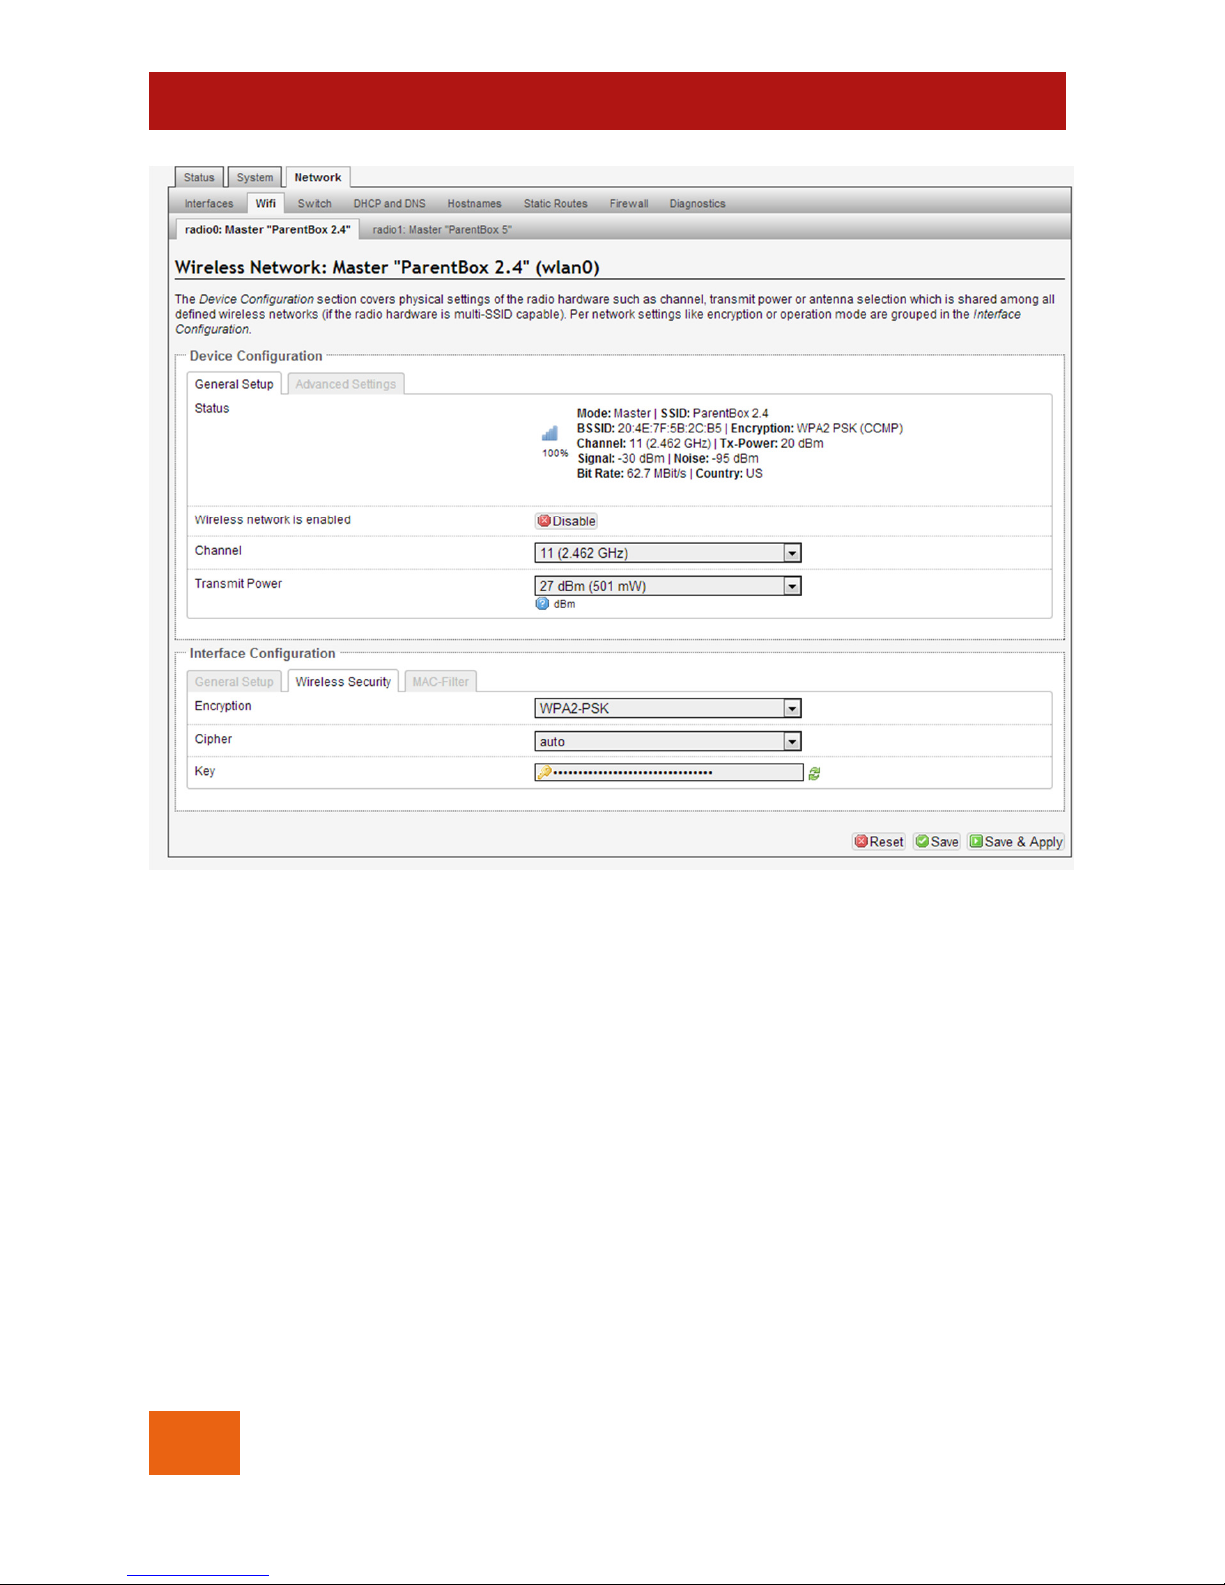
As was mentioned in Turning on the wireless on page 15, ParentBox
is preconfigured to use the WPA2-PSK security for its wireless
networks. If this type of security is not appropriate for your home
network then you can change it by following the instructions below.
1. Log in to ParentBox and click the ‘Administration’ link at the
very top of the screen.
2. Select the ‘Network’ tab then the ‘Wifi’ tab.
Page 55

© TAME TECHNOLOGY 2013
55
USER GUIDE
3. Click one of the two ‘Edit’ buttons depending on whether
you are changing the wireless for the 2 GHz band or the 5
GHz band.
4. In the lower half of the screen select the ‘Wireless Security’
tab – refer to Figure 26.
5. Select your desired value from the ‘Encryption’ dropdown.
• Depending on your selection you may have to enter
one or more keys.
6. Finally, click the ‘Save & Apply’ button.
For further support, go to
http://parentbox.com.au
 Loading...