

Page 1

Wi-Fi/RF Control Set Up Instructions – For use with TTi-HV1600-RFwRR (Conversion Kit)
IMPORTANT: Perform these tasks before removing the RF control box from
to the control box ONLY.
Devices that must be present to control the Wi-Fi fan
Compatible smart devices
Before setting up the Wi-Fi control, check the following
Your control box is disconnected from the fan
Your router is MAC – open
For this Wi-Fi/RF kit to be compatible with your HV1600 fan, it must meet the following criteria:
• The HV1600 serial number must be SN: 12244 or higher and purchased after 2/10/12
• The HV1600 must have an external control box connected to the fan with a length of 14/3 romex cable
• The capacitor in the original control box must be a 60mf capacitor. Check for 60mf on the side of the “capacitor
can” inside the black control box
Provided with the Wi-Fi Hub Retro kit
• One Wi-Fi/RF Control Box w/Remote Key Fob
• One metal romex clamp 3/8
• One 4 wire harness (w/male connector)
• One 1” piece of fiberglass protective sleeving
Tools required
• One (small) flat head screw driver (to release the black plastic romex clamp, if present, in the junction box).
•
One (medium) flat head screw driver (to remove the lid to the junction box hard mounted to side of the fan)
•
One #2 sized Phillips head screwdriver (to remove the ground screw in junction box).
•
Wire strippers/cutters (to cut wire, if needed)
• Plyers (to assist in removing / adding romex clamp)
your fan. To connect the Wi-Fi receivers to the home network, provide power
• An active 2.4GHz b/g/n wireless home network (Not compatible with 5.0GHz)
• A Smart Device. You may also use Alexa or Google Home and a smart device to control the fan without the need
to log in to regain control each time
• EWelink app is used to operate the fan by providing the wireless network information to the Wi-Fi Control
• A smart phone or tablet that has access to iTunes or Google Play to download the EWelink app is compatible.
Once the setup process is complete you may use other smart phones and tablets. Generally, only one device can
be signed in at one time to control the fan (Exception: If you have more than one EWelink account and you
share control).
Your smart phone or tablet is connected to a 2.4 GHz Wi-Fi network
with internet access
You have the correct Wi-Fi password
Your phone or tablet has access to iTunes or Google Play.
20 Patterson Brook Road, West Wareham, MA 02576
774-678-4433 800-222-5932 774-678-4436
HV1600-RFwRR.1
Page 2
1. Set up EWelink app
free
EWelink app on iTunes
EWelink app on Google Play
EWelink detailed user guide
2.
Sign into or register your EWelink account
3. Pair the HV1600 Wi-Fi control box to the home network with the EWelink app
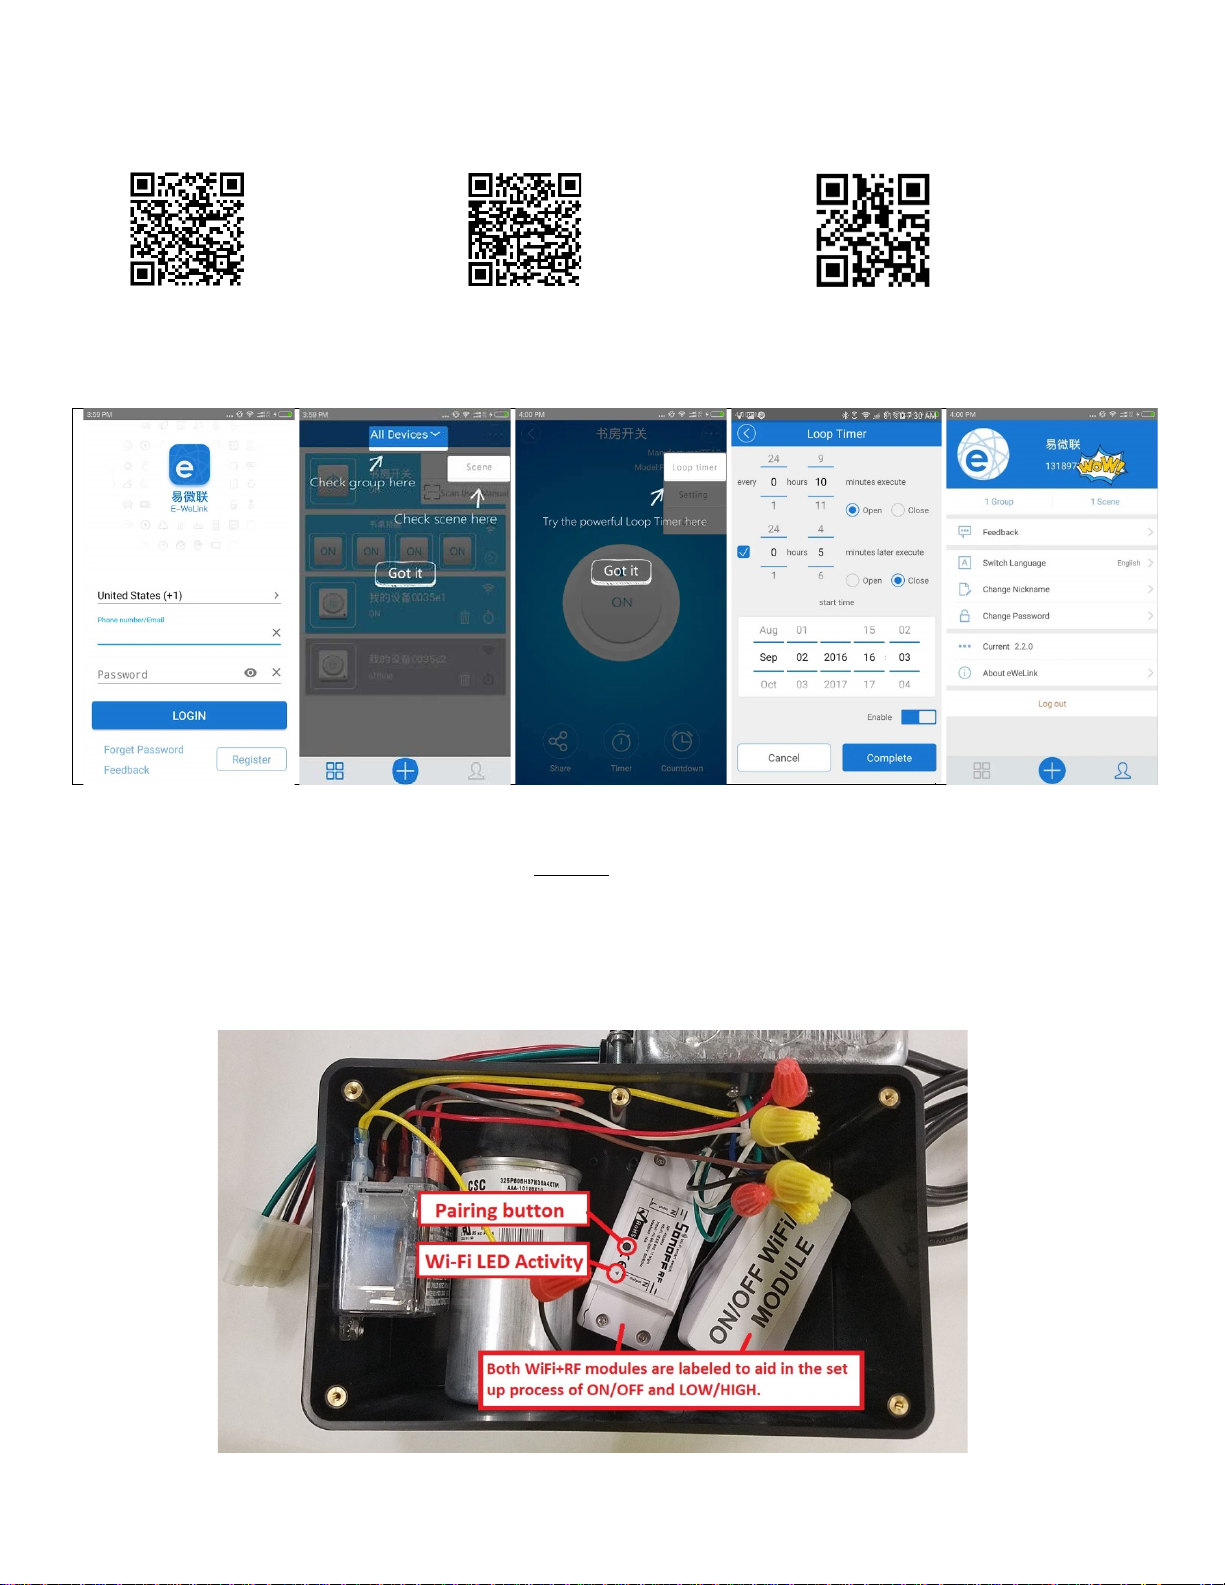
a. Provide power to the control box without it being connected to the HV1600
b. Remove the lid to the HV1600 control box to gain access to the EWelink Wi-Fi devices
c. Locate the ON/OFF receiver module inside of the box
d. Press the Pairing button on the ON/OFF module for 7 seconds until the Wi-Fi LED blinks 3 times
every few seconds
Scan the QR code to download the
EWelink APP and user guide or search for “EWelink”
Use a #1 sized Phillips head screw driver to remove the 6 black screws on the black box lid
Page 3

e. On your smart device, open the EWelink app and tap the (+) symbol
f. Input your Wi-Fi SSID Network name and password
g. Name the module in the field provided: “ON/OFF”
When the EWelink device has connected to the home network successfully the Wi-Fi LED
will remain lit, confirming connection
h. Repeat steps 3c-3g, for the LOW/HIGH module, naming the field “LOW/HIGH”
i. Test functionality with EWelink to confirm the control box is switching (audible clicks)
Factory reset
If any information was entered incorrectly during the set up process, a factory reset is recommended. To perform a factory
reset to the EWelink module press and hold the “Pairing Button” for upwards of seven seconds until the LED blinks a
different pattern. The factory reset is now complete. You may start the pairing process again (Step 3d).
4. Unplug control box from power outlet, place the control box lid onto the box and tighten
screws
5. Remove the RF Remote system from the HV1600 (at the fans location)
Use the appropriate pairing method for your device as illustrated below
a. Terminate power to the HV1600
i. Unplug the control box from the outlet or, if hardwired, shut off the circuit breaker providing
power to the circuit. Disconnect the line cord from the power supply in the junction box and
cap the wires that were providing power
b. Disconnect the RF Control Box
i. Open the junction box hard mounted to the HV1600 flange
ii. Disconnect the wires in the junction box from the romex cable entering from the control box,
retaining the ground screw for future use
iii. Loosen the romex clamp holding the romex cable in place and pull the romex cable out of the
junction box
iv. If your fan has a black, plastic romex clamp, remove it and replace it with the metal clamp
provided
will no longer be used)
(Alternately, you may use a new hole in the junction box and leave the plastic clamp in place-which
20 Patterson Brook Road, West Wareham, MA 02576
774-678-4433 800-222-5932 774-678-4436
HV1600-RFwRR.1
Page 4

6. Connect the Wi-Fi/RF control box to the fan
Hand Held Remote
The Wi-Fi / RF models are provided with a 4 button pre-programed hand held
(key fob) remote. The “A” button controls ON/OFF power to the fan. The “B”
button controls LOW/HIGH speed. C & D are not in use. You may use a
433MHz frequency remote as an alternate remote. To reprogram, if
necessary, follow the instructions below
ERASING STORED REMOTE CODES: Locate the receiver module you wish to clear from the remote (see
diagram 3d). Quickly press the pairing button three times. A red LED will be lit for 3 seconds to confirm the
codes have been erased
LEARNING: Locate the receiver module you wish to pair to the remote (see diagram 3d). Quickly press the
pairing button twice in a row. Press the corresponding button on the remote for 1 to 2 seconds. Test with
the remote to confirm the remote function.
7e
a. Insert the metal romex clamp (provided) into a hole in the junction box and fasten with the retaining nut.
b. Slip the fiberglass protective sleeving (provided) over the end of the wiring harness, sliding it back several
inches
c. Slide the ends of the wires into the junction box through the hole containing the romex clamp
d. Secure the ground wire (green) to the junction box with the ground screw (See 1.B.b)
e. Attach each wire from the HV1600 fan to the matching colored wires of the wiring harness
• BLACK wire form the fan (switched hot) to the BLACK wire from the harness
• RED wire from the fan (constant hot) to the RED wire from the harness
• WHITE wire from the fan (neutral) to the WHITE wire from the harness
f. Adjust the length of wire into the junction box to accommodate the mounting location
g. Slide the sleeving under the romex clamp
h. Tighten romex clamp over the fiberglass protective sleeving
i. Replace the junction box lid to the hard mounted junction box
j. Plug the Wi-Fi/RF control box into wire harness connector (confirm they are solidly connected)
k. Plug the line cord into an available power outlet
.
Page 5

Troubleshooting /FAQ
My device on the app stays “Offline”:
Wi-Fi LED quickly blinks one time every second
Wi-Fi LED quickly blinks twice every second:
Failure to connect:
I lost/broke the hand held remote. Can I buy a new one?
Optional: Wiring manual switches to operate the fan, bypassing the Wi-Fi control.
HI/ON
ON/FAN ON
Use 14/3 or 12/3 Romex Cable
says offline for a longer time, please judge the problem by the Wi-Fi LED status.
Device failed to connect to your Wi-Fi. Perform a factory reset and enter the network information again starting at step #3c. Possible causes:
1. Device is too far away from your Wi-Fi signal
2. Incorrect Wi-Fi password
3. Device cannot be added to the 5.Ghz Wi-Fi router (only works on 2.4 GHz Wi-Fi)
4. Router is not MAC - open
The added device needs 1 min to connect to Wi-Fi and the internet. If it
Device has connected to Wi-Fi but failed to connect to server. Check
your network connectivity.
Perform a factory reset (page 3).
Yes. You will need access to the control box to pair it to your fan.
There are three wires located in the junction box hard mounted to the HV1600 Wi-Fi Box that will allow for
the use of two SP/ST (single pole / single throw) wall switches to bypass the Wi-Fi method of control.
When the manual switches are in use the fan cannot be turned off using the app or changed to low speed
if the speed switch is set to high speed. See wiring diagram below for wiring. Only a mechanical timer may
be used as an alternative control SP/ST switch.
LOW/OFF
OFF/FAN OFF
20 Patterson Brook Road, West Wareham, MA 02576
774-678-4433 800-222-5932 774-678-4436
HV1600-RFwRR.1
Page 6

This Page Intentionally Left Blank
 Loading...