

PRODUCT MANUAL & INSTALLATION GUIDE
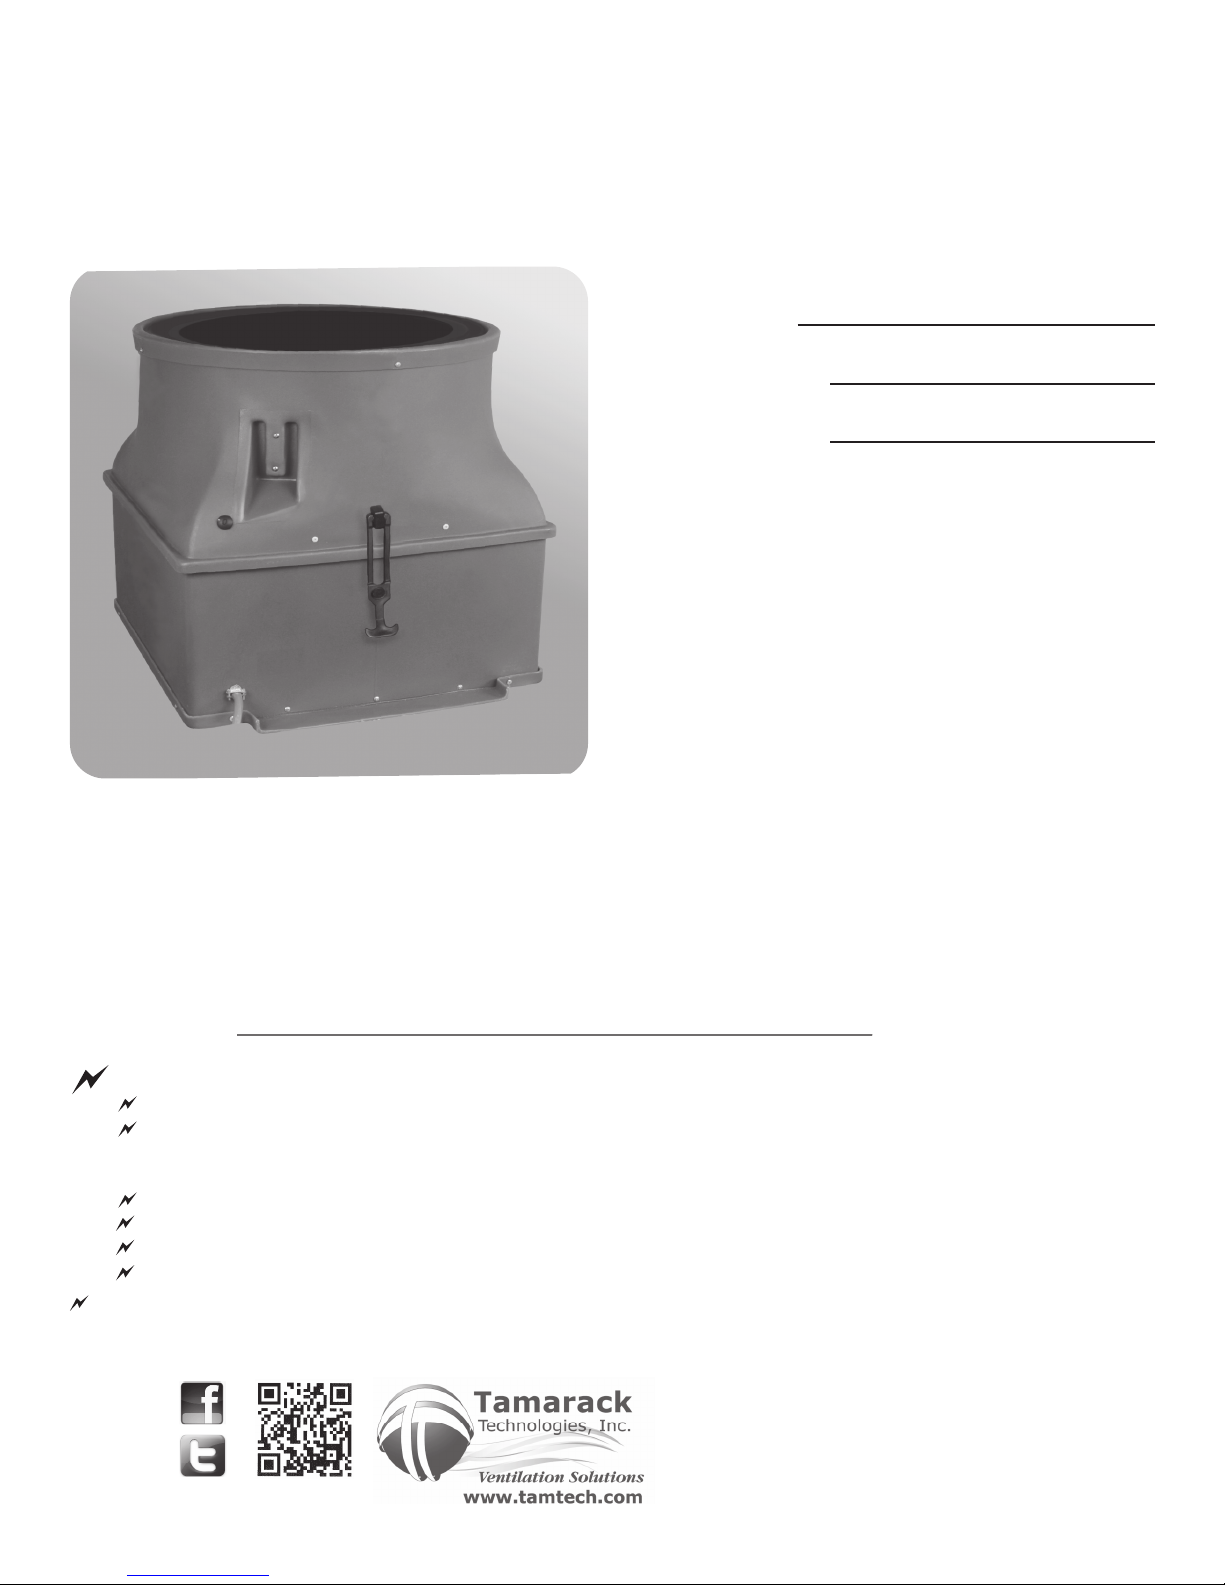
One (1) GHOST
One (1) White Metal Grille w/(6) Screws
One (1) Hand Held Remote Transmitter
One (1) Remote Receiver w/ line cord & interconnect cable
The serial number is located on the shipping carton
and on a label affixed to an insulated door.
When you have unpacked your GHOST
carefully you will find the following:
GHOST
Unpacking your GHOST:
G
H-10
Serial Number
Date of Purchase
Point of Purchase
The Best Location for your GHOST:
The GHOST should be installed in your attic in a central location within
your home. Above a central hallway or at the top of a stairwell will provide the best airflow.
► Make sure that there aren’t any pipes, wires, rafters or air conditioning or heating ducts running through
the space where the GHOST will be installed. The GHOST can NOT be mounted vertically.
► Make sure that you have adequate exhaust area out of your attic. This can be accomplished with
a combination of roof, ridge or gable end vents. The GHOST requires a minimum of 9 square feet of attic exhaust area.
►
If your home has an engineered roofing system, care should be taken that the GHOST will fit within the truss layout.
READ AND SAVE THESE INSTRUCTIONS
W
A
R
N
I
N
G
:
T
O
R
E
D
U
C
E
T
H
E
R
I
S
K
O
F
F
I
R
E
,
E
L
E
C
T
R
I
C
S
H
O
C
K
,
O
R
I
N
J
U
R
Y
T
O
P
E
R
S
O
N
S
,
O
B
S
E
R
V
E
T
H
E
F
O
L
L
O
W
I
N
G
:
U
s
e
t
h
i
s
u
n
i
t
i
n
t
h
e
m
a
n
n
e
r
i
n
t
e
n
d
e
d
b
y
t
h
e
m
a
n
u
f
a
c
t
u
r
e
r
.
I
f
y
o
u
h
a
v
e
a
n
y
q
u
e
s
t
i
o
n
s
,
c
o
n
t
a
c
t
t
h
e
m
a
n
u
f
a
c
t
u
r
e
r
.
B
e
f
o
r
e
s
e
r
v
i
c
i
n
g
o
r
c
l
e
a
n
i
n
g
u
n
i
t
,
s
w
i
t
c
h
p
o
w
e
r
o
f
f
a
t
s
e
r
v
i
c
e
p
a
n
e
l
a
n
d
l
o
c
k
s
e
r
v
i
c
e
p
a
n
e
l
t
o
p
r
e
v
e
n
t
p
o
w
e
r
f
r
o
m
b
e
i
n
g
s
w
i
t
c
h
e
d
o
n
a
c
c
i
d
e
n
t
a
l
l
y
.
W
h
e
n
t
h
e
s
e
r
v
i
c
e
d
i
s
c
o
n
n
e
c
t
i
n
g
c
a
n
n
o
t
b
e
l
o
c
k
e
d
,
s
e
c
u
r
e
l
y
f
a
s
t
e
n
a
p
r
o
m
i
n
e
n
t
w
a
r
n
i
n
g
d
e
v
i
c
e
,
s
u
c
h
a
s
a
t
a
g
,
t
o
t
h
e
s
e
r
v
i
c
e
p
a
n
e
l
.
W
h
e
n
c
u
t
t
i
n
g
o
r
d
r
i
l
l
i
n
g
i
n
t
o
w
a
l
l
o
r
c
e
i
l
i
n
g
,
d
o
n
o
t
d
a
m
a
g
e
e
l
e
c
t
r
i
c
a
l
w
i
r
i
n
g
o
r
o
t
h
e
r
h
i
d
d
e
n
u
t
i
l
i
t
i
e
s
.
N
e
v
e
r
p
l
a
c
e
a
s
w
i
t
c
h
w
h
e
r
e
i
t
c
a
n
b
e
r
e
a
c
h
e
d
f
r
o
m
a
t
u
b
o
r
s
h
o
w
e
r
.
D
o
n
o
t
u
s
e
t
h
i
s
f
a
n
o
v
e
r
a
t
u
b
o
r
s
h
o
w
e
r
.
D
o
n
o
t
u
s
e
t
h
i
s
f
a
n
o
v
e
r
c
o
o
k
i
n
g
a
p
p
l
i
a
n
c
e
s
.
W
A
R
N
I
N
G
:
T
o
R
e
d
u
c
e
T
h
e
R
i
s
k
o
f
F
i
r
e
o
r
E
l
e
c
t
r
i
c
S
h
o
c
k
,
D
o
N
o
t
U
s
e
T
h
i
s
F
a
n
W
i
t
h
A
n
y
S
o
l
i
d
-
S
t
a
t
e
S
p
e
e
d
C
o
n
t
r
o
l
D
e
v
i
c
e
.
C
A
U
T
I
O
N
:
F
o
r
G
e
n
e
r
a
l
V
e
n
t
i
l
a
t
i
o
n
U
s
e
O
n
l
y
.
D
o
N
o
t
U
s
e
T
o
E
x
h
a
u
s
t
H
a
z
a
r
d
o
u
s
O
r
E
x
p
l
o
s
i
v
e
M
a
t
e
r
i
a
l
s
A
n
d
V
a
p
o
r
s
C
A
U
T
I
O
N
:
T
h
i
s
u
n
i
t
h
a
s
a
n
u
n
g
u
a
r
d
e
d
i
m
p
e
l
l
e
r
.
D
o
N
o
t
U
s
e
i
n
L
o
c
a
t
i
o
n
s
R
e
a
d
i
l
y
A
c
c
e
s
s
i
b
l
e
t
o
P
e
o
p
l
e
o
r
A
n
i
m
a
l
s
.
LIKE US ON
FACEBOOK
FOLLOW US
ON TWITTER
WHOLE HOUSE VENTILATOR
20 Patterson Brook Rd, Suite 7
West Wareham, MA 02576
774-678-4433 / 800-222-5932 / Fax 774-678-4436
Installation
Tools and supplies needed:
You will need the following items: two pieces of 2x stock to match
y
our existing framing, a saw to cut the hole in the ceiling, a hammer or screw gun to attach the blocking to the existing joists, a
Phillips head screw driver to attach the grille, weather strip material and low expansion spray foam sealant.
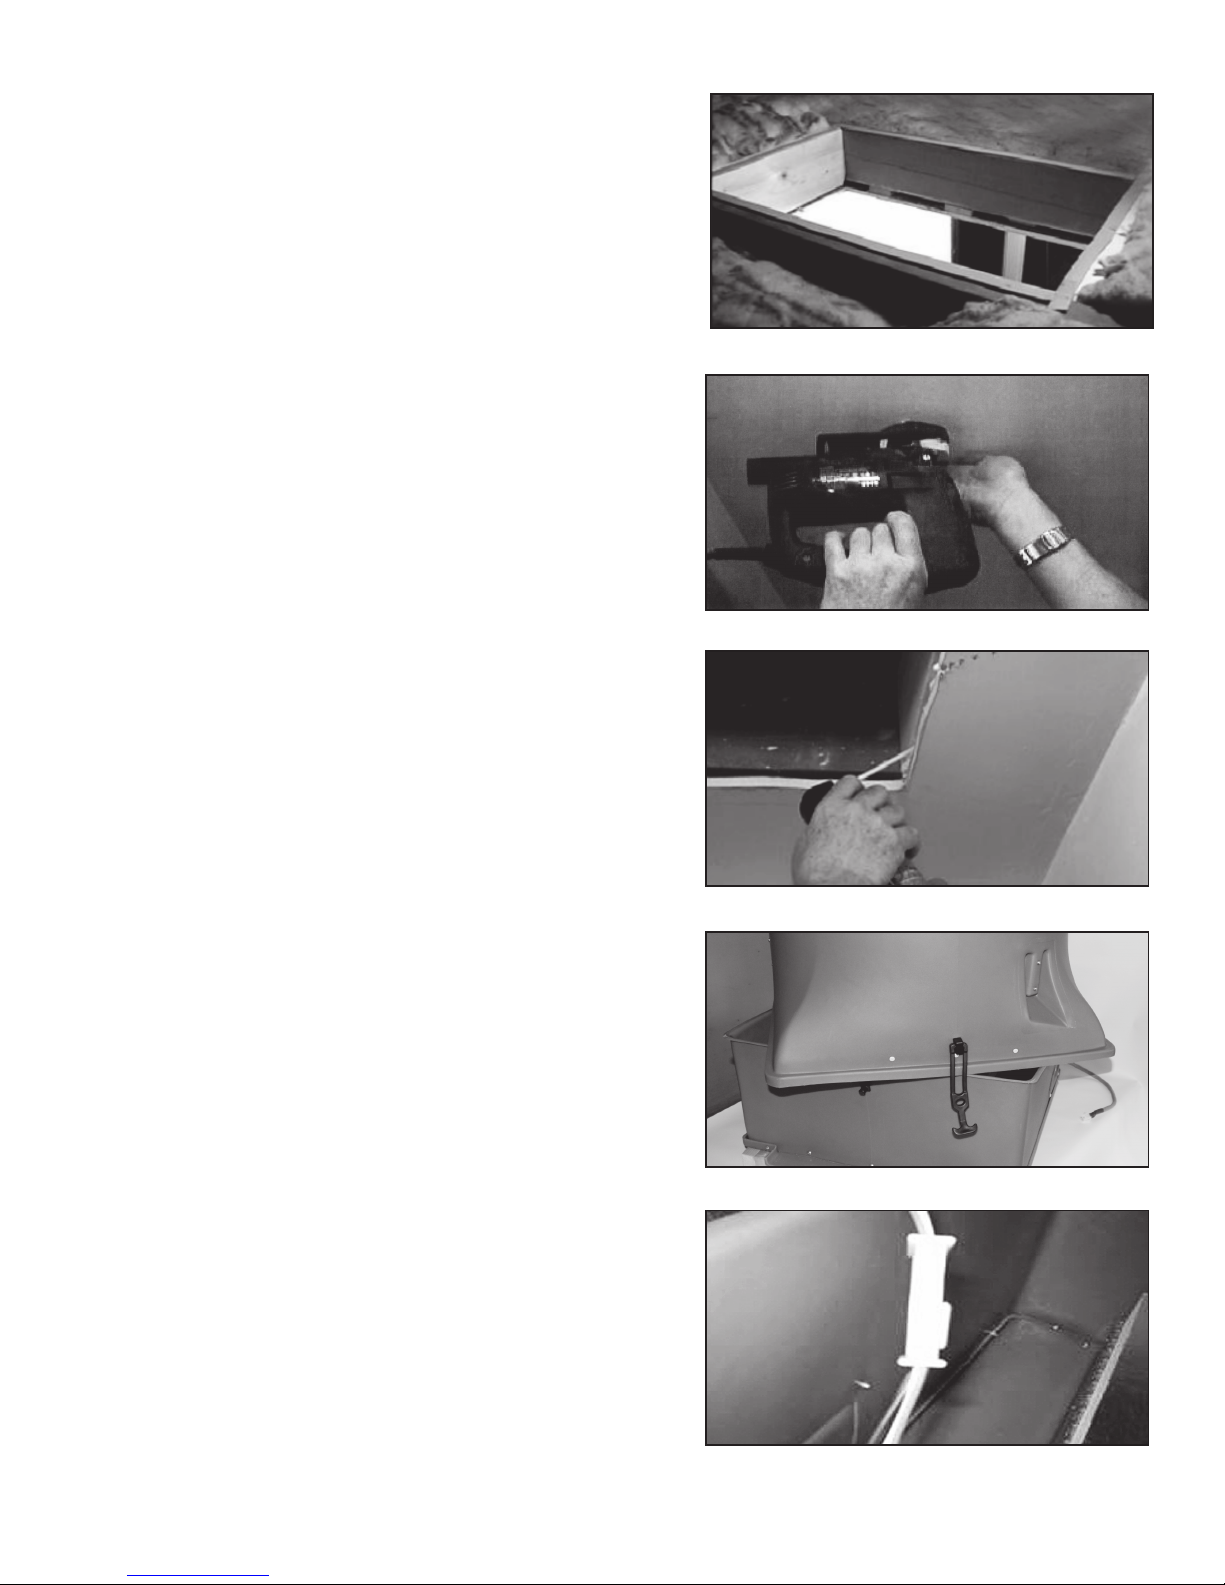
1. The fan housing will fit either 16” or 24” on center
framing. Cut two pieces of 2x stock (2 x 6 or 2 x 8 etc.)
of the same dimension as the existing joists. Add these
pieces of framing to form a box between the joists
(Figure 1).
TIP: When the GHOST is to be installed in a hallway or other location with low ceilings, some
homeowners find that building a box out of 2 x 10s
or similar material will raise the GHOST to a position where the sound level will be reduced but
the efficiency of the fans will not be diminished.
This box should not exceed 24 inches in height.
2. Cut a hole in the ceiling under where the GHOST will
be installed. The hole should be no larger than
14 1/2" x
22 1/2".
This will allow for the grille to cover the exposed
edges. The suggested method for making the proper
sized hole in the ceiling is; cut a pilot hole under where
the fan will be installed (Figure 2). From above, using a
saw, cut along the inside edge of the framework removing the ceiling panel and any strapping within the framework.
Do not damage electrical wiring or other hidden
utilities.
3. Install a foam weather stripping or other flexible mate-
rial (not supplied) on the top of the joists and added framing. This will serve to seal between the housing and the
framing as well as dampen vibrations. Check the joint between the ceiling and the 2x stock. Some types of ceilings
are spaced away from the joists. Any gap between the
2x’s and the ceiling should be sealed prior to final installation. (Figure 3) Use a low expansion spray foam sealant
(not supplied).
4. Set the GHOST lower housing onto the framing. The
lower housing will fit into the box with the mounting
flanges overlapping the framing.
DO N O T DR A G TH E
GH O S T IN T O POSITION AS THIS MAY SEVERLY
DAMAGE IT
.
5. Set the GHOST upper housing at an angle on top of
the lower housing, orienting the upper housing so that
the fan motor connections are located in the same corner (Figure 4). Push the fan electrical connection into
the fan electrical feed. The connectors are ‘keyed’ so
they will only connect correctly (Figure 5).
Figure 1.
Figure 2.
Figure 3.
Figure 4.
Figure 5.
Electrical:
Voltage
Power
Air Flow
Operation
Insulation Value of
Closed Doors
Weights
Top Housing
Lower Housing
115 VAC 60Hz
(High Speed) 450 Watts
(Low Speed) 340 Watts
High Speed 3400 CFM
Low Speed 1900 CFM
30 second Door Cycle Time
(Open-Close)
Model:Ghost R-38
Model:Ghost/R50 R-50
Whole House Ventilator: 48 Lbs.
Shipping: 71 Lbs. (2 boxes)
26 1/4” L x 26” W x 14 1/8” H
25 7/8” L x 29 1/2” W
x 13 5/8” H
GHOST-Optional wiring
for fan operation
(control not included)
WARNINGS: State and local
electrical codes may require that
the GHOST be installed
by a licensed electrician.
Check with your local code
officials before installing.
The GHOST is not for use
with solid state controls.
Be sure to turn off power
before wiring the GHOST.
Figure 6.
Figure 7.
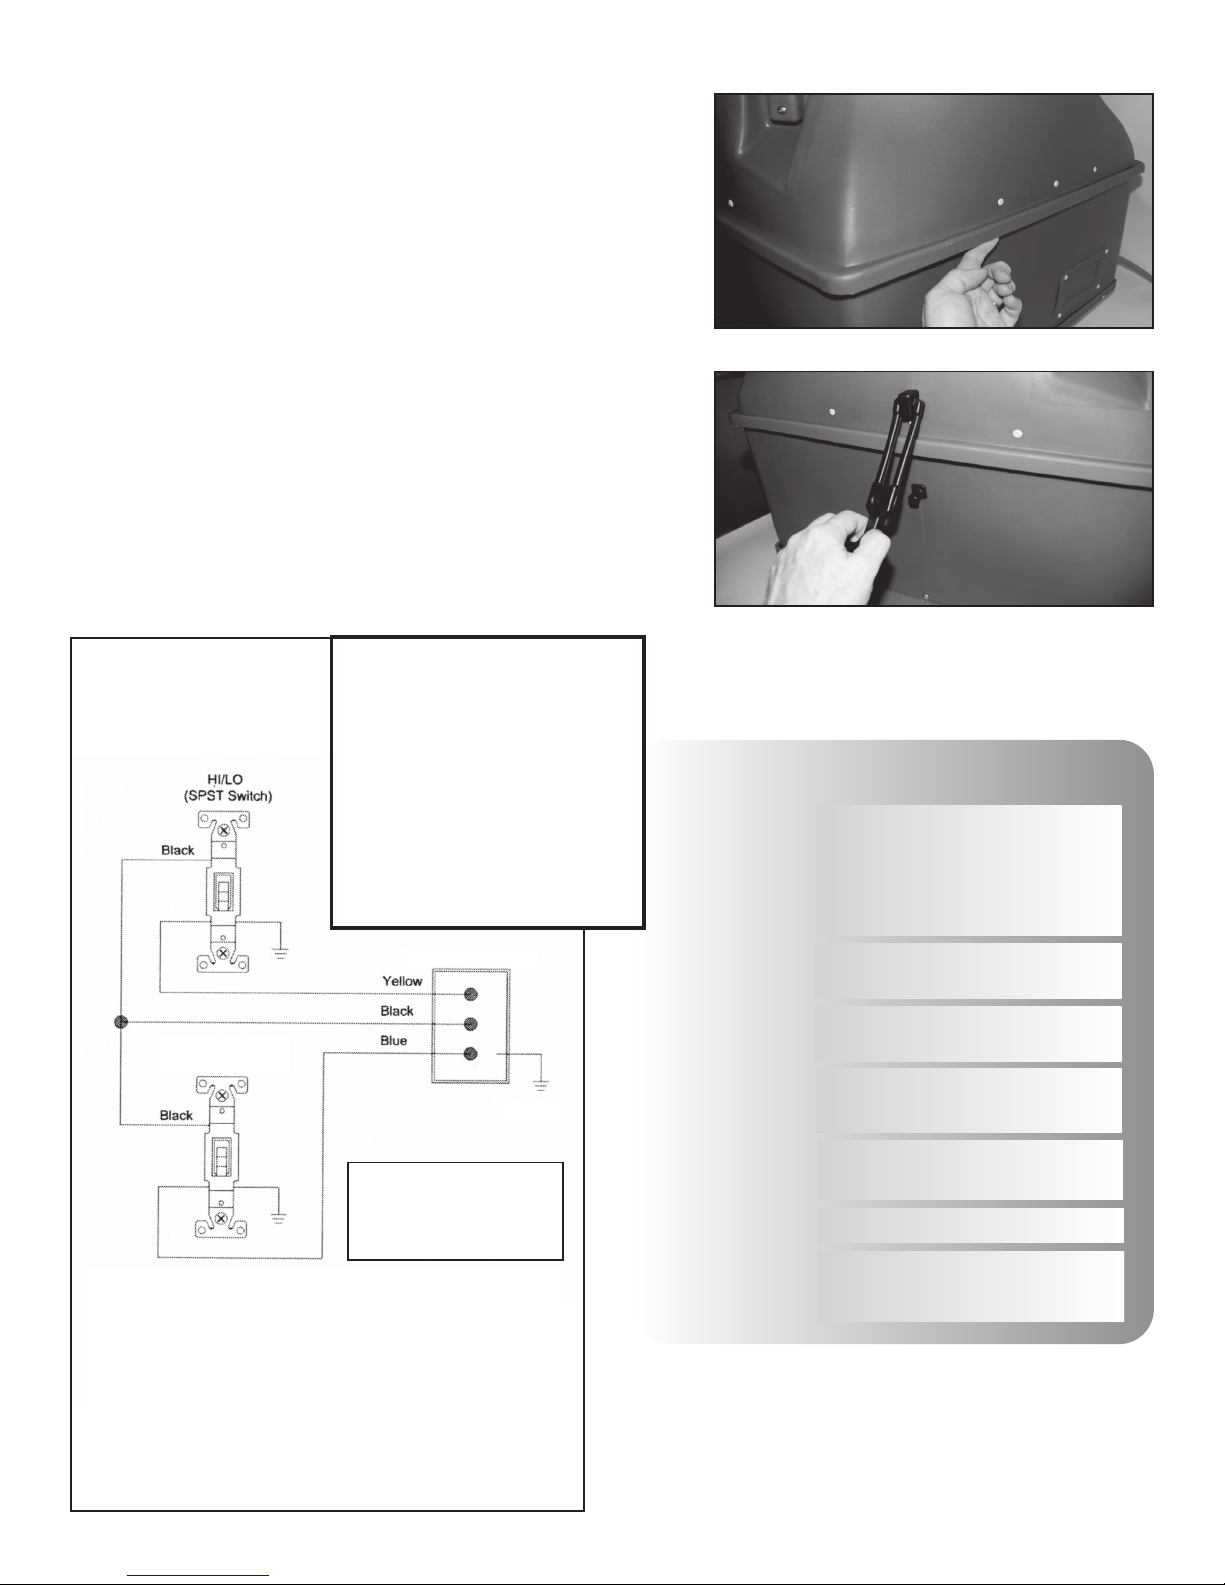
6. Rotate the upper housing until it lines up with the
lower housing. Make sure the edges of the two housings mate all the way around the GHOST (Figure 6)
and then pull the black attachment handles down over
their attachment posts (Figure 7).
7. If desired, secure the GHOST to the top of the joists.
8. Plug the connector from the GHOST into the Control
Box. Plug the Control Box into an unswitched,
grounded receptacle.
9. Install the ceiling grille (screws provided).
10. Check the unit for proper operation.
Operating your GHOST
Important - Be sure at least one window is open when the
fan is operating. The GHOST is controlled by the hand held
remote transmitter. The transmitter has two buttons; ON/OFF
and LO/HI. LO/HI controls the speed of the fan. See the
Wiring section of this manual for further details.
The line cord must
remain plugged into
a constant HOT outlet.
Silver Utility Box
*1
(SPST Switch)
GROUND
Hardwiring the unit to controls using the YELLOW, BLACK and
BLUE wires will allow for additional, manual operation. Use of
controls will override remote control functions. Recommended
controls are SPST switches and/or non digital spring wound
timers. Use of other controls will void the warranty.
SPECIFICATIONS
*1
*1. SPST Switch (shown) and/or mechanical spring wound timer. These
devices are wired directly to the leads found in the silver utility box.
DO NOT CONNECT TO ELECTRICAL SERVICE.

LIMITED WARRANTY If, within the period of three years from the date of purchase, the GHOST (the Product) is defective or
malfunctions in normal home use, Tamarack Technologies, Inc. will repair or replace the Product, at its discretion. Customer is responsible for shipping charges.
NOTE: Some states codes require fans to be hardwired. HARDWIRING THE GHOST WILL NOT VOID WARRANTY PROVIDING
THE WIRING IS PERFORMED BY A LICENSED ELECTRICIAN.
CONDITIONS, EXCLUSIONS, AND LIMITATIONS -This Warranty is subject to the following conditions, exclusions
and limitations: THIS WARRANTY DOES NOT COVER PROBLEMS RESULTING FROM INSTALLATION, OPERATION OR
MAINTENANCE THAT HAS BEEN UNDERTAKEN OTHER THAN IN ACCORDANCE WITH THE INSTRUCTIONS. THIS WARRANTY DOES NOT COVER PROBLEMS RESULTING FROM DEFECTS IN OR CAUSED BY ASSOCIATED EQUIPMENT
(FURNACES, SOLARIA, ETC.); FROM REPAIRS OR MODIFICATIONS ATTEMPTED BY PERSONS OTHER THAN TAMARACK TECHNOLOGIES, INC.; FROM ABUSE, ACCIDENTAL OR SHIPPING DAMAGE OR ACTS OF GOD. THIS WARRANTY
DOES NOT APPLY TO THE PRODUCT USED OUTSIDE THE UNITED STATES, ITS TERRITORIAL POSSESSIONS, AND
CANADA. EXCEPT AS SET FORTH ABOVE, NO EXPRESS OR IMPLIED WARRANTY IS GIVEN OR AUTHORIZED BY
TAMARACK TECHNOLOGIES, INC. AND ALL OTHER SUCH WARRANTIES ARE EXPRESSLY DISCLAIMED. ANY WARRANTY OR MERCHANTABILITY OF FITNESS FOR ANY PARTICULAR PURPOSE SHALL BE LIMITED TO THE WARRANTY
HEREUNDER. MOREOVER, ANY LIABILITY OF TAMARACK TECHNOLOGIES, INC. FOR THE PRODUCT SHALL BE LIMITED TO THE REPLACEMENT VALUE OF THE PRODUCT. IN NO EVENT SHALL TAMARACK TECHNOLOGIES, INC. BE
LIABLE FOR ANY INCIDENTAL DAMAGES OR FOR ANY CONSEQUENTIAL PROPERTY OR COMMERCIAL DAMAGES,
IRRESPECTIVE OF THE CAUSE THEREOF, OCCURRING EITHER DURING OR AFTER THE WARRANTY PERIOD, INCLUDING WITHOUT LIMITATION ANY DAMAGES TO ANY PART OF A BUILDING OR ITS CONTENTS. NOTE: SOME
STATES DO NOT ALLOW THE EXCLUSION OR LIMITATION OF INCIDENTAL OR CONSEQUENTIAL DAMAGES AND SOME
STATES DO NOT ALLOW LIMITATIONS ON HOW LONG AN IMPLIED WARRANTY LASTS, SO THE ABOVE LIMITATIONS
OR EXCLUSIONS MAY NOT APPLY TO YOU. THIS WARRANTY GIVES YOU SPECIFIC LEGAL RIGHTS AND YOU MAY
ALSO HAVE OTHER RIGHTS THAT VARY FROM STATE TO STATE.
PROOF OF PURCHASE REQUIRED.
Troubleshooting
If the wireless remote fails to activate the fan try the following:
• The battery may need replacing. The transmitter uses a type CR2032
battery. Remove the back plate from the transmitter and remove the battery.
Following the markings, replace the battery and secure the back plate
to the transmitter.
• Check that all the connections are tight and that there is power to the outlet.
• If wall switches are also used to control the Ghost, check to see that they
are not in use and overriding the hand held transmitter.
If the doors are open but the fan is not rotating try the following:
• Check the electrical connection between the upper and lower sections.
• Turn off the power and check for foreign matter blocking fan rotation.
PRODUCT MANUAL & INSTALLATION GUIDE
GHOST
WHOLE HOUSE VENTILATOR
20 Patterson Brook Rd, Suite 7
West Wareham, MA 02576
774-678-4433 / 800-222-5932 / Fax 774-678-4436
 Loading...