


IRON COBRA HI-HAT STAND
INSTRUCTION MANUAL
Please read through this instruction manual first before starting to use your Iron Cobra Hi-Hat Stand.
Thank you for purchasing this Iron Cobra Hi-Hat Stand. For safe use and to gain the most from this product, read through this
instruction manual before assembly. Keep this manual in safe, handy place for future reference.
取扱説明書
ご使用になる前に、必ず説明書をお読み下さい。
この度はアイアンコブラ・ハイハットスタンドをお買い上げ頂き、誠にありがとうございます。製品の機能を十分に発揮し、安全にご使用頂くために、組
み立て前に必ず本説明書をお読み下さい。また本書は大切に保管して下さい。
• Do not use this product for anything other than musical performances.
• Tighten bolts before every performance.
• Use with caution.
To avoid injury, keep hands and feet out from under stand feet and away from
gears, chain and pedal hinges.
• To avoid injury, avoid physical contact with rusted or damaged metal.
• Do not operate the foot pedal without appropriate footwear.
• To avoid staining clothes, keep clothes clear of the chain, bearing and other
lubricated areas.
• Be careful not to damage flooring.
The stand's feet can damage flooring. Also, the rubber pads on the legs can
discolor flooring if left in the same position for a prolonged period of time. It is
recommended to use this stand on thick carpeting or an appropriate mat.
• Dieses Produkt nicht für andere Zwecke als musikalische Auftritte verwenden.
• Die Schrauben vor jedem Auftritt festziehen.
• Immer vorsichtig verwenden.
Um Verletzungen zu vermeiden. Hände und Füße von der Unterseite der
Ständerfüße und von Zahnrädern, Ketten und —Pedalscharnieren fernhalten.
• Um Verletzungen zu vermeiden, Berührungen mit rostigem oder
beschädigtem Metall vermeiden.
• Das Fußpedal nicht ohne geeignets Schuhwerk bedienen.
• Um Flecke auf Kleidung zu vermeiden, immer Kleidung von der Kette,
Lagern und anderen geschmierten Teilen fernhalten.
• Darauf achten, nicht den Boden zu beschädigen.
Die Füße des Ständers können den Boden beschädigen. Auch können die
Gummipolster an den Beinen Verfärbungen auf dem Boden hervorrufen, wenn sie
längere Zeit in der gleichen Position gelassen werden. Es wird empfohlen, diesen
Ständer auf dickem Teppichboden oder einer geeigneten Bodenmatte zu verwenden.
• Non usare questo prodotto per alcun altro scopo che esecuzioni musicali.
• Serrare i bulloni prima di ogni esecuzione.
• Usare con cautela.
Per evitare lesioni, tenere mani e piedi lontano dai piedi del sostegno e da
ingranaggi, catene e cardini dei pedali.
• Per evitare lesioni, evitare il contatto fisico con metallo arrugginito o
danneggiato.
• Non azionare il pedale senza calzature appropriate.
• Per evitare di sporcare gli abiti, tenerli lontani dalla catena, cuscinetto e
altre aree lubrificate.
• Fare attenzione a non danneggiare il pavimento.
I piedi del sostegno possono danneggiare il pavimento. Inoltre i cuscinetti di
gomma delle gambe possono scolorire il pavimento se sono lasciati nella stessa
posizione per lunghi periodi. Si consiglia di usare questo sostegno su una
moquette spessa o su un tappetino appropriato.
• Gebruik dit product uitsluitend voor het spelen van muziek.
• Draai de bouten stevig vast voor u gaat drummen.
• Ga voorzichtig met de standaard om.
Steek uw handen of voeten niet onder de poten van de standaard of tussen het
mechanisme, de ketting of de scharnieren, om verwonding te voorkomen.
• Pas op met verroeste of afgebroken metalen onderdelen, want u zou zich
daaraan kunnen snijden.
• Bedien het pedaal niet als u geen schoenen draagt.
• Houd uw kleding uit de buurt van de ketting, glijlagers en andere
onderdelen met olie of smeervet.
• Let op dat de vloer niet beschadigd wordt.
De poten van de standaard zouden de vloer kunnen beschadigen. En als de
rubber doppen van de poten te lang op één plaats blijven staan, kan het
vloermateriaal hierdoor verkleuren. Het is aanbevolen deze standaard op te
stellen op een stevige mat of dik tapijt.
• No utilice este producto para nada que no sean actuaciones en directo.
• Apriete los pernos antes de realizar cualquier actuación.
• Utilice con precaución.
Par evitar lesiones, mantenga los pies y las manos del pedestal y de los
engranaje, de los pedales, y de las bisagras de dichos pedales.
• Para evitar lesiones, evite el contacto físico con metales oxidados o dañados.
• No accione el pedal sin el calzado apropiado.
• Para evitar manchar su ropa, manténgase alejado de las cadenas, cojinetes,
y demás áreas lubricadas.
• Tenga cuidado para no dañar el piso.
Además, los amortiguadores de caucho de las patas pueden descolorar el piso
si deja la unidad en el mismo sitio durante mucho tiempo. Se recomienda
utilizar este soporte sobre una moqueta gruesa o una alfombra apropiada.
• Ce produit est exclusivement destiné à être employé dans un kit de batterie
et à des fins musicales uniquement.
• Avant chaque séance d’entraînement ou chaque performance, veillez à
resserrer tous les boulons.
• Soyez prudent afin d’éviter toute blessure.
Veillez à ne pas vous blesser les mains ou les pieds sur les pieds du stand, les
pignons, les chaînes et les articulations.
• Pour votre sécurité, évitez tout contact avec des pièces rouillées ou
autrement endommagées.
• Ne jouez jamais de la batterie sans porter des chaussures adéquates.
• Afin d’éviter de souiller vos vêtements, veillez à ne pas laisser ces derniers
entrer en contact avec la chaîne, le roulement, ou d’autres pièces lubrifiées.
• Veillez à protéger le sol.
Notez que les crampons du stand pourraient endommager le sol. De même, le
caoutchouc des pieds du stand pourrait entraîner une décoloration du sol si le
stand est installé au même endroit pendant une longue période. Veuillez placer
un morceau de moquette épaisse ou un tapis prévu à cet effet sous le stand afin
de protéger le sol.
• 演奏以外の目的に使用しないで下さい。
• ネジ類は演奏する前に、しっかりと締めて下さい。
• 取り扱いには十分注意して下さい。
脚部先端剣先や、ギアー、チェーン部、プレートのヒンジ部などに触れる場合は、
ケガをする恐れがありますので、十分に注意して下さい。
• サビや金属の劣化により傷ついた部分に触れてケガをしないように注意して下さい。
• はだしで演奏しないで下さい。
• チェーンやベアリング部には潤滑油が使われています。衣服に付着する恐れがあり
ますので、十分にご注意下さい。
• 床面を傷つけないように、ご注意下さい。
脚部先端の剣先等を使用する場合、床面を傷つけます。また脚ゴムを、長期間同じ
場所に設置すると、床面に色移りします。ご使用の際はあらかじめ厚手のカーペッ
トや専用マットを敷いた上で設置されることをお勧めします。
HH905 LEVER GLIDE / HH805 VELO GLIDE
取り扱い方法
How to assemble /
This Hi-Hat Stand is packaged for shipping. Detach the clutch from the top and pull the cymbal rod out.
1.
このハイハットスタンドは、あらかじめ運搬し易い形に組み立ててあります。上段部はクラッチを外し、シンバルロ
ッドを抜きます。
Dual leg setup
The Hi-Hat Stand stands on two legs with rubber padded feet and one rubber stabilizer that is
extends from the base flame under the pedal plate.
2.
デュアルレッグ
このハイハットスタンドは、2本の脚の先端のラバー部 2 点と、ベースフレームからペダルプレートの下へのびた部
分のラバー部(スタビライザー)の3 点で自立する構造です。
Extend the legs outward and stand the stand on the floor.
3.
下段部の脚部を開き、スタンド本体を床面と垂直に立てます。
Attach the cymbal rod. Tighten the black plastic nut is attached to the bottm end of the cymbal rod.
4.
シンバルロッドを取り付けます。シンバルロッドの下部に取り付けられている黒い樹脂製ナットを指で締めて固定します。
Fit the top pipe over the cymbal rod and into the bottom pipe.
5.
シンバルロッドを通すように、上段パイプを下段パイプへ差込 みます。
Fit the bottom cymbal over the cymbal rod and set on the Hi-Hat bottom.
6.
ボトムシンバルを、シンバルロッドに通してハイハットボトムに乗せます。
Attach the top cymbal to the Hi-Hat clutch and lock it to the cymbal rod.
7.
ハイハットクラッチにトップシンバルを取り付け、シンバルロッドに通して固定して下さい。
Pedal plate angle adjustment
The pedal plate angle can be adjusted to suit the user. Loosen the square headed bolts1 with the
turning key. Then, slide the backside cover of the frame up/down until
the pedal is at the desired angle and retighten the bolts1. (Be sure both
bolts are parallel when tight.)
8.
ペダルプレート角度調整
ペダルプレートの角度を調整できます。角頭ボルト 1をチューニングキーで緩め、
フレーム部の背面カバーの位置を手で上下にずらすと、ペダルプレートのアングルが
連動して調整できます。適当な位置で角頭ボルト1 を締めて固定して下さい。(この
時2 本の各頭ボルト 1が、水平に固定されるようにボルトを締め付けて下さい。)
Spring tension adjustment
Spring tension can be adjusted to any of 5 steps. Raise the tension lever and turn the adjuster to the
desired tension. Then, lower the lever. Turning the adjuster to the right
increases tension, whereas to the left decreases it.
5段階テンション調整
スプリングのテンションを5 段階に調整できます。テンションレバーを手で持ち
上げ、調整部を回転させ、お好みの位置でレバーを降ろして下さい。右へ回すと
テンションが強くなり、左へ回すと弱くなります。
9.
Stabilizer adjustment
Stand stability is adjusted from the stabilizer. First, raise the pedal plate as if to flip it over backwards
and loosen the two square headed bolts3 on the stabilizer. Then, pull the rubber to the desired
position and retighten the bolts.
スタビライザー
スタビライザーの位置の調整により、演奏中の安定感を高めることができます。
まずペダルプレートを折りたたむように持ち上げ、ベースフレームからペダルプ
レートの下にのびているスタビライザーの2 本の角頭ボルト 3を緩め、ラバー部
を手で引き伸ばして下さい。適当な位置で角頭ボルト 3を締めて固定して下さい。
11.
Once the stand is set up, check all bolts and nuts are tight before use.
各アングルのセッティングがすべて終わったら、演奏前に必ずもう一度各調整ボルト&ナ
ットをしっかりと締めて固定してください。
13.
メインテナンス
Maintenance /
Duospike length
Legs have a rubber padded foot and a spike to keep the stand from walking. We call this the
"Duospike". To adjust the projected length of the Duospike, loosen the square
headed bolt2 until the spike is the desired length and then retighten it.
デュオスパイク
脚部先端は、スタンドのウォークを防止するため、脚ゴムとスパイクを併用できるデュオスパイク
を採用しています。角頭ボルト 2を緩め、スパイクの出具合を調整し、しっかりと固定して下さい。
10.
OCT03637
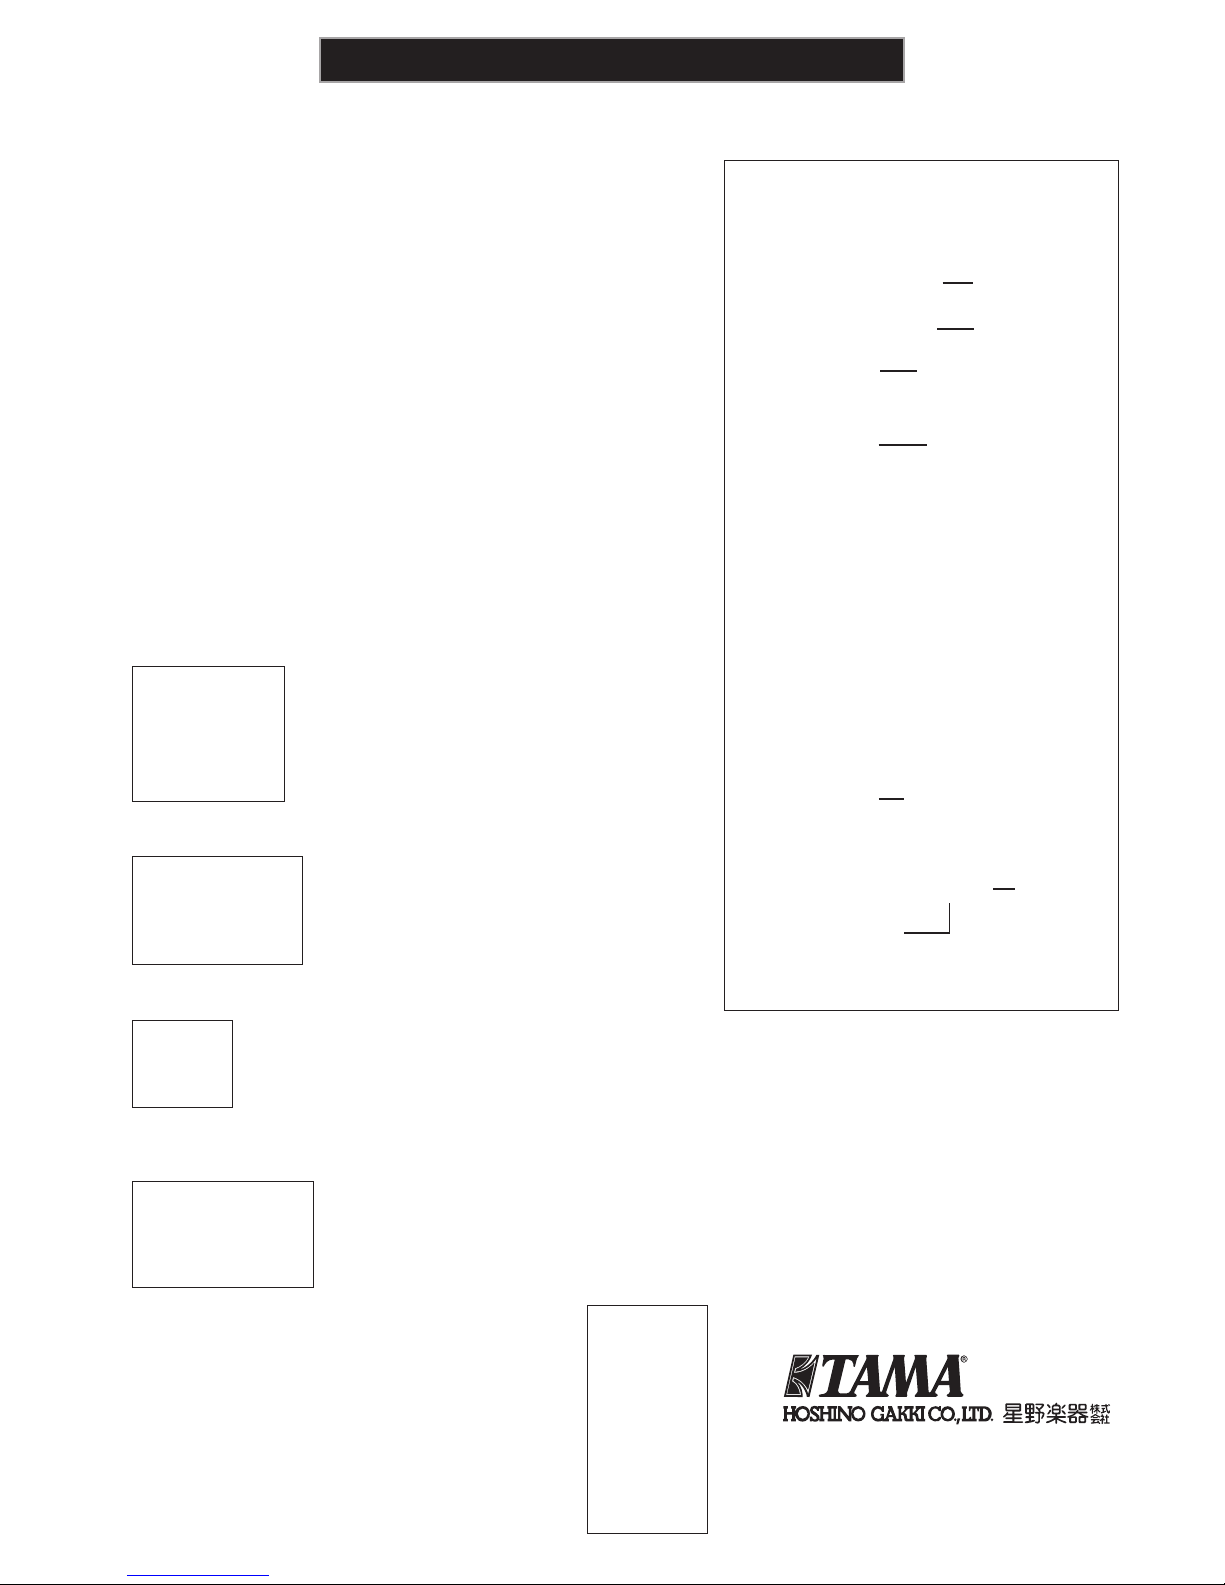
Hi-Hat Clutch
ハイハットクラッチ
Cymbal Rod
シンバルロッド
Pedal Plate
ペダルプレート
Hi-Hat Bottom
ハイハットボトム
Base Frame
ベースフレーム
Stabilizer
スタビライザー
Top Pipe
上段パイプ
Tilt adjustment
Tilting the stand is another way to adjust high hat angle. Loosen the bolts4
that adjust leg extension and slide the slider downward so that the legs extend
farther out. Retighten the bolts when the stand is suitably tilted.
ティルトシステム
スタンド自体をプレイヤー側へ傾けることで、ハイハットのトップシンバルの角度を調整
することができます。脚部の開きを調整するボルト 4を緩め、脚をより広げるようにスラ
イダーを下方向にずらすと、スタンド本体が前傾します。適当な位置でボルト 4をしっか
り締めて固定して下さい。
12.
4
1
Backside
Cover
背面カバー
Tension Lever
テンションレバー
Adjuster
調整部
2
3
To ensure parts move smoothly over time, periodically wipe
off dust with a dry cloth and lubricate the chain and hinges
with TOL2 tune-up oil by TAMA. The bearing is packed in a
special grease, therefore it does not need further lubrication.
•
より長く滑らかなアクションをお楽しみいただくために、時々乾いた
布でほこりを拭い、チェーンには、オイルを(TAMA チューンナッ
プ・オ イル : TOL2)をさして下さい。ベアリング部にはあらかじめ専
用のグリスが注入されていますので、オイルをさす必要はありません。
Bolts for the Duospike and plate angle adjuster can loosen
during use and transport. Tighten as necessary with the
turning key.
•
デュオスパイクやプレートアングルアジャスターなどのボルトは、
演奏中や移動運搬中の振動で若干緩むことがあります。チューニン
グキーで時々増し締めして下さい。
This instruction manual was issued in July 2009.
Specifications and design are subject to change without notice.
この取り扱い説明書は2009 年 7月現在のものです。商品改良のため予
告無く仕様を変更することがありますので、あらかじめご了承ください。
〒 461-8717
愛知県名古屋市東区橦木町3-22
http://www.tama.com
 Loading...