

Page 1
Page 2

Contents
1 - Introduction…………………………………………….………………………………………………………… 2
1.1 About this this manual ………………………………………………………………………………...……… 2
1.2 Configuration …………………………………………………………………………………………………… 2
1.3 SMS Functions ………………………………………………………………………………………………… 2
1.4 Product Information …………………………………………………………………………………………… 2
1.5 System Requirements ………………………………………………………………………………………… 2
2 – SMS Installation …………………………………………………………...…………………………………… 3
2.1 How to install …………………………………………………………………………………………………… 3
3 - SMS ………………………………………………………………….………………………………..………… 5
3.1 General …………………………………………………………….……….………………………………..… 5
3.2 SMS Configuration …………………………………………………..……………………………………..… 5
3.3 SMS Functions ………………………………………………………...…….……………………………..… 6
3.3.1 Remote Site List ………………………………………………………………………………………… 6
3.3.2 Event List ……………………………………………………………………………..….………………… 11
3.3.3 Status ……………………………………………………………………………..…………..…………… 11
3.3.4 e-Map ……………………………………………………………………………….........………………… 12
3.3.5 Config ………………………………………………………………………..………………..…………… 14
3.3.6 Backup ……………………………………………………………………………………….…..………… 17
4 – Live Viewer … … … … … … … …… … … … … … … … … …… … ..… …… .….……………... 21
4.1 General … … …… ……… ……… ……… …… … …… … ……… …… … …… … …… … … ...…… 21
4.2 Live Viewer Configuration …… …… …… … …… …… …… … …… … …… …… …… … …… … 21
4.3 Live Viewer Functions ……………………………………………………………………..…… 22
4.3.1 Remote Site List ………………………………………………………………………………...……… 22
4.3.2 Video Monitoring Area ……………………………………………………………..………………..…… 24
4.3.3 Utility …………………………………………………………………………………………………..…… 26
4.3.4 Search ……………………………………………………………………………………………....……… 28
5 – Search Viewer ……………………………………………………………………………………………..…… 30
5.1 General ………………………………………………………………………………..………………...……… 30
5.2 Search Viewer Configuration …………………………………………………..………………………..…… 30
5.3 Search Viewer Functions …………………………………………………………………….……......……… 31
5.3.1 Local Search ……………………………………………………………………………………..………… 31
5.3.2 Remote Search ………………………………………………………………….………………...……… 31
5.3.3 AVI File Conversion ………………………………………………………………………………………. 32
6 – DVR Player …………………………………………………………………………………………...………… 33
6.1 General ………………………………………………………………...……………..………………………… 33
6.2 DVR Player Functions …………………………………………………………………………………....…… 33
7 – Web Viewer ………………………………………………………………………………………….…………. 34
7.1 Web viewer Configuration ……………………………………………………………………………….….… 34
7.2 Web Viewer Functions ……………………………………………………………………………..…………. 34
1
Page 3

1. Introduction
1.1 About this manual
This manual describes the functions and provides a step by step guide in operating SMS (Server
Management Software), a software used to remotely monitor and manage a DVR.
1.2 Configuration
The SMS package consists of the SMS, Live Viewer, and Search Viewer programs.
SMS: Main Management Program
Live Viewer: Remote Monitoring and Auxiliary Video Play Program
Search Viewer: Remote Search Program
1.3 SMS Functions
Checks and reports the status of a DVR system from a remote site
Reports the detection of an event from a remote site
Remotely monitors a real-time video
Searches and plays recorded images by time and event
Features E-MAP function
Provides a variety of backup tools from a remote site
Allows recording and remote setting of a camera
Upgrades a DVR firmware from a remote site
1.4 Product Information
SMS Software User Guide
SMS Installation CD-ROM (1 diskette)
1.5 System Requirements
OS: Microsoft Windows XP or higher
CPU: Intel Processor Dual core 1.3GHz or higher
Memory: 2GByte or higher
Graphic: 256MB or higher
2
Page 4
2. SMS Installation
2.1 How to install
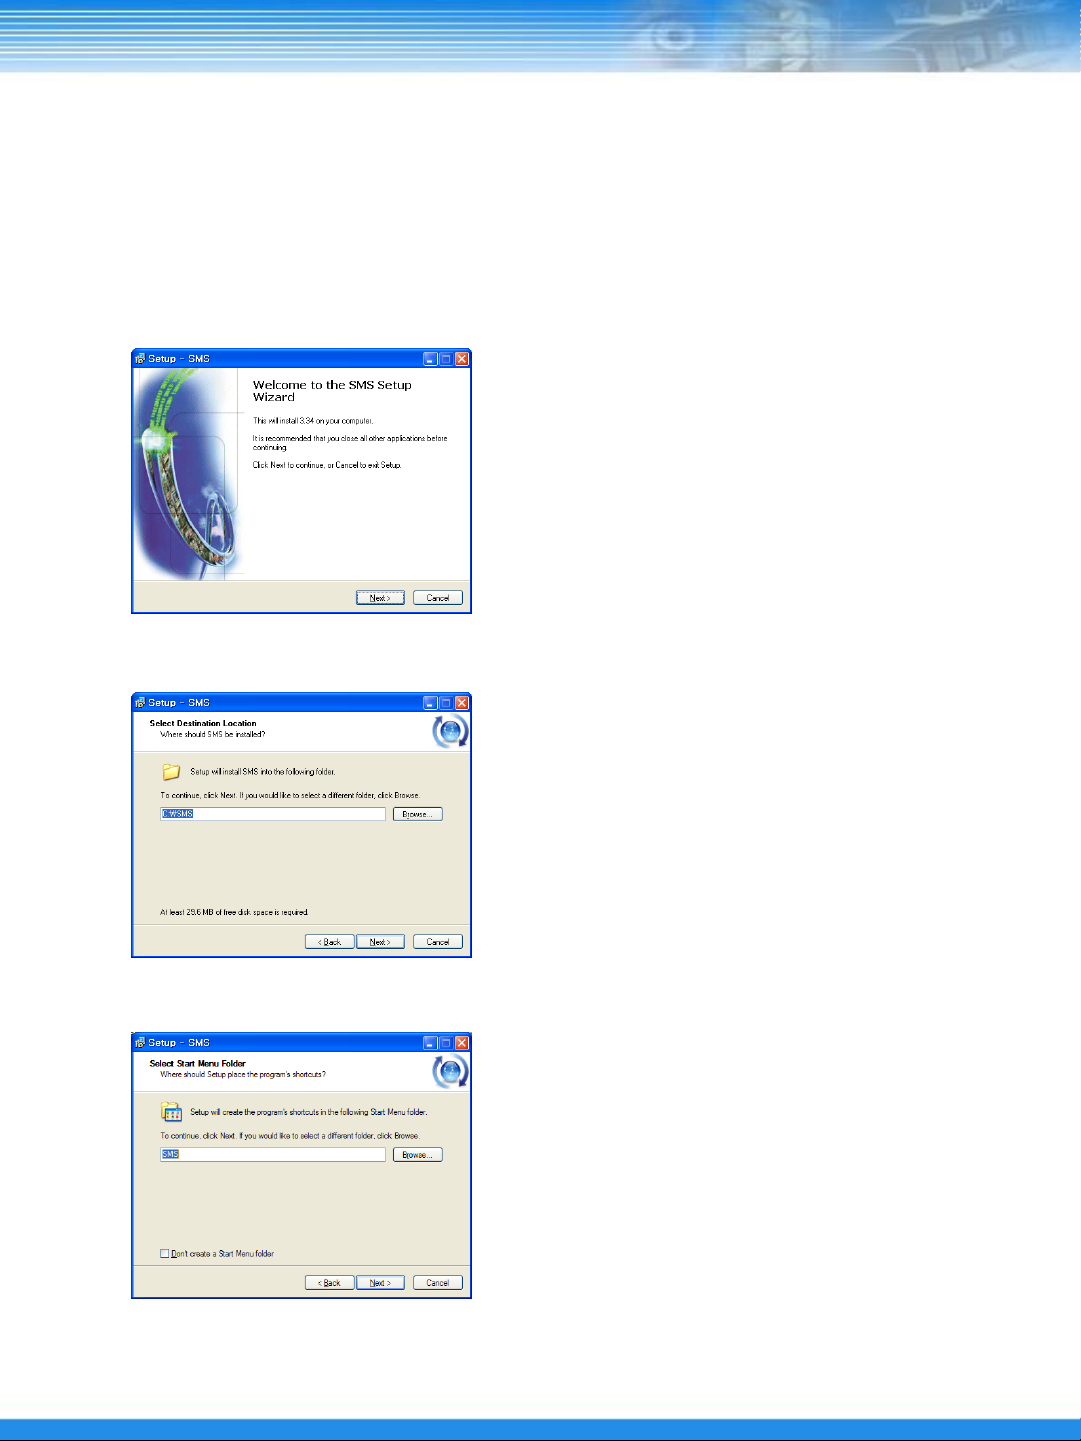
① Set the Installation CD on the CD-ROM drive.
② Browse the content of the CD and click on the “Setup.exe” file.
③ On the SMS Setup Wizard dialogue box that is displayed, click on the “Next” button.
④ Set the installation path, and click “Next”.
⑤ Set the name of the Start Menu folder, and click “Next”.
3
Page 5
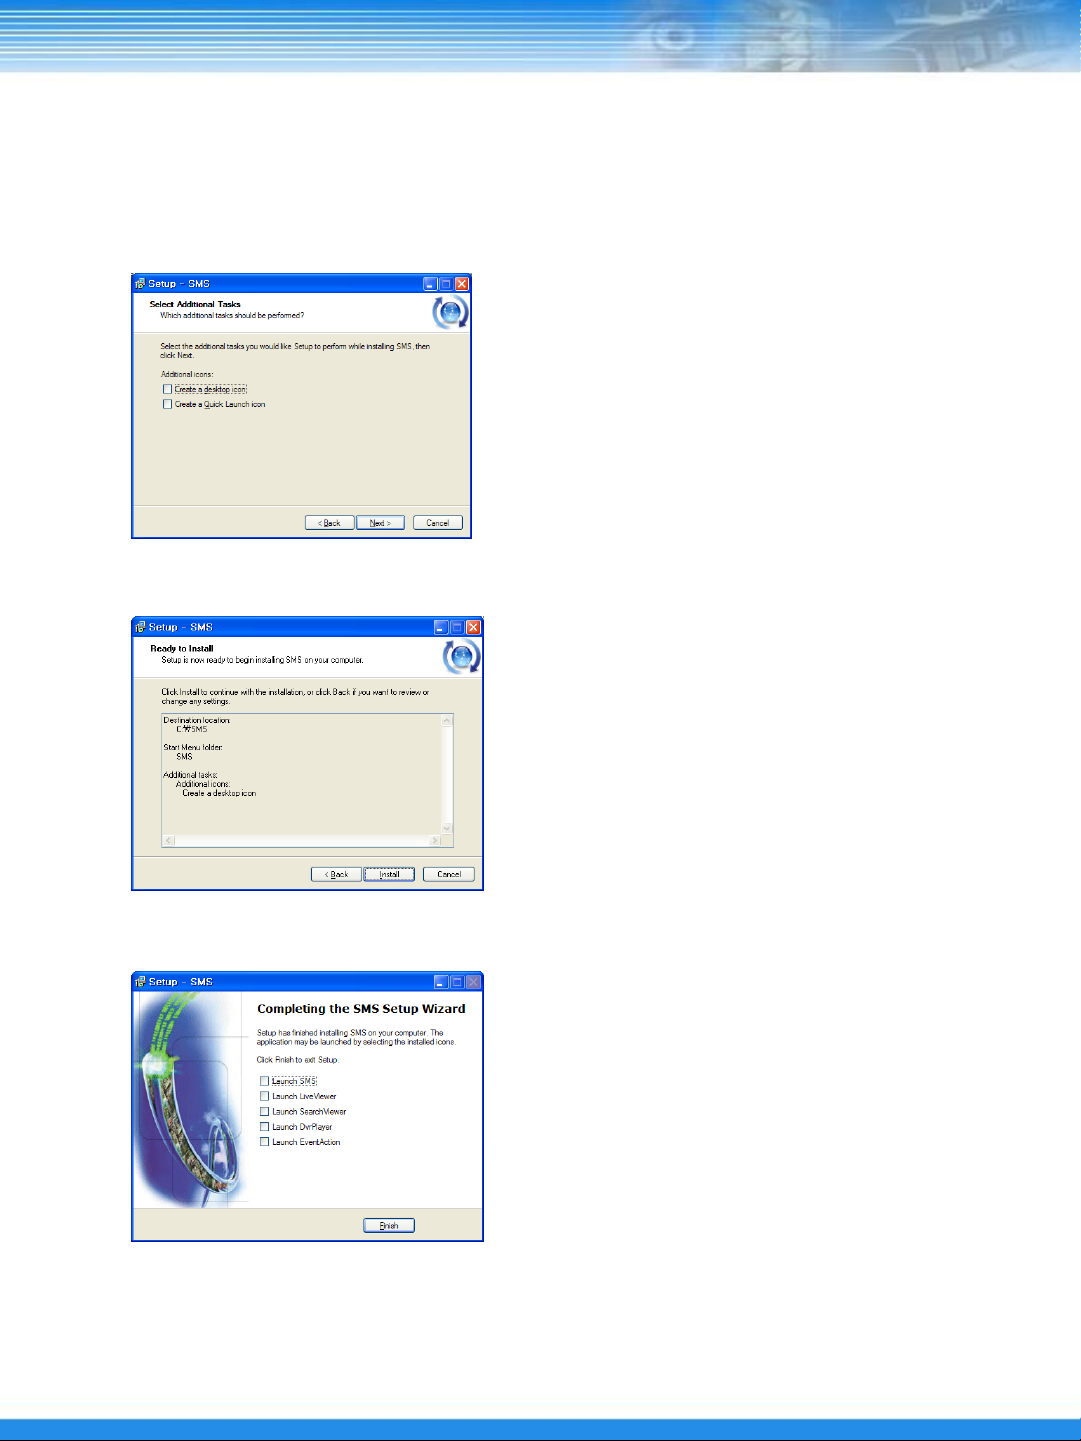
⑥ Select the additional tasks to be performed by marking the appropriate options, and click “Next”.
⑦ Check the installation settings, and click “Install” to proceed with the installation.
⑧ When the window below is displayed, click on the “Finish” button to complete the installation.
4
Page 6
3. SMS
3.1 General
SMS is an integral software that can control the DVR system status management, real-time video
monitoring, e-Map, DVR system setting, and DVR backup from a remote site.
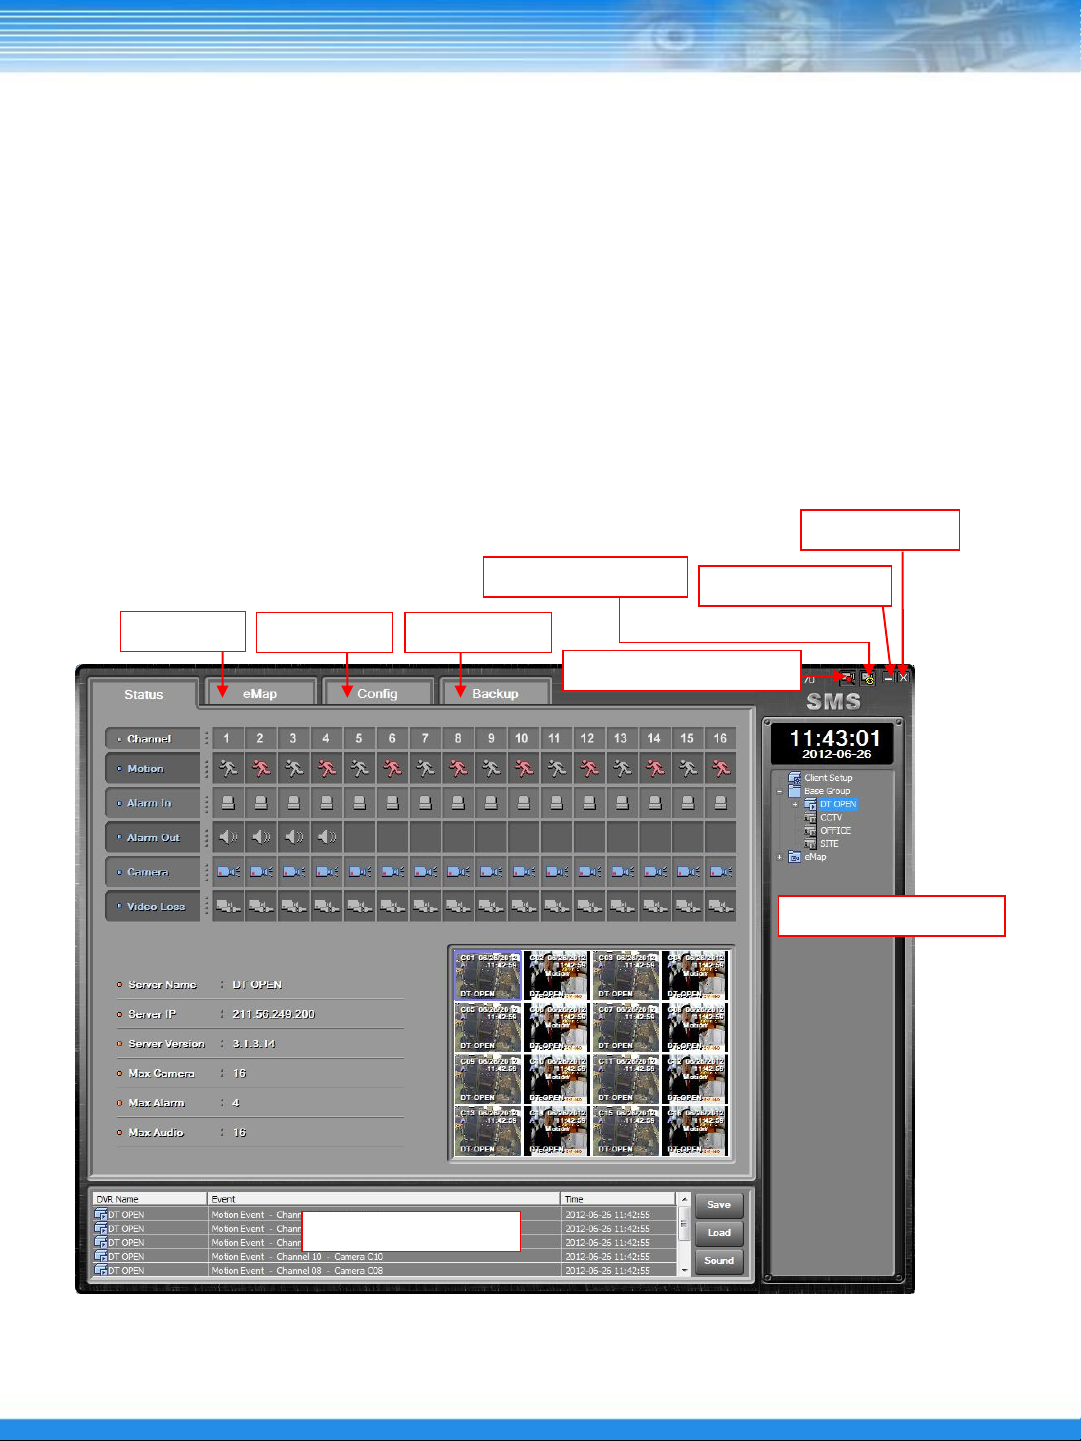
3.2 SMS Configuration
The SMS window features the List of Remote Sites and List of Events sections found at the right side and
bottom of the window. It has the following tabs, Status, e-Map, Config, and Backup, as shown below:
Close Button
eMap Tab
Got to Live Viewer
Config Tab Backup Tab
Minimize Button
Go to Search Viewer
List of Remote Sites
List of Events
5
Page 7

3.3 SMS Functions
3.3.1 Remote Site List
SMS software can register multiple DVRs as a list and connect them to use.
A. DVR Group
The List of Remote Sites manages DVR items as a group;
the Base Group is created during initial installation.
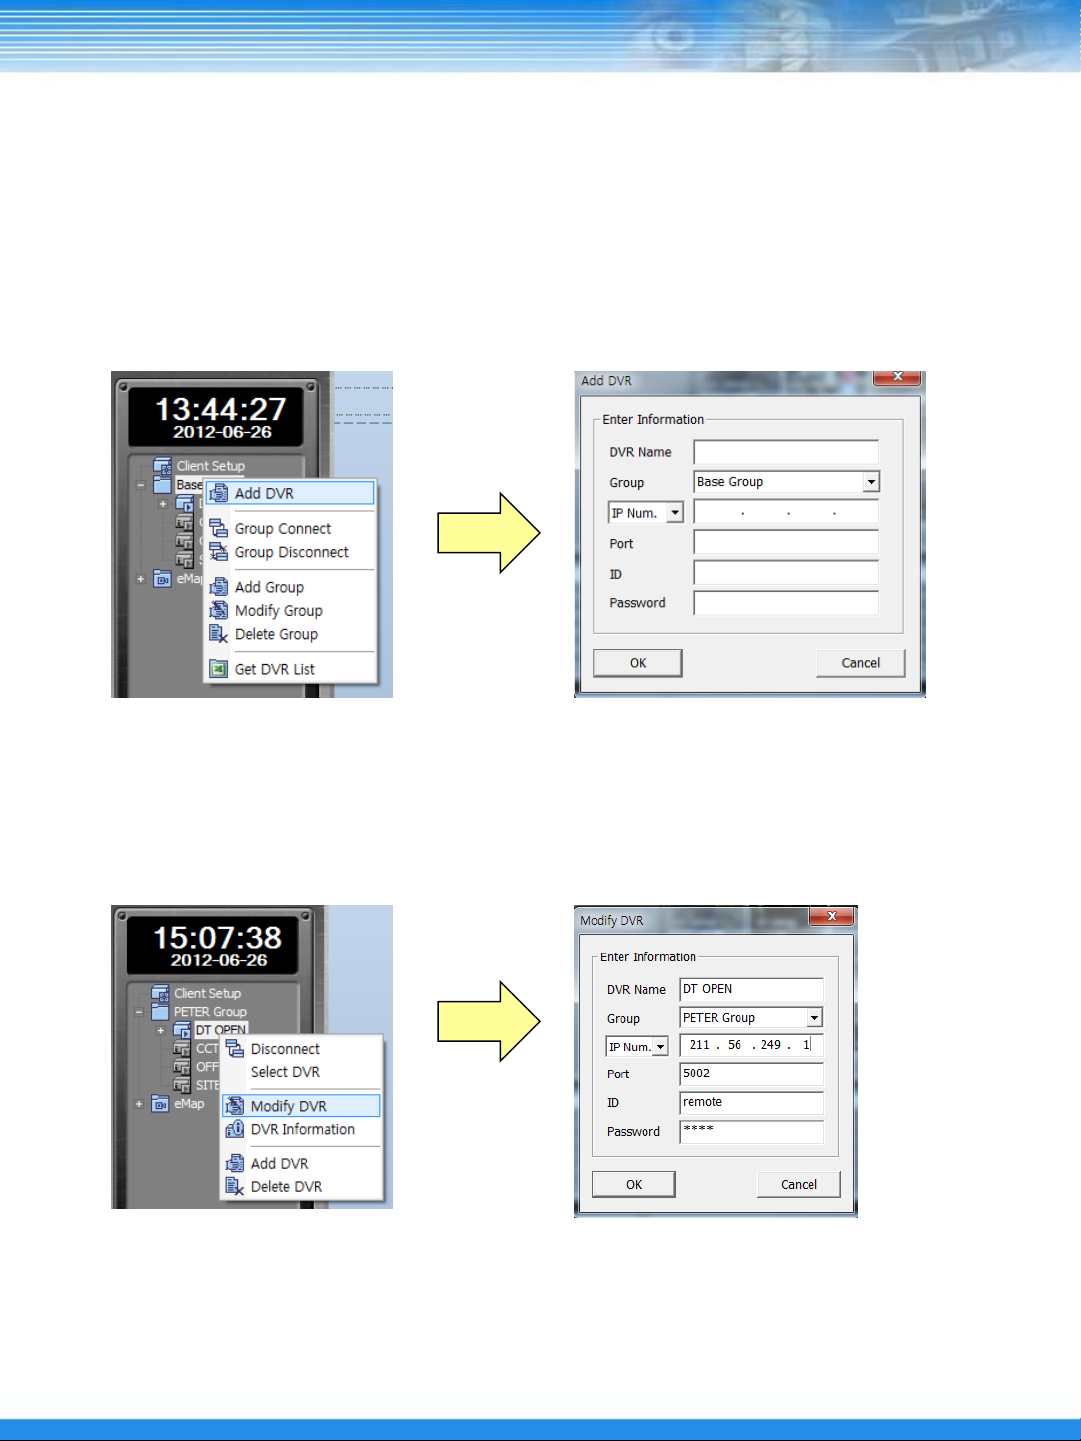
① ADD Group
: Click the right mouse button on the [Base Group] and select [Add Group].
Input any group name and click the [OK] button to add.
② Modify Group
: Click the right mouse button on the created group and select [Modify Group].
Change the group name and click the [OK] button.
③ Delete Group
: Click the right mouse button on the created group and select [Delete Group].
NOTE
: If any DVR, which is included in the created group is connected, the group cannot be deleted.
6
Page 8
B. DVR List
① Add DVR List
Click the right mouse on the [Base Group] and select the [Add DVR]
Input the DVR information for connection.
NOTE : Default Port : 7000 , ID : remote , Password : 1111
② Modify DVR
Click the right mouse on the created DVR list and select the [Modify DVR]
③ Delete DVR
Click the right mouse on the created DVR list and select the [Modify DVR]
7
Page 9
④ Move DVR List
: To move the added DVR list into a different group, simply drag and drop the list into the desired group.
NOTE : Drag-and-drop is the action of clicking on an item using the left mouse button and
dragging it to a different location.
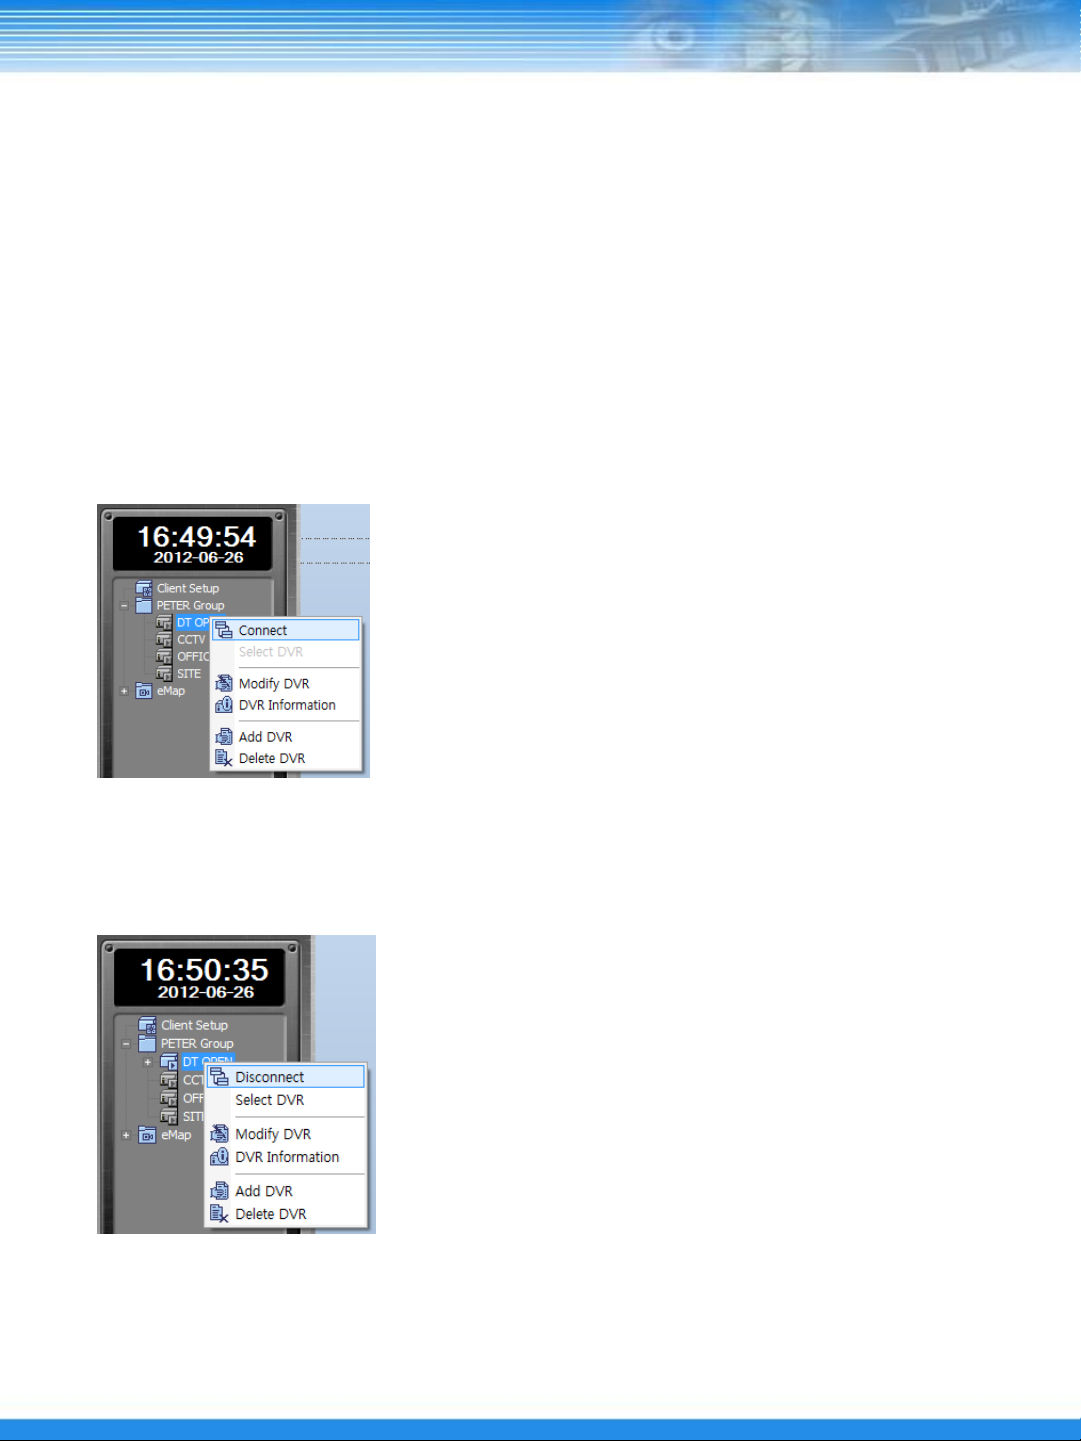
⑤ Connect DVR
: Click the right mouse on the DVR list and select [Connect] or double- click on the DVR list.
⑥ Disconnect DVR
: Click the right mouse on the connected DVR and select [Disconnect] button.
8
Page 10
C. E-MAP
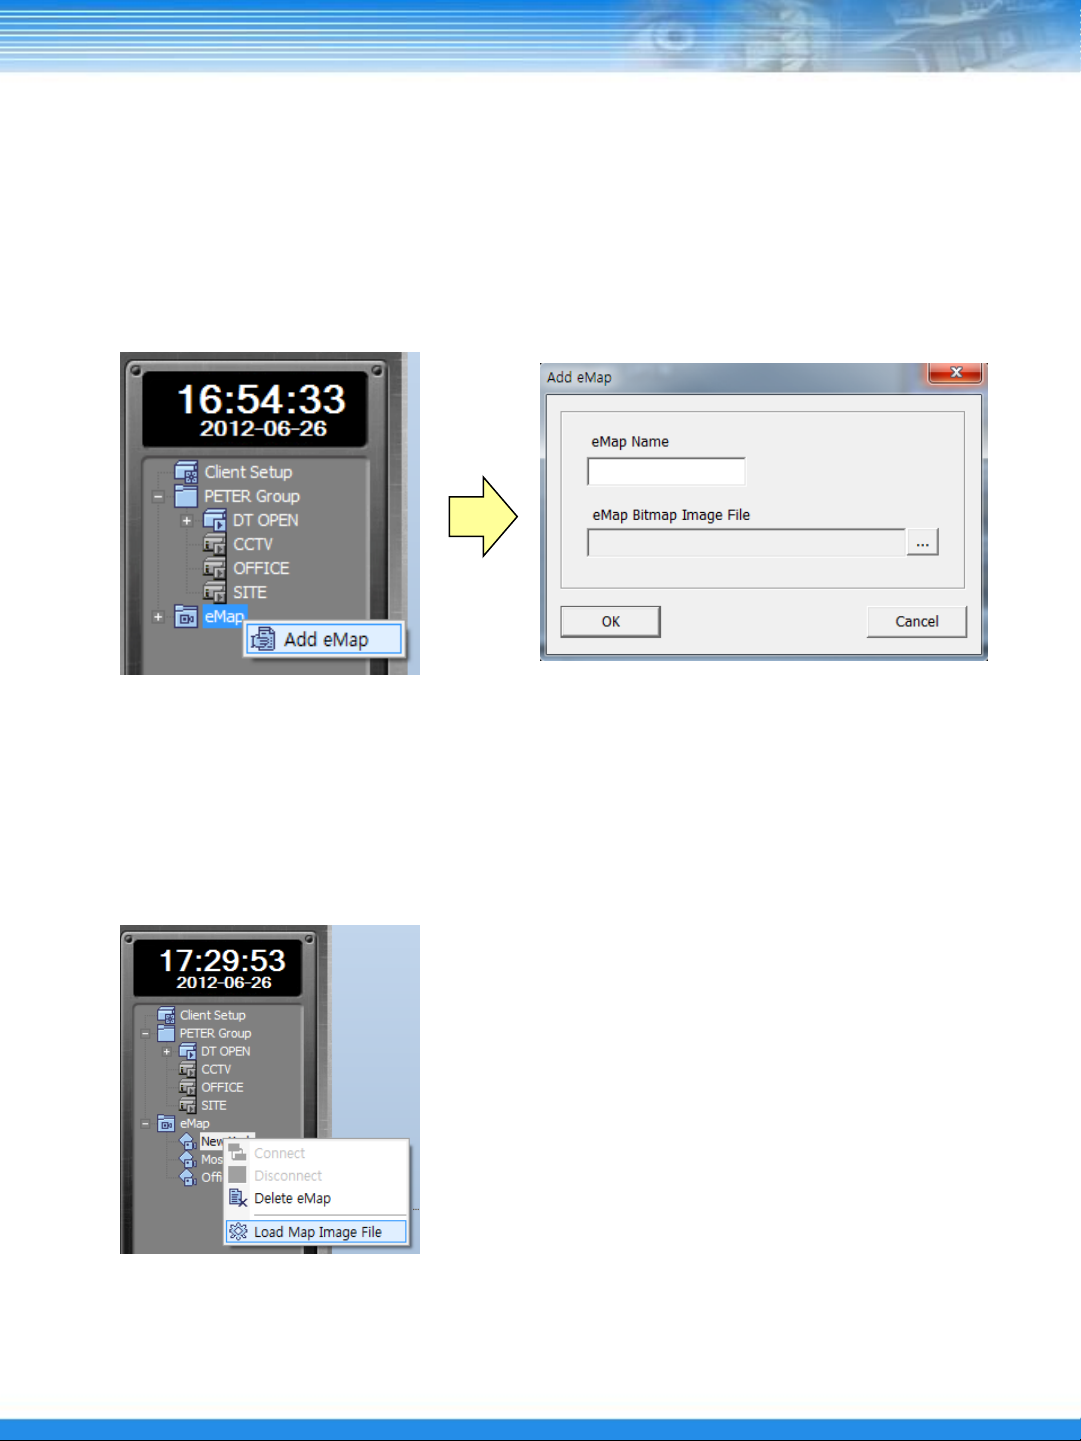
① Add eMap
: Click the right mouse on the [eMAP] menu and select [Add eMap].
Input the emap name and select the e-map that saved on PC.
NOTE : SMS only supports a bitmap image.
② Change eMap Image
: Click the right mouse on the registered eMap and select [Load Map Image File]
then select the image file to be changed.
③ Delete eMap
: Click the right mouse on the eMap and select [Delete eMap].
9
Page 11
D. Client Setup
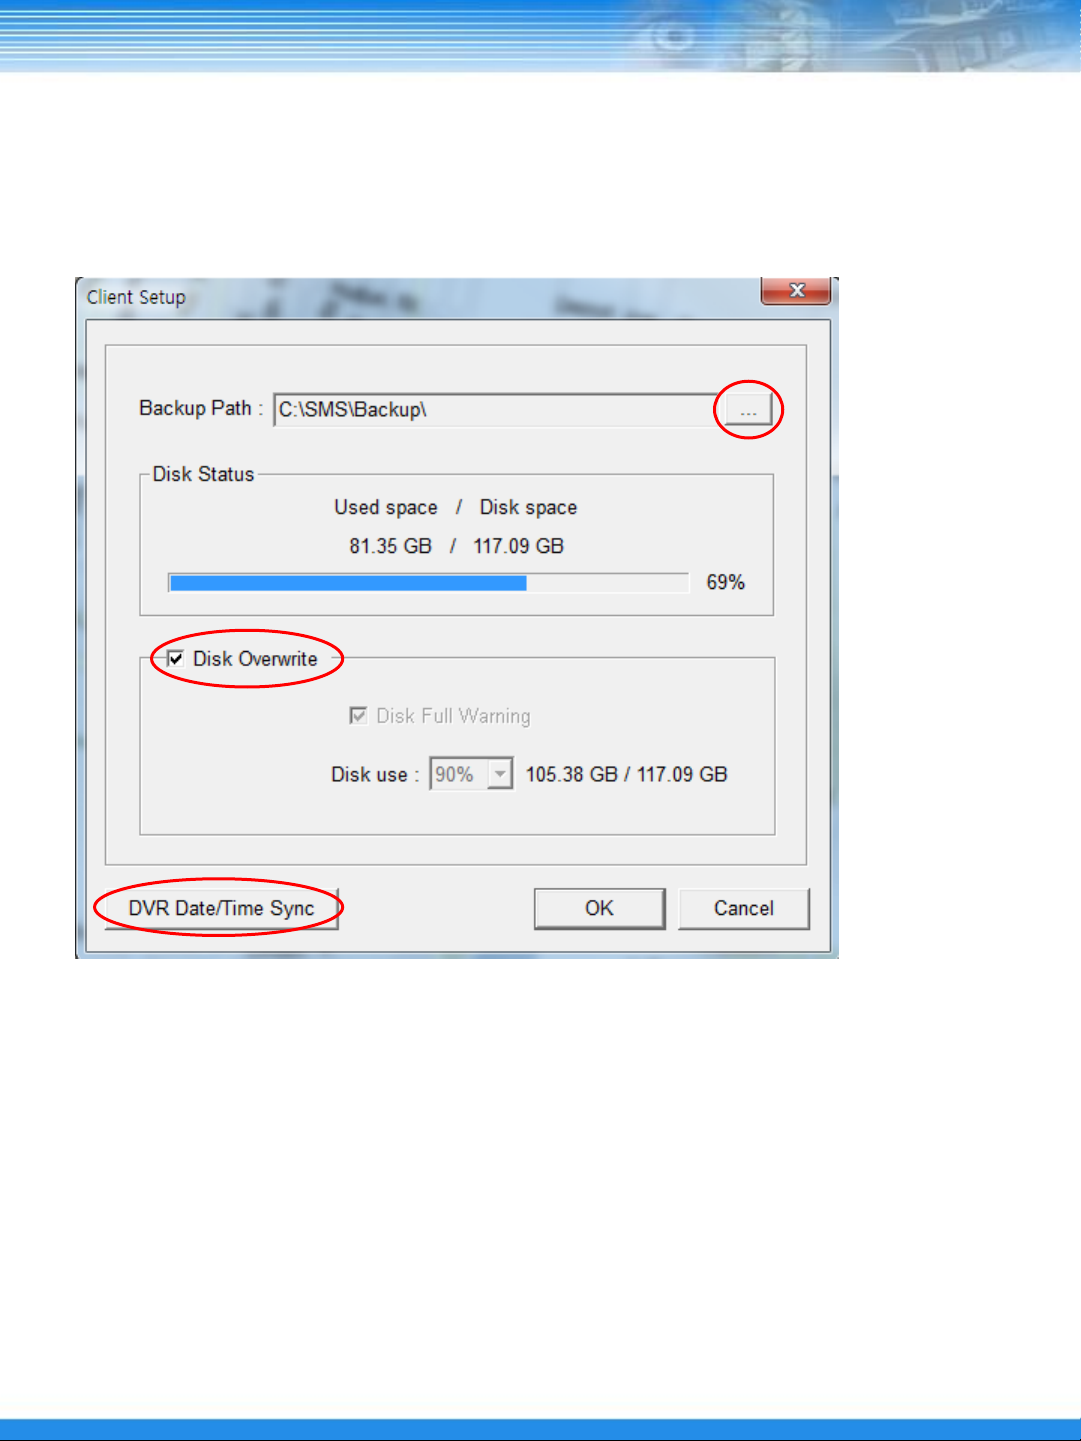
Double click the [Client Setup].
a
b
c
a. Backup Path : Select the path to save backup data on PC.
Disk Status : Display disk space and used space.
b. Disk Overwrite : Check to overwrite HDD.
Disk Full Warning : If not check [Disk Overwrite] option, when HDD is full, there will be a warning.
Disk use : Select the HDD usage for disk full warning.
c. DVR Date/Time Sync
: If click the DVR Date/Time Sync button, can change the time setting of DVR according to NTP Server
/ Time Zone / User Input.
NOTE : To apply the changes of the Client Setup, a separate password is required. This password
is used commonly throughout the SMS software. The password is set to 1234 by default.
10
Page 12

3.3.2 Event List
Event list display events that occurred from DVR that are connected in a list.
① Save
Click the [Save] button to save the event information displayed in the current event list to the Log folder
that is created as the Backup Path during the Client Setup.
② Read
Click the [Load] button to load the event list form the Log folder.
3.3.3 Status
System Status Information Area
Real-time Video
Monitoring Area
DVR Information Area
① System Status Information Area
Displays the motion, alarm input/output, camera connection status, and video loss information.
② DVR Information Area
Displays the basic information of the connected DVR.
③ Real-time Video Monitoring Area
Displays all cameras of the connected DVR.
11
Page 13

3.3.4 e-Map
By placing a camera at a virtual map and monitoring the video real-time, e-Map enables a user to
remotely monitor more intuitively the location via video of the camera.
Map Image in Bitmap
format
Camera
Video
Viewer
① Place Camera
: Drag-and-drop the camera of the connected DVR into a desired location on the map.
NOTE : The positioned camera color : Gray – No connection. Blue – Connected. Red – Event.
The camera cannot be relocated once positioned, but the video viewer is movable.
The positioned camera is automatically added to eMap as shown below:
12
Page 14

② Delete Camera
: Click the right mouse on the positioned camera and select [Delete Camera].
Once the camera is deleted, it is deleted from the eMap of
the remote site list as well.
③ Video Viewer
Select [View Live] from the hot menu of the positioned camera or double-click on the camera to
display a viewer window as shown below:
To close the viewer window, reselect [View Live]
or double-click on the camera.
④ Hot Menu
Sets the size of the viewer.
The viewer is enlarged to X4 when an event occurs and
an alarm sound is generated.
Enlarges or reduces the video digitally.
Paly Live audio.
Set the displayed text information on video .
Print the image or capture and save it as an image file.
Save video on PC (The save folder is [Live] folder)
Close the camera viewer.
13
Page 15

3.3.5 Config
The config function can change DVR setup remotely.
NOTE : For the DVR setup from Config, refer to the DVR manual.
① Select Server
Select the currently connected DVR for change setup.
② Save
Click the Save button and select a save path in the PC where the currently set data is to be saved
③ Open
Click the Open button and select the saved setup file to read the saved setup data.
14
Page 16

④ Setup Server
Click the [Setup Servers] button to apply the setup to DVR.
NOTE :
If NETWORK Accept is checked, the
A
B
NOTE
: Before the setup application window appears, you will be prompted to enter a password.
The password is the same as the one used for the Client Setup. (Default = 1234)
C
network setup is also applied. If the
same network setup is applied to
multiple DVRs, there may be problems
caused by IP address conflict.
A. Select the DVR for changing setup by double click under group.
If multiple DVRs are added, the same setup is applied to all the added DVRs.
B. Click the [Config] button and click the [OK] button when appears [Remote Configuration] message.
15
Page 17

C. DVR Check
Check the connected DVR version.
⑤ S/W Upgrade
Click the [S/W Upgrade] button for DVR firmware upgrade.
A
B
A. Select the DVR for firmware upgrade by double click under group.
B. Click the [Upgrade] button and click the [OK] button when appears [Remote Upgrade] message.
NOTE
: Before the setup application window appears, you will be prompted to enter a password.
The password is the same as the one used for the Client Setup. (Default = 1234)
16
Page 18

3.3.6 Backup
SMS Backup supports four modes: Direct, Event, Schedule, and CD Backup.
A. Direct Backup
: Direct Backup can backup directly based on date and time.
①
②
⑤
③
④
⑥
① Select Server : Select the connected DVR for backup.
② Select Date: Select the data. (The date with recorded video is activated in blue)
③ Select Time: Select the start and end times for backup by the icon.
④ File Information: Click the [Accept] button then the recording information is displayed on [Channel List].
⑤ Select Channel: Double-click the channel then the selected channel move to the [Download List].
⑥ Start Backup: Click the Start Download button to start the Direct Backup.
If the backup is completed, double-click on a corresponding item to play a video being coupled with a DVR
player.
17
Page 19

B. Event Backup
: Event Backup can backup with an event that occurred at a specified time.
①
②
④
③
⑤
NOTE : From the event setup operation of the DVR menu, the video transmission function should
be activated.
① Select Server : Select the connected DVR for backup.
② Select Channel: Select a channel for backup.
③ Select Time: Select the start and end times for Event Backup.
④ Select Day: Select a day when the Event Backup is activated.
⑤ Add Event Backup : When click [Add Event Backup] button, the set items are added in the
[Download List] and Event Backup is started automatically.
NOTE :
The time and day being set for Event Backup is based on the default settings of the user’s PC.
18
Page 20

C. Schedule Backup
: Schedule Backup can backup the specified recorded video at a specified time.
①
③
②
④
⑤
① Select Server : Select the connected DVR for the Schedule Backup.
② Select Channel: Select a channel for Schedule backup.
③ Set Time : Select the start and end times for the backup of recorded video.
④ Set Download Start Time: Set a day and time during which the Schedule Backup is to be activated.
⑤ Add Schedule Backup : When click [Add Schedule Backup] button, Schedule Backup is automatically
activated to backup the recorded video.
NOTE : [Set Time] should be done based on a DVR at a remote site, and “Set Time” should be
based on the default settings of the user’s PC.
19
Page 21

D. CD Backup
: The CD Backup function is used to remotely backup recorded video on a CD-ROM in DVR.
①
②
③
④
⑤
⑥
NOTE : CD Backup is only supported for DVR models with CD/DVD Writer.
① Select Server : Select the connected DVR for the CD Backup.
② Select Channel: Select a channel for CD Backup.
③ Set Time: Select the start and end times for the backup of recorded video.
④ Get List : Click the [Get List] button to import the file information of the recorded video set.
⑤ Select List: Check the channel and information of the recorded video and select an item to backup.
⑥ Start Burning : Click the [Start Burning] button to start the CD Backup of the recorded video.
The backed up video is backed up to the CD-ROM in the DVR.
20
Page 22

4. Live Viewer
4.1 General
Live Viewer is a stable remote monitoring software. It can connect multiple DVRs and play real-time and
recorded videos, and monitor up to 64 channels of videos. It can also display event information when an
event occurs at a remote site to help a user search related video.
4.2 Live Viewer Configuration
Live Viewer consists of the Video Monitoring Area, Remote Site List, Event List, and Utility.
Close Button
Video Monitoring Area
Go to SMS
Go to Search Viewer
Minimize Button
Remote Site List
Screen Split
Event List
Utility
21
Page 23

4.3 Live Viewer Functions
4.3.1 Remote Site List
The Remote Site List of Live Viewer is divided into two tabs: the DVR tab for the management of DVR list
and the My PC tab for the management of video list stored on a user’s PC.
A. DVR
The management of DVR list and the Client Setup can be done in the same way as those of SMS. The Live
Viewer has an additional function called “Favorites”, which can manage up to 64 camera configurations
being monitored from the Video Monitoring Area at the moment.
① Connect DVR
Click the right mouse on the DVR to be connected, and select [Connect] button from the hot menu that
is displayed, or double-click on the DVR to get it connected
From the connection completion window, select [All Camera View] to see all camera videos of the
connected DVR via the Video Monitoring Area; select [Custom View] to see the camera videos when
needed.
② Disconnect DVR
Click the right mouse on the connected DVR, and select [Disconnect] button from the hot menu to
disconnect the DVR.
③ Favorites
This function is used to save up to 64 camera lists being monitored through the Video Monitoring Area.
These lists can be added/modified/deleted using the hot menu commands of the Favorites.
22
Page 24

B. My PC
Using the Backup or Real-time Recording function of SMS, the video lists saved on a user’s PC can be
searched easily, and the Windows Explorer-like structure helps find saved videos.
① Backup
The Backup items are the lists contained in the Backup Path set through Client Setup.
- Direct : Video saved through Direct Backup of SMS
- Event : Video saved through Event Backup of SMS
- Live : Video saved through real-time recording
- Schedule : Video saved through Schedule Backup of SMS
② My PC
My PC can find saved videos through the list of storage devices of a user’s PC.
23
Page 25

4.3.2 Video Monitoring Area
Video Monitoring Area can monitor real-time videos of up to 64 cameras, and provide various functions via
the hot menu and utility.
A. Select Video Area
The operation of each video area can be independent. To do this, video area can be selected in three
different ways. The selected video area is turned into blue.
① General Selection: Click the left mouse button on the selected video area.
② Simultaneous Selection: To select No. 1 to 7 video areas at the same time, select the No. 1 video area
via General Selection and then click the left mouse button on the No. 7 video
area while pressing the Shift key.
③ Multiple Selection: Click the left mouse button on the video area selected arbitrarily while pressing the
Ctrl key. Multiple selection of arbitrary video areas is possible.
24
Page 26

B. Play Camera Video
Select a video area to play and double-click on a camera item on the remote site list.
Or, drag-and-drop a camera into a video area to play the corresponding camera video.
C. Hot Menu
If one or multiple channels are selected, hot menu functions are applied to all selected video areas.
• View Single: Changes selected video area to one screen mode.
• Zoom In, Zoom Out: Enlarges or reduces video digitally.
• Live Audio: If an audio input is connected, plays the audio.
• Live Quality: Sets the play quality of video. (SLT model not supported)
• OSD Setup: Sets text information displayed on video.
• Use DirectX: Sets the use of DirectX for the playing of the video.
• Freeze: Temporarily pauses the playing of the video.
• Record : Saves video real-time to PC. The storage folder is the “Live” folder
created as the Backup Path.
• Search: Remotely plays recorded video of the channel currently playing the video.
• Print & Save: Captures a video image to print or save it as an image file.
25
Page 27

4.3.3 Utility
Utility provides a variety of convenient functions, which facilitate more diverse monitoring of the video.
A. Screen Split
Live Viewer supports 11 screen split modes as well as overall screen mode.
When the current screen split mode is 4 screen mode and if 4 screen split mode is reselected, a new 4
screen mode with the next 4 videos is displayed. When the video area is double-clicked, the area is
converted to 1 screen mode, and when the area is double-clicked again, it is converted to the mode prior to
the conversion to 1 screen mode.
B. Video Adjustment Control
Using the slide type control, the video of the selected video area can be adjusted.
Adjusts the number of frames to be played in 1 second
Adjusts the brightness of the video
Adjusts the light and darkness of the video
Adjusts the filter of the video
NOTE : SLT model does not support the number of frames played per second and the video filter.
C. P/T/Z Control
If a camera of which a video is played is P/T/Z camera, P/T/Z control is enabled.
Controls the directional movement
Controls the Zoom In
Controls the Zoon Out
Click the [Advance] button for the Preset, Pattern and other expanded P/T/Z controls.
26
Page 28

C. Alarm Control
This function enables the control of alarm output devices such as emergency light and siren that are
connected to the DVR.
Select the connected DVR
Alarm Control
Based on the number of alarm output devices supported according to DVR model, the control appears.
D. Audio Control
Using the microphone connected to a user’s PC, the remote transfer of audio to a corresponding DVR
is possible.
Select the connected DVR
Audio Control
NOTE : The transferred audio can only be played with DVR and cannot be saved into it.
27
Page 29

4.3.4 Search
Live Viewer provides the Search function that can play videos real-time and videos recorded to DVR and
saved on a user’s PC
A. Local Search
To play a video saved on a user’s PC, double-click it from the [My PC] tab of the Remote Site List.
The video is played at the selected video area. It can also be played using drag-and-drop action.
B. Remote Search
The Remote Search function is used to remotely play recorded video to DVR.
① Single Search
Single Search enables the playing of the video through the hot menu of video area being played.
28
Page 30

② Multi Search
Multi Search enables the playing of the video through the hot menu of DVR item in the Remote Site List.
C. Search Video Control
This controls the playing of the searched video. It can control searched videos in the selected video
area in the same direction and can also control the videos in each video area independently.
29
Page 31

5. Search Viewer
5.1 General
Search Viewer is a software dedicated for the playing of recorded videos. It searches videos recorded to
DVR or the ones saved to a user’s PC. It plays up to 16 videos and provides various play controls for each
video.
5.2 Search Viewer Configuration
Search Viewer consists of the Remote Site List, Search Video Area, Time Search Area, and Utility.
Close Button
Search Video Area
Go to SMS
Go to Live Viewer
Minimize Button
Remote Site List
Screen Split
Time Search Area
Utility
30
Page 32

5.3 Search Viewer Functions
5.3.1 Local Search
The Local Search function is used to search and play video files saved on a user’s PC.
The procedure for searching and playing video files saved on a user’s PC is the same as that of the Live
Viewer.
5.3.2 Remote Search
The Remote Search function is used to remotely play video recorded or saved to DVR, and is available
through the connection via Remote Site List.
A. Video Search
When the connection to DVR is completed via Remote Site List, the video search window appears.
When the date recorded to the connected DVR and the play start time are selected, the searched
video is played at the search video area.
NOTE : In Search Viewer, only one DVR can be connected; multiple connection of DVRs is not
supported.
31
Page 33

B. Time Search
It is possible to move a video part searched through Video Search to another video part at specific time
through Time Search. When a video part is moved to a section where no recording is performed, the
movement to a video part close to that section is made.
5.3.3 AVI File Conversion
AVI file conversion is used to convert a video saved on a user’s PC to an AVI file, which can be played by
commercially available video playing programs.
Converts to AVI File
Prints Video
Select a search video area and select “AVI” from the Utility; the AVI file conversion window then
appears.
32
Page 34

6. DVR Player
6.1 General
DVR Player is a software that is used for playing video files saved on a user’s PC. While backing up using
USB or DVD/CD from DVR, video files are saved together. Thus, video files saved on a user’s PC can be
played without installing the SMS software separately.
6.2 DVR Player Functions
DVR Player functions are the same as those of the Local Search of the Search Viewer.
33
Page 35

7. Web Viewer
7.1 Web viewer Configuration
Screen
Split
Utility
Connect
Disconnect
7.2 Web viewer Functions
Web viewer functions are the same as those of the Live Viewer.
① Adjustment Control ② P/T/Z Control ③ Alarm out Control ④ Search Control
34 34
Page 36

7.1 Network Connect
For using web connection through internet, 7000 and 80 ports should be set as port forwarding at
the Router.
① DVR Web client setup
To connect Web viewer, the [Ethernet] setup on DVR is required firstly.
② Input the IP address or Domain name of DVR
In case of other Web port, input the address as http://test.ddnsdvr.com:XXXX
( ‘XXXX’ is assigned web port number)
③ User Have to allow download ActiveX
In case of Windows not allow to download the ActiveX, Go to the Security Tab on IE and
check all ActiveX to Enable.
④ Input ID & Password then click the Connect button.
35 35
 Loading...