


W
ARNING • PLEASE READ
F
or y
our o
wn saf
ety please read this manual before attempting to operate your new unit.Failure to follow instructions
can result in serious personal injury. Spend a few moments to familiarize yourself with your blower before each use.
MODEL NO. ABA103
SAFETY
OPERATION
MAINTENANCE
Blower-Vac Attachment
USER MANUAL
9096-A10303
BLOWER VACUUM ATTACHMENT WARRANTY
The benefits conferred by this warranty are in addition to all other conditions and warranties in respect of
this product which the consumer may have taken under the Trade Practices Act 1974 or by any legislation
of a State or Territor y of Australia. This product is warranted by Talon Tools Australia (ABN 12 099 520
939)(the “Company”) to be free from defects in material and workmanship for a period of 24 months from
the date of original purchase. The Company during the period of the warranty, will at its option, and subject
to the conditions stated herein, repair or replace without charge this product or any component part, which
upon examination by an Authorised Service Agent or by the Company is found to be defective.
Warranty conditions
This warranty will not apply:
(i) where this product has been subjected to misuse, abuse, accident or want of care;
(ii) where this product has been used for a purpose for which it was not designed or is not suited;
(iii) where the service of this product has been undertaken by a person not authorised by the Company
to carry out such work or where parts that have not been approved by the Company have been used;
(iv) where this product has been
used for industrial or commercial purposes.
Should service become necessary during the warranty period, the purchaser should contact an Authorised
Service Agent or the Company. In order to obtain warranty service, the purchaser must present the store
receipt showing the name of the retailer and the date of purchase together with a completed Warranty Card.
The period of the warranty begins from the original date of purchase, notwithstanding any subsequent
repair or parts replacement. No additional warranty or guarantee other than set out in this document,
whether written or verbal, is authorised to be made on the Company's behalf. The purchaser shall be
responsible for delivery or causing the product to be delivered to the Company or the Authorised Service
Agent and the purchaser shall be responsible for all charges in connection with re-delivery of the product
and/or the delivery of parts. Damage in transit is not covered by this warranty and purchasers should
remove from the product any liquids (if applicable) before sending and pack the product securely to prevent
damage.
Warranty exclusions
Normal wear parts or components are subject to separate terms as follows: Normal wear parts, components or service required when performing normal and regular maintenance of this product are not covered
by warranty unless it is found to be defective by an Authorised Service Agent or by the Company. Normal
wear parts include, but are not limited to:
WARRANTY INFORMATION
AU
Returns based on the above listed normal wear parts will not be accepted under this warranty as they
are considered consumable items and are at the expense of the purchaser.
Collection Bag
Impeller Fan
Vacuum/Blower Tube
1
3
AU
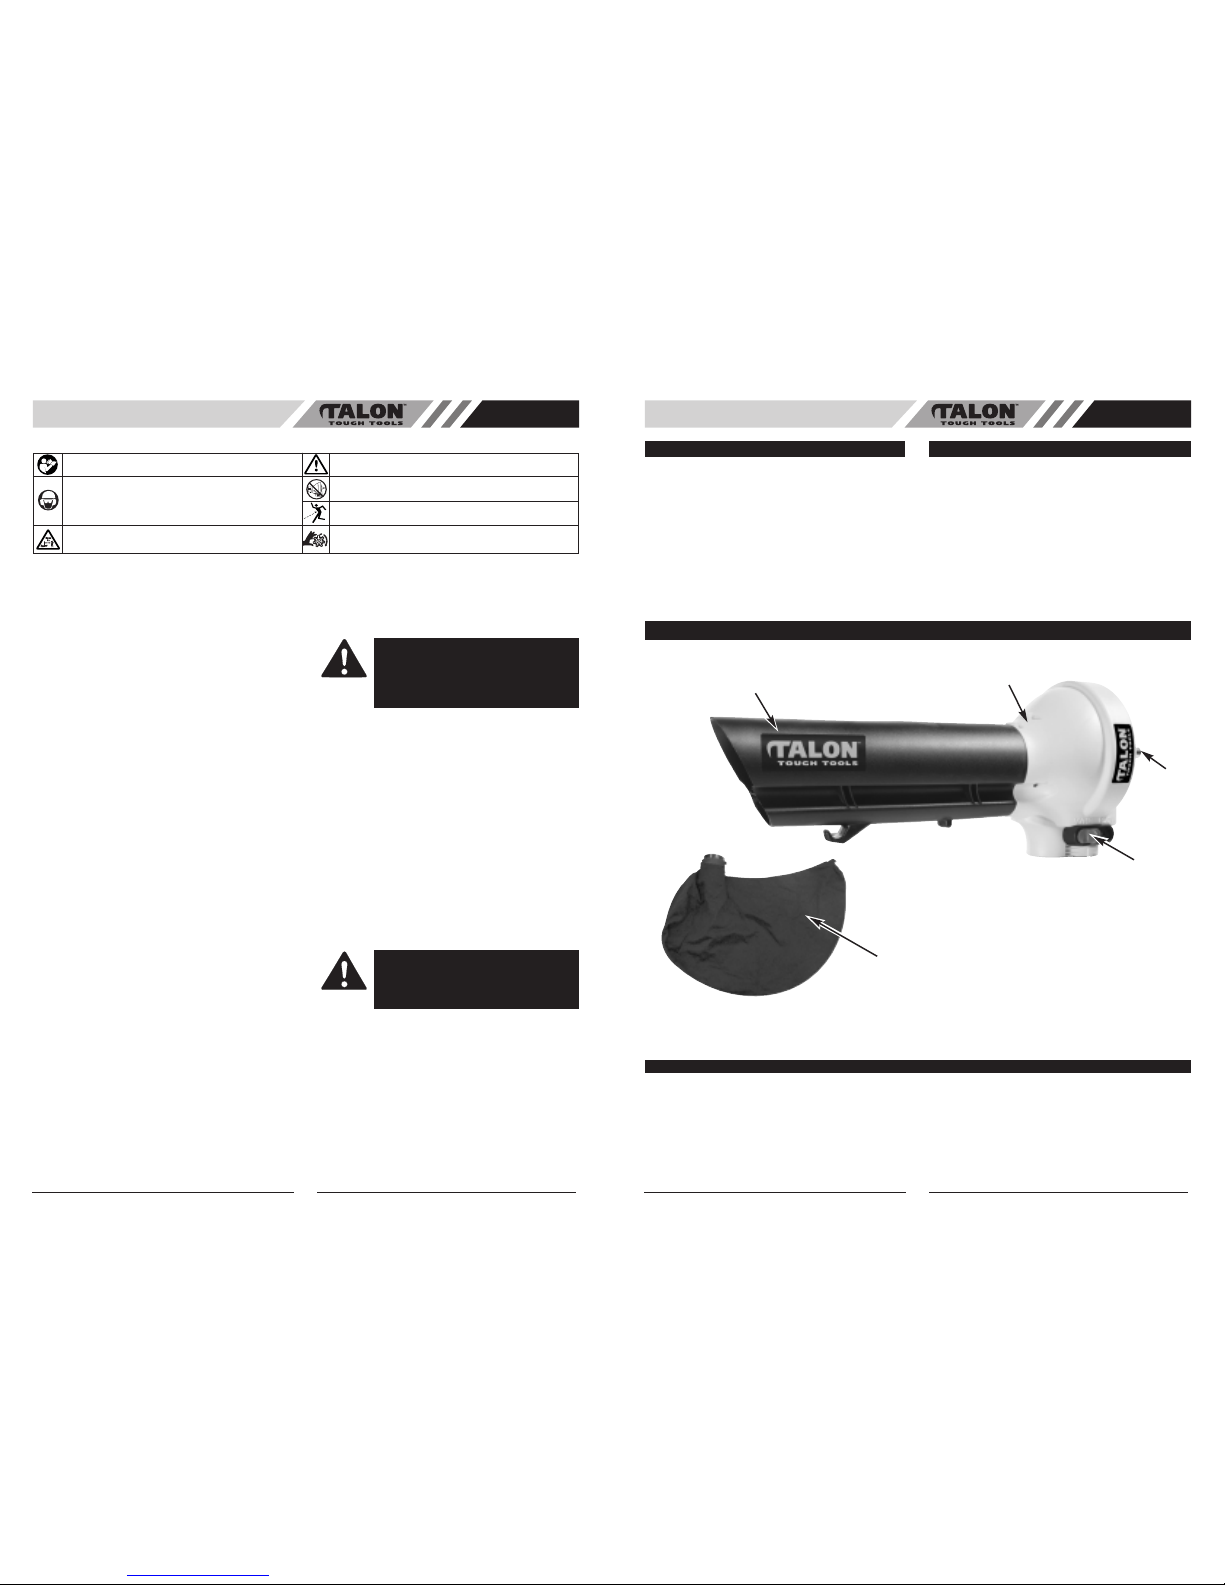
1. Vacuum/Blower Tube
2. Housing
3. Vacuum/Blower Button
4. Drive Shaft
5. Vacuum Bag
SPECIFICATIONS
Max. Air Velocity . . . . . . . . . . . . . . . . . . . . . . . . . . . . . . . . . . . . . . . . . . . . . . . . . . . . . . . . . . . . . . . . . . . . . . . . . . .195km/h
Max. Air Volume . . . . . . . . . . . . . . . . . . . . . . . . . . . . . . . . . . . . . . . . . . . . . . . . . . . . . . . . . . . . . . . . . . . . . . . . . .8.5cm/min
Bag Capacity . . . . . . . . . . . . . . . . . . . . . . . . . . . . . . . . . . . . . . . . . . . . . . . . . . . . . . . . . . . . . . . . . . . . . . . . . . . . . . .35 Litre
Mulching Ration
. . . . . . . . . . . . . . . . . . . . . . . . . . . . . . . . . . . . . . . . . . . . . . . . . . . . . . . . . . . . . . . . . . . . . . . . . . . . . . . .
8:1
Weight (Attachment) . . . . . . . . . . . . . . . . . . . . . . . . . . . . . . . . . . . . . . . . . . . . . . . . . . . . . . . . . . . . . . . . . . . . . . . . . . .1.5kg
GENERAL IDENTIFICATION
1
2
4
3
5
1. Avoid spilling the fuel when refueling.
2.
Do not smoke while fueling the power unit.
3.
Fuel the power unit in a well-ventilated area.
4.
Move away from the fueling area when starting the
unit.
5.
Do not wear rubber or other insulated gloves when
oper
ating the unit to avoid static electricity shock.
6. Store in an area free of potential fuel vapor ignition
sources such as open flames (pilot lights) or electrical
sparking devices (switches electric motors).
7. Turn off the engine and let it cool before refueling or
before putting the unit in storage.
1.
Do not use in rain.
2.
Avoid dangerous environments, never operate powerhead in damp or wet conditions.
3. To reduce the risk of electric shock, do not expose the
unit to rain or operate powerhead on wet ground.
4.
Always unplug the powerhead and allow it to cool
bef
ore putting it into storage. Store indoors.
5.
Always unplug the unit when not in use, and before
performing any maintenance or repairs.
SAFETY
WARNINGS FOR GAS BLOWER/VAC
SAFETY WARNINGS FOR ELECTRIC BLOWER/VAC
2
GENERAL SAFETY RULES
AU
WARNING! When using garden tools, basic safety precautions, including the following, should always be followed to
reduce the risk of serious personal injury and/or damage to the unit.
Read all these instructions before operating this product and save these instructions.
• WHAT TO DO
READ YOUR USER MANUAL AND ALL SUPPLEMENTS (IF ANY ENCLOSED) THOROUGHLY BEFORE
OPERATING YOUR UNIT.
1. WEAR CLOSE FITTING, TOUGH WORK CLOTHING
that will provide protection, such as long slacks or
trousers, safety work shoes, heavy duty work gloves,
hard hat, a safety face shield, or safety glasses for eye
protection and a good grade of ear plugs or other
sound barriers for hearing protection.
2. REFUEL IN A SAFE PLACE. Open fuel cap slowly to
release any pressure which may have formed in fuel
tank. Always wipe unit of fuel or oil spills before starting. To prevent a fire hazard, move at least 10 feet (3
meters) from fueling area before starting.
3. TURN UNIT OFF before setting it down, and also
before installing or removing attachments.
4. KEEP ALL SCREWS AND FASTENERS TIGHT and
the unit in good operating condition. Never operate
this equipment if it is improperly adjusted or not completely and securely assembled.
5. KEEP HANDLES DRY, clean and free of fuel mixture.
6. STORE EQUIPMENT AWAY FROM POSSIBLE IGNITION SOURCES, such as gas-powered water
heaters, clothes dryers, or oil-fired furnaces, portable
heaters, etc.
7. ALWAYS KEEP the engine free of debris build-up.
8. OPERATION OF EQUIPMENT should always be
restricted to mature and properly instructed
individuals.
9. ALL PERSONS WITH RESPIRATORY PROBLEMS
and persons operating blower in very dusty environments, should wear a dust particle mask at all times.
Paper dust masks are available at most paint and
hardware stores.
• WHAT NOT TO DO
1. DO NOT SMOKE while refueling or operating equipment.
2. DO NOT OPERATE UNIT WITHOUT A MUFFLER
and properly installed muffler shield.
3. DO NOT TOUCH or let your hands or body come in
contact with a hot muffler or spark plug wire.
4. DUE TO THE DANGER of exhaust fumes, never operate blower in a confined or poorly ventilated area.
5. NEVER POINT BLOWER in the direction of people,
animals, buildings, automobiles, or windows, etc.
6. DO NOT operate unit without inlet cover installed to
prevent contact with impeller.
7. DO NOT set a hot engine down where flammable
material is present.
8. DO NOT OPERATE UNIT FOR PROLONGED PERIODS. Rest periodically.
9. DO NOT OPERATE UNIT WHILE UNDER THE
INFLUENCE OF ALCOHOL OR DRUGS.
10. DO NOT operate your unit near or around flammable
liquids or gases whether in or out of doors. An explosion and/or fire may result.
11. DO NOT WEAR loose clothing, scarfs, neck chains,
unconfined long hair, and the like. Doing so could
cause injury associated with objects being drawn into
the rotating parts.
12.
DO NOT refuel a running engine or an engine that is
hot
WARNING: DO NOT USE ANY OTHER
FUEL than that recommended in your manual. Never use gasoline unless it is properly
mixed with 2-cycle engine lubricant.
Permanent damage to engine will result,
voiding manufacturer’s warranty.
WARNING: DO NOT ADD, REMOVE OR
ALTER ANY COMPONENTS OF THIS
PRODUCT. Doing so could cause personal
injury and/or damage the unit voiding the
manufacturer’s warranty.
Meaning of symbols marked on the product
Read the user man
ual before using the machine
Whenever the machine is in use, safety goggles
m
ust be worn to protect against flying objects. Ear
protection must be used to protect the operators
hearing
Warning! Danger
Never operate blower without tube installed
Keep people or animals at least 15m away from
the machine during operation
Do not operate unit without proper attachments
and guards in place
K
eep hands away from blade
AU
5
DO NOT operate the blower with other people or animals
in the immediate vicinity. Allow a minimum of 30 feet (9
meters) betw
een operator and other people or animals.
W
e recommend that a face mask be worn when operating
b
lower in dusty areas.
Stand a
way from the debris, at a distance that will easily
allow you to control the direction of blown debris. Never
b
low debris in direction of bystanders.
To control velocity of airstream, blower can be operated at
any speed between idle and full throttle. Experience with
the unit will help you determine the amount of airflow necessary for each application.
• VACUUM OPERATIONS
Do not vacuum ash from outdoor fireplaces or barbecue
pits unless cinders are cool. Do not vacuum lighted
smoking material such as discarded cigars or cigarettes.
Do not operate unit near open flame.
Do not attempt to vacuum rocks, broken glass, bottles, tin
cans or other such objects. Damage to impeller and unit
as well as operator injury could result.
If vacuum tube is level with or above power unit, rocks or
large objects may be drawn into tube, damaging the
impeller.
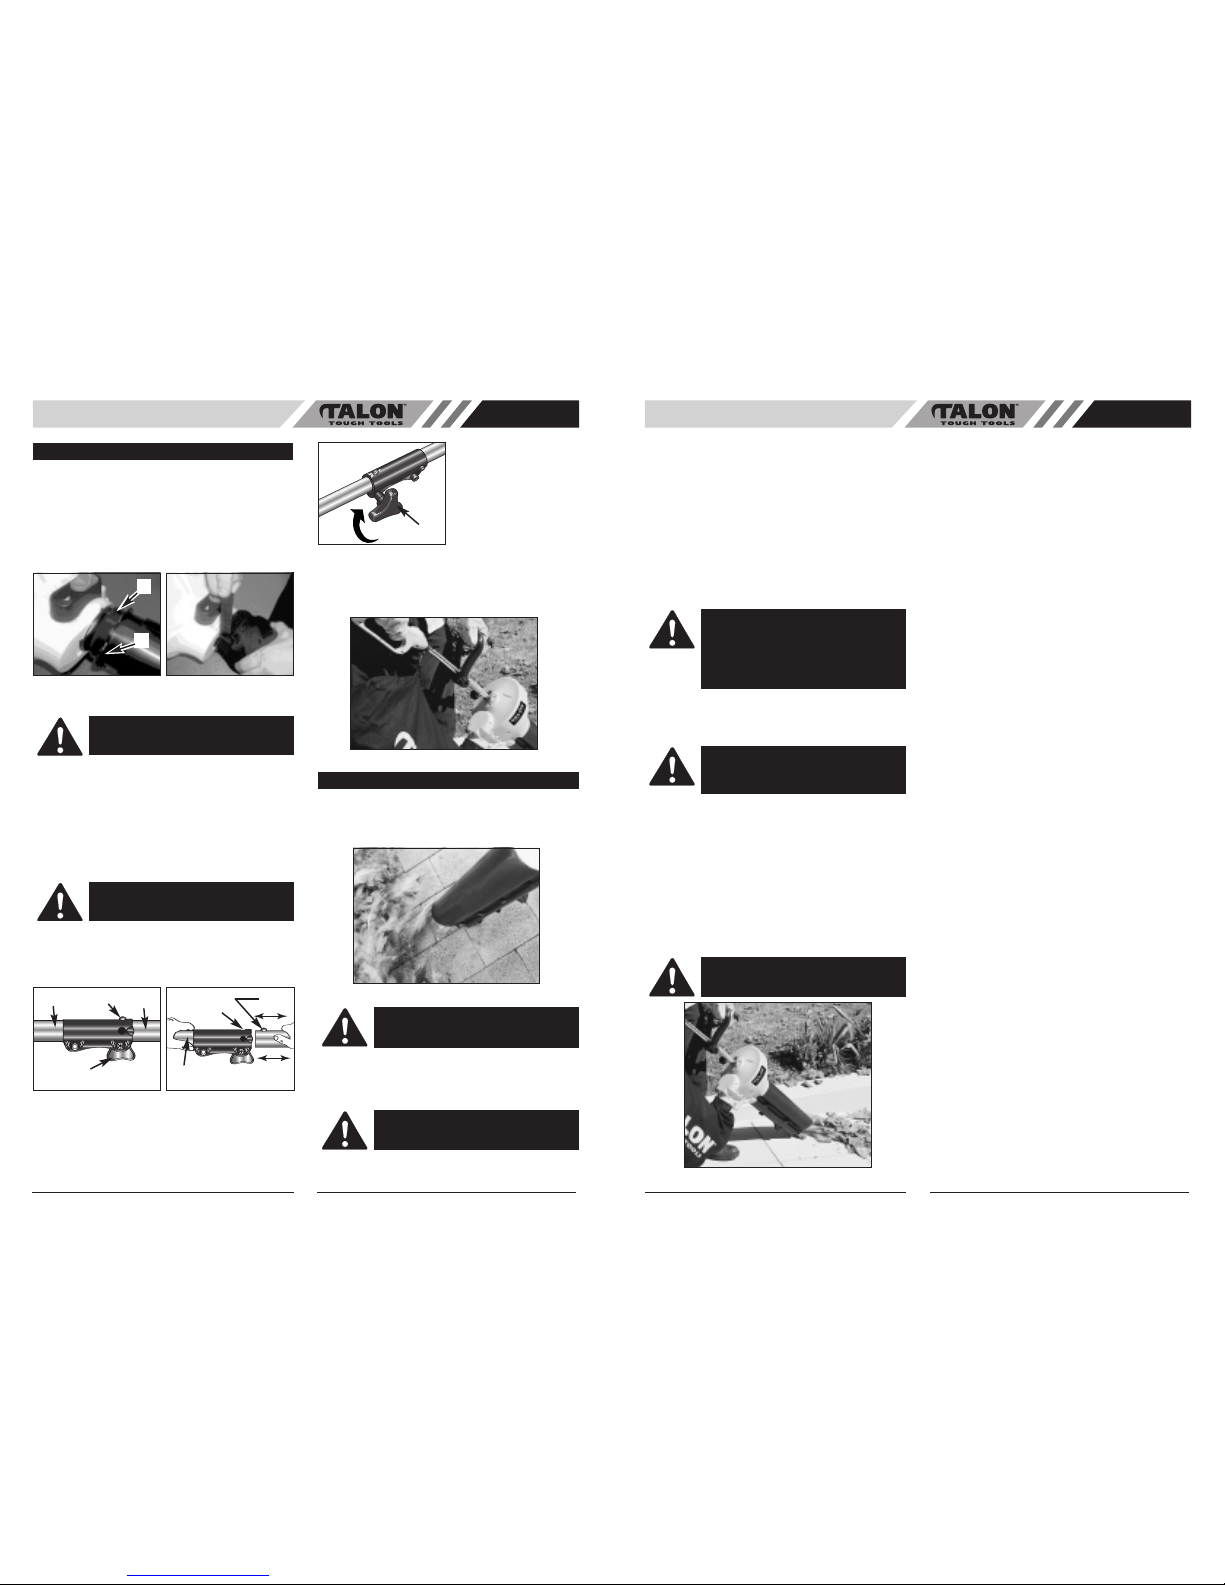
To Operate Vacuum:
1. Follow correct starting procedures for the power head.
2. Place your left hand on the trigger handle and right
hand on auxiliary handle as shown (Fig. 5).
3. Swing unit side to side to vacuum debris.
• VACUUM TUBE CLOGGING
To Unclog Vacuum Tube:
1. Turn engine “OFF”. Promptly compress vacuum bag
while it is still inflated, expelling air out of the suction
tube
.
This reverse airflow is usually sufficient to dislodge most
obstructions. If the obstruction cannot be cleared by
compressing vacuum bag, follow this procedure:
2. Remove and inspect vacuum tubes.
3. Carefully clean out nozzle.
4. Reinstall vacuum tubes.
WARNING: NEVER OPERATE VACUUM
WITHOUT VACUUM BAG PROPERLY
ATTACHED, AS FLYING DEBRIS COULD
CAUSE INJURY TO OPERATOR AND
BYSTANDERS. ALWAYS MAKE SURE VACUUM BAG ZIPPER IS CLOSED BEFORE
OPERATING UNIT.
CAUTION: This unit is designed to vacuum
up debris such as leaves, small bits of paper,
small twigs, weeds, grass clippings, etc. Do
not use this unit for any other purpose.
CAUTION: To avoid clogging vacuum tube.
DO NOT FORCE OR PLACE SUCTION
TUBE INTO A PILE OF DEBRIS.
Fig. 5
4
AU
• INSTALL VACUUM BAG
Connection Tube : Align pins (A) and clips (B) on black
connection tube with g
rooves in main housing. Push con-
nection tube up as f
ar as it will go rotate tube clockwise
fir
mly until it clicks into place. (Fig. 1A)
Vacuum bag: slide round opening at top of vacuum bag
over connection tube up to recessed area below grip.
Use str
ap and buckle to secure bag tightely. (Fig. 1B)
• INSTALLING THE ATTACHMENT
NOTE: To make installing or removing the attachment
easier, place the unit on the ground or on a work bench.
1. Turn the knob (A) counterclockwise to loosen (Fig.
2A).
2. While firmly holding the attachment (B), push it
straight into the Quick-Change coupler (C) until the
release button (D) appears in the primary hole (E) of
the Quick-Change coupler. (Fig. 2B)
3. Turn the knob (A) clockwise to tighten. (Fig. 2C)
All attachments are designed to be used in the primary
hole unless otherwise indicated in the specific attachments operators manual. If the incorrect hole is used, it
could result in injury, or damage to the unit.
• BAG ATTACHMENT TO SHAFT
Secure bag strap around trimmer shaft tube or handle
(Fig. 3)
• BLOWER OPERATIONS (Fig. 4)
Your Talon blower is designed to easily remove debris
from patios, walkways, lawns, bushes, etc., and many
hard to reach areas where debris may accumulate.
Before using your blower, review Safety Precautions in
your User Manual, and all regulations for operation of the
unit. These precautions and regulations are for your protection.
ASSEMBLY INSTRUCTIONS
Fig. 1A
Fig. 1B
A
B
WARNING:
To avoid serious personal injury,
shut unit off before removing or installing
attachment.
CAUTION:
The release button must be in the
primary hole and the knob securely tightened
before operating this unit.
A
Fig.
2C
Fig. 2A
Fig.
2B
A
B
D
C
D
E
D
Fig. 3
OPERATING INSTRUCTIONS
Fig. 4
WARNING: Because of flying debris, always
wear approved shielded safety glasses or
face shield when operating blower.
CA
UTION:
Hold the b
lower so that hot
e
xhaust does not damage clothing and is not
inhaled b
y oper
ator
.
 Loading...