

Page 1

1
GENERAL SAFETY RULES
GB
MODEL NO. AB320322, AB320325
USER MANUAL
Gas Blower
9096-320301
WARNING • PLEASE READ
For your own safety please read this manual before attempting to operate your new unit. Failure to follow instructions can result in serious personal injury. Spend a few moments to familiarize yourself with
your blower before each use.
SAFETY OPERATION MAINTENANCE
• WHAT TO DO
READ YOUR USER MANUAL AND ALL SUPPLE
MENTS (IF ANY ENCLOSED) THOROUGHLY BEFORE
OPERATING YOUR UNIT.
1. WEAR CLOSE FITTING, TOUGH WORK CLOTH-
ING that will provide protection, such as long slacks
or trousers, safety work shoes, heavy duty work
gloves, hard hat, a safety face shield, or safety glasses for eye protection and a good grade of ear plugs or
other sound barriers for hearing protection.
2. REFUEL IN A SAFE PLACE. Open fuel cap slowly to
release any pressure which may have formed in fuel
tank. Always wipe unit of fuel or oil spills before starting. To prevent a fire hazard, move at least 10 feet (3
meters) from fueling area before starting.
3. TURN UNIT OFF before setting it down, and also
before installing or removing attachments.
4. KEEP ALL SCREWS AND FASTENERS TIGHT and
the unit in good operating condition. Never operate
this equipment if it is improperly adjusted or not completely and securely assembled.
5. KEEP HANDLES DRY, clean and free of fuel mixture.
6. STORE EQUIPMENT AWAY FROM POSSIBLE
IGNITION SOURCES, such as gas-powered water
heaters, clothes dryers, or oil-fired furnaces, portable
heaters, etc.
7. ALWAYS KEEP the engine free of debris build-up.
8. OPERATION OF EQUIPMENT should always be
restricted to mature and properly instructed
individuals.
9. ALL PERSONS WITH RESPIRATORY PROBLEMS
and persons operating blower in very dusty environments, should wear a dust particle mask at all times.
Paper dust masks are available at most paint and
hardware stores.
• WHAT NOT TO DO
1. DO NOT SMOKE while refueling or operating equipment.
2. DO NOT OPERATE UNIT WITHOUT A MUFFLER
and properly installed muffler shield.
3. DO NOT TOUCH or let your hands or body come in
contact with a hot muffler or spark plug wire.
4. DUE TO THE DANGER of exhaust fumes, never
operate blower in a confined or poorly ventilated area.
5. NEVER POINT BLOWER in the direction of people,
animals, buildings, automobiles, or windows, etc.
6. DO NOT operate unit without inlet cover installed to
prevent contact with impeller.
7. DO NOT set a hot engine down where flammable
material is present.
8. DO NOT OPERATE UNIT FOR PROLONGED PERIODS. Rest periodically.
9. DO NOT OPERATE UNIT WHILE UNDER THE
INFLUENCE OF ALCOHOL OR DRUGS.
10. DO NOT operate your unit near or around flammable
liquids or gases whether in or out of doors. An explosion and/or fire may result.
11. DO NOT WEAR loose clothing, scarfs, neck chains,
unconfined long hair, and the like. Doing so could
cause injury associated with objects being drawn into
the rotating parts.
12. DO NOT refuel a running engine or an engine that is
hot
WARNING: DO NOT USE ANY OTHER
FUEL than that recommended in your manual. Always follow instructions in the Fuel and
Lubrication section of this manual. Never use
gasoline unless it is properly mixed with 2cycle engine lubricant. Permanent damage to
engine will result, voiding manufacturer’s
warranty.
WARNING: DO NOT ADD, REMOVE OR
ALTER ANY COMPONENTS OF THIS
PRODUCT. Doing so could cause personal
injury and/or damage the unit voiding the
manufacturer’s warranty.
SPECIFICATIONS
AB320322 . . . . . . . . . . . . . . . . .AB320325
Engine . . . . . . . . . . . . . . . . . . . . . . . . . . .22 cc . . . . . . . . . . . . . . . . . . . . .25 cc
Max. Air Velocity
. . . . . . . . . . . . . . . . . . .250 km/h . . . . . . . . . . . . . . . . . .250 km/h
Max. Air Volume . . . . . . . . . . . . . . . . . . .8.5 c.m/m . . . . . . . . . . . . . . . . .8.5 c.m/m
Max. Engine Speed . . . . . . . . . . . . . . . .8,000 RPM . . . . . . . . . . . . . . . .8,000 RPM
Collection Bag . . . . . . . . . . . . . . . . . . . . .55 Litre . . . . . . . . . . . . . . . . . . .55 Litre
Mulching Ratio
. . . . . . . . . . . . . . . . . . . .
8:1
. . . . . . . . . . . . . . . . . . . . . . .
8:1
Fuel Capacity . . . . . . . . . . . . . . . . . . . . .650 ml . . . . . . . . . . . . . . . . . . . .650 ml
Weight
. . . . . . . . . . . . . . . . . . . . . . . . . . .
6.5 kg
. . . . . . . . . . . . . . . . . . . .
7.1 kg
Meaning of symbols marked on the product
Read the user manual before using the machine
Wear safety goggles to protect your eyes
Wear ear protector to protect against noise
Wear dust mask to protect against dust
Wear glove to protect your hands
Wear safety boots to protect against electric shock
Page 2
• FUEL
Use regular grade unleaded gasoline mixed with 2-cycle
engine oil in 25:1 ratio for best results. Use mixing ratios
in Section FUEL MIXING TABLE.
• MIXING FUEL
Mix fuel with Talon brand 2 cycle oil in an approved container. Use mixing table for correct ratio of fuel to oil.
Shake container to ensure thorough mix.
• FUEL AND LUBRICATION
• FUEL MIXING TABLE
• RECOMMENDED FUELS
Some conventional gasolines are being blended with oxygenates such as alcohol or an ether compound to meet
clean air standards. Your Talon engine is designed to
operate satisfactorily on any gasoline intended for automotive use including oxygenated gasolines.
• STARTING A COLD ENGINE
Fill fuel tank with proper gas and oil mixture. See Fuel and
Lubrication. Set unit on ground so that it rests on housing
feet.
1.
Pull the trhottle trigger (A). (It will auto lock) Fig. 4A.
2.
Prime the carburetor. Pump the primer bulb (C) 10
times (Fig. 4B).
3. Your unit is designed with a 2 position choke (D):
START “ ” and RUN “ ”. Move choke lever to
START “ ” position (Fig. 4C).
4. Grip handle firmly .
5. Pull starter rope out a short way until resistance is felt
(approximately 100mm). Pull starter rope until engine
starts or attempts to run.Once engine starts, warm up
at full throttle for 10 seconds and release throttle.
6. Push down the throttle lock (B), the throttle trigger (A)
will back to the nomal position. (Fig. 4A)
7. Move the choke to RUN “ ” position (Fig. 4E).
NOTE: If engine fails to start after repeated attempts, refer
to Troubleshooting section.
NOTE: Always pull starter rope straight out. Pulling starter
at an angle will cause rope to rub against the eyelet. This
friction will cause the rope to fray and wear more quickly.
Always hold starter handle when rope retracts. Never
allow rope to snap back from extended position. This
could cause rope to snag or fray and also damage the
starter assembly.
• STOPPING THE ENGINE
Emergency Stopping Procedure. When it is necessary
to stop blower engine immediately, DEPRESS the switch
to stop.
Normal Stopping Method. For normal stopping, push
down the throttle lock, the throttle trigger will back to the
nomal position and allow engine to return to idle speed.
Then DEPRESS and HOLD the “OFF” switch until the
engine stops completely.
• STARTING A WARM ENGINE (Engine has been
stopped for no more than 15-20 minutes)
1. Pull starter rope again. Engine should start with ONE or
TWO pulls. If engine fails to start after 6 pulls, repeat
steps 2 through 6 .
2.
If engine does not start, or starts and then stops after 5
rope pulls, follow procedure “STARTING A COLD
ENGINE”.
FUEL AND LUBRICATION
WARNING
: Never use straight gasoline in your
unit. This will cause permanent engine damage
and void the manufacturer’s warranty for that
product. Never use a fuel mixture that has been
stored for over 90 days.
WARNING: If 2-cycle lubricant other than Talon
Custom Lubricant is to be used, it must be a premium grade oil for 2-cycle air cooled engines
mixed at a 40:1 ratio. Do not use any 2-cycle oil
product with a recommended mixing ratio of
100:1. If insufficient lubrication is the cause of
engine damage, it voids the manufacturer’s
engine warranty for that occurrence.
WARNING: Lack of lubrication voids engine
warranty.
Gasoline and oil
mix 25:1
GASOLINE 25:1 Ratio Lubricant
5 Liters 6.7 oz. 200ml (cc)
1 lmp. Gal. 6.1 oz. 180ml (cc)
Mixing 25 Parts Gasoline
Procedure to 1 part Lubricant
1ml = 1cc
3
2
GB GB
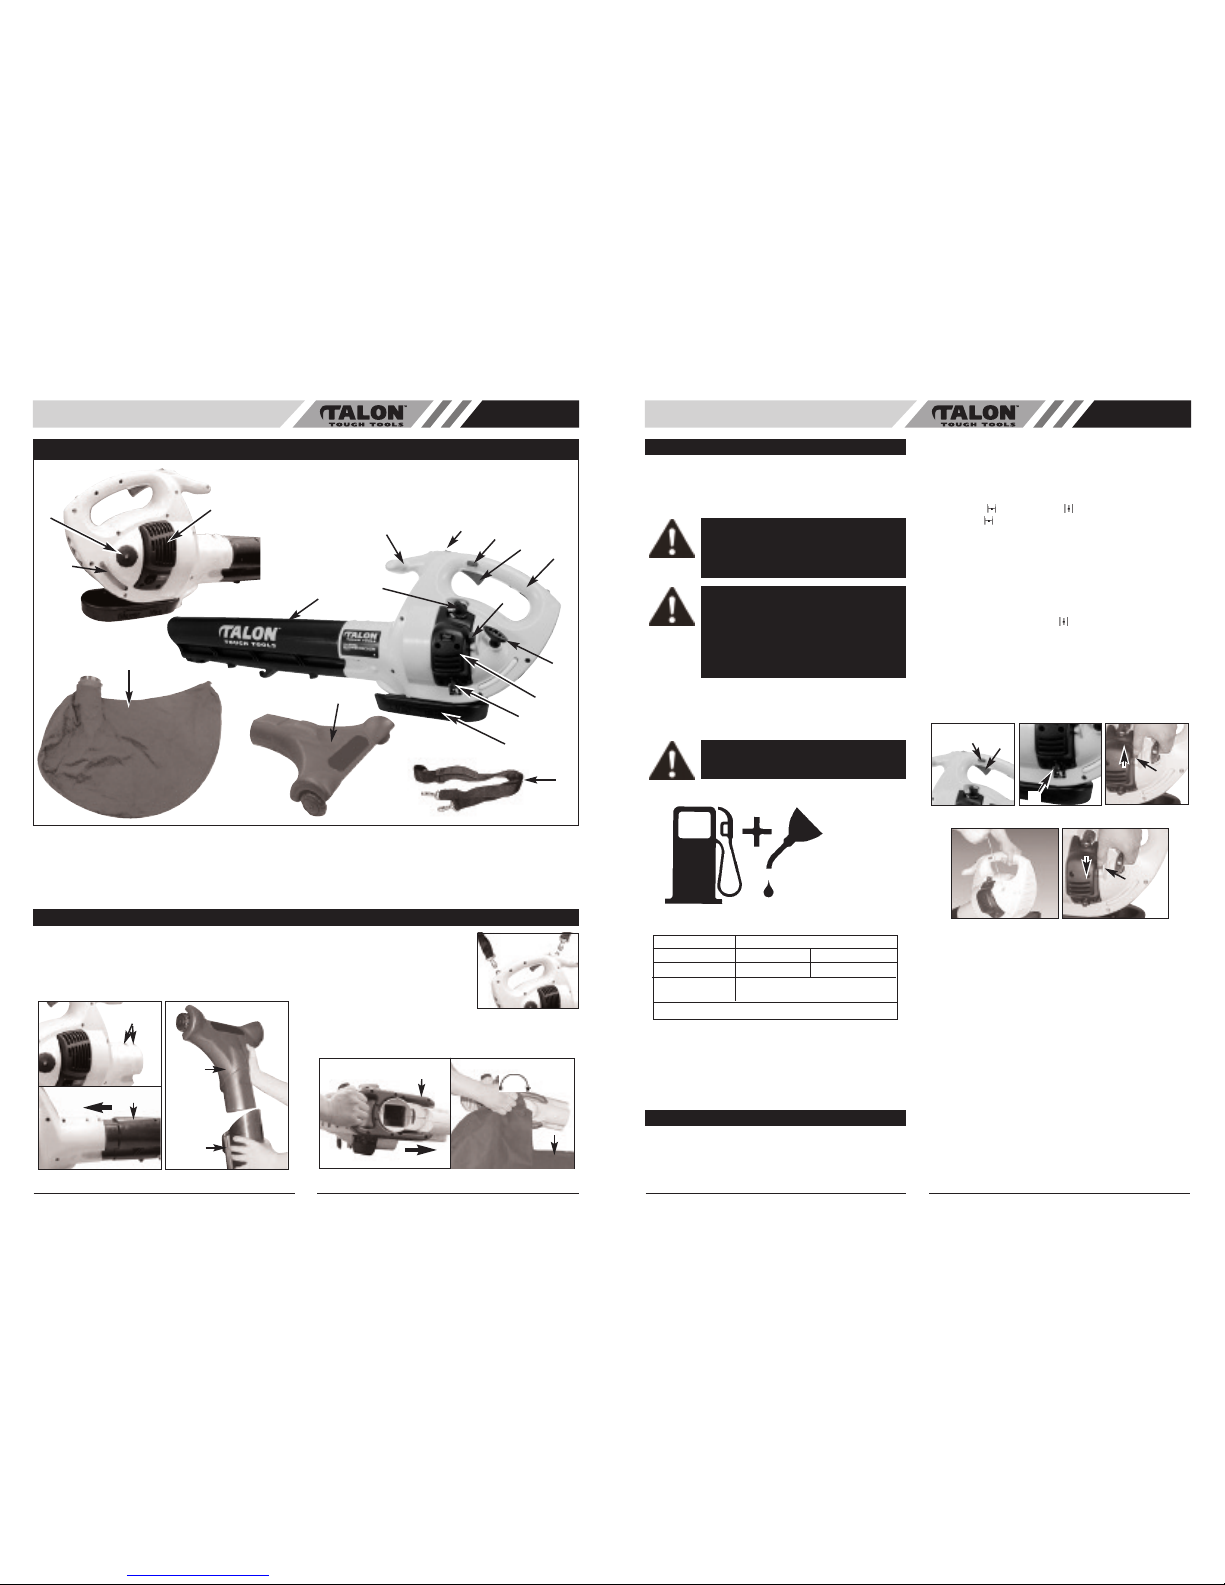
1. Rear Handle
2. Throttle Trigger
3. Throttle Lock
4. On/Off Switch
5. Front Handle
6. Muffler Cover
7. Fuel Tank Window
8. Fuel Cap
9. Starter Handle
10. Air Filter Cover
11. Vacuum/Blower Tube
12. Choke Lever
13. Spark Plug Wire /
Spark Plug
14. Vauum/Blower Slide
15. Primer Bulb
16. Harness
17. Vacuum Bag
18. Speed Cleaner head
(Model AB320325
only)
1
GENERAL IDENTIFICATION
2
3
4
5
6
7
8
9
10
13
15
11
12
16
14
• BLOWER ATTACHMENT ASSEMBLY INSTRUCTIONS
1. Release the screws (A ) and insert blower tube (B) into
the blower housing and tight the screws (B). (Fig. 1A)
2. Insert speed cleaner head (C) to the tube (B). (Fig. 1B
Model AB320325 only)
• HARNESS INSTALLATION
Attach the 2 harness clips to the 2
links in the blower handle. (Fig. 2)
• VACUUM ATTACHMENT
ASSEMBLY INSTRUCTIONS
To install vacuum bag:
ASSEMBLY INSTRUCTIONS
Fig. 3
B
A
17
18
Fig. 2
Fig. 1A Fig. 1B
A
B
B
C
OPERATING INSTRUCTIONS
Fig. 4D Fig. 4E
Fig. 4A
C
A
Fig. 4B Fig. 4C
D
D
B
Page 3
5
GB
4
GB
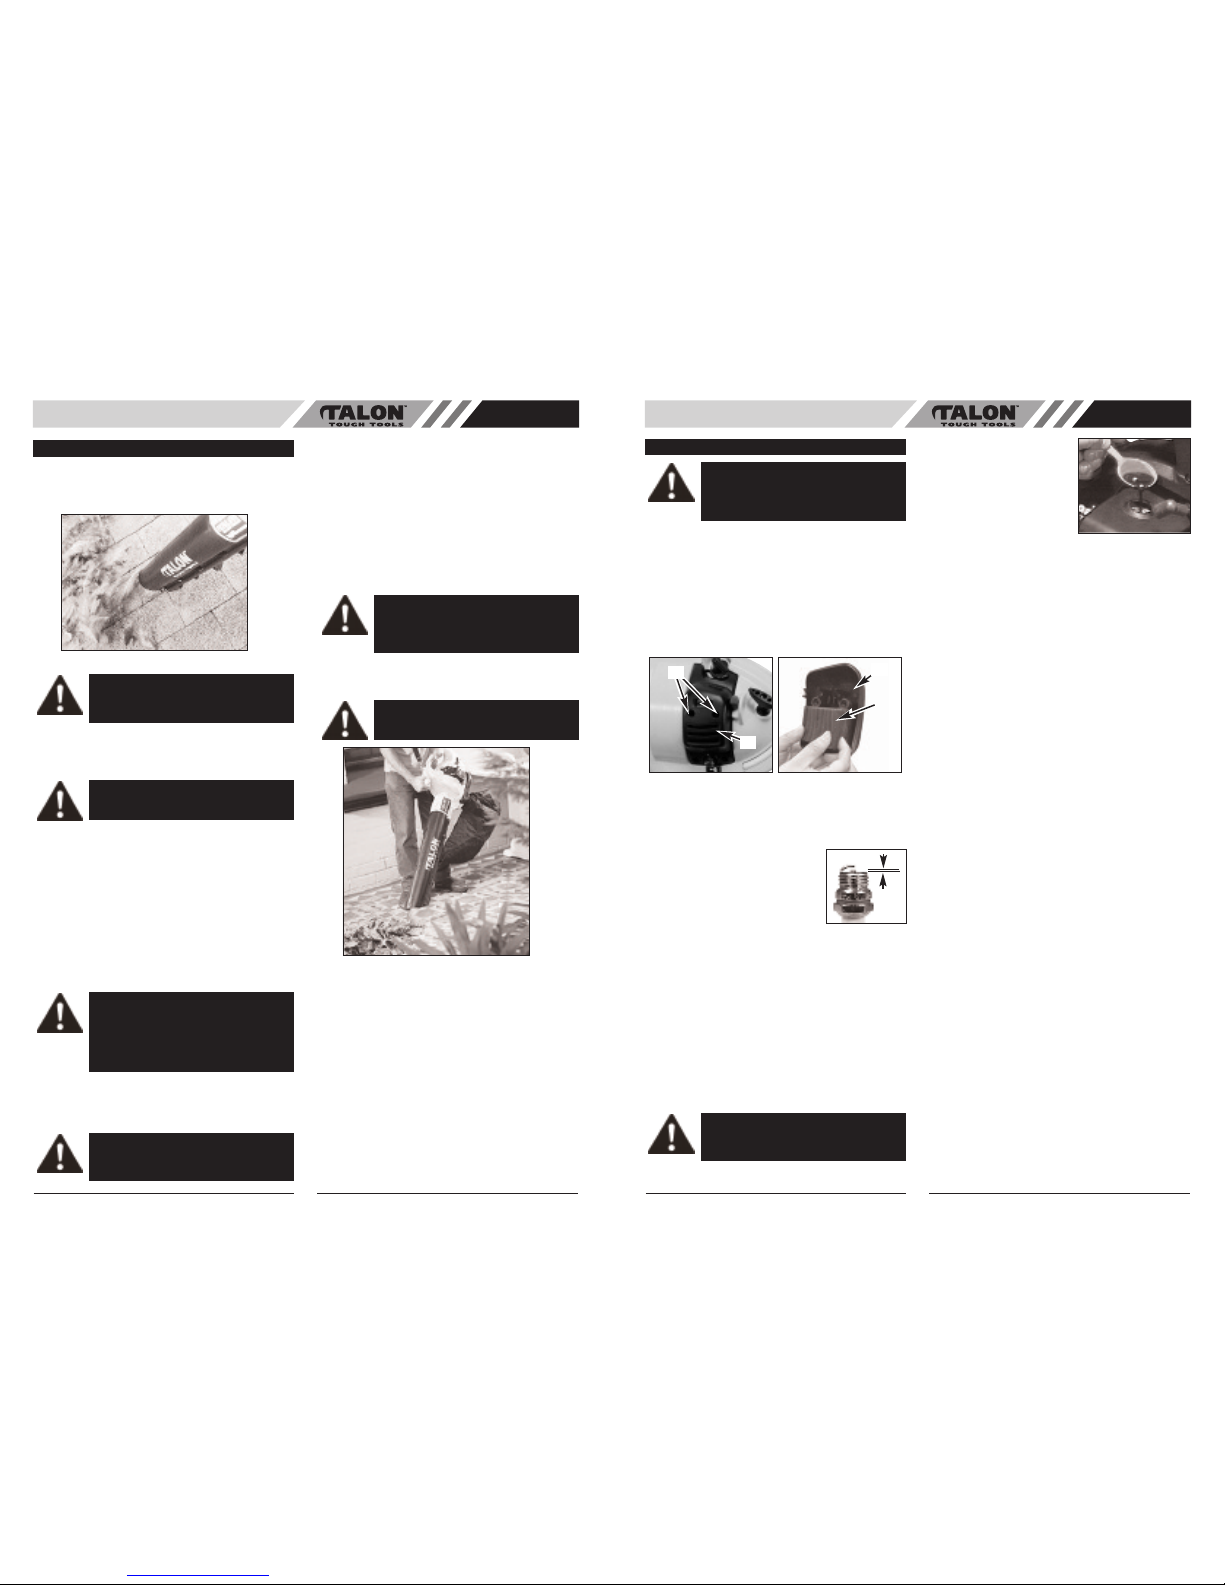
To Clean Air Filter:
1. Remove 2 screws (A) holding air filter cover in place,
remove cover (B) and lift filter (C) from cover (Fig. 7A
and B).
2. Wash filter in soap and water. DO NOT USE GASO-
LINE!
3. Air dry filter.
4. Reinstall air filter and air filter cover.
NOTE: Replace filter if frayed, torn, damaged or unable to
be cleaned.
• CARBURETOR ADJUSTMENT
The carburetor was pre-set at the factory for optimum performance. If further adjustments are necessary, please
take your unit to the nearest professional.
• SPARK PLUG
1. Spark plug gap = .025 in.
(.635mm) (Fig. 8).
2. Torque to 105 to 130 inch pounds
(12 to 15 N•m). Connect spark
plug boot.
• VACUUM BAG CLEANING
A dirty bag will obstruct airflow, thereby reducing vacuum
efficiency.
To Clean Bag:
1. Detach vacuum bag from unit.
2. Open zipper and remove contents.
3. Turn bag INSIDE OUT and shake vigorously. This
procedure should be performed on a regular basis.
4. Turn bag RIGHT SIDE OUT, close zipper and attach
to unit.
NOTE: If vacuum bag is unusually dirty, it should be
washed by hand in warm water with a mild detergent.
Rinse thoroughly. Let dry before using.
• STORING A UNIT
1.
Perform all the general
maintenance recommended in the Maintenance
Section of your User
Manual.
2. Clean outside surface of
unit.
3. Drain fuel from the fuel
tank.
4. After fuel is drained, start
engine.
5. Run engine at idle until unit stops. This will purge the
carburetor of fuel.
6. Allow engine to cool (approx. 5 minutes).
7. Using a spark plug wrench, remove the spark plug.
8. Pour 1 teaspoon of clean 2-cycle oil into the combustion chamber (Fig. 9). Pull starter rope slowly several
times to coat internal components. Replace spark
plug.
9. Store unit in a cool, dry place away from any source
of ignition such as an oil burner, water heater, etc.
• REMOVING A UNIT FROM STORAGE
1. Remove spark plug.
2. Pull starter rope briskly to clear excess oil from combustion chamber.
3. Clean and gap spark plug or install a new spark plug
with proper gap.
4. Prepare unit for operation.
5. Fill fuel tank with proper fuel / oil mixture. See Fuel
and Lubrication Section.
AIR FILTER
CAUTION:
NEVER operate blower without
the air filter or dust and dirt will be sucked into
the engine and damage it. The air filter must
be kept clean. If it becomes damaged, install
a new filter.
Fig. 7A
Fig. 7B
C
B
A
B
.025 in.
(.635mm)
Fig. 8
WARNING: Failure to follow these steps may
cause varnish to form in the carburetor and
difficult starting or permanent damage following storage.
Fig. 9
• BLOWER OPERATIONS (Fig. 5)
Your Talon blower is designed to easily remove debris
from patios, walkways, lawns, bushes, etc., and many
hard to reach areas where debris may accumulate.
Before using your blower, review Safety Precautions in
your User Manual, and all regulations for operation of the
unit. These precautions and regulations are for your protection.
DO NOT operate the blower with other people or animals
in the immediate vicinity. Allow a minimum of 30 feet (9
meters) between operator and other people or animals.
We recommend that a face mask be worn when operating
blower in dusty areas.
Stand away from the debris, at a distance that will easily
allow you to control the direction of blown debris. Never
blow debris in direction of bystanders.
To control velocity of airstream, blower can be operated at
any speed between idle and full throttle. Experience with
the unit will help you determine the amount of airflow necessary for each application.
• VACUUM OPERATIONS
Do not vacuum ash from outdoor fireplaces or barbecue
pits unless cinders are cool. Do not vacuum lighted
smoking material such as discarded cigars or cigarettes.
Do not operate unit near open flame.
Do not attempt to vacuum rocks, broken glass, bottles, tin
cans or other such objects. Damage to impeller and unit
as well as operator injury could result.
If vacuum tube is level with or above power unit, rocks or
large objects may be drawn into tube, damaging the
impeller.
T
o Operate Vacuum:
1.
Follow correct starting procedures as explained in this
manual.
2. Allow engine to return to idle. Put the shoulder harness
on so the strap is over your right shoulder. Put the
vacuum bag strap on so it is over your left shoulder.
3. Place your left hand on the top handle and right hand
on side handle as shown (Fig. 6).
4. Swing unit side to side to vacuum debris.
• VACUUM TUBE CLOGGING
To Unclog Vacuum Tube:
1. Turn engine “OFF”. Promptly compress vacuum bag
while it is still inflated, expelling air out of the suction
tube.
This reverse airflow is usually sufficient to dislodge most
obstructions. If the obstruction cannot be cleared by
compressing vacuum bag, follow this procedure:
2. Remove and inspect vacuum tubes.
3.
Carefully clean out nozzle.
4.
Reinstall vacuum tubes.
OPERATING INSTRUCTIONS
Fig. 5
WARNUNG: Because of flying debris, always
wear American National Standards Institute
(A.N.S.I.) approved shielded safety glasses
or face shield when operating blower.
CAUTION: Hold the blower so that hot
exhaust does not damage clothing and is not
inhaled by operator.
WARNUNG: NEVER OPERATE VACUUM
WITHOUT VACUUM BAG PROPERLY
ATTACHED, AS FLYING DEBRIS COULD
CAUSE INJURY TO OPERATOR AND
BYSTANDERS. ALWAYS MAKE SURE
VACUUM BAG ZIPPER IS CLOSED
BEFORE OPERATING UNIT.
CAUTION: This unit is designed to vacuum
up debris such as leaves, small bits of paper,
small twigs, weeds, grass clippings, etc. Do
not use this unit for any other purpose.
CAUTION: Do not allow shoulder harness to
cover, block, or come in contact with exhaust
outlet during operation. The muffler generates heat and could burn, melt, or damage
harness strap.
CAUTION: To avoid clogging vacuum tube.
DO NOT FORCE OR PLACE SUCTION
TUBE INTO A PILE OF DEBRIS.
Fig. 6
 Loading...