

Tallygenicom 9050N DATASHEET

9050N Laser Printer
User Manual

Trademarks
The following are trademarks or registered trademarks of their respective owners. Other product names
mentioned in this manual may also be trademarks or registered trademarks of their respective owners.
Registered trademarks are registered in the United States Patent and Trademark Office; some trademarks
may also be registered in other countries. TallyGenicom, is registered trademarks of TallyGenicom.
PostScript is a trademark of Adobe Systems Incorporated for a page description language and may be
registered in certain jurisdictions. Throughout this manual, PostScript 3® is used to refer to a set of
capabilities defined by Adobe Systems for its PostScript 3 page description language. Adobe, Adobe
Systems Incorporated. Apple, EtherTalk, Macintosh, TrueType/Apple Computer, Inc. Hewlett-Packard, HP,
PCL, HP-GL, HP-UX, LaserJet/Hewlett-Packard Co. IBM PC, International Business Machines Corporation.
Intel/Intel Corporation. Microsoft, Windows/Microsoft Corporation. Novell and NetWare/Novell, Inc. The
ENERGY STAR logo/United States Environmental Protection Agency. The ENERGY STAR logo emblem
does not represent EPA endorsement of any product or service.
Copyright Notice
This manual is Copyrighted © 2007 by TallyGenicom. All Rights Reserved. This manual may not be copied in
whole or in part, nor transferred to any other media or language, without the express written permission of
TallyGenicom.
The specifications of your printer and the content of this publication are subject to change without prior
notice. Every attempt has been made to verify the accuracy of the content herein.
Publication No. GEG-99201

Cont ents
1 About this Manual...................................................................................................1-1
Conventions......................................................................................................................... .............. 1-2
Safety Notes ...................................................................................................................................... 1-2
Printer Orientation...................... ... ... ... .... ...................................... .... ... ... ... ....................................... . 1-2
2 Getting to Know Your Printer................................................................................. 2-1
Front view.......................................................................................................................................... 2-1
Rear View............................... .... ... ... ... .... ... ....................................... ... ... ................................... .... ... . 2-2
Internal Components.............. .... ...................................... .... ... ....................................... ... ................. 2- 3
Turning the Printer On and Off...... ... ... ....................................... ... ....................................... .............. 2-3
Turning the Printer On......... ... ....................................... ... ....................................... .....................2-3
Turning the Printer Off............................ ... ... ....................................... .........................................2-4
Available Printer Drivers..................................................................................................................... 2-4
Understanding Printing Options......................................................................................................... 2-4
Operator Panel Features .................................................................................................................... 2-5
LCD Display..................................................................................................................................2-5
LED Indicators ........................ ... ... ....................................... ... ....................................... .. .............2-5
Push buttons ................................................................................................................................2-6
Navigating the Operator Panel Menus ................... ... .... ... ....................................... ... ... ... ... .........2-7
Embedded Web Server.............................................................. ... .... ... ... ................................... .... ... . 2-8
Driver Printer Properties.................................................................................................................... . 2-9
Paper Usage..................................................................................................................................... 2-11
Standard Paper ...........................................................................................................................2-11
Special Media Types.. ....................................... ... ... ... .... ...................................... .... ... ... .............2-12
Paper Tray Capacity....................................................................................................................2-13
Paper Weight by Tray .................................................................................................................2-14
Available Paper Sizes..................................................................................................................2-14
Unusable Paper ..........................................................................................................................2-15
System Settings............................ ... ....................................... ... ... .... ............................................... 2-16
Power Saver Modes......................................................................................................................... 2-16
3 Basic Printing Tasks.................................................................................................3-1
Printing a Configuration Summary ..................................................................................................... 3-1
Loading Paper ............................................................................................................................ .... .... 3-1
Loading Trays 2-5 ... ... ... ... .... ... ....................................... ... ... ... .... ... ... ............................................3-1
Loading MPF (Tray 1). ... ... .... ... ... ... ....................................... ... .... ... ...................................... .........3-3
Loading Tray 6 HCF ......................................................................................................................3-5
Printing a Test Page.. .... ... ... ... .... ...................................... .... ... ....................................... ... ................. 3- 6
Basic Printing .......................................................................................................................... ... .... ... . 3-6
Selecting Paper Size.....................................................................................................................3-7
Selecting Number of Copies.........................................................................................................3-7
Collating Copies............ ....................................... ... ... .... ... ....................................... ... ... .. .............3-7
Setting Orientation ................................. ... ... .... ... ... ....................................... ... ... .... .....................3-7
Skip Blank Pages ................................. ... ....................................... ... ... ... .... ... ... ............................3-8
Printing in Reverse Order ....................................................... .... ... ... ............................................3-8
2-Sided Printing....................................................................... ... ... .................................... ... .............. 3-8
Binding Preferences ............... ... ... .... ... ....................................... ... ... ................................... .........3-9
Printing on Special Media................................................................................................................... 3-9
Setting Media Types .. ... ... ....................................... ... .... ... ... ....................................... ... ... ............3-9
Transparencies ...........................................................................................................................3-10
Loading Transparencies ................................... ... .... ... ... ....................................... ... ... ..........3-10
Envelopes...................................................................................................................................3-11
TOC-1

Loading and Printing in Tray 1 ............................................................................................. 3-11
Postcards ................................................................................................................................... 3-11
Loading and Printing in Tray 1 ............................................................................................. 3-12
Labels......................................................................................................................................... 3-12
Loading and Printing............... ... ....................................... ... ... .... ...................................... ...3-12
Custom Size Paper..................................................................................................................... 3-13
Tray Settings........... ... ... ....................................... ... ... ....................................... ... ............................ 3-14
Source........................................................................................................................................ 3-14
Output Destination..................... ... ... ... .... ... ....................................... ... ... ... ... ............................. 3-14
Input Tray Linking.......................... ....................................... ... ... ...................................... .......... 3-15
Output Bin linking....................... ... ....................................... ... ... ... .... ......................................... 3-15
Manual Feed .............................................................................................................................. 3-15
Media Check.............................................................................................................................. 3-15
Job Offset............ ... ... ... ....................................... ... ... ....................................... ... .... ........................ 3-16
Saved Settings........ ... ... ... ....................................... ... .... ...................................... .... ... ..................... 3-16
Using the Hole Puncher................................................................................................................... 3-17
Emptying the Punch Waste Basket ........................ ... .......................................... ... ... .... ... ... ... ... 3-17
Using the Stapler............................................................................................................................. 3-18
Adding Staples.... ... ... .... ... ... ....................................... ... ... ....................................... ... ................ 3-19
Cancelling/Checking Printing........ .... ... ... ... .... .................................................................................. 3-20
Cancelling Printing...................................................................................................................... 3-20
Cancelling a Print Job at the Printer...........................................................................................3-20
Cancelling Print Jobs at the Computer....................................................................................... 3-20
4 Advanced Printing Tasks.........................................................................................4-1
Cover Pages ...................................................................................................................................... 4-1
Separator Page ............................. .... ... ... ... .... ...................................... .... ... ....................................... 4-1
Multiple Pages to Single Sheet (Nup)................................................................................................ 4-1
Booklets................................................................................................................................ ... ... ....... 4-2
Poster Print................................................................................................................................. ... .... 4-3
Scaling............................................................................................................................................... 4-3
Automatically Resize Paper ....................... .... ... ... ... ... .... ...................................... .... ... ... ... .... ............. 4-3
Watermarks................................................................................................................................... ... . 4-3
Image Options............................................................................................................................... ... . 4-4
Brightness and Contrast............................................................................................................... 4-4
Quality.......................................................................................................................................... 4-5
Email Notifications............................................................................................................................ . 4-5
Job Storage and Secure Printing ............... ....................................... ... .... ................................... ... ... . 4-5
Stored Jobs...................................... ... .... ...................................... .... ........................................... 4-5
Private Jobs.................................................................................................................................. 4-5
Direct PDF Printing............................................................................................................................ 4-6
eForms .............................................................................................................................................. 4-7
Overlays......................................................................................................................... ... ................. 4- 7
Job Accounting.................................................... ... ... ....................................... ... .... .......................... 4-8
Sending Files ..................................................................................................................................... 4-9
5 Networking...............................................................................................................5-1
SUPPORTED ENVIRONMENT .......................................................................................................... 5-1
Supported OS and Environment ................................................................................................. 5-1
CONFIGURATION ................................................................................................................... ... ... ... . 5-2
IP ADDRESS ................................................................................................................................ 5-2
PRINTER SETUP USING THE EWS................................................................................................... 5-2
PRINTING FROM A WINDOWS COMPUTER ............................................................................. 5-3
INSTALLATION OF TCP/IP PROTOCOL................................................................................ 5-3
WINDOWS 95/98/Me.......................................... ... ... .... ...................................... .... ... ... ... ..... 5-4
WINDOWS NT 4.0..... ... ....................................... ... ... .... ... ....................................... ... ... ... ..... 5-4
WINDOWS 2000 .............................................................. ... ... .... ...................................... ... .. 5-4
TOC-2 User Manual

Click [Close] in the [Local Area Connection Status] dialogue box. .........................................5-4
CONFIGURING AS A NETWORK PRINTER .................................. ... ... ... .... ... ...............................5-5
WINDOWS 95/98/ME ................................ ... ... ....................................... ... ... .... .....................5-5
WINDOWS NT 4.0. ... .... ... ....................................... ... ... ... ....................................... ... ... .... ... ..5-5
WINDOWS 2000.................... .... ... ... ... ... .... ...................................... .... ... ... ............................5-6
WINDOWS XP AND VISTA....................................................................................................5-7
CREATING A SHARED PRINTER ............................................... ... ... ... ... .... ... ... ... .........................5-8
Settings Windows NT 4.0/2000/XP/Server 2003 ...................................................................5-8
Settings of Windows 95/98/Me .............................................................................................5-9
PRINTING FROM UNIX...................................................................................................................... 5-9
FOR PRINTING FROM UNIX............... ... ... ... ....................................... ... .... ... ... ... .........................5-9
SYSTEM CONFIGURATION .........................................................................................................5-9
TARGET COMPUTERS . ...................................... .... ... ... ....................................... ... ... ... .... .....5-9
INTERFACE..........................................................................................................................5-10
SET UP PROCEDURE ..........................................................................................................5-10
SETTING UP THE WORKSTATION ............................................................................................5-10
Before Setup........................................................................................................................5-10
EXAMPLES OF SETTINGS FOR SOLARIS 2.X ....................................................................5-11
PRINT (LP)............................................................................................................................5-11
Command Format...................................... ... ... ... ....................................... ... .... ... ... .............5-11
Command Options.............................. ... .... ...................................... .... ... ... ..........................5-11
-d Printer name.....................................................................................................................5-11
-n No. of copies....................................................................................................................5-11
Precautions ..........................................................................................................................5-12
Sample.................................................................................................................................5-12
DELETE (CANCEL)...............................................................................................................5-12
Command Format...................................... ... ... ... ....................................... ... .... ... ... .............5-12
Command Options.............................. ... .... ...................................... .... ... ... ..........................5-12
Printer name..................................................... ... ....................................... ... .... ...................5-12
-a ..........................................................................................................................................5-12
-e..........................................................................................................................................5-12
-u user name ........................................................................................................................5-12
JOB NUMBER......................................................................................................................5-13
Precautions ..........................................................................................................................5-13
Sample.................................................................................................................................5-13
INQUIRY (LPSTAT).............. ... .... ... ... ....................................... ... ....................................... ...5-13
Command Format...................................... ... ... ... ....................................... ... .... ... ... .............5-13
lpstat [Option].......................................................................................................................5-13
-o [Printer name]...................................................................................................................5-14
-t...........................................................................................................................................5-14
-u [User name]......................................................................................................................5-14
-v [Printer name]......................... ...................................... .... ... ... ..........................................5-14
Precautions ..........................................................................................................................5-14
Sample.................................................................................................................................5-14
-C OPTION (LPR COMMAND) .............................................................................................5-14
FUNCTION...........................................................................................................................5-14
Selecting a Paper Tray................................................................................................................5-15
Selecting a Paper Output Tray....................................................................................................5-15
Specifying 2 sided Printing .........................................................................................................5-16
Specifying Paper Size and 2 sided Printing.................................................................................5-17
Specifying Collation ....................................................................................................................5-17
Specifying Color and Print Modes ..............................................................................................5-18
PRINTING ...................................................................................................................................5-18
-C, [Parameter], [Parameter].................................................................................................5-18
PRINTING FROM A MACINTOSH COMPUTER .............................................................................. 5-19
User Manual TOC-3

PRINTING FROM A MACINTOSH COMPUTER ........................................................................ 5-19
SYSTEM CONFIGURATION....................................................................................................... 5-19
TARGET COMPUTERS .......... ....................................... ... .... ... ... ....................................... ... ... ... 5-19
SET UP PROCEDURE ................................................................................................................5-19
SNMP SUPPORT............................................................................................................................. 5-19
PRECAUTIONS AND LIMITATIONS................................................................................................ 5-19
ON USING TCP/IP...................................................................................................................... 5-19
Setting Up the Printer..........................................................................................................5-19
Setting Up the Computer .................................................................................................... 5-20
PRINTING FROM WINDOWS.................................................................................................... 5-20
PRINTING FROM UNIX..............................................................................................................5-20
Print..................................................................................................................................... 5-20
Delete.................................................................................................................................. 5-21
6 Installing Consumables ...........................................................................................6-1
Installing the Drum Cartridge............................................................................................................. 6-1
Installing the Toner Cartridge ............................................................................................................ 6-4
7 Maintenance.............................................................................................................7-1
Cleaning the Printer........................................................................................................................... 7-1
Cleaning the exterior.................................................................................................................... 7-1
Cleaning the interior..................................................................................................................... 7-1
When Not in Use for a Long Time..................................................................................................... 7-2
Moving the Printer............................................................................................................................. 7-2
Fuser Unit............................ ... ... ... .... ... ... ....................................... ... ... .................................... ... ... .... 7-5
Caution on Handling the Fuser Unit .............................. ... .... ...................................... .... ... ... ... ..... 7-5
Replacing the Fuser Unit.............................................................................................................. 7-5
Transfer Roll Cartridge....................................................................................................................... 7-6
Caution on Handling the Transfer Roll Cartridge.......................................................................... 7-6
Replacing the Transfer Roll Cartridge...........................................................................................7-7
Maintenance Kit......... ... ... .... ... ....................................... ... ... ... ....................................... .................... 7-7
8 Troubleshooting.......................................................................................................8-1
Poor Print Quality.... ... ... ....................................... ... ... ....................................... ... .............................. 8-1
No Power.............................................................................................................................. ... ... ... .... 8-5
Cannot Print................................................................................................................................ ... ... . 8-5
Printing is Not Clear.................................................................................................................... ... ... . 8-5
Paper Incorrectly Fed......................................................................................................................... 8-6
Noise ................................................................................................................................................. 8-6
Network Troubleshooting....... ... ... ....................................... ... .... ...................................... .... ............. 8-6
USING TCP/IP .............................................................................................................................. 8-6
WHEN USING WINDOWS 95/98/ME.................................................................................... 8-7
USING WINDOWS NT 4.0/2000/XP/VISTA/SERVER 2003.................................................... 8-7
When Using Unix............................................. ... .... ... ... ....................................... ... ... .... .............. 8-9
USING ETHERTALK............................................................................................................. 8-10
Error and Warning Messages.......................................................................................................... 8-13
................................................................................................................................................... 8-21
9 Clearing Paper Jams. ...............................................................................................9-1
Jam Area Locations...................... .... ... ... ... .... ...................................... .... ... ... .................................... 9-1
Jam at A .............. ... ....................................... ... ... ... ... ....................................... ... .... ... ....................... 9-1
Jam at B .............. ... ....................................... ... ... ... ... ....................................... ... .... ... ....................... 9-2
Jam at C .............. ... ....................................... ... ... ... ... ....................................... ... .... ... ....................... 9-4
Jam at D....... ....................................... ... ... .... ... ....................................... ... ... ... ................................. 9-6
Jam at E..................... ... ... .... ... ....................................... ... ... ... ....................................... ... .... ... .......... 9-7
Jam at F........................... .... ... ... ... .... ... ....................................... ... ... ... ....................................... ... ... . 9-8
Jam at G....... ....................................... ... ... .... ... ....................................... ... ... ... ................................. 9-9
Jam at H....... ....................................... ... ... .... ... ....................................... ... ... ... ............................... 9-11
Jam at the Stacker Upper Tray........................................................................................................ 9-12
TOC-4 User Manual

Paper Jam in MPF (Tray 1)............................................................................................................... 9-13
Paper Jams in Trays 2-5................................................................................................................... 9-14
Paper Jam in Tray 6.......................................................................................................................... 9-16
10 Installing Accessories..........................................................................................10-1
Duplex Module................................................................. .... ... ... ...................................................... 10-1
Two Tray or Tandem Tray Module ................................ ... .... ... ....................................... ... ... ... ......... 10-5
High Capacity Feeder (Tray 6) .......................................................................................................... 10-9
Finisher........................................................................................................................................... 10-13
Hard Disk Option........................... ... ... .... ... ....................................... ... .......................................... 10-20
Memory Option and Compact Flash .............................................................................................. 10-22
A Operator Panel.........................................................................................................A-1
Paper Menu....................................................................................................................................... A-1
Interface Menu.................................................................................................................................. A-2
PS Menu ................... .... ... ... ... ....................................... ... .... ...................................... ....................... A-4
PCL Menu.............. ... .... ... ... ....................................... ... ... .... ... ....................................... ................... A-5
System Menu......................... .... ... ... ... ....................................... ... .... ... ............................................. A-6
Quality Menu..................................................................................................................................... A-6
Functions Menu................................................................................................................................ A-7
Date/Time Menu............................................................................................................................... A-7
Status Menu...................................................................................................................................... A-7
Information Menu ......... ... ... ....................................... ... ... .... ...................................... .... ... ................ A-8
Options Menu................................................................................................................................... A-8
User Manual TOC-5

TOC-6 User Manual

Chapter 1: About this Manual
Thank you for selecting the 9050N 50 ppm Laser printer.
This manual contains all of the information necessary to
operate and care for your printer and accessories. It is
intended to be used with the pictorial unpacking
instructions and the Quick Start Guide, both included in the
printer packaging. If you have not already unpacked and
installed the printer, please refer to these documents. This
manual does not contain instructions for unpacking and
installing the printer.
This printer has the following special features:
• Quality printing at a high speed
Print speed is up to 50 pages per minute at either
600x600 or True 1200 x 1200 dpi in 1-sided or
2-sided modes.
• Flexible use of paper sources and delivery methods
The 9050N printer provides a 100-sheet Tray 1/
Multi-Purpose Feeder (MPF) from which specialty
media, card stock, custom size paper, transparencies,
and envelopes are fed. Tray 1 also supports manual
feeding.
In this Chapter...
• Conventions
• Safety Notes
• Printer Orientation
Two additional trays, Tray 2 and 3, each provide 500
sheets of capacity for paper sizes up to A3 or 11 X 17
inches.
The Standard Top Bin Output Tray holds 500 sheets
face down.
• Network-readiness
The standard printer includes a 10/100BaseT
Ethernet Network Interface for use with TCP/IP,
Apple Ethertalk, and Novell communications.
• Easy operation
Consisting of LEDs, a display, and nine function
buttons, the easy-to-read Operator Panel display
shows the status of printer operation.
Operator Panel push buttons allow you to access and
view printer menus and status messages.
1-1
Conventions
About this Manual
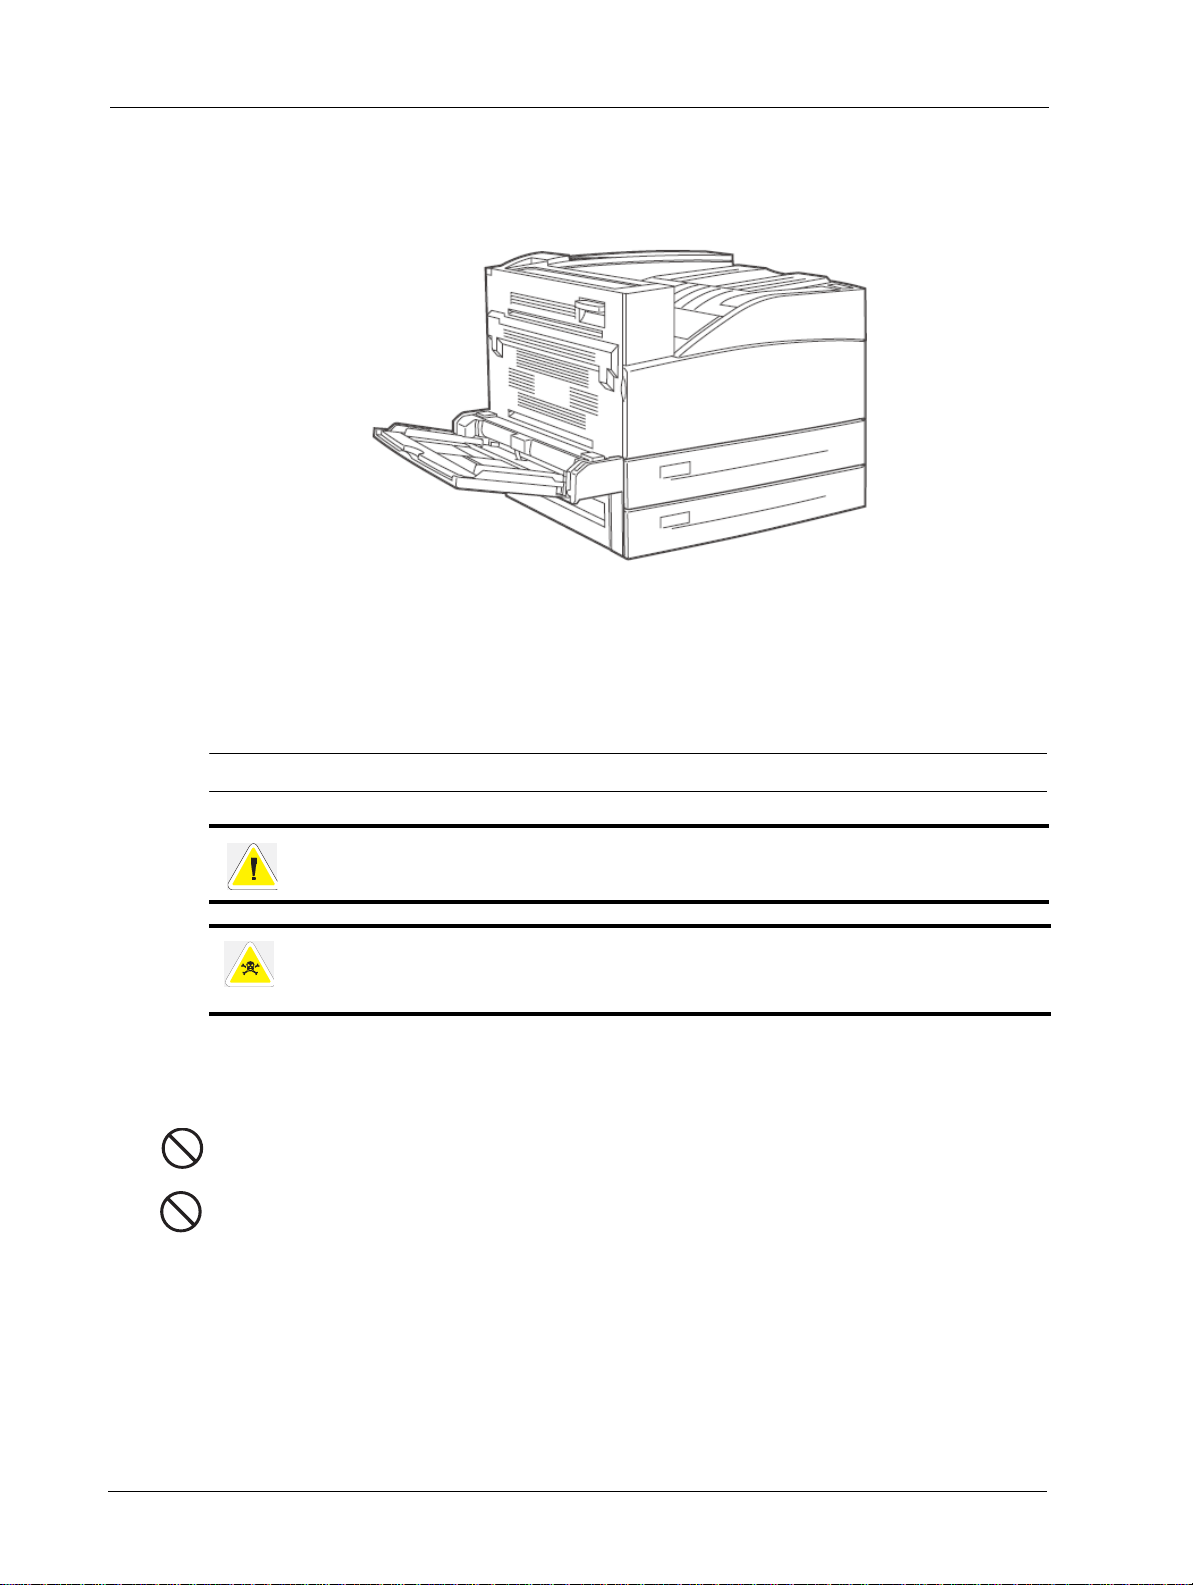
The basic printer consists of the print engine main unit, consumables, Tray 1 (100 Sheet Multi
Purpose Feeder (MPF)) as well as Trays 2 and 3 (500 sheet capacity each).
Conventions
This following conventions are used throughout this manual to emphasize certain procedures or
information:
NOTE: A note is a tip or extra information that may be helpful in installing or using the printer.
CAUTION: A caution message provides information that may help you avoid equipment
damage, process failure, or inconvenience. Read all caution messages carefully.
WARNING! A warning message indicates the possibility of personal injury if a specific
procedure is not performed exactly as described in the guide. Pay close attention to these
sections and read them fully to prevent possible injury.
Safety Not es
For your own safety, please read this page carefully before using the machine.
• Do not place the machine in a hot, humid, dusty, or poorly ventilated environment.
Prolonged exposure to these adverse conditions can cause fire or electric shock.
• Do not place the machine near heaters or volatile, flammable, or combustible materials
such as curtains that may catch fire.
Printer Orientation
Throughout this guide, the four sides of the printer are referred to as front, rear, right, and left.
The front of the printer is the side near the Operator Panel, and the rear of the printer is opposite
the front. The left and right sides of the printer are defined as the sides to the left and right,
respectively, of a person who is facing the front of the printer.
1-2 User Manual
Chapter 2: Getting to Know Your Printer
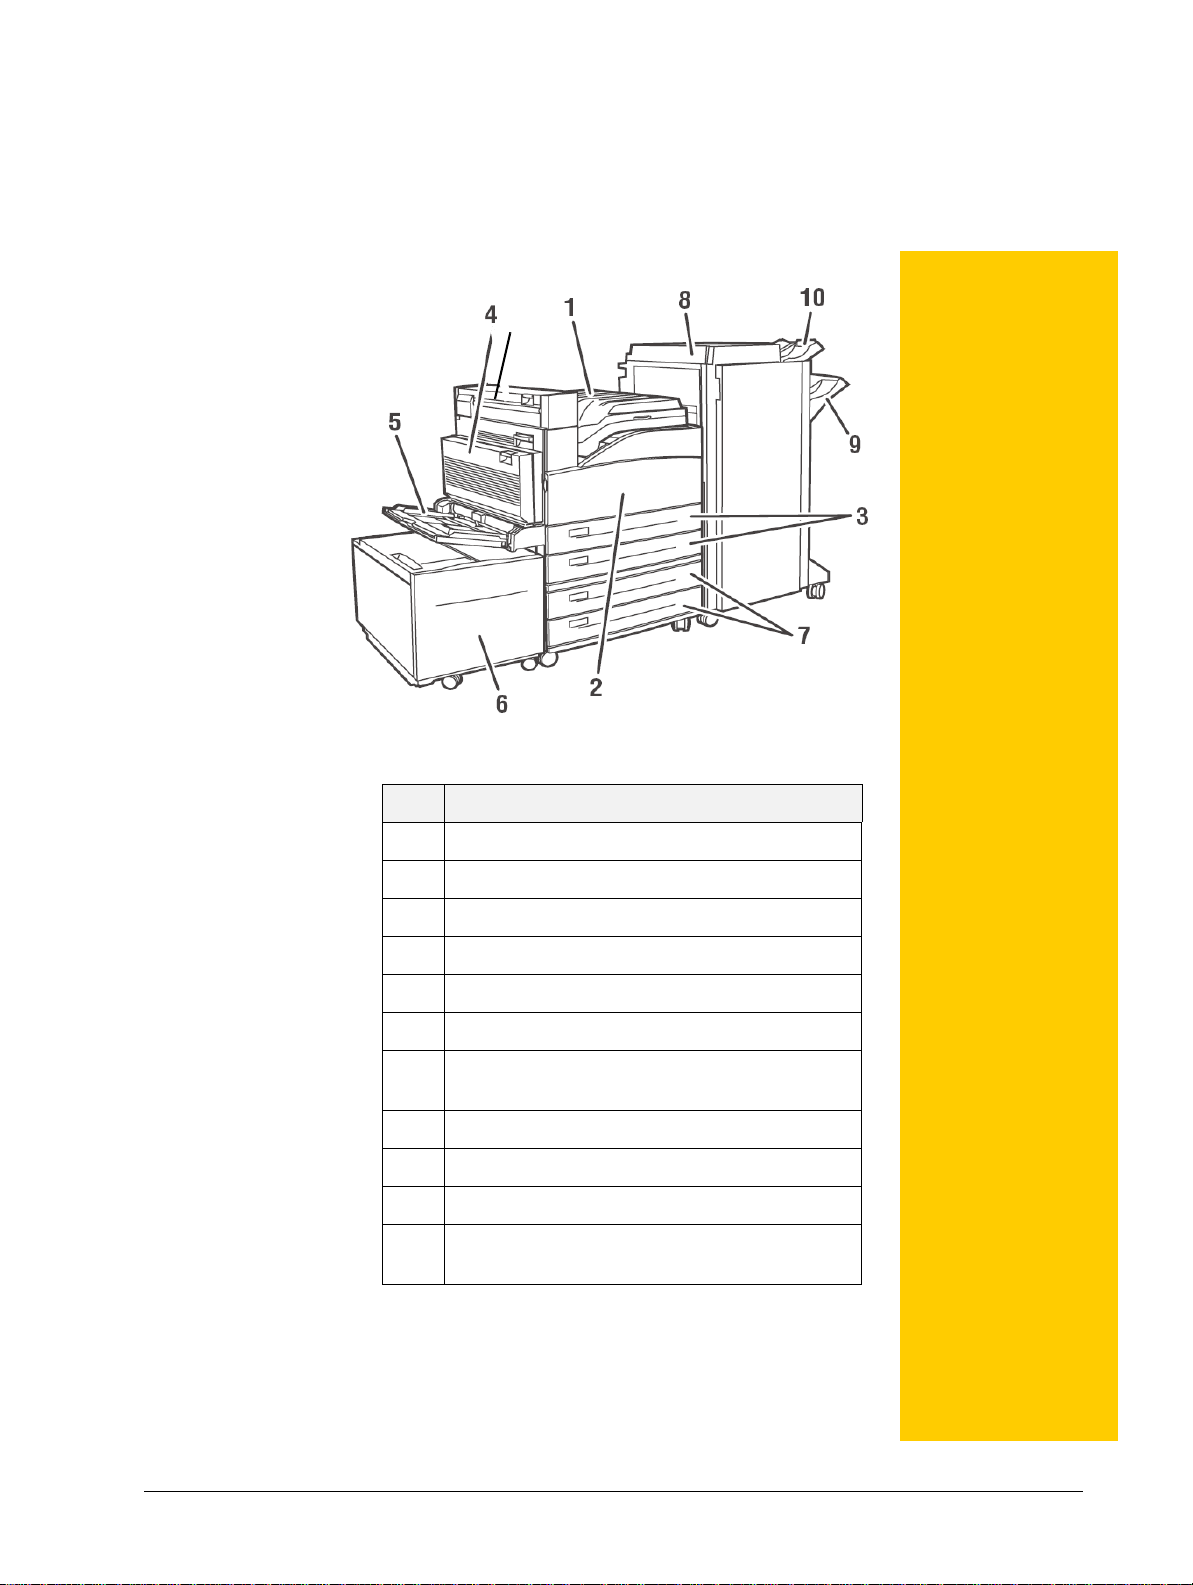
Front view
11
No. Name
1 Standard output tray and transport to finisher
In this Chapter...
• Front view
•Rear View
• Internal
Components
• Turning the Printer
On and Off
• Available Printer
Drivers
• Understanding
Printing Options
• Operator Panel
Features
• Embedded Web
Server
• Printer Properties
• Paper Usage
• Networking
•System Settings
• Power Saver
Modes
2 Front Door
3 Two 500-sheet feeders (Trays 2 and 3)
4 Optional Duplex Unit
5 Tray 1 (Multi Purpose Feeder)
6 Optional High Capacity Feeder (Tray 6)
7 Optional 2x 500-sheet Two Tray Module or Tandem
Tray Module
8 Optional 3500-Sheet Finisher
9 Stacker Main Bin (3000 Sheets)
10 Stacker Upper Bin (500 Sheets)
11 Exit 2 is used in conjunction with duplex unit and
finisher, comes with the Duplex unit.
2-1
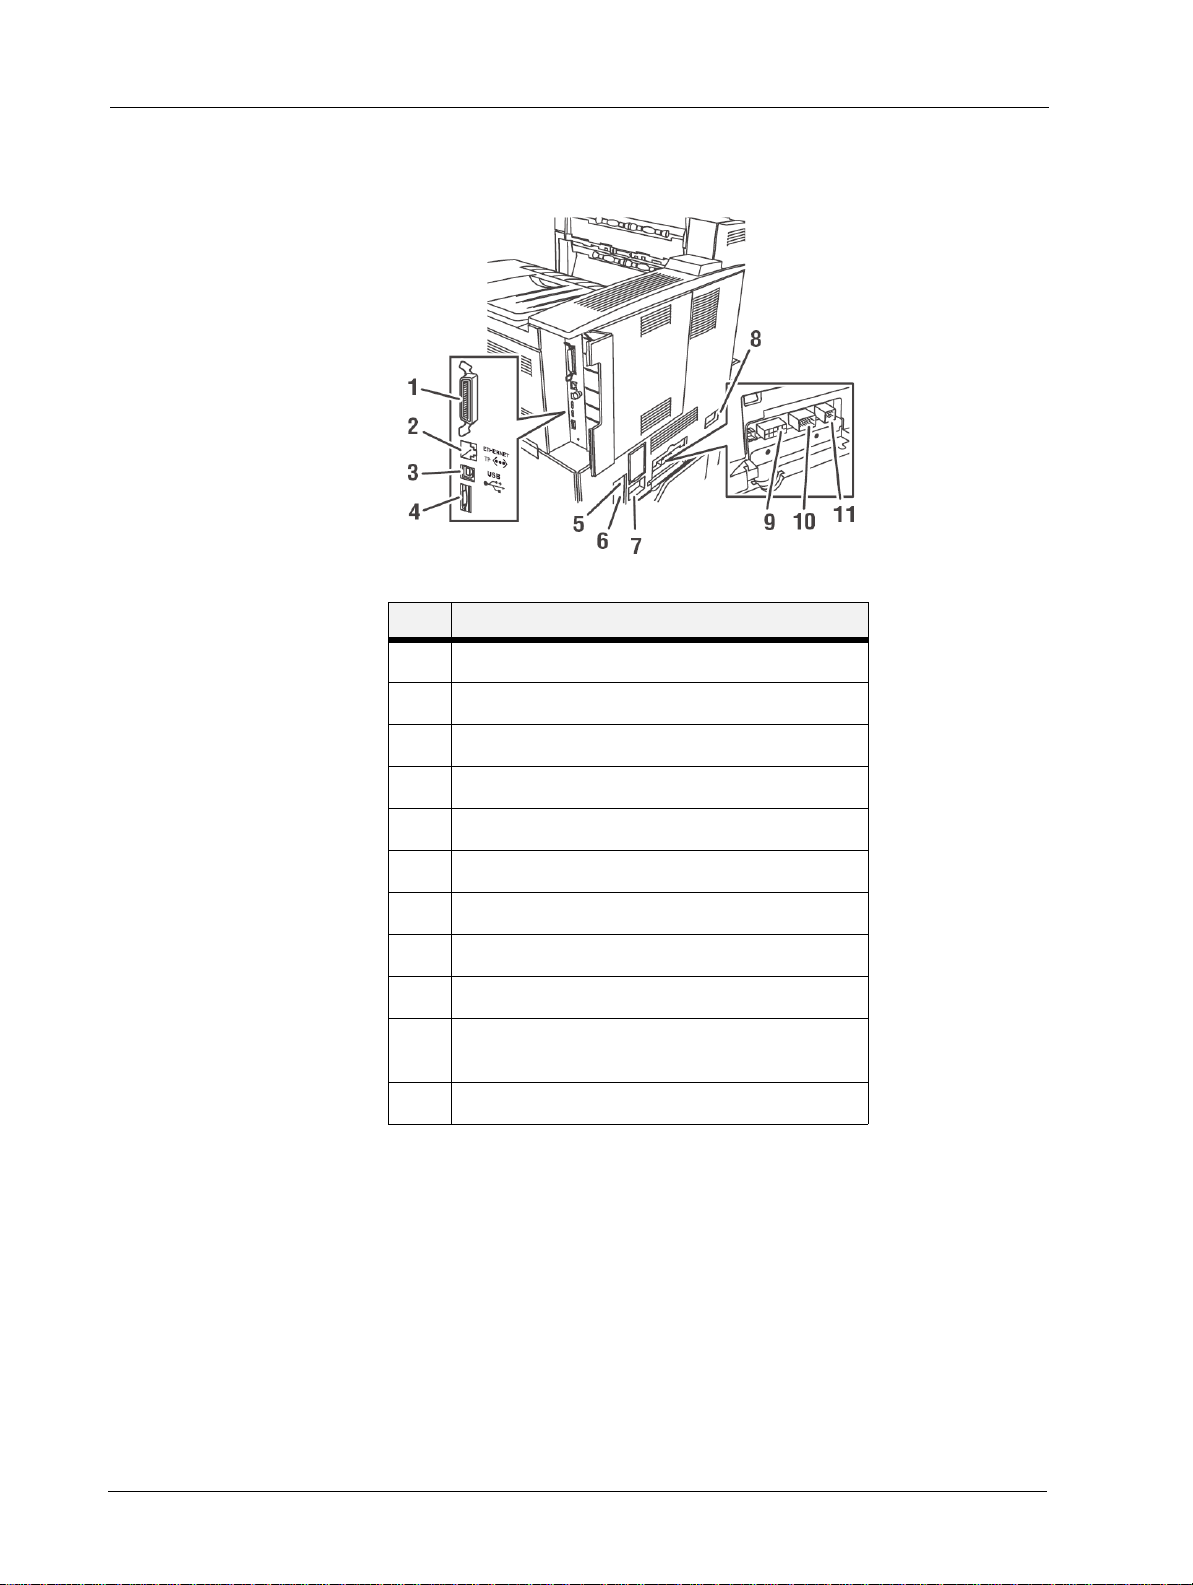
Rear View
Getting to Know Your Printer
Rear View
No. Name
1
2
3
4
5
6
7
8
9
10
11
Parallel Port, IEEE 1284
Ethernet 10/100 BaseT connection
USB 2.0 connection
Serial RS232 port
Ground Fault Interrupt (GFI) reset
Power cord connection
Finisher power cord connection
High Capacity Feeder (Tray 6) connection
Finisher connection
Tandem or Two Tray module (Trays 4 and 5)
connection
Duplex Unit connection
Data I/O connector settings can be configured via the Operator Panel’s Interface Menu. There
are settings for Ports, Parallel Setup, USB Setup, and Serial Setup See “Interface Menu” on
page A-2 for a detailed description of each setting.
2-2 User Manual
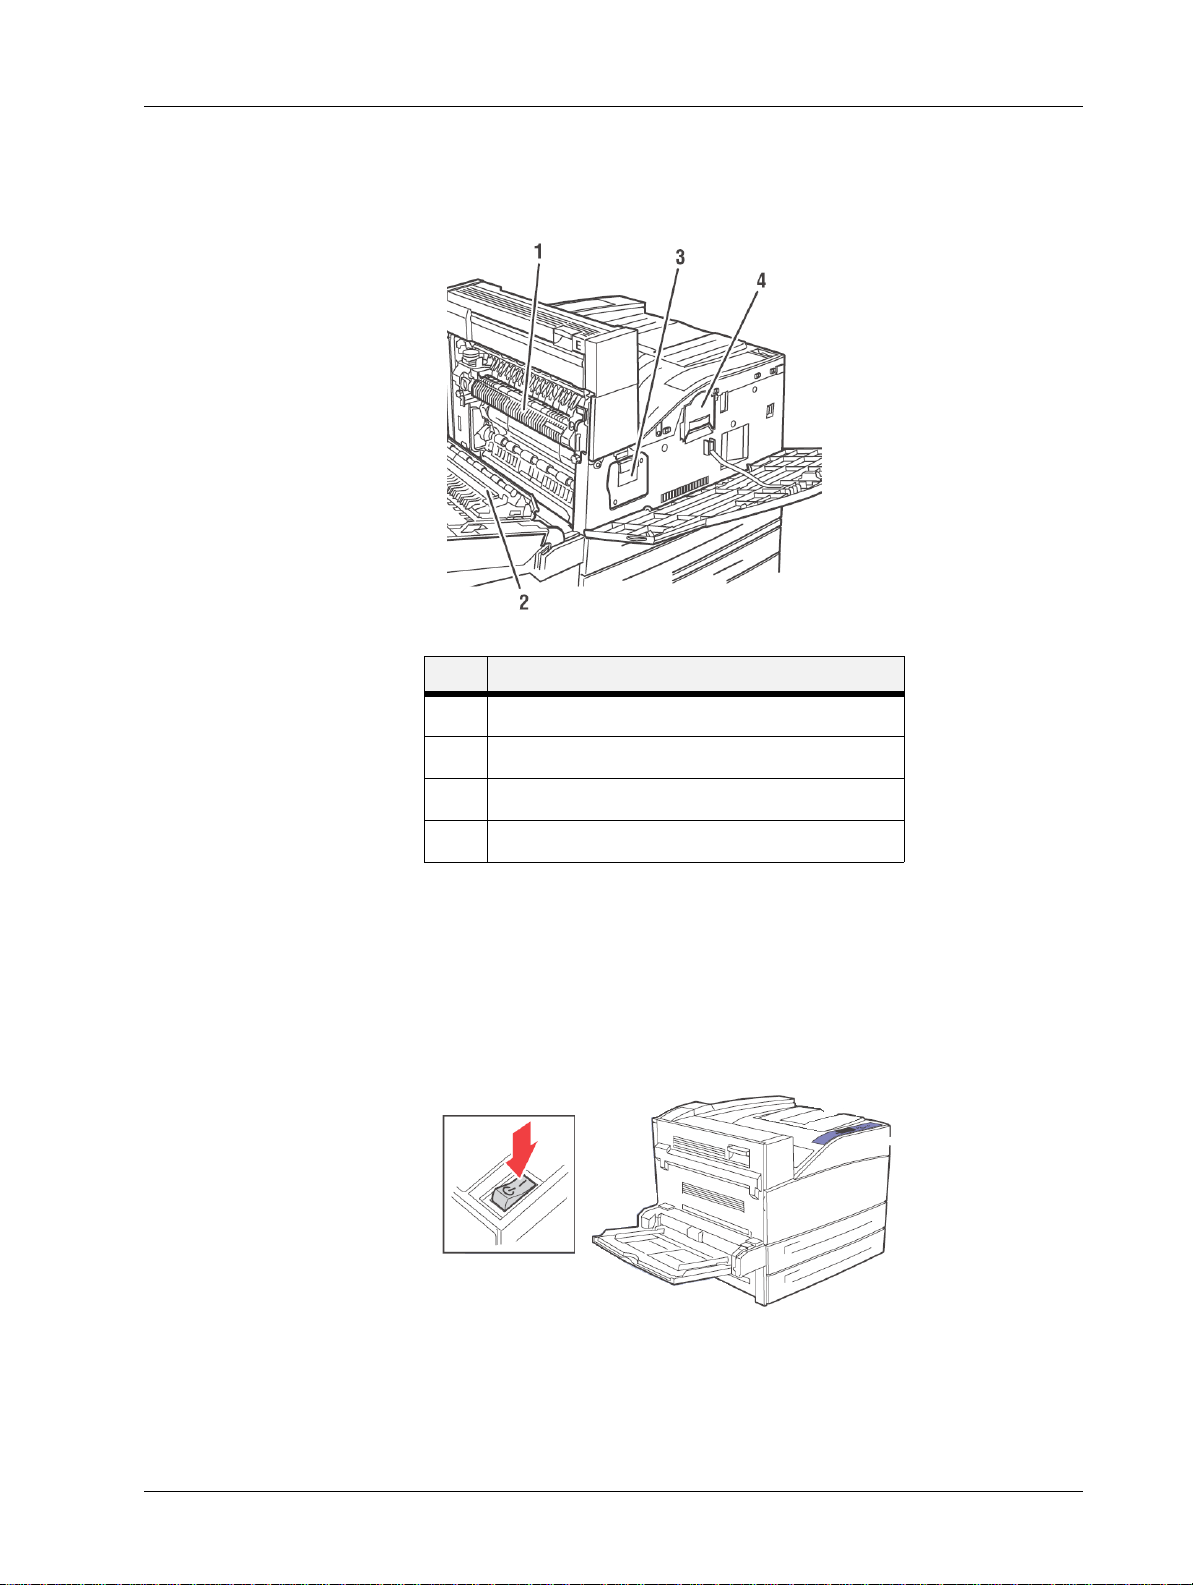
Internal Components
Internal Components
Getting to Know Your Printer
No. Name
1
2
3
4
Turning the Printer On and Off
Switch on the power before operating the printer. When you have finished using the printer for
the day or you do not intend to use it for a long period of time, switch off the power.
Turning the Printer On
1. Press the power switch to the <I> position to turn the power on.
Fuser
Transfer Roll
Drum Unit
Toner Cartridge
User Manual 2-3

Available Printer Drivers
Getting to Know Your Printer
Turning the Printer Off
1. Make sure that the printer is not processing a print job.
2. Press the power switch to the <{> position to turn the power off.
Remember to turn off the printer at the end of day or when the printer will not be used for an
extended period of time.
NOTE: When the printer is turned off, all print data still in memory will be erased
Available Printer Drivers
Drivers are available for the following Microsoft operating systems: Vista 32/64, XP 32/64,
Server 2003 32/64, Windows 2000, NT 4, Windows 98, Windows Me, and Windows 95.
Drivers for the following PDLs are available for each of the above operating systems:
• PostScript 3 Driver
•PCL5e
•PCL6
PCL6 is the default installed driver.
The printer emulates PCL5c, PCL6, and has a native Adobe processor for PostScript 3.
Configuration options for these emulations are available via the Operator Panel PS and PCL
Menus.
PPDs are provided for Mac OSX (10.2 and later). The installation CD contains PPDs for use
with standard internal Mac drivers.
The installation CD contains PPDs for use with most current Unix CUPS drivers.
Understanding Printing Options
The printer offers many ways to modify printing options. The Operator Panel provides an
interface at the printer. The Embedded Web Server (EWS) provides remote access via HTML.
You can access features of the printer driver through your application or through your Printers
and Faxes menu (on Windows). When accessing the driver through your Printers and Faxes
Menu, you reach the Printing Properties window and are setting global options. When
accessing the driver through an application, the Printing Properties entered apply only to
documents printed through the application. Printing Properties set through an application
supersede settings entered in any other way.
Certain printer settings, such as number of copies, duplexing, and collating may be set from the
Print window provided by your application. These settings may be used instead of similar
settings accessed via the driver. The settings from your application’s Print window are reflected
in the Printing Properties accessed from the driver.
2-4 User Manual
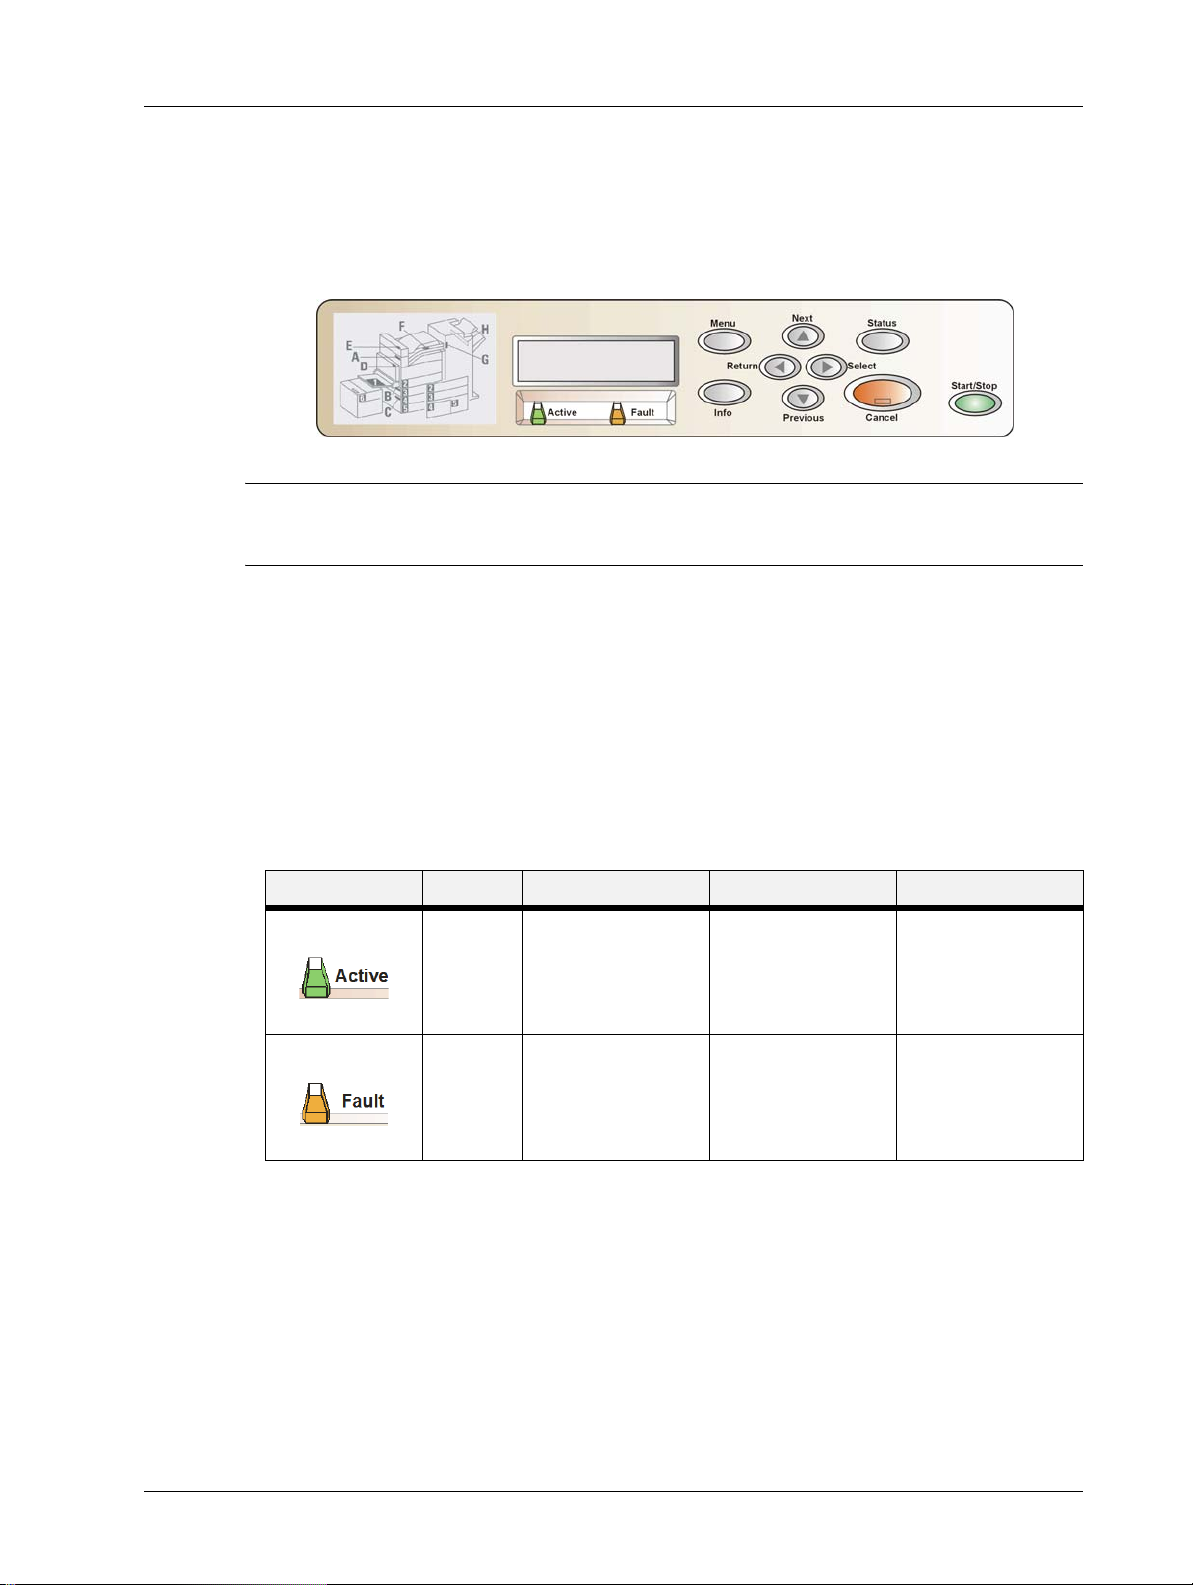
Operator Panel Features
The Operator Panel is located on the front of the printer. It contains the display, indicators, and
push buttons that allow you to view and change global printer settings. All features of the
printer are accessible through the Operator Panel. These changes affect all documents printed
unless instructions are provided through your applications printer settings.
NOTE: If there is a conflict between settings in the Operator Panel, Printing Preferences, or Embedded Web
Server and printer settings set via your application, the application settings supersede any other
setting.
LCD Display
The LCD display shows status and error messages that inform you of the current status of the
printer, and also displays menus, submenus, and printer settings when you are in the menu
system. The display contains two lines of text, each with a maximum of sixteen characters.
Operator Panel Features
Getting to Know Your Printer
LED Indicators
The LED indicators also indicate printer status. The three indicators can each be on, off, or
blinking, indicating different phases of printer operation. The table below explains two of the
LED indicators.
LED Color When Off When On When Blinking
Green Printer is IDLE Printer is ACTIVE
(processing a job)
Red Printer is not in error
mode
There is an error that
requires user
intervention, such as a
paper jam, a service
call required, etc.
Printer is W AITING (a
partial job has been
printed, and the printer
is waiting for
additional job data)
N/A
User Manual 2-5
Operator Panel Features
Getting to Know Your Printer
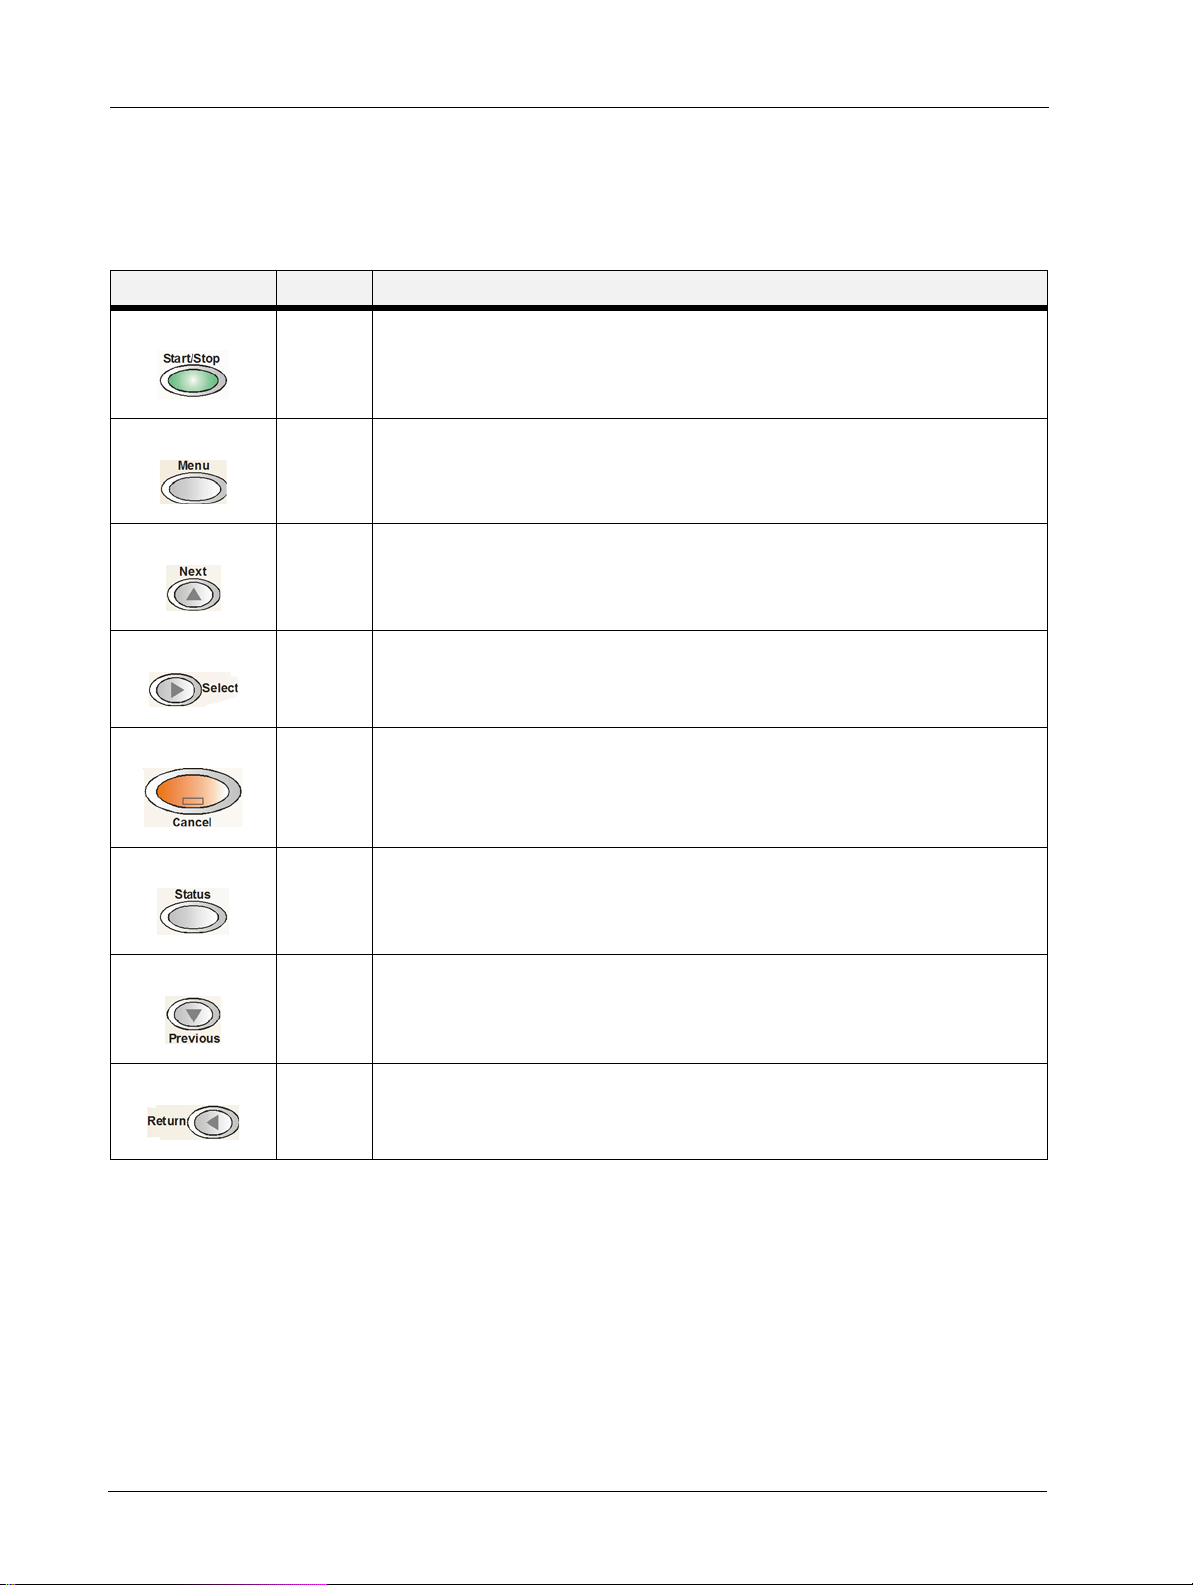
Push buttons
The Operator Panel push buttons allow you to access and navigate menus, and also assist you in
recovering from printer errors. The table below explains the functions of the eight push buttons.
Button Name Function
Start/Stop Start or stop the printer or to exit the menu system. The LED on the Start/Stop button is
solid green when ready to print. It flashes green when the printer is in power save mode.
Menu Enter the menu system.
Next Move to the next menu, submenu, or setting within the same level of the menu structure.
Select Select the menu or submenu that is shown on the second line of the display or to choose
and save the setting shown on the second line of the display.
Cancel Cancel a print job.
Status Enter the Status Menu and view the current status various items on the printer.
Previous Return to the previous menu, submenu, or option within the same level of the menu
structure.
Return Move up one level in the menu structure to the menu shown on the first line of the display.
2-6 User Manual
Operator Panel Features
Getting to Know Your Printer
Navigating the Operator Panel Menus
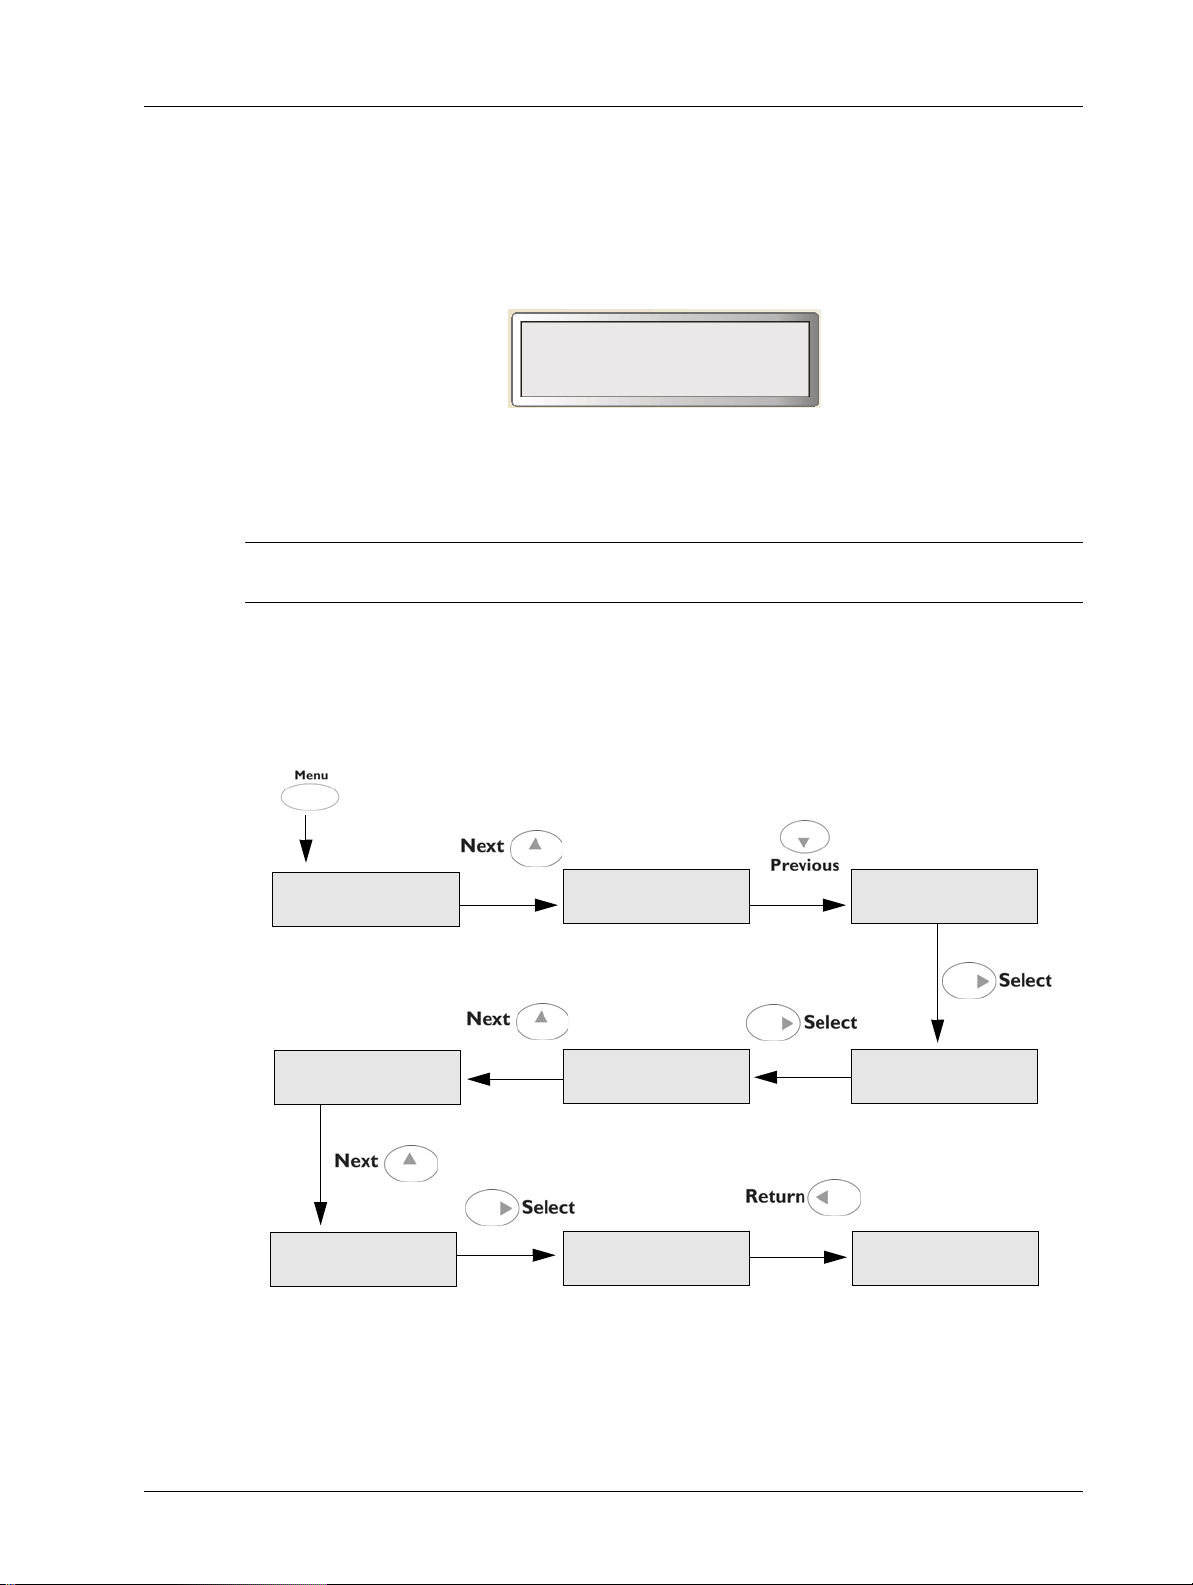
When you press the Menu button on the Operator Panel, you enter the printer’s menu system.
At that point, the first line of the display contains the text “Menu”, indicating that you are in the
menu system. The second line of the display lists the active menu, which you can change by
pressing the Next or Previous button.
Menu
Job Library
If you press the Next button repeatedly, the second line of the display cycles through the main
menus.
NOTE: Additional menus and submenus may appear in the printer menu system when other options are
installed.
The following figure shows the sequence of push buttons and display messages that would
allow you to change the number of copies printed. This example illustrates the basic
relationship between menus and submenus and demonstrates how the Next, Previous, Select,
and RETURN buttons help you to navigate through the menus.
Menu
Paper Menu
Copies
2
Copies
3
Menu
Interface Menu
Copies
1
Paper Menu
Copies
Menu
Paper Menu
Paper Menu
Copies
Menu
Paper Menu
1. Press the Menu button on the Operator Panel enters the printer’s menu.
The first line of the display contains the text “Menu”.
User Manual 2-7
Embedded Web Server
Getting to Know Your Printer
2. Press the Next button until the text “Paper Menu” is shown on the second line of the
display.
3. Press the Select button to enter the paper menu.
4. Press the Next button until the text “Copies” is shown on the second line of the display.
5. Press the Select button to enter the copies submenu.
6. Press the Next or Previous button to increase or decrease the number of copies printed.
7. Press the Select button to save this setting.
8. Press the Start/Stop button to exit the menu system.
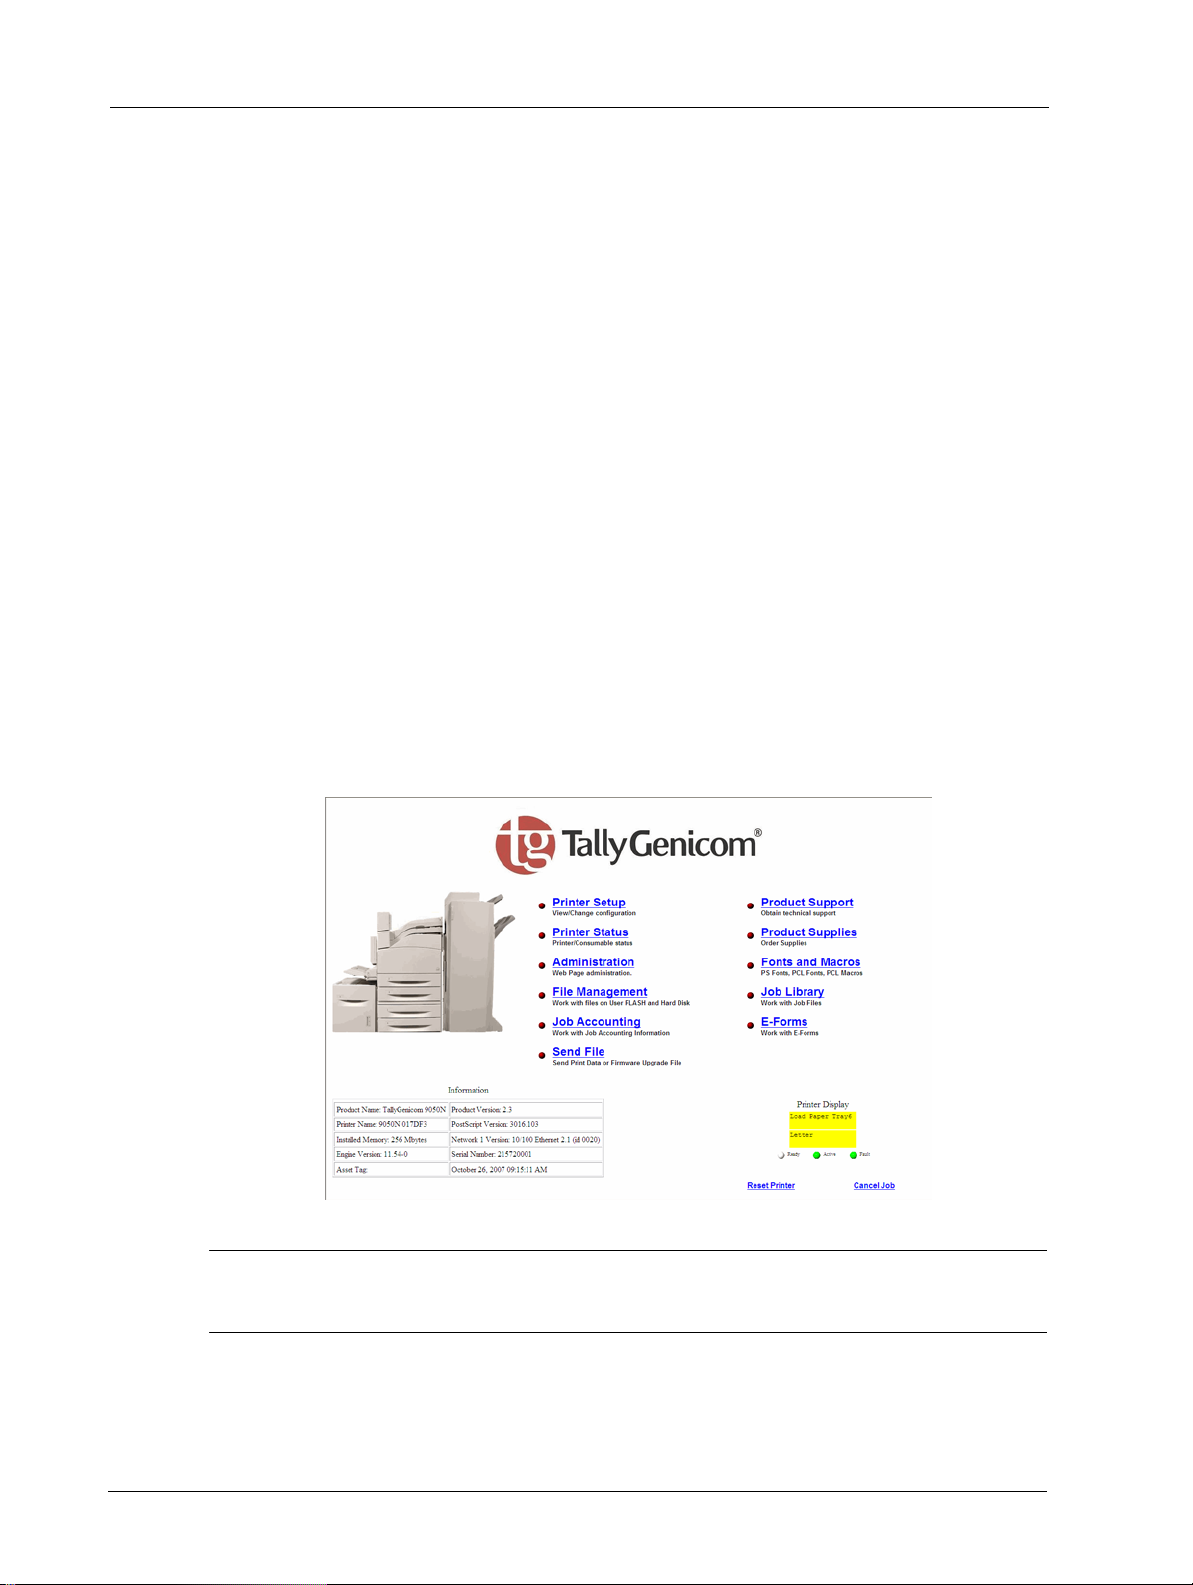
Embedded Web Server
This printer comes with an embedded web server (EWS). The EWS resides on the hardware
and no installation is required. The EWS can be used from any remote station via HTTP access.
The EWS contains access to all printer features and presents them as HTML web pages. The
changes made via the EWS change the printer settings in the same manner as the Operator
Panel. To change settings for specific documents, you should use your Printer Properties
options within the driver.
To access the embedded web server, you must be on an IP-based network and have access to a
web browser.
In your web browser, type the IP address assigned to the printer. For example http://192.0.0.1
NOTE: If there is a conflict between settings in the Operator Panel, Printing Preferences, or Embedded Web
Server and printer settings set via your application, the application settings supersede any other
setting.
The EWS interface consists of a left-navigation area and a display area. Use the left-navigation
area to locate the desired items and make any configuration changes in the display area.
2-8 User Manual
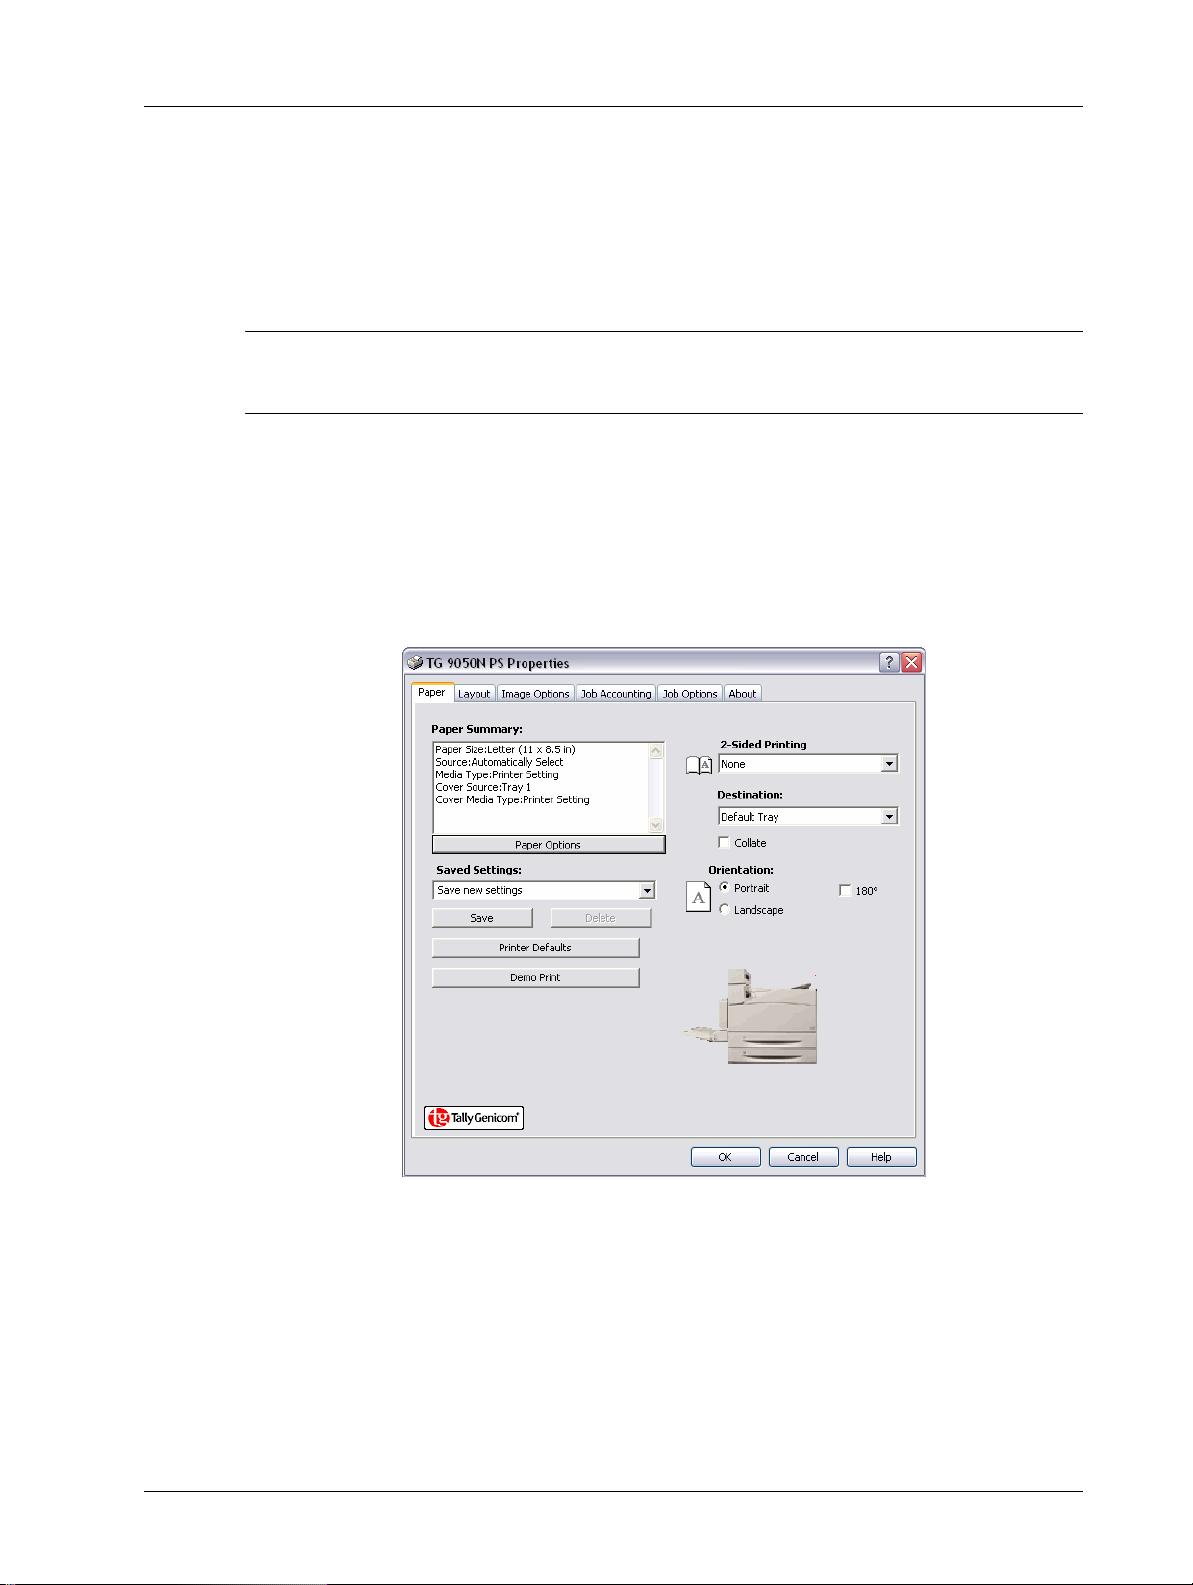
Driver Printer Properties
The Printer Properties window (the driver) can be accessed either from your application or
through your Printer’s Printer and Faxes (Windows). To make changes that apply to all jobs,
access Printer Properties via your Printers and Faxes Menu. To make changes that apply to
documents printed from a specific application, access Printer Properties from the application.
NOTE: If there is a conflict between settings in the Operator Panel, Printing Preferences, or Embedded Web
Server and printer settings set via your application, the application settings supersede any other
setting.
To access Printer Properties from an application:
1. Select the Print option from your program.
2. Select the desired 9050 printer.
3. Click Printer’s Properties button.
The Printer Properties window appears.
Driver Printer Properties
Getting to Know Your Printer
To access Printer Properties from Printers and Faxes (Windows):
1. Select the Printers and Faxes from your Start menu.
2. Right-click the desired 9050 printer and select Properties.
User Manual 2-9
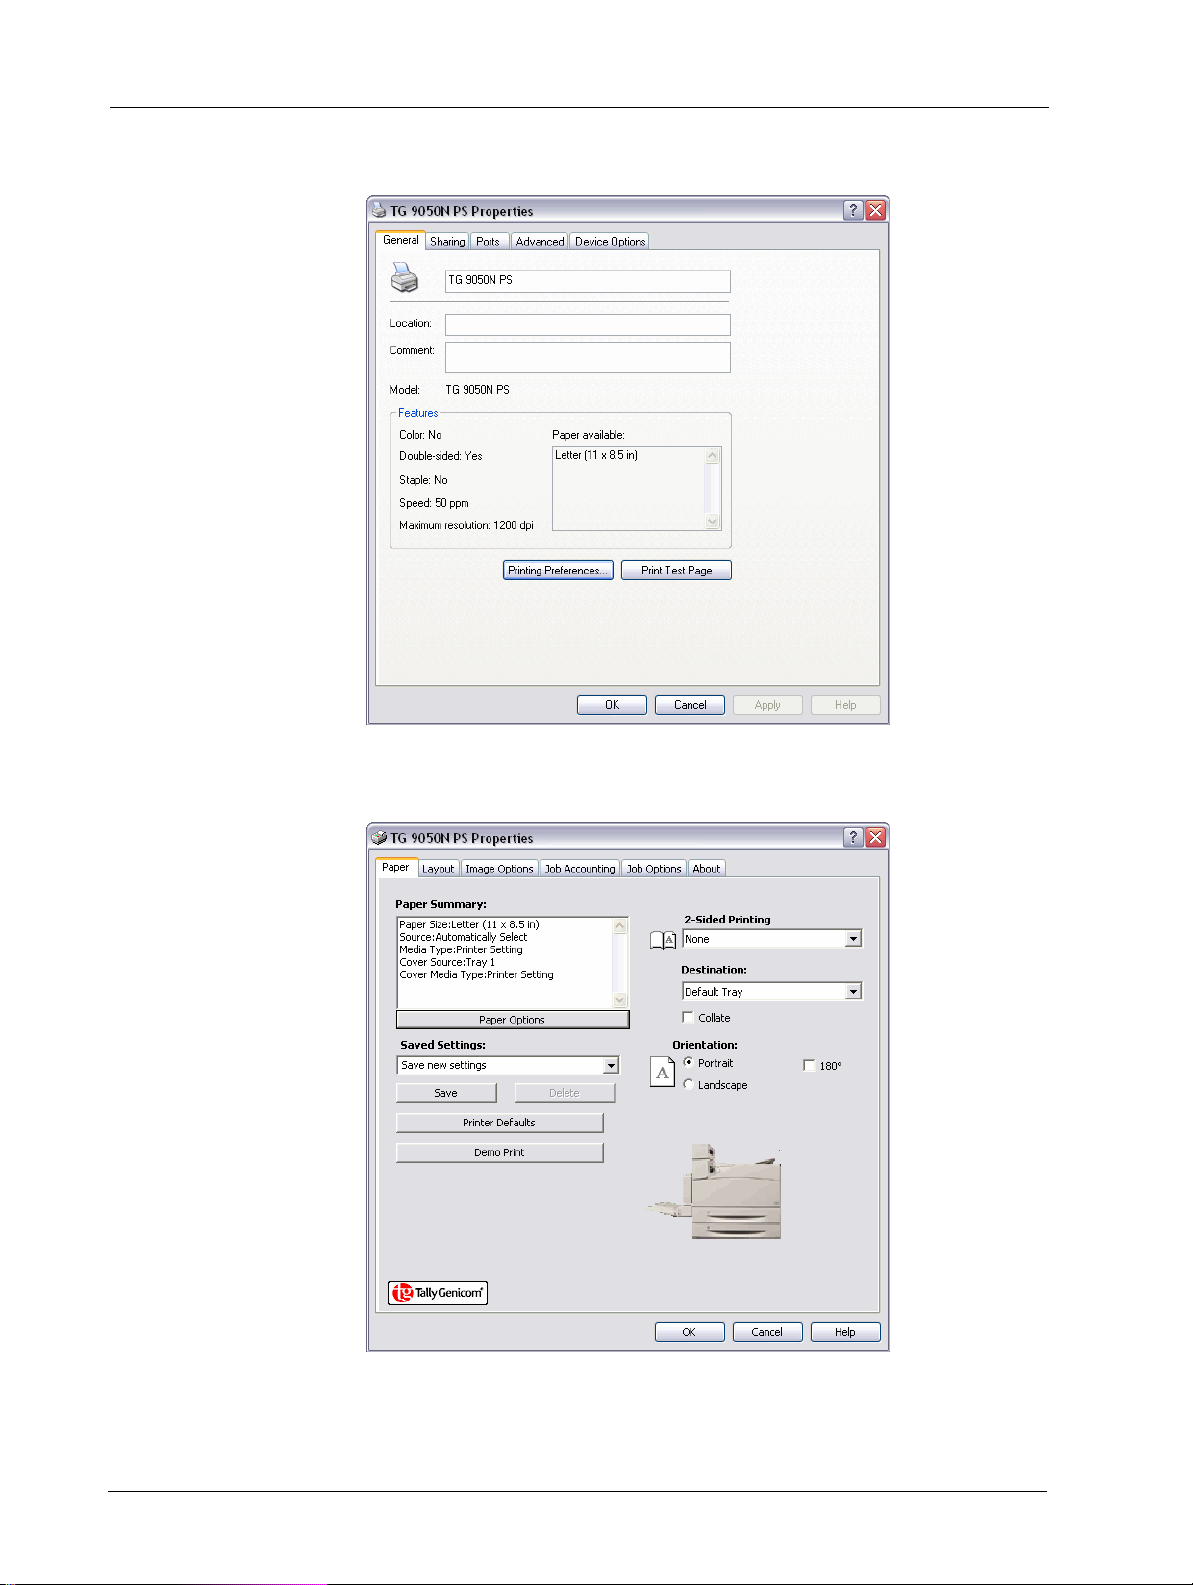
Driver Printer Properties
Getting to Know Your Printer
The Printer’s configuration window appears.
3. On the General Tab, click Printing Preferences
The Printer Properties window appears.
2-10 User Manual

Paper Usage
This printer can print on paper that is commonly sold. Select paper suitable for use by referring
to the table below. However, we recommend the use of the standard paper for clearer printing.
NOTE: GSM indicates the weight of a 1 m2 sheet of paper.
Standard Paper
The standard paper that can be used for this printer is as follows.
Paper Usage
Getting to Know Your Printer
Using paper that is not suitable for this printer might lead to paper jams or poor print
quality. To make full use of the printer features, we suggest using only paper that is
recommended here.
Manufacturer Paper size Weight
Xerox Business Multipurpose
4200
Xerox Business Multipurpose
4200
Xerox Business Multipurpose
4200
Hammermill Tidal MP Letter 20 Lb.
Hammermill Tidal MP Legal 20 Lb.
Hammermill Tidal MP Ledger 20 Lb.
Willamette Willcopy, 84
brightness
Boise Cascade X-9000 Letter 20 Lb.
Georgia-Pacific Microprint Laser Letter 24 Lb.
Xerox 4024 Tabloid 20LB
Xerox 4024 Legal 20 LB
Xerox Business Multipurpose
4200 3 hole
Xerox Business Multipurpose
4200
Letter/A4 20 Lb./75 GSM
Legal 20 Lb.
Tabloid/A3 20 Lb./75 GSM
Letter 20 Lb.
Letter 20 Lb.
Statement 20 Lb.
Georgia-Pacific Microprint Laser
1000 - (Cut)
Xerox Premier A4 80 GSM
Berga Focus, 265.101 A4 80 GSM
Xerox Business (Saillat) A3 80 GSM
User Manual 2-11
Executive 24 Lb.
Paper Usage
Getting to Know Your Printer
Manufacturer Paper size Weight
Xerox A5 80GSM Premier A5 80 GSM
Xerox Recycled (Steinbeins) A4 80 GSM
Stra Enso Multicopy A4 100 GSM
Arjo Wiggins Conqueror High
Speed Laser Laid
Xerox Business 4-Hole A4 80 GSM
Xerox 4-hole punched Nymolla A4 80 GSM
Neusiedler ColorCopy A3/A4 80 GSM
A4 90 GSM
Special Media Types
The printer can also print on special media types such as transparencies, envelopes, labels, and
postcards. These types of media are called special media.
Media Type Size Weight Manufacturer
Envelope COM-10 24 Lb. Columbian No. 10 (Com 10) Envelope
Envelope Monarch 24 Lb. Strathmore Writing Bright White Move
Monarch Envelope
Transparency Letter Xerox Paper Backed Transparency
Transparency Letter Xerox Removable Stripe Transparency
Specialty Letter Xerox Carbonless Paper 2-Part
Specialty Legal Xerox Carbonless Paper 2-Part
Specialty Letter Xerox Carbonless Paper 3-Part
Specialty Legal Xerox Carbonless Paper 3-Part
Heavy media Letter 32 Lb. / 120
GSM
Heavy media Letter 32 LB/120G Hammermill Laser Print
Heavy media Letter 90 Lb. / 163
GSM
Heavy media Letter 110 Lb. /
179GSM
Heavy media Letter 215 GSM Wausau Bright Cover White
Label Letter Xerox High-speed labels 1-up
Label Letter Xerox High-speed labels 33-up
Envelope DL 80 GSM Riverseries DL Severn Gummed Envelope
Envelope C5 80 GSM Riverseries C5 Congo Gummed Envelope
Transparency A4 3M Type L Desktop Laser Transparencies
2-12 User Manual
Xerox Digital Color Xpressions+
Xerox 90 lb. - index
Xerox 110 lb. index
Media Type Size Weight Manufacturer
Transparency A4 Xerox Type B Universal White Stripe
Heavy media A4 160 GSM Premier 160 GSM
Heavy media A4 200 GSM Premier 200 GSM
Heavy media A3 160 GSM Premier A3 Paper
Heavy media A4 120GSM Xerox Colotech+ (IP & Neusideler)
Label A4 Xerox Copier/Laser 24-Up Paper Label
Paper Tray Capacity
Paper that can be loaded in the paper trays is as follows:
Paper type Maximum Capacity
MPF (Tray 1) (A4/100 sheets) Trays 2-5 (A4/500 sheets)
Standard paper 100 sheets 500 sheets
Envelopes 15 sheets Not supported.
Paper Usage
Getting to Know Your Printer
Labels 100 sheets Up to a height of 59 mm
Not supported in tray 2
Transparencies 100 sheets 100 sheets
Card stock 120 sheets Up to a height of 59 mm
Not supported in tray 2
Other paper Up to a height of 17 mm Up to a height of 59 mm
User Manual 2-13
Paper Usage
Getting to Know Your Printer
Paper Weight by Tray
Tray Num ber Weight
1 60-215 gsm
2 60 - 105 gsm
3, 4, 5
Tandem and two tray feeders
6 60-215 gsm
Duplex Unit 60- 215 gsm
60-215 gsm
Available Paper Sizes
All trays but MPF have paper size sensors to detect sizes.
Paper Size Paper Tray
Trays 2-5 Tray 6 and Tandem
Tr ay Module
A4
(210x297 mm)
Letter
(8.5”× 11”)
B5
(182x257mm)
B4
(257x364)
OOO
OOO
OOO
OOO
O-O
O-O
O-O
O-O
MPF (Tray 1)
Legal 13
(8.5”×13”)
Legal
(8.5”×14”)
A3
(297x420mm)
Tabloid
(11” ×17”)
B5 (257x182mm) or
Executive
(7.2" X 10.5")
A5 (148x210mm) O - O
2-14 User Manual
O-O
O-O
O-O
O-O
O-O
O-O
O-O
O-O
OOO
OOO
O-O
Paper Size Paper Tray
Paper Usage
Getting to Know Your Printer
Trays 2-5 Tray 6 and Tandem
Tr ay Module
Statement (5.5"x 8.5") O - O
O-O
Those listed below are categorized as “Irregular size paper” that cannot be detected automatically
C5 Envelope
(229x162mm)
COM-10 (4.125" x
9.5")
DL Envelope
(220.2x110mm)
Monarch Envelope
(3.875" x 7.5")
A6 LEF (148x105)mm O - O
C4
(229x324mm)
O-O
---
O-O
---
O-O
---
O-O
---
--
O-O
---
MPF (Tray 1)
Oficio
--O
(216 X 340)
Unusable Paper
Using the following types of paper might cause paper jams, malfunctions or damage to the
printer. Do not use them.
• full-color transparencies
• Paper that is too thick or thin
• Paper that has been printed on before (including color printing)
• Wrinkled, folded, or torn paper
•Wet paper
• Curled paper
• Paper with static electricity
• Adhesive paper
• Postcards with pictures
• Paper with special coating on its surface
• Treated colored paper
• Paper using ink that will run at a temperature of 150 °C
User Manual 2-15

System Settings
Getting to Know Your Printer
• Heat sensitive paper
• Carbon paper
• Paper with staples, paper clips, ribbons, or tape
• Paper with rough surfaces such as pulp paper or fibrous paper
• If acid paper is used, the characters might appear fuzzy. Replace it with alkaline paper.
• Envelopes that are not flat or have metal fasteners
• Labels which do not fully cover the adhesive backing
• Transparencies which are not compatible for laser printers (i.e., inkjet transparencies)
• Paper that cannot be heated.
If background image suppression agent sticks to the feed roll when feeding postcards with
pictures, the postcards may not feed. When this happens, clean the feed roll by referring to
“Cleaning the Printer” on page 7-1”.
System Settings
You can set a variety of system settings via the System, Quality, and Date/Time menus in your
Operator Panel. These settings control items such as power saving, display language, and
resolution. For complete descriptions of these settings see “System Menu” on page A-6,
“Quality Menu” on page A-6, and “Date/Time Menu” on page A-7.
Power Saver Modes
This printer is equipped with a low power mode to reduce power consumption when it is left
idle.
When no print data is received for 10 minutes, the printer will enter the power saver.
Consumption of power during the Power Saver mode is 10 W or less. After one hour the printer
will enter sleep mode and the Operator Panel will shut down.The flashing green LED on the
Operator Panel indicates the printer is in Sleep mode.
The printer automatically cancels its power save status once it receives data from the computer.
2-16 User Manual
Chapter 3: Basic Printing Tasks
Printing a Configuration Summary
Your printer can print a configuration summary that lists
the currently selected status of menu options, media
selections in trays, options installed and other relevant
information about your printer. To print a Configuration
Summary, press the Info button. A multi-page summary
prints.
Loading Paper
This section describes how to load paper in each paper tray.
See“Paper Usage” on page 2-11 for details on the type and
size of paper that can be loaded in each paper tray.
Loading Trays 2-5
Trays 3 and 4 are pictured as the two tray feeder. The
Tandem tray option is loaded in a similar manner.
1. Pull out the Paper Tray(s).
In this Chapter...
•Printing a
Configuration
Summary
• Loading Paper
• Printing a Test
Page
• Basic Printing
• 2-Sided Printing
• Printing on Special
Media
• Tray Settings
• Job Offset
• Saved Settings
•Using the Hole
Puncher
• Using the Stapler
• Cancelling/
Checking Printing
3-1

Loading Paper
Basic Printing Tasks
2. Fan the paper to release sheets that may stick together.
3. Add paper to the tray without exceeding the maximum level.
NOTE: Do not load paper exceeding the maximum fill line or the maximum capacity allowed. Align the
right width guide with the paper width correctly. If the right width guide is not in place, the paper
will not be properly fed and may cause a paper jam.
3-2 User Manual
Loading Paper
Basic Printing Tasks
4. Insert the paper into the tray. If necessary, adjust the paper guides to the size of the paper.
5. Slide the paper tray back into the machine.
6. If custom sizes of paper are used, make the appropriate changes in your Printer Properties
and at the Operator Panel as needed.
Loading MPF (Tray 1)
The MPF can be used for both manual and automatic feeds. There is an indicator label on the
tray that shows the positioning of each side of paper. This label addresses long-edge and
short-edge orientation. For Standard and Custom Size paper loaded in the MPF, you must
change the paper type and size on the Operator Panel to match the paper and orientation that
you loaded.
Side guides must be set accurately against the sides of paper. The printer uses the placement of
these guides to calculate and verify the correct paper width.
User Manual 3-3
Loading Paper
Basic Printing Tasks
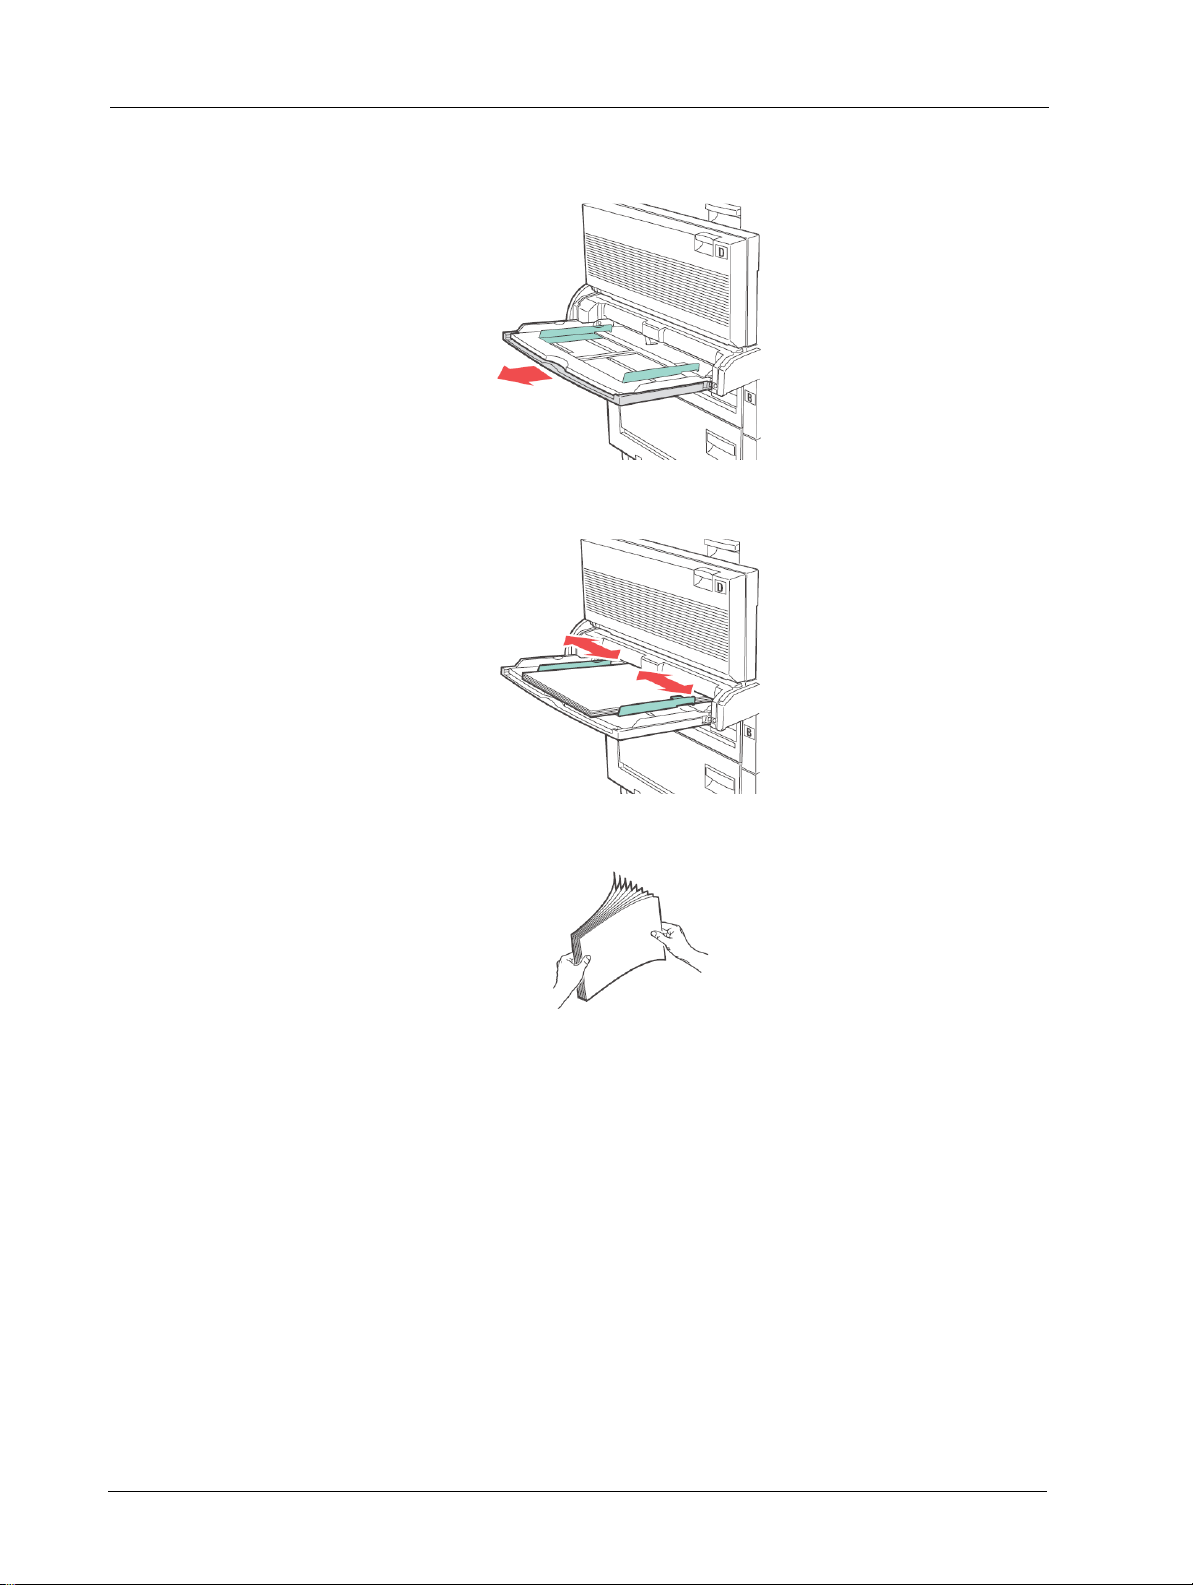
1. Lower the MPF tray.
2. Adjust the paper guides to the size of the paper.
3. Fan the paper to release sheets that may stick together.
4. Insert the paper into the tray. If necessary, adjust the paper guides to the size of the paper.
5. Select the correct paper size in the OPerator Panel.
It is advised to insert A4 and letter sizes into the tray so that it is fed in long edge first into
the printer as opposed to short edge. If short edge is fed first, then select A4/Letter (SEF)
as opposed to A4/Letter via the Operator Panel for the paper size.
3-4 User Manual
 Loading...