

®
Quick Start Guide
Kurzanleitung
Guide de démarrage rapide
Guida di avvio rapida
Guía de instalación
Guia Rápido de Inicialização
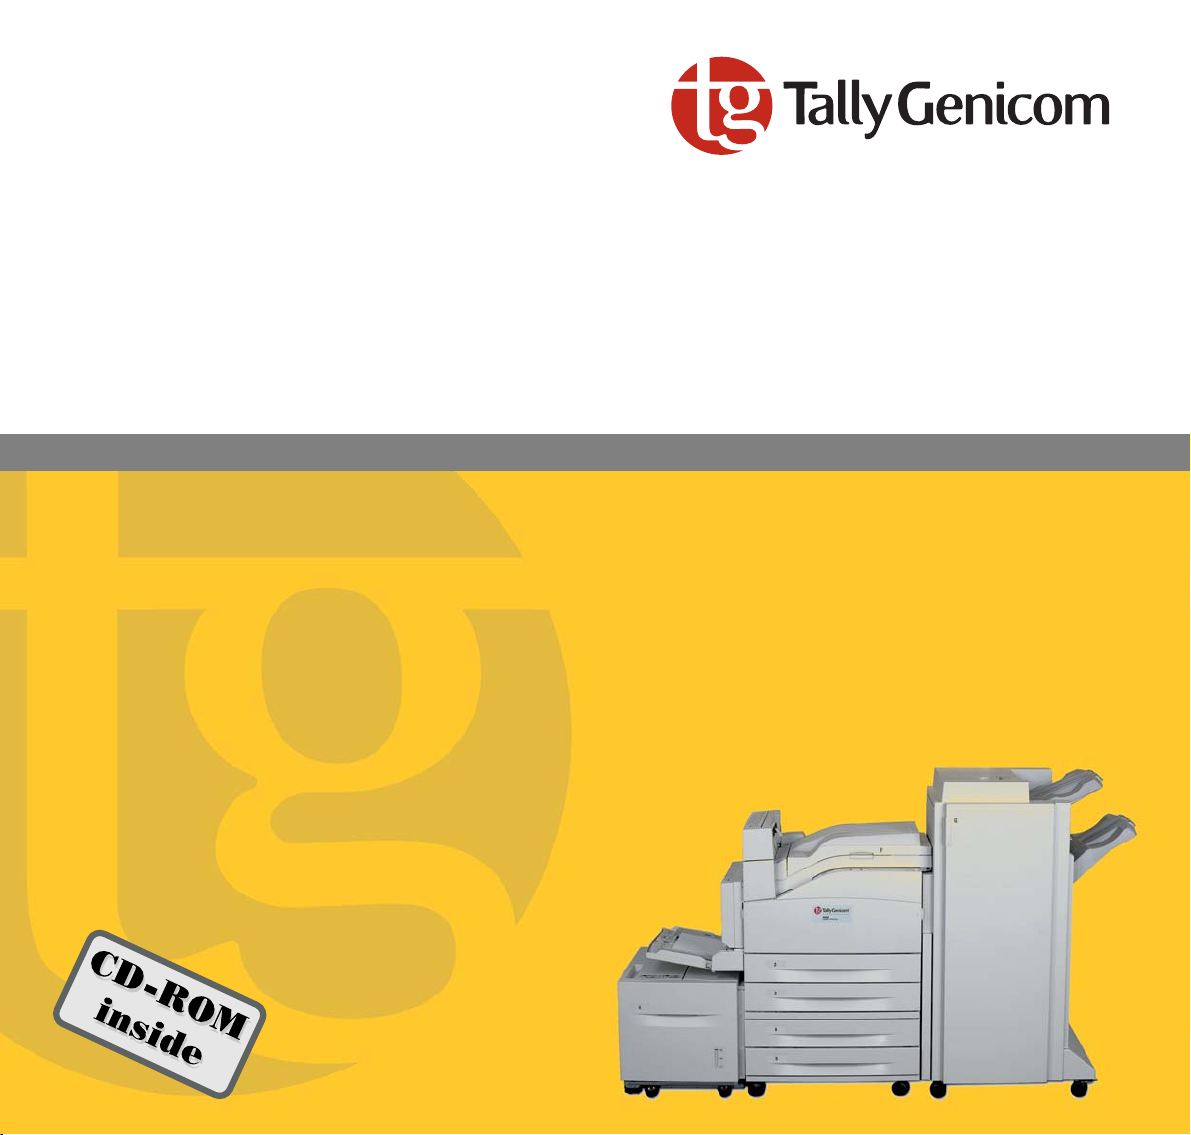
9050N Laser Printer
Important Information
This equipment generates and uses radio frequency energy and if not installed and used properly, that is, in accordance with the manufacturer's
instructions, may cause interference in radio and television reception. It
has been type tested and found to comply with the limits for class B computing devices in accordance with the specification in subpart J of part 15
of FCC rules, which are designed to provide reasonable protection
against such interference in a residential installation. However, there is
no guarantee that interference will not occur in a partial installation. If this
equipment does cause interference to radio or television reception, which
can be determined by turning the equipment off and on, the user is encouraged to try to correct the interference by one or more of the following
measures:
g Reorient the receiving antenna,
g Relocate the peripheral away from the receiver,
g Move the peripheral away from the receiver
g Plug the peripheral into a different outlet, so that the peripheral and re-
ceiver are on different branch circuits
If necessary, the user should consult the dealer or an experienced radio/
television technician for additional suggestions. The user may find the following booklet, prepared by the Federal Communications Commission,
helpful: “How to Identify and Resolve Radio-TV Interference Problems”.
This booklet is available from the U.S. Government Printing Office,
Washington DC 20402 Stock No. 004.000.00345.4.
WARNING: To comply with FCC regulations on electromagnetic inter-
ference for a class B computing device, the printer cable must be shielded. To assure compliance with FCC regulations for a computing device,
use a shielded interface cable with a metal shell connector. The use of
cables not properly shielded may result in violating FCC regulations.
This digital apparatus does not exceed the class B limits for radio noise
emissions from digital apparatus as set out in the radio interference regulations of the Canadian department of communications.
This unit complies with DOC standard C108.8-M 1983
ATTENTION: Le présent apparei l numérique n'ement pas de bruits radioélectriques déspassant les limites applicables aux appareils numériques
de la classe B prescrites dans le règlement sur le brouillage radio-électrique édicté par le minstère des communications du Canada.
The paper used is made of raw materials treated with a chlorine-free
bleaching process.
Das verwendete Papier ist aus chlorfrei gebleichten Rohstoffen hergestellt.
Le papier utilisé est fabriqué à partir de matières premières blanchis
sans chlore.
La carta utilizzata è prodotta con materiali sbiancati senza cloro.
El papel utilizado ha sido fabricado con un proceso de blanqueo libre
de cloro.
O papel usado é feito de matérias-primas tratadas com um processo
de branquamento sem cloro.
WARNING For continued protection against risk of fire, replace only with same type and rating of fuse. Only trained and qualified personnel may open covers or
WARNUNG Aus Brandschutzgründen nur Sicherungen desselben Typs und derselben Auslegung verwenden. Das Entfernen oder Öffnen von Abdeckungen und
ATTENTION Pour ne pas compromettre la protection contre les risques d'incendie, remplacer par un fusible de même type et de mêmes caractèristiques nomi-
ATTENZIONE Per evitare il pericolo di incendio, utilizzare esclusivamente fusibili dello stesso tipo e della stessa portata. Solo personale qualificato puo'accedere a
ADVERTENCIA Sólo utilizar fusibles del mismo tipo y con las mismas características para evitar cualquier riesgo de incendio. Las cubiertas y piezas sólo deberán ser
AVISO Para proteção contínua contra risco de incêndio, substitua somente com o fusível do mesmo tipo e voltagem. Somente pessoas treinadas e qualifi-
remove parts that are not explicitly shown and described in the User Guide as being accessible to the operator.
Teilen darf nur durch geschultes Fachpersonal vorgenommen werden. Ausgenommen hiervon sind nur solche Abdeckungen und Teile, deren Entfernen bzw. Öffnen in der Bedienungsanleitung ausdrücklich gekennzeichnet und beschrieben sind.
nales. Seul un personnel qualifié et formé est habilité à démonter les sous-ensembles de la machine qui ne sont pas formellement indiqués dans le
Manuel d'utilisation meme s'ils sont accessibles par l'opérateur.
parti che non siano esplicitamente descritte nelle Istruzioni per l'operatore come accessibill all'operatore.
quitadas o abiertas por personal especializado. Se exceptúan de esta regla sólo las cubiertas y piezas cuya retirada y apertura estén indicadas y
descritas expresamente en las Instrucciones de uso.
cadas podem abrir tambas ou remover partes que não estão explicitamente mostradas e des-critas no Manual do Usuário como sendo acessíveis
ao operador.
Note: Conformity may be affected by:
g using interface cables not complying with the specifications
g non-observance of important instructions in the operator's manual
g installing components not approved for this device by the manufacturer
g unauthorized manipulation
Hinweis: Die Konformität kann beeinflußt werden durch:
g Benutzung von nicht spezifizierten Schnittstellenkabeln
g Nichtbeachtung wichtiger Hinweise der Bedienungsanleitung
g Ersetzen von Bauteilen, die nicht vom Hersteller für dieses Gerät freigegeben wurden
g Eingriffe durch Unbefugte
Remarque: La conformité peut être influencée par:
g l'utilisation de câbles d'interface non spécifiés
g le non-respect de consignes importantes du manuel d'utilisation
g le remplacement de composants qui n'ont pas été homologués pour cet appareil par le constructeur
g l'intervention de personnes non autorisées
Nota: La conformità può essere influenzata tramite:
g Utilizzo di cavi interfaccia non specificati
g Inosservanza di importanti indicazioni delle istruzioni per l'uso
g Sostituzione di componenti per i quali non è stato dato il benestare dal produttore per questo apparecchio
g Interventi tramite persone non autorizzate
dotado de la marca CE.
Indicación: La conformidad puede estar influida por:
g la utilización de cables de interface no especificados
g la inobservancia de indicaciones importantes contenidas en el manual de servicio
g la sustitución por componentes, que no han sido homologados por el fabricante para el equipo en cuestión
g intervenciones de personas no autorizadas
Maschinenlärminformations-Verordnung 3. GPSGV: Der höchste Schalldruckpegel beträgt 70 dB(A) oder weniger gemäss EN ISO 7779.
This device fulfils the European standards requirements by complying with the Directive of the Commission
dated May 3, 1989 (89/336/EEC) relating to electromagnetic compatibility and the Directive dated February
19, 1973 (73/23/EEC) relating to low-voltage electrical equipment. Conformity with the above mentioned Directives is indicated by the CE symbol attached to the device.
Dieses Gerät erfüllt die Anforderungen der Europäischen Normen durch Einhaltung der Richtlinie des Rates
vom 3. Mai 1989 (89/336/EWG) bezüglich der Elektromagnetischen Verträglichkeit sowie die Richtlinie vom
19. Februar 1973 (73/23/EWG) bezüglich Elektrischer Betriebsmittel mit Niederspannungen. Die Konformität
zu den oben angeführten Richtlinien ist durch das am Gerät angebrachte CE-Zeichen gekennzeichnet.
Cet appareil remplit aux exigences des normes européennes en respectant la directive du Conseil du 3 mai
1989 (89/336/CE) relative à la compatibilité électromagnétique et la directive du 19février 1973 (73/23/CE)
en matière du matériel à basse tension. La conformité aux directives mentionnées ci-dessus est repérée par
la marque de conformité de la Communauté Européenne (CE).
Questo apparecchio soddisfa le richieste delle norme europee rispettando la direttiva del consiglio del 3 Maggio 1989 (89/336/CEE) relativa alla compatibilità elettromagnetica nonché la direttiva del 19 Febbraio 1973
(73/23/CEE) relativa a mezzi di produzione elettrici a bassa tensione. La conformità alle direttive sopra citate
è contrassegnata con il simbolo CE applicato sull'apparecchio.
Este equipo corresponde a lo exigido en las normas europeas a base del cumplimiento de la directriz del
Consejo del 3 de mayo de 1989 (89/336/CEE) en lo que se refiere a la compatibilidad electromagnética así
como de la directriz del 19 de febrero de 1973 (73/23/CEE) en lo que se refiere a los materiales eléctricos
con bajas tensiones. Para señalizar la conformidad con las directrices antes mencionadas, el equipo está

Quick Start Guide Table of Contents
Table of Contents
Chapter 1 Introduction . . . . . . . . . . . . . . . . . . . . . . . . . . . . . . . . . . . . . . . . . . . . . . . . . 1
About this manual . . . . . . . . . . . . . . . . . . . . . . . . . . . . . . . . . . . . . . . . . . . . . 1
Conventions . . . . . . . . . . . . . . . . . . . . . . . . . . . . . . . . . . . . . . . . . . . . . 1
General Safety Guidelines . . . . . . . . . . . . . . . . . . . . . . . . . . . . . . . . . . . . . . . 2
Safety Precautions . . . . . . . . . . . . . . . . . . . . . . . . . . . . . . . . . . . . . . . . 2
Handling the Printer . . . . . . . . . . . . . . . . . . . . . . . . . . . . . . . . . . . . . . . 2
Printer Components . . . . . . . . . . . . . . . . . . . . . . . . . . . . . . . . . . . . . . . . . . . . 3
Chapter 2 Setting Up Your Printer . . . . . . . . . . . . . . . . . . . . . . . . . . . . . . . . . . . . . . . . 7
Checking Your Package. . . . . . . . . . . . . . . . . . . . . . . . . . . . . . . . . . . . . . . . . 7
Preparing a Location for the Printer . . . . . . . . . . . . . . . . . . . . . . . . . . . . . . . . 8
Dimensions . . . . . . . . . . . . . . . . . . . . . . . . . . . . . . . . . . . . . . . . . . . . . . 8
Installation Precautions. . . . . . . . . . . . . . . . . . . . . . . . . . . . . . . . . . . . . 8
Space Requirements . . . . . . . . . . . . . . . . . . . . . . . . . . . . . . . . . . . . . . 9
Installation procedure. . . . . . . . . . . . . . . . . . . . . . . . . . . . . . . . . . . . . . . . . . 11
Removing the Tape . . . . . . . . . . . . . . . . . . . . . . . . . . . . . . . . . . . . . . 11
Installing the Toner Cartridge . . . . . . . . . . . . . . . . . . . . . . . . . . . . . . . 11
Installing the Drum Unit . . . . . . . . . . . . . . . . . . . . . . . . . . . . . . . . . . . 13
Loading Paper . . . . . . . . . . . . . . . . . . . . . . . . . . . . . . . . . . . . . . . . . . 16
Installing Options . . . . . . . . . . . . . . . . . . . . . . . . . . . . . . . . . . . . . . . . 18
Connecting the Power Cord . . . . . . . . . . . . . . . . . . . . . . . . . . . . . . . . 19
Turning the Printer On . . . . . . . . . . . . . . . . . . . . . . . . . . . . . . . . . . . . 19
Language Selection . . . . . . . . . . . . . . . . . . . . . . . . . . . . . . . . . . . . . . 20
Printing a Configuration Summary . . . . . . . . . . . . . . . . . . . . . . . . . . . 21
ENGLISH
Setting an IP address manually . . . . . . . . . . . . . . . . . . . . . . . . . . . . . . . . . . 21
i

Table of Contents Quick Start Guide
Chapter 3 Installing Software. . . . . . . . . . . . . . . . . . . . . . . . . . . . . . . . . . . . . . . . . . . 24
Driver Installation . . . . . . . . . . . . . . . . . . . . . . . . . . . . . . . . . . . . . . . . . . . . . 24
Chapter 4 Specifications . . . . . . . . . . . . . . . . . . . . . . . . . . . . . . . . . . . . . . . . . . . . . . 25
Chapter 5 Options and supplies . . . . . . . . . . . . . . . . . . . . . . . . . . . . . . . . . . . . . . . . 28
ii
Quick Start Guide Chapter 1 Introduction
Chapter 1
Introduction
About this manual
This quick start guide is intended to provide guidance for the proper installation
of your printer. If you require more information to install your printer, consult
the User Guide located on the CD-ROM. For further help, please contact your
dealer or responsible representative (see addresses at the rear cover page of this
manual).
ENGLISH
Conventions
STOP
This following conventions are used throughout this manual to emphasize
certain procedures or information:
NOTE: A note is a tip or extra information that may be helpful in installing or using the
printer.
CAUTION: A caution message provides information that may help you avoid equipment
damage, process failure, or inconvenience. Read all caution messages carefully.
WARNING! A warning message indicates the possibility of personal injury if a specific
procedure is not performed exactly as described in the guide. Pay close attention to these sections
and read them fully to prevent possible injury.
1
Chapter 1 Introduction Quick Start Guide
General Safety Guidelines
Before operating the printer, read the following instructions carefully:
z Follow all the operating procedures provided in this manual.
z Follow all the hazard warnings on the printer and in the manual. Failure to do
so can cause injury to yourself or damage to the printer.
z Do not perform any operation or action in any way other than provided in this
manual. When in doubt, contact your dealer or service company.
z Keep in mind that hazard warnings in this manual or on the printer cannot
cover every possible case, as it is impossible to predict and evaluate all circumstances beforehand. Be alert and use your common sense.
Precautions
Handling the
Printer
2
Safety
This printer is available in two models, the 110 V model and the 230 V model.
The specifications that apply to your printer depend on your machine
configuration. To prevent fire or shock hazards, connect the power plug only to a
properly rated power outlet.
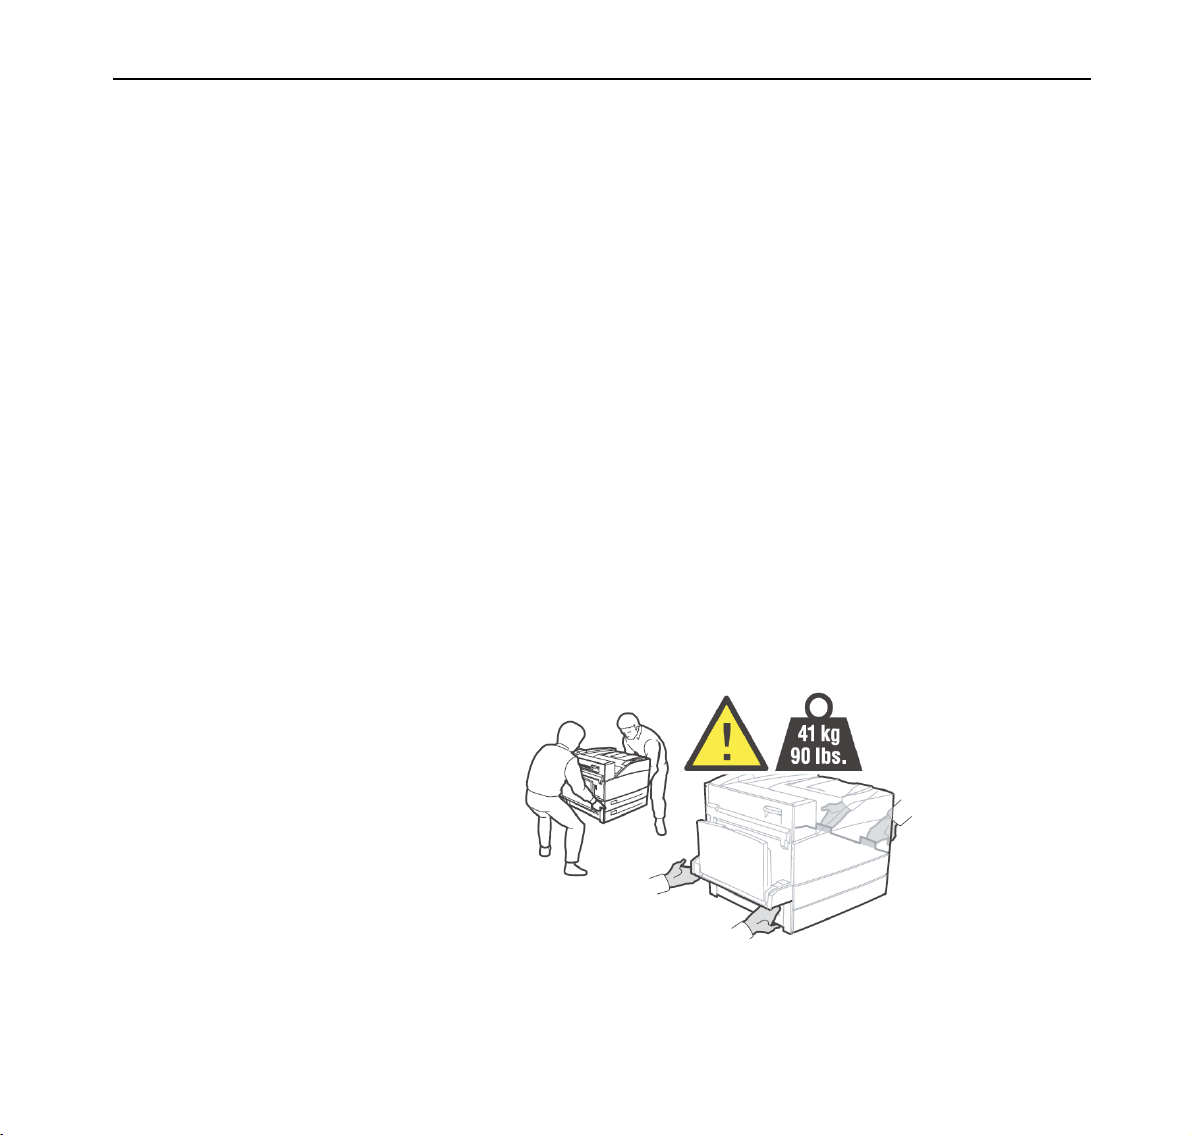
z The weight of the printer without paper tray, toner cartridge, and paper is
about 41 kg (90 lbs). Never attempt to lift the printer alone.
z To lift the printer, have two individuals facing each other from each side of the
printer grasp the recessed areas on each side of the printer. Do not lift the
printer by grasping any area other than these recessed areas.
Quick Start Guide Chapter 1 Introduction
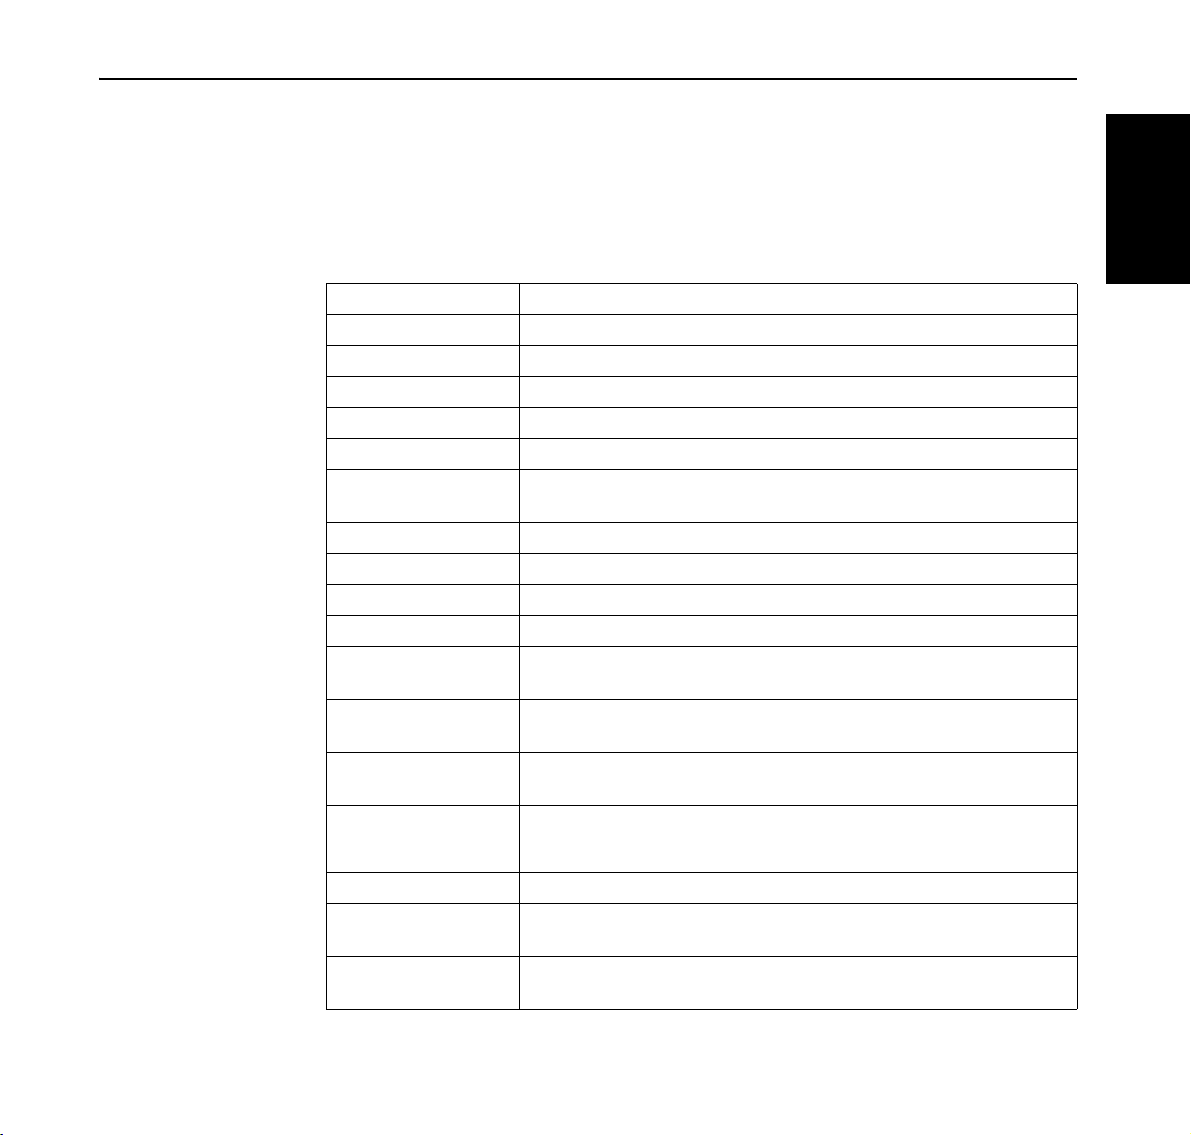
Printer Components
6
5
4
1
2
3
ENGLISH
No. Name Description
1 Tray 1, Multipurpose feeder Can feed transparencies, postcards, note cards and envelopes.
2 Tray 2 Load paper here (500 sheet tray B5,A5–A3 format).
3 Tray 3 Load paper here (500 sheet tray B5,A5–A3 format).
4 Operator Panel Consists of operation buttons, indicators, and the display.
5 Power Switch Switches the power of the printer on and off. Pushing the switch to the <I>
side switches it on and pushing it to the <O> side switches it off.
6 Standard Top Bin Print jobs are output with the printed side facing down.
3
Chapter 1 Introduction Quick Start Guide
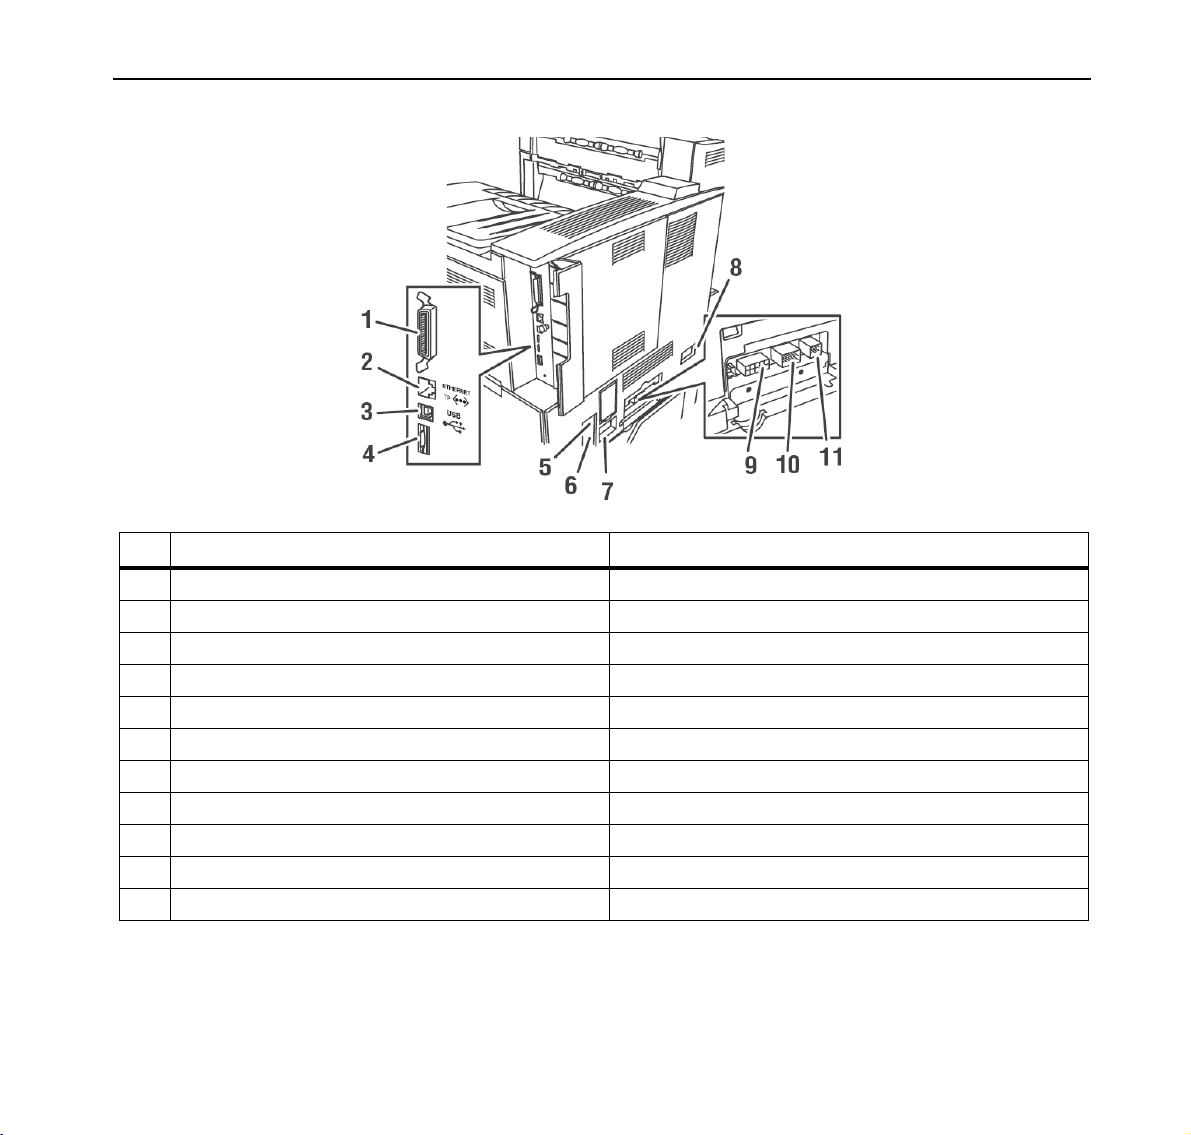
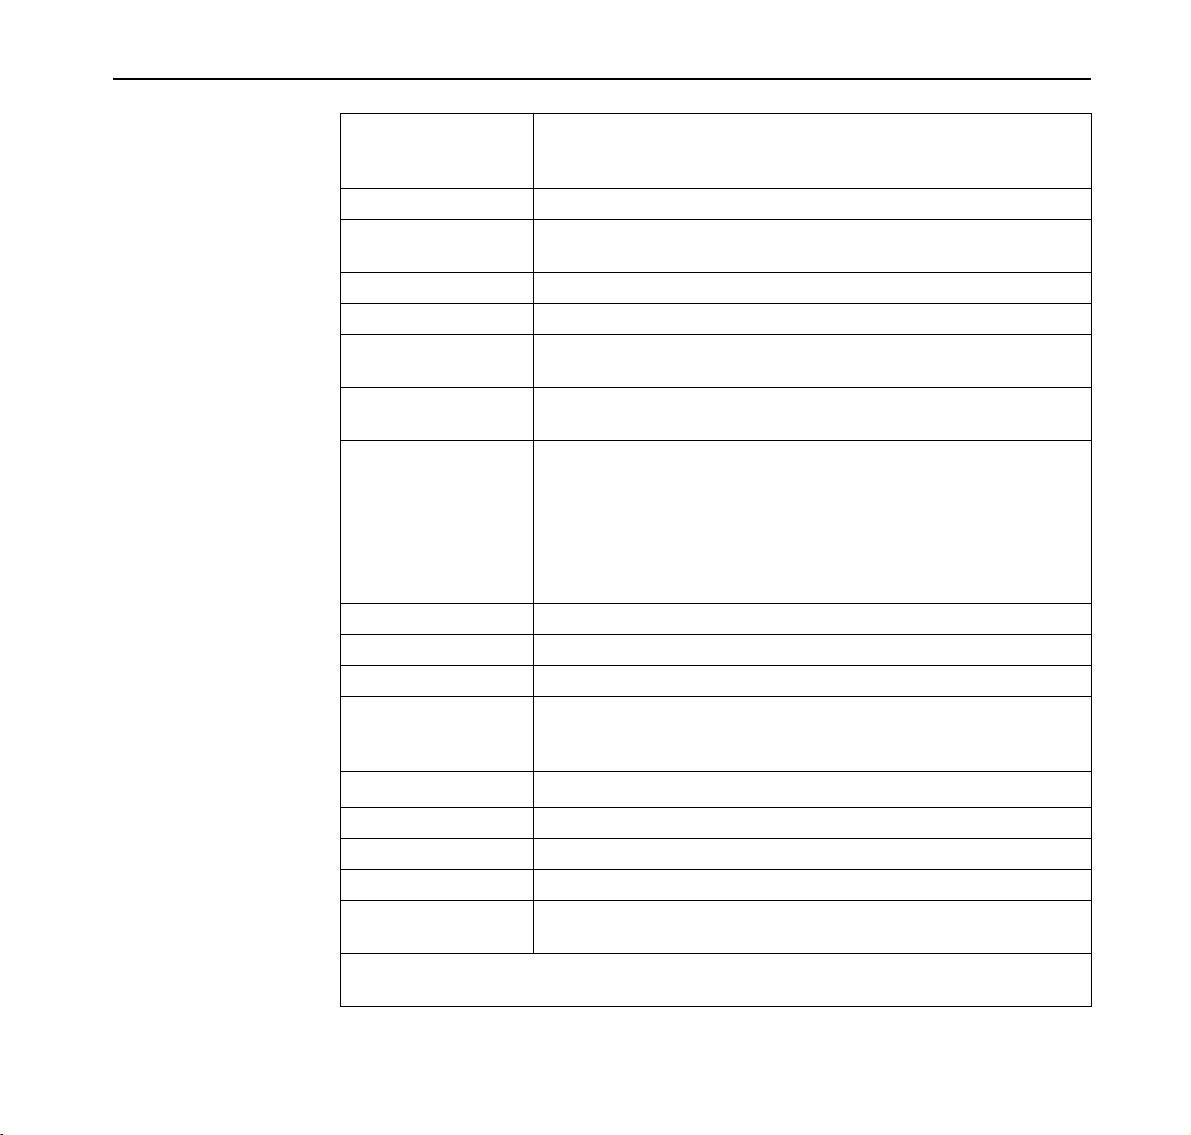
No. Name Description
1 Parallel Port, IEEE 1284 Connect the parallel cable here.
2 Ethernet 10/100 BaseT connection Connect the Ethernet cable here.
3 USB port Connect the USB cable here.
4 Serial RS232 port Connect the Serial cable here.
5 Ground Fault Interrupt (GFI) reset Use to reset power interruption.
6 Power cord connector Connect the power cord here.
7 Finisher power connection Connect the Finisher power here.
8 High Capacity Feeder (Tray 6) connection Connect the High Capacity Feeder here.
9 Finisher connection Connect the Finisher here.
10 A3 or Tandem Sheet Feeder (Trays 4/5) connection Connect the A3 or Tandem Sheet Feeder here.
11 Duplex module connector Connect the duplex module here.
4
Quick Start Guide Chapter 1 Introduction
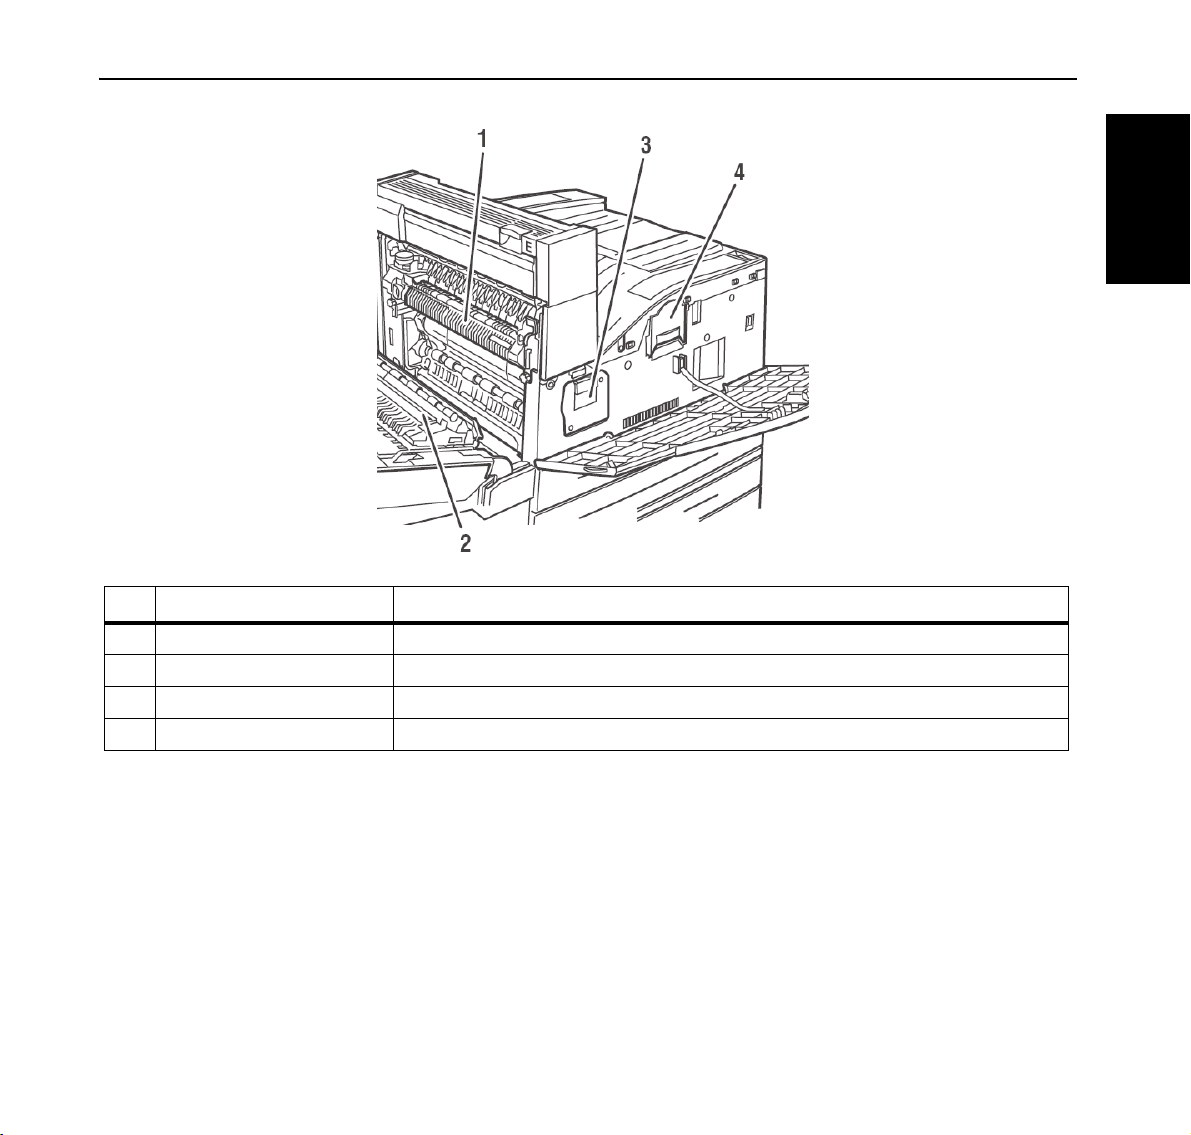
No. Name Description
1 Fuser Permanently fixes the image to the paper using heat and pressure.
2 Transfer Roller Transfers the toner image on the surface of the photosensitive drum to the paper.
3 Drum Unit Contains the photosensitive drum.
4 Toner Cartridge Contains the toner supply.
ENGLISH
5

Chapter 1 Introduction Quick Start Guide
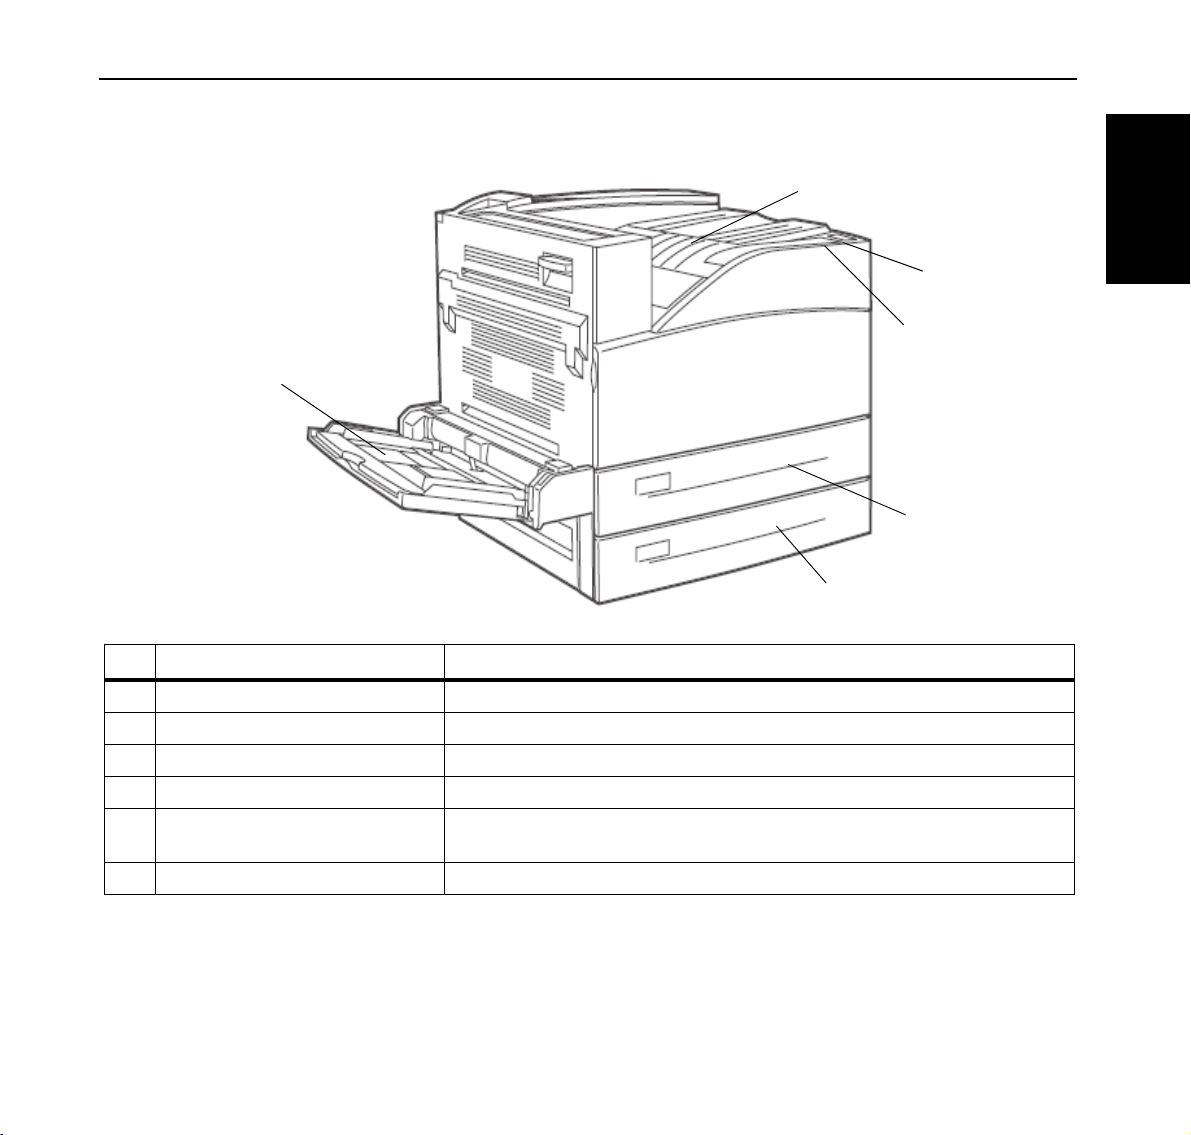
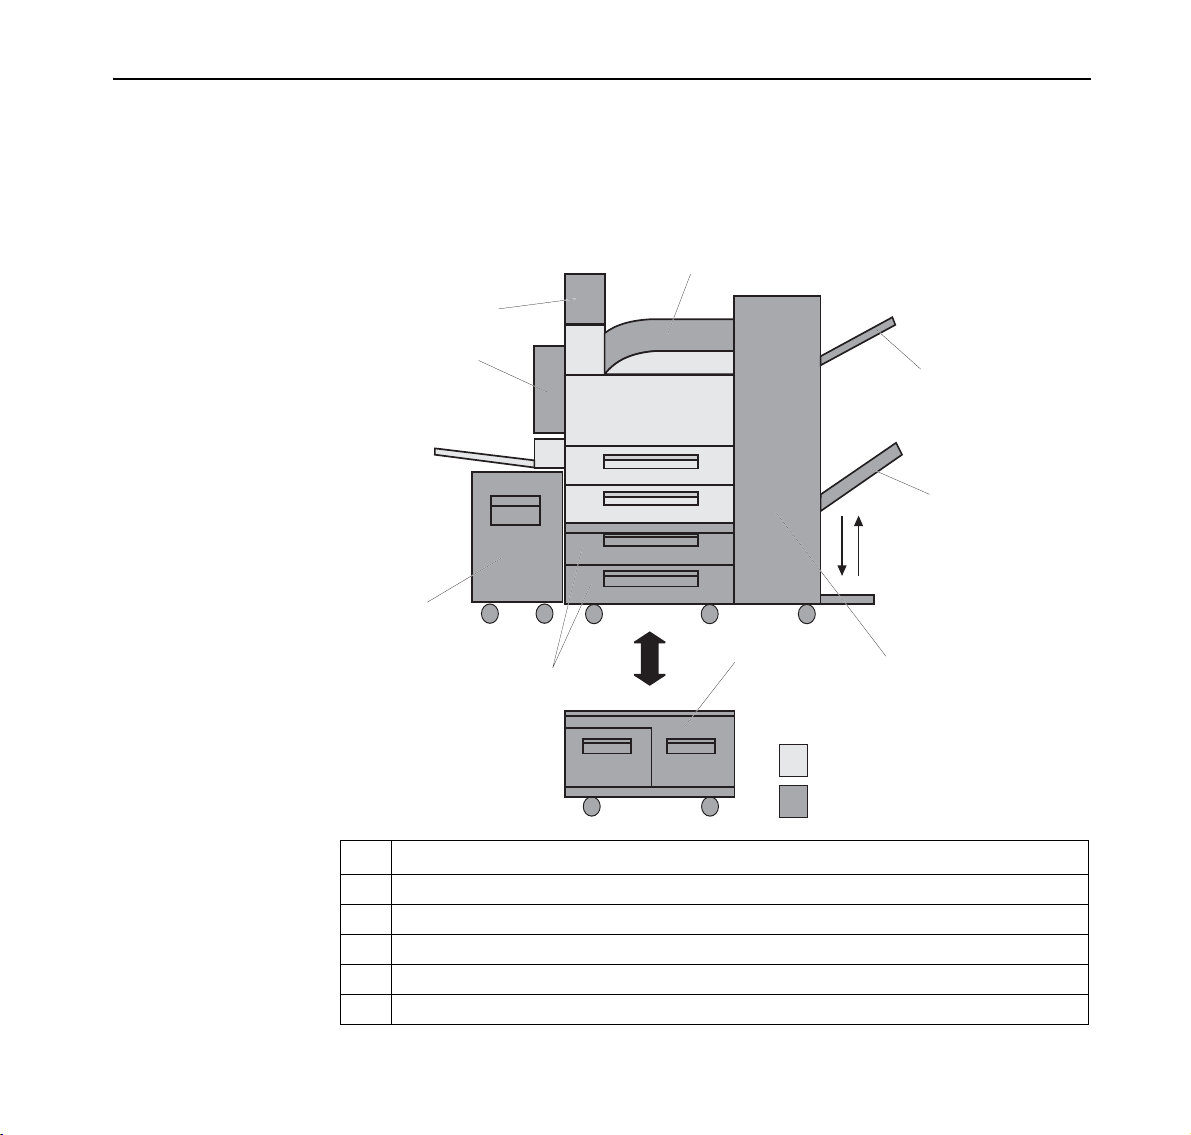
The following illustration shows a fully configured printer.
No. Name
1 Standard output tray and transport to finisher
2 Front Door
3 Two sheet feeders (trays 2 and 3, 500 sheets each)
4 Optional Duplex Unit
5 Tray 1 (Multi-purpose feeder)
6 Optional High Capacity Feeder (Tray 6, 2000 sheets)
7 Optional trays (A3, 2 x 500 sheets) or dual input tray (Tandem, 800 + 1200 sheets) =
tray 4 and 5
8 Optional Finisher (3500 sheets)
9 Stacker Tray (3000 Sheets)
10 Top Tray (500 Sheets)
11 Exit 2 is used in conjunction with duplex unit and finisher, comes with the Duplex unit.
6
Quick Start Guide Chapter 2 Setting Up Your Printer
Chapter 2
Setting Up Your Printer
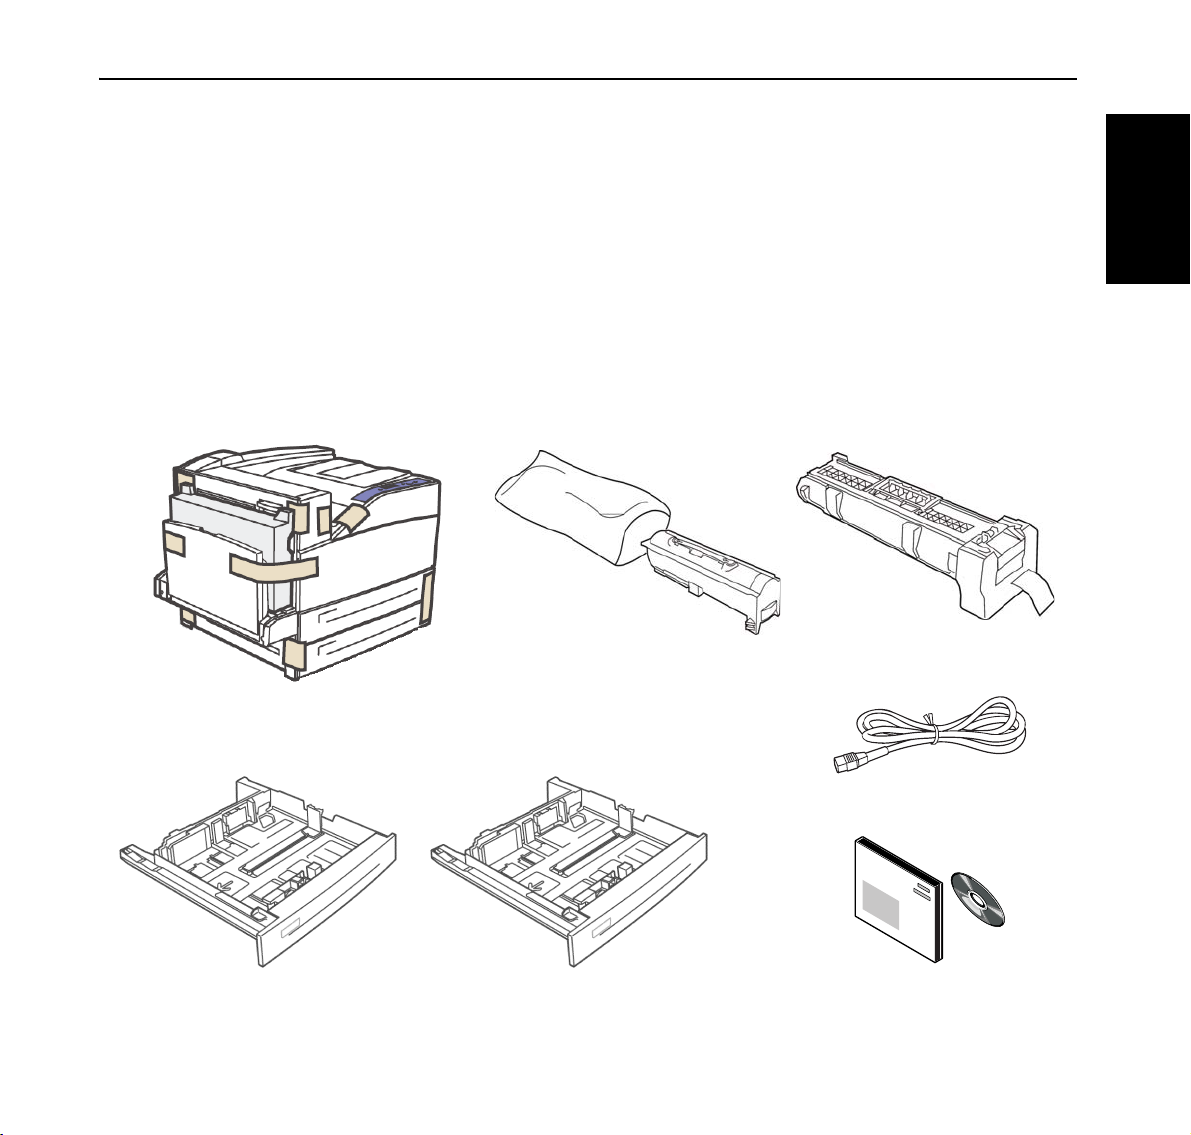
Checking Your Package
Before installing the printer, check that all the items are contained in the package.
Should any components be missing or damaged, contact your dealer.
ENGLISH
Printer
Paper trays 2 & 3 (500 sheets)
Toner Cartridge (Yield 30K)
Drum Unit (60K)
Power cord
Quick Start Guide and CD-ROM
7

Chapter 2 Setting Up Your Printer Quick Start Guide
Preparing a Location for the Printer
Dimensions
Installation
Precautions
STOP
z Printer Height: 498 mm (19.6 in)
z Printer Width (left to right): 640 mm (25.2 in)
z Printer Depth (front to back): 525 mm (20.7 in)
Before unpacking your laser printer, it is recommended that you read the
following to assist in locating a suitable spot for your new laser printer. To make
optimum use of the printer, observe the following precautions when locating the
printer.
The installation surface must be stable and very sturdy to support the considerable weight of the
printer. If the printer falls over, there is a severe risk of injuries.
z Always keep the printer under the following conditions:
Temperature: 5 to 35º C (41º to 95º F)
Humidity: 15 to 85% (non-condensation)
z Be sure to keep the temperature below 28º C (82º F) if the humidity is 85%. If
the temperature changes drastically from a cold environment to a warm environment, condensation may develop inside the printer and cause print problems. Therefore, be sure to let the printer rest for some time to adjust to the
new temperature.
z Do not subject the printer to direct sunlight or a malfunction may result.
z Do not place the printer in a location with poor ventilation, or high level of
dust, otherwise a fire hazard or electric shock may result.
z Do not place the printer near heaters or similar objects, otherwise a fire hazard
may result.
z Never block the ventilation openings of the printer, otherwise the internal tem-
perature will build up and cause a fire hazard.
z Do not place the printer near alcohol, benzine, or other volatile and flammable
materials, or a fire hazard may result.
8

Quick Start Guide Chapter 2 Setting Up Your Printer
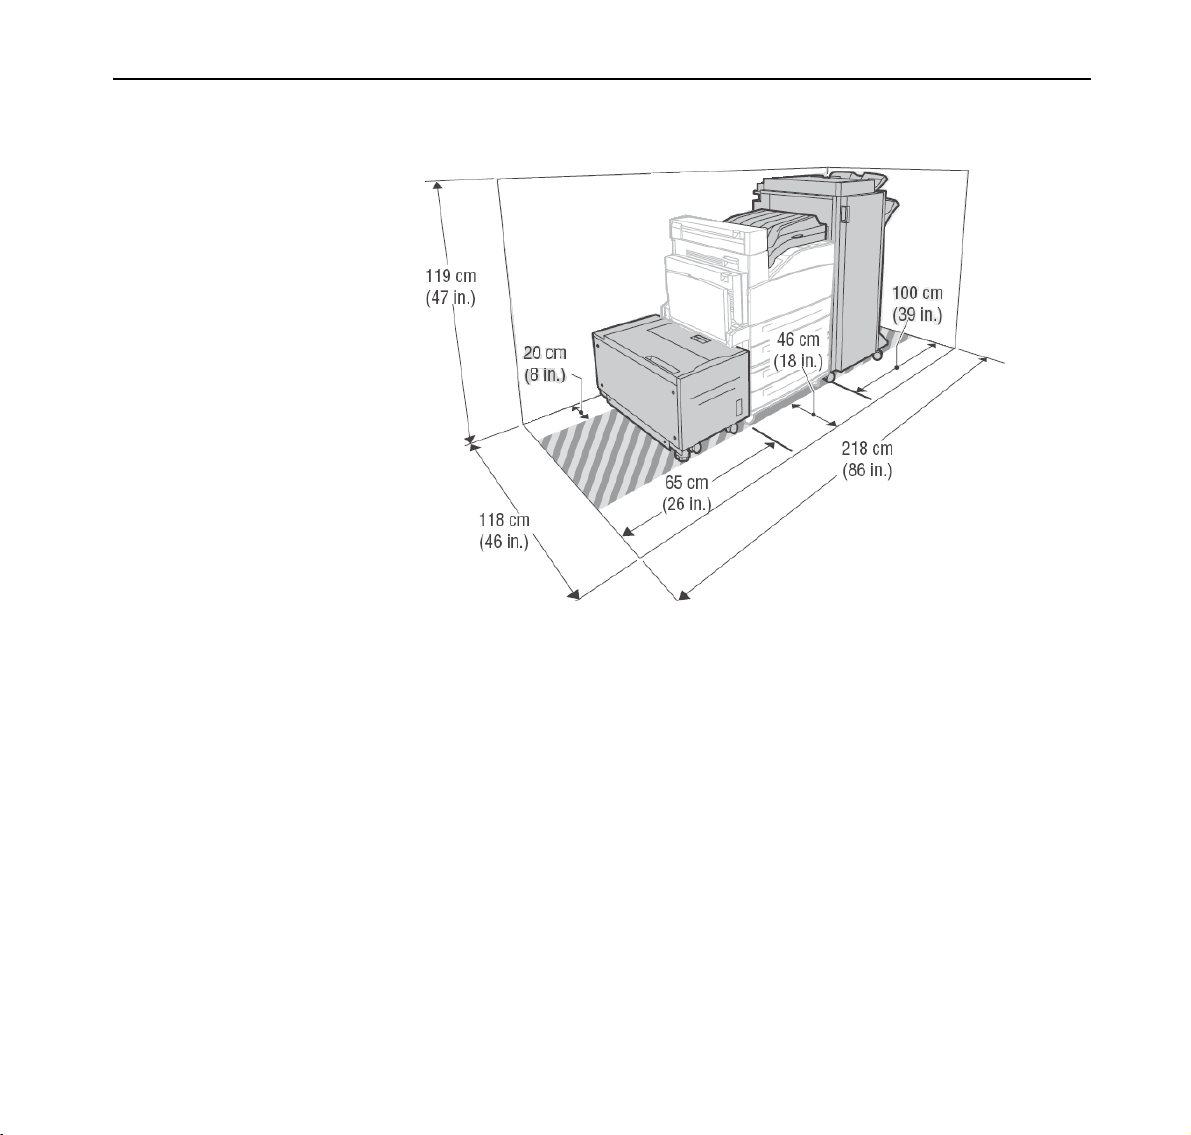
Space
Requirements
A certain amount of space is required for proper operation of the printer and also
for performing printer maintenance and replacing consumables. Use the
following figures to plan for appropriate clearances when determining a location
for your printer.
ENGLISH
Be sure to leave ample space between the ventilation openings on the printer and the nearest wall
or other surface, otherwise overheating may occur leading to a fire hazard. For easy operation,
maintenance and replacing of consumables, you should also leave the clearances shown below
around the printer. Installation of the printer should be carried out by qualified service personnel.
Printer Installation Space Requirements
9
Chapter 2 Setting Up Your Printer Quick Start Guide
Printer Installation Space With Options
10
Quick Start Guide Chapter 2 Setting Up Your Printer
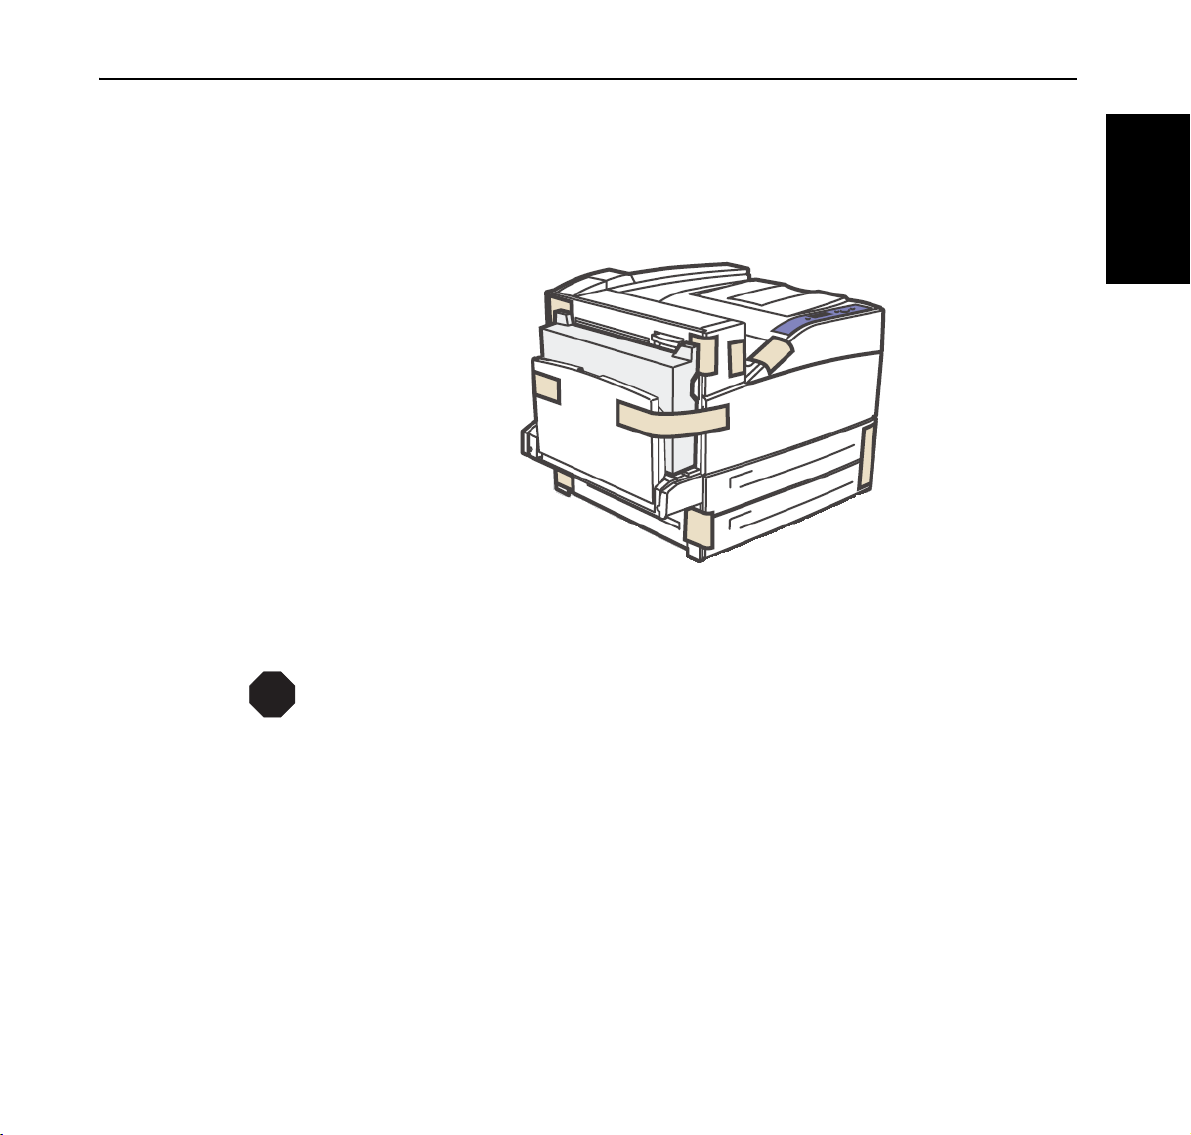
Installation procedure
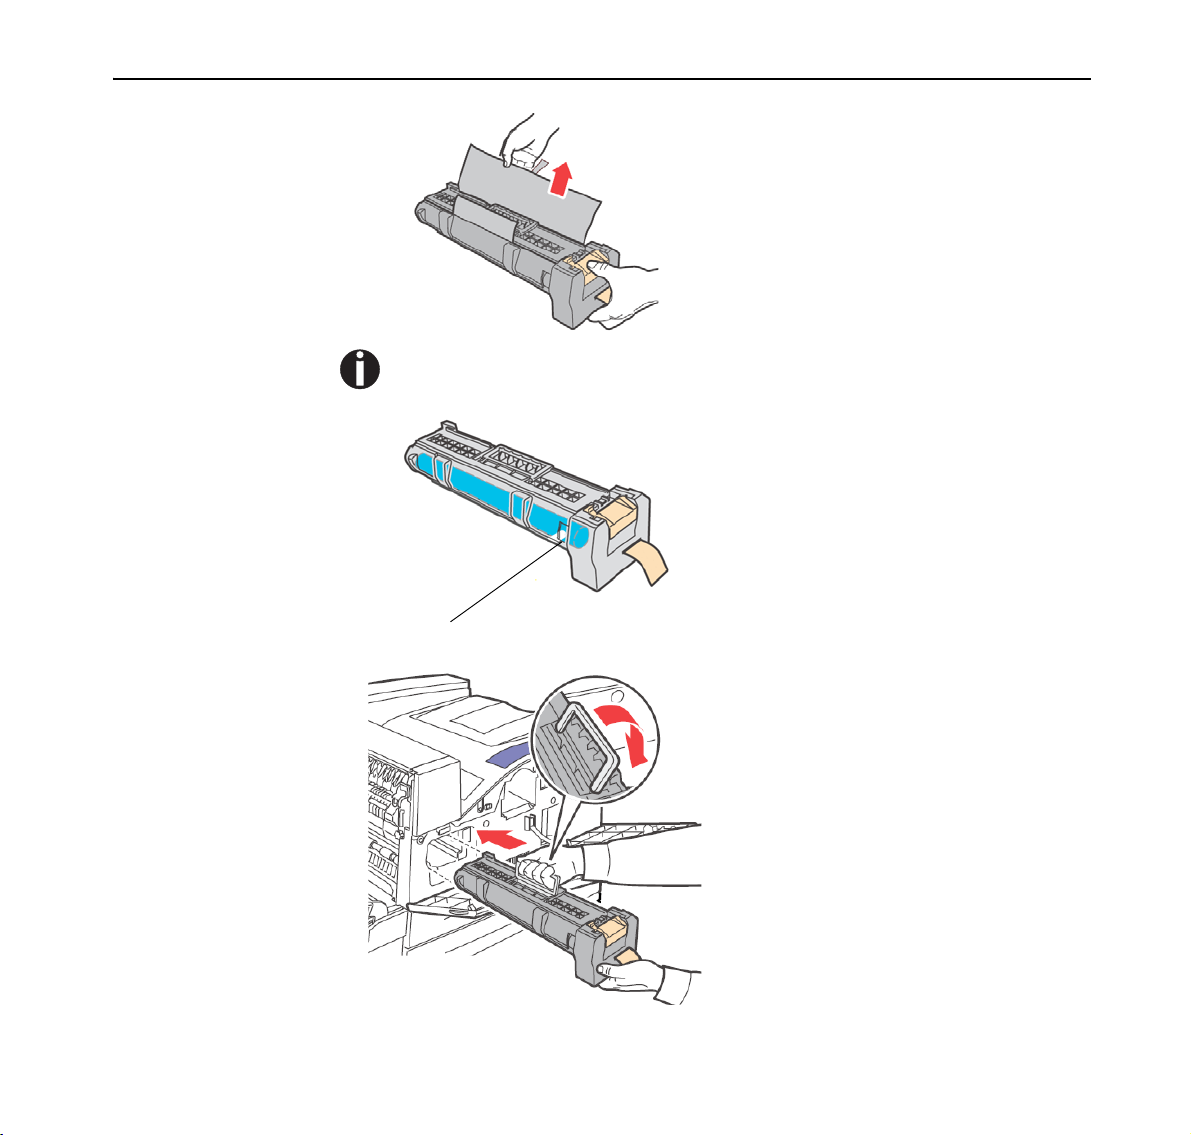
Removing
the Tape
Installing the
Toner Cartridge
STOP
When the printer is first taken out of the packaging box, the covers of the printer
are taped as shown in the diagram. Remove the tape.
ENGLISH
When installing the Toner Cartridge, take note of the following points:
Never throw a Toner Cartridge into an open flame. It can cause an explosion and you can get
burned.
z Keep the toner cartridge in a location out of reach of children.
z Do not forcibly open the toner cartridge.
z Do not subject it to heat.
z Do not stand or place the Toner Cartridge upside down.
z Toner is not harmful to the human body, but if some toner has come into con-
tact with your skin, you can wash it off with cold water and soap. If toner gets
on your clothing, you should try to immediately remove it with a vacuum
cleaner which has a fine filter.
z Avoid inhaling toner dust.
11
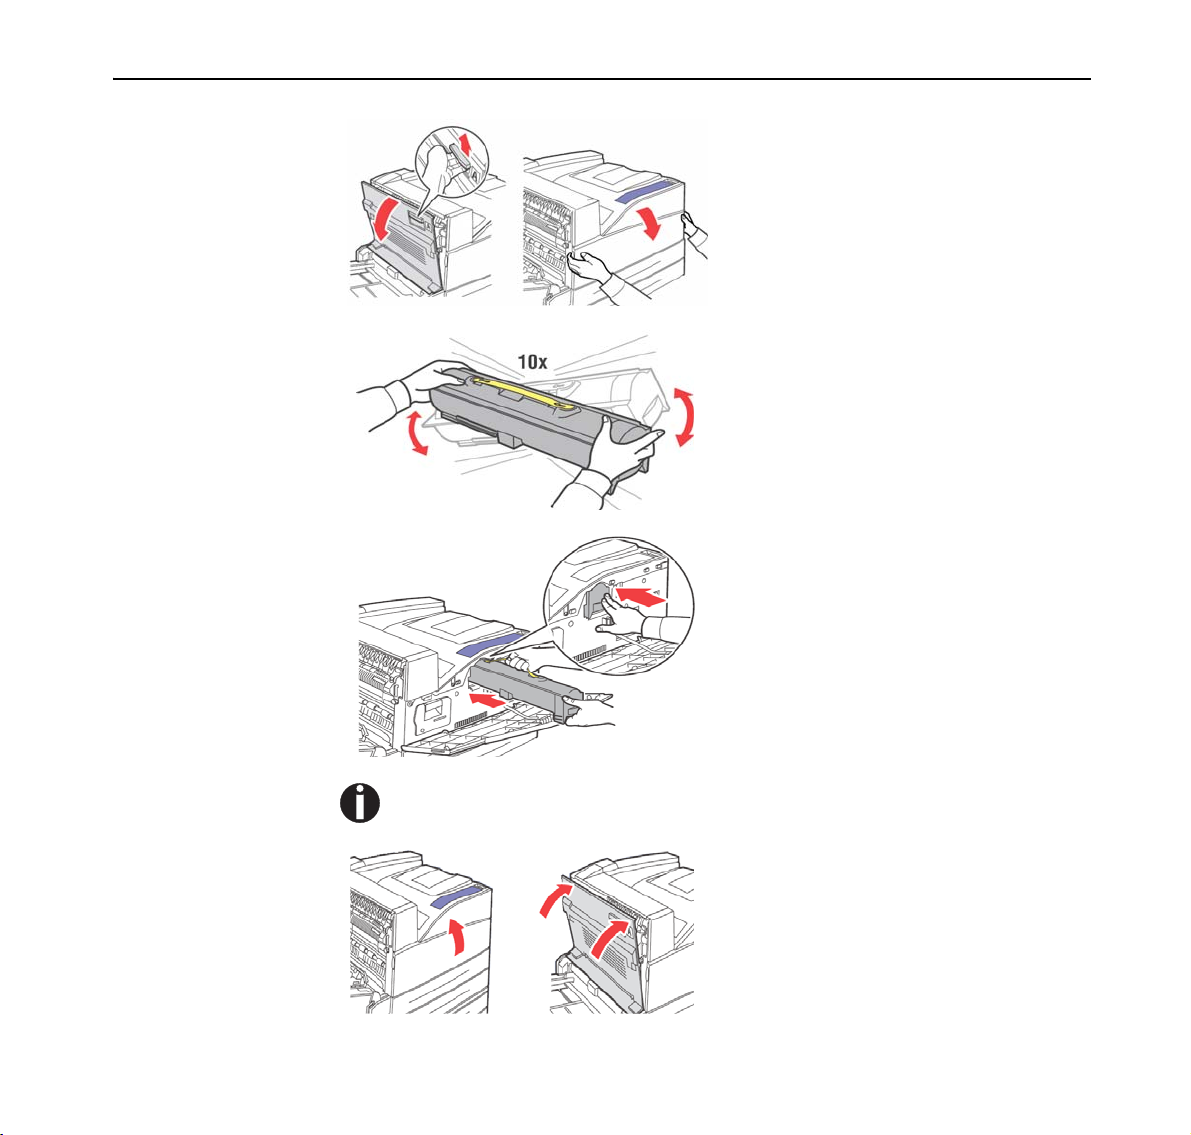
Chapter 2 Setting Up Your Printer Quick Start Guide
1
Open the printer front and side
covers.
2
Take the Toner Cartridge out of
the box and shake it 10 times as
shown in the diagram.
3
Hold the Toner Cartridge by the
handle and insert it into the slot
inside the printer.
12
Ensure that the Toner Cartridge is firmly set.
4
Close the printer covers.
Quick Start Guide Chapter 2 Setting Up Your Printer
When printing text at 5% coverage, you can expect a toner cartridge life of approximately 30,000 pages with the standard toner cartridge supplied with the printer.
Installing the
Drum Unit
STOP
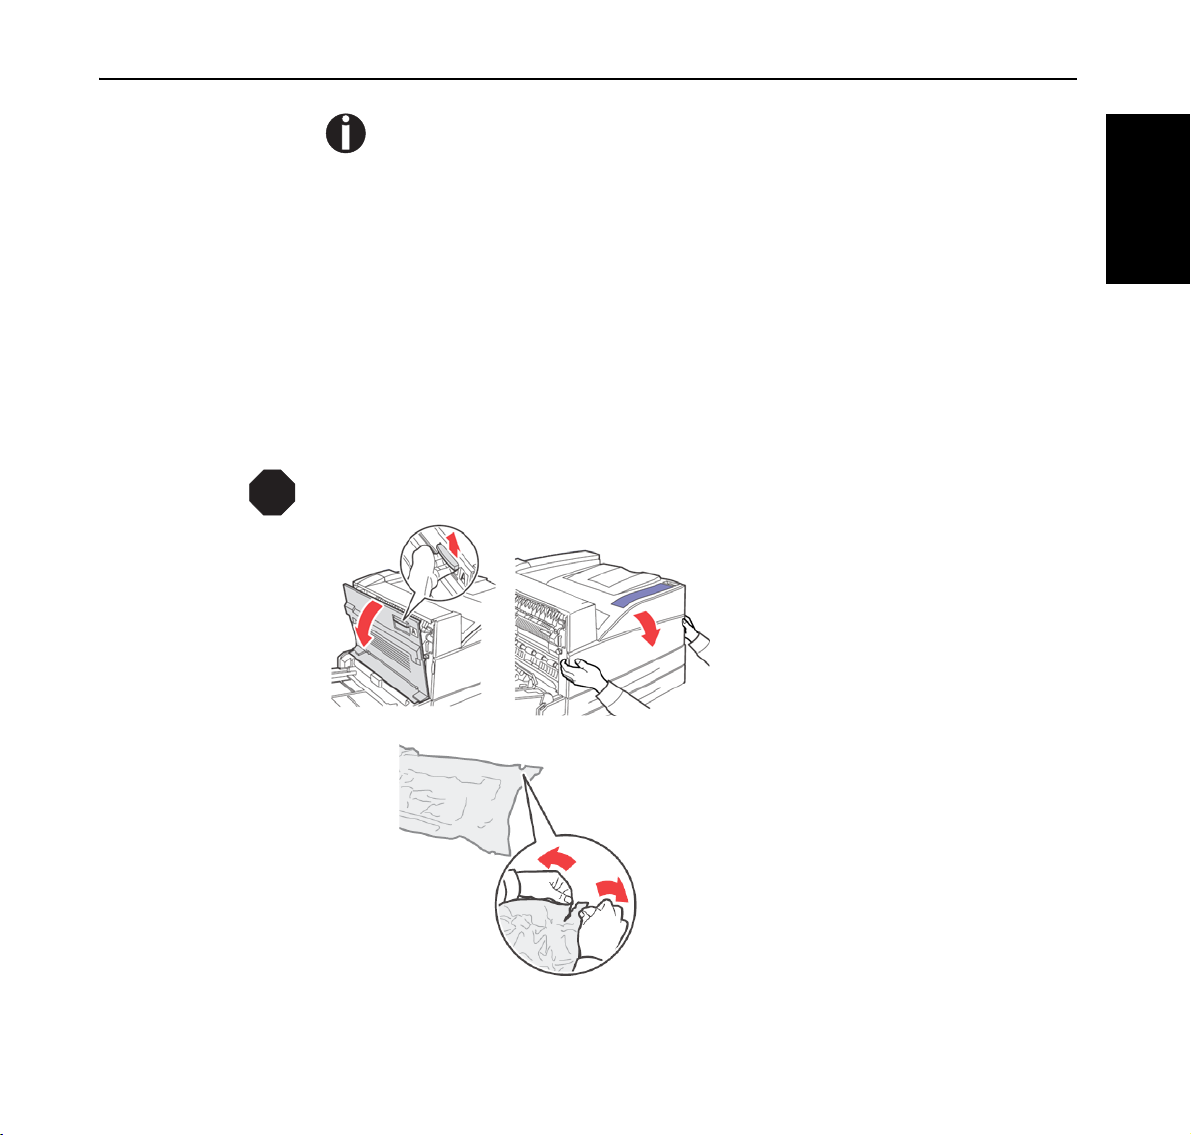
When installing the Drum Cartridge, take note of the following points:
z Do not subject it to direct sunlight or strong light.
z When installing the Drum Cartridge, select a location not subject to strong
light and try to finish the installation within 5 minutes or less.
z Do not touch the surface of the photosensitive drum.
z A drum shutter protects the photosensitive drum from light. Do not open the
drum shutter or contact any internal surfaces with your fingers or hand.
Never throw a Drum Unit into an open flame. It can cause an explosion and you can get burned.
1
Open the printer front and side
covers.
2
Remove the Drum Unit from
the package.
ENGLISH
13
Chapter 2 Setting Up Your Printer Quick Start Guide
3
Remove the protective sheet
from the Drum Unit.
When pulling out the protective sheet, pull it out horizontally. The sheet might break if
it is pulled out diagonally.
4
Avoid contact with internal surfaces and limit exposure to light
for no longer than 5 minutes.
Avoid contact with fingers
14
5
Fold the handle down and slide
the Drum Cartridge into the
printer.
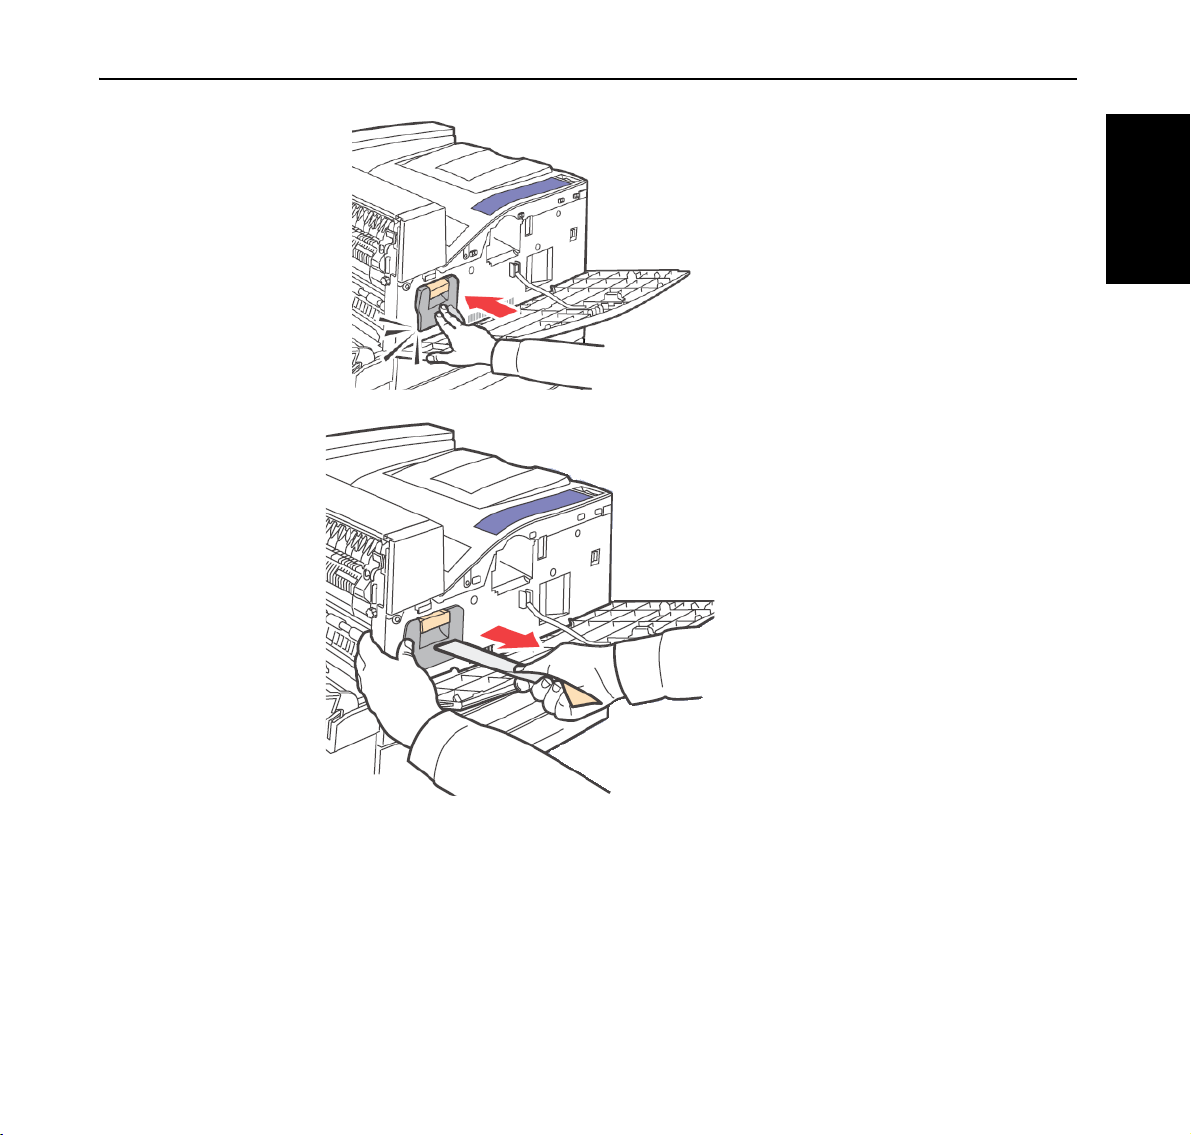
Quick Start Guide Chapter 2 Setting Up Your Printer
.
6
Seat the Drum Unit firmly into
the printer.
7
Remove and discard the protective strip.
8
Close the printer covers.
ENGLISH
15
Chapter 2 Setting Up Your Printer Quick Start Guide
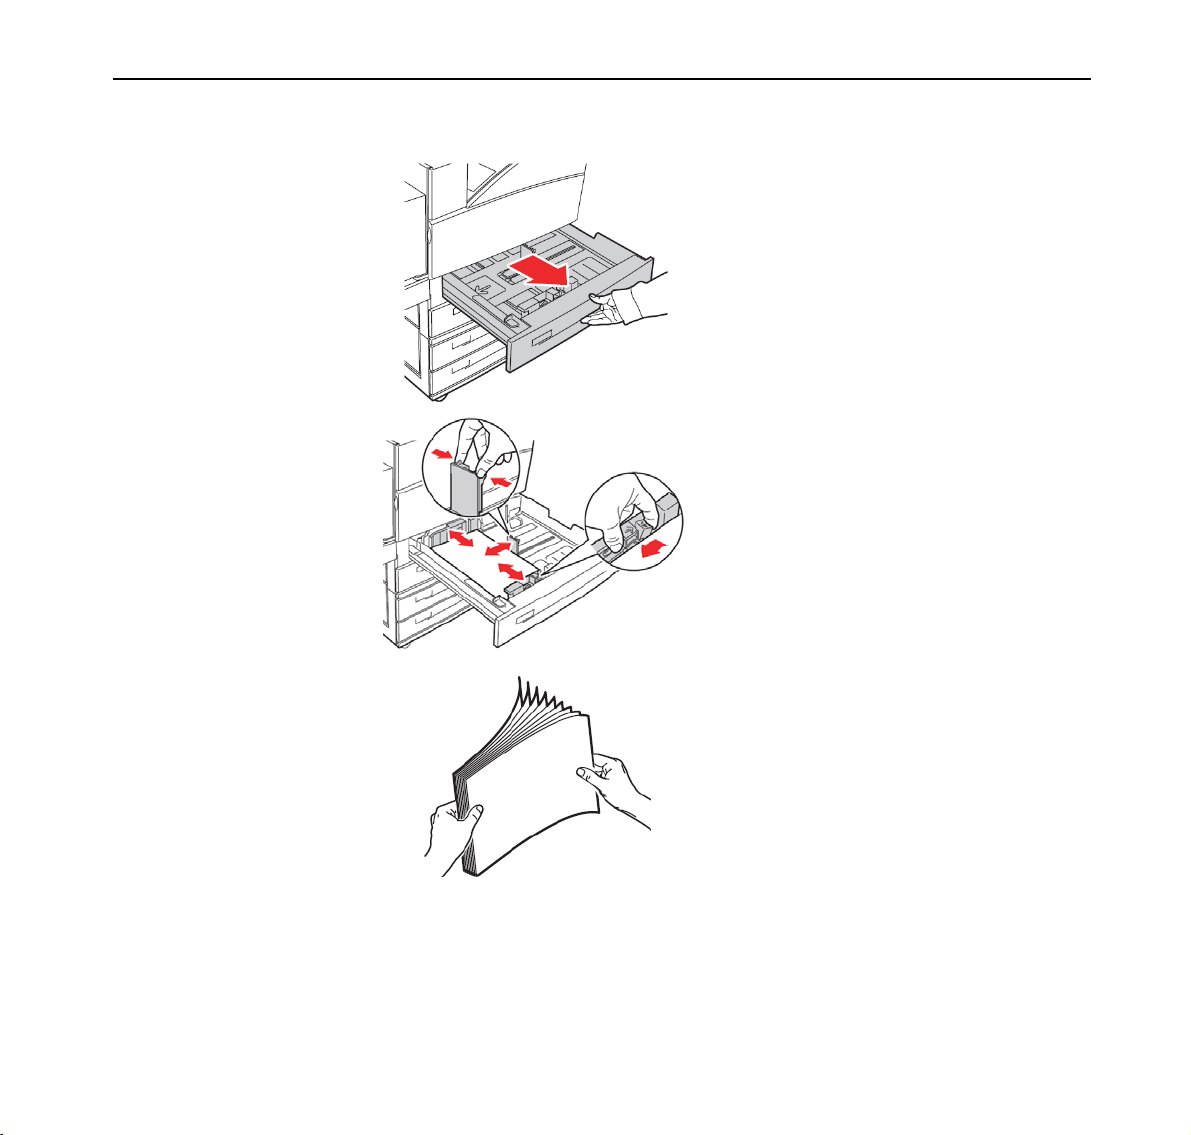
Loading Paper
Loading paper in trays 2–5.
1
Pull out the tray until it stops.
2
Squeeze the side guide tab, and
slide the guide to outside of the
tray.
3
Squeeze the front guide tab and
slide the guide to the correct
position for the size media you
are loading.
4
Fan the sheets back and forth to
loosen them. Straighten the
edges on a level surface.
16
Quick Start Guide Chapter 2 Setting Up Your Printer
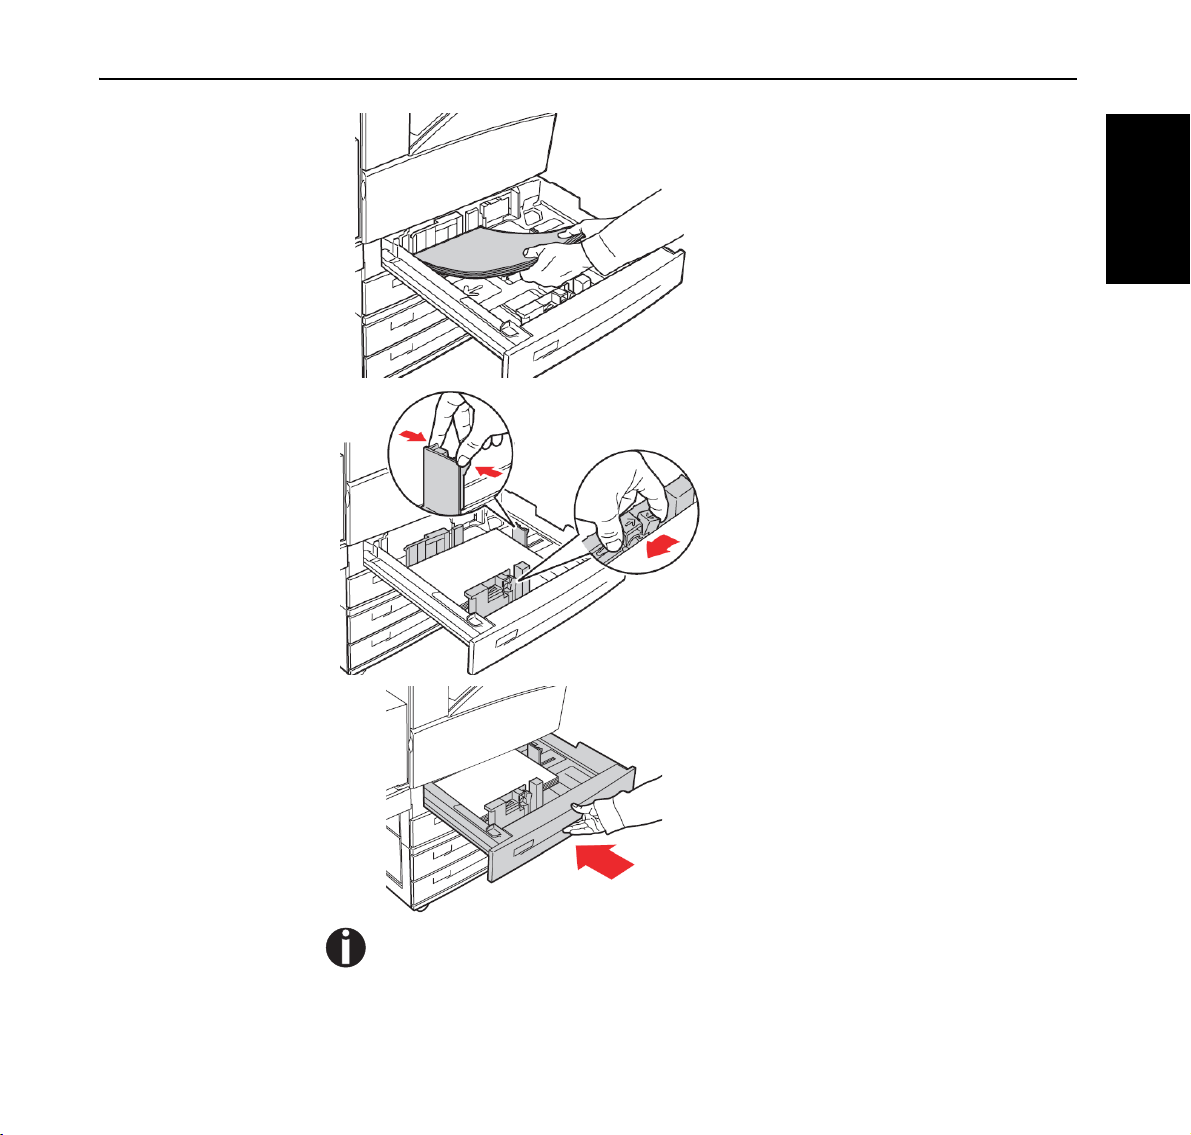
5
Load print media in the tray
with the print side up.
6
Squeeze the side guide tab, and
slide the guide until it lightly
rests against the edge of the
media.
7
Squeeze the front guide tab and
slide the guide to the correct
position for the size media you
are loading.
ENGLISH
8
Insert the tray.
Do not load paper exceeding the maximum fill line or the maximum capacity allowed.
Align the right width guide with the paper width correctly. If the right width guide is
not in place, the paper will not be properly fed and may cause a paper jam.
17
Chapter 2 Setting Up Your Printer Quick Start Guide
Installing
Options
If you have purchased any optional accessories, please refer to the Installation
Instructions that come with each option and to the User Manual on the Online
CD-ROM.
The following illustration shows all optional accessories which are available for
this printer.
Transport
Exit 2
1
2
4
3
To p Tr a y
Stacker Tray
5
18
Standard printer
Options
No. Option
1 Duplex Unit (with Exit 2)
2 High Capacity Feeder (2000 sheets)
3 A3 Sheet Feeder (2 x 500 sheets)
4 Tandem Sheet Feeder (2000 sheets)
5 Finisher with Transport, Top Tray and Stacker Tray (3500 sheets)

Quick Start Guide Chapter 2 Setting Up Your Printer
Connecting the
Power Cord
Turning the
Printer On
1
Make sure the power switch is
Off.
2
Connect the power cord to the
power connector at the back of
the printer.
3
Then insert the other end of the
ENGLISH
power cord to a correctly rated
power outlet.
1
Press the power switch to the
<I> position to turn the power
on.
The printer motors run for 2 or 3 minutes when you first turn the power on.
The top line of the LCD display reads:
Loading
Followed by asterisks progressing across the
bottom line:
Loading
*****************
19
Chapter 2 Setting Up Your Printer Quick Start Guide
Following an LED self test, asterisks progress
across both lines of the display, the beeper
sounds …
*****************
*****************
Initializing
Warming up
… and the Power On Self Test ends with the
top line of the display reading:
Ready
While turned on, the printer will go into the Power Saver Mode after 10 minutes of idle time.
After 4 hours of idle time, the printer will enter Sleep Mode which further reduces energy consumption by turning off power to the paper handling options and the operator display. The flashing green LED on the Operator Panel indicates Sleep Mode.
When you have finished using the printer for the day or you do not intend to use it for a long
period of time, it is advisable to switch off the power to conserve energy.
20
Language
Selection
The default language for all LCD display messages and the Configuration
Summary and Test Page is English. You can change the language to Espanol,
Italiano, Deutsch, Brazilian Portuguese, or Francais.
The language that you select will be reflected on all LCD display messages, and also the content
of the Configuration Summary and Test Page.
To change the language used for the text on the front panel:
1
At the printer’s front panel, select Printer Setup, then press the OK button.
2
Select Front Panel Setup, then press the OK button.

Quick Start Guide Chapter 2 Setting Up Your Printer
3
Select Front Panel Language, then press the OK button.
4
Select the desired language, then press the OK button.
Printing a
Configuration
Summary
Your printer can print a configuration summary that lists the currently selected
menu options, media selections in trays, options installed and other relevant
information about your printer. To print a Configuration Summary, press the
INFO key.
Setting an IP address manually
If you need to set an IP address manually, as opposed to letting the printer receive
one automatically from a DHCP source, then you must ensure that DHCP is
turned off. Use the following procedure to turn DHCP off.
1
Press the MENU button on the control panel.
2
Press the NEXT button until “Interface
Menu” is shown on the second line of the
display.
3
Press the SELECT button to enter the interface menu.
4
Press NEXT until “Network 1 Setup” is
shown on the display.
ENGLISH
Menu
Interface Menu
Interface Menu
Network 1 Setup
5
Press SELECT.
6
Press NEXT until “DHCP” is shown on
the display.
7
Press SELECT.
Network 1 Setup
DHCP
21
Chapter 2 Setting Up Your Printer Quick Start Guide
8
Press the NEXT button until “Off ” is
shown on the second line of the interface.
DHCP
Off
9
Press SELECT.
10
Press START/STOP button to finish.
Use the following procedure to enter the interface menu and add the IP Address
and other related settings.
1
Press the MENU button on the control panel.
2
Press the NEXT button until the text
“Interface Menu” is shown on the second
line of the display.
3
Press the SELECT button to enter the interface menu.
4
Press NEXT until “Network 1 Setup” is
shown on the display.
Menu
Interface Menu
Interface Menu
Network 1 Setup
22
5
Press SELECT.
6
Press NEXT until “IP ADDRESS” is
shown on the display.
7
Press SELECT.
8
Use NEXT/PREVIOUS buttons to change the first digit.
9
Press SELECT for the next digit.
10
Press SELECT after all digits are set.
Network 1 Setup
IP Address
Quick Start Guide Chapter 2 Setting Up Your Printer
11
The display shows “IP Address”.
Network 1 Setup
IP Address
12
Press NEXT and “Subnet Mask” is
shown on the display.
Network 1 Setup
Subnet Mask
13
Repeat steps 7 – 10.
14
The display shows “Subnet Mask”.
Network 1 Setup
Subnet Mask
15
Press NEXT and “Default Gateway” is
shown on the display.
Network 1 Setup
Default Gateway
16
Repeat steps 7 – 10.
17
The display shows “Default Gateway”.
Network 1 Setup
Default Gateway
ENGLISH
18
Press START/STOP button to finish.
Print a configuration summery to check the proper setting of the IP Address, Subnet Mask, and
Default Gateway.
23

Chapter 3 Installing Software Quick Start Guide
Chapter 3
Installing Software
Driver Installation
For a printer to be connected using TCP/IP printing, ensure the printer has been
configured for a valid IP address, subnet, and gateway.
If this has been assigned by a DHCP server, ensure there is a reservation for the
printers MAC address, seen on the network Configuration test page against the
reserved IP address in the DHCP servers scope. See your company network
manager if there is any doubt.
If the printer has not obtained an IP address subnet and gateway automatically
refer to “Setting an IP address manually” on page 21.
Ensure the printer is powered on and has been connected to the network.
You must be logged on to the computer as an administrator or equivalent in
order to install the printer drivers.
24
1
Load the CD into the drive.
2
After it loads select I ACCEPT to the opening screen as shown.
3
Install software for this printer.
Quick Start Guide Chapter 4 Specifications
Chapter 4
Specifications
Print Speed 50 pages per minute A4 and Letter
Print Method Electrophotographic laser
Processor MIPS RM7035 600 Mhz
Resolution 1200 dpi at full engine speed
Time to first Page 3 seconds from ready mode; 7 seconds from standby mode
Memory 256 MB expandable to 768 MB
Standard Connectivity Bi-directional IEEE 1284 Parallel, USB V 2.0, Ethernet 10/100baseT,
Serial RS 232
Optional Connectivity 1 GB Ethernet
®
Standard Emulation PCL5c/PCL6, Adobe PostScript 3
Print Monitor Embedded Web server
Fonts 136 Adobe PostScript, 86 PCL
Consumables Toner Cartridge 30,000 pages, OPC Drum Cartridge 60,000 pages,
based on 5% coverage, Staples
Maintenance Maintenance Kit (includes Fuser and paper feed rollers 300,000
pages at 5%)
STD Paper Handling 100 sheet Multi Purpose Feeder (MPG)
2 x 500 sheet A3 universal cassettes
Optional Paper Handling
Duplexing Optional on 9050N; standard on 9050DN
Paper Type Paper and envelopes, recycled paper, postcards, cardstock, labels,
Paper Weight
1000 sheet feeder – 2 A3 universal cassettes
2000 sheet feeder – 1200 + 800 A4/Letter cassettes
2000 sheet high capacity feeder – A4/Letter
index cards, and transparencies
Trays 2, 3, 4, 5, 6: Standard 16 to 80 lb cover (60–216 gsm); Tray 1 MPF
16 to 28# (60–105 gsm). Two sided printing 16 to 32 lb (60–120 gsm)
, Epson FX-80, Adobe PDF 1.3
ENGLISH
25
Chapter 4 Specifications Quick Start Guide
Paper Size Auto Detect: A3, A4, A5, A6, B5, B4-JIS, Letter, Legal, Legal 13,
Executive, Statement, Tabloid
Custom: 3.5" x 5.5" minimum size; 11" x 17" maximum size
Envelopes COM-10, Monarch, C4, C5, and DL
Paper Output 500 sheet face down standard
3000 + 500 sheet finisher with hole punch and stapling
Physical Weight 97 lbs (44 kg)
Physical Size 25.2" x 21" x 19.6" (640 x 525 x 498 mm)
Power 110 V Model; 100-134 V, 12 A 50/60 Hz
230 V Model: 215-240 V; 8A, 50/60 Hz
Power Consumption Less than 10 Watts in sleep mode, Standby 100-110 Watts, Less
than 1300 Watts printing
Regulatory 110 V Model: cULus Listed 60950, FCC Part 15 Class B, ICES-003,
FDA-21 CFR Chapter 1 Subchapter J 1002.10 and 1002.12,
ENERGY STAR® Qualified, NOM
230 V Model: CE Mark, IEC60950, IEC60825-1 Class 1, GS Mark,
EN55022 Class B, EN55024, EN61000-3-2, EN61000-3-3, IEC
61000-4, Blue Angel for Duplex Model, WEEE, DoC:73/23/EEC/89/
336/EEC
Workload Maximum 300,000 images per month
Reliability MPBF 500,000 pages (Standard configuration)
Reliability MTTR 30 Mins
Drivers PCL5e, PCL6, and PostScript 3 for Vista 32/64, WinXP 32/64,
Win2K, Server 2003 32/64, Win NT4, Win Me/98/95; PPD for Mac
OSX 10.2 and later.
Temperature
Humidity 15 to 85% non-condensing
Altitude 3,500 metres (maximum)
Acoustic Printing: 71 dBa
Storage 12 MB User Flash standard
Note: Paper is a highly variable medium, and should be tested prior to purchase. The quoted
consumable life is the average for the printer when used under normal operating conditions.
o
to 90o F (5o to 32o C)
41
Optional: Hard Disk, Compact Flash
26
 Loading...