

Page 1

wego TMwrite
User Guide
Hi! How are you?
I
How You We
Page 2

Table of contents
Hardware and features
Guided Access
Quick Keys
Settings
Phrase categories
Phrases
Speech
Pronunciation
Abbreviations
Word prediction
Message history
Emotes
Floor hold
Install communication software updates
User information and notes
1
3
4
4
5
7
10
11
12
13
14
15
16
17
18
Page 3

Hi! How are you?
I
How You We
Hardware and features
Quick Keys
The wegowrite touchscreen and keyboard features several quick keys:
delete, speak, phrases, and emotes. The touchscreen also features the Use
button allowing you to save phrases or check message history.
4
2
Volume
Press and hold this button to turn the device on or o. To conserve battery life
when the wegowrite is not in use, press the power button once to place in
“Sleep” mode.
1
Power
Press volume toggle to the left to increase speaker volume or to the right to
decrease volume.
3
Lock Screen
You can turn on Lock Screen to lock the screen orientation. Switch button to left
to unlock and to right to lock screen orientation.
4
3 2
1
1
4
Page 4

5
Charging the wegowrite
Charge device, speaker, and keyboard at night or when not in use.
Please only use TTMT-approved charging cables to charge your device.
7
Detach the magnetic keyboard
To use the wegowrite without the keyboard, rst place one hand on the
keyboard, then grasp the top of the device with your other hand and
gently pull away.
Hardware and features, continued
7
5
5
5
2
Customization Buttons
Look for these buttons on your touchscreen to edit and personalize your device.
Settings Edit Save
6
Keyboard power
Press the keyboard power button once to turn o and on. To conserve battery
life, turn o the keyboard when not using with the wegowrite.
6
Page 5

Guided Access
In addition to being a dedicated communication device, the wegowrite has
Guided Access, which keeps the user locked into the communication software.
All dedicated devices come with Guided Access enabled, but you may disable
Guided Access after receiving your device. The wegowrite will remain
dedicated to communication even with Guided Access disabled.
1. Open Guided Access by quickly triple-clicking the home button on the right
side of the touch screen.
2. Enter passcode: default password is all 1s (1111 or 111111).
3. To continue Guided Access: press Resume (top right).
4. To turn o Guided Access: press End (top left).
5. Lock Menu (restrict use of specic buttons/categories): open Guided
Access > use nger to draw a circle around buttons to restrict.
End Resume
3
Let’s go for a walk.
Page 6

Settings
Settings allow you to customize your device’s speech and voice, accessibility
settings, word prediction, and appearance. The settings button is located
on your touchscreen.
Quick Keys
Your wegowrite has Quick Keys located on the touchscreen and keyboard that
provide quick access to various menus and commands.
Delete
Deletes text in the message window.
Phrases
Opens your phrase categories page.
Speak
Speaks out any text in the message window.
Emotes
Opens menu of emotions that sound when pressed.
Use
Allows you to check message history or quick-save your message to
phrases. The Use key is only located on the touchscreen.
4
Page 7

Phrase categories
The wegowrite allows you to save common or favorite phrases, and
categorize the phrases for easy access.
Add a phrase category
1. Select Phrases > select the pencil button at bottom of page > swipe left
to the last category page > tap add category button.
2. Type name of new phrase category at the blue cursor.
3. Select No Image, or select one of the following to add an image:
Take from camera > take photo using camera > Use Photo.
Choose from gallery > tap to select image from gallery.
Choose from Predictable image library > tap to select symbol.
5. When nished, tap the save button in the top right of screen.
5
Page 8

Edit a phrase category
1. Select phrases > select the pencil button at bottom of page > tap category
to edit > select Edit to update category name or image.
2. When nished, tap the save button in the top right of screen.
Move a phrase category
1. Select phrases > select the pencil button at bottom of page > tap category
to edit > select Move.
2. Press and hold the category to move until it “pops” > drag category to new
location.
3. When nished, tap double arrow button > tap pencil button to complete.
Delete a phrase category
1. Select phrases > select the pencil button at bottom of page > tap category
to edit > select Delete.
2. A message will conrm that you want to delete category > select yes.
3. Select the pencil button at bottom of page to complete.
6
Page 9
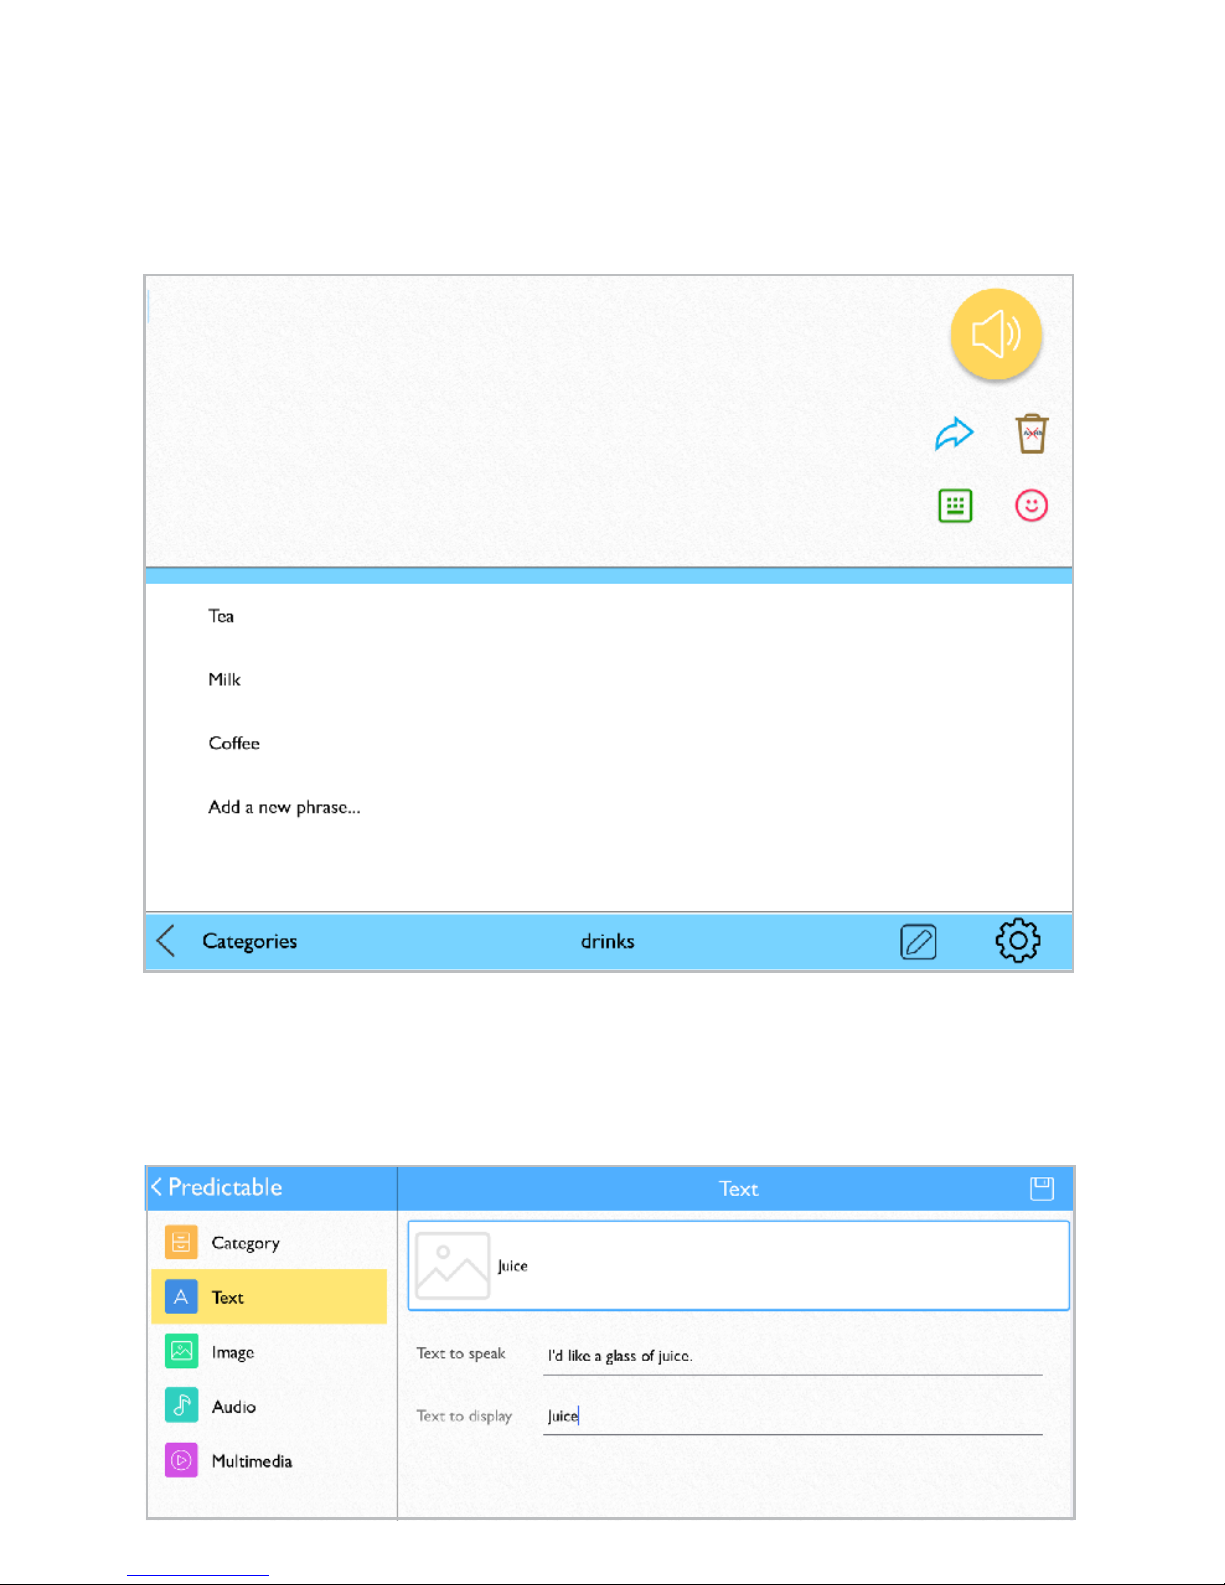
Phrases
Save a phrase
1. Select category to add new saved phrase > select Add a new phrase from
the list of saved phrases.
2. Select Tex t from left navigation menu.
3. On Text to speak line: type message to speak when phrase is selected.
4. On Text to display line: type text (label) to display in phrase bank.
5. When nished, tap the save button in the top right of screen.
7
I’m thirsty.
Page 10
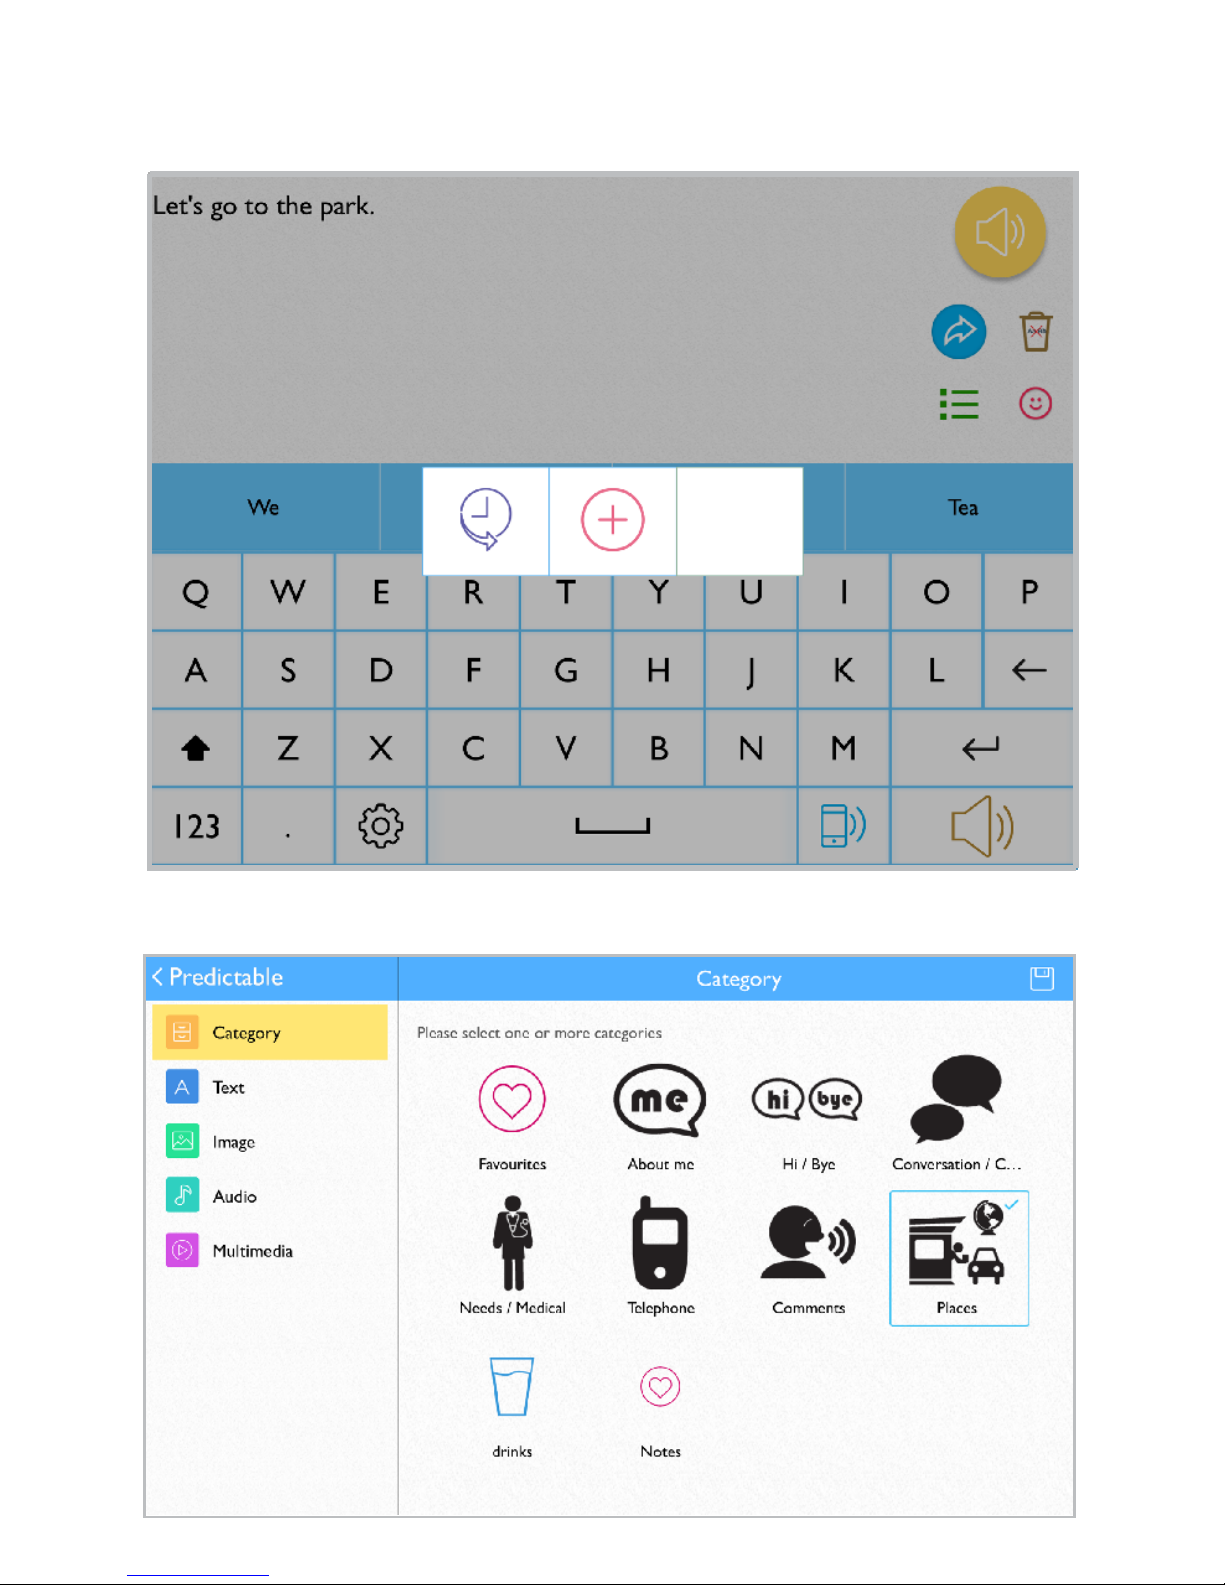
Quick-save a phrase from the homepage
1. Type phrase using keyboard on homepage > select Use button on
touchscreen > select plus sign from pop-up menu.
2. Select category to save new phrase > tap the save button in the top right.
8
Page 11
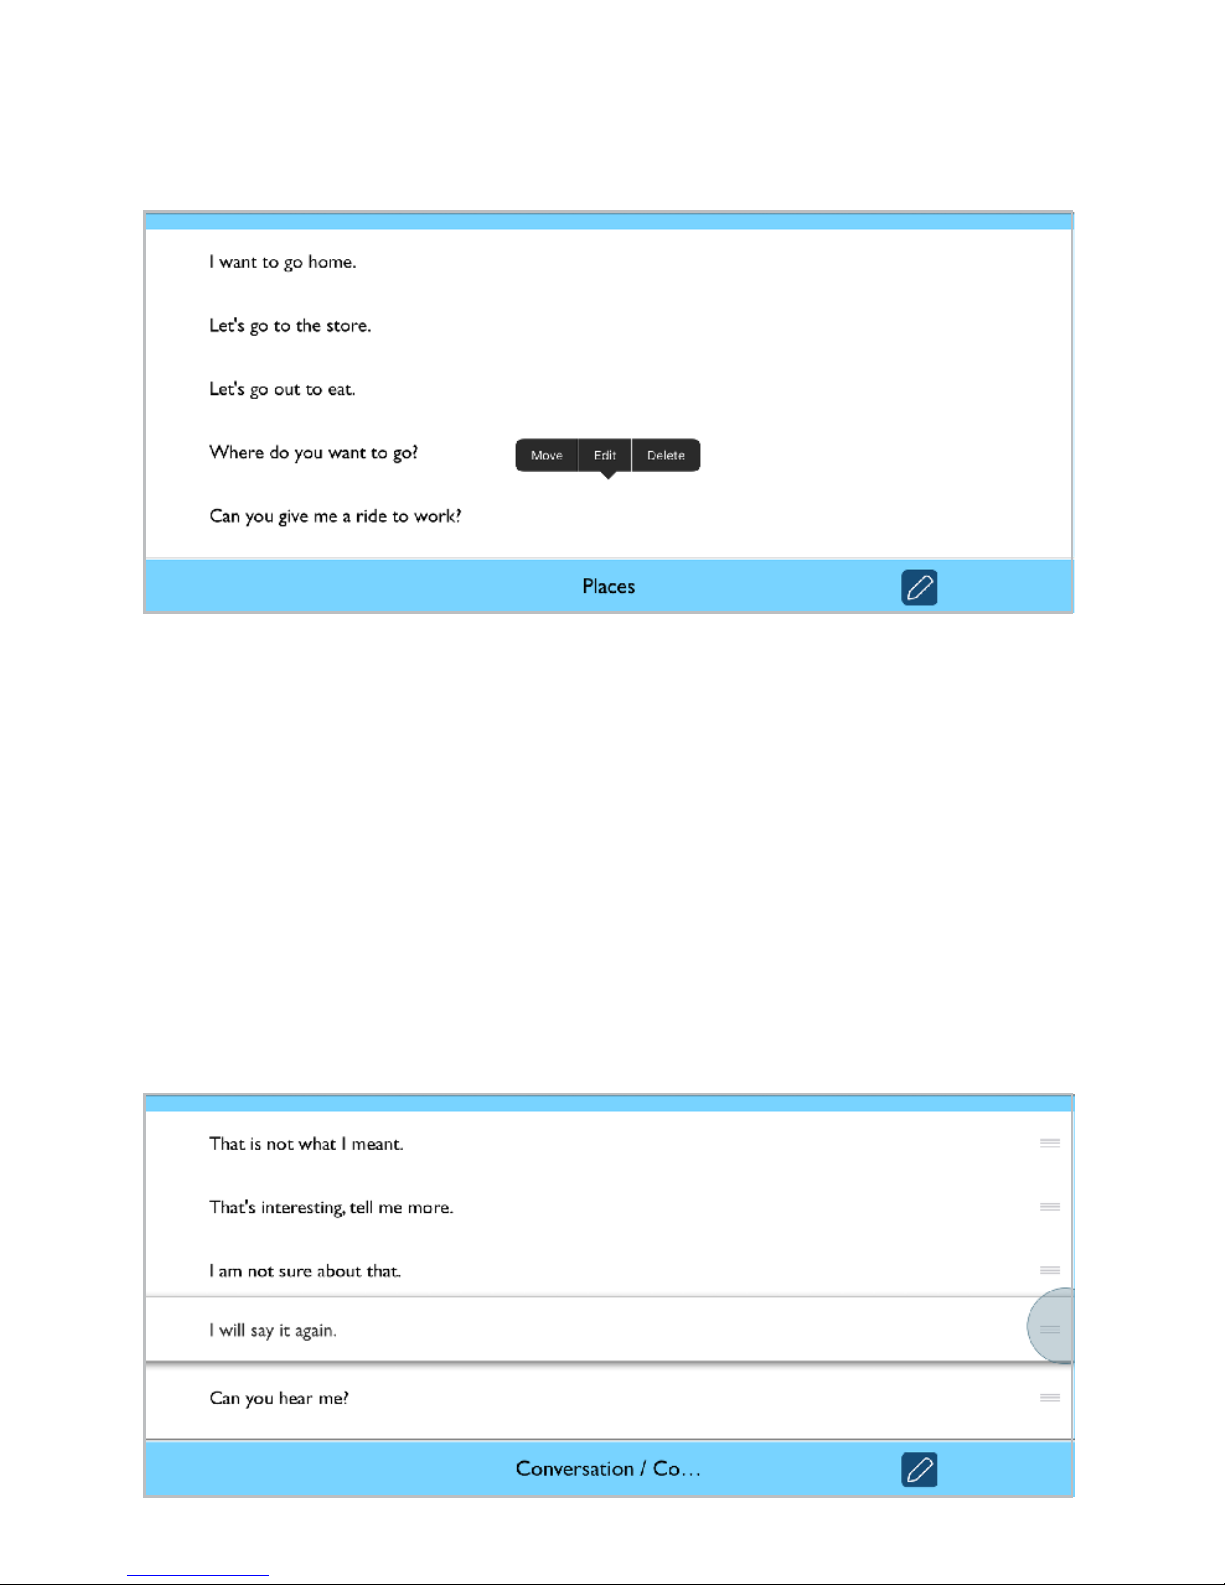
Edit a saved phrase
1. Navigate to category with phrase you wish to edit > select pencil button at
bottom of page > tap phrase to edit > choose Edit from pop-up menu.
2. Follow steps 2-5 from Save a phrase to complete to nish editing.
Delete saved phrase
1. Navigate to phrase you wish to delete > select pencil button at
bottom of page > choose Delete from pop-up menu.
2. Select pencil button when complete to nish editing.
Change saved phrase order
1. Navigate to category with phrase you wish to move > select pencil button on
bottom of page > tap phrase to move > choose Move from pop-up menu.
2. Tap button to the right of phrase to move > drag phrase up/down to
desired order within phrase bank > tap pencil button to nish editing.
9
Page 12
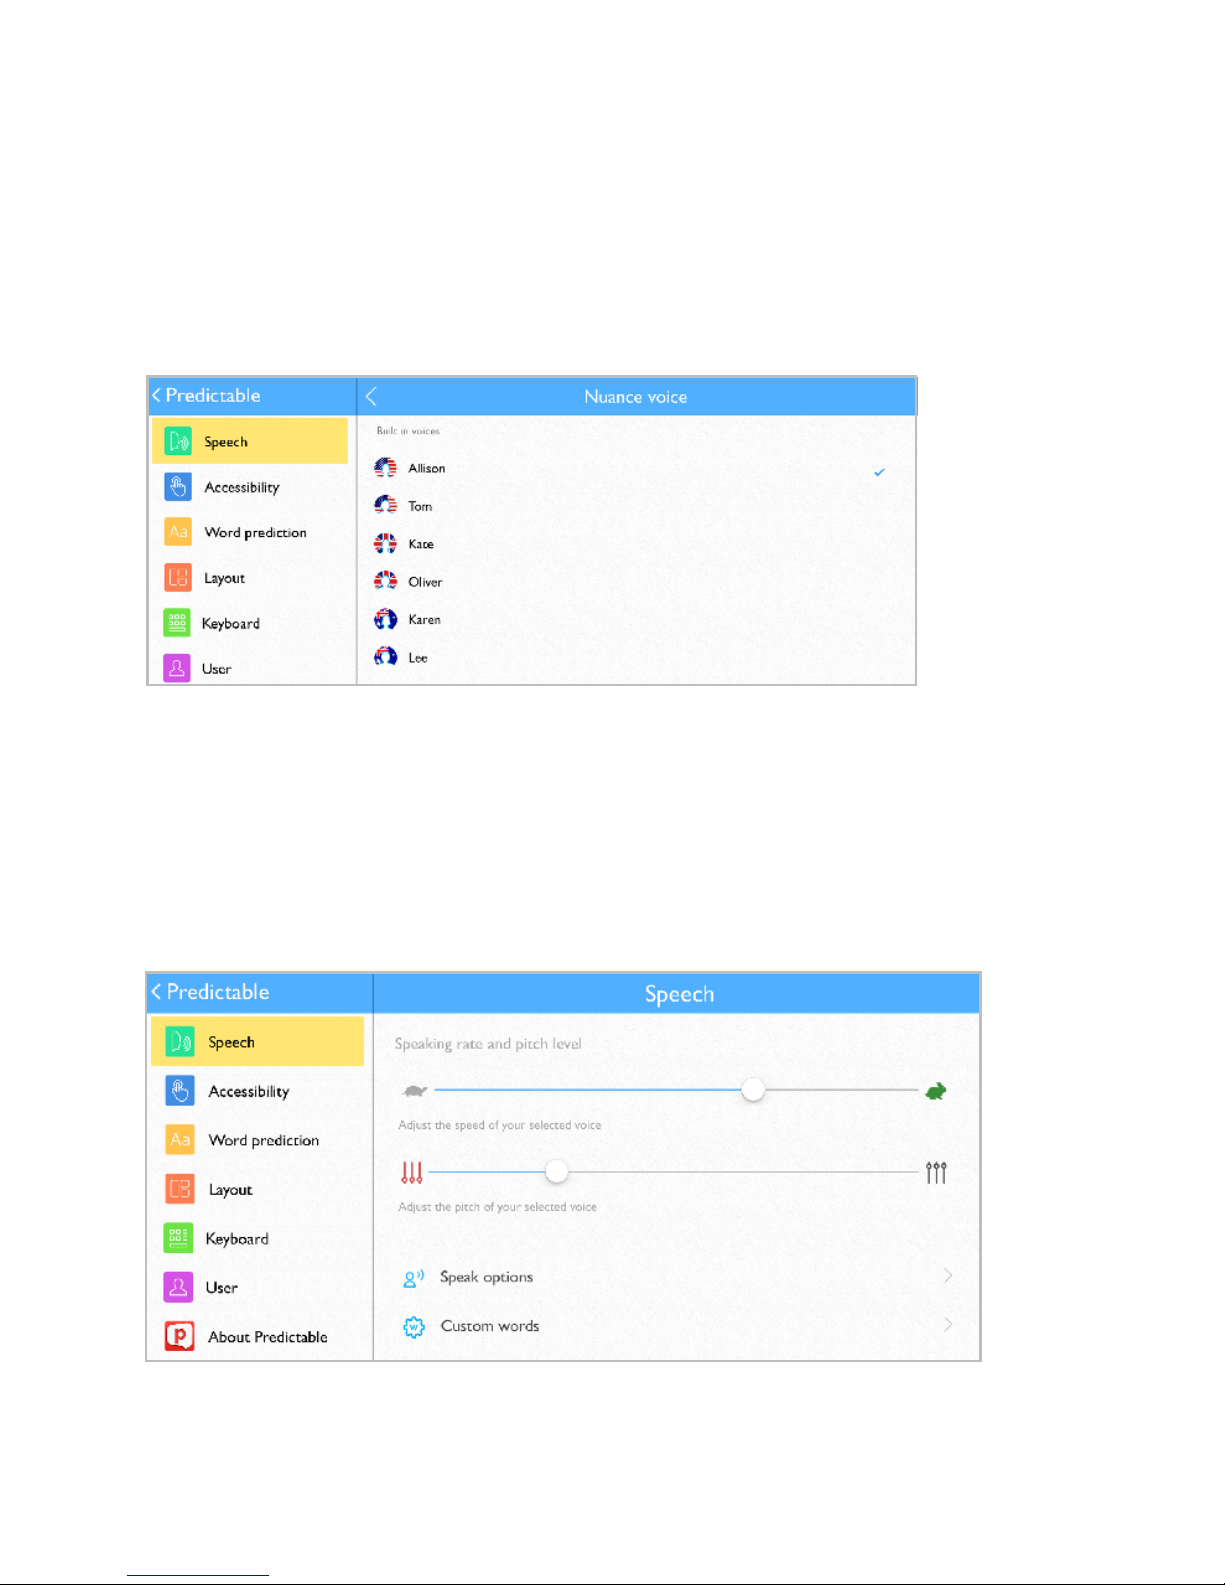
Speech
The Speech settings allow you to personalize your voice by selecting your
favorite voice option, and make it your own by adjusting the speaking pitch
and rate.
Change voice
1. Select settings icon on touchscreen > select Speech from left menu > select
from Nuance, ModelTalker, or iOS to open voice menu > tap to select new voice.
Change speaking rate, pitch, speed
1. Select Settings icon on touchscreen > select Speech from left menu.
2. To adjust speaking rate: Use nger to slide and adjust your voice rate.
Slide to the left to slow and to the right to increase speed.
3. To adjust pitch: Use nger to slide and adjust your voice pitch.
Slide to the left to lower and to the right to raise pitch.
Edit speech options
Speech Options contains preferences for speech timing and message window
appearance. To access:
Settings > Speech > Speak Options > tap buttons to turn options on and o.
10
Page 13
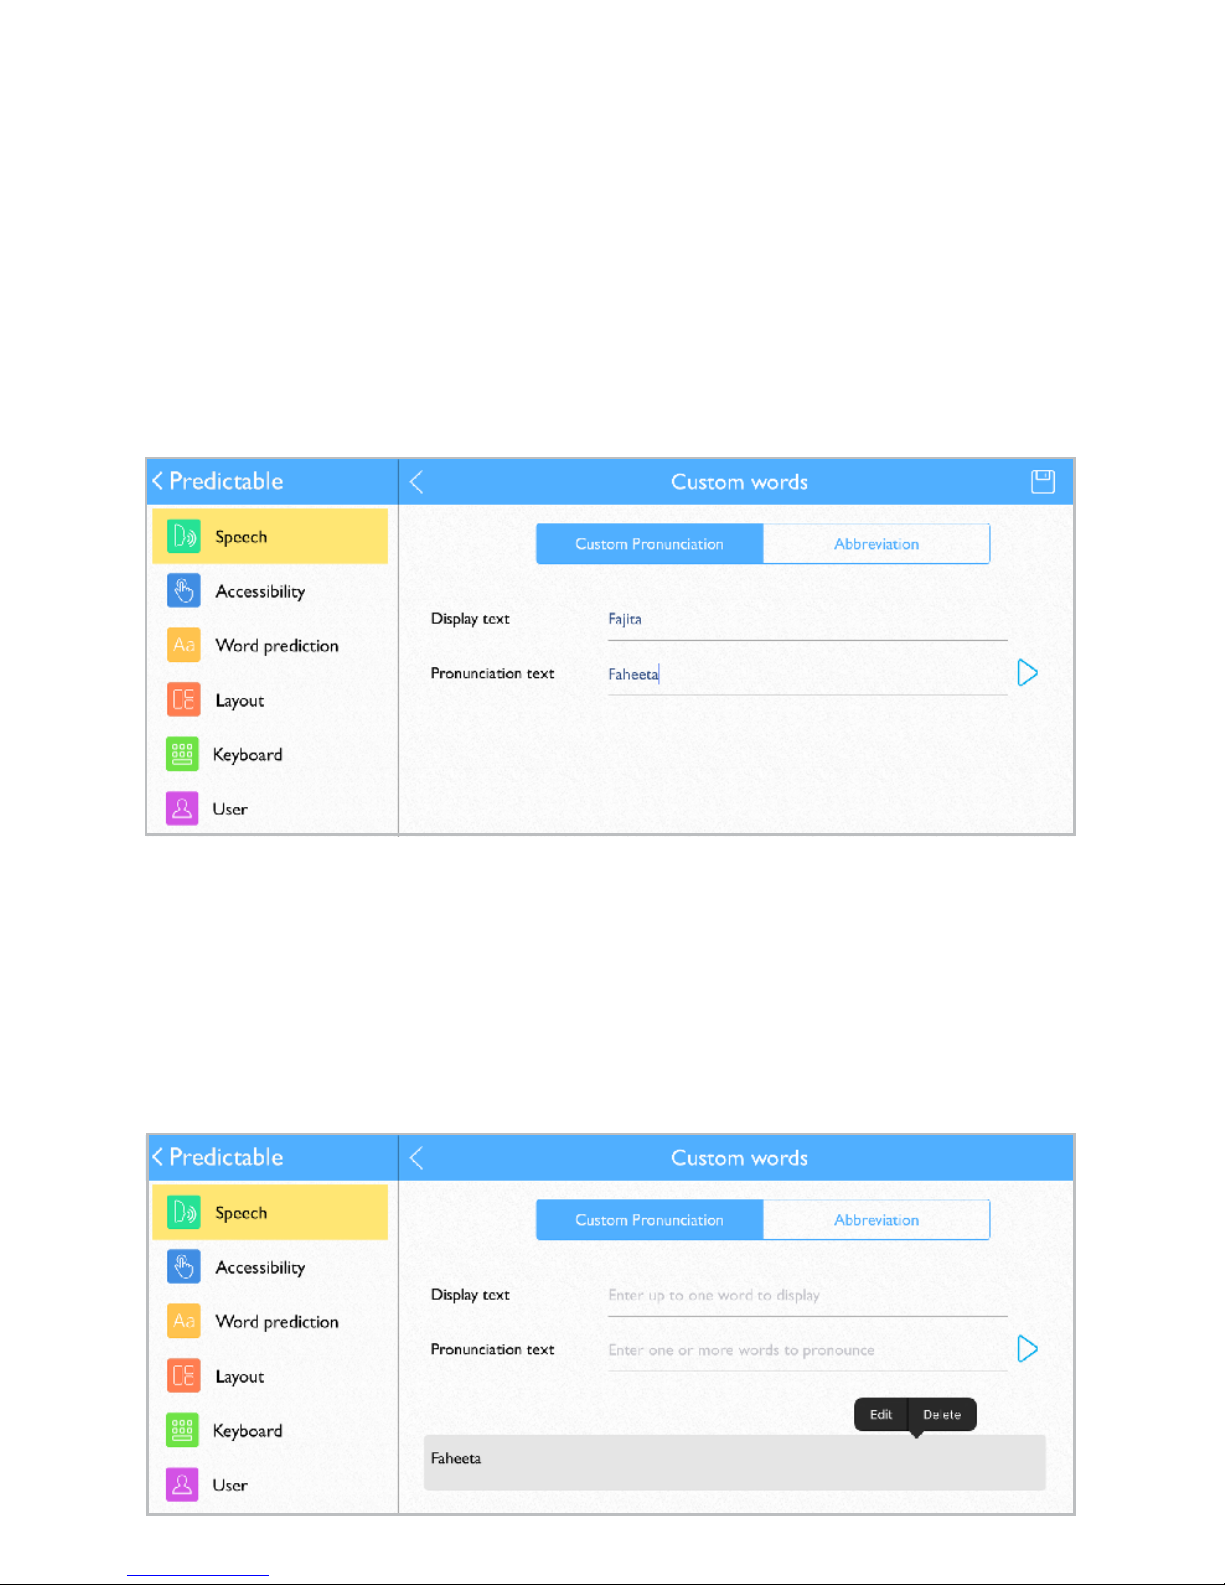
Pronunciation
Change pronunciation of a word
1. Select Settings icon on touchscreen > select Speech from left navigation >
select Custom Words > select Custom Pronunciation.
2. On Display text line: type word with correct spelling (i.e. fajita).
3. On Pronunciation text line: type word as you want pronounced (i.e.
faheeta).
4. Press the play button next to pronunciation to hear how word will sound.
5. When nished, tap the save button in the top right of screen.
Edit pronunciation
At any point, you can edit your custom pronunciation.
1. Select Settings icon on touchscreen > select Speech from left navigation >
select Custom Words > select Custom Pronunciation.
2. Tap word from pronunciation list to edit > select edit from menu.
3. Follow steps 2-5 above to complete editing.
11
Page 14
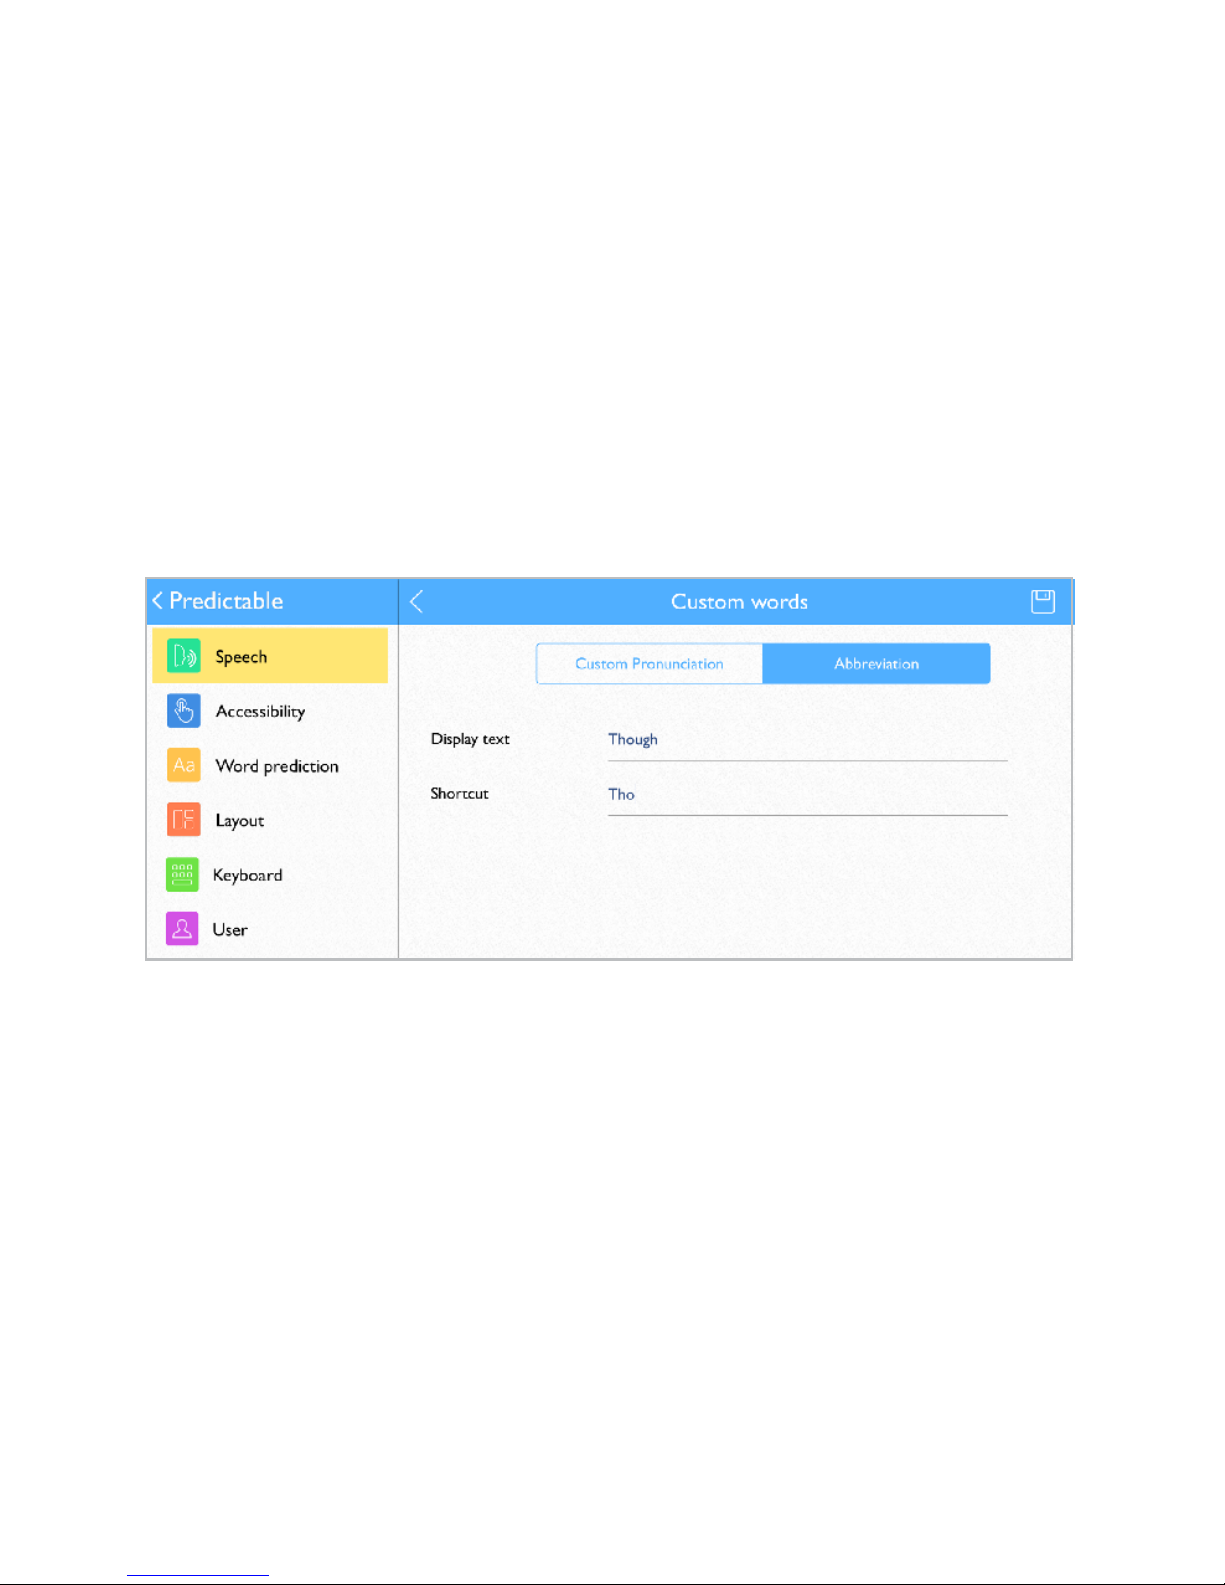
Abbreviations
To save time and keystrokes, you can create custom abbreviations. For example,
if you create an abbreviation for boulevard (blvd), then Boulevard will speak
when you type blvd.
Add abbreviation
1. Select Settings icon on touchscreen > select Speech from left navigation >
select Custom Words > select Abbreviation.
2. On Display text line: Type word to speak and display (i.e. boulevard)
3. On Shortcut line: Type abbreviation for word (i.e. blvd).
4. When nished, tap the save button in the top right of screen.
Tip: Your abbreviation must have at least two letters or symbols to save.
Edit abbreviation
1. Select Settings icon on touchscreen > select Speech from left navigation >
select Abbreviation from top of page.
2. Tap word from abbreviation list to edit > select edit from pop-up menu.
3. Follow steps 2-3 above to complete editing.
12
Page 15
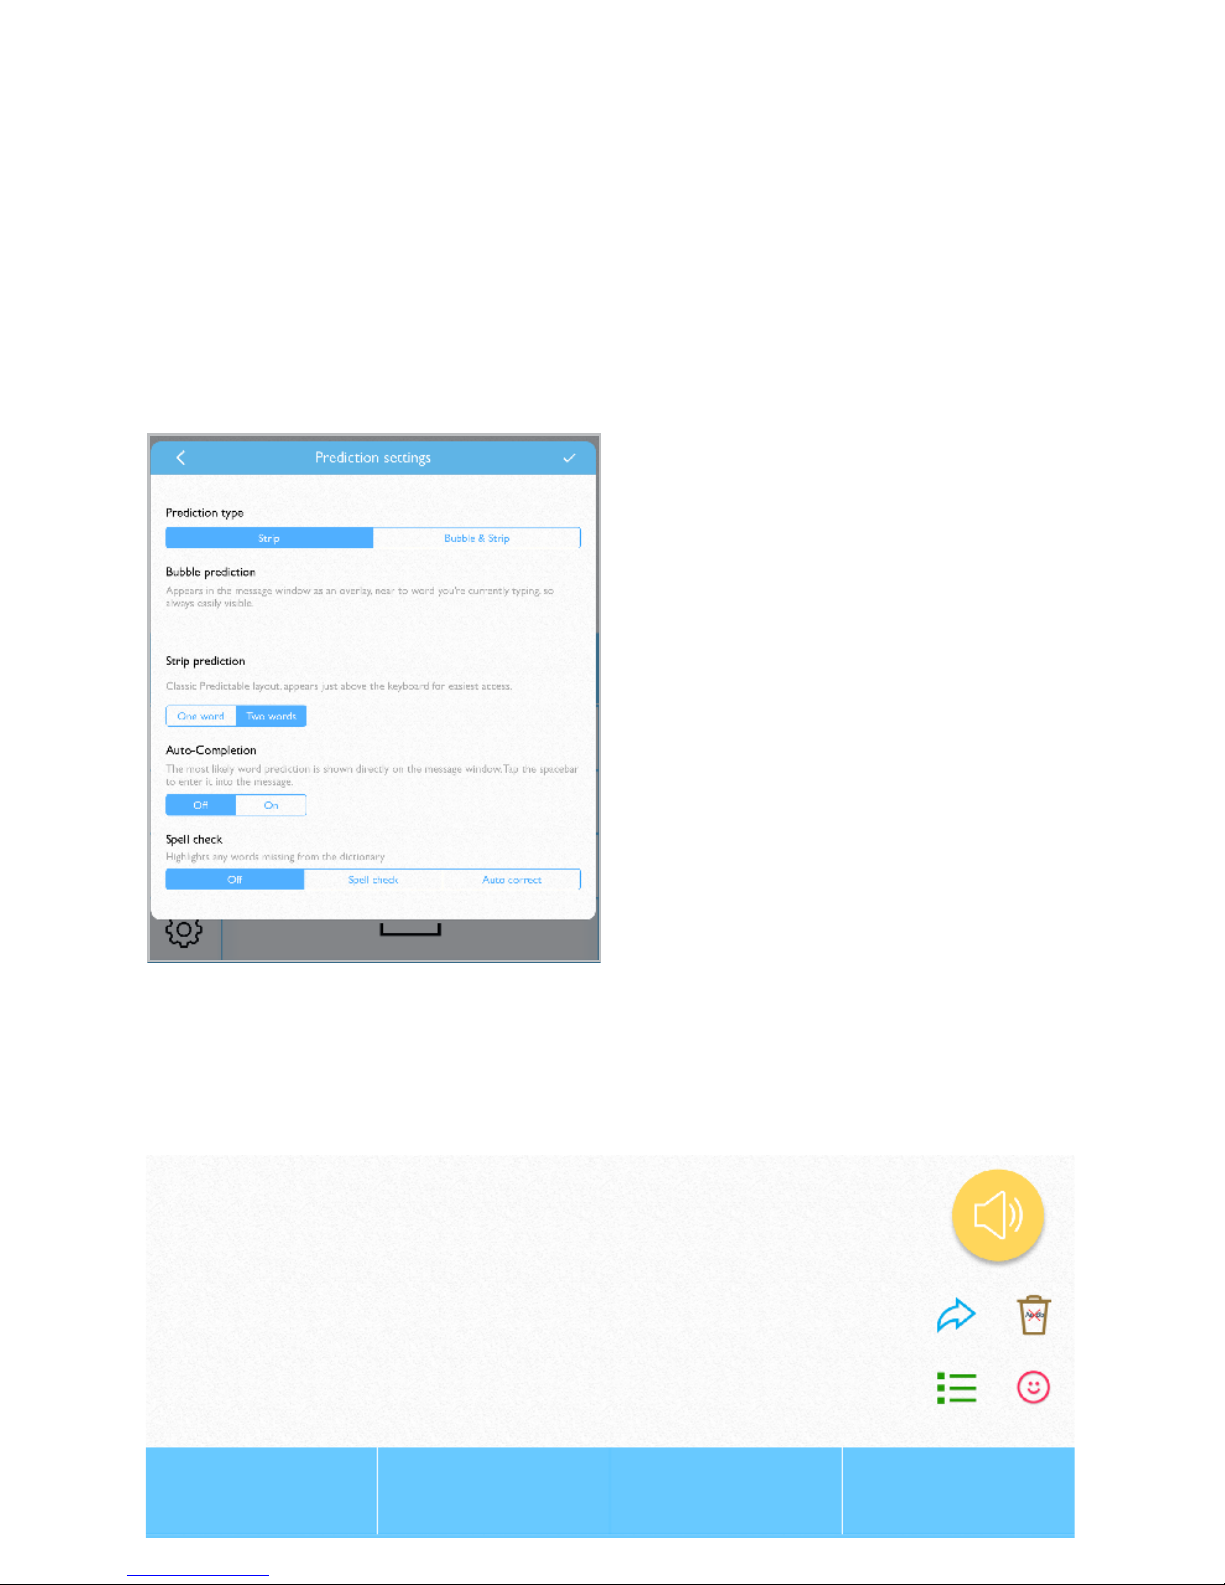
Word prediction
Word prediction is another great time and keystroke-saving feature built into
your wegowrite. Your wegowrite analyzes as you are typing (letters and words
already typed, the context from previous words/messages, and your own
vocabulary) to provide real-time word predictions. The word prediction tool is
self-learning and will become more accurate over time as it learns from your
usage pattern along with your preferred grammar and speech style.
You may adjust the prediction text settings to meet your needs.
To access: settings > word prediction > Prediction type.
Prediction Strip
The Word Prediction strip appears at the top of the on-screen keyboard,
displaying up to four text predictions at any time.
1. Tap word in text prediction strip to add it to message window.
13
Do you want to go to a show to
together
movie
tonight
we
Page 16
14
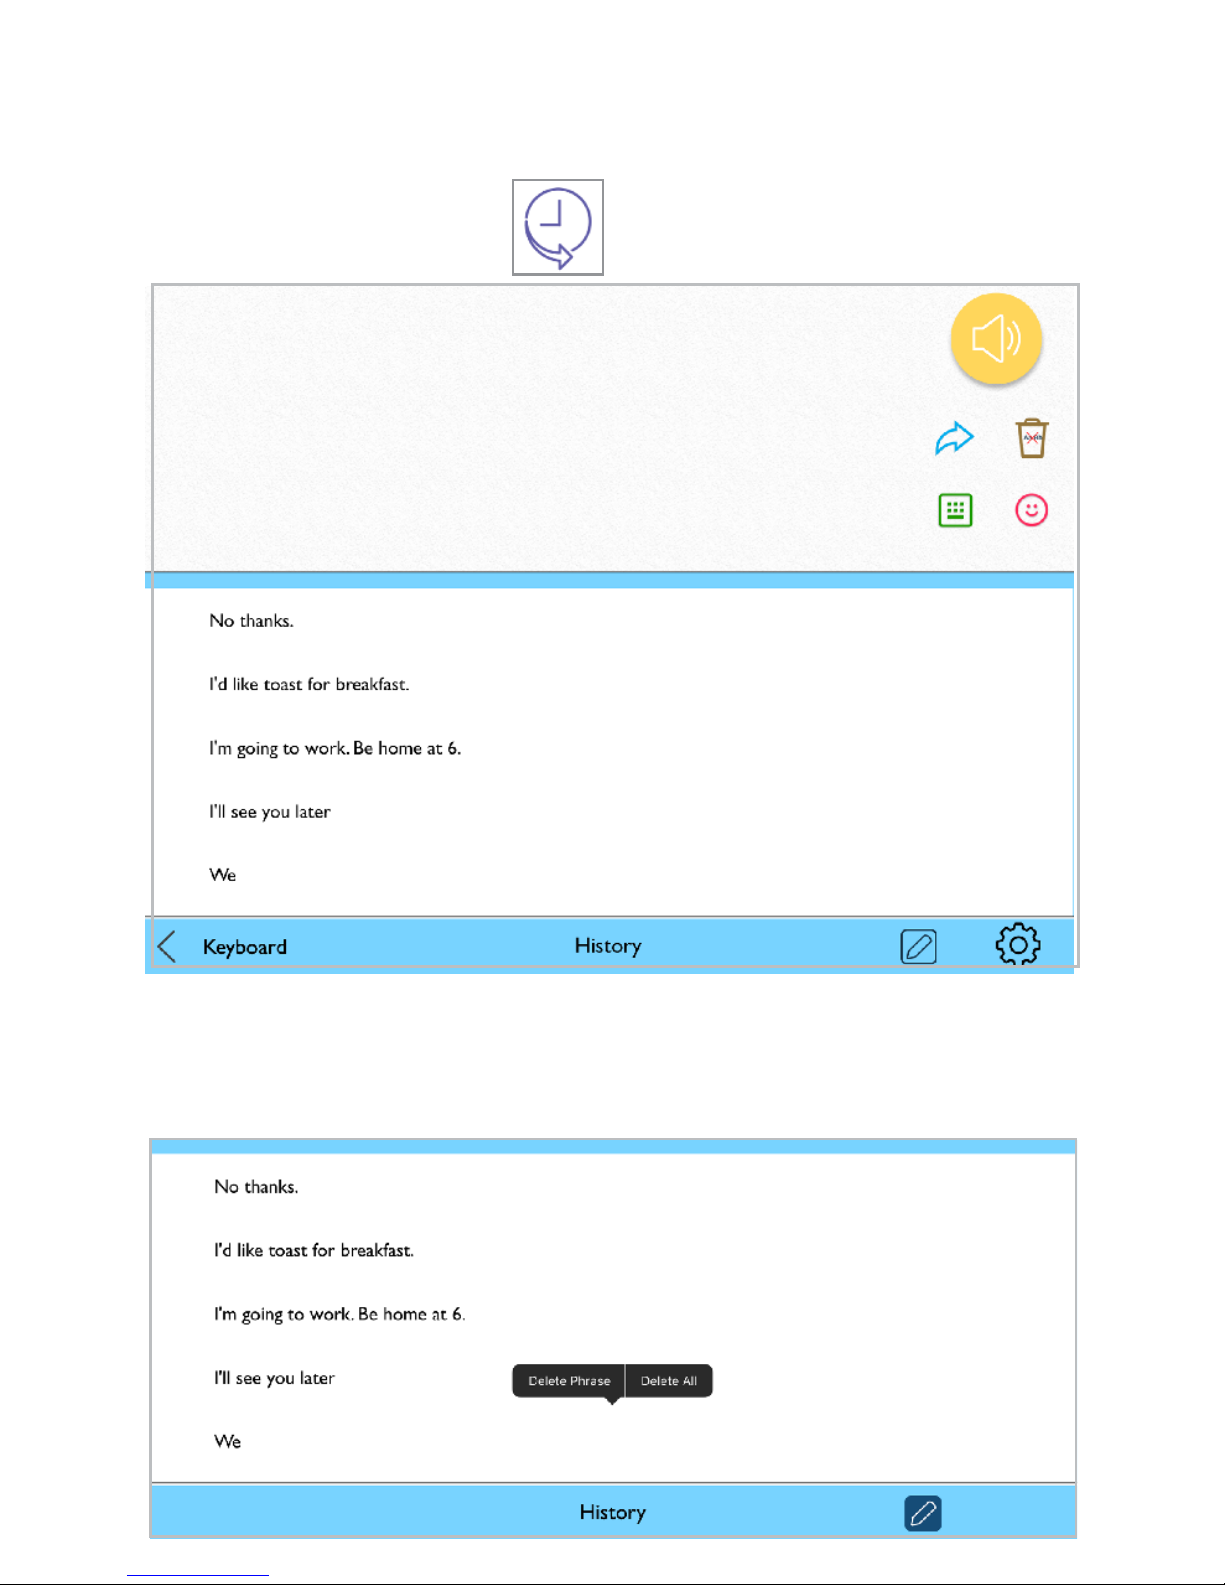
Message history
Your message saves to message history each time you push the Speak button.
1. Select the Use button > select the clock icon to open history > select phrase
to add to message window.
Clearing History
1. Navigate to History > tap the edit button > tap phrase to delete> select to
either delete this phrase or delete all.
I’m going to work. Be home at 6.
Page 17
15
Emotes
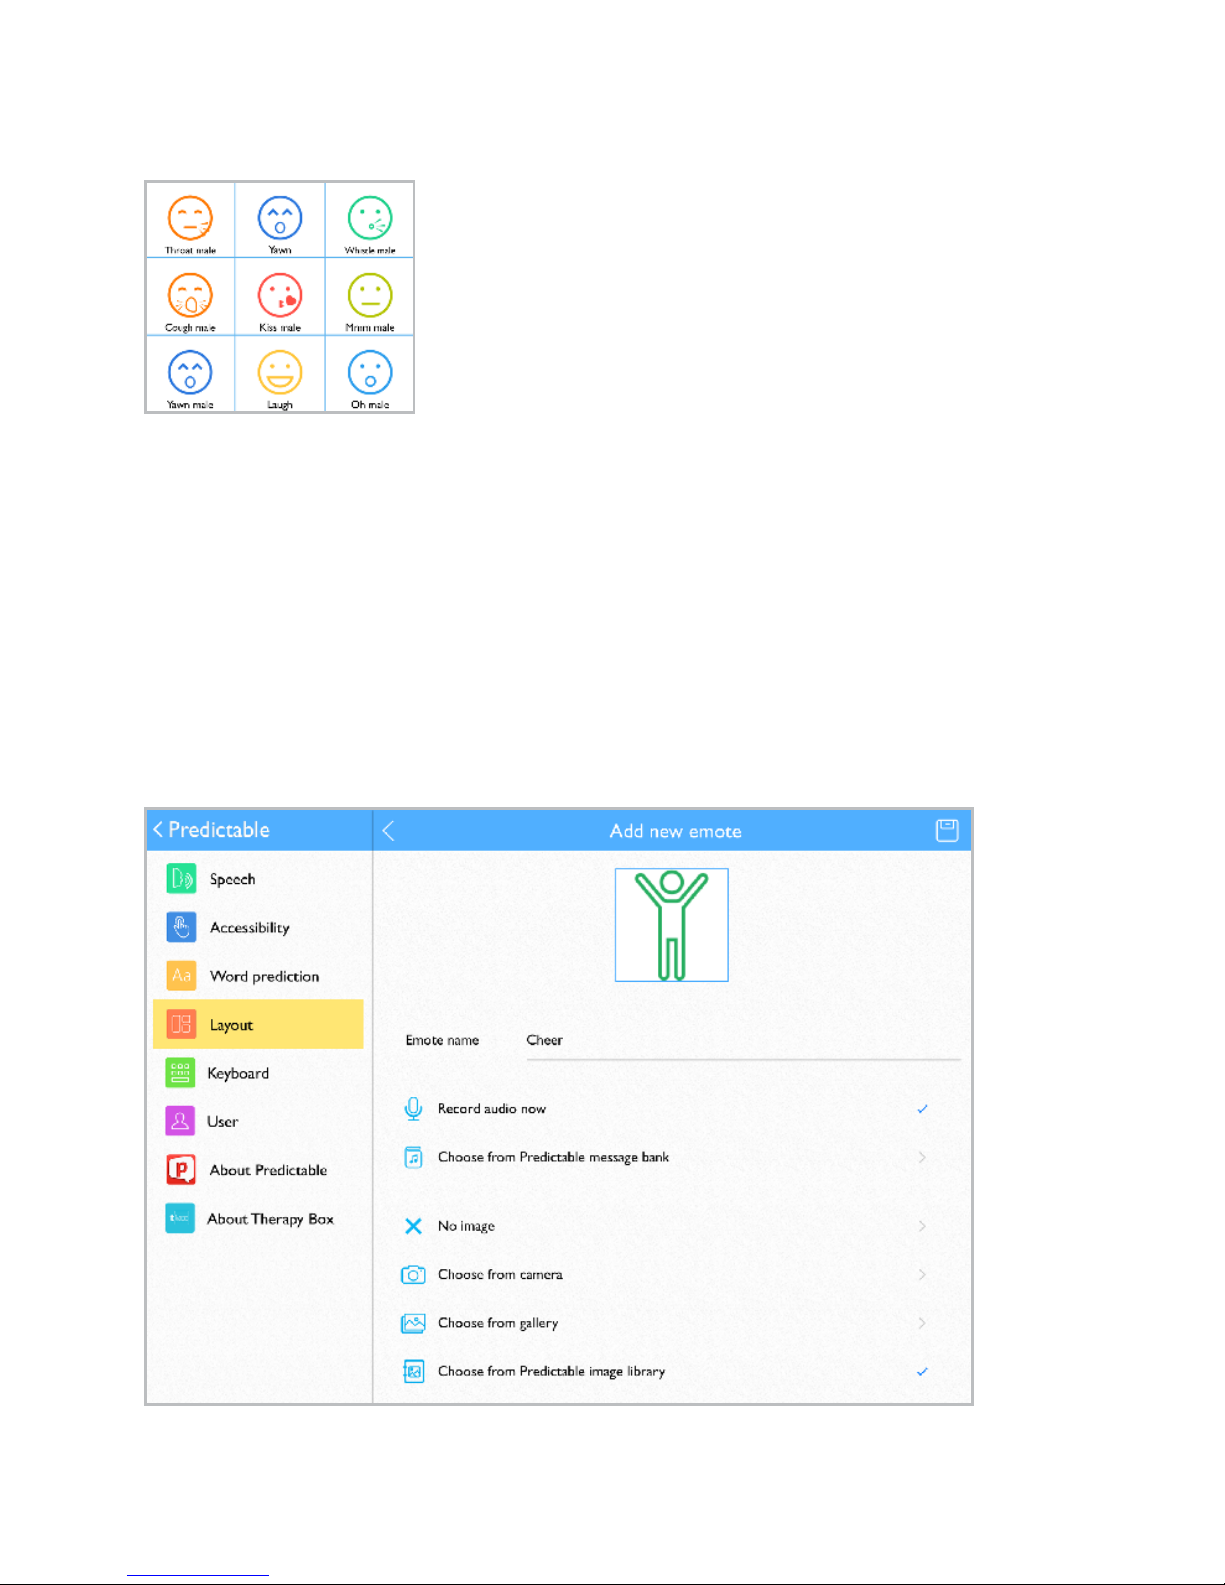
Your wegowrite contains a menu of emotions that sound when pressed. Access
the emotes menu via your Quick Keys.
Custom Emotes
In addition to the pre-recorded emotes, you can create your own emote sounds.
1. Settings > Layout > Manage emotes.
2. Create new emote > give new emote a name.
3. Record a new emote sound or choose an existing message:
Record audio now: Press Record audio now > press microphone icon > say
your emote message > press stop icon to nish > press play to test message.
Choose from Predictable message bank: Press Choose from Predictable
message bank > press emote you want to use.
4. Tap the save icon in the top right.
Manage Emote Menu
You can customize your Emotes menu to display the options you want to see.
1. Settings > Manage Emotes > tap emote options to select or deselect.
Page 18
16
Floor hold
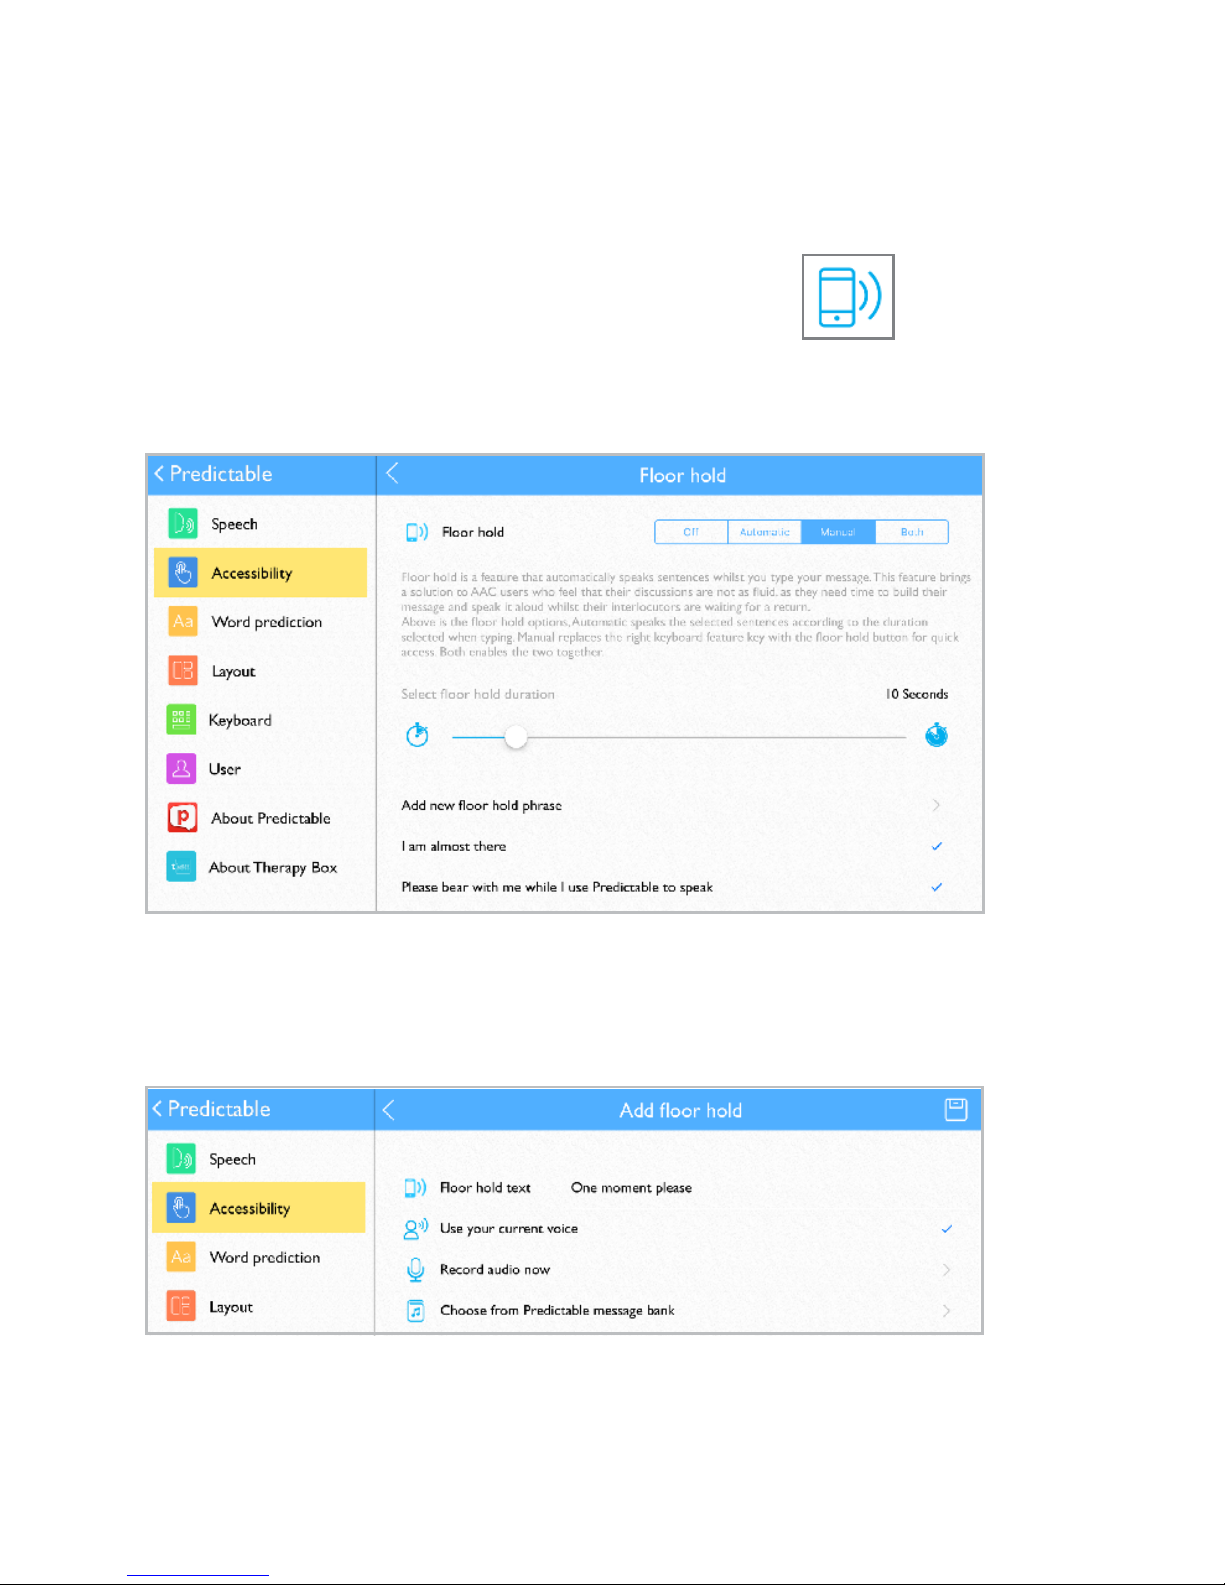
Floor hold allows you to speak pre-recorded sentences while typing your
message and is for when you need more time to type your message before
speaking it out loud. For example, use Floor hold to say “one moment please”
while typing your message to speak. To use, sound a phrase by pressing the
Floor hold button at the bottom of your touch screen.
Add a new oor hold phrase
1. Settings > Accessibility > Floor hold > Add a new oor hold phrase.
2. On Floor hold text line: type your new oor hold phrase.
3. Tap to select to Use your current voice, Record the oor hold phrase, or
Choose from the Predictable message bank.
4. When nished, select the save button in the top right.
Edit oor hold phrases
1. Settings > Accessibility > oor hold.
2. Tap phrase to edit > select Edit from the pop-up menu.
3. Follow steps 2-4 above to complete editing your oor hold phrase.
Page 19

Install communication software updates
Your wegowrite is locked/dedicated and can only perform speech/
communication functions. It cannot connect to the internet for web-surng, etc.
However, the wegowrite can be connected to the App Store to download
software updates for your communication software. Please note that once
connected to the App Store you cannot download/install new Apps to your
wegowrite. This functionality is disabled.
Initial setup: turn on access to the App Store
1. Turn o Guided Access: quickly triple-click Home button to open Guided
Access > enter pass code (default pass code is all 1s) > press End (top right).
2. Press Home button to view device home screen.
3. Connect to Wi-Fi if not already: Settings > Wi-Fi > connect to your network.
4. Settings > General > Restrictions > enter the 4-digit pass code 9357.
5. Tap buttons to turn on options: Installing Apps, In-App Purchases.
6. Press Home button. The App Store icon will display on device home screen.
Update software in the App Store
1. Select the App Store icon.
2. Select Updates on bottom menu bar to display applications with updates
available.
3. Select Update button next to application.
4. If prompted, enter your Apple user ID and password (located on pg 14 of this
guide). If you cannot locate your user ID or password, please contact our
Support team: 877-392-2299 Option 3, or [email protected].
Update complete: turn o access to the App Store
1. Once update is complete: press Home button to return to home screen.
2.
Settings > General > Restrictions > Enter 4-digit pass code 9357.
3. Tap buttons to turn o the following options:
Installing Apps, In-App Purchases.
4. Press Home button to return to device home screen.
5. Open vocabulary/page set.
6. Quickly triple-click the Home button to resume Guided Access.
17
Page 20

User information and notes
Vocabulary account username:
Vocabulary account password:
Apple username:
Apple password:
Guided Access code:
Notes:
18
Page 21

19
Page 22

20
Page 23

21
Page 24
 Loading...